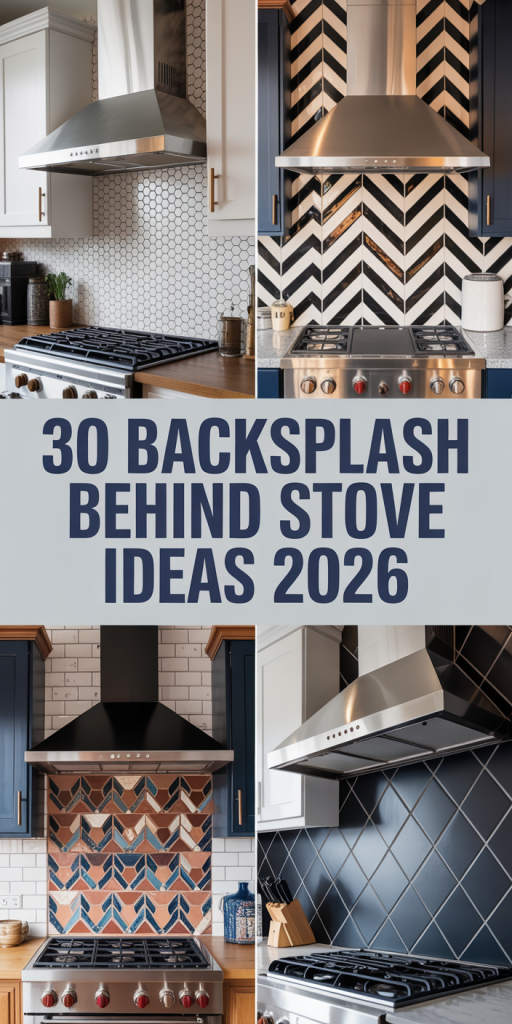
You know that feeling when you find the one—the backsplash idea that just clicks for your kitchen? That perfect pin that ends hours of scrolling? Finding the right focal point behind your stove can feel like a quest, but it’s the design detail that pulls the whole room together. We’ve filtered through hundreds of options to bring you 30 stellar ideas that actually deliver. Inside, you’ll find everything from dramatic full-slab marble to rustic stone and vibrant patterned tiles that will define your space in 2026. And stay until the end—we break down the most common mistakes that can ruin these looks. 📌 Save this to Pinterest for later—you’ll want to revisit these ideas.
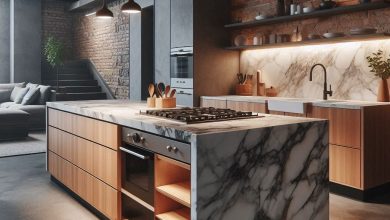
1. Frame Your Range with a Full-Height Marble Slab
There’s a reason designers keep coming back to the full-height slab: it’s pure, uninterrupted luxury. By carrying the same heavily veined white marble from the countertop up the wall, you create a seamless, monolithic focal point. This eliminates busy grout lines, making the entire space feel cleaner and more expansive. The organic, flowing veins of the marble provide a beautiful, natural contrast to the sharp, modern lines of the sleek grey range hood and stainless steel appliances, striking a perfect balance between soft and structured.
|
📋 Copy HEX 🔗 Share |
Achieving this specific high-end look requires a significant investment, primarily in the stone and its fabrication. Remember that slab prices vary wildly by marble type and quarry.
- Marble Slab (30-40 sq. ft.): $3,000 – $7,000
- Fabrication & Installation: $2,500 – $5,000
- Sleek Range Hood: $800 – $2,500
- Finishing (outlets, lighting): $500 – $1,000
- TOTAL: $6,800 – $15,500
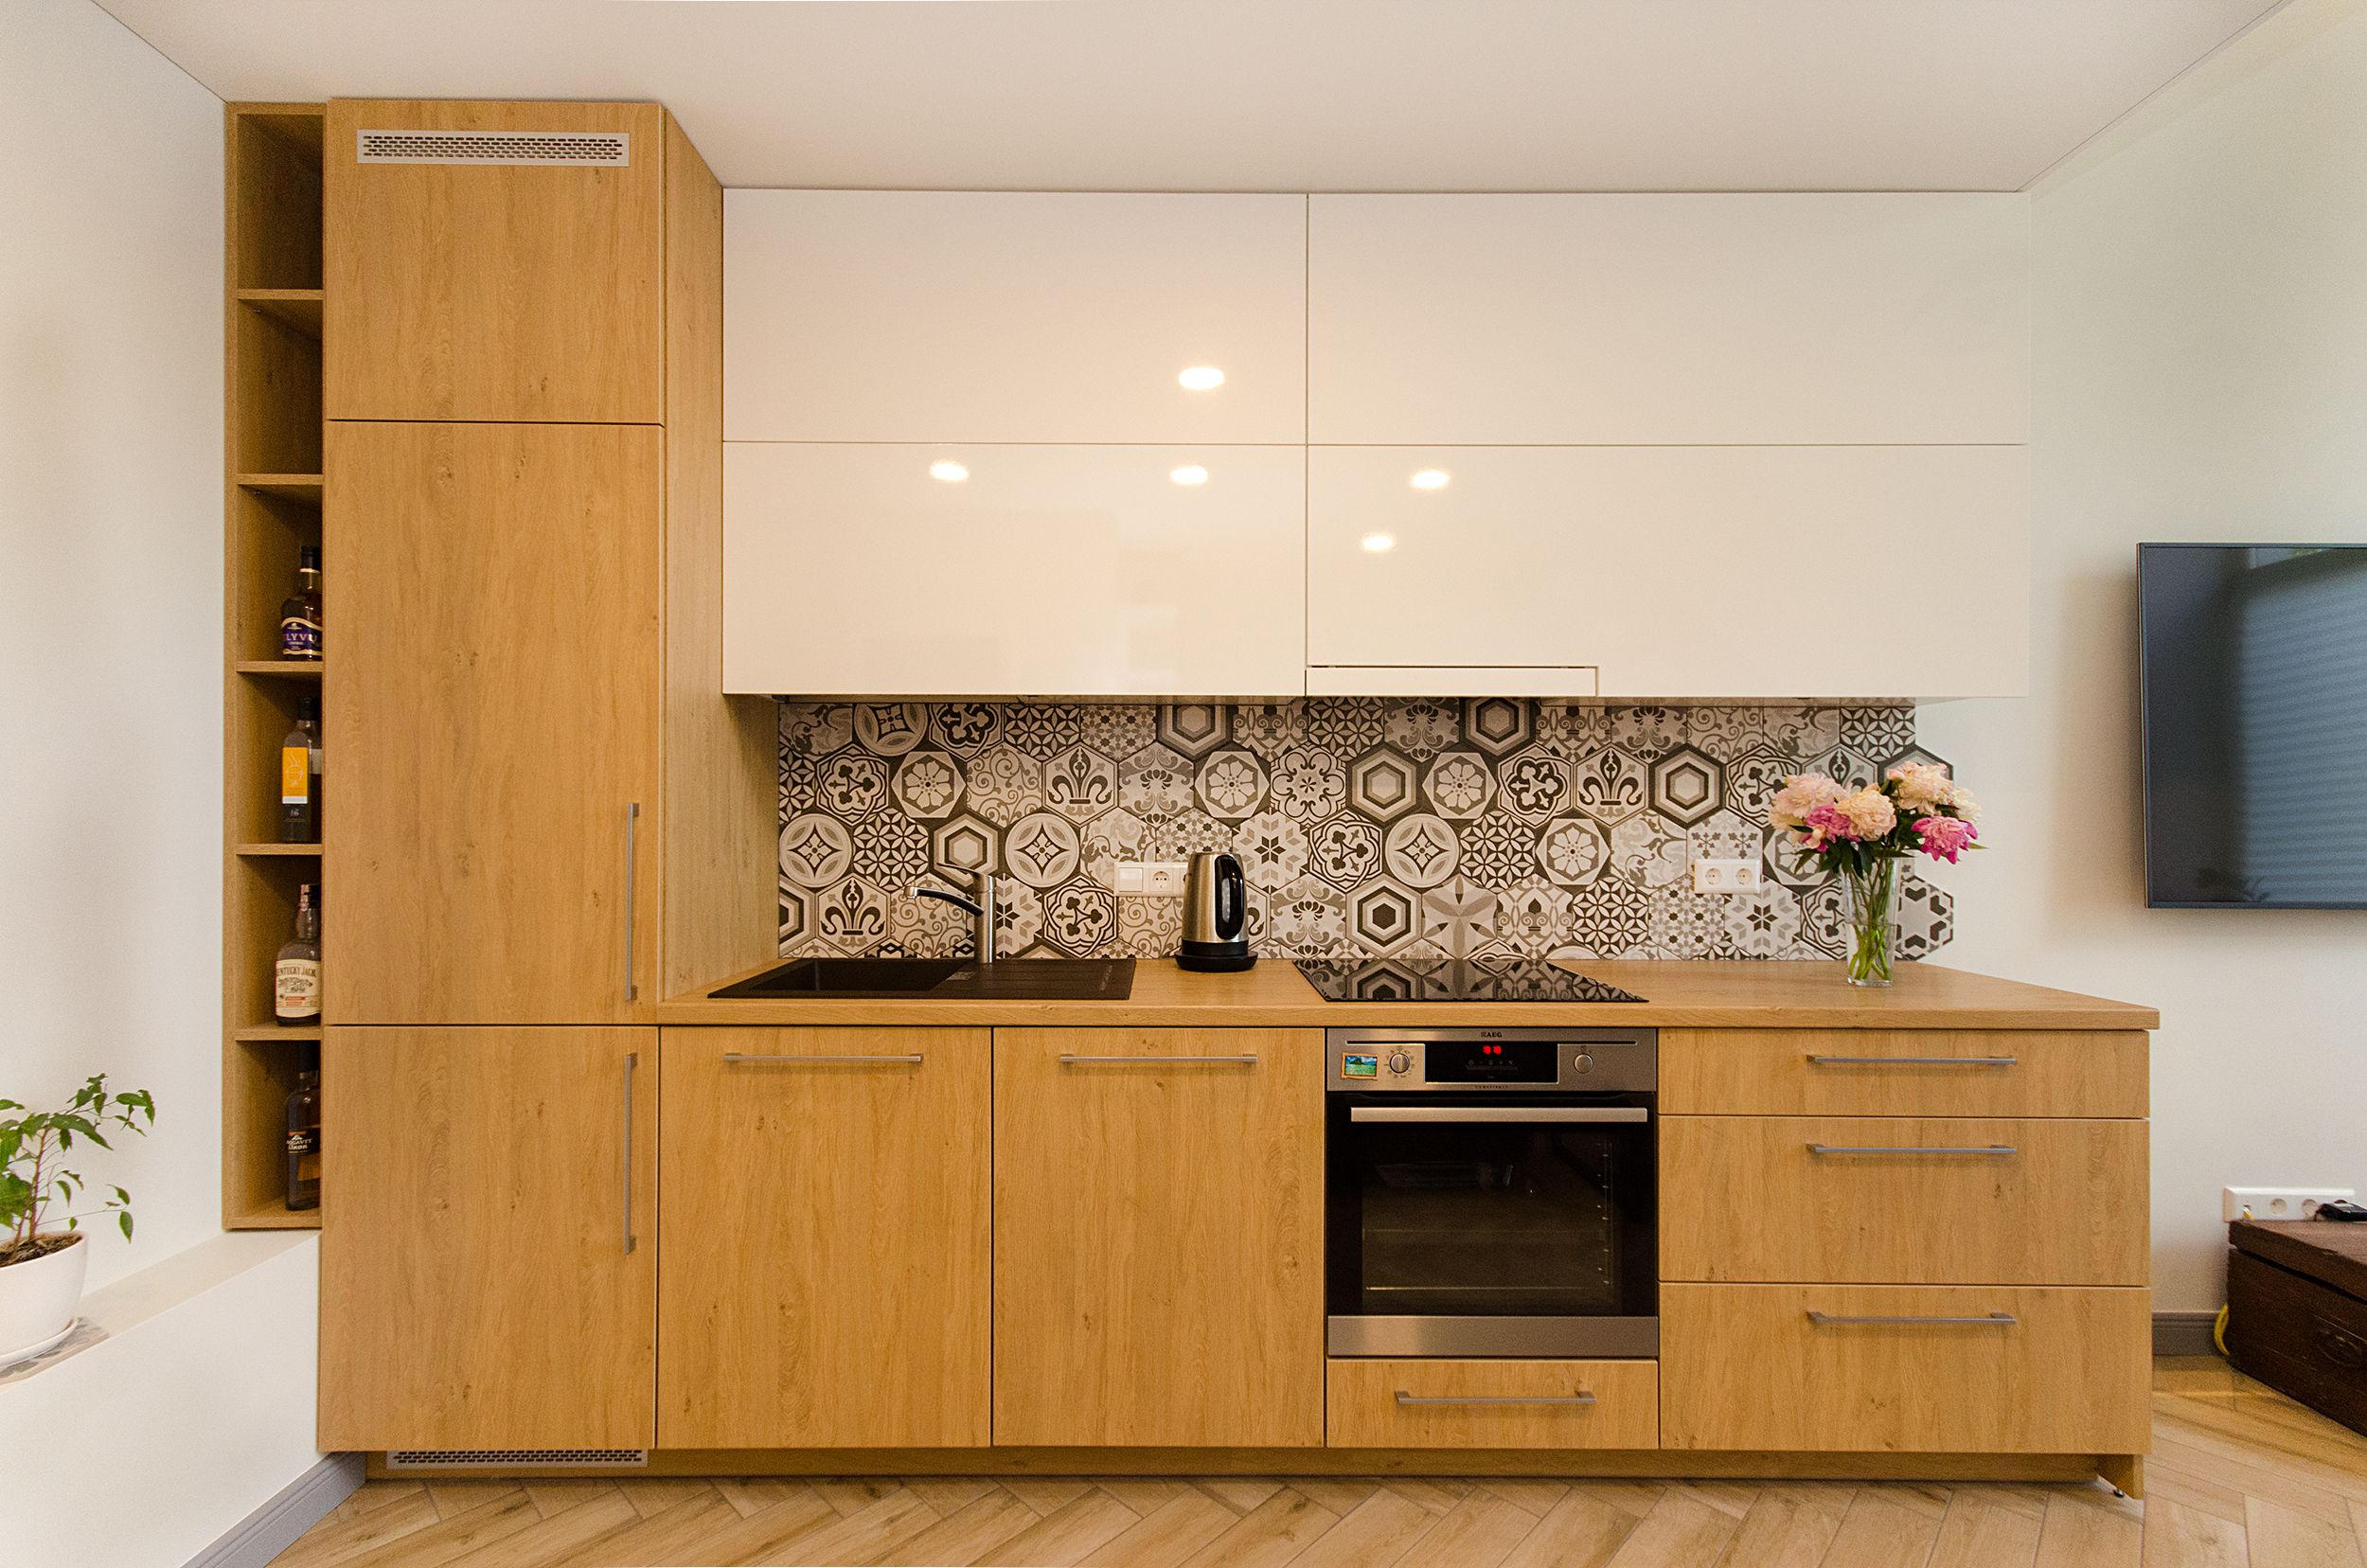
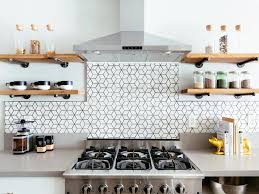
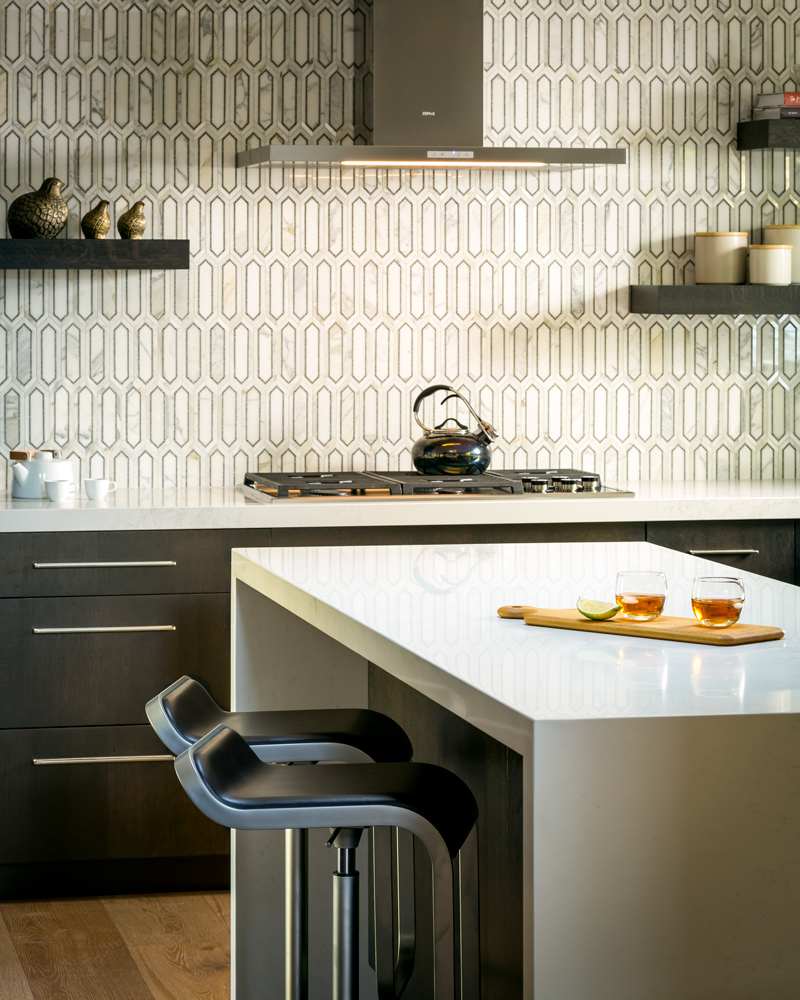
2. Mix Warm Wood and Patterned Hexagon Tiles
The single element that makes this kitchen sing is the hexagonal patterned backsplash. If you swapped it for a plain white tile, the room would still be nice, but it would lose its personality and energetic pulse. The varied geometric patterns in grey, black, and white inject a dose of playful modernity that prevents the light wood and white cabinets from feeling too simple. It’s the confident design choice that all the other elements are designed to support, from the simple black faucet to the clean lines of the cabinetry.
|
📋 Copy HEX 🔗 Share |
When working with a busy pattern like this, let the tile be the star and keep your other major surfaces simple. Notice how the cabinets are either a solid light wood grain or a glossy white. The countertops are a quiet, solid surface. This allows the eye to appreciate the complexity of the tile without feeling overwhelmed. If your backsplash is the art, the rest of the room is the gallery wall. Scale is also key; the medium size of these hex tiles is perfect for a standard backsplash height, large enough to be clear but small enough to create a detailed pattern.
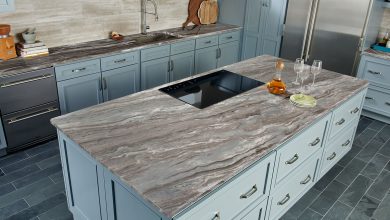
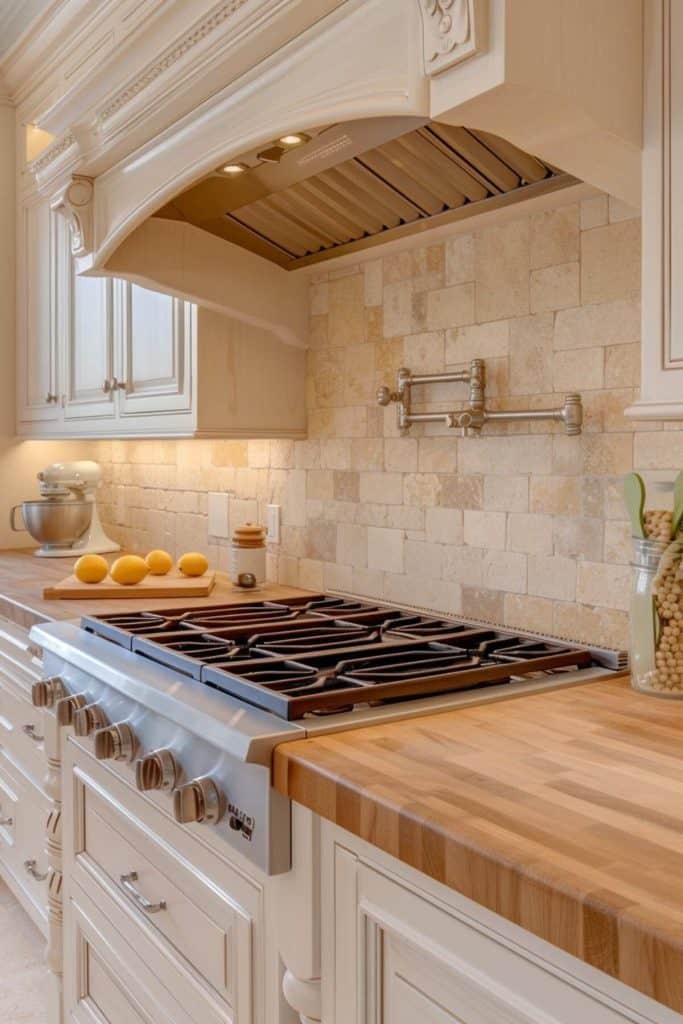
3. Pair Cream Cabinets with Rustic Stone & Butcher Block
This kitchen’s warm, inviting formula is all about balancing textures. Think of it as 50% traditional cabinetry, 30% rustic stone, and 20% natural wood. The ornate cream cabinets provide a classic, formal base. The rugged texture of the rectangular stone tiles introduces a casual, earthy element that keeps things from feeling stuffy. Finally, the light butcher block countertops add a layer of warmth and functional charm. You could swap the color palette—imagine navy cabinets with a white stone—but the magic lies in that specific 50/30/20 textural ratio.
|
📋 Copy HEX 🔗 Share |
Let’s be honest: while beautiful, both butcher block countertops and natural stone backsplashes require some love. The wood counters will need to be sealed properly upon installation and re-oiled every 6-12 months to prevent staining and water damage. The stone backsplash, especially if it’s porous like travertine, should also be sealed to protect it from grease splatters and sauce splashes behind the stove. If you’re a meticulous cook, you’re fine. If you’re a ‘clean it up later’ type, you may want to consider a porcelain tile that mimics this look with less upkeep. See Idea #16 for a more low-maintenance tile approach.
4. Contrast Dark Cabinets with a Glossy Gray Subway Tile
This design is a masterclass in contrast. The deep, dark shaker cabinets create a dramatic and grounded feeling, while the glossy, light gray subway tile backsplash acts as a reflective surface that bounces light around the room. This push-and-pull between dark and light is what creates the elegant tension. The bright white countertop serves as a crisp divider, preventing the gray tile and dark cabinets from visually blending into each other. Finally, the small touch of brass hardware adds a necessary layer of warmth against the cool tones, keeping the space from feeling too sterile.

|
📋 Copy HEX 🔗 Share |
You don’t need custom cabinets and high-end tile to get this sophisticated vibe. Start with IKEA’s black LERHYTTAN cabinet fronts for that dark, moody base. Then, look for a basic glossy gray subway tile from a big box store like Lowe’s or The Home Depot—you can often find it for under $5 per square foot. A simple white laminate countertop can provide the same bright contrast as stone for a fraction of the cost. The key is the color blocking, not the price tag of the individual materials. You can achieve this entire look for under $3,000 with some smart shopping.
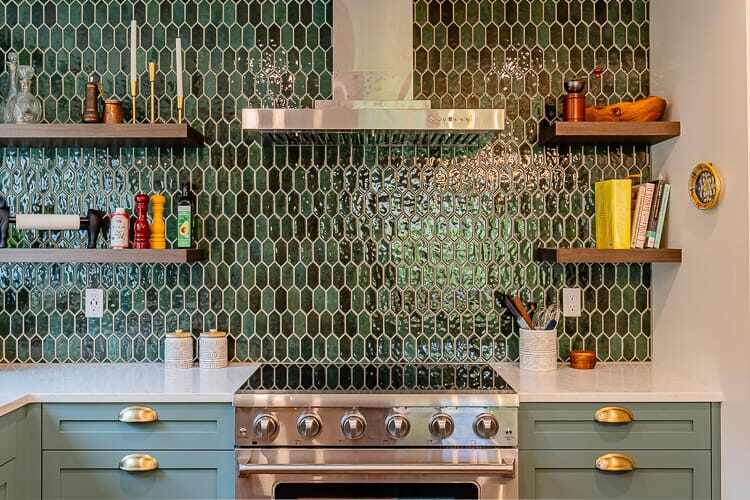
5. Embrace Texture with Deep Green Picket Tiles
Undoubtedly, the hero of this space is the tile’s unique picket shape combined with its deep, saturated green color. It’s a bold departure from standard squares or rectangles and announces a confident design point of view. The vertical orientation of the pickets draws the eye upward, creating a sense of height, while the irregular, reflective texture behind the stove adds a handcrafted, artisanal quality. Remove this element, and you lose the room’s most compelling feature; it’s the very soul of the design.
|
📋 Copy HEX 🔗 Share |
A textured, glossy tile like this is fantastic for looks, but it’s worth considering the cleaning reality, especially behind a stove. While the glossy surface itself is easy to wipe down, the sheer number of grout lines in a small-format tile means more places for grease and grime to settle. Using a high-quality stain-resistant grout (like an epoxy or urethane formula) is non-negotiable here. The irregular, bumpy texture on the accent tiles might also require a bit more attention with a scrub brush compared to a perfectly flat tile. It’s not high-maintenance, but it’s not zero-maintenance either.
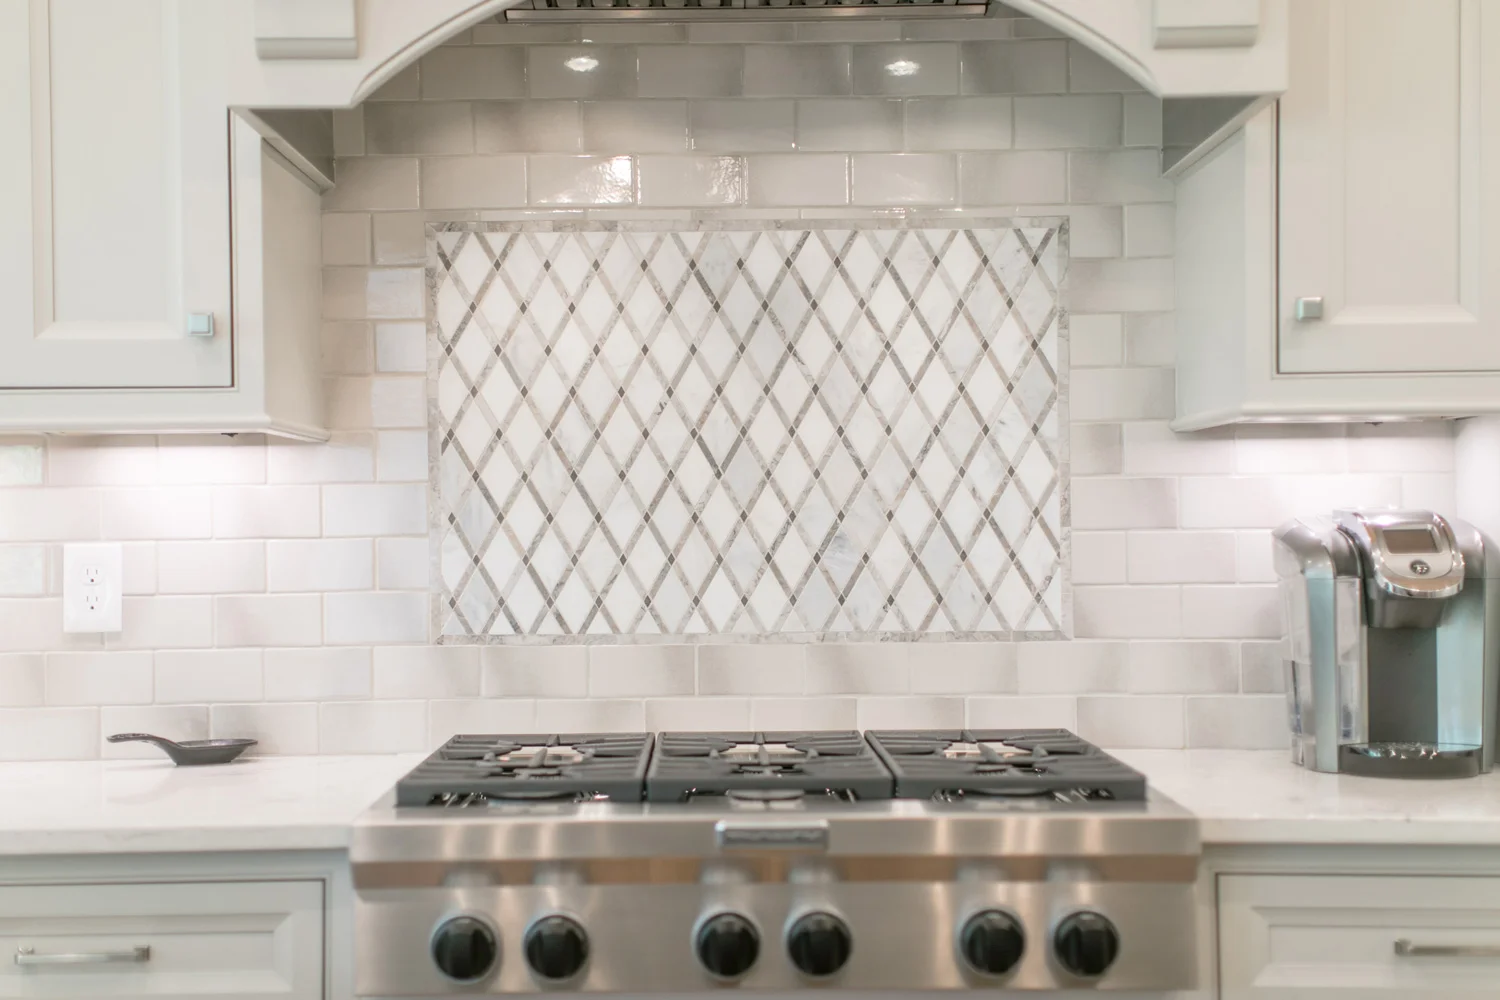
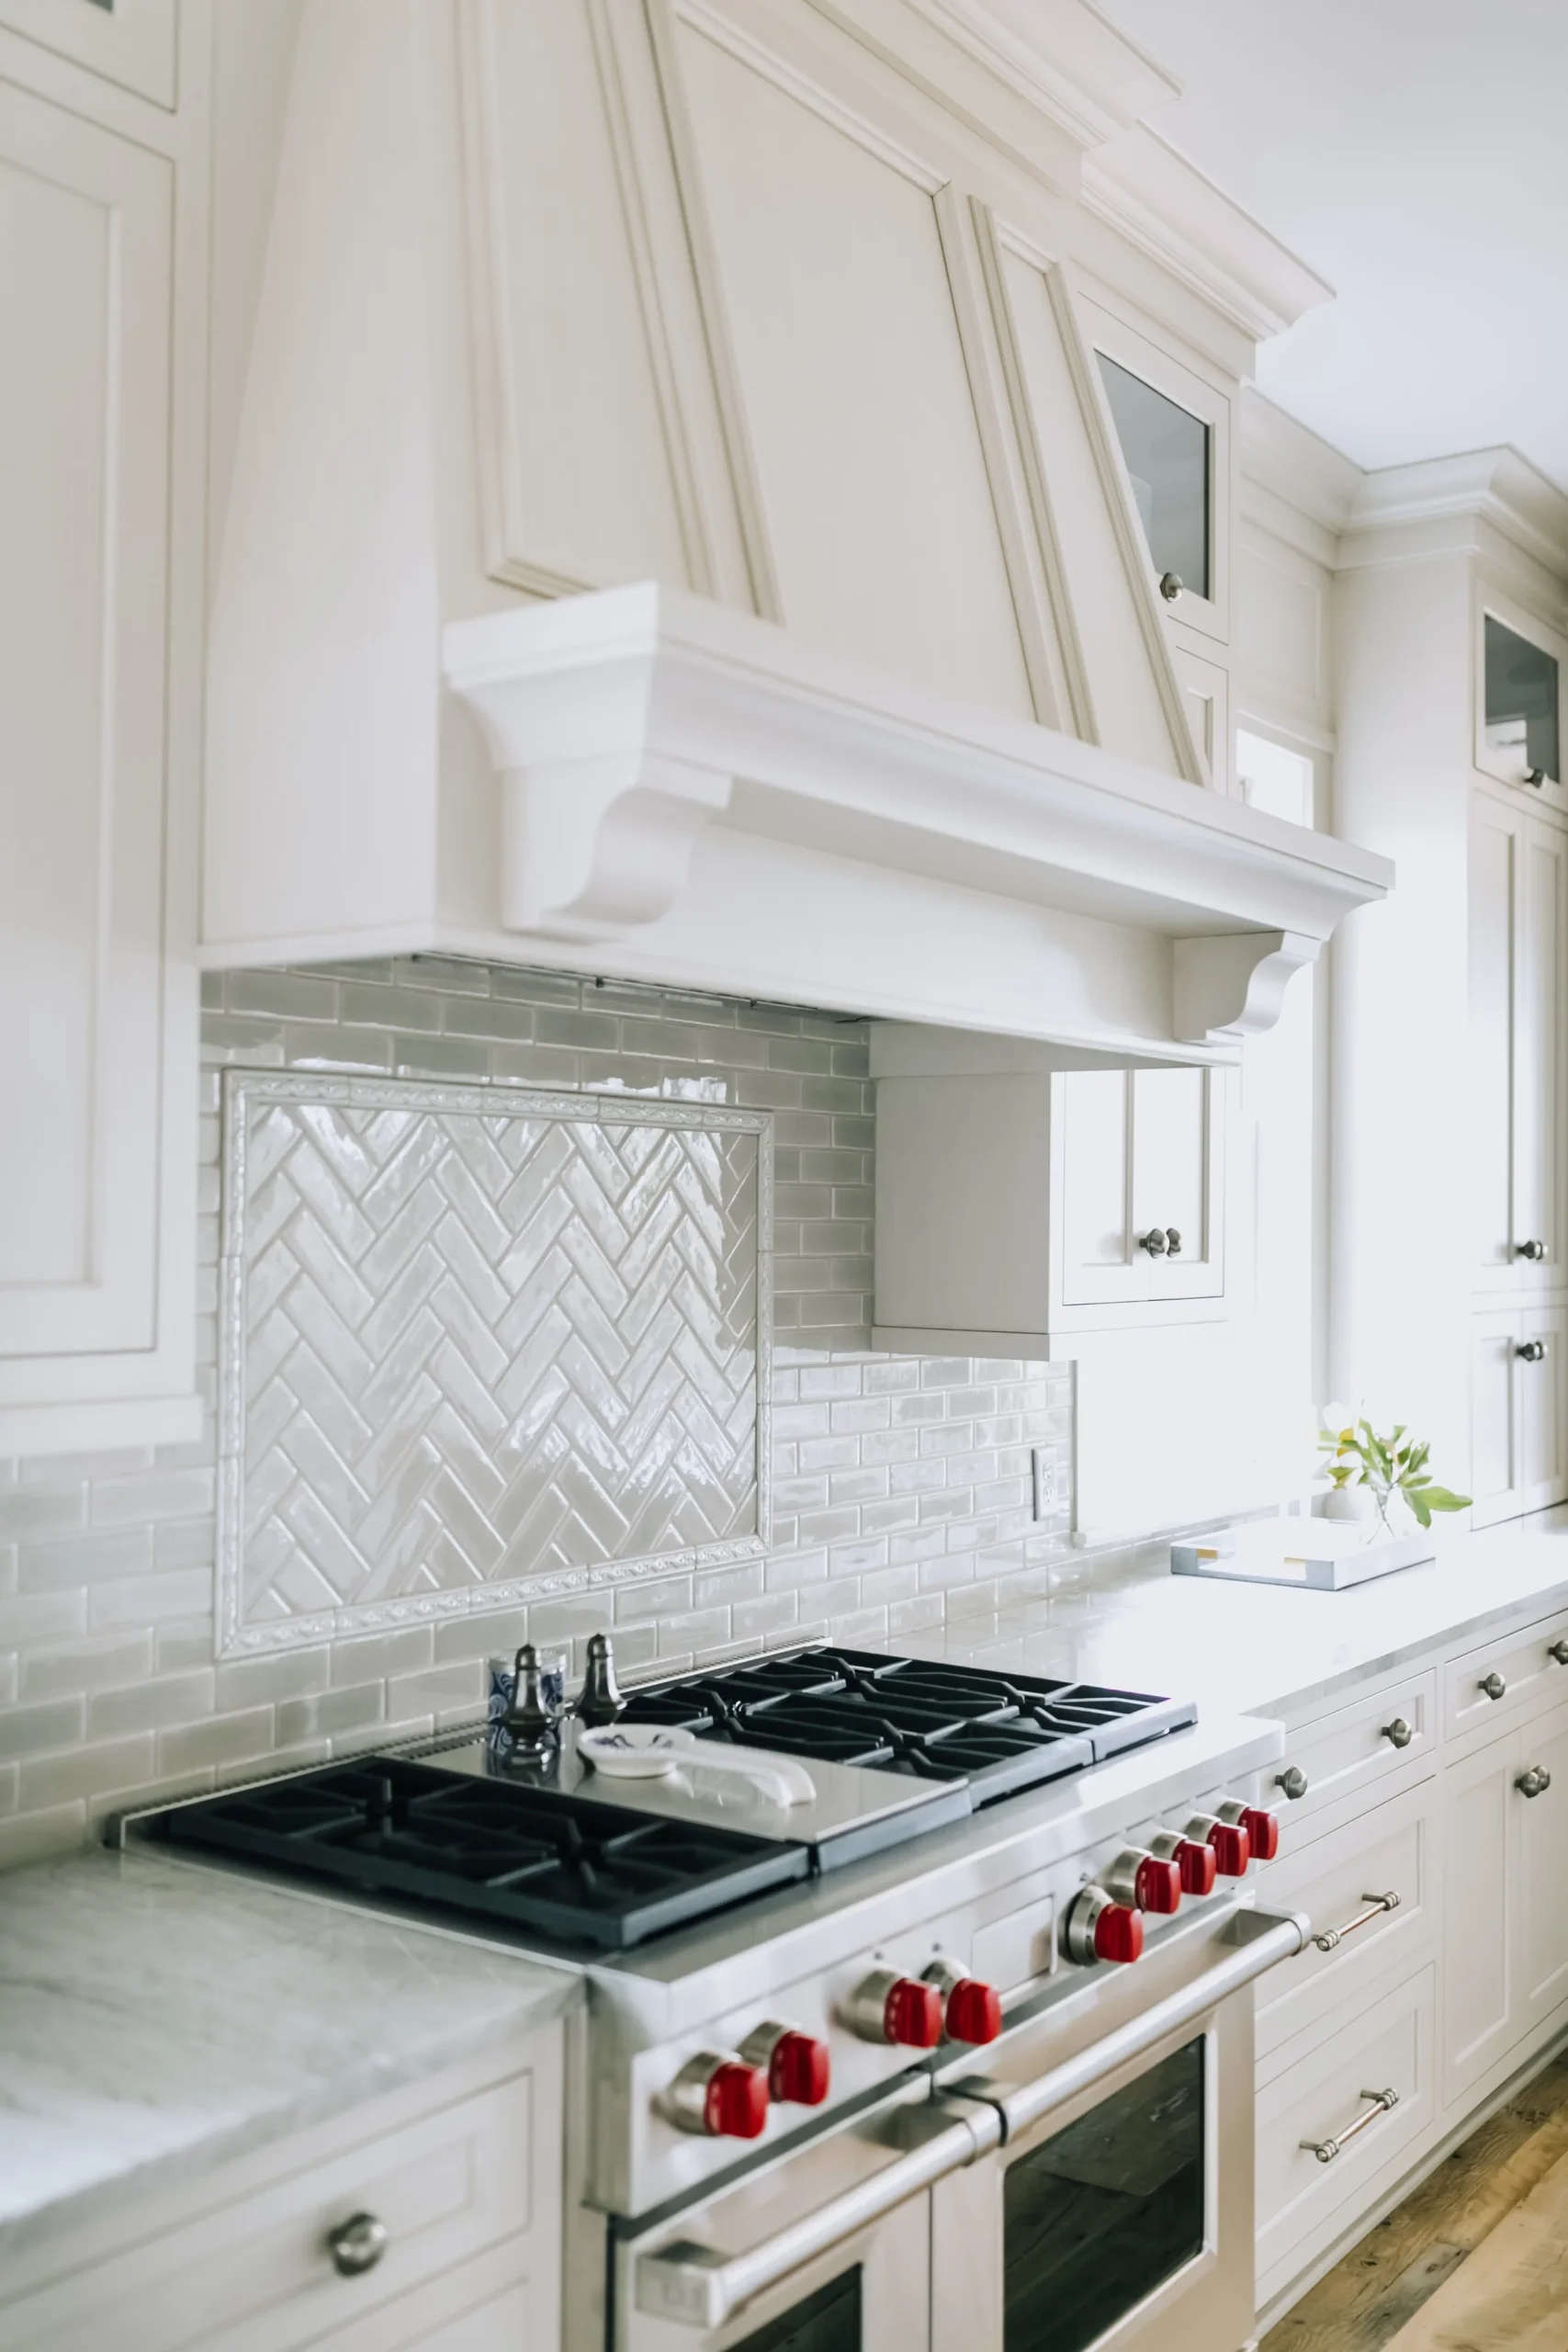
6. Add Subtle Elegance with a Framed Marble Mosaic
For a dose of luxury that isn’t overwhelming, frame an intricate mosaic behind the range and use a simpler tile for the rest of the backsplash. This technique, called a ‘range frame’ or ‘feature inset,’ creates a focal point without the expense of covering the entire wall in pricey marble mosaic. The key is to choose an inset tile and a field tile that share a common color. Here, the soft gray in the diamond-patterned marble mosaic connects perfectly with the simple, glossy white subway tile surrounding it, creating a cohesive, intentional look.
|
📋 Copy HEX 🔗 Share |
This approach is incredibly versatile and works best in kitchens with a dedicated range area that is at least 30 to 36 inches wide. A smaller space can make the framed accent feel cramped. The key is to maintain visual balance. Ensure you have at least 4-6 inches of the main field tile on either side of the framed mosaic to give it breathing room. This technique is perfect for adding a high-end touch to a traditional or transitional kitchen, similar to the herringbone accent in Idea #10 but with a more classic feel.
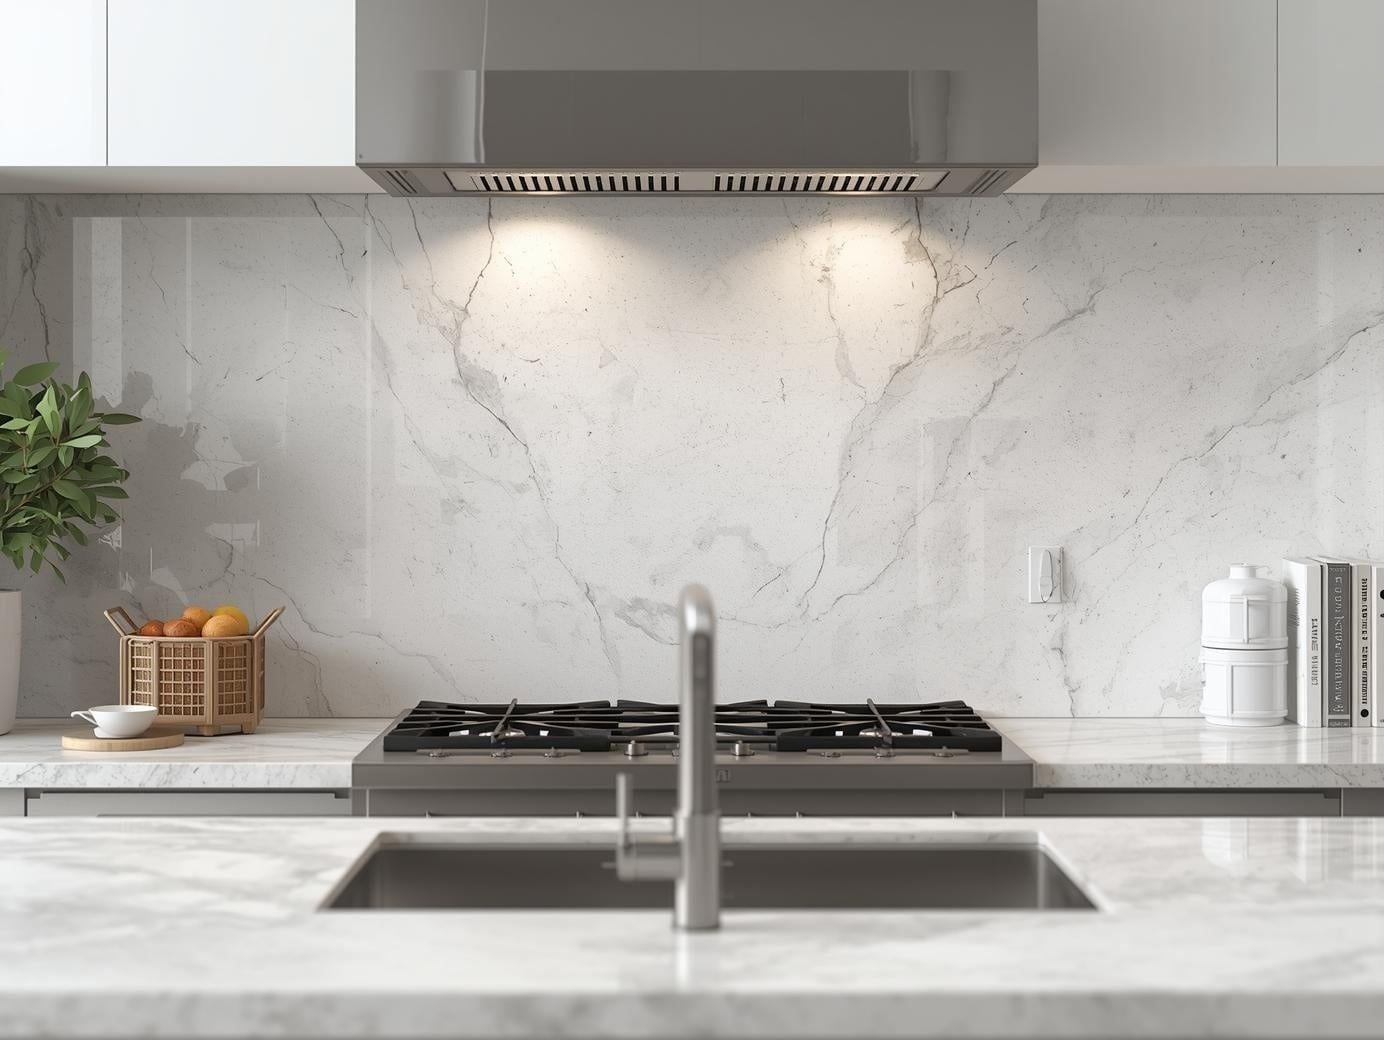
7. The Power of a Single, Large-Format Material
Often the most impactful statements are the simplest. Using a single, large-format material for the backsplash behind the stove creates a clean, architectural look that minimizes visual clutter. The formula here is about dominance: 80% bold backsplash material + 20% functional appliances. By dedicating the majority of the visual real estate to one continuous surface, whether it’s a porcelain slab, a sheet of stainless steel, or a large composite panel, you create a sense of scale and modernity. The focus remains on the material’s texture and color, uninterrupted by grout lines.
|
📋 Copy HEX 🔗 Share |
Here’s the reality check: large-format materials can be tricky. Slabs and large panels are heavy and unforgiving to install. You’ll need a perfectly flat wall, and professional installation is almost always required, which can be a significant portion of the budget. Templating for outlets and switches must be precise, as mistakes can’t be easily hidden. It’s also worth noting that while fewer grout lines mean less cleaning, scratches or chips on a single slab are much harder to repair than replacing a single small tile.
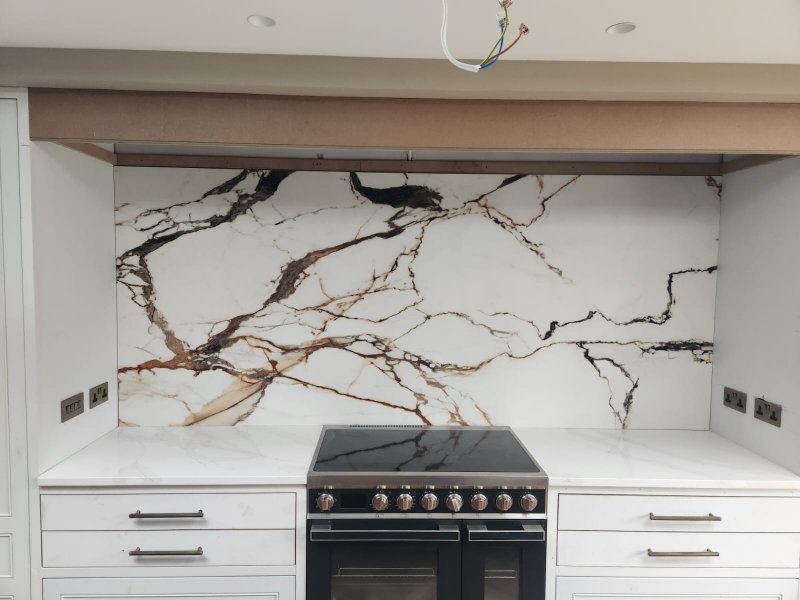
8. Go Bold with a High-Contrast Marble Slab
The magic here is in the stone’s dramatic movement and high-contrast veining. The stark white background serves as a canvas for the aggressive black and warm reddish-brown veins that sweep across the surface. This isn’t a subtle, quiet marble; it’s a confident statement piece that functions as a work of art. By pairing it with simple, white recessed-panel cabinetry and understated dark bronze pulls, the design allows the marble to be the undisputed star of the show. It’s proof that when your main material is this powerful, everything else can—and should—play a supporting role.
|
📋 Copy HEX 🔗 Share |
We’re seeing a major shift away from subtle, barely-there marble veining towards bold, graphic, and painterly stone slabs like this one. In 2026, homeowners want personality and uniqueness, and a slab with this much character ensures that no two kitchens will ever be exactly alike. This trend reflects a broader desire for natural materials that show their raw, organic beauty. It has staying power because it’s rooted in the timeless appeal of natural stone, simply amplified with more confidence and drama than we’ve seen in years past.
9. Create Drama with Book-Matched Marble Slabs
Book-matching is the technique of using two adjoining slabs of stone that are cut and polished to create a mirror image of each other, like the pages of an open book. This creates a stunning, symmetrical pattern that instantly elevates a kitchen to a level of pure glamour. The dramatic, Rorschach-like effect of the veining becomes a large-scale piece of natural art. When paired with rich, warm wood tones and moody lighting, it creates a kitchen that feels both luxurious and deeply personal—a far cry from a generic builder-grade space.
|
📋 Copy HEX 🔗 Share |
A book-matched marble wall is a showstopper, but it’s not for the faint of heart when it comes to upkeep. Marble is a relatively soft, porous stone, meaning it can etch or stain if acidic substances like lemon juice, vinegar, or wine are left to sit on it. Sealing the marble annually is crucial to protect its surface. Behind a stove, this is especially important to guard against oil splatters. Wiping up spills immediately is the best policy. For those who love the look but fear the maintenance, new porcelain slabs offer incredibly realistic book-matched designs with zero porosity.
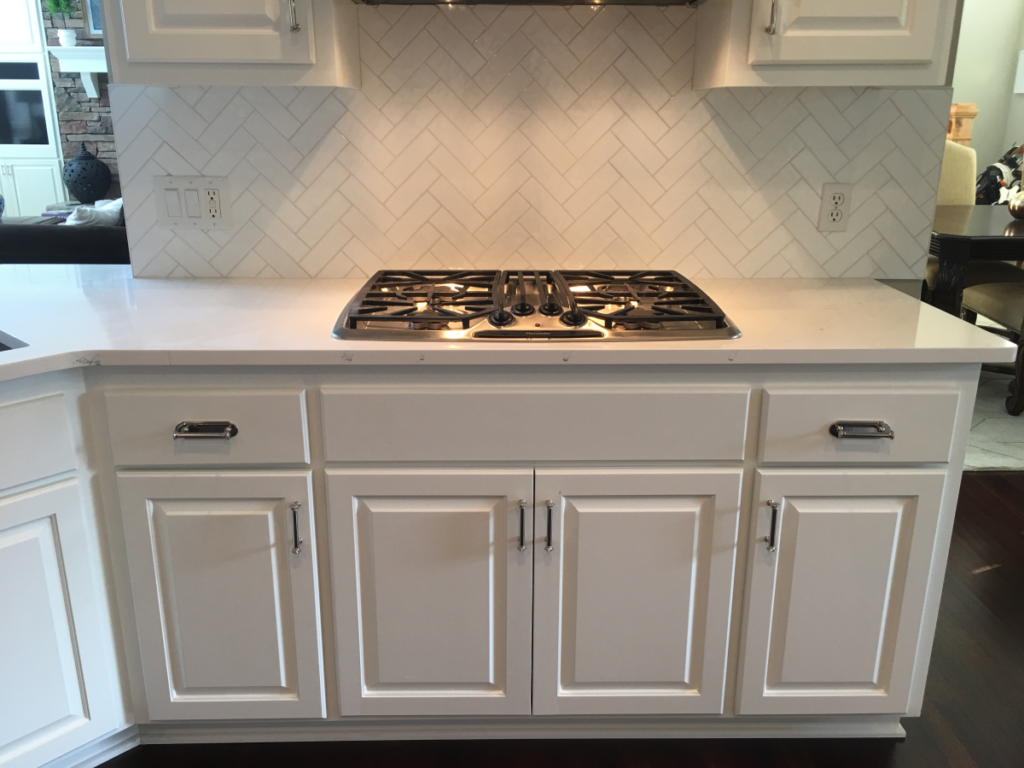
10. A Modern Twist with a Herringbone Tile Accent
The framed herringbone pattern is the quiet hero that elevates this entire design. By taking the same glossy light gray subway tile and simply changing its orientation within a defined space, the design creates a sophisticated focal point without introducing a new color or material. It’s a testament to the power of pattern. This detail adds a layer of custom-designed interest that breaks up the running bond pattern and draws the eye directly to the cooking zone, making it feel special and intentional.
|
📋 Copy HEX 🔗 Share |
When creating a herringbone inset, the details make all the difference. To ensure the pattern looks crisp, use a tile spacer to maintain consistent, clean grout lines. For elongated subway tiles like these, a 45-degree angle is standard. The most critical step is to perfectly center the pattern on the range. Start tiling from the center line and work your way outwards to ensure the pattern is symmetrical. An off-center herringbone accent can make the entire installation look like a mistake.
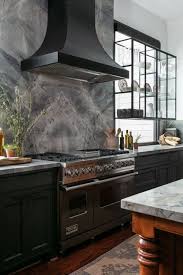
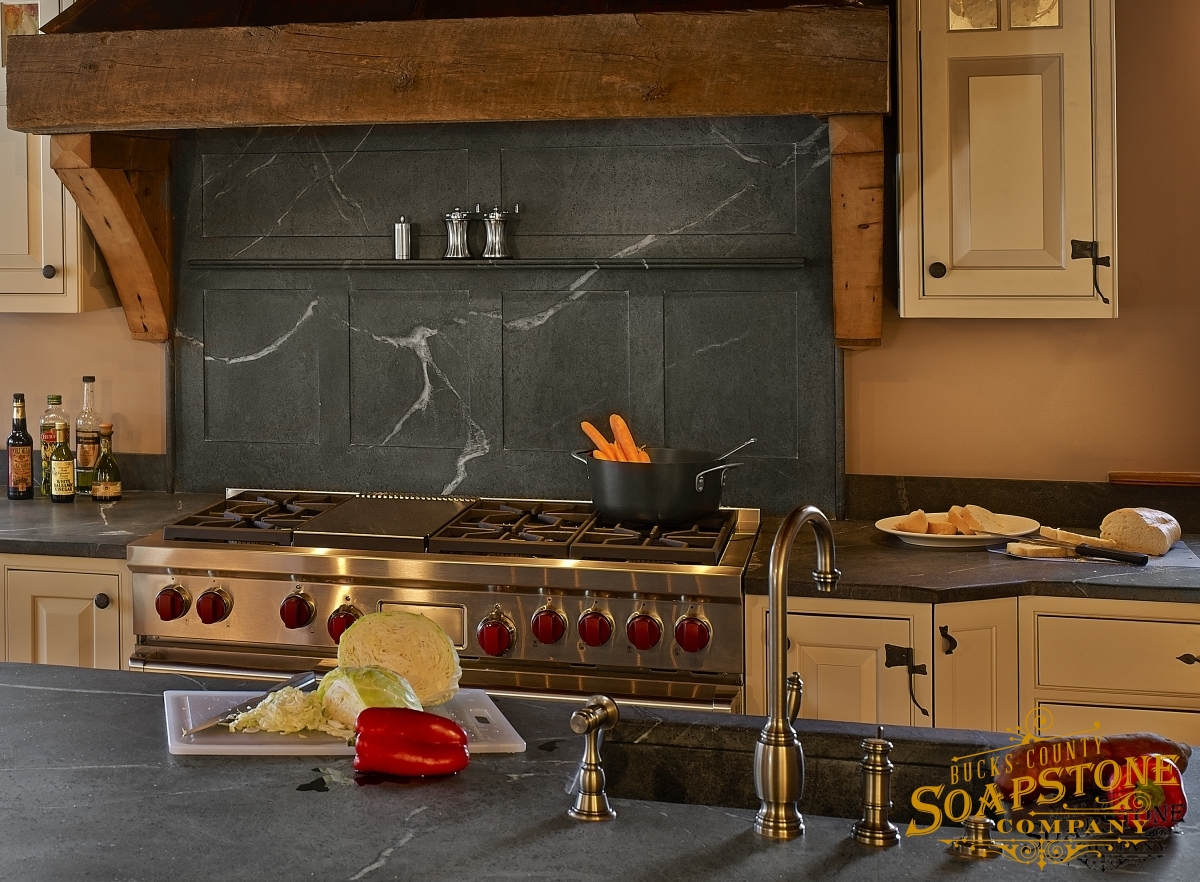
11. Embrace Rustic Modern with a Paneled Soapstone Backsplash
This look succeeds by blending rustic, raw materials with a refined, custom design. The dark, veined soapstone itself feels earthy and grounded. However, by fabricating it with recessed panels and a small rail, it takes on a sophisticated, almost furniture-like quality. This is then framed by rough-hewn wooden beams, doubling down on the natural texture. The result is a perfect fusion of rustic charm and tailored design—it feels both substantial and elegant, a difficult balance to strike. Compare this to the sleek slab in Idea #1 to see how the same material concept can have a completely different mood.
|
📋 Copy HEX 🔗 Share |
You can replicate that narrow soapstone rail for a fraction of the cost using a simple painted wood ledge. Here’s a quick guide:
- Measure & Cut: Measure the width of your range area and cut a 1×2 piece of poplar wood to size. (Time: 15 mins)
- Sand & Prime: Lightly sand the wood and apply one coat of a high-adhesion primer. Let it dry completely. (Time: 2 hours)
- Paint: Apply two coats of a durable enamel paint color-matched to your desired stone look. A dark charcoal or black with a satin finish works well. (Time: 2 hours)
- Install: Secure the ledge to the wall using construction adhesive and finish nails into studs for support. (Time: 30 mins)
Total Time: ~5 hours active, Cost: Under $50
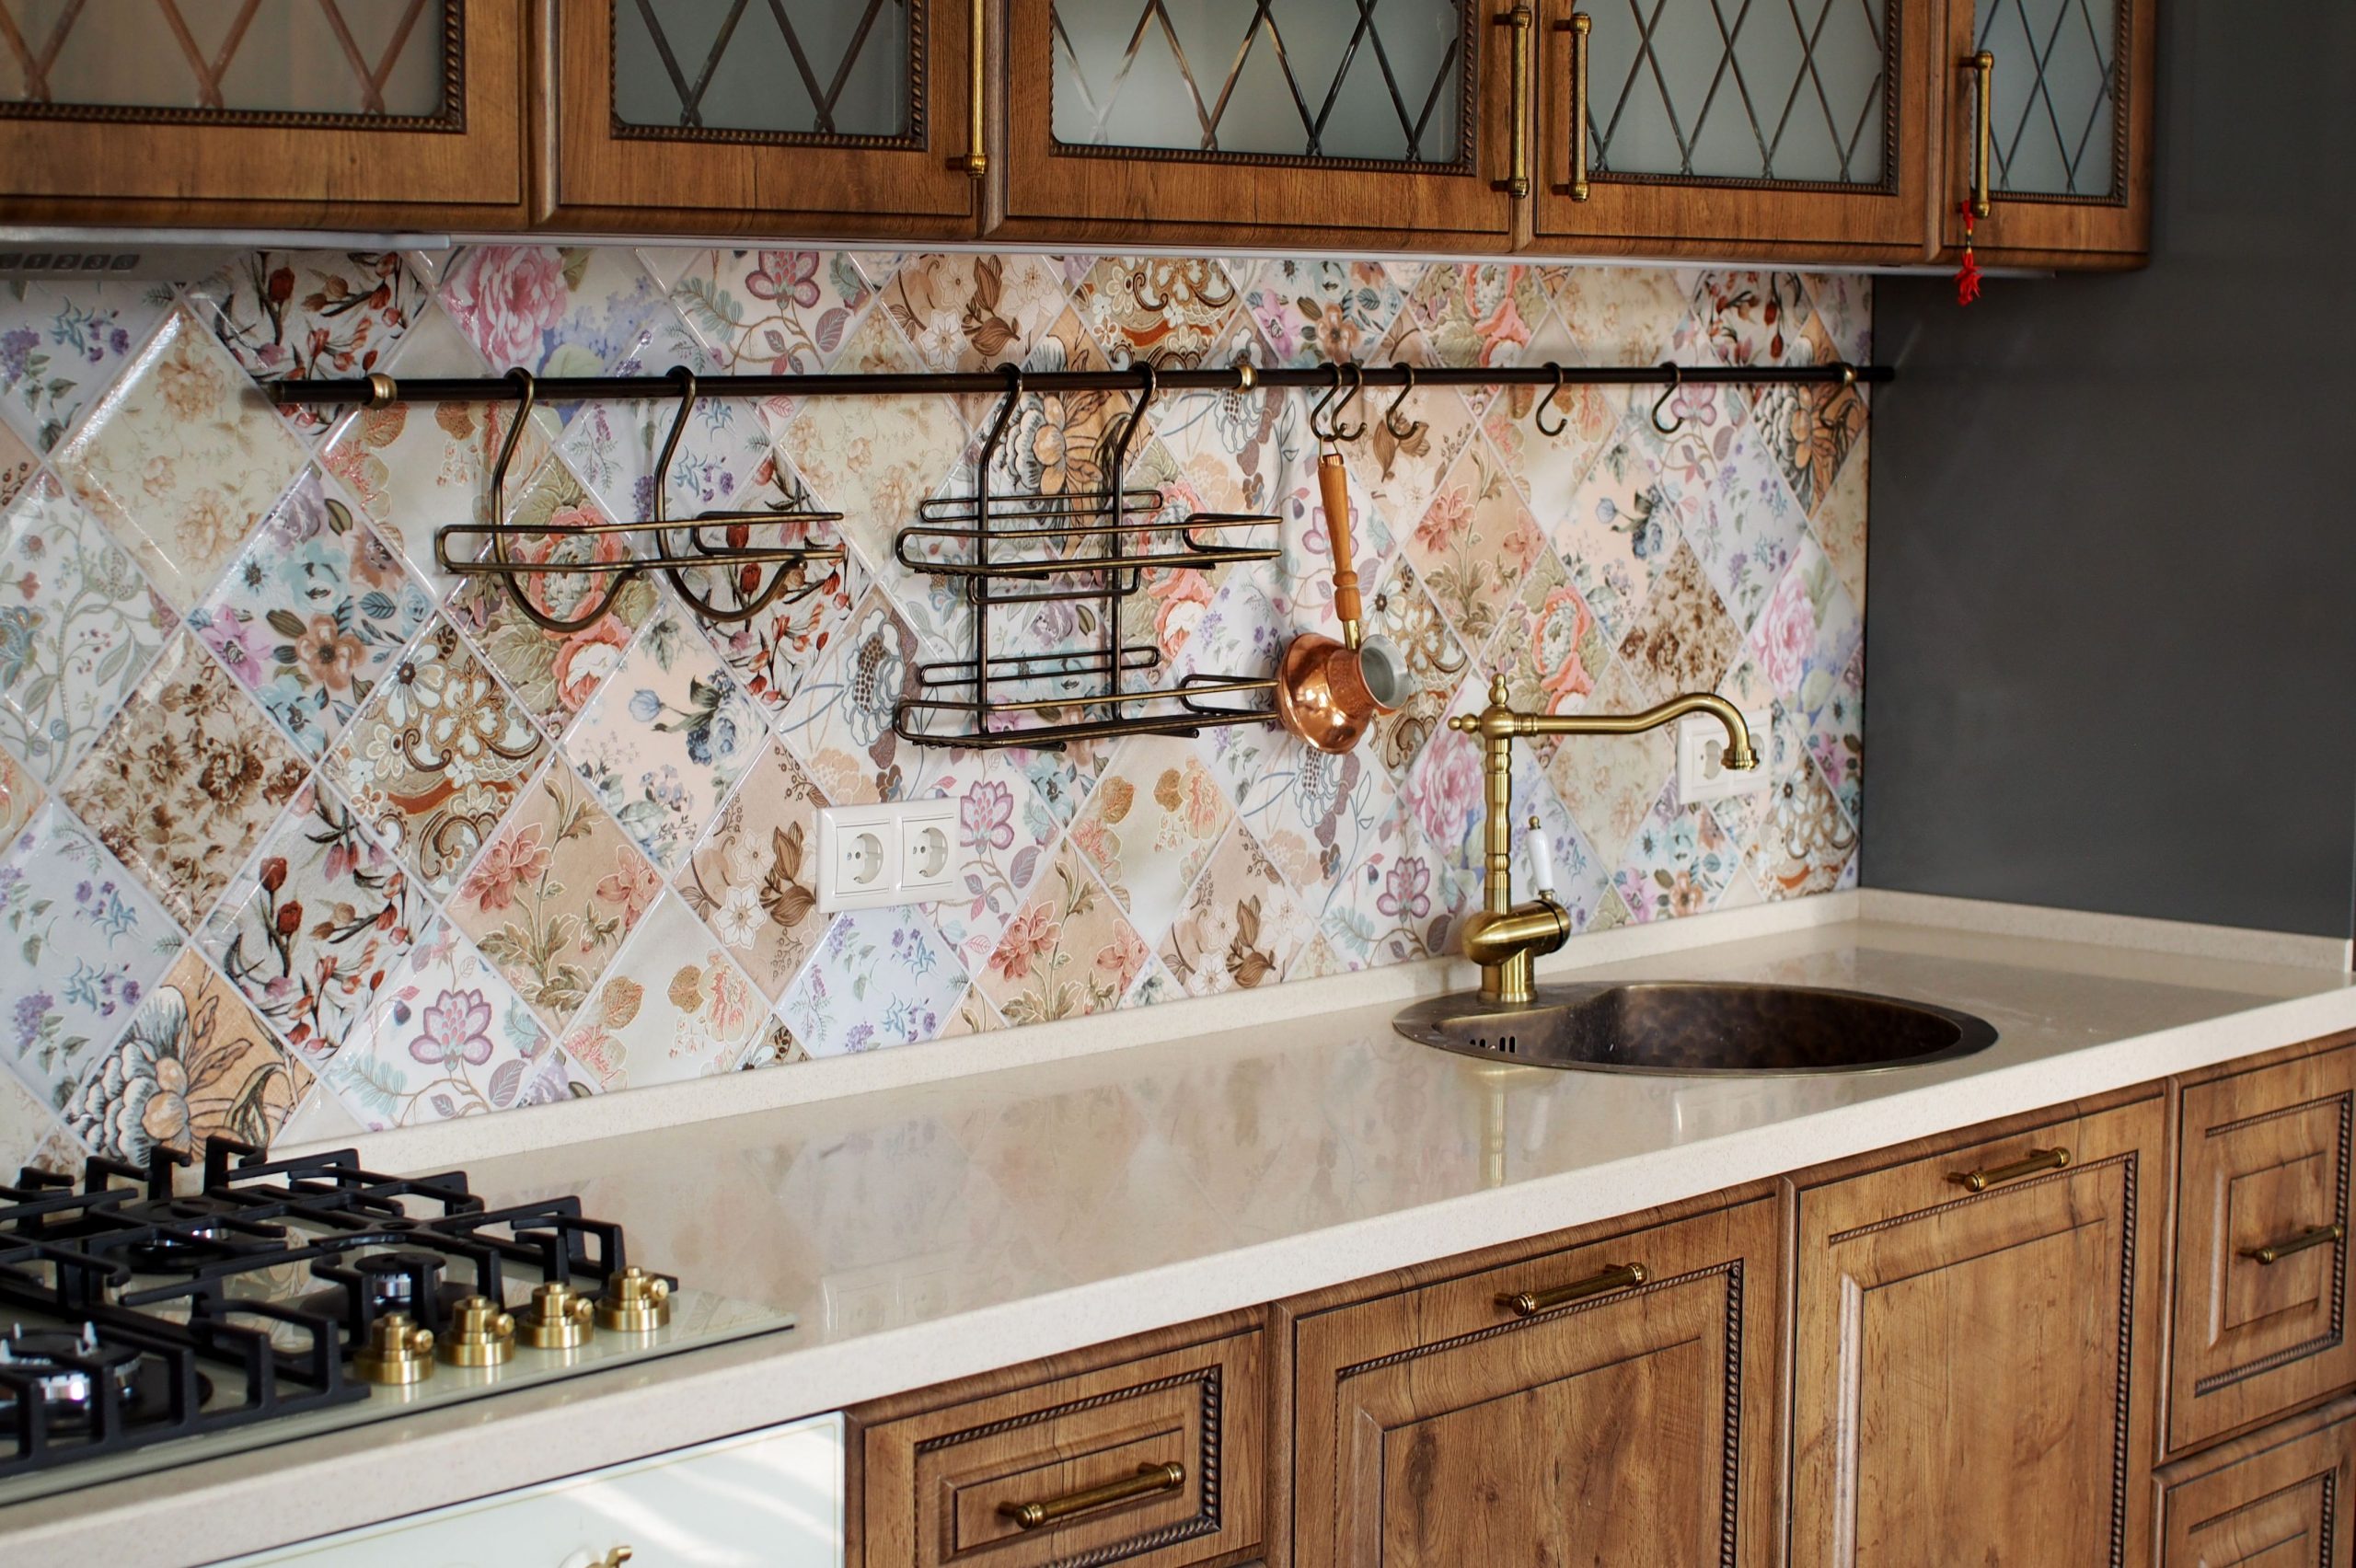
12. Add Vintage Charm with Patterned Floral Tiles
The single element breathing life and personality into this kitchen is the collection of diamond-set patterned tiles. Each tile tells a tiny story with its unique floral or botanical motif, creating a quilted, collected-over-time feeling. Without these tiles, you’d have a lovely but standard kitchen. With them, the space is transformed into a cozy, nostalgic haven. The dark metal hanging rail layered on top enhances this effect, adding a touch of utilitarian, old-world charm that feels both beautiful and practical.
|
📋 Copy HEX 🔗 Share |
This look is part of the ‘Grandmillennial’ and ‘Cottagecore’ trends that continue to have a strong hold. As people seek more personalization and turn away from minimalist, impersonal spaces, decorative and slightly nostalgic elements like these are making a huge comeback. It’s a rebellion against the all-white kitchen, embracing color, pattern, and objects that feel like they have a history. This trend has staying power because it’s not about a specific pattern but about curation and personality, which are always in style.
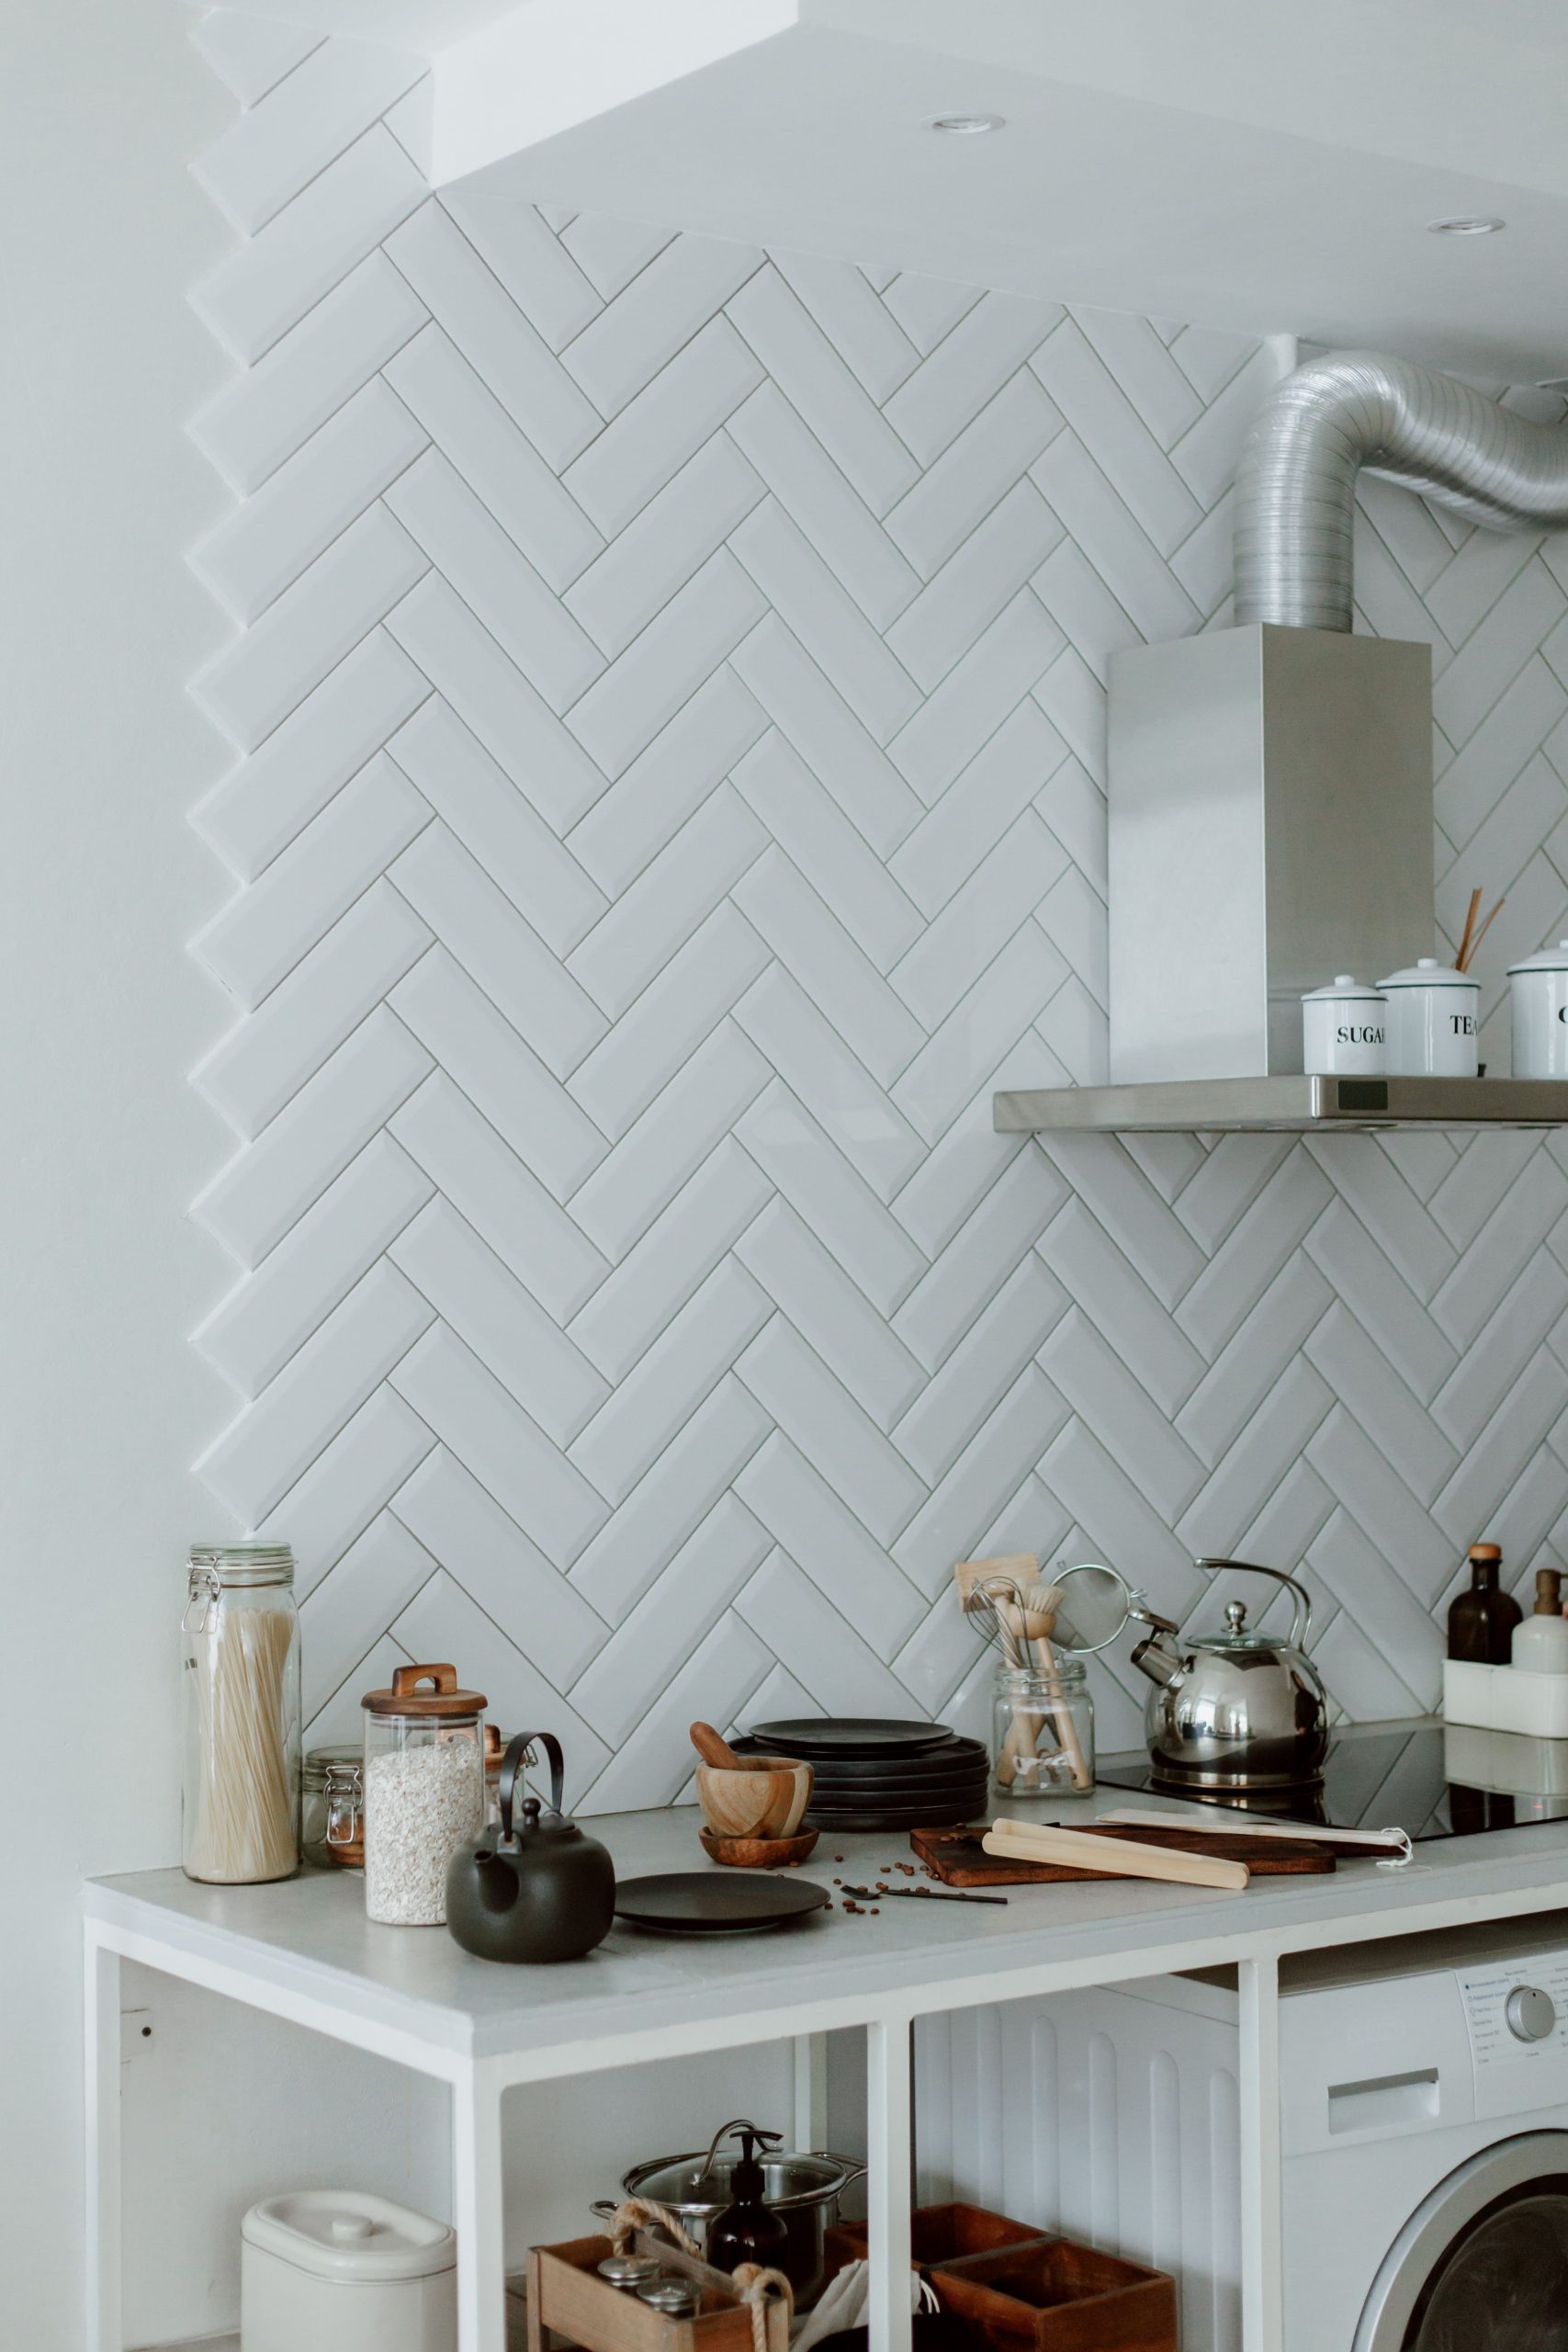
13. Go Vertical with a Full-Wall Herringbone Backsplash
This design’s success lies in its bold commitment to a single pattern. By running the white herringbone tile from the countertop all the way to the ceiling, the wall becomes a dynamic, textured surface rather than just a functional backsplash. This unbroken vertical pattern draws the eye upward, making the ceilings feel higher and the entire space feel larger and more architectural. The choice of a slim stainless steel shelf instead of bulky upper cabinets keeps the focus squarely on the beautiful tile work, preventing it from being visually cluttered.
|
📋 Copy HEX 🔗 Share |
A full-wall tile installation like this is a brilliant solution for kitchens with 8- to 9-foot ceilings where you want to maximize the sense of height and openness. It works particularly well in spaces with limited upper cabinetry or open shelving. This treatment is perfect for galley kitchens or along a single wall in an open-plan space to create a strong focal point. For kitchens with lower ceilings (under 8 feet), this can sometimes feel a bit overwhelming; a more traditional backsplash height might be a better choice in that scenario.
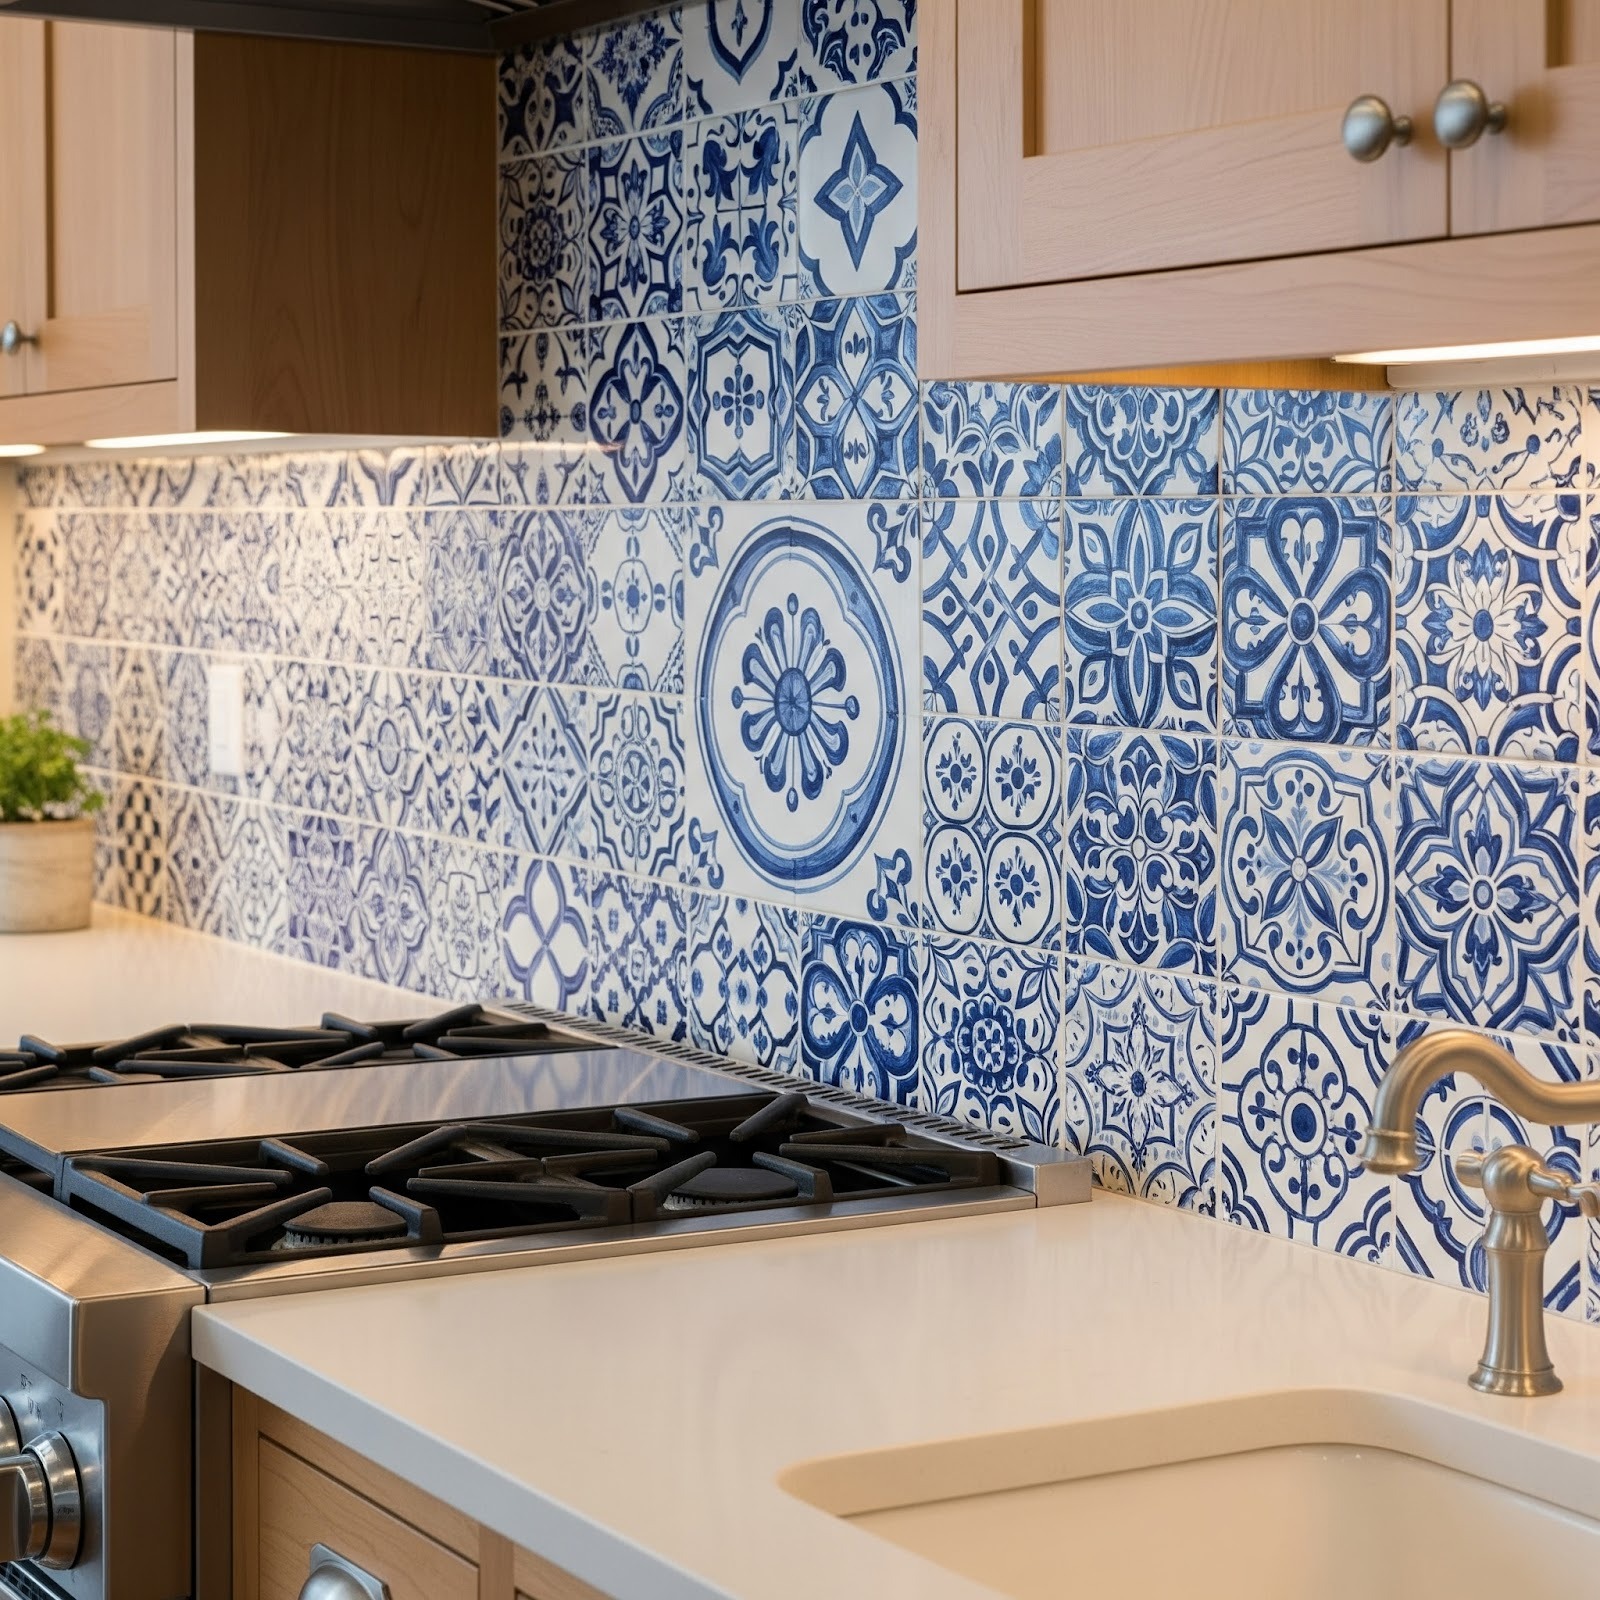
14. Channel Mediterranean Vibes with Blue and White Patterned Tiles
It’s all about the tile. The vibrant, intricate blue and white patterned tiles are the undeniable heart and soul of this kitchen. They transport you straight to a sun-drenched villa on the Mediterranean coast. The variety of floral and geometric motifs within the tiles creates a rich tapestry of design that is endlessly fascinating to look at. Paired with simple light wood cabinets and clean white countertops, the tile is allowed to be the art, the color, and the personality of the entire room. It’s a joyful, energetic choice that makes the kitchen feel alive.
|
📋 Copy HEX 🔗 Share |
This look is stunning, but it requires commitment. Before you dive in, run through this checklist:
- Is your kitchen ready for this much pattern? If you already have busy floors or countertops, adding a bold tile like this might create visual chaos. This look works best with quiet surrounding surfaces.
- Does the blue tone complement your cabinetry? Test a sample tile next to your cabinet doors in different lighting conditions.
- Have you budgeted for professional installation? Aligning intricate patterns can be very tricky for a DIY-er. A pro will ensure the layout is perfect.
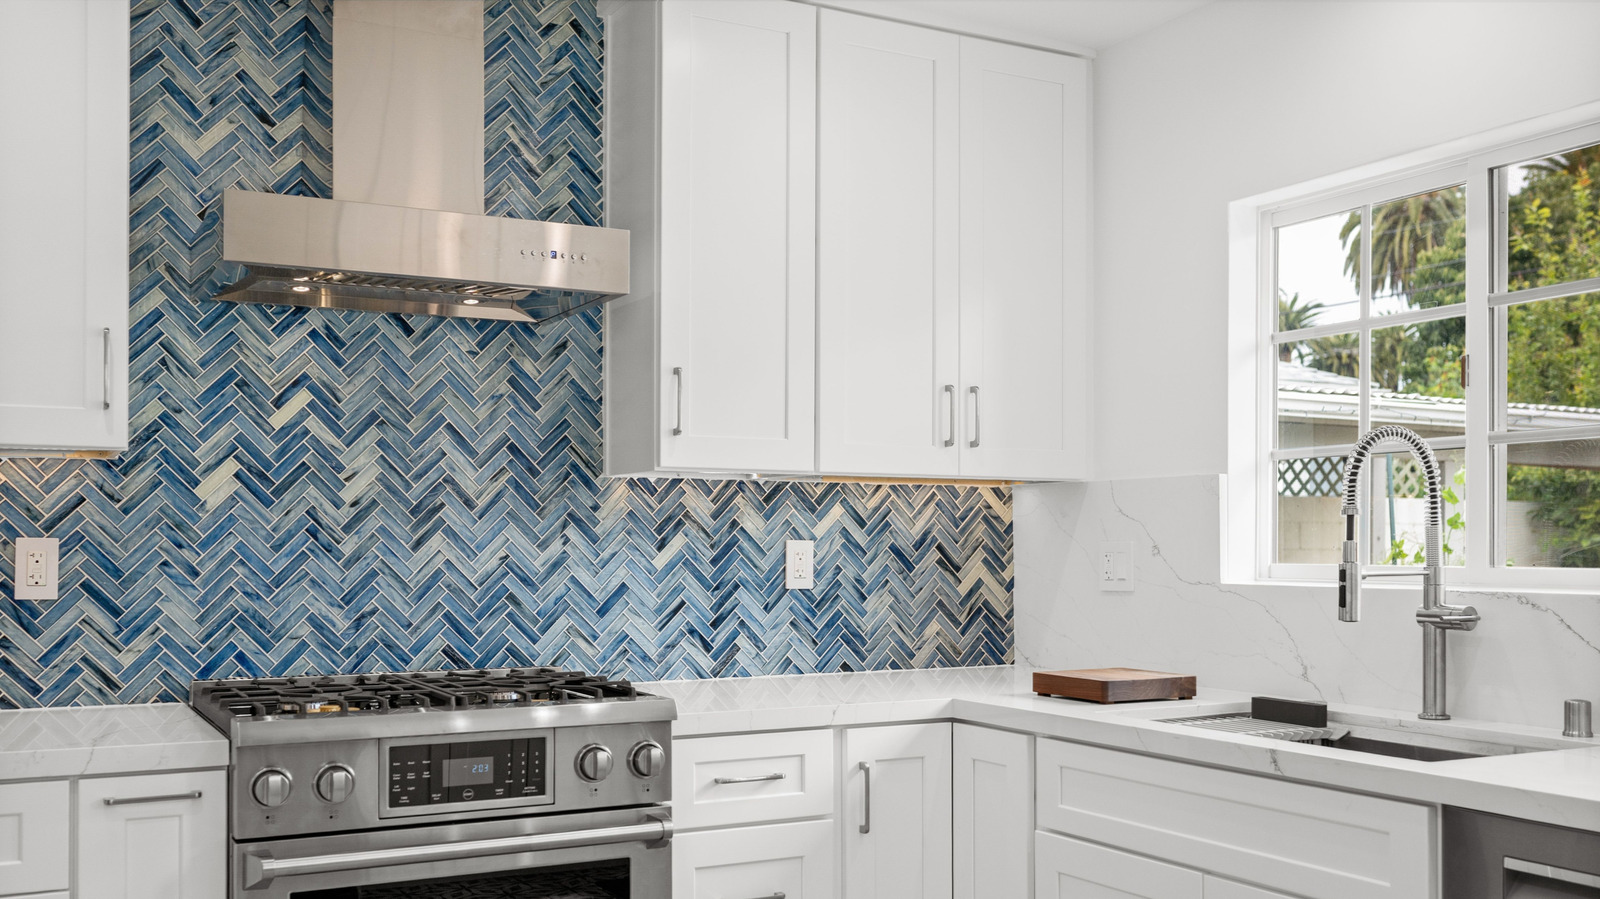
15. Create a Fresh Look with a Blue Herringbone Backsplash
The visual recipe for this kitchen is simple and effective: 60% clean white canvas (cabinets and countertops) + 30% vibrant color and pattern (the blue herringbone tile) + 10% sleek metallic accents (stainless steel appliances and hardware). This formula ensures the space feels bright and airy, but the bold blue backsplash provides a powerful punch of personality. You could easily swap the blue for a deep green or even a warm terracotta, and the kitchen would still work beautifully because the underlying ratio of neutral to color is perfectly balanced. This is a much more colorful take than the all-white version in Idea #13.
|
📋 Copy HEX 🔗 Share |
Love this vibrant, modern look but not the price of mosaic tile sheets? You can get a remarkably similar vibe on a shoestring budget. Check out peel-and-stick backsplash tiles from retailers like Target, Wayfair, or Amazon. Many companies now offer high-quality, realistic herringbone patterns in a range of blues for as little as $5-$10 per square foot. Since it’s a DIY-friendly product, you also save on installation costs. Pair it with white cabinets and affordable silver bar pulls from a hardware store, and you can recreate this entire aesthetic for a few hundred dollars.
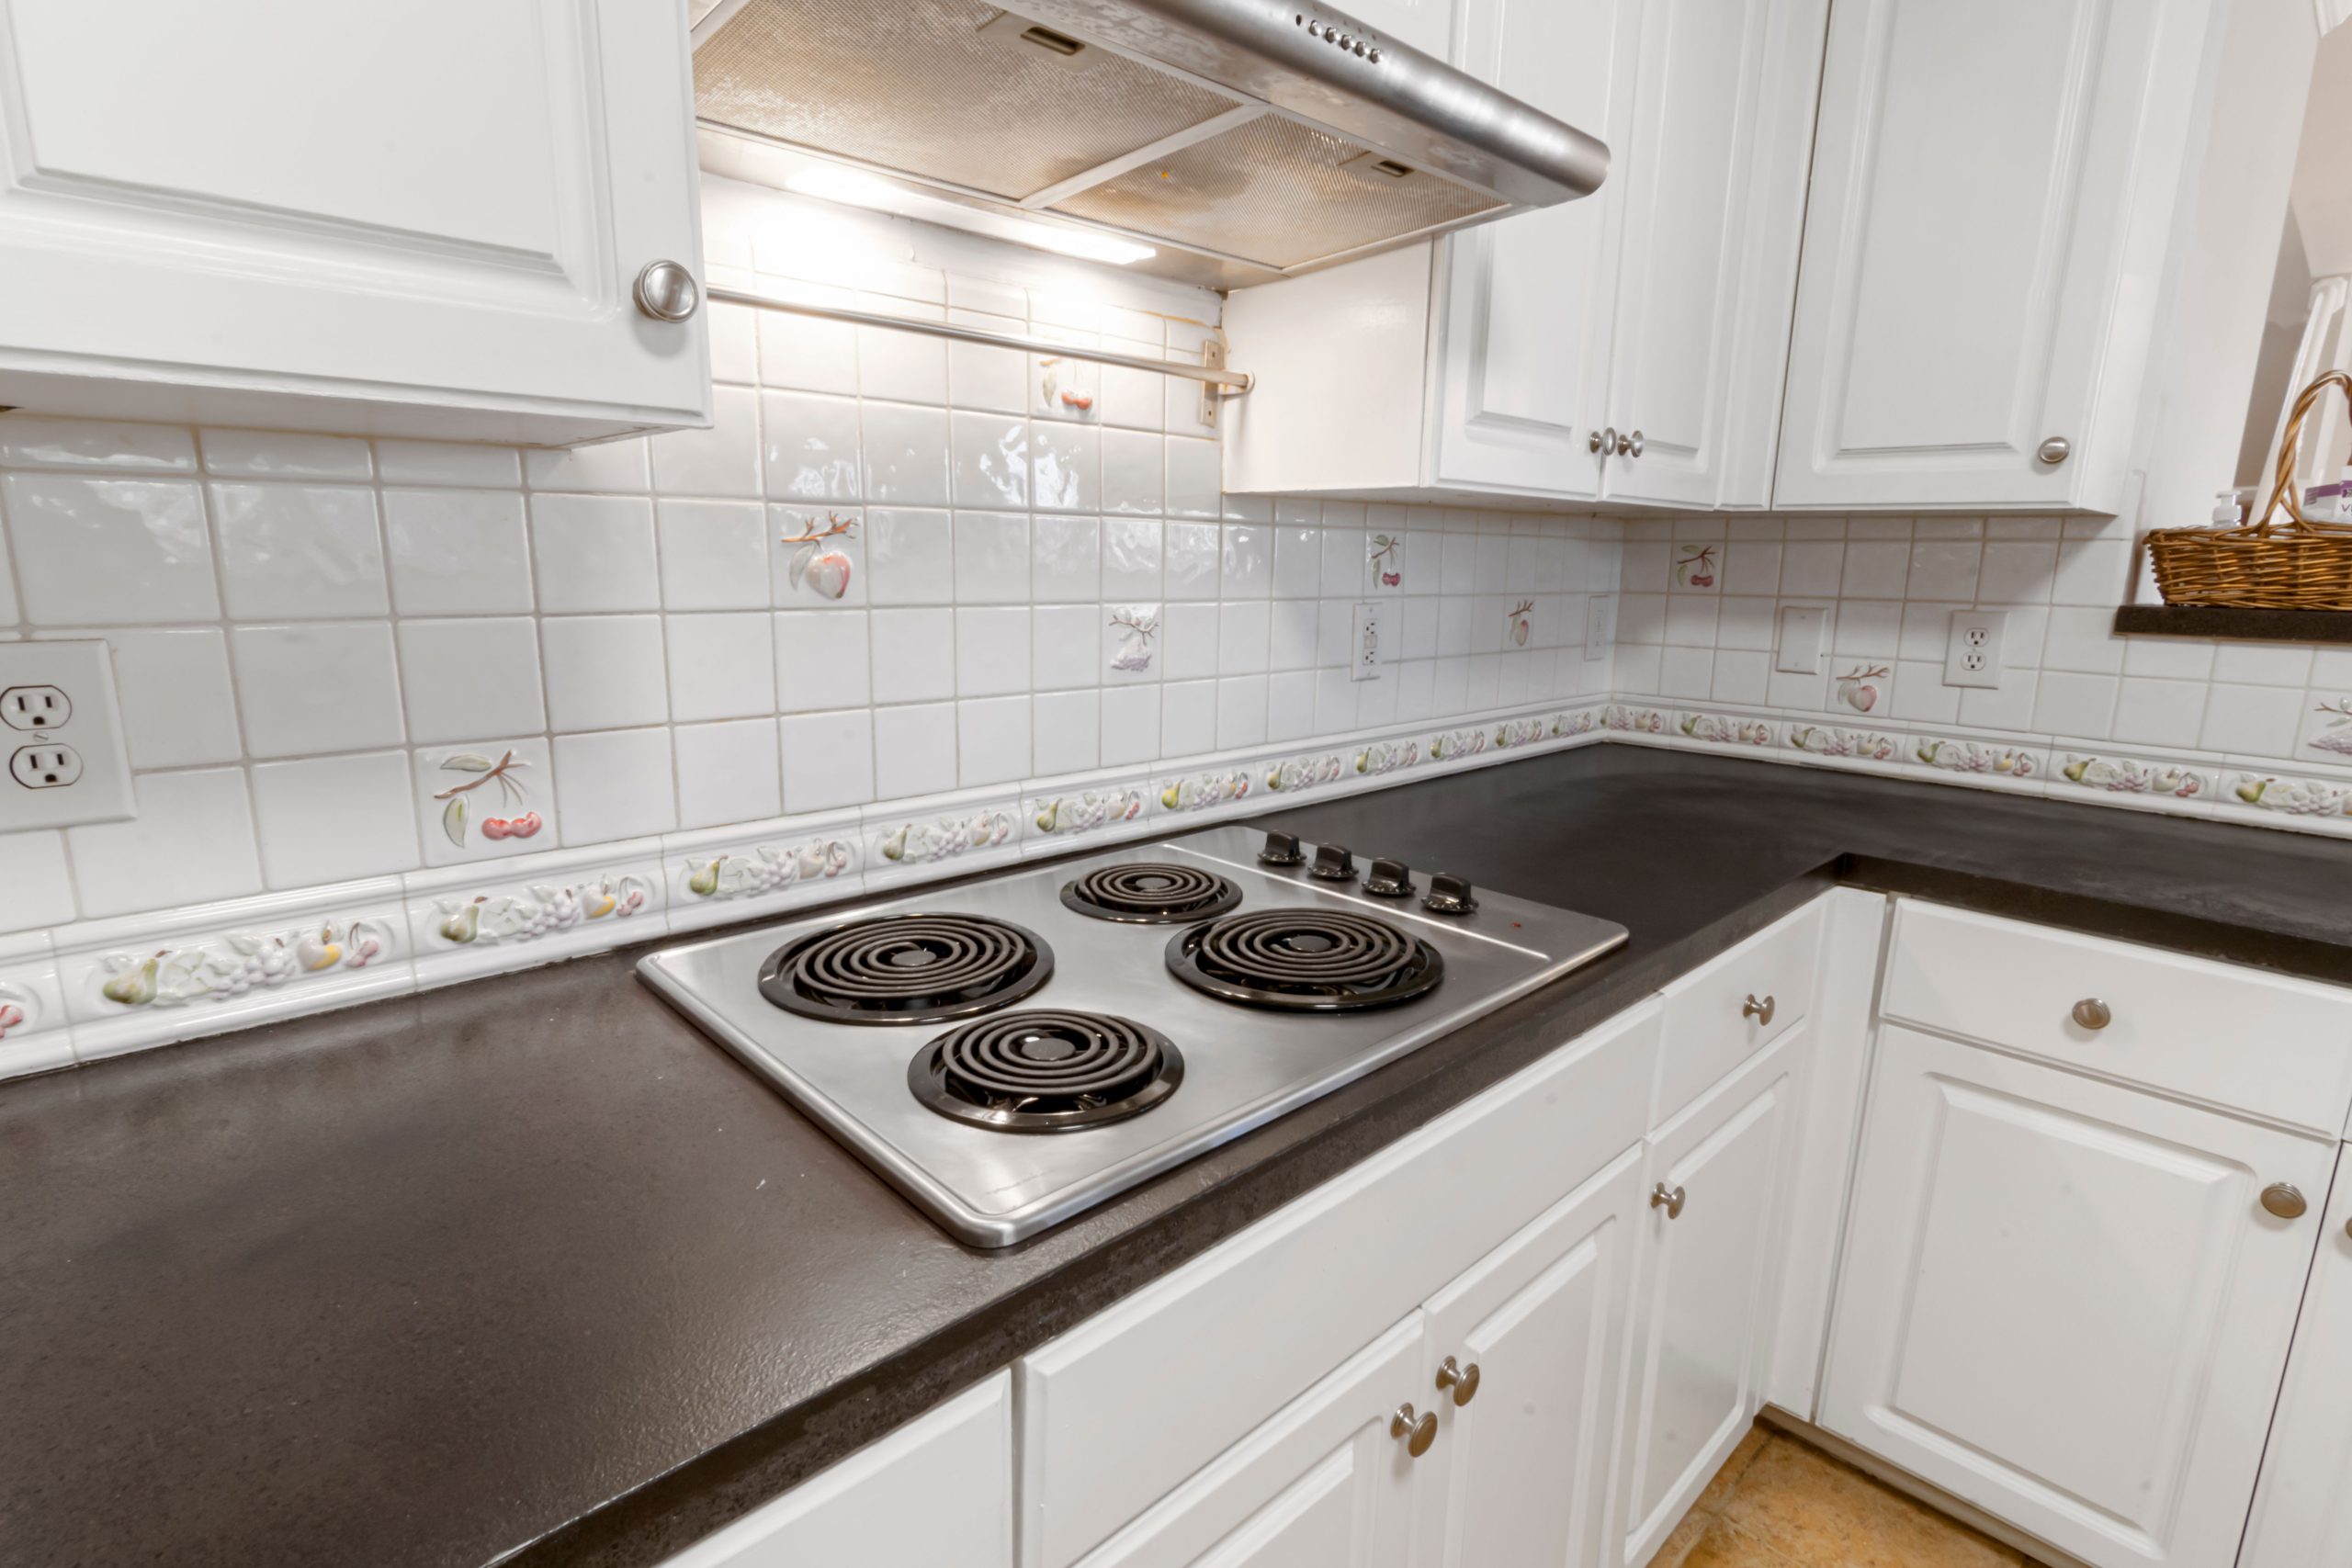
16. Add a Touch of Whimsy with Fruit-Motif Accent Tiles
This backsplash works because it leans into a specific, charmingly traditional style without apology. The combination of simple white square tiles with the raised fruit accents and decorative border creates a look that is unapologetically homey and nostalgic. In a world of sleek, minimalist kitchens, this design stands out for its personality and warmth. The strong contrast with the dark countertop grounds the look and keeps it from feeling overly fussy. It’s a design that doesn’t take itself too seriously, prioritizing charm over fleeting trends.
|
📋 Copy HEX 🔗 Share |
Let’s be real: this look is not for everyone. A decorative fruit motif is a very specific stylistic choice that can feel dated if not executed with care in the right context—a country farmhouse or a traditional-style home. If you’re planning to sell your home in the near future, a highly personalized tile like this might not appeal to the broadest range of buyers. A more neutral choice, like the simple subway tile in Idea #4, would be a safer bet for resale value. But if you love it and plan to stay, then embrace what makes you happy!
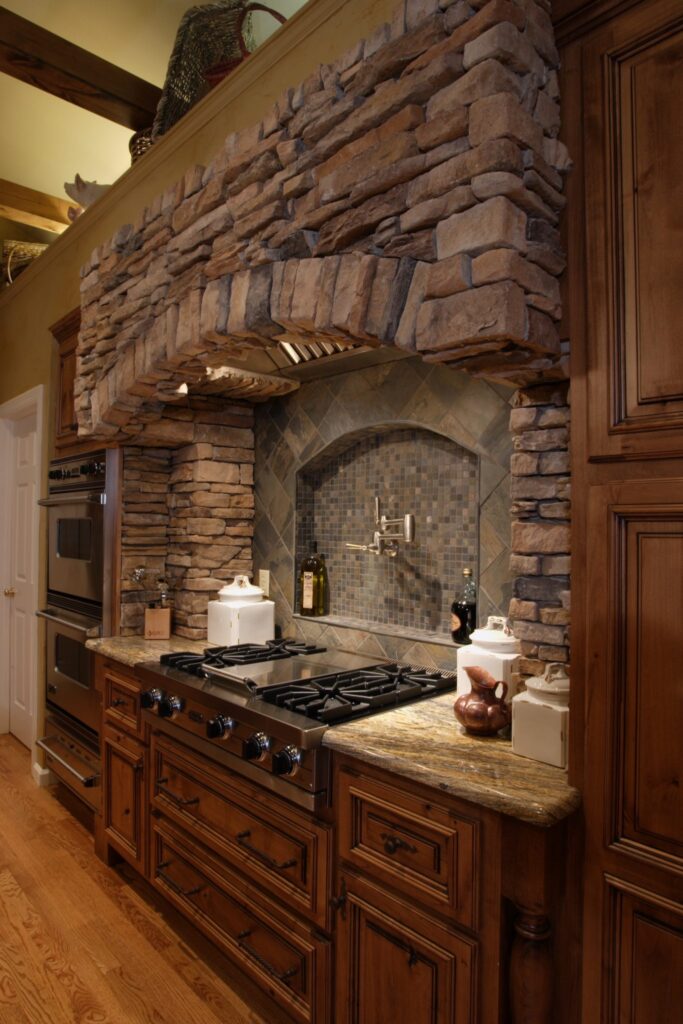
17. Create a Grand Focal Point with a Carved Stone Hood
The massive, carved stone range hood is undeniably the element that defines this entire kitchen. It is architecture as much as it is an appliance feature. This single, substantial piece sets a tone of rustic, old-world permanence that the rest of the kitchen is built around. The arched niche and mixed tile materials within are complementary details, but the stone hood is the undisputed focal point. Removing it would fundamentally change the room’s character from a grand, traditional space to something far more conventional.
|
📋 Copy HEX 🔗 Share |
A feature of this magnitude demands a room with appropriate scale. This idea is best suited for large kitchens with high ceilings (10 feet or more) and a generous overall footprint (at least 250-300 sq. ft.). In a smaller kitchen, a massive stone hood would be physically and visually overwhelming, making the space feel cramped and top-heavy. It also requires a wide cooking area, typically a 48-inch range or larger, to feel properly balanced. For smaller spaces, consider the framed inset technique shown in Idea #6 for a more proportionally scaled focal point.
18. A Clean & Bright Look with a Marble Chevron Backsplash
This design feels so fresh because it balances classic and contemporary elements perfectly. The chevron pattern, an updated cousin of the herringbone, provides a sense of dynamic movement and modern geometry. Using white marble for the tile, however, grounds the look in a classic, luxurious material. This combination of a modern pattern with a timeless material is what gives it such broad appeal. The light gray cabinets and white veined countertop complete the serene, low-contrast palette, making the entire space feel bright, open, and effortlessly chic.
|
📋 Copy HEX 🔗 Share |
When using a marble tile with natural veining in a geometric pattern like a chevron, it pays to be strategic with tile placement. Before your installer begins, lay out the tiles on the floor and arrange them to create the most pleasing flow of veining. Avoid placing tiles with very heavy, dark veins next to those with almost no veining. The goal is to create a balanced, cohesive look where the pattern feels harmonious, not random or patchy. This little bit of extra prep work makes a world of difference in the final result.
19. Achieve Sleek Minimalism with a Marble Backsplash and Black Accents
The formula for this striking minimalist kitchen is all about purity and punctuation. It’s approximately 80% clean white surfaces (flat-panel cabinets and countertop), 15% dramatic natural patterns (the marble slab), and 5% sharp black accents (cooktop and faucet). This high ratio of white creates a gallery-like backdrop, allowing the grey-veined marble to stand out as a piece of art. The carefully placed black elements then act as graphic focal points, adding definition and a touch of severity that is quintessentially modern.
|
📋 Copy HEX 🔗 Share |
The single element that makes this modern kitchen work is the use of stark black accents against the otherwise all-white and marble palette. The black induction cooktop and the sculptural black gooseneck faucet are not just functional; they are crucial design elements. They provide a strong visual anchor and a necessary point of contrast that keeps the sea of white from feeling bland or one-note. Imagine them in stainless steel—the effect would be significantly less impactful. The black is the confident, graphic choice that gives the space its edge.
20. Highlight a White Herringbone Backsplash with Lighting
This design’s success stems from its subtle and effective use of layering. The first layer is the timeless white herringbone tile, which provides quiet texture and pattern. The second, and most crucial, layer is the under-cabinet lighting. The warm light washes down the tiled wall, grazing the surface and making the herringbone pattern pop. It transforms the backsplash from a simple background element into a thoughtful, illuminated feature. This interplay between texture and light is what gives the space a warm, contemporary, and high-end feel.
|
📋 Copy HEX 🔗 Share |
Installing LED under-cabinet lighting is a project that dramatically changes your kitchen’s ambiance. Here’s a brief guide:
- Choose Your Light: Select a dimmable LED tape light kit. Aim for a warm white color temperature (2700K-3000K) for a cozy glow.
- Prep the Surface: Thoroughly clean the underside of your upper cabinets where the light strip will be placed.
- Install the Track (Optional): For a more diffused look, mount a shallow channel with a frosted cover first, then place the LED strip inside.
- Adhere the Strip: Peel the backing off the LED tape and press it firmly onto the cabinet or into the channel.
- Connect to Power: Plug the transformer into a nearby outlet. Use small clips to hide wires neatly along the cabinet edges. Many kits are now plug-and-play, but a hardwired solution by an electrician is the cleanest option.
Time Estimate: 1-3 hours. Cost: $50 – $200.
21. Create Scandinavian Contrast with White Tile and Wood Cabinets
This kitchen perfectly captures the Scandinavian design ethos with its simple, balanced formula: 50% warm natural wood + 40% crisp white + 10% black accents. The light-toned wood of the base cabinets brings in natural warmth and texture. The elongated white subway tile and white upper cabinets provide a bright, clean canvas that maximizes light. Finally, the black hardware and oven details act as graphic punctuation marks, adding a touch of modern contrast that keeps the palette feeling intentional and sharp. It’s a clean, functional, and effortlessly stylish combination.
|
📋 Copy HEX 🔗 Share |
When mixing cabinet finishes, a good rule of thumb is to keep the darker or heavier material on the bottom. Placing the warm wood base cabinets below and the light white upper cabinets on top makes the space feel more open and airy. This arrangement grounds the room without weighing it down. If you were to reverse it, with wood uppers and white lowers, the kitchen would feel top-heavy and the ceiling would appear lower. This simple visual trick is key to making a two-tone kitchen feel balanced.
22. Elevate a Herringbone Backsplash with a Gold Trim Accent
The single detail that elevates this entire kitchen from simply ‘nice’ to ‘designer chic’ is the thin horizontal gold trim band. It’s a small but incredibly impactful gesture. It acts like a piece of jewelry for the wall, providing a clean, crisp separation between the white herringbone tile and the taupe wall above. This sliver of metallic warmth coordinates perfectly with the cabinet hardware and framed prints, tying the whole look together and giving it a polished, custom-finished feel that belies the simplicity of the materials.
|
📋 Copy HEX 🔗 Share |
You don’t need a high-end tile job to incorporate this chic detail. You can achieve this look with a simple peel-and-stick solution. Once you have your main backsplash installed (whether it’s tile or a peel-and-stick panel), you can buy metallic vinyl tape or a thin, self-adhesive metal trim online for under $20. Carefully apply it along the top edge of your backsplash for that same sharp, metallic accent line. It’s a low-cost, high-impact detail that looks incredibly expensive.
23. Make a Statement with Swirling Green Marble
This kitchen is a masterclass in controlled maximalism. The success lies in the fearless, full-throttle commitment to the swirling green marble. By using this incredibly bold, painterly stone for both the countertops and the full-height backsplash, the design creates an immersive, nature-inspired experience. The flat-panel cream cabinetry and simple hardware are intentionally understated, refusing to compete with the stone. This allows the marble’s dramatic movement and rich color variations to be the one and only star of the show. It’s a confident decision that pays off in spades.
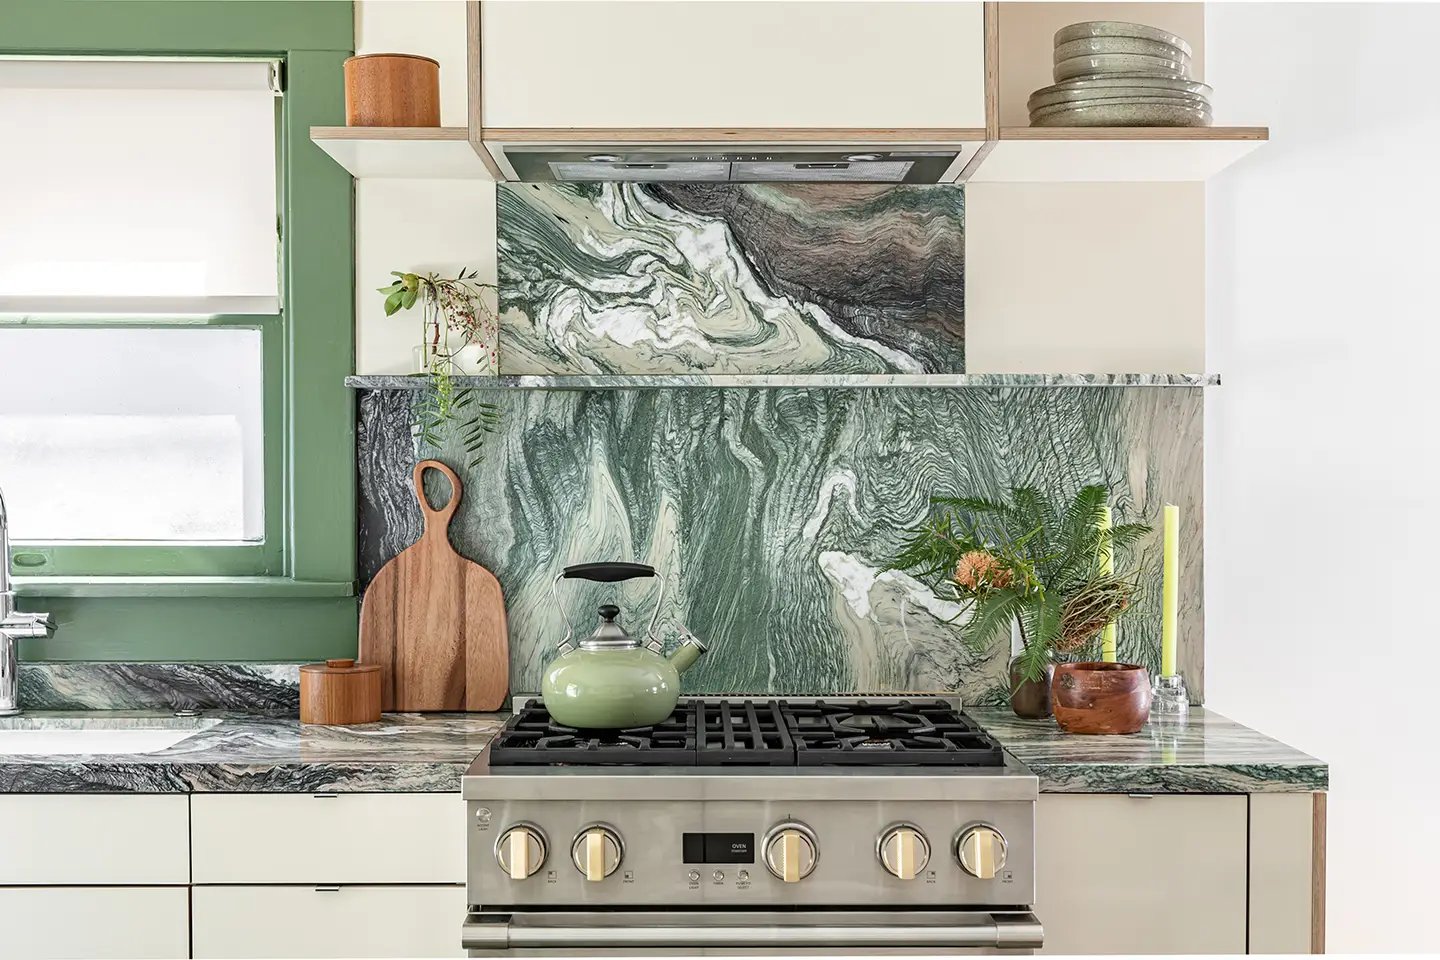
|
📋 Copy HEX 🔗 Share |
A marble this distinctive is a forever commitment. While its beauty is undeniable, its pattern is so specific and memorable that it might not appeal to all potential buyers if you sell your home down the line. It’s also a choice that dictates all other decor decisions—your dishware, your countertop appliances, and your textiles will all need to coexist with this powerful green statement. If you are someone who loves to redecorate often, you might feel limited by such a dominant, unchangeable feature. For a similar color vibe with more flexibility, check out the picket tiles in Idea #5.
24. Mix Materials: A Marble Slab with Herringbone Tile Sides
This is a brilliant way to get the luxe look of a full marble slab without the full cost. By using a show-stopping slab of veined marble only in the most visible area—directly behind the range—you create a powerful focal point. You then fill in the surrounding backsplash areas with a more affordable but still elegant white herringbone subway tile. The key to making this work is ensuring both materials share the same color family. The white of the subway tile perfectly matches the white base of the marble, creating a cohesive and intentional look, not a

|
📋 Copy HEX 🔗 Share |
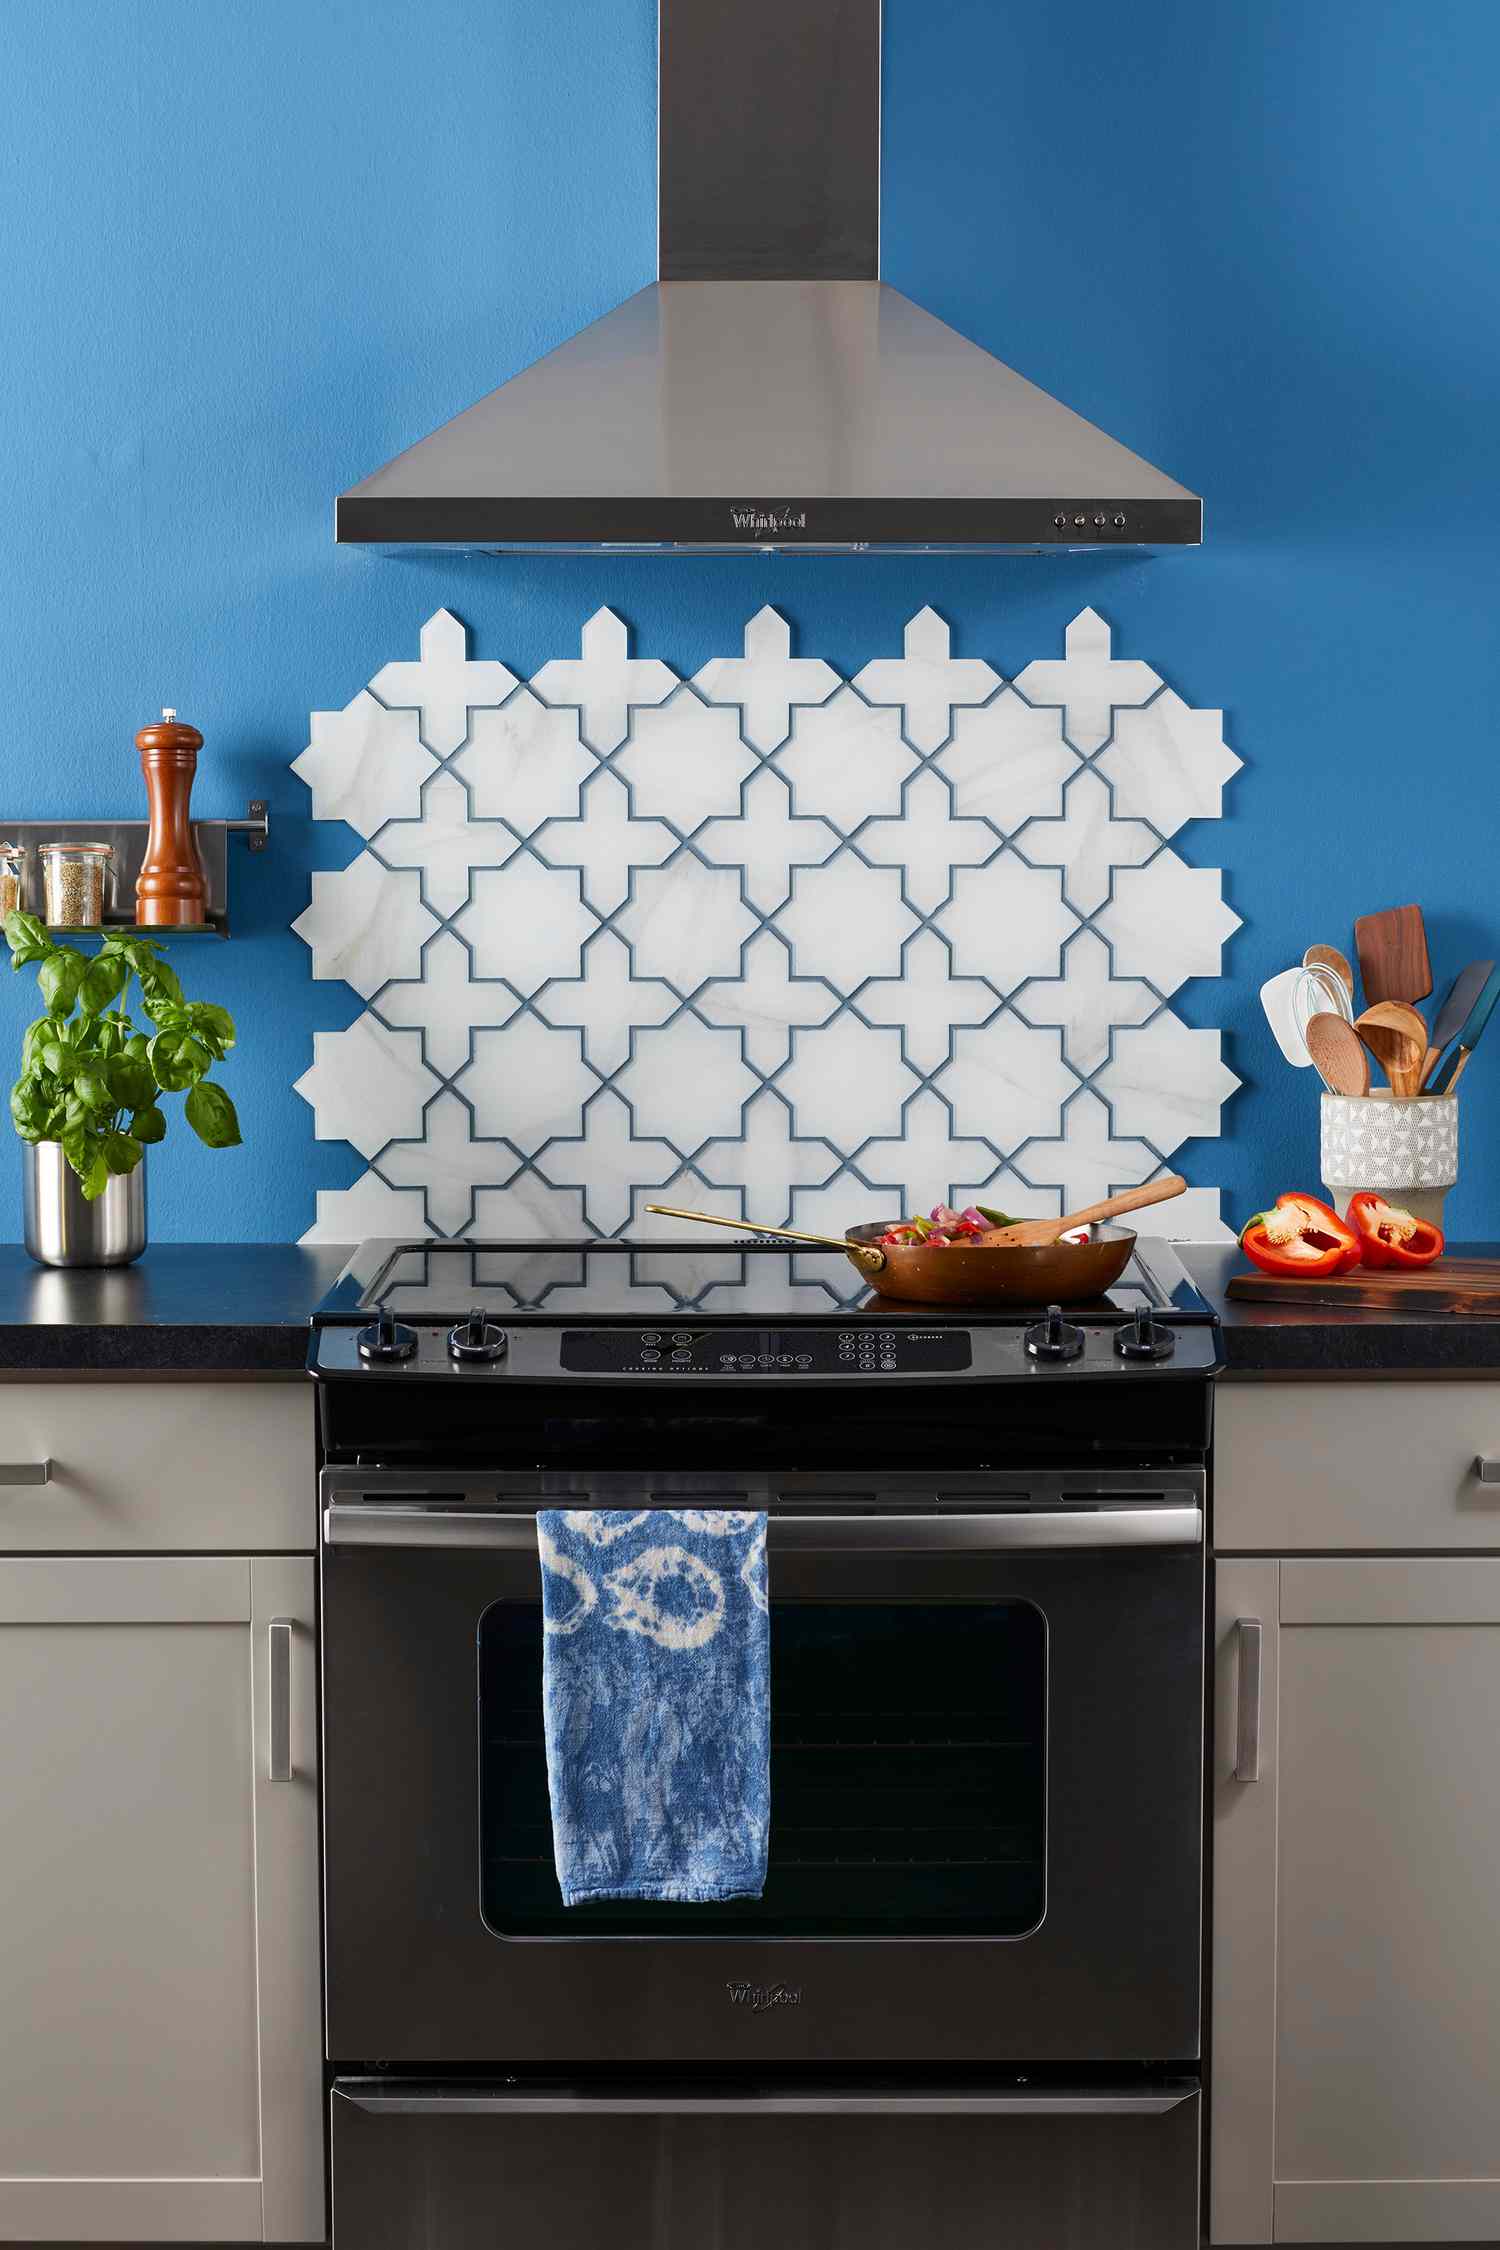
25. A Modern Look with a Marble Picket Mosaic Backsplash
The strength of this design lies in its mix of soft and sharp elements. The picket fence shape of the marble mosaic tiles offers a clean, geometric pattern that feels structured and modern. However, because it’s made of white marble with soft grey veining, the overall effect is softened and feels luxurious rather than severe. This is then contrasted with the dark, matte finish of the floating shelves and lower cabinets, which ground the space and add a touch of drama. The balance between the light, patterned wall and the dark, solid elements is what makes it so visually compelling.
|
📋 Copy HEX 🔗 Share |
A full-height tile wall is a big commitment, so it’s smart to plan ahead. Here’s what to check off your list before you start tiling:
- Have you finalized your shelf and range hood placement? Mounting hardware directly onto a tiled wall needs to happen at the time of installation, with proper support behind the tile. It’s very difficult to change your mind later.
- Is your wall perfectly flat? Minor bumps or dips in the wall will be exaggerated by a geometric tile pattern. A skim coat of plaster may be needed first.
- Did you order enough tile? For a mosaic with a distinct pattern, always order at least 15% extra to account for cuts, mistakes, and ensuring the veining looks balanced.
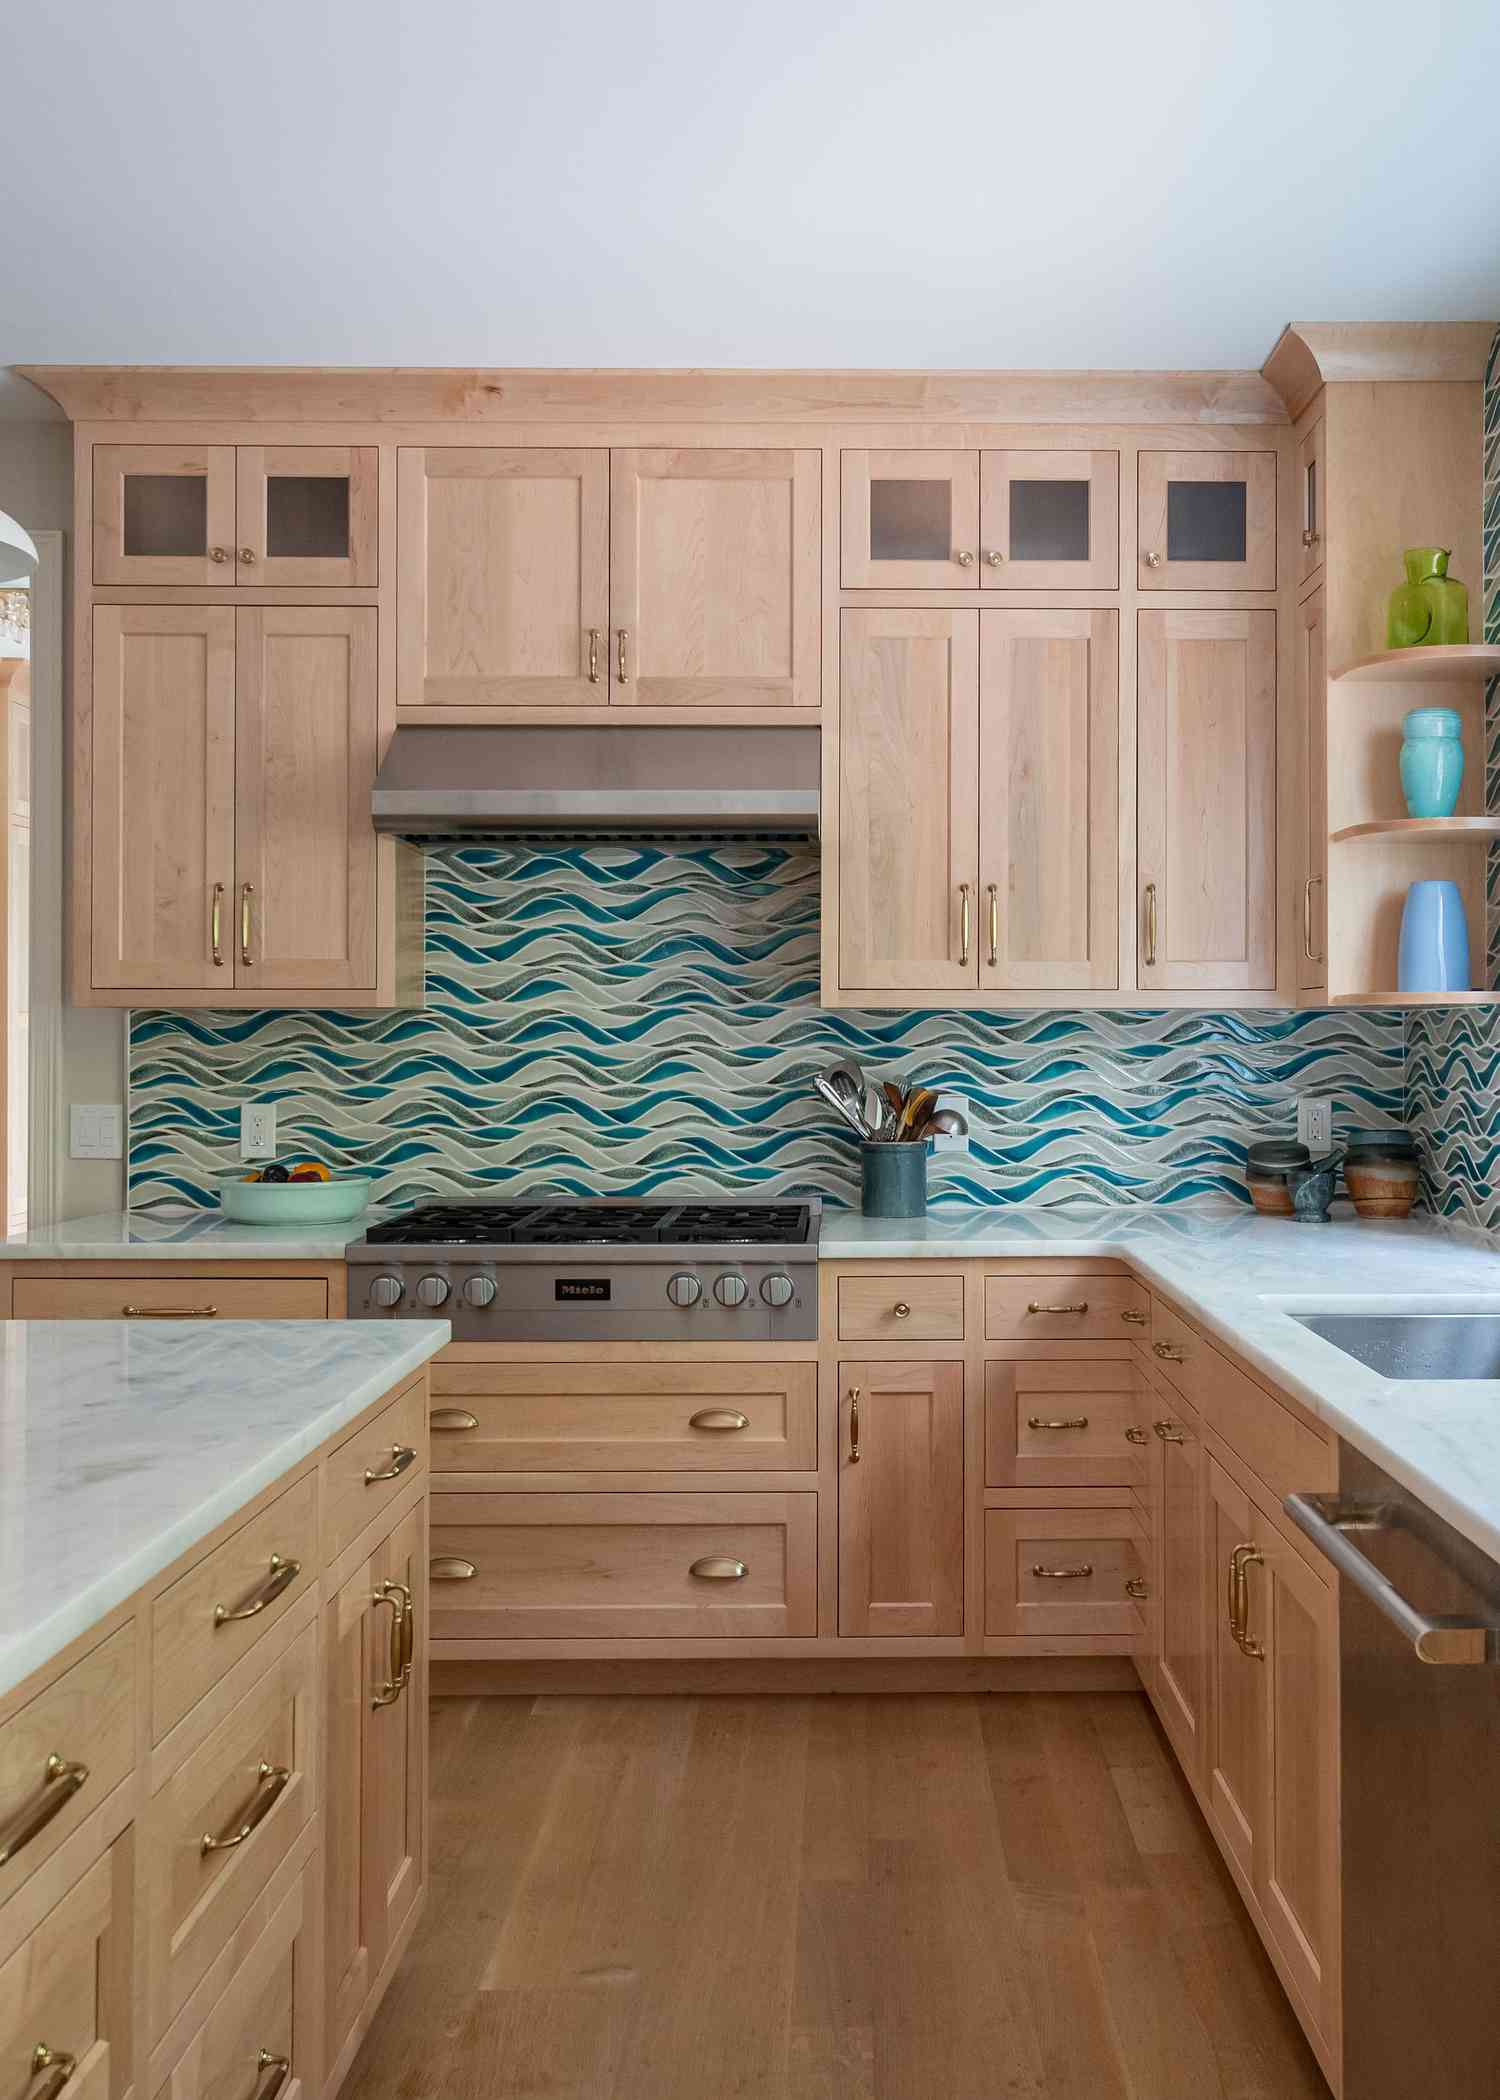
26. Create a Dynamic, Wavy Backsplash with Mosaic Tiles
The absolute showstopper here is the wavy, water-like mosaic tile backsplash. The undulating pattern and the blend of teal, grey, and white create a sense of movement that is completely captivating. It transforms a simple backsplash into a dynamic piece of art. The design is a bold choice that infuses the kitchen with energy and a unique, organic texture. Paired with the warmth of the light wood cabinets and the gleam of brass hardware, it strikes a perfect balance between natural and glamorous. This is a far more organic take on a mosaic than the structured pattern in Idea #28.
|
📋 Copy HEX 🔗 Share |
A mosaic tile with this much texture and a multitude of grout lines requires a bit of extra thought, especially behind a stove. Grease splatters can be tougher to clean from the small grooves and detailed texture compared to a flat slab. Sealing the grout is absolutely essential to prevent staining. When wiping it down, you’ll want to use a soft cloth or sponge and a non-abrasive cleaner to avoid damaging the delicate tiles or pulling at the grout. It’s a higher-maintenance choice than a simple subway tile, but the visual payoff is immense.
27. A Pop of Color with a Blue Picket Tile Backsplash
This kitchen’s cool, contemporary vibe comes from a well-balanced formula: 50% calm, neutral gray (cabinets and countertop) + 30% vibrant color (the blue picket tiles) + 20% sleek silver and black accents (appliances and hardware). The gray provides a modern, sophisticated base that isn’t as stark as white. This allows the shiny teal-blue backsplash to truly pop, becoming the undeniable focal point. The black handles add a final touch of graphic definition. It’s a modern and replicable recipe for adding personality without overwhelming the space.

|
📋 Copy HEX 🔗 Share |
That gorgeous picket tile can be pricey, but you can get this look for much less. Search for ‘picket peel-and-stick backsplash’ on sites like Wayfair or Amazon. You can find surprisingly realistic and durable options for around $7-$12 per square foot. Pair them with affordable light gray shaker cabinets from a big-box store like The Home Depot. For the countertop, a laminate in a mottled gray or black from IKEA will give you the same effect as stone for about 80% less cost. The look is in the color and shape, not the material’s price tag.
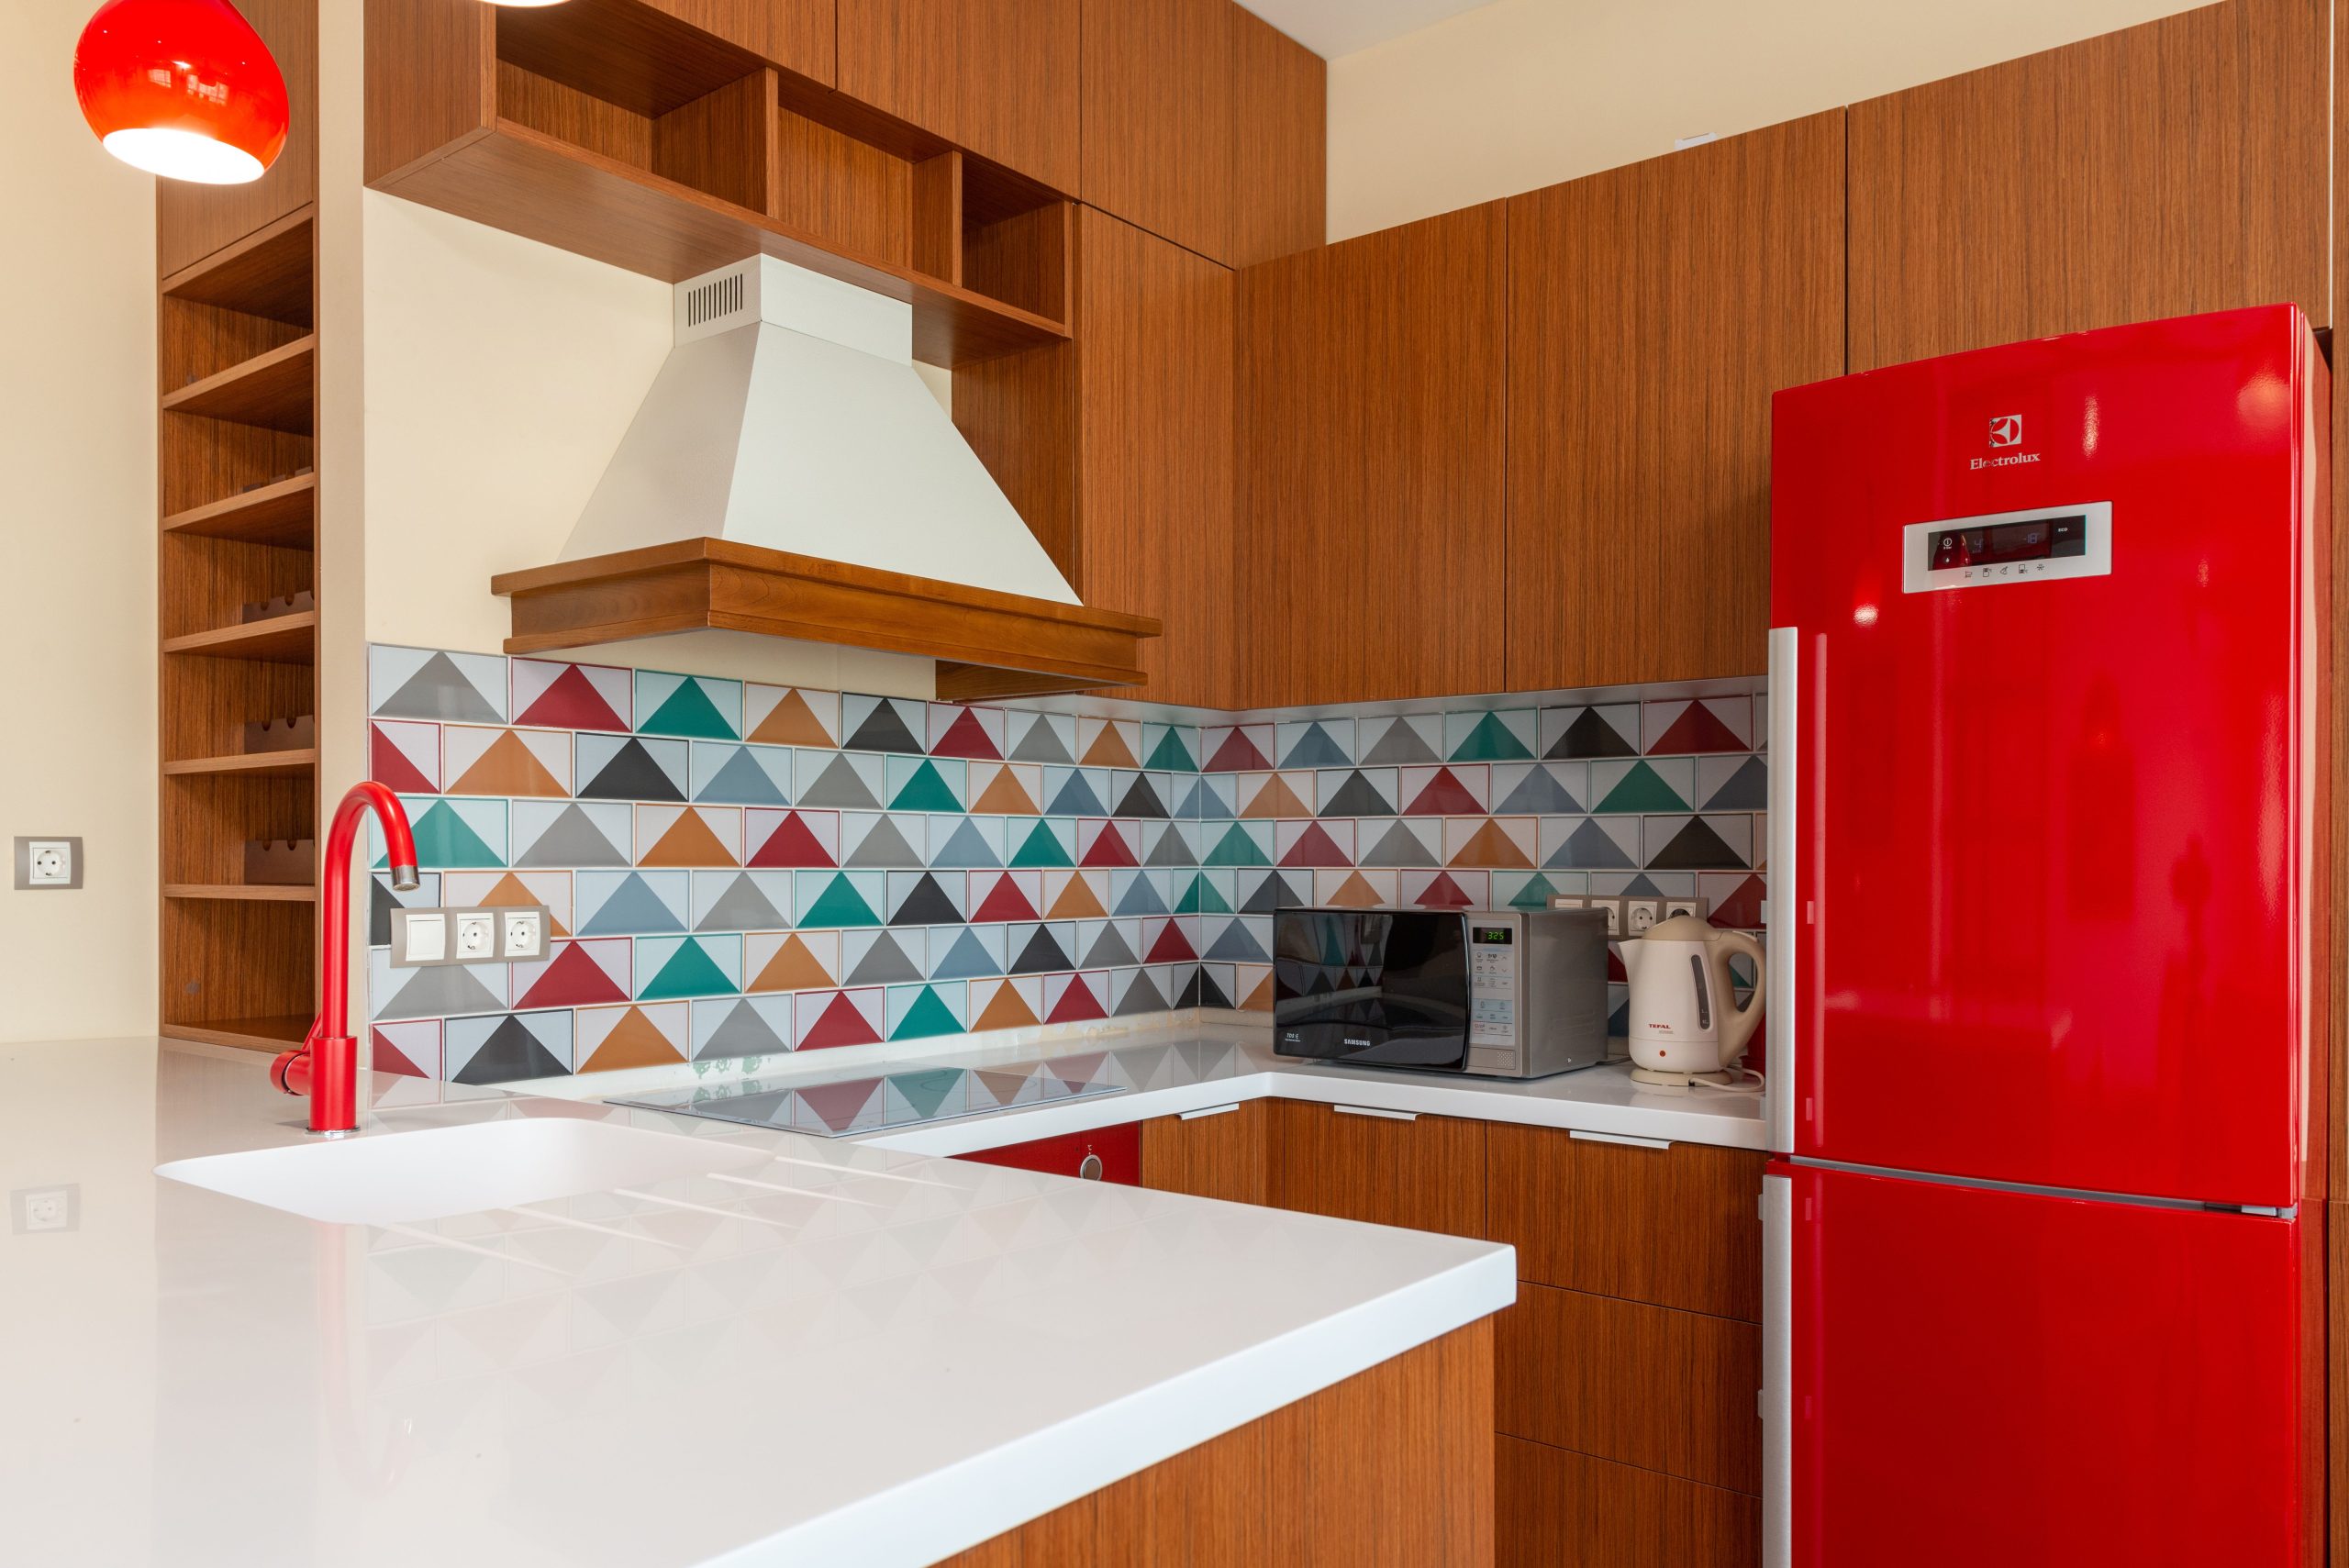
28. Embrace Playful Modernism with a Geometric Triangle Tile
The single element that defines this kitchen’s joyful and eclectic spirit is the geometric triangle tile backsplash. The playful mix of orange, teal, white, and wood tones in a dynamic pattern is a fearless design choice. It radiates energy and personality. Paired with a bold red refrigerator and warm wood cabinets, it signals a homeowner who isn’t afraid of color. Removing this tile would erase the room’s entire story; it’s the heart of this vibrant, modern space and what makes it truly unforgettable.
|
📋 Copy HEX 🔗 Share |
This design works because it follows the ‘Rule of Three’ in its energy level. You have three bold elements: the colorful backsplash, the reddish-brown wood cabinets, and the bright red refrigerator. They all operate at the same high-vibrancy level, so they feel like a cohesive family of choices rather than one random oddball. The clean white countertops and simple hood then provide the necessary ‘visual resting place,’ a calm zone that keeps the three main stars from descending into total chaos. It’s a carefully balanced act of high energy and quiet support.
29. Use Bold Grout to Create a Moroccan-Inspired Pattern
This is a fantastically clever and budget-friendly way to create a high-impact graphic backsplash. The tiles themselves are simple, geometric marble shapes, but the magic happens with the grout. By choosing a vibrant blue grout that contrasts sharply with the white marble and matches the surrounding wall paint, the grout lines themselves form the pattern. This technique, called a ‘reverse mosaic,’ puts the focus on the negative space, creating a custom Moroccan-inspired look for the cost of a bag of colored grout.
|
📋 Copy HEX 🔗 Share |
While colored grout is a brilliant design tool, be aware that lighter, vibrant colors like this blue can be prone to staining, especially behind a stove where oil and sauces can splash. Using a high-performance, stain-resistant epoxy or urethane grout is an absolute must. You’ll also want to be diligent about cleaning it. Some people find that any discoloration over time is more noticeable on a bright color than it would be on a standard gray or white grout. It’s a stunning look, but it requires the right materials and consistent upkeep.
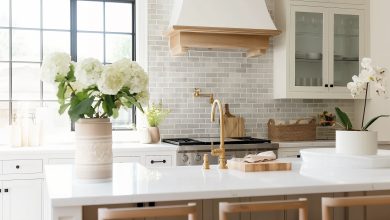
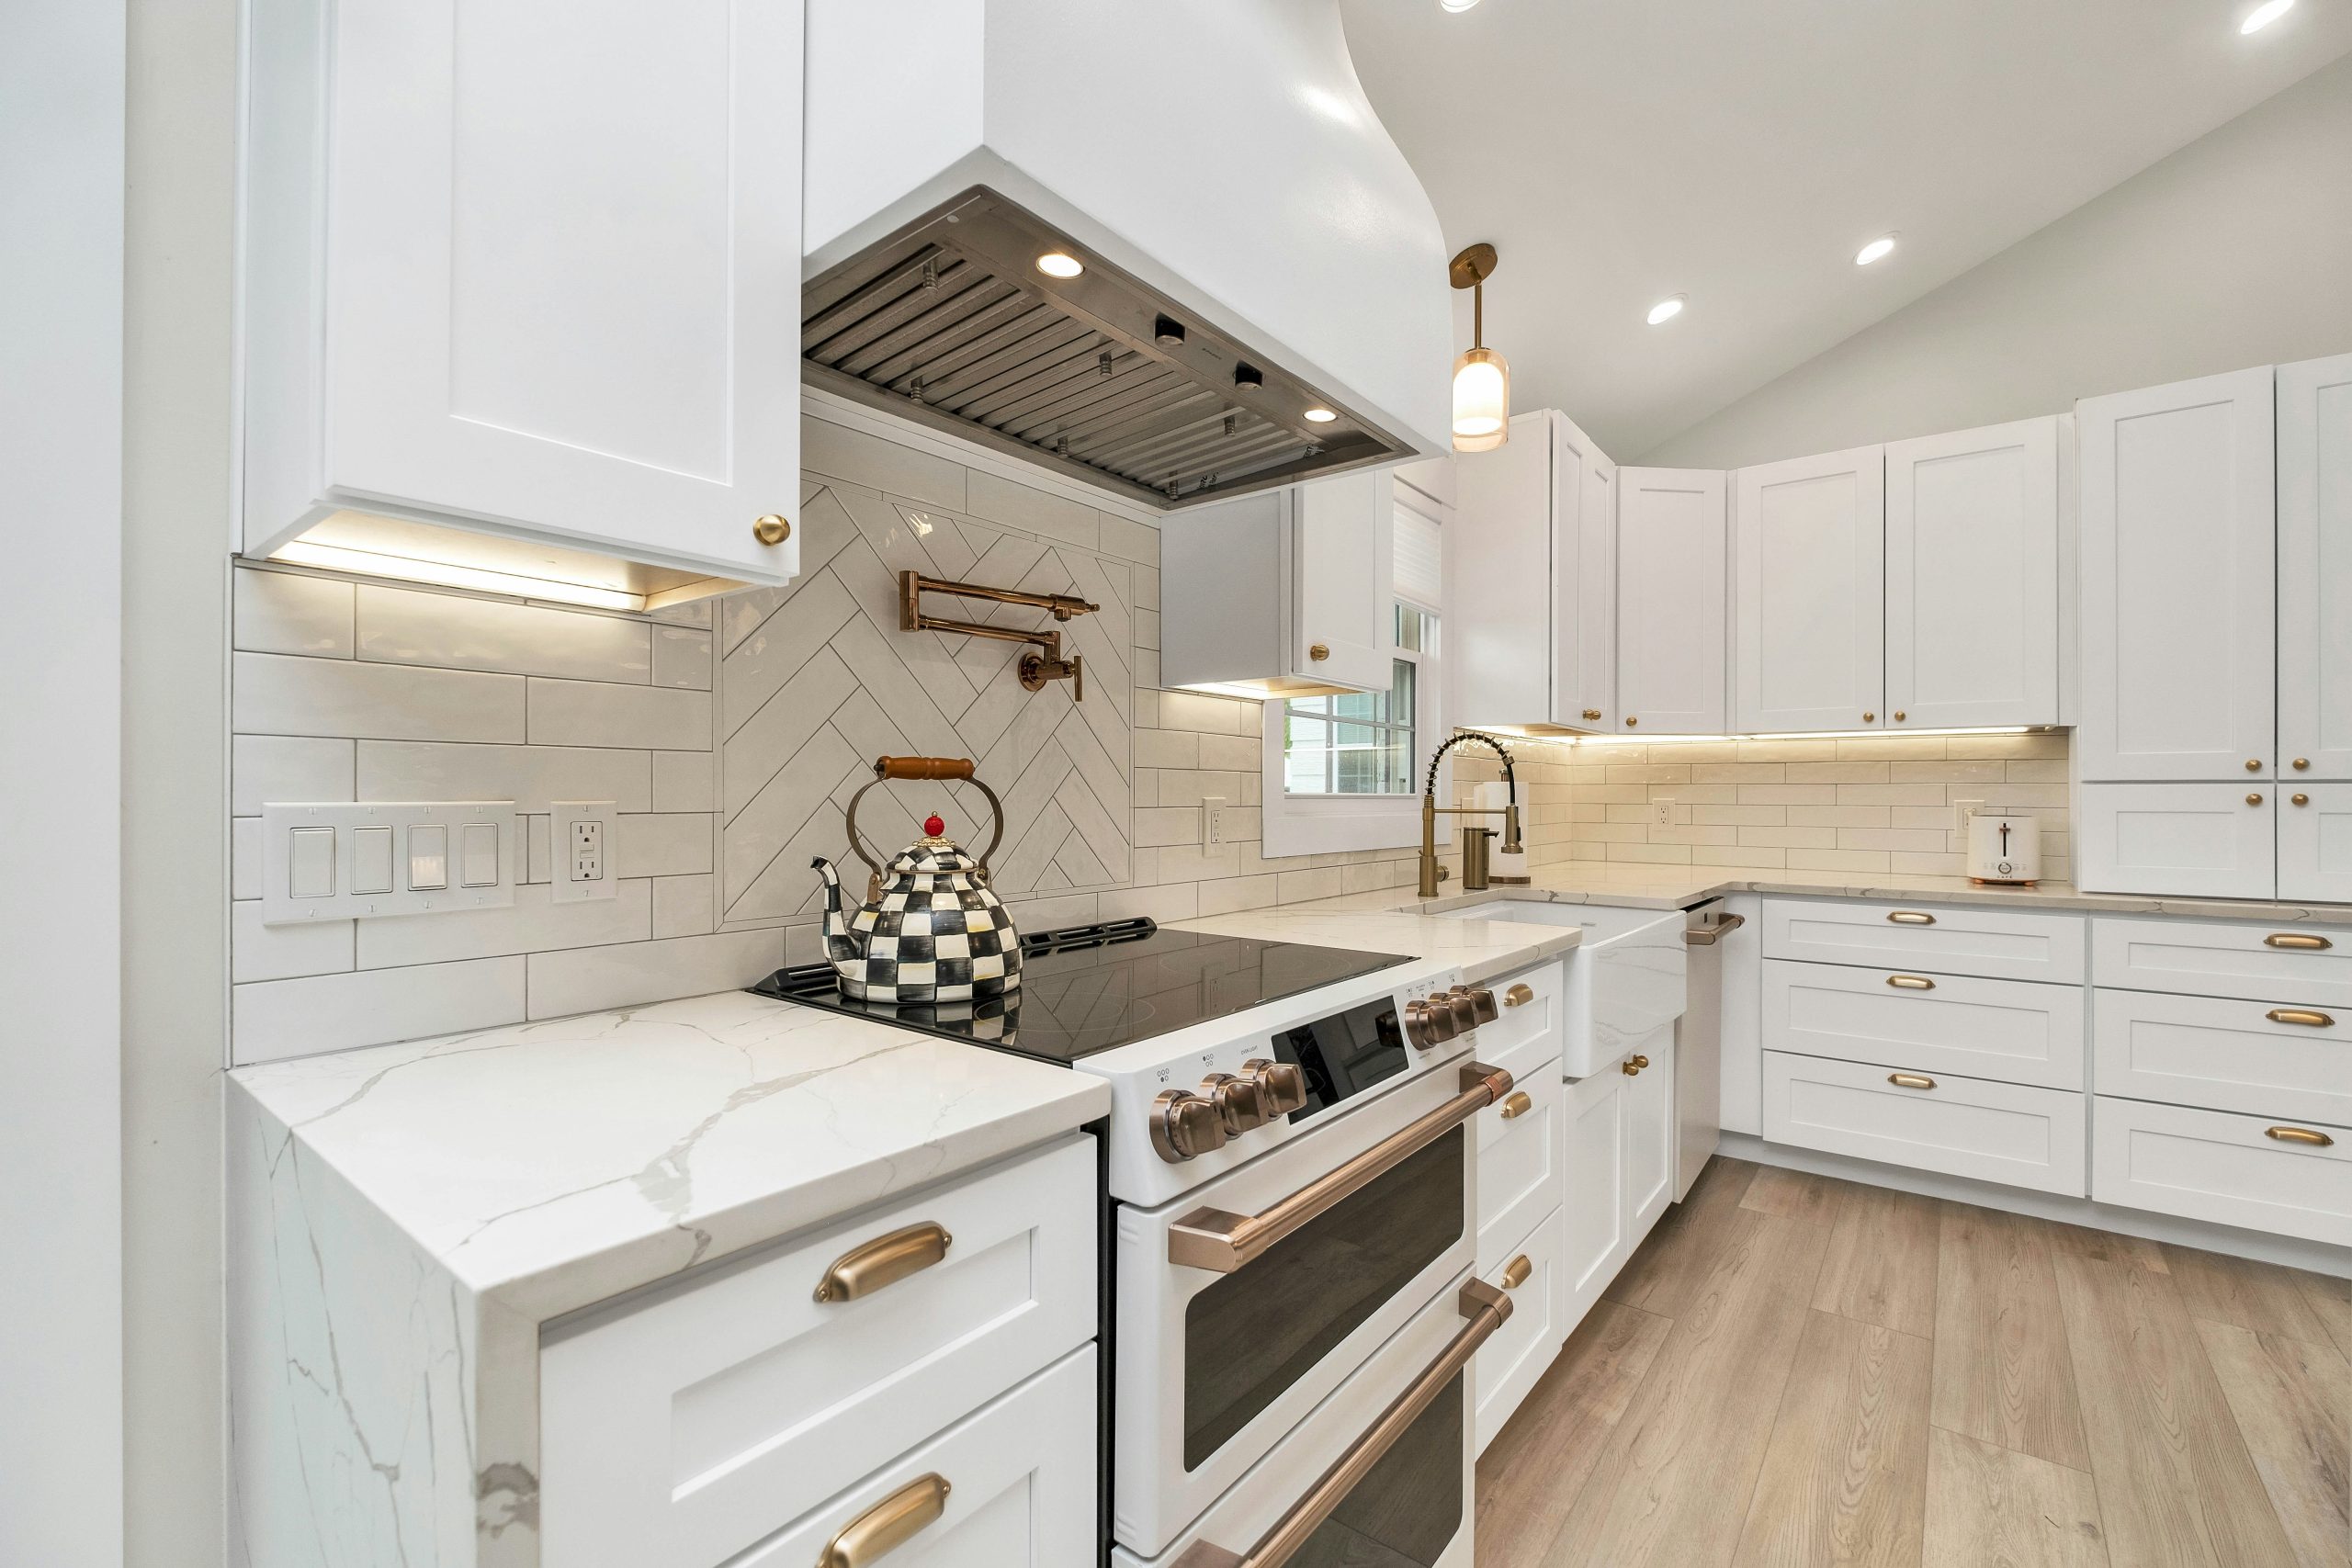
30. A Classic Look with White Shaker Cabinets and Gold Accents
This kitchen feels so timelessly elegant because it flawlessly executes a classic design strategy: a neutral, textured foundation accented with warm metallics. The white shaker cabinets and subtly veined quartz countertops create a bright, clean canvas. The herringbone tile pattern behind the stove adds a layer of sophisticated texture without introducing a loud color. Then, the gold-toned fixtures—the hardware, pot filler, and faucet—are layered on top like jewelry. This touch of gold adds warmth and a sense of luxury that elevates the entire space.
|
📋 Copy HEX 🔗 Share |
This elegant look is more attainable than it might seem. The key is in the details, not necessarily in big-ticket items. You can find great quality shaker cabinets at big-box stores, and the tile is often a very affordable ceramic or porcelain.
- White Shaker Cabinets (for a standard 10×10 kitchen): $3,000 – $8,000
- Subway & Herringbone Tile: $300 – $800
- Quartz Countertops: $3,500 – $6,000
- Gold Hardware & Fixtures: $500 – $1,500
- TOTAL: $7,300 – $16,300
Budget alternative: Use a high-quality laminate countertop and source fixtures from Amazon to bring the total cost down by 40-50%.
Your Kitchen’s Main Character Moment
That’s a lot of inspiration to soak in, but the perfect backsplash is all about what makes you happy every time you step into your kitchen. Whether you’re drawn to a serene marble slab or a pop of playful patterned tile, the right choice is waiting to become the focal point of your home. Ready to start your own inspiration board? Head over to Pinterest and get saving!