You know that feeling when you finally find the cheap backsplash idea that looks exactly right for your space, but then you question if it can actually look high-end? It absolutely can. A great backsplash doesn’t need a huge budget, just a great idea. We spent serious time sorting through trends and materials at places like Home Depot, Lowe’s, and even Etsy to find what truly works. We’ve filtered through hundreds of options to bring you projects that can range from a quick $30 update to a more involved weekend project.
Inside, we’ve curated 28 distinct and affordable backsplash ideas that cover styles from sleek modern to classic farmhouse and bold geometric. For 2026, it’s all about achieving a premium look without the premium price, driven by a wave of clever DIY solutions and peel-and-stick innovations that are genuinely impressive. And stay until the end — we break down the most common mistakes that can ruin these budget-friendly looks.
📌 Save this to Pinterest for later — you’ll want to revisit these ideas.
1. Achieve a Luxe Look with Large Format Marble-Look Tile
This look feels so expensive for one primary reason: minimal grout lines. Using large-format tiles creates a nearly seamless surface that mimics a solid slab of marble, which would cost a fortune. The soft, grey veining provides that elegant, natural pattern without overwhelming the space. It’s a classic choice that reflects a ton of light, making your entire kitchen feel brighter and bigger. It works beautifully here by extending from the countertop all the way up to the range hood for a fully integrated, custom look.
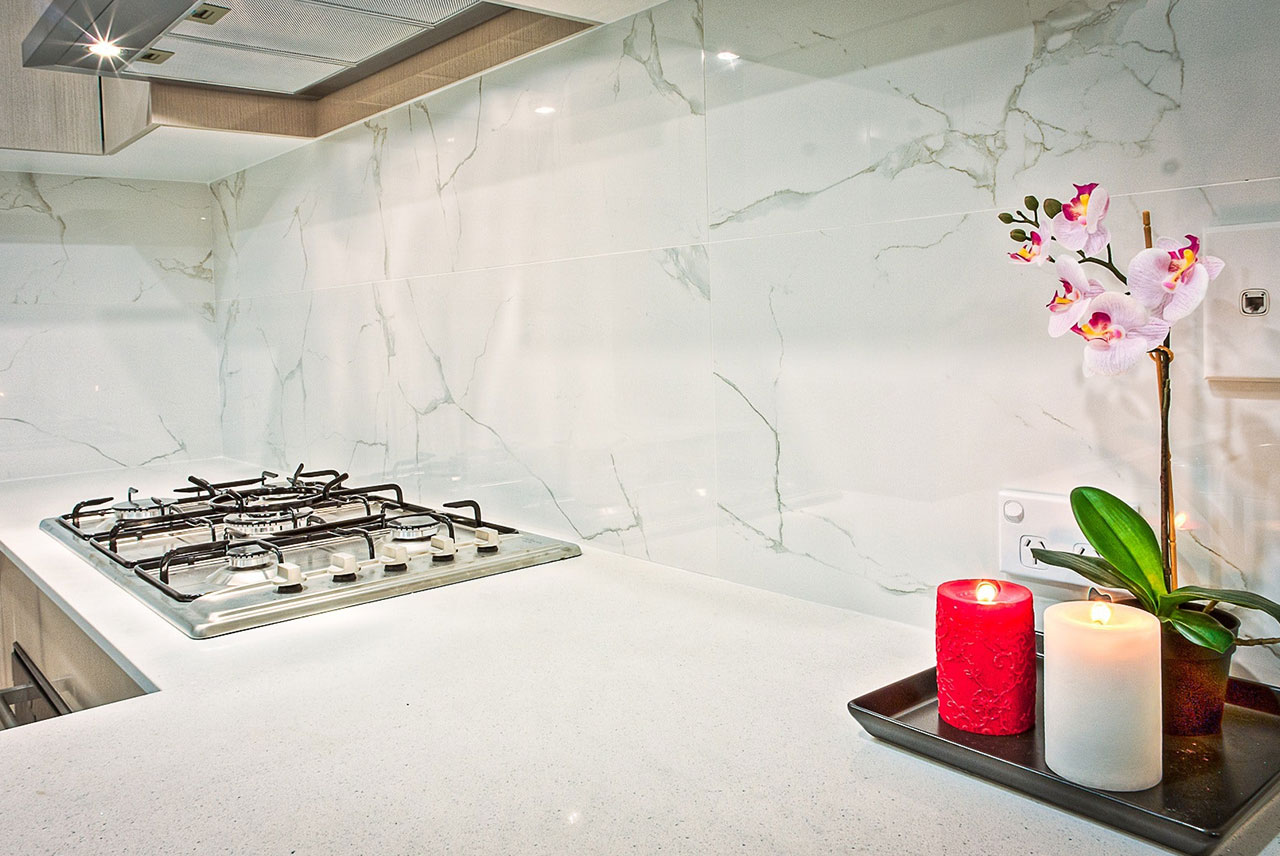
Here’s a realistic cost estimate to bring this look home.
- Large Format (24×48) Porcelain Tile: $250 – $600
- Tile Adhesive & Grout: $50 – $100
- Tools (Trowel, Spacers, Wet Saw Rental): $75 – $150
- Sealant: $20 – $40
- TOTAL: $395 – $890
- Budget Alternative: High-quality peel-and-stick marble-look vinyl panels can achieve a similar effect for around $150-$250, cutting out labor and tool costs.
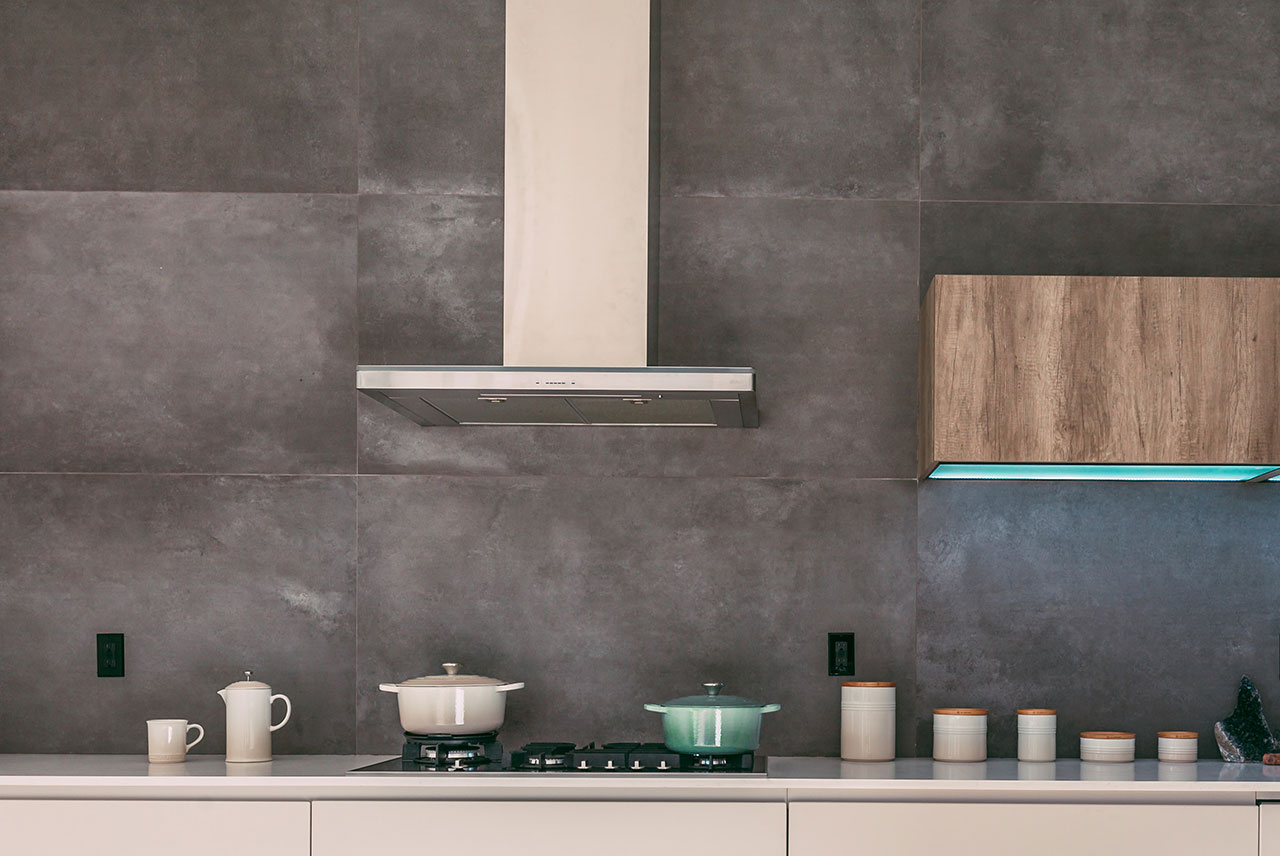
2. Go Moody and Modern with Large Dark Gray Tiles
Let’s be honest: a dark backsplash can be a bit of a diva. In a kitchen that lacks abundant natural or under-cabinet lighting, these gorgeous matte gray tiles could make the space feel smaller and darker. They look incredibly chic and sophisticated, but the matte finish tends to show grease splatters more than a glossy tile would. Be prepared for regular wipe-downs with a gentle cleaner to keep it looking sharp. If you’re a messy cook, you might want to consider a semi-gloss alternative.
|
📋 Copy HEX 🔗 Share |
This kitchen’s inviting modernism comes down to a simple, repeatable formula. Think of it as 60% moody gray tile + 30% warm wood + 10% sleek metallic. The large, dark tiles provide a dramatic, architectural base. The floating wooden cabinet injects necessary warmth and organic texture, preventing the gray and steel from feeling too cold. The stainless steel range hood and hob are the functional, modern jewelry. You could swap the wood for black for a more industrial feel or white for higher contrast, but the core balance would remain.
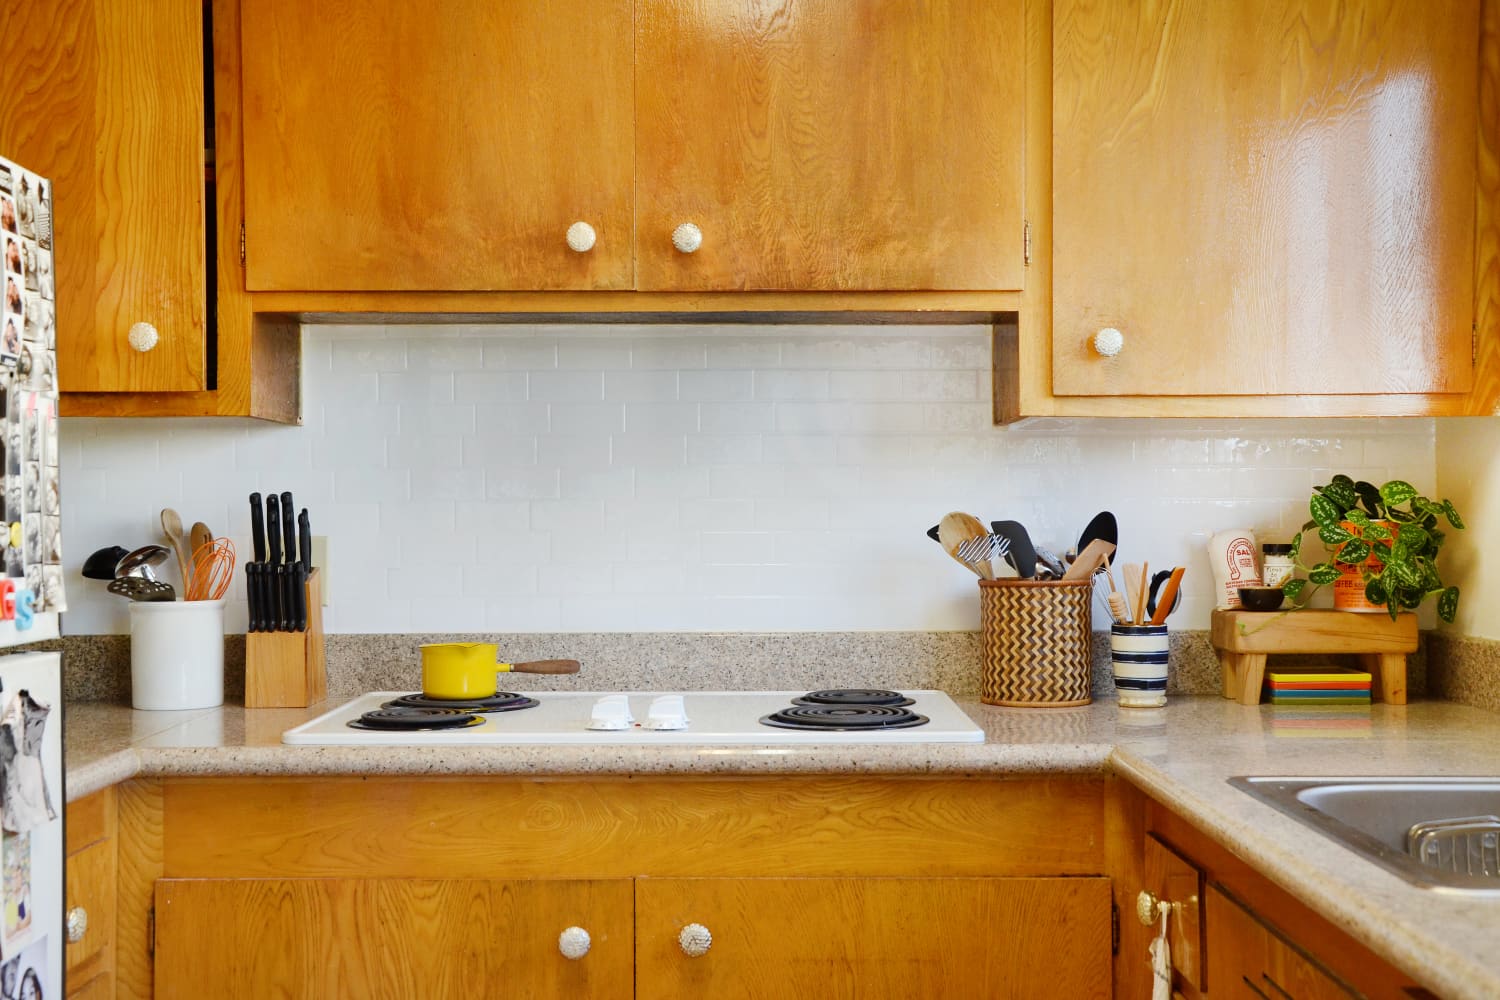
3. Embrace Homestyle Charm with Subway Tile and Light Wood
This look is a lesson in the power of familiar textures. The combination of classic white subway tile and warm, light-toned wood cabinets is timeless for a reason. It feels approachable, clean, and honest. The subway tile provides a bright, easy-to-clean surface, while the wood grain prevents the kitchen from feeling sterile. It’s the balance of the crisp, geometric tile grid with the natural, organic wood that creates a sense of harmony and comfort. The speckled countertops act as a perfect bridge between the two, pulling in both white and brown tones.
|
📋 Copy HEX 🔗 Share |
You don’t need custom cabinetry to get this friendly, functional vibe. Check out IKEA’s extensive range of light wood-effect cabinet doors, which can be paired with simple white subway tiles from any big-box hardware store for about $1 per square foot. For countertops, a laminate surface like Formica or Wilsonart offers incredibly realistic granite patterns for a fraction of the cost—often $20-$40 per square foot installed versus $80+ for real stone. Check Facebook Marketplace for leftover tile from other projects for a truly shoestring budget.
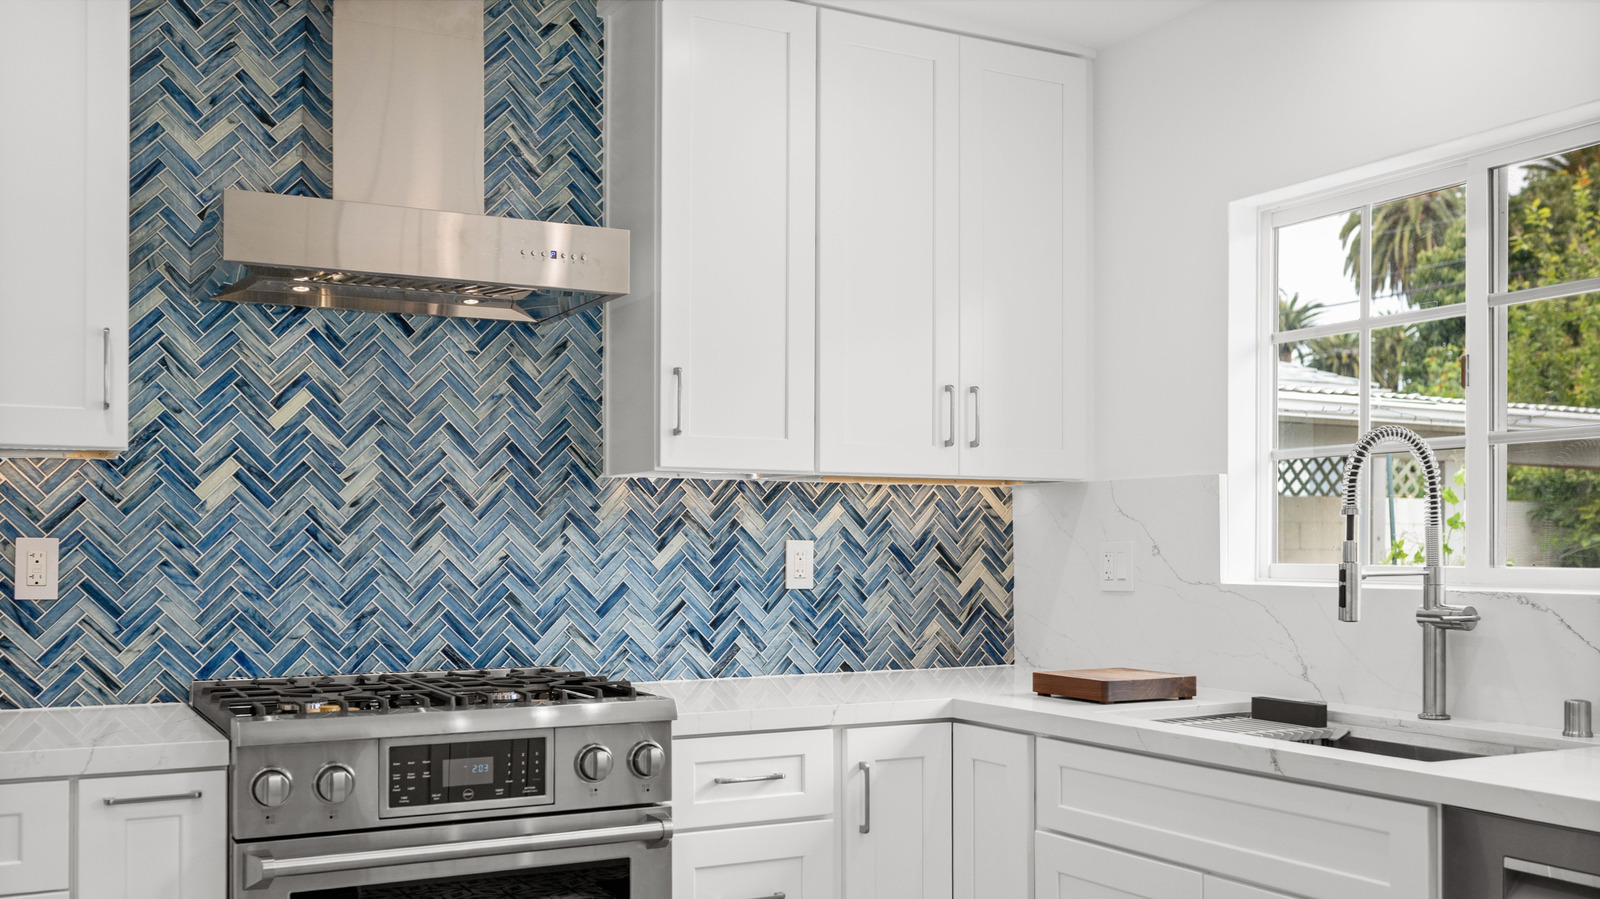
4. Energize Your Kitchen with a Blue Chevron Tile Backsplash
The single element making this entire kitchen sing is that bold, blue chevron backsplash. Take it away, and you have a perfectly nice but standard white shaker kitchen. The tile is the personality, the focal point, and the design statement all in one. It proves that you don’t need to change cabinets or countertops to create a dramatic transformation. By concentrating the color and pattern in one area, the design feels confident and intentional, not chaotic. It’s the perfect strategy for adding high impact without a high cost.
|
📋 Copy HEX 🔗 Share |
When you’re working with a directional pattern like chevron or herringbone, always order at least 20% extra tile, not the standard 10-15%. The angled cuts required at the end of each row, especially around outlets and corners, generate significantly more waste material than a simple grid layout. Running out of a specific dye lot midway through a project is a nightmare you want to avoid, so that extra box of tile is your best insurance policy for a professional-looking finish.
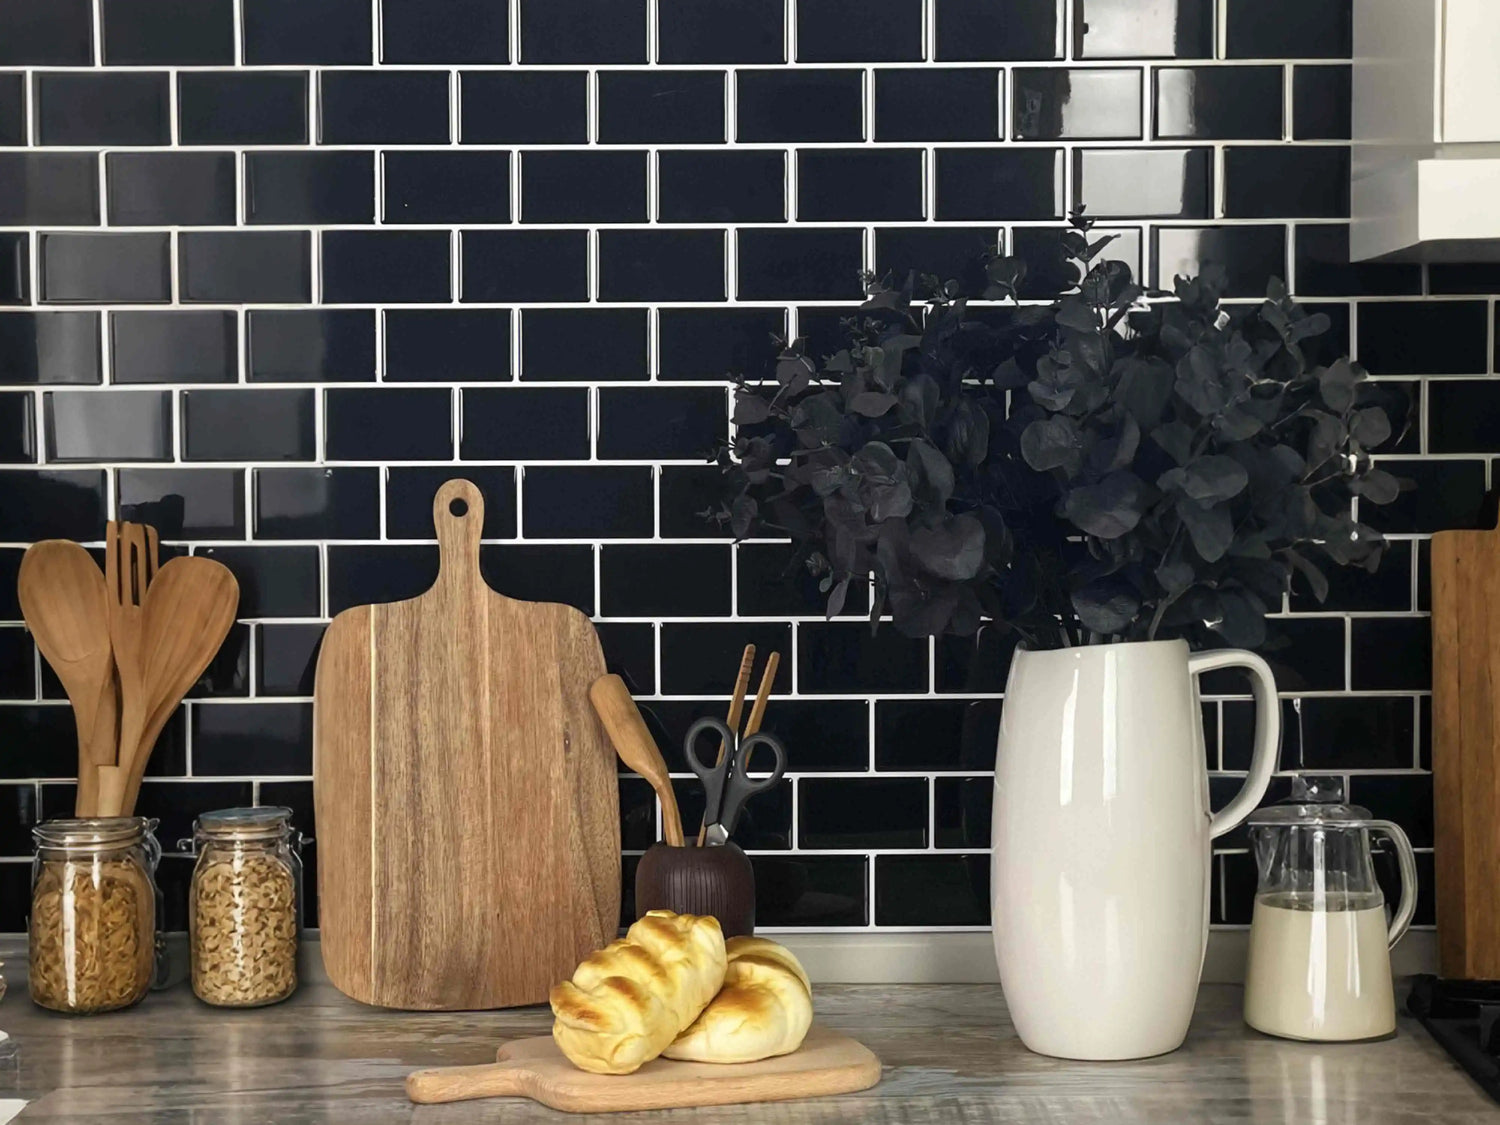
5. Create Bold Contrast with Glossy Black Subway Tile
A glossy black tile backsplash is undeniably chic, but it requires a bit of commitment. The high-gloss surface reflects light beautifully, but it also highlights every single water spot, fingerprint, and grease splatter. The good news is that it’s non-porous and easy to wipe down. The white grout, while providing a stunning graphic pop, is prone to staining, especially behind a cooktop. Using a high-quality grout sealer upon installation and cleaning up spills like tomato sauce or coffee quickly is non-negotiable to keep it looking crisp.
|
📋 Copy HEX 🔗 Share |
This design is all about graphic contrast. The deep black of the tiles against the bright white grout creates a visual ‘pop’ that feels modern and intentional. This high contrast is softened by the introduction of natural wood tones in the cutting boards and utensils. The warm wood prevents the black and white from feeling too stark or clinical, adding a necessary layer of organic texture. It’s that balance between the hard, glossy geometry of the tile and the soft, natural material that makes the whole vignette feel curated and complete. It’s a more dramatic version of the classic look in Idea #6.
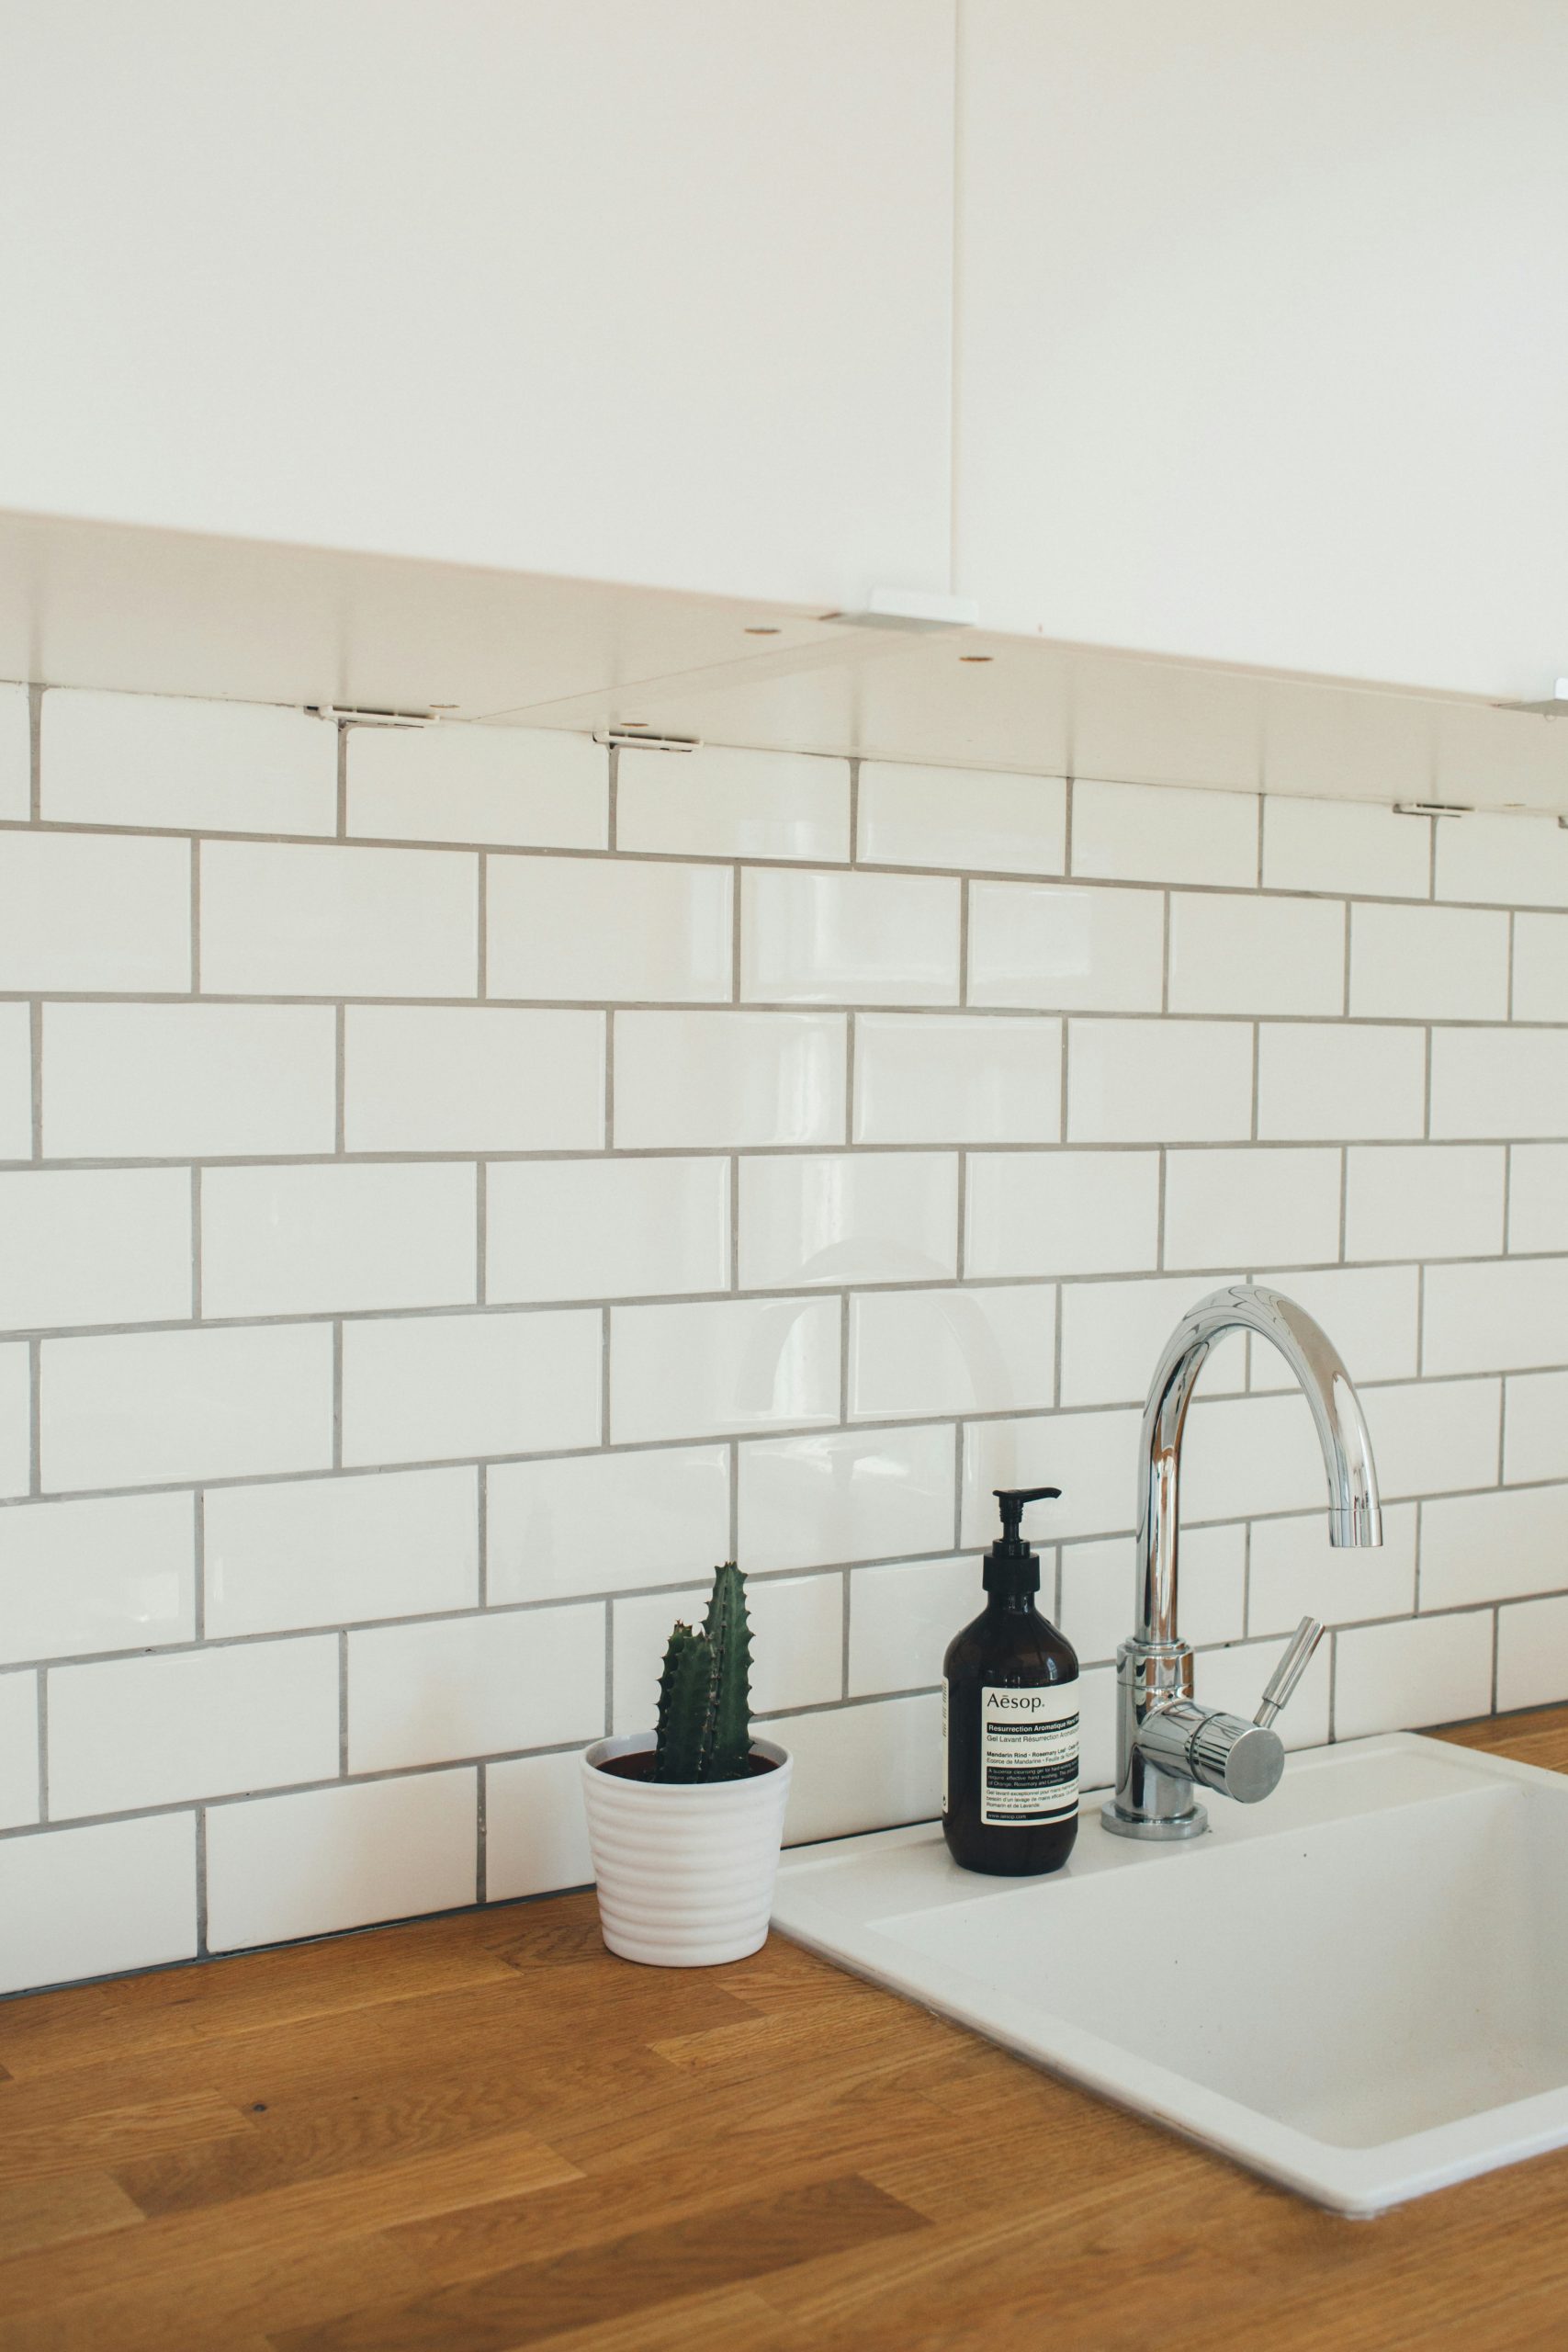
6. Get a Classic, Clean Look with White Subway Tile and a Wood Counter
This is a look you can absolutely achieve on a minimal budget. White ceramic 3×6 subway tiles are famously affordable, often costing less than $2 per square foot at big box stores like Home Depot or Lowe’s. The real star for budget savings is the butcher block countertop. IKEA’s KARLBY countertop is a cult favorite for its durability and impossibly low price point (around $200-$300 for a large slab). With a bit of DIY spirit for the install and sealing, you can get this entire look for under $500, a fraction of what stone countertops and custom tile work would cost.
|
📋 Copy HEX 🔗 Share |
This combination is a small-space superstar. Because the white subway tiles are so reflective, they bounce light around and make a kitchen feel more open and airy. This idea works in spaces with as little as 4-5 linear feet of counter space. The minimum ceiling height isn’t a major concern here, as the backsplash typically only runs 18-24 inches high. It’s an excellent choice for galley kitchens, apartment kitchens, or laundry rooms where you want a clean, bright feel without overwhelming the limited square footage. For a bolder take in a larger space, check out the blue version in Idea #4.
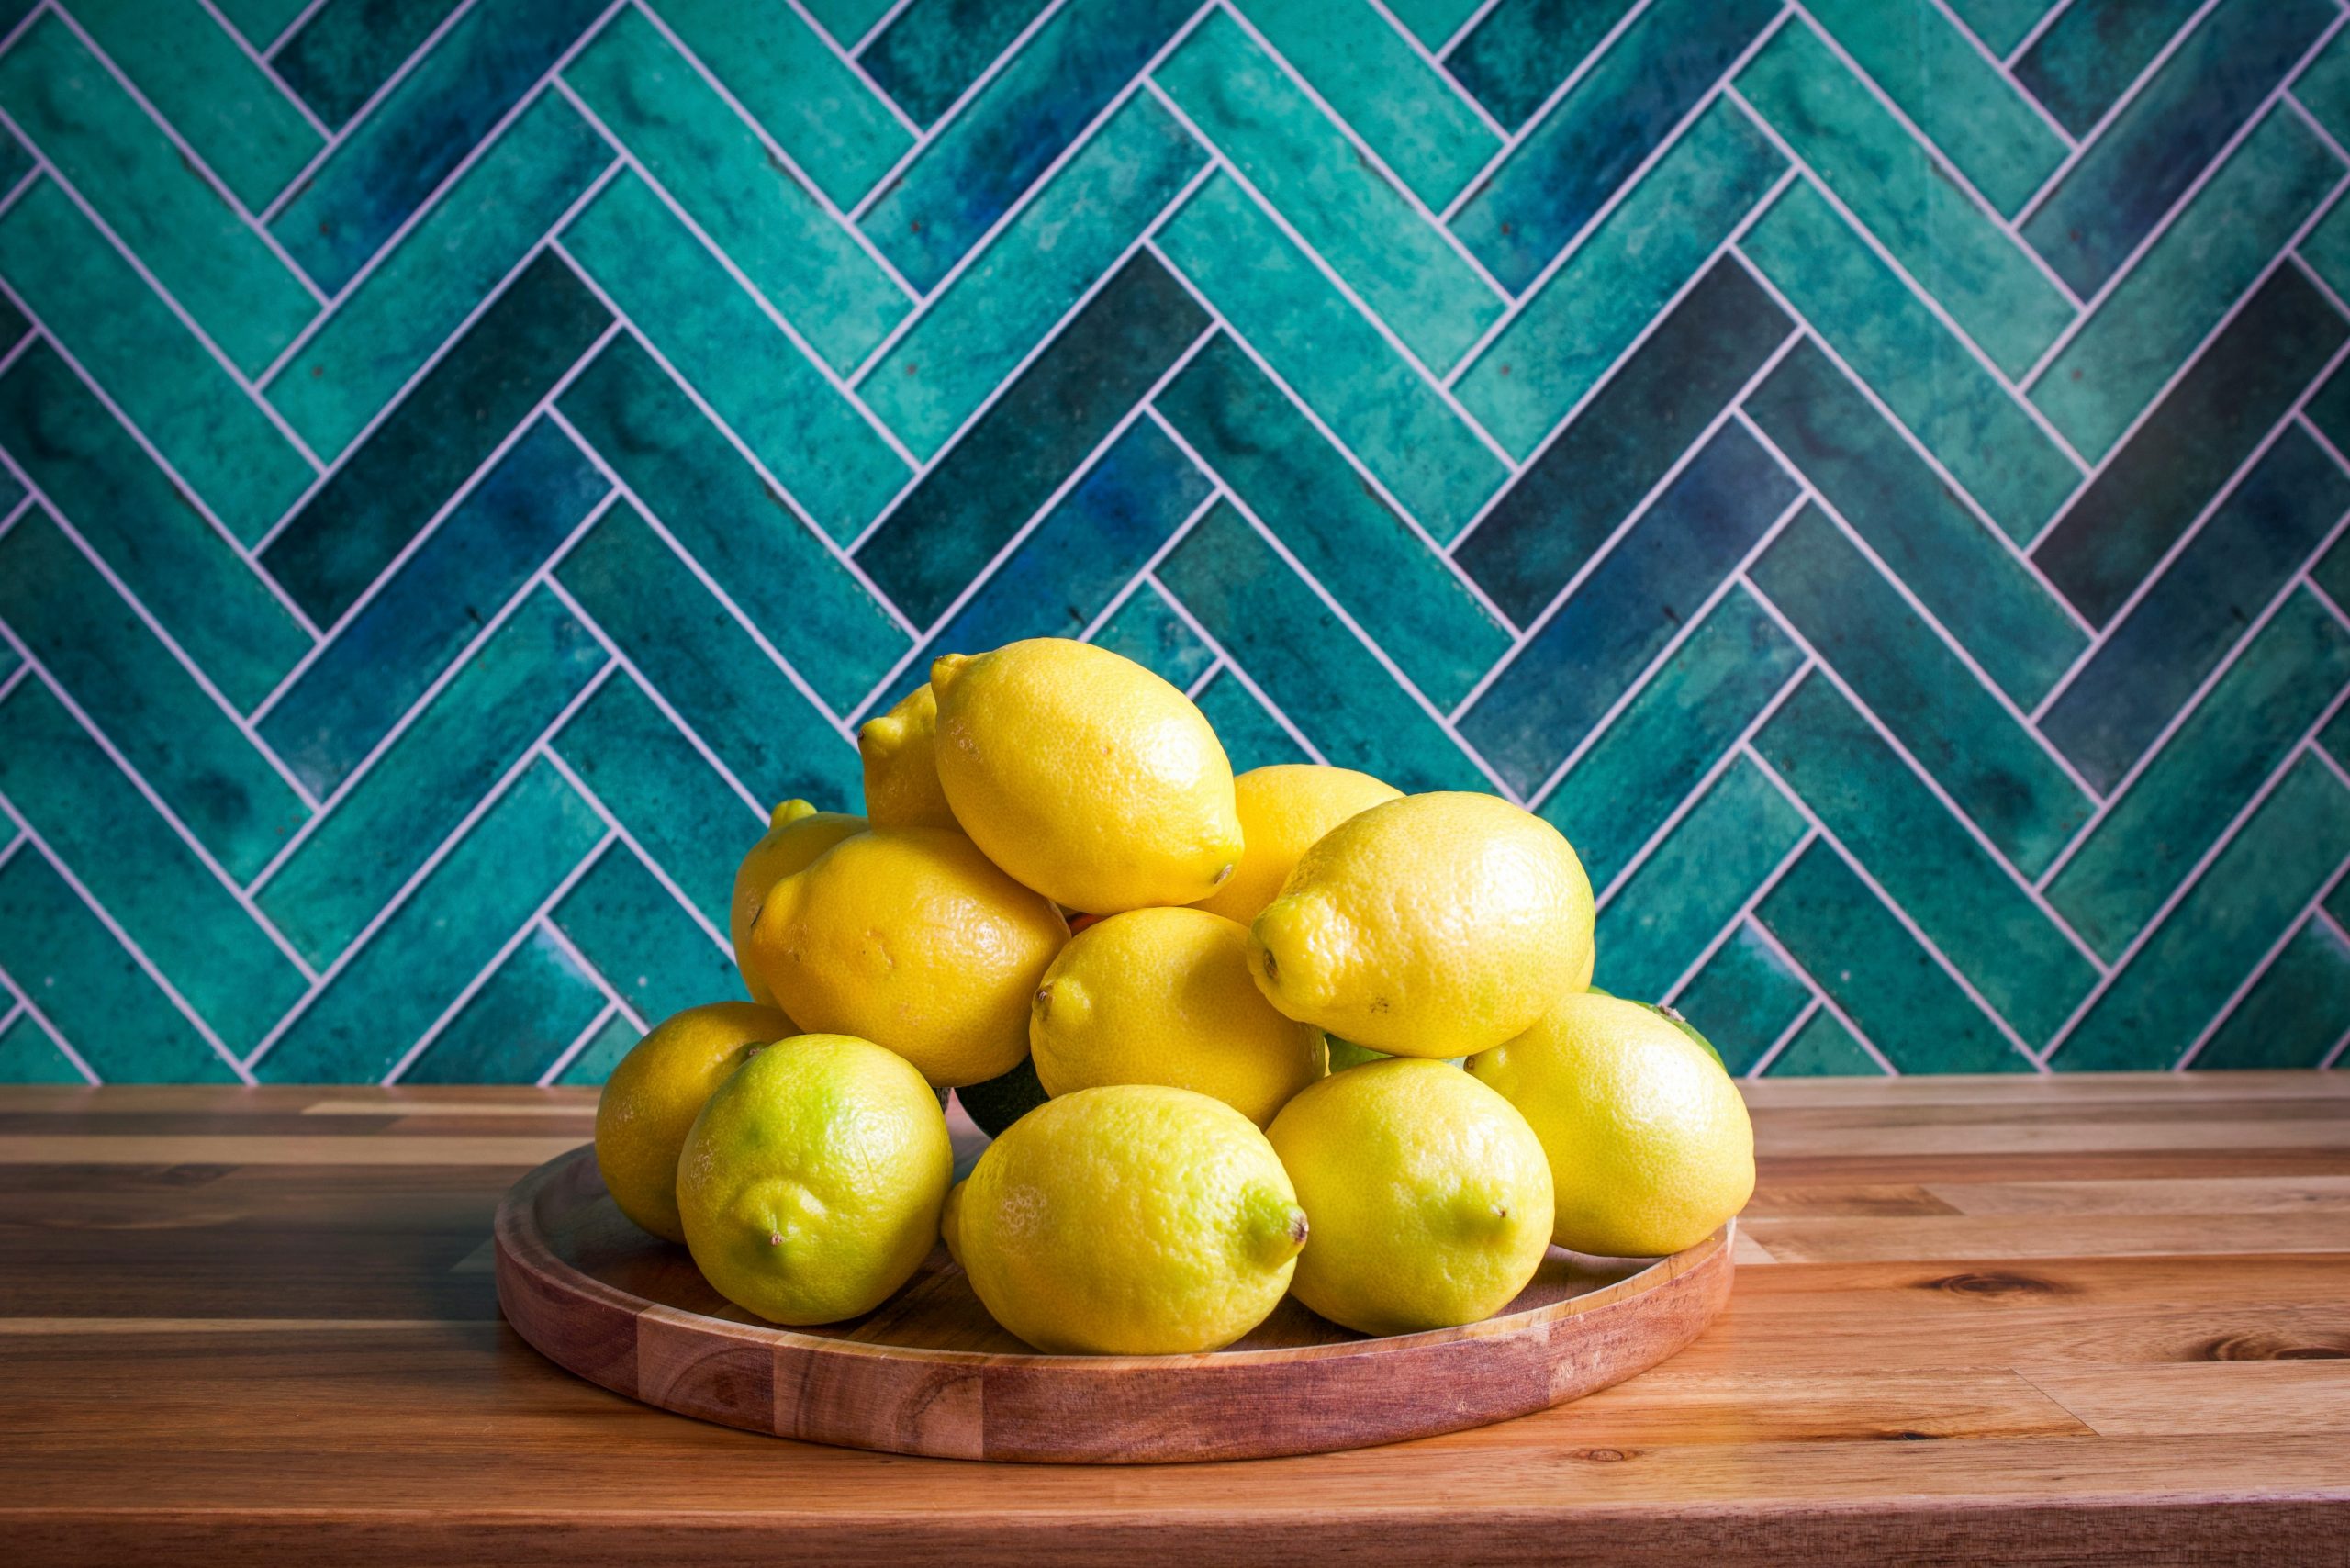
7. Infuse Freshness with a Teal Herringbone Backsplash
The magic here is the color. While the herringbone pattern is beautiful, it’s the vibrant teal-and-blue hue of the tiles that truly makes this design unforgettable. It evokes a fresh, coastal feeling that’s instantly uplifting. Paired with the warm, natural butcher block, the color feels earthy and grounded, not childish. If these tiles were white or grey, the look would still be nice, but it would lose that unique, joyful personality. The color is what makes you stop and look twice.
|
📋 Copy HEX 🔗 Share |
You can install a wooden tray like this to corral oils and spices next to the stove. Here’s a quick guide to making your own.
- Measure & Cut: Start with a 1×6 piece of pine or oak. Cut one piece for the bottom (e.g., 12 inches) and two pieces for the sides (e.g., 5.5 inches). For low sides, cut thin strips instead.
- Sand Everything: Sand all pieces smooth with 120-grit sandpaper, then finish with 220-grit for a soft touch.
- Assemble the Tray: Use wood glue and small finishing nails to attach the side pieces to the ends of the bottom piece.
- Seal for Protection: Apply 2-3 coats of a food-safe wood sealant or mineral oil, especially if it will be near the sink or stove. Let it dry completely.
Estimated Time: 2 hours. Estimated Cost: $15-$25.
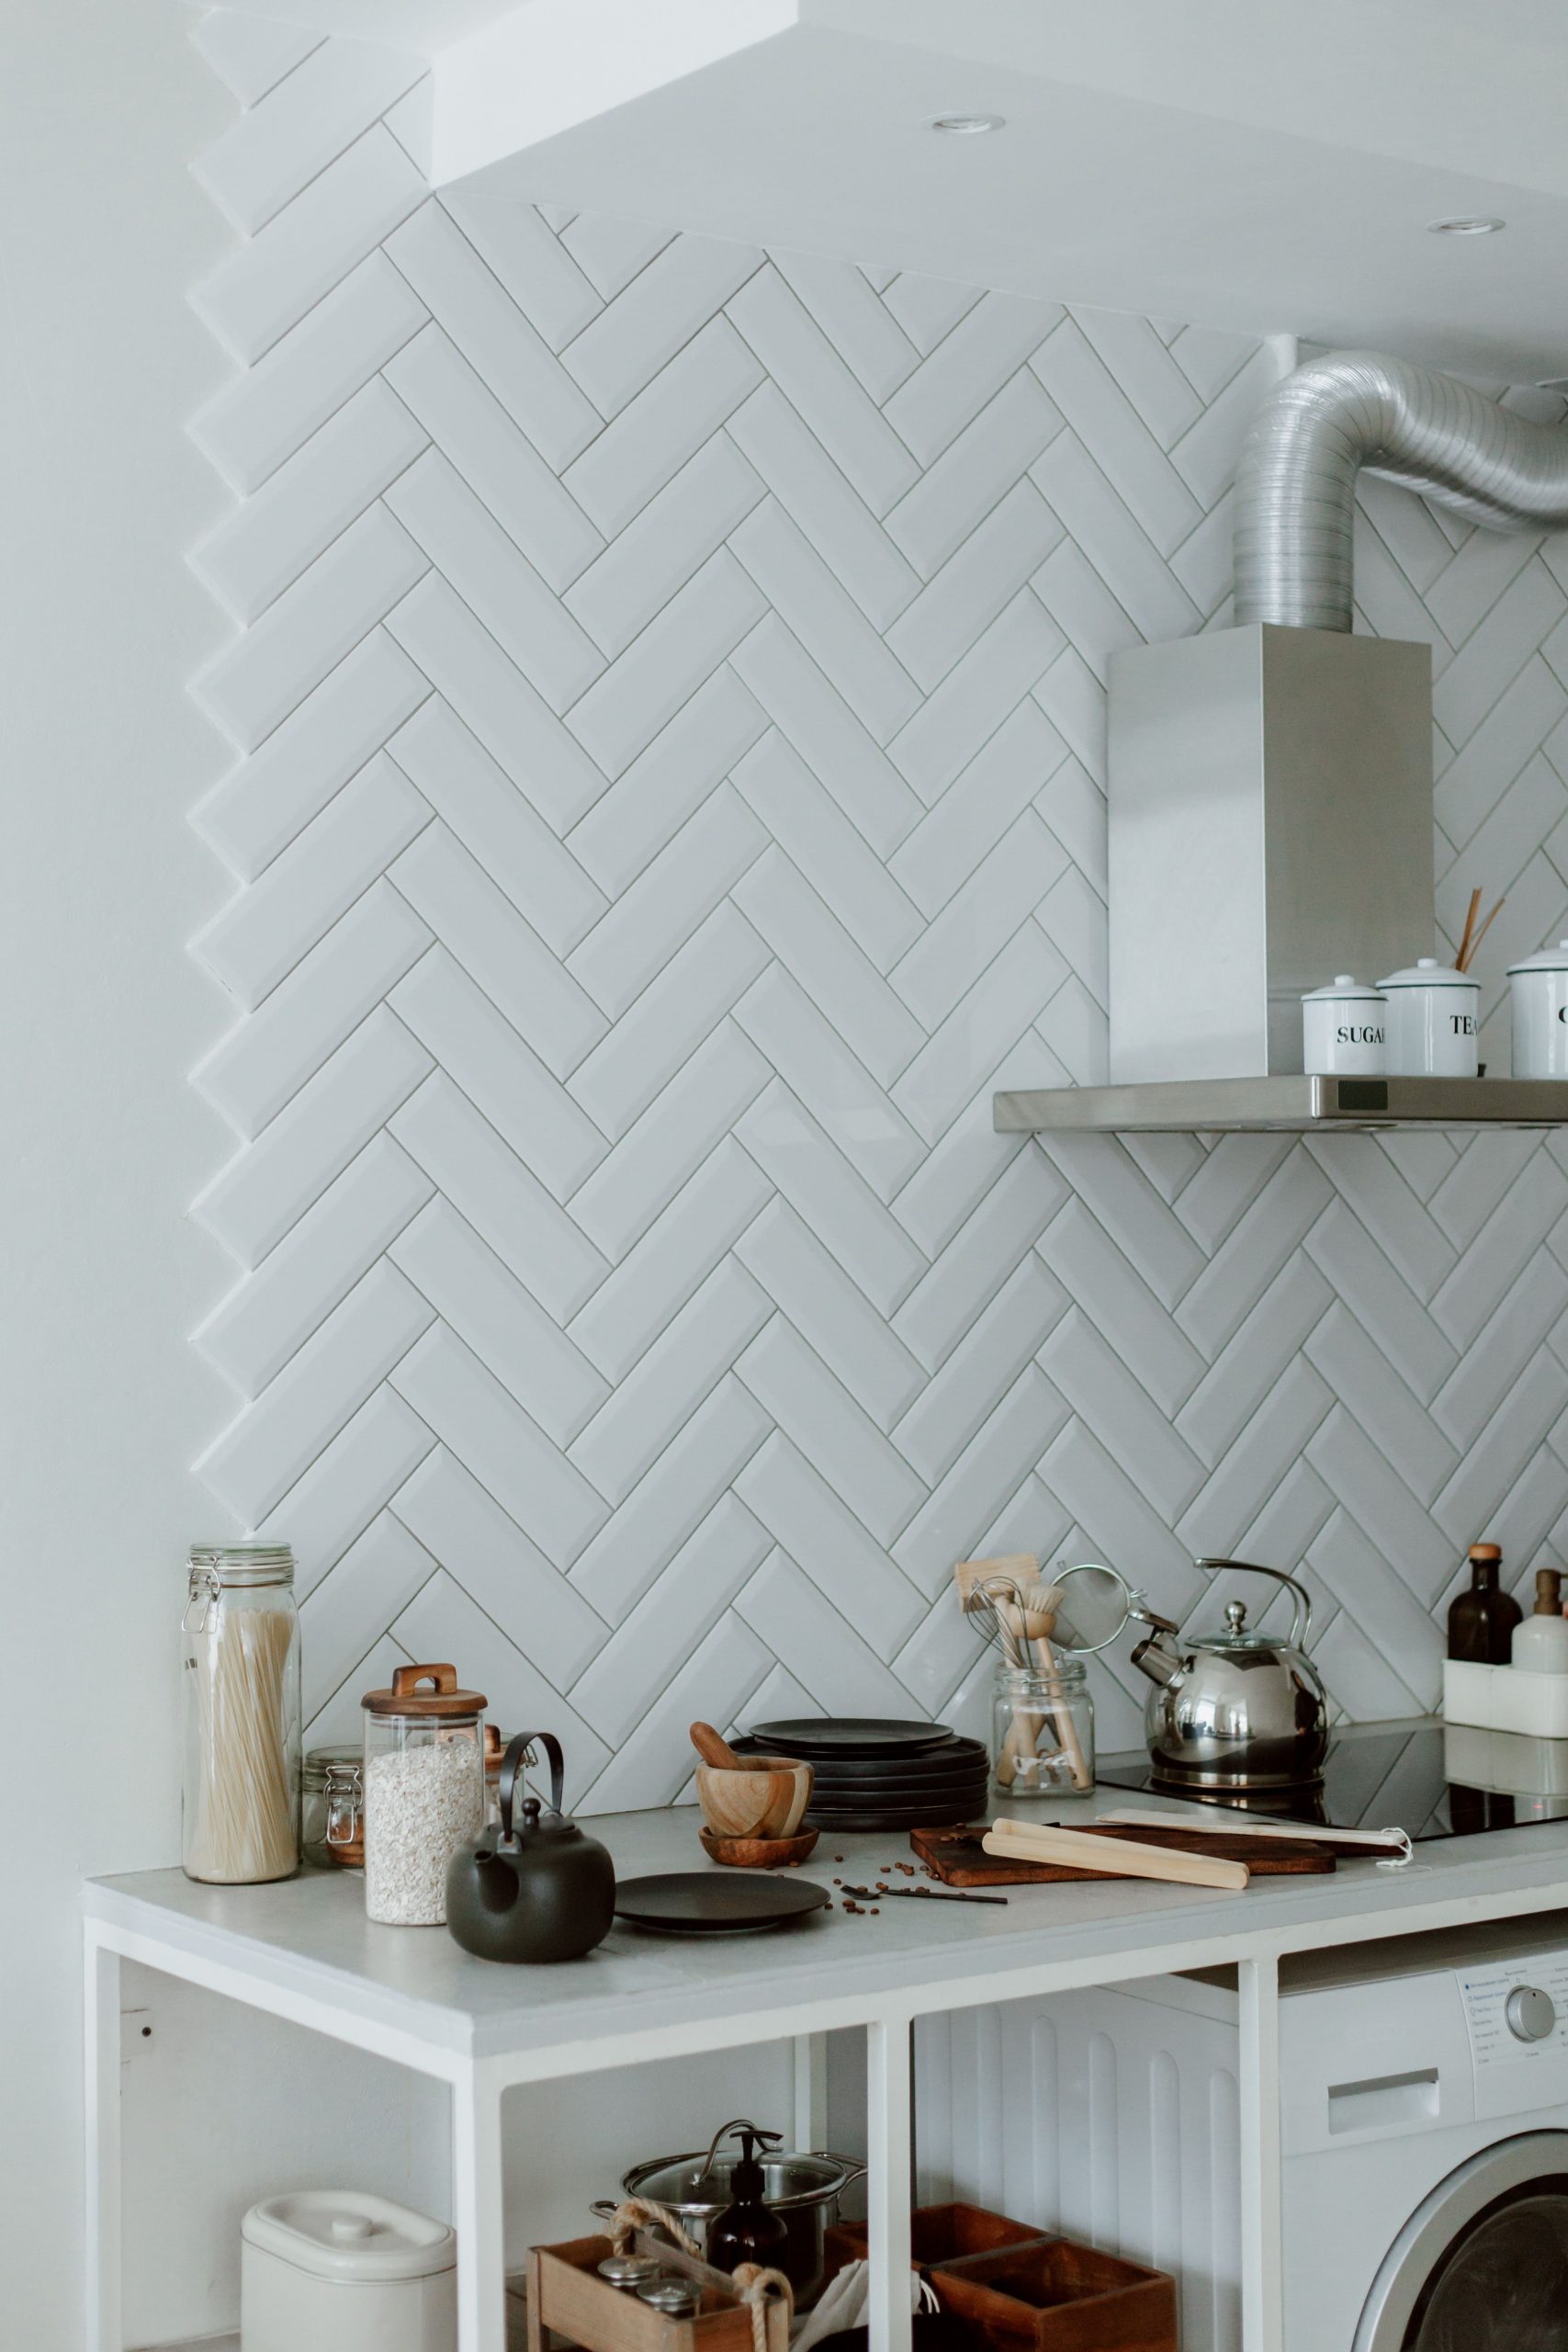
8. Master Modernism with a White Herringbone Backsplash
This is a perfect example of texture taking center stage. By using classic white subway tiles but arranging them in a dynamic herringbone pattern, the backsplash gains a sense of movement and sophistication. It’s more visually interesting than a standard running bond pattern but still maintains a clean, monochromatic look. The texture of the pattern catches the light in different ways, creating subtle shadows and highlights that prevent the all-white scheme from feeling flat. The industrial touch of the exposed metal vent pipe adds a nice raw contrast to the polished tile.
|
📋 Copy HEX 🔗 Share |
A pristine white-on-white look like this is stunning, but it’s not for the faint of heart when it comes to cleaning. The white grout, in particular, will be the first thing to show any discoloration from cooking splatters or dust. Using a high-quality stain-resistant epoxy grout from the start is a smart investment. Regular sealing of traditional grout is a must. And that beautiful metallic vent pipe? It’s a dust magnet. Plan on wiping it down frequently to keep it from looking grimy.
9. Get Playful with a Colorful Geometric Backsplash
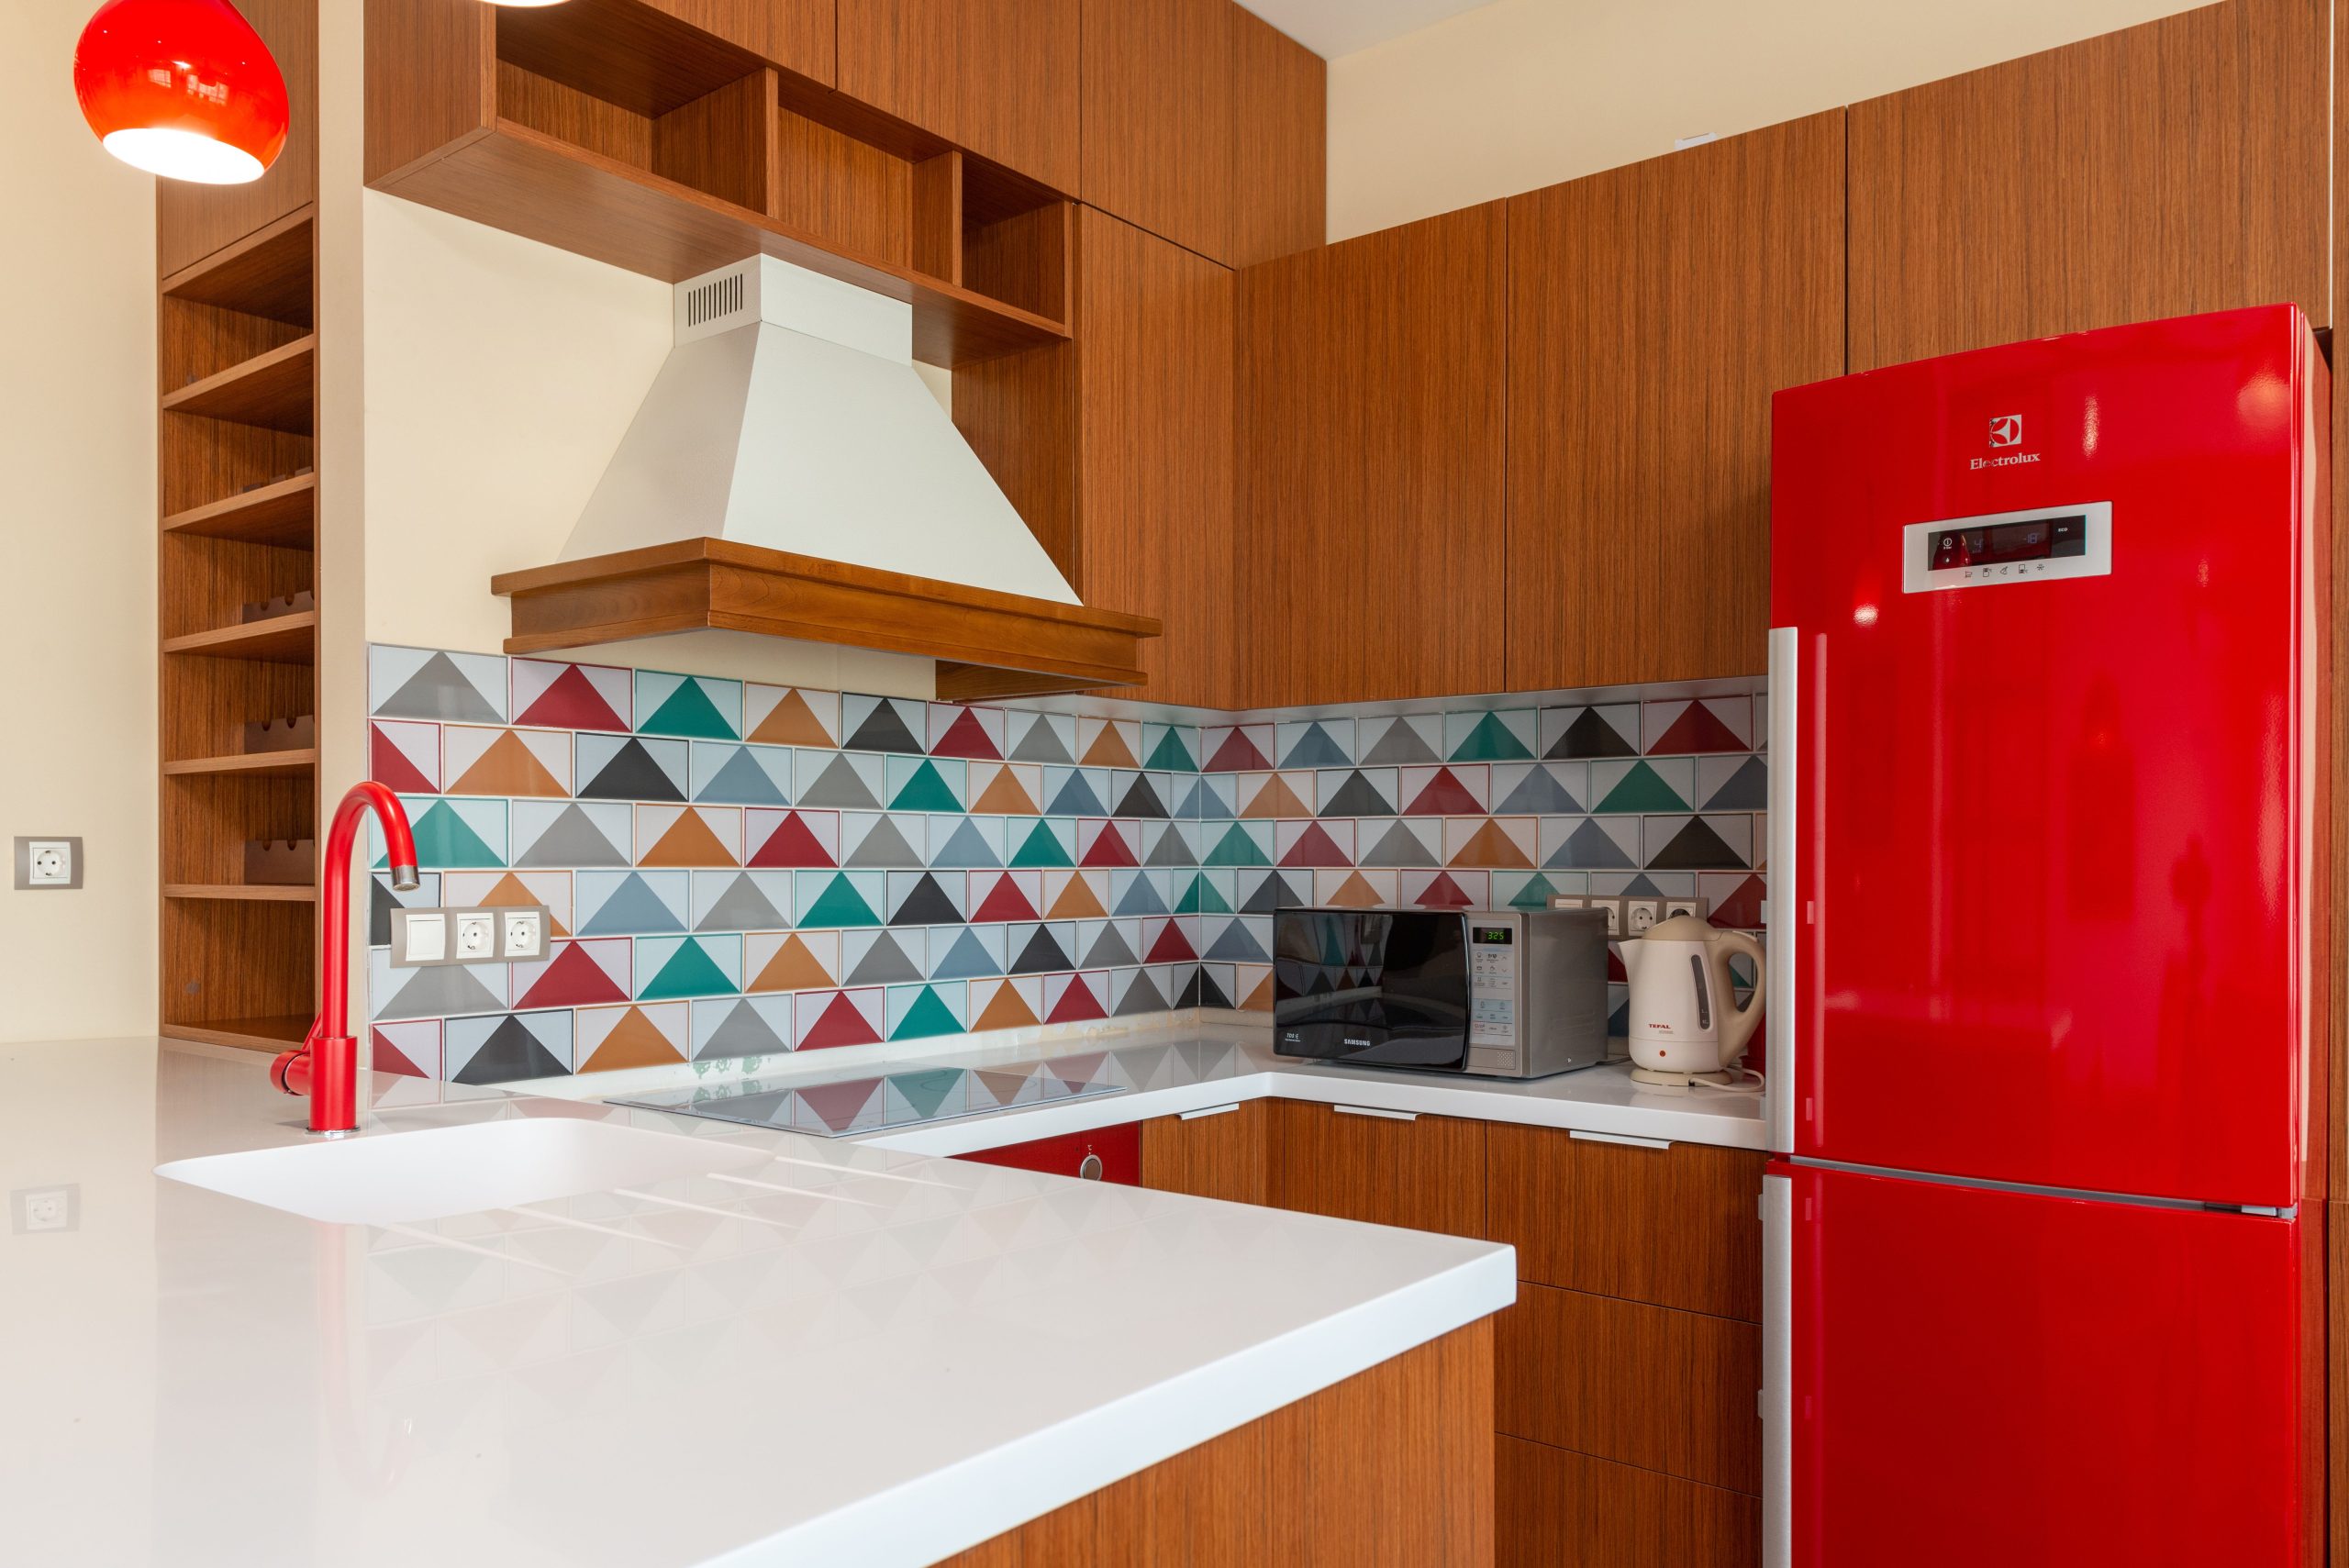
There’s a reason we’re seeing more of these joyful, geometric patterns. After years of all-white and gray kitchens dominating Pinterest, there’s a collective craving for personality and color in our homes. This trend, sometimes called ‘Dopamine Decor,’ is all about using color and pattern to create spaces that feel energetic and optimistic. This triangular tile backsplash isn’t just a surface; it’s a piece of art that makes the kitchen feel unique and personal. It has staying power because it’s rooted in individual expression, not just a passing fad.
|
📋 Copy HEX 🔗 Share |
The success of this vibrant kitchen is a balancing act. Think of it as 50% warm wood + 30% neutral white + 20% bold color & pattern. The expansive wood cabinets provide a grounding, natural base that keeps the look from feeling too chaotic. The white countertops and range hood act as ‘negative space,’ giving the eyes a place to rest. This allows the geometric backsplash and the fire-engine red faucet to be the undisputed stars of the show. You could swap the red for yellow or cobalt blue, and the formula would still hold perfectly.
10. Find Calm with a Sage Green Subway Tile Backsplash
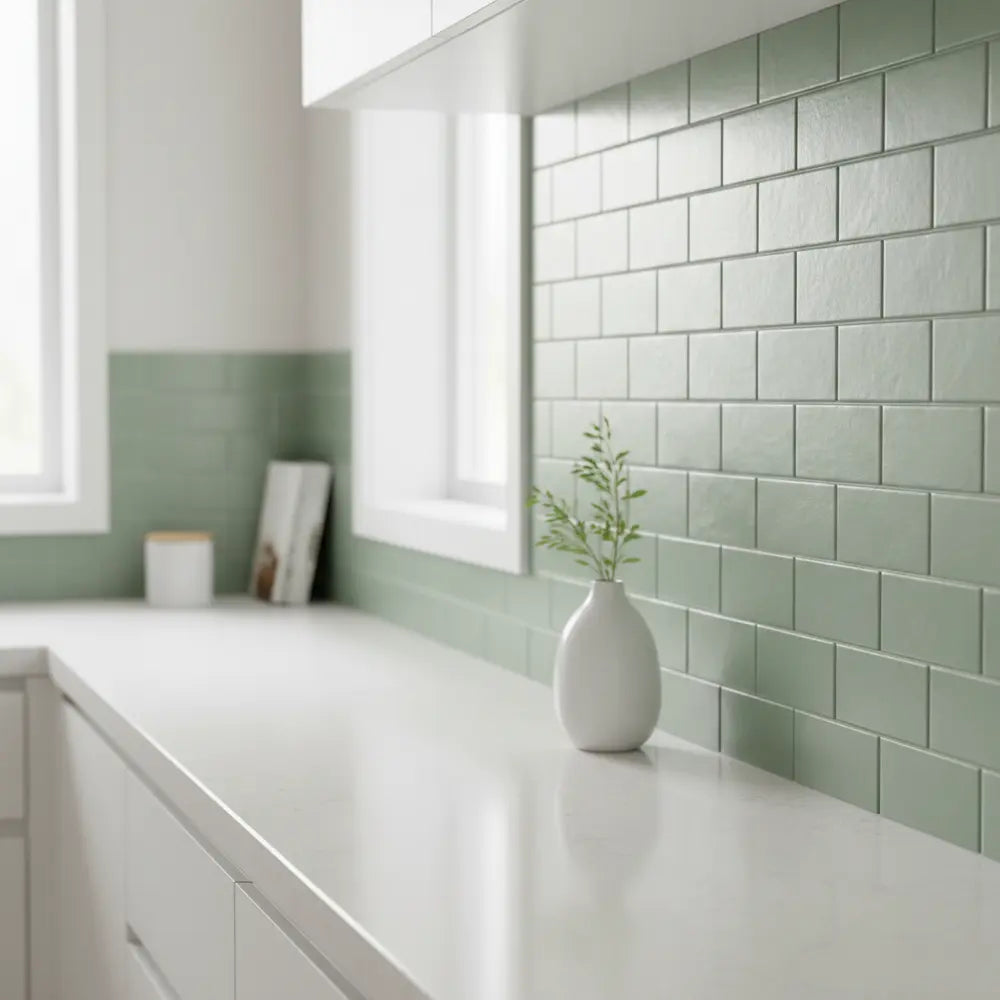
This space feels incredibly serene, and it’s all about the sophisticated color palette. Sage green is a ‘new neutral’ for a reason: it has color, but it’s muted and earthy enough to feel calming rather than jarring. It evokes a sense of nature and tranquility. Paired with crisp white cabinets and countertops, the look is fresh and clean. The simplicity of the classic subway tile shape allows the beautiful, soft color to be the main focus, creating a minimalist yet warm aesthetic.
|
📋 Copy HEX 🔗 Share |
Before you commit to this beautifully serene look, run through this quick checklist.
- Check Your Light: Sage green can look totally different in a north-facing (cooler) versus a south-facing (warmer) room. Get a few tile samples and watch how the color changes throughout the day.
- Coordinate Your Whites: Not all whites are the same. Ensure your chosen white paint and cabinet color don’t have weird undertones that clash with the green. Put a sample tile directly against your cabinets and walls.
- Grout Matters: Do you want the grout to blend in (match the tile) or pop (use white or a light gray)? A light gray grout, like the one shown here, adds subtle definition without being too busy.
11. Add an Artistic Touch with Floral Tile Decals
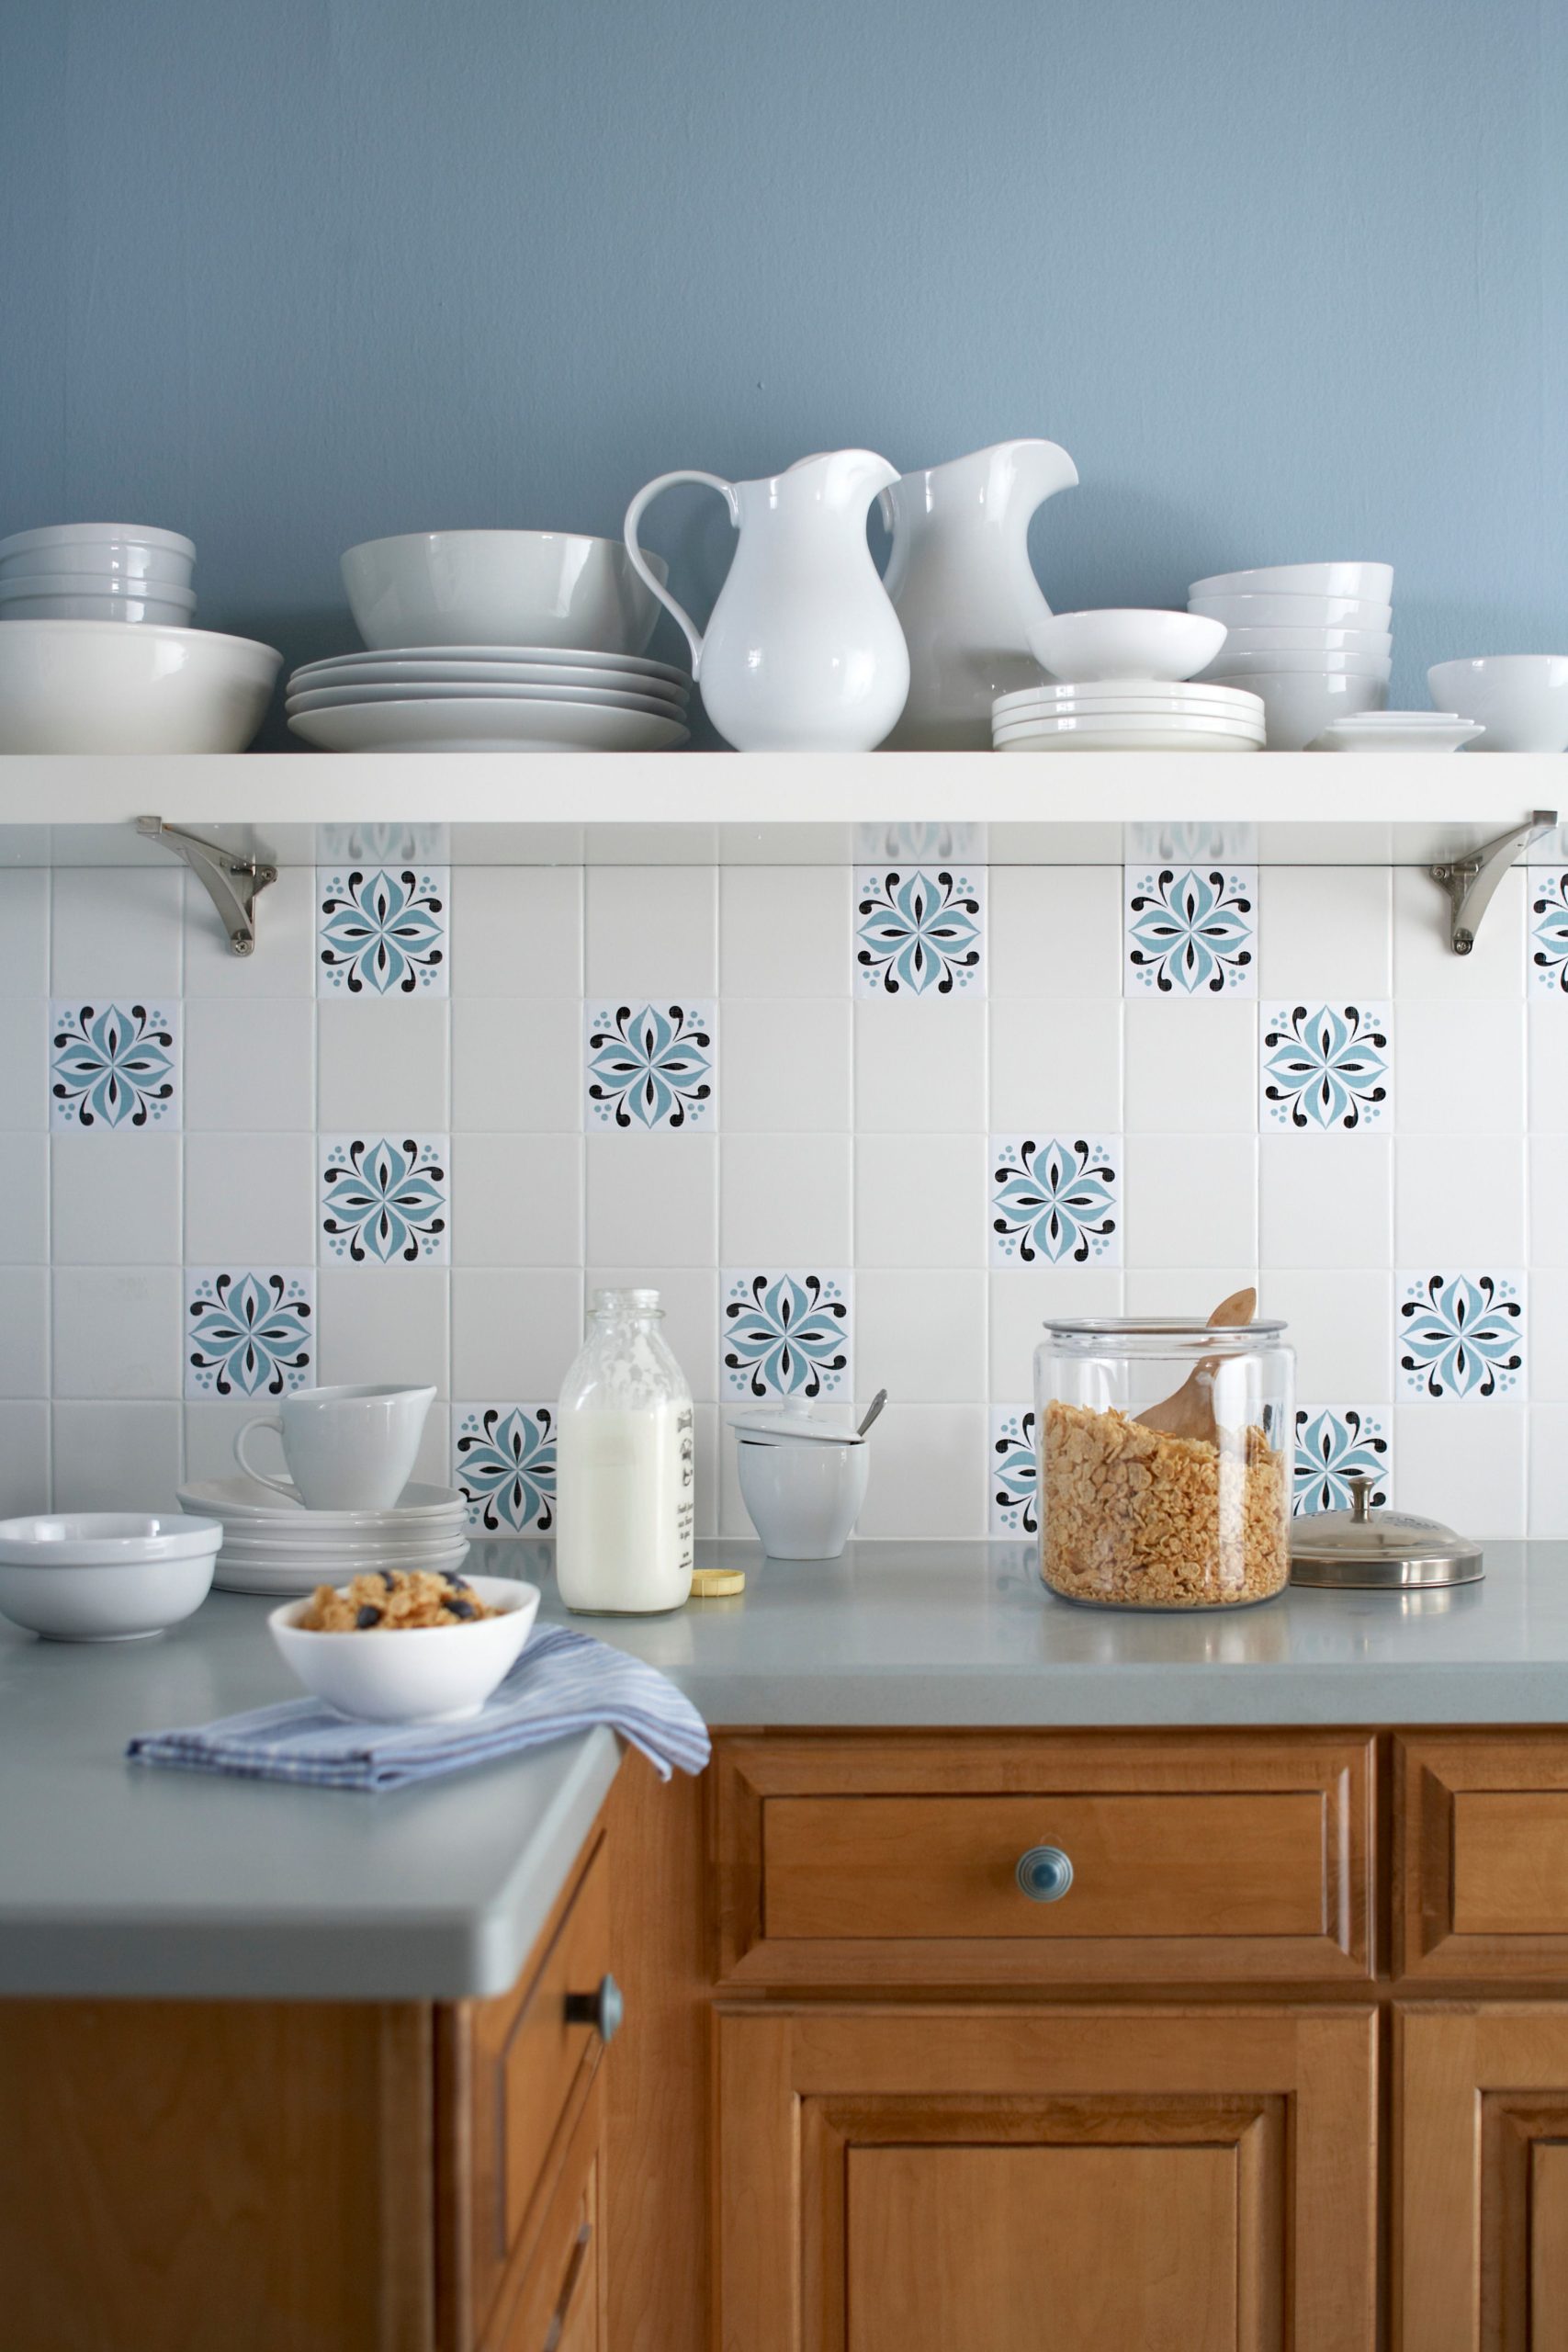
This is a fantastic way to upgrade boring tiles without a full renovation. Here’s how to apply decals for a finish that lasts.
|
📋 Copy HEX 🔗 Share |
- Prep the Surface: Clean your existing tiles thoroughly with a degreasing cleaner to remove any kitchen grime. Let them dry completely. Any oil or residue will prevent the decals from sticking properly.
- Plan Your Pattern: Lay out your decals on the counter first. Do you want a random pattern or a repeating one? This avoids mistakes on the wall.
- Apply with Care: Peel the decal from its backing and align it with one corner of the tile. Use a squeegee or a credit card to smooth it down from the center outwards, pushing out any air bubbles.
- Let it Cure: While you can use the kitchen right away, avoid scrubbing or exposing the decals to heavy steam for about 72 hours to allow the adhesive to fully bond.
Estimated Time: 1-2 hours. Estimated Cost: $20-$60.
Tile decals are the ultimate budget and renter-friendly alternative to patterned tile. You can find thousands of designs on sites like Etsy, Amazon, and Wayfair for as little as $20-$30 for a pack that covers a significant area. This allows you to experiment with a bold pattern or color without the commitment or cost of real tile and labor. If you get tired of the look in a few years, you can simply peel them off and try something new. It’s a low-risk, high-reward design choice.
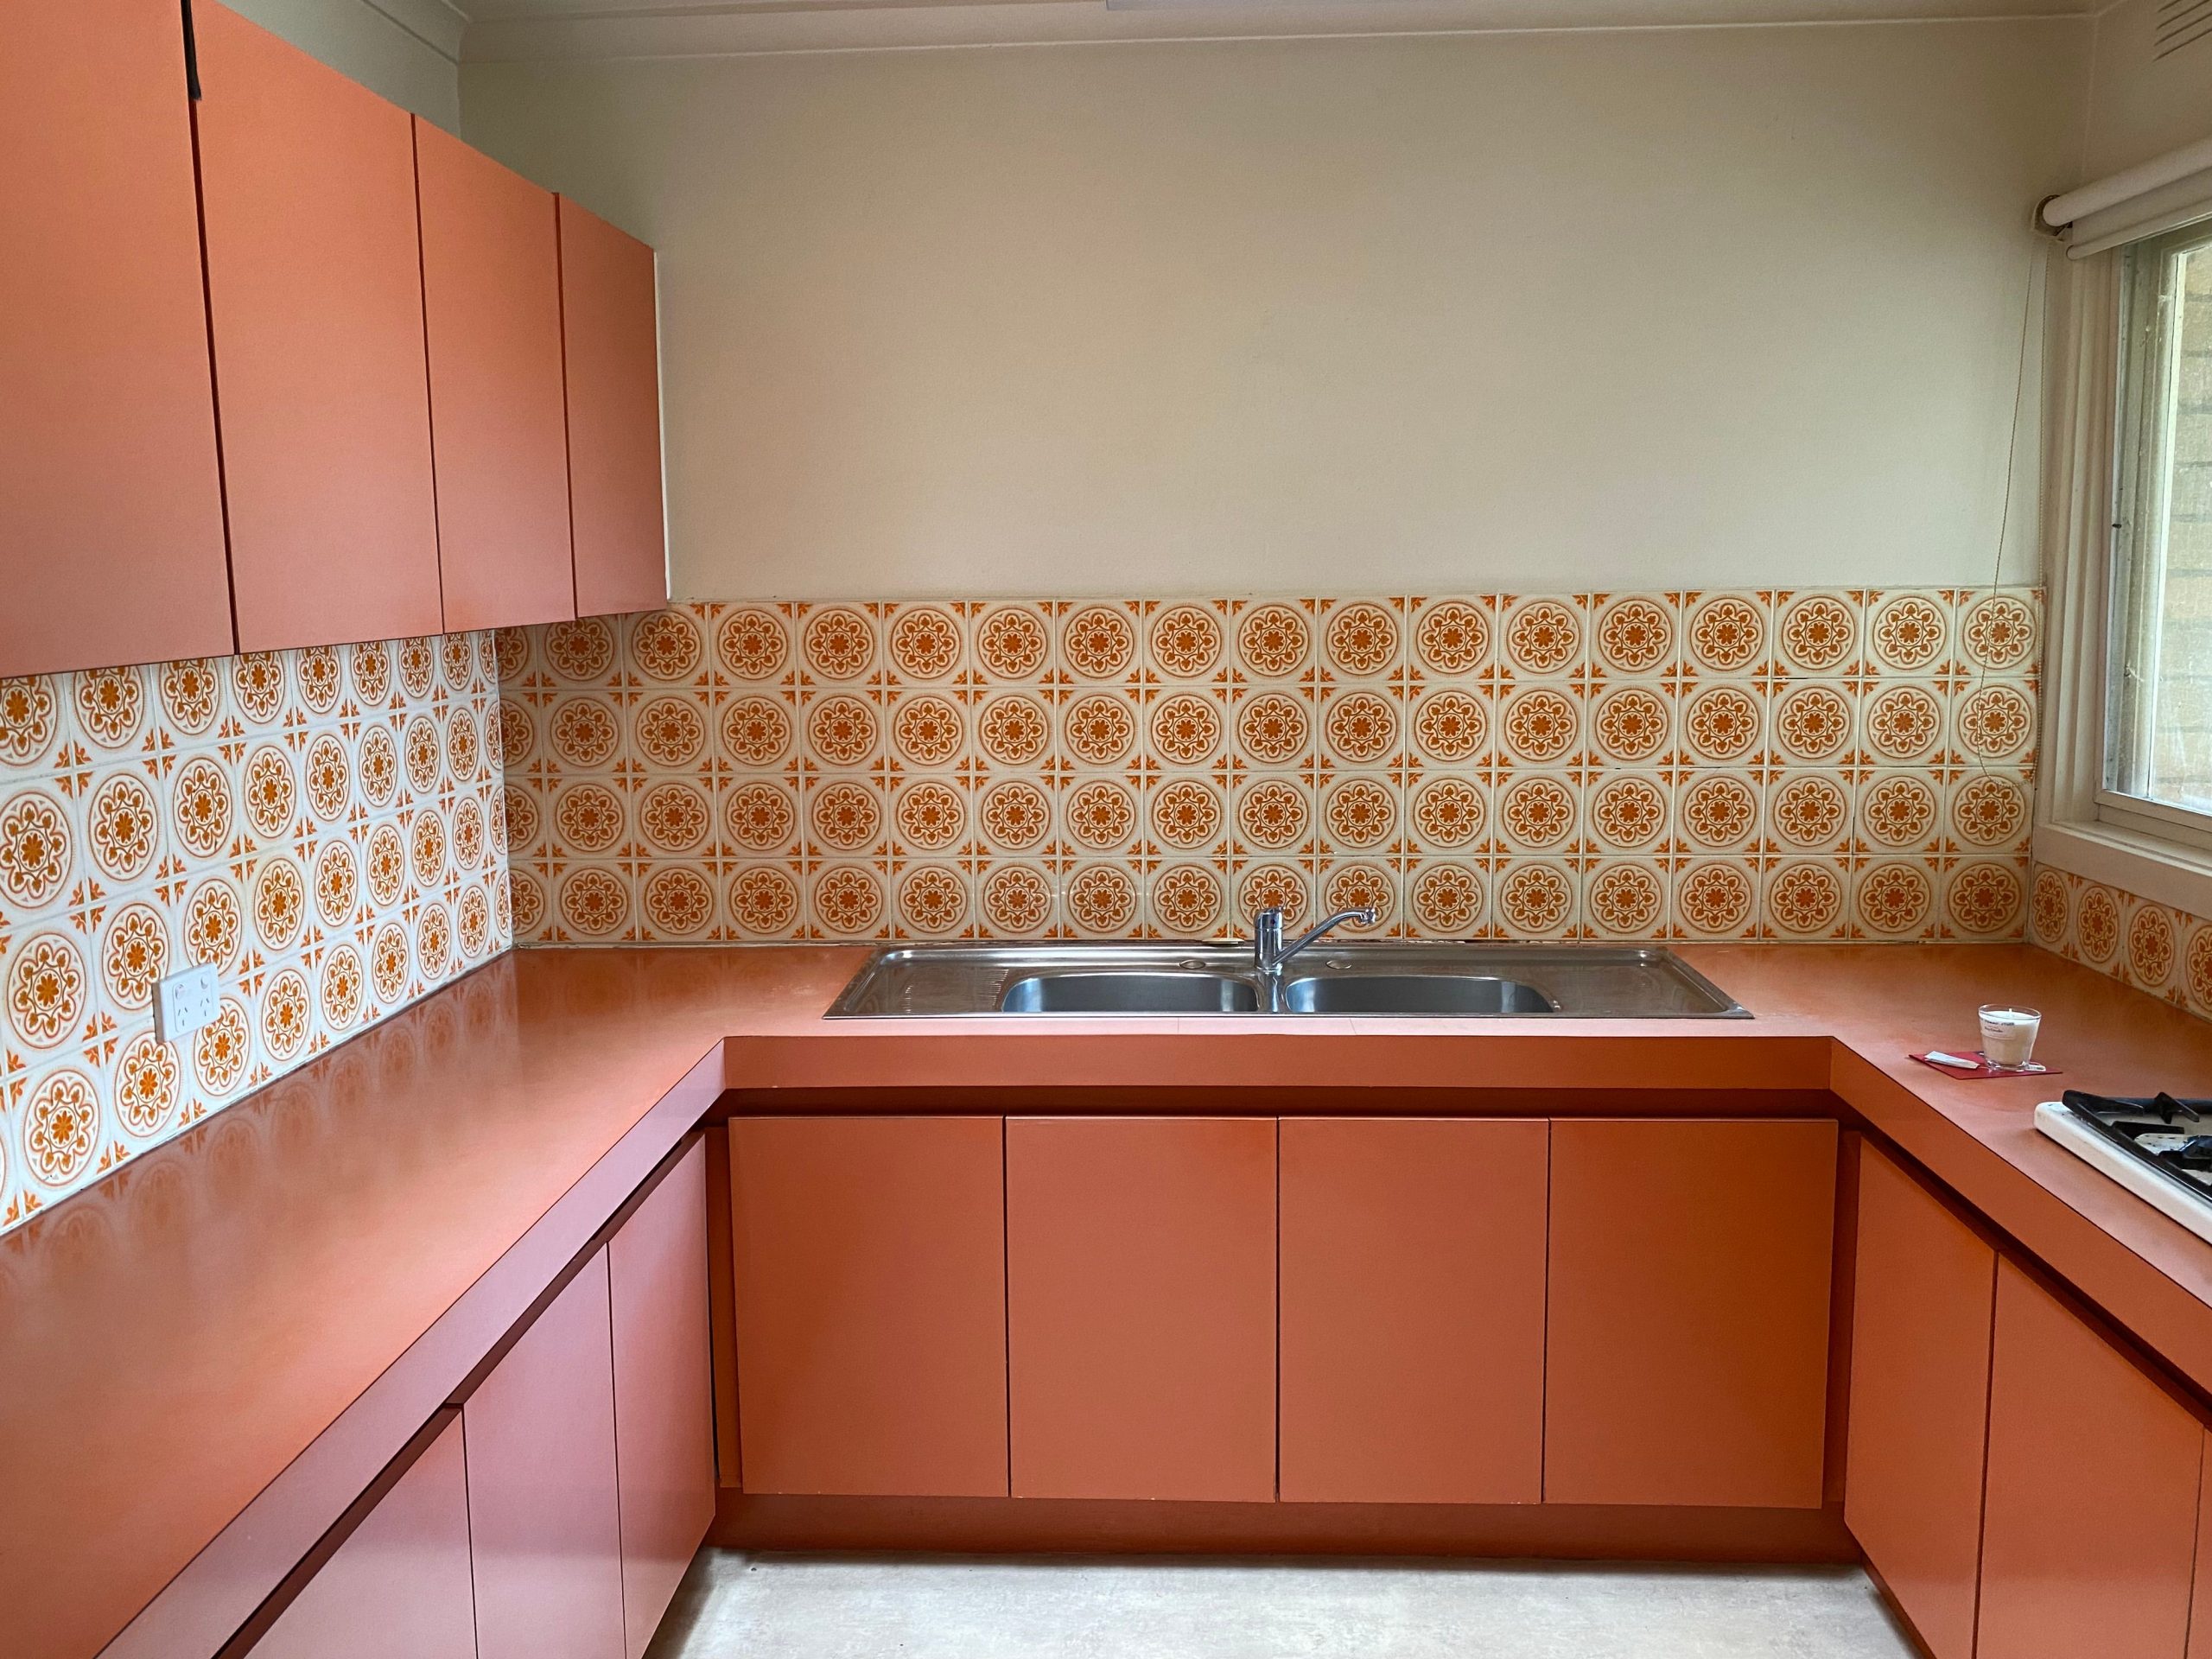
12. Go Retro with an Orange Floral Geometric Tile
This kitchen’s bold, retro vibe is built on a daring formula: 70% monochromatic color + 30% statement pattern. The decision to use the same vibrant orange-red for both the cabinets and the countertops is a powerful one. It creates a seamless, color-drenched foundation. This allows the geometric floral tile backsplash to act as the primary decorative element, providing visual relief and a ton of personality. The key is that the pattern’s colors are harmonious with the solid orange, making it feel cohesive rather than chaotic.
|
📋 Copy HEX 🔗 Share |
A look this bold is a major commitment. That orange-red is a very specific, taste-driven choice. While it looks fantastic here, it might not be for every future buyer if you’re thinking about resale value in the near term. Also, a fully monochromatic joinery and countertop scheme means that any scratch or chip will be more noticeable than on a varied or patterned surface. However, if you love color and plan to stay in your home for a while, embracing a bold personal style like this can be incredibly rewarding.
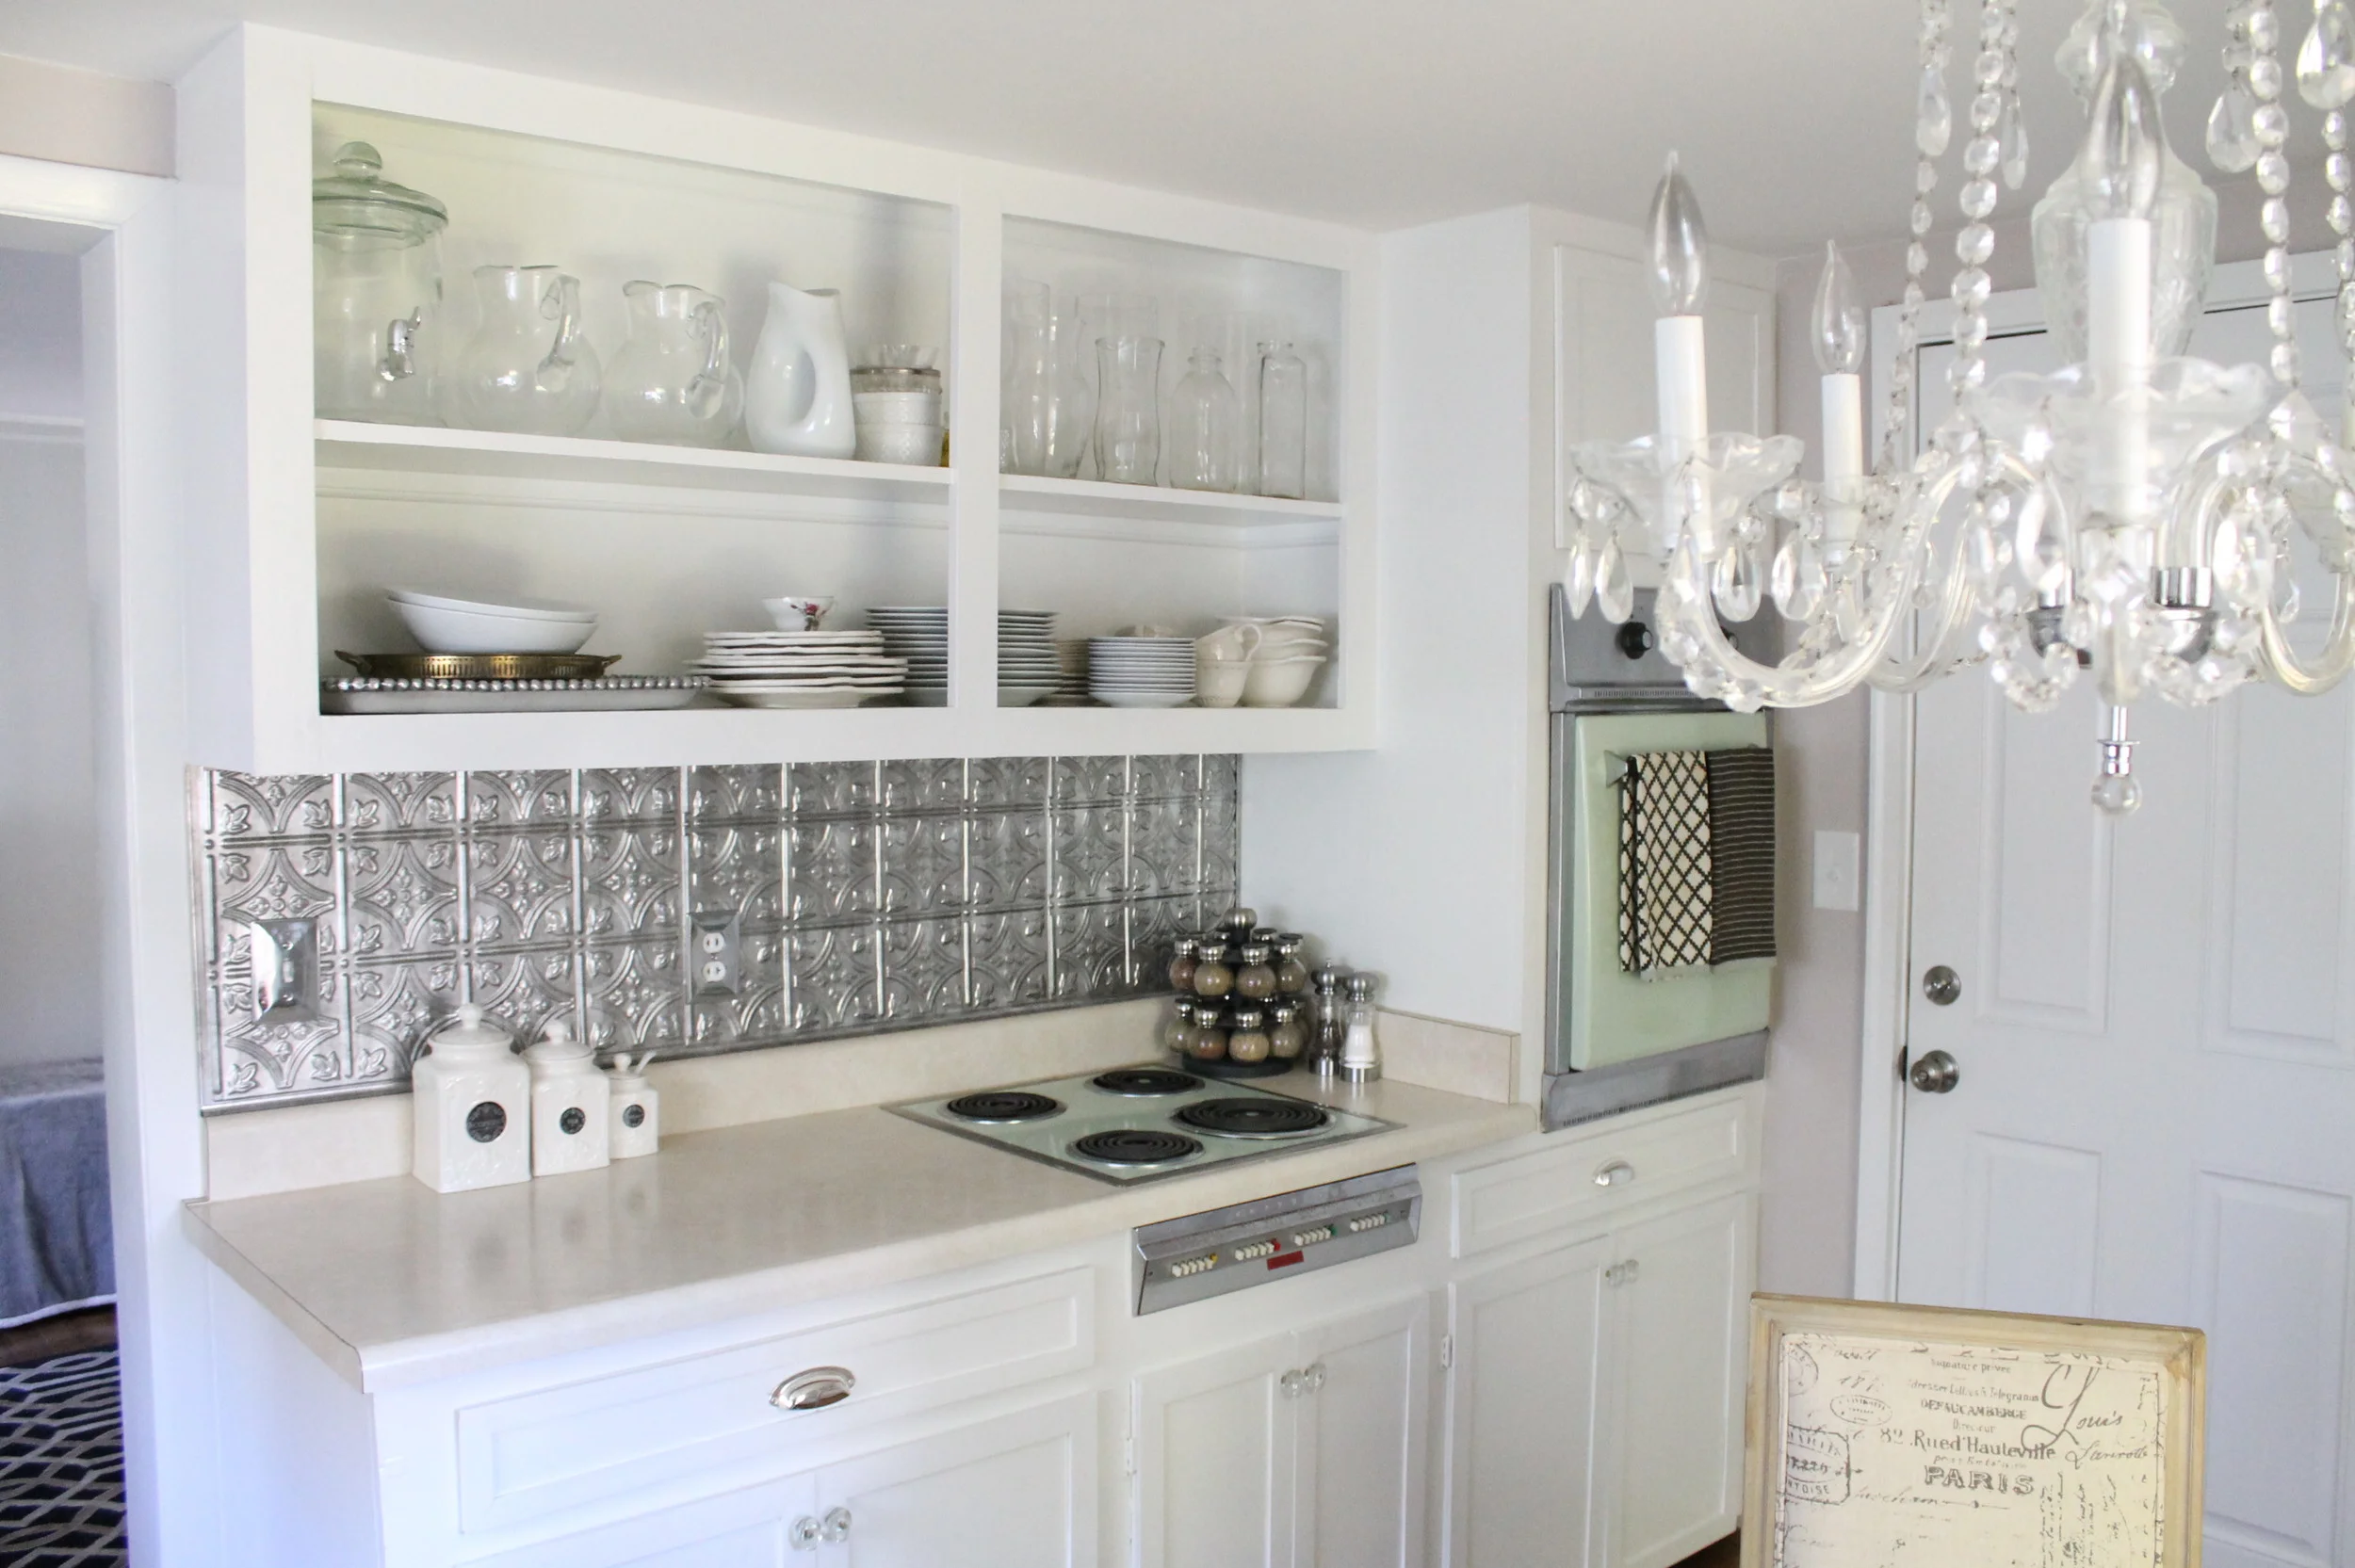
13. Add Vintage Texture with an Embossed Tin Panel Backsplash
This kitchen feels special because it masterfully layers texture on top of a simple color palette. The room is almost entirely white, but it’s anything but boring. The embossed tin backsplash introduces a layer of vintage-inspired pattern and a subtle metallic sheen that catches the light. This textural element is then echoed by the ornate, light-scattering facets of the crystal chandelier. It’s this interplay of different textures—smooth cabinets, patterned tin, sparkling crystal—that creates depth and a sense of curated elegance.
|
📋 Copy HEX 🔗 Share |
An embossed tin backsplash offers a lot of bang for your buck. Let’s break down the potential costs for a standard 30-square-foot backsplash area.
- Tin-Look PVC or Metal Panels: $150 – $400
- Construction Adhesive: $15 – $30
- Trims/Edge Pieces: $40 – $80
- Tools (Tin Snips, Tape Measure, Caulk Gun): $30 – $60
- TOTAL: $235 – $570
- Budget Alternative: You can find paintable, textured wallpaper that mimics the look of pressed tin for under $100. When painted with a metallic silver or nickel paint, it gives a surprisingly convincing effect from a distance.
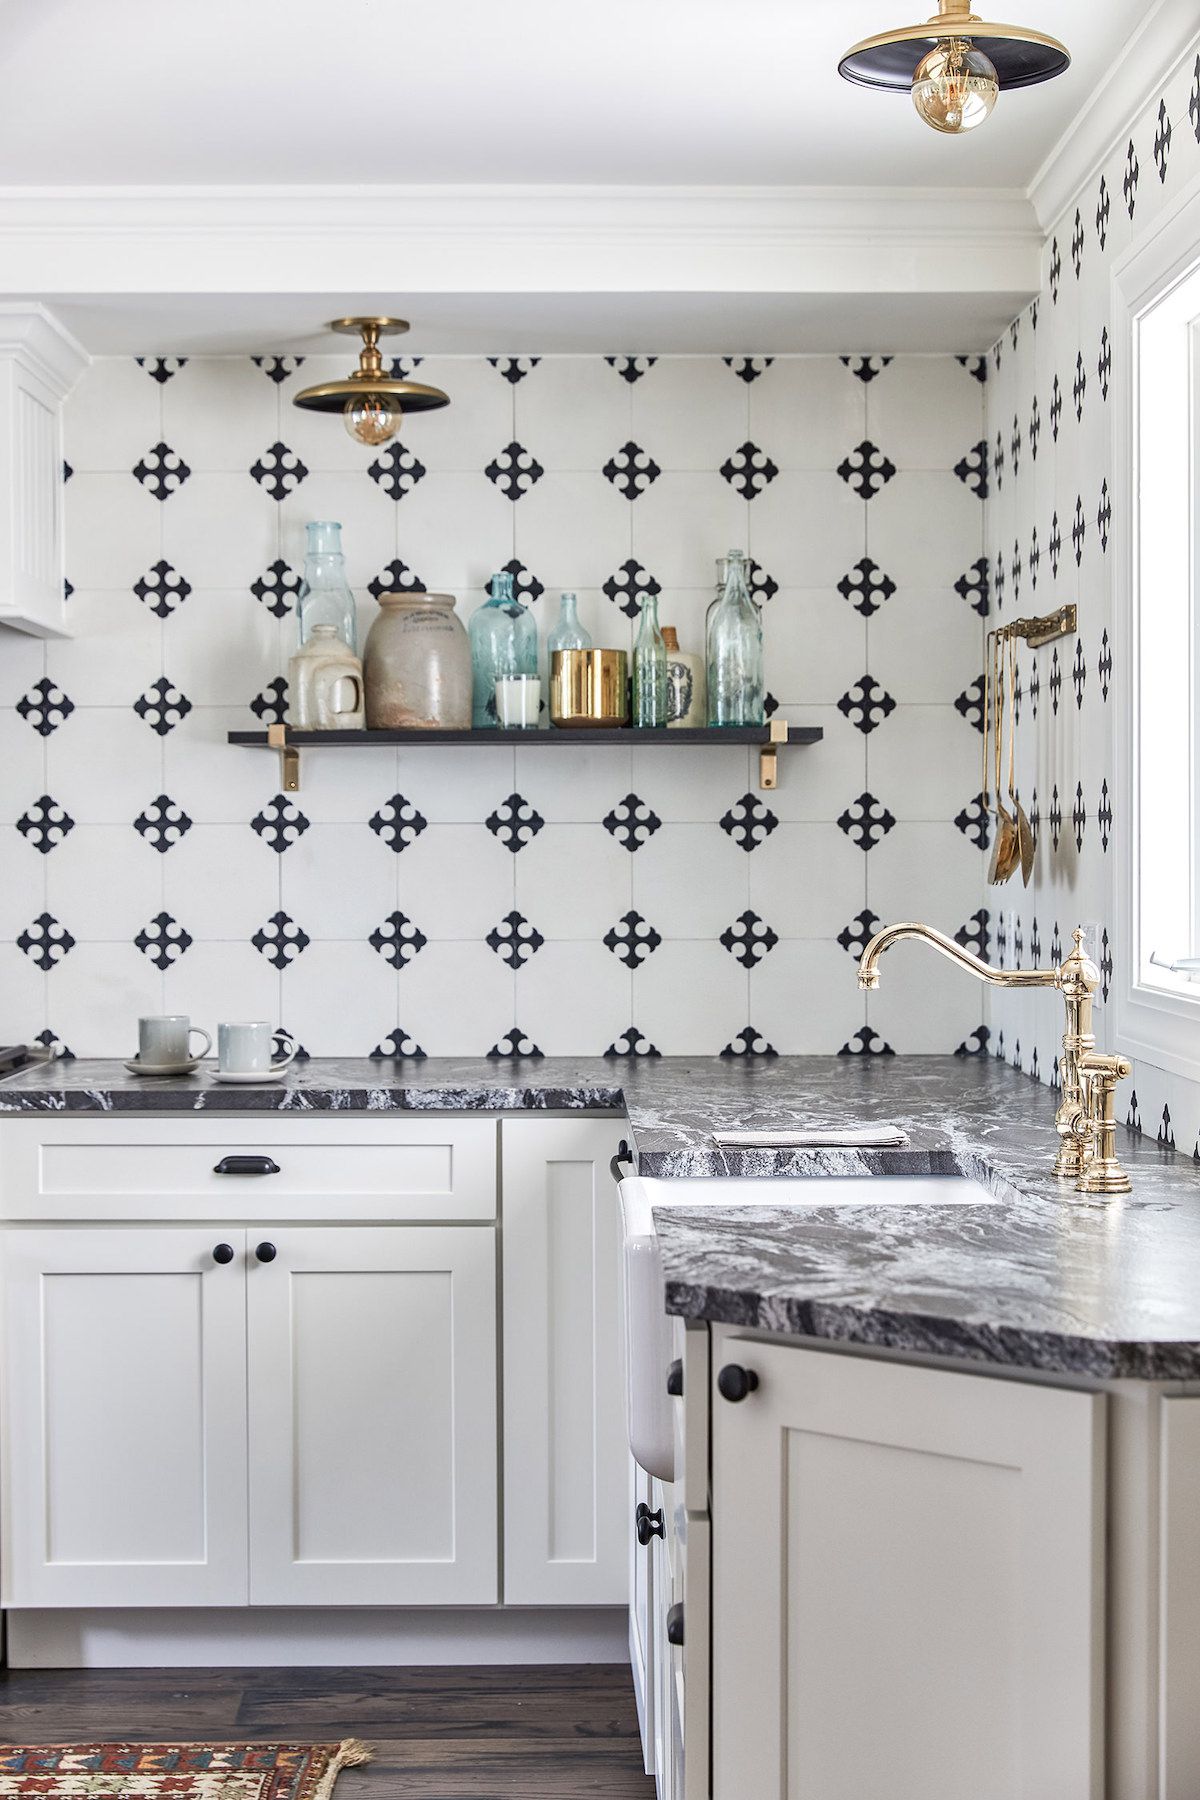
14. Make a Statement with a Black Geometric Patterned Backsplash
The absolute star of this kitchen is the graphic, black-and-white geometric tile. Everything else—the white shaker cabinets, the dark grey countertops, the brass hardware—is classic and fairly neutral. They create the perfect supporting cast for the tile’s lead performance. If you were to swap this for a simple white subway tile, the kitchen would lose all of its unique, bold personality. It just goes to show that you can make a huge impact by investing in one standout feature and keeping the rest of the elements simple and timeless.
|
📋 Copy HEX 🔗 Share |
When working with a busy, repeating pattern like this, grout color is a critical decision. A contrasting grout (like a light gray) would fight with the pattern and make it look chaotic. The best choice is almost always to match the darkest color in the tile—in this case, black. Using a black or dark charcoal grout makes the grout lines disappear, allowing the geometric pattern to read as a single, continuous surface. This makes the overall effect feel more polished and high-end.
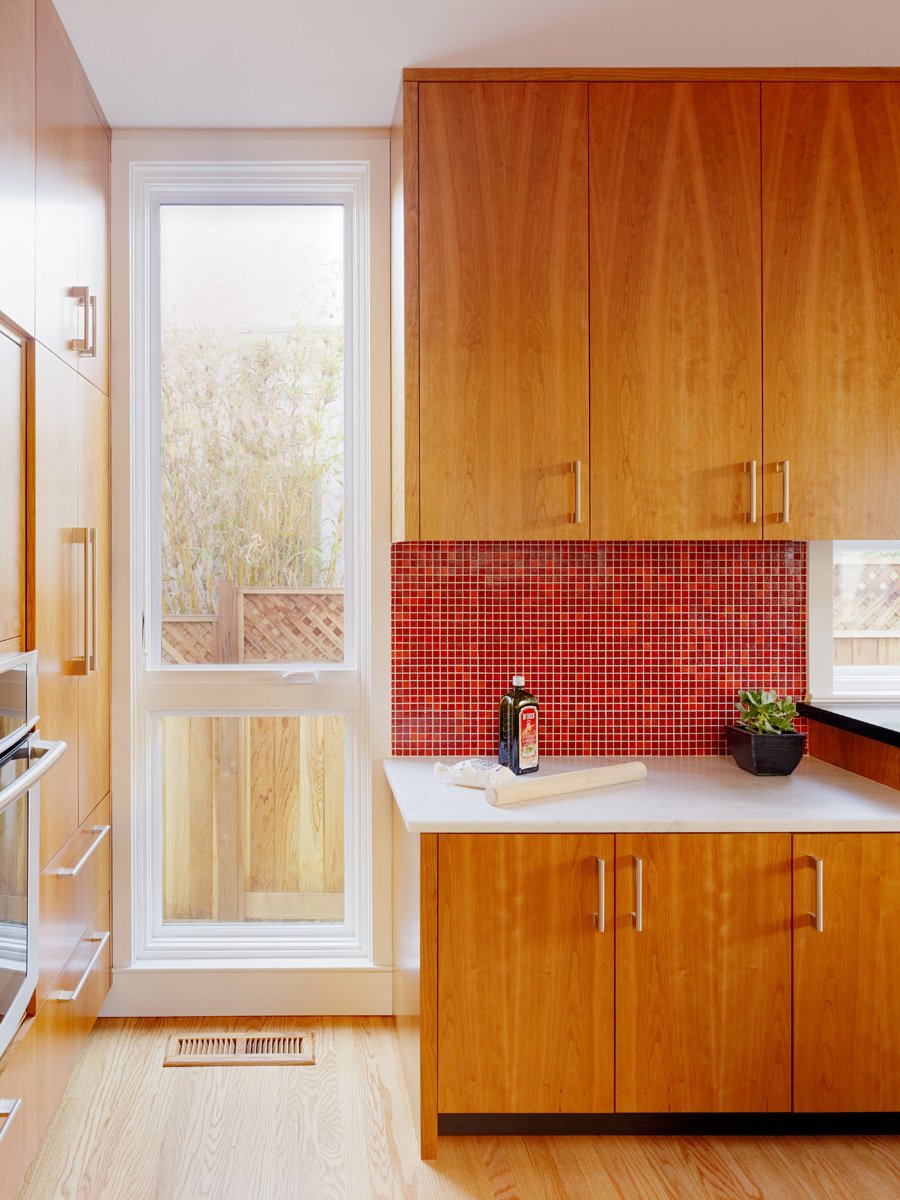
15. Energize a Modern Kitchen with a Red Mosaic Tile Backsplash
A bold splash of color like this works wonders in kitchens of all sizes, but it’s particularly effective in small to medium-sized spaces. In a larger kitchen, a full wall of bright red mosaic tile could feel overwhelming. Here, used in a contained area between the light wood cabinets and the white countertop, it acts as a powerful accent. This idea is perfect for a backsplash area of 15-40 square feet. The small scale of the mosaic tiles adds texture without making the space feel busy, because the color is uniform.
|
📋 Copy HEX 🔗 Share |
If tiling with tiny mosaics feels intimidating or is out of the budget, peel-and-stick is your best friend. You can find high-quality peel-and-stick mosaic tile sheets at stores like Wayfair, Amazon, or even Walmart for as little as $5-$8 per square foot. They are designed for easy DIY installation and are completely removable, making them a perfect solution for renters or for those who love the color now but might want a change in a few years. It gives you the same look as this vibrant red backsplash for a fraction of the cost and commitment.
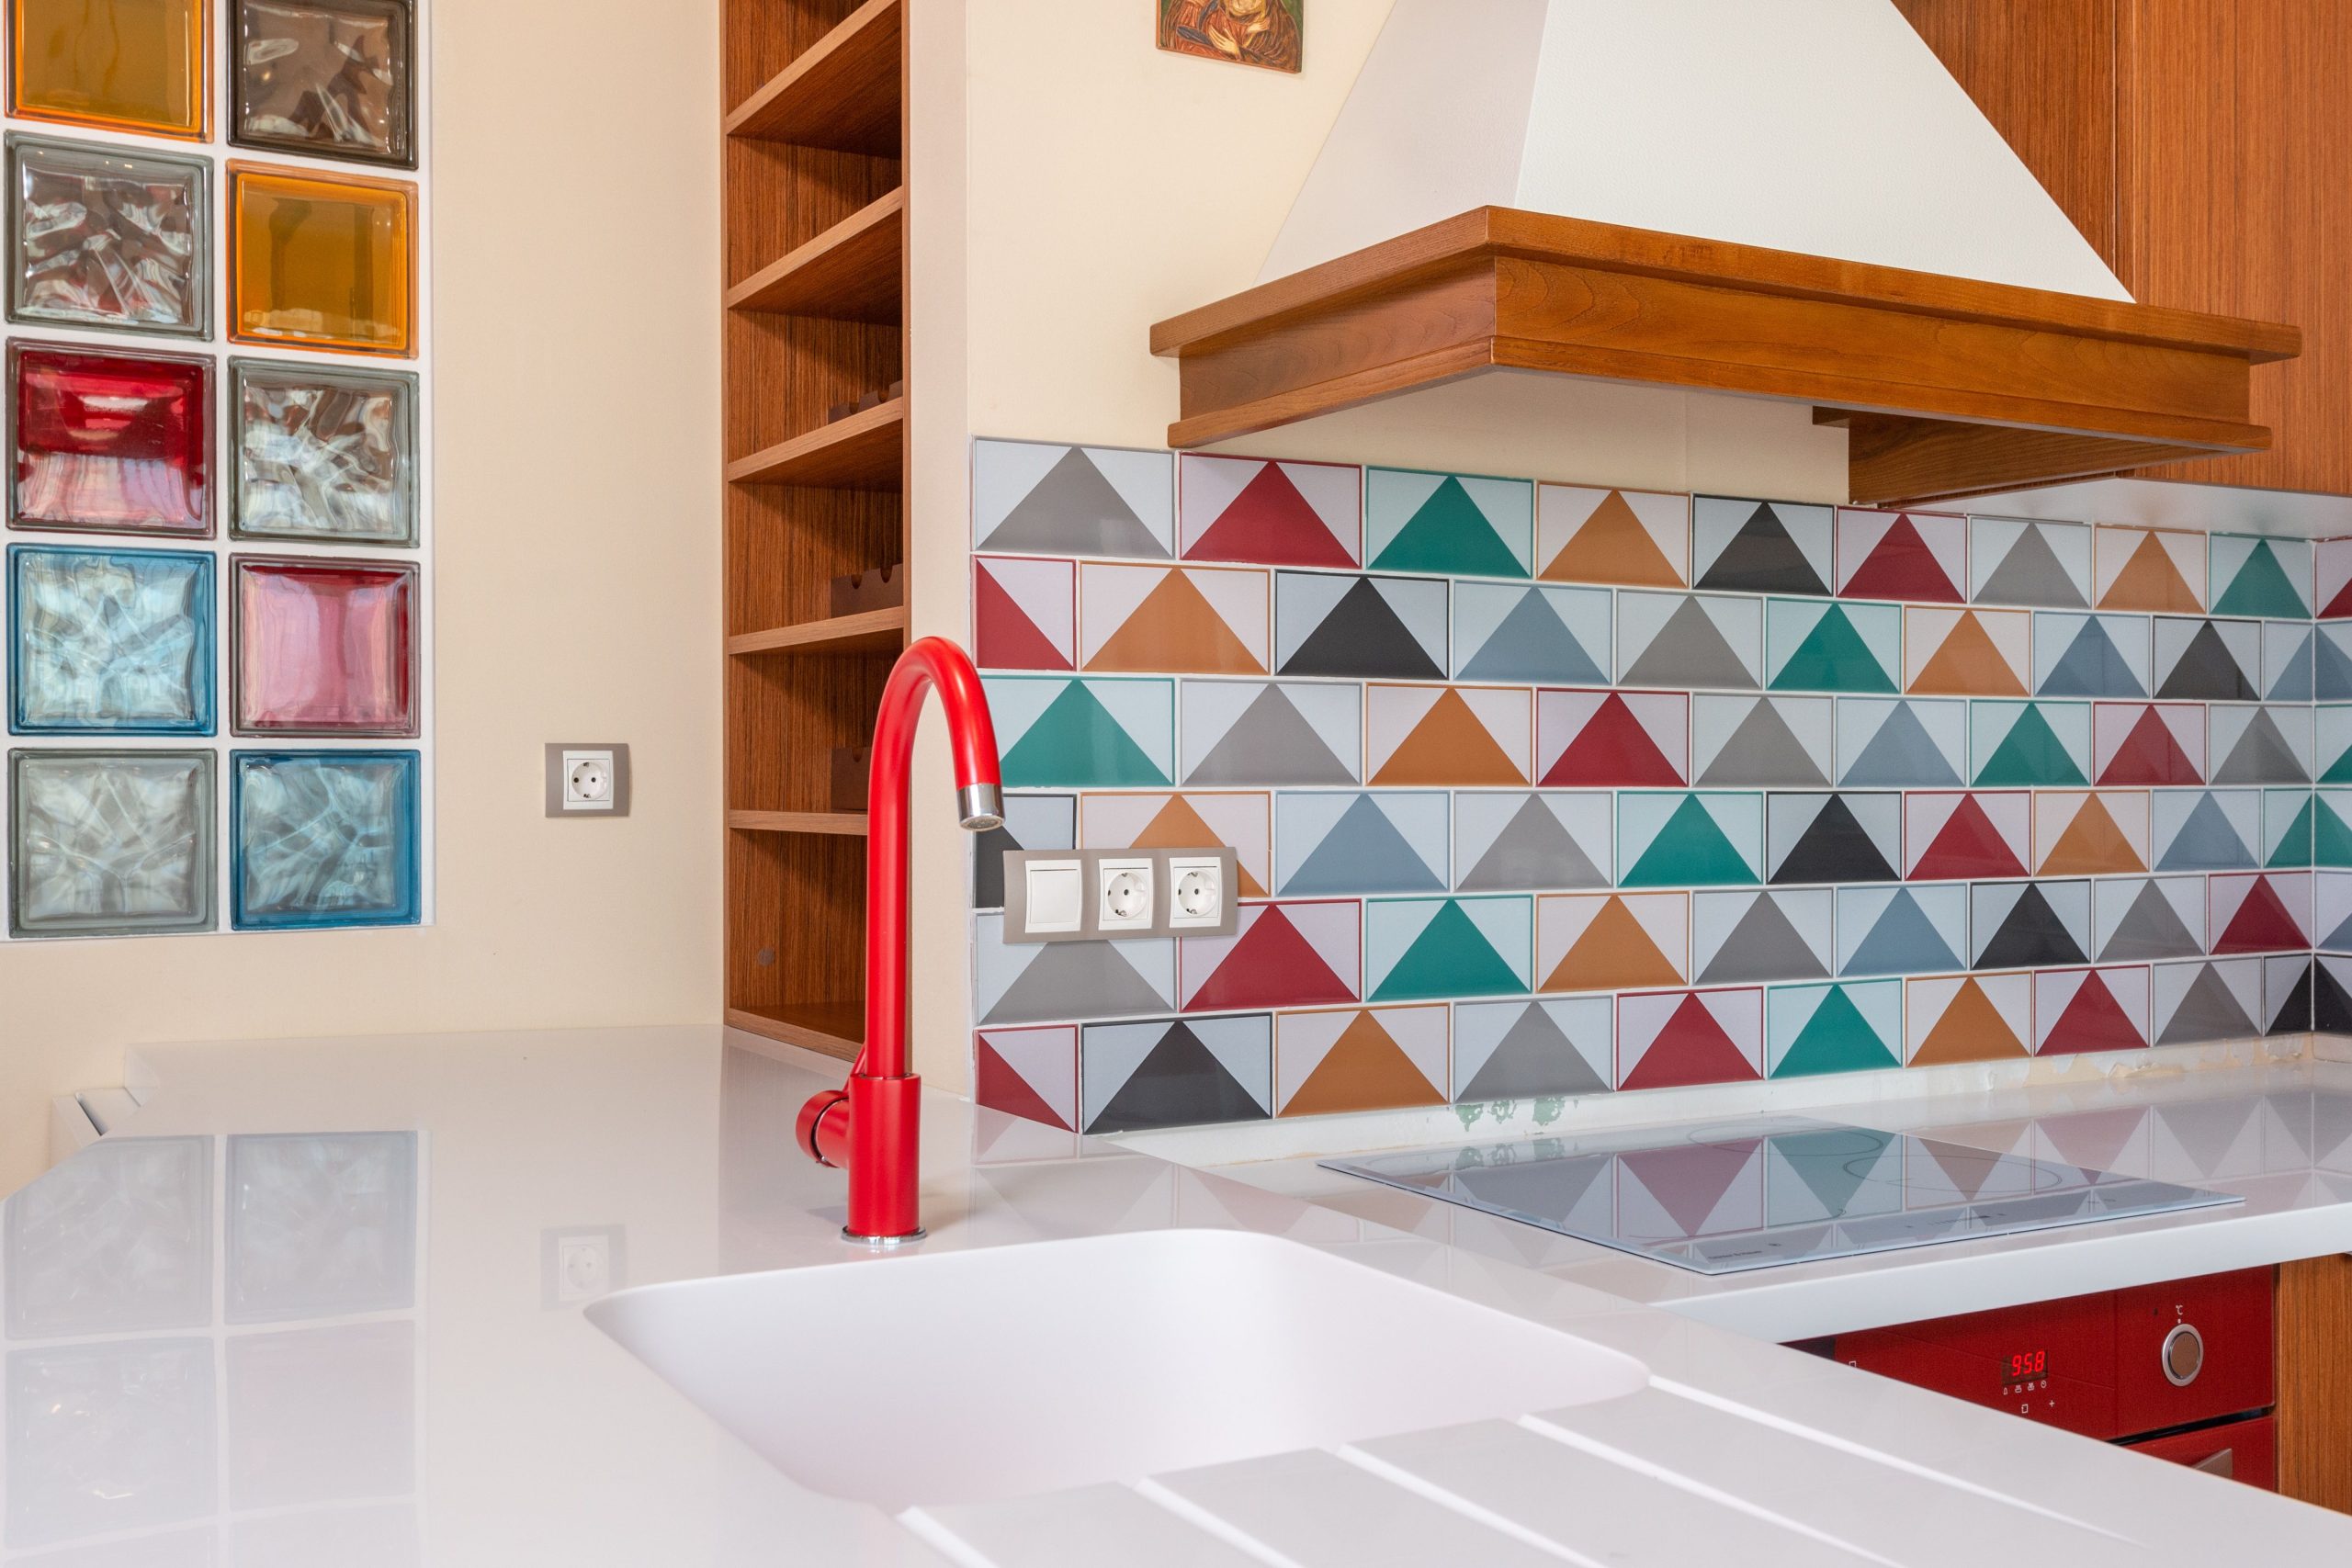
16. Get Playful with Geometric Triangles and Red Accents
This kitchen is a masterclass in joyful, curated eclecticism. It works because it commits to a playful theme and repeats its key elements. The colors from the geometric triangle backsplash are pulled out and used for accent pieces, like the bold red faucet and oven. This repetition makes the choices feel intentional, not random. The design successfully balances the busy pattern of the backsplash with large areas of solid, neutral surfaces, like the pristine white countertop and simple wooden shelving. This gives the whole composition breathing room and impact.
|
📋 Copy HEX 🔗 Share |
This is a very specific, personality-driven look. While it’s incredibly fun and unique, it might not be everyone’s cup of tea when it comes time to sell your home. A potential buyer might not share your love for a multicolored backsplash and red oven. This is a design you choose because you absolutely love it for yourself. If you’re looking for a safer bet for resale, consider a more neutral version of a geometric tile, or try the peel-and-stick approach for easy removal later on. It shares a similar happy energy with Idea #9.
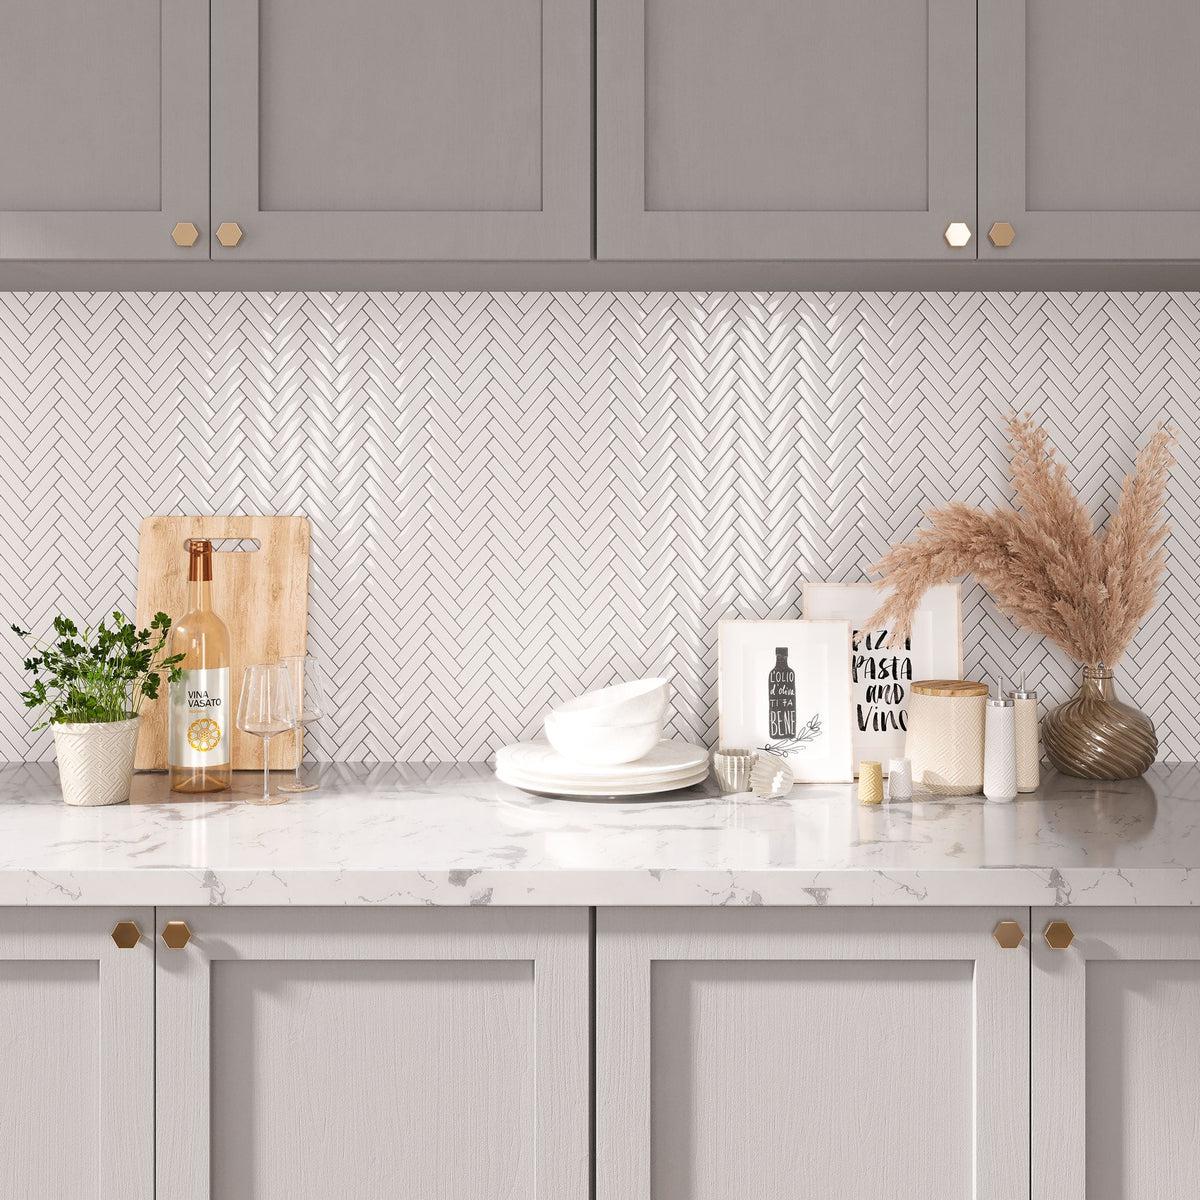
17. Add a Touch of Glam with a White Herringbone and Gold Hardware
This elegant, light-filled look is all about a refined visual recipe. Let’s call it 50% calm gray + 40% crisp white + 10% warm metallic. The light gray shaker cabinets provide a soft, neutral foundation. The white marble-look countertop and white herringbone backsplash bounce light around, creating brightness and a sense of luxury. The real key is the 10% accent: the brushed gold hexagonal knobs. This single choice adds a layer of warmth and on-trend glamour that elevates the entire scheme from simply ‘nice’ to ‘designer-curated.’
|
📋 Copy HEX 🔗 Share |
While this look is stunning, keeping it pristine requires some attention. White marble, even if it’s a more durable quartz lookalike, can be prone to staining from things like red wine or coffee if not wiped up quickly. The white herringbone tile backsplash has many grout lines, which are a prime spot for discoloration. Regular sealing is essential. As for those beautiful gold knobs? Be mindful of harsh chemical cleaners, which can damage the finish over time. A simple wipe with a damp cloth is all they need.
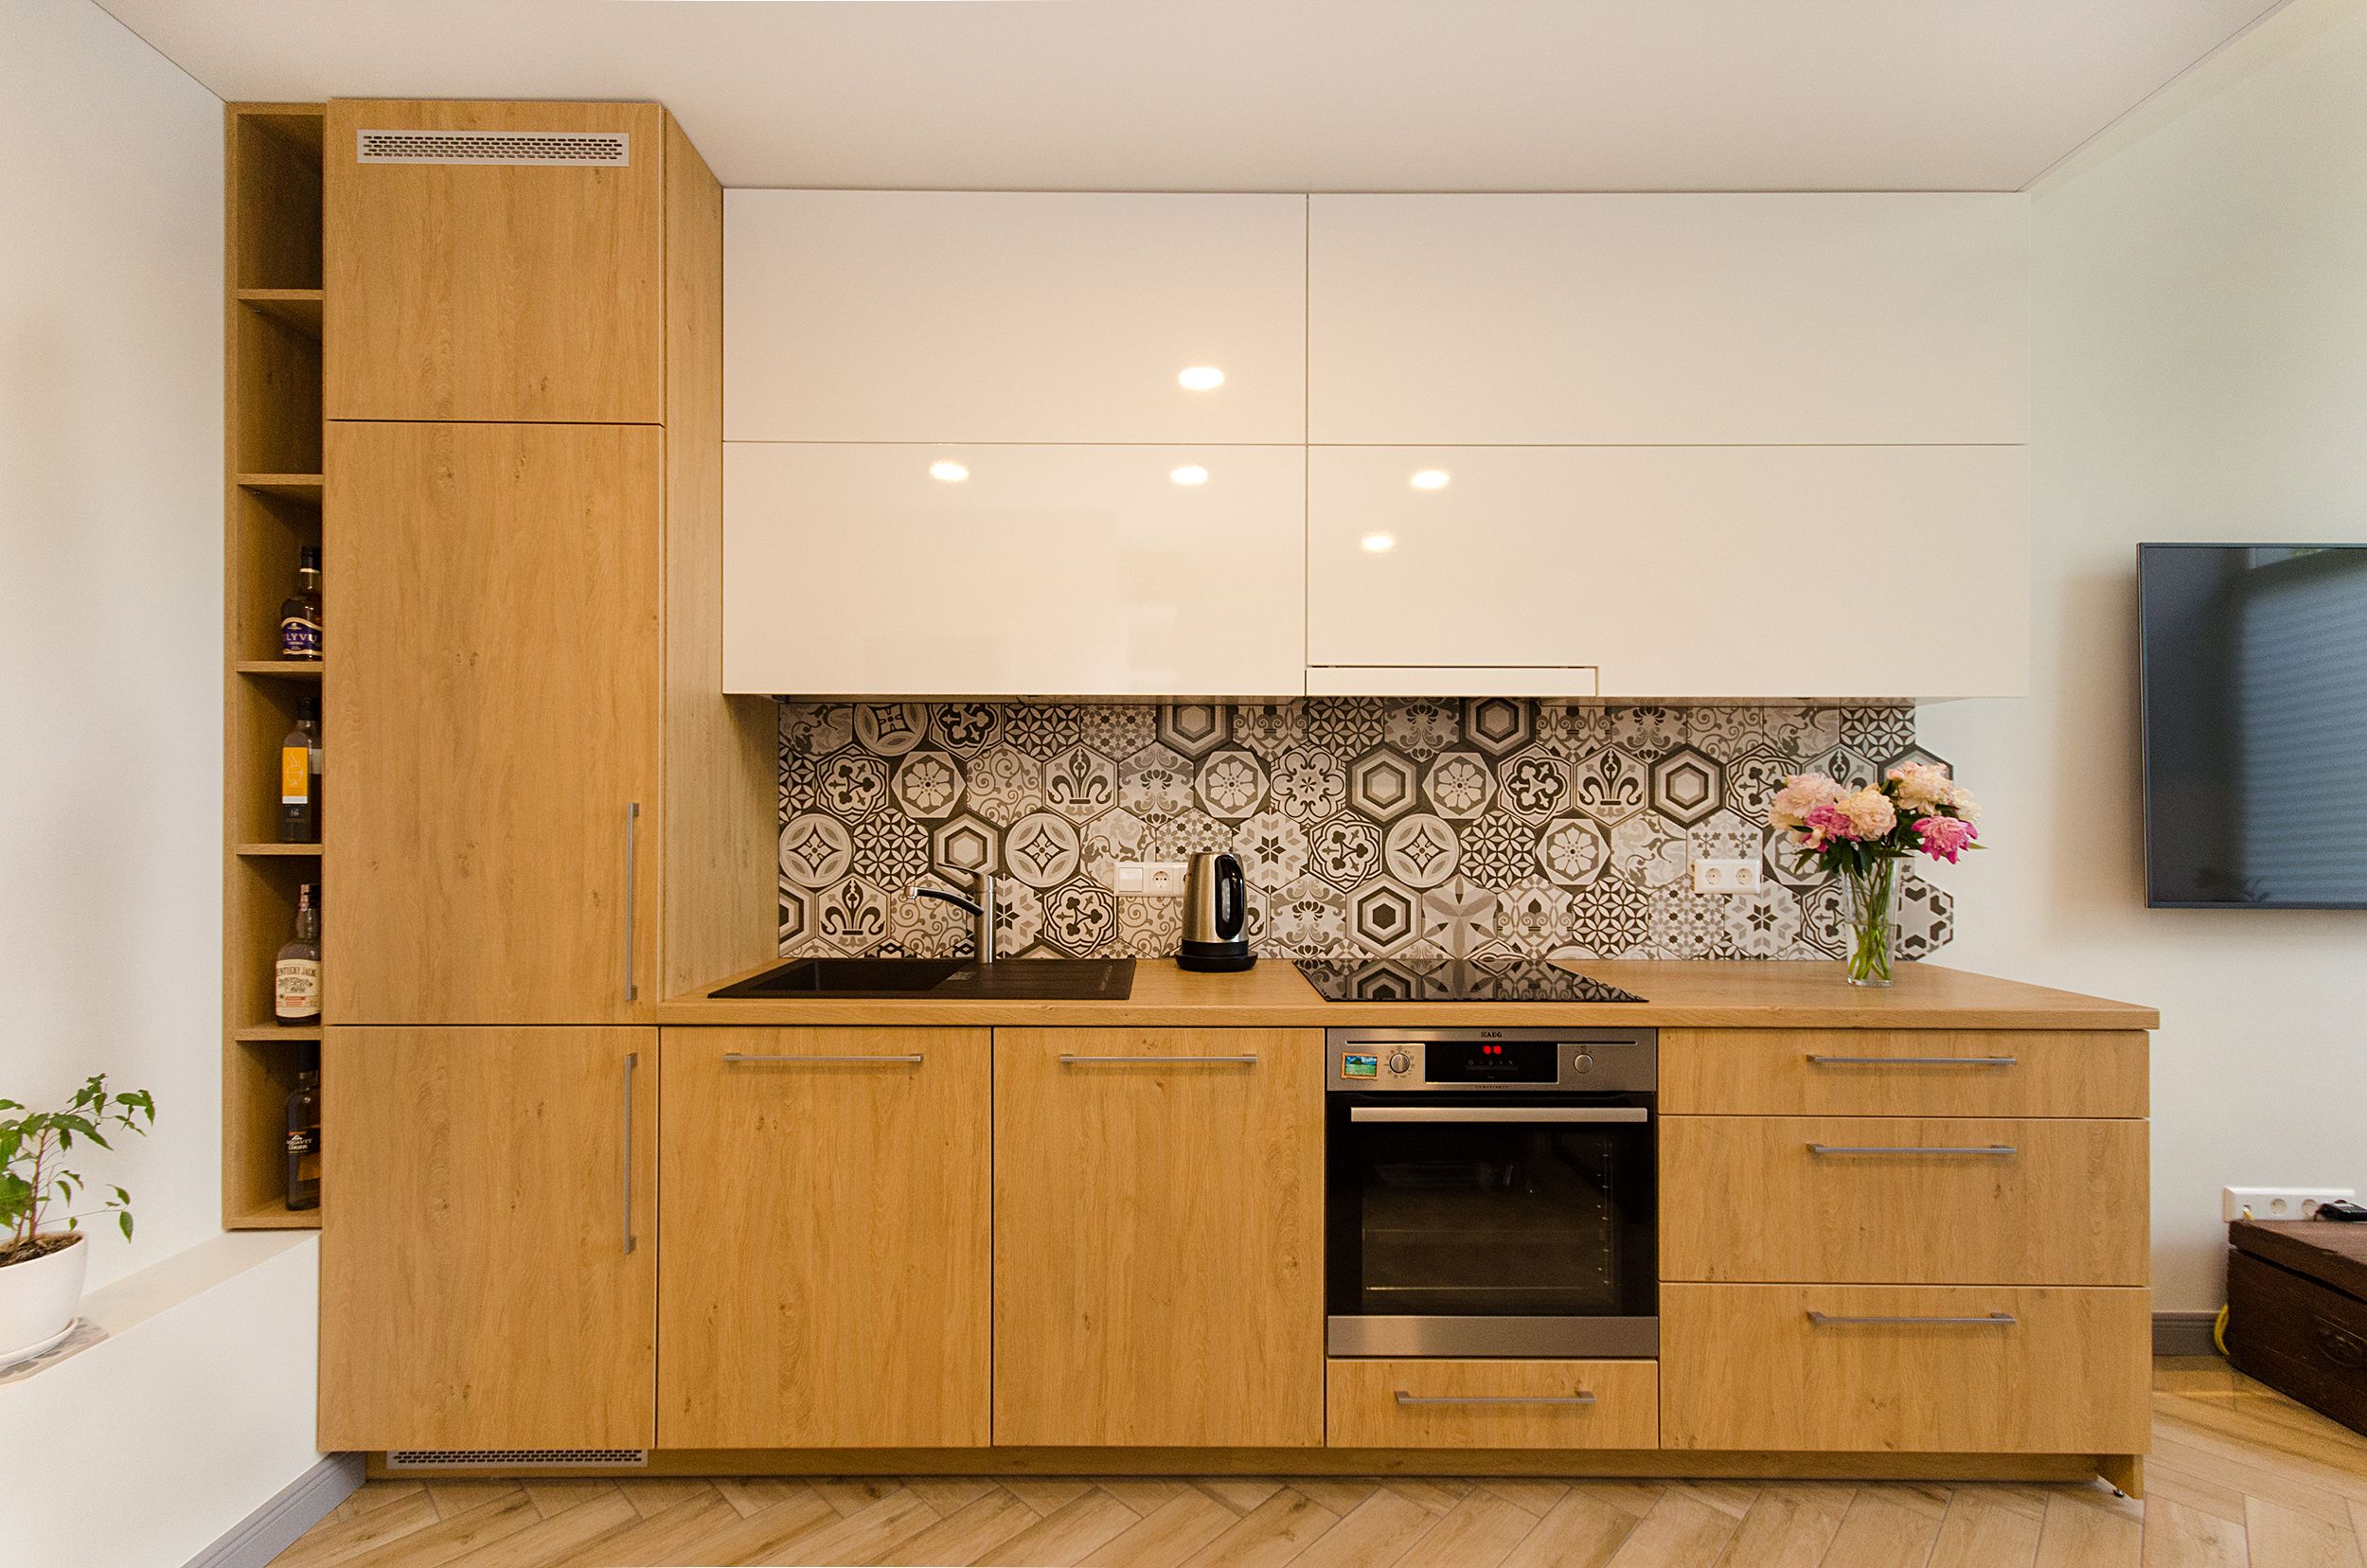
18. Balance Wood and White with a Patterned Hexagonal Backsplash
This design succeeds by perfectly balancing warmth and coolness. The natural beech wood of the lower cabinets provides a rich, organic warmth that grounds the space. This is contrasted by the crisp, glossy white of the upper cabinets, which adds light and a sense of openness. The hexagonal tile backsplash acts as the perfect mediator between the two. Its grayscale pattern picks up on both the white uppers and the black integrated sink, while its geometric nature adds a modern touch that ties the whole contemporary look together.
|
📋 Copy HEX 🔗 Share |
This is an incredibly versatile design that works well in medium-sized kitchens, typically those around 100-150 square feet. The mix of materials requires a bit of breathing room to be appreciated. The use of white upper cabinets is a great trick for any ceiling height, as it draws the eye upward and makes the space feel taller. In a much smaller kitchen, you might opt for the wood only on open shelves rather than all lower cabinets to keep it from feeling too heavy.
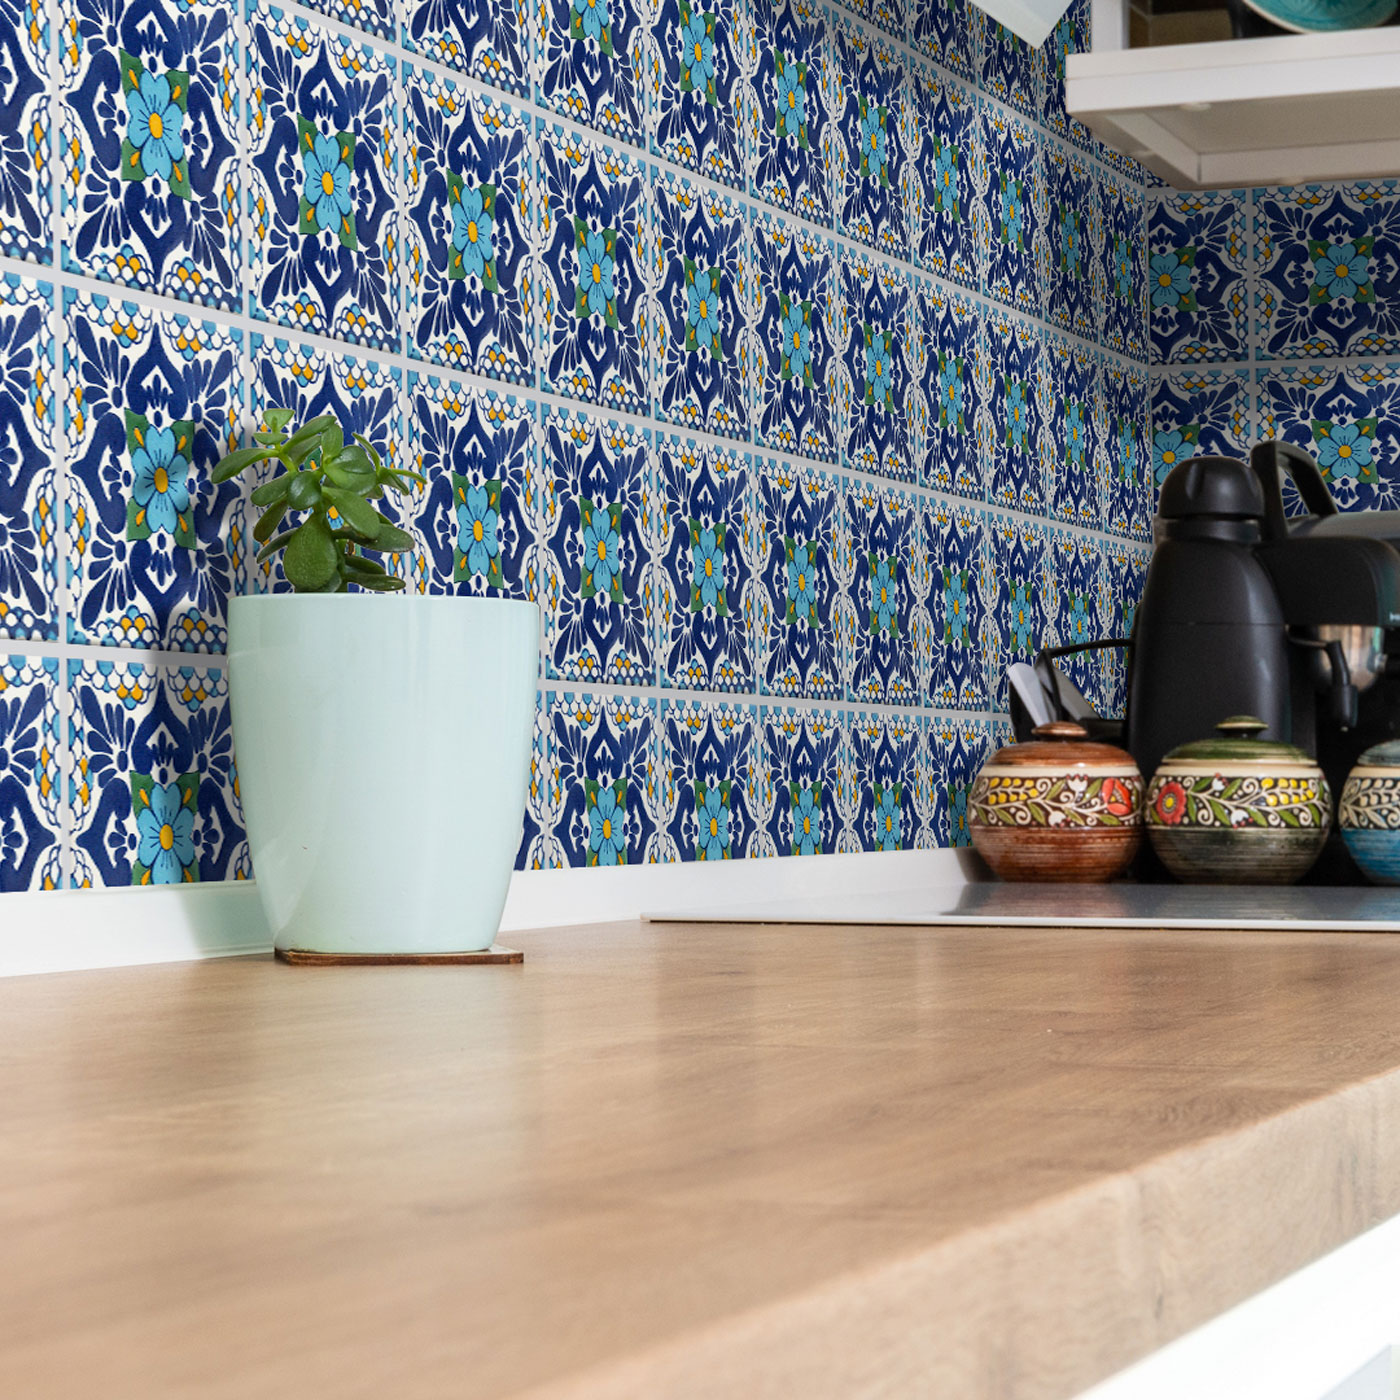
19. Install a Charming Blue Floral Patterned Tile Backsplash
The undeniable heart of this design is the blue floral tile. It’s an immediate focal point that infuses the space with personality and a touch of handmade charm. Without it, you would have a simple wood countertop and a neutral wall. The tile tells a story and transforms a functional kitchen area into a decorative vignette. It proves that you don’t need a lot of space or a huge budget to make a significant style statement. A few square feet of a truly special tile can have more impact than an entire kitchen of bland, safe choices.
|
📋 Copy HEX 🔗 Share |
A patterned tile like this is a commitment, so let’s make sure it’s the right one for you.
- Order a Sample (or a few): Computer screens can be deceiving. The blues in person might be brighter, darker, or have a different undertone. Order a single tile and place it on your countertop, against your wall color, to see how it looks in your home’s actual lighting.
- Consider the Scale: How large is the repeating pattern? A very large pattern might get cut off awkwardly in a small backsplash area. This tile, with its medium-scale floral design, works well in tighter spaces.
- Plan Your Grout: With a blue and white tile, you’ll likely want a white or very light gray grout to let the pattern shine. A dark grout would compete with the floral illustration and make it look too busy.
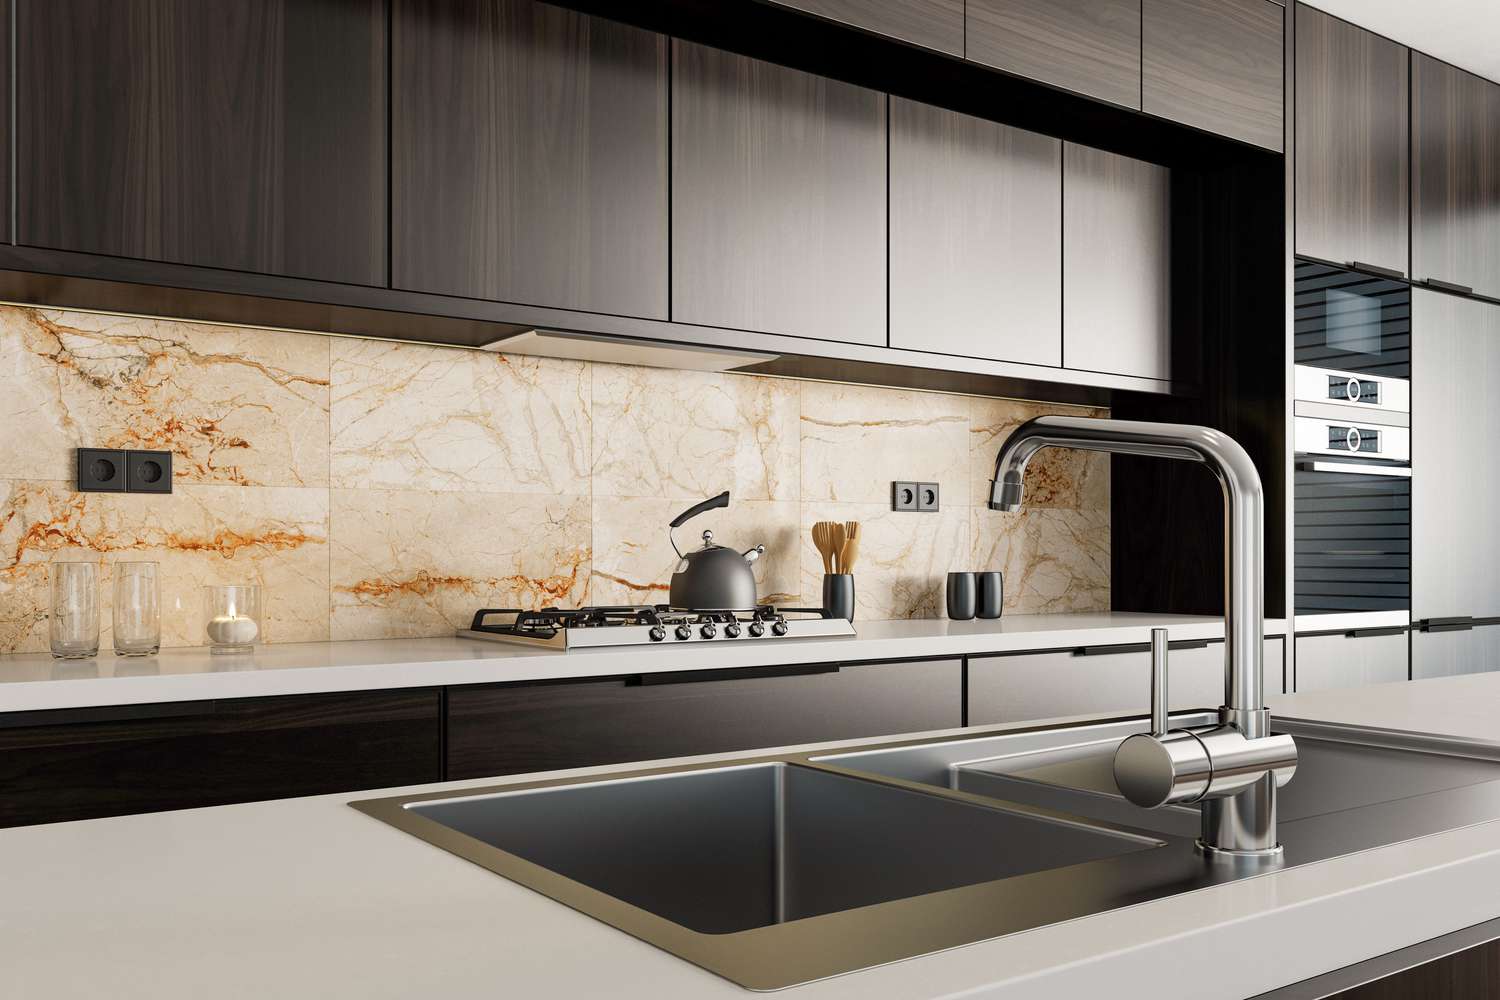
20. Create Sophistication with Dark Wood and Warm Marble
This kitchen nails a high-end, sophisticated look through the power of dramatic contrast. The deep, dark wood grain of the cabinets creates a sense of richness and depth. This is boldly contrasted with the light, creamy marble backsplash. The key element that makes it all work is the prominent rust-colored veining in the marble. This warm, earthy tone perfectly echoes the warmth of the wood, creating a cohesive and intentional link between the light and dark elements. The clean, solid white countertop acts as a quiet buffer between the two strong personalities.
|
📋 Copy HEX 🔗 Share |
To ensure a marble backsplash with prominent veining looks like a cohesive, high-end installation, lay out all your tiles on the floor before a single one goes on the wall. This allows you to arrange the tiles like a puzzle, ensuring the veins flow logically from one tile to the next. Avoid placing tiles with very heavy veining right next to ones with very little. A thoughtful layout that creates a natural, flowing pattern is the number one secret to making tile look like a single, expensive slab of stone.
21. Add a Pop of Sunshine with a Yellow Square Tile Backsplash
The shot of vibrant yellow is everything here. It’s the singular element that injects joy and energy into an otherwise very calm and neutral kitchen. Take away the yellow tile, and you have a stylish but much more subdued space with off-white cabinets and a dark gray counter. The yellow tile is a declaration of personality. It shows that the homeowner isn’t afraid of color and wants their kitchen to be a happy, uplifting place. It’s a testament to the power of a single, bold color choice to define an entire room’s mood.
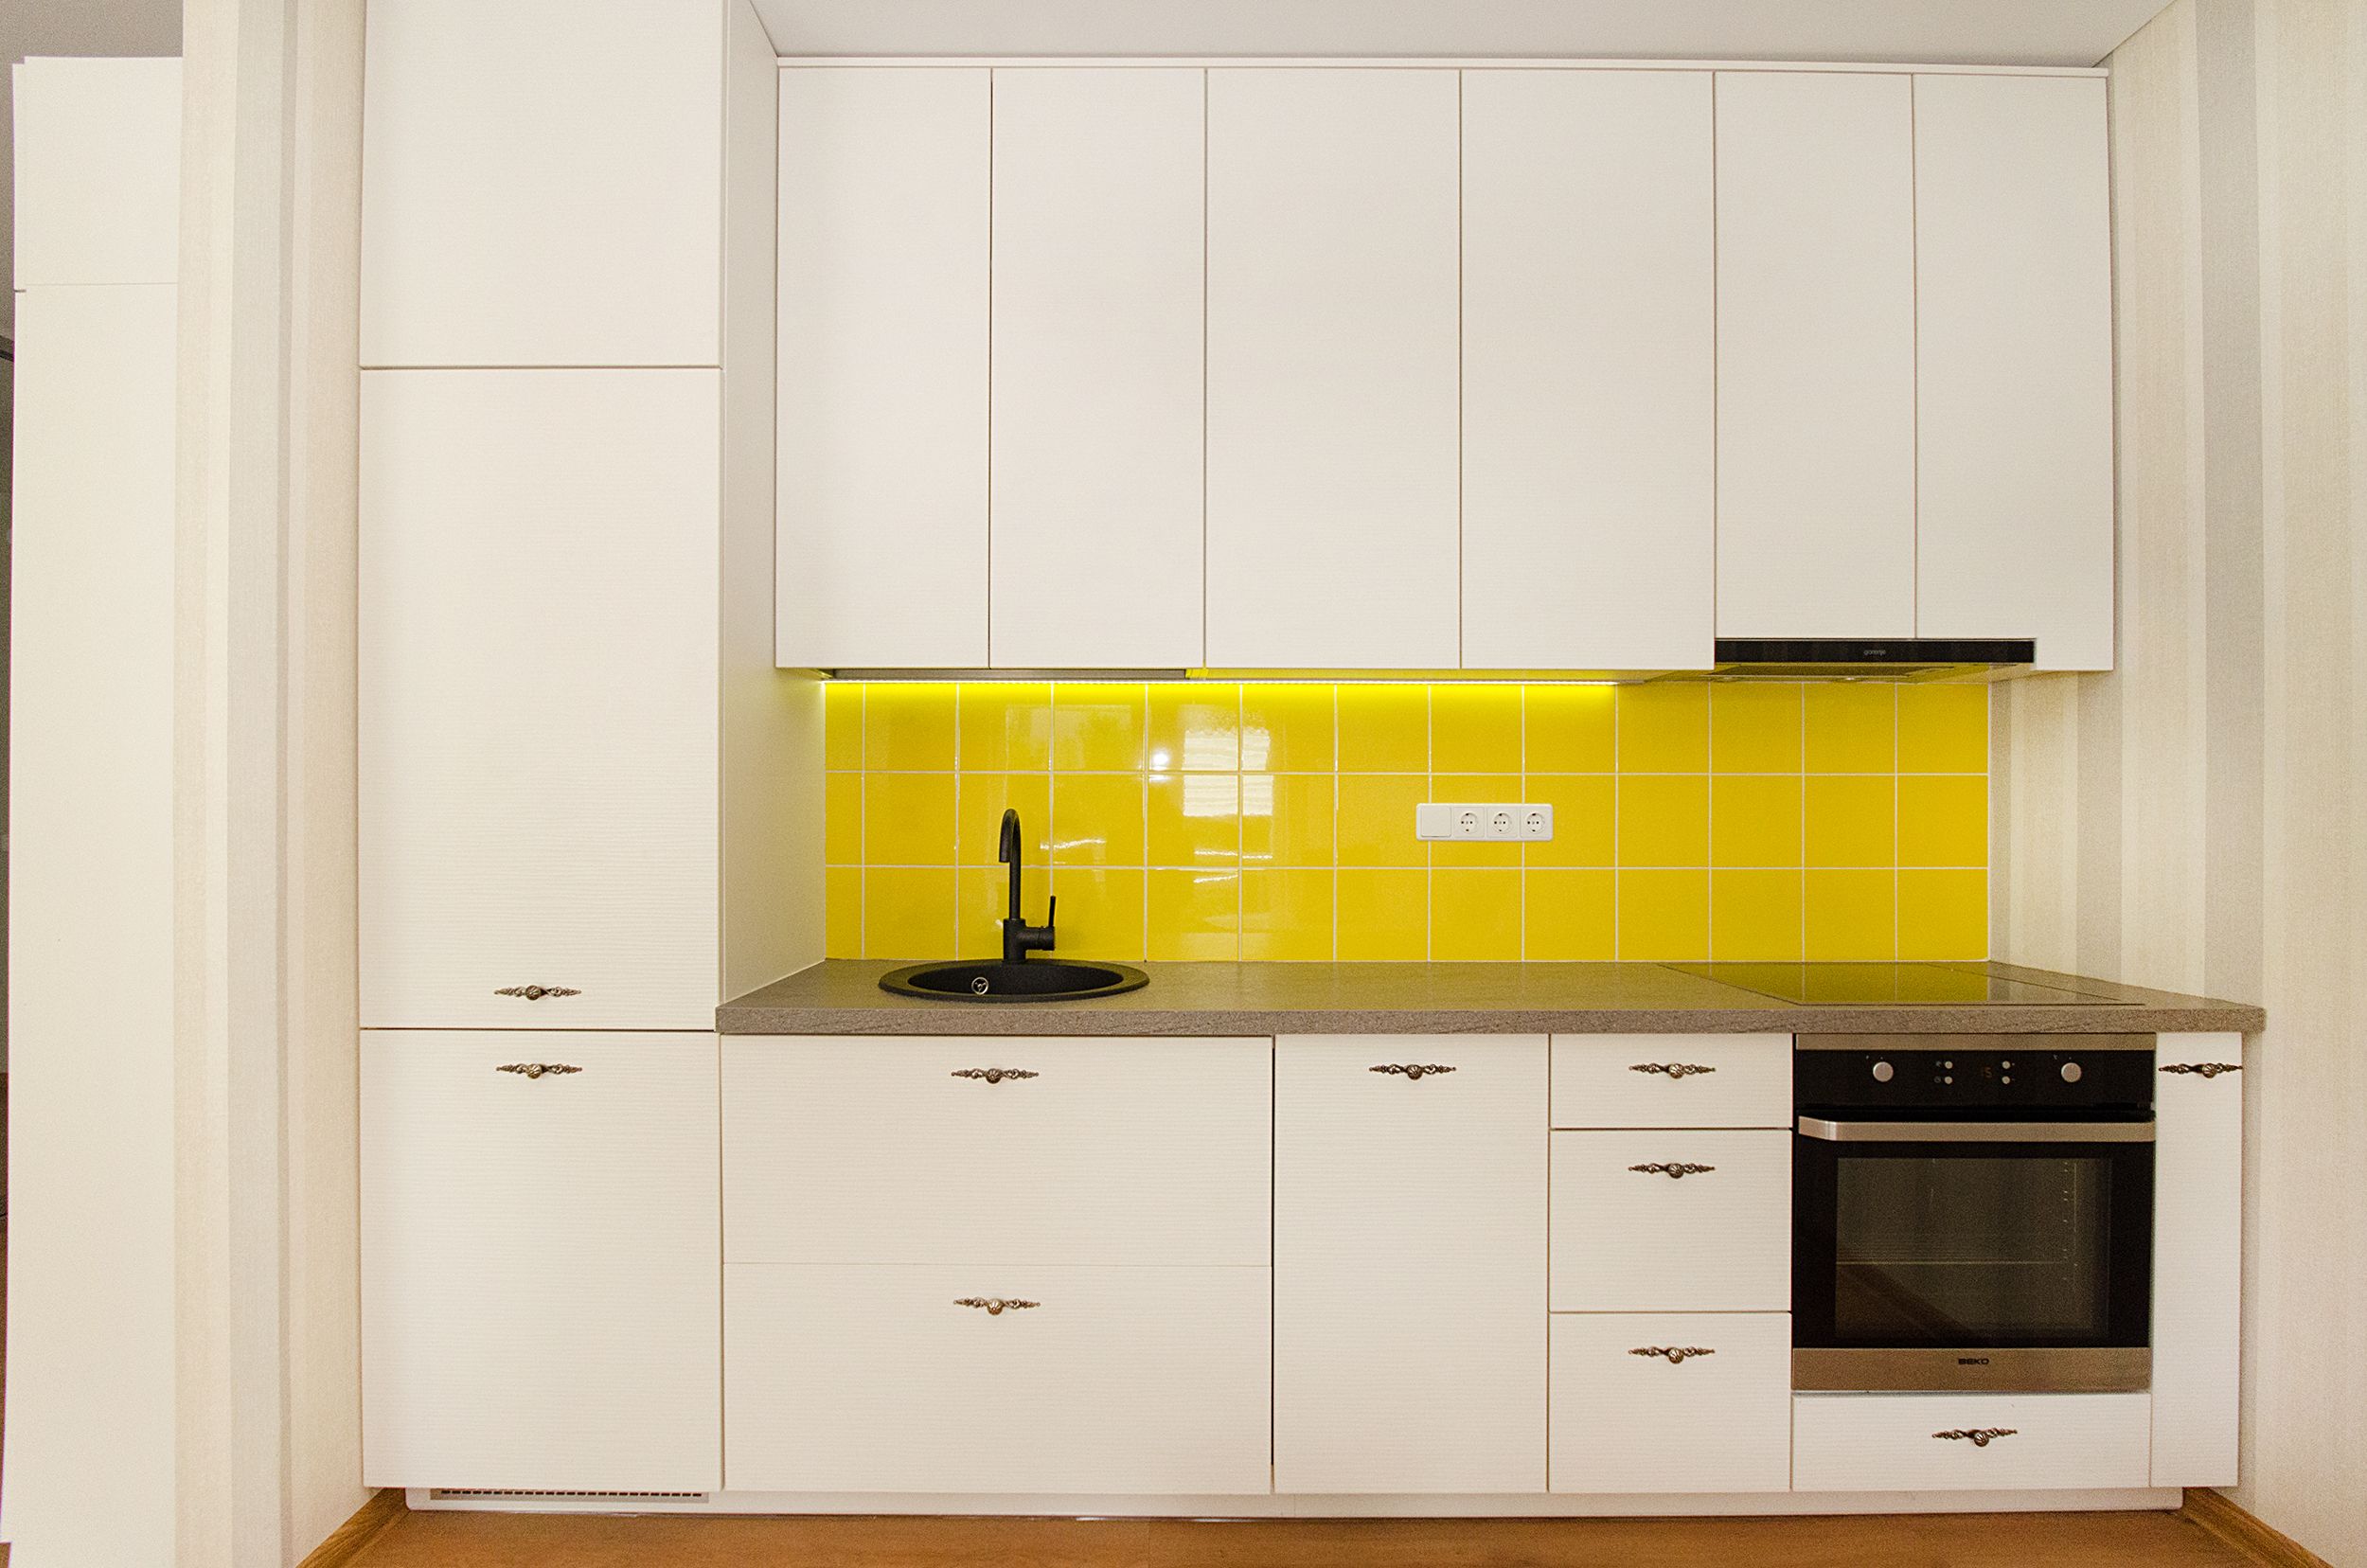
This kitchen’s chic formula breaks down to about 70% neutral base + 20% bold accent color + 10% metallic hardware. The off-white cabinets and dark gray countertops provide a versatile, neutral canvas. The sunny yellow tile is the high-impact accent, covering enough area to make a statement. The final 10% comes from the decorative brass pulls, which add a touch of warmth and sophistication. You could easily swap the yellow for a cobalt blue or an emerald green, and the chic, balanced effect would remain.
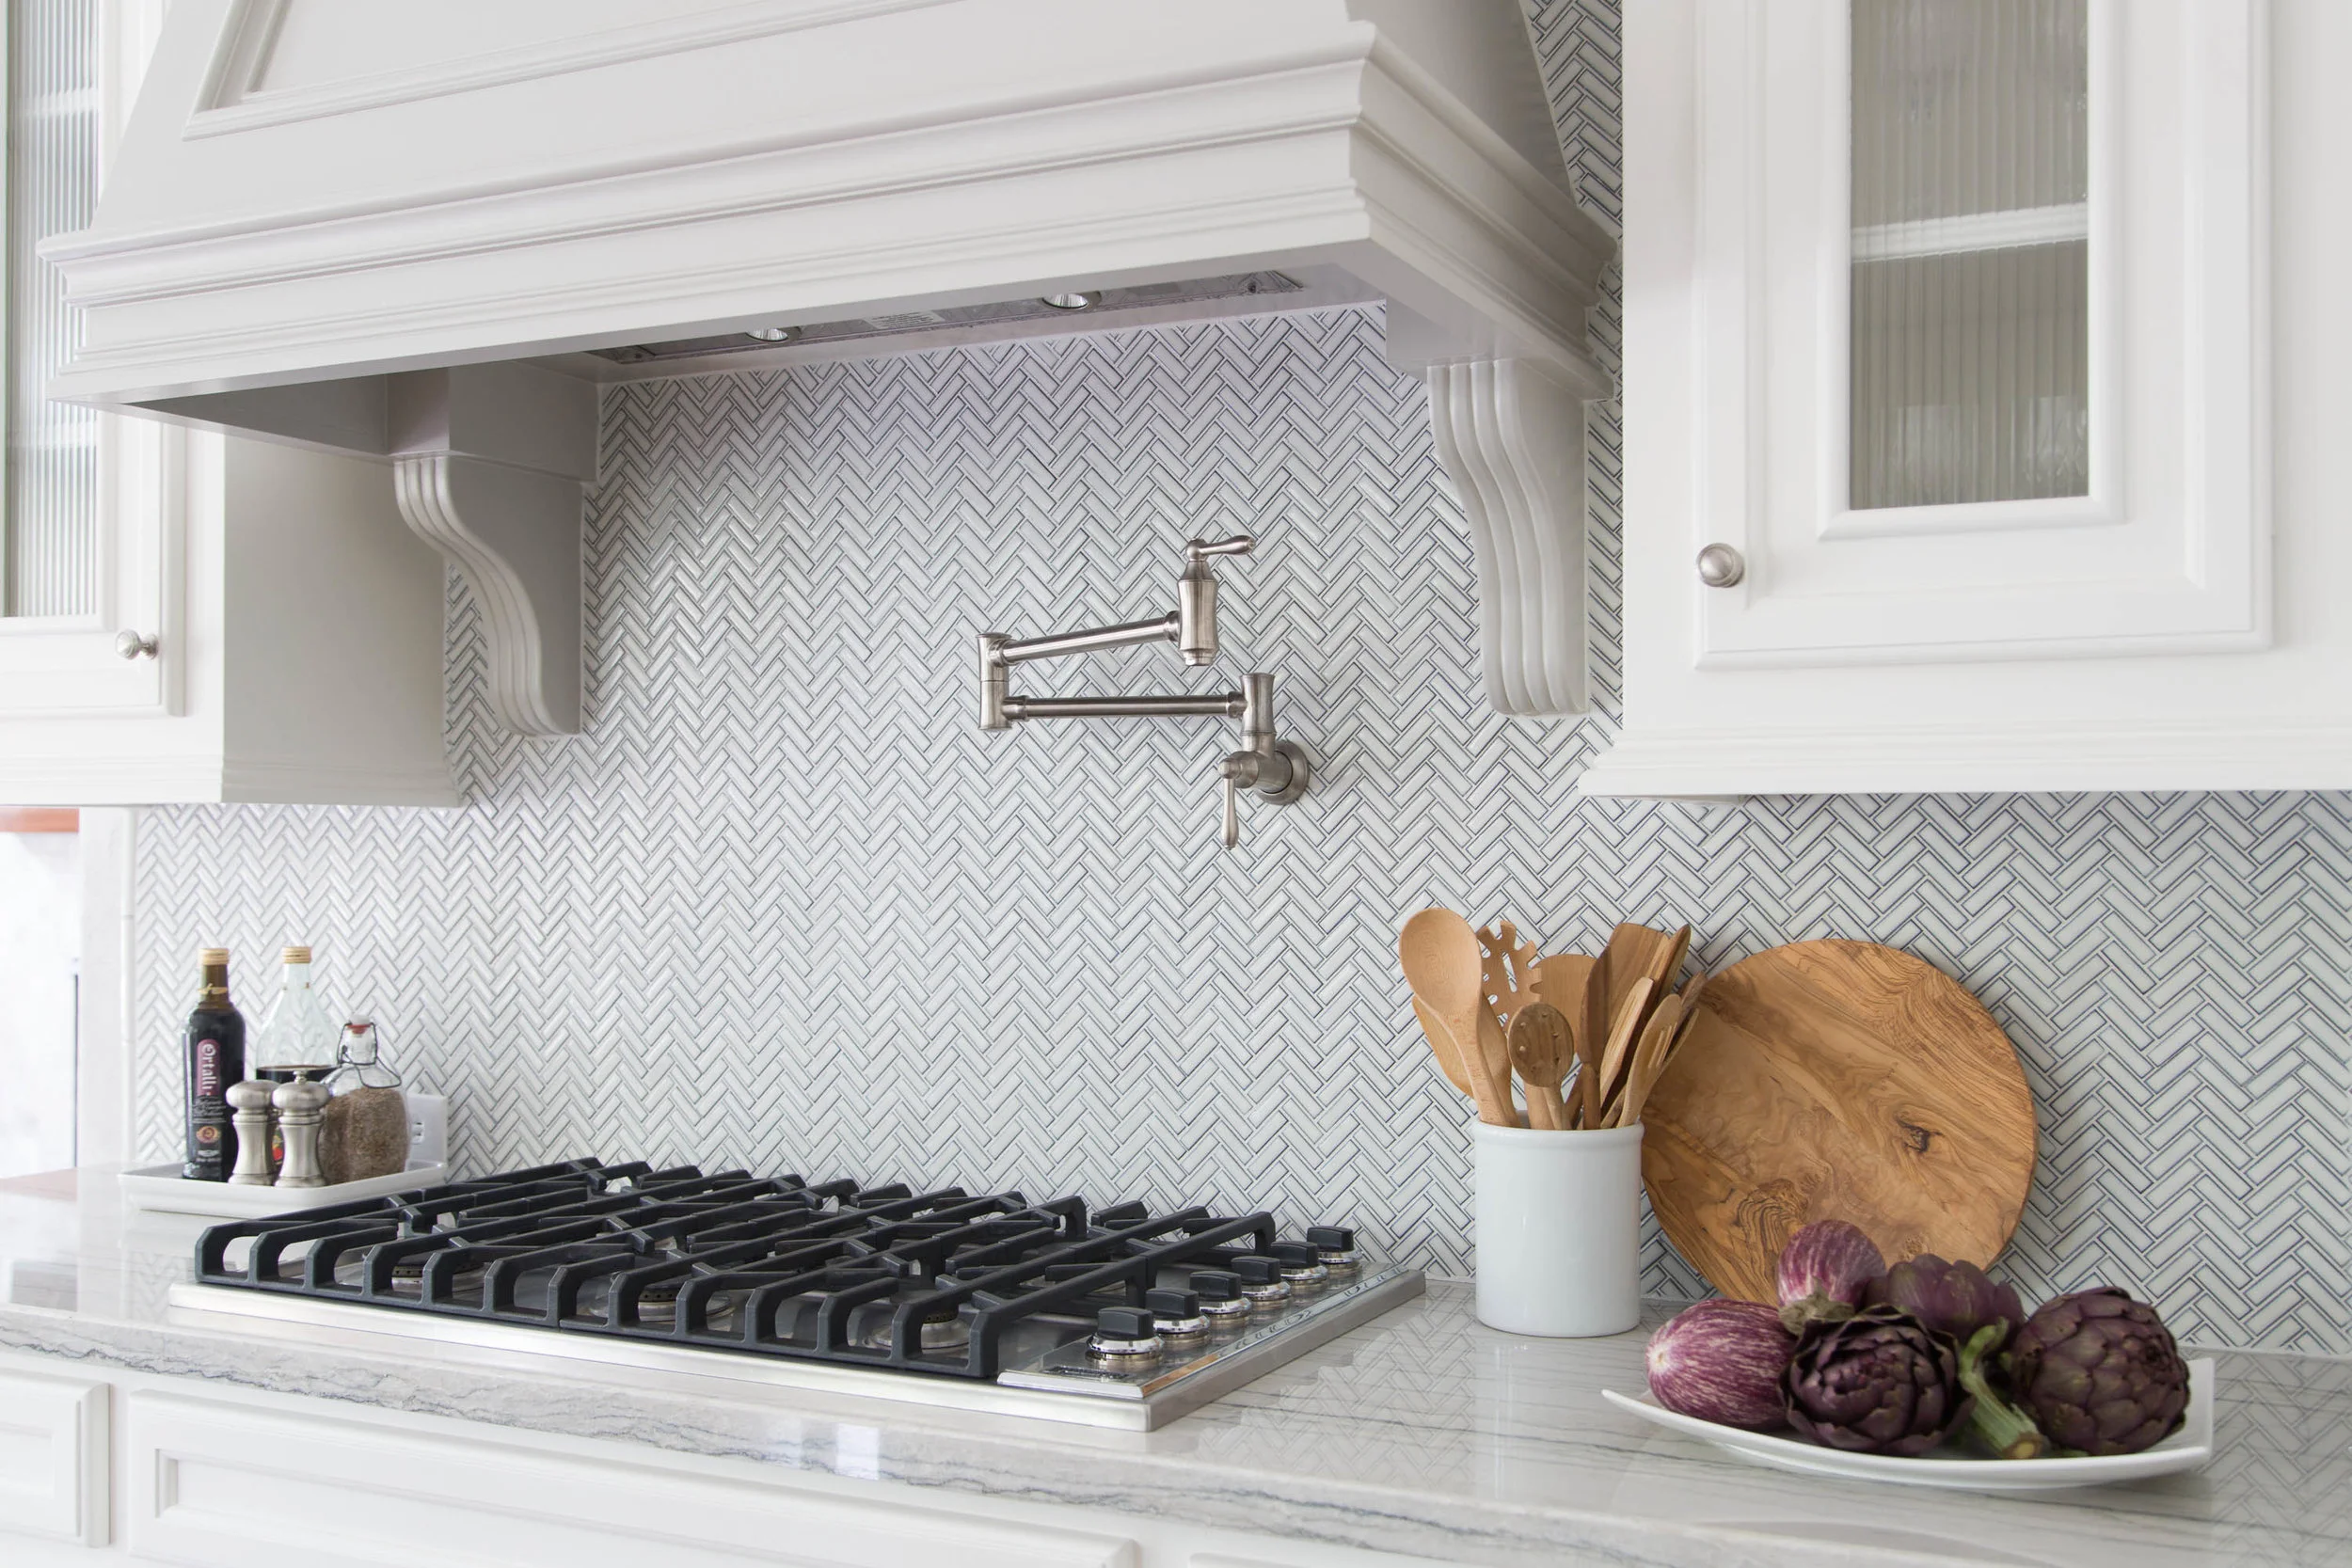
22. Get a Modern Farmhouse Look with White Herringbone and a Pot Filler
This look masterfully blends classic and modern elements. The herringbone pattern, a classic flooring choice, feels fresh and modern on a backsplash. Using dark grout with the white tiles emphasizes the dynamic ‘V’ shape, adding texture and a graphic quality. The pot filler faucet, a feature of high-end and restaurant kitchens, adds a touch of functional luxury. The simple, clean lines of the custom range hood and shaker cabinets ground the look in a contemporary farmhouse aesthetic. It’s the mix of pattern, utility, and clean lines that makes it so successful.
|
📋 Copy HEX 🔗 Share |
A pot filler looks incredibly cool, but let’s talk about the practical side. It requires running a separate cold water line in the wall behind your stove, which can be a significant plumbing expense ($400-$800+) if you’re not already doing a major renovation. Also, because it’s only used for filling pots, the water sits in the pipe for long periods. You’ll need to remember to let it run for a few seconds to flush out any stagnant water before filling a pot for cooking. Finally, it’s another fixture to clean and a potential, if unlikely, source for leaks.
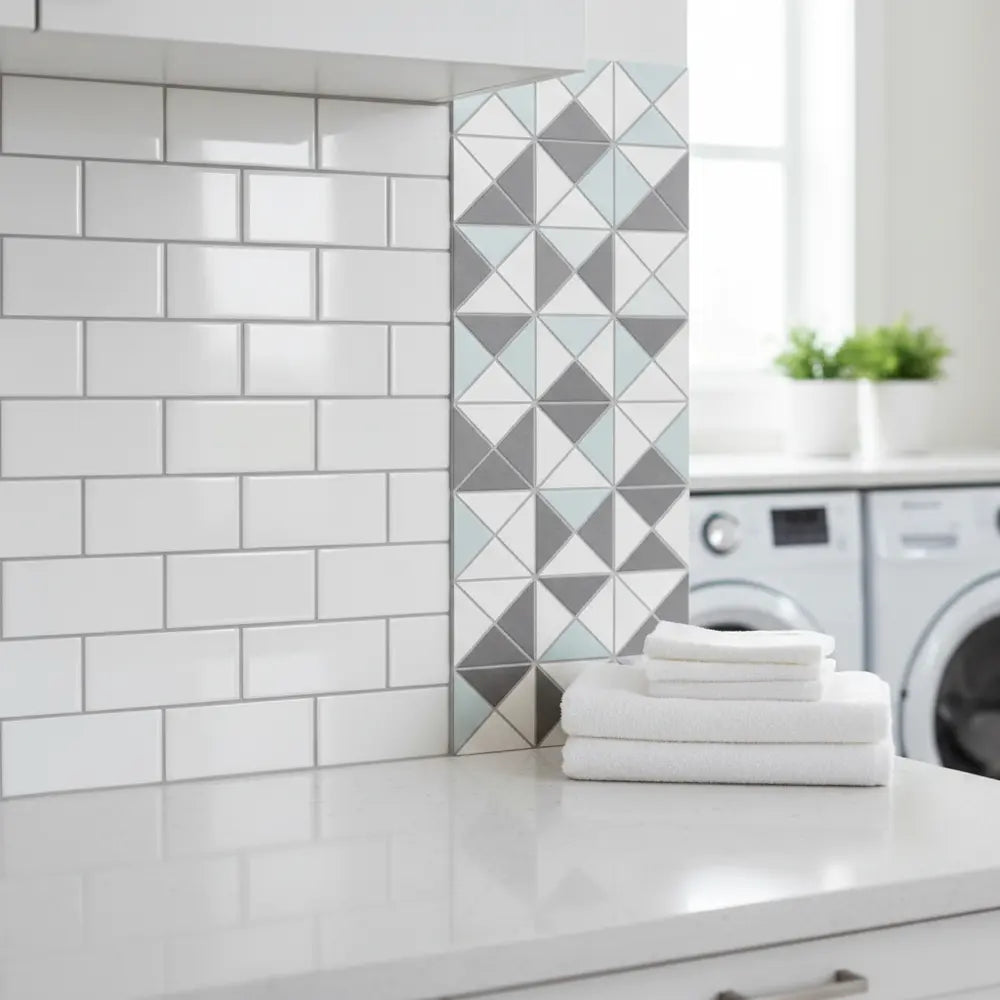
23. Combine Subway and Geometric Tiles for a Custom Accent
When you’re mixing two different tiles like this, the transition is everything. The key to making it look intentional and custom, rather than like you just ran out of one tile, is to use a metal tile trim, often called a Schluter strip. This thin metal edge provides a clean, crisp border between the subway tile and the geometric accent pattern. It defines the space and gives the transition a professional, finished look. Choose a metal finish that matches other elements in your room, like your cabinet hardware or faucet.
|
📋 Copy HEX 🔗 Share |
Creating a defined accent panel behind a sink or stove is a great budget-friendly way to use a more expensive patterned tile.
- Define Your Area: Use painter’s tape to mark out the exact size and location of your accent panel.
- Install the Accent First: Install your patterned tile within the taped-off area. Let the adhesive set.
- Add the Edging: Apply your Schluter trim around the border of the accent panel, pressing it into a fresh layer of thin-set mortar.
- Tile the Field: Now, tile the rest of your backsplash with the more affordable subway tile, working outwards from the accent panel’s trim.
This method ensures clean lines and a professional result.
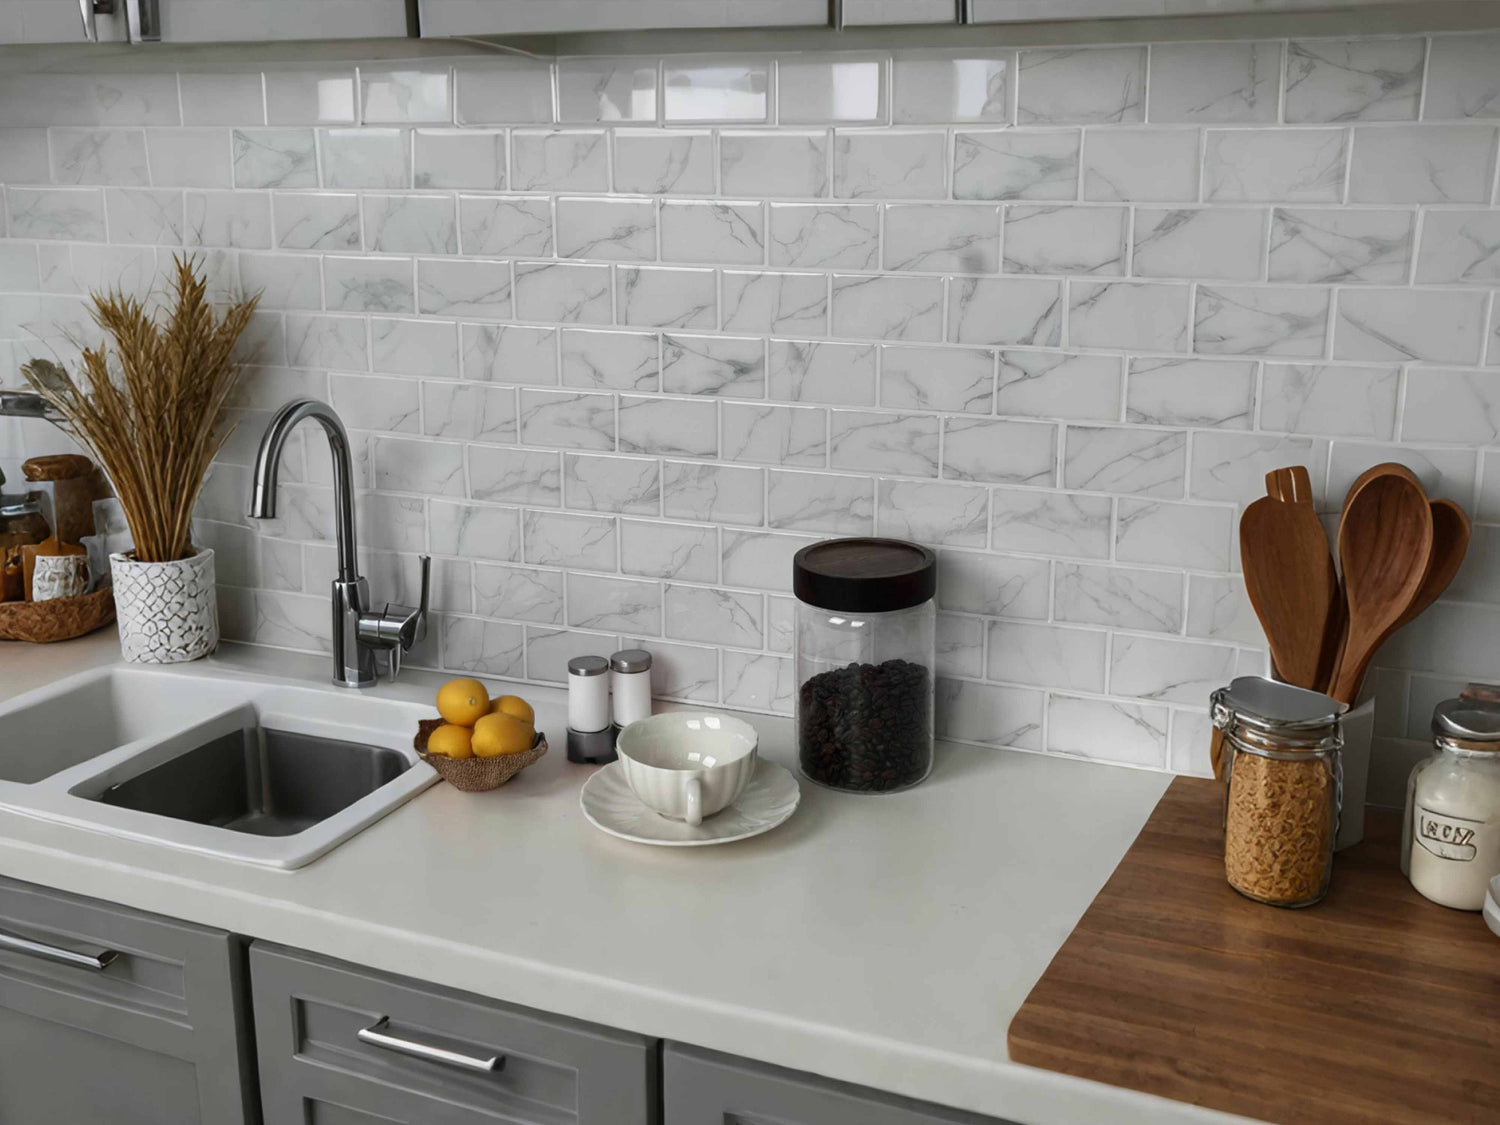
24. Get a High-End Look with Faux Marble Subway Tile
This backsplash is a brilliant budget move that reads as luxurious. It combines the affordable, easy-to-install shape of subway tile with the expensive look of marble. Because the tiles are porcelain or ceramic with a printed-on pattern, you get the veined, elegant appearance of marble without the cost, porosity, or maintenance. The light grey veining provides just enough pattern to be interesting, while the overall white background keeps the kitchen feeling bright and clean. It’s a perfect compromise between plain white tile and a busy, expensive natural stone.
|
📋 Copy HEX 🔗 Share |
For the ultimate cheap and easy version of this look, turn to peel-and-stick tiles. You can find faux marble subway tile patterns on Amazon or at stores like Target and Home Depot. A project of this size might only cost $60-$120 and can be done in a single afternoon with no grout or mortar required. It’s an ideal solution for renters who want to upgrade their kitchen’s style without losing their security deposit. It’s a less permanent version of the tile shown, but from a distance, the effect is strikingly similar.
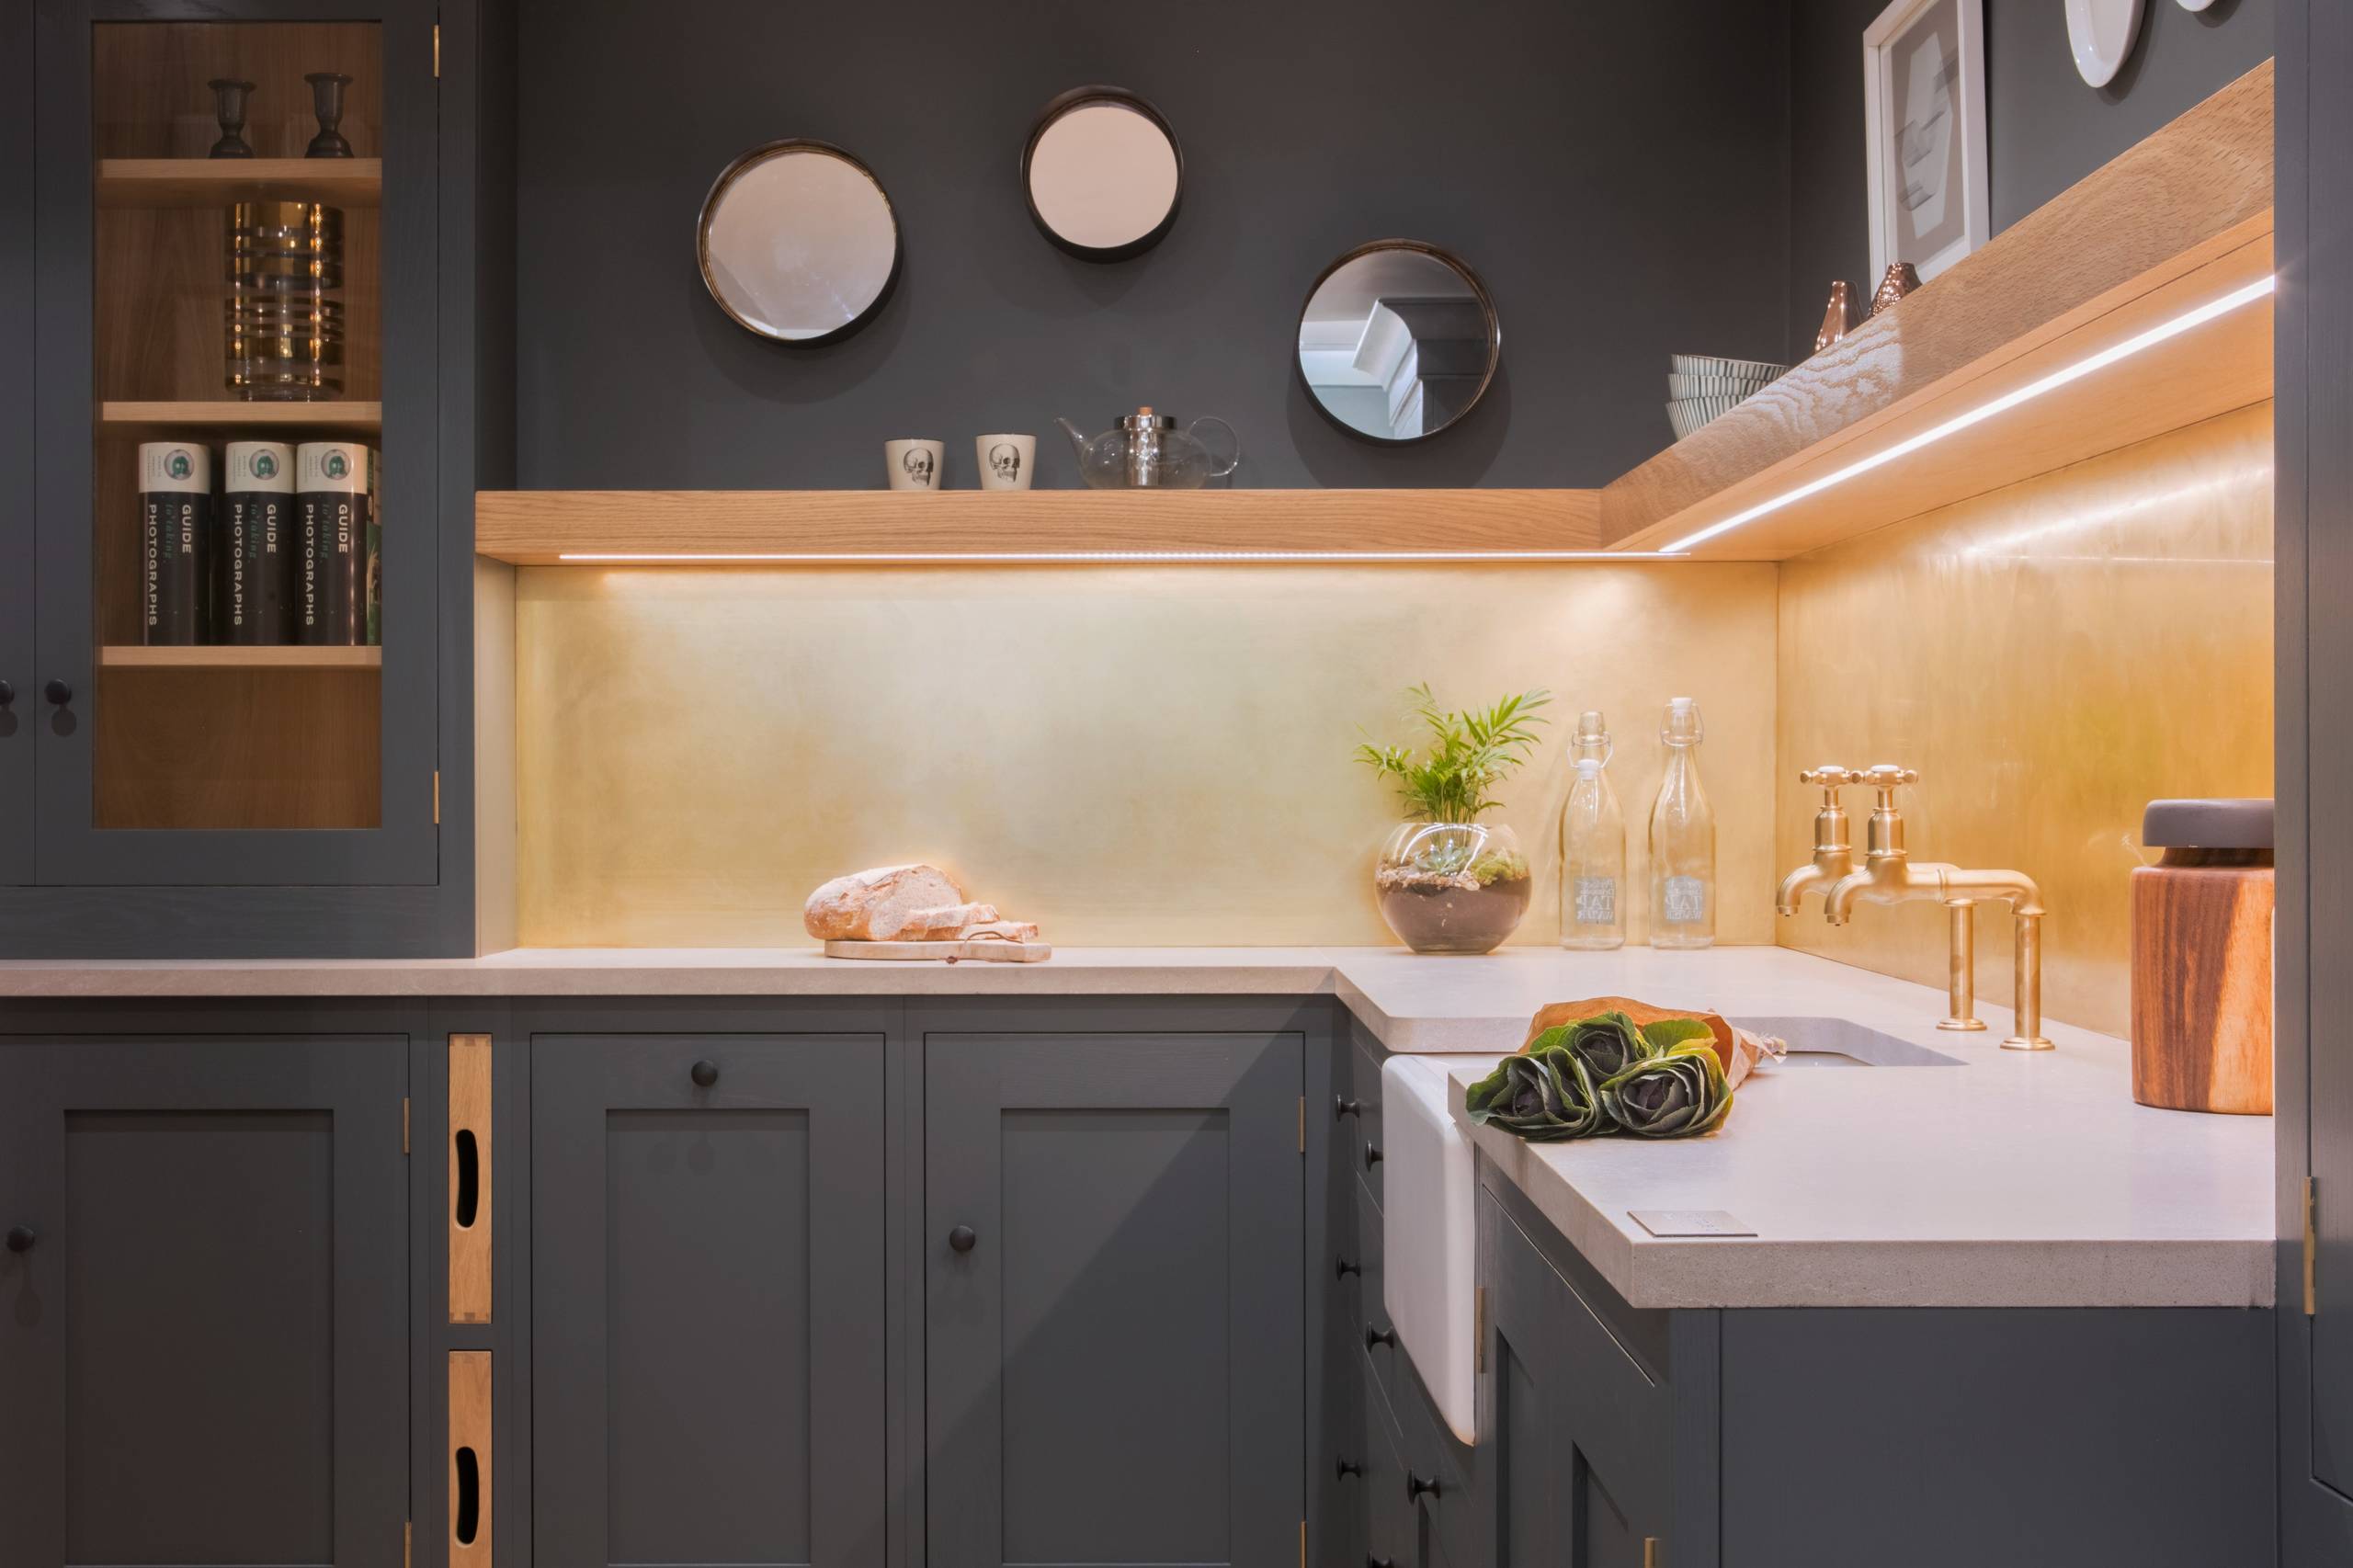
25. Add Glamour with a Gold Paneled Backsplash
Warm metals are having a major moment, and this kitchen shows why. Moving away from the cool chromes and stainless steels that dominated for years, designers and homeowners are embracing brass, gold, and copper for the warmth and character they bring. This gold-paneled backsplash is a reflection of that trend. It acts like jewelry for the kitchen, adding a touch of glamour and reflecting warm light around the space, especially with the integrated under-shelf lighting. It feels luxurious and very current for 2026.
|
📋 Copy HEX 🔗 Share |
The single element that elevates this kitchen from ‘modern and moody’ to ‘modern and glamorous’ is the gold backsplash. The dark gray cabinets are handsome, and the light countertops are practical, but the gold panel is the showstopper. It creates an immediate focal point and infuses the entire room with a warm, ambient glow. If you replaced it with a simple tile, the kitchen would still be functional, but it would lose its ‘wow’ factor and its unique, sophisticated personality.
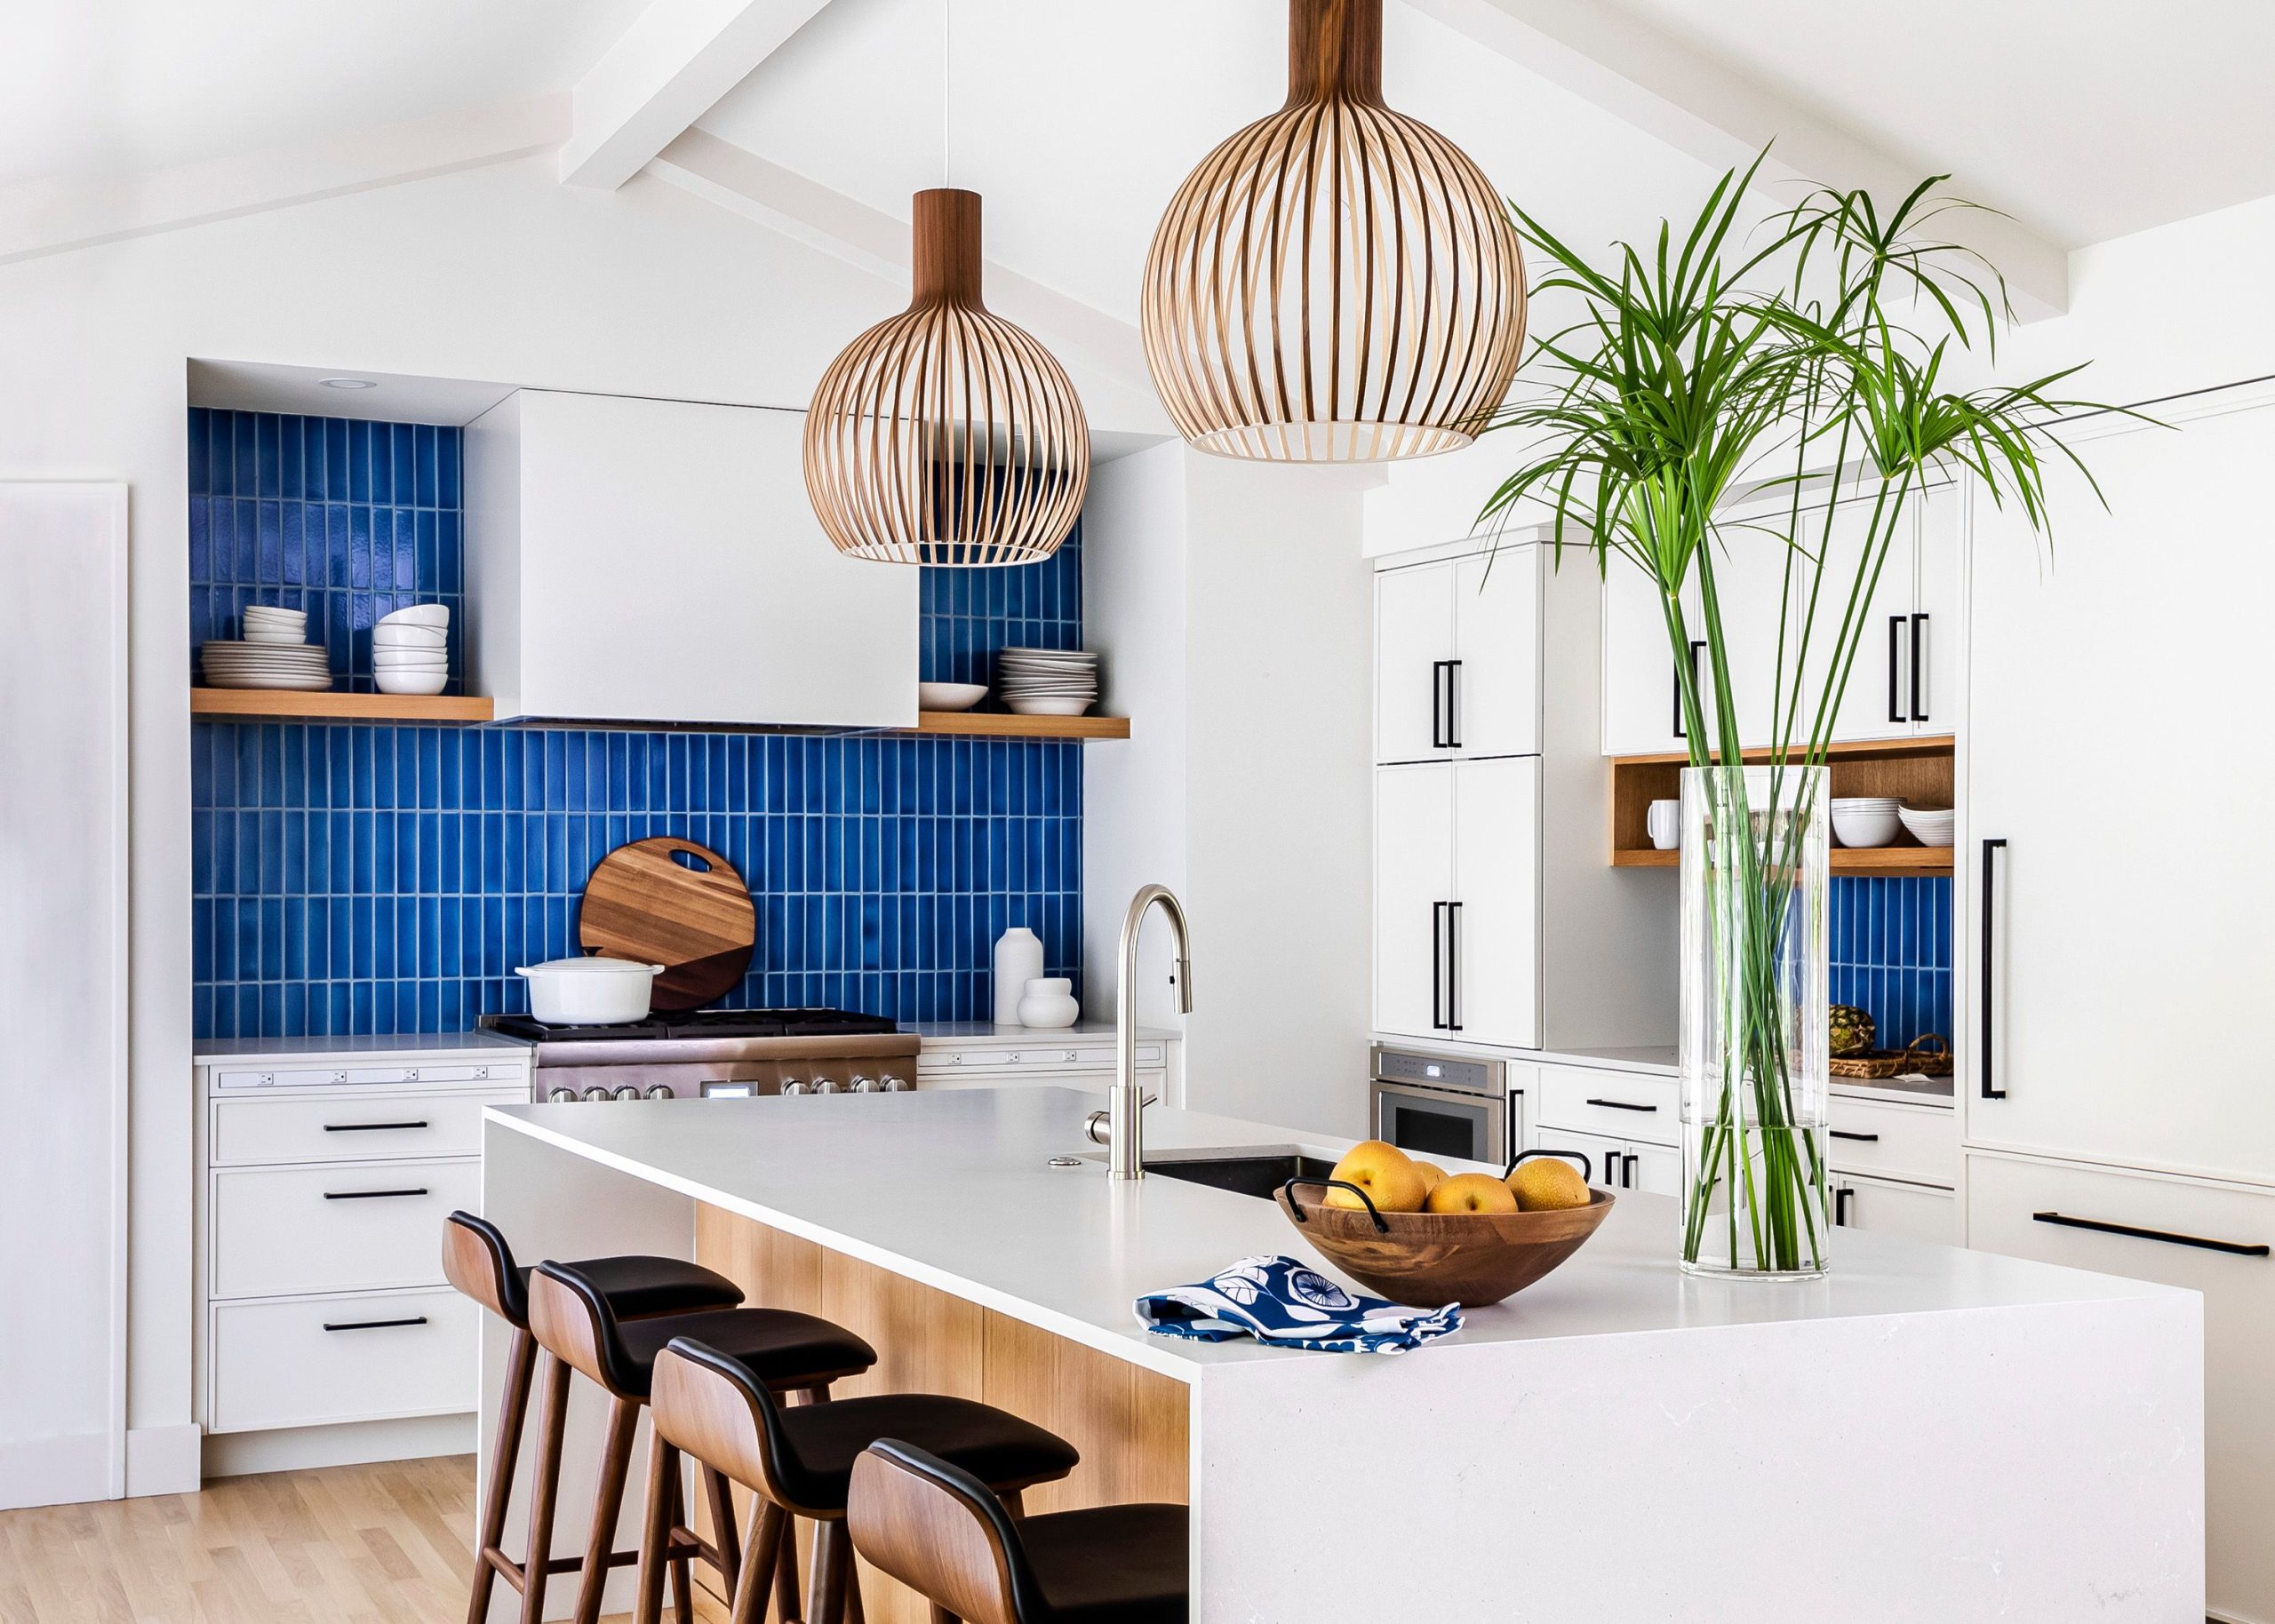
26. Create a Focal Point with a Vertical Blue Subway Tile Backsplash
When you’re using a simple, inexpensive tile like the classic subway, orientation is everything. Simply turning the tile 90 degrees and stacking it vertically, as shown here, completely transforms the look. It feels instantly more modern and architectural. The vertical lines draw the eye upward, which can help to create an illusion of height in kitchens with standard or even low ceilings. It’s a no-cost way to add a custom designer touch to a standard material.
|
📋 Copy HEX 🔗 Share |
This design is so effective because of its high-contrast, focused application of color. The kitchen is predominantly a sea of calming white—white cabinets, a white island, and white walls. This makes the single wall of vibrant blue tile incredibly impactful. It doesn’t have to compete with any other colors. The choice to run the tile vertically adds to this modern feel, while the repetition of natural wood tones in the pendant lights and stool legs provides just enough warmth to keep the space from feeling stark. Compare this with the chevron pattern in Idea #4 for another way to use blue tile.
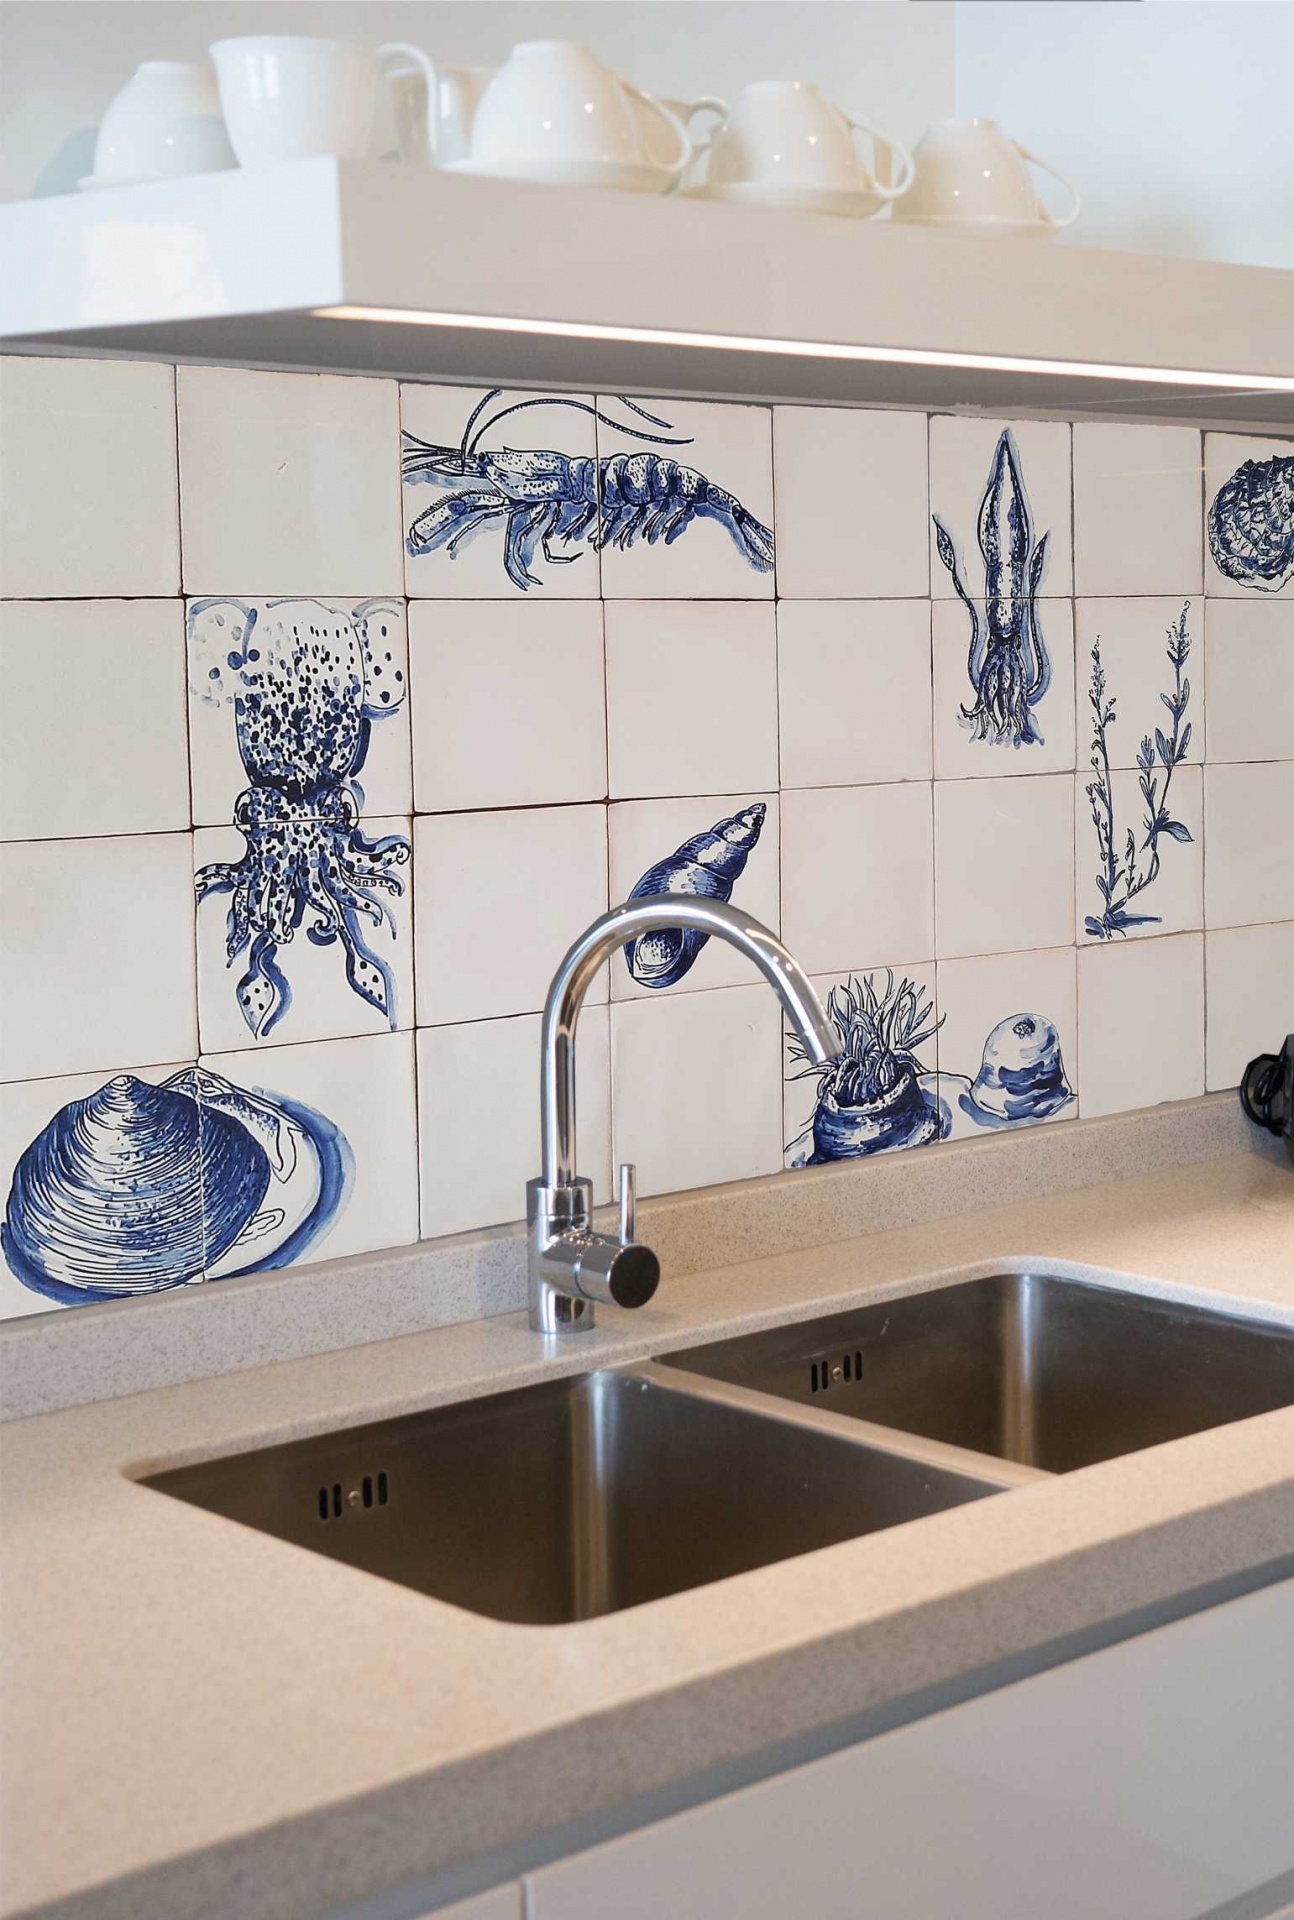
27. Curate a Personal Look with Hand-Painted Marine Life Tiles
What makes this backsplash so special isn’t the tile itself, but the art on it. The hand-painted blue illustrations of marine life turn a standard white tile backsplash into a deeply personal and unique feature. It tells a story about the homeowner’s tastes and interests. This isn’t a look you can buy in a big-box store; it feels curated, artistic, and one-of-a-kind. It’s a powerful reminder that a backsplash can be a canvas for personal expression, not just a functional surface.
|
📋 Copy HEX 🔗 Share |
Love this look but can’t find or afford hand-painted tiles? DIY it! You can buy plain, inexpensive white ceramic tiles (often under $1 each) and use a porcelain paint pen to draw your own designs. Sketch out your ideas first, then simply draw onto the clean tile surface and bake them in your home oven according to the pen’s instructions to set the design. You can create a look that is just as personal and artistic for a tiny fraction of the cost. Or, seek out tile decals from sites like Etsy, as seen in Idea #11.
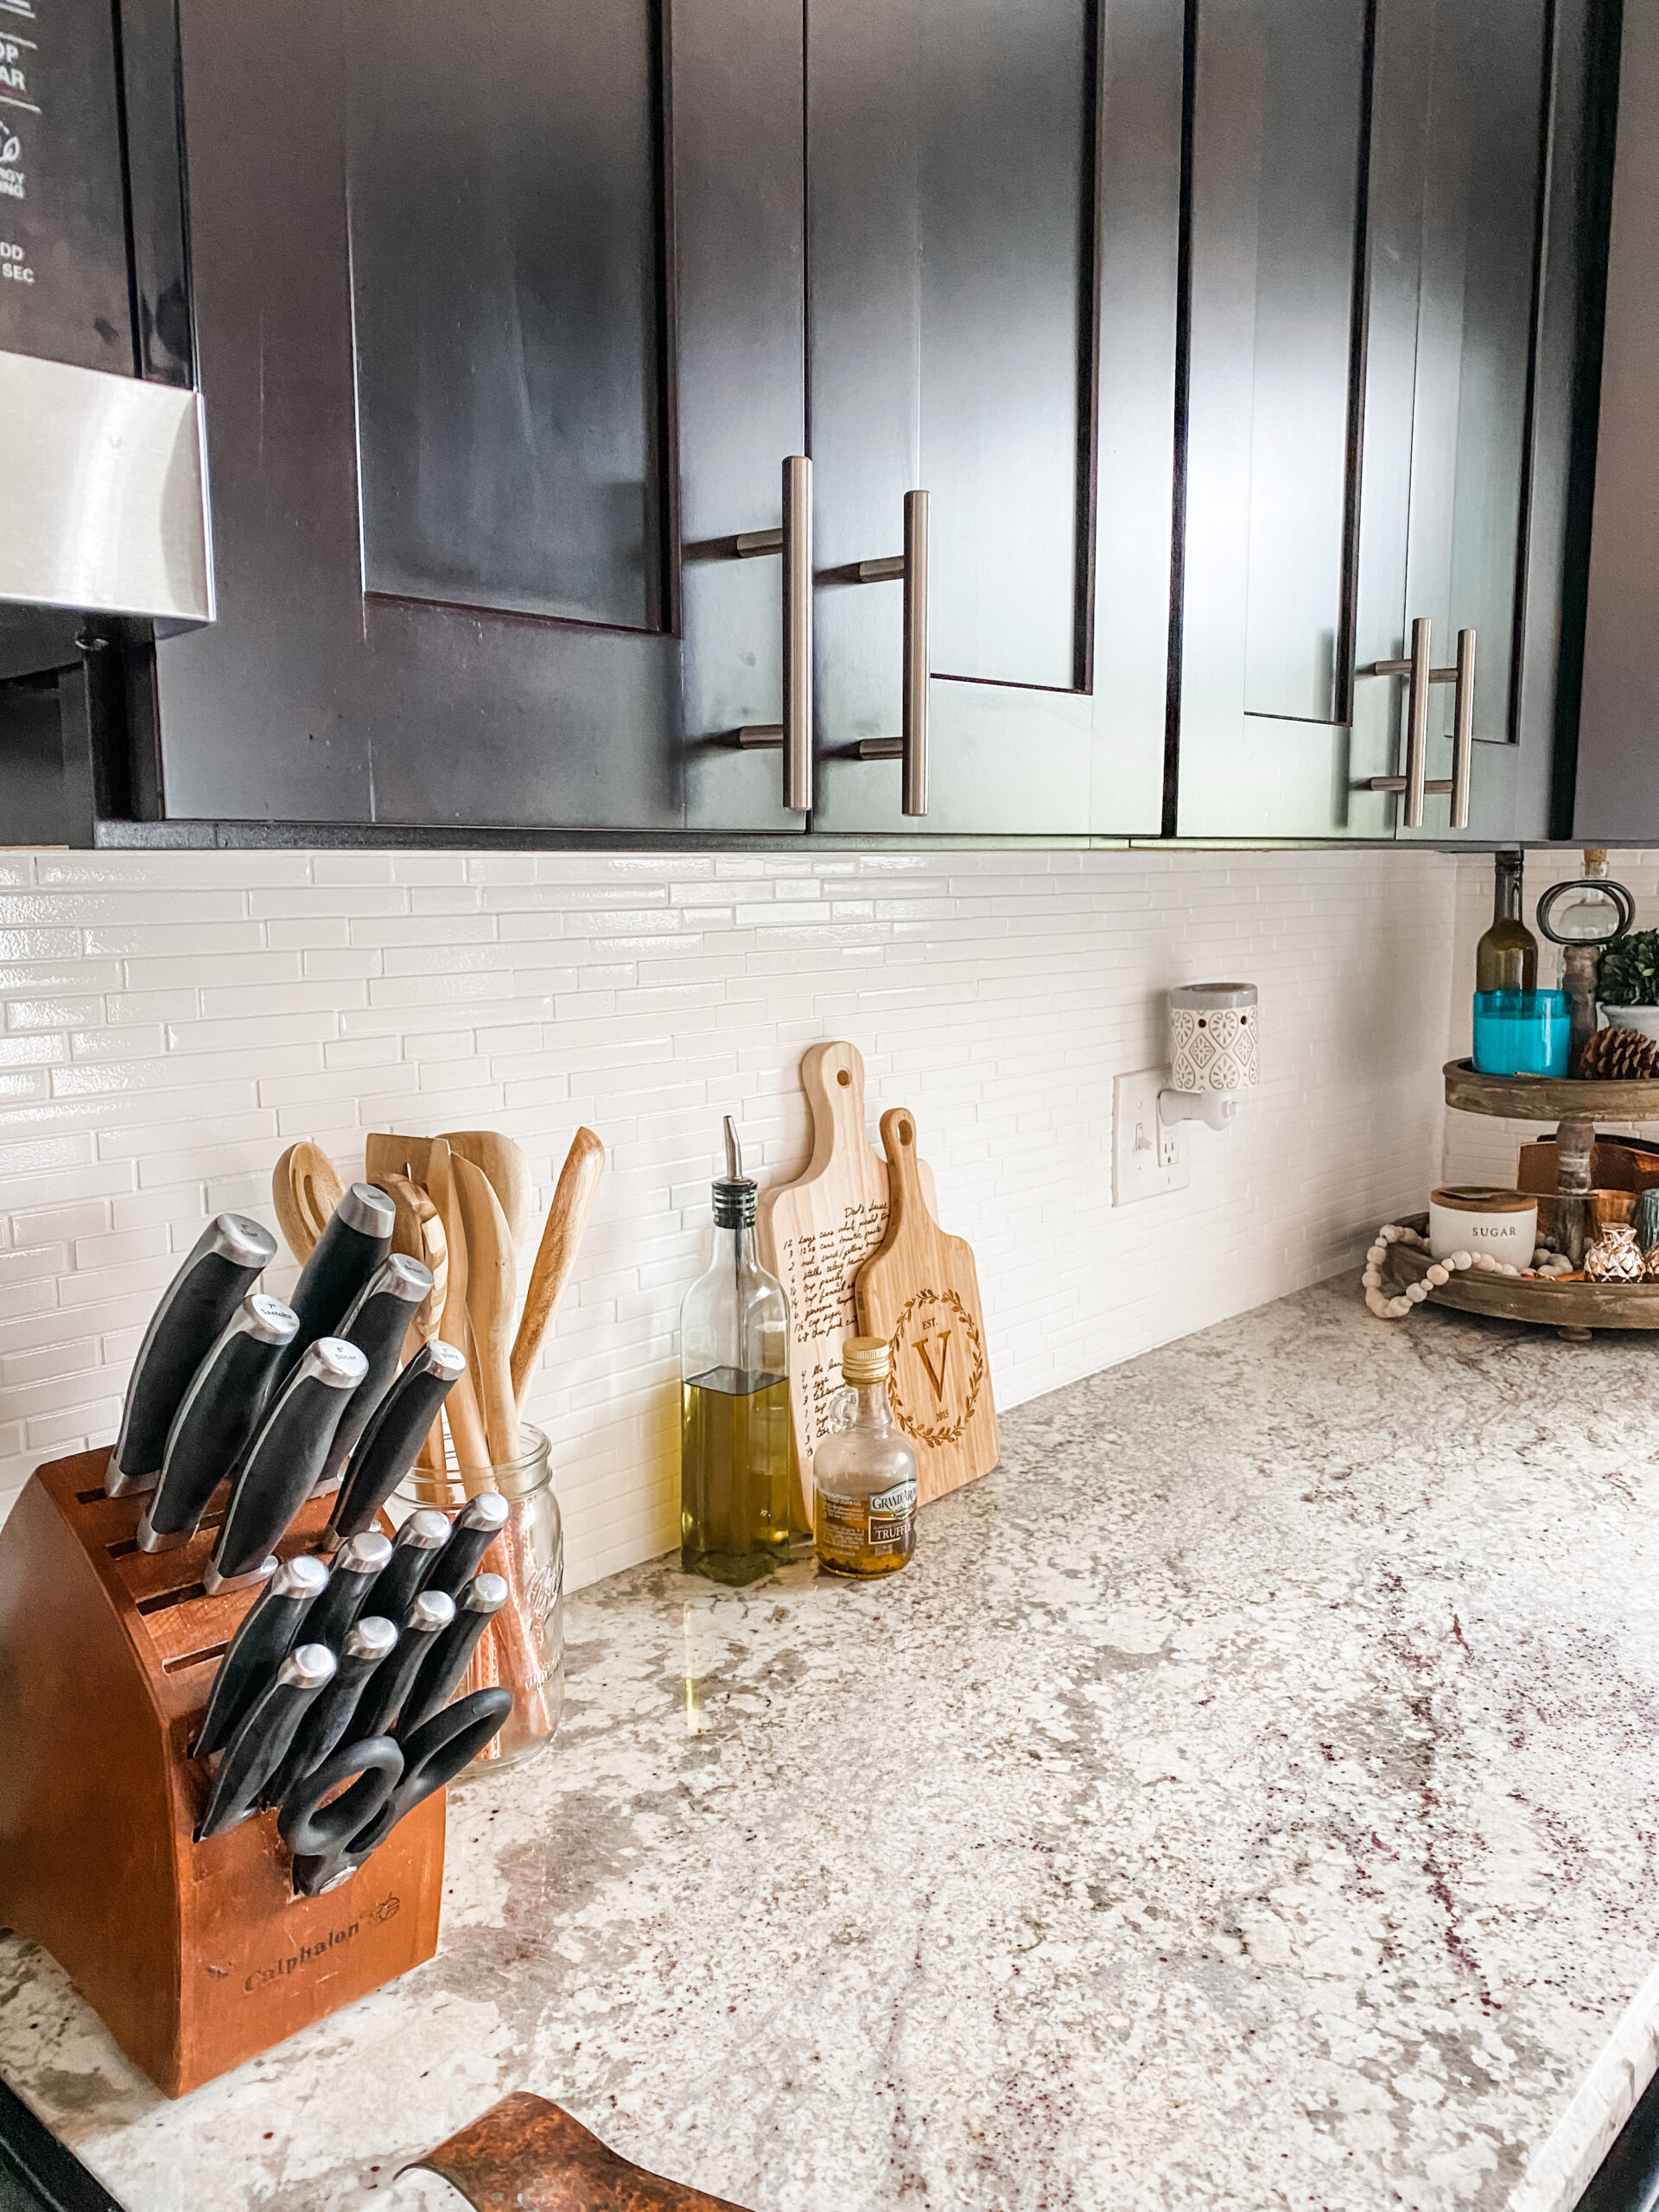
28. Paint Your Existing Tile for a $30 Transformation
Don’t have the budget to rip out that old, dated backsplash? Paint it! This is the single most impactful, low-cost update you can make. Here’s a quick guide.
|
📋 Copy HEX 🔗 Share |
- Clean and Degrease: This is the most important step! Use a strong degreasing cleaner like TSP (trisodium phosphate) to remove all traces of kitchen grime.
- Scuff and Sand: Lightly scuff the surface of the glossy tiles with 100-grit sandpaper. You’re not trying to remove the finish, just dull it down so the primer can grip.
- Prime with the Right Stuff: Use a high-adhesion primer designed for slick surfaces. Kilz Adhesion or a shellac-based primer is an excellent choice.
- Paint with Durable Paint: Apply two thin coats of a high-quality cabinet and trim enamel or a specialty tile paint. Let it cure fully before scrubbing.
Estimated Time: 4-6 hours (plus drying time). Estimated Cost: $30-$50.
Let’s be real: painted tile is an incredible budget fix, but it’s not a ‘forever’ solution. While modern paints are incredibly durable, they can still be vulnerable to chipping if you accidentally hit a tile with a heavy pan. The area directly behind the sink or stove will see the most wear and tear. You’ll also need to be gentle when cleaning—avoid abrasive sponges or harsh chemical scrubbers that could wear away the finish over time. Think of it as a fantastic 2-5 year solution while you save up for the real deal.
Your Kitchen’s Next Chapter Starts Here
And that’s a wrap on 28 ways to give your kitchen a major style upgrade without emptying your savings account. Whether you’re feeling a bold geometric pattern or a classic, clean subway tile, the perfect affordable backsplash is out there waiting for you. The most important step is the first one: picking an idea you love and making a plan.
So, which of these looks will you be saving to your board on Pinterest? We can’t wait to see what you create.