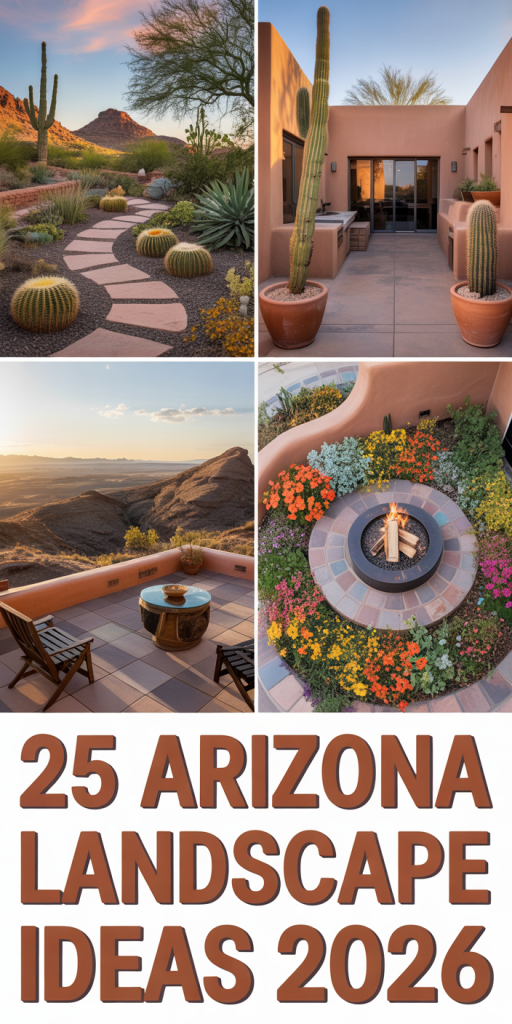
Let’s be honest, staring at a blank, dusty yard can feel completely overwhelming. You’ve probably saved a dozen Arizona landscape pins, but figuring out how to translate that inspiration into your own backyard is a whole different challenge. We get it. We’ve waded through hundreds of designs to find the 25 most inspiring, realistic, and beautiful ideas for your desert home. For 2026, the focus is on creating landscapes that are not only stunning but also sustainable and deeply personal. And stay until the end — we break down the most common mistakes that can ruin these looks. 📌 Save this to Pinterest for later — you’ll want to revisit these ideas.
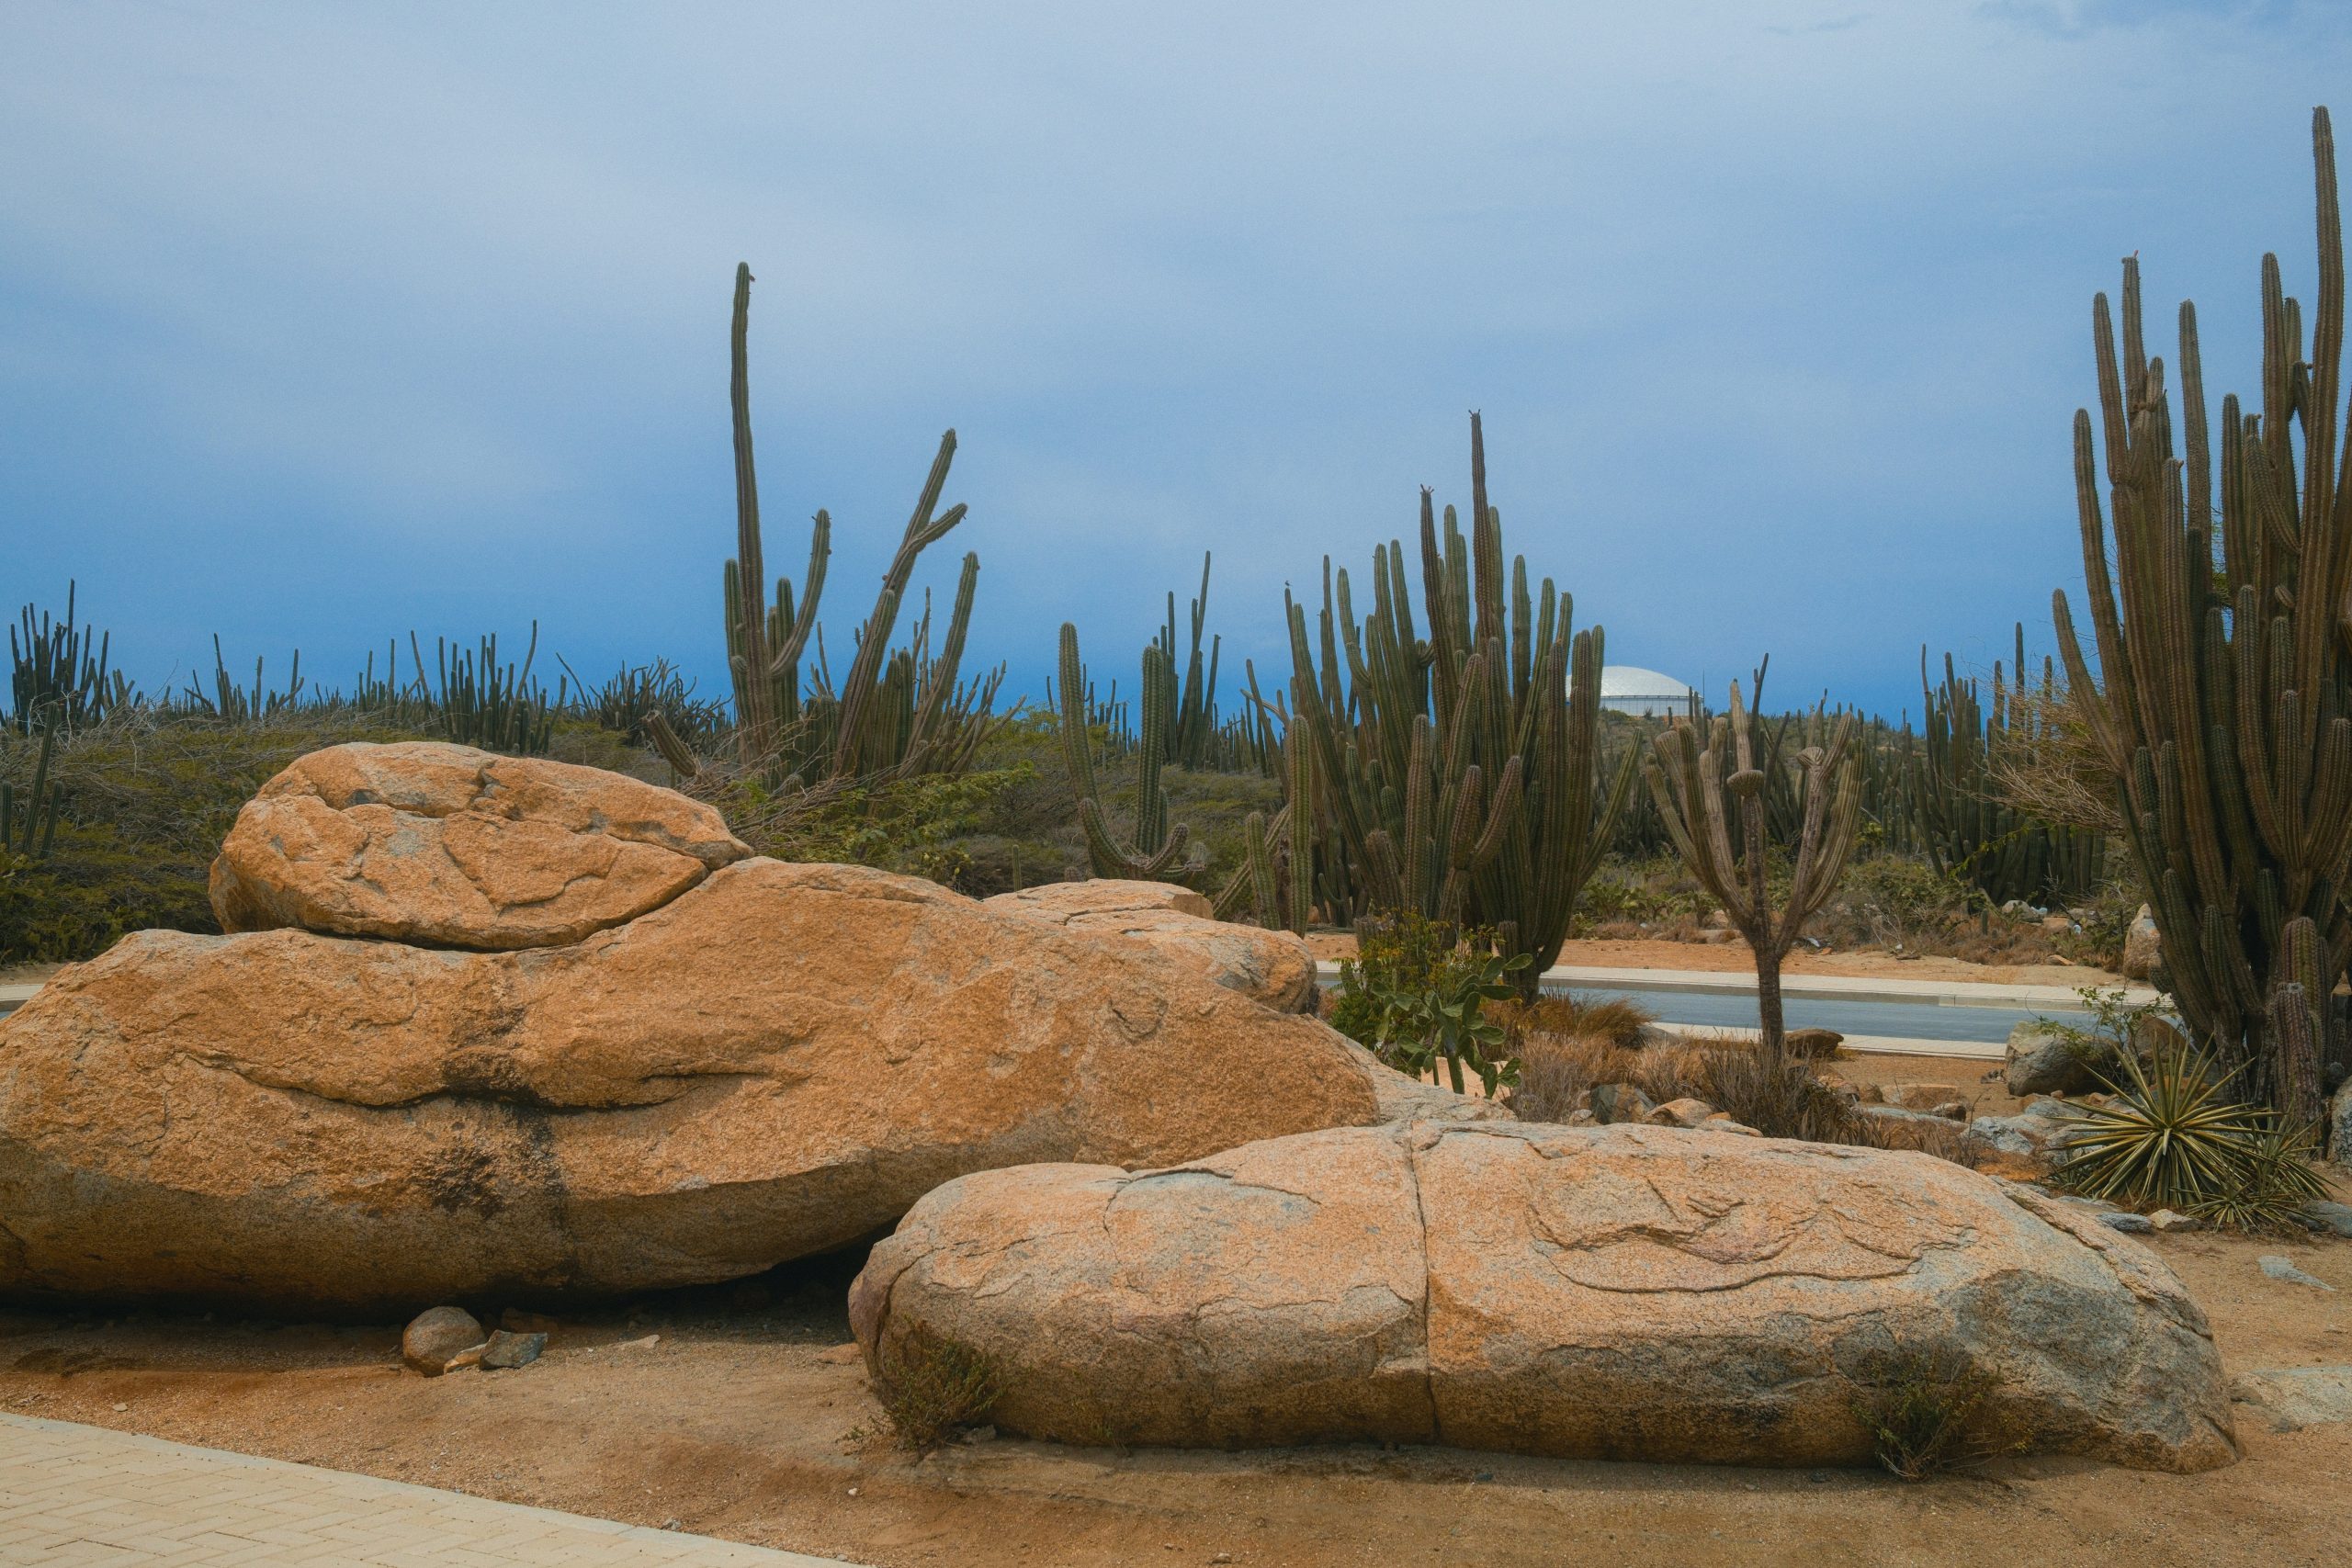
1. Classic Desertscape with Towering Cacti & Sandy Boulders
This look leans into the inherent beauty of the Arizona desert without trying to tame it. What makes it work is the powerful combination of scale and texture. The tall, slender cacti provide strong vertical lines that draw the eye upward, making the space feel larger, while the massive, rounded boulders anchor the scene and impart it a sense of permanence and history. The limited color palette—mostly greens, sandy browns, and the blue sky—creates a serene and cohesive environment that feels completely natural and unstaged.
|
📋 Copy HEX 🔗 Share |
This approach is ideal for larger properties, typically a quarter-acre or more, where you have enough room to let the arrangement breathe. To truly capture this sense of a vast, natural landscape, you need space for the cacti to stand as proud individuals rather than a crowded cluster. It works best on lots with an open view, allowing the blue sky to become a crucial part of the design, as seen here. For smaller yards, consider the more contained approach shown in Idea #16.
2. Starting Your Arizona Xeriscape Backyard Design
Before you bring in a single plant or shovel, laying the groundwork for a successful xeriscape is critical. This is the blank canvas stage. Think about the non-negotiables first. Do you have a plan for drainage? Where does the sun hit at 3 PM in August? Answering these questions now saves you from costly mistakes later. Here’s a quick checklist to run through before you finalize your design:
|
📋 Copy HEX 🔗 Share |
- Map your sun exposure: Track the sun for a full day to identify full-sun, part-shade, and full-shade zones.
- Test your soil: Understand if you have heavy clay or sandy soil to choose appropriate plants and amendments.
- Plan your irrigation: Decide where you will run drip lines. It’s much easier to install them before planting.
- Define your zones: Mentally separate areas for seating, planting, and pathways.
One of the biggest mistakes homeowners make is underestimating their water needs, even in a xeriscape. Install a smart drip irrigation system with separate zones. Group plants with similar water requirements together on the same valve. For example, your thirsty bougainvillea shouldn’t be on the same watering schedule as your drought-tolerant agaves. This not only saves water but ensures each plant gets exactly what it needs to thrive, preventing both wilting and root rot.
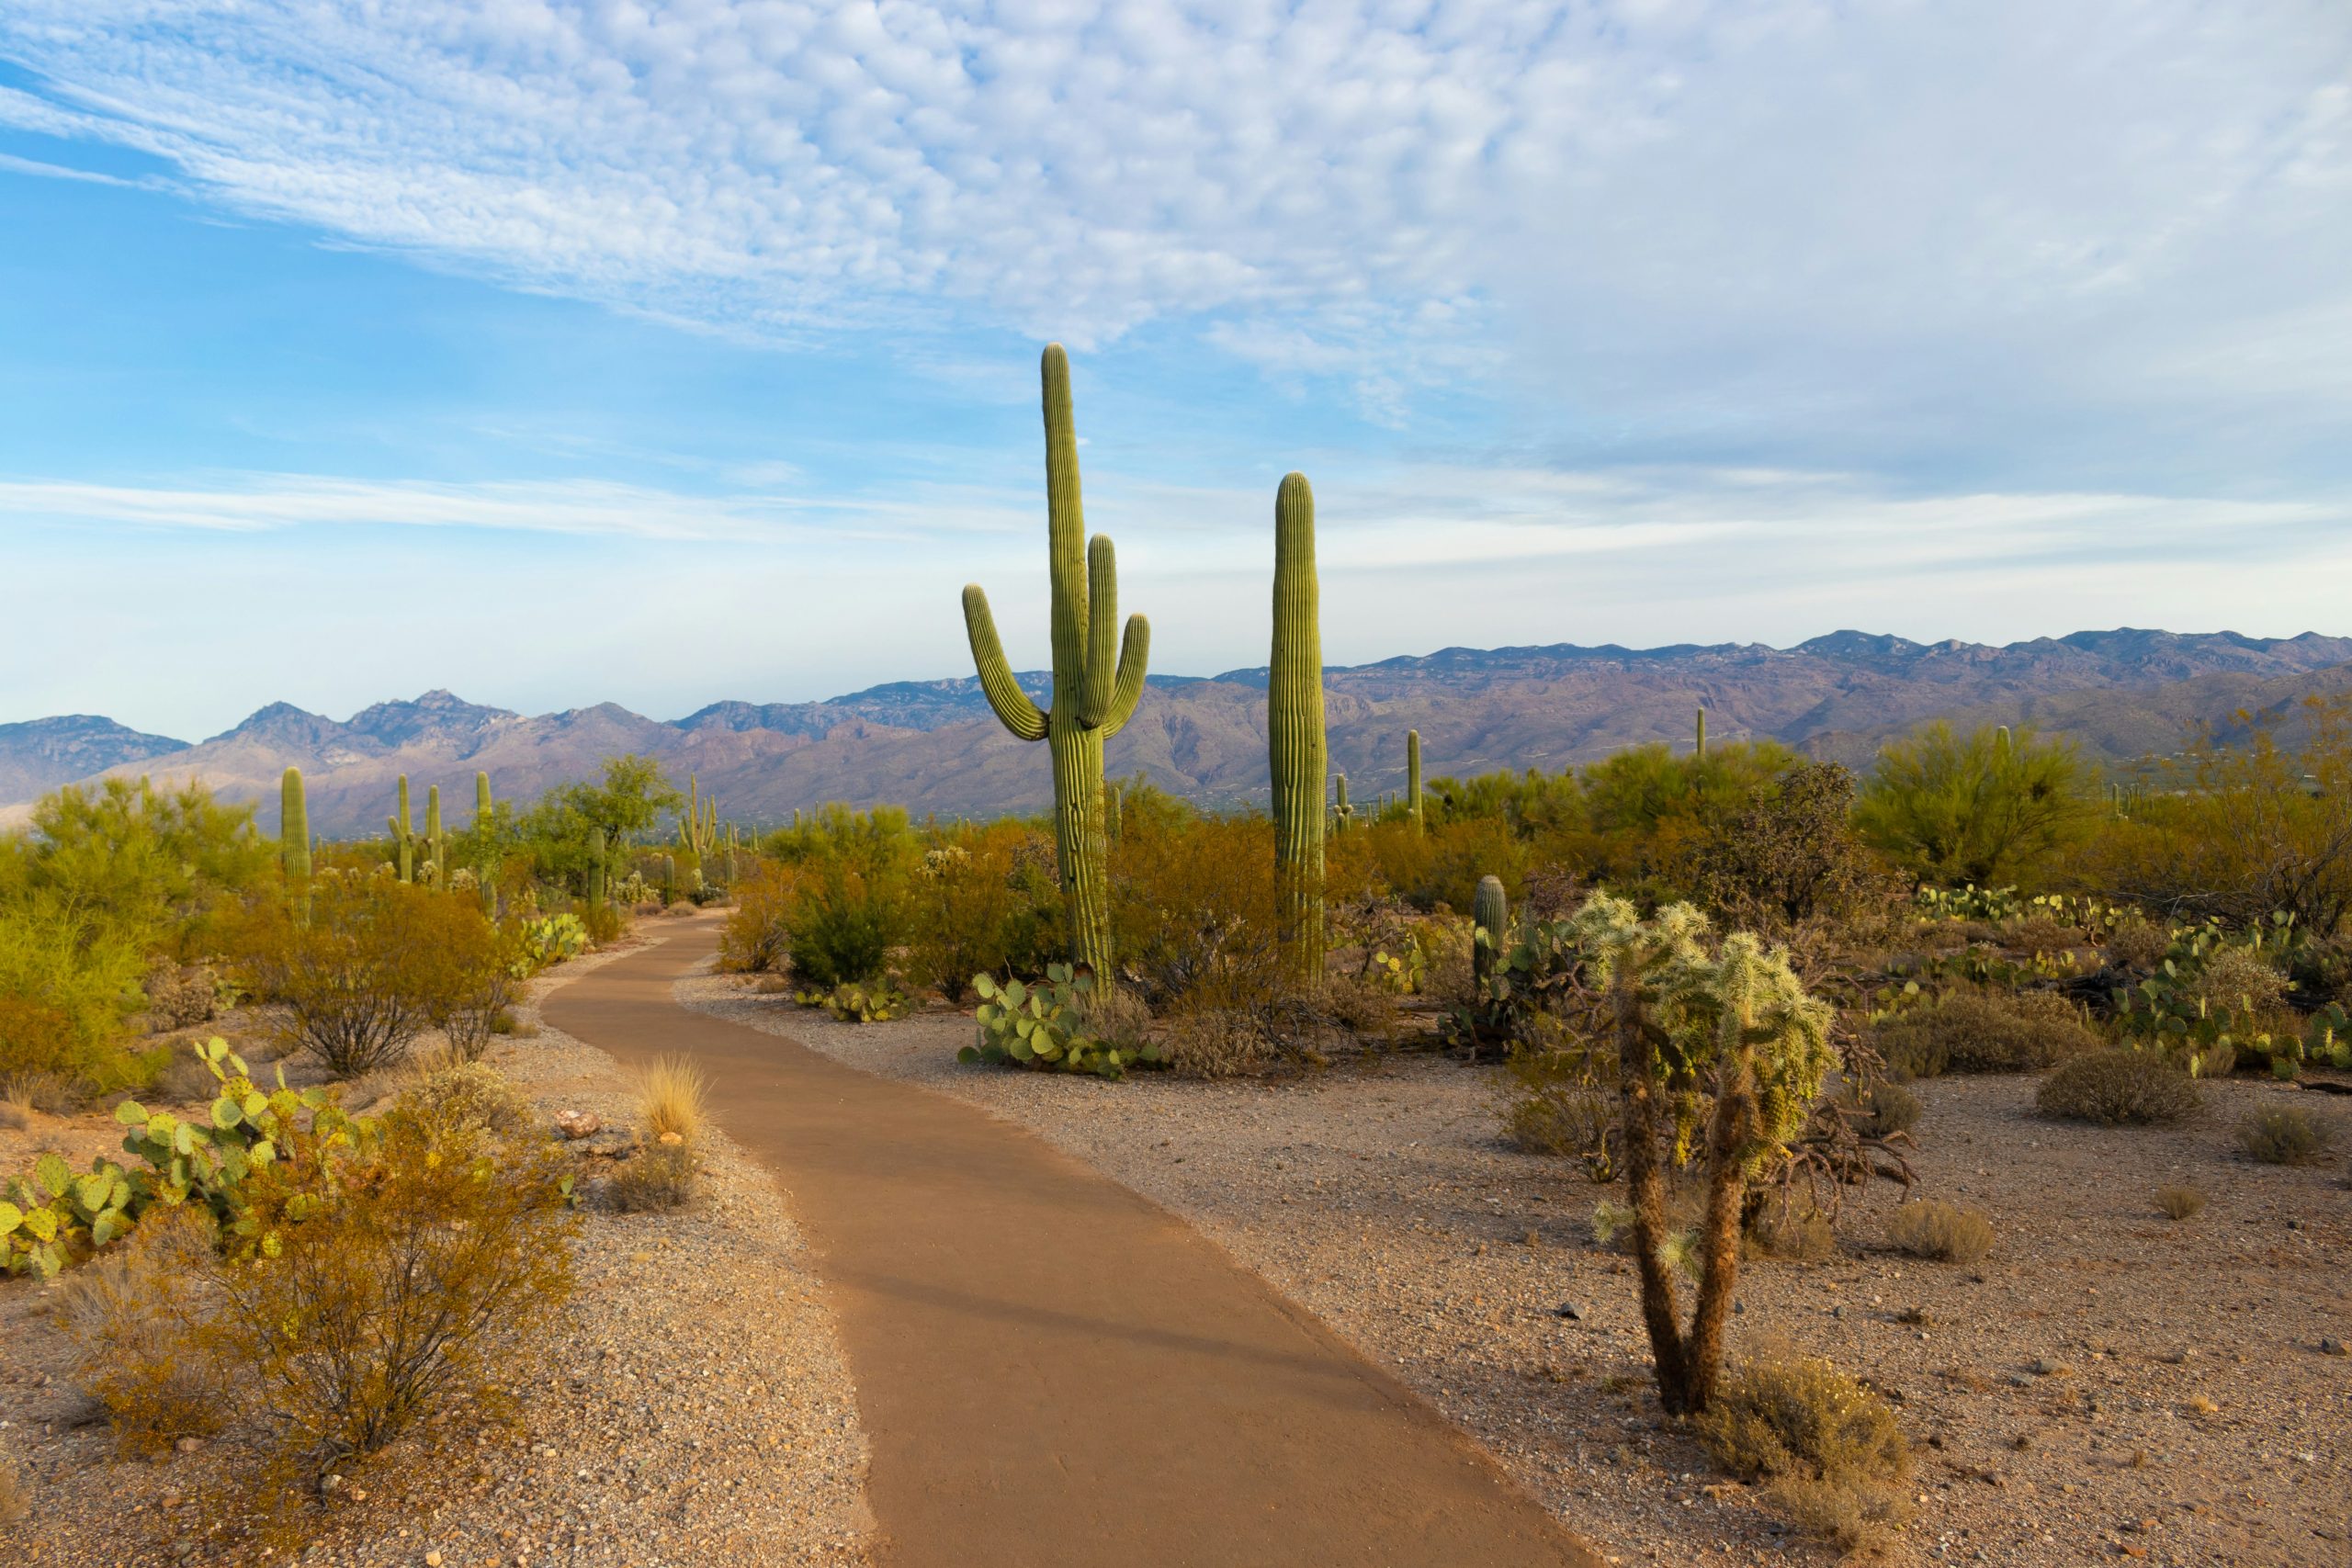
3. A Meandering Path Through Saguaro and Prickly Pear
The single most important element here is the pathway. It’s more than just a way to travel from A to B; it’s a narrative device. The gentle, undefined curves invite you to slow down and experience the garden, rather than just pass through it. It creates pockets of interest and a sense of discovery around every bend. Without the path, the garden would just be a collection of cacti. With it, it’s a journey. The soft, sandy texture of the dirt path feels organic and appropriate for the setting, blending seamlessly with the surrounding landscape.
|
📋 Copy HEX 🔗 Share |
The visual formula for this natural look is deceptively simple. It’s about 60% native plants (like the saguaro and prickly pear), 30% ground cover (the sandy soil and gravel), and 10% open space (the path itself). The key is to let the plants be the heroes. You could swap the specific cacti for other desert-adapted species like palo verde trees or desert marigolds and maintain the same feel, as long as you keep the proportions. The raw, untamed energy comes from letting the plant life, not hardscaping, dominate the view.
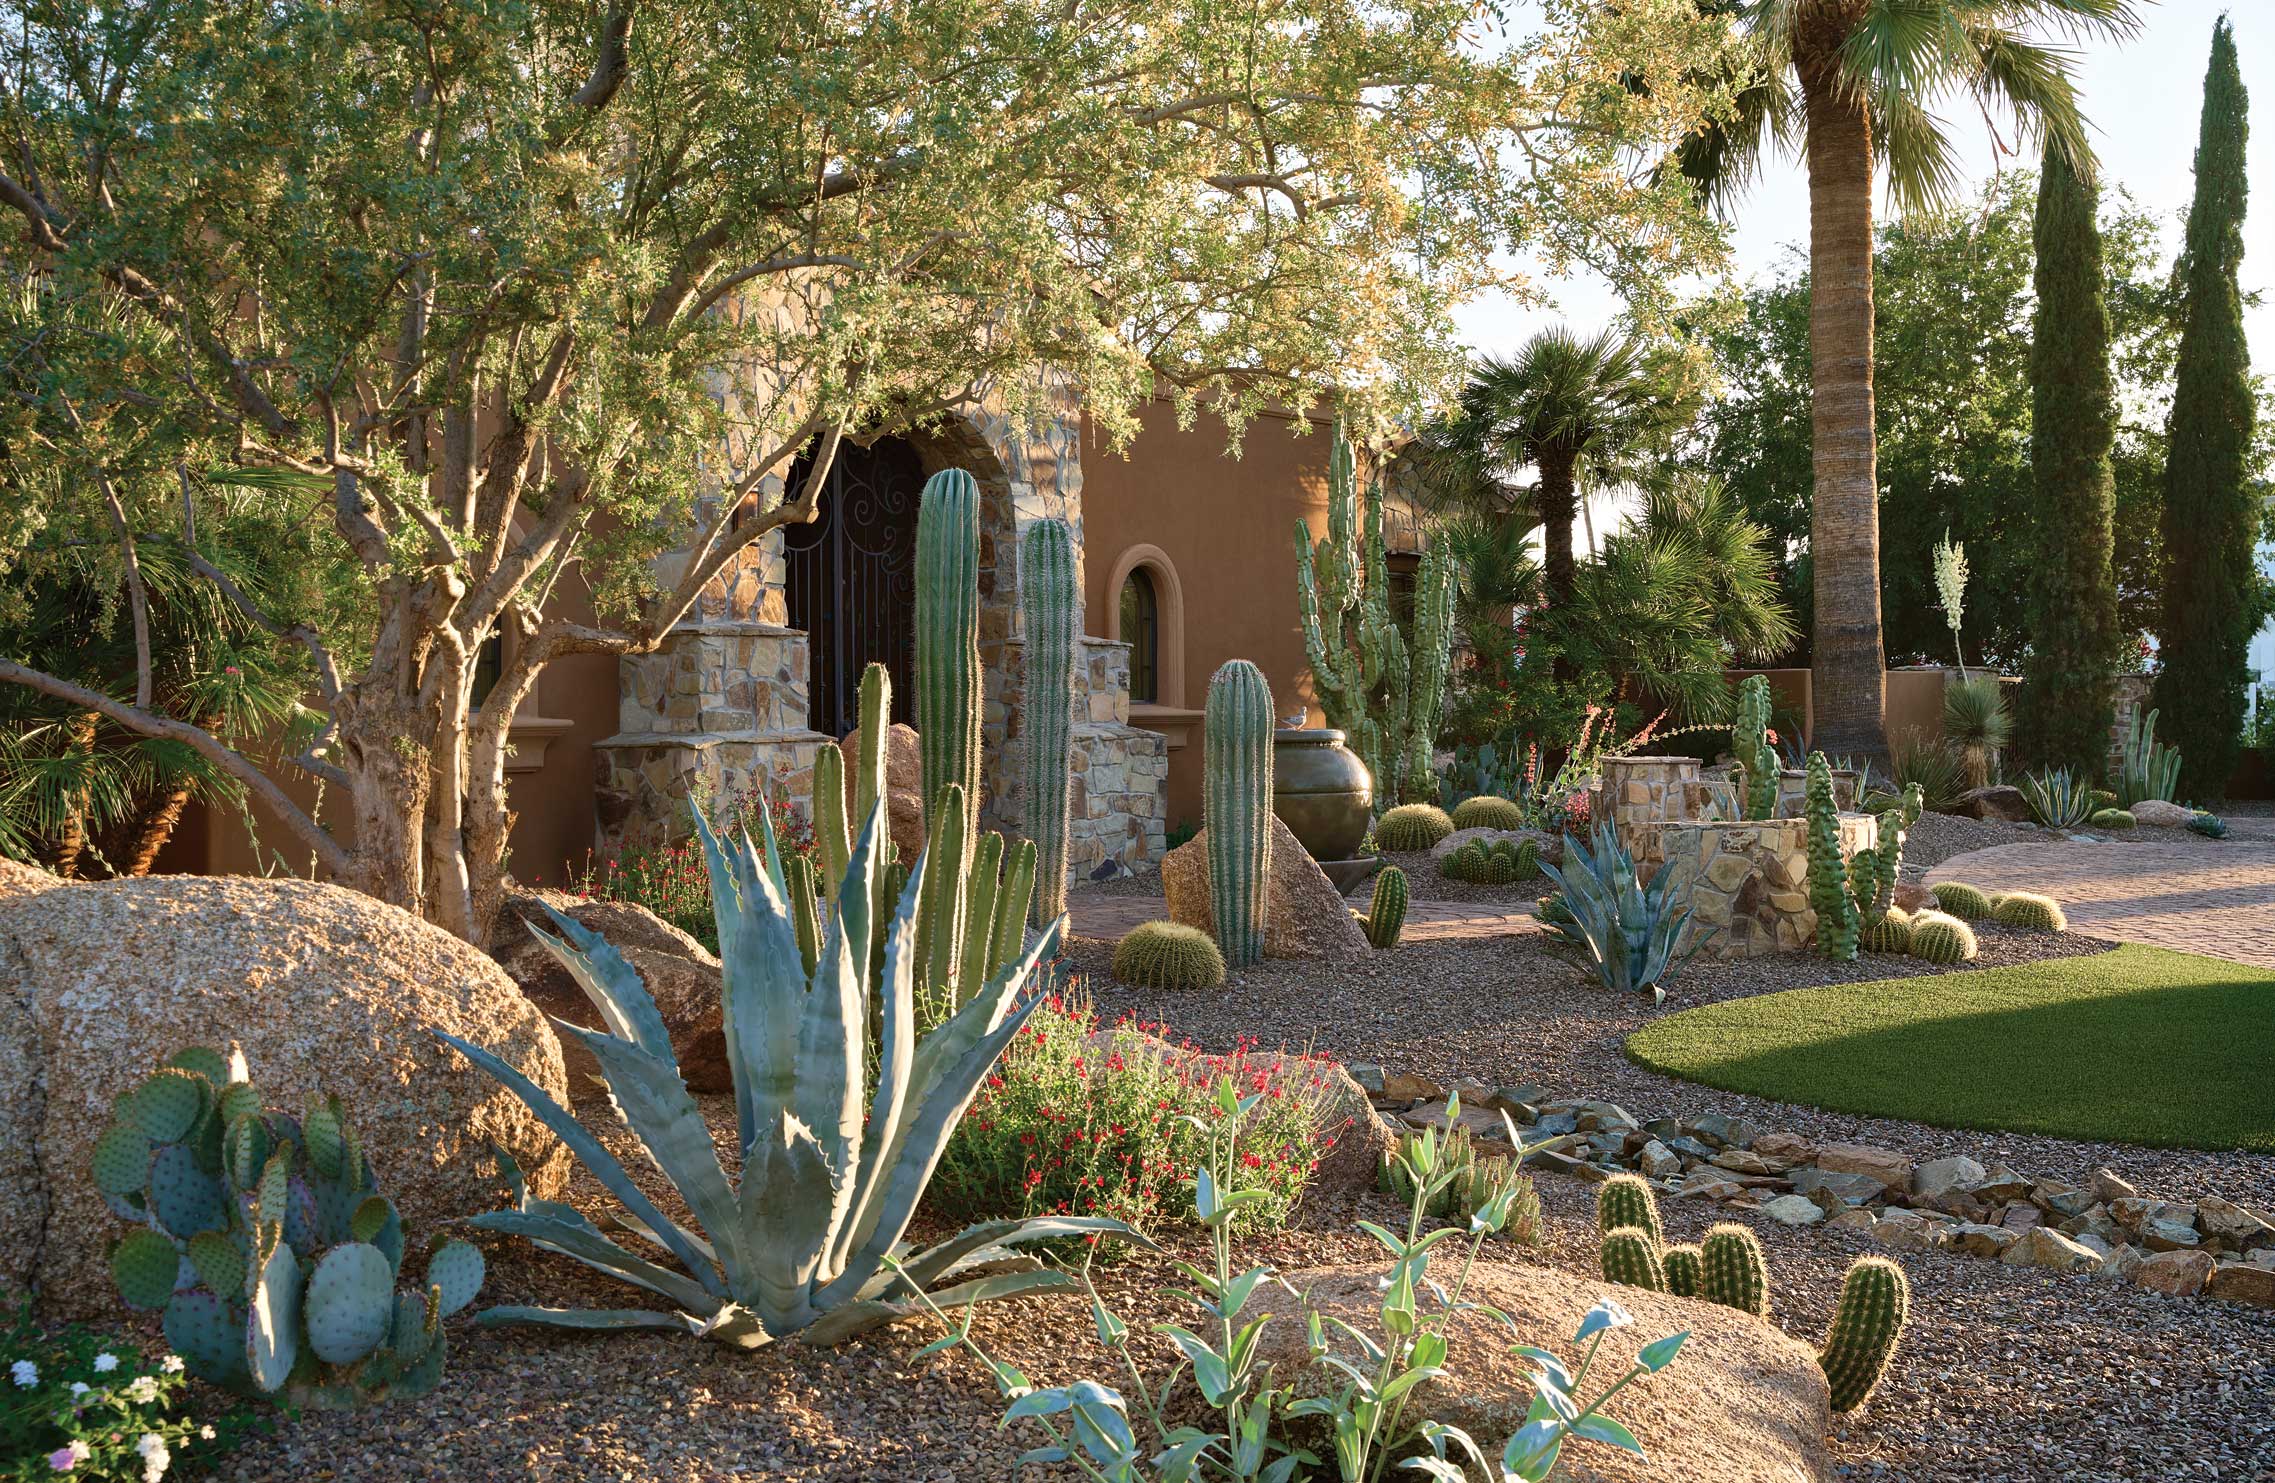
4. Modern Home Framed by Saguaros and Mountain Views
Recreating this high-end modern desert look is a significant investment, with mature specimen plants being a major cost factor. The clean lines and seamless integration of the house and landscape come at a premium.

|
📋 Copy HEX 🔗 Share |
- Specimen Plants (Saguaro, etc.): $8,000 – $25,000+
- Hardscaping (Stone Veneer, Gravel, Driveway): $15,000 – $30,000
- Smaller Plants & Succulents: $3,000 – $7,000
- Labor & Installation: $10,000 – $20,000
- TOTAL: $36,000 – $82,000+
Budget alternative: Get a similar vibe by focusing on the gravel ground cover and smaller succulents and planting a younger, smaller saguaro that will grow over time. Cost: $10,000 – $20,000.
Let’s have some real talk about flat roofs and large windows in the desert. While they look incredibly chic, they have practical downsides. That stunning expanse of glass can lead to soaring cooling bills in the summer if it’s not high-quality, double-paned, and UV-coated. Furthermore, flat roofs require meticulous maintenance to prevent leaks during monsoon season. They need to be inspected annually for cracks or damage to the membrane. This look is a commitment, both financially and in terms of upkeep, but for many, the aesthetic payoff is worth it.
5. Southwestern Home with a Tiered Flagstone Patio
Creating a layered flagstone patio offers an organic, rustic feel. This is not a weekend job, but it’s a rewarding DIY for the ambitious homeowner. Here’s a simplified breakdown for creating one of these steps:
|
📋 Copy HEX 🔗 Share |
- Foundation First: Excavate the area for your step, digging down about 6-8 inches. Fill with 4-5 inches of compacted gravel base for drainage and stability.
- Mortar Mix: Mix a batch of mortar to a thick, peanut-butter-like consistency. Spread a 1-2 inch layer of mortar over the gravel base.
- Place the Stone: Select your largest, flattest flagstone for the tread. Wiggle it into the mortar until it’s level and stable.
- Build the Riser: Use smaller, thicker stones to build the vertical face (riser) under the front edge of the tread stone, using mortar to secure them.
- Cure and Set: Let the mortar cure for at least 48-72 hours before putting any weight on the step. Time: Approx. 4-6 hours per step. Cost: $150-$400 per step in materials.
Those gorgeous dark brown carved wood beams are a hallmark of Southwestern style, but they require consistent care in the harsh Arizona sun. To prevent cracking, fading, and drying, they should be inspected annually. Plan to re-stain or re-seal them every 2-3 years, depending on their exposure to direct sun. The light beige stucco is more forgiving, but it can show stains from rain runoff, especially from the wood beams. A gentle power wash every few years will keep it looking fresh. This style is a look that ages gracefully, but only with a little help.
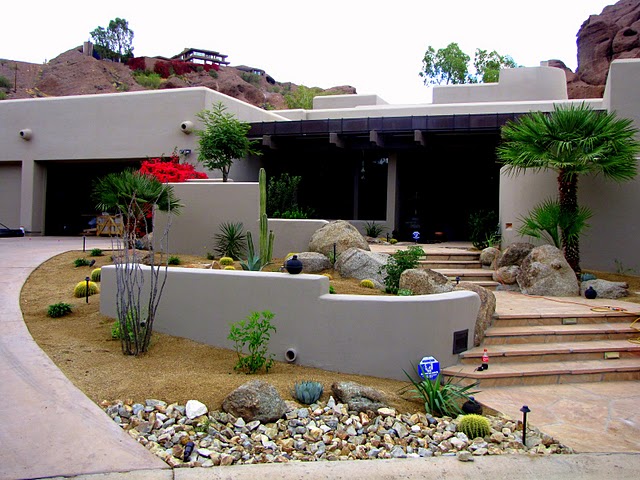
6. Architectural Tiered Planters with Natural Stone Steps
This landscape works because it uses strong, clean geometry to bring order to the wildness of the desert plants. The tiered stucco planters create defined zones and elevations, turning a simple slope into a deliberate architectural feature. This contrast between the smooth, light-colored stucco and the rugged textures of the boulders and flagstone is key. It feels both modern and deeply connected to the natural environment. The repetition of materials—the stucco of the house echoed in the planters—makes the entire property feel cohesive. Compare the clean lines here with the more rustic, organic tiers of the Idea #4 patio.
|
📋 Copy HEX 🔗 Share |
When using large natural boulders, bury at least one-third of the rock below ground level. This is a classic landscape designer trick. It makes the boulder look like an integrated part of the landscape, as if it has been there for centuries, rather than just placed on top of the soil. It provides the arrangement a sense of stability and authenticity that you can’t achieve when the rocks look like they were just dropped off a truck. It’s a small detail that makes a significant difference in the final result.
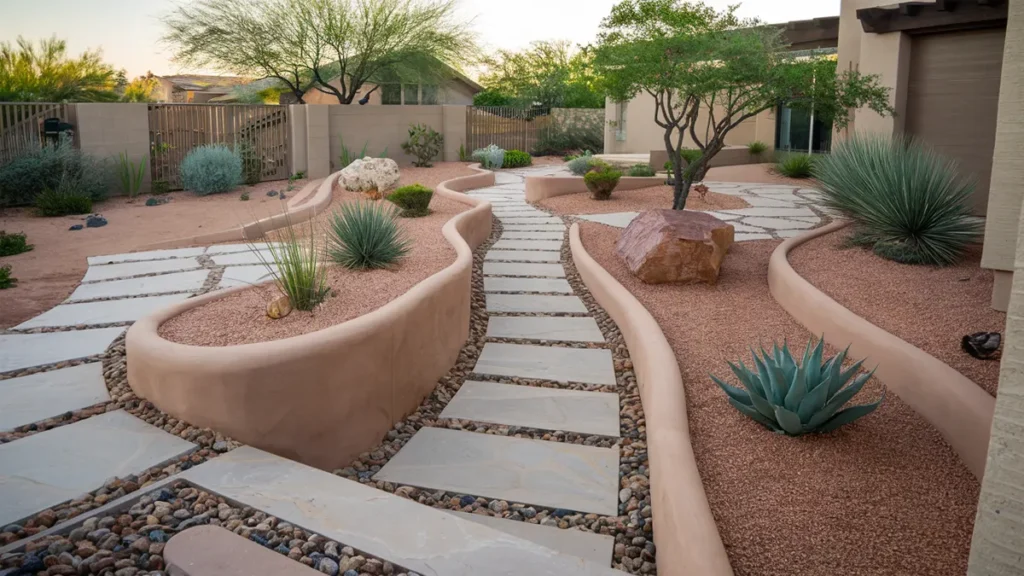
7. A Winding Path Defined by Curving Terracotta Walls
The magic of this design is all in those low, curving walls. They are the single element that elevates this area from a simple gravel yard to a sculptural, engaging garden. Their gentle, serpentine lines create a sense of movement and gracefully guide the eye (and foot) through the space. The warm, earthy terracotta color provides a beautiful contrast against the cooler greens of the succulents and the reddish-brown gravel. If you removed these walls, the entire design would lose its structure, definition, and charm. They create contained, deliberate planting beds from a sea of gravel.
|
📋 Copy HEX 🔗 Share |
This look follows a sophisticated formula: 40% hardscape (path, walls, gravel), 40% plants (a varied mix of succulents and trees), and 20% accent rocks. The key is the interplay between the different hardscape materials. The smooth, light-colored stepping stones are for walking, the larger river rocks are for bordering, and the reddish gravel is for filling. You could swap the terracotta walls for poured concrete or stacked stone and achieve a different mood (modern vs. rustic) while still using the same successful spatial formula.
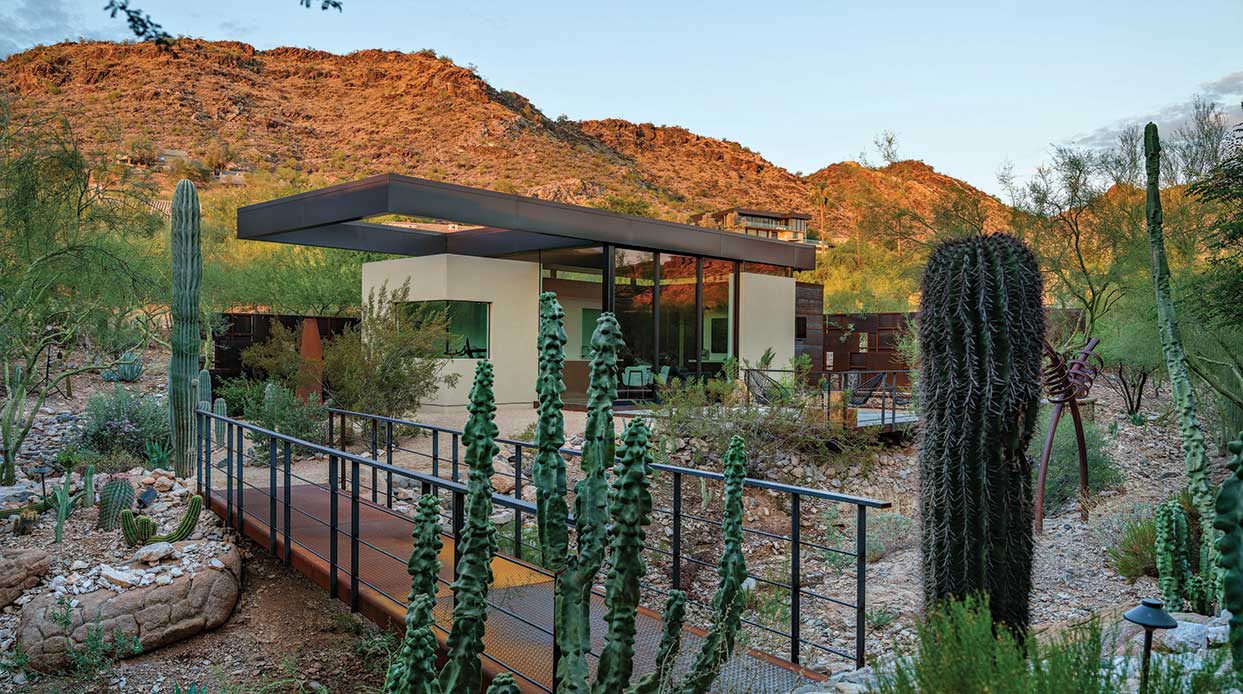
8. Contemporary Desert Hideaway with a Bridge Entry
We’re seeing a major trend towards architecture that doesn’t just sit on the landscape but actively integrates with it. This design is a perfect example. Instead of leveling the rocky terrain, the architect chose to embrace it, using a bridge to create access. This reflects a cultural shift towards respecting the natural environment and minimizing our footprint. It’s a design philosophy called “site-specific architecture,” and it privileges the unique character of the location over imposing a generic structure. This home feels like it grew out of the rocks, not on top of them.
|
📋 Copy HEX 🔗 Share |
A bridge entrance looks spectacular, but it comes with a host of practical considerations. First, the cost. This requires specialized engineering and construction, making it significantly more expensive than a standard walkway. Second, accessibility can be an issue for those with mobility challenges. Third, materials matter. The rust-colored metal deck seen here is beautiful, but it might get dangerously hot in the summer sun. You’d need to consider composite materials or wood, which then introduces its own maintenance schedule. This is a show-stopping feature, but it’s not a decision to be made lightly.
9. Modern Mix: Gravel, Succulents, and a Pop of Green Turf
You can achieve this clean, modern aesthetic without the high-end price tag. The key components are gravel and a few stately plants. Instead of a custom concrete curb, use simple steel or plastic edging from Home Depot or Lowe’s ($3-$6 per foot). For ground cover, buy light-colored gravel in bulk from a landscape supplier, which is far cheaper than buying it by the bag. The biggest savings comes from the plants: skip the mature, slow-growing succulents and opt for smaller, faster-growing varieties like ‘Blue Glow’ agave or ornamental grasses. For a really budget-friendly approach, browse Facebook Marketplace for people removing and giving away large succulents for free. You can get this look for $1,500-$3,000 if you do the labor yourself. For a fully natural alternative, see the pure gravel look in Idea #15.
|
📋 Copy HEX 🔗 Share |
Let’s talk about artificial turf. While it offers a lush green look with no watering, it’s not a ‘set it and forget it’ solution. In Arizona, its surface can become extremely hot in direct summer sun, sometimes too hot for bare feet or paws. It needs to be regularly rinsed to clear off dust and debris. Over time, the blades can become matted in high-traffic areas and will need to be brushed or ‘bloomed’ with a power broom to stay looking fresh. Also, be aware that reflective surfaces from windows can sometimes magnify sunlight and melt sections of the turf, so placement is key.
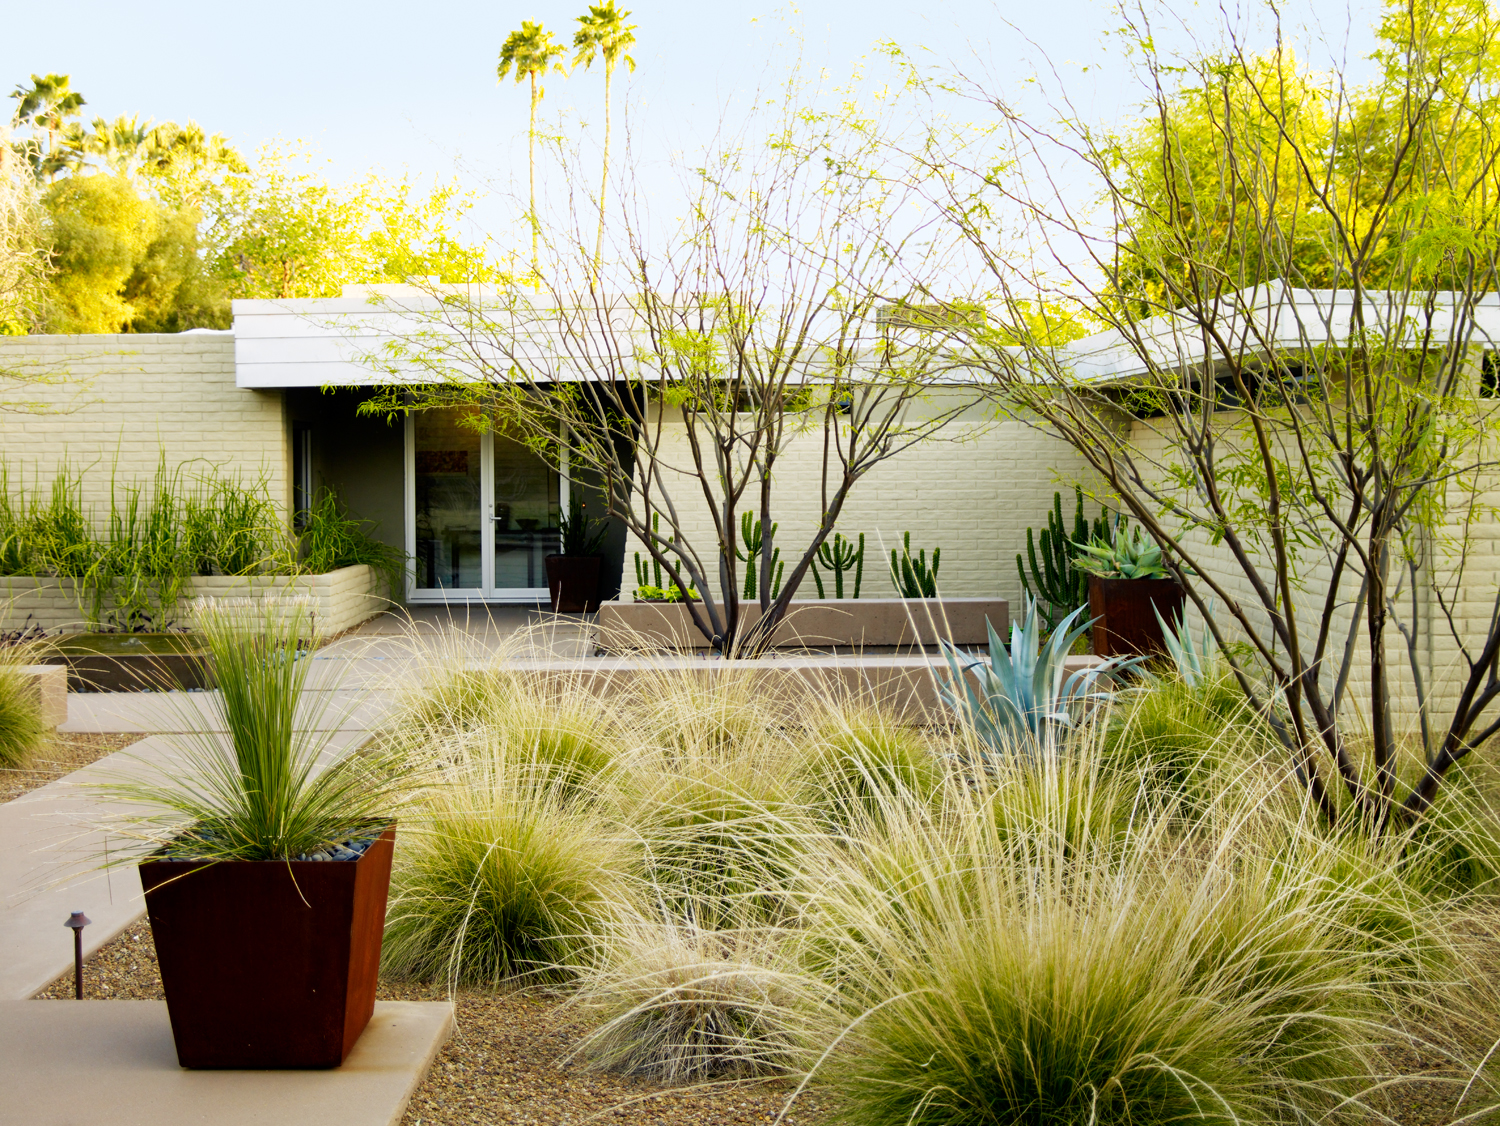
10. Sage Green Brick Paired with Rusty Metal Planters
This design is a masterclass in subtle color and texture pairings. The light sage green of the brick is an unexpected choice that works beautifully because it harmonizes with the varied greens of the desert plants, creating a soft, monochromatic base. The oxidized, rusty-brown of the metal planters then comes in as a perfect complementary color, adding warmth and a modern, industrial edge. This contrast between the soft, cool green and the warm, rough rust is what gives the entire composition its sophisticated, designer feel. The light gray gravel acts as a neutral backdrop, allowing these two main elements to shine.
|
📋 Copy HEX 🔗 Share |
When combining multiple ground covers like concrete paths and gravel beds, always use a solid physical border. A flush-mount steel edge, a concrete curb, or a brick border is essential. This locked-in edge prevents the gravel from migrating onto your clean pathway every time it rains or someone walks by. It’s a small, upfront installation detail that saves you the endless sweeping and maintenance, keeping those crisp, clean lines that make a modern landscape look sharp and intentional.
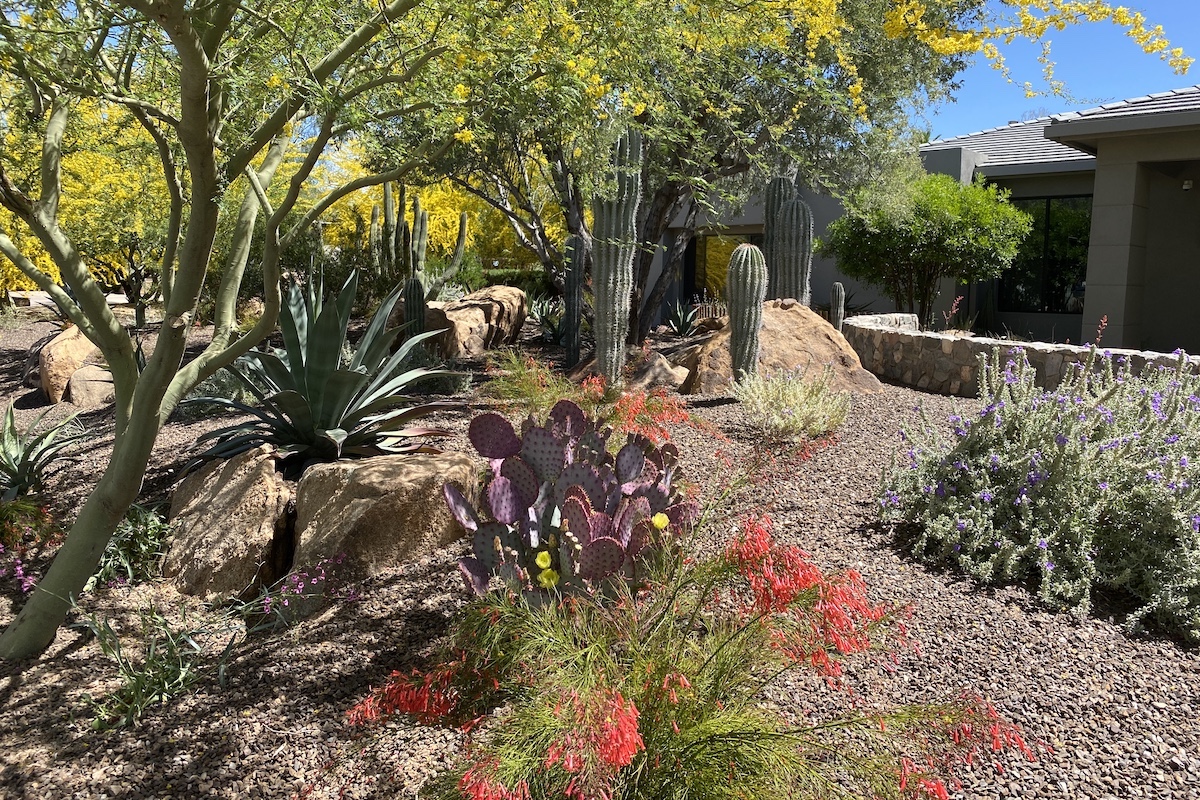
11. A Riot of Color: Purple Prickly Pear and Red Blooms
The single most captivating element here is the unapologetic use of color, specifically the purple prickly pear cactus. In a landscape often dominated by greens and browns, introducing a vibrant, unexpected hue like purple instantly creates a focal point and injects personality. It proves that a desert landscape doesn’t have to be monochromatic. The purple pads, combined with the bright yellow flowers and the nearby red flowering bush, create a stunning, high-contrast display that feels both natural and artfully composed.
|
📋 Copy HEX 🔗 Share |
Want to layer color like this? It’s about strategic placement and understanding bloom times. Here’s a mini-guide:
- Choose a Colorful ‘Anchor’ Plant: Start with a plant that has colorful foliage, like the purple prickly pear (Opuntia santarita). This provides color year-round, not just when flowering.
- Add a Contrasting Flower: Plant a shrub with a contrasting bloom color nearby. The red bougainvillea, or fairy duster, seen here is a perfect contrast against the purple/green.
- Introduce a Tertiary Color: Add a smaller pop of a third color, like the yellow cactus flowers, to create a color triangle.
- Space Them Out: Don’t crowd them. Give each colorful plant some breathing room, using neutral green plants and gravel as a backdrop to make the colors pop.
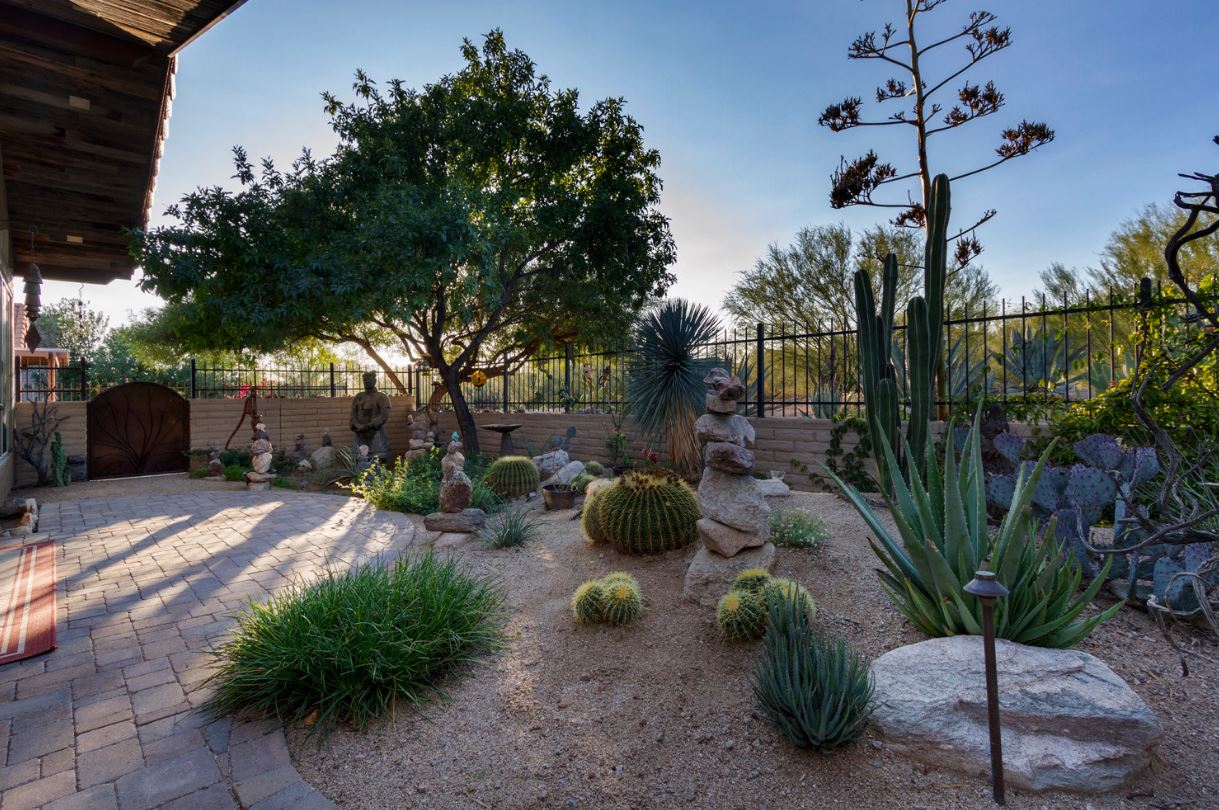
12. Textured Xeriscape with Agave, Boulders, and a Hint of Turf
This design is all about celebrating texture. The formula is roughly 50% rock and gravel, 40% sculptural plants, and 10% soft texture. The rough, muted surfaces of the large granite boulders and light brown gravel create a neutral canvas. Onto this, the sharp, architectural shapes of the agaves and cacti are layered, providing strong visual interest. The final 10%—the small patch of bright green artificial turf—is the secret weapon. It’s a moment of unexpected softness and vibrant color that makes all the other rough textures appear even more dramatic and interesting. This uses a smaller patch of turf than Idea #8, treating it more like a textural accent.
|
📋 Copy HEX 🔗 Share |
This approach is incredibly versatile and works well in small to medium-sized yards, from a tiny front courtyard to a 500-square-foot patch of lawn you’re looking to convert. The key is to scale the boulders to the size of your space. In a small yard, use a cluster of three medium-sized boulders (1-2 feet in diameter) as your anchor. In a larger space, you can use several massive, 4-foot boulders to create drama. The concept remains the same, but the scale of the elements adjusts to fit the container.
13. A Modern Weathered Steel Fire Feature
A statement fire feature like this becomes the focal point of an outdoor living space, but it comes with a designer price tag. The weathered steel (often called Corten) and custom stone work are premium materials.
|
📋 Copy HEX 🔗 Share |
- Weathered Steel Linear Burner Kit (36-48”): $2,500 – $5,000
- Stacked Stone Veneer & Block Work: $3,000 – $6,000
- Blue Fire Glass: $100 – $300
- Gas Line Installation & Labor: $2,000 – $4,000
- TOTAL: $7,600 – $15,300
Budget alternative: Opt for a pre-fabricated concrete or composite fire table from a big-box store and surround it with loose rock instead of a built-in planter. Cost: $1,500 – $3,000.
Corten or weathered steel is beloved for its rustic, evolving patina, but it has one significant characteristic to be aware of: it “bleeds.” For the first few years as the protective rust layer develops, rainwater runoff will contain rust particles that can—and will—stain adjacent light-colored surfaces like the beautiful patio tiles seen here. Designers account for this by incorporating a gravel margin or a drainage channel around the base of the feature to catch the runoff. If you install it directly on a light concrete patio, be prepared for orange streaks.
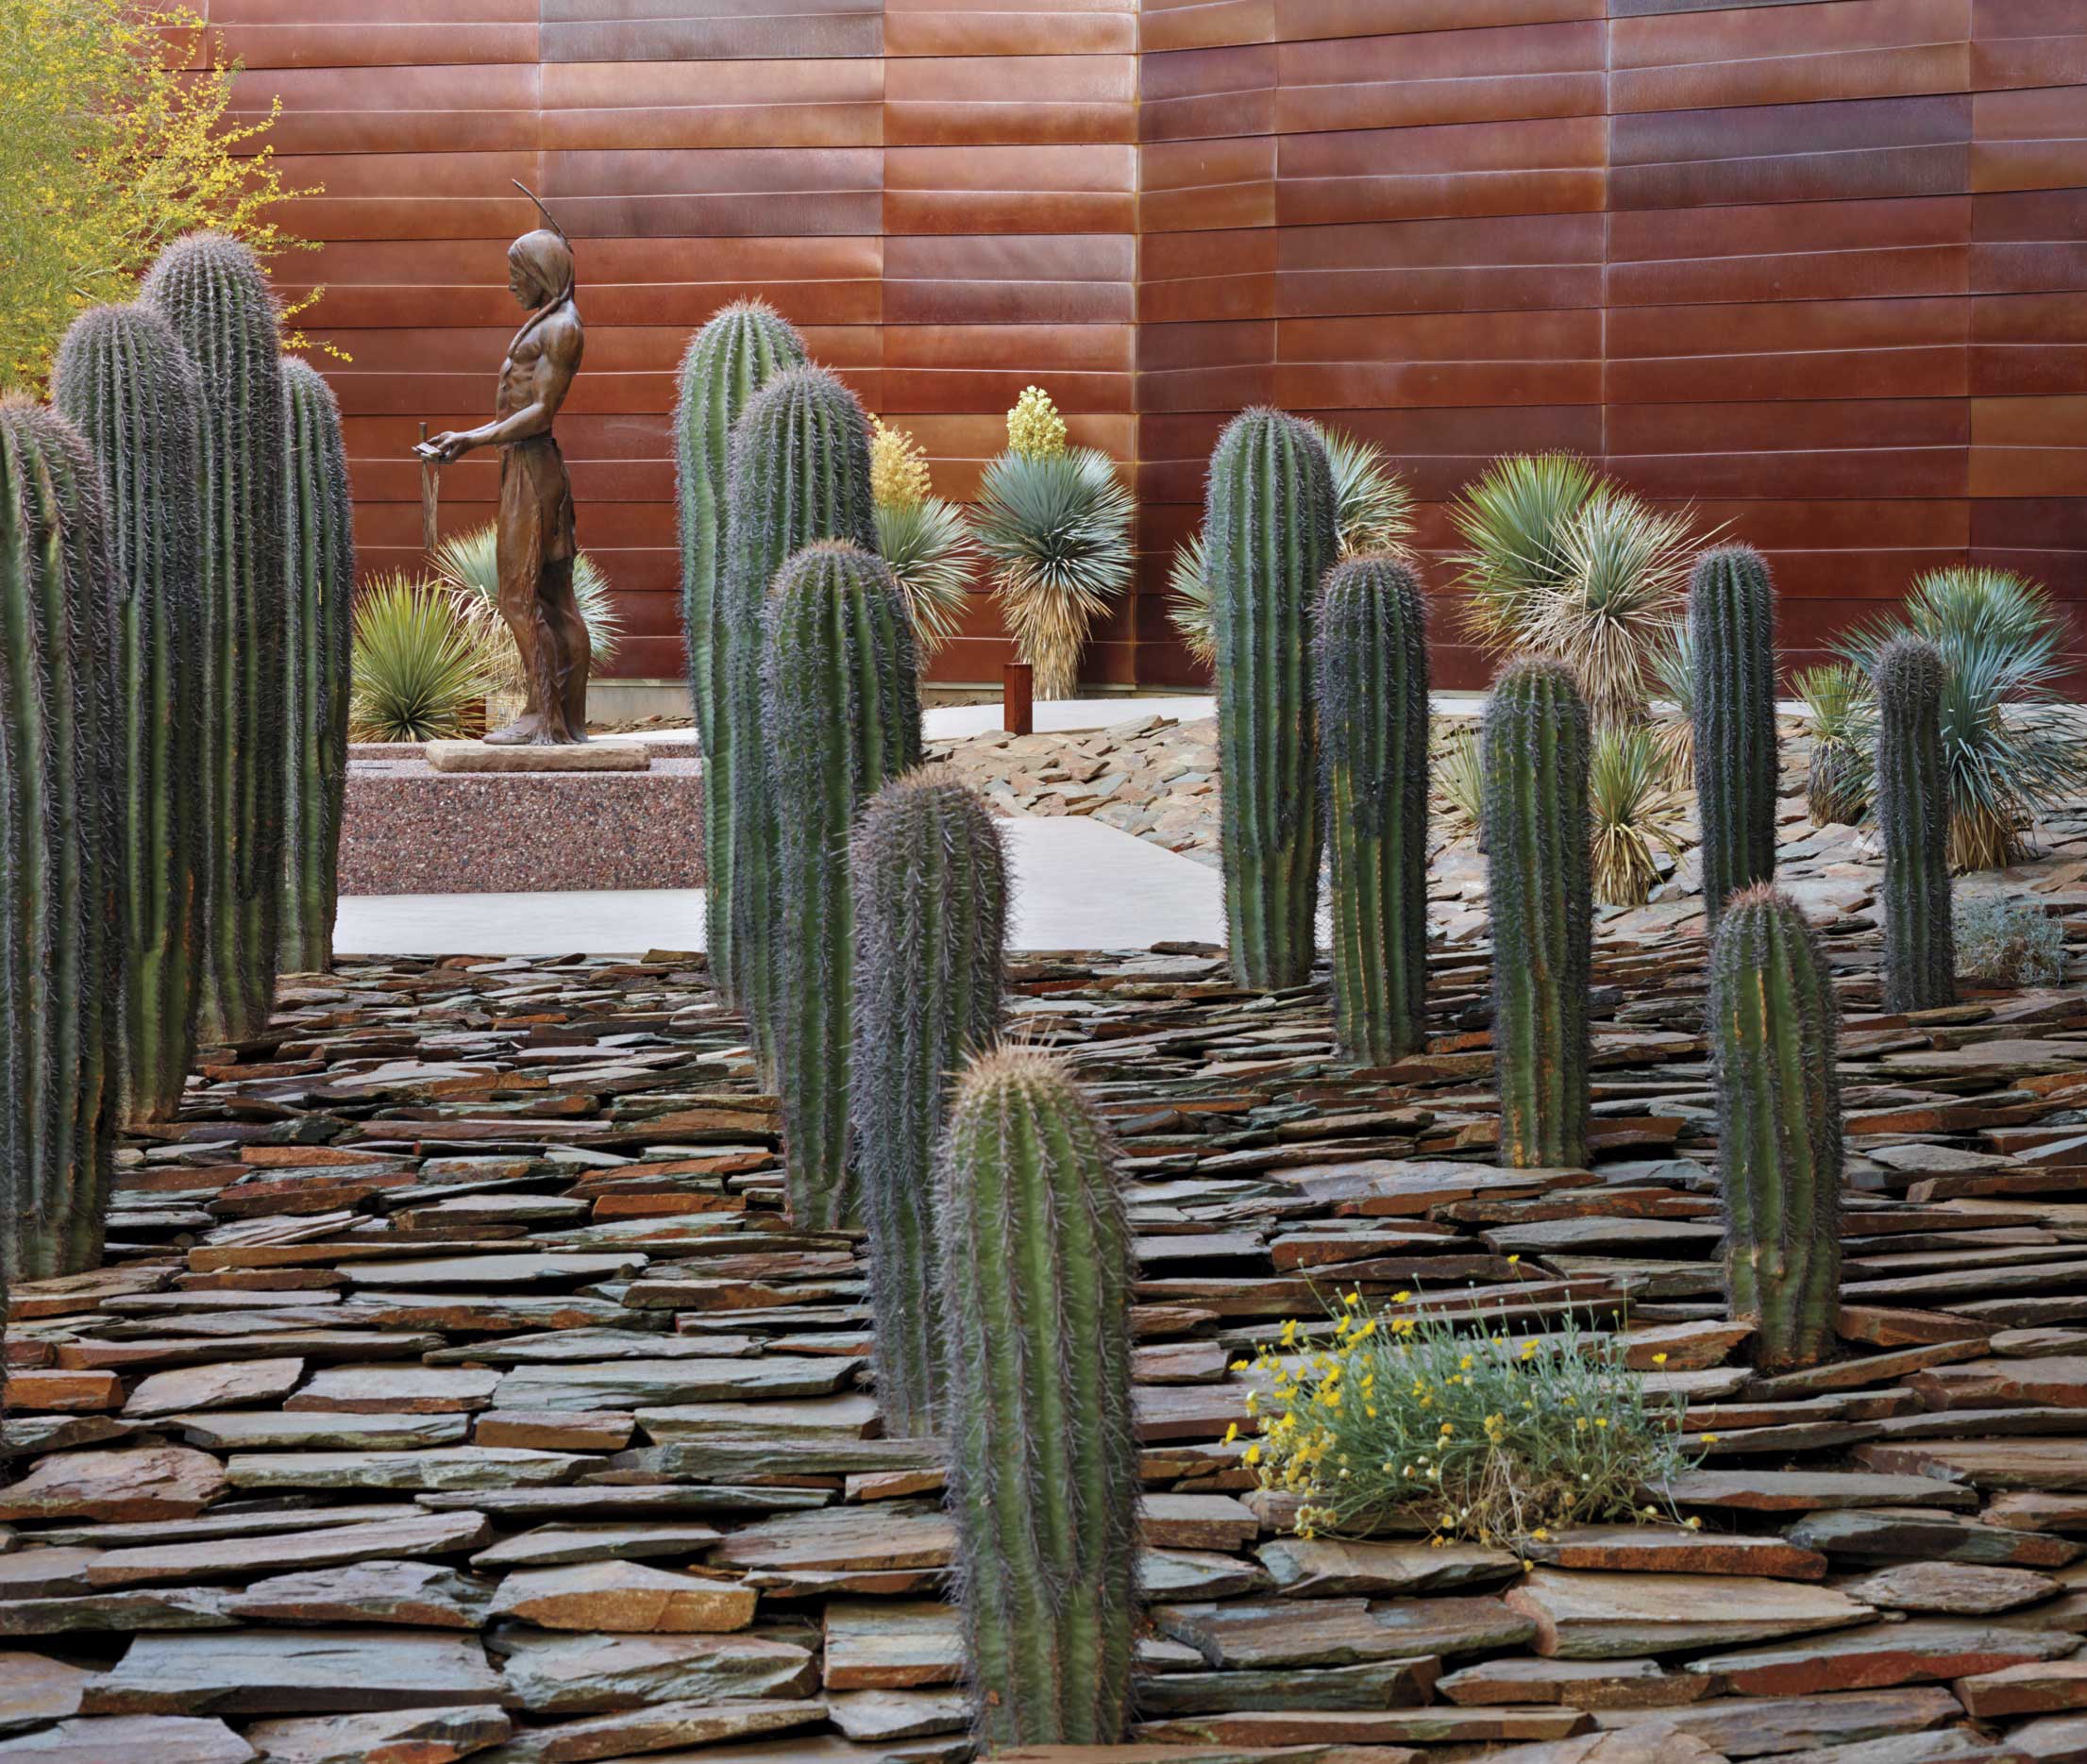
14. Sculptural Desert Scene with a Rusted Steel Backdrop
This is more than just a landscape; it’s an art installation. It works because it fearlessly commits to a dramatic, almost theatrical vision. The success lies in the interplay of three distinct elements: the organic verticality of the columnar cacti, the industrial horizontality of the rusted metal wall, and the classical form of the human statue. Each element is strong on its own, but together they create a powerful visual tension. The layered flagstone ground acts as a unifying textured base, its ruggedness echoing both the natural plants and the weathered man-made elements.
|
📋 Copy HEX 🔗 Share |
That rusted metal wall is a showstopper, but let’s be real about living with it. As with the fire feature in Idea #12, rust runoff is a major issue that can permanently stain the beautiful flagstone below. This requires careful planning for drainage. Also, the edges of metal panels can be sharp, which might be a concern in a yard with pets or small children. Finally, a large metal wall can absorb and radiate a tremendous amount of heat, creating a microclimate that could scorch nearby sensitive plants if they are placed too close.
15. A Sun-Dappled Garden with Gravel Paths and Lush Cacti
To create a natural, sun-dappled effect like this, think like a forest, not a farm. Plants in nature don’t grow in straight lines. When placing your cacti and trees, arrange them in triangular clusters rather than rows. Use groupings of three or five plants of varying heights. Overlap the planting beds with the gravel paths in gentle curves, allowing some plants to spill over the edges. This intentional lack of rigid structure is what makes the space feel relaxed, organic, and like it has been there forever. The dappled light is a bonus that comes from having taller, leafy trees mixed in with the cacti.
|
📋 Copy HEX 🔗 Share |
This lush, layered style is perfect for medium to large backyards where you want to create a sense of immersion and privacy. You need a space of at least 1,000-1,500 square feet to accommodate the mix of tall trees, large barrel cacti, and meandering paths without it feeling cramped. It’s particularly effective at breaking up long, narrow yards, as the curved paths and layered plants can create the illusion of a wider, more interesting space. In smaller yards, you would need to scale down the plant sizes significantly to avoid being overwhelmed.
16. Create a Miniature Desert World in a Container
Building a miniature desert landscape is a perfect weekend project and a great way to get into desert gardening. It condenses a large-scale look into a manageable, artistic arrangement.
|
📋 Copy HEX 🔗 Share |
- Choose a Shallow, Wide Pot: A bowl-shaped pot with a drain hole is ideal. Terracotta or unglazed ceramic works best.
- Layer Your Soil: Fill the pot 1/3 with gravel for drainage, then top with a cactus-specific soil mix.
- Arrange Your ‘Boulders’: Place 3-5 interesting rocks of varying sizes first. These are the structural bones of your landscape.
- Plant Your Cacti: Add a ‘thriller’ (a taller cactus), a ‘filler’ (a mid-size one like a barrel), and a ‘spiller’ (a low-growing succulent).
- Add Top Dressing: Finish with a layer of fine sand or pebbles to cover the soil and complete the desert look.
This is the ultimate budget-friendly way to get a high-design desert look. While a full-yard landscape can run into tens of thousands of dollars, a beautiful container garden like this can be made for under $100. A ceramic pot might cost $40, a bag of cactus soil is $10, and a handful of small cacti and succulents from a local nursery will run $5-$8 each. The rocks and decorative pebbles can often be found for very cheap at a landscape supply yard. This approach captures the essence of grand landscapes like Idea #3 in a small, affordable, and renter-friendly package.
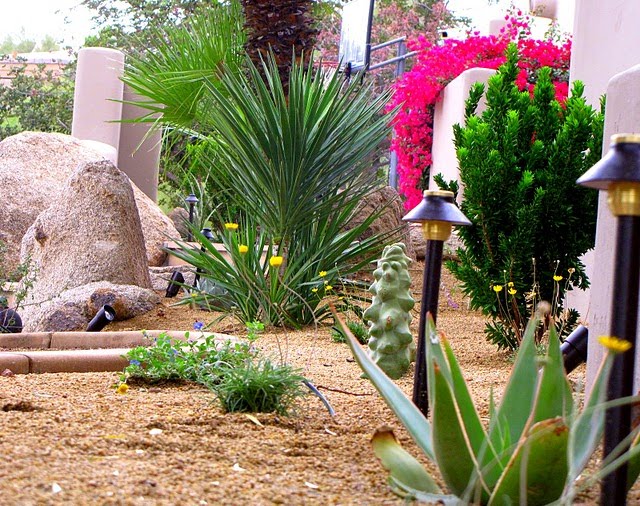
17. Landscape Lighting to Highlight Boulders and Bougainvillea
What transforms this from a nice daytime garden to a dramatic nighttime scene is the landscape lighting. By day, the boulders and plants are the stars. By night, the light itself becomes a key design element. It’s used here not just for visibility, but for artistry. Uplighting a large boulder reveals its rugged texture, while placing a light within a vibrant bougainvillea makes the colors glow from within. Without the carefully placed lights, the garden would simply disappear into the darkness after sunset. With them, it gains a whole new life and a sophisticated, resort-like quality.
|
📋 Copy HEX 🔗 Share |
When using landscape lighting, focus on ‘grazing’ and ‘uplighting.’ To graze a textured surface like a large boulder, place the fixture very close to its base and aim the light almost straight up. This technique casts dramatic shadows across the surface, emphasizing every crack and crevice. For plants like agaves or yuccas, place a spotlight a few feet away and aim it at the center of the plant. This creates a bold silhouette and highlights the plant’s architectural form against the dark background. Use warm white bulbs (around 2700K) for a welcoming, natural glow.
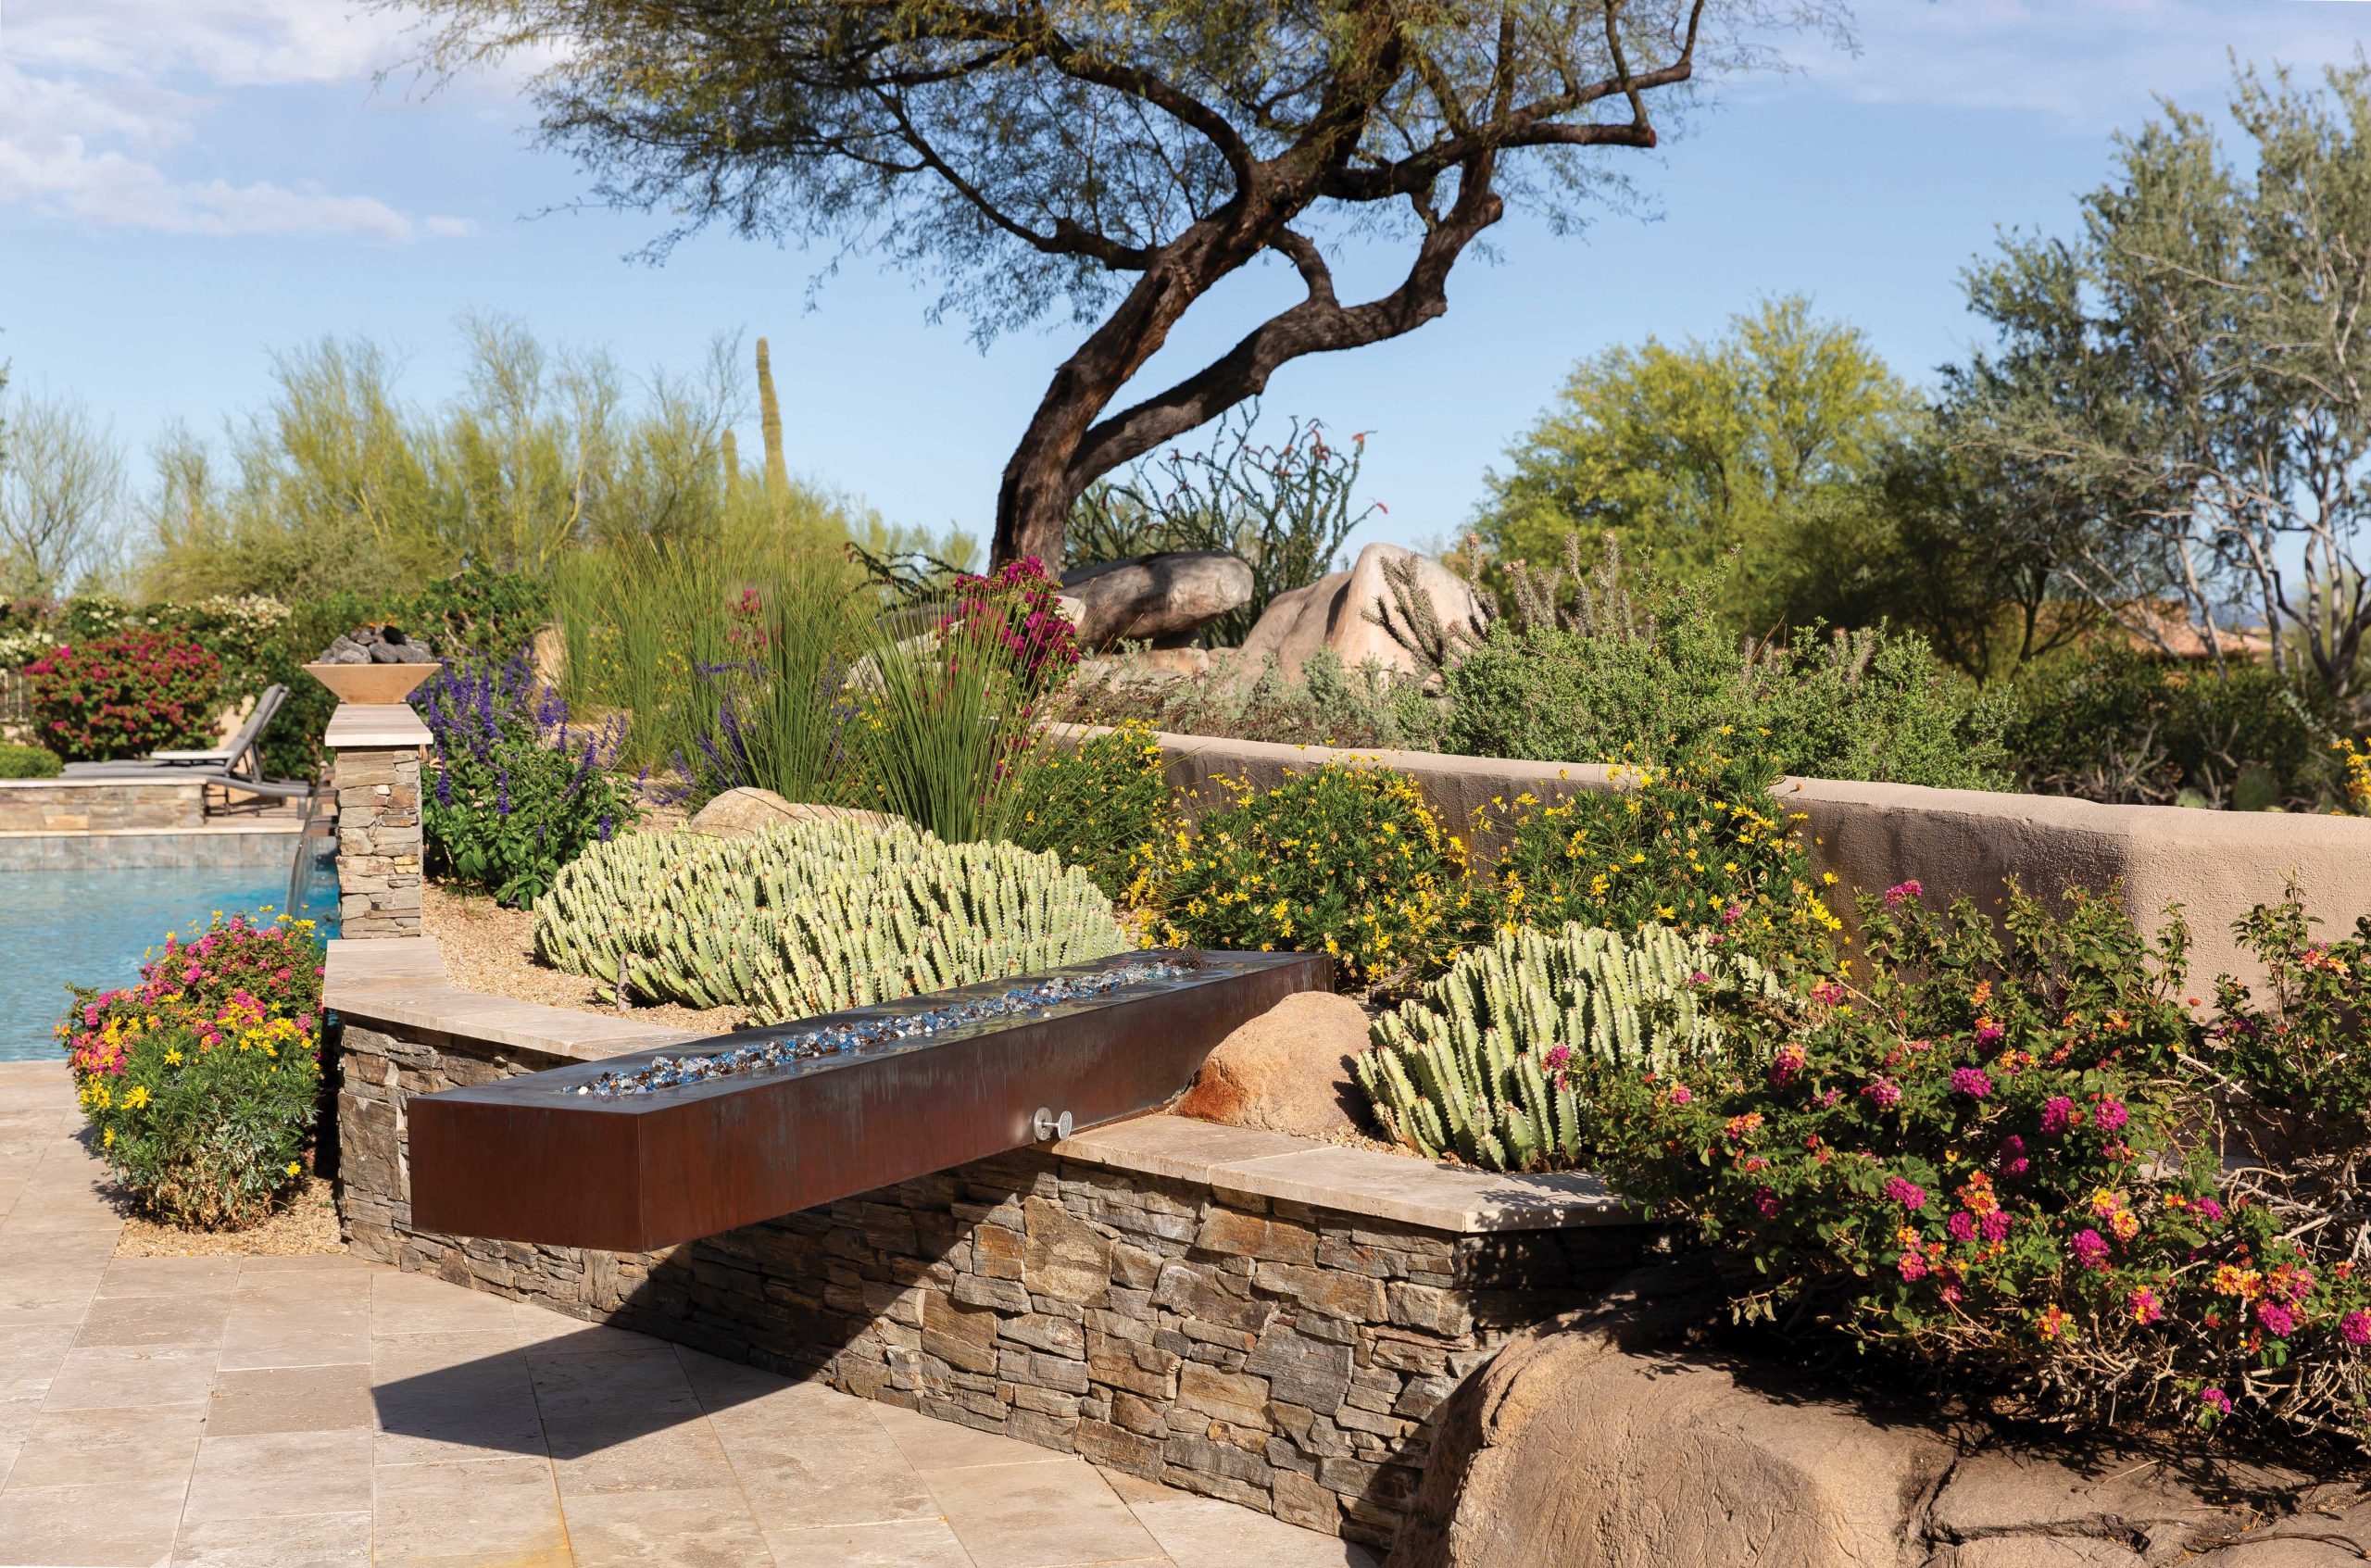
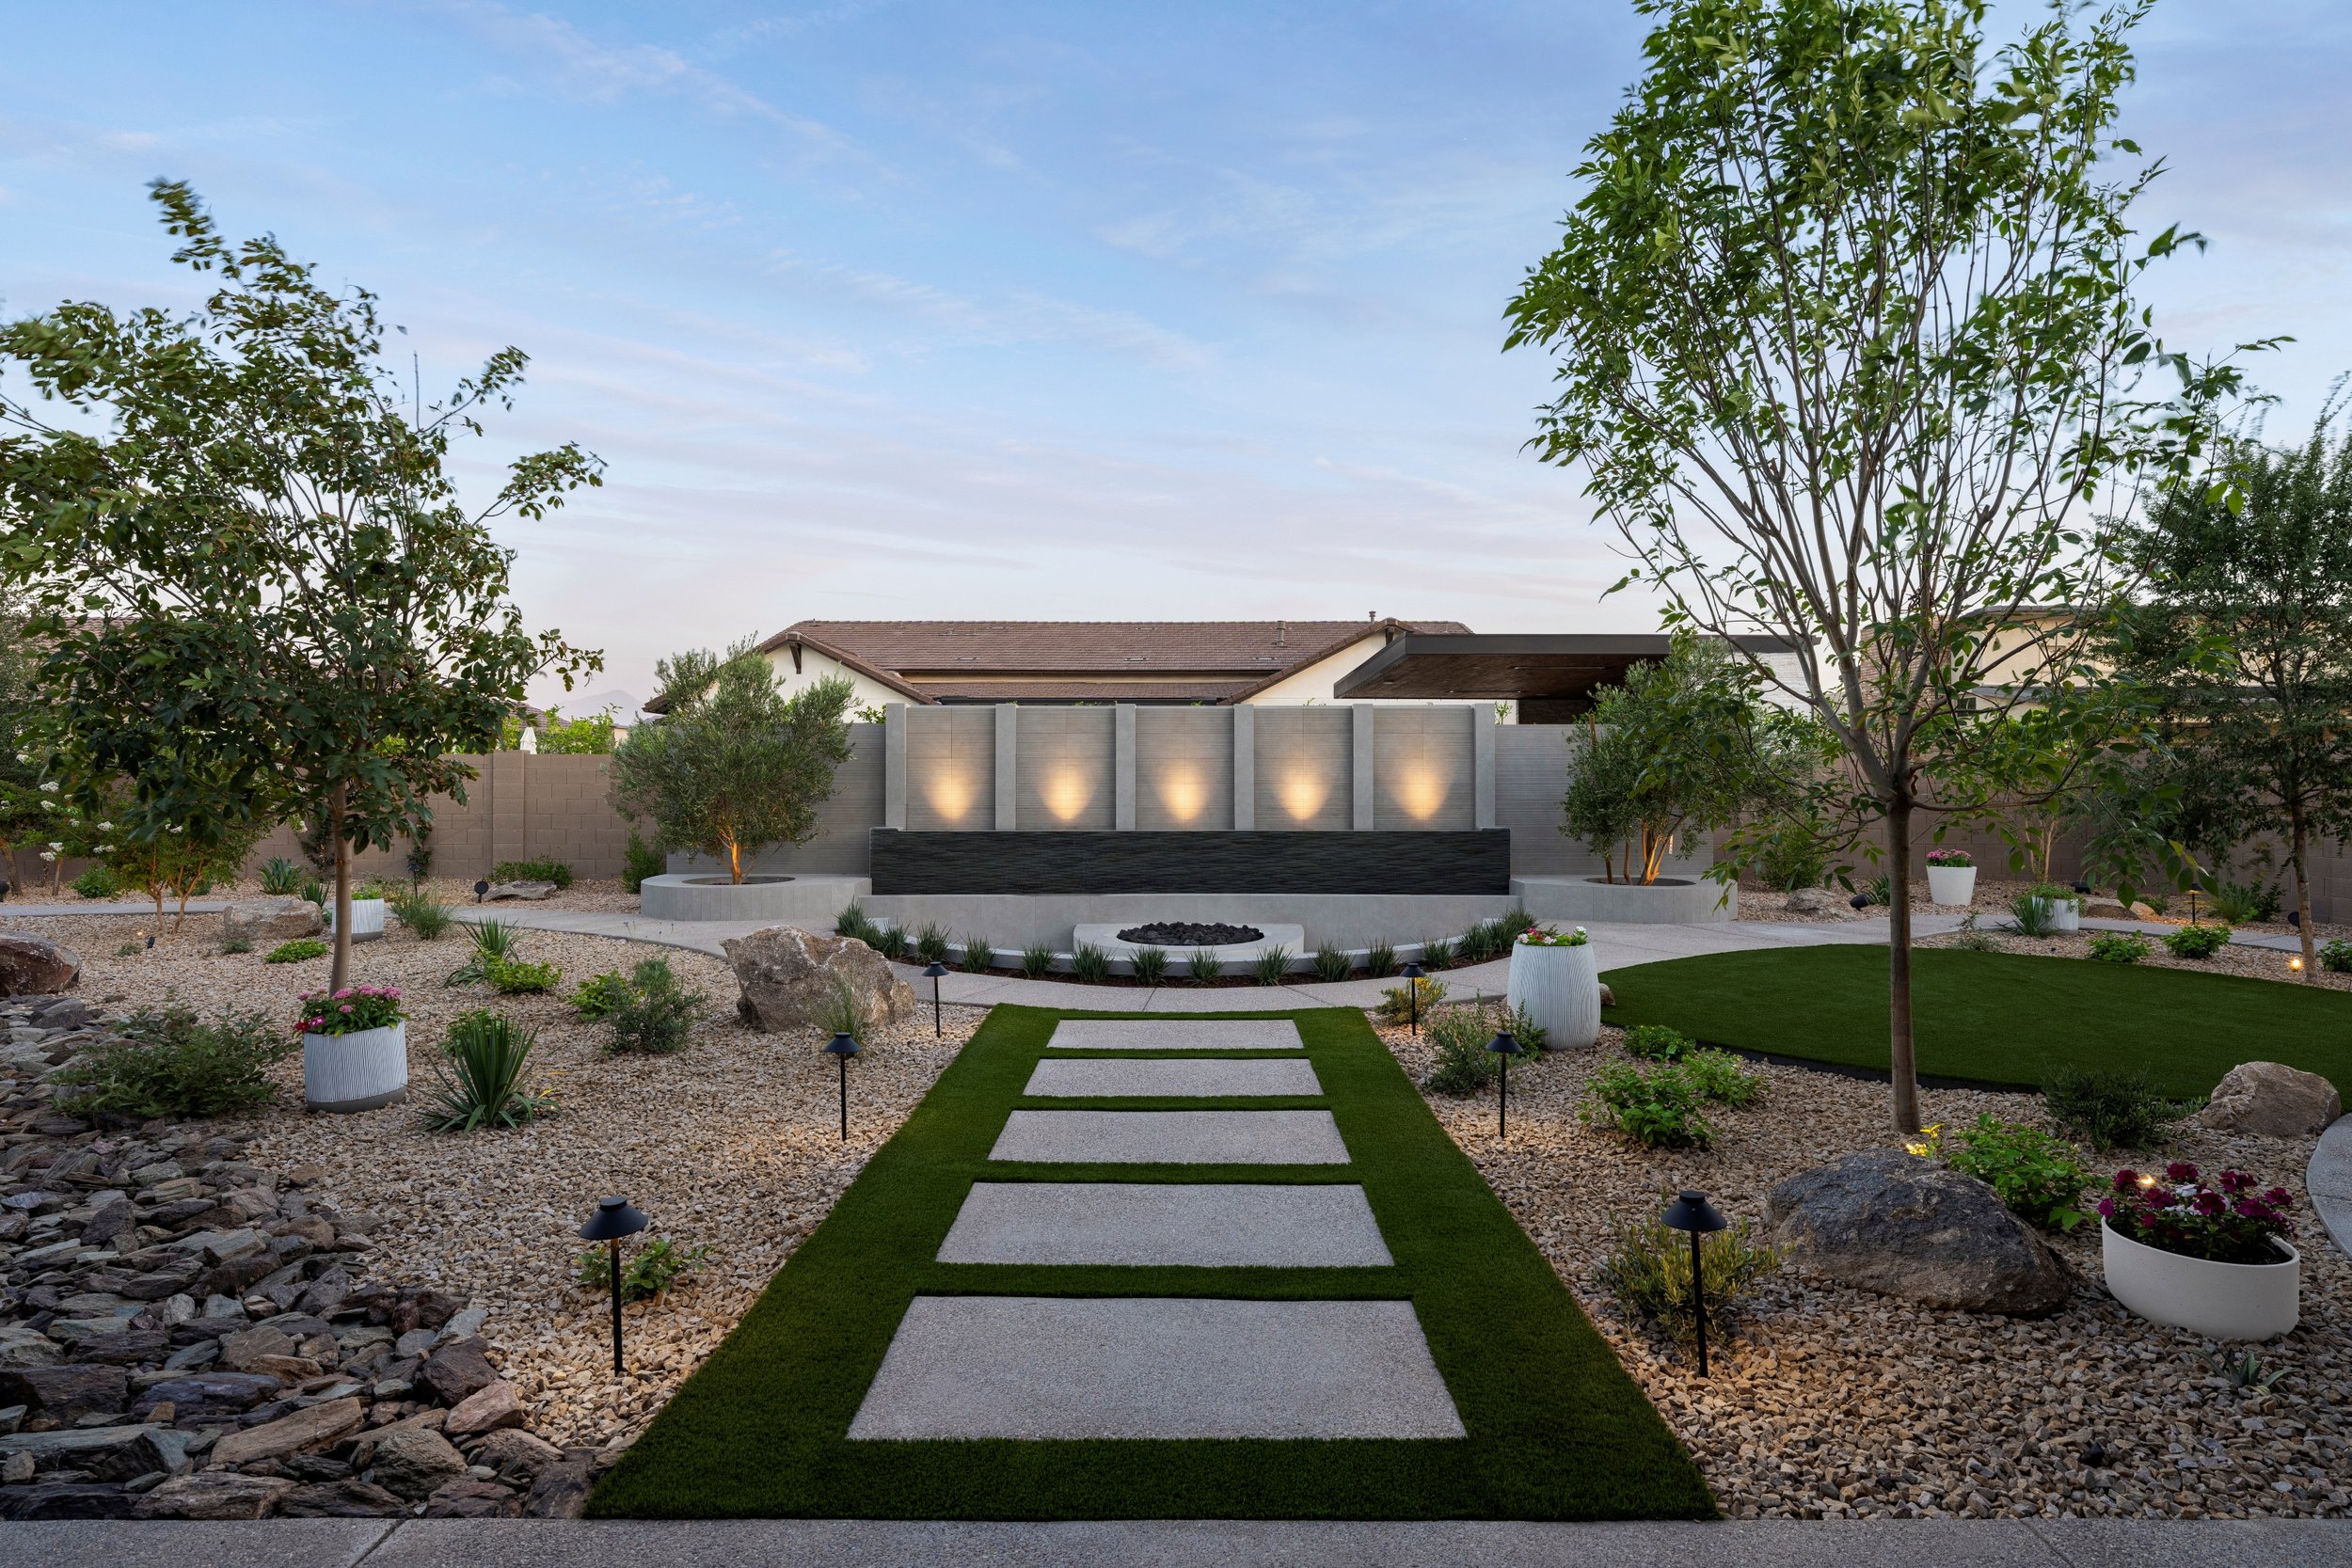
18. A Modern Oasis with Water Wall and Sunken Fire Pit
This is the pinnacle of the modern outdoor living room, incorporating multiple high-end features. This level of custom integration involves significant design and construction costs.
|
📋 Copy HEX 🔗 Share |
- Custom Water Feature Wall (8-10 ft): $15,000 – $35,000+
- Sunken Circular Fire Pit (Gas): $8,000 – $15,000
- Concrete Pavers & Artificial Turf Inlay: $8,000 – $18,000
- Low-Voltage LED Lighting System: $3,000 – $7,000
- Plants and Gravel: $4,000 – $8,000
- TOTAL: $38,000 – $83,000+
Budget alternative: Create a similar feel with a standalone fountain ($500-$1,500), a portable fire pit ($300-$1,000), and standard pavers from a big box store. Total cost: $5,000 – $10,000.
This design perfectly captures the trend of the ‘outdoor room. Homeowners no longer see their backyard as just a patch of grass but as a true extension of their indoor living space. We’re seeing a huge demand for backyards that serve multiple functions: dining, lounging, entertaining, and relaxing. Features like integrated fire pits, water walls, and outdoor kitchens are becoming the new standard in luxury homes. It’s a response to a desire to connect more with nature while still enjoying all the comforts and defined spaces of being indoors.
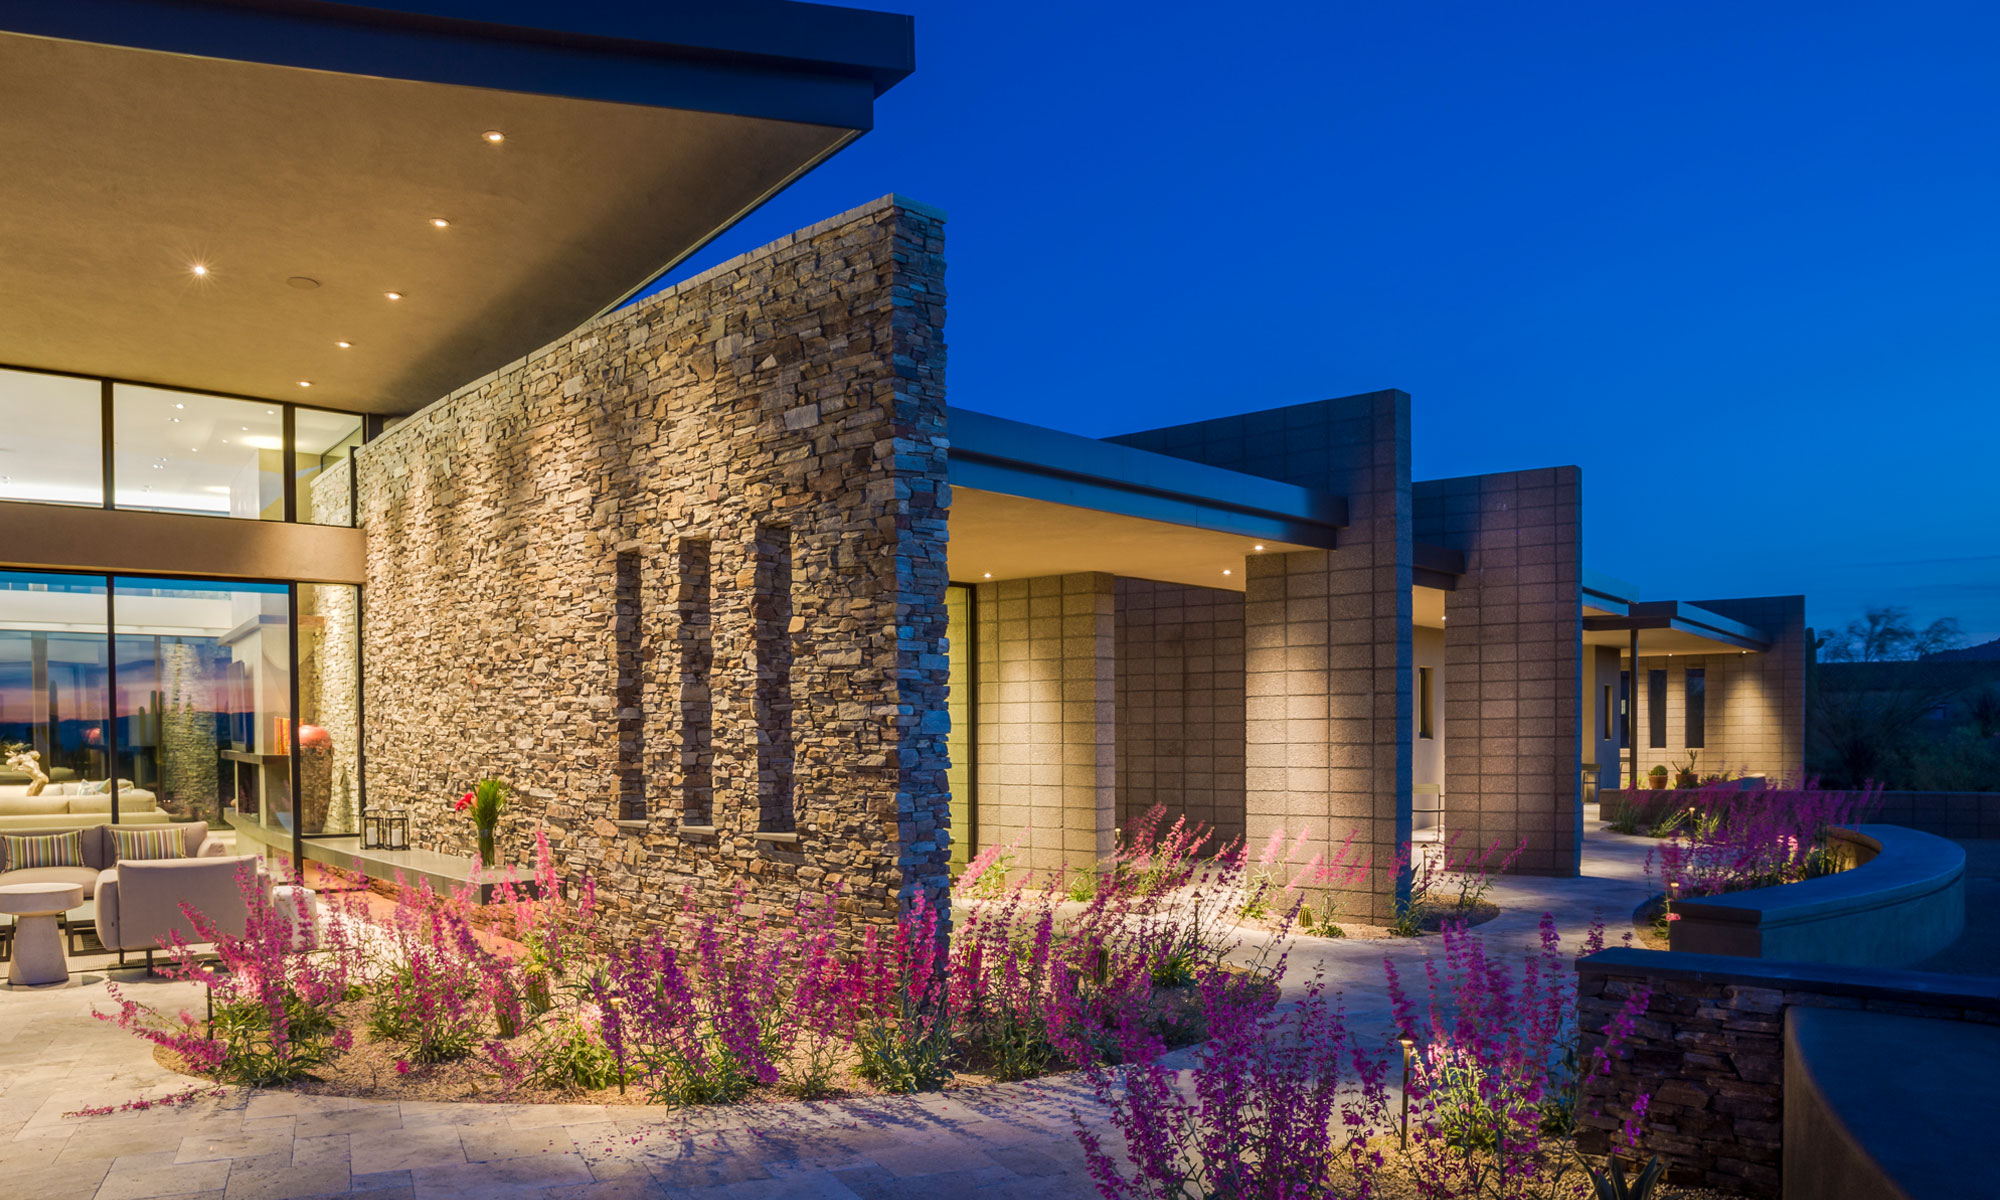
19. Warmly Illuminated Stone Facade with a Pop of Pink
The magic here is the masterful layering of light and texture. The stacked stone facade provides a rich, tactile surface that comes alive under the warm glow of the recessed ceiling lights. This lighting creates a ‘wall wash’ effect, highlighting the texture and color variations in the stone. The decision to then plant a line of vibrant pink flowers at the base is a stroke of genius. The bright, soft flowers offer a stunning contrast in both color and form to the hard, neutral-toned stone wall, making the entire entrance feel dynamic, modern, and incredibly inviting.
|
📋 Copy HEX 🔗 Share |
A stacked stone facade is a premium architectural feature with a price to match. Professionally installed, a natural stone veneer like this can cost between $45 and $85 per square foot. For a large feature wall, this can quickly add up to tens of thousands of dollars. While there are more affordable manufactured stone veneer options, they may not offer the same depth of color and texture. Likewise, a professionally designed and installed recessed lighting system is not a simple DIY job and adds several thousand dollars to the project cost. It’s a look that says ‘luxury’ for a reason.
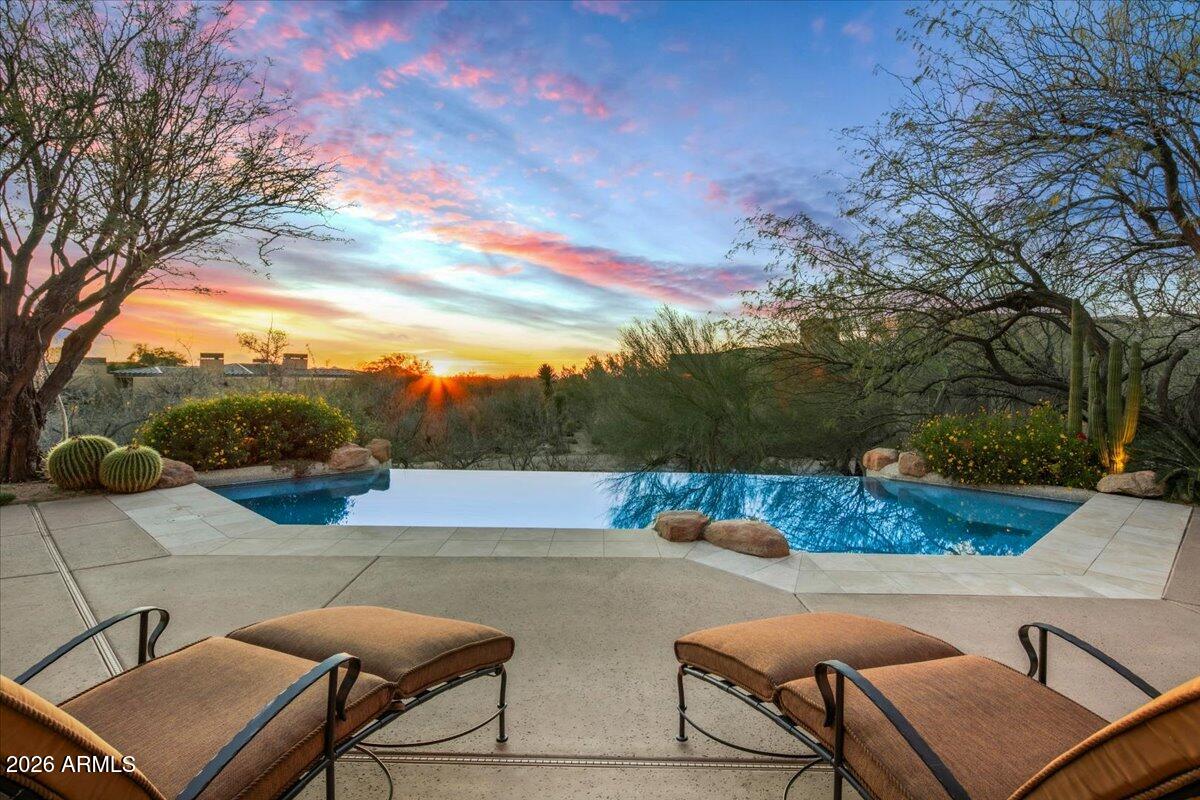
20. An Infinity Pool Overlooking a Saguaro-Studded Sunset
What makes this entire scene breathtaking is, of course, the infinity edge of the pool. It’s a brilliant design trick that creates a seamless visual transition between the man-made pool and the natural landscape beyond. The water appears to merge with the desert and the sky, blurring the lines and creating an illusion of vast, open space. Without that disappearing edge, this would be a lovely—but conventional—pool. With it, it becomes an immersive experience that fully capitalizes on its stunning location and view.
|
📋 Copy HEX 🔗 Share |
An infinity pool is not a feature for every backyard. It has two critical requirements: a significant budget (they are typically 25-40% more expensive than a standard pool) and, most importantly, a slope. The design relies on having a lower catch basin for the water to spill into, which means it’s only suitable for properties with a natural grade change or a hillside location. For a truly effective look, you also need an interesting view to merge with, whether it’s a mountain range, a city skyline, or a valley. For a pool design that works on a more standard flat lot, see the beautiful rock waterfall in Idea #20.
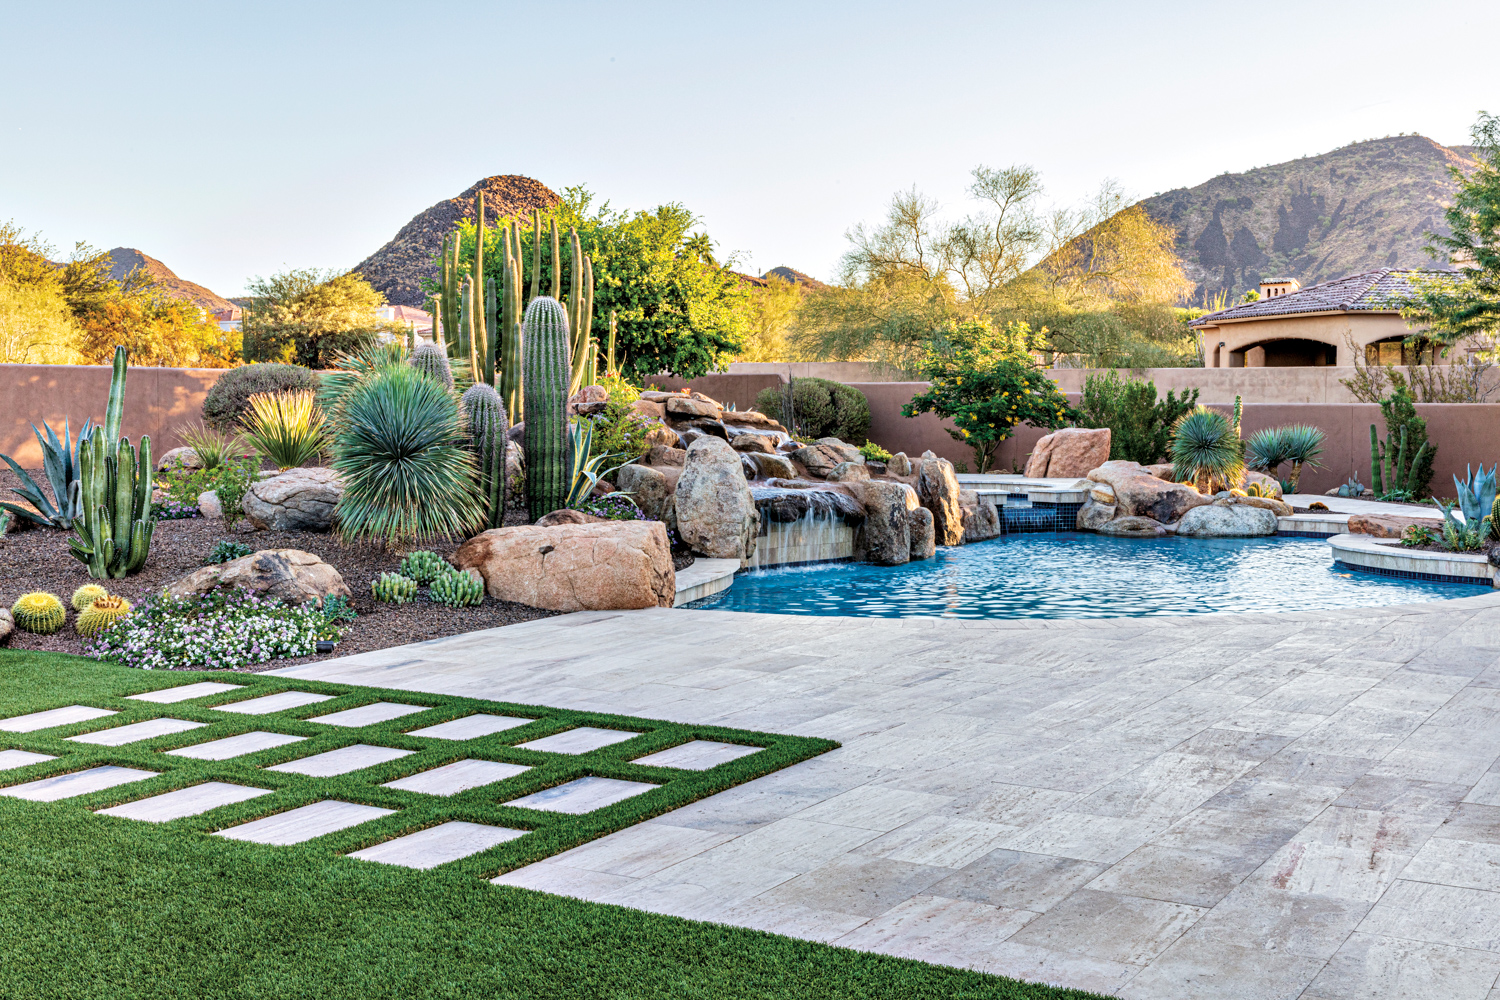
21. Backyard Oasis with a Natural Rock Waterfall Pool
A custom-built, multi-tier rock waterfall like this can be a major expense, often adding $10,000 to $25,000+ to the cost of a pool. But you can get the sound and feel of moving water for much less. Look into pre-fabricated waterfall kits, which are essentially modular fiberglass forms designed to look like rock. These can be installed for a fraction of the cost, typically in the $2,000-$5,000 range. For an even simpler approach, consider a standalone ‘spillway’ scupper built into a raised planter wall next to the pool. This can provide the soothing sound of a waterfall for under $1,500.
|
📋 Copy HEX 🔗 Share |
A rock waterfall looks stunning, but it introduces extra maintenance. The splashing water increases evaporation, meaning you’ll need to add water to your pool more often, which can affect your water chemistry. Calcium deposits can build up on the rock surfaces over time, creating a white, crusty look that requires periodic cleaning with a stiff brush and specialized tile cleaner. Furthermore, the nooks and crannies in the rocks can become a breeding ground for algae if your pool chemistry isn’t perfectly balanced. It’s beautiful, but it’s not a hands-off feature.
22. A Dense, Vibrant Garden of Cacti, Agave, and Yucca
To achieve this lush, collected look, ignore uniform spacing and think in layers. Start with your tallest ‘architectural’ plants in the back, like the tree-like cactus or a tall yucca. Then, create a mid-layer with large, sculptural agaves and prickly pears. Finally, fill in the front and the gaps with smaller barrel cacti, succulents, and groundcovers. The key is to vary not just the height, but also the shape and texture. Mix spiky, rounded, and rosette forms together. This intentional, dense layering is what gives the garden its mature, abundant, and vibrant character.
|
📋 Copy HEX 🔗 Share |
This visually rich style is a brilliant exercise in controlled chaos. The formula is approximately 70% dense plantings, 20% ground cover (the reddish-brown gravel), and 10% hardscape edging. The magic is in the sheer variety within that 70% plant portion. By using at least 10-15 different types of desert plants, you create a tapestry of different greens, shapes, and sizes. You could alter the ground cover to a lighter gravel or the edging to a more modern steel, but as long as you maintain the high density and variety of plants, the lush, powerful aesthetic will remain.
23. Exotic Desert Palette: Pink Gravel, Palm Trees, and Cacti
The most defining choice in this landscape is the pinkish-brown gravel. It’s a bold departure from the more common light beige or gray tones, and it completely changes the mood of the garden. This single decision infuses the space with warmth, personality, and a touch of the exotic. It makes the greens of the cacti and succulents appear richer and more saturated by comparison. This isn’t just a ground cover; it’s a powerful color statement that serves as the foundation for the entire design. Without it, the scene would be far more conventional.
|
📋 Copy HEX 🔗 Share |
Choosing a colored gravel is a major commitment, so it’s wise to test it out before you order several tons of it. Here’s a quick checklist:
- Get a Sample: Always get a physical sample of the gravel. The color can look completely different online or in a catalog.
- Test it In-Situ: Place the sample in your yard in the exact spot you plan to use it. Look at it in the morning light, at midday, and in the evening. Color changes dramatically with the light.
- Check it Wet and Dry: Spray the sample with water to see how the color changes when it rains. Some rocks become much darker and more intense.
- Pair with Plants: Place a few of your chosen plants next to the sample to ensure the colors are complementary and not clashing.
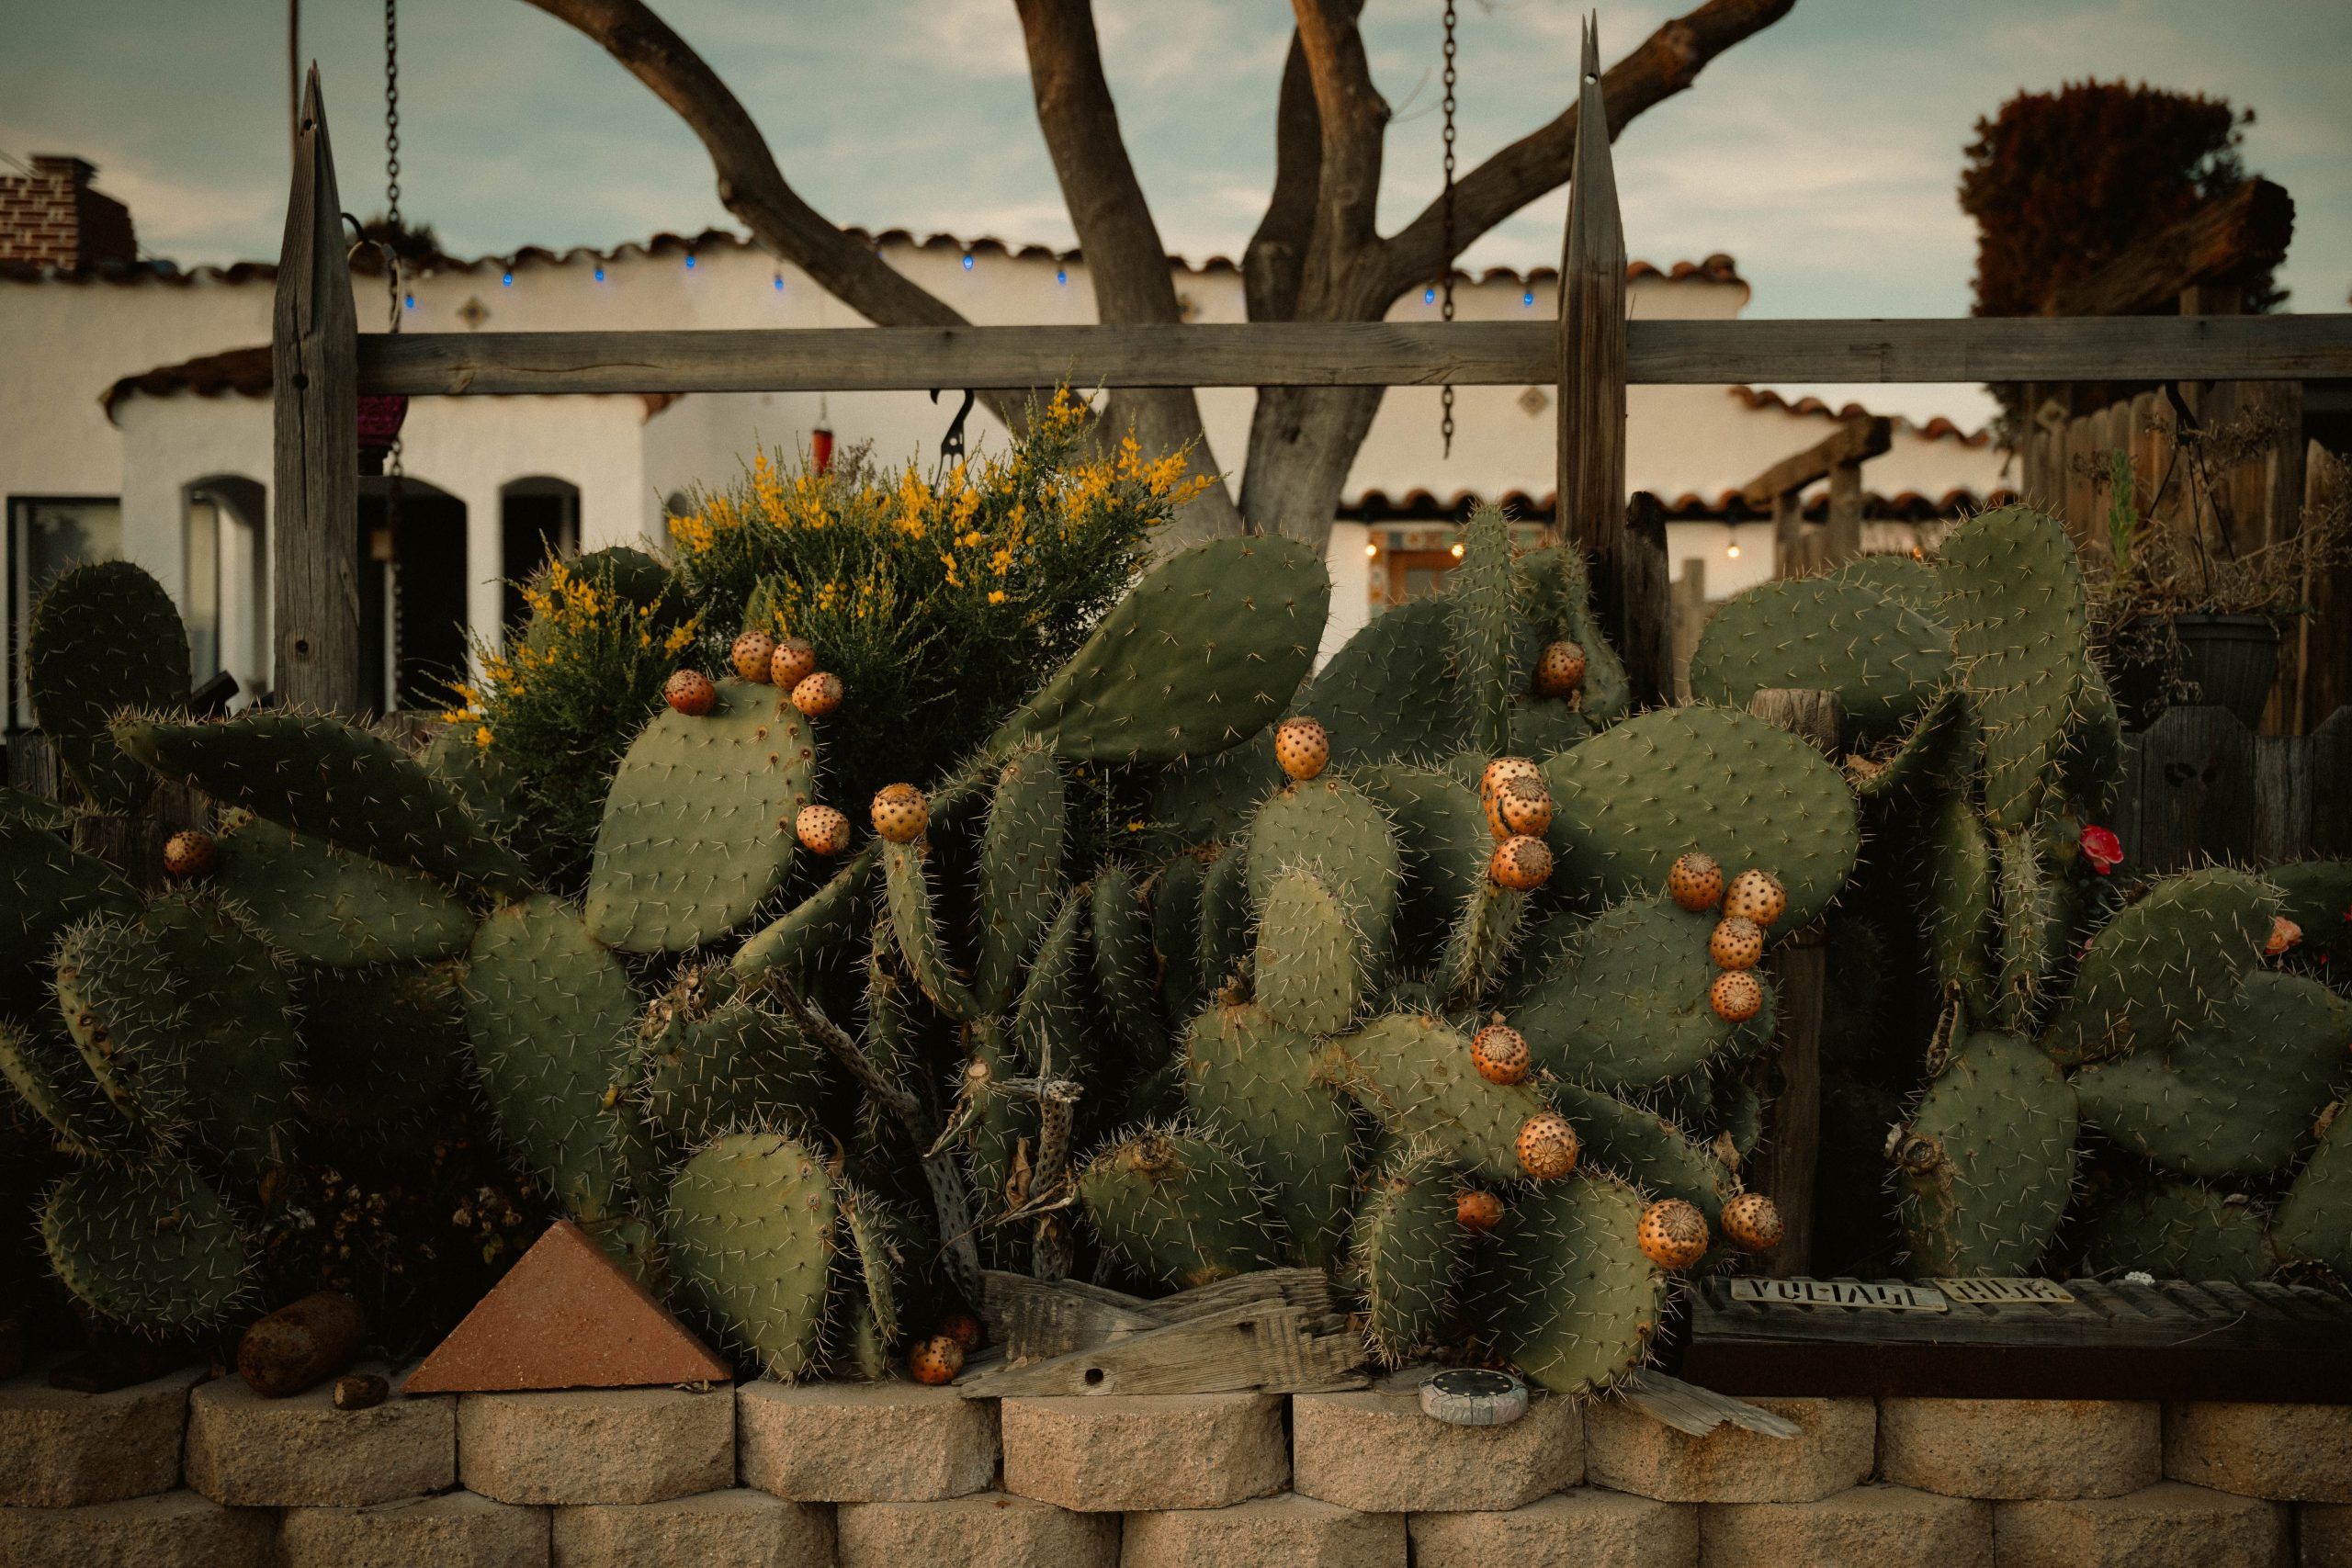
24. Fruiting Prickly Pear in a Rustic Spanish-Style Courtyard
Edible landscaping is a huge and growing trend, and this is a perfect desert interpretation. For years, landscaping was purely ornamental. Now, there’s a major shift towards functionality and sustainability. Homeowners want to grow things they can eat, and the prickly pear cactus is a classic Sonoran Desert native that produces delicious fruit (tunas) and edible pads (nopales). This scene taps into that desire for a productive, useful garden that is also beautiful and regionally appropriate. The blue string lights add a touch of modern bohemian flair, another popular Pinterest trend.
|
📋 Copy HEX 🔗 Share |
This design feels so authentic because of its harmonious blend of rustic textures and a cohesive color story. The weathered brown of the wooden fence, the earthy green of the cacti, and the warm orange-yellow of the fruit all belong to the same natural, sun-baked palette. The white stucco building acts as a bright, clean backdrop that makes all of these rustic elements pop. It’s a study in contrasts: rough wood against smooth stucco, and sharp cactus spines against soft, glowing lights. The rustic feel is a beautiful contrast to the sleek modernism of Idea #3.
25. A Shaded Brick Patio Surrounded by Textured Greens
This design absolutely depends on having enough space to accommodate a large, mature tree. A shade tree is the defining feature here, creating a cooler microclimate and a welcoming canopy for the patio beneath. To replicate this, you need a yard with at least 25-30 feet of open space away from the house to allow the tree’s root system and canopy to grow without causing problems. This look is ideal for older homes on larger lots that might already have a mature tree to work with. If you’re starting from scratch, planting a faster-growing desert tree like a Desert Willow or Palo Verde is a great investment for the future.
|
📋 Copy HEX 🔗 Share |
Having a large, leafy tree right next to your patio and gravel beds is beautiful, but it means you’ll be doing regular cleanup. Leaf litter will constantly fall onto the brick pavers and get stuck in the gravel. You’ll need to sweep or use a leaf blower weekly in the fall to keep it looking tidy. The brick pavers may also require periodic spraying to prevent weeds or moss from growing in the joints, especially in the shaded, cooler areas under the tree. It is a trade-off: you get the wonderful shade, but it comes with a bit more yard work.
Conclusion
Feeling inspired? The best Arizona landscapes tell a personal story, blending the wild beauty of the desert with your own unique style. Start small, be patient as your plants grow, and don’t be afraid to experiment. Now, which idea are you pinning to your ‘Dream Backyard’ board first?