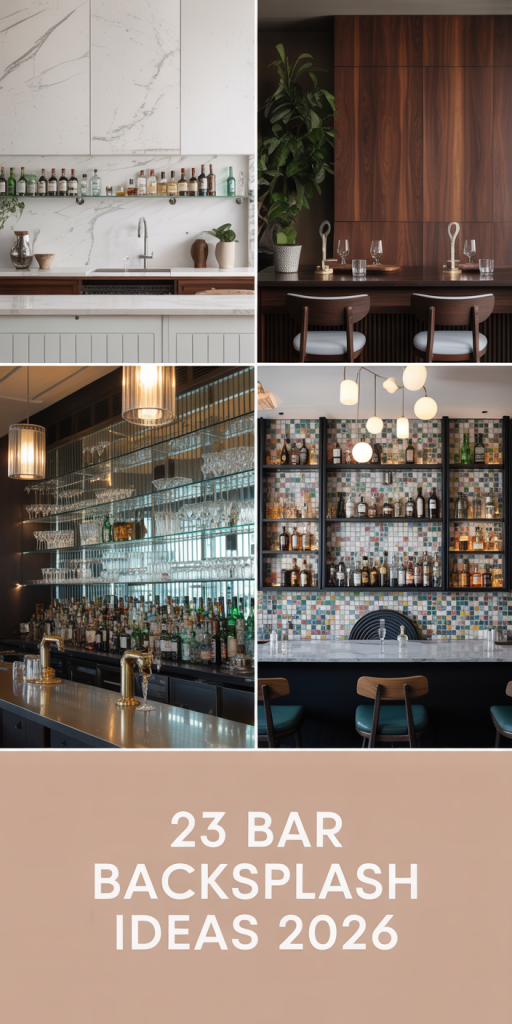
You know that feeling when you finally find the bar backsplash that looks exactly right for your space? That little corner of your home is begging for a personality infusion, and the right backsplash is the fastest way to deliver it. After filtering through hundreds of options across IKEA, Target, and West Elm, we narrowed it down to 23 ideas that actually deliver. We’re talking modern, luxe, and eclectic designs that range from a simple $50 peel-and-stick refresh to a full $5,000 custom build. As home entertaining continues its reign, your home bar isn’t just a utility space—it’s a design statement. And stay until the end — we break down the most common mistakes that can ruin these looks. Pin this guide for later—your future self will thank you when it’s time to actually do this.
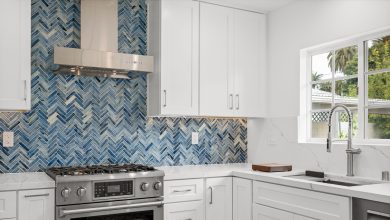
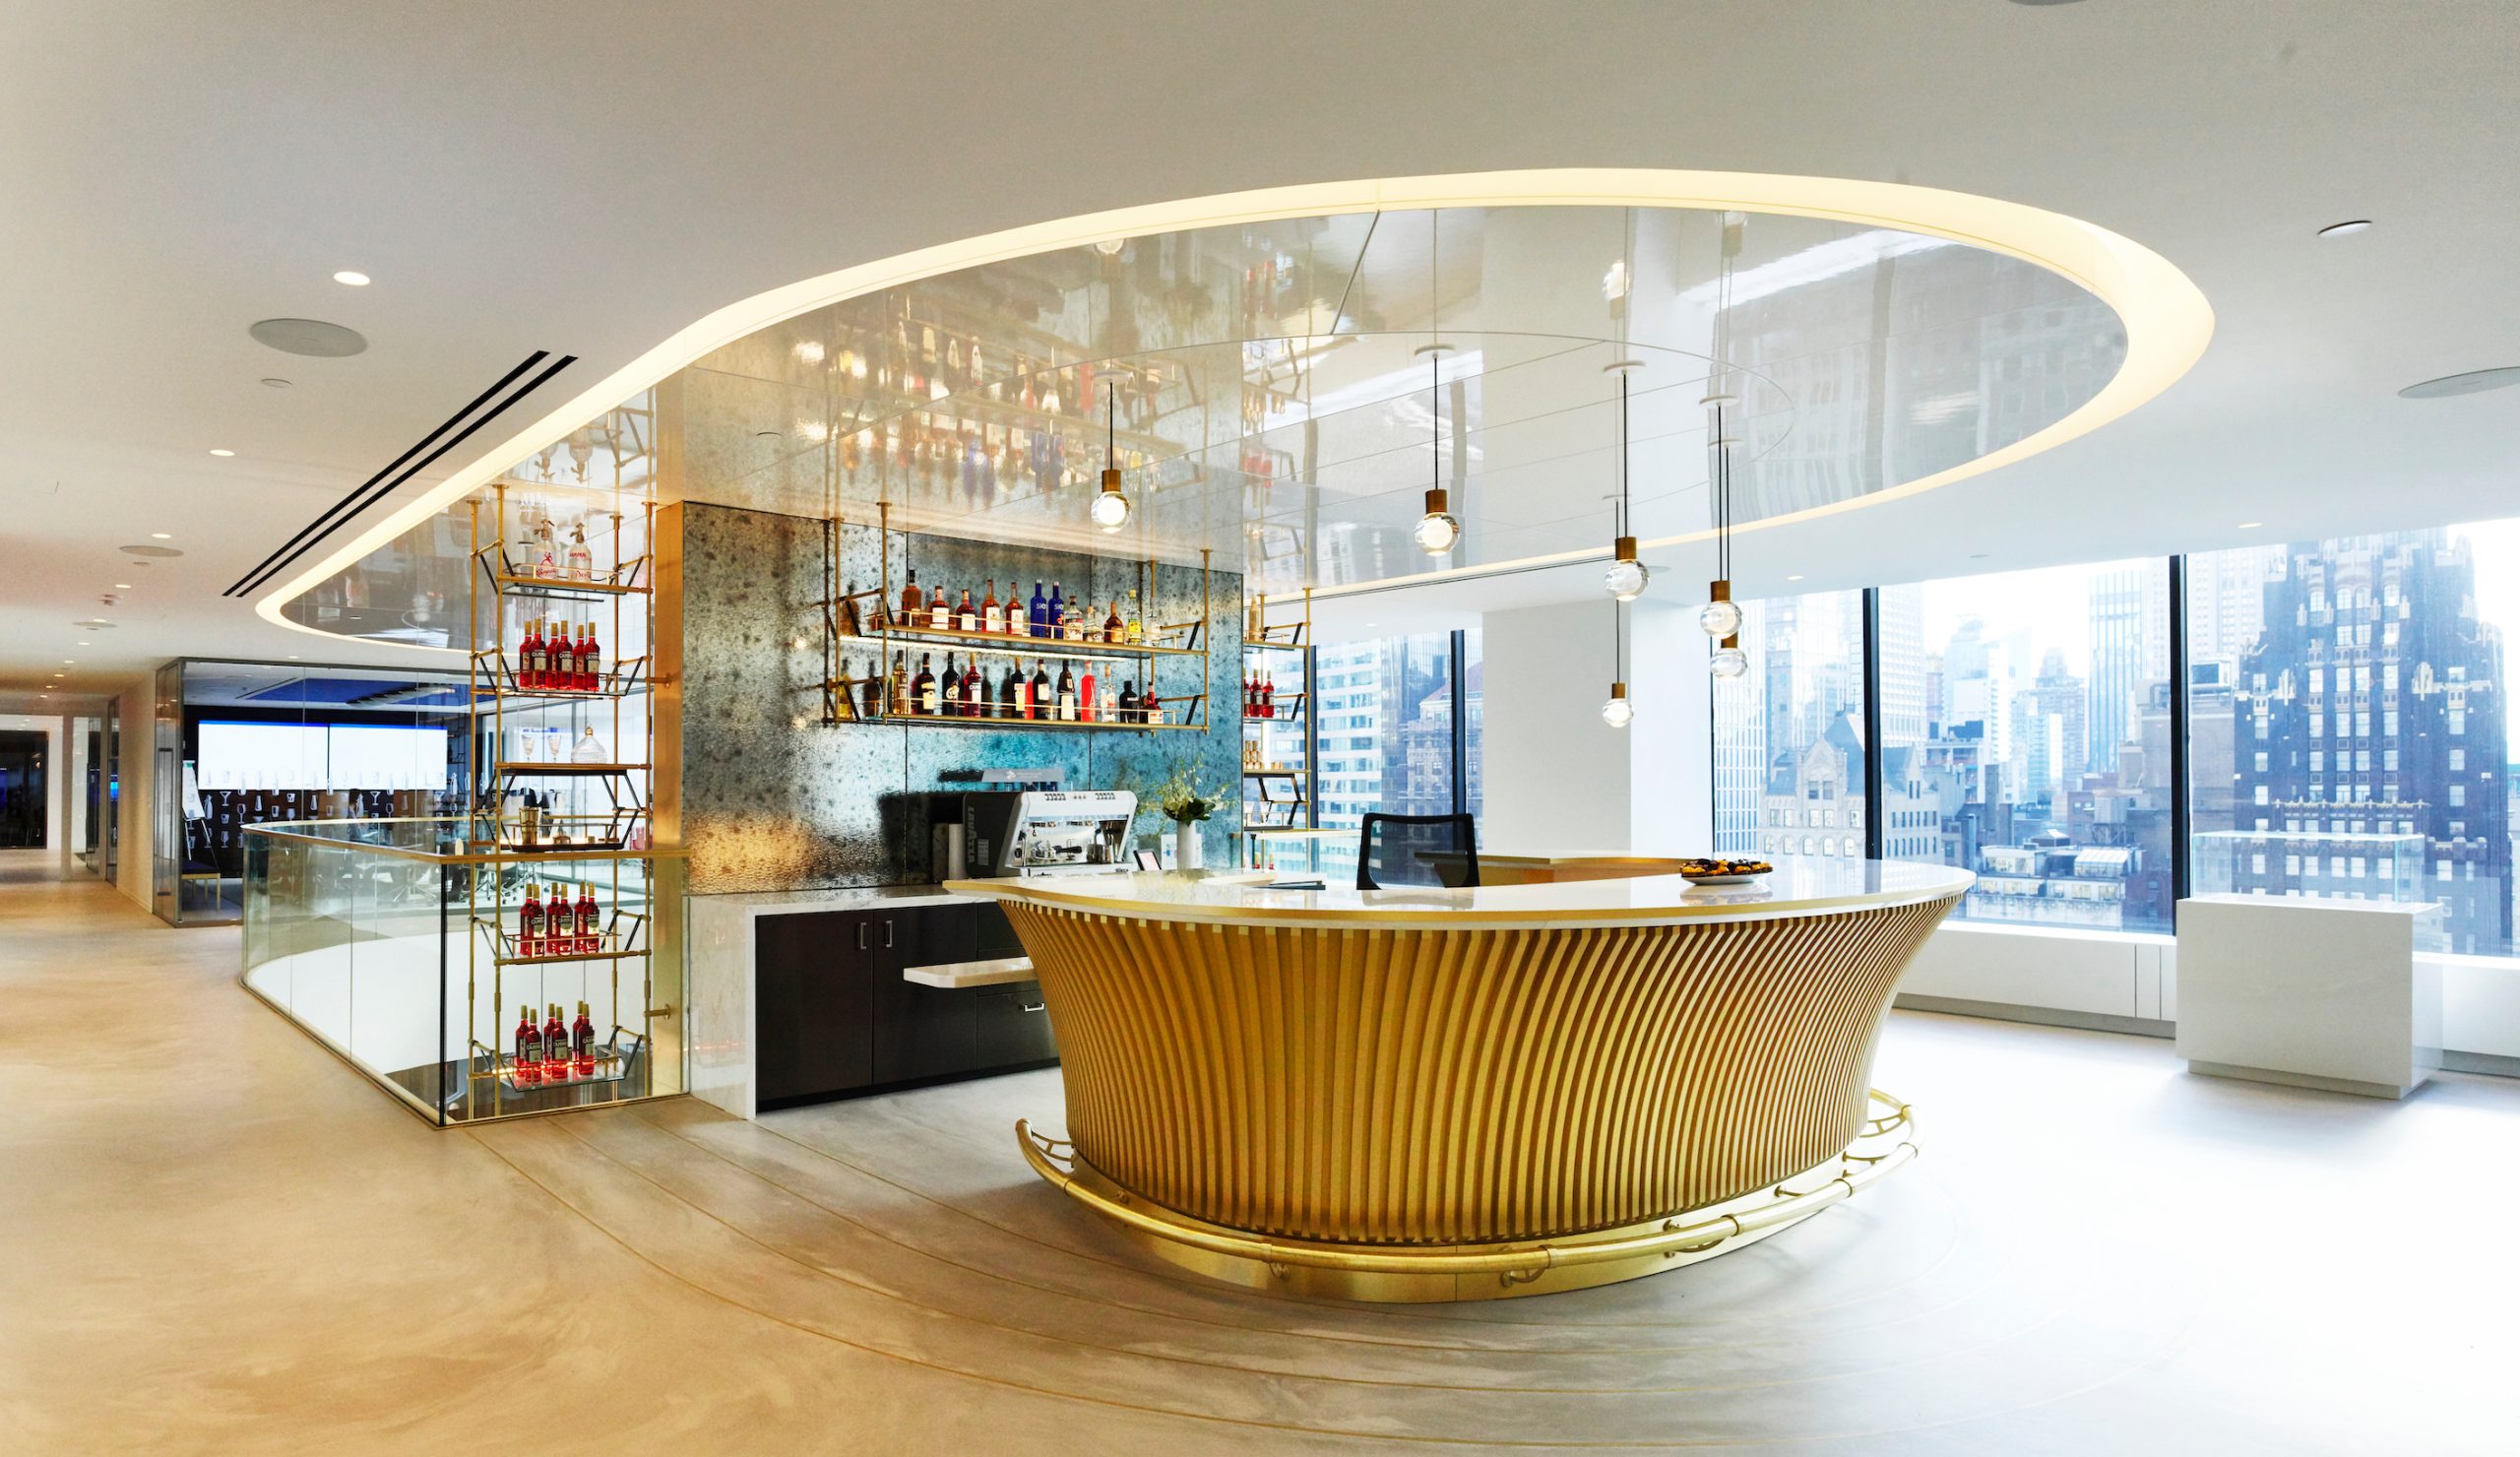
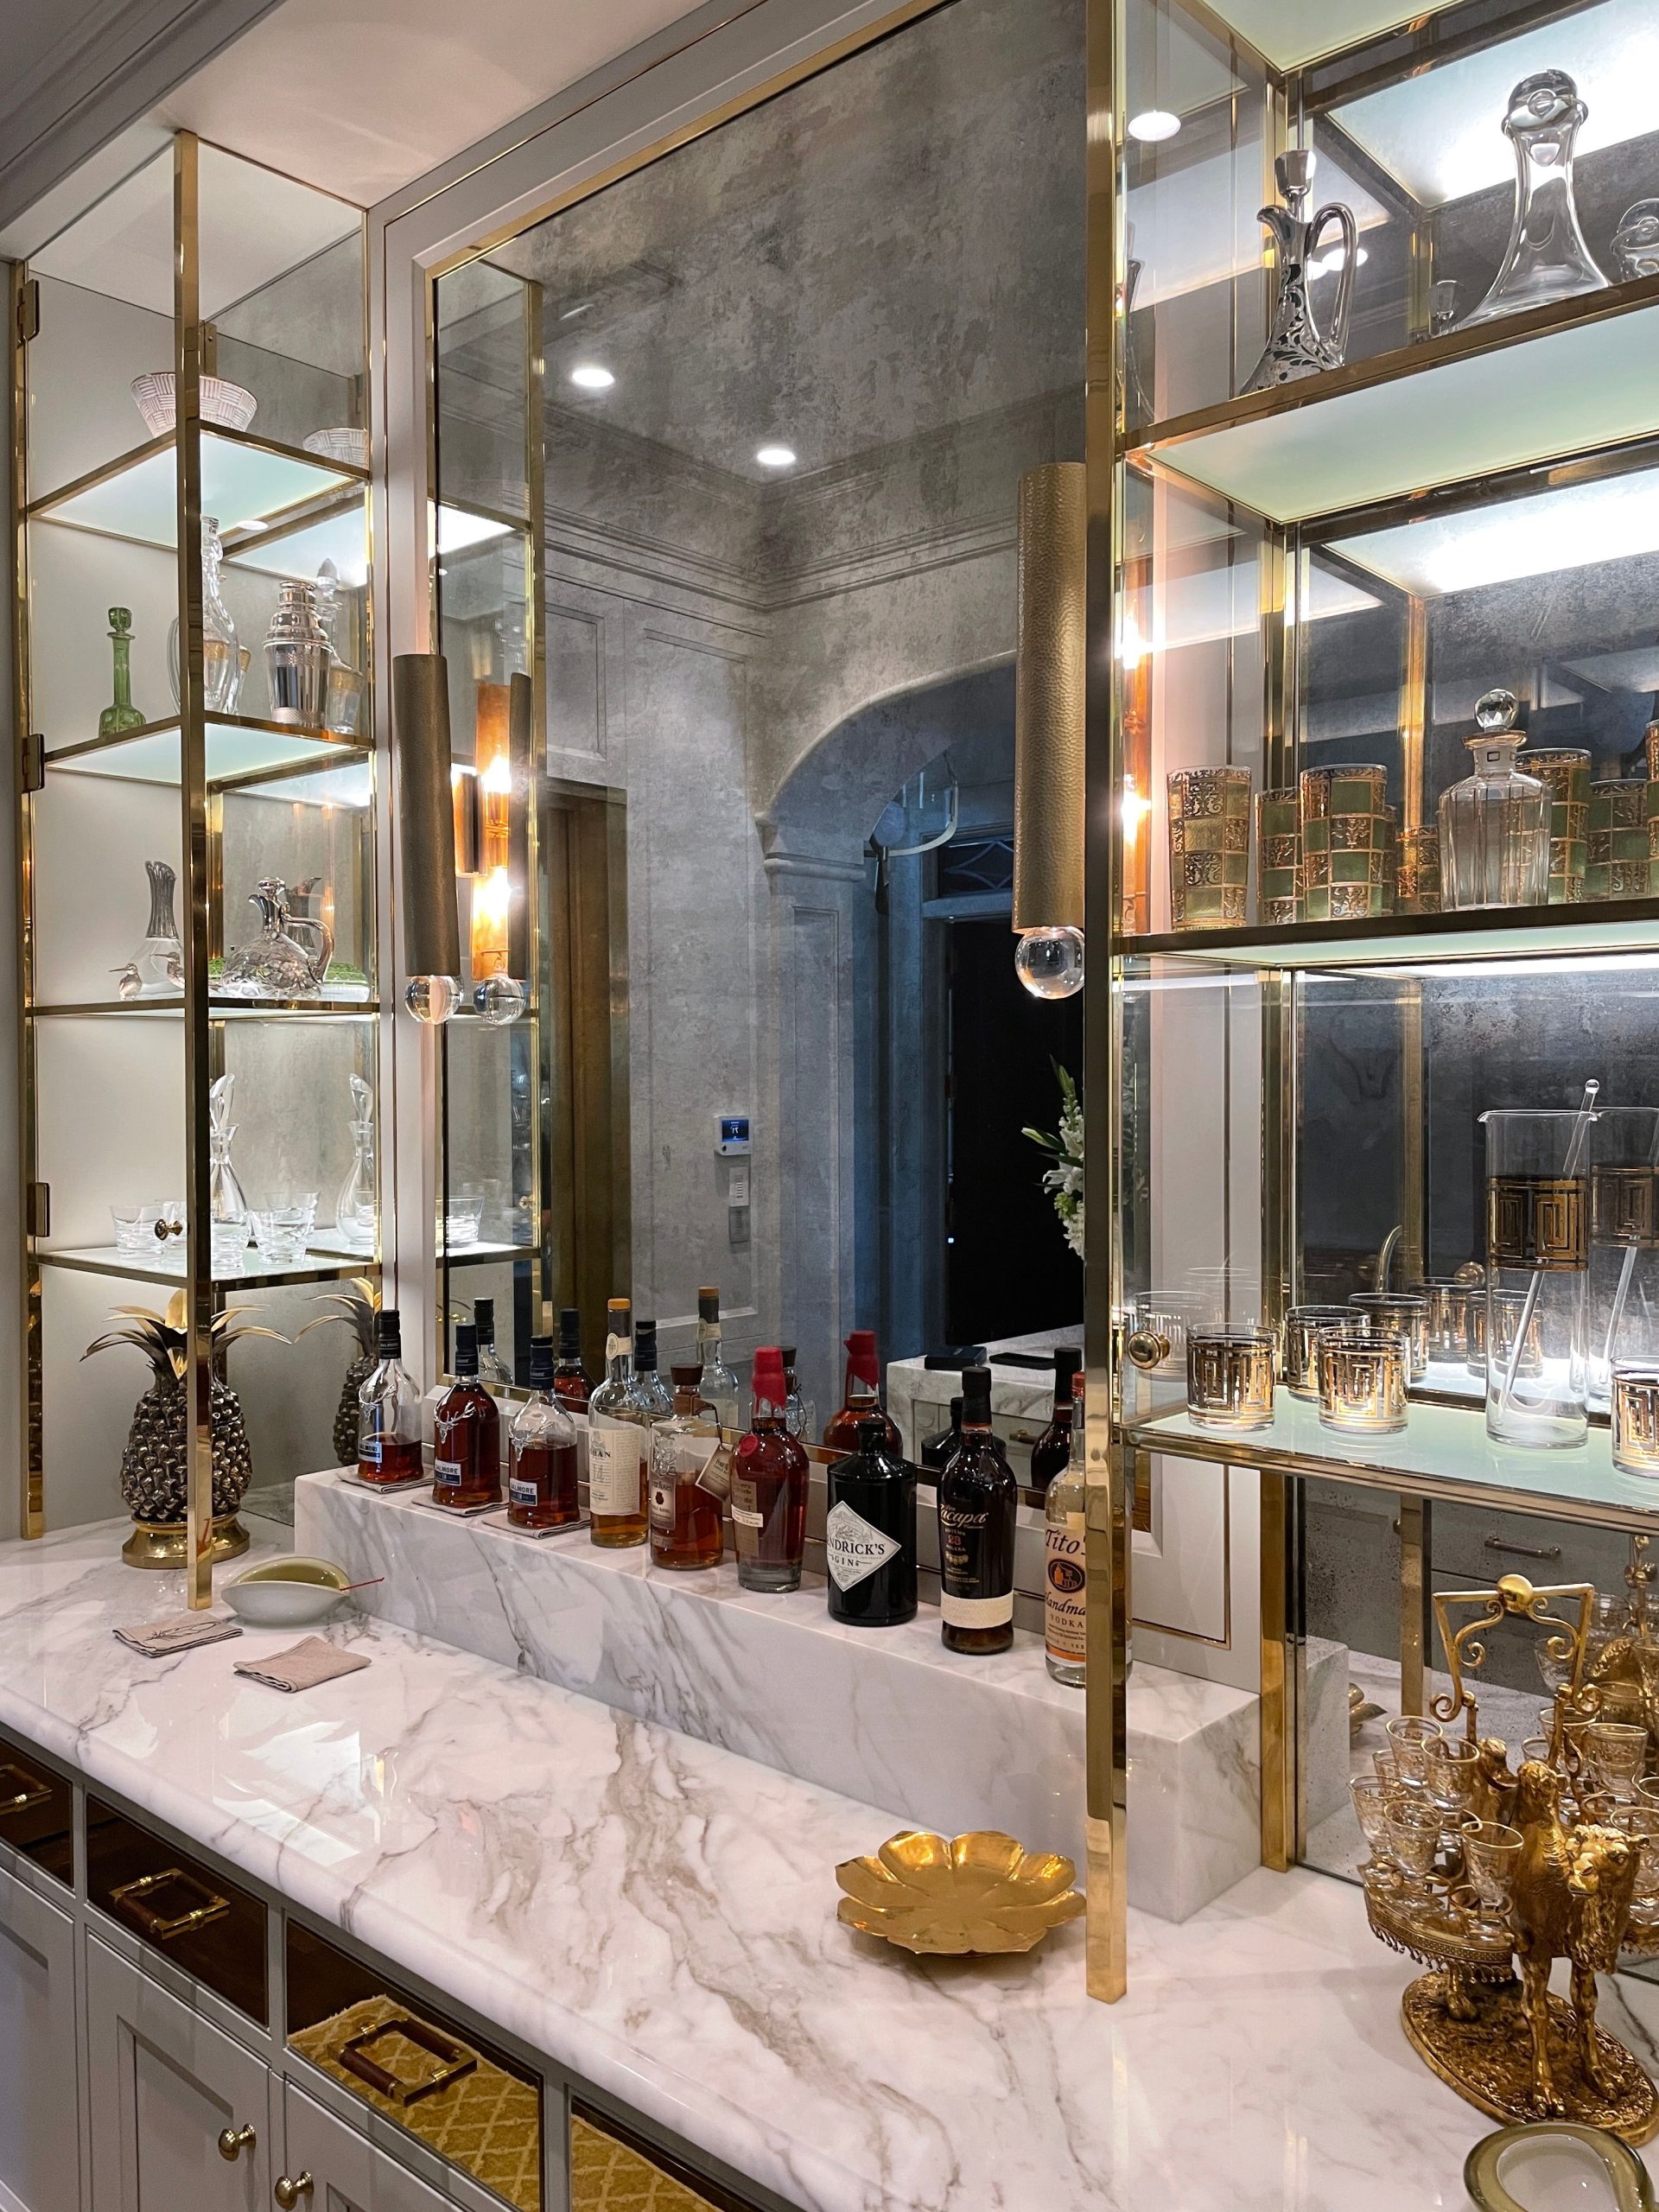
1. Modern Bar with Distressed Mirror Backsplash and Gold Accents
This design succeeds by balancing reflection and warmth. The distressed mirror backsplash creates depth and reflects light without the harshness of a standard mirror, making the space feel larger and more open. This slightly obscured reflection adds a layer of sophistication. Paired with the bold, clean lines of the gold-toned shelving and slatted bar front, the result is pure luxury. The warm metallic finish prevents the mirror from feeling too cool or clinical.
|
📋 Copy HEX 🔗 Share |
When mounting shelves directly onto a mirrored or glass backsplash, precision is everything. To avoid costly cracks, hire a professional glazier. They use diamond-tipped drill bits with a continuous stream of water to keep the glass cool and prevent fractures. Specify the exact placement and weight load of your shelves beforehand so they can install the correct anchors. For a typical spirits bottle collection, plan for anchors that can support at least 25-30 lbs per linear foot.
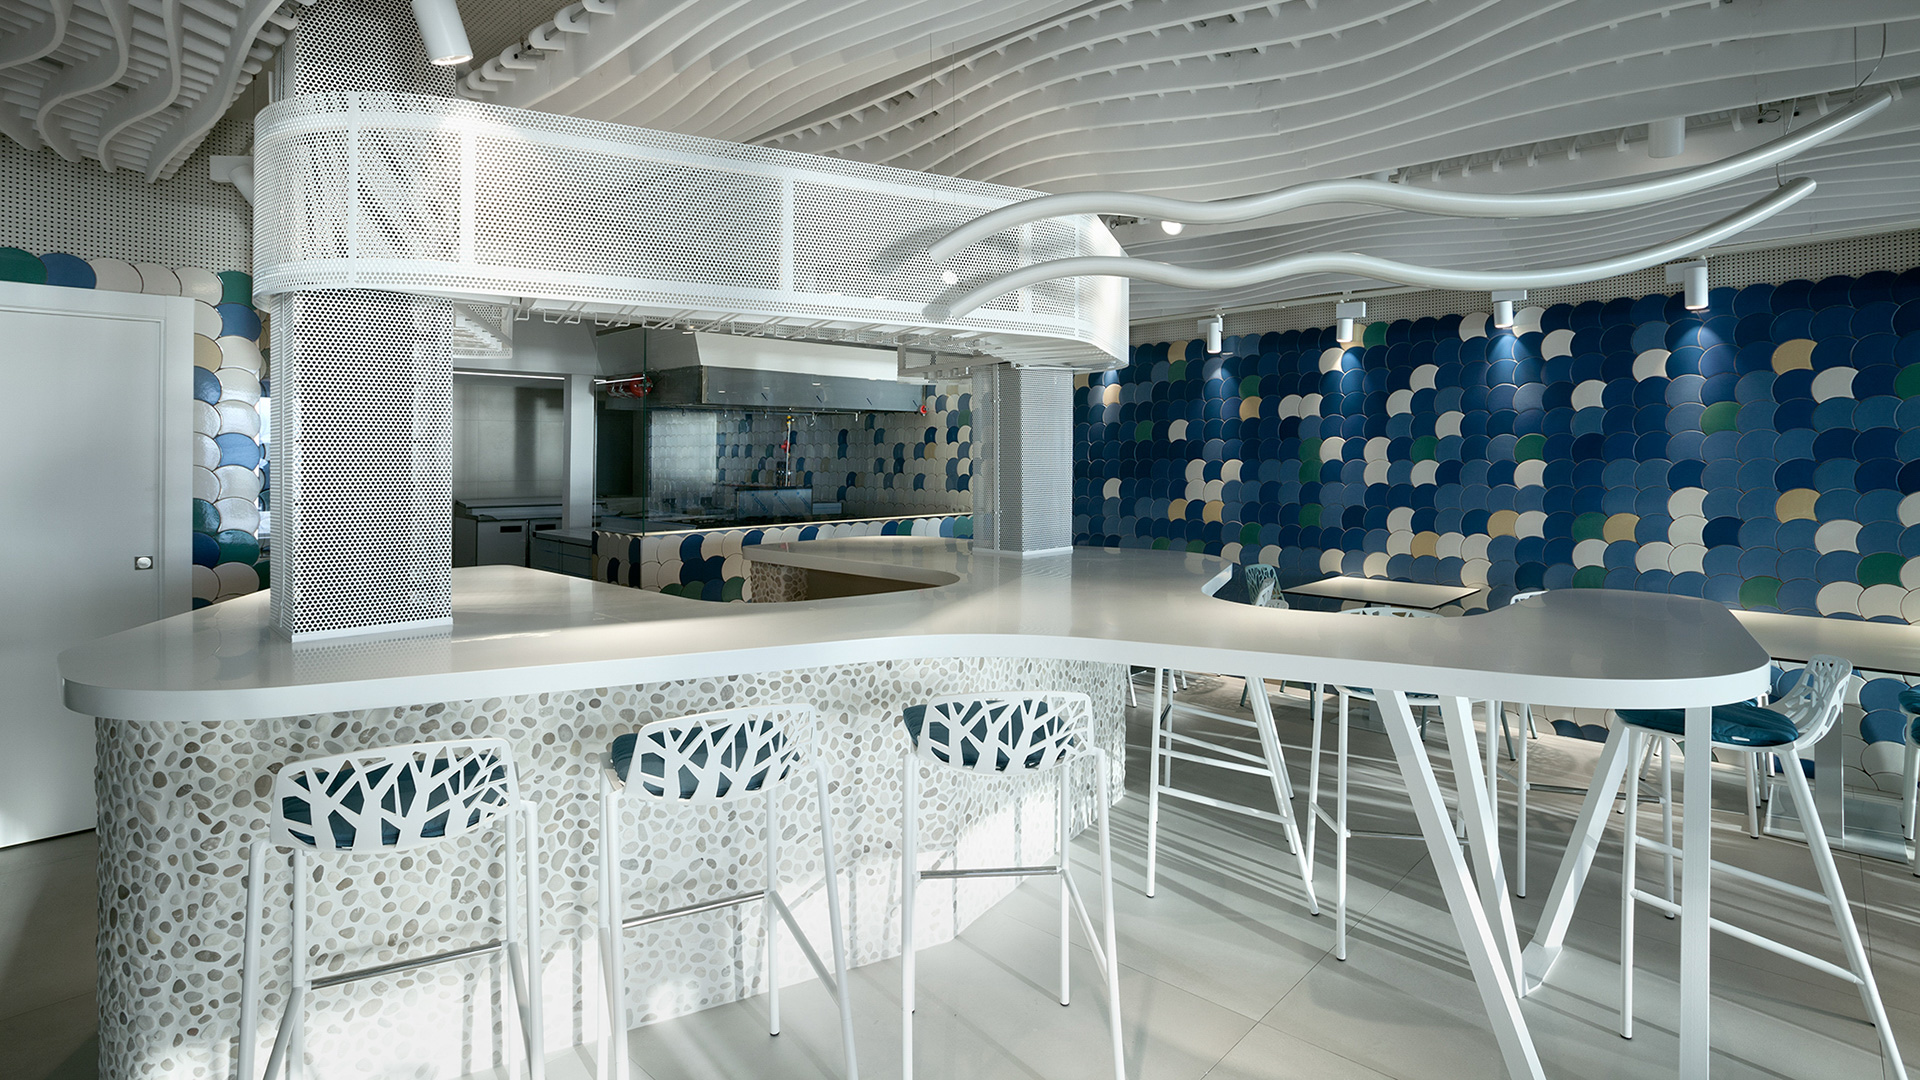
2. Coastal Scalloped Tile Bar with Perforated Metal Accents
This look is a masterclass in playful proportion. The formula is roughly 60% statement tile + 30% neutral structure + 10% architectural detail. The expansive wall of blue and teal scallop tiles provides the dominant personality. This is grounded by the clean white of the curved bar and stools. The final 10% comes from the white perforated metal panels, which add texture and a modern edge without competing with the tile. You could swap the blue for shades of green or terracotta and still achieve the same balanced effect.
|
📋 Copy HEX 🔗 Share |
A full wall of mosaic tile, especially with lighter grout, looks incredible but requires some honest upkeep. Grout in a bar area is susceptible to splashes from mixers like cola, juices, or red wine, which can cause stains. You’ll want to seal the grout upon installation and reseal it annually. For cleaning, avoid harsh chemicals and opt for a pH-neutral cleaner to prevent grout erosion. This is a high-impact look, but it’s not a ‘wipe-and-go’ surface like a solid slab.
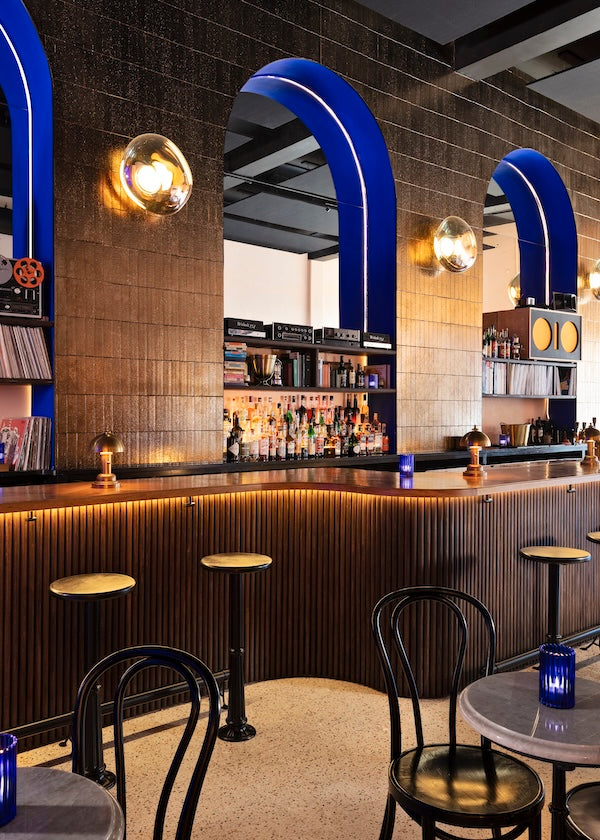
3. Arched Gold Mosaic Tile with Royal Blue Accents
The element that makes this entire design sing is the surprising pop of royal blue within the arched alcoves. Without them, you’d have a beautiful but somewhat predictable gold mosaic wall. The deep blue creates a stunning contrast, adds unexpected depth, and provides a focal point that draws the eye. The illuminated inner lining of the arches makes them feel intentional and jewel-like, turning simple shelving nooks into a major design feature. It’s a lesson in using color as a delightful secret.
|
📋 Copy HEX 🔗 Share |
You don’t need a five-figure budget for this level of glam. Recreate this drama for under $500. Start with peel-and-stick gold mosaic tile sheets, which are widely available online and at home improvement stores. For the alcoves, use a high-quality, paintable recessed shelving insert. Paint the inside of the insert with a rich, velvety royal blue paint. Finish by installing battery-operated, motion-sensor puck lights inside the top of the arch to get that warm glow without hiring an electrician.
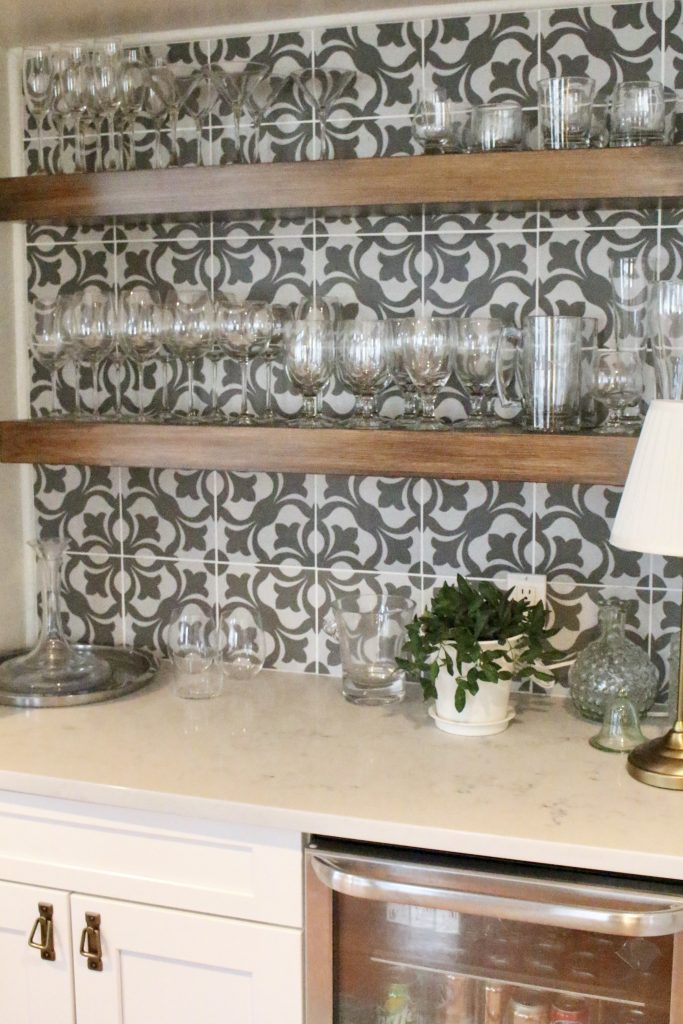
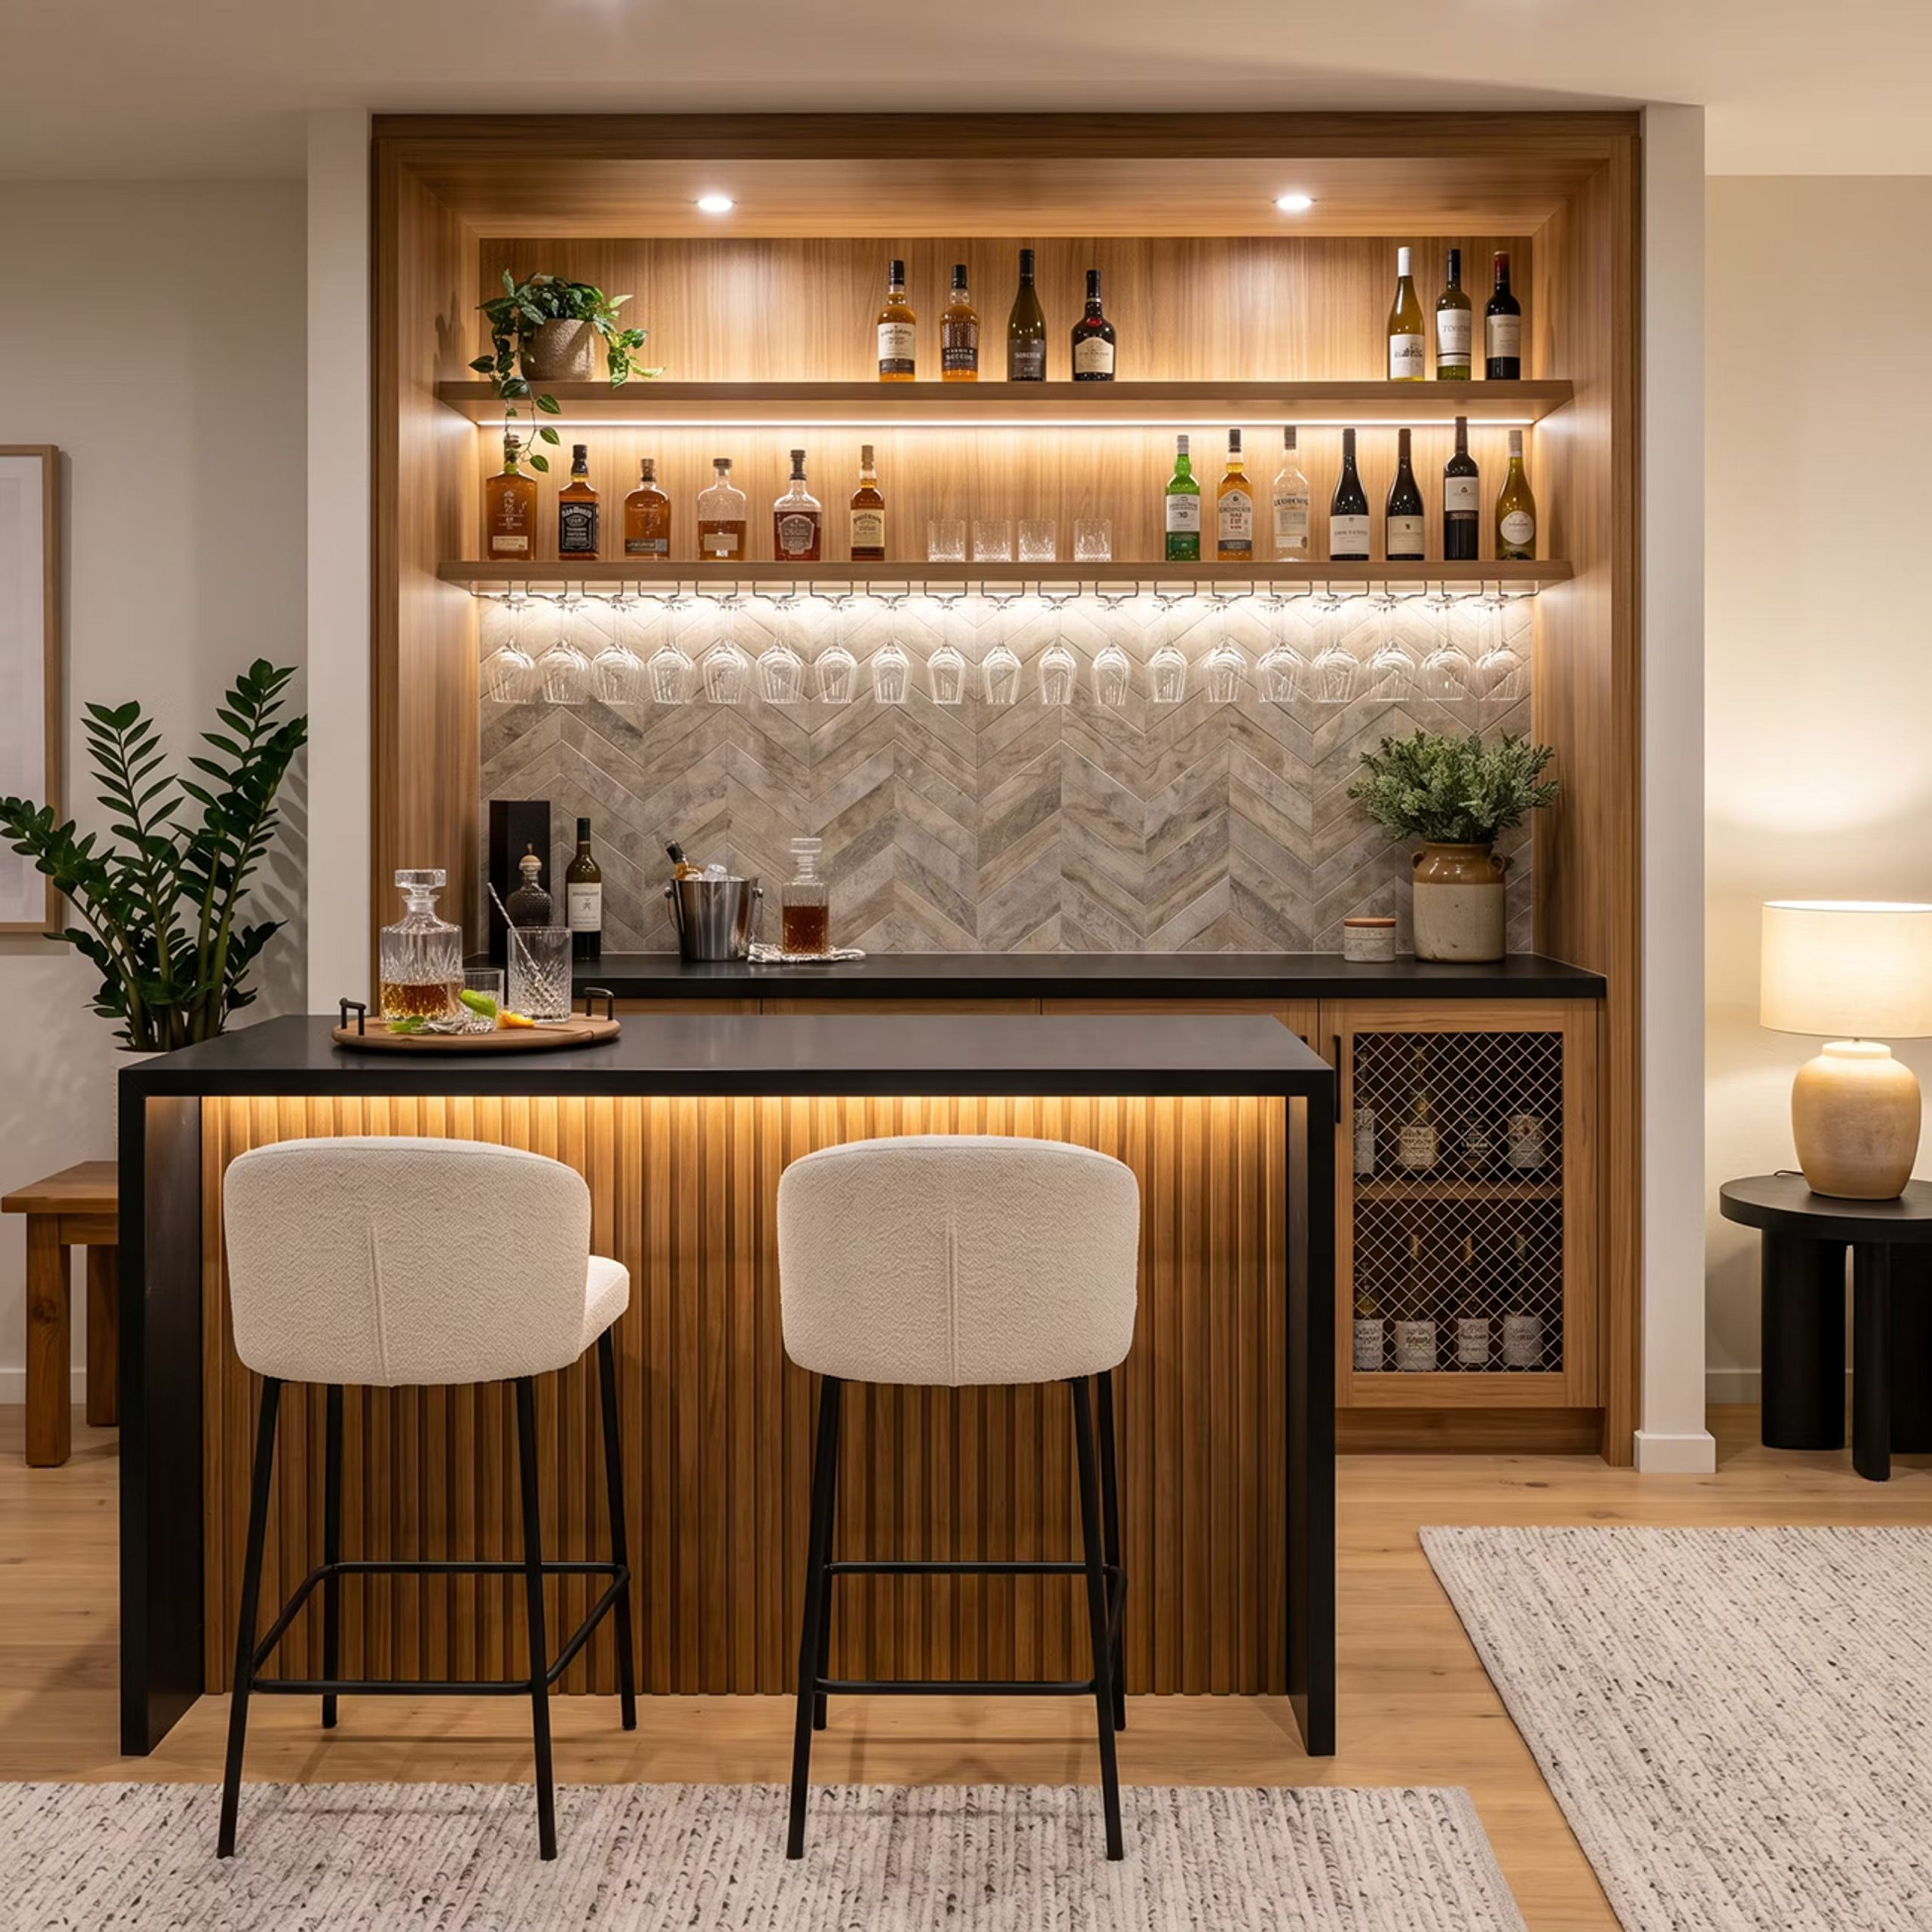
4. Sleek Wood Plank Bar Backsplash with Open Shelving
This streamlined wood-planked backsplash is incredibly versatile but works best in spaces with at least 8 feet of horizontal wall space and standard 8- to 9-foot ceilings. The long, unbroken lines of the planks create a sense of width, making it ideal for galley-style kitchens or long basement bars. Anything less than 6 feet wide might make the planks feel stubby and defeat the elongating effect. The open shelving above requires vertical clearance, so be sure you have at least 18-24 inches of height above the counter.
|
📋 Copy HEX 🔗 Share |
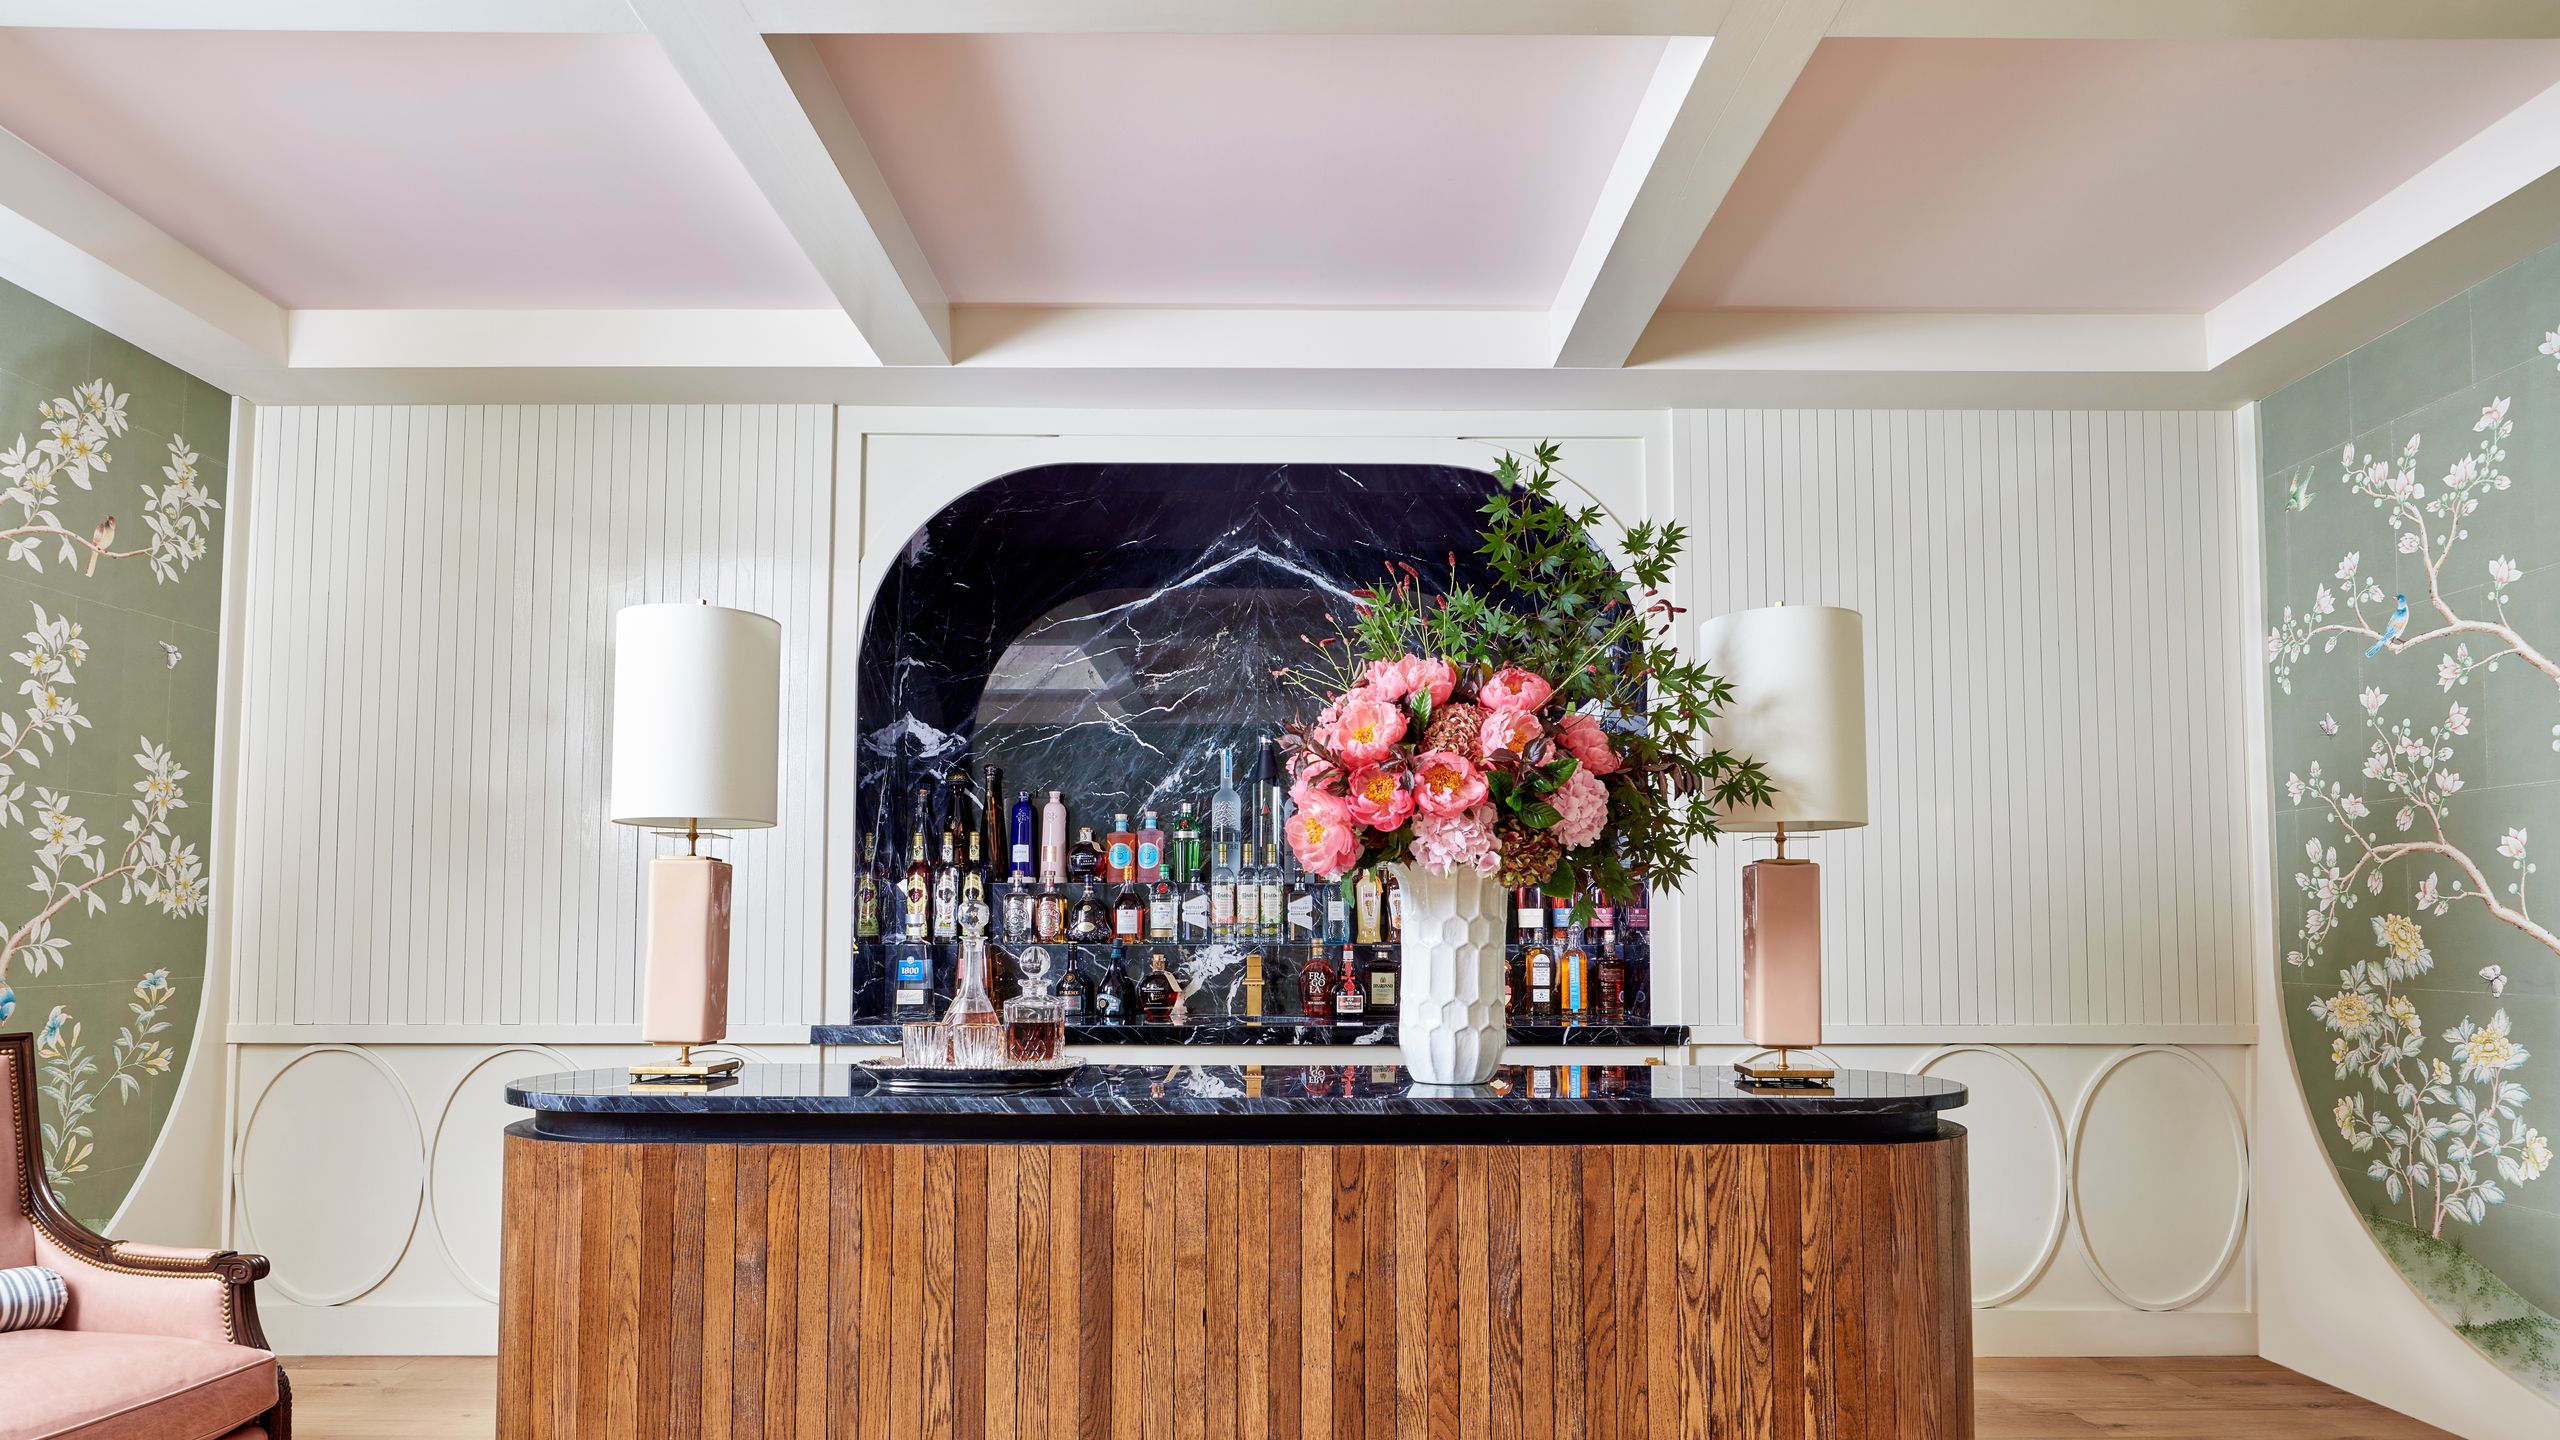
A real wood backsplash in a bar or kitchen area needs a proper seal. To maintain the rich, warm look and protect it from splashes, the wood must be treated with multiple coats of a high-quality polyurethane or a marine varnish, especially around the sink or range area. Be prepared to gently wipe up any spills immediately. Avoid abrasive sponges, which can scratch the finish. Over time, the wood may darken or change tone slightly with exposure to light, which is part of its natural charm.
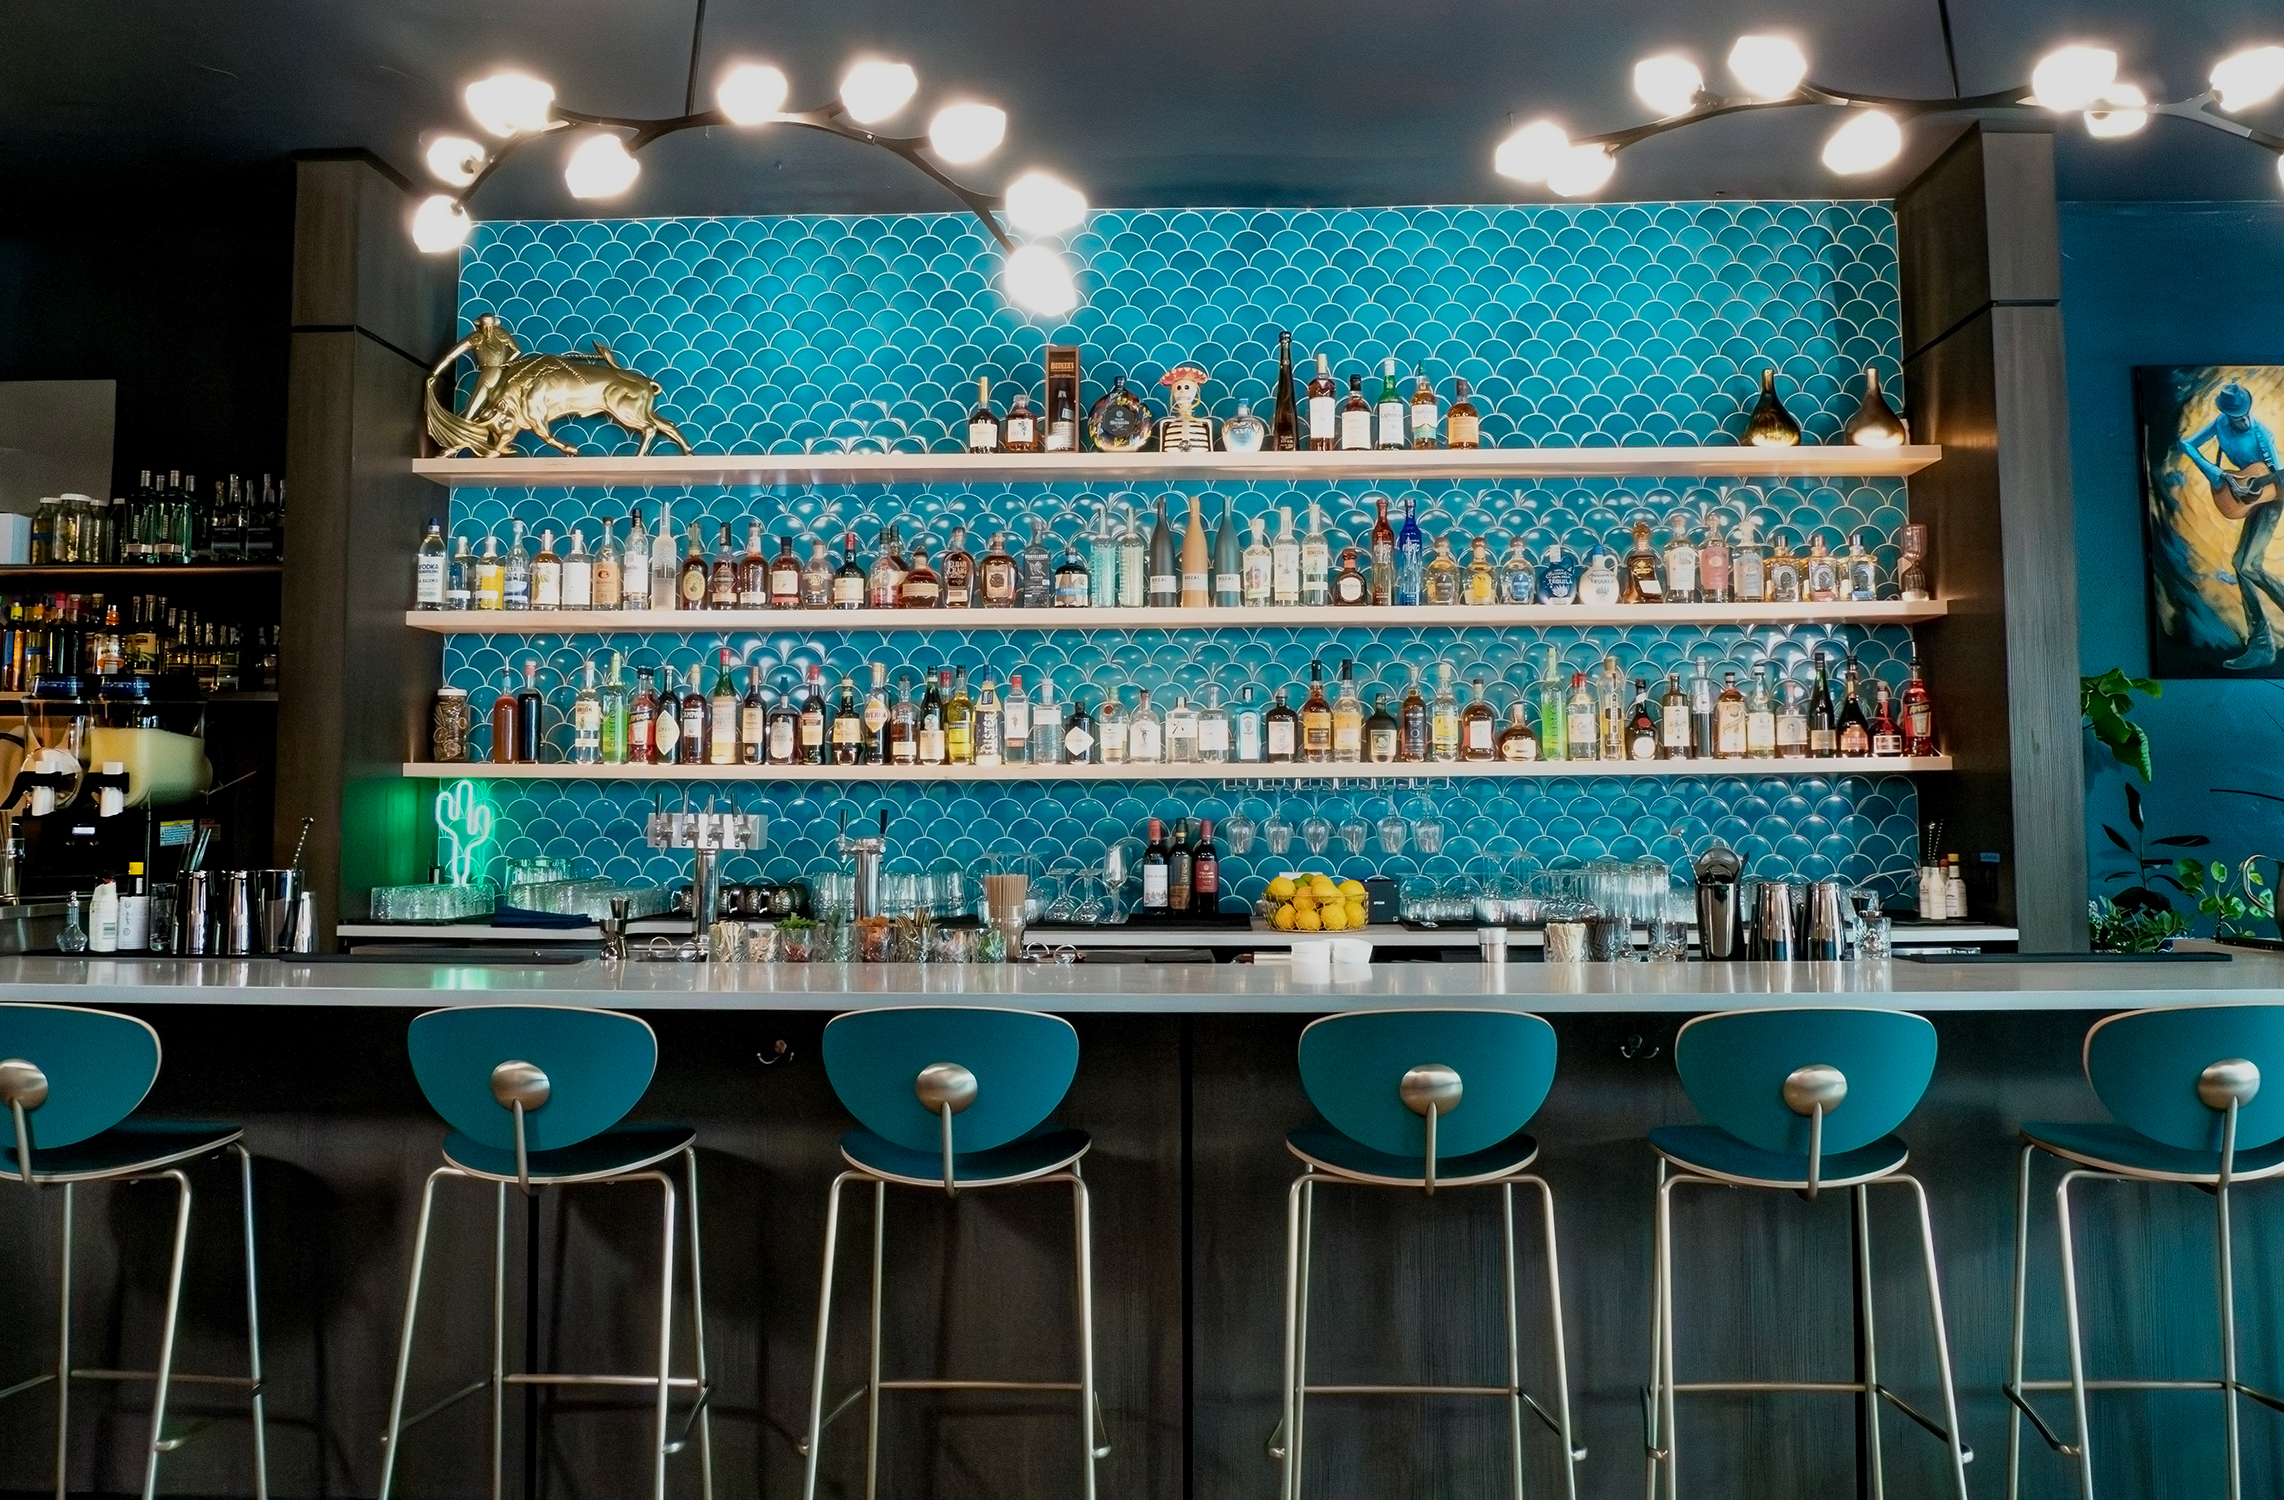
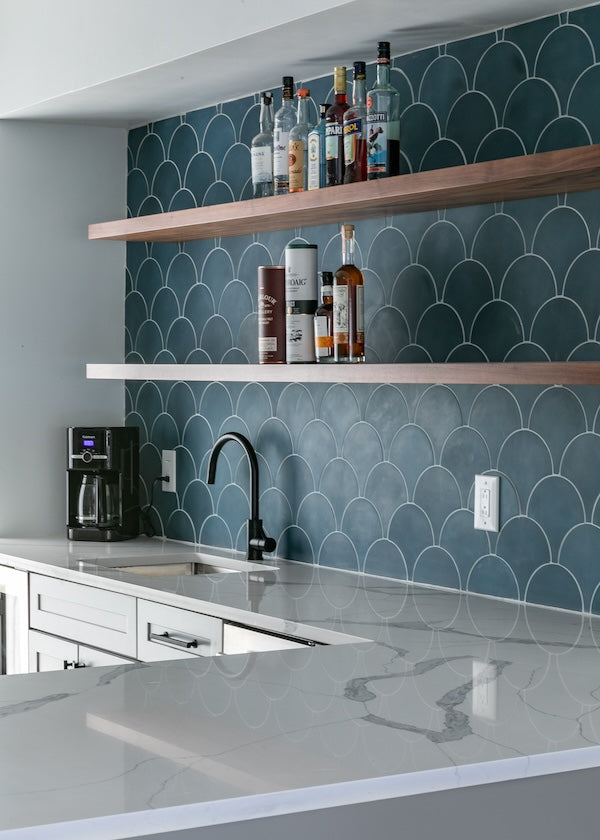
5. Teal Scallop Tile Backsplash with Floating Shelves
The ‘Mermaid’ or scallop tile has been a steady favorite on Pinterest for a few years, but its staying power comes from its versatility. Initially a purely coastal or bohemian accent, we’re now seeing it used in more modern and even glamorous contexts. The vibrant teal here feels energetic and playful, tapping into the broader trend of ‘dopamine decor’—using bold colors to create joyful spaces. Pairing it with light wood and metallic accents, as seen here, keeps it feeling fresh and contemporary for 2026.
|
📋 Copy HEX 🔗 Share |
When styling open shelves against a busy, colorful tile pattern, curate your display with intention. Group items by color or material to create visual calm. Notice how the clear glass bottles are grouped together, allowing the teal tile to show through. Use a 2:1 ratio: for every two functional items (like bottles or glasses), add one purely decorative object (like the gold bull sculpture). This prevents the shelves from looking like simple clutter and instead makes them a curated collection. A simpler tile choice awaits you in Idea #10, which offers a more subdued take.
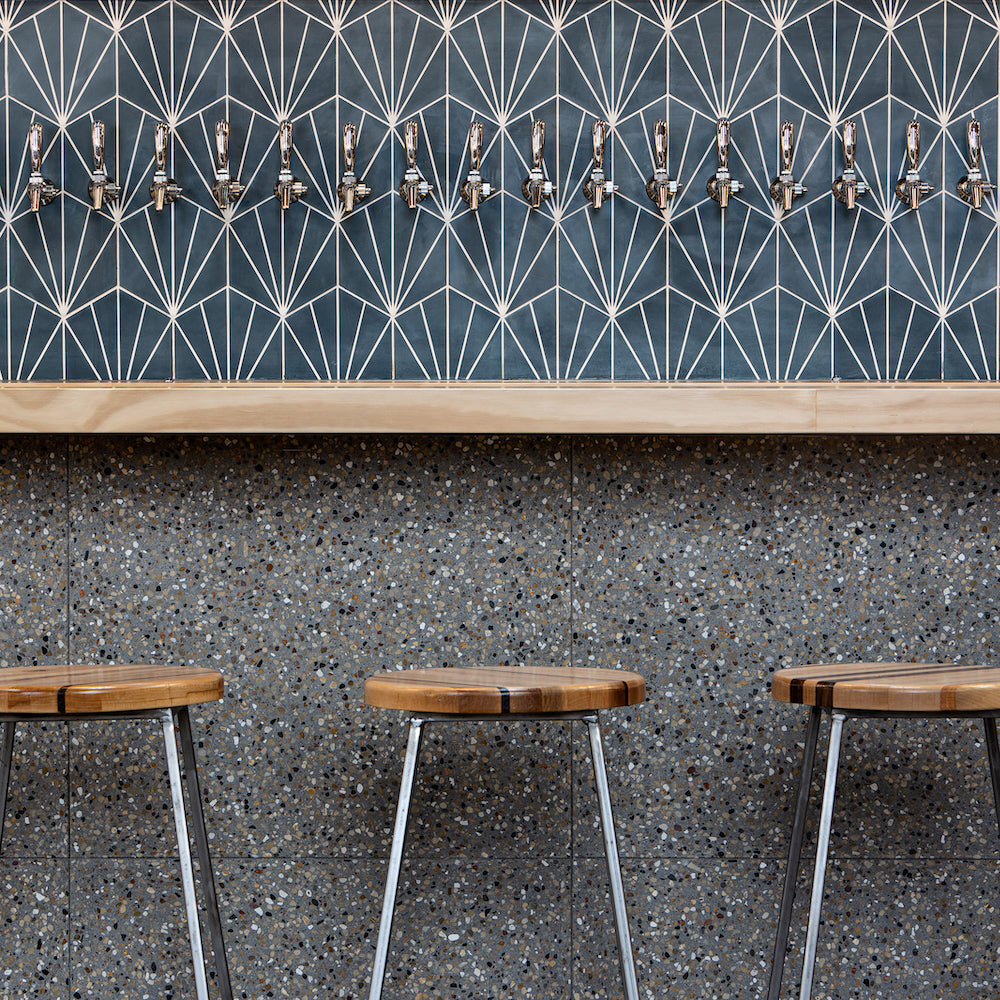
6. Dark Teal Geometric Tile Bar Backsplash
What makes this work is the smart interplay of texture and shape. The geometric fan pattern of the dark teal tiles creates movement and visual interest without being overwhelming. This pattern is beautifully contrasted by the smooth, light wood ledge, which acts as a visual ‘stop,’ providing a place for the eye to rest. Finally, the speckled terrazzo-like base adds a different scale of pattern—small and random—which complements the larger, more regular tile pattern above without competing with it.
|
📋 Copy HEX 🔗 Share |
Installing a terrazzo-style bar front is a manageable DIY project. Here’s a quick guide:
- Prep the surface: Ensure the bar front is clean, dry, and lightly sanded. (Time: 1 hour)
- Apply the base coat: Paint the bar with a quality primer and a base color matching your terrazzo mix. (Time: 2 hours, including drying)
- Mix and apply flakes: Use a pre-made terrazzo flake kit. Mix the flakes into the clear topcoat and apply with a roller or trowel for an even spread. (Cost: $80-$150. Time: 2 hours)
- Sand and smooth: Once dry, lightly sand the surface to knock down any high points for a smoother finish. (Time: 30 minutes)
- Seal it: Apply two to three coats of a durable, food-safe sealant like a clear epoxy or polyurethane. (Time: 3 hours, including drying between coats)
Total Project Time: Approx. 8-9 hours.
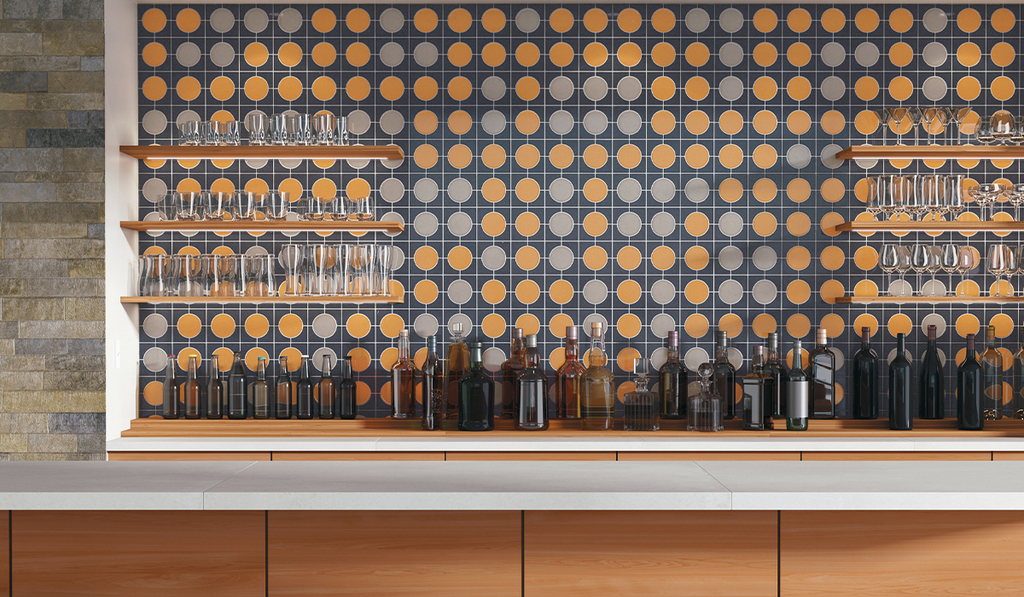
7. Geometric Circular Tile Backsplash with Floating Shelves
The formula here is a bold retro-modern blend: 70% graphic pattern + 20% natural material + 10% negative space. The navy, orange, and gray circular tiles are the undeniable star of the show. To keep this from feeling chaotic, about 20% of the visual space is given to the warm, grounding texture of the light wood floating shelves. The final 10% is the crucial ‘breathing room’ provided by the crisp white grout lines, which define the pattern and prevent the colors from bleeding into one another visually.
|
📋 Copy HEX 🔗 Share |
A tile this bold is a major commitment. While it looks fantastic, it will dictate your decor choices for years to come. If you’re someone who likes to frequently change up your color palettes, this might feel restrictive. Also, be aware of lighting; in a room with a lot of direct natural light, the high contrast between the dark navy and white grout could appear overly busy or cause a strobing effect. It’s best suited for a space with soft, diffused, or controlled artificial lighting for the best result.
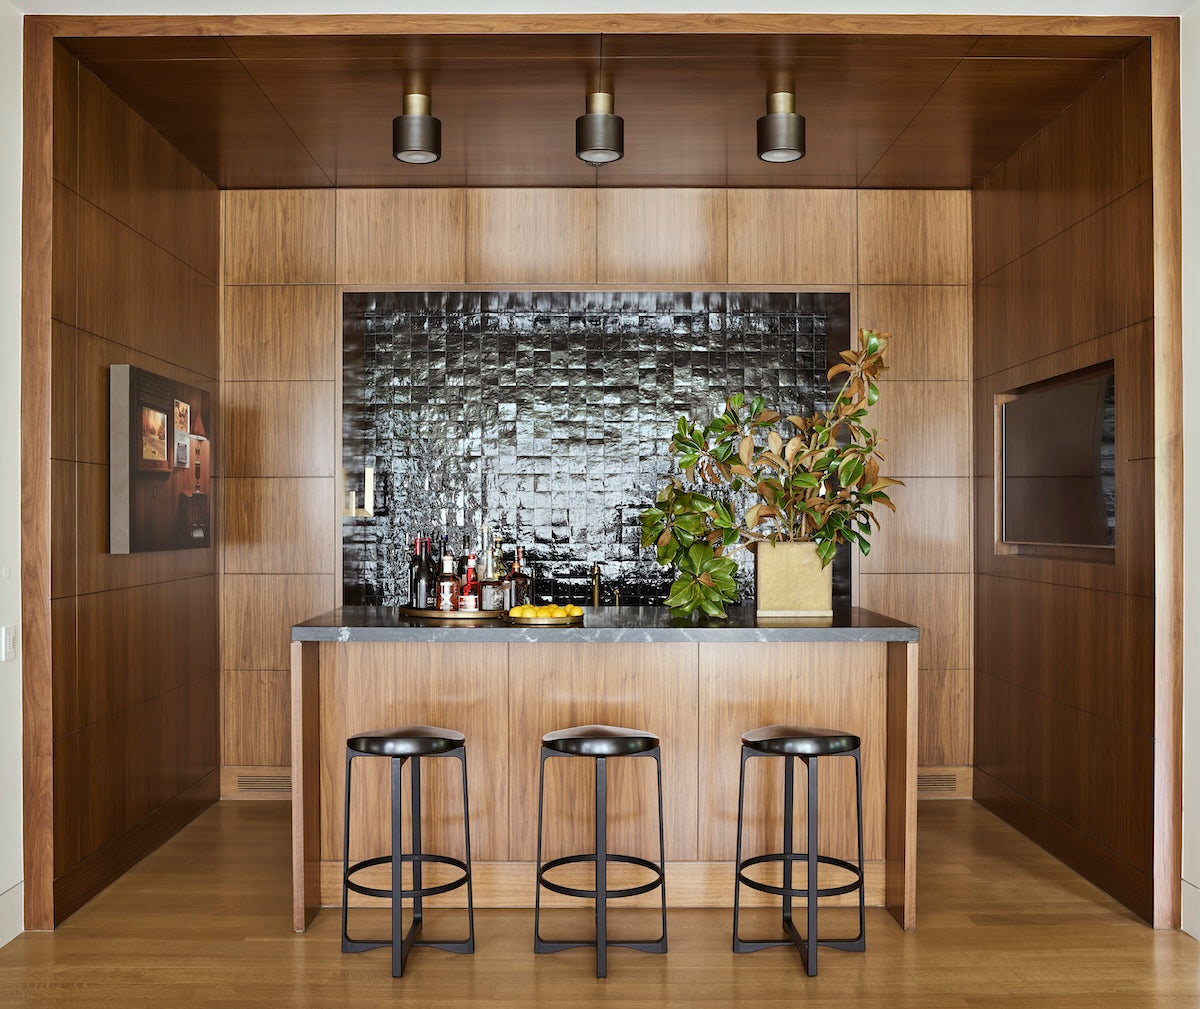
8. Dark Textured Tile Backsplash with Wood Panel Wet Bar
This enclosed, moody wet bar concept is perfect for smaller, dedicated spaces. It excels in a nook or recessed area that is between 4 and 7 feet wide. The dark, textured tiles and enveloping wood panels create a cozy, intimate feel that could be lost in a larger, more open room. For this to work, you need a ceiling height of at least 8 feet to accommodate the overhead panels and prevent the dark colors from feeling claustrophobic. It’s an excellent solution for utilizing an under-stair area or a large closet.
|
📋 Copy HEX 🔗 Share |
To make a dark-on-dark design like this work, you must be strategic with your lighting. This is not the place for a single, central ceiling light. Instead, use layers of light. Notice the use of multiple overhead cylindrical spotlights aimed directly at the work surface. This task lighting is critical for functionality. Adding under-cabinet or under-shelf LED strip lighting would further enhance the space, highlighting the texture of the backsplash and ensuring the bar is usable and not just a dark corner.
9. Scallop Tile Backsplash with Floating Wood Shelves
This design works because of its expert balance of color, pattern, and texture. The teal-blue scallop tiles provide a strong dose of color and a playful pattern. This is beautifully counterbalanced by the warm, organic texture of the natural wood floating shelves. The light stone countertop with its subtle grey veining adds a touch of quiet luxury without competing for attention. Finally, the matte black faucet acts as a modern, graphic punctuation mark against the colorful backdrop. This is the more subdued cousin to the look in Idea #5.
|
📋 Copy HEX 🔗 Share |
Before you commit to this chic wet bar look, run through this quick checklist:
- Confirm plumbing access: Is there a nearby water line and drain you can tap into? Adding plumbing can be a significant hidden cost.
- Measure for shelving: Ensure your chosen wall space can accommodate the depth of the shelves (typically 10-12 inches) without impeding traffic flow.
- Check your studs: Floating shelves carrying the weight of liquor bottles need to be anchored directly into wall studs. Use a stud finder to map them out before you buy a single tile.
- Get a tile sample: Teal can look very different under your home’s specific lighting. Get a sample and see how it looks in the morning, afternoon, and evening.
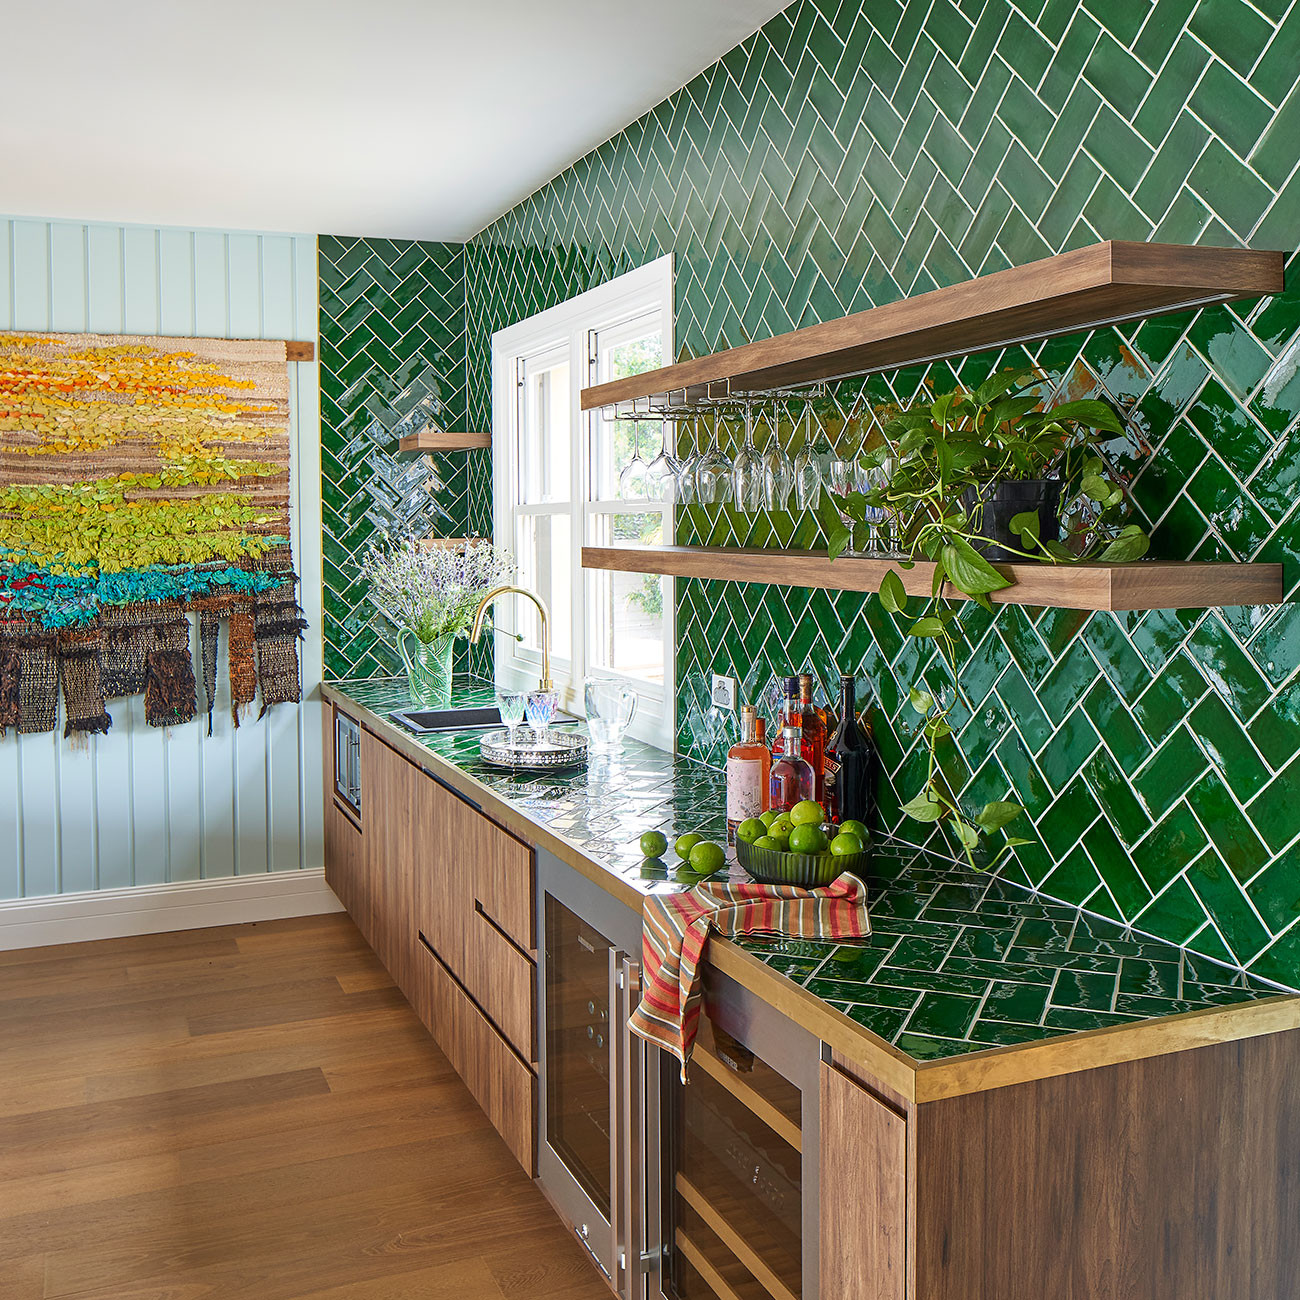
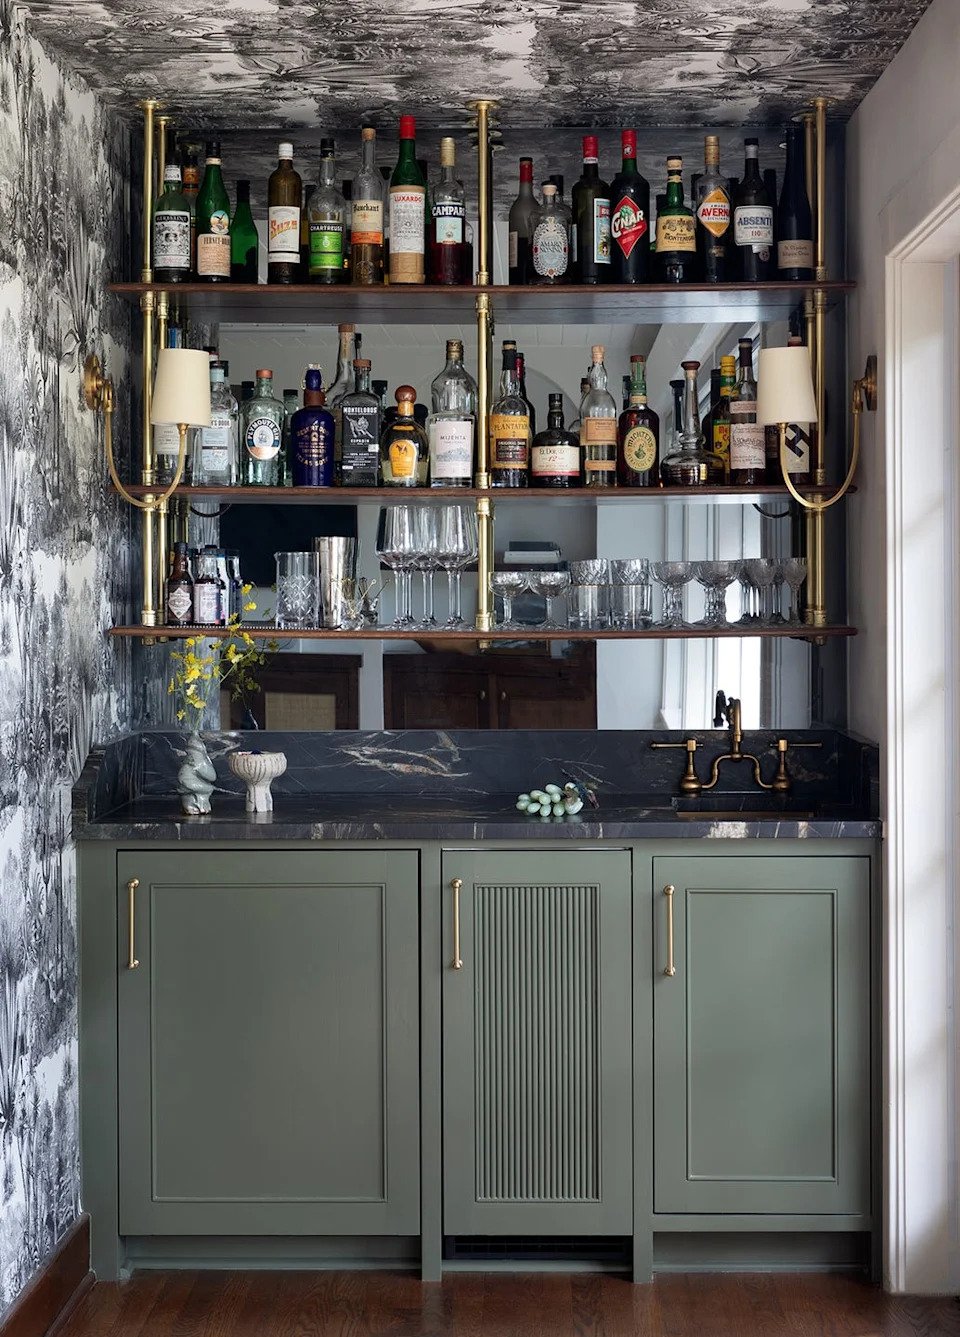
10. Emerald Green Herringbone Tile Backsplash with Wood Shelves
A tiled countertop is a bold, custom statement. Here’s how to get it right:
- Choose the right tile: Select a porcelain or ceramic tile rated for countertop use. Ensure it’s durable and non-porous. (Cost: $8-$20/sq ft)
- Build a solid substrate: Use a layer of cement backer board over a plywood base for a stable, water-resistant foundation. (Time: 3 hours)
- Lay the tiles: Use a high-quality thin-set mortar. Pay close attention to getting the countertop tiles perfectly level. (Time: 4-6 hours)
- Select the right grout: Use epoxy grout. It’s more expensive and harder to work with than cement grout, but it is stain-proof and waterproof, which is essential for a countertop. (Cost: $100-$150)
- Install the trim: Finish the edge with a metal trim, like the brass Schluter strip shown here, for a clean, professional look that protects the tile edges. (Time: 1 hour)
Total Project Time: Approx. 10-12 hours.
|
📋 Copy HEX 🔗 Share |
While a tiled countertop is stunning, the real conversation is about the grout. Even with a stain-resistant epoxy grout, the lines can trap crumbs and require more detailed cleaning than a solid surface. Be prepared to use a grout brush regularly. Also, be mindful of acidic spills (lemon juice and wine), which can damage certain types of grout over time. The brass trim is beautiful but will require occasional polishing to maintain its shine and prevent patina, unless you prefer the aged look.
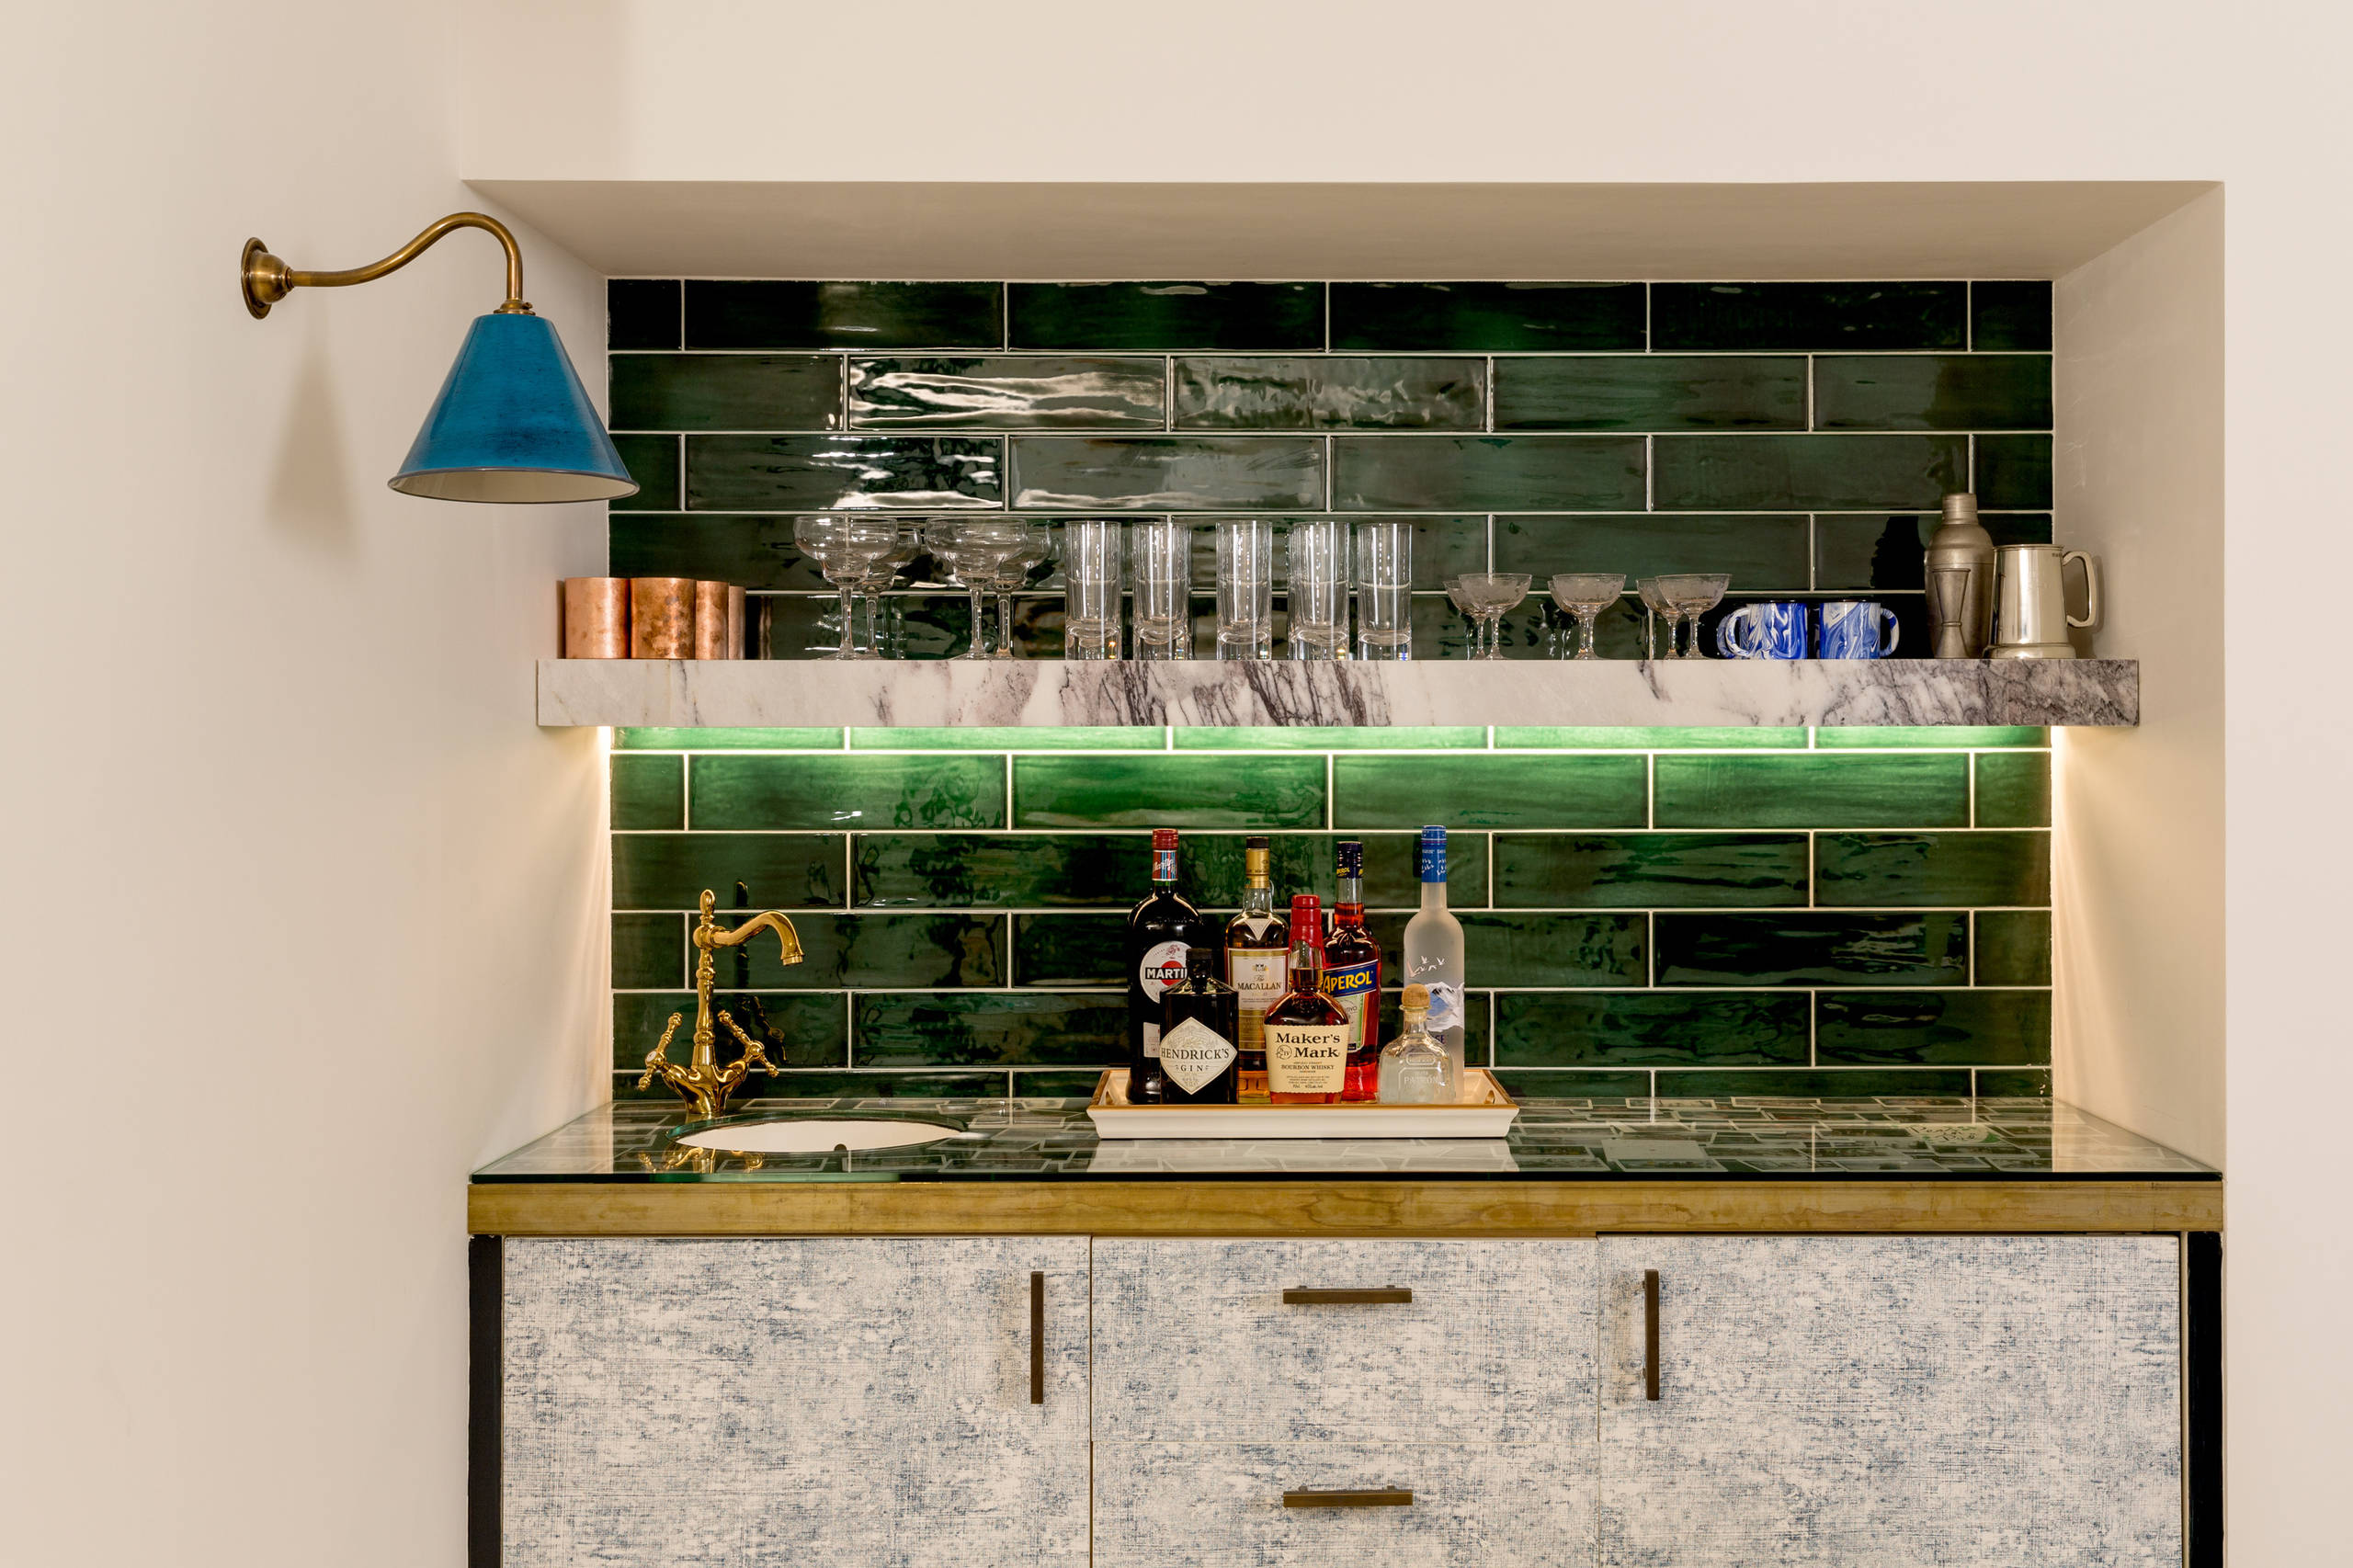
11. Deep Green Glossy Subway Tile Bar Nook
The single most transformative element here is the integrated lighting under the marble shelf. Without it, the deep green subway tiles would be beautiful but could feel dark and flat, especially in a recessed nook. The strip of light washes down the glossy tile, creating dramatic highlights and reflections that bring the surface to life. It accentuates the richness of the green and turns a simple bar nook into a glowing jewel box. This proves that lighting isn’t an afterthought; it’s a design tool.
|
📋 Copy HEX 🔗 Share |
When creating a bar within a recessed nook, use a visual trick to make it feel more expansive. Installing a shelf, like the marble one here, about two-thirds of the way up the wall breaks up the vertical plane. It draws the eye upward and creates two distinct zones. By lighting the lower section and using reflective, glossy tiles, you create an illusion of depth that makes the entire nook feel more spacious and intentionally designed, rather than just a carved-out hole in the wall.
12. Patterned Gray and White Tile Backsplash with Floating Shelves
This classic, organized look is surprisingly achievable on a tight budget. Get this look for less than $300. Instead of ceramic tiles, use peel-and-stick vinyl backsplash tiles in a similar gray and white quatrefoil pattern (around $60-$80 for a typical bar area). For the shelves, head to IKEA or Target for their inexpensive floating shelf options, or find reclaimed wood planks at a lumber yard for a more rustic feel ($50-$100). The brass lamp and accessories can easily be found at thrift stores or on Facebook Marketplace for under $50.
|
📋 Copy HEX 🔗 Share |
This idea is perfect for small- to medium-sized walls. The repeating tile pattern provides visual interest without being overwhelming, making it suitable for a backsplash area that is between 4 and 8 feet long. The key is the scale of the pattern itself; this medium-sized quatrefoil design is ideal. A tiny mosaic might look too busy, while a very large-format pattern might get awkwardly cut off. The use of two long, parallel shelves emphasizes the horizontal space, which also helps in making a smaller area feel wider.
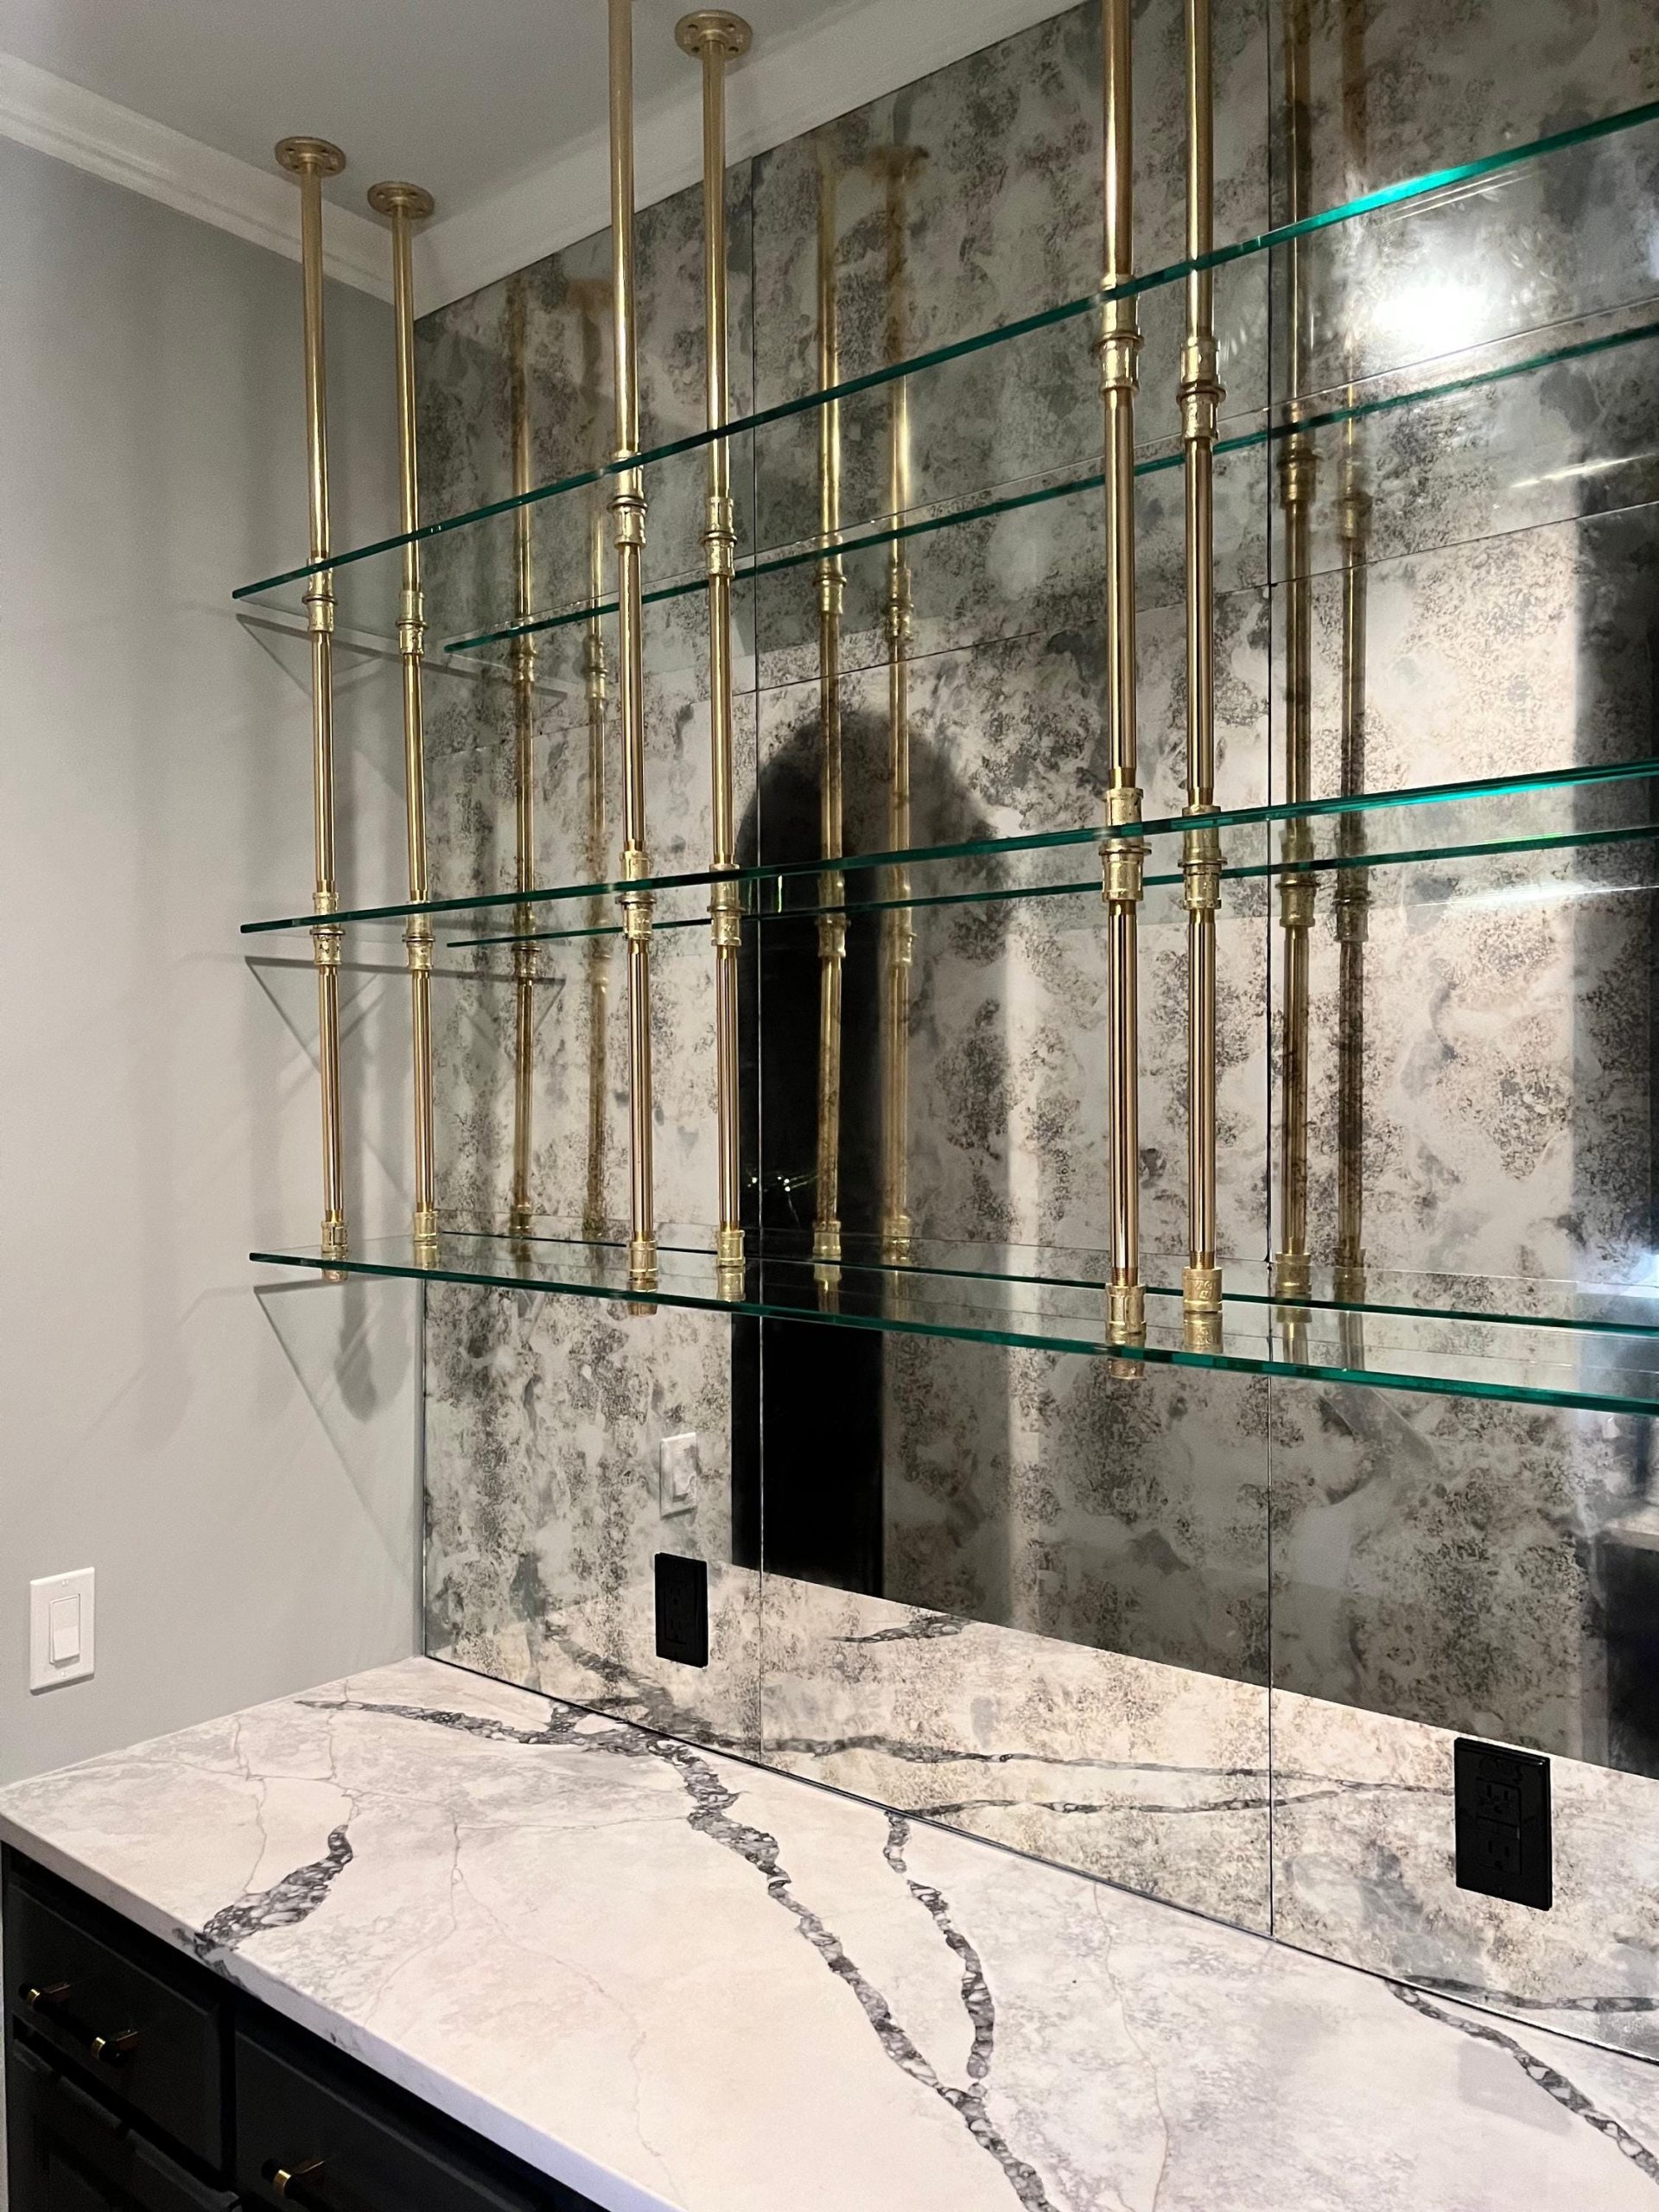
13. Mirrored backsplash with brass pole-mounted glass shelving
This setup is a masterclass in verticality and reflection. Mounting the shelving supports directly to the ceiling draws the eye upward, making the entire area feel taller and more grand. The use of a full mirrored backsplash behind the open glass shelves creates a dazzling effect, reflecting the glassware and doubling the sense of space. The combination of clear glass and mirror means the focus remains entirely on the items displayed, making them appear as if they are floating in mid-air. Compare this to the more integrated shelving in Idea #18.
|
📋 Copy HEX 🔗 Share |
Let’s be honest: this is a high-maintenance look. A mirrored backsplash will show every single splash, fingerprint, and speck of dust. If you’re a meticulous cleaner, go for it. If not, you might find yourself constantly wiping it down. The same goes for the clear glass shelves. This is a look best suited for a less-frequently used formal bar rather than a busy, everyday coffee station. The stunning visual payoff is undeniable, but it comes at the cost of constant upkeep to keep it looking pristine.
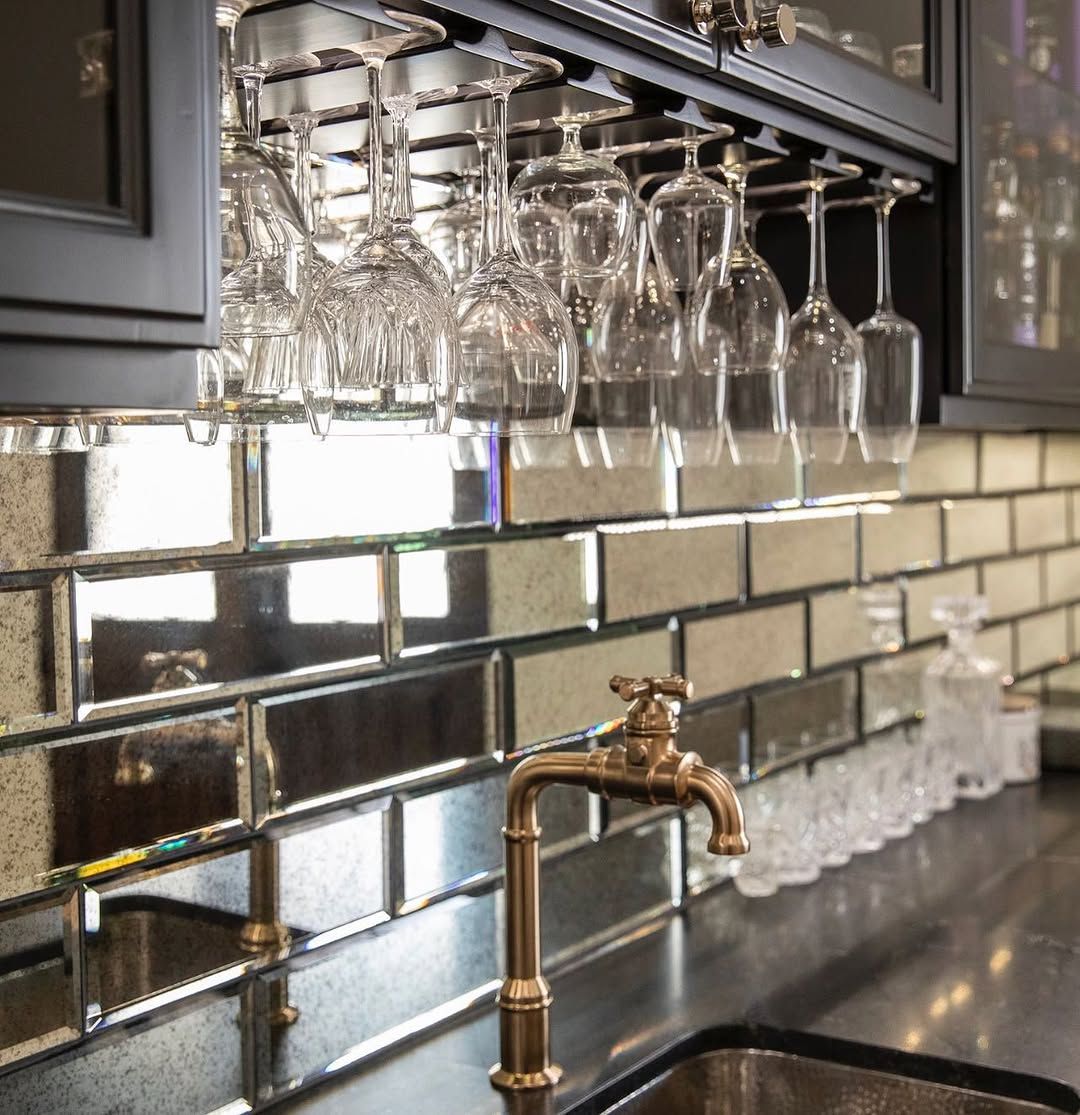
14. Beveled Antique Mirror Subway Tile Backsplash with Brass Faucet
If you’re using a reflective or antique mirror tile, the type of under-cabinet lighting you choose is critical. Opt for a frosted or diffused LED strip light with a warm color temperature (between 2700K and 3000K). A bare, cool-toned LED can create harsh glare and unflattering ‘hot spots’ on the mirror. A diffused, warm light, however, will bring out the rich undertones in the antique finish and the brass fixtures, creating a soft, glamorous glow instead of a disco ball effect. Compare the effect to the more modern mirror in Idea #1.
|
📋 Copy HEX 🔗 Share |
The single element that elevates this design from simply ‘nice’ to ‘luxurious’ is the bevel on the mirror tiles. A flat mirrored tile can look a bit one-dimensional. The beveled edges catch the light from multiple angles, creating a subtle, jewel-like faceting effect. This adds a layer of depth and sophistication that mimics classic, old-world bar designs. It’s a small detail that makes a huge difference in the overall feeling of quality and timeless elegance.
15. Mirrored subway tile backsplash with floating shelves and wet bar
You can capture this elegant, coastal-inspired look without a gut renovation. Start with peel-and-stick mirrored subway tiles from a home improvement store (approx. $100-$150 for a standard backsplash). Install simple white floating shelves from Target or IKEA above it ($60 for two). The ‘wet bar’ can be faked if plumbing is an issue; simply use a stylish beverage tub or a decorative bowl as a stand-in for a sink for parties. The look is more about the reflective surface and clean white shelves than a functional sink.

|
📋 Copy HEX 🔗 Share |
Installing floating shelves on a tiled wall requires the right tools and a little nerve. Here’s a brief guide:
- Locate Studs: Use a stud finder to mark where your studs are located *before* you tile. Plan your shelf placement around them.
- Mark and Drill Pilot Holes: After tiling, use a grease pencil to mark your spots on the tile. Use a glass and tile drill bit to slowly drill a pilot hole through the tile at each mark. Go slow and use water to keep the bit cool.
- Drill for the Anchor: Switch to a regular drill bit to drill into the stud or drywall behind the tile.
- Install Hardware: Insert your shelf’s mounting bracket and secure it tightly to the stud. This is crucial for supporting the weight of bottles and glassware.
Time: 1-2 hours. Cost: $30 for a quality tile drill bit set.
16. Mirrored subway tile backsplash with textured wall paneling
Combining multiple backsplash materials can be chic, but it can also go wrong. The transition is key. Here, the thin mosaic accent strip acts as a visual ‘border’ between the mirrored tile and the textured paneling. Without it, the abrupt switch in materials could look like a mistake or an unfinished project. If you’re mixing materials, make sure there is a deliberate, decorative element that justifies the transition. Also, consider the thickness of the materials; a large difference can create an awkward lip.
|
📋 Copy HEX 🔗 Share |
This look is a careful balance of textures and finishes. The formula is approximately 40% reflective surface (mirrored tile) + 30% textured neutral (wall paneling) + 30% classic foundation (dark shaker cabinets and granite). The shine of the mirror is tempered by the matte, organic feel of the paneling. The dark cabinets and speckled granite provide a traditional, grounding base that keeps the more modern elements from feeling out of place. It’s a successful blend of modern and classic sensibilities.
17. Mirrored Backsplash with Brass Shelving and Marble Countertop Bar
This is a high-end, luxury look with a price tag to match. Here’s a realistic estimate for a professionally installed bar of this caliber:
- Antique Mirror Panels: Custom-cut and installed antique mirror panels can run from $60 to $150 per square foot. For a 30 sq. ft. area: $1,800 – $4,500.
- Custom Brass & Glass Shelving: Fabricating custom brass frames and integrated lighting is a specialty job. Expect to pay $3,000 – $8,000+.
- Marble Countertop: A high-quality polished white marble like Calacatta or Carrara can cost $150 – $250 per square foot, installed. For a 15 sq. ft. bar top: $2,250 – $3,750.
- TOTAL: $7,050 – $16,250+
- Budget alternative: Use mirrored plexiglass, pre-made brass shelving units (not integrated), and a high-quality marble-look quartz or laminate countertop to achieve a similar vibe for under $3,000.
|
📋 Copy HEX 🔗 Share |
This design feels so opulent because it commits to a tightly controlled palette of luxurious materials. The magic is in the repetition of brass, mirror, and white marble. The brass isn’t just on the shelves; it’s hinted at in the decor. The mirror isn’t a simple tile; it’s a large, seamless panel. The white marble provides a solid, cool-toned anchor to all the reflection and shine. Keeping the material list short and high-quality is the secret to its sophisticated power. This is the luxury version of the look explored in Idea #14.
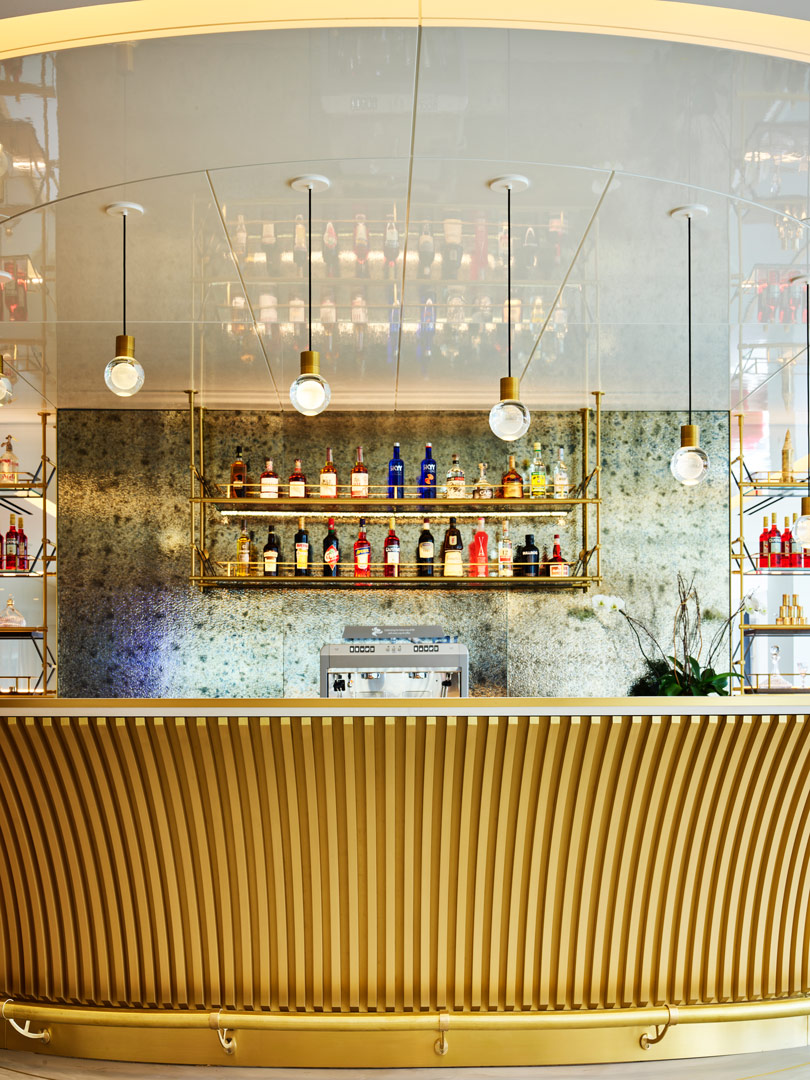
18. Regal Gold Ribbed Bar with Speckled Metallic Backsplash
We’re seeing a major resurgence of ‘modern regency’ style, and this bar is a perfect example. After years of minimalist and farmhouse aesthetics, there’s a collective craving for glamour, texture, and unapologetic opulence. The combination of the ribbed gold bar front and the speckled metallic backsplash speaks to this desire for more decorative, tactile surfaces. The look feels both nostalgic, nodding to mid-century hotel bars, and thoroughly modern in its clean execution. It’s a statement of confidence and a love for entertaining in style.
|
📋 Copy HEX 🔗 Share |
A bar with this much presence needs room to breathe. This design is best suited for a larger space, either a dedicated room or an open-plan area of at least 300 square feet. The curved front and bold gold finish demand to be a focal point, not crammed into a corner. A minimum ceiling height of 9 to 10 feet is recommended to properly accommodate the scale of the bar and the simple, elegant pendant lights without them feeling crowded. In a smaller room, this much gold could easily overwhelm the space.
19. Mirrored backsplash with brass open shelving, dark marble, and patterned wall
The single element that defines this eclectic space is the bold, graphic black and white wallpaper. While the mirrored backsplash, brass shelving, and marble are all individually luxurious, it’s the wallpaper that ties them all together and gives the bar its unique personality. It acts as a dramatic, unifying backdrop that prevents the mix of materials from feeling random. Removing it would leave you with a nice bar; with it, you have a daring and memorable design statement.
|
📋 Copy HEX 🔗 Share |
When mixing multiple statement elements like a patterned wallpaper, a mirrored backsplash, and dark marble, the key to avoiding chaos is to maintain a consistent color story. Notice how the black in the wallpaper is echoed in the dark marble countertop. The white from the wallpaper is picked up by the reflection in the mirror. The brass of the shelves adds a single, consistent warm metallic accent. By repeating these core colors—black, white, and brass—across the different materials, the look feels cohesive and intentional rather than cluttered.
20. Arched black marble bar backsplash with curved wooden counter
This design is a study in the power of contrasting shapes and materials. The dramatic, solid arch of the black marble backsplash creates a strong focal point. This hard, cool stone is beautifully juxtaposed with the warm, vertically slatted wood of the curved bar front. The curve of the bar softens the hard lines of the wall paneling and the arch. This dialogue between organic curves and strong geometric shapes, and between warm wood and cool marble, is what gives the space its sophisticated and dynamic energy.
|
📋 Copy HEX 🔗 Share |
A solid slab of black marble for a feature backsplash like this is a significant investment and comes with maintenance realities. Marble is a natural stone and is porous, meaning it can be susceptible to etching from acidic liquids like lemon juice or wine if they are not wiped up immediately. It also requires sealing upon installation and periodically thereafter (usually annually) to protect it. While incredibly durable, it’s not indestructible. This is a choice for someone who appreciates natural materials and is willing to provide proper care.
21. Modern Wooden Bar with Herringbone Tile Backsplash
This warm, modern look follows a balanced and inviting formula: 50% natural wood + 30% neutral texture + 20% dark accent. The warm wood cabinetry and shelving create a welcoming, organic base. The light grey herringbone tile provides a subtle geometric texture that adds interest without overwhelming the space. Finally, the black bar top and dark ridged panels provide a strong, contemporary contrast that grounds the entire design and gives it a sophisticated edge. The cream stools soften the look, preventing it from feeling too stark.
|
📋 Copy HEX 🔗 Share |
Installing wire mesh in cabinet doors is a great way to add texture and visual interest. Here’s a quick DIY:
- Remove the door panel: Take the cabinet door off its hinges and use a router to create a rabbet (a small groove) on the back side of the frame, removing the existing panel.
- Cut the mesh: Purchase decorative wire mesh online or at a specialty hardware store. Cut it to size using heavy-duty wire snips, making it slightly larger than the opening.
- Secure the mesh: Place the mesh into the rabbet you created. Secure it tightly using a staple gun every few inches.
- Finish the back: For a professional look, glue or tack a thin quarter-round molding over the staples to hide them and create a clean finish on the inside of the door.
Time: 1-2 hours per door. Cost: $40-$80 for a roll of mesh.
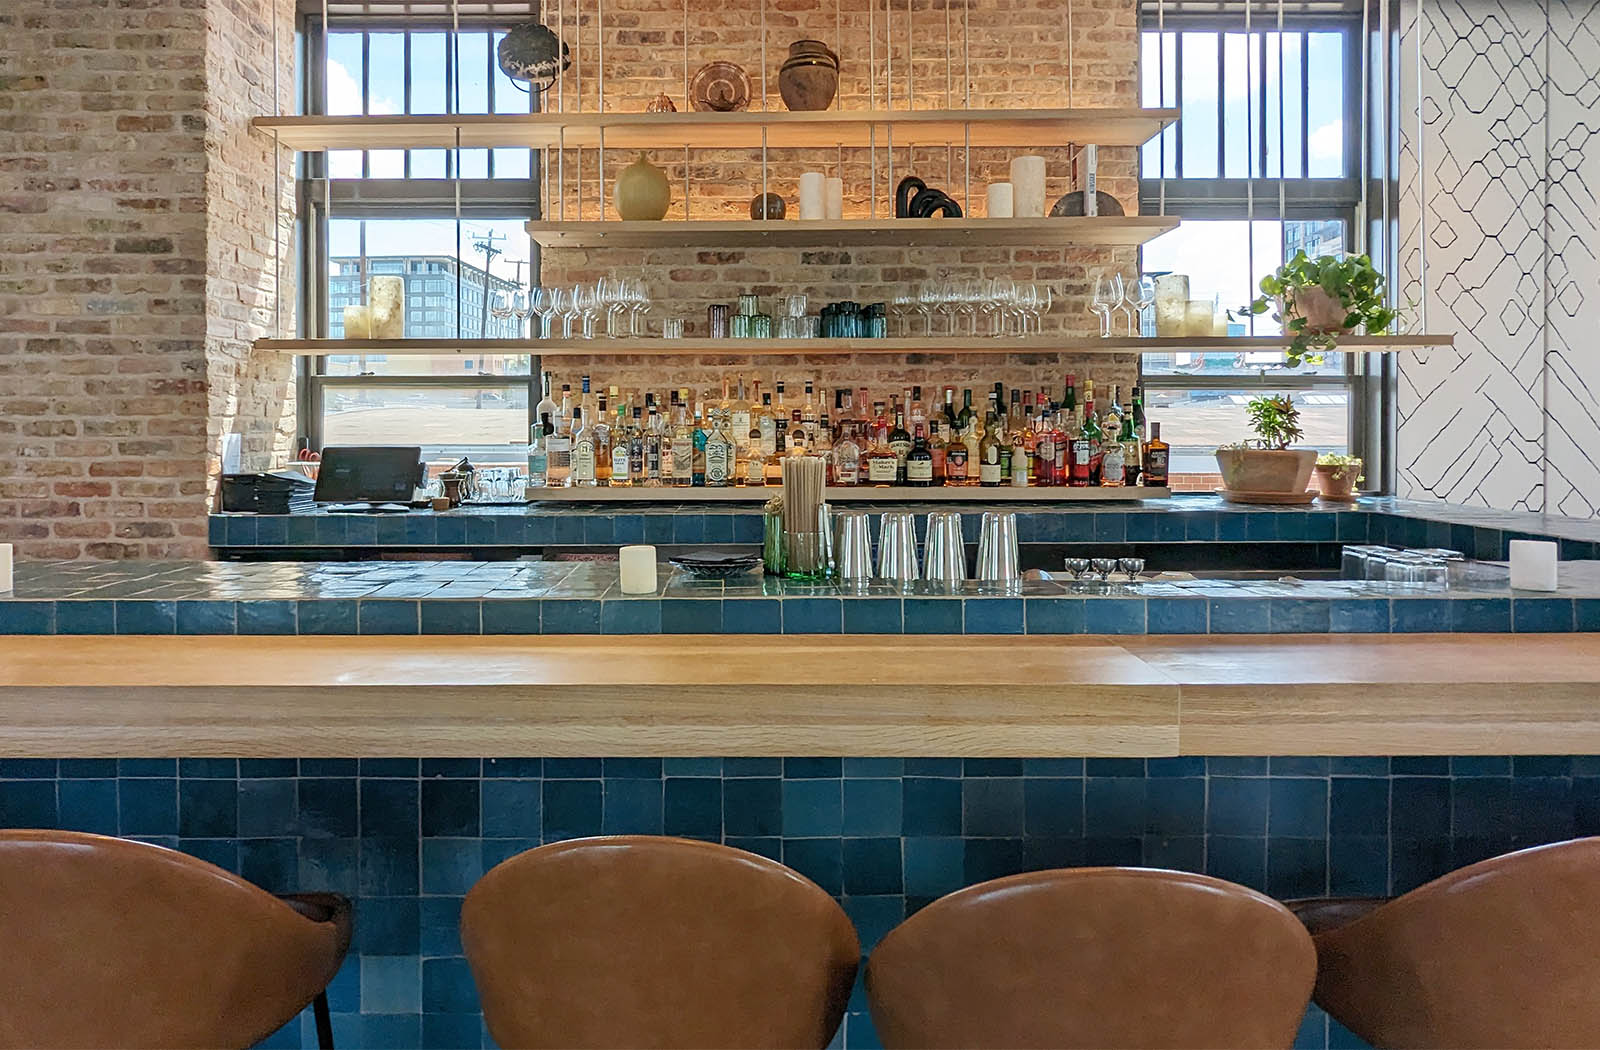
22. Industrial Brick with Tiled Bar and Modern Wood Shelving
Love this industrial loft vibe but don’t have an exposed brick wall? You can fake it! High-quality faux brick paneling from home improvement stores can look remarkably realistic for about $50-$70 per 4’x8′ panel. For the bar front, look for textured subway tile on clearance. The real star for a budget version is the shelving. Use simple black plumbing pipes and inexpensive wood planks from a lumber yard to create your own industrial-style suspended shelves for under $150. Hunt for used leather stools on Facebook Marketplace to complete the look.
|
📋 Copy HEX 🔗 Share |
This look, with its combination of a heavy brick texture and open, airy shelving, thrives in a space with high ceilings. A minimum ceiling height of 10 feet is ideal to prevent the brick from feeling too heavy and to allow the suspended shelves to float without feeling cramped. The design is well-suited for long, relatively narrow spaces, as the horizontal lines of the shelves and brickwork can help to visually widen the room. It’s a fantastic choice for basement bars or converted commercial spaces.
23. Neutral Hexagonal Tile Backsplash in Arched Coffee Nook
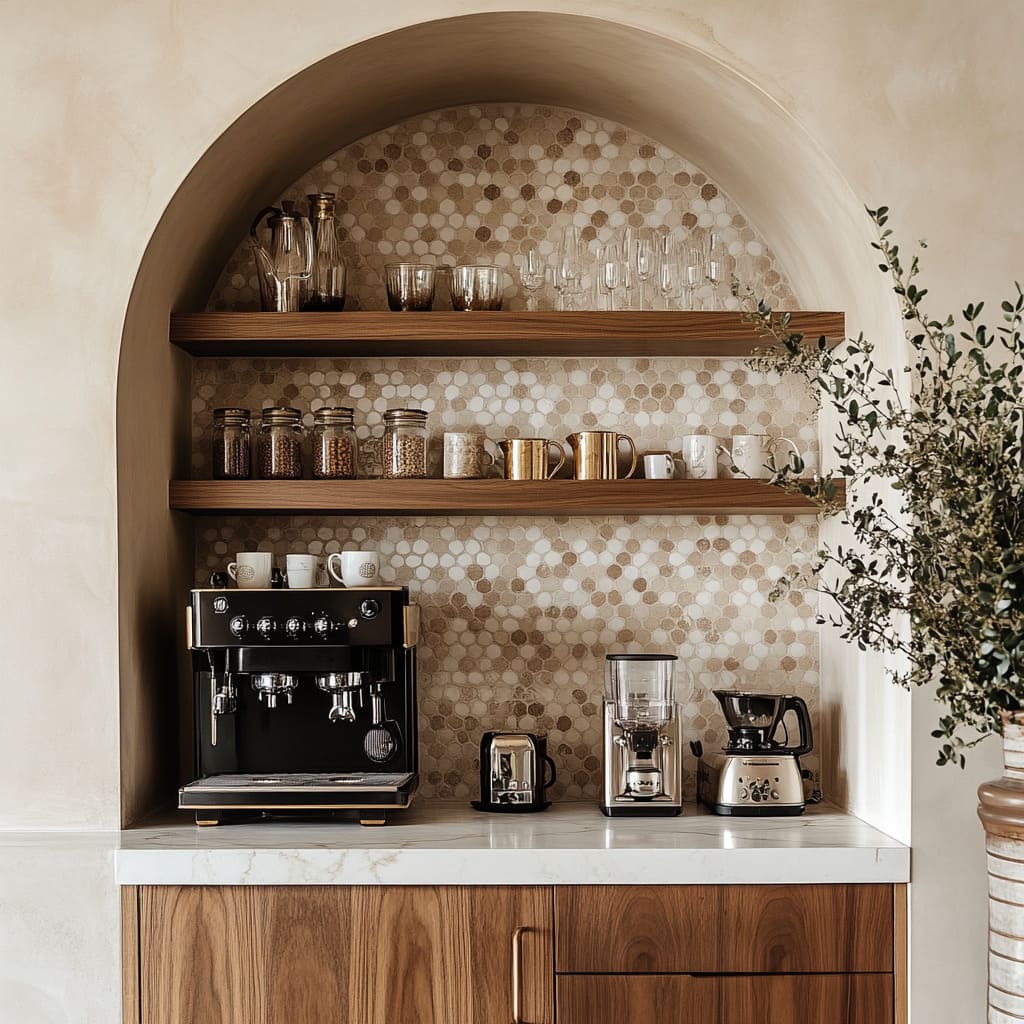
Before creating this dream coffee nook, do a quick audit:
- Electrical check: You’ve got an espresso machine, grinder, and maybe more. Do you have a dedicated circuit with enough amperage to run them without tripping the breaker? Consult an electrician.
- Measure your machines: Know the exact height, width, and depth of your coffee appliances before designing the shelves. Ensure you have enough ‘headspace’ to comfortably operate everything.
- Consider water: Are you okay with carrying water to the machine, or do you want to run a plumbed-in water line? This is a major decision that affects budget and construction.
- Ventilation: Coffee grinders produce fine dust. Ensure the nook has decent air circulation or is easy to wipe down. Speaking of which…see our notes in the mistakes section (Common Bar Backsplash Mistakes) for what not to do.
|
📋 Copy HEX 🔗 Share |
A hexagonal mosaic tile backsplash looks fantastic, but all those grout lines can be a magnet for coffee grounds and splashes. The fine dust from a coffee grinder, in particular, will find its way into every crevice. Sealing the grout is non-negotiable here. You’ll want to choose a grout color that is forgiving—a light tan or beige, like in this example, will hide coffee stains much better than a stark white. Expect to give the backsplash a detailed wipe-down with a cloth or brush at least once a week to keep it looking fresh.
Ready to Raise the Bar?
Your home bar is more than just a place to pour a drink—it’s a canvas for your personal style. Whether you opt for a dramatic tiled wall or a subtly reflective mirrored surface, the right backsplash can completely define your space. Don’t be afraid to mix materials and play with lighting to create a look that’s uniquely you. Now, head over to Pinterest and start creating a board for your dream bar—you’re ready.