24 Jaw-Dropping Back Yard Deck Ideas for 2026 That Will Transform Your Outdoors
You know that feeling when you finally find the one—the backyard deck photo that looks exactly right for your space? It’s a mix of excitement and a little bit of “Wait, can I actually pull this off?” After filtering through hundreds of options, we narrowed it down to 24 incredible deck ideas that actually deliver. We’re talking about real homes, real inspiration, and designs that work for a variety of budgets, from simple DIY projects to full-scale outdoor kitchens.
This isn’t just another dump of pretty pictures. These 24 ideas cover everything from modern composite builds to rustic, multi-level retreats with integrated hot tubs and pergolas. We’re breaking down what makes each design work, how to get the look for less, and the honest realities of maintenance. And stay until the end—we break down the most common mistakes that can ruin these looks. 📌 Save this to Pinterest for later — you’ll want to revisit these ideas.
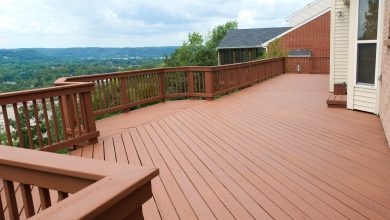
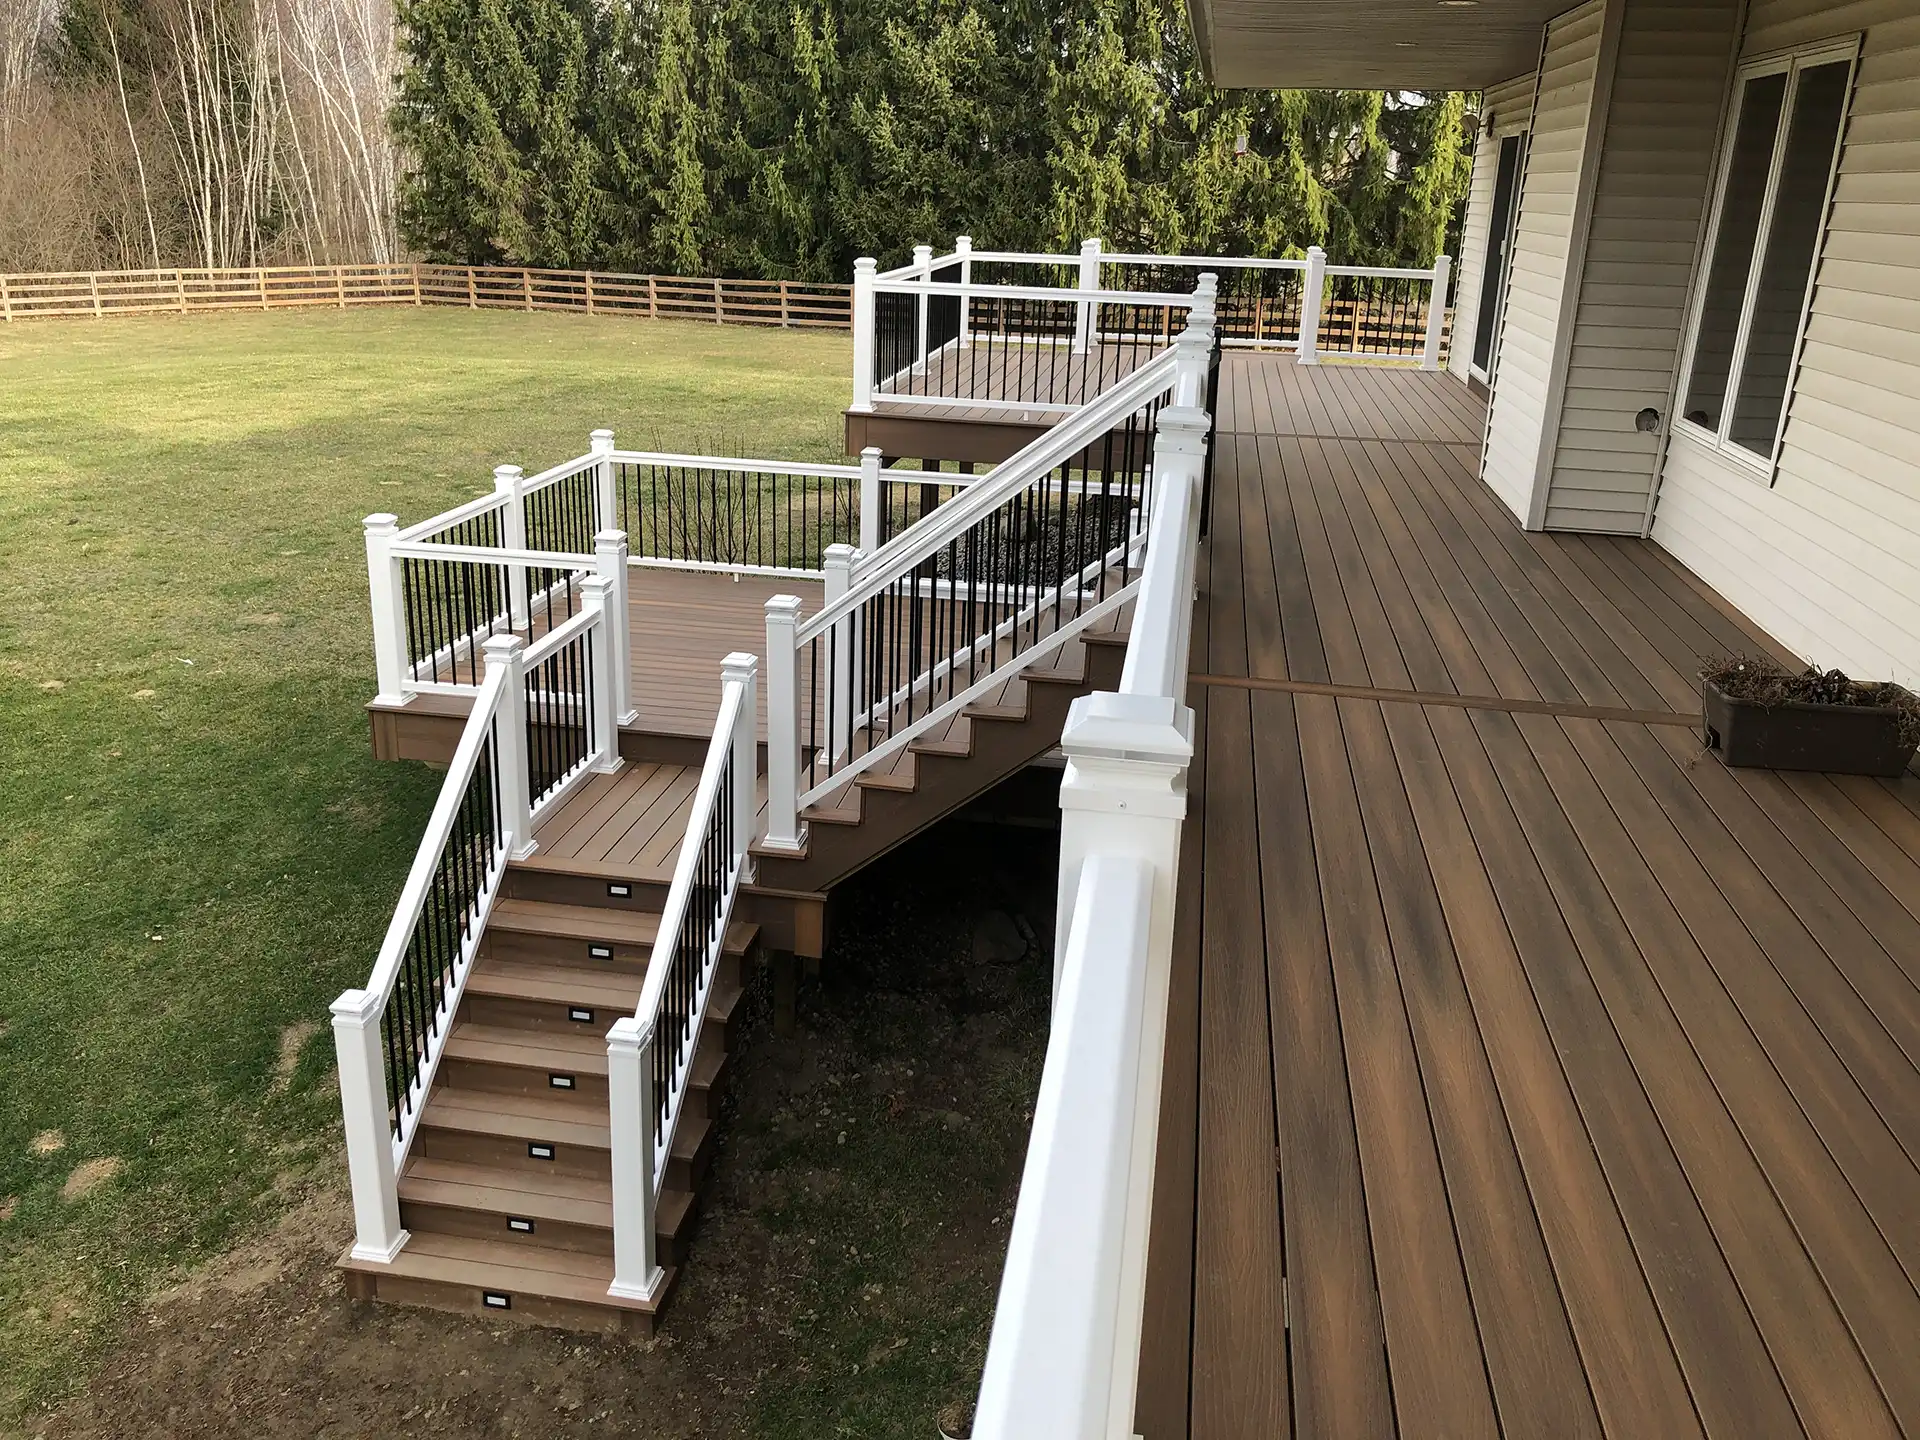
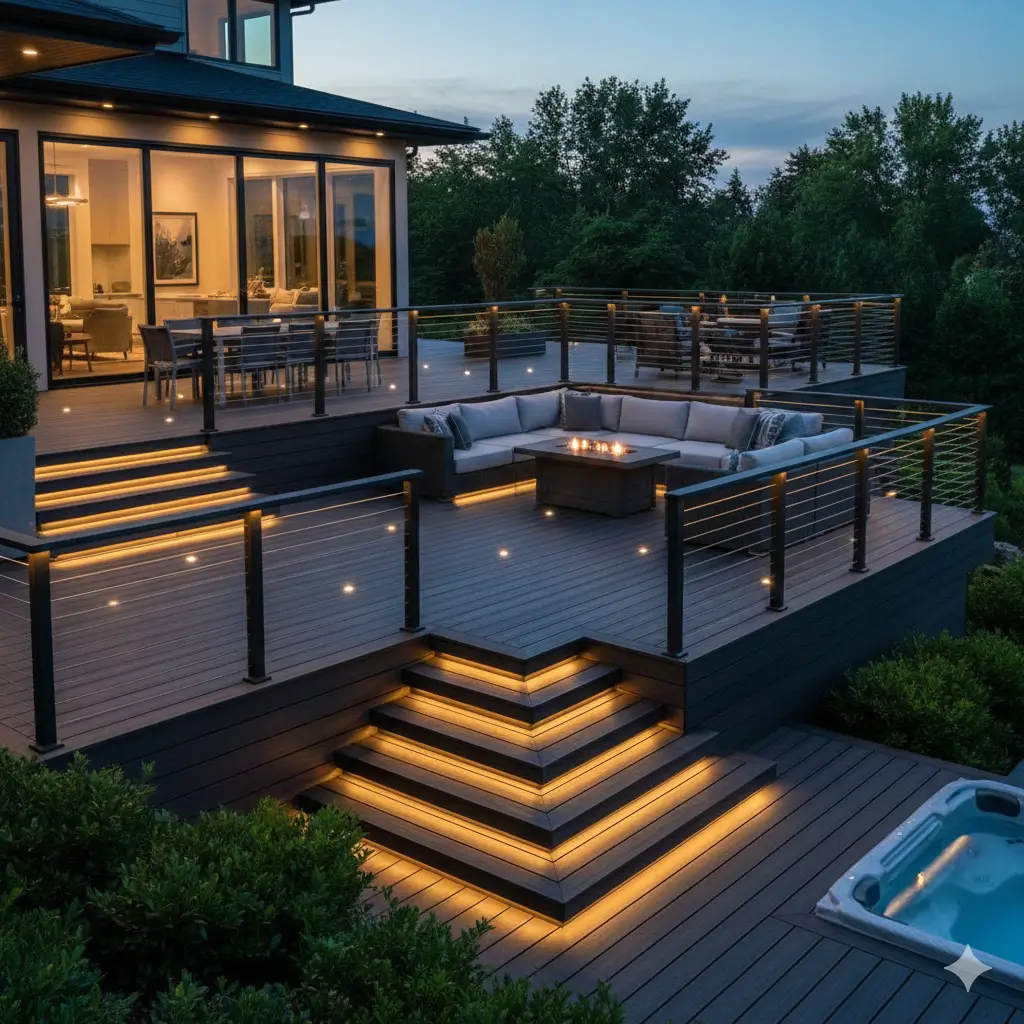
1. Light the Way with a Multi-Level Composite Deck
The magic here is in the sharp contrast. The clean white railings and posts pop against the deep brown of the composite decking, creating a crisp, modern framework that feels intentional and polished. It’s a classic color combination that never fails to look sharp. This design also cleverly uses multiple levels to break up a large space, creating distinct zones without needing walls or dividers. The flow from one area to another feels natural and inviting, making it an extension of the house itself.
|
📋 Copy HEX 🔗 Share |
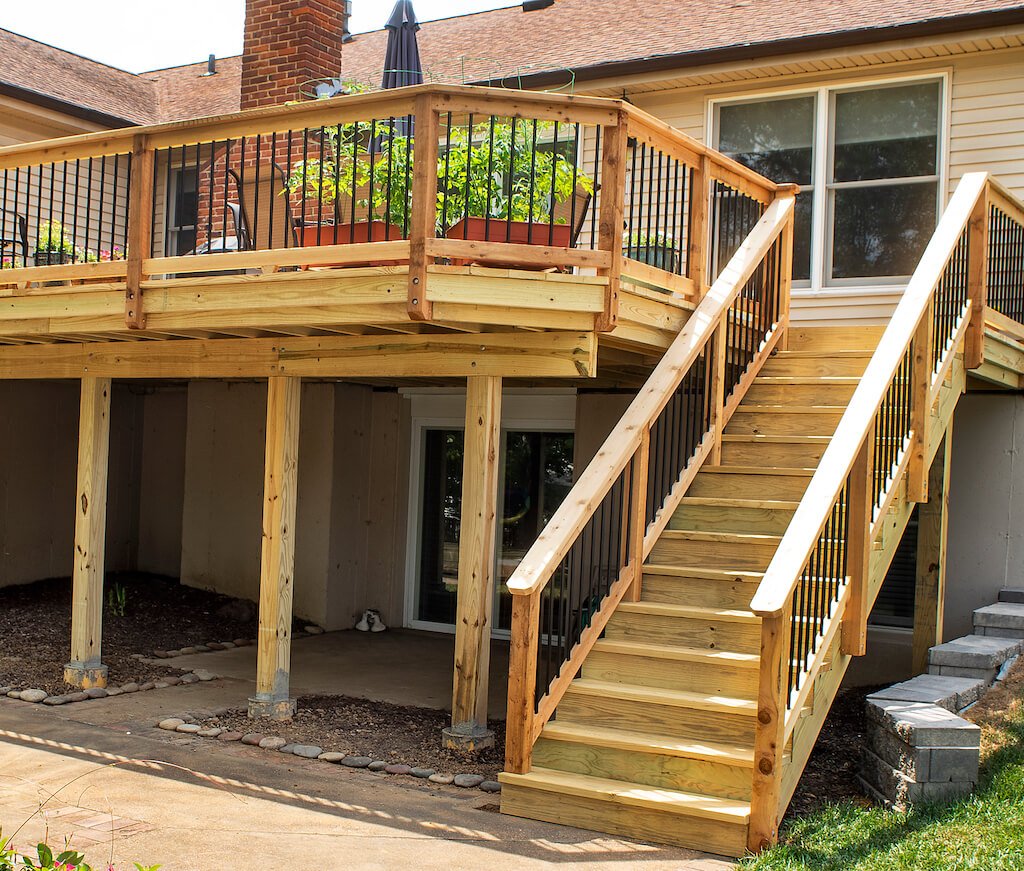
When integrating stair lighting, always opt for fixtures rated for outdoor, wet locations (IP65 or higher). For a subtle, high-end look, choose a warm color temperature (2700K-3000K). Position the lights to wash light down the stair risers, not out into your eyes. A good rule of thumb is one light for every 3-4 feet of stair width. And always, always connect them to a dimmer switch—full blast is for landing a plane, not for enjoying a quiet evening outdoors.
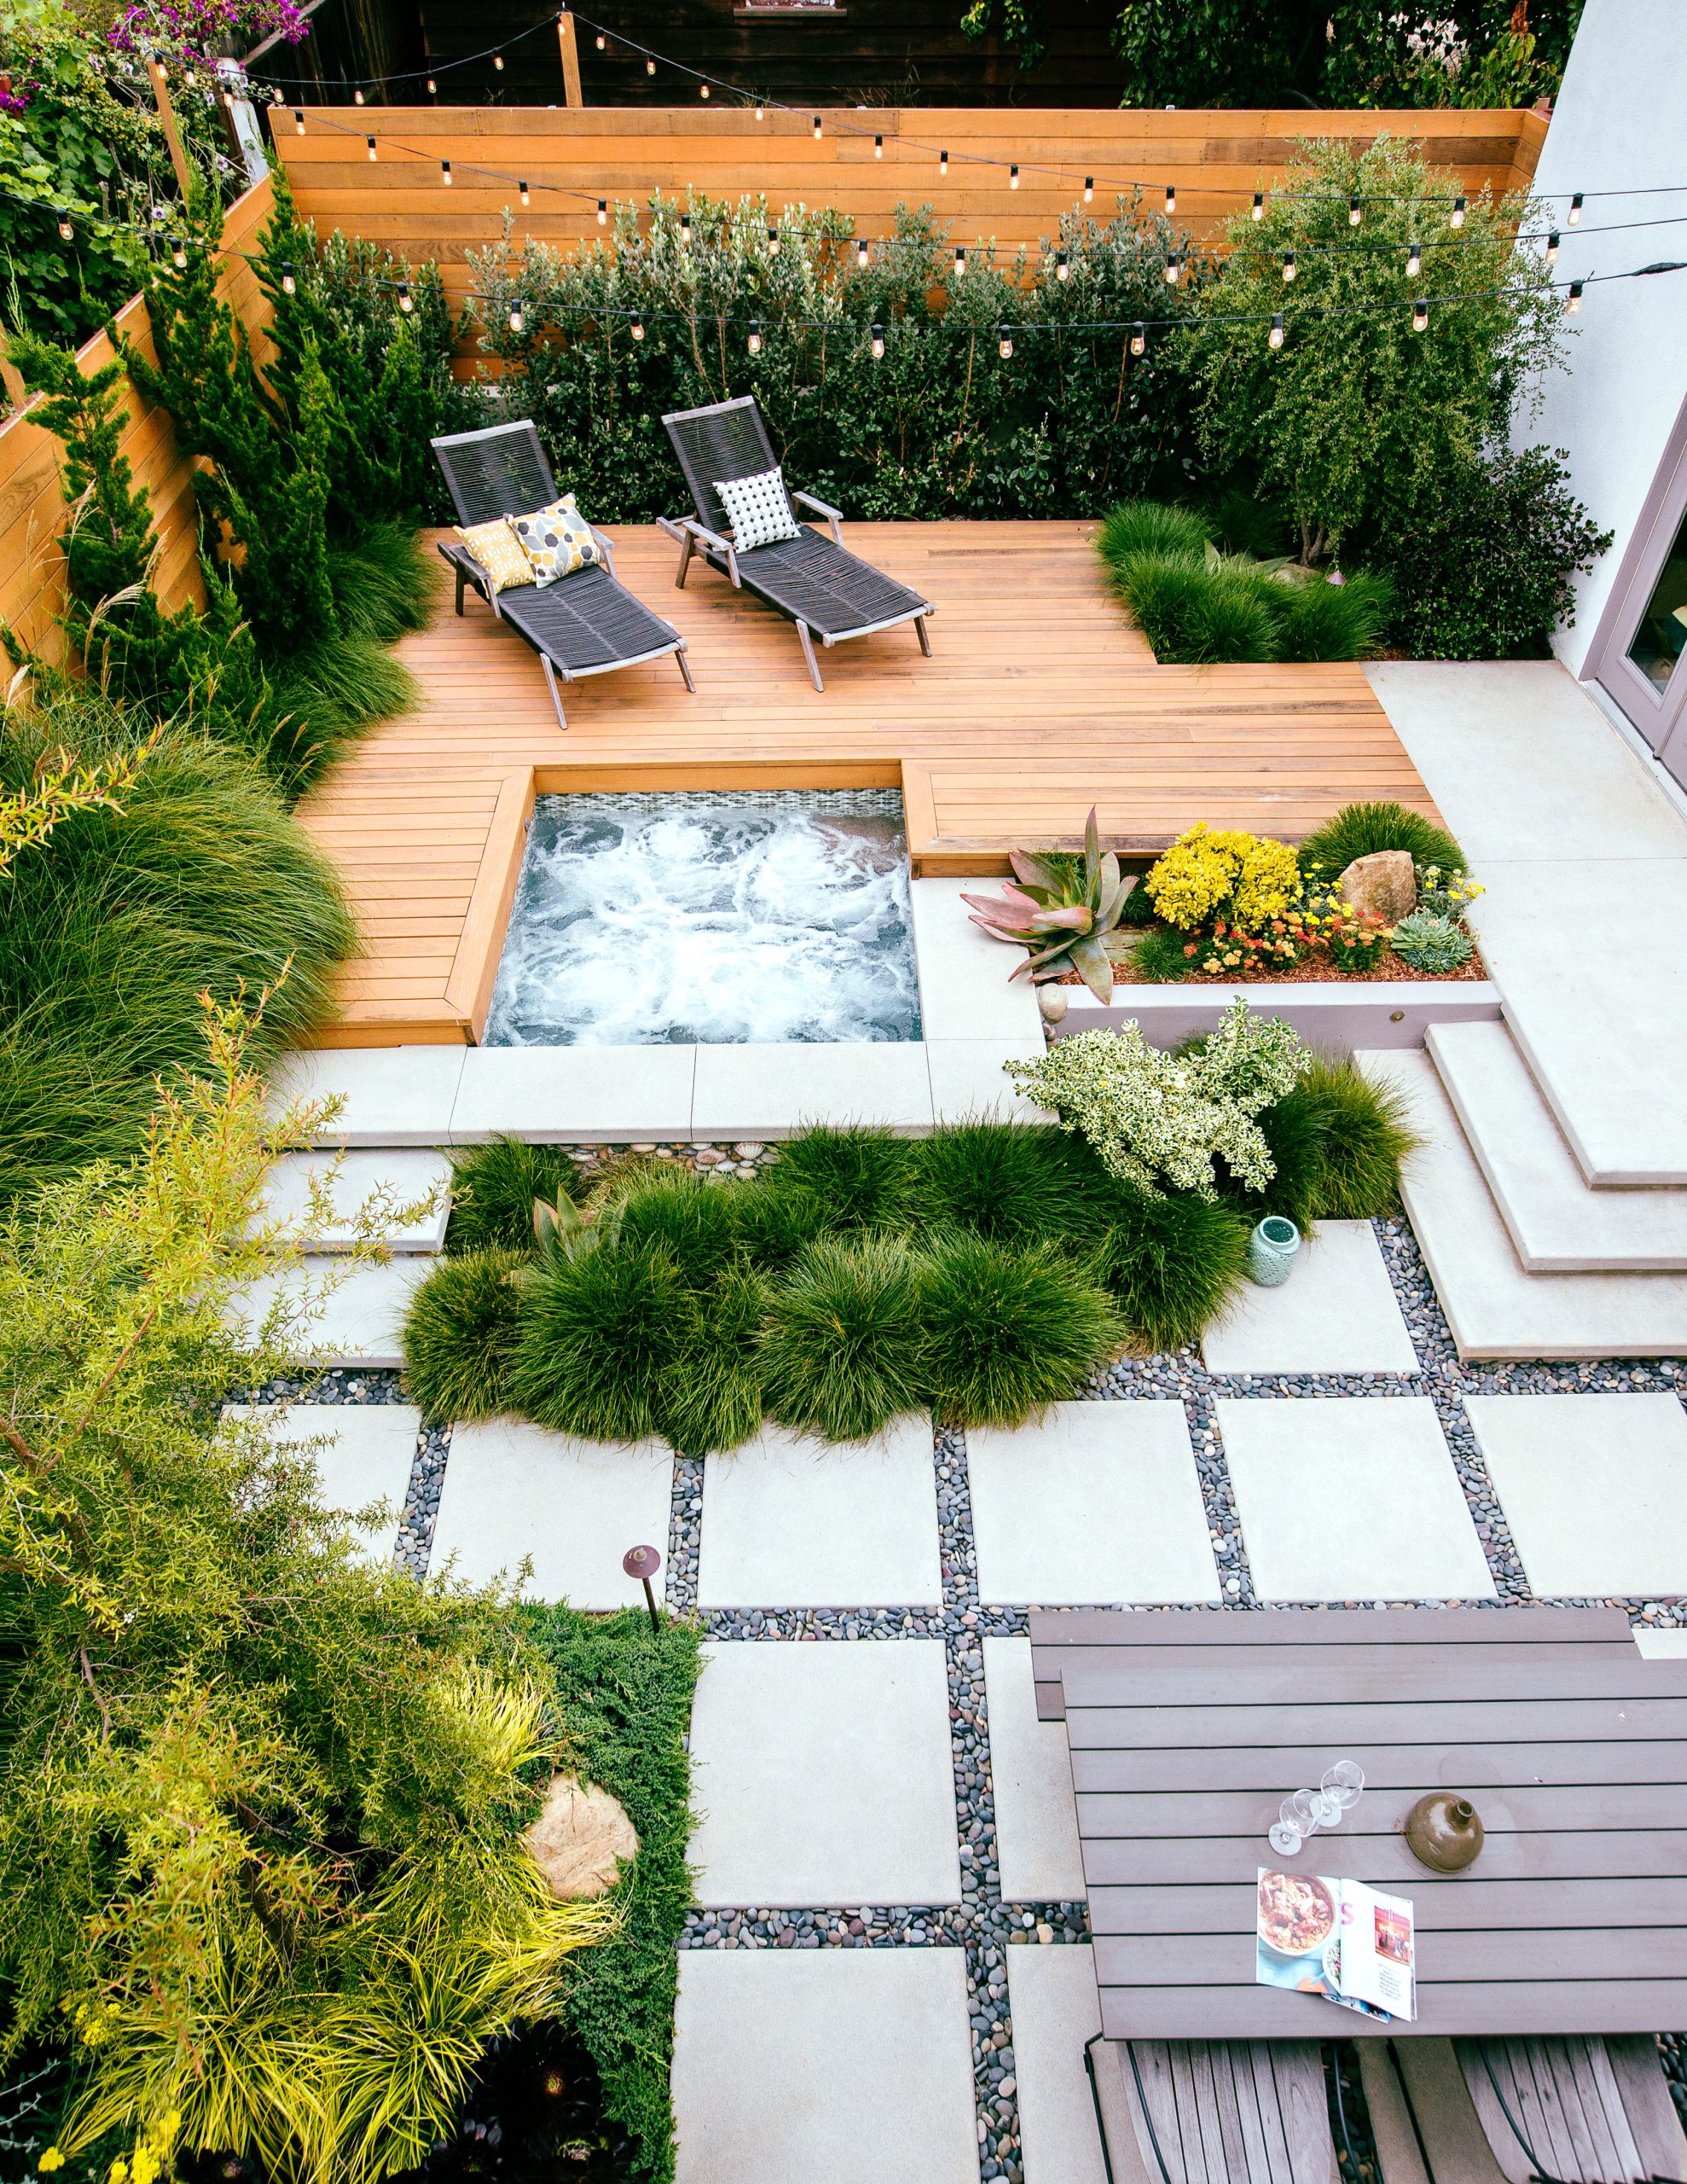
2. Create a Lush Oasis with a Deck-and-Paver Combo
This look follows a simple but effective formula: 40% warm wood decking + 30% cool-toned hardscaping + 30% lush, layered greenery. The wooden deck provides a warm, organic platform for lounging, while the light concrete pavers offer a durable, high-contrast path. The real key is the planting—it’s not just an afterthought. Greenery is woven into every part of the design, from the edges of the deck to the gaps between the pavers, softening the hard lines and making the whole yard feel like a private garden retreat.
|
📋 Copy HEX 🔗 Share |
A built-in hot tub is a dream, but it’s a pricey one. You can get a very similar vibe for a fraction of the cost with a stock tank pool or a freestanding inflatable spa. Place it on a level bed of gravel or a small concrete pad adjacent to your deck. A brand new 8-foot galvanized stock tank runs about $400-$600, and a quality inflatable hot tub can be found for under $1,000. Surround it with potted plants to replicate that lush, integrated feel you see here.
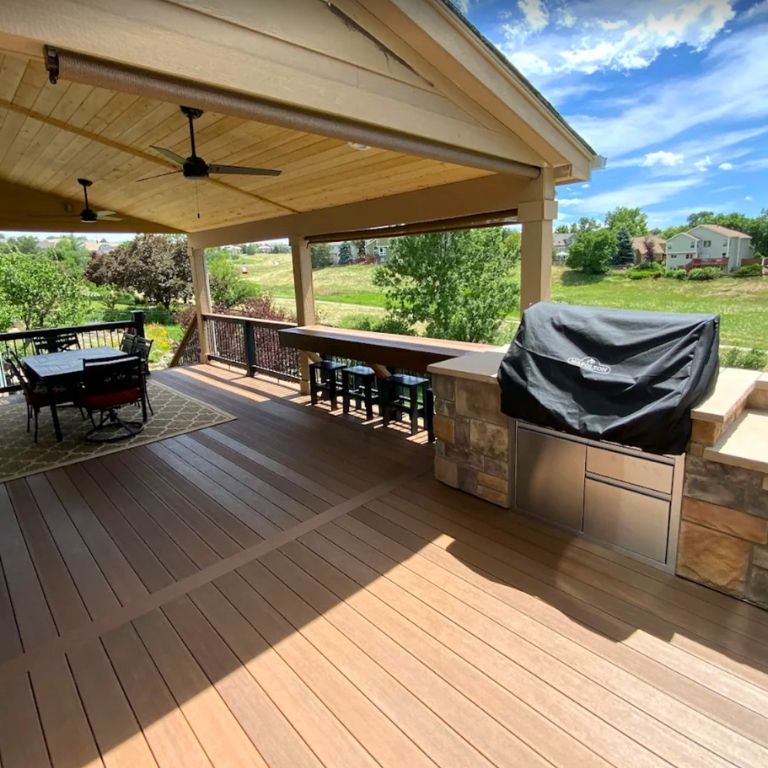
3. The Ultimate Entertainer’s Deck with an Integrated Kitchen
Recreating this full-service outdoor kitchen and dining space is a significant investment in your home’s social life. Here is a rough estimate of what a project of this scale could cost.
|
📋 Copy HEX 🔗 Share |
- Outdoor Kitchen Structure (stone veneer, counters): $5,000 – $12,000
- Appliances (grill, cabinets): $3,000 – $8,000
- Covered Roof Structure: $8,000 – $20,000+
- Furniture (bar stools, dining set): $1,500 – $4,000
- TOTAL: $17,500 – $44,000+
Budget alternative: A high-quality grill on a cart ($800), a freestanding outdoor bar island ($600), and a cantilever umbrella ($500) give you 80% of the function for about 10% of the cost.
Let’s be honest: an outdoor kitchen is a commitment. If it’s not covered, you’ll need to buy marine-grade stainless steel appliances (like 316-grade) to resist rust, especially in humid climates. Even then, you’ll be wiping down surfaces constantly. And think about plumbing and electrical—running lines for a sink or refrigerator adds significant cost and complexity. Before you commit, be realistic about how often you’ll really use it. Will it be your go-to cooking spot all summer, or will it be a novelty that collects pollen?
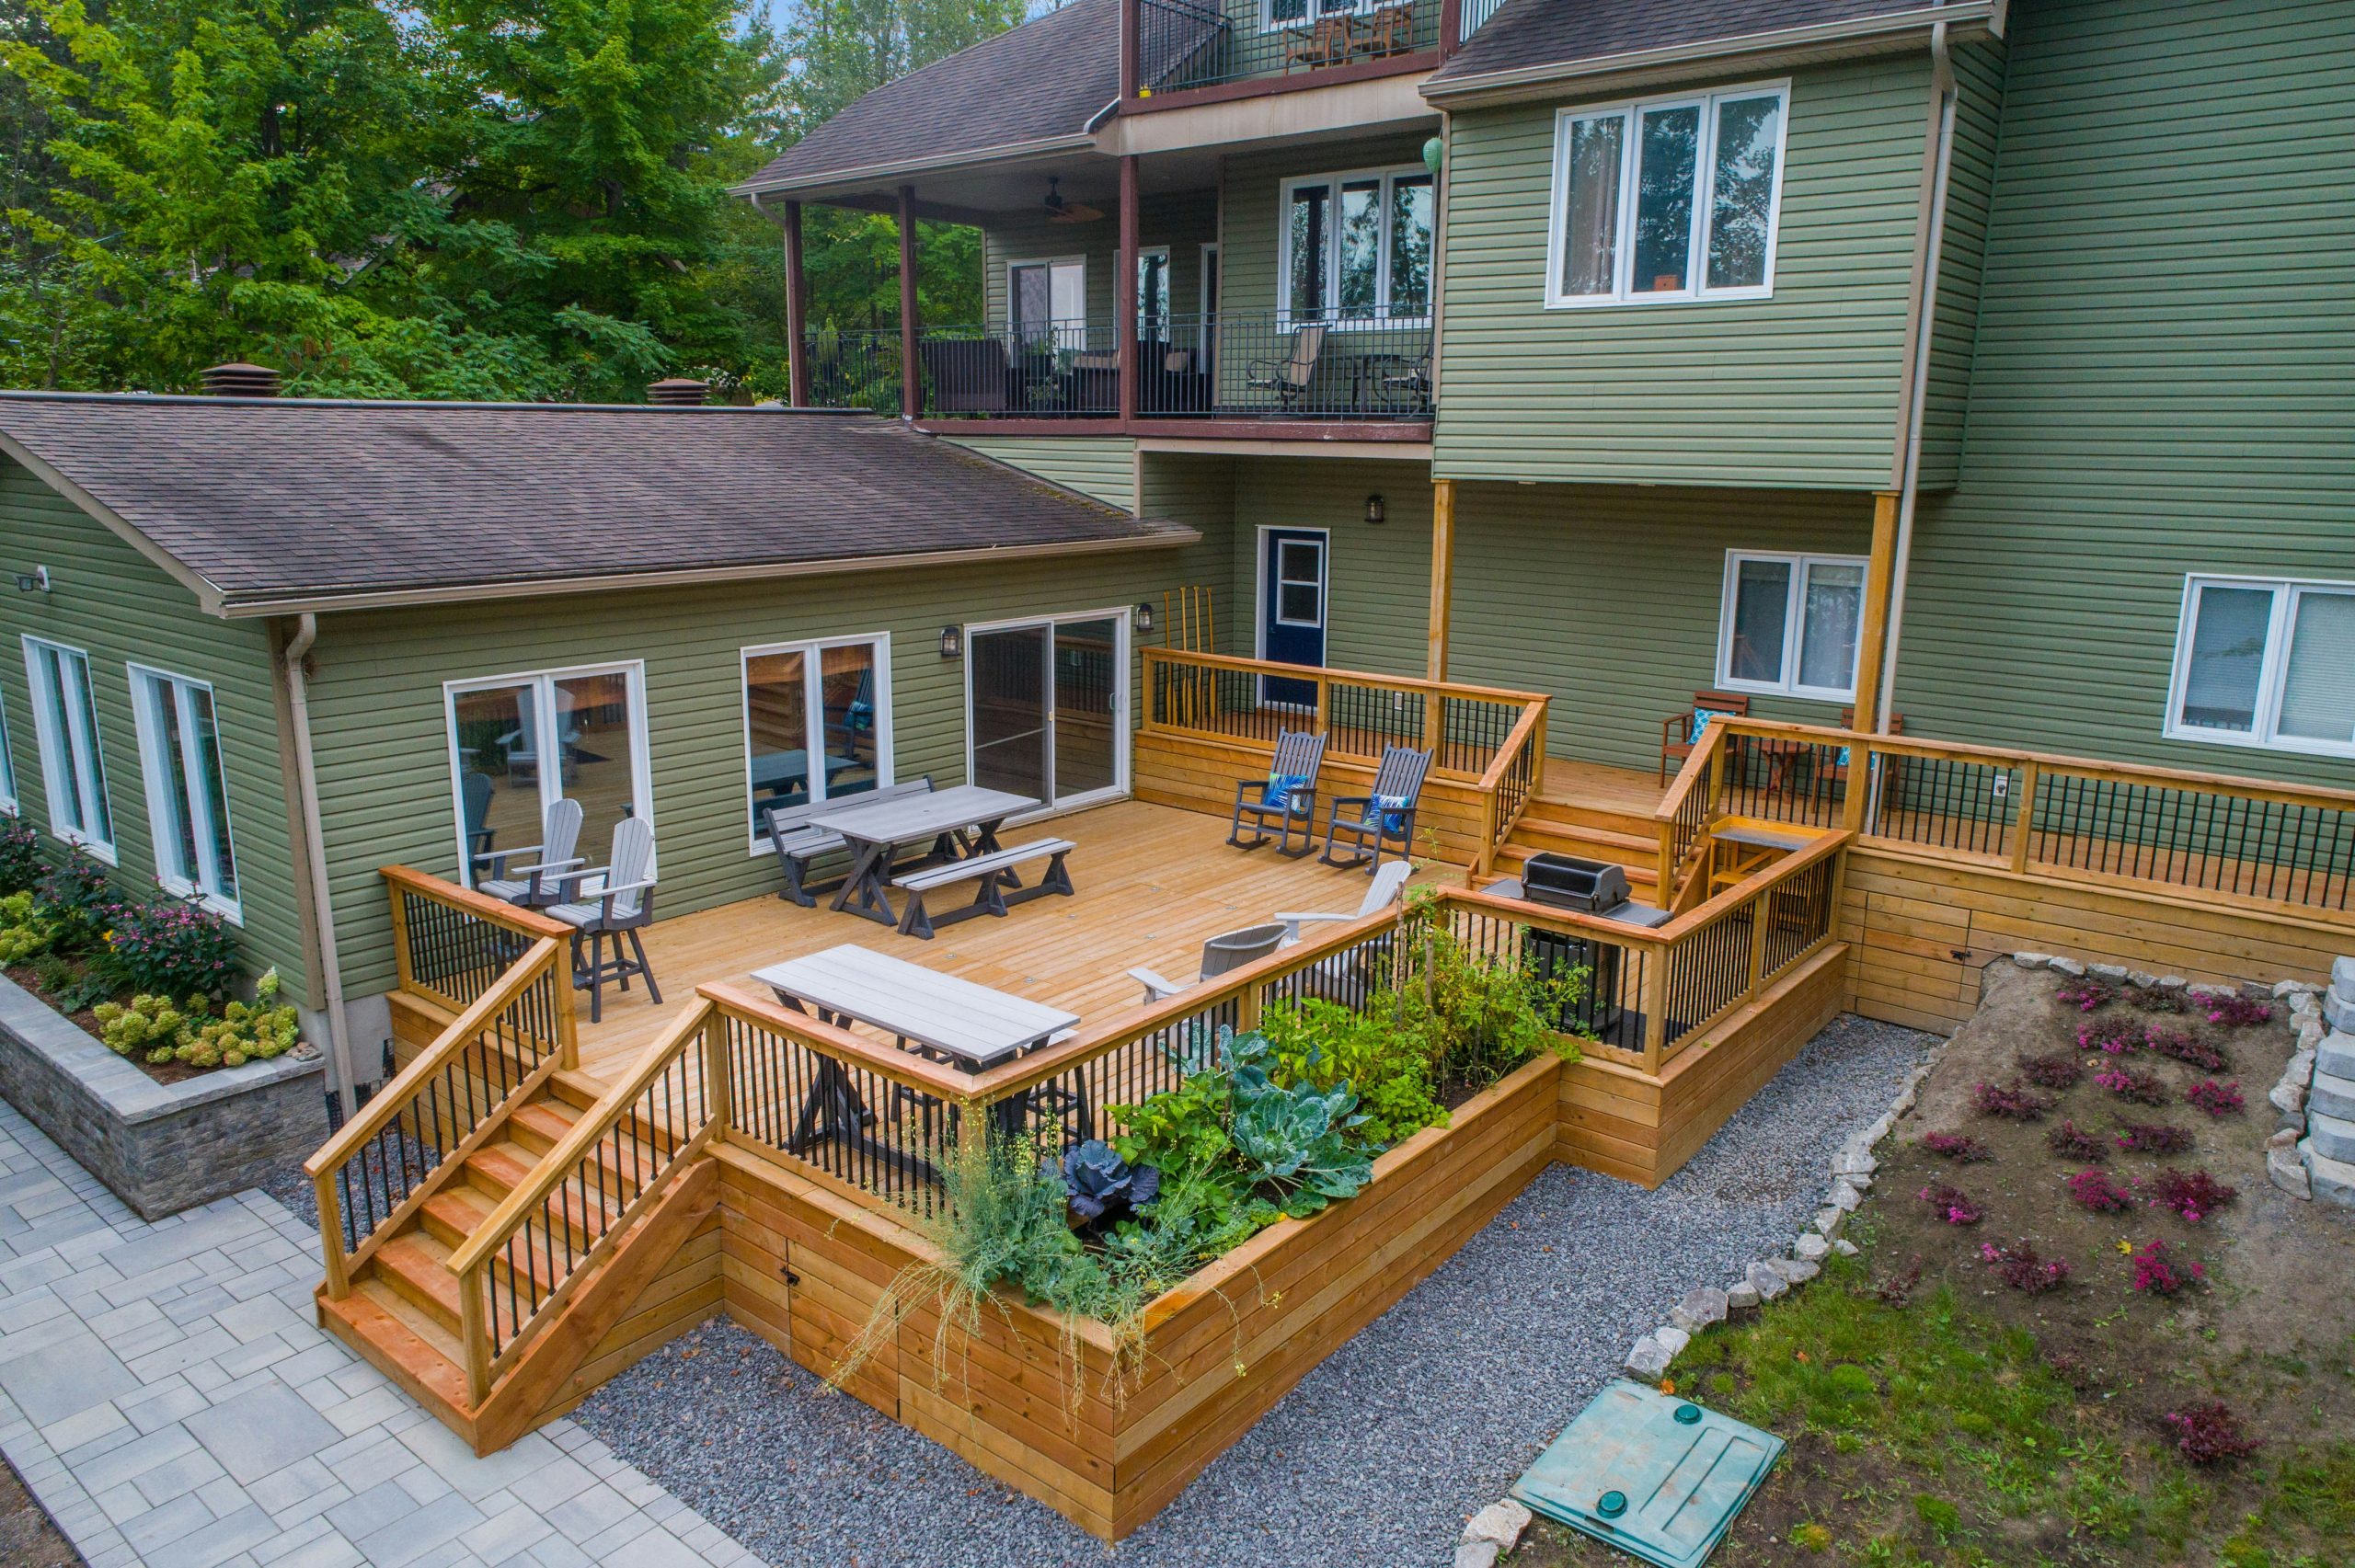
4. Go Green with a Deck Featuring Built-In Planters
Building a planter box directly into your deck is a fantastic way to integrate greenery. Here’s a quick guide for a simple version.
|
📋 Copy HEX 🔗 Share |
- Time: 3-4 hours
- Cost: $100-$200 in materials
- Step 1: Frame the box using pressure-treated 2x4s, securing it to the deck’s substructure for stability.
- Step 2: Line the inside of the frame with the same decking boards you used for the surface for a seamless look.
- Step 3: Drill several 1-inch drainage holes in the bottom support planks. This is non-negotiable!
- Step 4: Line the interior walls and bottom with a heavy-duty pond liner, stapling it securely just below the top edge. Poke holes through the liner where you drilled for drainage.
- Step 5: Fill with a layer of gravel, then your preferred potting mix, and get planting!
Natural wood decks are beautiful, but they demand a relationship. To keep this light wood tone looking fresh and prevent it from turning a splintery gray, you need to clean and reseal it every 1-2 years, depending on your climate and sun exposure. The annual cost can be $200-$500 if you hire a pro or a weekend of sweat equity and about $100 in supplies if you DIY. The integrated planters are lovely, but be vigilant about drainage to prevent water from sitting against the wood framing, which can accelerate rot. For a lower-maintenance alternative, consider composite decking from the start.
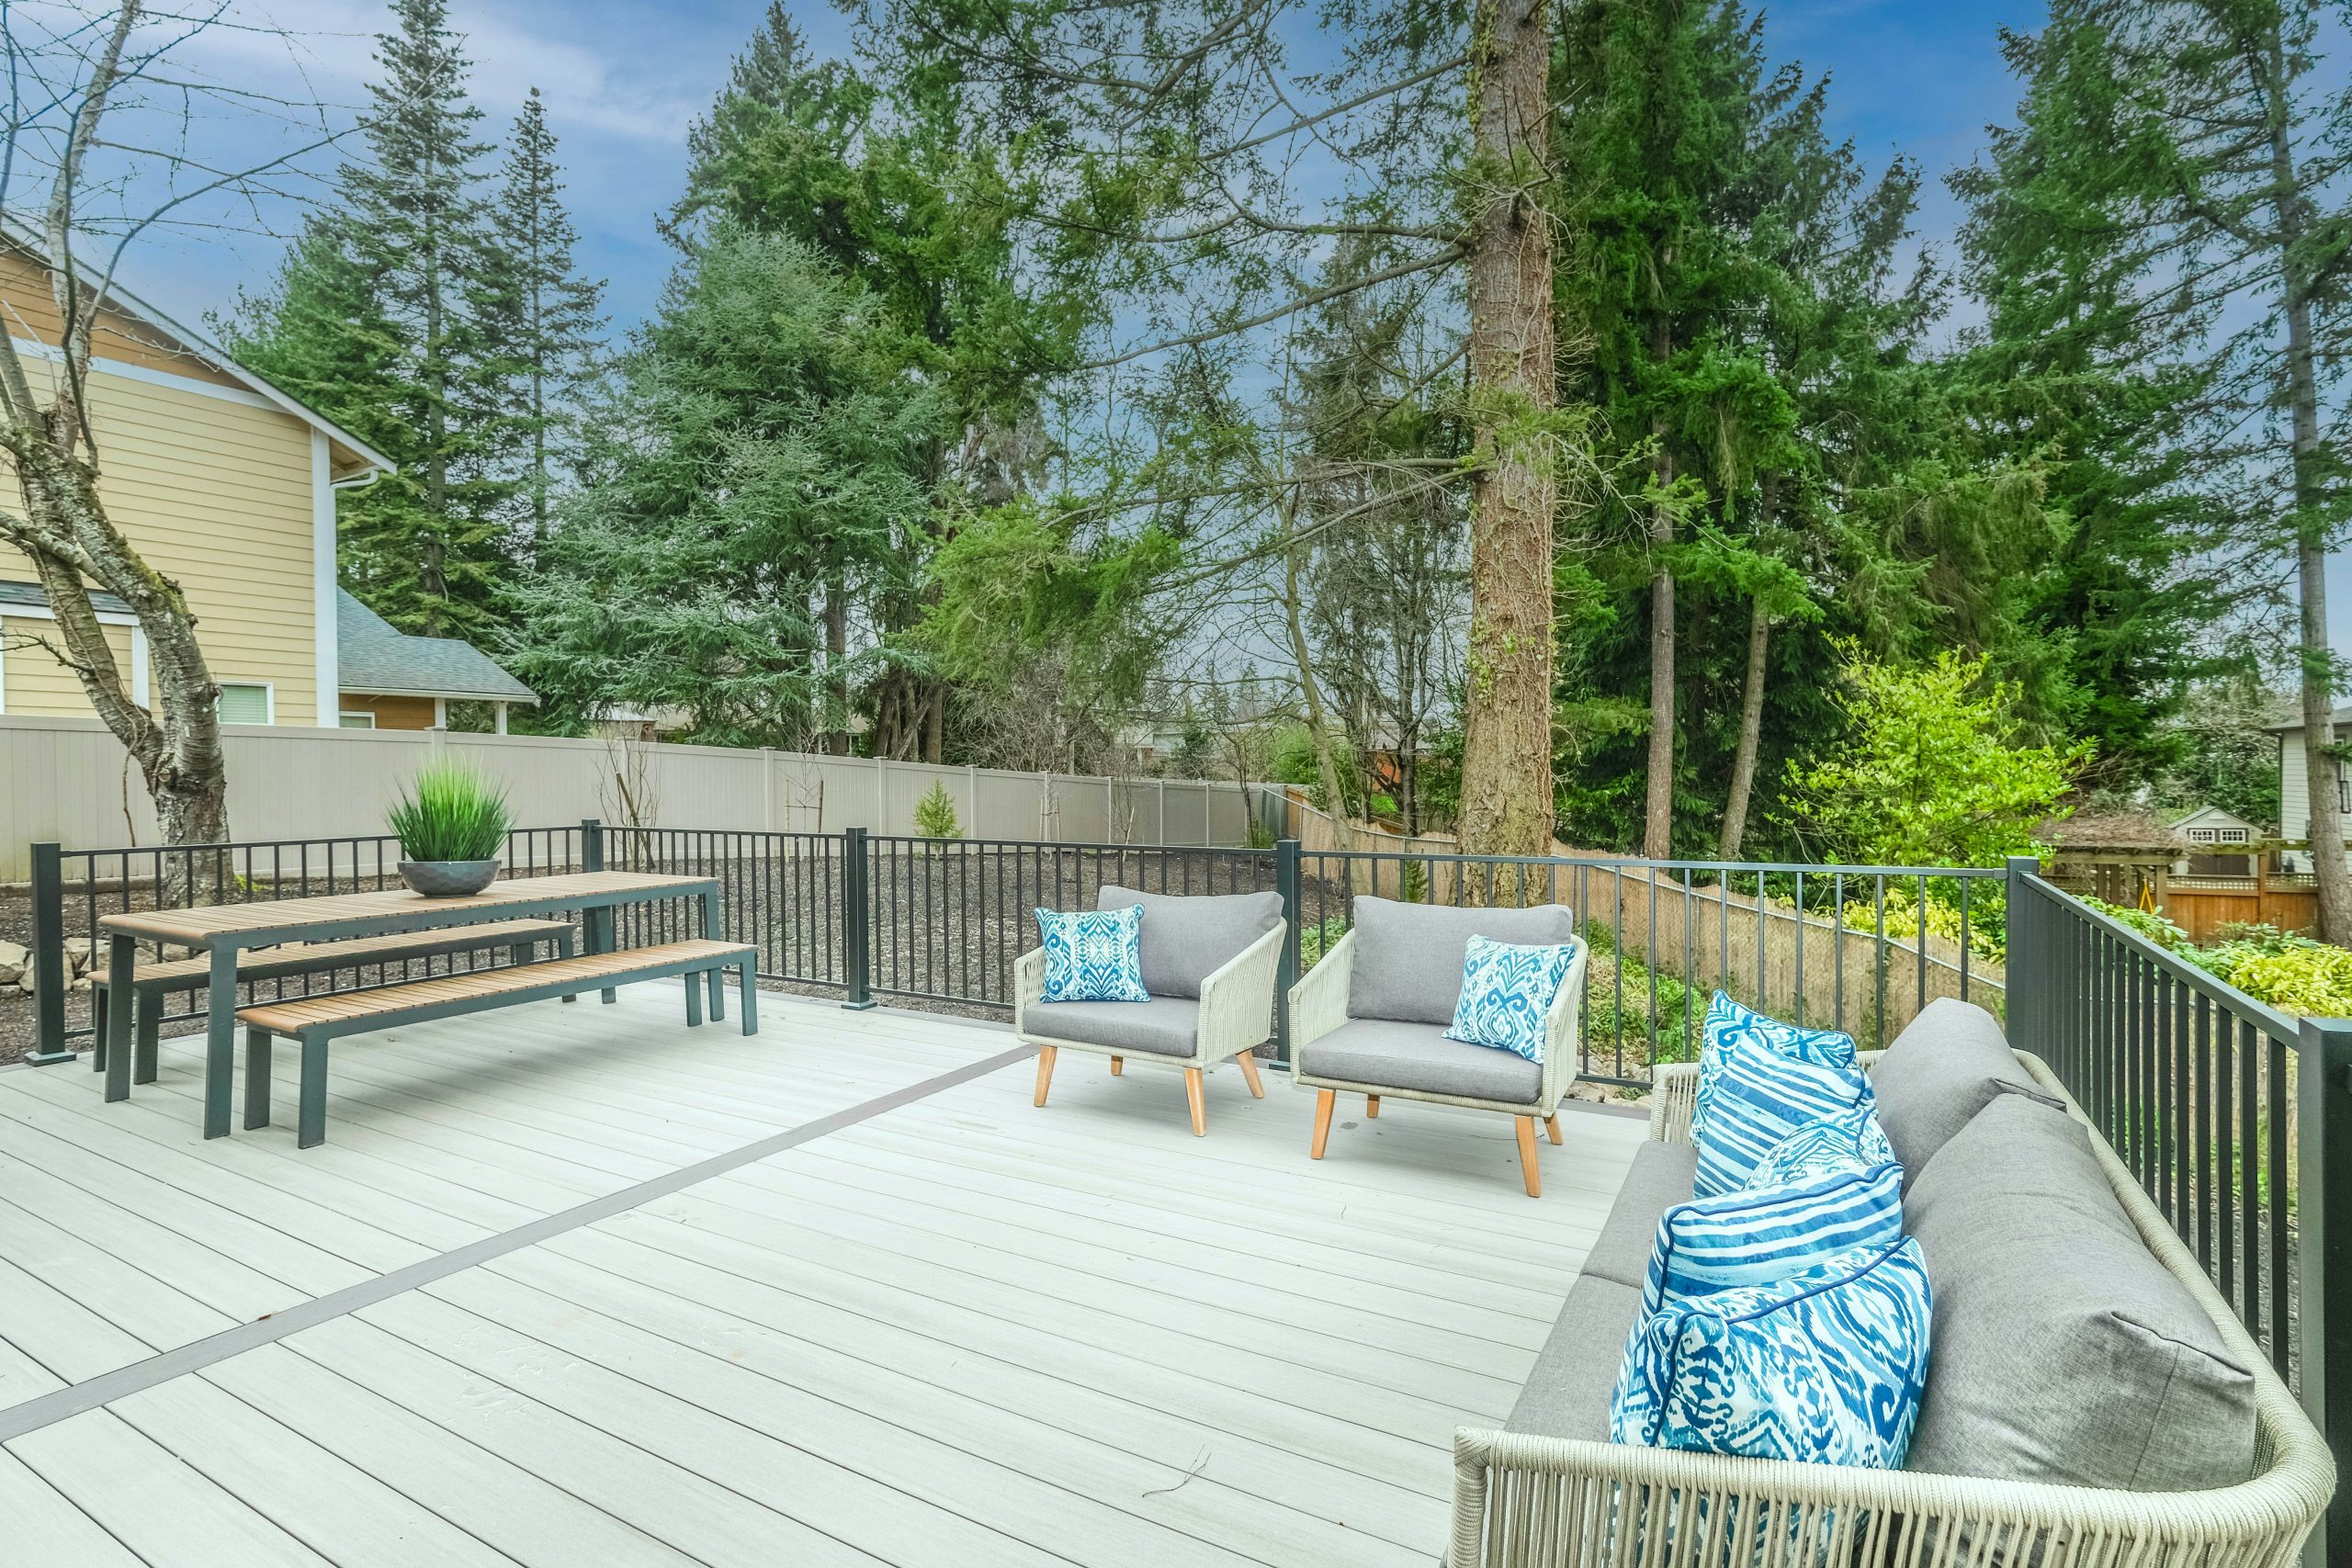
5. Modern Monochromatic Style on a Cool Gray Deck
The single element that elevates this design is the darker gray accent line that runs through the deck. It’s a small detail that does a ton of heavy lifting. It acts like a pinstripe on a suit, adding a touch of custom-tailored sophistication. Without it, the deck would just be a simple gray surface. With it, the space feels defined, intentional, and visually interesting. It’s a brilliant way to break up a large monolithic surface without adding clutter, guiding the eye and creating subtle zones for dining and lounging. For a similar effect, see the privacy fence in Idea #21.
|
📋 Copy HEX 🔗 Share |
This design is a masterclass in tonal layering. The formula is roughly 70% Neutral Base + 20% Textural Accents + 10% Color Pop. The light gray decking and gray cushions form the dominant, calming base. The textural interest comes from the light brown slatted wood tabletop and the woven rope on the armchairs. Finally, that little 10% of vibrant blue in the throw pillows is all you need to bring the whole scene to life. You could easily swap the blue for terracotta, sage green, or even a sunny yellow to change the mood without redoing the entire space.
6. Layer the Action on a Multi-Tiered Wooden Deck
This deck design works because it creates ‘destinations.’ Instead of one vast, undefined platform, the multiple tiers establish distinct zones for different activities—a dining area on one level, a casual conversation spot on another. This separation makes the overall space feel larger and more functional. The consistent use of black for the railings and planters acts as a strong visual thread, tying the different levels together into a cohesive whole, even as the function of each space changes.
|
📋 Copy HEX 🔗 Share |
A multi-tiered deck is the perfect solution for a yard with a gentle to moderate slope, turning a challenging landscape into a dynamic feature. This specific design would work well for a yard that drops 3-6 feet over a 20-foot span. The main dining level should have a minimum footprint of 12×12 feet to comfortably fit a table and chairs, while the smaller bistro level could be as compact as 8×8 feet. Anything smaller than that and the levels start to feel more like landings than usable spaces.
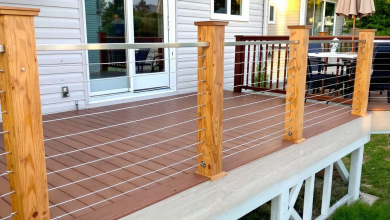
7. Mix Materials with Glass and Metal Balusters
When mixing railing types, use the glass panels where the view is best and the metal balusters everywhere else. This is a pro move to save money while maximizing impact. A full glass railing is expensive, but using it strategically in one or two key sections gives you that high-end, unobstructed view without breaking the budget. For the transition between the two styles to feel seamless, keep the top and bottom rails consistent in material and color across the entire deck perimeter. Here, the wood top rail unites both the glass and metal sections.
|
📋 Copy HEX 🔗 Share |
Glass railings look absolutely stunning… for the first 10 minutes after you’ve cleaned them. If you have kids, pets, or live anywhere with pollen or frequent rain, be prepared for constant wipe-downs. Water spots, fingerprints, and dust are incredibly visible. While fantastic for preserving a view, they offer zero privacy. Also, birds can sometimes have trouble seeing clear glass, so consider adding subtle decals or markers to help prevent collisions. For an easier-to-maintain option that still feels open, consider cable railings as seen in Idea #19.
8. Embrace Curves and Mixed Tones for a Natural Look
The gentle curve of the deck’s edge is the standout feature here. In a world of straight lines and right angles, a curve is unexpected and instantly softening. It breaks up the boxy shape of the house and deck, creating a more organic, flowing transition to the yard beyond. It feels less like a structure that was dropped onto the landscape and more like something that grew out of it. This curve turns a standard deck into a statement piece, inviting a more leisurely path and a more relaxed state of mind.
|
📋 Copy HEX 🔗 Share |
This design feels so integrated because it mimics the complexity of nature. The variegated wood tones in the decking are like the subtle color shifts in a forest floor—they add depth and hide wear and tear better than a uniform color. The combination of materials—wood, stone, and metal—also works because they are all ‘natural’ textures. The smooth metal of the roof, the rugged stone of the pillars, and the warm wood of the deck create a balanced textural palette that is interesting but not chaotic.
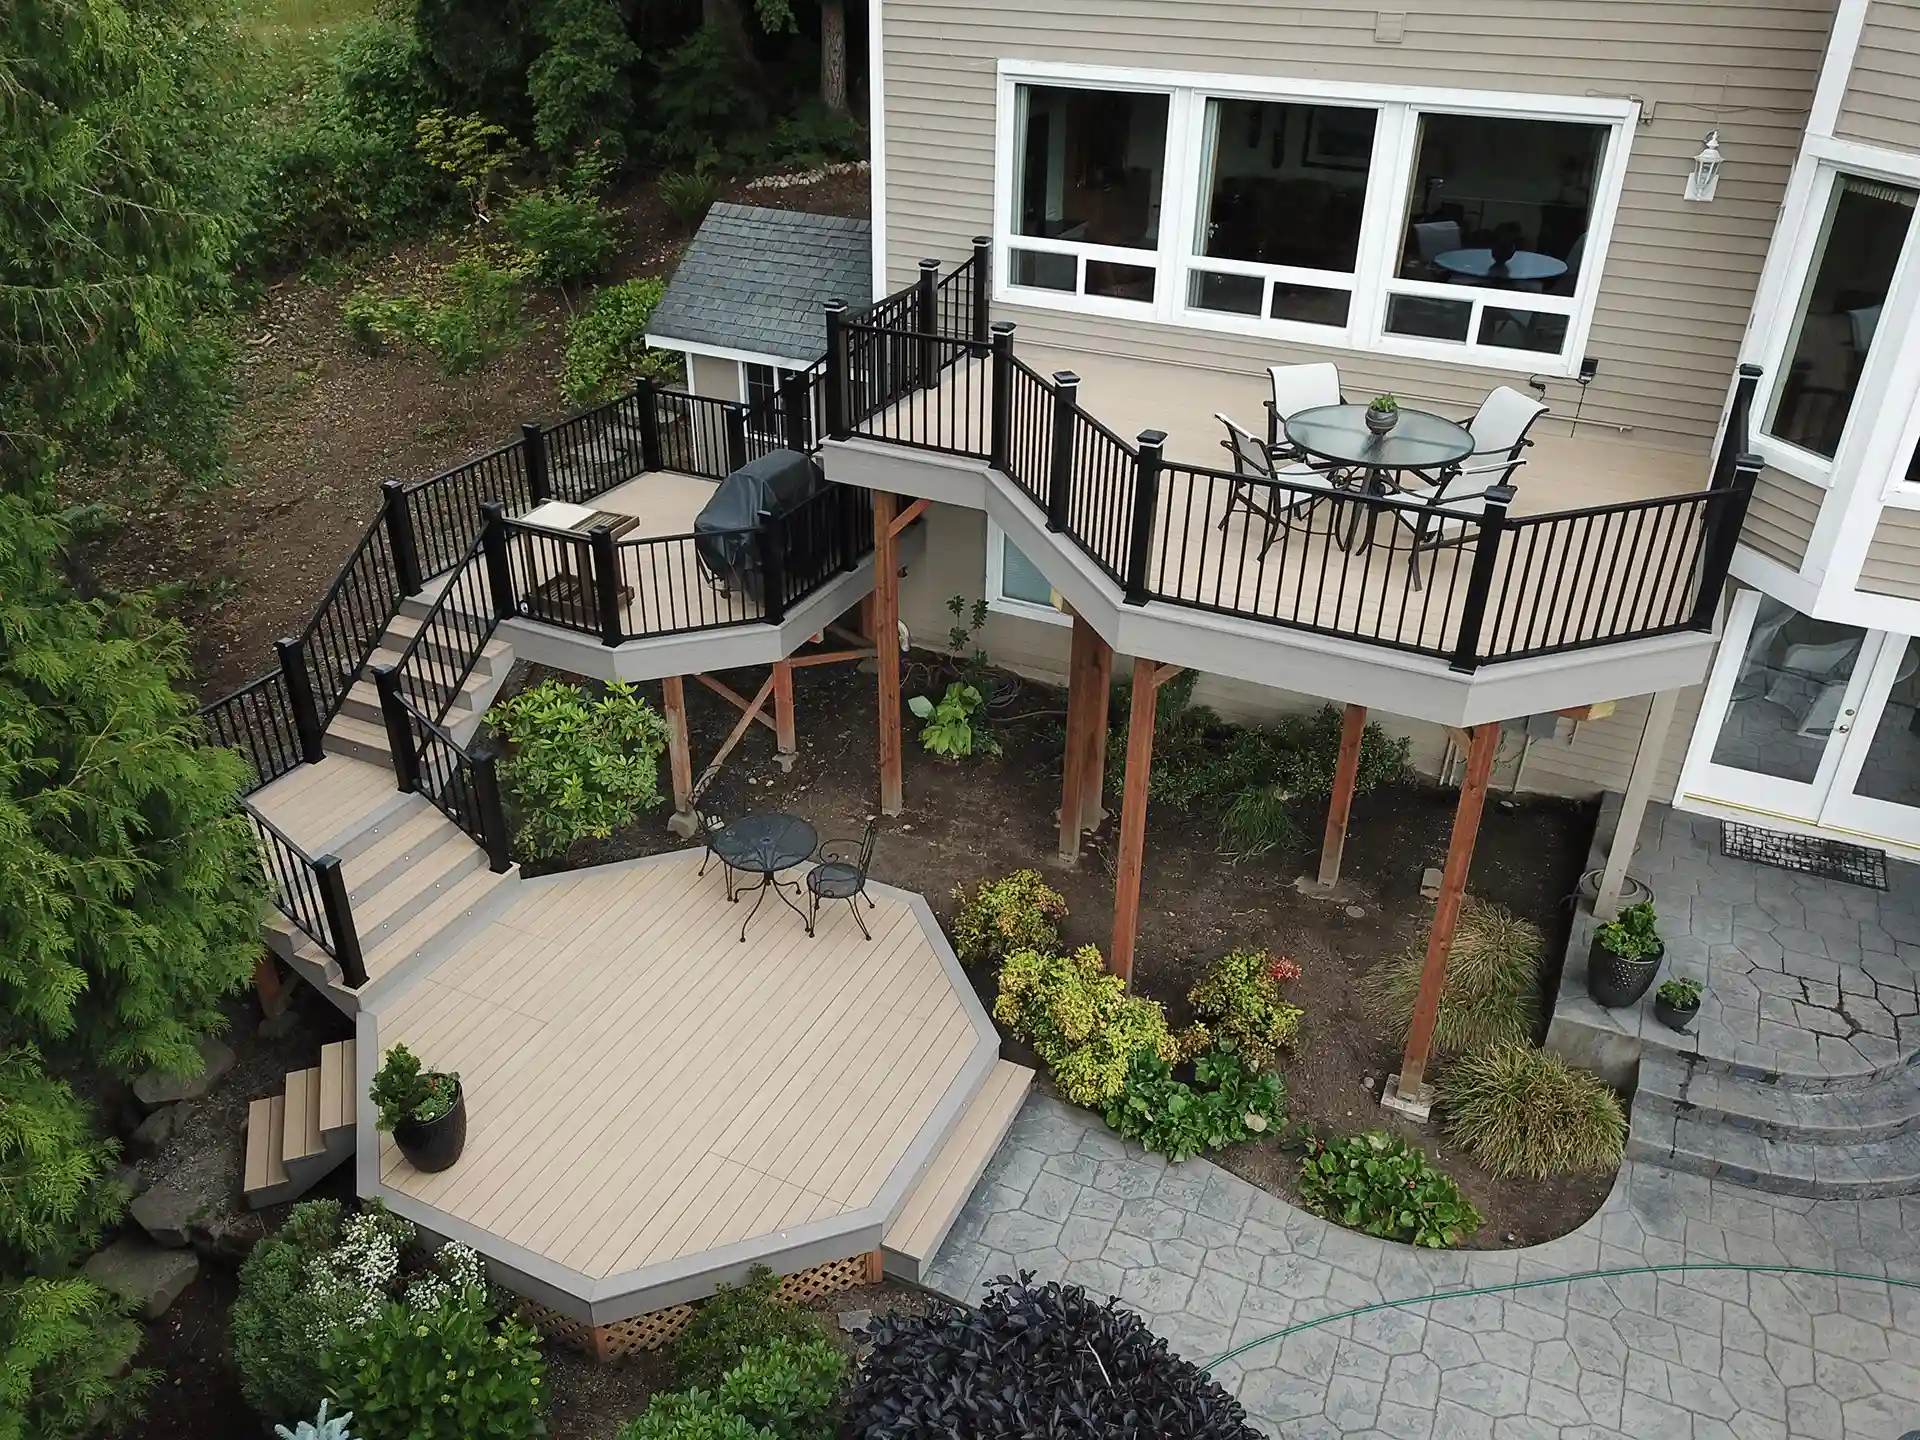
9. Classic Tiered Decks for Sloped Yards
Tiered decks are the ultimate solution for making a sloped yard not just usable but beautiful. This approach works best on yards with a noticeable but not extreme grade change—think a drop of 4 to 8 feet across the back of your house. By splitting the difference with two or three levels, you create multiple flat, functional areas for things like dining, lounging, or a hot tub, as seen in Idea #12. Each level should be at least 10-12 feet deep to feel like a true ‘room’ rather than just a wide staircase.
|
📋 Copy HEX 🔗 Share |
When designing steps for an outdoor, multi-level deck, make them wider and deeper than you would for an indoor staircase. Aim for a tread depth of at least 12 inches and a riser height of no more than 7 inches. This creates a more relaxed, leisurely pace. Generously wide staircases, say 5-6 feet, feel more inviting and can double as informal seating for large gatherings. Always factor in lighting for safety, like the integrated lights in Idea #1, especially if the stairs will be used after dark.
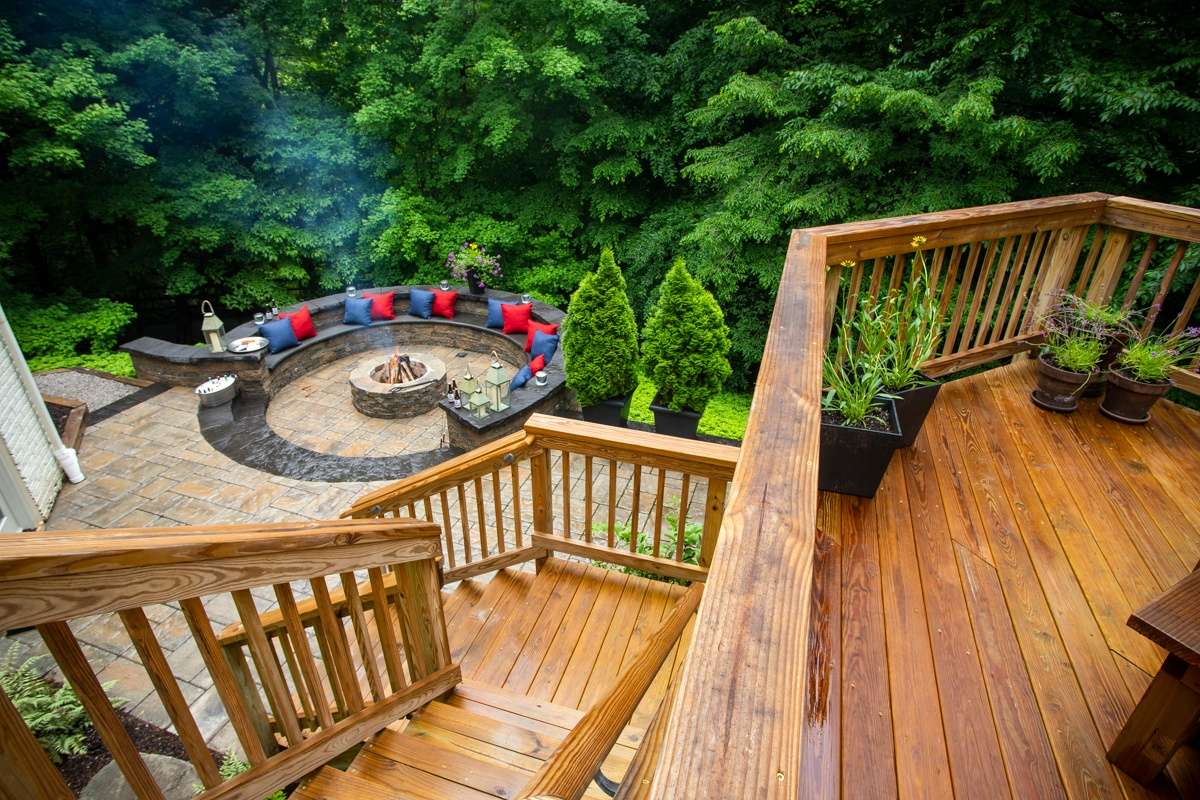
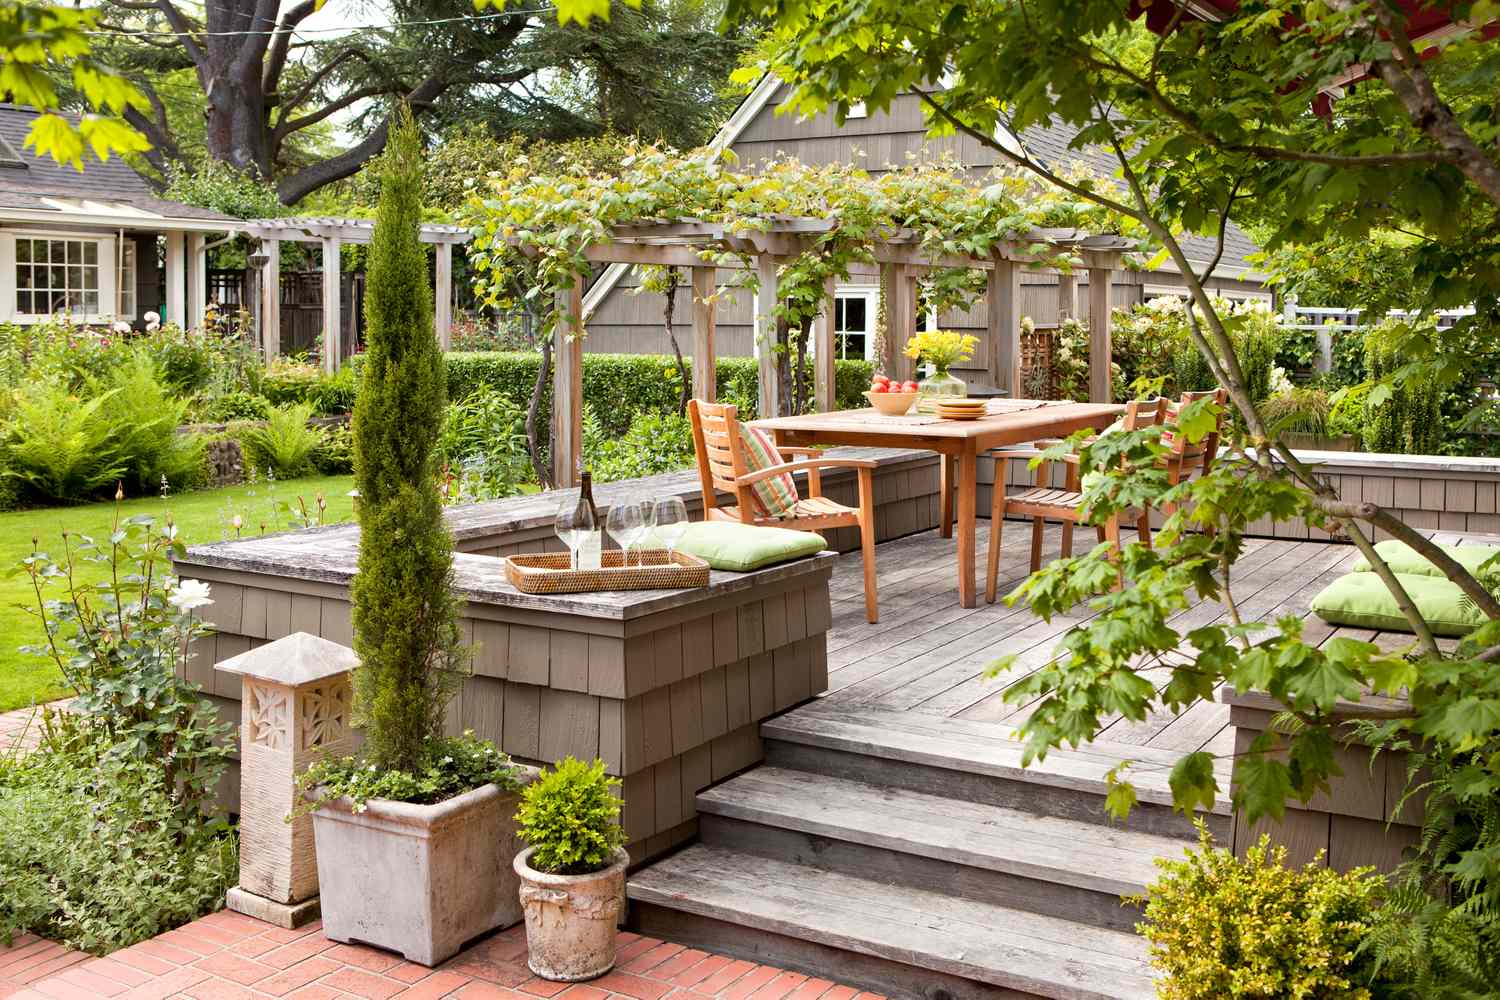
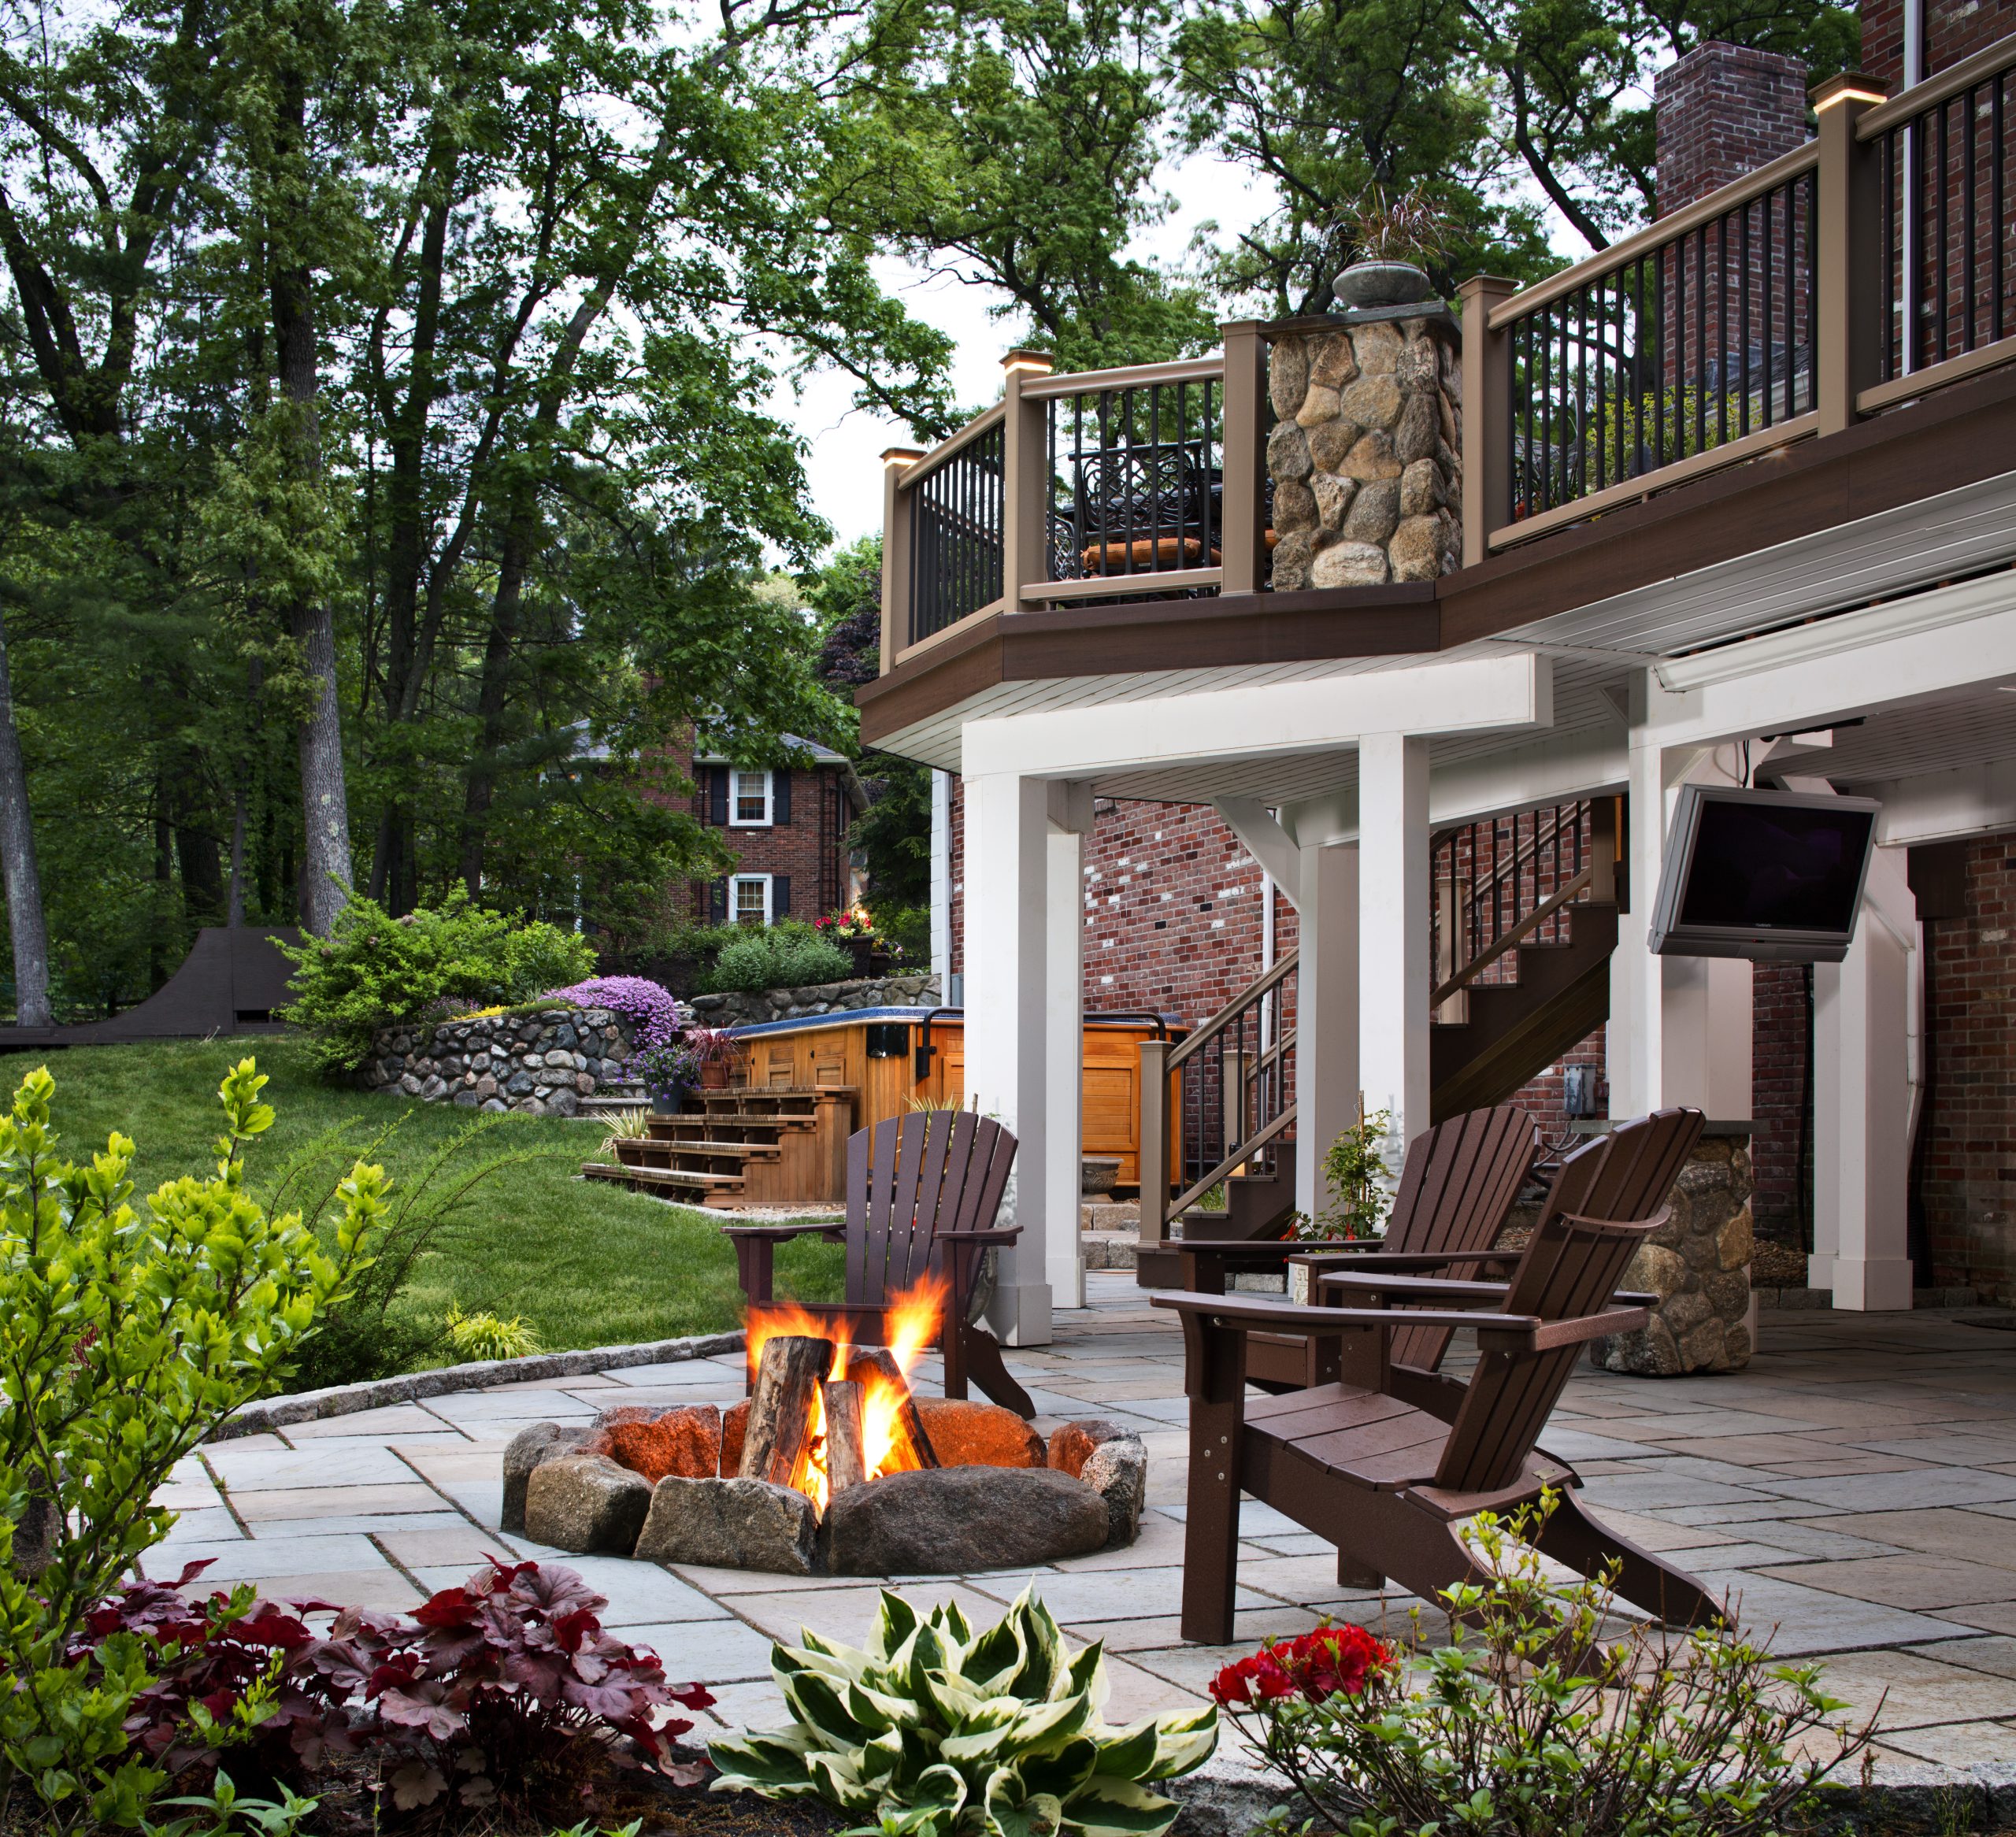
10. Pair a Wood Deck with a Cozy Stone Fire Pit Patio
The formula here is all about creating zones with texture: 50% warm wood + 50% rustic stone. The raised wooden deck provides a classic area for dining or entry, while the lower stone patio designates a specific, cozy zone for gathering around the fire. The key is in the transition; wide, welcoming wooden steps cleanly connect the two spaces. The curved stone bench repeats the circular shape of the fire pit, making the lower patio feel like a self-contained outdoor room. The colorful cushions add a necessary pop of softness and personality.
|
📋 Copy HEX 🔗 Share |
A built-in stone fire pit is a fantastic feature, but wood smoke can be a real nuisance for you and your neighbors. Before building, check your local municipal codes regarding open fires, required distances from structures, and burn bans. If you plan to use it frequently, consider a natural gas or propane insert. It’s a higher upfront cost, but it provides instant, smoke-free flames with the turn of a knob. It’s a much more neighbor-friendly (and often easier) option in the long run.
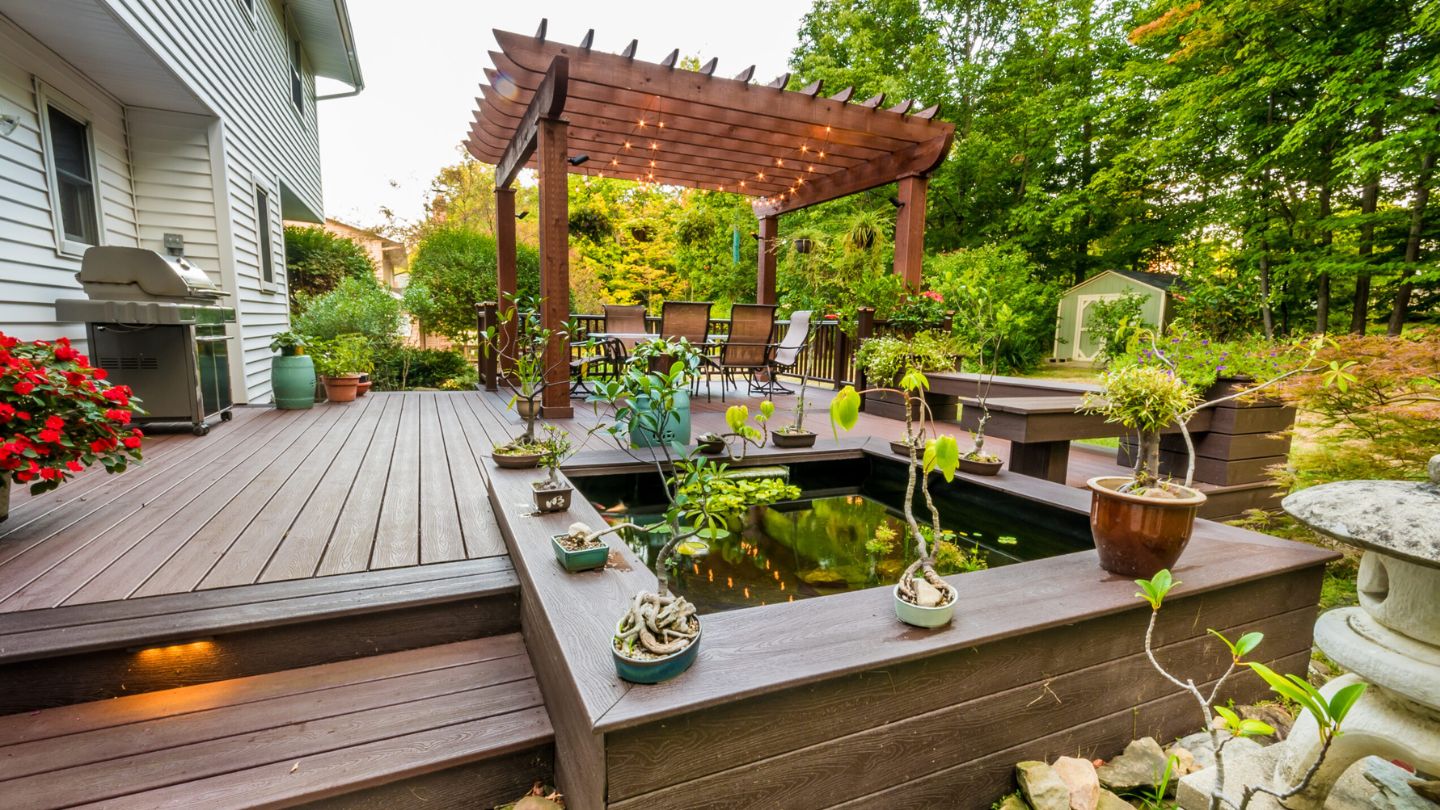
11. Find Zen with a Pergola, Pond, and Composite Deck
This space feels so serene because it masterfully layers elements of nature. The sound and sight of water from the koi pond, the dappled light filtering through the pergola, and the earthy tones of the composite decking all work together to engage the senses. The design creates distinct “rooms” without walls. The pergola defines the dining space, while the built-in benches frame the pond as a quiet relaxation zone. Using potted bonsai instead of in-ground plants gives the space a curated, gallery-like feel, reinforcing the tranquil, Japanese-inspired aesthetic.
|
📋 Copy HEX 🔗 Share |
A built-in pond, especially one with fish, is a living ecosystem that requires consistent attention. You’ll need a filtration system running 24/7 to keep the water clear and healthy for the koi. This involves weekly checks of the skimmer basket and monthly filter cleaning. You’ll also be testing water parameters (pH, ammonia) regularly. Be prepared for seasonal tasks, like managing algae in the summer and potentially needing a de-icer in the winter depending on your climate. It’s more of a hobby than a set-it-and-forget-it feature.
12. Relax and Unwind: A Tiered Deck with a Built-in Spa
This idea is perfect for a backyard that has a slight slope away from the house. Creating a tiered system allows you to nestle the hot tub into the deck structure, making it feel custom and integrated rather than just plopped on top. For this to work well, you need a depth of at least 15 feet from the house to accommodate the deck, the spa, and the steps down. The upper tier should be a minimum of 8×8 feet to create a usable staging area for towels and drinks next to the spa.
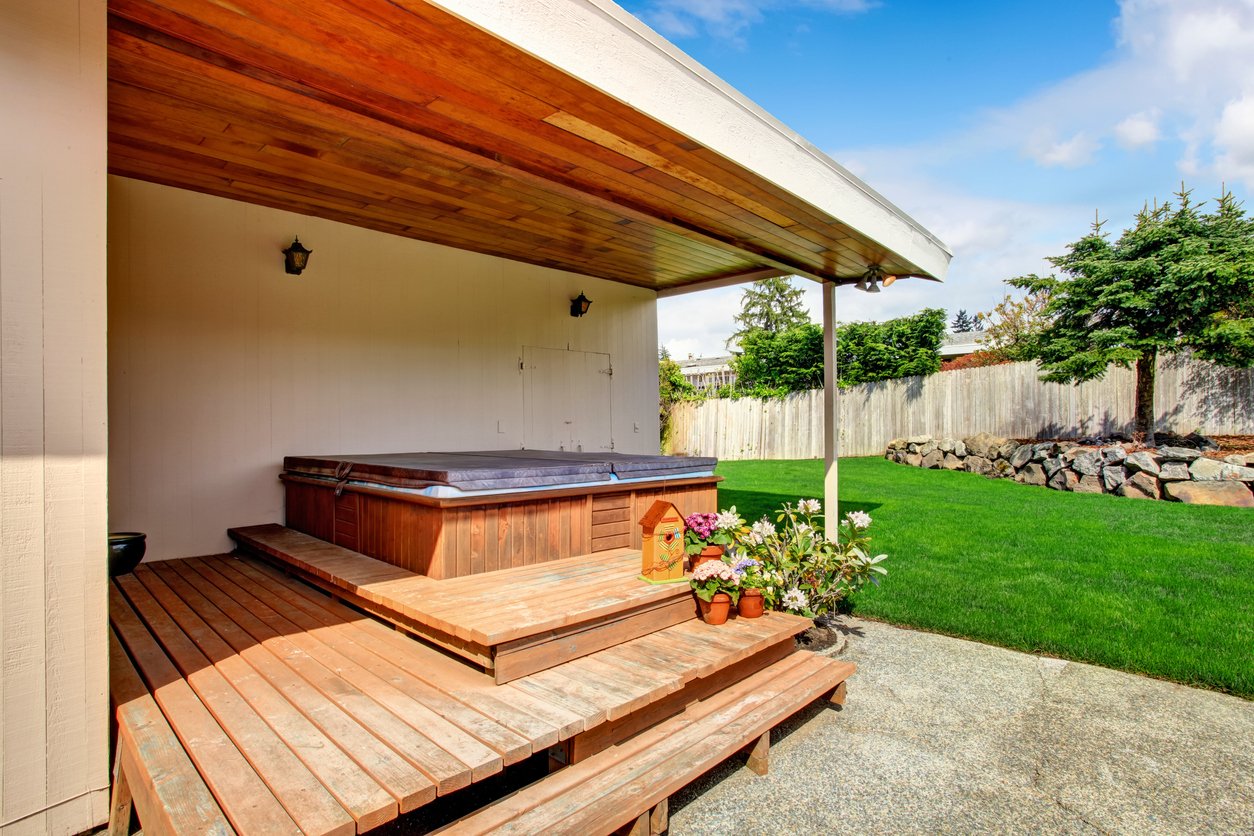
|
📋 Copy HEX 🔗 Share |
When integrating a spa, always ensure you have service access. Plan for at least one or two removable deck panels next to the spa’s control panel and pump equipment. Pros recommend a 3-foot clearance on the service side. Trust me, the first time you need a repair, you will be so grateful you don’t have to rip up your beautiful deck just to let the technician in. Also, be sure the substructure is heavily reinforced to handle the immense weight of a water-filled spa (often 4,000-5,000 lbs).
13. Modern Gray Decking with Natural Wood Accents
The combination of cool gray and warm wood is the secret sauce here. The sleek, modern gray composite deck provides a neutral, durable canvas. The natural wood tones of the dining table and benches add a layer of warmth and organic texture that keeps the space from feeling cold or sterile. It’s this high-contrast pairing of synthetic and natural, cool and warm, that creates a perfectly balanced and sophisticated modern look. The consistent use of dark grey/black on the metal frames and railing ties everything together for a cohesive finish. This same palette is shown in a slightly different configuration in Idea #5.
|
📋 Copy HEX 🔗 Share |
This look is right on trend for 2026. Homeowners are moving away from the monochromatic, all-gray-everything look and embracing a more nuanced palette that mixes materials. We’re seeing this everywhere on Pinterest: gray decks paired with cedar pergolas, black railings with wood top caps, and concrete patios softened with wood furniture. It’s about creating depth and character. This trend has staying power because it’s rooted in classic design principles—contrast, texture, and balance—rather than a fleeting fad color.
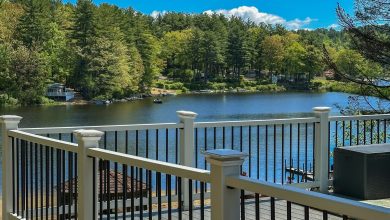
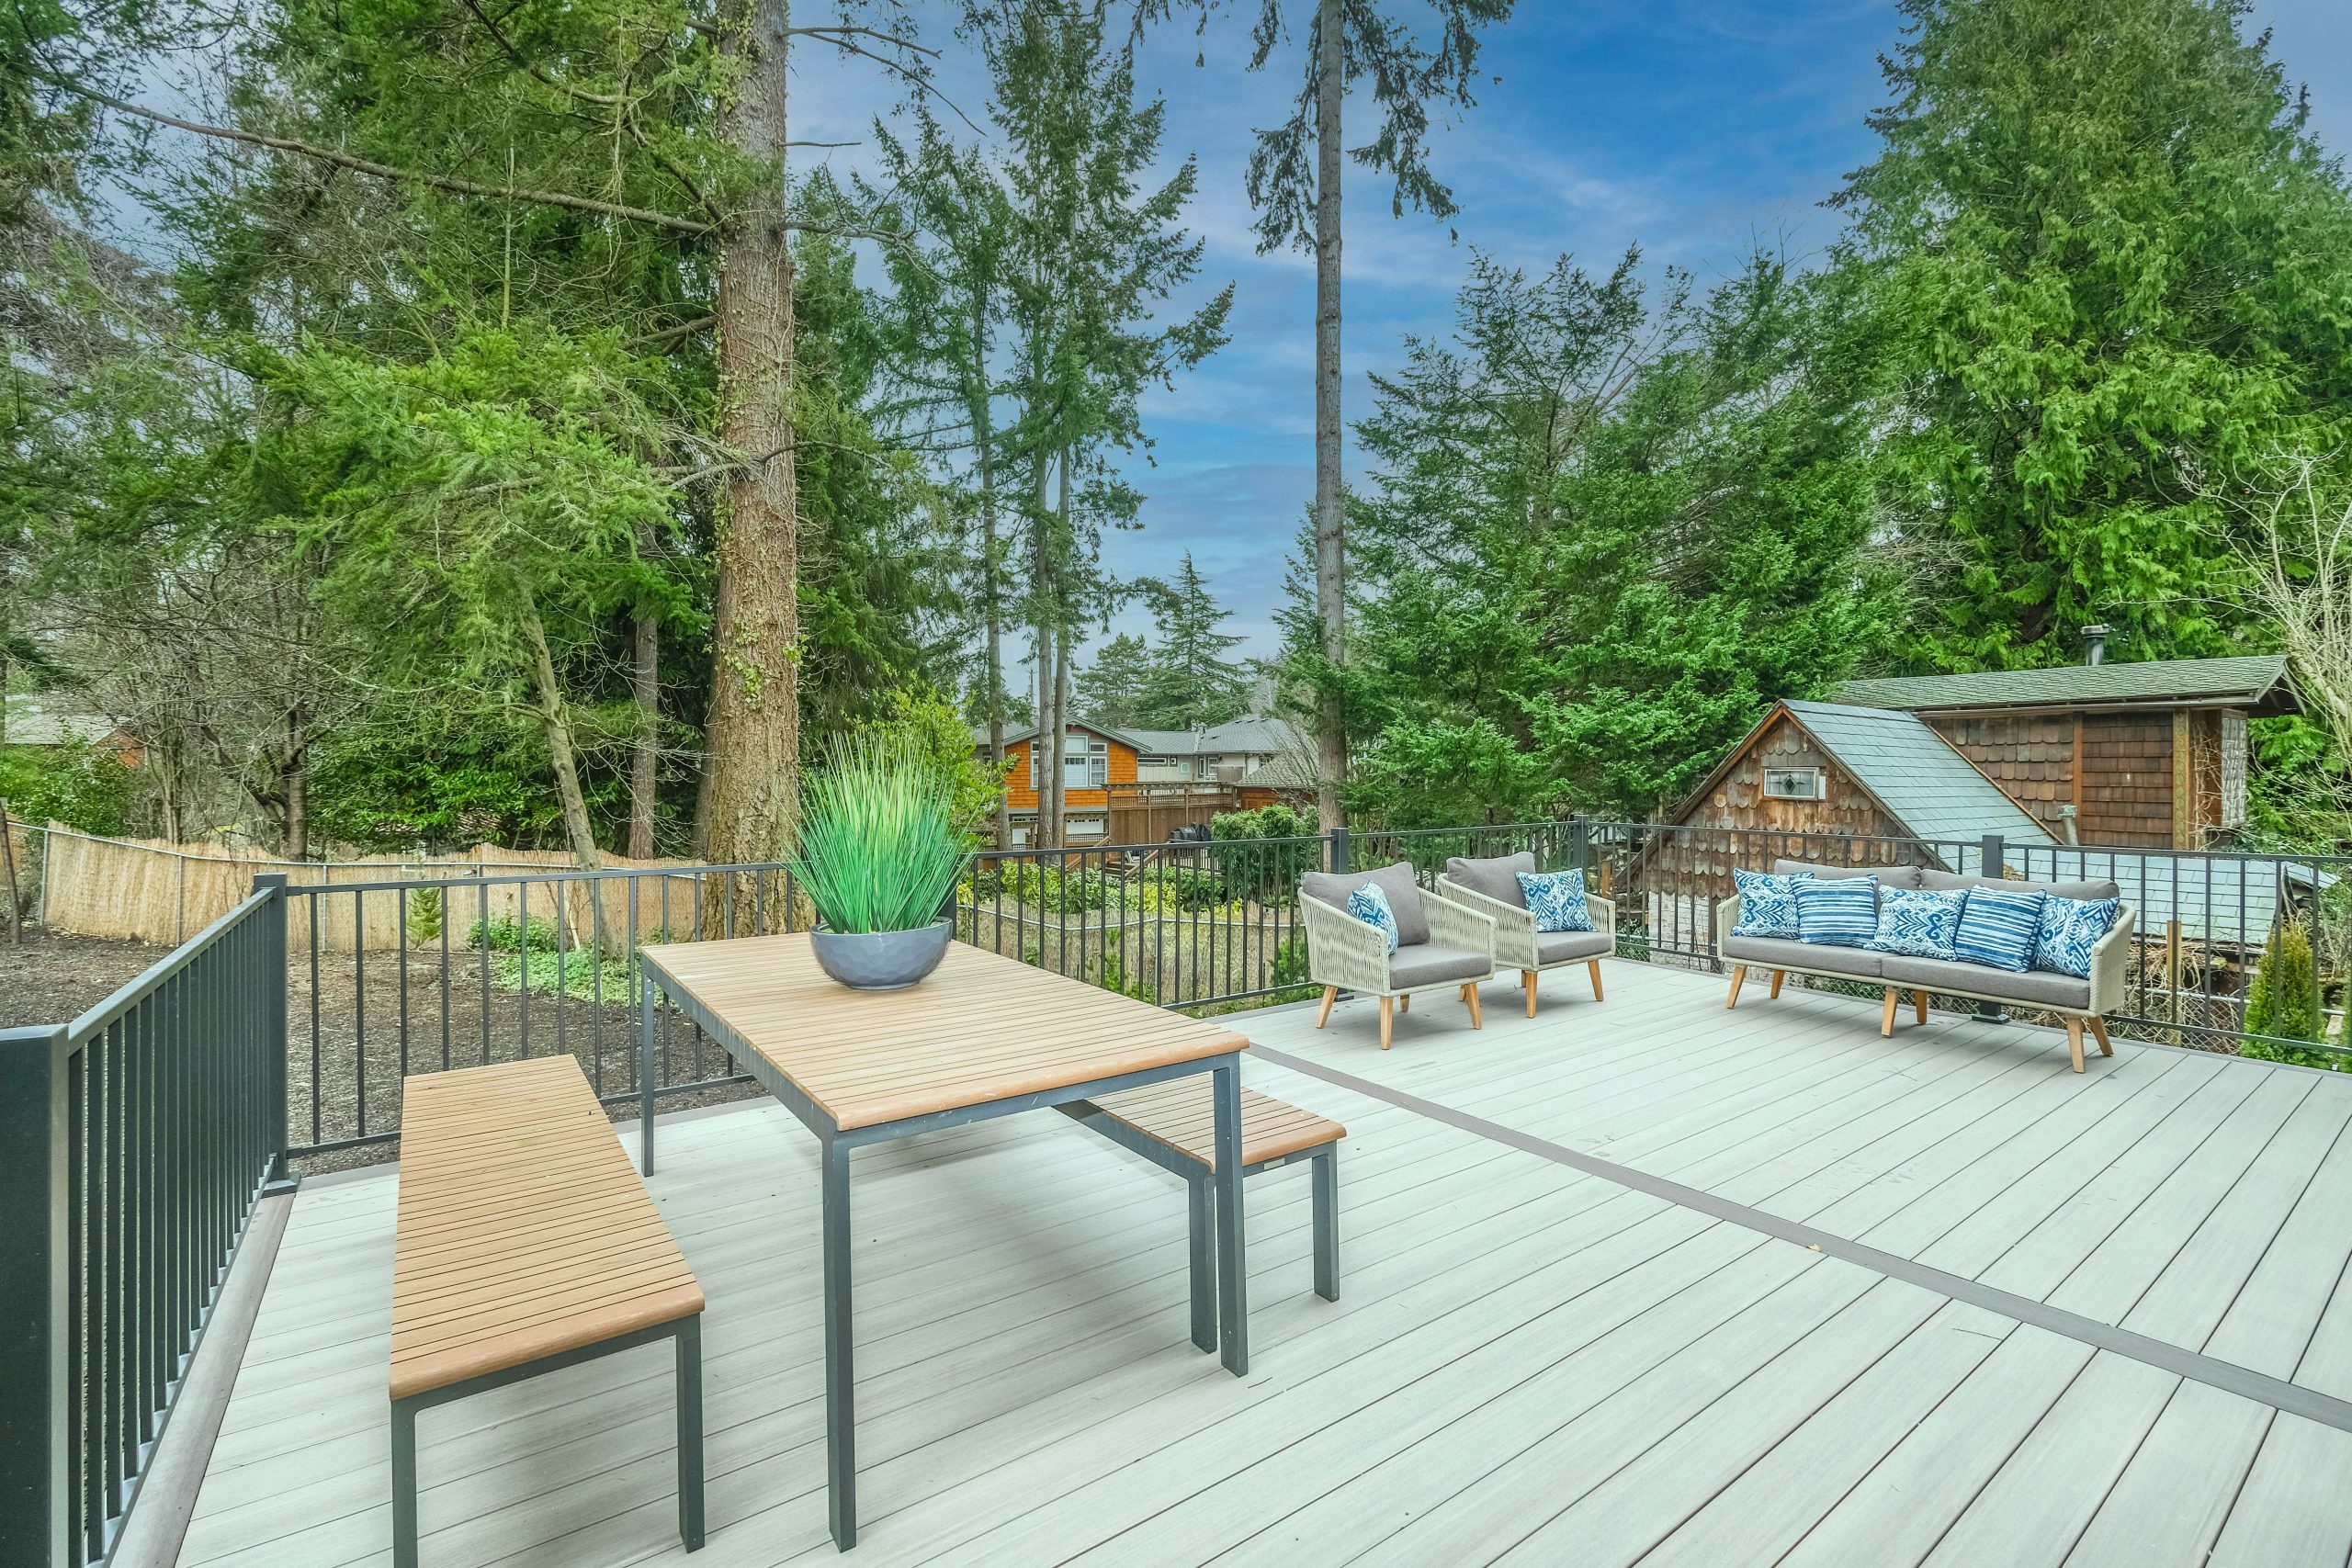
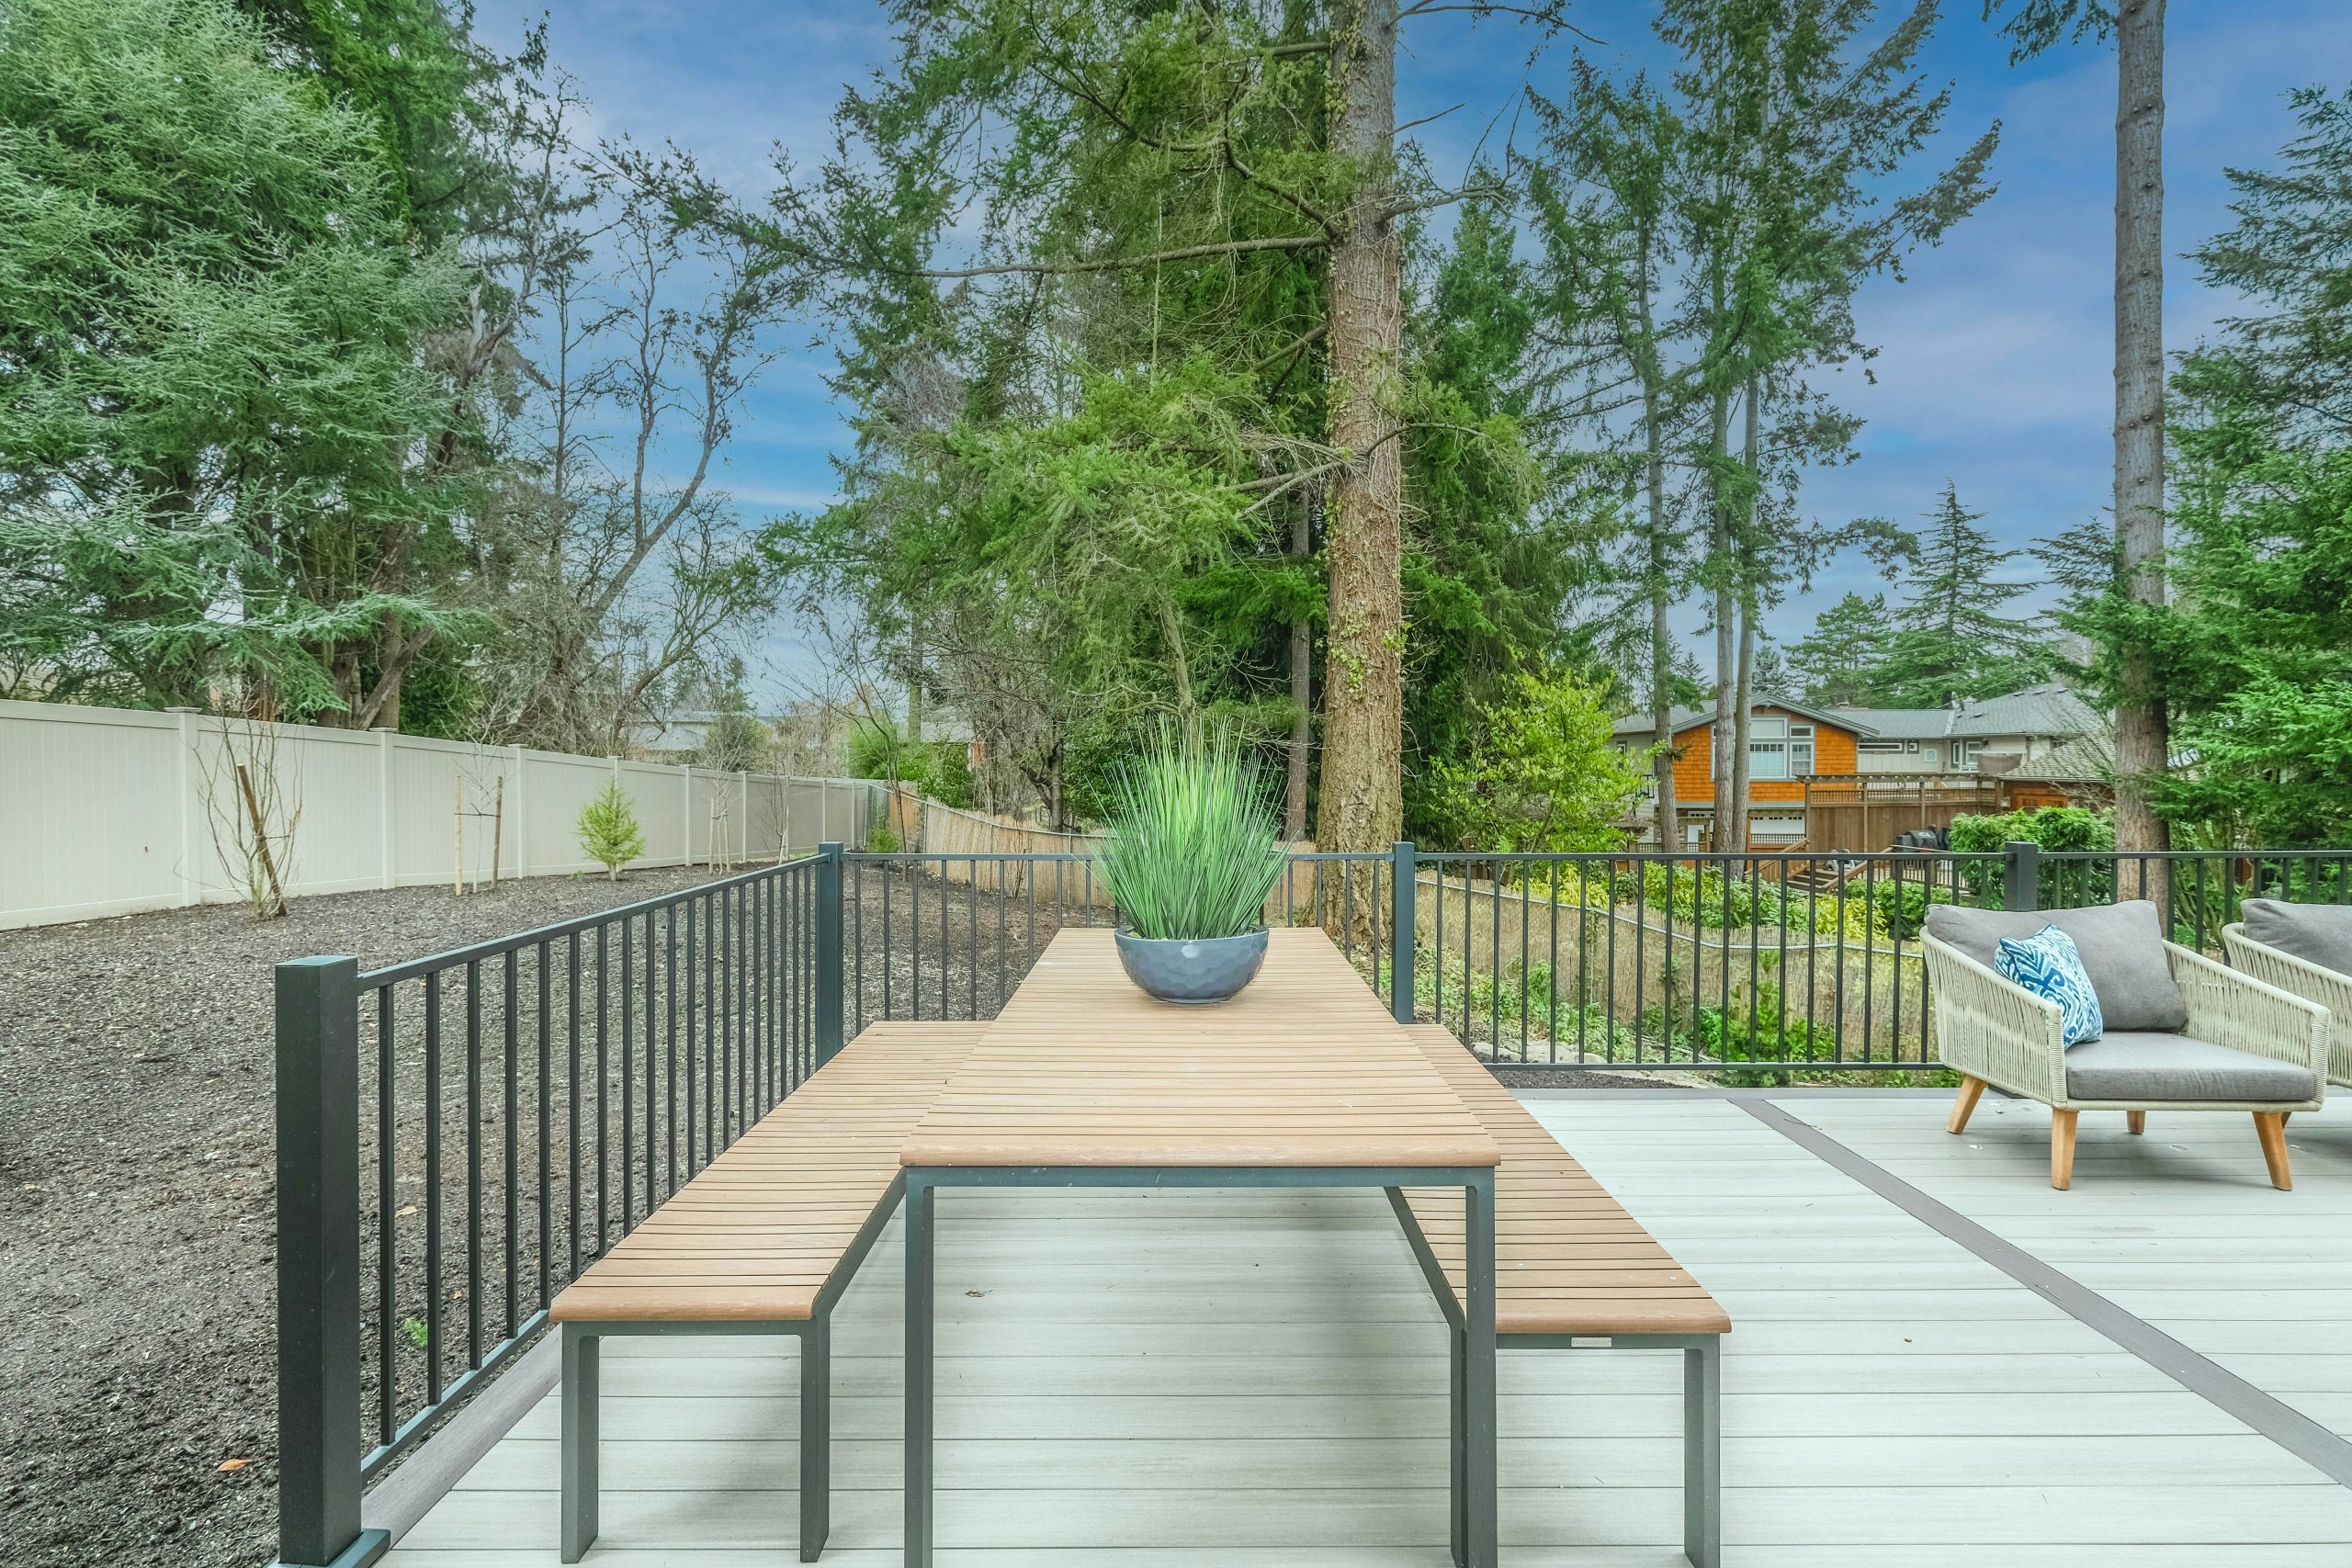
14. A Room with a View: Gray Deck Overlooking a Sloped Yard
The most important element here isn’t on the deck itself—it’s the view beyond it. The entire design is oriented to capitalize on the feeling of being elevated among the trees. The black metal railing is key; its thin, minimal profile provides necessary safety without obstructing the sightline to the sloped yard and trees. If a bulky wooden or vinyl privacy railing were used instead, the entire open, serene feeling of the space would be lost. This deck is a reminder that sometimes the best feature is the one you don’t build.
|
📋 Copy HEX 🔗 Share |
Before you commit to a raised deck to get a better view, there are a few things to check off your list.
- View Permanence: What is the zoning behind your property? Could those beautiful trees be replaced by a new development in a few years?
- Sun Direction: Will the deck be baking in the hot afternoon sun? If so, you’ll need to budget for a pergola, umbrella, or retractable awning from day one.
- Wind Factor: Elevated decks can be significantly windier. Consider adding a glass panel or a slatted screen on one side to create a comfortable nook.
- Local Setbacks: Check your property lines and local building codes. You may be required to keep your deck a certain distance from the fence line.
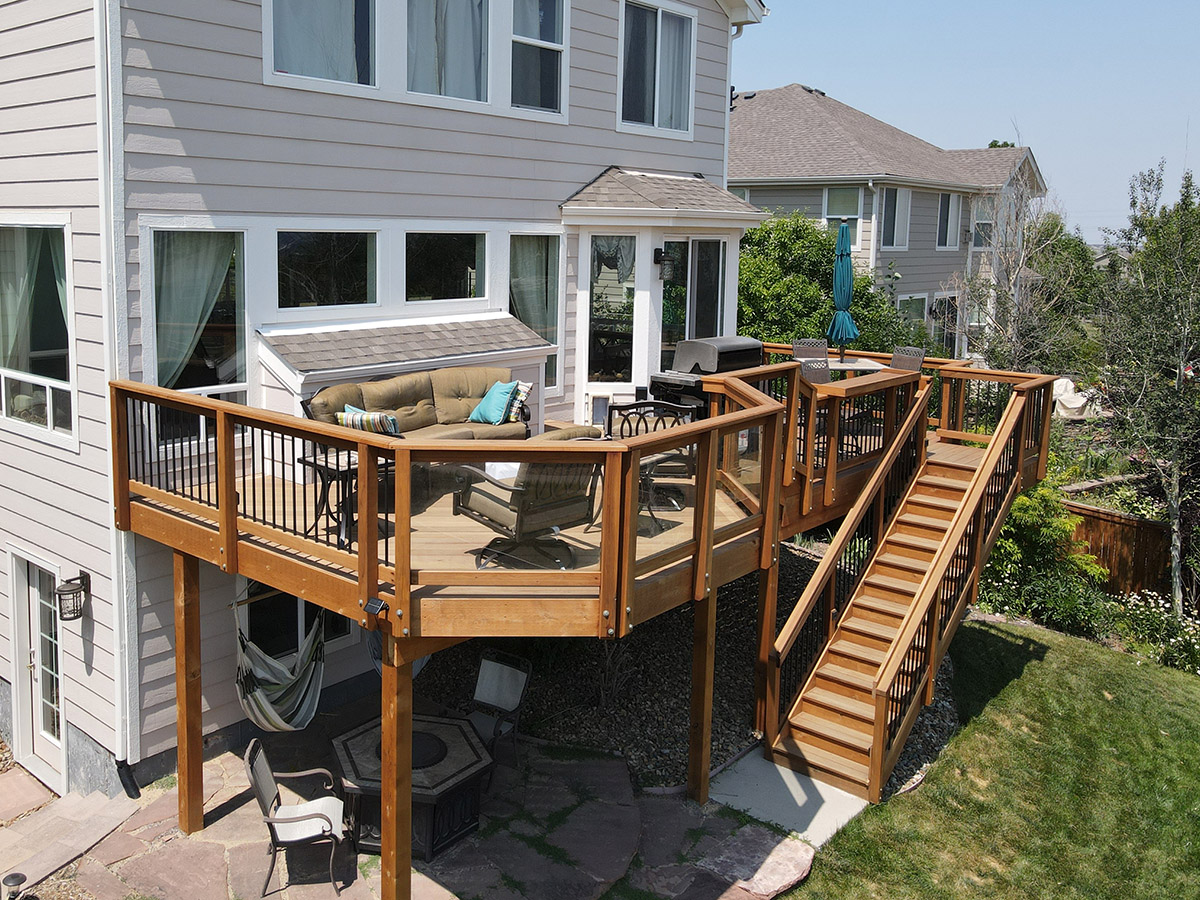
15. A Casual, Multi-Level Deck for Lounging and Hosting
This comfortable, lived-in feel comes from a simple recipe: 60% Natural Wood Structure + 30% Coordinated Painted Furniture + 10% Eclectic Accents. The sprawling wooden deck provides a warm, rustic base. The key is painting all the different furniture styles—Adirondack chairs, rockers, and picnic tables—in the same shade of light gray. This unifies the space and prevents it from looking like a random collection of patio furniture. The final 10% comes from personal touches like the blue door and patterned cushions, which add personality without overwhelming the calm palette.
|
📋 Copy HEX 🔗 Share |
Having a large, multi-level deck is fantastic for hosting, but it also creates a lot of nooks and crannies that collect leaves, pine needles, and dirt. Those integrated planters will need regular weeding and watering to look good. Also, a deck this large can be a huge undertaking to clean and re-stain every few years. Be honest with yourself about the level of upkeep you’re willing to do. If the answer is ‘not much,’ you might be better off with a smaller deck and a larger paver patio area, which requires less maintenance.
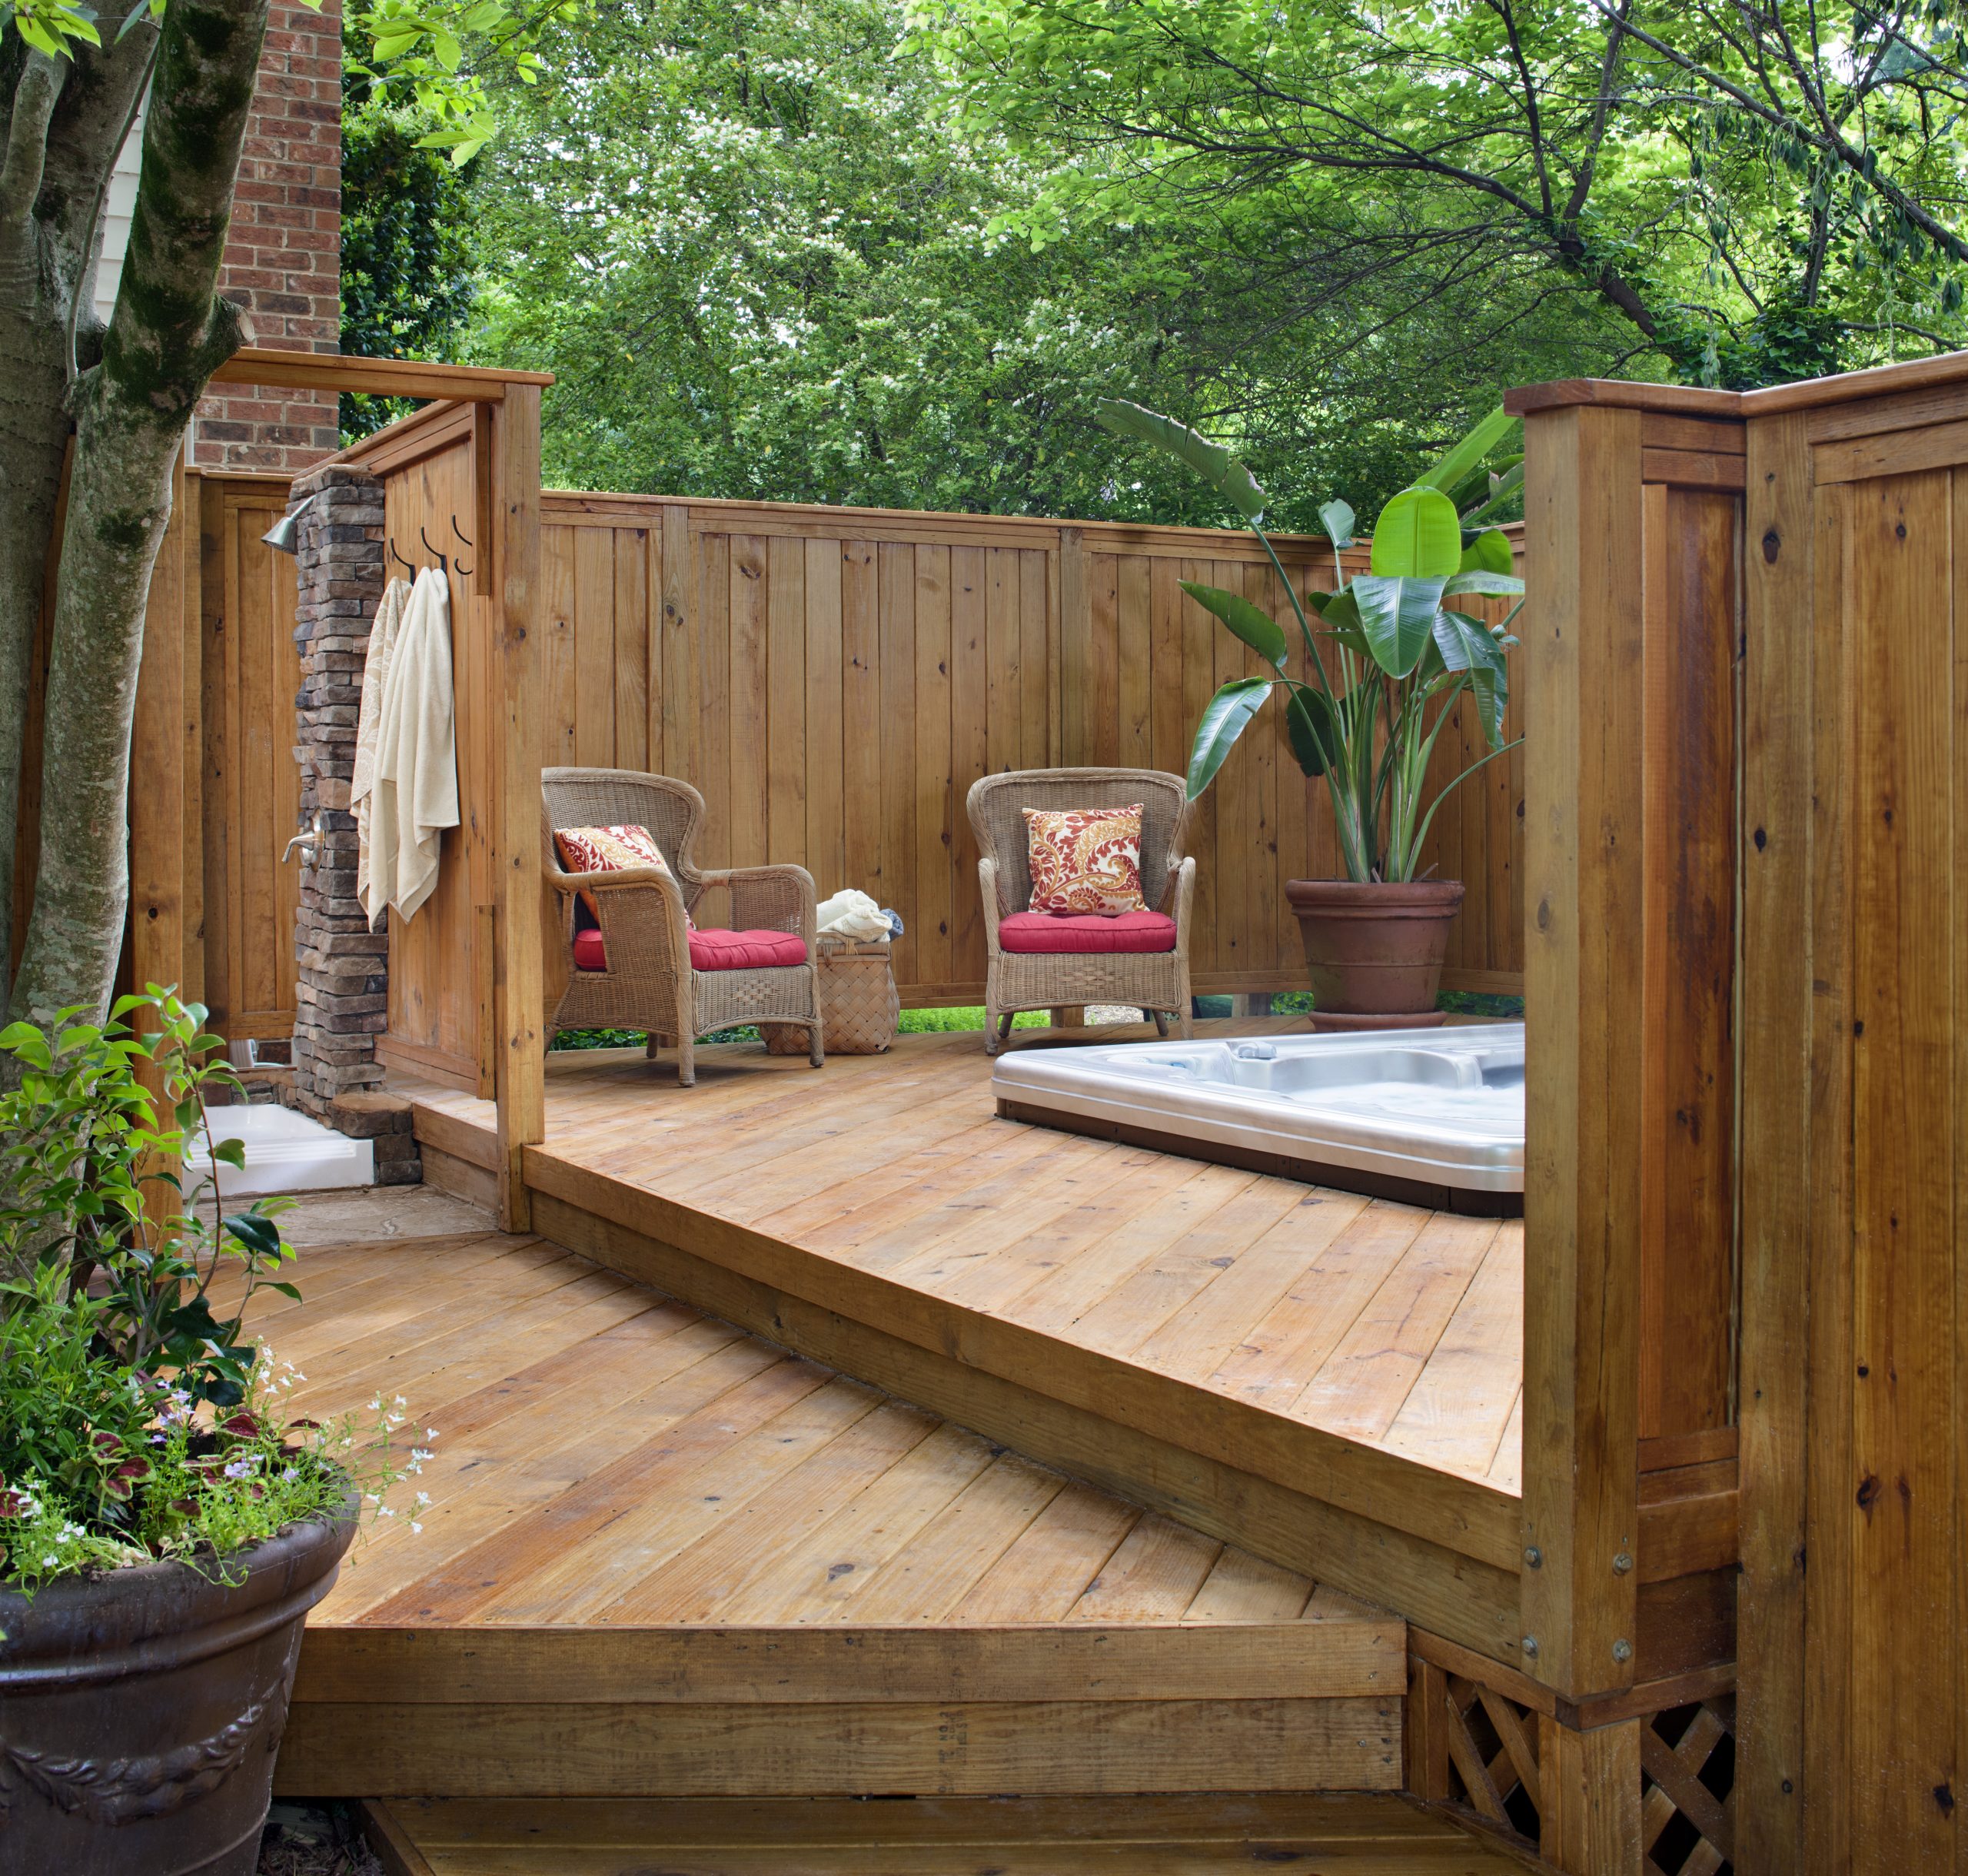
16. Create a Private Oasis with a Hot Tub and Outdoor Shower
This design absolutely nails the feeling of a private resort by carefully layering textures and ensuring total privacy. The warm wood of the deck and fence creates a cozy, enveloping feel. The rugged texture of the stone shower wall adds a rustic, spa-like element that contrasts beautifully with the smooth water of the hot tub. The final touch is the lush greenery peeking over the top of the fence—it makes the space feel like a secret garden, completely secluded from the outside world. The tall, solid privacy fence isn’t just a backdrop; it’s essential to the entire concept.
|
📋 Copy HEX 🔗 Share |
A full stone-clad wall and professionally installed outdoor shower can cost thousands. To get this look for less, create a similar privacy screen using pre-made fence panels or even outdoor curtains. For the shower, you can buy all-in-one outdoor shower kits that connect directly to a garden hose for under $300. Mount it to a simple wooden post or directly to your fence. You won’t have hot water, but it’s perfect for a quick, refreshing rinse-off after a dip in the tub on a hot day.
17. Embrace a Weathered, Rustic Vibe with a Pergola and Lush Greenery
The single most important element in this design is the patina. The weathered gray of the wooden deck tells a story of time and exposure to the elements. It’s not a flaw; it’s the entire point. It gives the space an effortless, settled-in character that new materials just can’t replicate. If you were to replace this deck with pristine, brand-new composite boards, you would completely lose the rustic, romantic, and slightly wild charm that makes this garden so enchanting. The climbing vines and overflowing greenery only enhance this perfectly imperfect look.
|
📋 Copy HEX 🔗 Share |
Achieving this beautifully weathered look requires either patience or a specific product choice. You can let a new cedar or pressure-treated pine deck weather naturally, but it can take 2-3 years to reach this silvery gray, and it might weather unevenly. Alternatively, you can use a weathering stain to speed up the process and get a more uniform color from the start. Keep in mind that ‘weathered’ doesn’t mean ‘no maintenance. ‘You’ll still need to clean it annually to prevent mildew and address any splinters or popped nails to keep it safe underfoot.
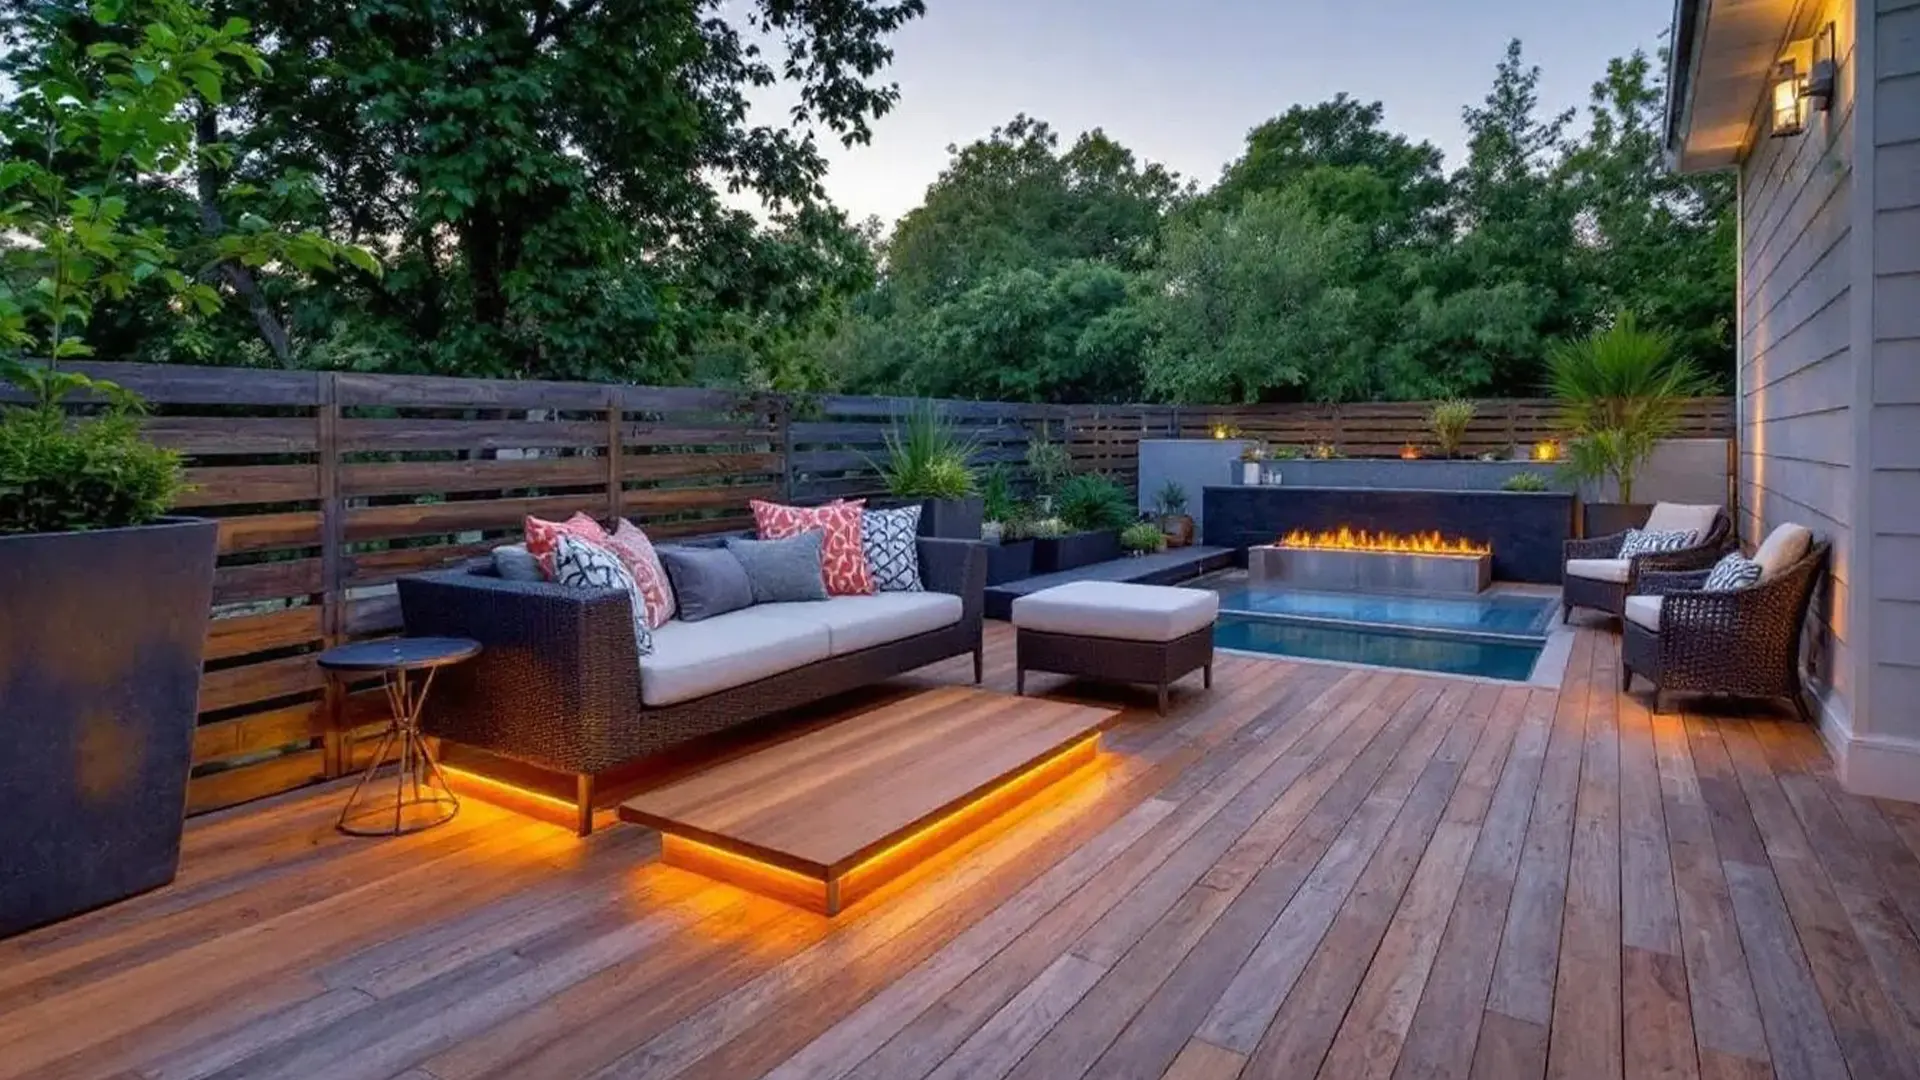
18. Get Cozy with a Sunken Fire Pit and Undermount Lighting
Installing LED strip lighting under a floating bench or sofa is a high-impact DIY project. Here’s a simplified version.
|
📋 Copy HEX 🔗 Share |
- Time: 2 hours
- Cost: $50 – $150
- Step 1: Purchase a weatherproof outdoor LED light strip kit. Make sure it comes with a power supply that can be plugged into an outdoor outlet.
- Step 2: Thoroughly clean the underside of the furniture where you plan to stick the lights. The surface must be clean and dry.
- Step 3: Plan your path. Map out where the strip will go, ensuring the power cord can discreetly reach an outlet.
- Step 4: Peel the backing off the LED strip and press it firmly into place. For extra security, add a dab of clear silicone every 12 inches.
- Step 5: Use cable clips to secure any loose wiring neatly against the furniture legs or frame.
When designing an outdoor space with both fire and water features, keep them close but distinct. Placing the water element at the end of the linear fire pit, as seen here, is brilliant. It creates a dynamic focal point where two opposing elements meet. For a modern, seamless look, choose a fire pit that is the same height as your seating. A 16-18 inch height for both the fire pit wall and the seat of the sofa creates a comfortable, unified horizontal line across the space.
19. Set the Mood with Integrated LED Deck Lighting
The integrated lighting is, without a doubt, the element that makes this deck extraordinary. During the day, it’s a handsome, modern multi-level space. But at night, the lighting completely transforms it into a luxurious, resort-like environment. The warm glow from the stair risers provides safety and drama, while the subtle puck lights create pools of ambient light perfect for conversation. This isn’t just functional lighting; it’s a core part of the design aesthetic, turning the architecture of the deck itself into a light fixture. It’s what makes the space feel special long after the sun goes down.
|
📋 Copy HEX 🔗 Share |
This design is a masterclass in layering light. There are three distinct types at play: 1) Safety lighting (the stair riser strips), which clearly defines elevation changes. 2) Ambient lighting (the surface puck lights), which provides a general, soft glow for the main living areas. 3) Feature lighting (the glow from the fire pit table), which creates a central, dynamic focal point. By combining these three layers, the space avoids the common pitfall of being either too dark or lit up like an airport runway. The result is a space that feels sophisticated, safe, and incredibly inviting.
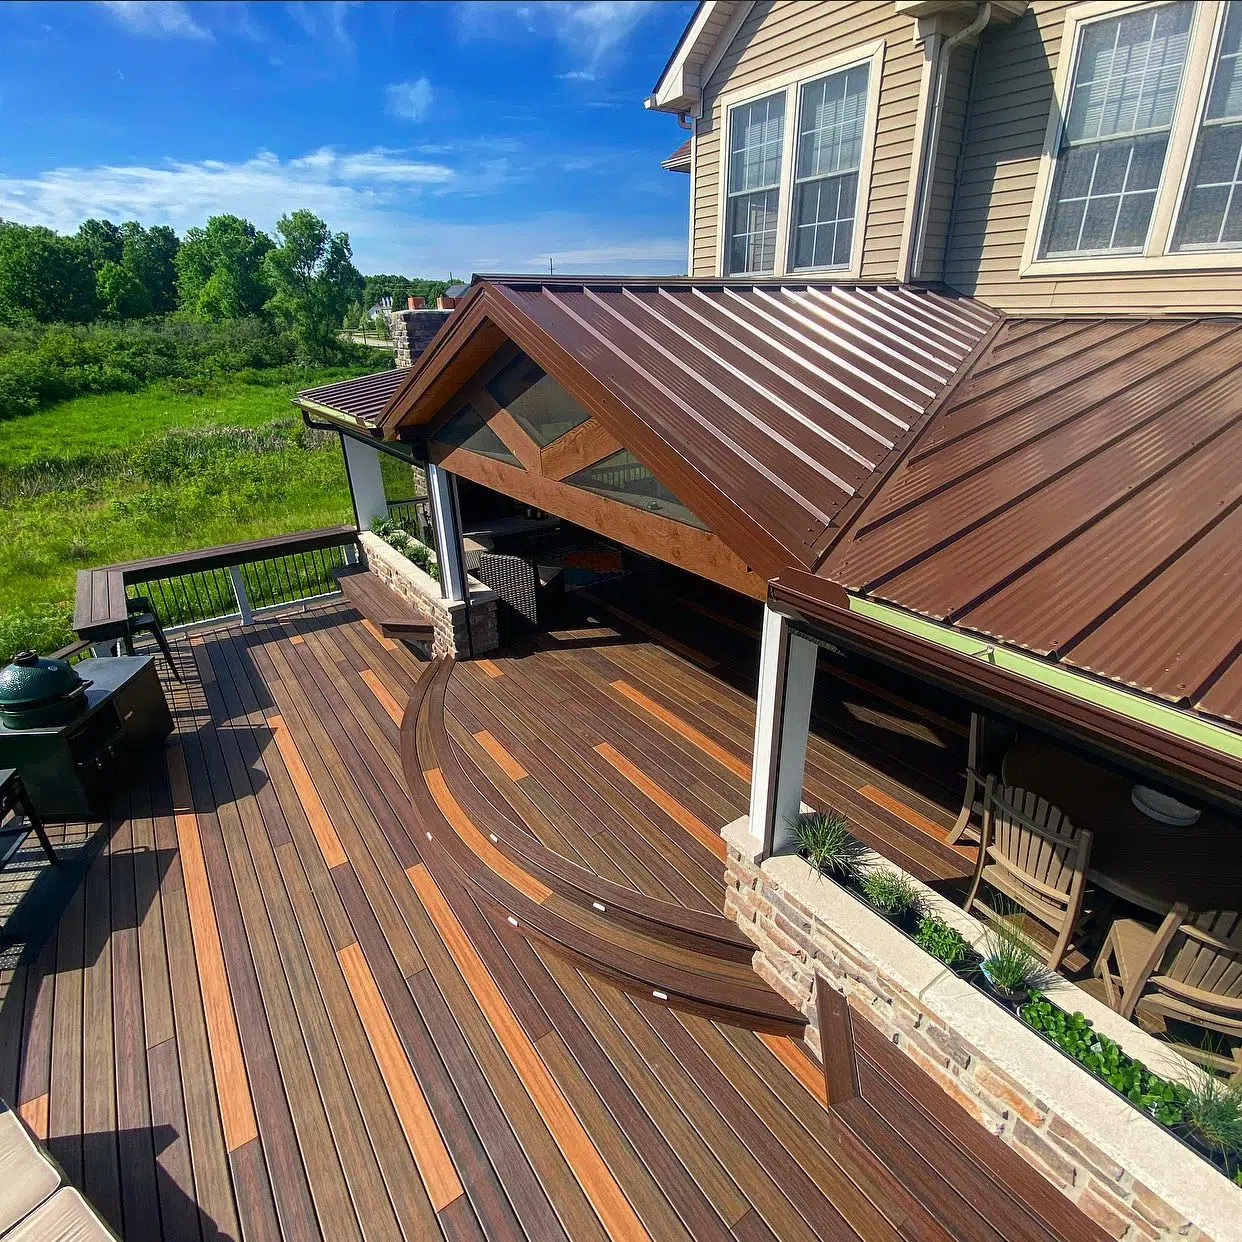
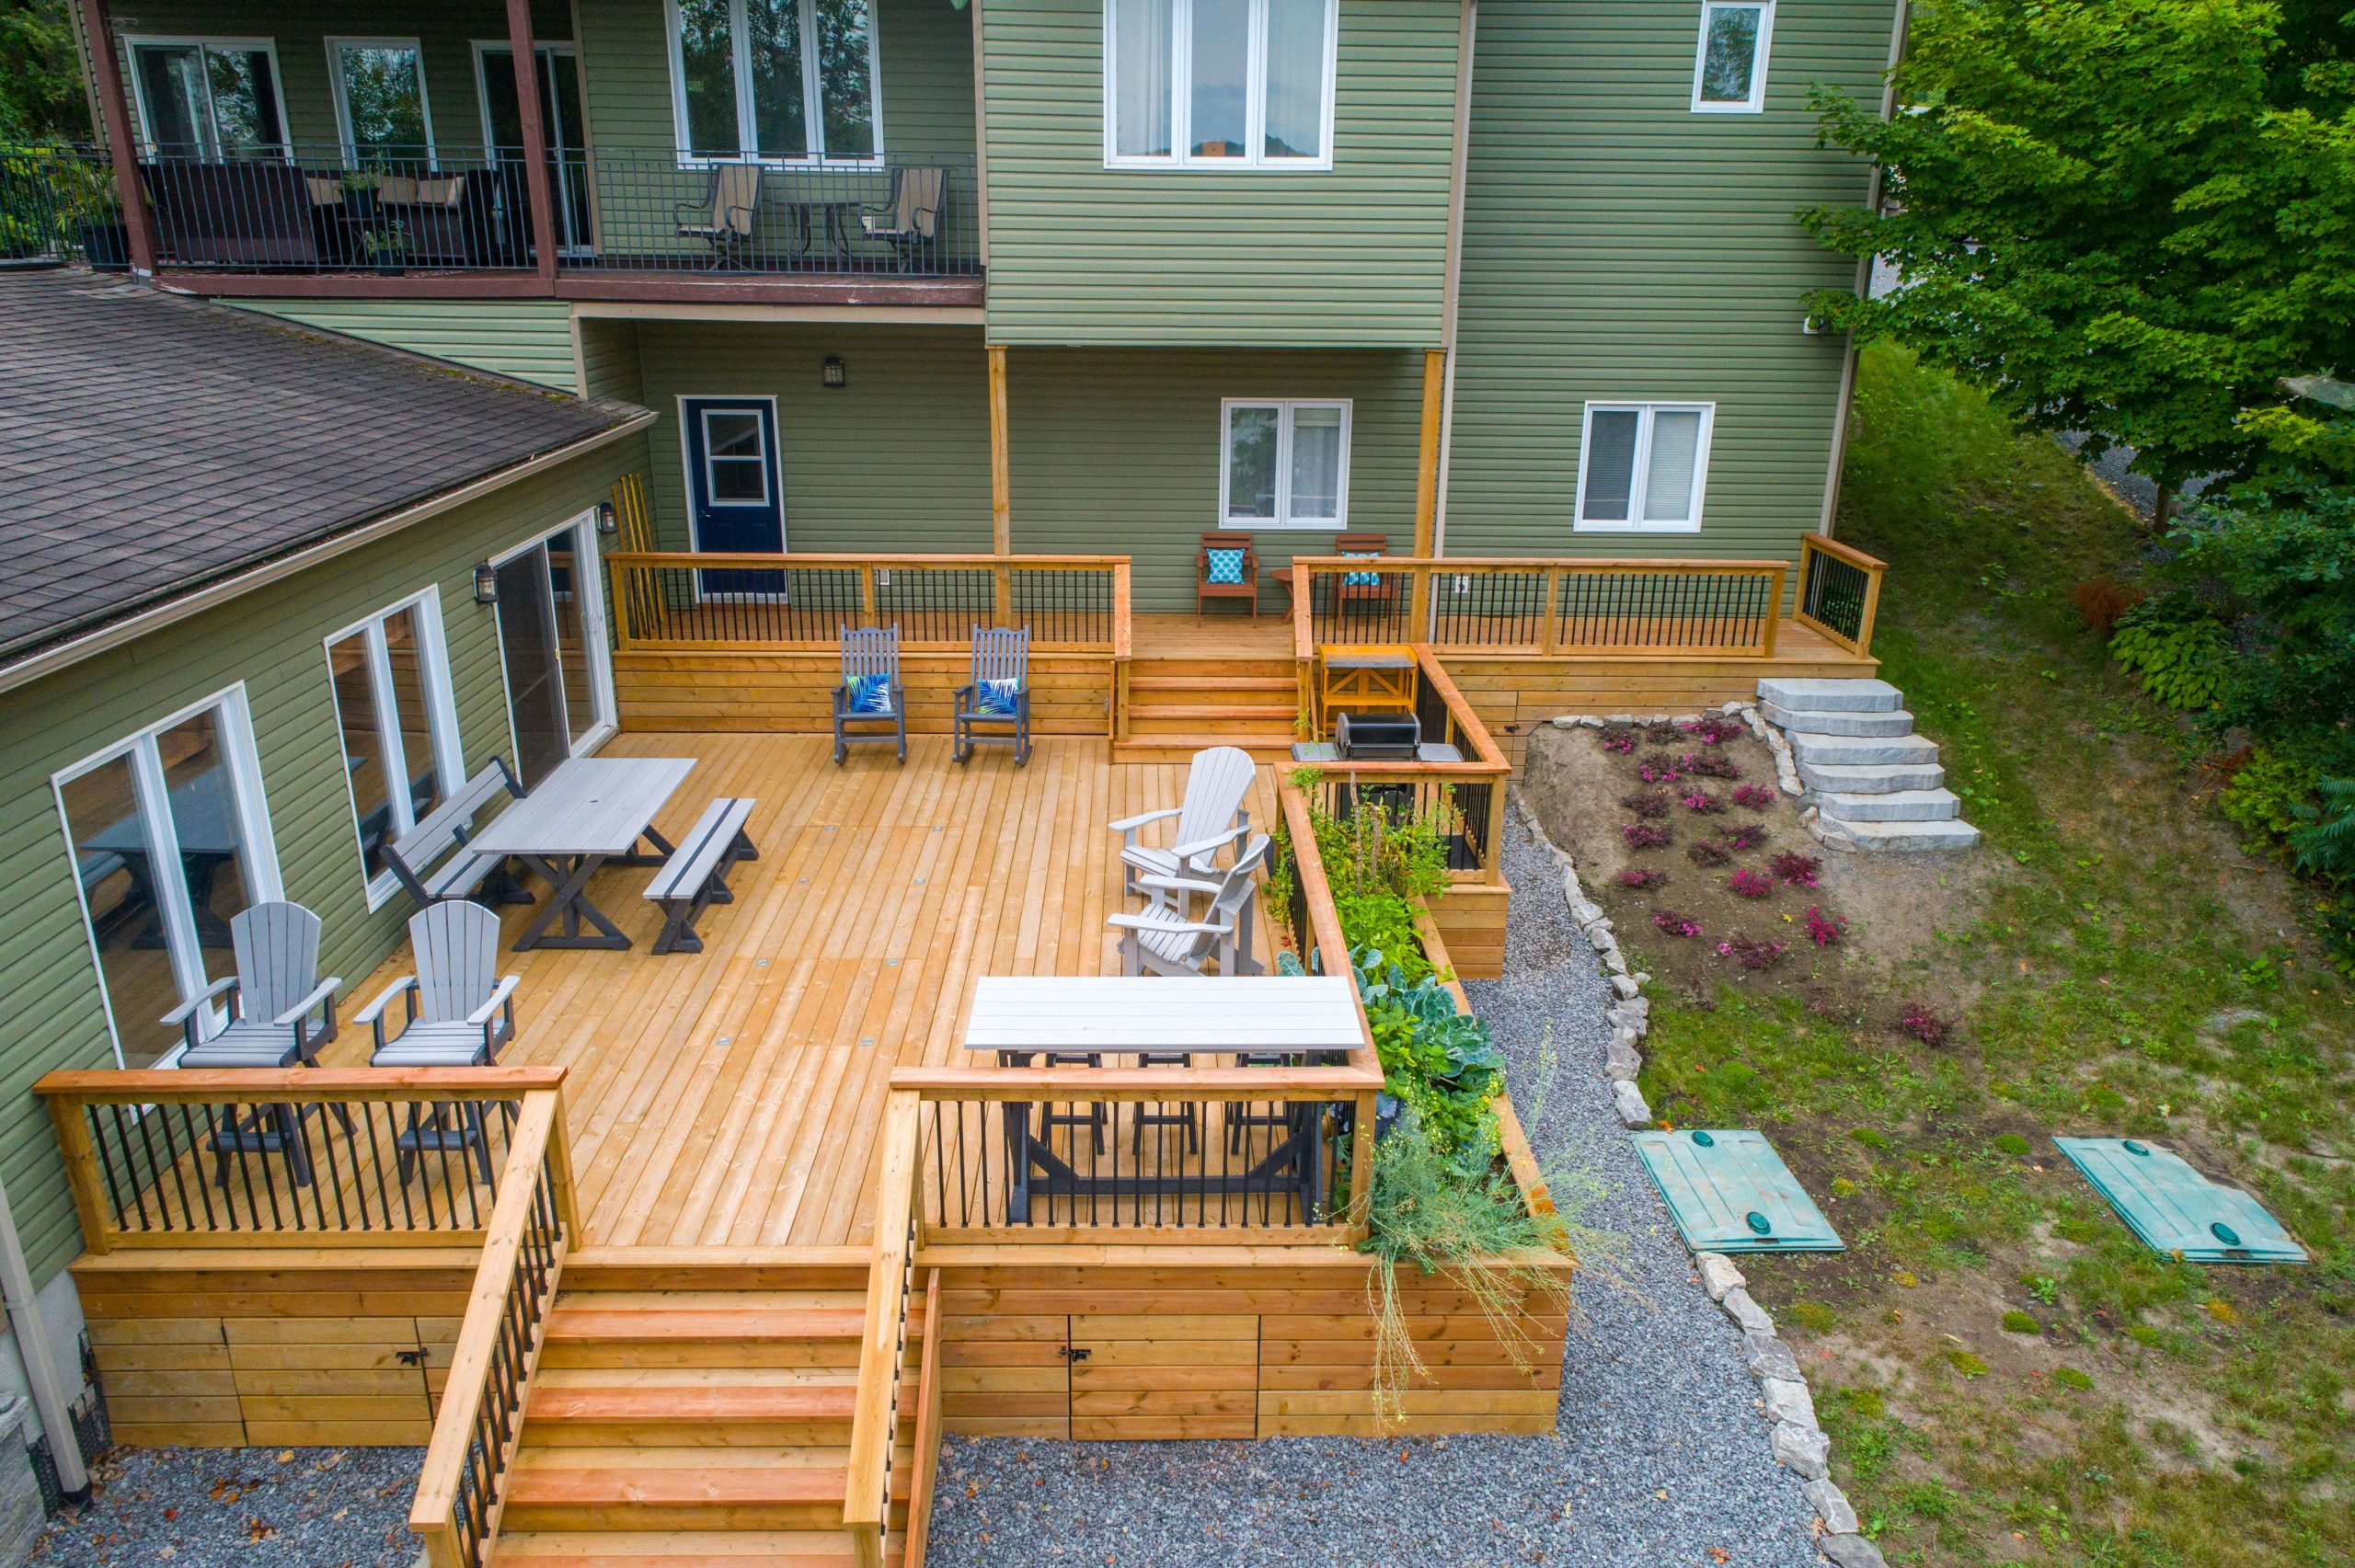
20. Define Zones on a Sprawling, Multi-Zone Wood Deck
A large, rambling deck like this is best suited for a wider property where you have at least 40-50 feet of horizontal space along the back of the house. The key is to avoid a simple, boring rectangle. Here, the design uses different shapes—like the octagonal bump-out—and different levels to create visual interest and dedicated zones. The covered dining area requires a footprint of at least 14×16 feet to feel airy and un-cramped, while the open seating areas can be more flexible. This design would feel overwhelming on a narrow lot.
|
📋 Copy HEX 🔗 Share |
When you have a lot of one material—in this case, natural wood—the best way to add interest is through plants. Notice how potted plants of varying sizes, shapes, and heights are used here as styling props. They are placed strategically to soften corners, define edges, and add pops of color and life without cluttering the space with more ‘stuff.’ Taller plants can create privacy, while trailing plants can soften the edges of the deck. Treat your plants like furniture and move them around until each one has found its perfect spot.
21. A Contemporary Courtyard with a Gray Deck and Built-in Seating
This space works because of its powerful use of graphic contrast. The dark grey decking, the bright white retaining walls, and the black mulch create a bold, clean-lined composition that feels incredibly modern. The warmth is introduced through texture rather than color: the wood grain of the deck, the rough painted brick, the intricate pattern of the metal fence, and the soft foliage of the plants. This limited color palette allows the different materials to really stand out, creating a space that is both minimalist and rich in detail. It proves you don’t need a riot of color to make a big statement.
|
📋 Copy HEX 🔗 Share |
A built-in bench is a fantastic space-saver, but it’s permanent. Before you build, make sure you’ve considered these key points.
- Seat Depth: Aim for a depth of 18-20 inches to be comfortable. Too shallow and it feels like a perch; too deep and you can’t sit back properly.
- Back Angle: If your bench is against a wall, is the wall perfectly vertical? A slight 5-10 degree slant on the backrest makes a world of difference in comfort.
- Material Choice: Concrete is durable but hard and cold. Capping it with composite decking material, as seen here, provides a warmer, more comfortable seat.
- Sun Exposure: If the bench is in full sun, will the material get scorching hot? This is a critical consideration for dark composite or metal seating surfaces.
22. Go Bold with a Multi-Zone Deck and Vibrant Seating
The single element that defines this entire space is the shocking, joyful color of the furniture. The acid yellow and bright green chairs are a bold, confident choice that instantly injects energy and personality. Without them, this would be a very handsome but safe, neutral space with a black pergola and brown decking. The chairs announce that this is a place for fun, for parties, and for conversation. It’s a powerful reminder that furniture isn’t just functional; it’s an opportunity to express your style and set the mood.
|
📋 Copy HEX 🔗 Share |
When using bold, vibrant colors in an outdoor space, anchor them with plenty of sophisticated neutrals. Here, the black pergola, brown decking, gray pavers, and natural wood screen provide a calm, grounding backdrop that allows the bright chairs to be the star without becoming chaotic. A good rule is to keep your large, permanent surfaces (decking, pergola) neutral and introduce bold color through elements that are easier to change out, like furniture, pillows, and planters.
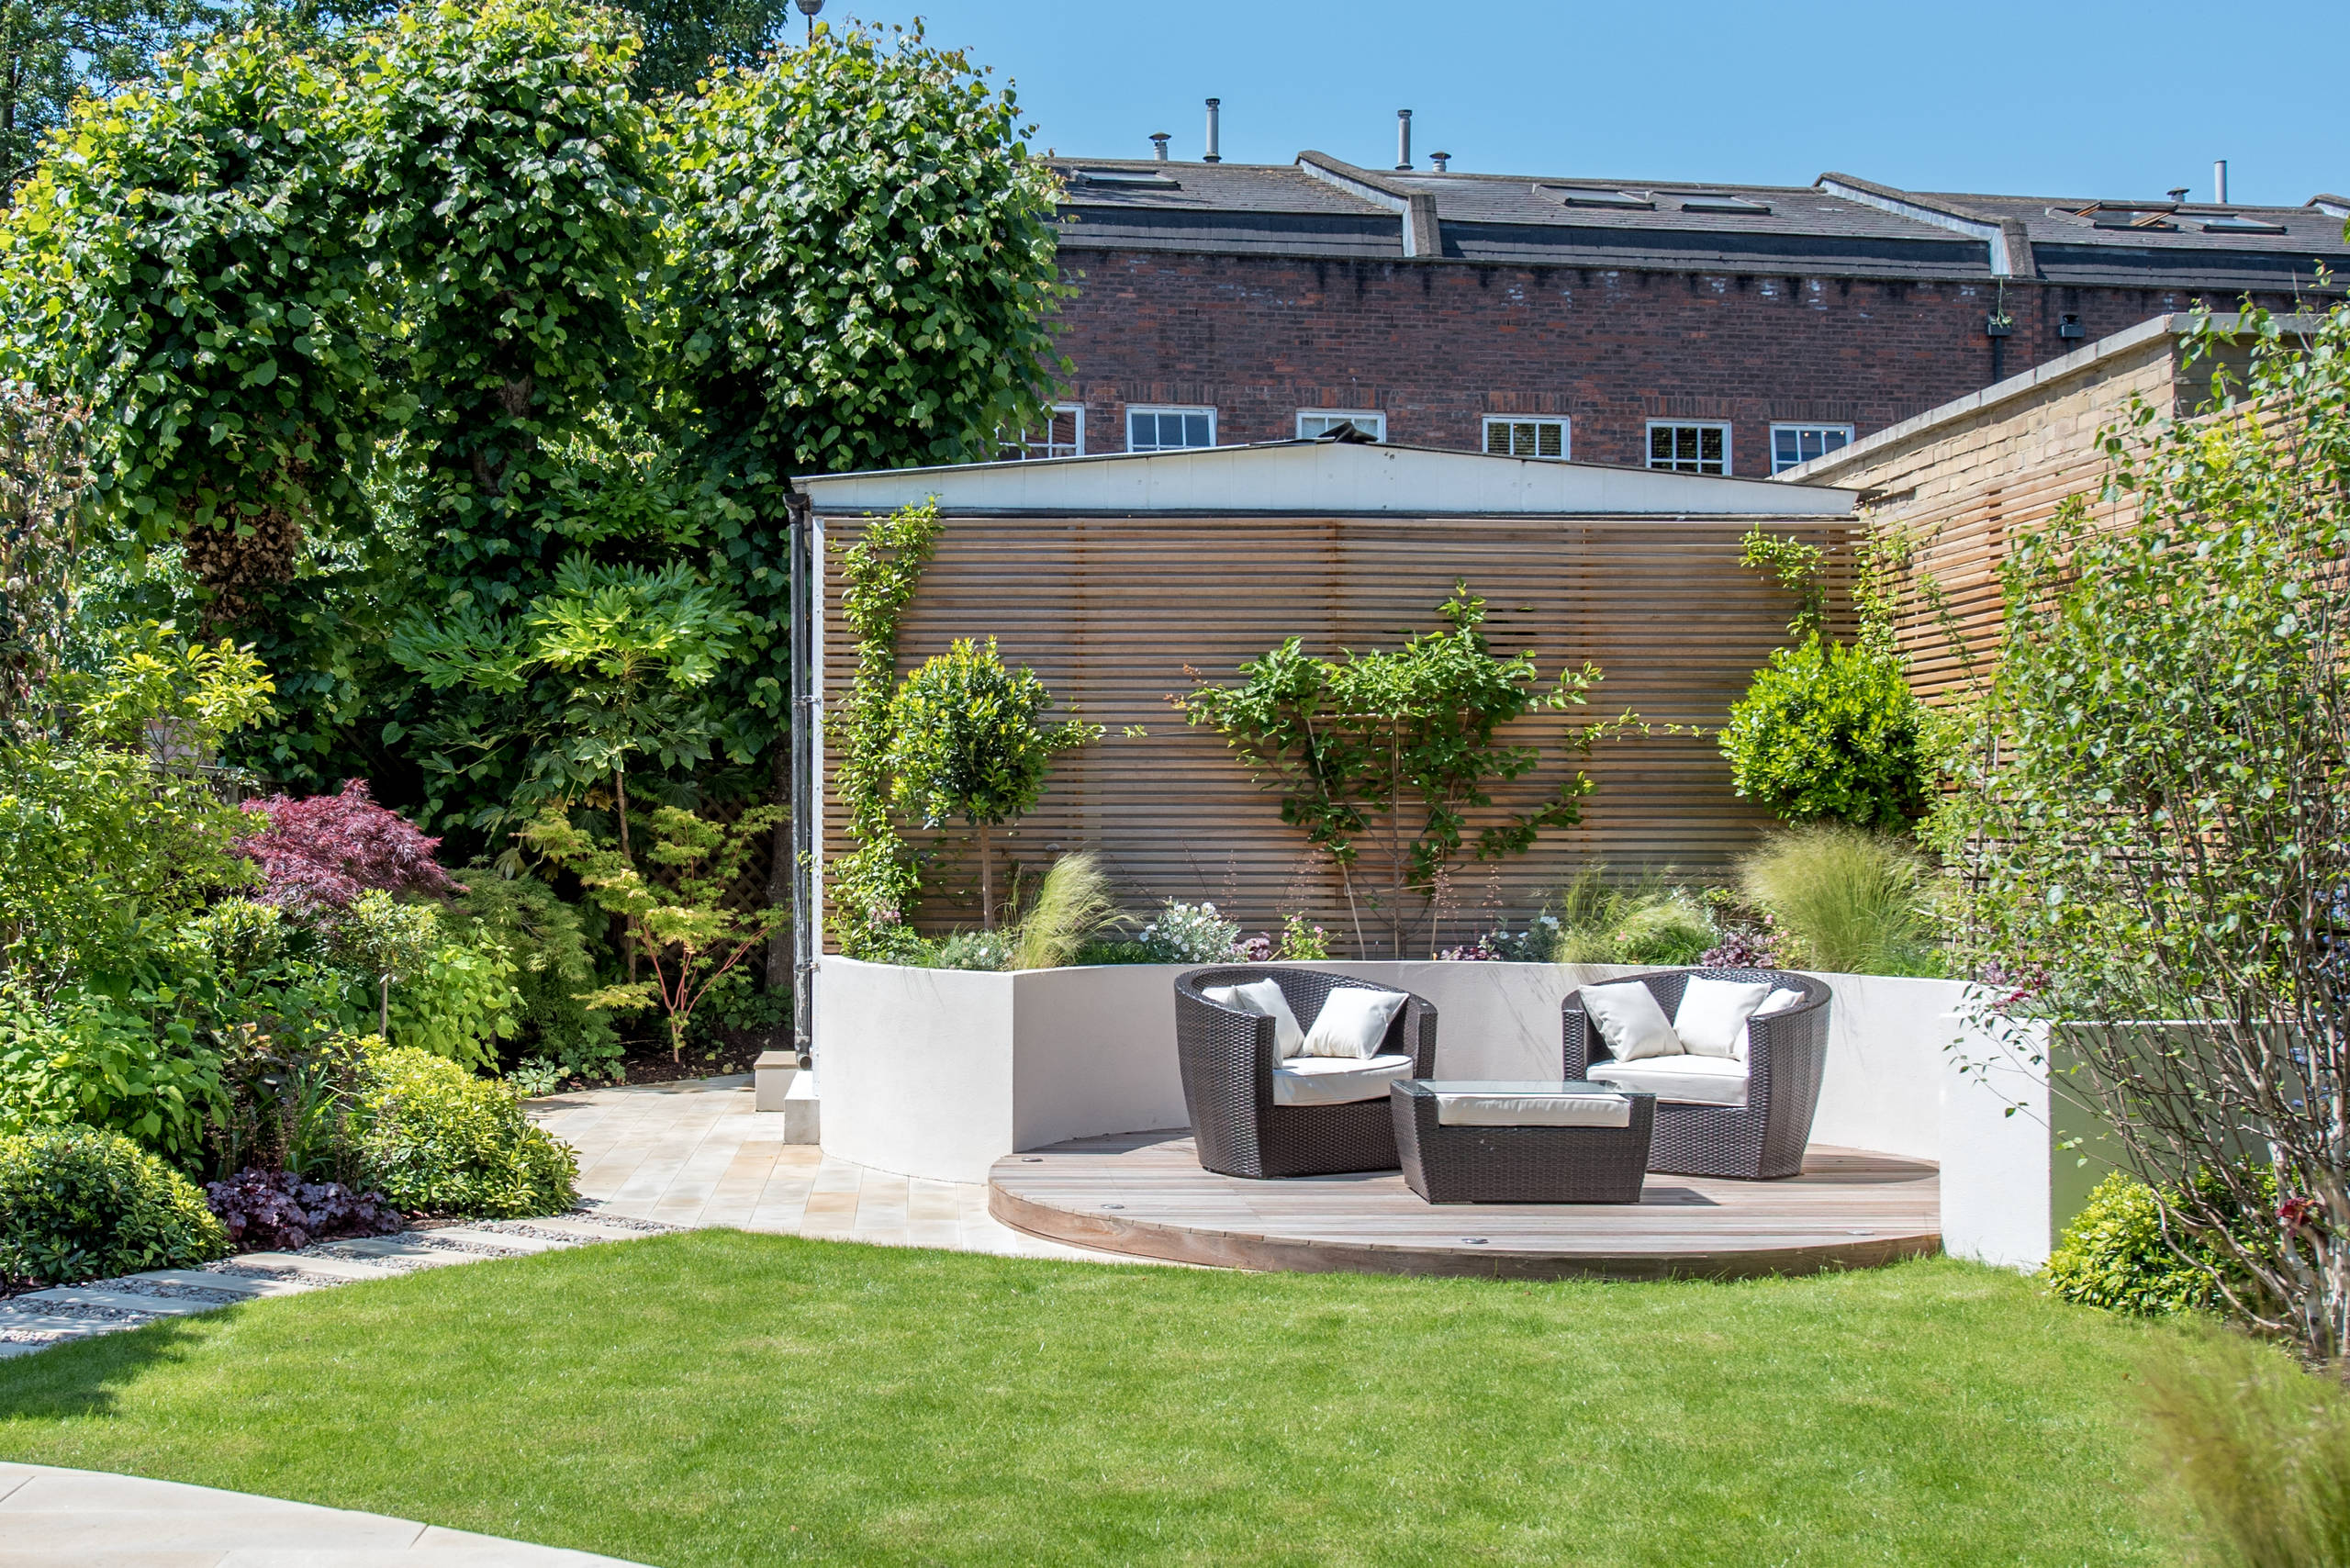
23. Break the Mold with a Circular Garden Deck
The circular shape is the hero of this design. It carves out a distinct ‘room’ within the wider garden, making the seating area feel special and intentional. In a landscape dominated by the straight lines of a fence and the rectangular shape of a house, the curve offers a soft, organic counterpoint that is naturally pleasing to the eye. The curved white planter walls reinforce this shape and create a beautiful, clean edge, separating the structured deck from the looser plantings beyond. This thoughtful geometry elevates the simple deck into a work of landscape art.
|
📋 Copy HEX 🔗 Share |
A circular deck is a brilliant way to create a focal point in a small to medium-sized yard. To feel functional as a seating area for four armchairs, the deck itself should have a diameter of at least 10 feet. Anything smaller will feel cramped. This design works particularly well when floating in a corner of the yard, as shown here, turning an often-neglected space into the garden’s main destination. It’s less effective when placed directly against a flat house wall, where a rectangular deck would feel more natural.
24. The All-in-One Retreat: Deck, Fire Pit, and Hot Tub Haven
Creating a multi-zone destination with high-end features like this is a major project. The costs can vary dramatically based on materials and labor in your area, but here’s a general idea. Compare this to the more kitchen-focused budget of Idea #3.
|
📋 Copy HEX 🔗 Share |
- Multi-Level Composite Deck & Stairs: $15,000 – $30,000
- Stone Patio & Retaining Walls: $8,000 – $20,000
- Hot Tub (including electrical): $8,000 – $15,000
- Stone Fire Pit (wood-burning): $2,500 – $6,000
- Furniture & Landscaping: $2,000 – $7,000
- TOTAL: $35,500 – $78,000+
A space this complex requires a unified plan from the very beginning. You can’t just build a deck one year, add a patio the next, and drop in a hot tub later. The grading, drainage, electrical runs, and material transitions all need to be designed to work together. Trying to piece-meal a project of this scale often results in a disjointed look and costly retrofitting. Hire a landscape designer or a design-build firm to create a master plan, even if you plan to execute it in phases. This ensures the final result feels cohesive and intentional.
Your Dream Deck is Closer Than You Think
Whew, that was a lot—but amazing, right? The perfect backyard deck isn’t about having the biggest space or the trendiest furniture. It’s about creating a place that feels like you, whether that’s a quiet, zen-like retreat or the ultimate neighborhood party spot. Take these ideas, mix and match the concepts, and start dreaming up your perfect outdoor escape.
Ready to get started? Head over to Pinterest and start creating a board for your project—you’ll be enjoying your own dream deck before you know it.