You know that feeling when you finally find the deck floor covering that looks exactly right for your space? It’s that perfect blend of style, durability, and ‘wow’ factor that ties your whole outdoor area together. We spent serious time browsing Home Depot, Wayfair, and specialty retailers to bring you only what’s worth your attention this year. From a simple DIY refresh to a full professional overhaul, we’ve got you covered.
This isn’t just a list; it’s a curated lookbook of 23 real-life deck flooring ideas, from timeless natural wood and low-maintenance composite to chic patterned tiles that make a statement. We’re diving into what makes each look work, how to get it, and what it really takes to live with it. Just so you know, this post may contain affiliate links. And stay until the end—we break down the most common mistakes that can ruin these beautiful looks.
📌 Save this to Pinterest for later—you’ll want to revisit these ideas.
1. Warm Brown Composite Decking Overlooking a Mountain Forest
Style Math: This inviting scene follows a simple but effective formula: 60% warm, natural tones + 30% deep neutrals + 10% color pop. The warm brown composite decking and surrounding pine forest create the dominant natural base. The black wicker sectional and metal railing provide strong, grounding neutral contrast. Finally, the vibrant orange umbrella and pillows inject just enough energy and personality to keep the view from feeling monotonous. You could easily swap the orange for a turquoise or a sunny yellow to change the mood without losing the balanced effect.
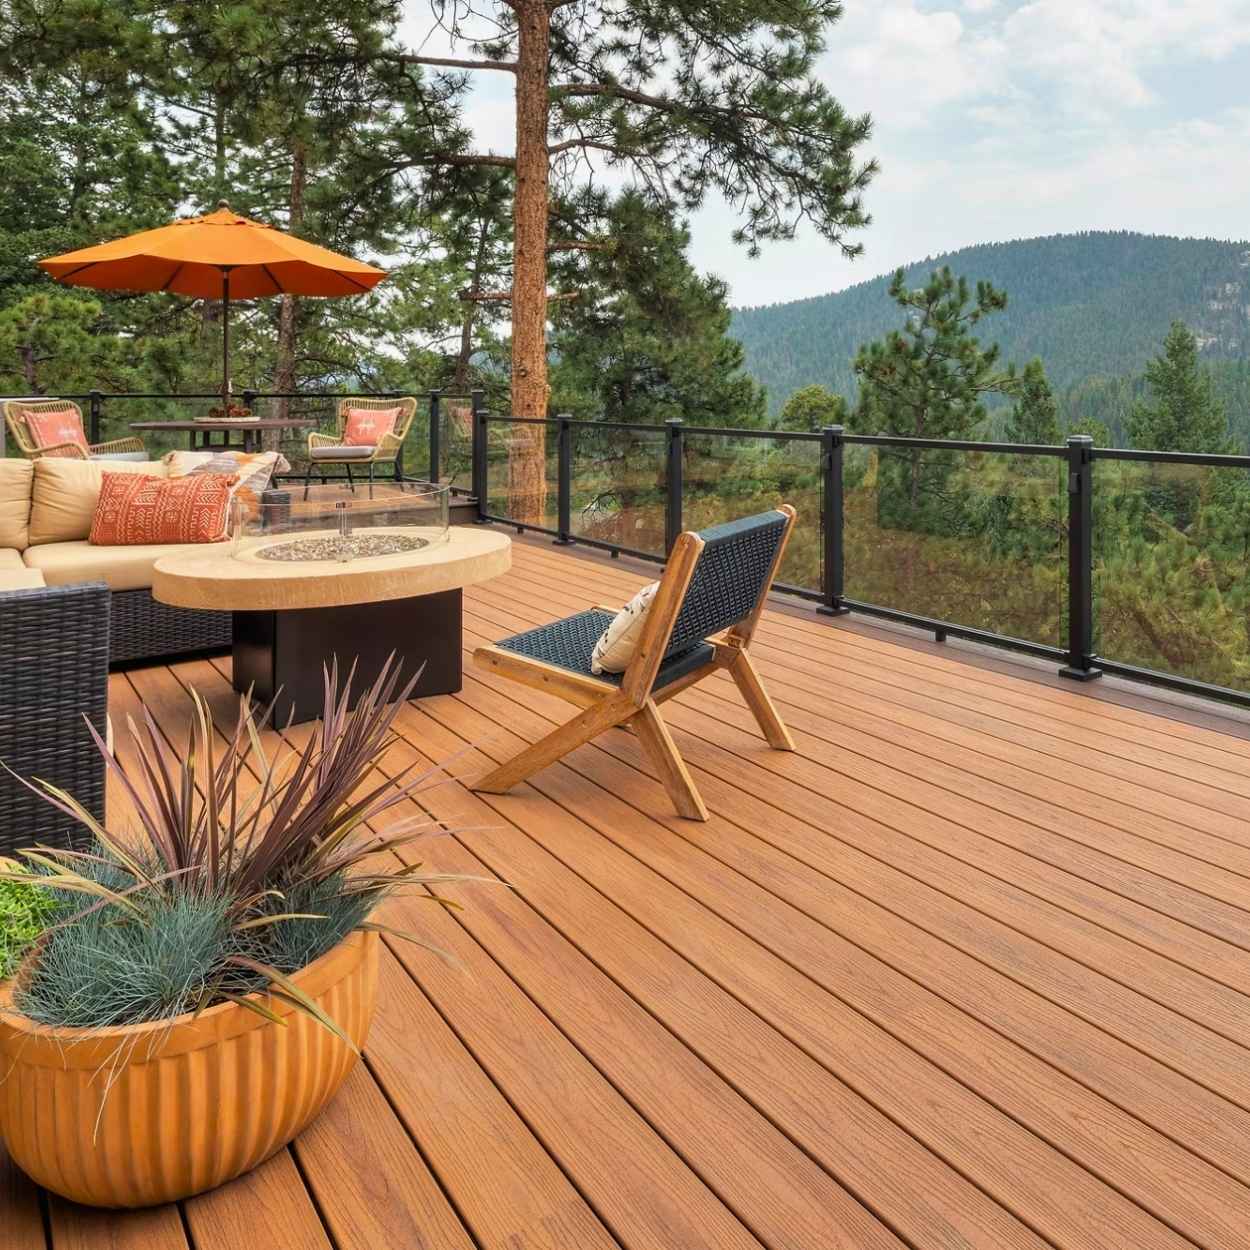
Real Talk: A fire pit on a composite deck is a fantastic feature, but it requires serious caution. Composite decking, while durable, can melt or get permanently scorched under high heat. You must place a non-combustible fire pit pad (made of stone, metal, or specialty heat-resistant material) underneath the fire pit. It needs to be larger than the pit’s base by at least 12-18 inches on all sides. Also, ensure your fire pit has tall enough legs to keep the heat source well away from the deck surface.
2. Grayish-Brown Composite with a Geometric Outdoor Rug
Budget Breakdown: Recreating this multi-zone deck involves a few key investments. The composite decking is the biggest line item, valued for its low maintenance. The furniture and rug define the ‘rooms’ within the space.
- Composite Decking (300 sq. ft.): $4,500 – $9,000
- Stainless Steel Cable Railing: $3,000 – $6,000
- Outdoor Lounge Seating: $1,500 – $4,000
- Outdoor Rug (8×10): $200 – $500
- Outdoor Dining Set: $800 – $2,500
- TOTAL: $9,000 – $22,000
Budget alternative: Use pressure-treated wood instead of composite, a simple wooden railing, and source furniture from Target or Facebook Marketplace to bring the total down to the $4,000 – $8,000 range.
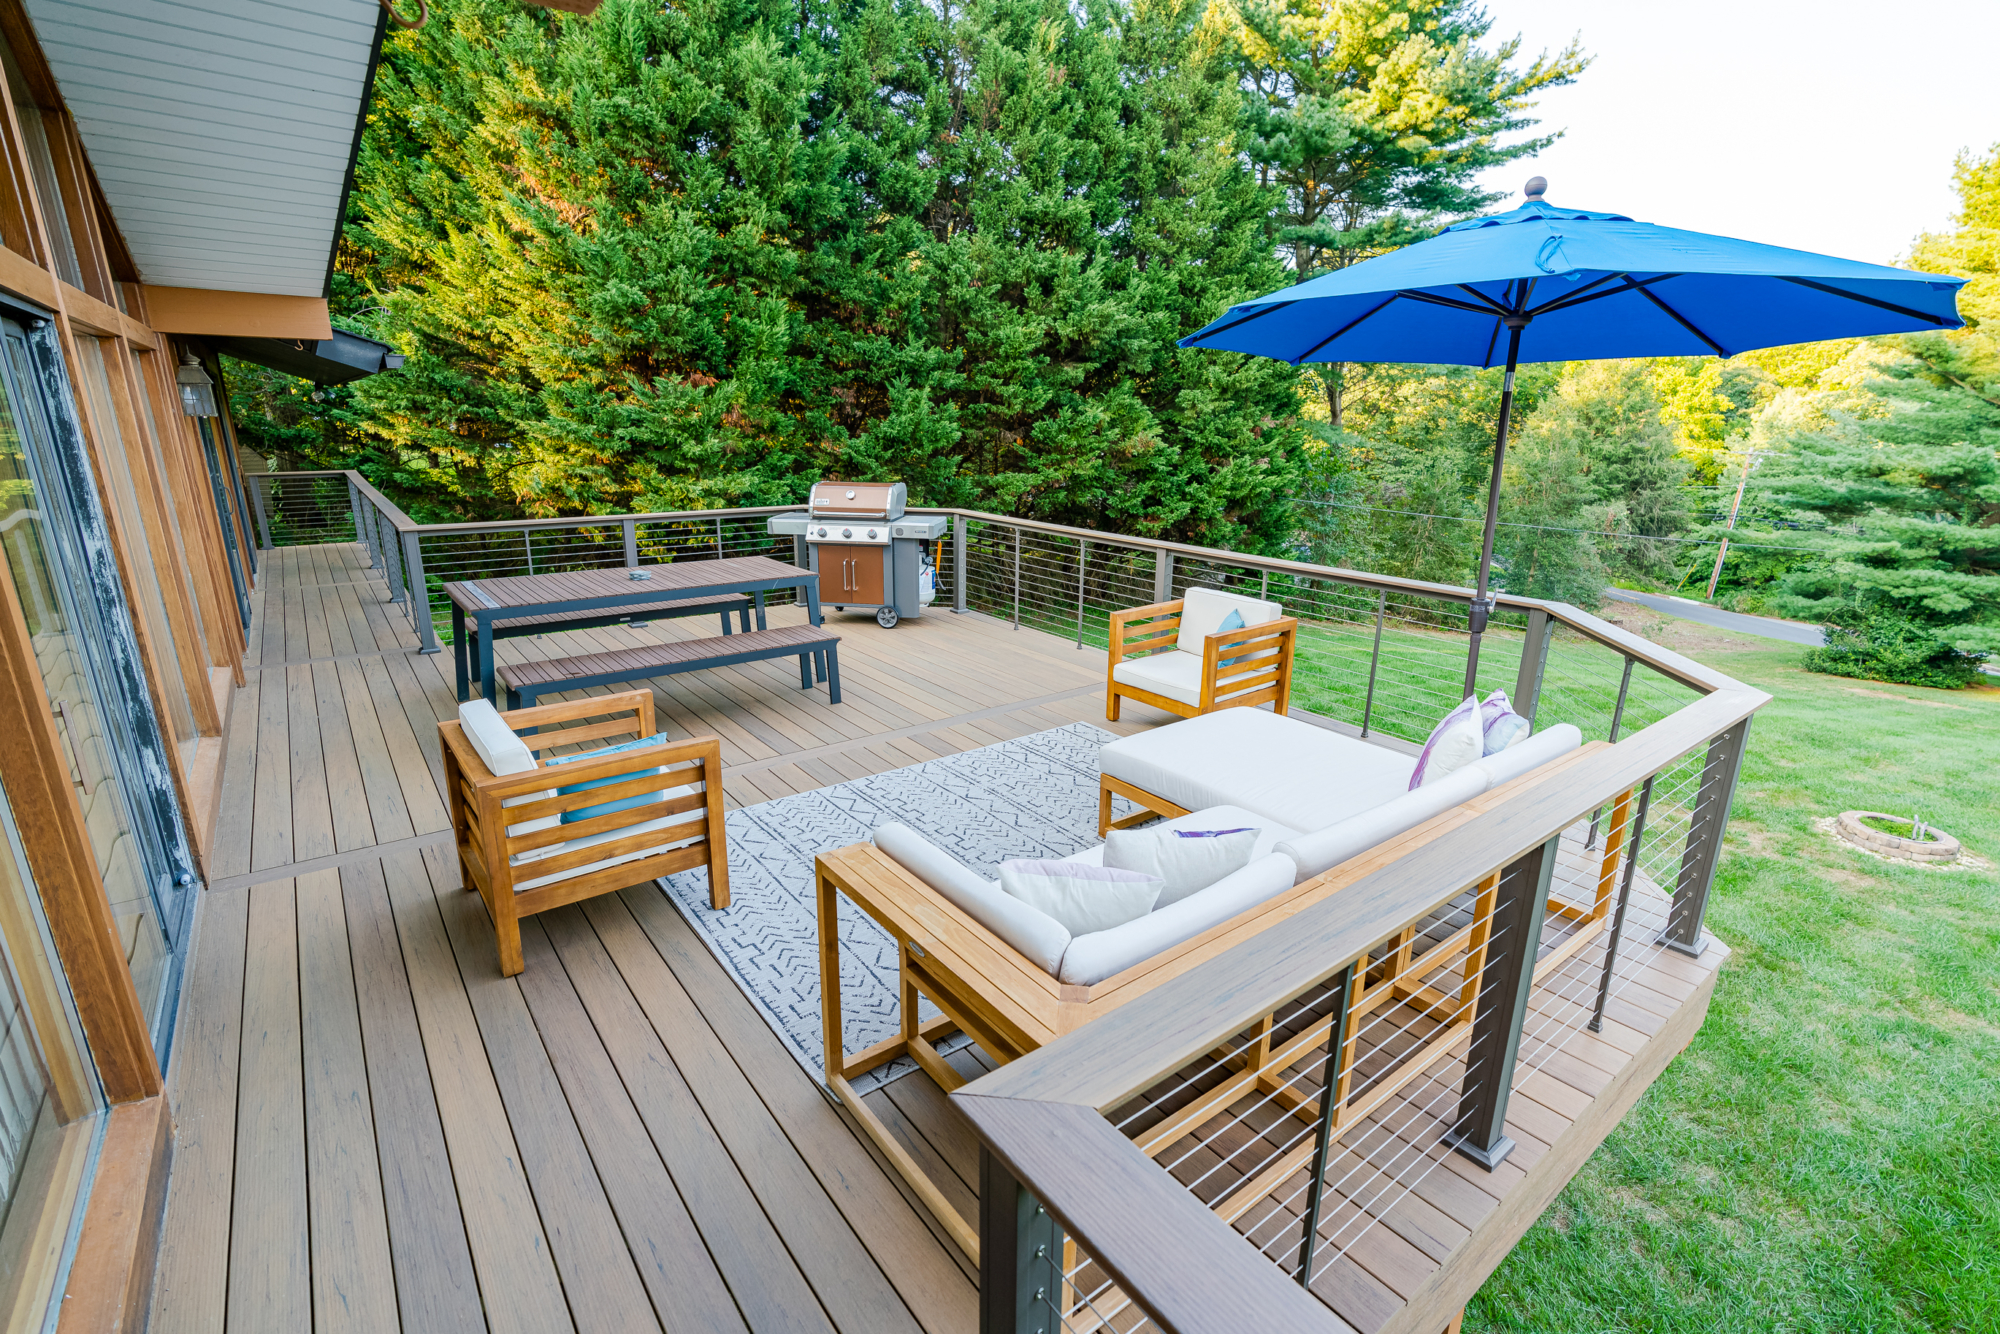
Scale Guide: This idea of creating distinct ‘zones’ for lounging, dining, and grilling works best on a deck that’s at least 250 square feet. For a comfortable layout like this one, you’ll want a minimum width of 12-14 feet. This allows you to place an 8×10 rug to anchor the seating area and still have clear, 3-foot-wide pathways between the zones. Anything smaller and the areas will feel cramped and cluttered, losing that open, inviting feel.
3. Light Gray Composite Decking with a Sleek Glass Railing
The One Thing: The glass panel railing is the absolute hero of this design. Remove it and replace it with a traditional wood or metal picket railing, and you’d instantly lose the clean, modern aesthetic and, more importantly, the unobstructed connection to the greenery beyond. The glass provides essential safety without creating a visual barrier, making the deck feel like an extension of the landscape rather than a platform merely overlooking it. It’s a high-impact choice that signals contemporary luxury.
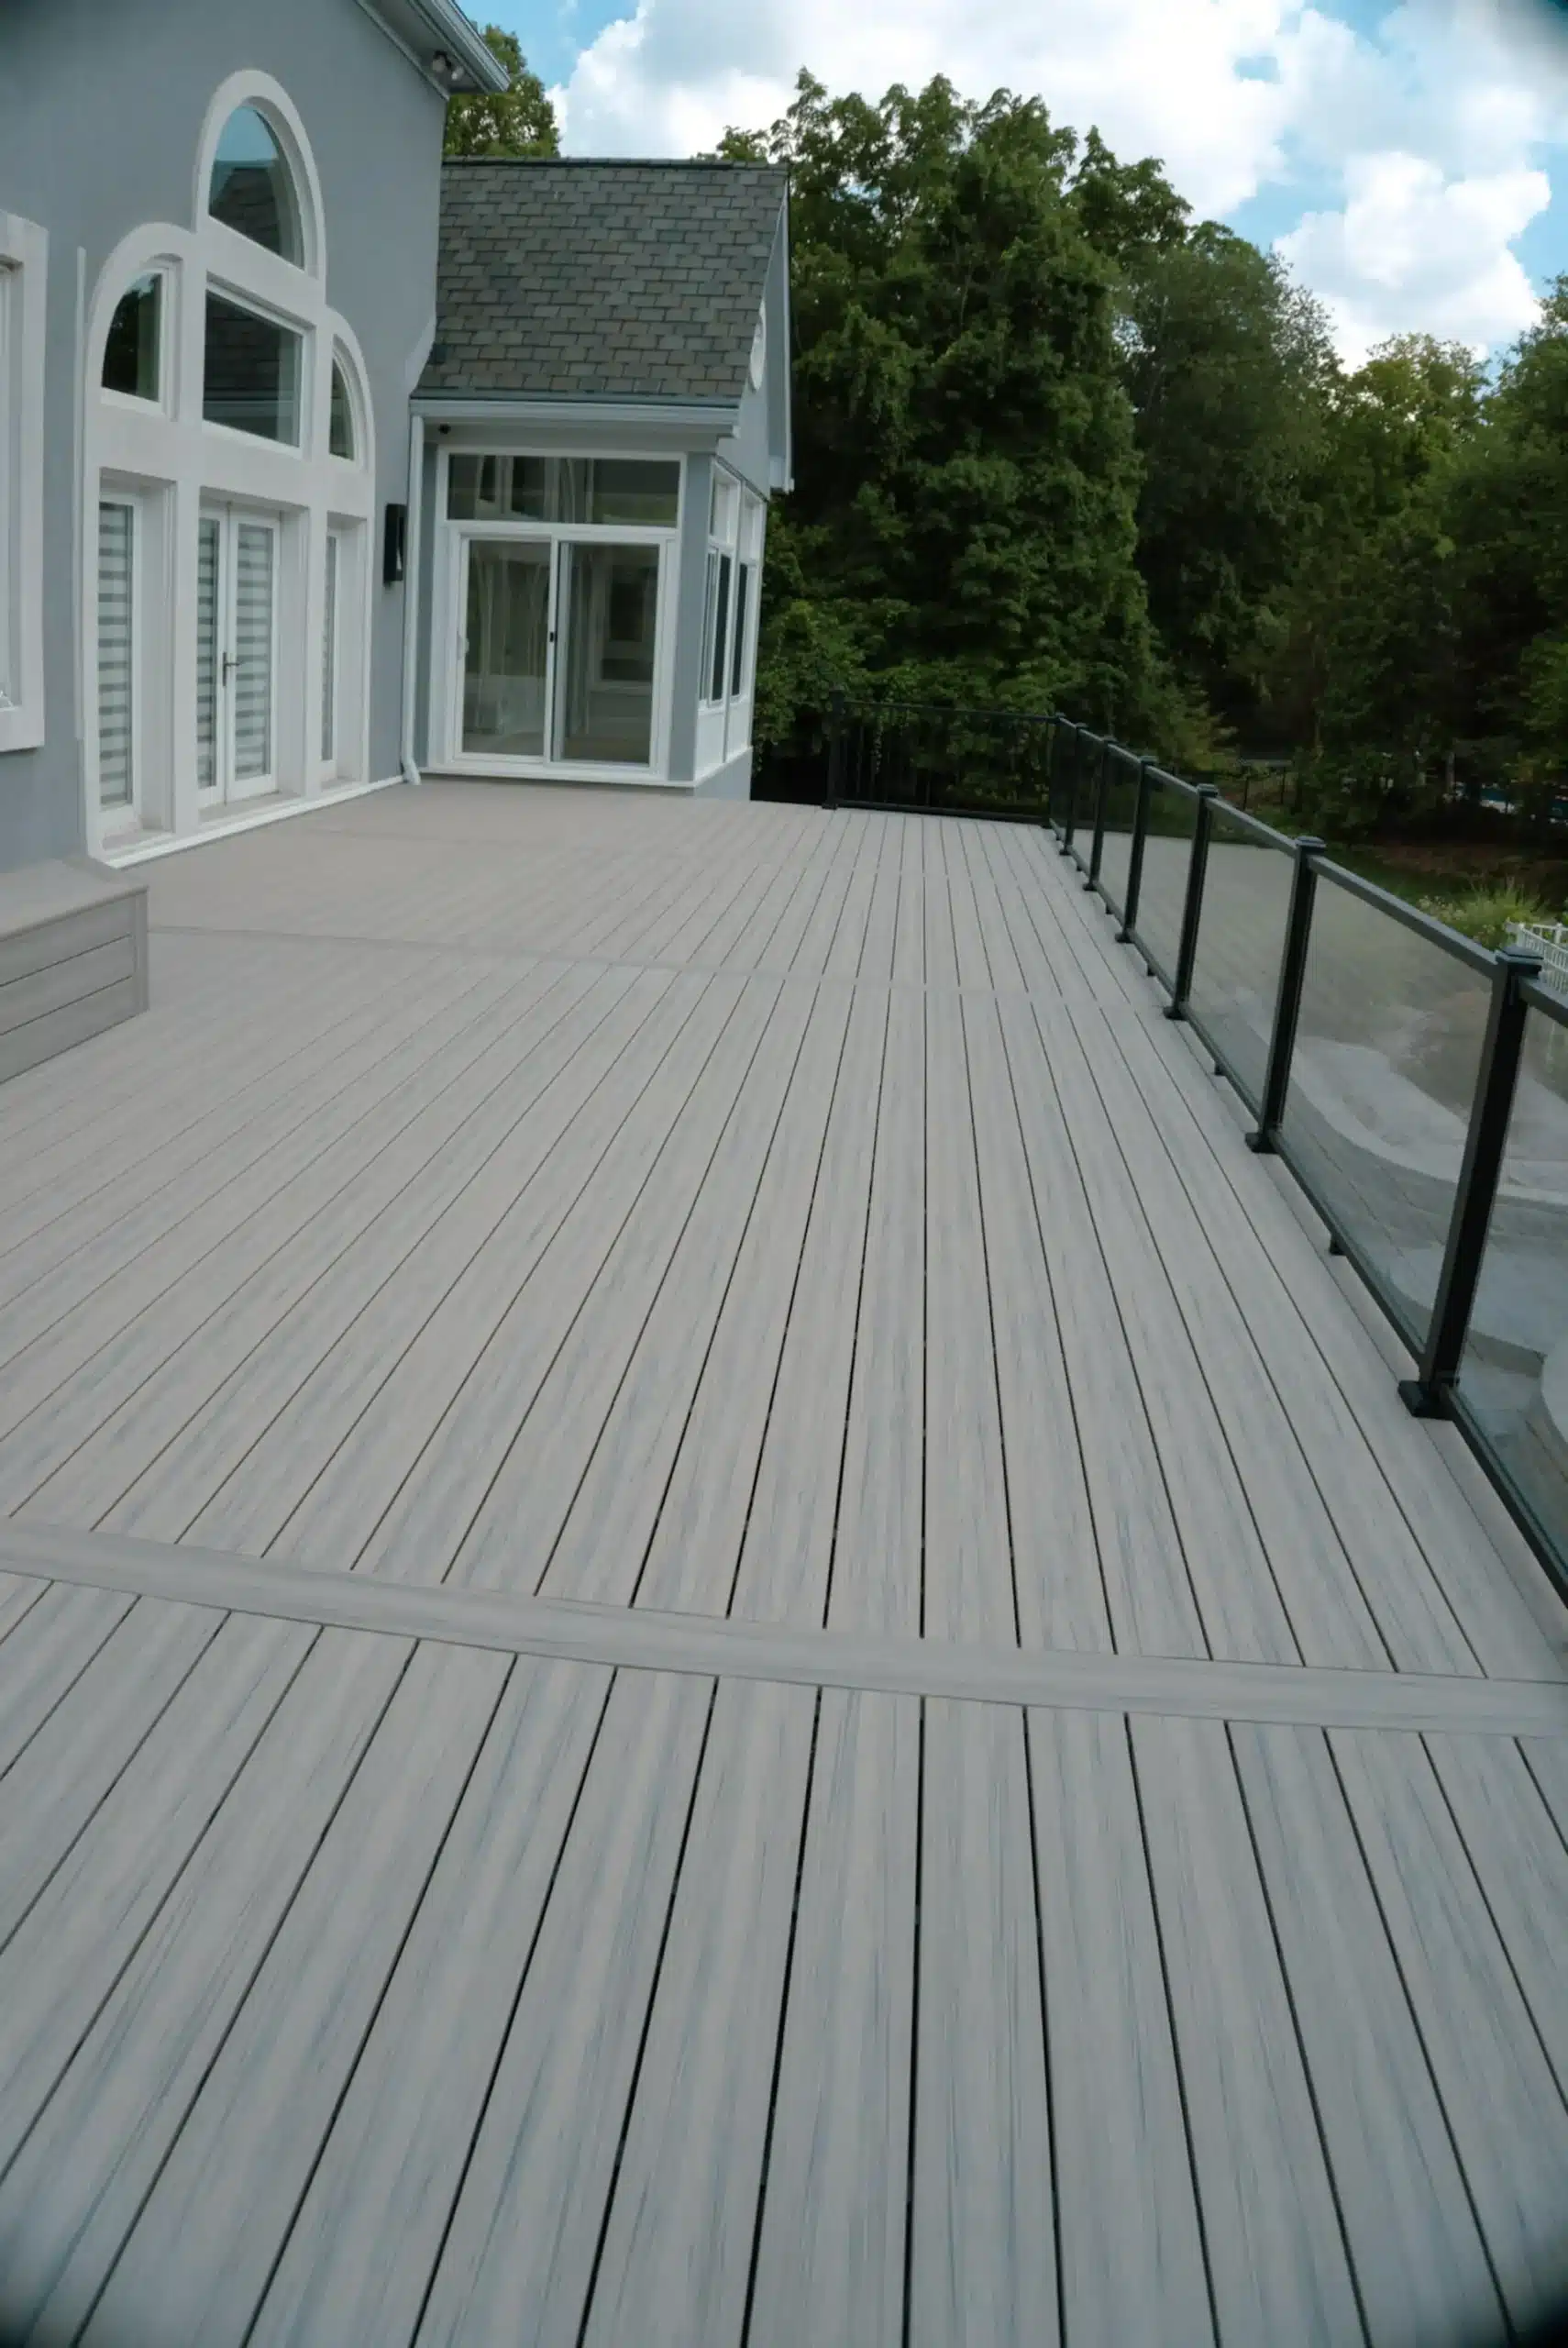
Maintenance Reality: While a glass railing offers a million-dollar view, it doesn’t stay clean on its own. Expect to squeegee it down at least once a week, more if you’re in an area with lots of pollen, dust, or frequent rain. Hard water spots can be a real pain, so using a solution of white vinegar and water can help. The light gray composite decking is great at hiding dust, but it will show darker debris like wet leaves and dirt, so a regular sweep or blow is necessary to maintain its crisp appearance.
4. Elevated Gray Composite Deck with a Modern Black Railing
Designer Tip: To achieve this kind of sleek, modern railing, specify a powder-coated aluminum material. It’s lightweight, rust-proof, and holds color far better than painted steel. For the vertical slats, a spacing of 3.5 inches is key. It’s close enough to meet the standard building code (which typically requires a gap of less than 4 inches to prevent a child’s head from fitting through) but wide enough to avoid a ‘cage-like’ feeling, preserving the open view of the lawn and trees. This precise spacing is what gives it that custom, high-end look.
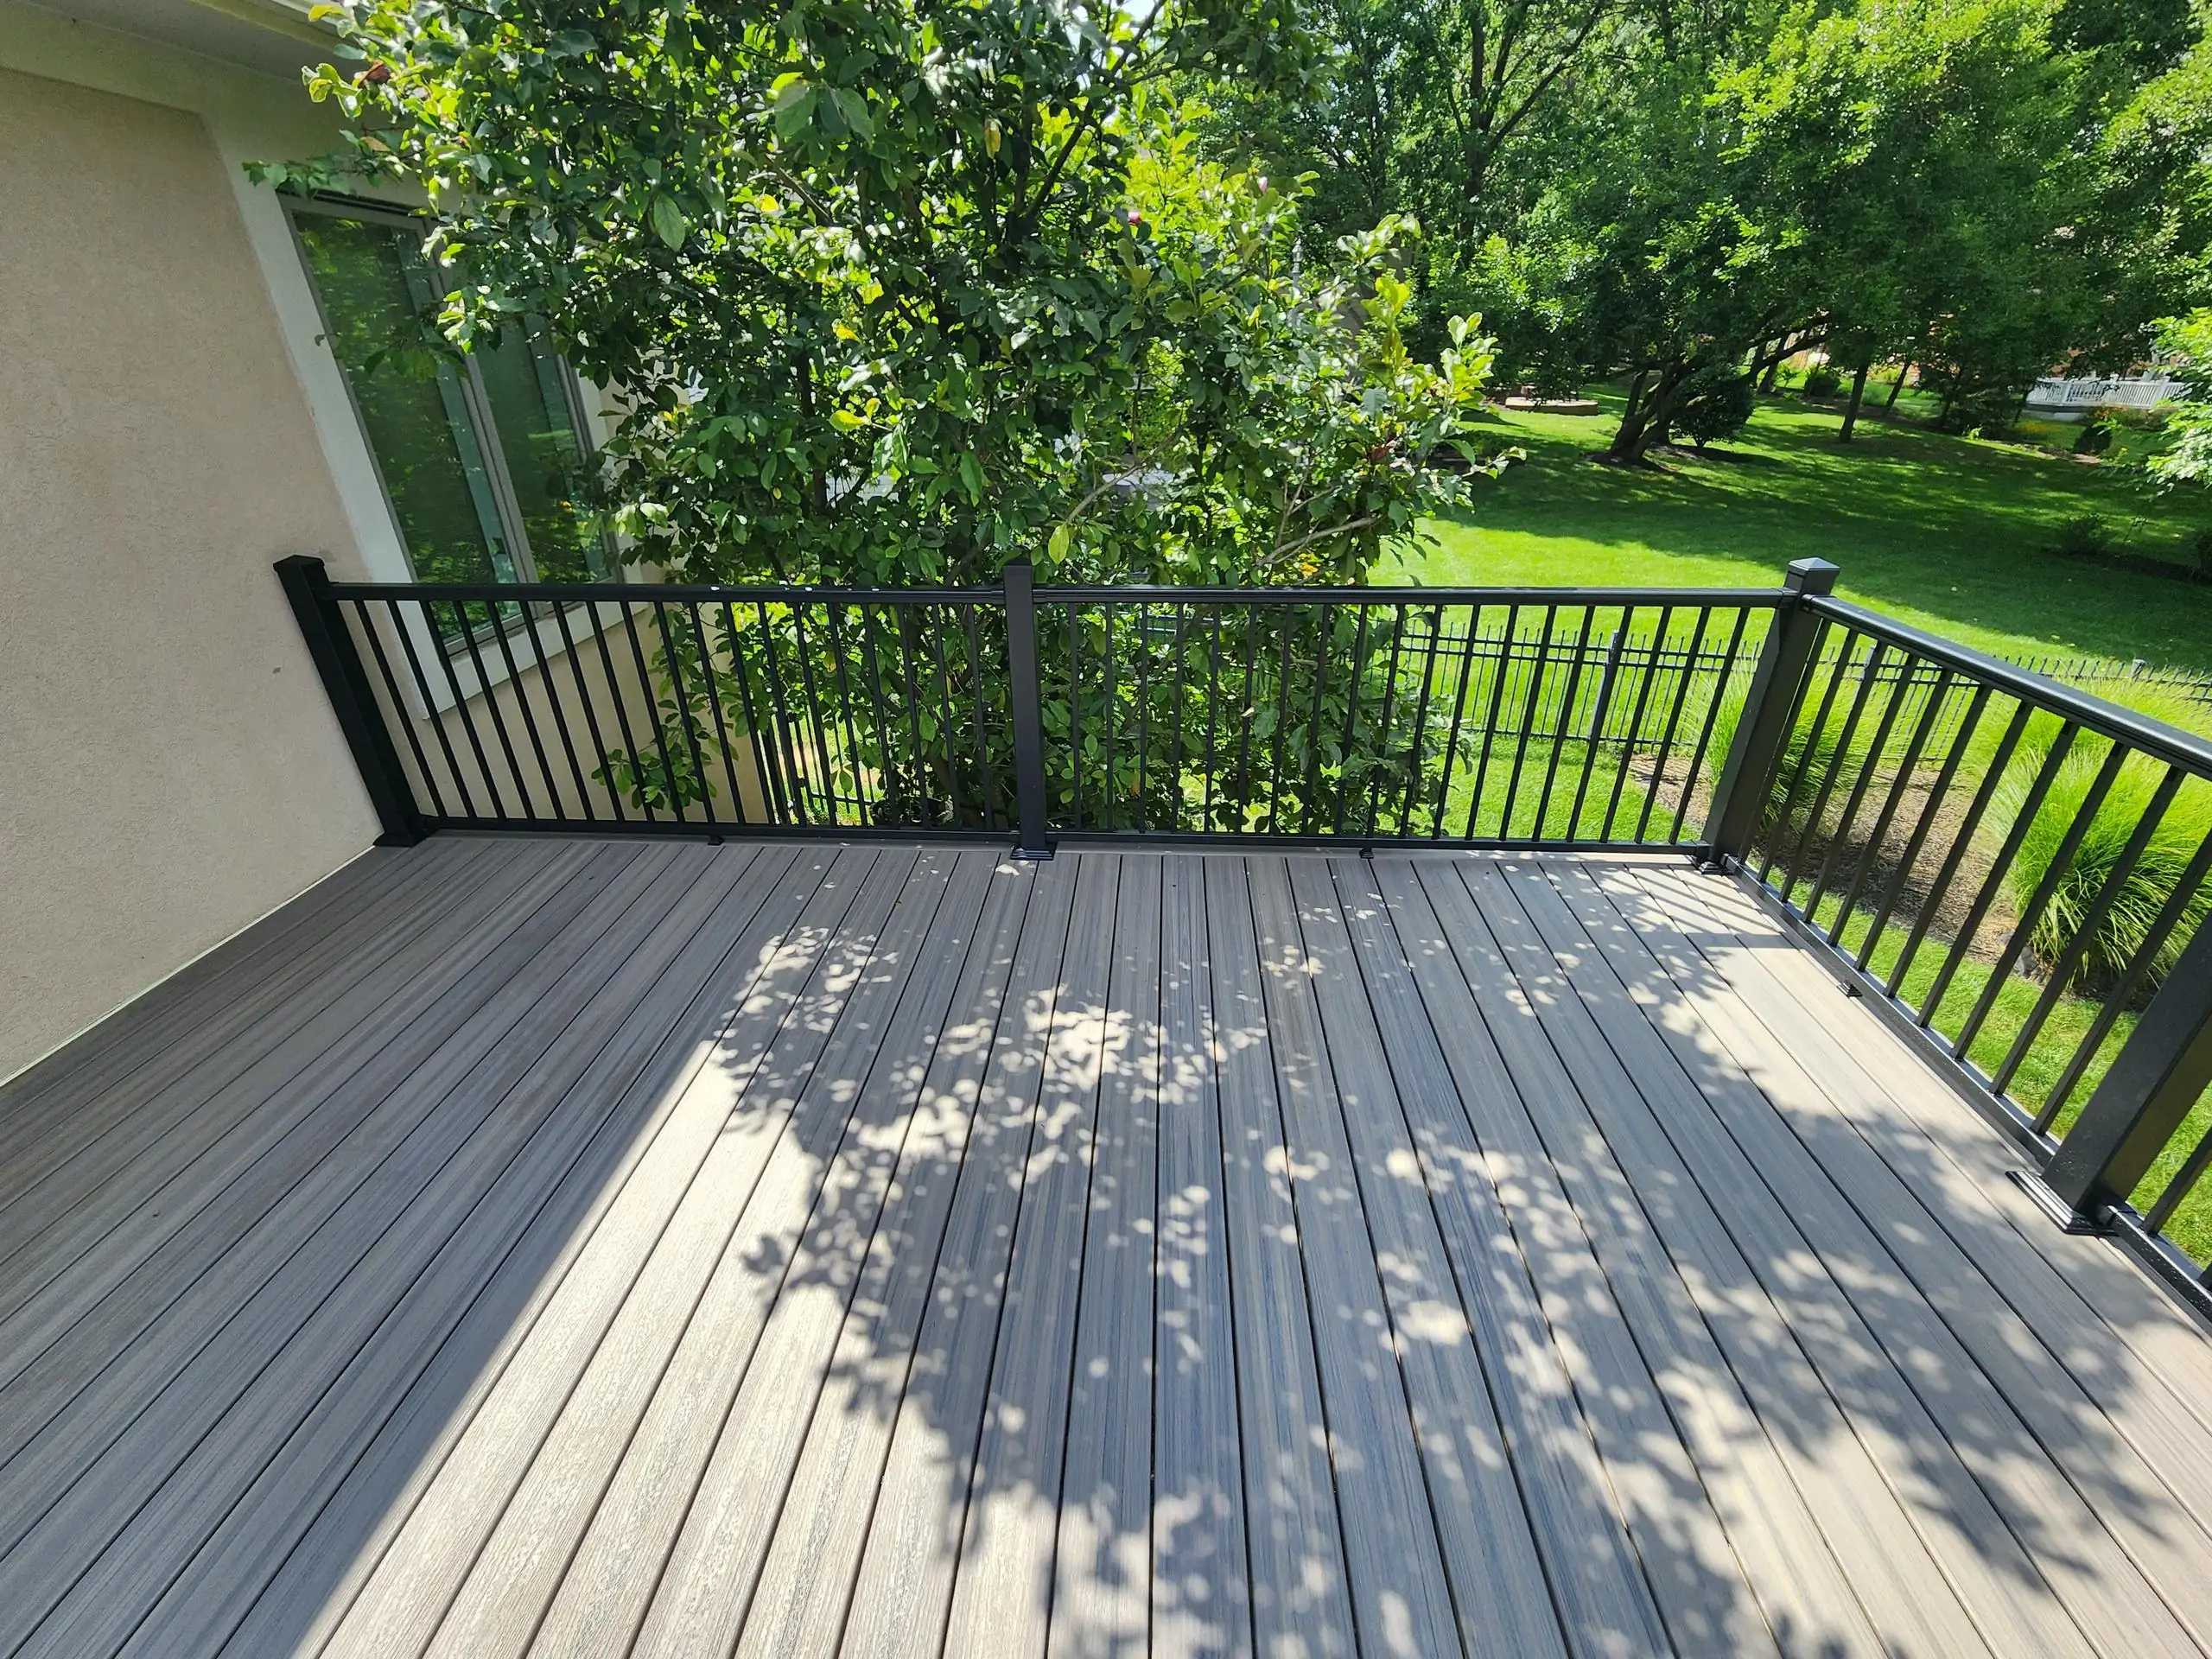
What Makes It Work: This design is a masterclass in contrast. The light gray of the composite decking creates a bright, airy foundation that feels expansive. This is then sharply defined by the bold, black metal railing. The clean, vertical lines of the railing slats create a graphic element that draws the eye outward, framing the lush green landscape beyond. The simplicity of the color palette—gray, black, and the beige of the house—allows the vibrant green of nature to be the true star. For a similar effect, check out the railing in Idea #3.
5. Light Brown Composite Deck with a Perpendicular Border Plank
How-To Brief: Adding a ‘breaker board’ or border plank is a pro-level detail that’s totally DIY-able. It breaks up the monotony of long runs of decking. Time: 2-3 hours. Cost: $50-$150 for the extra board and fasteners.
- Plan your layout: Decide where you want the border. It’s often used to frame the whole deck or, as seen here, to define a transition.
- Install your main decking, stopping where the border will go.
- Add extra joist blocking underneath where the border board will sit to ensure it has full support. The ends of both the main planks and the border plank need to be screwed into solid framing.
- Cut your main deck boards cleanly with a circular saw and a guide.
- Install the perpendicular border plank, ensuring a consistent gap.
- Continue with the rest of your main decking on the other side.
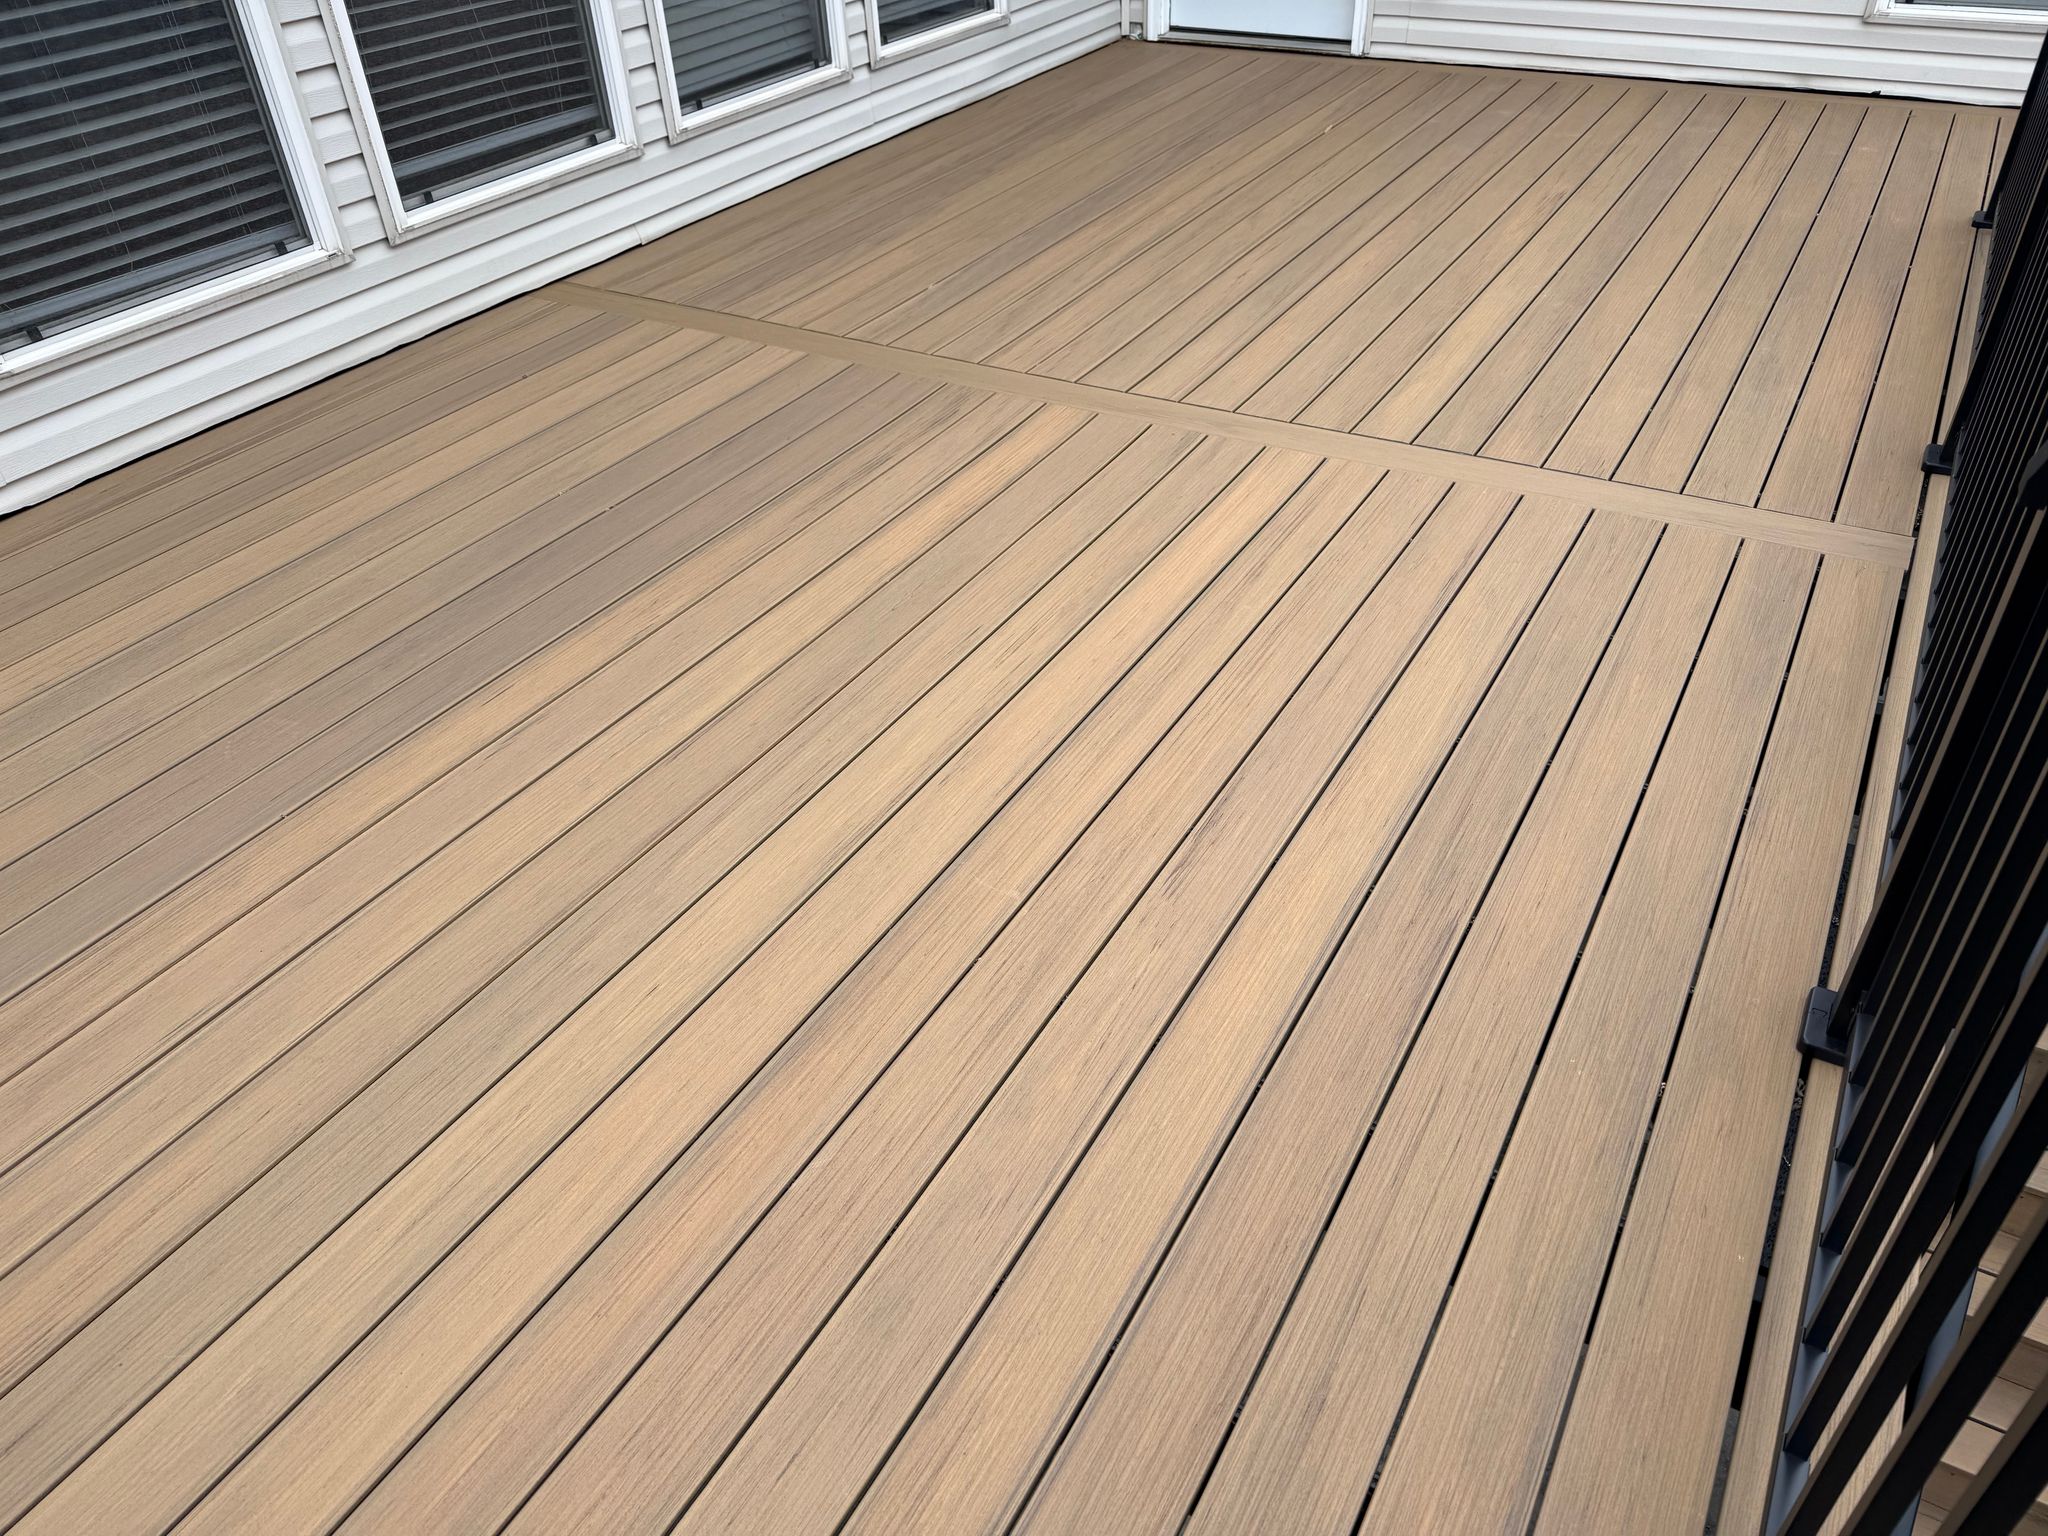
Real Talk: That single perpendicular board, often called a ‘picture frame’ or ‘breaker board,’ looks amazing, but it creates a joint that requires careful planning. Deck boards expand and contract lengthwise. When you run a board perpendicular, you’re changing the direction of that movement. You must leave a proper expansion gap (typically 1/8″ to 3/16″, check manufacturer specs) on both sides of that border plank. If you don’t, the boards can buckle and warp during hot weather, creating an ugly and unsafe raised edge.
6. Weathered Composite Decking with a Dark Privacy Wall
Style Math: This look achieves a quiet, contemporary feel using a simple ratio: 70% light neutral surface + 30% dark structural accents. The light brown-grey composite decking creates a large, uniform plane that feels clean and modern. The dark brown railing and matching privacy wall add structure, contrast, and a sense of enclosure. This formula works because the floor remains the largest visual element, keeping the space feeling open, while the darker elements add just enough definition and architectural interest without overwhelming it.
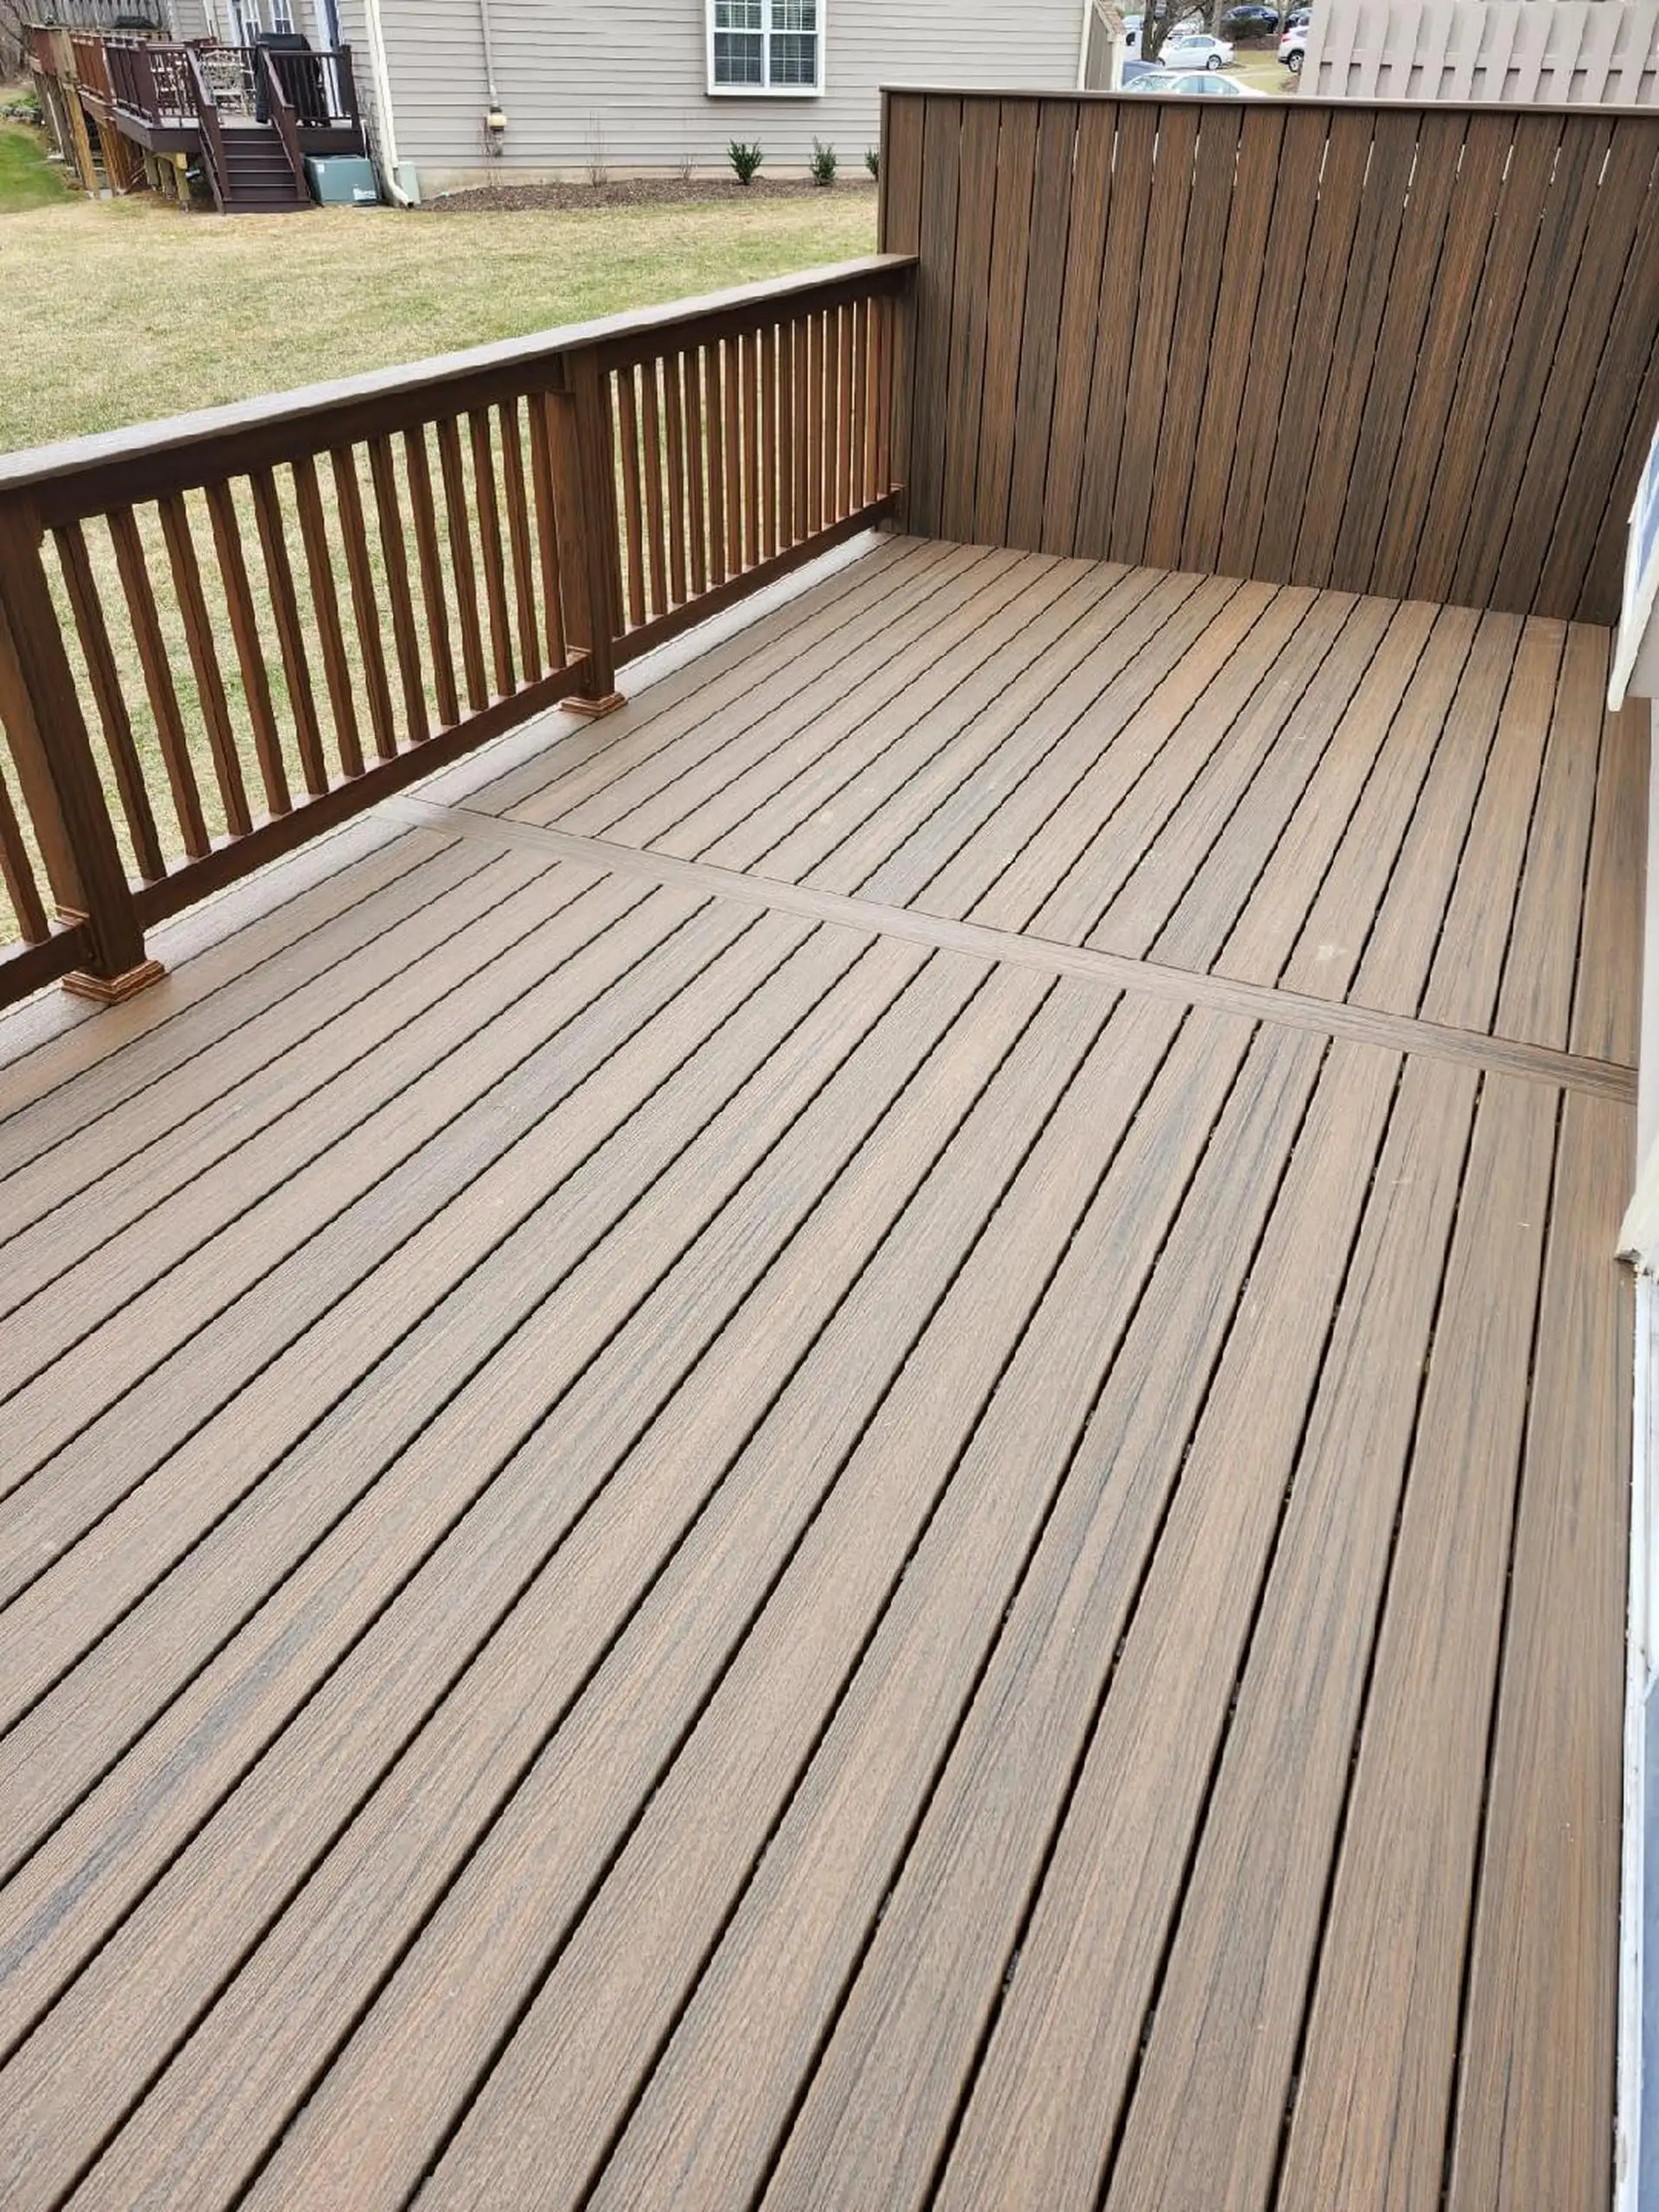
Get This Look For Less: Composite decking can be pricey. To get this same two-tone effect on a tighter budget, use standard pressure-treated pine decking for the floor and stain it with a semi-transparent weathered gray or light brown stain ($50/gallon). For the privacy wall and railing, use the same pressure-treated lumber but finish it with a solid, dark brown deck paint or stain ($60/gallon). This gives you the same color contrast and functionality for a fraction of the cost of composite materials. Find reclaimed lumber on Facebook Marketplace for even bigger savings.
7. Light Brown Composite Deck with Triangular Steps and Recessed Lights
The One Thing: The integrated, illuminated steps are what make this design special. It’s not just a flat rectangle; it’s a piece of functional architecture. By building the steps into the triangular corner, the design cleverly handles a change in elevation while adding significant visual interest. The small, recessed circular lights transform them from a simple utility into a design feature, providing safety and a high-end ambiance after dark. This thoughtful detail makes the deck feel custom and professionally designed.
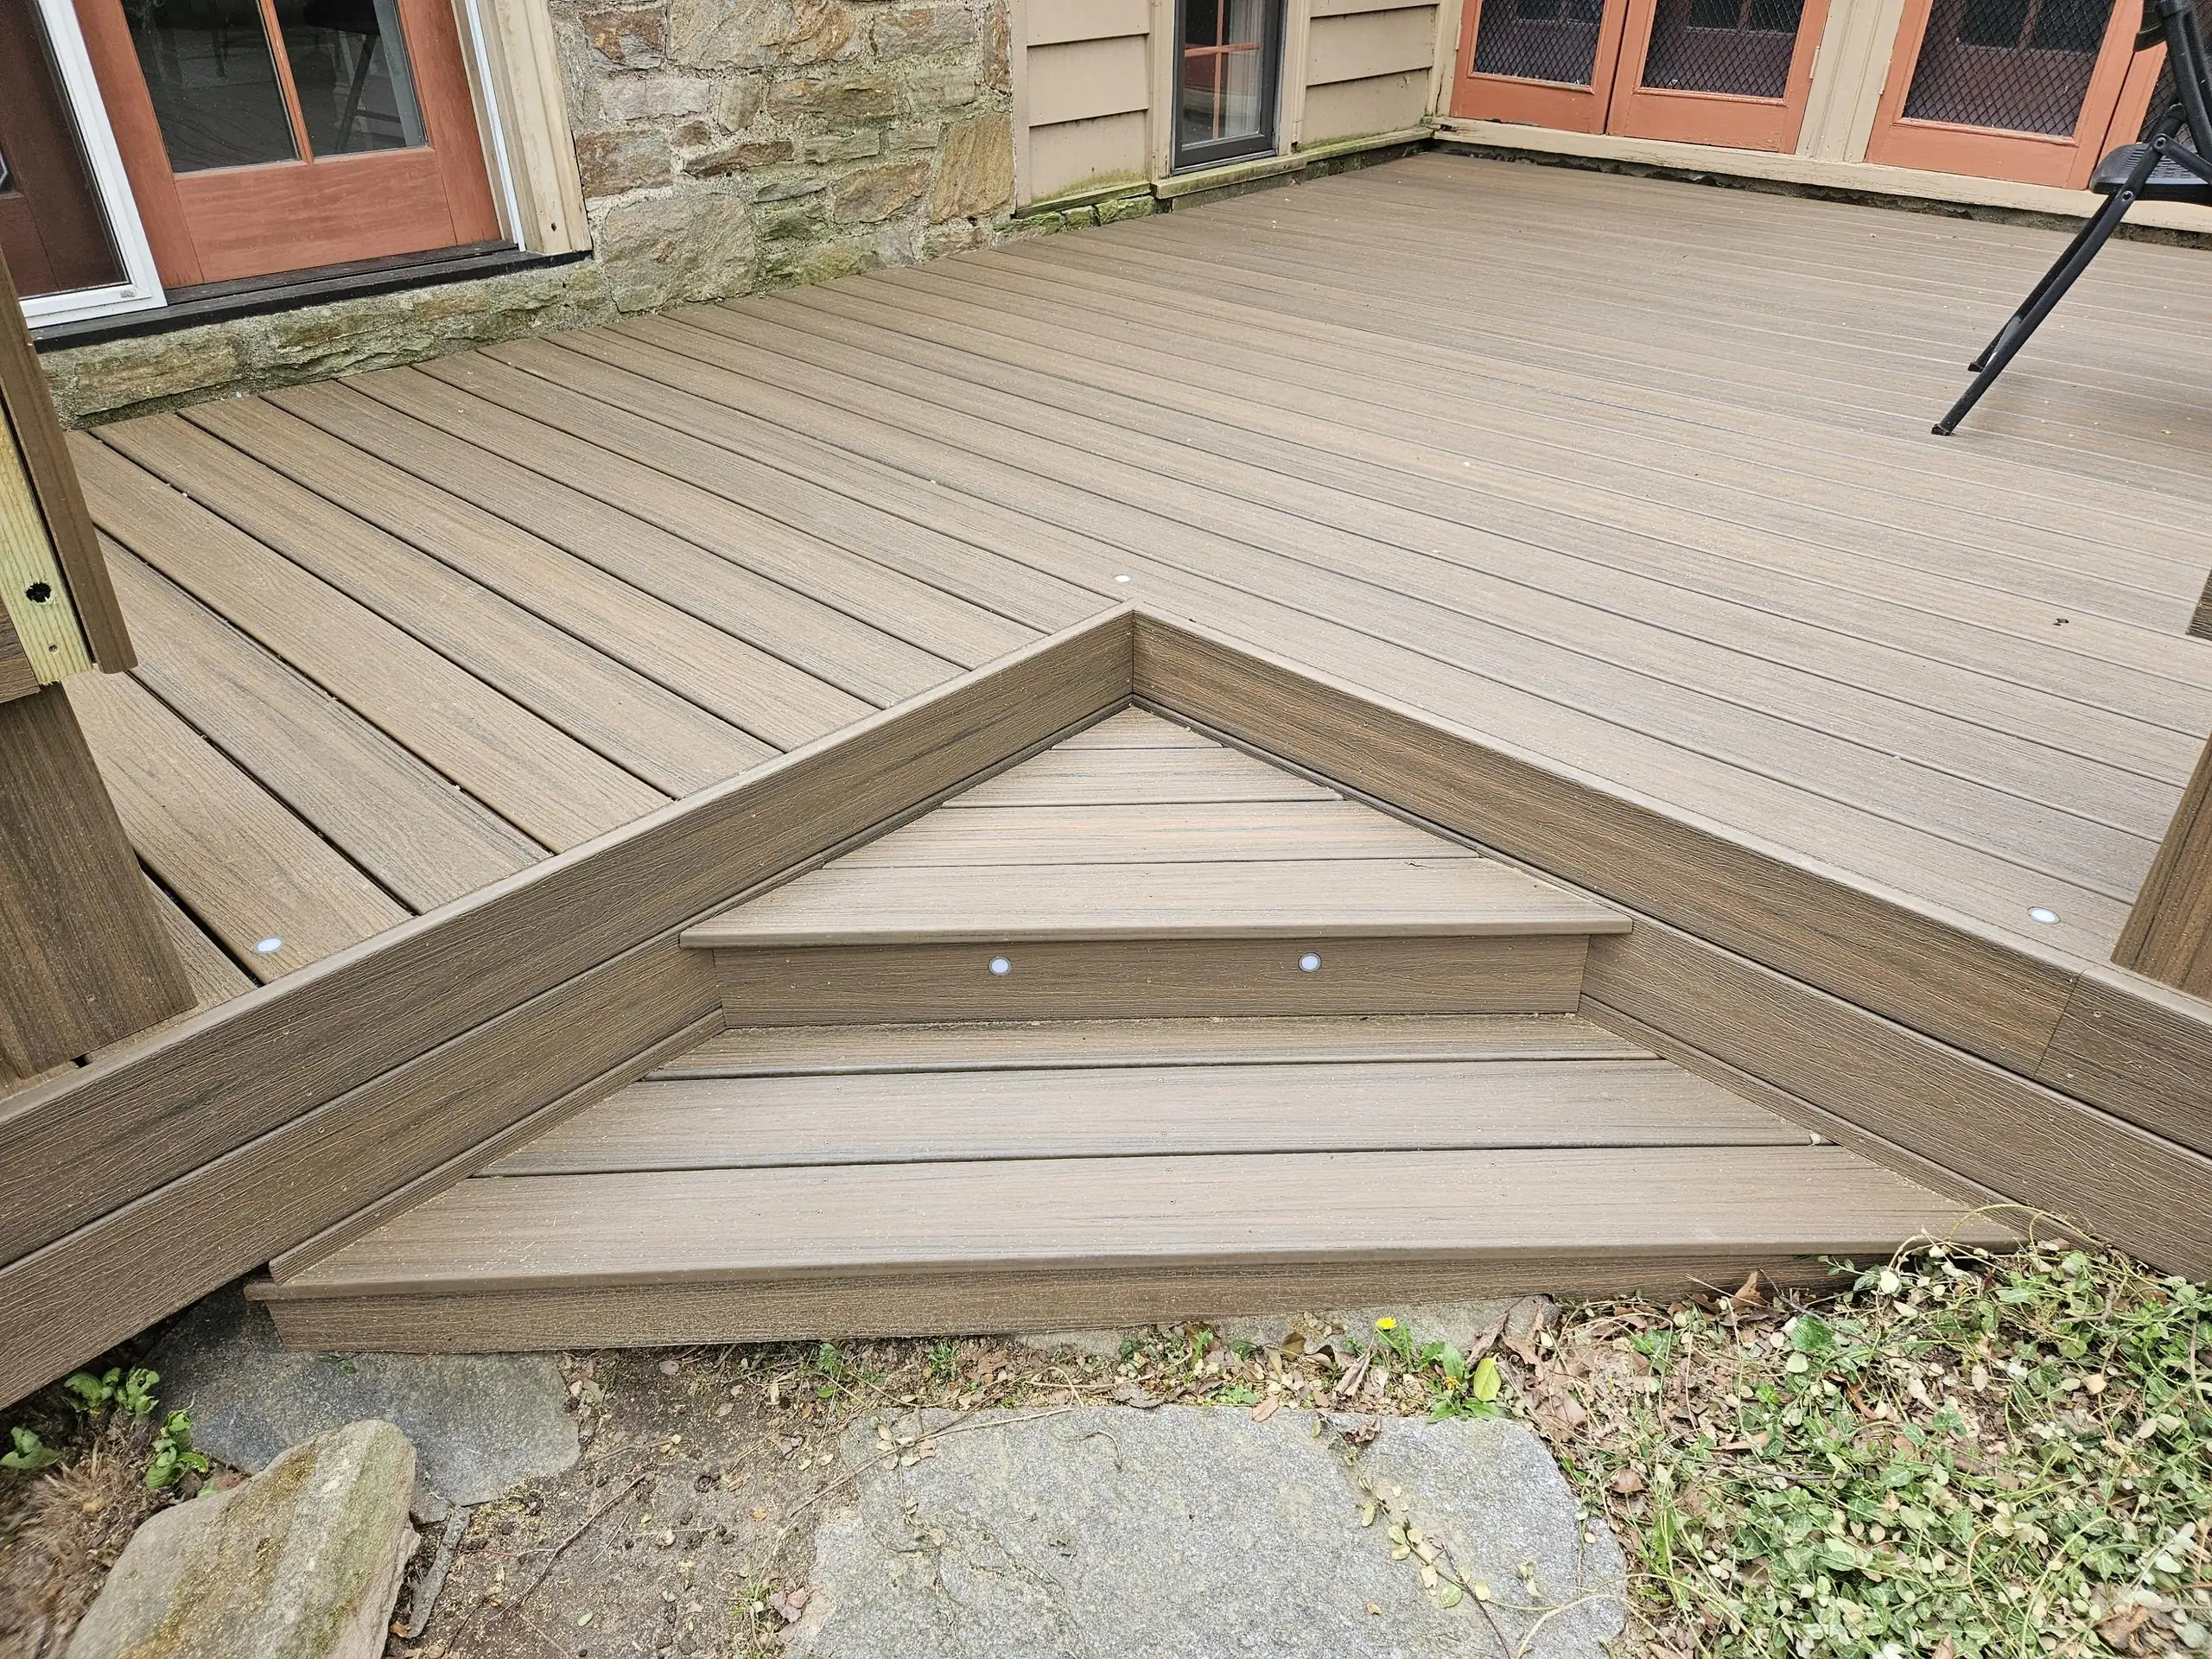
Designer Tip: When installing recessed deck lights, always opt for a low-voltage (12V) LED system. It’s much safer for outdoor environments and significantly easier for a DIYer to install than line-voltage (120V) lighting. For a subtle, sophisticated glow like this, choose fixtures with a warm white color temperature (2700K-3000K) and a low lumen output (around 20-50 lumens per light). This provides enough light to see the steps without creating distracting, airport-runway-style glare.
8. Dark Wood-Look Multi-Level Composite Deck with Integrated Steps
What Makes It Work: This design succeeds by creating a clear visual journey. The eye is naturally led from one level to the next. The use of a single material—the dark brown, wood-grain composite—for all the deck surfaces and wide steps creates a strong sense of unity. This dark, rich platform then provides a dramatic contrast against the lighter gray patio pavers and the bright green grass, clearly defining each zone. The multi-level structure breaks up what could have been a large, boring expanse, adding dimension and architectural interest. Compare the level changes here with the curves in Idea #9.
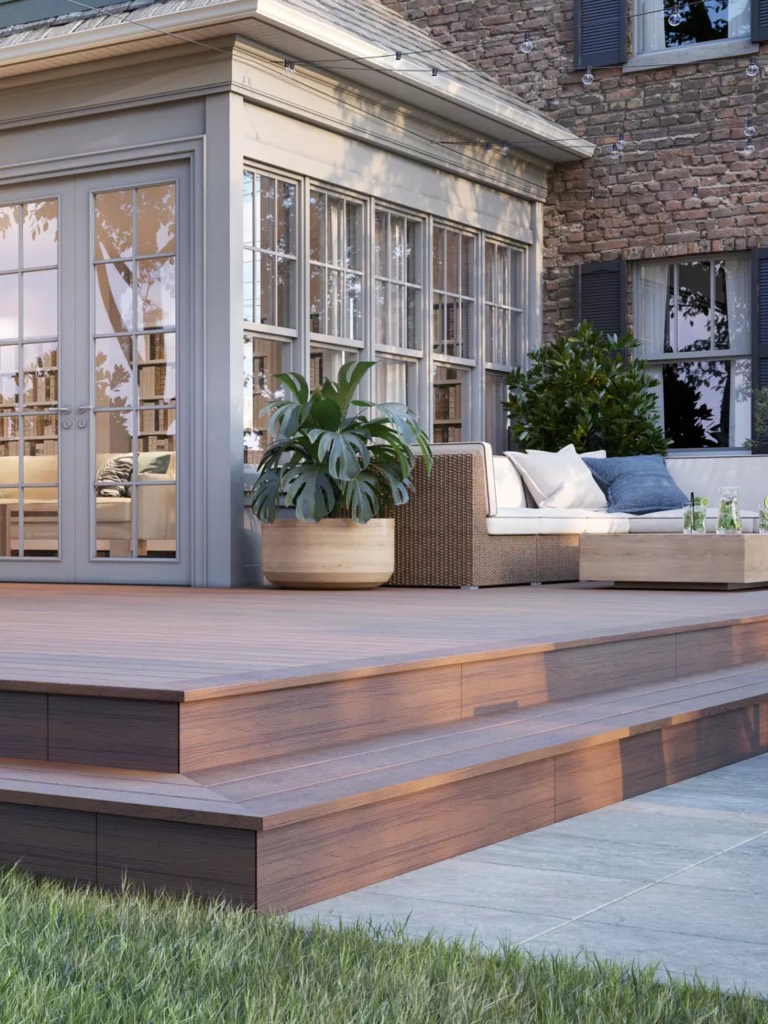
Scale Guide: A multi-level deck like this is an excellent solution for a sloped yard, but the steps themselves need careful consideration. For comfortable, lounge-like steps (often called ‘cascading’ steps), aim for a rise of 6-7 inches and a deep run (the tread depth) of at least 12-24 inches. This encourages people to sit on them. This design is ideal for managing a total elevation change of 18 to 36 inches. Any less, and a single platform might be better; any more, and you’ll need more traditional stairs with handrails for safety.
9. Curved Multi-Level Deck with Dark Brown Composite Planking
Budget Breakdown: A curved deck is a premium feature, as it requires more labor and material waste. The lighting and high-end railing also add to the cost.
- Dark Composite Decking (400 sq. ft.): $6,000 – $12,000
- Labor for Curved Installation: Additional $1,500 – $3,000
- White Vinyl Railing w/ Black Balusters: $4,000 – $7,000
- Railing Post Cap Lights (10): $500 – $1,200
- Outdoor Lounge Chairs: $800 – $2,000
- TOTAL: $12,800 – $25,200
Budget alternative: Achieve a similar feel with angled corners instead of true curves, use wood instead of composite, and opt for solar-powered cap lights instead of a hardwired system. This can bring the cost down to the $7,000 – $13,000 range.
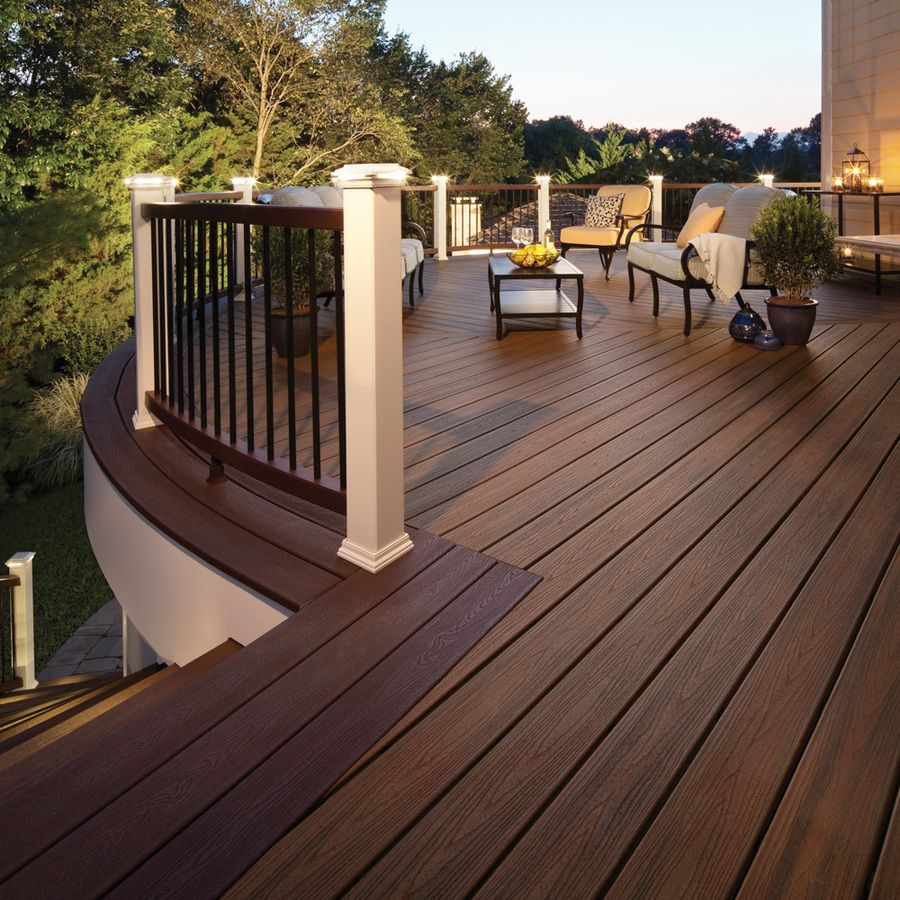
Real Talk: That beautiful curve doesn’t happen by accident. Composite deck boards can be heated and bent to create gentle curves, but it’s a specialized skill. This is not a beginner DIY project. It requires a ‘deck oven’ or heat blanket to get the board to a uniform, pliable temperature (around 250°F). If done incorrectly, the board can kink, warp, or crack. For a project this complex and costly, hiring an experienced deck builder who has specific experience with heat-bending composite is almost always the right call.
10. Natural Light Wood Plank Deck Overlooking a Calm Lake
Trending Context: This look taps directly into the ‘quiet luxury’ and ‘coastal grandmother’ aesthetics that are dominating Pinterest. It’s not about flashy materials but about quality, tranquility, and a connection to nature. The simple, light-toned wood and classic slatted furniture feel timeless and authentic. People are craving serene, uncluttered outdoor spaces that feel like a genuine retreat. This deck isn’t trying too hard; its beauty comes from its simplicity and the stunning natural view it so perfectly frames.
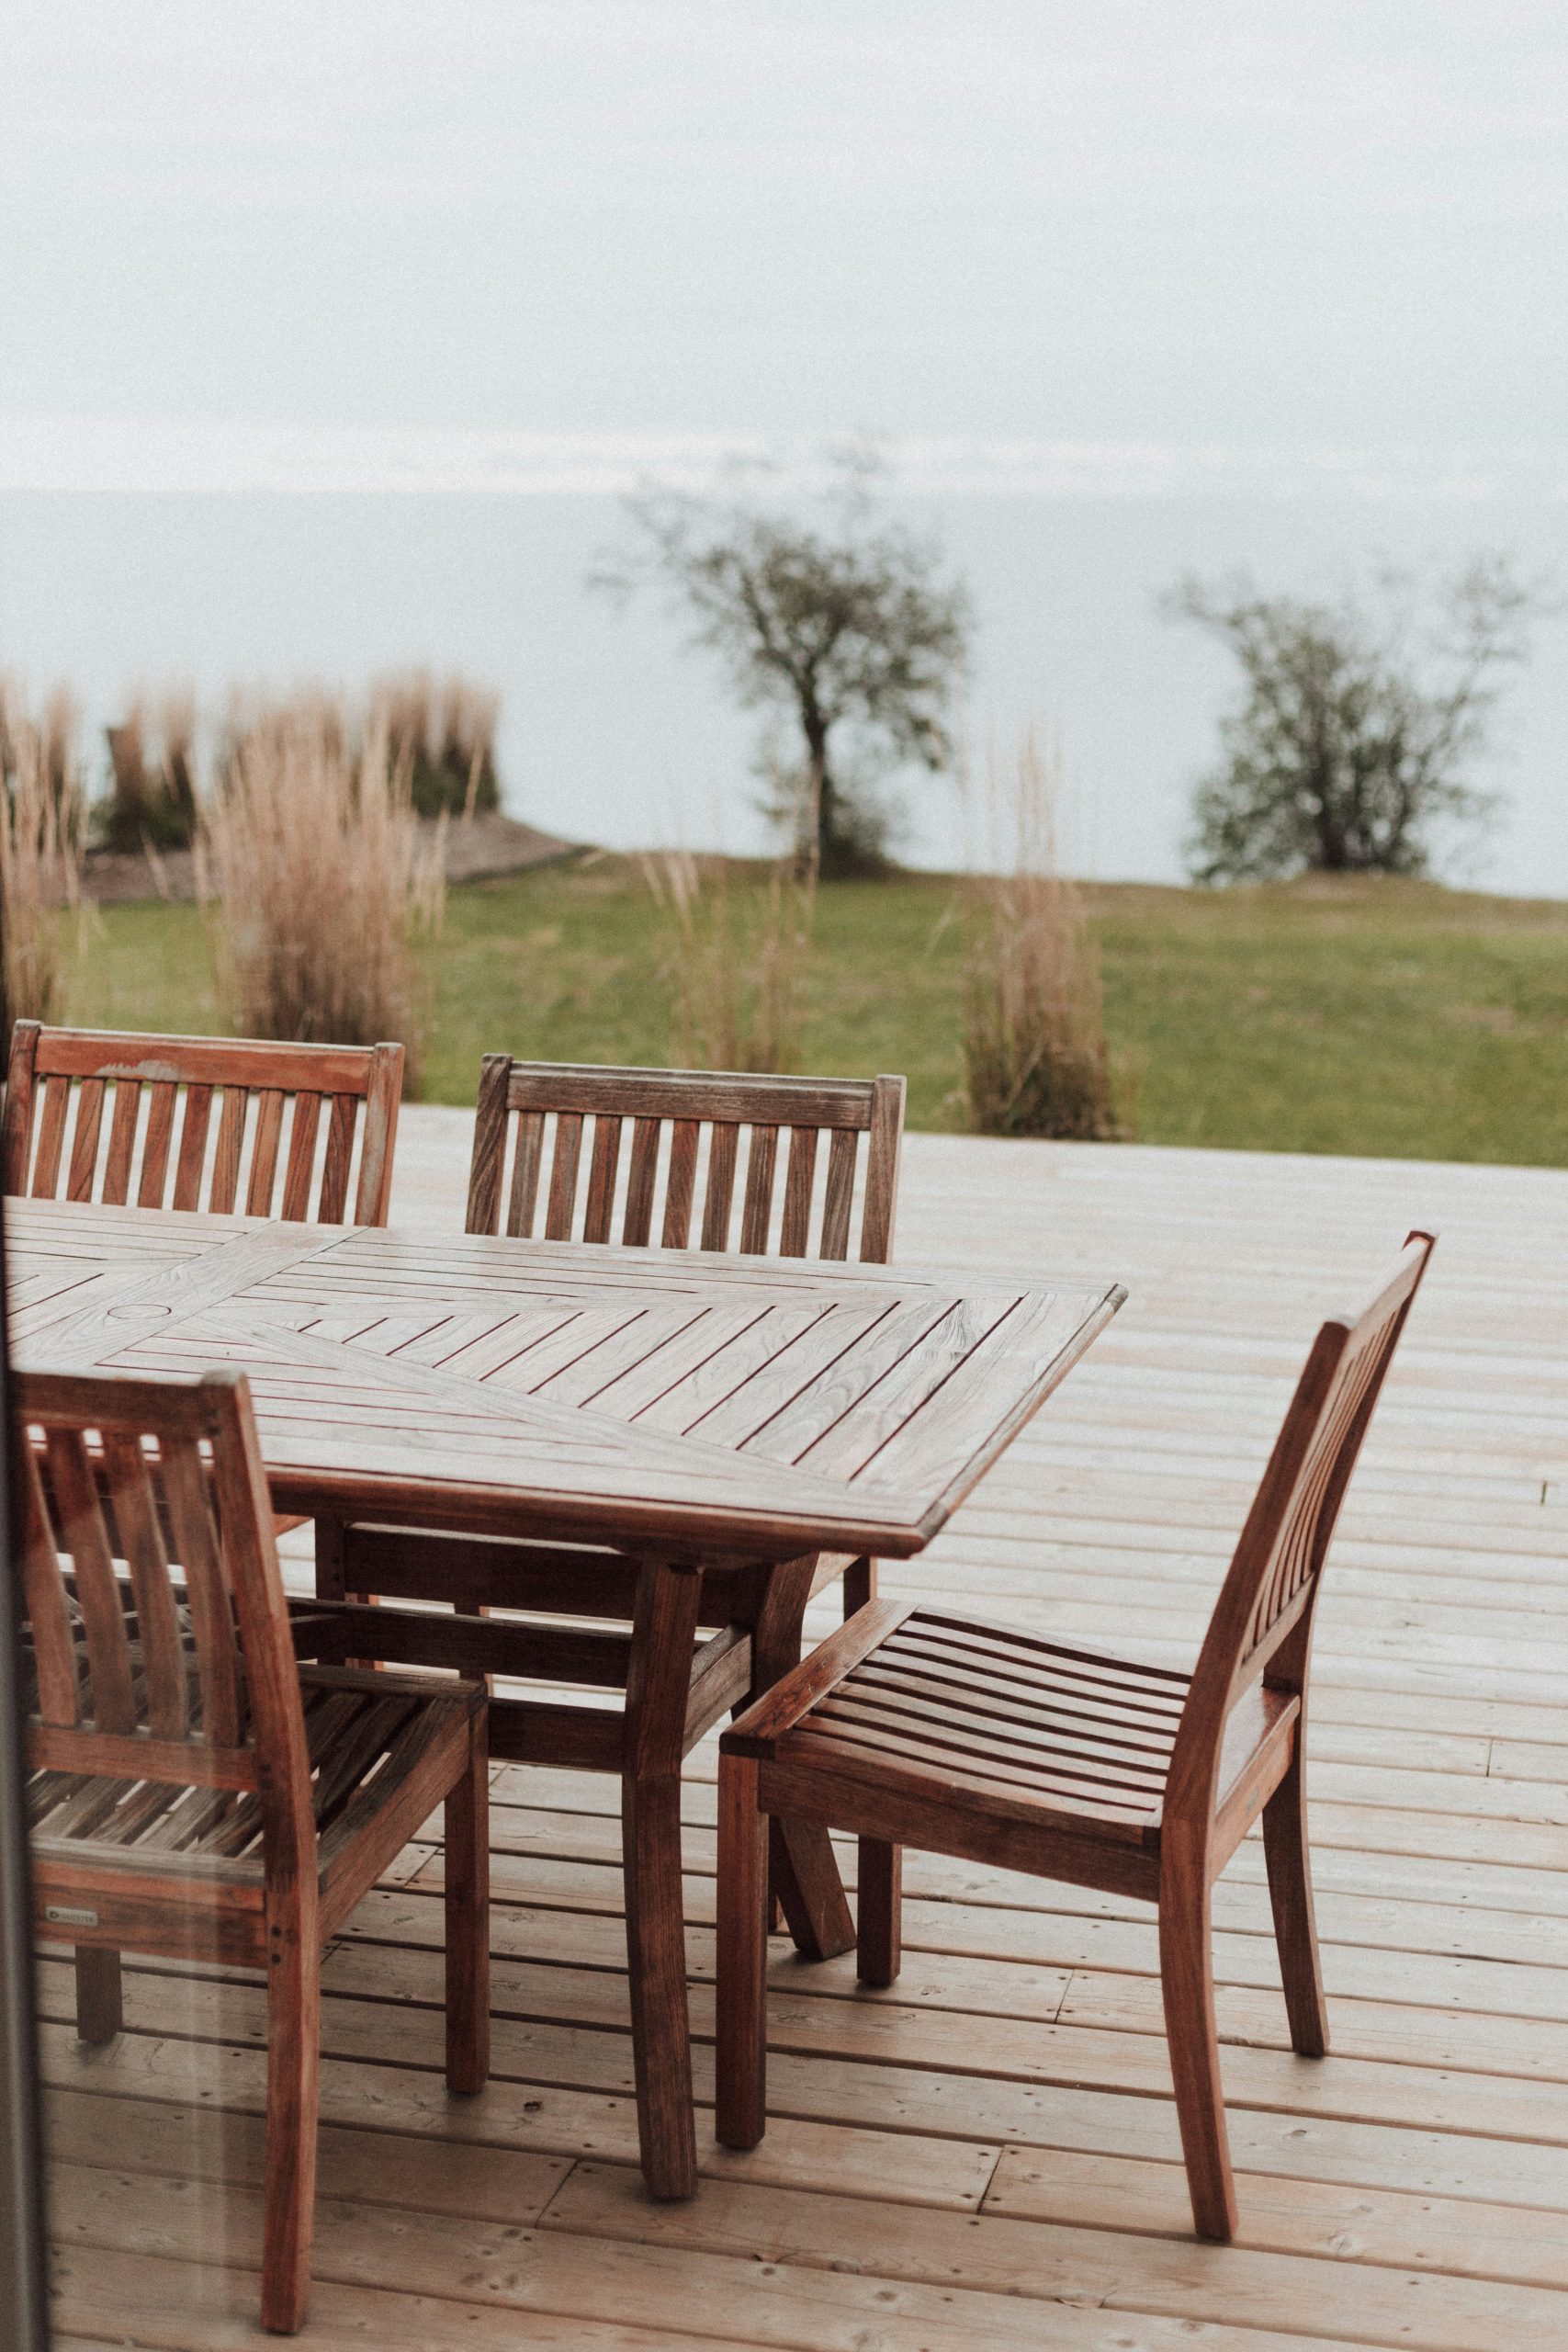
Maintenance Reality: Natural wood, especially a light-colored wood like cedar or pine near water, is a commitment. It will need to be cleaned and resealed every 1-2 years to prevent it from turning gray and splintering. The visible fasteners, while adding to the rustic charm, can become entry points for moisture if not properly sealed. Expect to spend a weekend each spring power washing (on a low setting!), potentially sanding rough spots, and applying a fresh coat of a quality penetrating oil or sealer. Annual cost: $100-$300 in materials if you DIY.
11. Geometric Wood-Look Deck Tiles in a Herringbone Pattern
How-To Brief: Interlocking deck tiles are one of the fastest ways to cover an old concrete patio or worn-out deck. The herringbone look is a stylish upgrade. Time: 2-4 hours for a 10×10 area. Cost: $5-$10 per square foot.
- Start with a clean, level surface. Sweep away all debris.
- Begin in a corner. Lay your first tile.
- The key to this pattern is orienting the small planks within each tile. For a herringbone effect with square tiles, you’ll need tiles where the internal planks are all angled at 45 degrees.
- Lay subsequent tiles, ensuring they interlock securely. The pattern is created by alternating the direction of the tiles.
- Work your way across the area, laying full tiles first.
- For the edges, you’ll need to cut tiles to fit using a jigsaw or handsaw. Measure carefully!
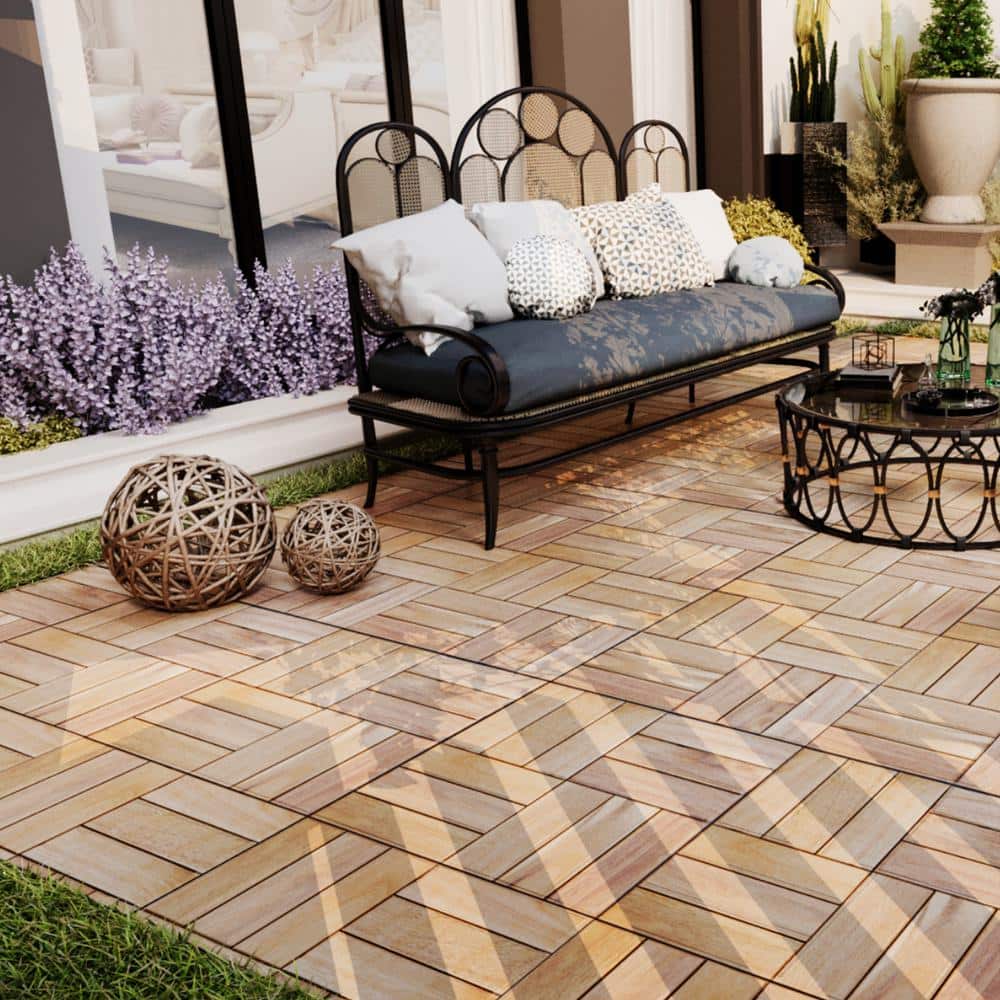
Get This Look For Less: While deck tiles are a great DIY option, you can create a similar herringbone effect for less money, but with more effort. Use standard, inexpensive wood deck boards (like 1×4 pine). Cut them into shorter, uniform lengths (e.g., 24 inches). Then, lay them out and fasten them to your deck joists in a true herringbone pattern. It requires more cuts and careful layout, but the material cost can be 40-60% lower than pre-made tiles. This is a great budget choice if you’re comfortable with a saw and have a weekend to spare. For a different tile look, see the balcony in Idea #24.
12. Interlocking Wood-Look Tiles and Artificial Grass on a Balcony
Before You Start Checklist: A mixed-material balcony floor is fantastic, but check these things first.
- Measure your balcony dimensions accurately. Buy about 10% extra tiles and turf for cuts and mistakes.
- Check the drainage situation. Most interlocking tiles are designed to let water flow underneath but ensure your balcony has a proper slope so water doesn’t just sit there.
- Confirm your building’s rules. Some condos or apartment buildings have restrictions on what you can place on your balcony floor.
- Decide on your layout. Sketch out where the tiles and grass strips will go before you start clicking them together. This will save a lot of headaches.
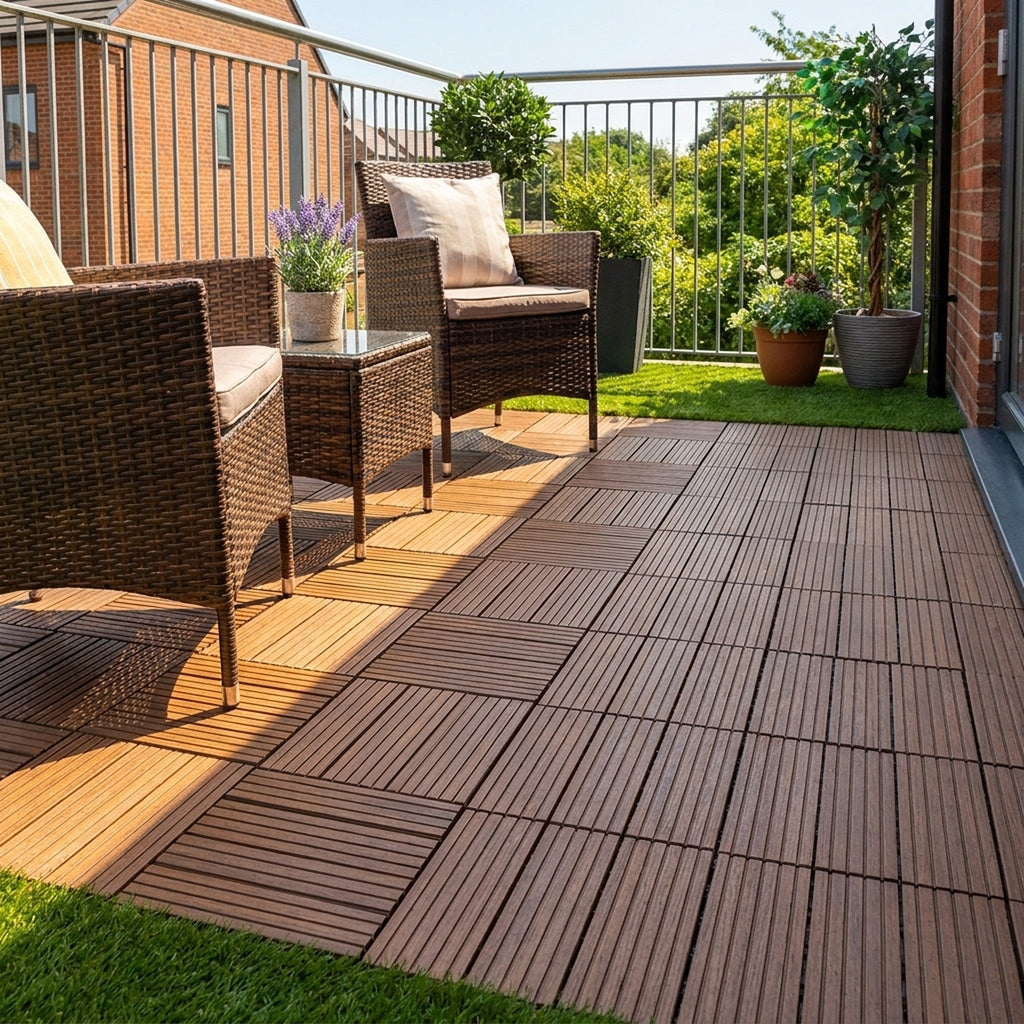
What Makes It Work: This balcony floor feels special because it masterfully combines textures. The warm, linear pattern of the wood-look tiles provides a solid, structured base. The strips of bright green artificial grass break up that pattern, adding a soft, organic texture and a welcome pop of color. This ‘texture blocking’ creates visual interest and cleverly defines the space, making the small balcony feel more dynamic and thoughtfully designed. It’s a much more engaging solution than just using a single material across the entire floor. This is a great small-space alternative to a full deck like Idea #12.
13. Grey Composite Deck with a Modern Horizontal Bar Railing
Designer Tip: For a high-contrast railing like this to really pop, the details matter. The thin, white horizontal bars are likely tensioned stainless steel cables that have been powder-coated white. To keep them perfectly straight and taut over a long span, intermediate support posts (called stanchions) are needed every 4-5 feet. Using black for the main posts and a contrasting white for the infill creates a crisp, graphic look that feels more intentional than a single-color railing system.
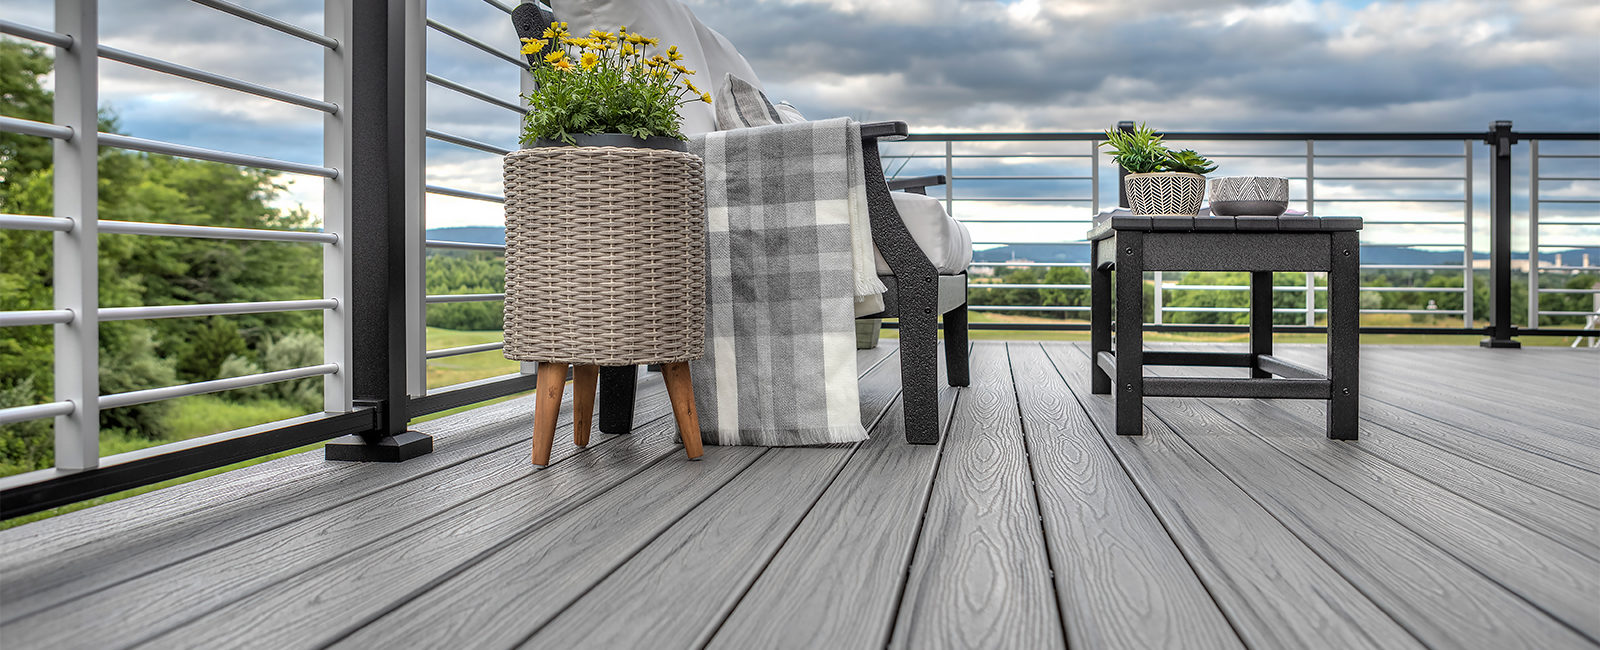
Style Math: This contemporary palette is built on layers of monochrome: 50% medium grey decking + 30% dark grey/black accents + 20% crisp white details. The grey composite planks provide a neutral, modern field. The dark grey armchair and black railing posts ground the space with depth and contrast. The thin white railing bars, cushion, and even the stitching on the throw blanket add bright, clean highlights that prevent the grey-on-grey scheme from feeling flat. The result is sophisticated, serene, and anything but boring.
14. Geometric Black and White Tile Deck with Vibrant Greenery
Budget Breakdown: A full-tile patio with high-end furniture is a significant investment. The tile itself and the labor to install it correctly are the main drivers.
- Patterned Cement or Porcelain Tile (250 sq. ft.): $2,500 – $7,500
- Installation Labor (including prep): $3,000 – $6,000
- Light Wood Outdoor Dining Set: $1,200 – $3,000
- Outdoor Sofa & Pillows: $1,500 – $4,000
- Mature Tree & Custom Planter Base: $1,000 – $5,000+
- TOTAL: $9,200 – $25,500
Budget alternative: Get a similar vibe by painting a geometric pattern on an existing concrete slab using porch and floor paint ($200). Use IKEA or Target furniture and fill planters with smaller, less expensive plants ($2,000 total).
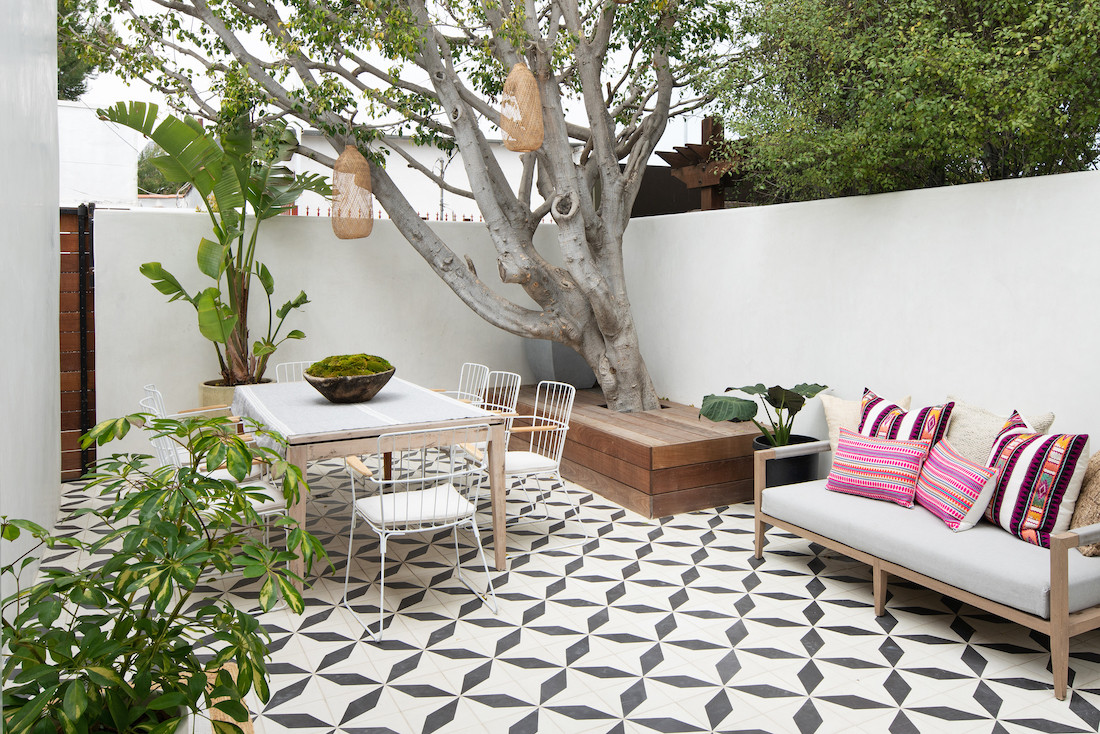
What Makes It Work: This space is a masterclass in balancing a bold pattern with natural elements. The black and white geometric tile floor provides a high-energy, graphic base that could easily feel overwhelming. However, it’s perfectly balanced by the abundant use of soft, natural textures. The warm wood of the dining table, the lush green leaves of the numerous plants, and the mature tree all work to soften the hard edges of the tile pattern. This blend of graphic modernism and organic softness is what creates such a vibrant, inviting oasis.
15. Dark Brown Wood-Grain Decking with White Adirondack Chairs
Designer Tip: To achieve this cozy, layered lighting scheme, think in zones. First, general ambient light comes from recessed ceiling fixtures. Second, task lighting for the dining area is provided by the low-hanging woven pendant. Third, accent lighting comes from the fireplace. For the overhead lights, install them on a dimmer switch. This allows you to turn them down low, so they provide a soft glow without competing with the warmth of the fire and the focused light from the pendant, creating that perfect evening atmosphere.
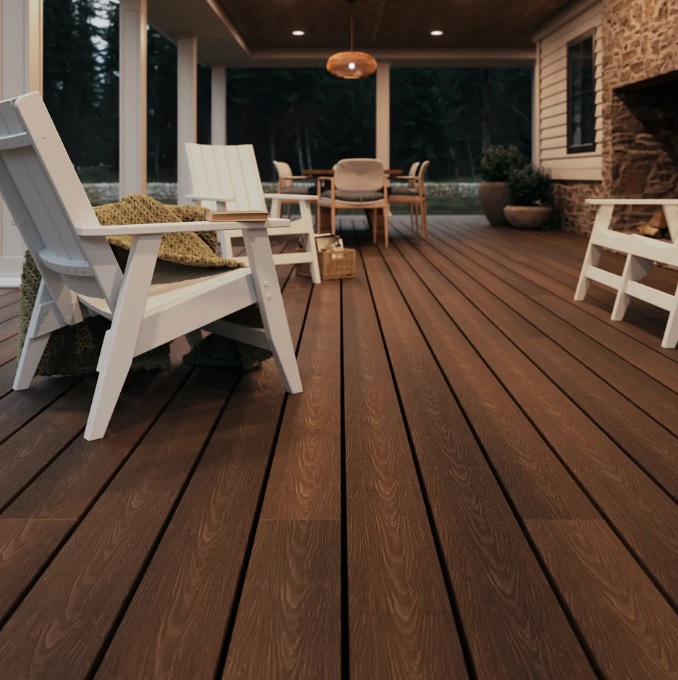
Scale Guide: A covered deck area that can comfortably accommodate both a dining zone and a separate lounge area needs significant square footage. Aim for a minimum depth of 16 feet and a width of at least 25 feet (400 sq. ft. total). This allows for a full-size dining table with chairs that can be pulled out, plus a generous seating arrangement around the fireplace with comfortable traffic flow between the two zones. A ceiling height of at least 9 feet is also recommended to keep the covered space from feeling dark or claustrophobic.
16. Reddish-Brown Stained Wood Deck with Bold Red Accents
Trending Context: We’re seeing a huge return to rich, warm wood tones after years of cool grays dominating outdoor design. This reddish-brown stain feels classic yet fresh, bringing a lot of warmth and character to the space. Paired with the pop of bright, confident red in the cushions, this look taps into the ‘Joyful Expression’ trend. Homeowners are getting more comfortable using bold color outdoors to create spaces that feel personal and energetic, moving away from purely neutral palettes.
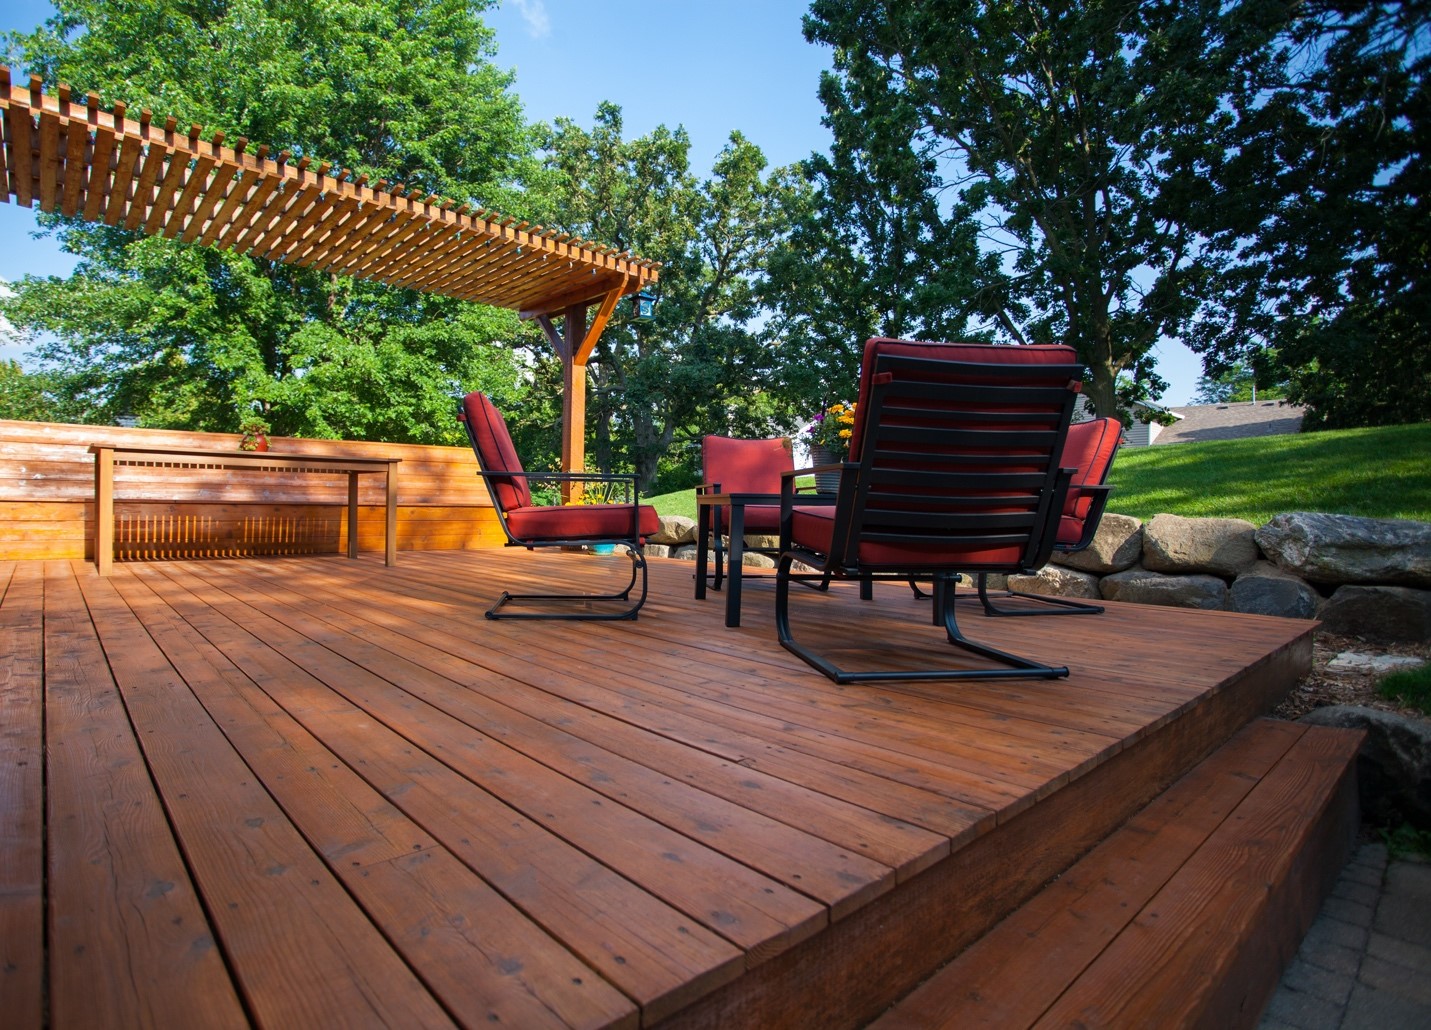
Get This Look For Less: The core of this look—a warm wood deck with colorful accents—is highly achievable on a budget. Instead of expensive hardwood, use standard pressure-treated pine decking, which costs about $2-$4 per square foot. The magic comes from the stain. A quality semi-transparent stain in a ‘Redwood’ or ‘Cedar’ tone will give you this rich color for about $50 a gallon. Find black metal patio chairs on Facebook Marketplace ($100-$200 for a set) and add new, vibrant red cushions from a store like Target or At Home for about $25-$40 each.
17. Long Dark Grey Outdoor Rug on a Brown Wooden Deck
The One Thing: The long, dark grey runner rug is the critical element that unifies this multi-functional deck. It acts as a visual pathway, connecting the distinct dining and lounge areas into one cohesive space. Without it, the two zones might feel disconnected, floating separately on the brown wooden planks. By running it down the center, it creates a strong linear axis that organizes the whole layout, making the deck feel more intentional and professionally styled. It’s a simple addition with a huge impact on the overall flow.
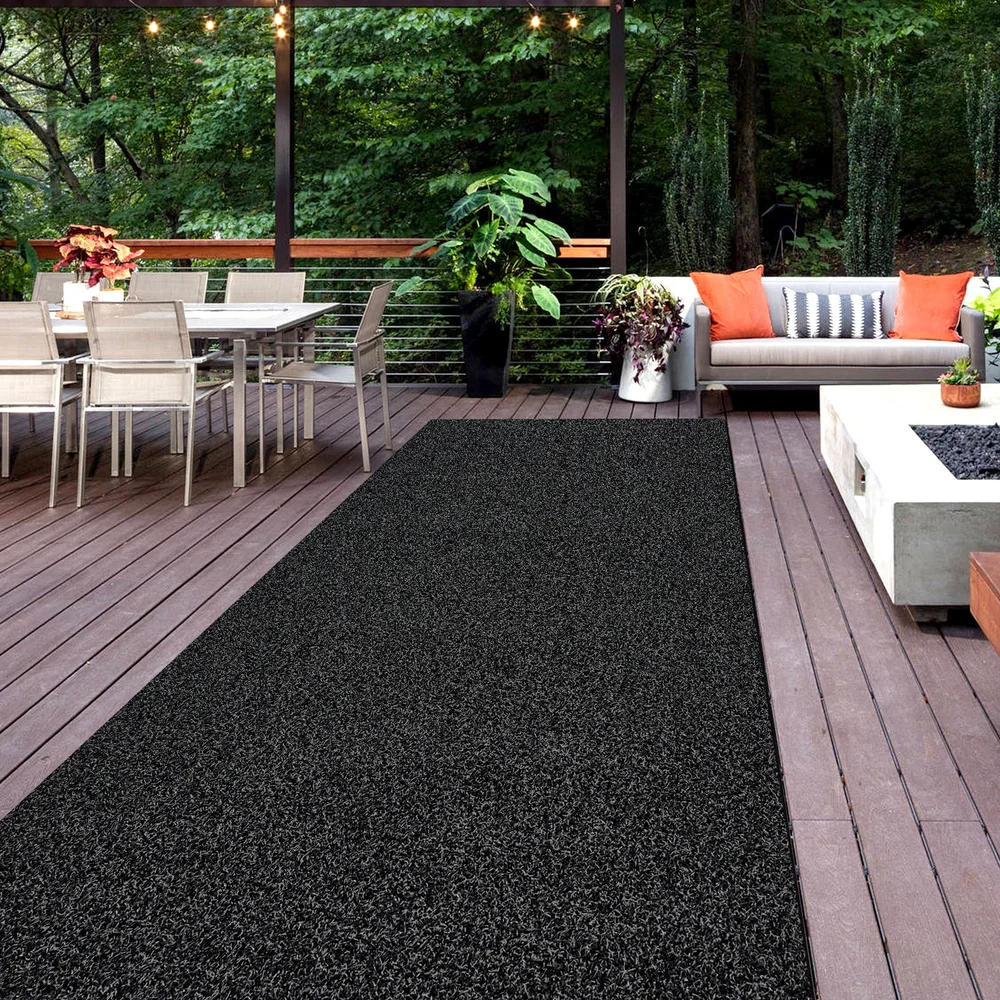
Real Talk: A dark-colored rug on a deck that gets a lot of direct sun can become surprisingly hot. That chic dark grey polypropylene can really absorb heat, making it uncomfortable for bare feet on a sunny afternoon. If your deck is a sun trap, consider a lighter color like a beige, light grey, or even a patterned rug with a lot of white or cream in it. It will reflect more sunlight and stay cooler to the touch. Also, a dark rug will show light-colored debris like pet hair and pollen more readily than a lighter one.
18. Natural Light Wood Plank Decking by a Riverside
What Makes It Work: This deck’s charm lies in its unpretentious, rustic simplicity. It works because it doesn’t try to compete with its natural surroundings. The light, natural wood planks feel like an organic extension of the riverside environment. The exposed wooden support beams and simple metal furniture reinforce the functional, no-fuss aesthetic. The translucent corrugated roof is a clever choice, providing shelter from rain without blocking the beautiful, soft light filtering through the trees. It feels less like a ‘decorated’ space and more like a comfortable, well-built perch to enjoy the view.
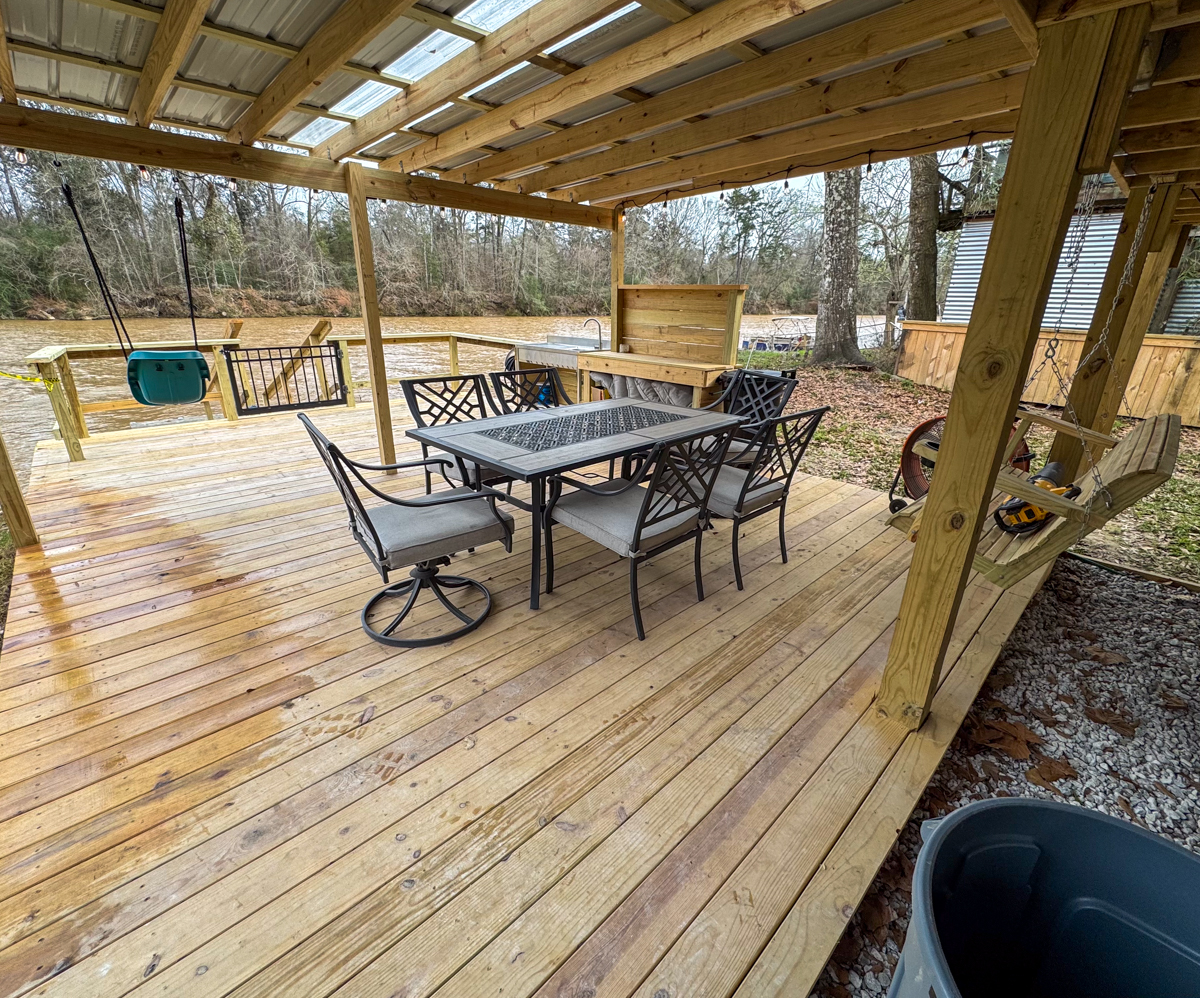
Maintenance Reality: A wooden structure this close to a river is in a constant battle with moisture. The translucent roof helps, but ambient humidity, splash-up, and condensation are major factors. The underside of the deck is particularly vulnerable to rot and mildew if it’s not well-ventilated. Using pressure-treated lumber for the framing is essential. The light wood decking will require a yearly cleaning and application of a water-repellent sealer with a mildewcide additive to prevent it from getting slimy and discolored.
19. Modern Gray Large-Format Outdoor Tile Patio
Style Math: This serene, modern look is achieved with a formula of 60% cool neutral hardscaping, 30% lush, living greenery, and 10% soft white furnishings. The large, light gray floor tiles and the dark pergola create a clean, architectural foundation. The climbing vines and surrounding landscaping are not just background; they are a major design element, providing softness and vibrant color. The white sofas and beige pouf act as comfortable, sculptural accents that brighten the space. The balance between hard and soft, and neutral and vibrant, is what makes it feel so inviting. For another tile-based look, see Idea #22.
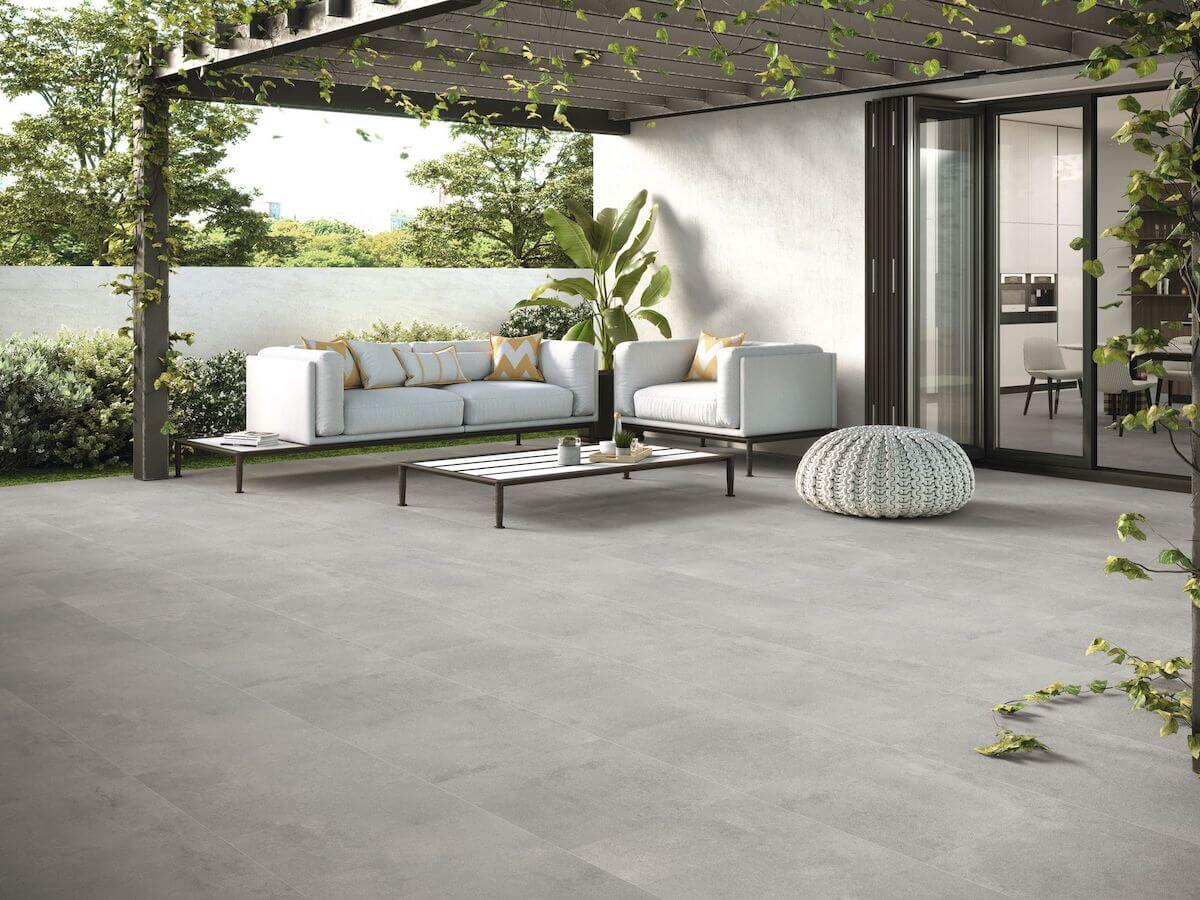
Designer Tip: When using large-format tiles (like 24×48 inches) outdoors, the substrate preparation is everything. Do not lay them directly on dirt or sand. For a lasting, crack-free installation, you need a reinforced concrete slab as a base. Then, the tiles should be set with a high-quality, polymer-modified thin-set mortar designed for large, heavy tiles. Using a leveling system with clips and wedges is non-negotiable to ensure there is no lippage (uneven edges), which can be a serious tripping hazard.
20. Modern Patio with Brown Composite Decking and Gray Tile
How-To Brief: Creating a seamless transition between composite decking and patio tiles requires careful planning of the elevations. Time: 1-2 days of prep work. Cost: Minimal, just careful labor.
- Start with the patio tile elevation. Once your concrete base is poured and tiles are selected, you know your final finished height.
- Build your deck’s substructure (the joists and framing) so that the top of the joists is lower than the finished tile height.
- The calculation is (Tile Height) – (Deck Board Thickness) = Top of Joist Height.
- For example, if your tiles are 1″ thick and your composite deck boards are 1″ thick, the top of your deck joists should be level with the top of the concrete slab the tiles are laid on.
- This ensures that when you lay the deck boards, they will be perfectly flush with the tiles.
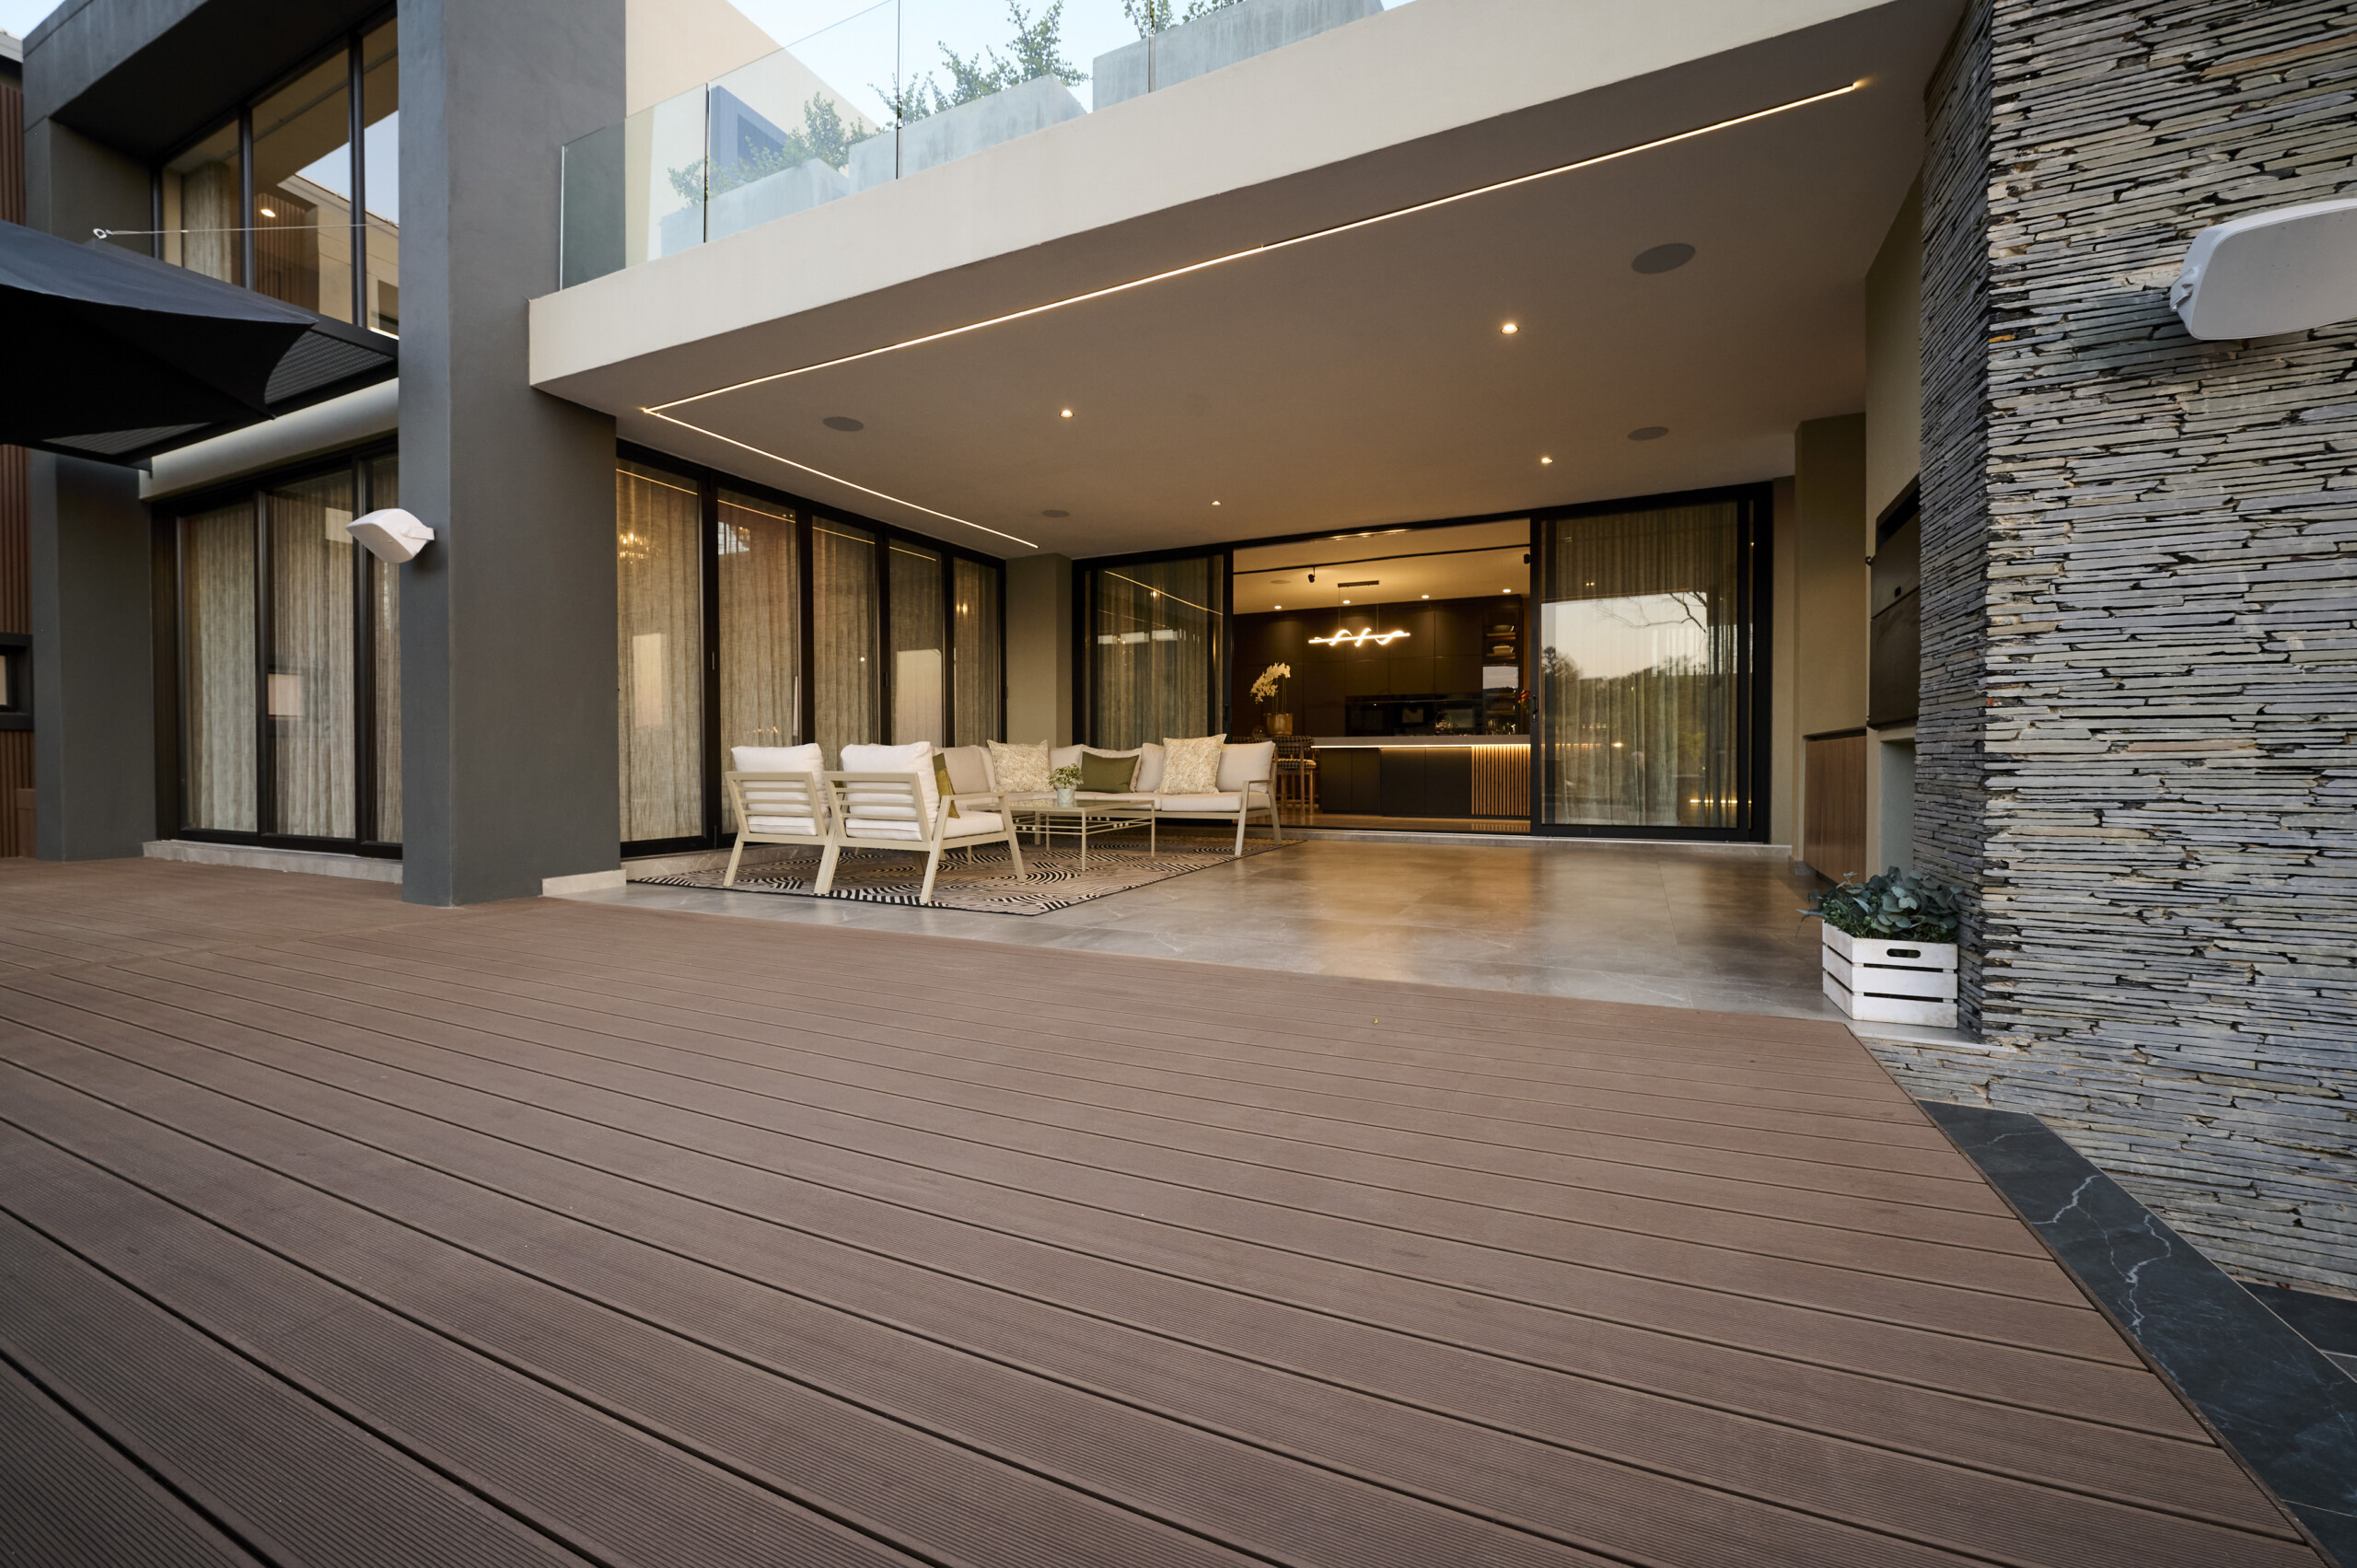
Scale Guide: A mixed-material ground-level patio like this is perfect for creating zones in a large, open backyard. It works best in spaces that are at least 20 feet wide by 20 feet deep. This provides enough room for each material to have a substantial presence. For example, you could have a 12×20 foot deck area for dining and an 8×20 foot tiled area for a fire pit and lounge chairs. Using two different floorings in a space smaller than 300 square feet can make it feel choppy and visually cluttered.
21. Weathered Wood Deck with Metal Furniture and String Lights
Before You Start Checklist: Ready to create this rustic-cozy vibe? Run through this list first.
- Check your structure: Is the existing structure for this covered deck sound? Weathered wood looks great, but you need to be sure the support posts and beams are free from rot or insect damage before you add lighting and fans.
- Assess your lighting plan: Where are your power sources? Plan the path for your string lights and the location for the ceiling fans to ensure you have GFCI-protected outdoor outlets where you need them.
- Measure for furniture: Dark, minimalist furniture can look smaller than it is. Measure your space carefully to ensure your desired dining and lounge sets fit comfortably without feeling cramped under the covered roof.
- Consider the sunset direction: This view is amazing at golden hour. Know which way your deck faces to plan where your main seating should go to best enjoy the view.
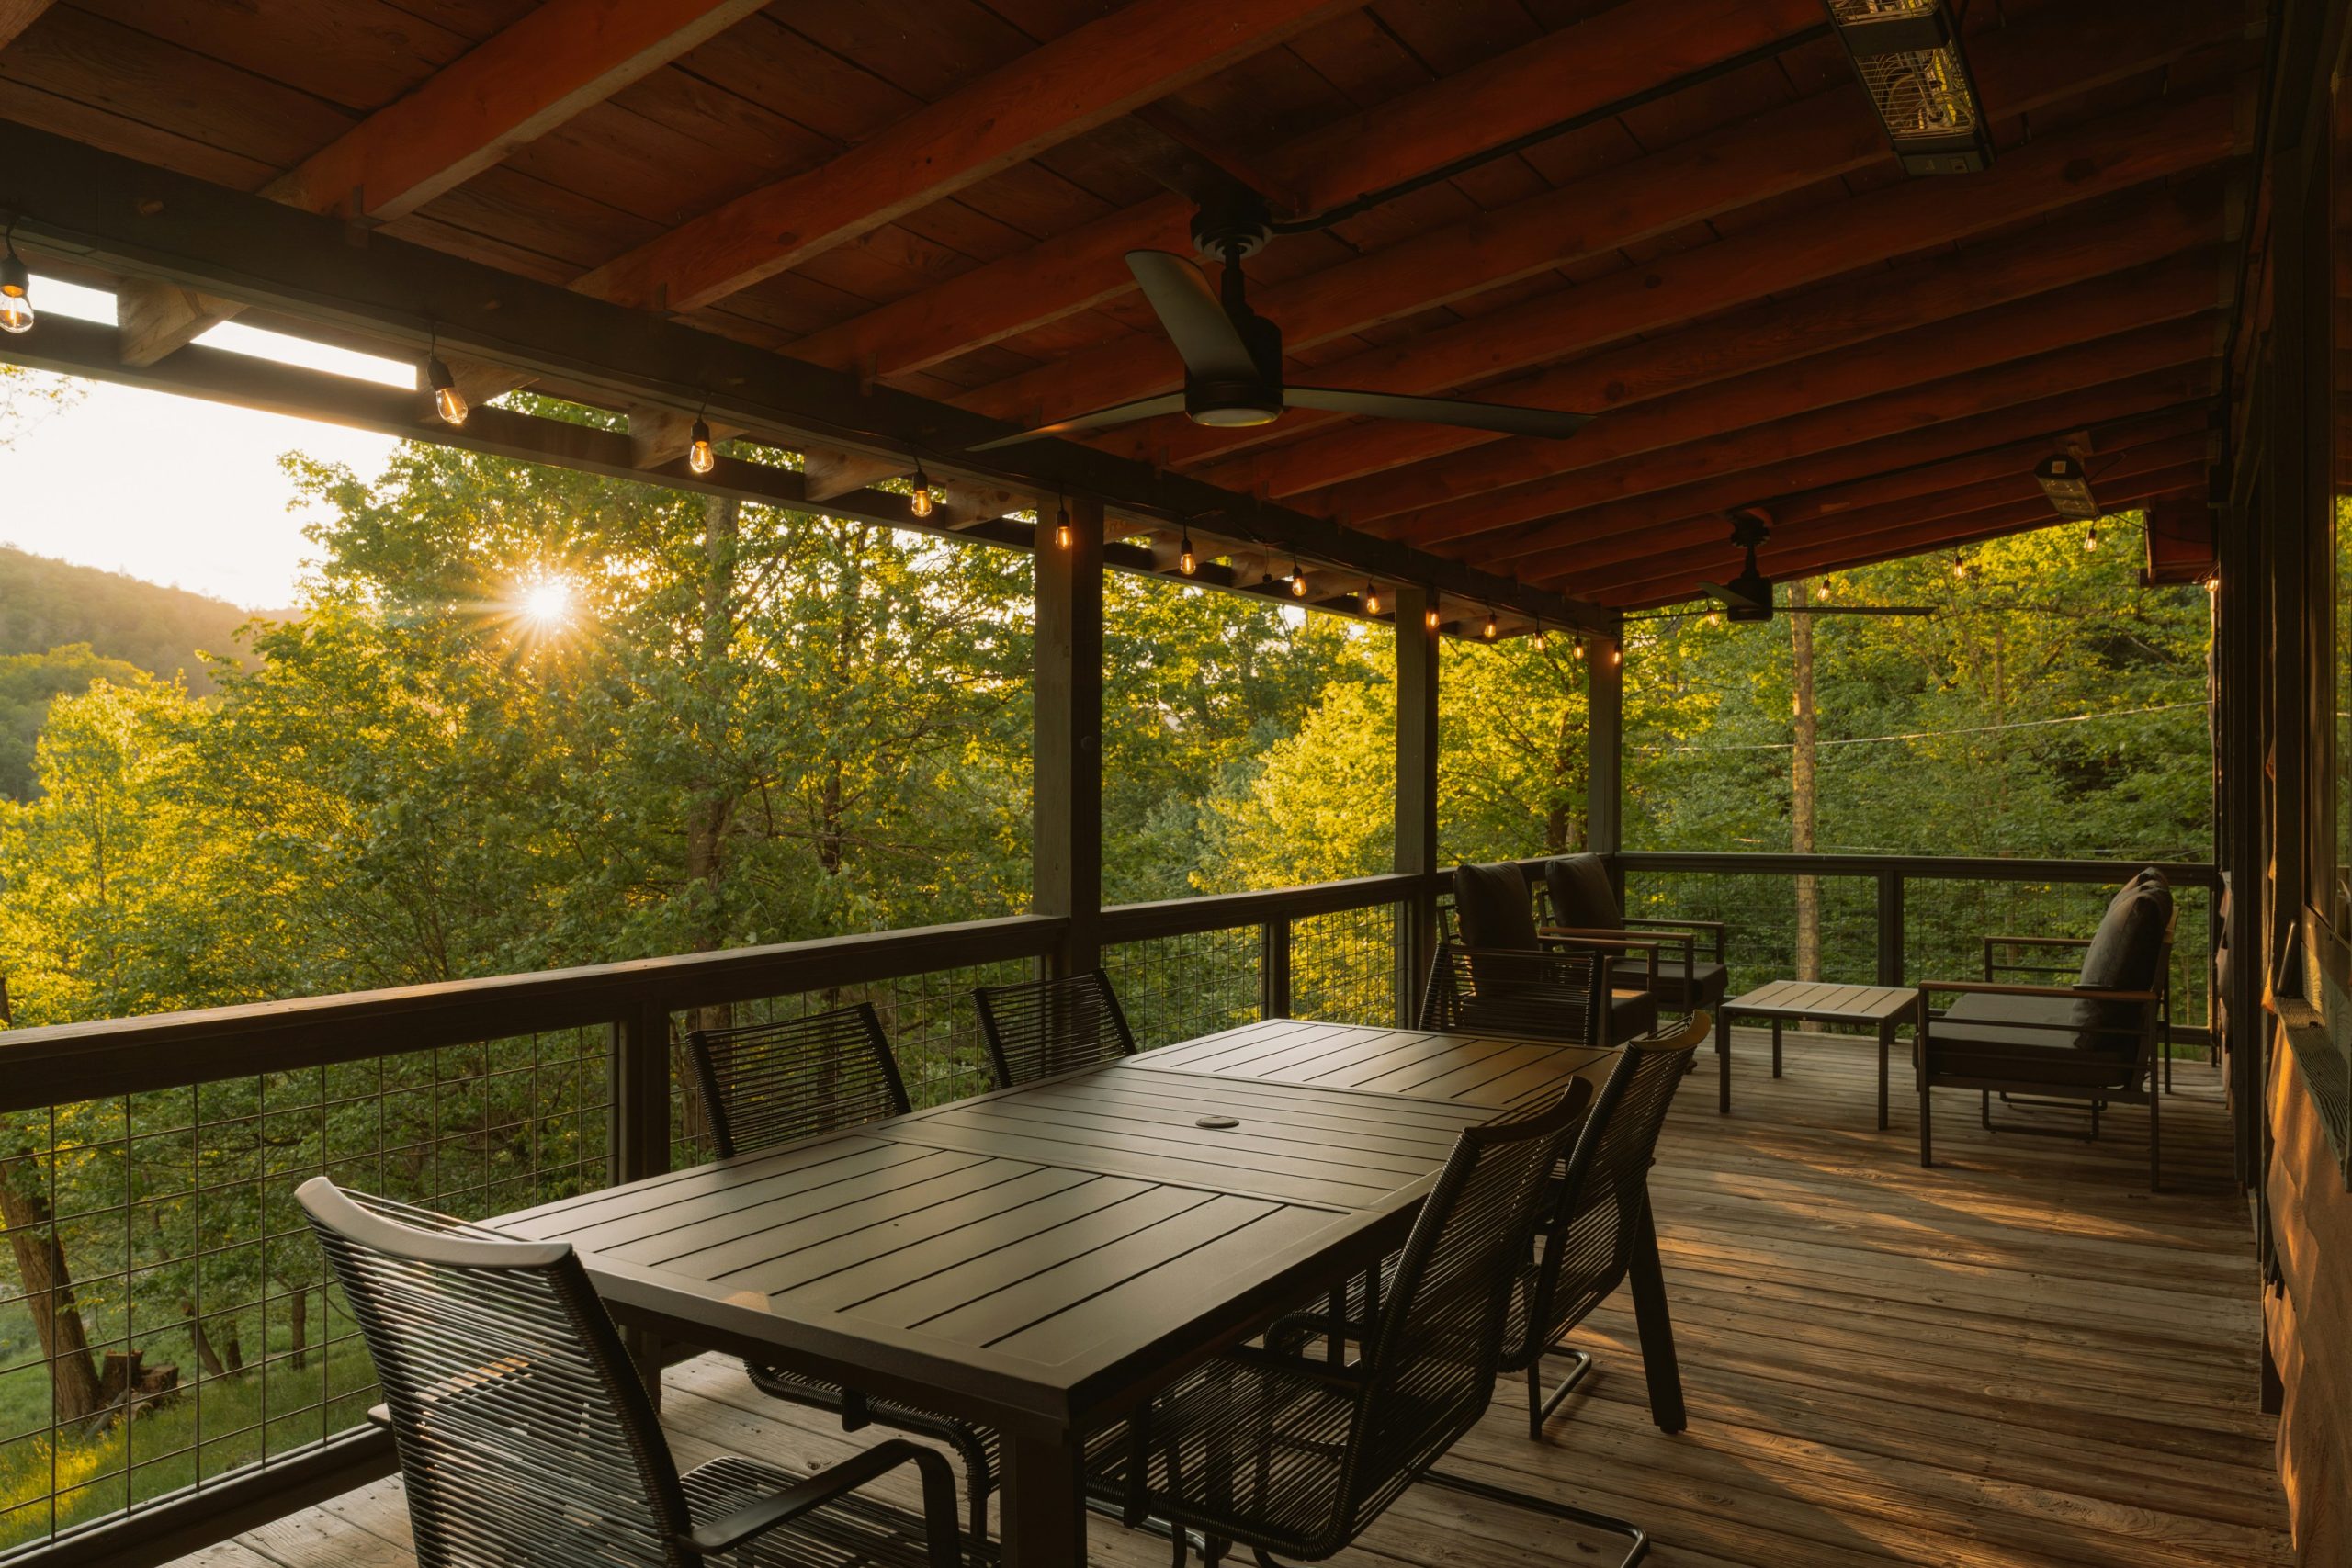
Real Talk: String lights create incredible ambiance, but cheap ones are a false economy. For a permanent outdoor installation, you need commercial-grade, weatherproof string lights. Look for thicker-gauge wire (at least 16-gauge, 14 is better) and sockets with a tight-sealing rubber gasket around the bulb. Cheaper, craft-store-grade lights have thin wires and sockets that will let in moisture, leading to short circuits, tripped breakers, and a lifespan of maybe one season before they fail.
22. Warm Wood Deck Tiles with Wicker Furniture and Vibrant Plants
Get This Look For Less: This cozy balcony is all about smart choices. The interlocking wood deck tiles are from IKEA’s RUNNEN line (or similar), costing about $3-$4 per square foot—a super affordable way to cover ugly concrete. The woven wicker chairs can be found at Target or Walmart for around $150-$300 for a pair. The real budget hero? The plants. Instead of expensive, large pre-potted arrangements, buy smaller starter plants and colorful plastic pots to create that lush, vibrant feeling for under $100. The entire look can be achieved for less than $500. This is the budget version of the custom tile in Idea #12.
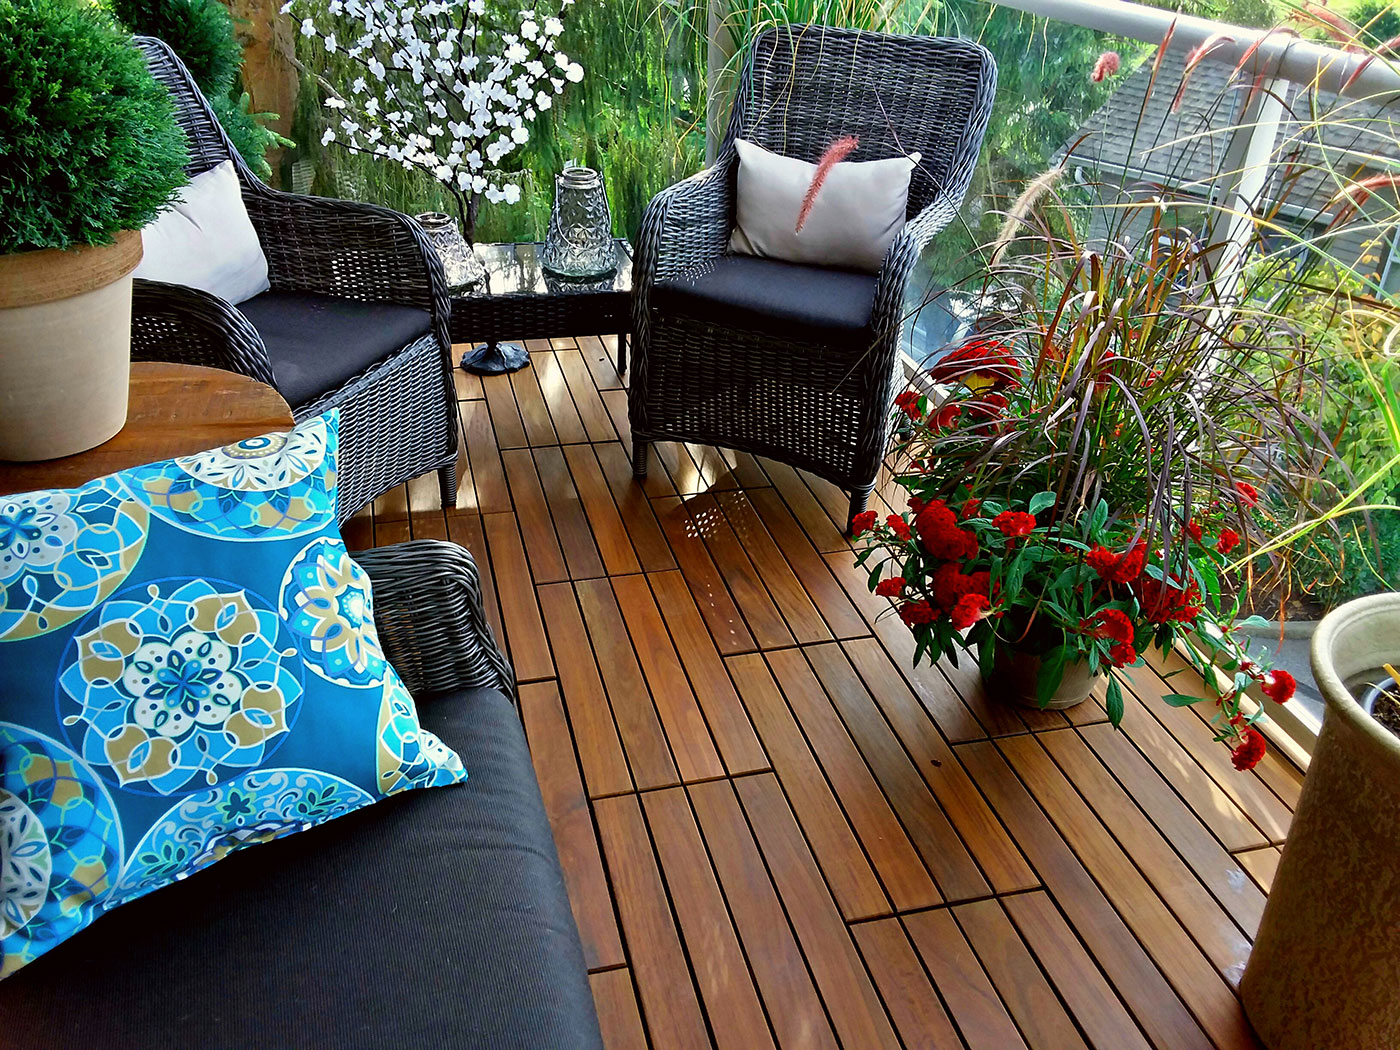
What Makes It Work: This design feels so inviting because it layers warm textures. The floor of rich brown wood tiles immediately makes the space feel warmer and more organic than a concrete slab. On top of that, the dark woven texture of the wicker chairs adds another layer of natural material. Finally, the soft textiles of the cushions and the living texture of the plants and flowers complete the effect. It’s this pile-up of different-but-complementary natural and cozy textures that makes the small space feel so lush and welcoming.
23. Grey Flagstone Patio with Dark Wood Beams and Warm Sconces
Designer Tip: To get this high-end, natural look with flagstone, insist on an irregular pattern with tight grout joints. The key is to have your mason use large, varied pieces and spend the time cutting and fitting them together like a puzzle, rather than just using small, uniform squares. For the grout, ask for a color that closely matches the mid-tone of the stone, and specify a joint width of no more than 3/4 inch. This minimizes the ‘grid’ effect and makes the floor look more like a single, continuous stone surface.
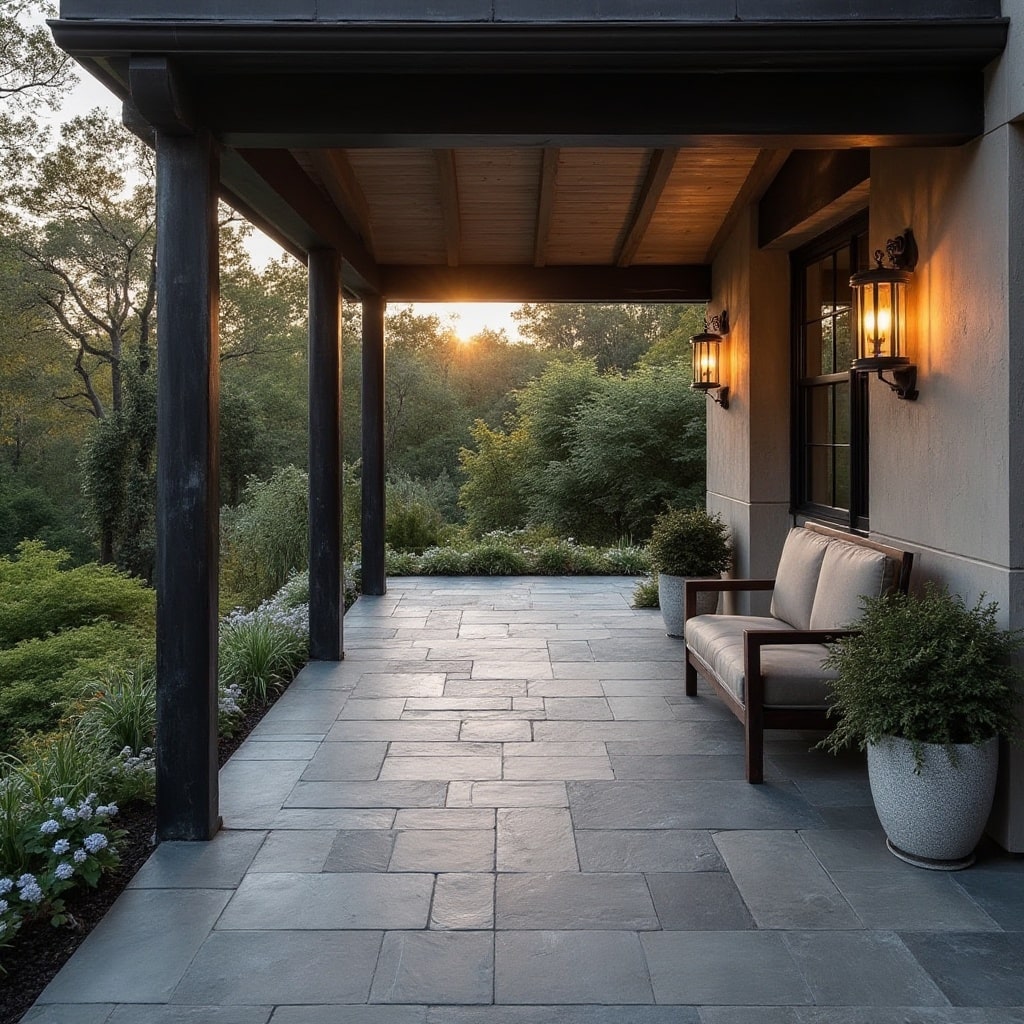
The One Thing: The warm lighting from the wall-mounted lantern sconces is the single element that brings this patio to life. During the day, it’s a handsome, natural space. But at night, that warm, orange glow is what creates the mood. It highlights the texture of the dark wood posts and casts a soft, inviting light across the grey flagstones and seating area. Without that specific, warm-temperature lighting, the space would feel much colder and less intimate after dark, losing all of its cozy, serene atmosphere.
Your Perfect Outdoor Floor Awaits
Whew, that was a lot! But now you’re armed with real-world ideas and practical advice to choose a deck floor covering that you’ll love for years. Whether it’s the timeless appeal of natural wood or the easy-care nature of modern composite, the right foundation can completely change how you use your outdoor space.
Don’t just dream about it—start planning! Pick your favorite look from the list, save it to your ‘Outdoor Oasis’ board on Pinterest, and take the first step toward creating the deck you deserve.