You know that feeling when you finally find the DIY Dollar Tree decor idea that looks exactly right for your space? That little spark of “I can totally make that!” is the very essence of this guide. Forget generic craft guides; we’ve gone deep into the world of high-style, low-cost decorating to find what truly works for 2026. After filtering through hundreds of projects, we narrowed it down to 30 ideas that actually deliver on their promise. These projects prove you don’t need a giant budget to create a home that feels personal and beautifully curated.
Inside, you’ll find 30 of our favorite DIY dollar store projects, covering styles from modern and minimalist to rustic and cozy. The trend for 2026 is all about “budget-luxe”—achieving a high-end look through clever crafting and smart shopping, which is precisely what the Dollar Tree ethos embodies. And stay until the end — we break down the most common mistakes that can ruin these looks. 📌 Save this to Pinterest for later — you’ll want to revisit these ideas.
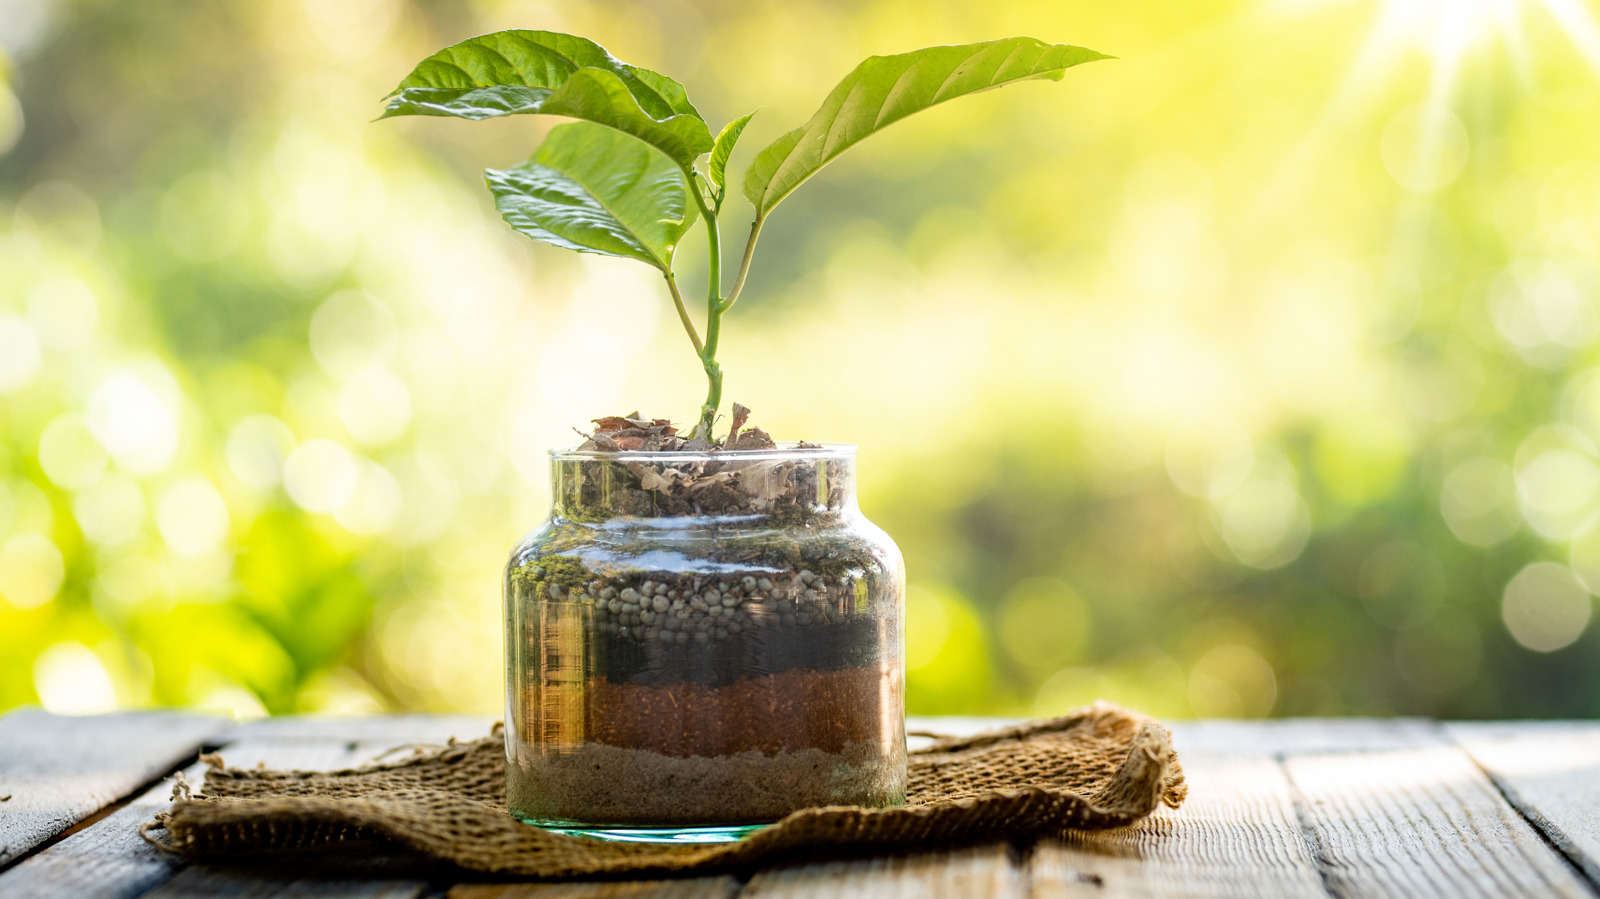
1. Grow a Layered Sprout in a Simple Glass Jar
This project is a perfect example of how the simplest materials can create a stunning visual. The clear glass jar acts as a window into the natural process of growth. It’s the visual storytelling that makes it so compelling—you see the roots, the soil, the pebbles, and the new life all at once. The layering of different textures and colors, from the dark soil to the light sand and rough pebbles, creates a beautiful, earthy gradient that is both scientific and artistic.
|
📋 Copy HEX 🔗 Share |
Ready to make your own? It’s a quick and satisfying project that brings a touch of green to any corner.
Time: 15 minutes.
Cost: Under $5.
- Start with a clean, clear glass jar from Dollar Tree.
- Create your layers: Start with small pebbles for drainage, followed by a thin layer of activated charcoal (found at pet or garden sections) to keep things fresh.
- Add a layer of potting soil, then a thin layer of sand. Top with a final layer of rich potting mix.
- Gently plant a sprout or a quick-growing seed (like a bean or avocado pit) just below the surface.
- Mist lightly with water and place it in a spot with indirect sunlight.
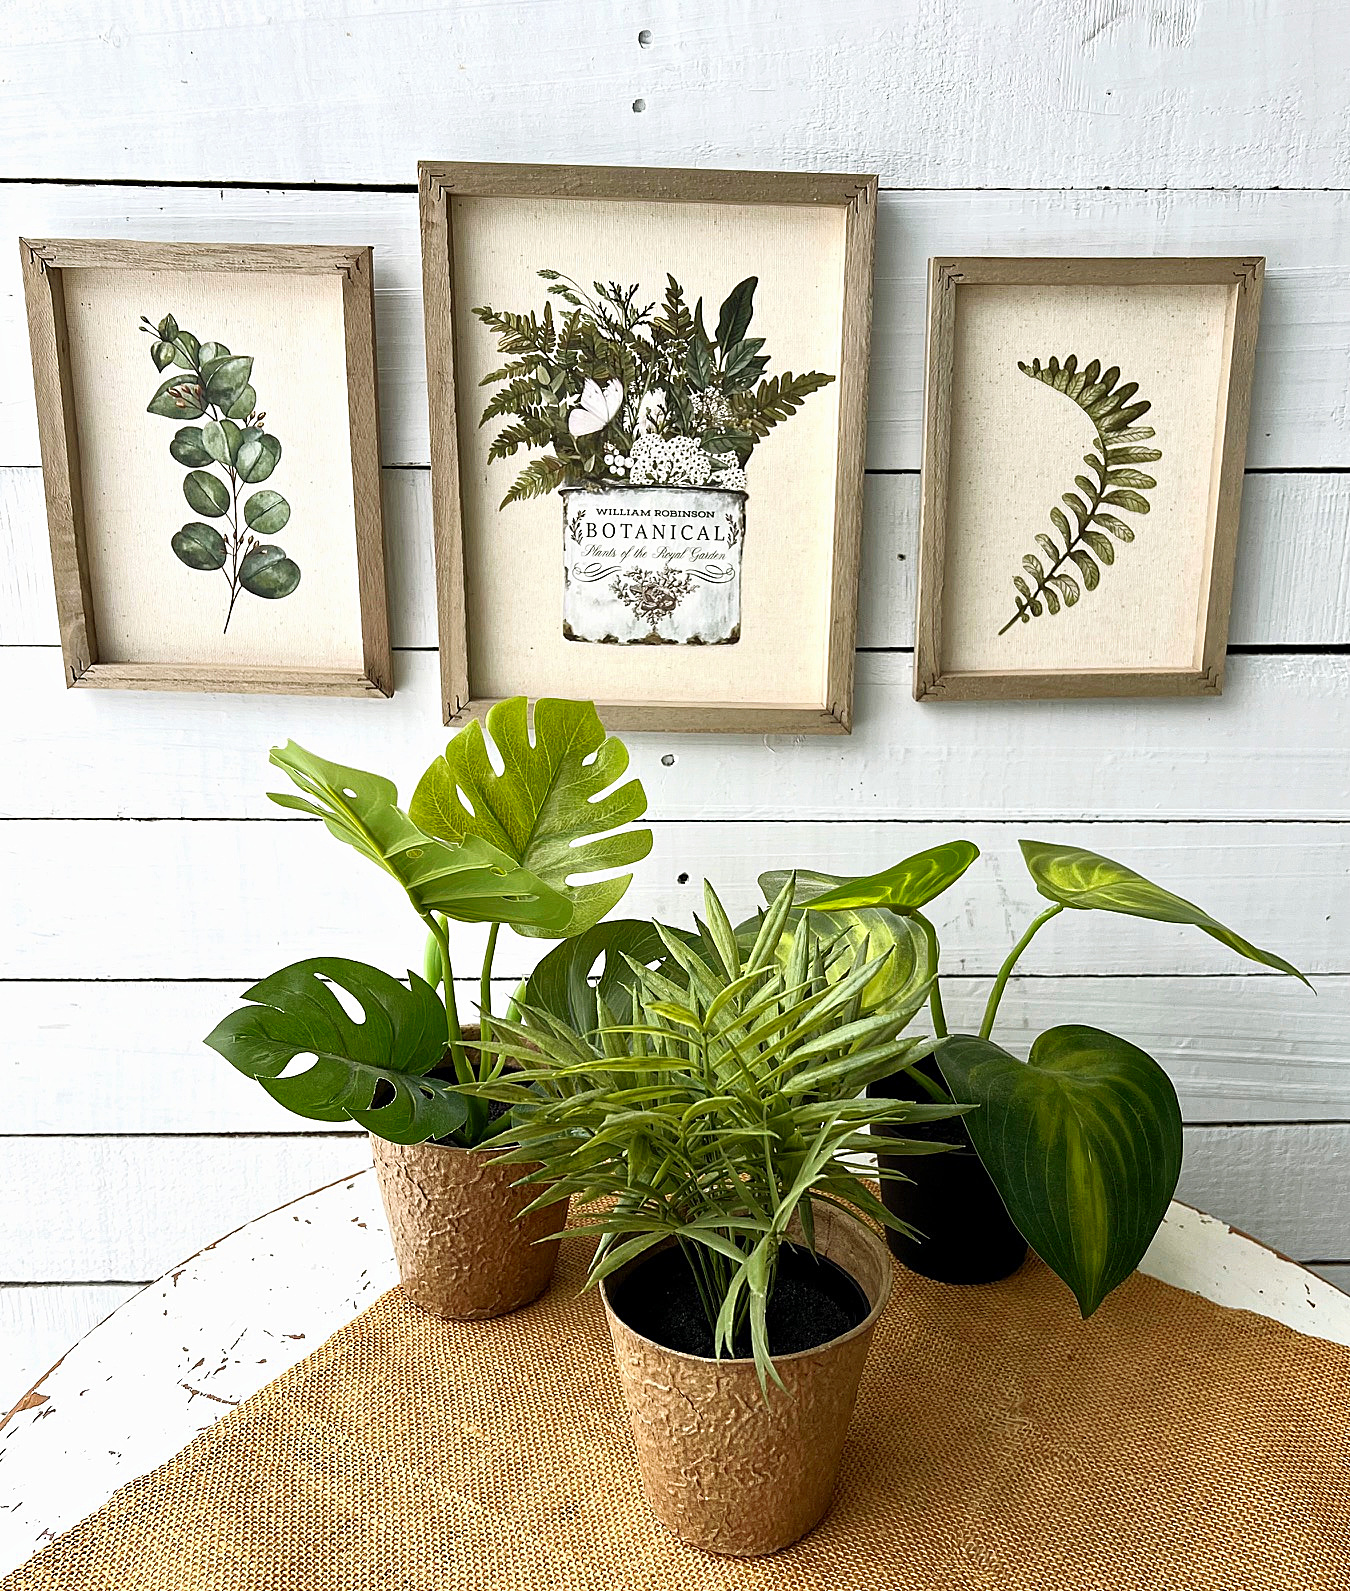
2. Style a Rustic Wall with Botanical Prints and Faux Plants
The formula for this charmingly rustic corner is all about balance. Think of it as 50% wall texture, 30% curated art, and 20% greenery. The distressed white plank wall provides a strong textural base that prevents the arrangement from feeling flat. The trio of botanical prints introduces a classic, educated element, while the faux plants add a pop of life and three-dimensional form. You can swap the botanical prints for abstract sketches or even family photos, as long as the frames are a consistent rustic wood tone to tie it all together.
|
📋 Copy HEX 🔗 Share |
To make a gallery wall like this design feel cohesive, the key is in the spacing. Always lay your frames out on the floor first to figure out the arrangement. Aim for a consistent 2-3 inch gap between each frame. Use a level and measuring tape! Nothing screams DIY-in-a-bad-way more than crooked frames do. For an even easier time, use painter’s tape to mark out the positions on the wall before you hammer in a single nail.
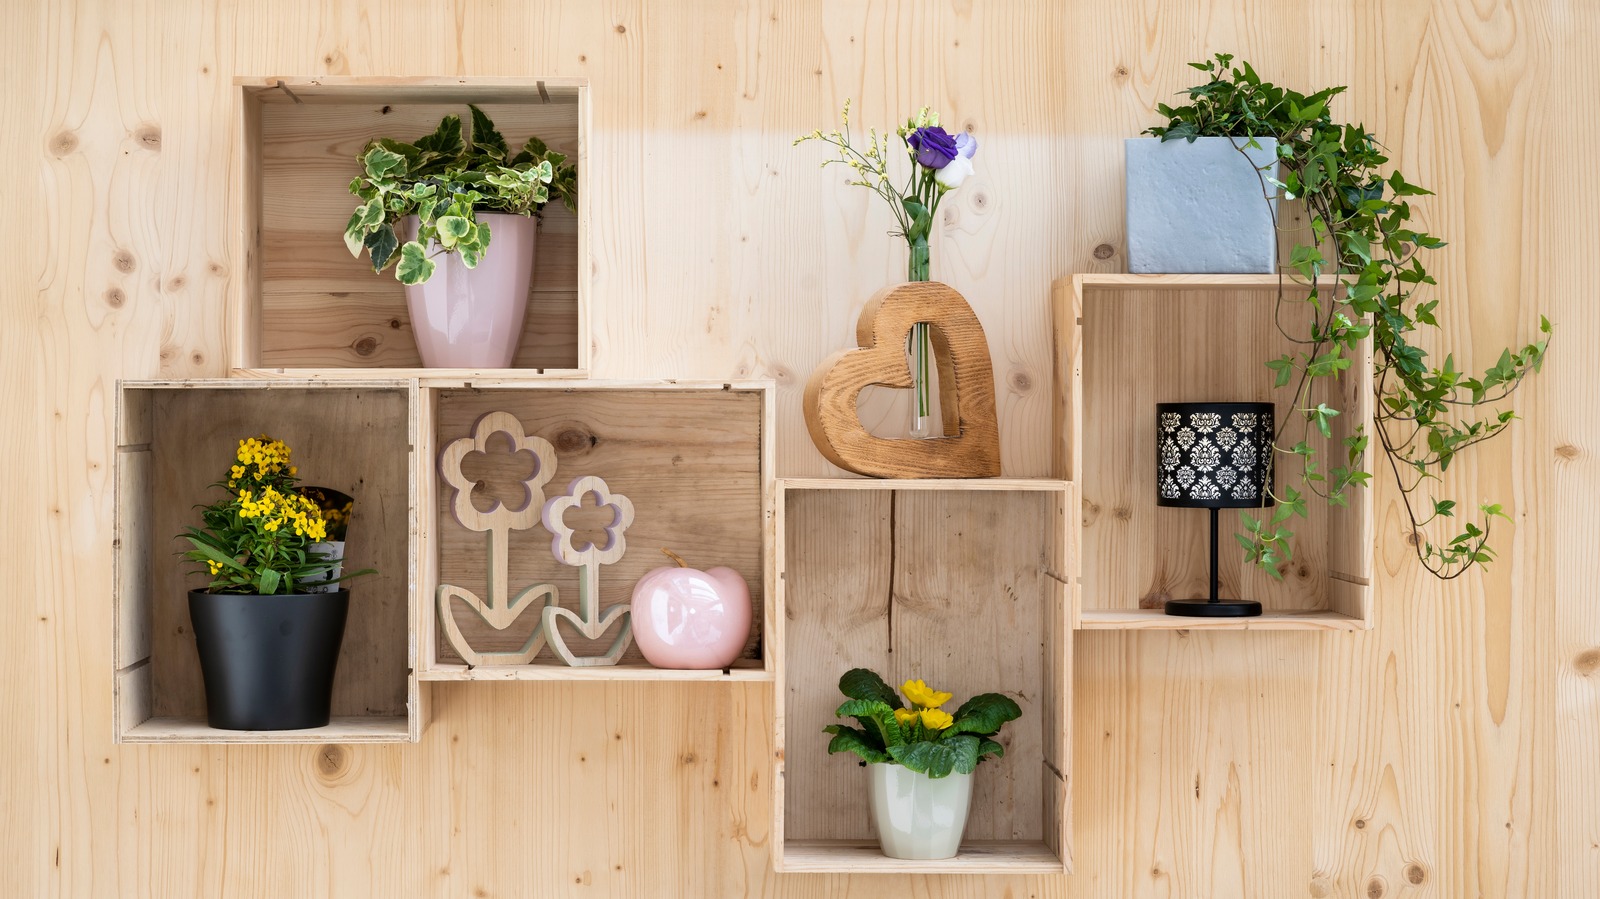
3. Mount Unfinished Wooden Crates as Floating Wall Shelves
This clever shelving unit turns simple wooden crates into a statement piece of functional art. It’s a fantastic way to get a custom modular shelving look for a fraction of the price. Here’s a potential cost breakdown to bring this idea to life using affordable finds.
|
📋 Copy HEX 🔗 Share |
- Unfinished Wooden Crates (4-6): $15 – $25 (often at craft stores or Dollar Tree Plus)
- Wall Mounting Hardware: $10 – $15
- Faux Potted Plants & Decor: $20 – $30 (hello, Dollar Tree floral aisle!)
- Small Accent Lamp: $10 – $20
- TOTAL: $55 – $90
- Budget alternative: Use smaller crates found directly at Dollar Tree for $1.25 each and focus on displaying only very lightweight items like air plants and tiny ceramic figures. This could bring the total cost down to under $30.
A word of caution: be realistic about what these shelves can hold. While perfect for displaying lightweight decor—potted faux succulents, small ceramic objects, and maybe a paperback book or two—these are not the shelves for your encyclopedia collection. Secure them properly into studs if possible, but even then, avoid overloading them to prevent sagging or, worse, a complete collapse. This is about decorative storage, not heavy lifting.
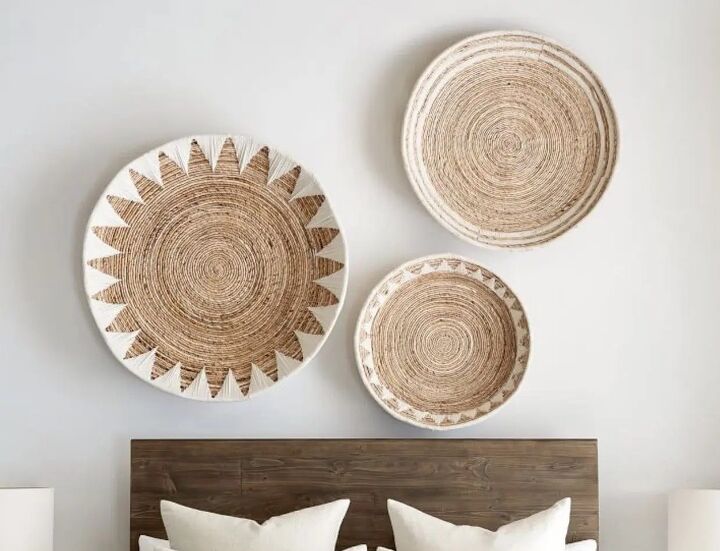
4. Create a Textured Wall Feature with Woven Baskets
The absolute star of this look is texture. Without the intricate weaving of the baskets, the design would just be three circles on a wall. The natural fibers bring an organic, handmade quality that immediately warms up the otherwise simple, neutral space. They break up the flat, painted surface of the wall and add a layer of depth and interest that paint or a flat print just can’t replicate. It’s a tactile element that makes you want to reach out and touch it, turning a blank wall into a sensory feature.
|
📋 Copy HEX 🔗 Share |
This idea is brilliant for adding impact to small or awkward walls. It’s perfect for the space above a headboard in a room with standard 8-foot ceilings, as it draws the eye up without overwhelming. The minimum wall width needed would be around 5-6 feet to give the arrangement breathing room. For a larger wall, you could expand the collection to five or seven baskets of varying sizes. This concept offers striking contrast to the bold, color-saturated wall in Idea #27, showing how texture can be just as impactful as color.
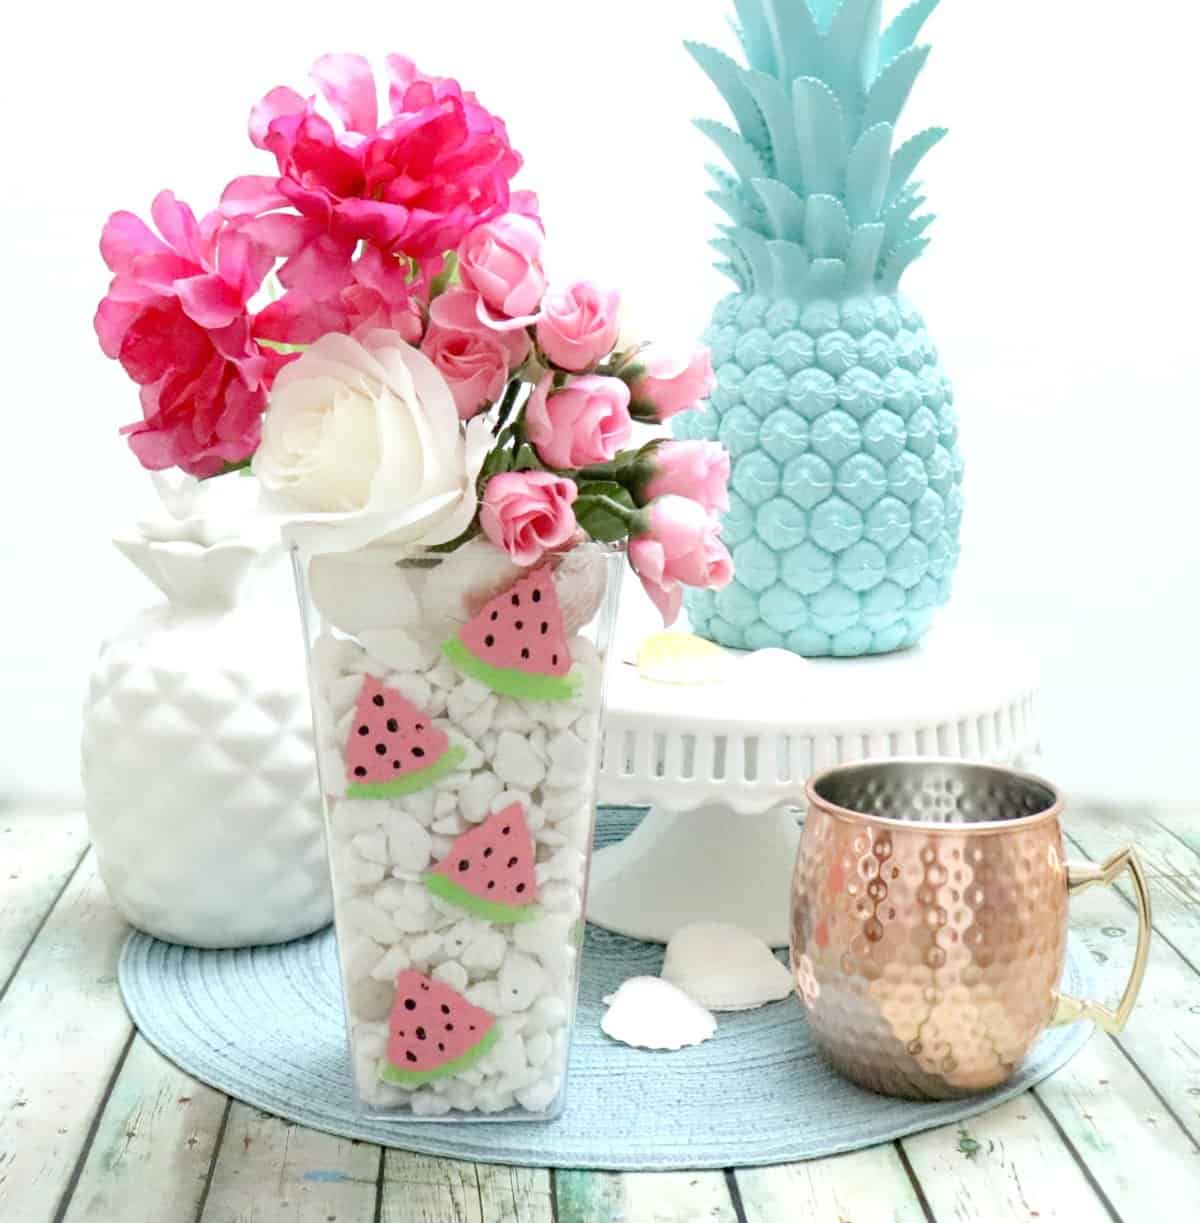
5. Craft a Playful Watermelon Vase for Summer Fun
A painted glass vase is one of the easiest and most impactful Dollar Tree transformations. This watermelon design is perfect for summer parties or just adding a pop of color to your kitchen. It’s a project that is nearly impossible to mess up and looks adorable with fresh or faux flowers.
Time: 30 minutes (plus drying).
Cost: Under $5.
|
📋 Copy HEX 🔗 Share |
- Find a simple, smooth glass cylinder vase from Dollar Tree.
- Using multi-surface craft paint, paint the bottom third of the vase with a light green color.
- Paint the top two-thirds with a bright pink or red paint, leaving a thin unpainted line between the colors.
- Once dry, use a darker green paint and a small brush to add wavy, vertical stripes to the green section.
- Use a black paint pen or a very fine brush to add small, teardrop-shaped “seeds” to the pink section.
- Let it dry completely before using. For a more durable finish, add a coat of clear sealant.
You can get this entire look for less than a fancy coffee. Dollar Tree is your go-to for the glass vase and craft paints. If you don’t have brushes, they often sell budget-friendly packs. If you want an even cheaper option, look in your recycling bin! A clean, label-free glass food jar (like one from pasta sauce or pickles) works just as well. This project is all about creativity, not cost.
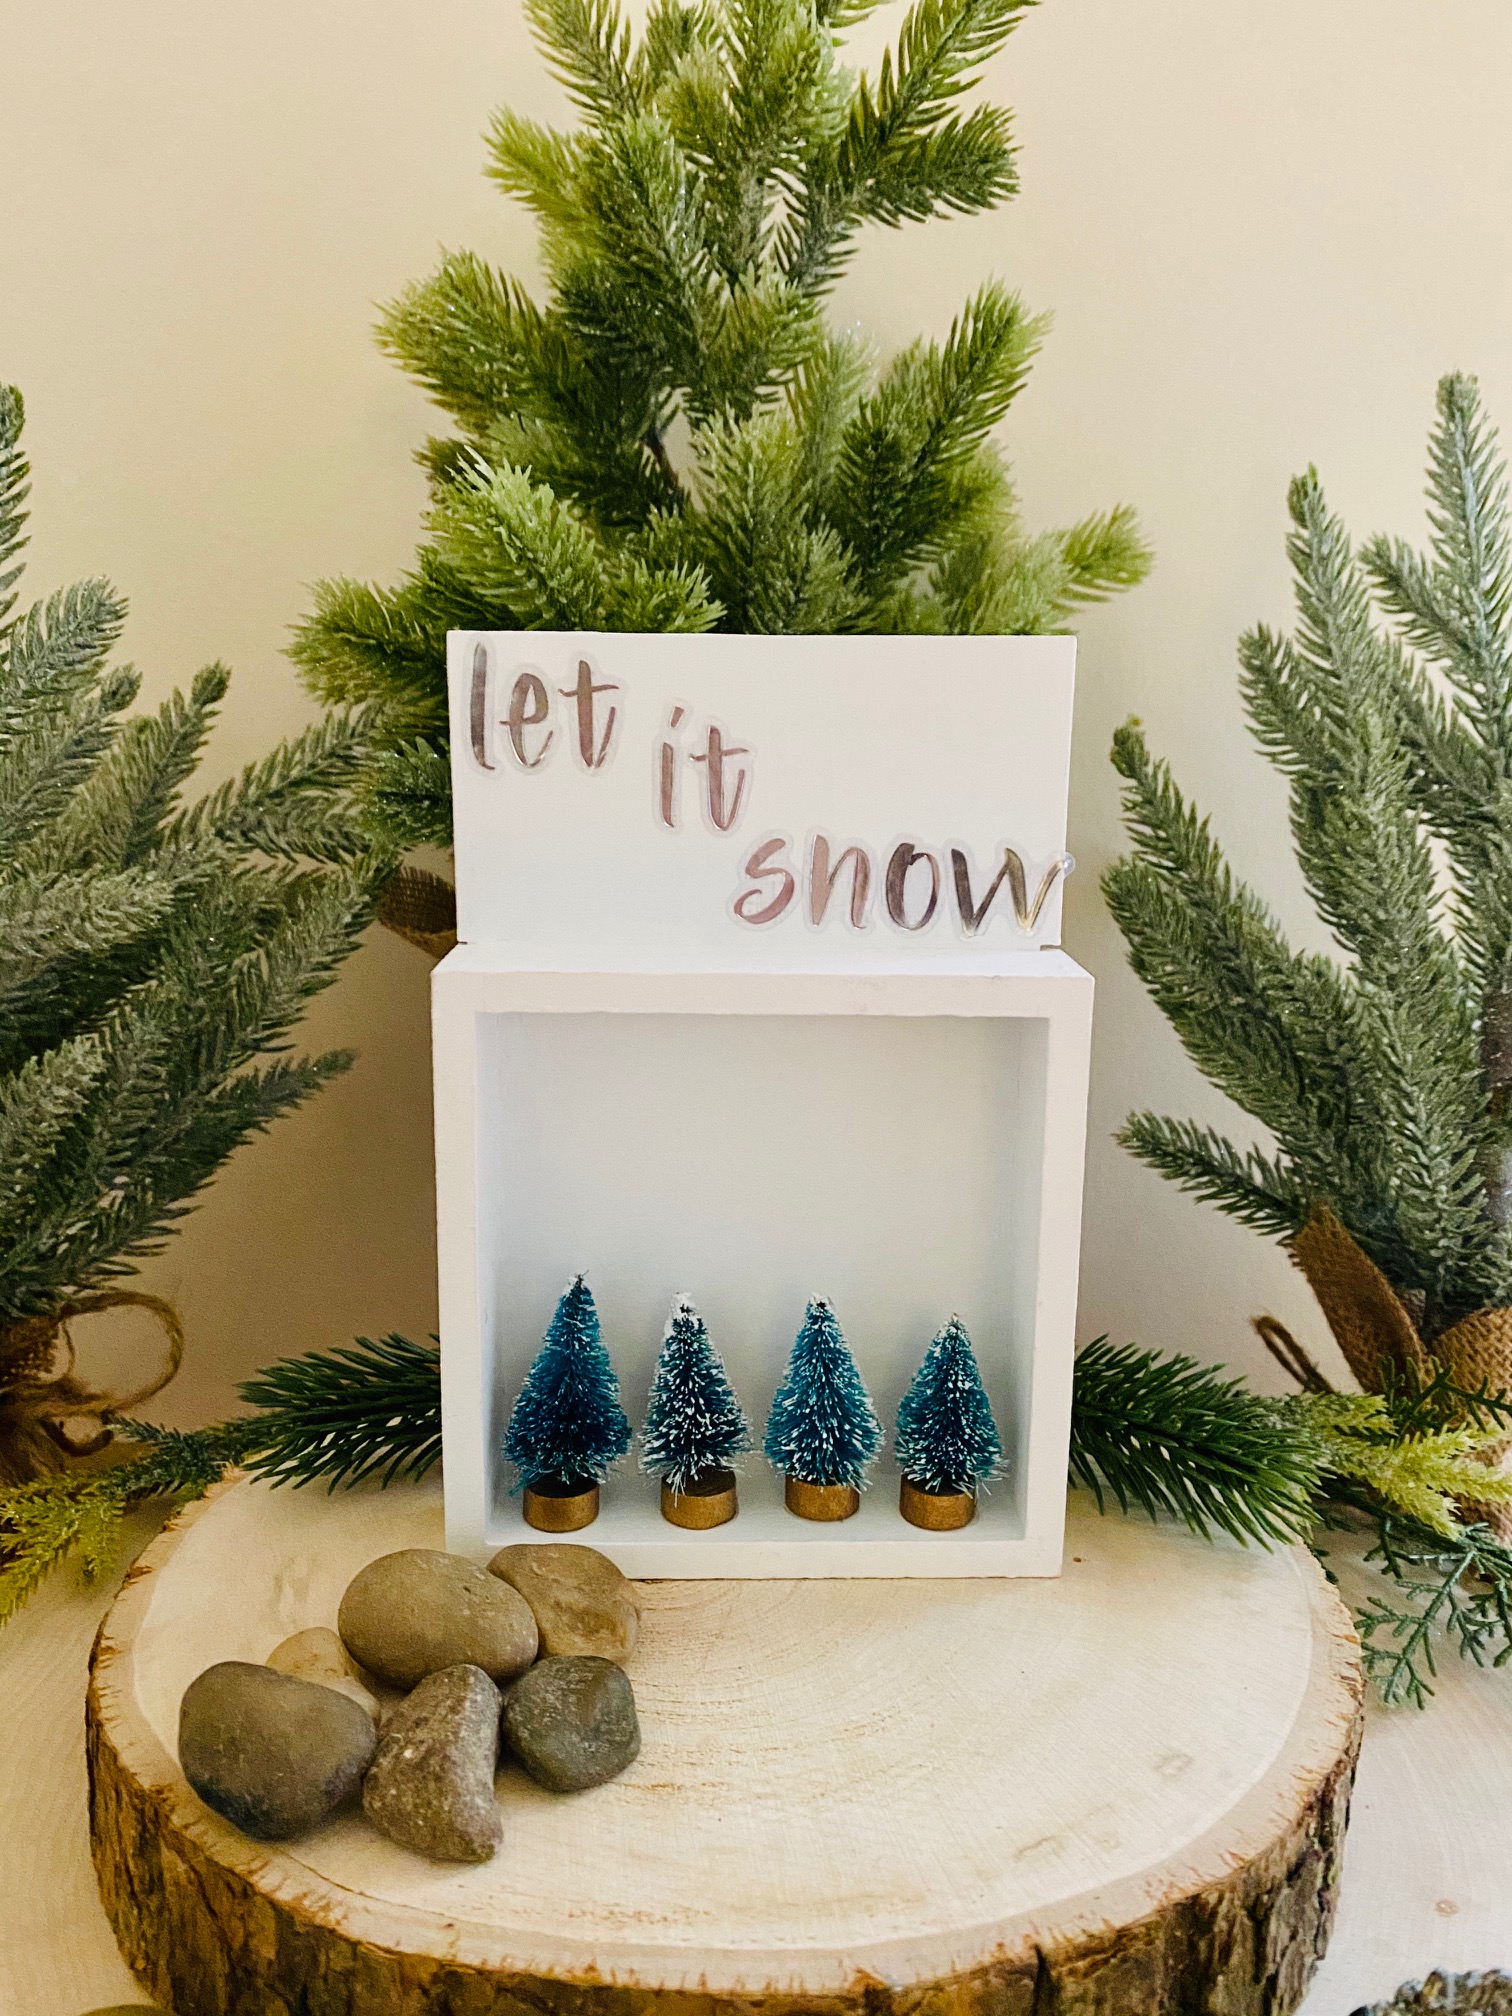
6. Assemble a Natural Winter Village on a Wood Slice
When creating a small decorative scene, or vignette, always include an item that gives it a solid ‘base’ or ‘anchor.’ Here, the thick wood slice does that job perfectly. It corrals all the smaller elements—the box, the trees, the rocks—into one cohesive display. Without it, the items would look a bit lost and random. Your anchor can be a tray, a placemat, a stack of books, or a natural element like this wood slice. It signals that these separate items are meant to be viewed as a single, intentional group.
|
📋 Copy HEX 🔗 Share |
This design succeeds by masterfully mixing textures and finishes. You have the rough, natural bark of the wood slice, the smooth, cool surface of the river rocks, the matte paint of the white box, the festive shimmer of the bottle brush trees, and the sleek metallic lettering. This combination of rustic and refined elements creates a display that is visually rich and far more engaging than if all the objects had the same texture. It feels collected and curated, not just placed.
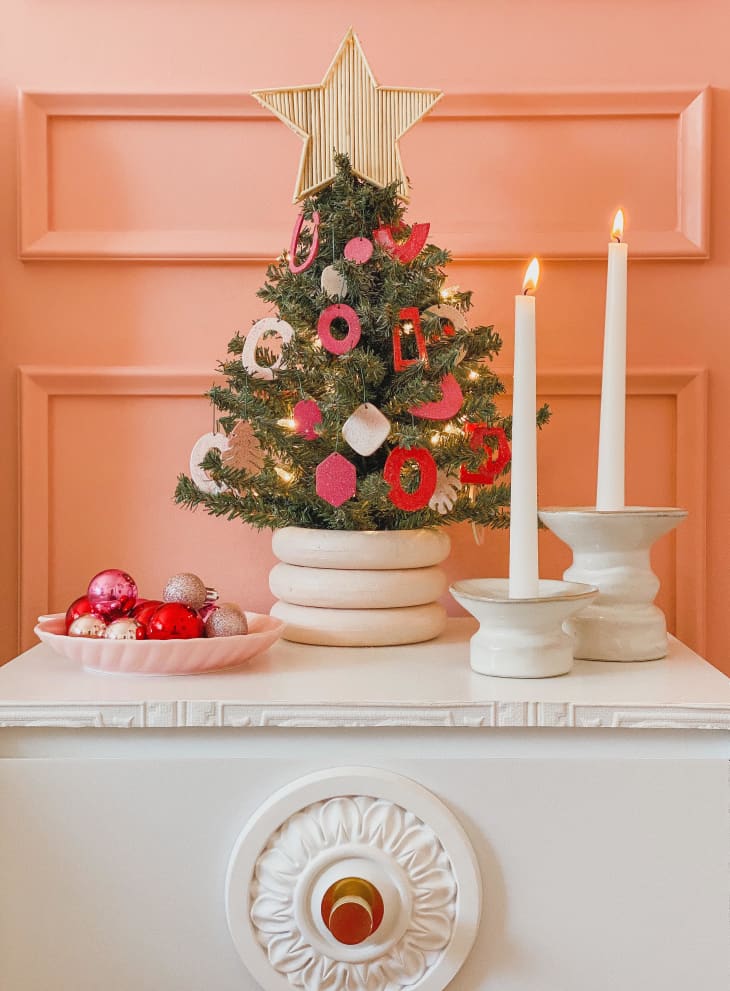
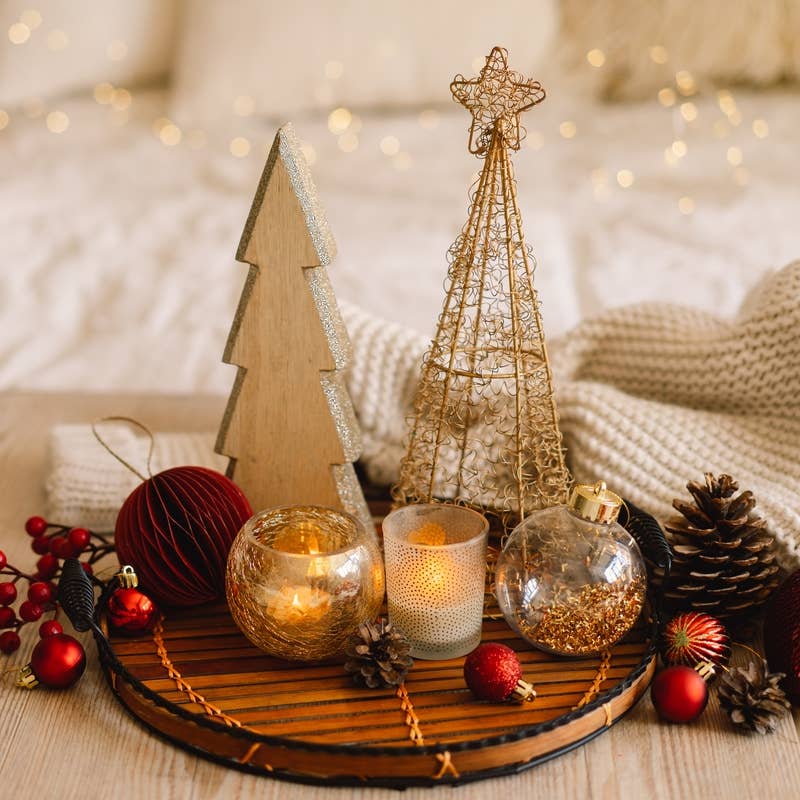
7. Embrace a Modern Holiday Vibe with Pink and Red
Breaking it down, the room’s festive formula is about 60% bold color, 30% crisp white, and 10% metallic accent. The warm pink paneled wall is the hero, setting a cheerful and unapologetically modern tone. White elements, like the cabinet and candles, act as a visual palate cleanser, keeping the look fresh and not overwhelming. The final 10% comes from the gold star topper and ornament details, which add a touch of holiday sparkle and warmth. You could easily swap the pink for a deep teal or mustard yellow to fit your own style.
|
📋 Copy HEX 🔗 Share |
This look is a direct and joyful rebellion against the traditional red-and-green Christmas palette. For the past few years, designers and DIYers on Pinterest have been embracing unexpected holiday color schemes. Pinks, teals, and even black are having a major moment. This trend speaks to a desire for holiday decor that reflects personal style rather than just tradition. It’s festive, yes, but it’s also chic and integrated with the home’s year-round aesthetic. Compare this approach with the cozier, traditional feel of Idea #21.
8. Create a Magical Christmas Tabletop Scene
Creating an entire holiday tablescape using only dollar store finds is one of the most satisfying DIY challenges. A cluster of small, coordinated items can look surprisingly high-end when grouped thoughtfully. Let’s estimate the cost for a festive display inspired by this idea.
|
📋 Copy HEX 🔗 Share |
- Mini Bottle Brush or Faux Trees (3-4): $5.00
- Glass Votive Holders and LED Candles: $6.25
- Bag of Faux Snow or Filler: $1.25
- Small Ornaments or Figurines: $3.75
- Serving Tray or Platter (as base): $1.25 – $5.00
- TOTAL: $17.50 – $21.25
- Budget alternative: Forage for your base! A few lovely branches or pinecones from the yard can supplement your Dollar Tree haul and make it feel more organic and completely free.
The key to making dollar store Christmas decor look chic is curation and restraint. It’s incredibly tempting to grab one of everything from the holiday aisle. Resist! Instead of a rainbow of colors, stick to a tight palette of two or three, like red, white, and gold. And focus on texture: mix shiny ornaments with matte figurines and glittery trees. A jumble of random items will always look cheap, but a curated collection looks like a deliberate design choice.
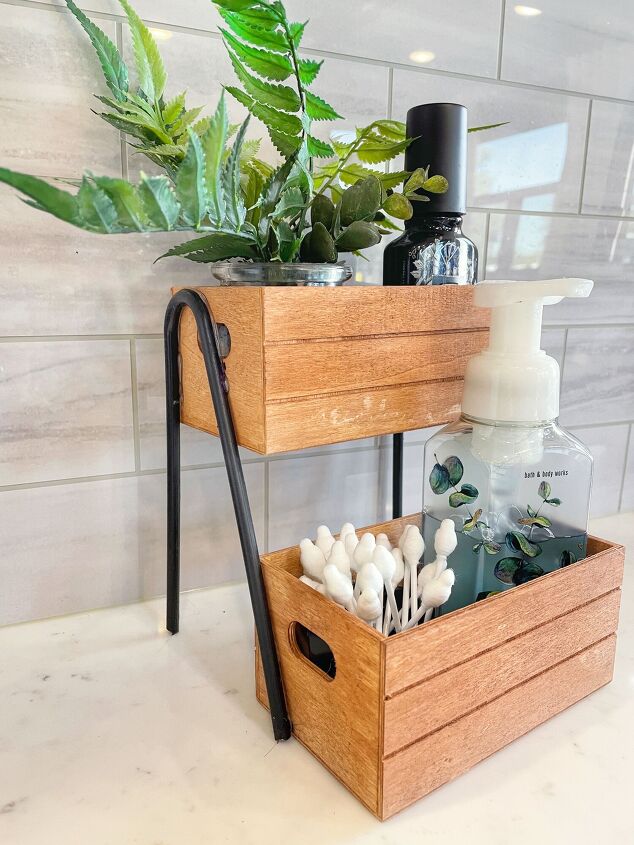
9. Build a Two-Tiered Organizer from Small Wooden Crates
This is a perfect weekend project, but a little prep goes a long way. Before you start gluing and screwing, run through this quick checklist to make sure your final product is sturdy and fits your space perfectly.
|
📋 Copy HEX 🔗 Share |
- Measure your counter space! Ensure the final dimensions of your organizer will fit where you envision it, accounting for the height of items you plan to store on top.
- Verify your crates. Are they from the same batch? Sometimes Dollar Tree items can have slight variations in size or color. Make sure they stack evenly.
- Decide on your finish. Will you paint, stain, or seal the wood? Wood in a bathroom or kitchen needs a protective clear coat to prevent water damage and warping.
- Gather your tools. You’ll likely need a strong adhesive like E6000 or wood glue, plus any hardware you plan to use.
Because this organizer is made of unfinished wood, it’s susceptible to moisture, especially in a bathroom or kitchen setting as shown. A simple coat of clear, water-resistant sealant (like a clear acrylic spray or polyurethane) is non-negotiable. Re-apply a light coat annually to keep the wood protected from splashes and humidity. For cleaning, simply wipe with a dry or very slightly damp cloth. Avoid letting water pool on the surfaces to prevent stains and warping over time.
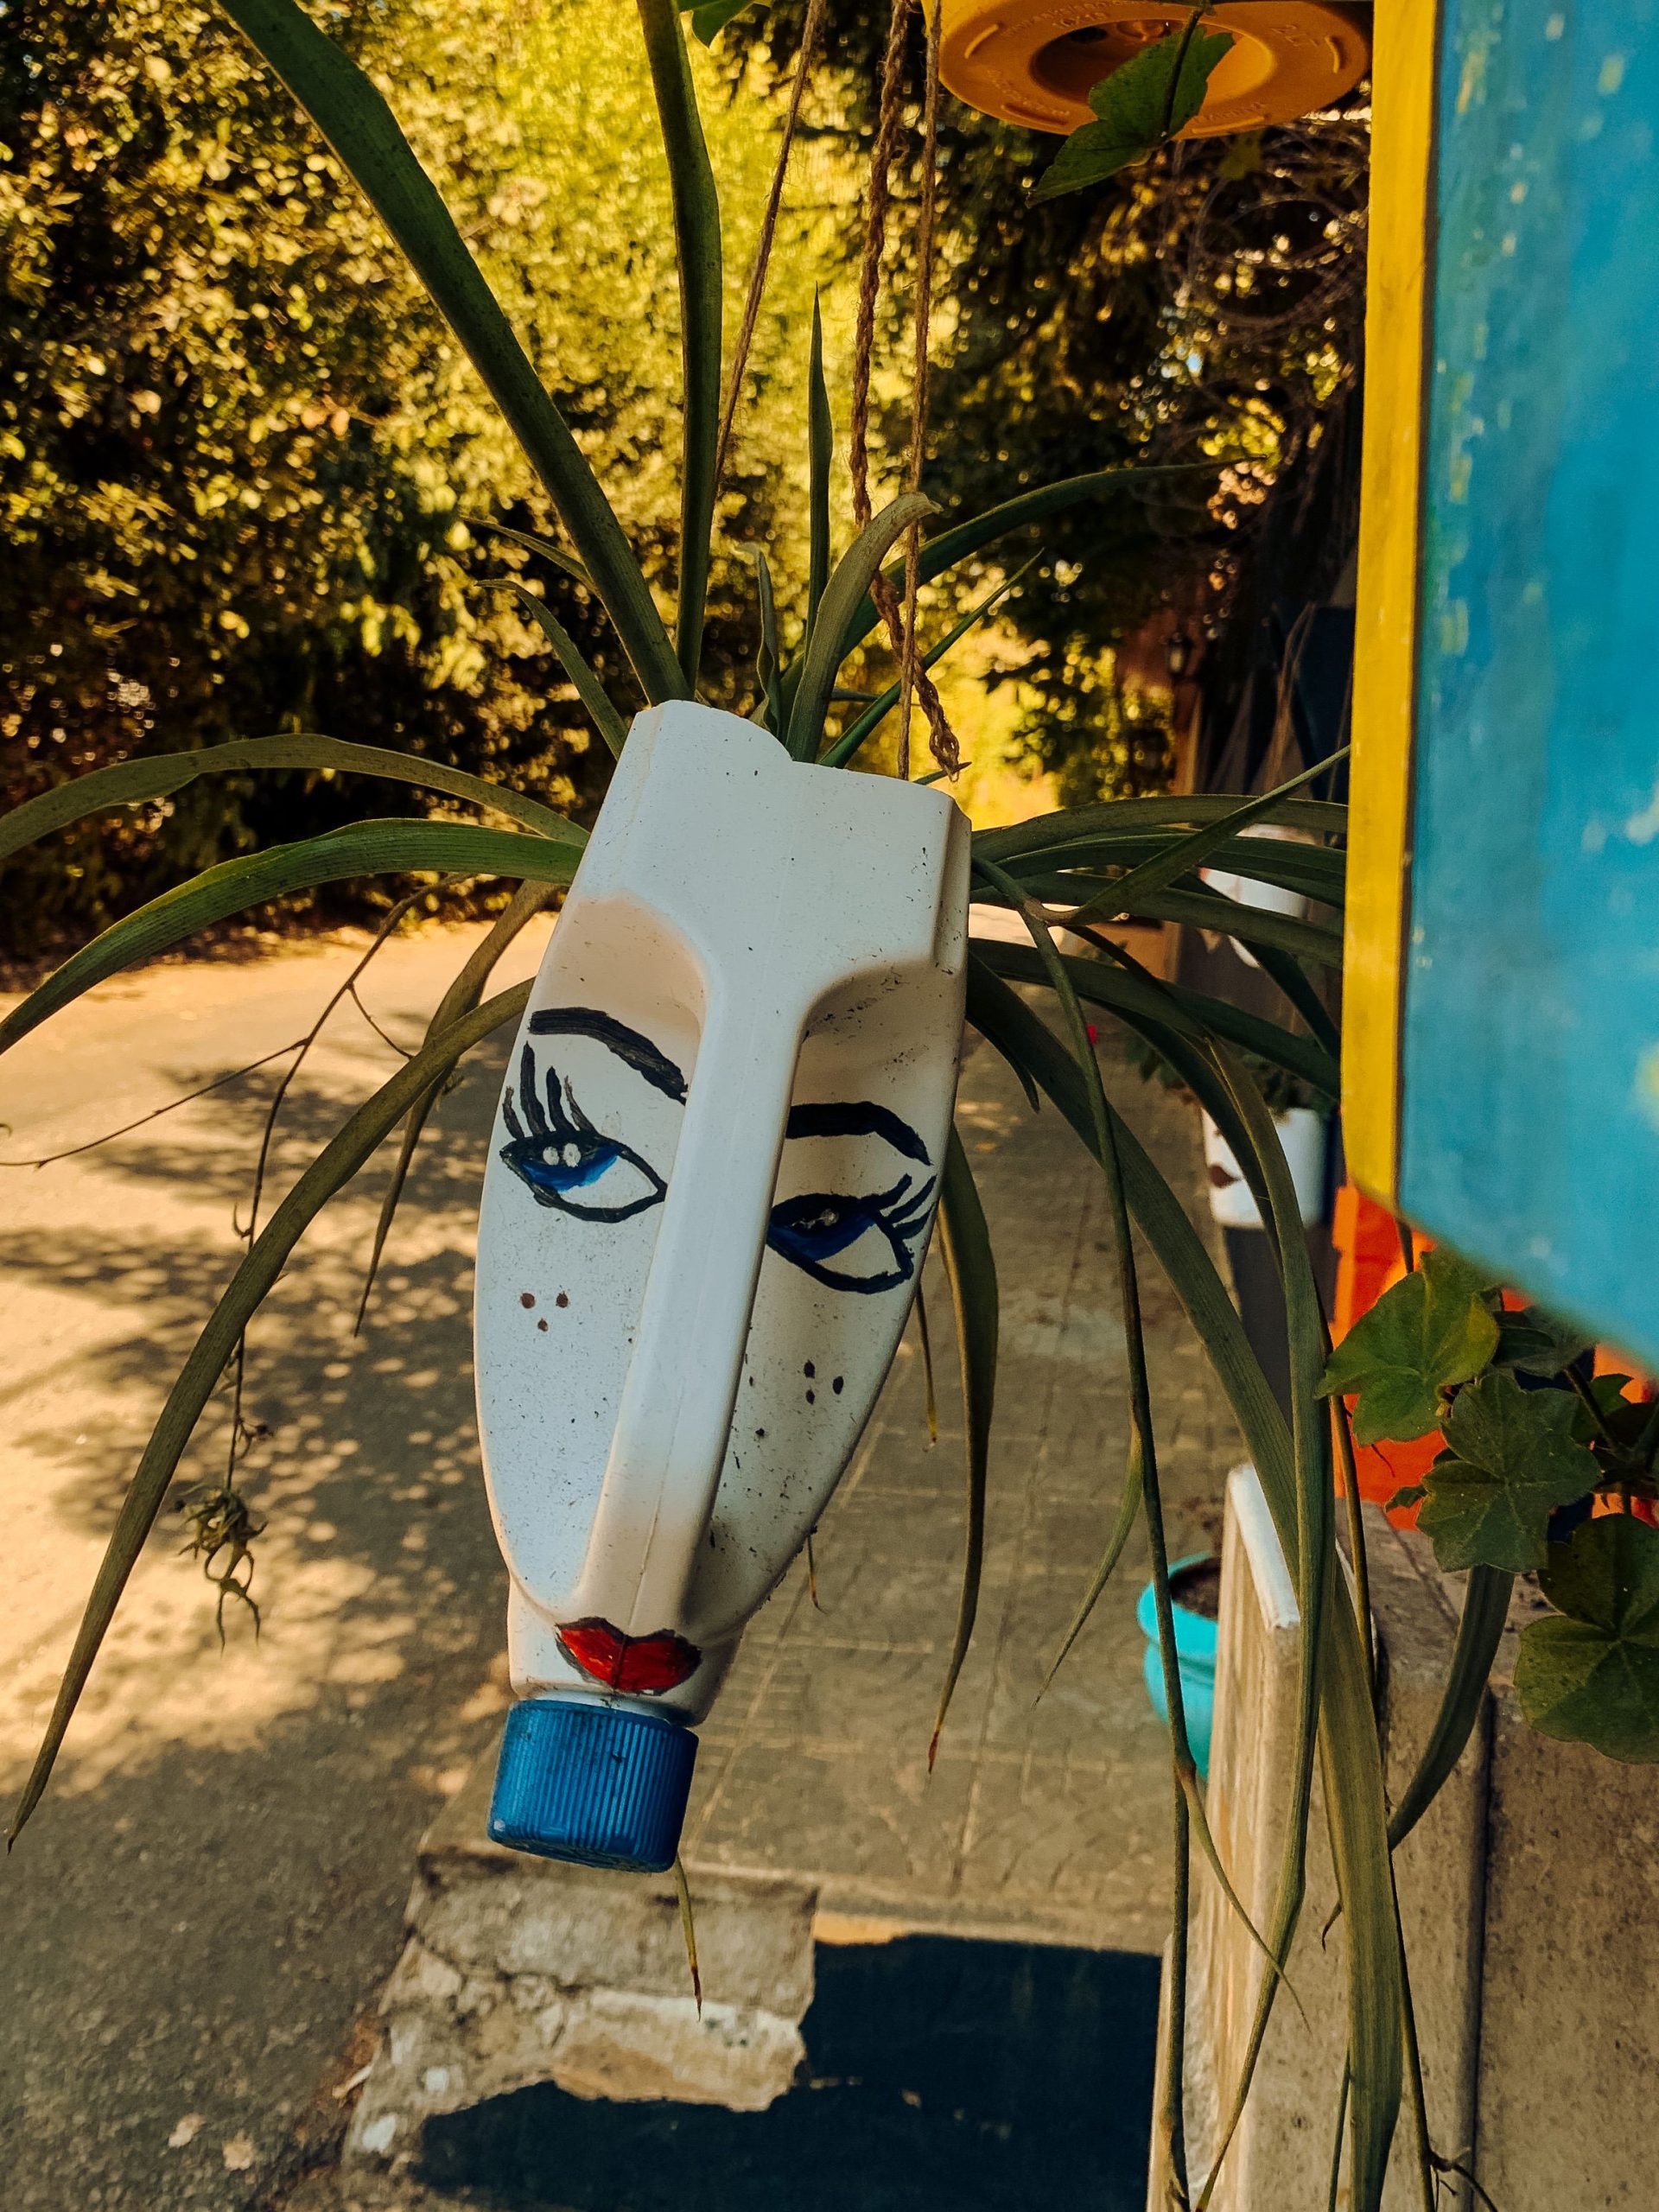
10. Upcycle a Plastic Bottle into a Quirky Face Planter
It’s the face. The entire charm and personality of this project come from the simple, hand-painted face that transforms a piece of trash into a whimsical character. The clever use of the bottle’s shape—the opening as a mouth, the cap as a chin—is what elevates the project from a simple craft to a piece of folk art. Without the face, it’s just a plastic bottle with a plant in it. With the face, it tells a story and has a playful spirit that is sure to make you smile.
|
📋 Copy HEX 🔗 Share |
This is a fantastic project for kids and adults alike, turning recycling into art. It’s quick, easy, and endlessly customizable.
Time: 20 minutes (plus drying).
Cost: Less than $2.
- Thoroughly clean and dry a white plastic bottle.
- Use a craft knife (adult supervision required!) to cut an opening for the plant.
- Use black and blue permanent markers or acrylic paint to draw on the eyes and eyebrows.
- Screw on a blue bottle cap to serve as the ‘chin.’ The bottle opening naturally forms the mouth shape.
- Poke a few small drainage holes in the bottom of the bottle.
- Punch two holes near the top and thread a piece of twine through for hanging. Fill with soil and a fun, spiky plant!
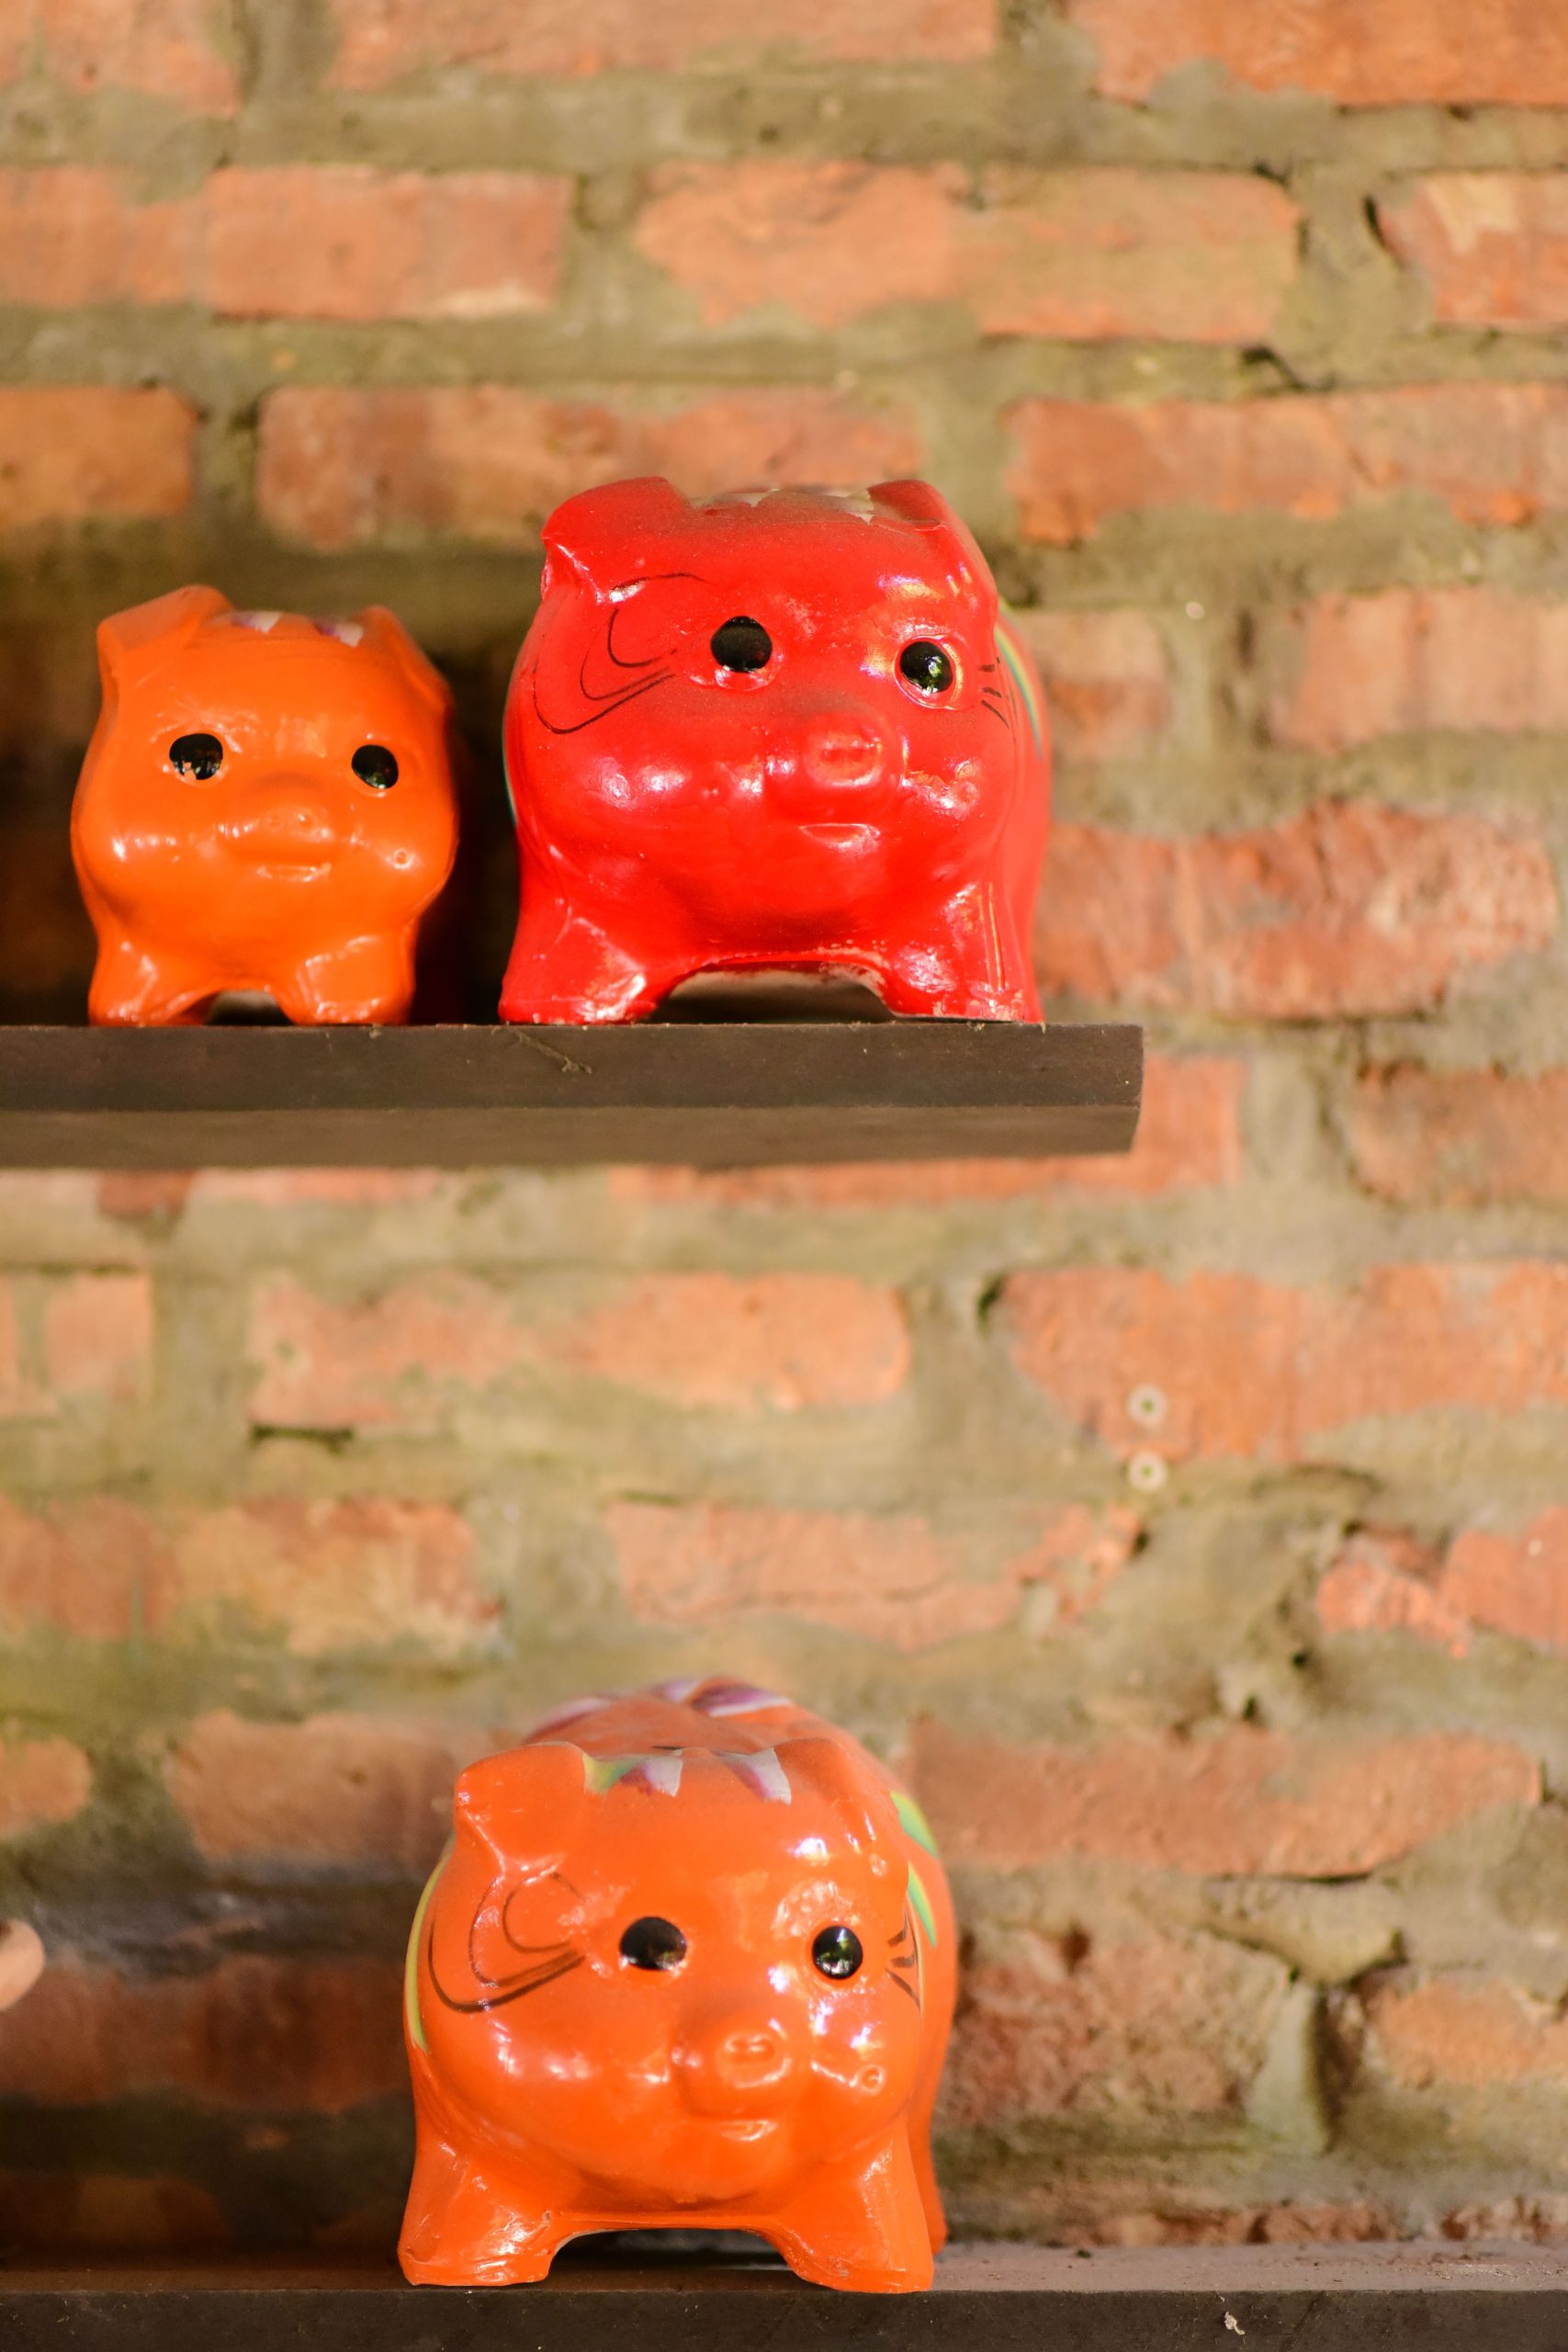
11. Display Colorful Ceramic Cat Figurines on Rustic Shelves
This playful pop of color is perfect for a narrow vertical space. Think of that awkward wall in your kitchen, the end of a hallway, or the space between two doors. You only need about 18 to 24 inches of wall width to install two small floating shelves like these. The key is to stack them vertically to draw the eye upward, making the space feel taller. Be mindful of the shelf depth; 4-6 inches is ideal for displaying small objects without jutting out too far into a walkway.
|
📋 Copy HEX 🔗 Share |
When displaying a collection of similar objects, the ‘rule of three’ is your best friend. An arrangement of three (or any odd number) is almost always more visually appealing and dynamic than an even number. Here, the two orange cats balance the single red one, creating a small visual triangle that keeps your eye moving. If you have a larger collection, try grouping them in clusters of three or five for a more curated, less cluttered feel.
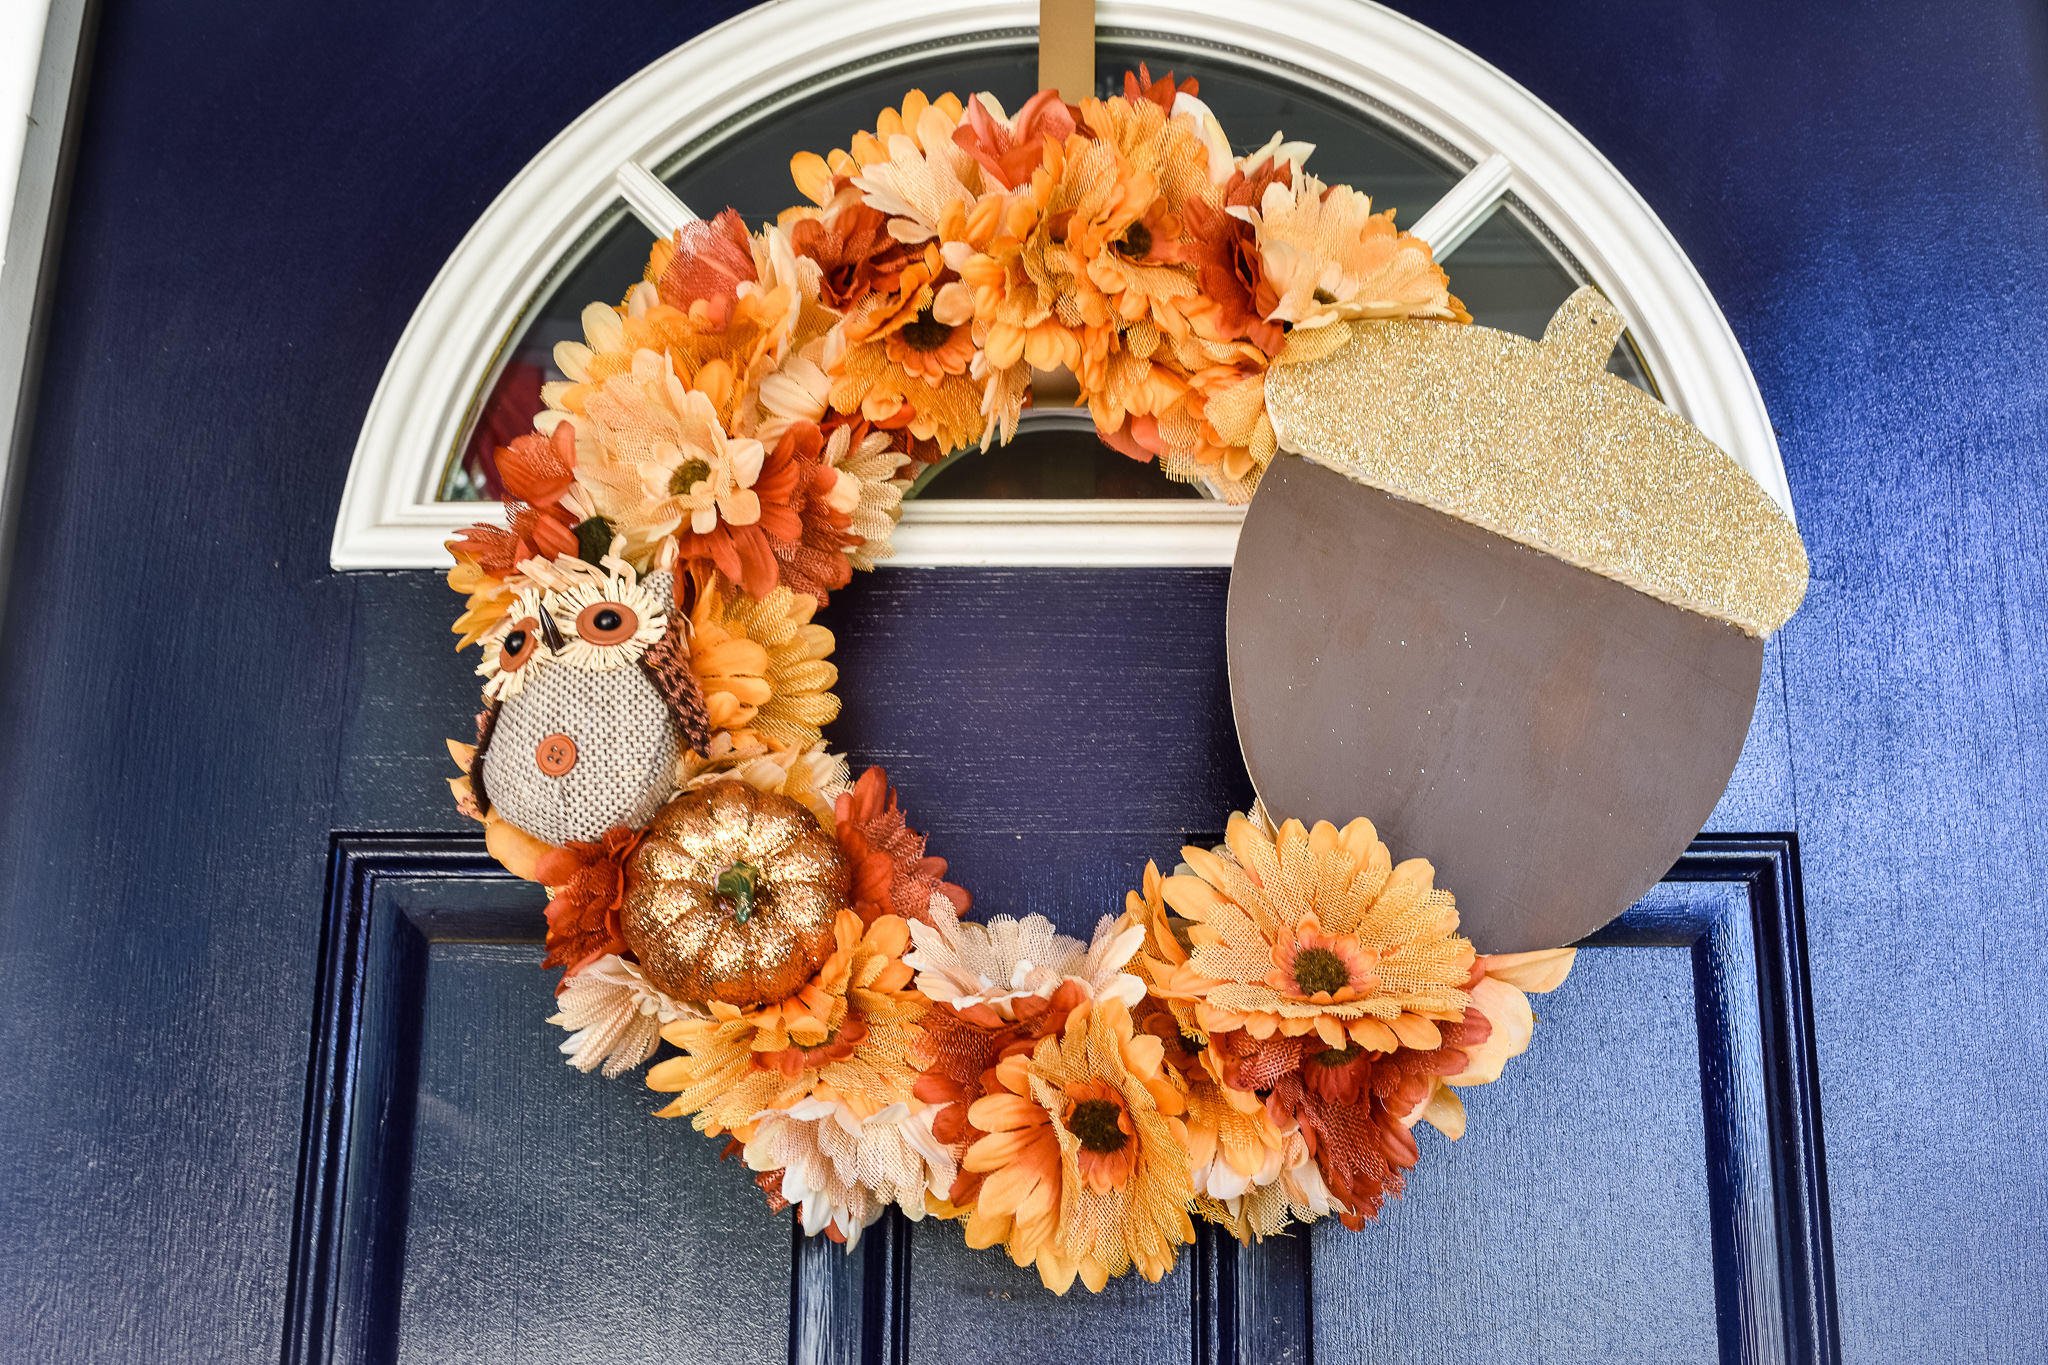
12. Craft a Festive Fall Wreath with a Burlap Owl
The success of this wreath lies in its brilliant use of complementary colors and textures. The deep, cool navy blue of the door provides a stunning backdrop that makes the warm oranges and peaches of the flowers pop. It’s a classic color theory trick that always delivers! Furthermore, the mix of materials—soft faux flower petals, rustic burlap, shimmering glitter, and smooth wood—creates a rich, tactile quality that makes the wreath feel lush and expensive, even if the components are from the dollar store.
|
📋 Copy HEX 🔗 Share |
Don’t have a navy blue door? No problem. You can achieve a similar high-contrast look by hanging this wreath against a dark-painted feature wall. To get this look for less, start with a basic grapevine wreath form from Dollar Tree ($1.25). Buy a few bunches of their faux fall flowers ($5-$7) and a roll of burlap ribbon ($1.25). You can create the owl and acorn yourself using felt, cardboard, and a bit of craft paint and glitter, bringing the grand total to under $15. This is a project where your creativity can save you a ton of money.
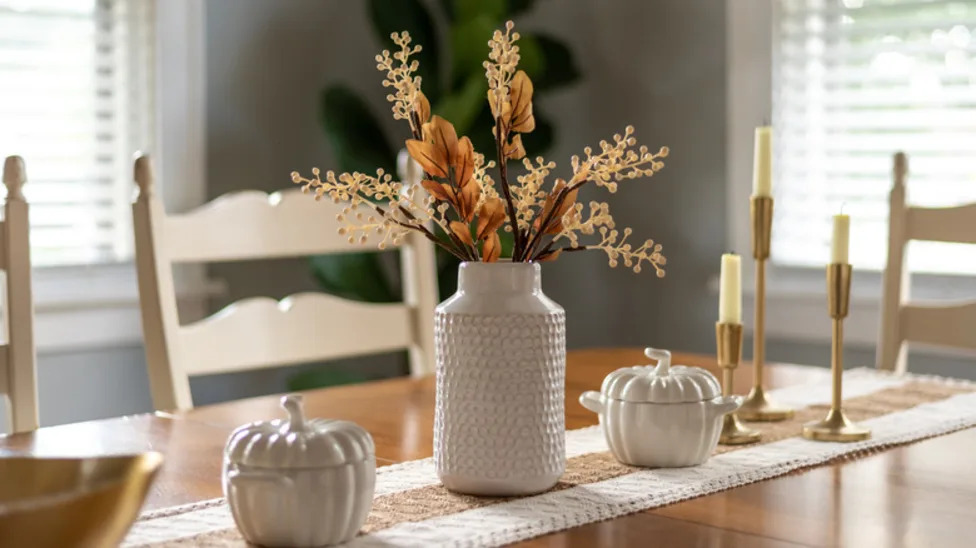
13. Set an Elegant Autumn Table with Ceramic Pumpkins and Gold Candlesticks
The visual recipe here is pure elegance: 40% natural texture, 40% clean white, and 20% metallic gleam. The woven table runner and wood grain of the table provide a warm, earthy base. The crisp white ceramic pumpkins and vase lift the look, adding a touch of modern sophistication. But it’s the 20% of polished gold from the candlestick holders that truly elevates the entire scene, injecting a dose of glamour and warm light. This balanced formula is what makes the tablescape feel both invitingly rustic and impressively chic. For a slightly different feel from a fall table, compare with the playful setup in Idea #30.
|
📋 Copy HEX 🔗 Share |
The single most important element in this tablescape is height variation. If you were to remove the gold taper candle holders, the entire arrangement would feel flat and one-dimensional. The candles draw the eye upward, creating a dynamic silhouette and adding a sense of occasion. It’s the difference between a casual table dressing and a formal, thoughtfully designed centerpiece. The varying heights of the vase, pumpkins, and candles create a beautiful rhythm.
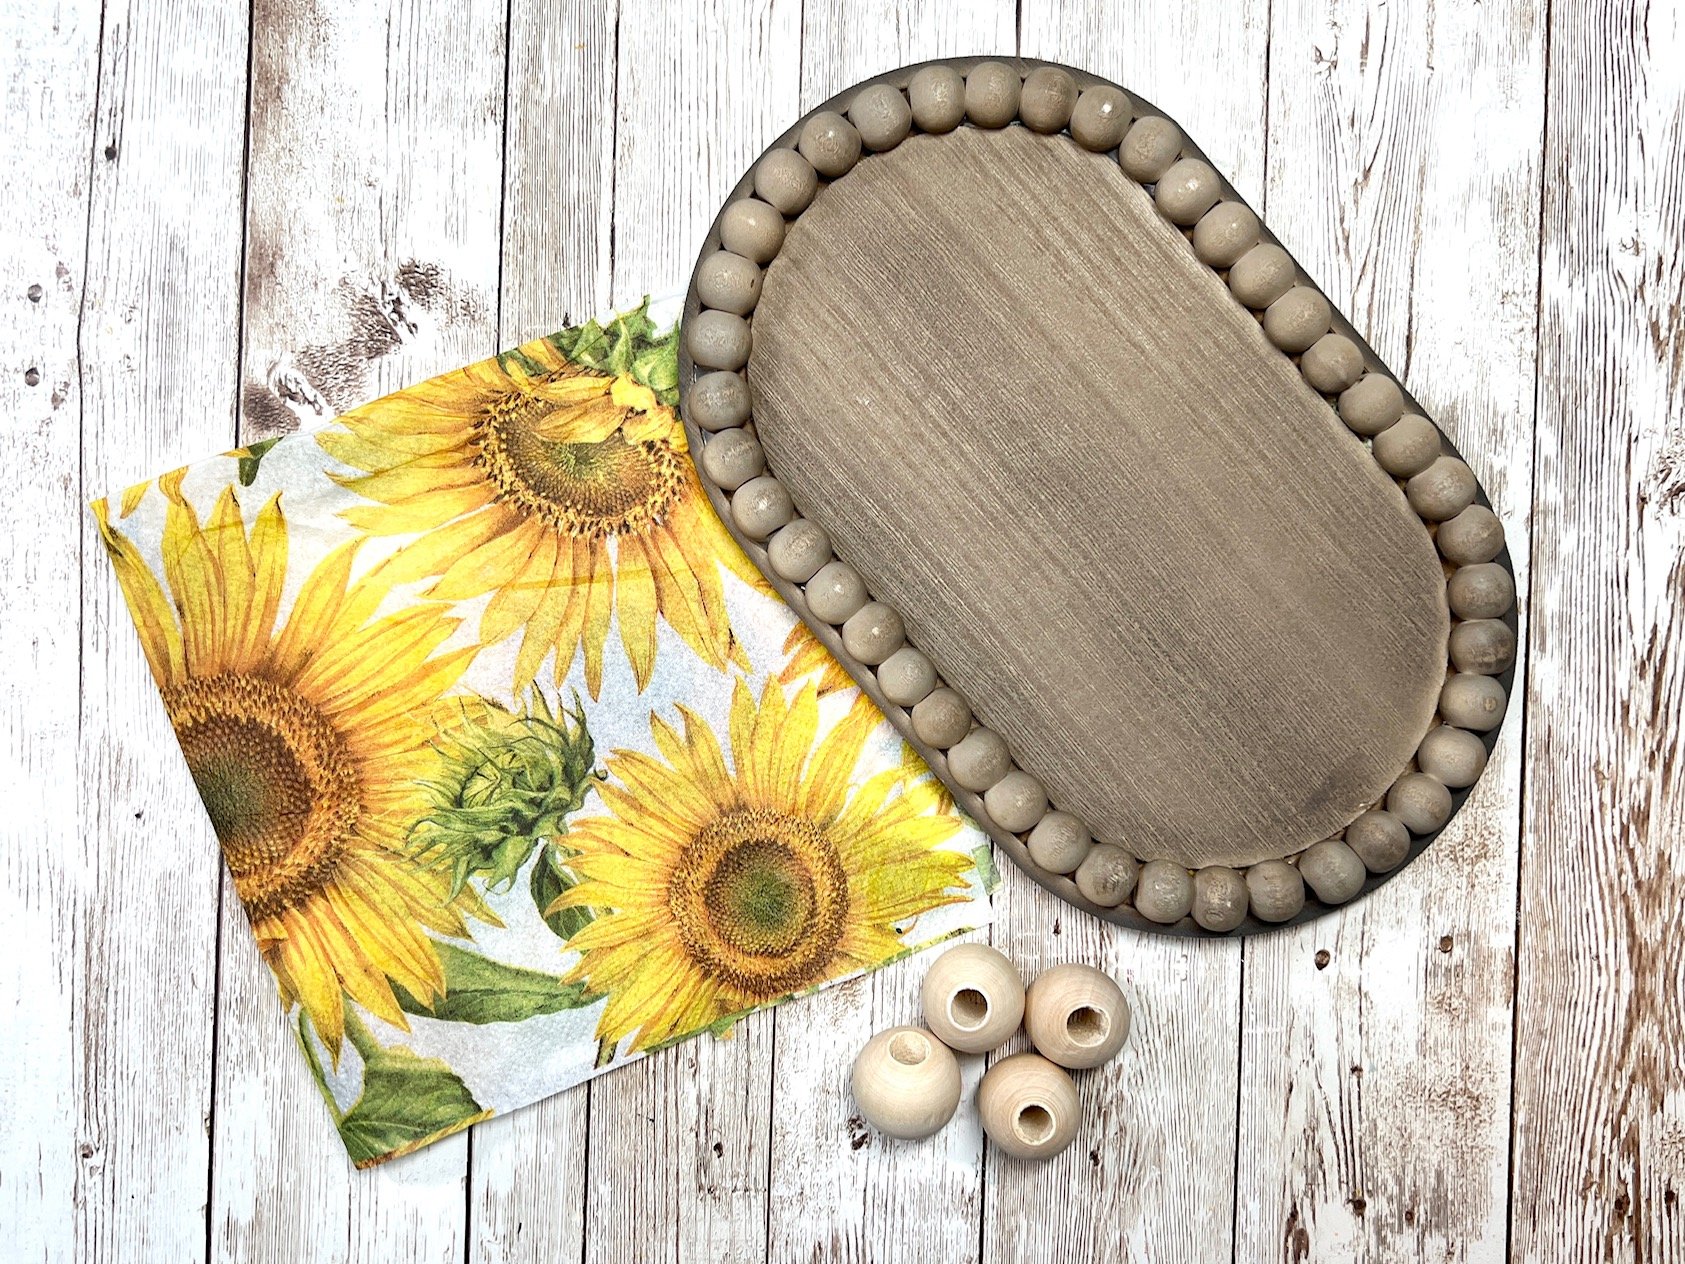
14. Create Farmhouse Wall Art from a Plastic Plate and Napkins
This is a classic Dollar Tree hack that turns simple party supplies into charming farmhouse decor. The clear plastic plate acts as a perfect blank canvas for decoupage.
Time: 25 minutes (plus drying).
Cost: Under $3.
|
📋 Copy HEX 🔗 Share |
- Start with a clear square plastic plate from Dollar Tree.
- Choose a decorative paper napkin with a design you love, like a sunflower. Carefully separate the top printed layer from the other white layers. You only want the thin, printed ply.
- Apply a thin, even coat of Mod Podge or watered-down school glue to the back of the plastic plate.
- Gently place the napkin’s printed layer face-down onto the glue. Smooth it out from the center to the edges to remove air bubbles. Be gentle, as the wet napkin is fragile.
- Let it dry completely. Once dry, you’ll see the design through the front of the plate.
- For a finished look, you can paint the back with a coat of white or black paint to make the design pop, and hot glue a ribbon to the back for hanging.
When working with decoupage on a clear surface like this, the trick is to apply the glue to the plate, not the napkin. The napkin is too delicate to handle once it’s wet. By placing the dry napkin onto the wet surface, you have more control and are less likely to tear it. Furthermore, don’t worry about small wrinkles; they often add to the rustic, handmade charm of the final piece.
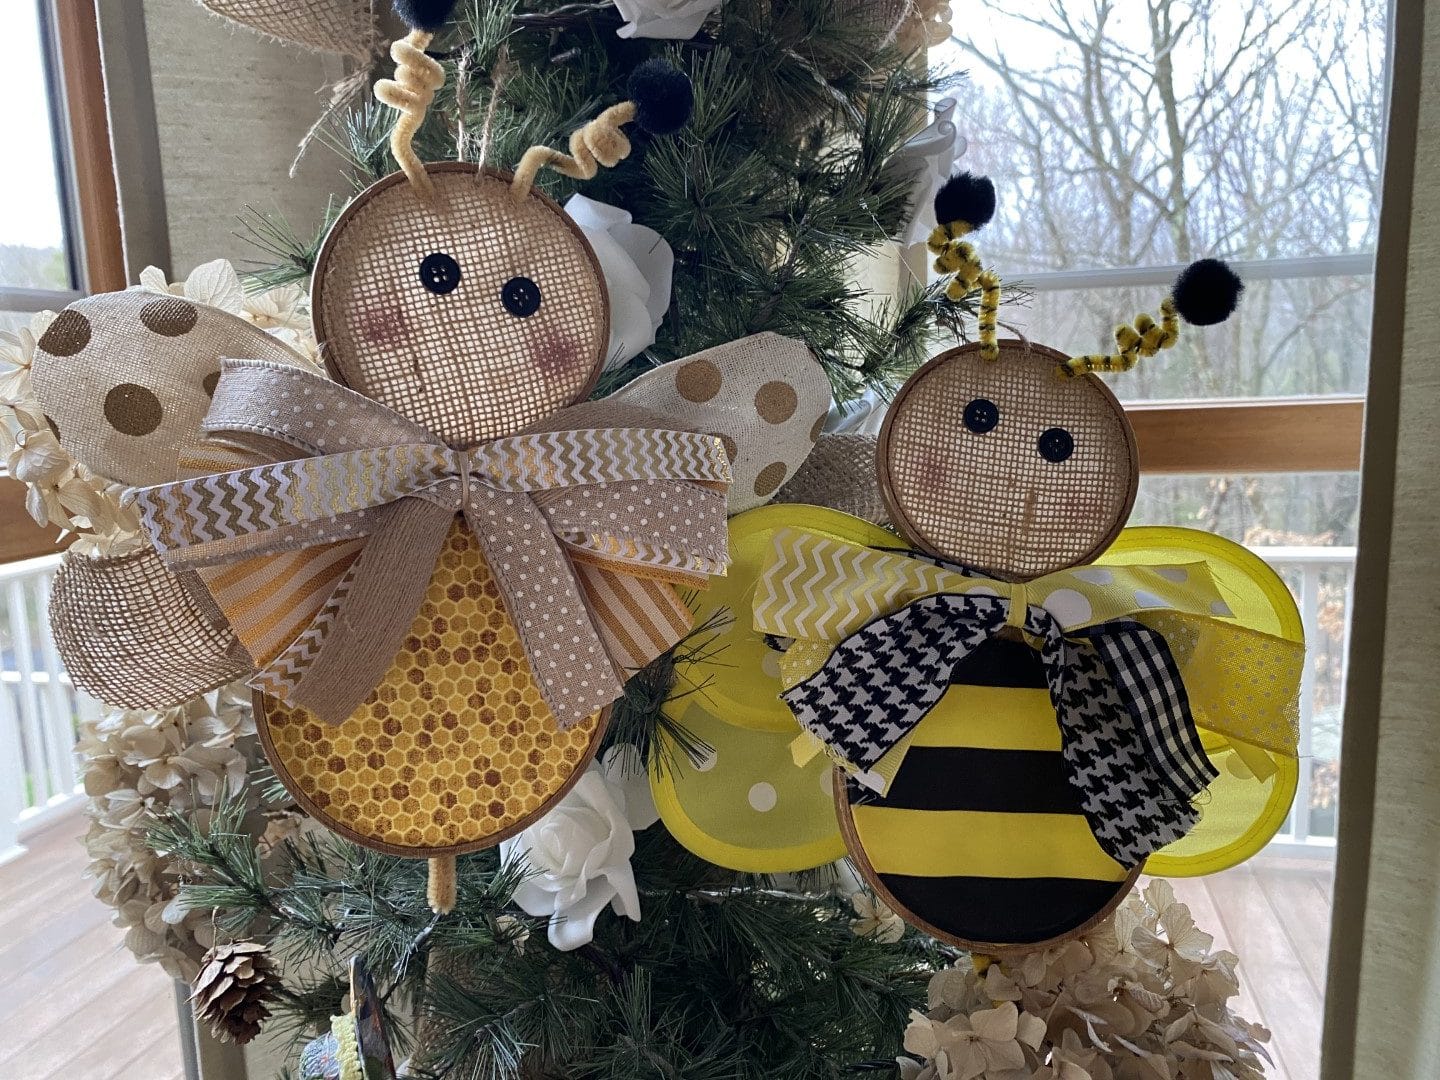
15. Craft Cheerful Bumblebee Ornaments for Spring
These bumblebee ornaments are incredibly charming, but let’s be honest about where they’ll work. Because they are made of burlap, textile, and paper ribbons, these are strictly for indoor use. A single morning dew or rain shower would leave them a soggy, sad mess. Keep them inside on a decorative tree, hanging from a cabinet knob, or as part of a spring-themed vignette on a mantelpiece to ensure they stay cheerful and intact.
|
📋 Copy HEX 🔗 Share |
You can create these adorable bees almost entirely from the craft aisle at Dollar Tree. Look for small embroidery hoops or wooden craft rings for the frame. They sell packs of burlap, craft fabric squares, and a wide assortment of ribbons. The bodies can be made from yellow and black felt, and the antennae from pipe cleaners and pom-poms. Instead of button eyes, a simple dot with a black permanent marker works just as well. This activity is a project where a $5-10 haul can yield a whole swarm of happy bees.
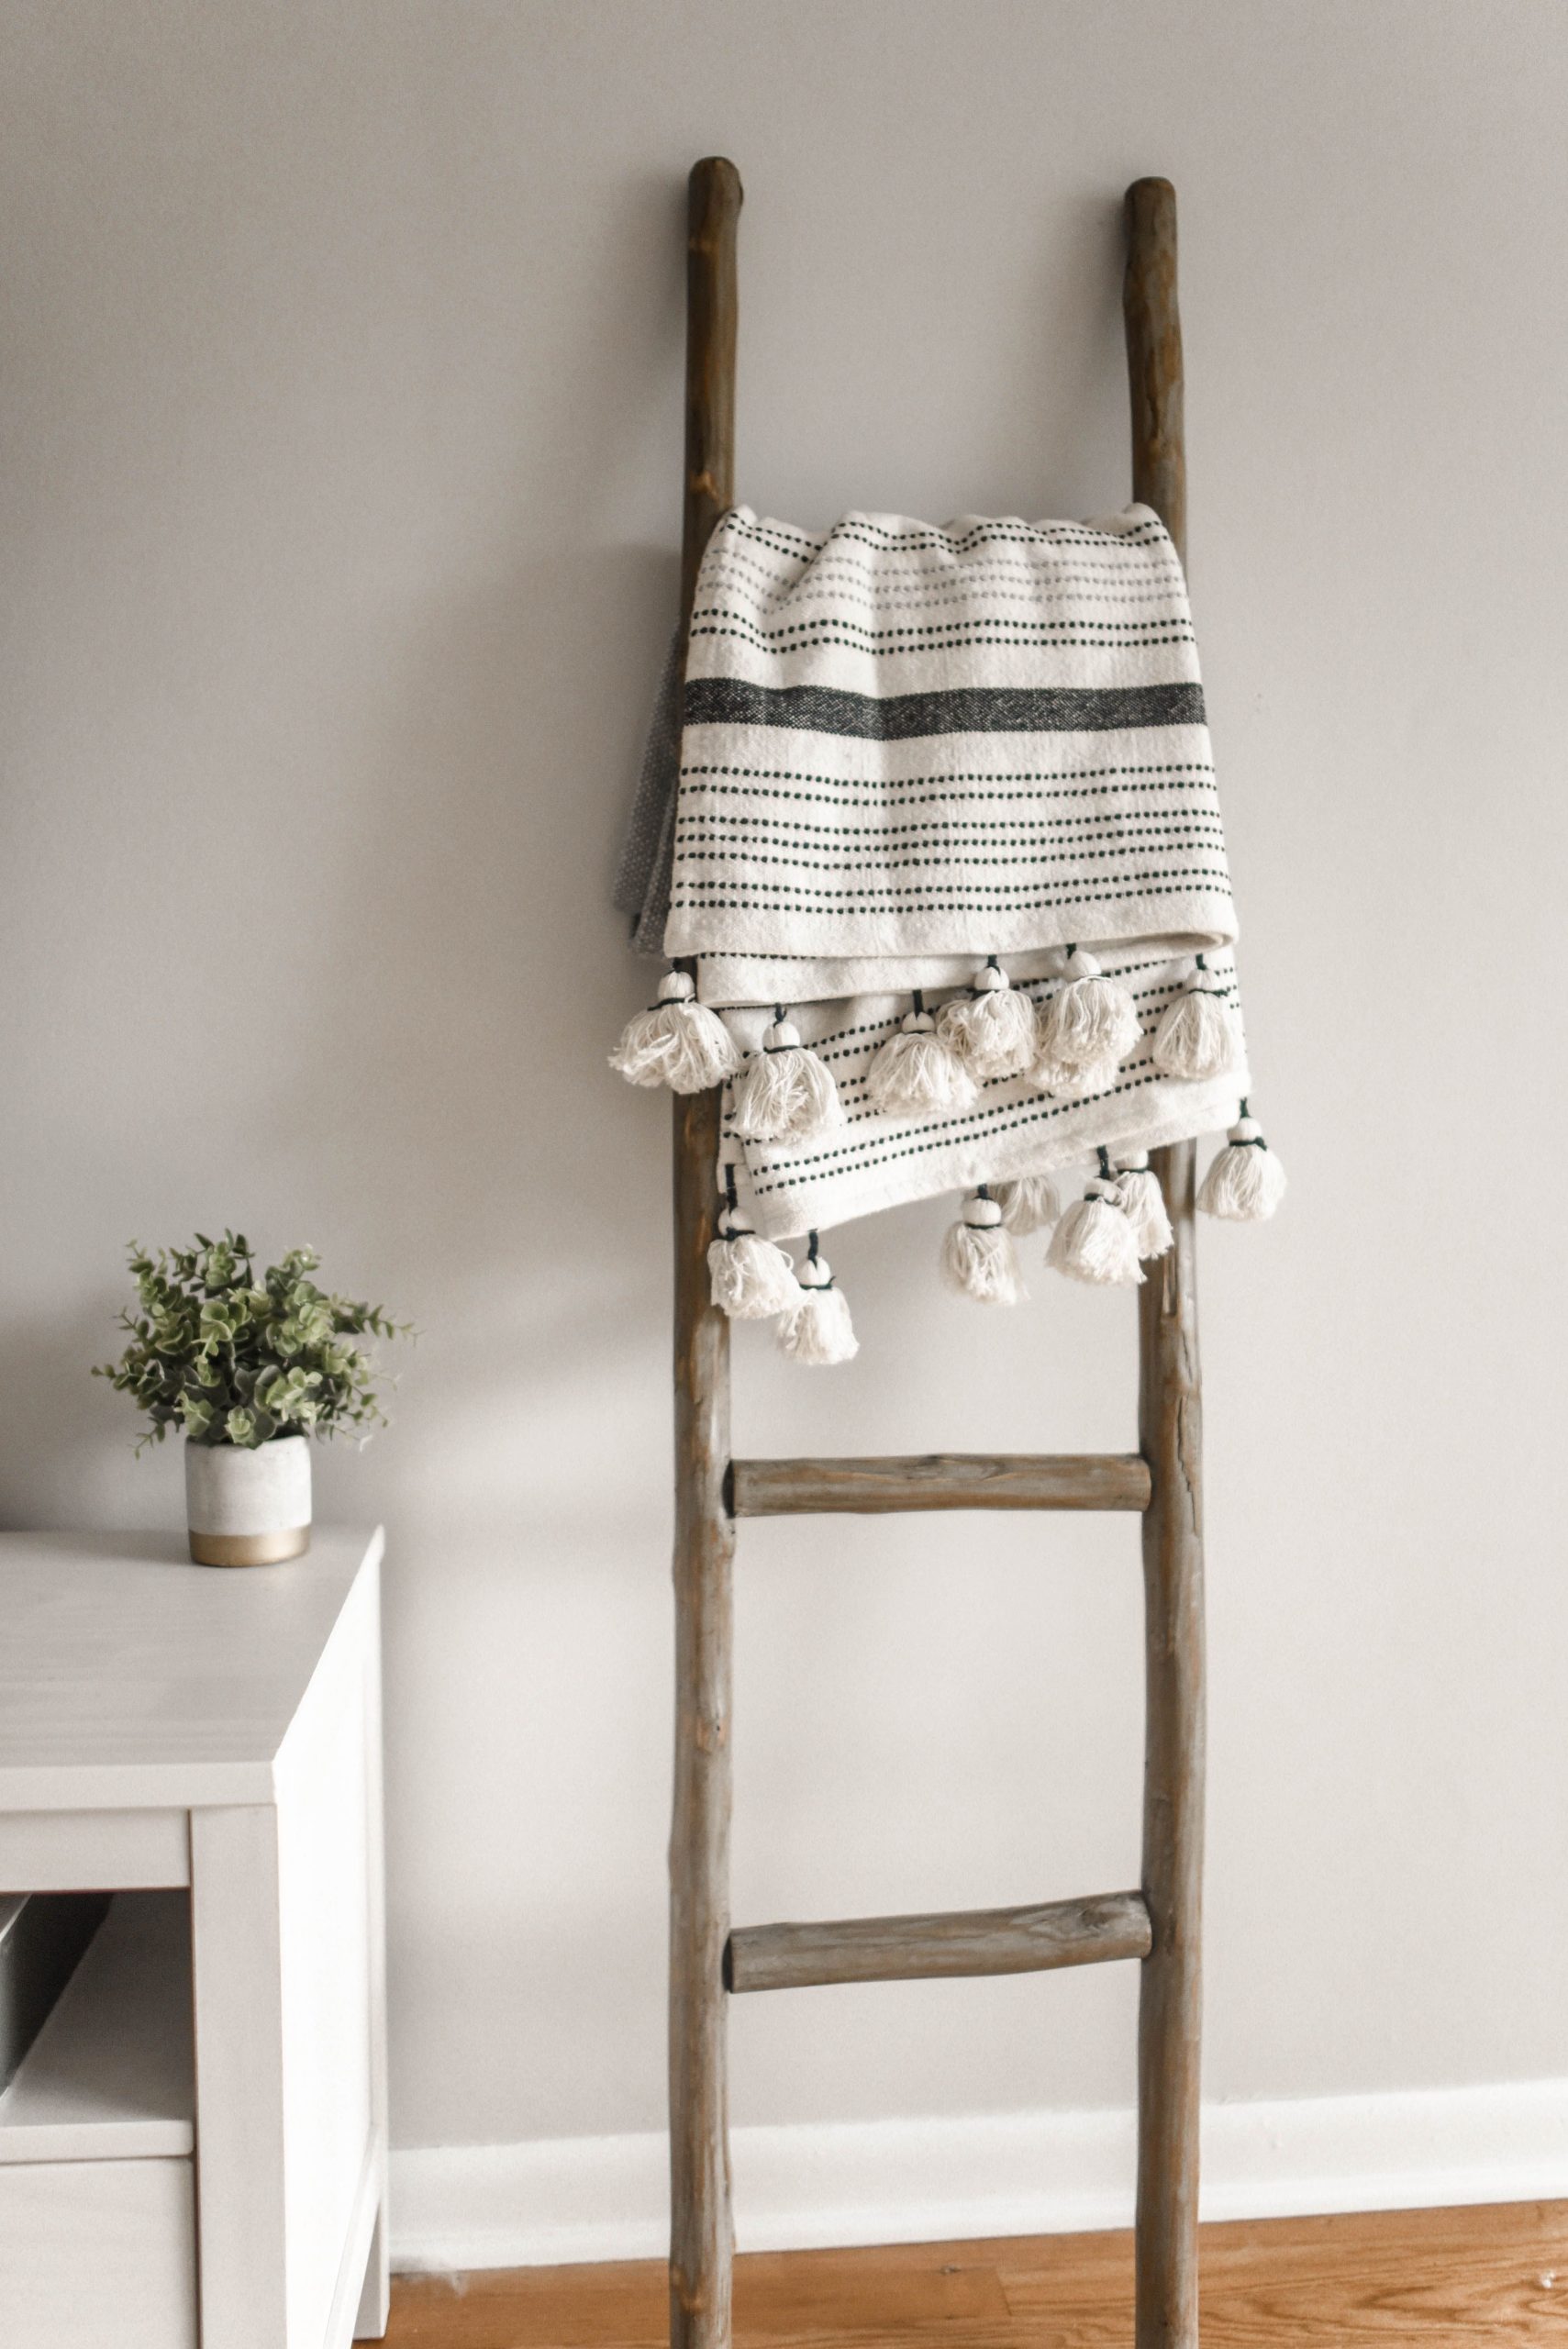
16. Drape a Tassel Throw on a Rustic Blanket Ladder
This simple setup is effective because it perfectly balances hard and soft, warm and cool. The rustic wooden ladder brings a warm, natural, slightly rough element into the space. In contrast, the striped blanket is soft and inviting. The cool grey of the wall provides a neutral, modern backdrop that allows these textures to stand out. It’s this thoughtful contrast that makes the corner feel layered and intentionally styled, rather than just a place where a blanket was left.
|
📋 Copy HEX 🔗 Share |
A decorative ladder like this requires almost zero maintenance, but the throw blanket is another story. Throws with large tassels can be tricky to wash, as the tassels can get tangled or unravel in a machine. To keep them looking neat, it’s best to hand-wash the blanket or place it in a large mesh laundry bag on a delicate cycle. To fluff up the tassels afterwards, gently comb them out with your fingers while damp and let them air dry.
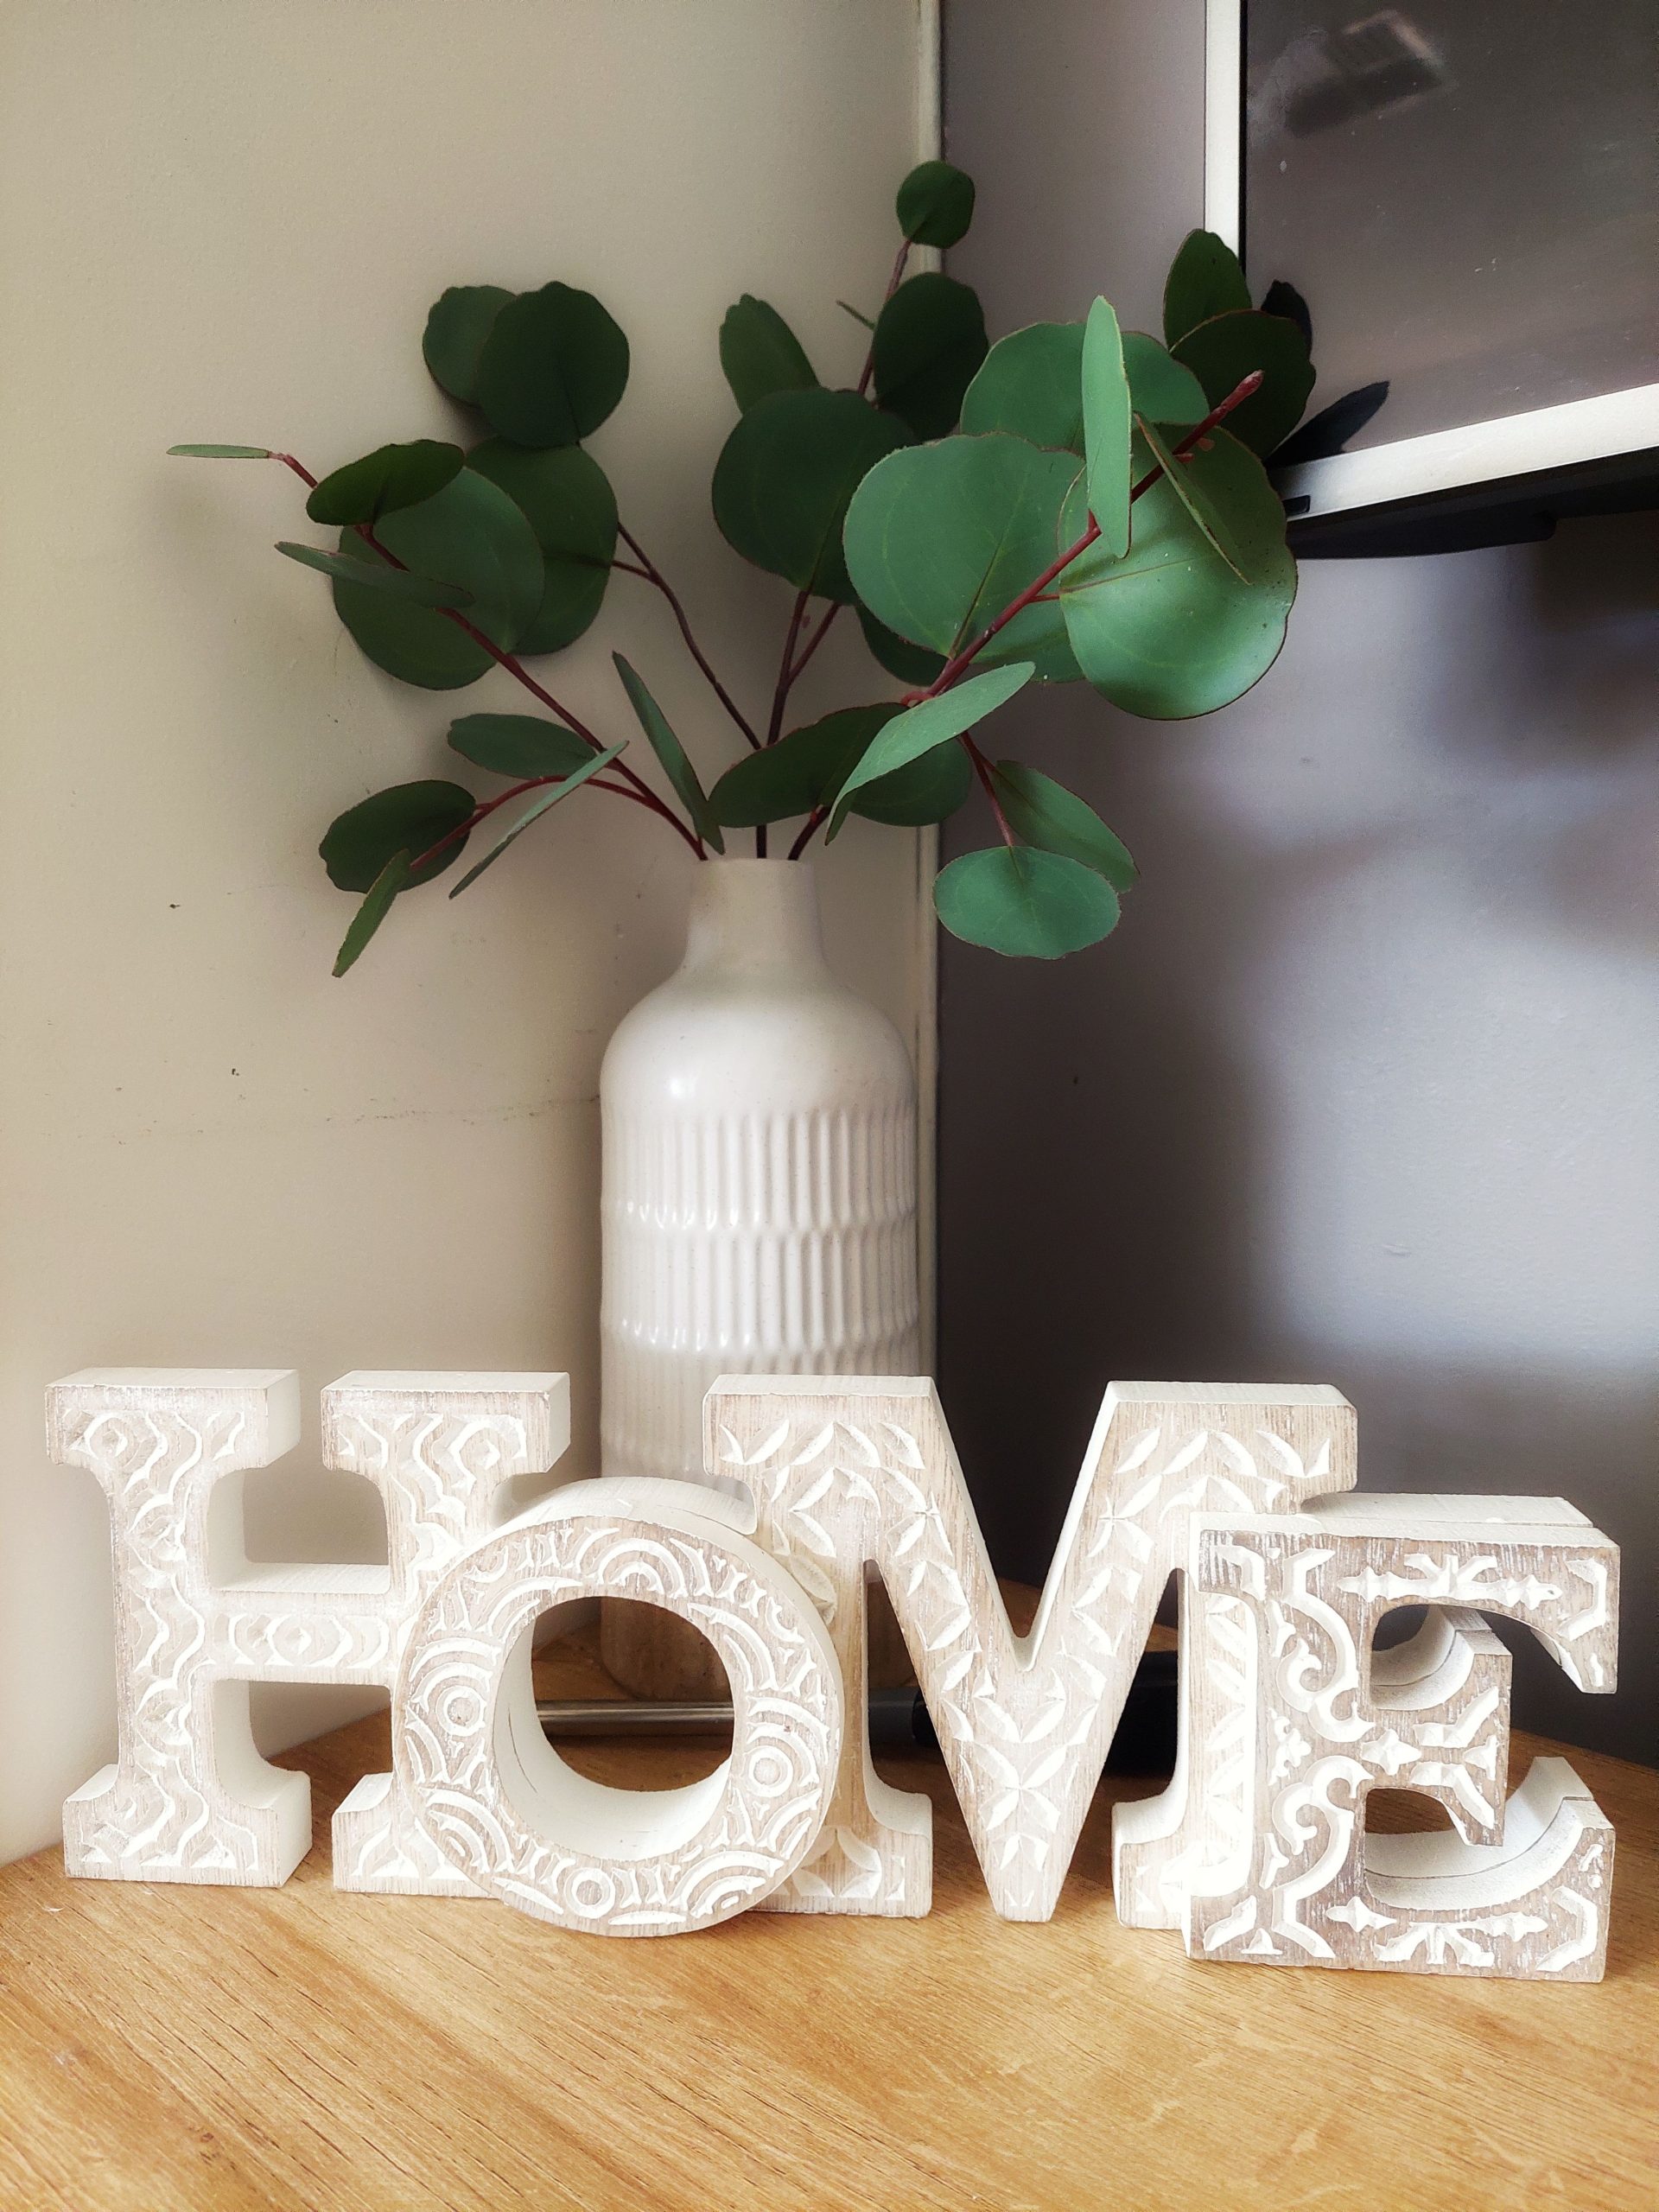
17. Spell out ‘HOME’ with White Letters and Eucalyptus
The secret to making pre-made decor letters look styled and not generic is what you place *behind* them. Adding the vase with eucalyptus branches creates depth and a visual backdrop. It breaks up the solid white of the letters and connects them to the natural wood tones of the surface. Without the greenery, the letters would look much starker and less integrated. Always think in layers: foreground (letters), midground (greenery), and background (wall).
|
📋 Copy HEX 🔗 Share |
This kind of decorative arrangement is perfect for a mantelpiece, a console table, or a deep floating shelf. You need a surface with a depth of at least 8-10 inches to comfortably fit the letters and the vase behind them without it feeling cramped. The overall width of the display is about 2-3 feet, making it a substantial focal point without overwhelming the space. It’s a lovely way to add personality to a living room or entryway. It shares a cozy, natural vibe with the minimalist arrangement in Idea #25.
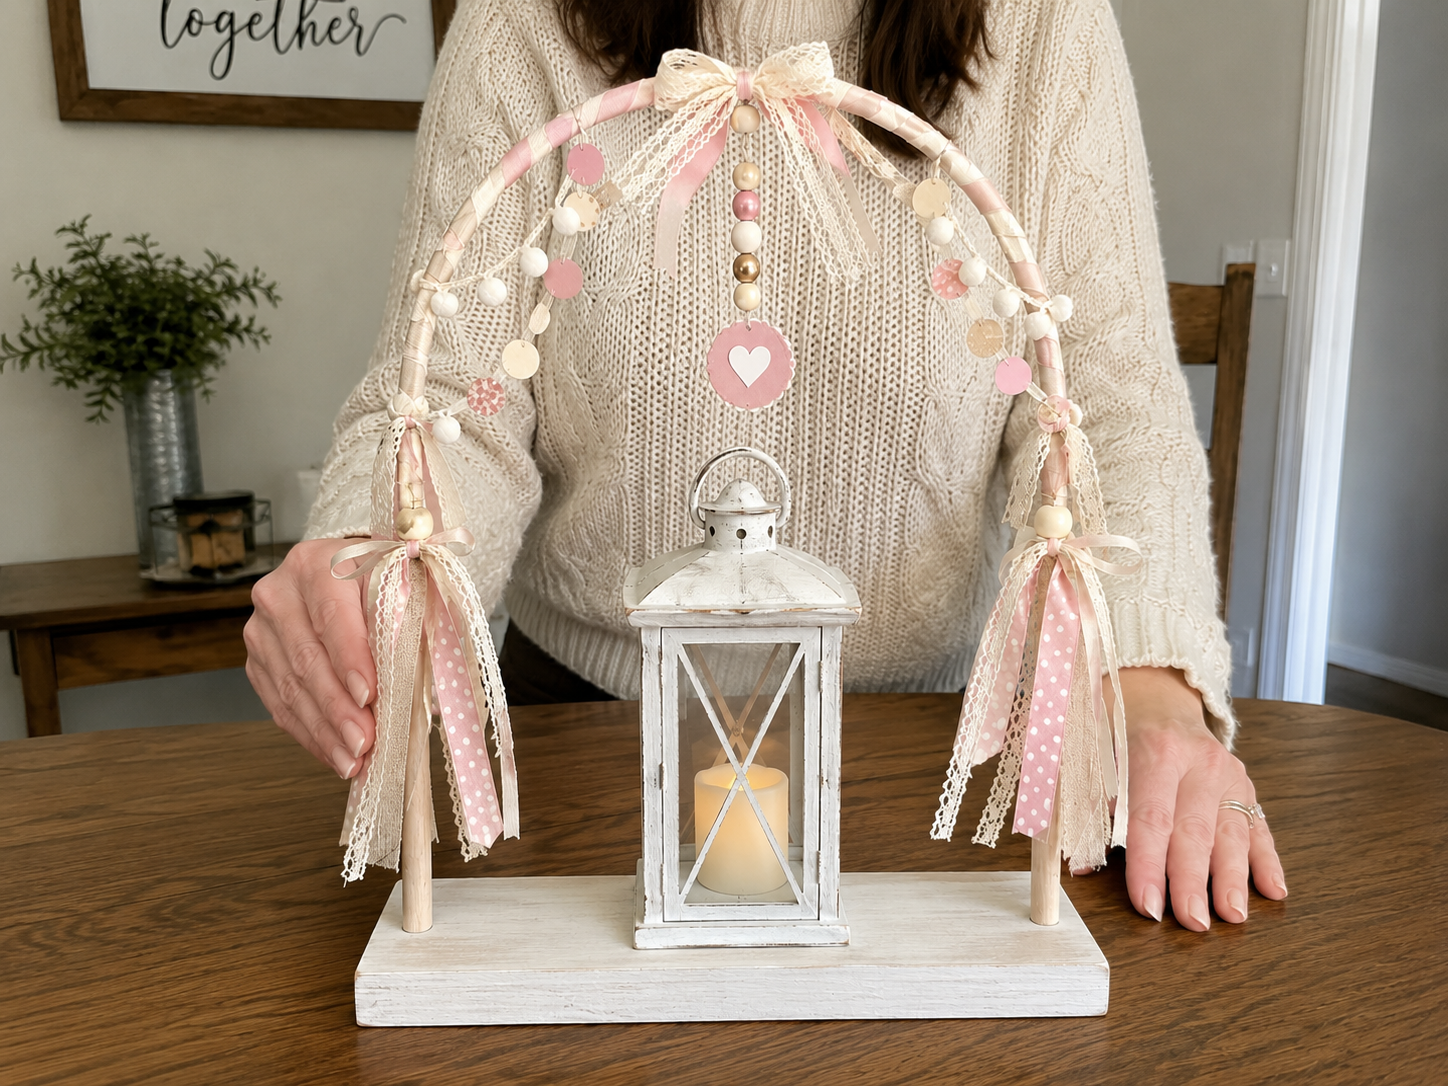
18. Assemble a Shabby Chic Lantern Arch Centerpiece
The single element that defines this piece is the distressed white finish. It’s the unifying factor that ties the lantern, the base, and the arch together and firmly plants this project in the shabby chic category. That soft, worn-in texture provides a romantic, vintage feel that wouldn’t be present if it were painted a solid, glossy white. The distressing adds history and character, even if the piece is brand new. Without it, the charm would be significantly diminished.
|
📋 Copy HEX 🔗 Share |
The design formula here relies heavily on a soft, feminine aesthetic. Let’s call it 70% texture and 30% soft-focus color. The distressed paint, the grain of the wood, the fabric wrap, and the various ribbons provide a wealth of tactile interest. The color palette—almost exclusively pink, white, and cream—keeps the focus on this texture and creates a dreamy, cohesive look. You could introduce another pastel, like a soft mint or baby blue, but the key is to keep the colors gentle and muted to maintain the shabby chic vibe.
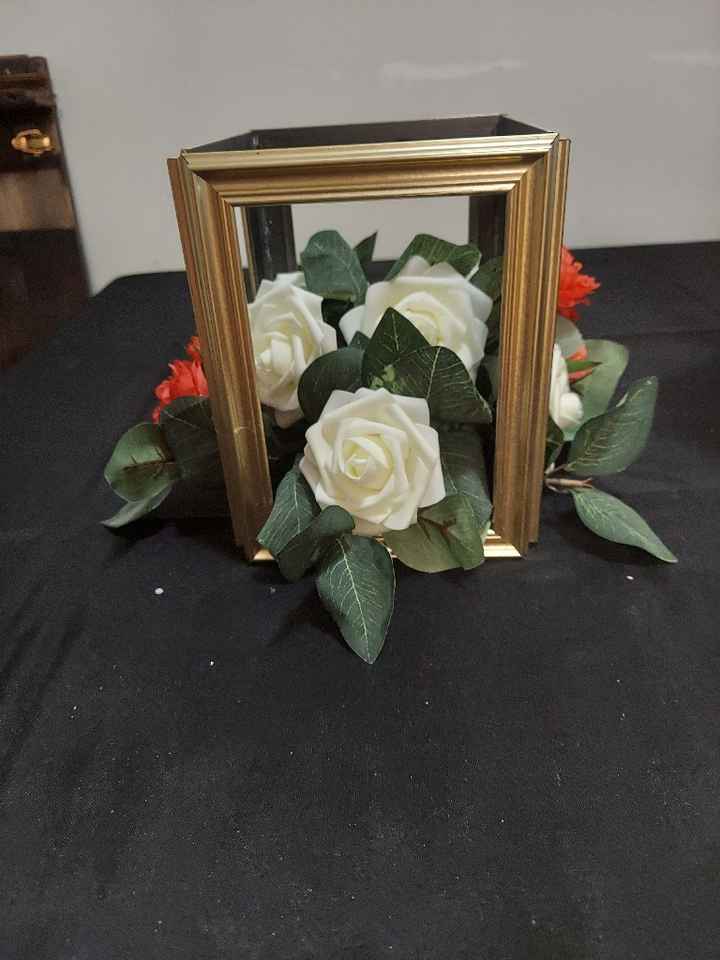
19. Construct a Floral Centerpiece from Gold Picture Frames
This is a brilliant way to create a modern, structural centerpiece using one of Dollar Tree’s most versatile items: their simple picture frames.
Time: 10 minutes.
Cost: Around $6.
|
📋 Copy HEX 🔗 Share |
- Gather four identical 4×6 or 5×7 gold picture frames from Dollar Tree.
- Remove the glass and backing from all four frames. You’ll only need the empty frames themselves.
- Stand the frames up on their long edges and arrange them into a square or rectangle.
- Use a hot glue gun or a strong craft adhesive like E6000 to carefully apply glue at the corners where the frames touch.
- Hold the frames together firmly for a minute or two until the glue sets. Let it cure completely if using a stronger adhesive.
- Once sturdy, place a small bunch of faux flowers from the dollar store in the center.
This project is the epitome of affordable elegance. The cost is wonderfully low, but the result looks surprisingly high-end and modern. Here’s how it breaks down:
- Gold Picture Frames (4): $5.00
- Bunch of Faux Flowers: $1.25
- Hot Glue (if you don’t have it): $1.25 for a small pack
- TOTAL: $6.25 – $7.50
- Budget alternative: This project is already about as budget-friendly as it gets! To stretch your dollar further, buy a larger floral bush and use wire cutters to separate it into smaller bunches for multiple projects.
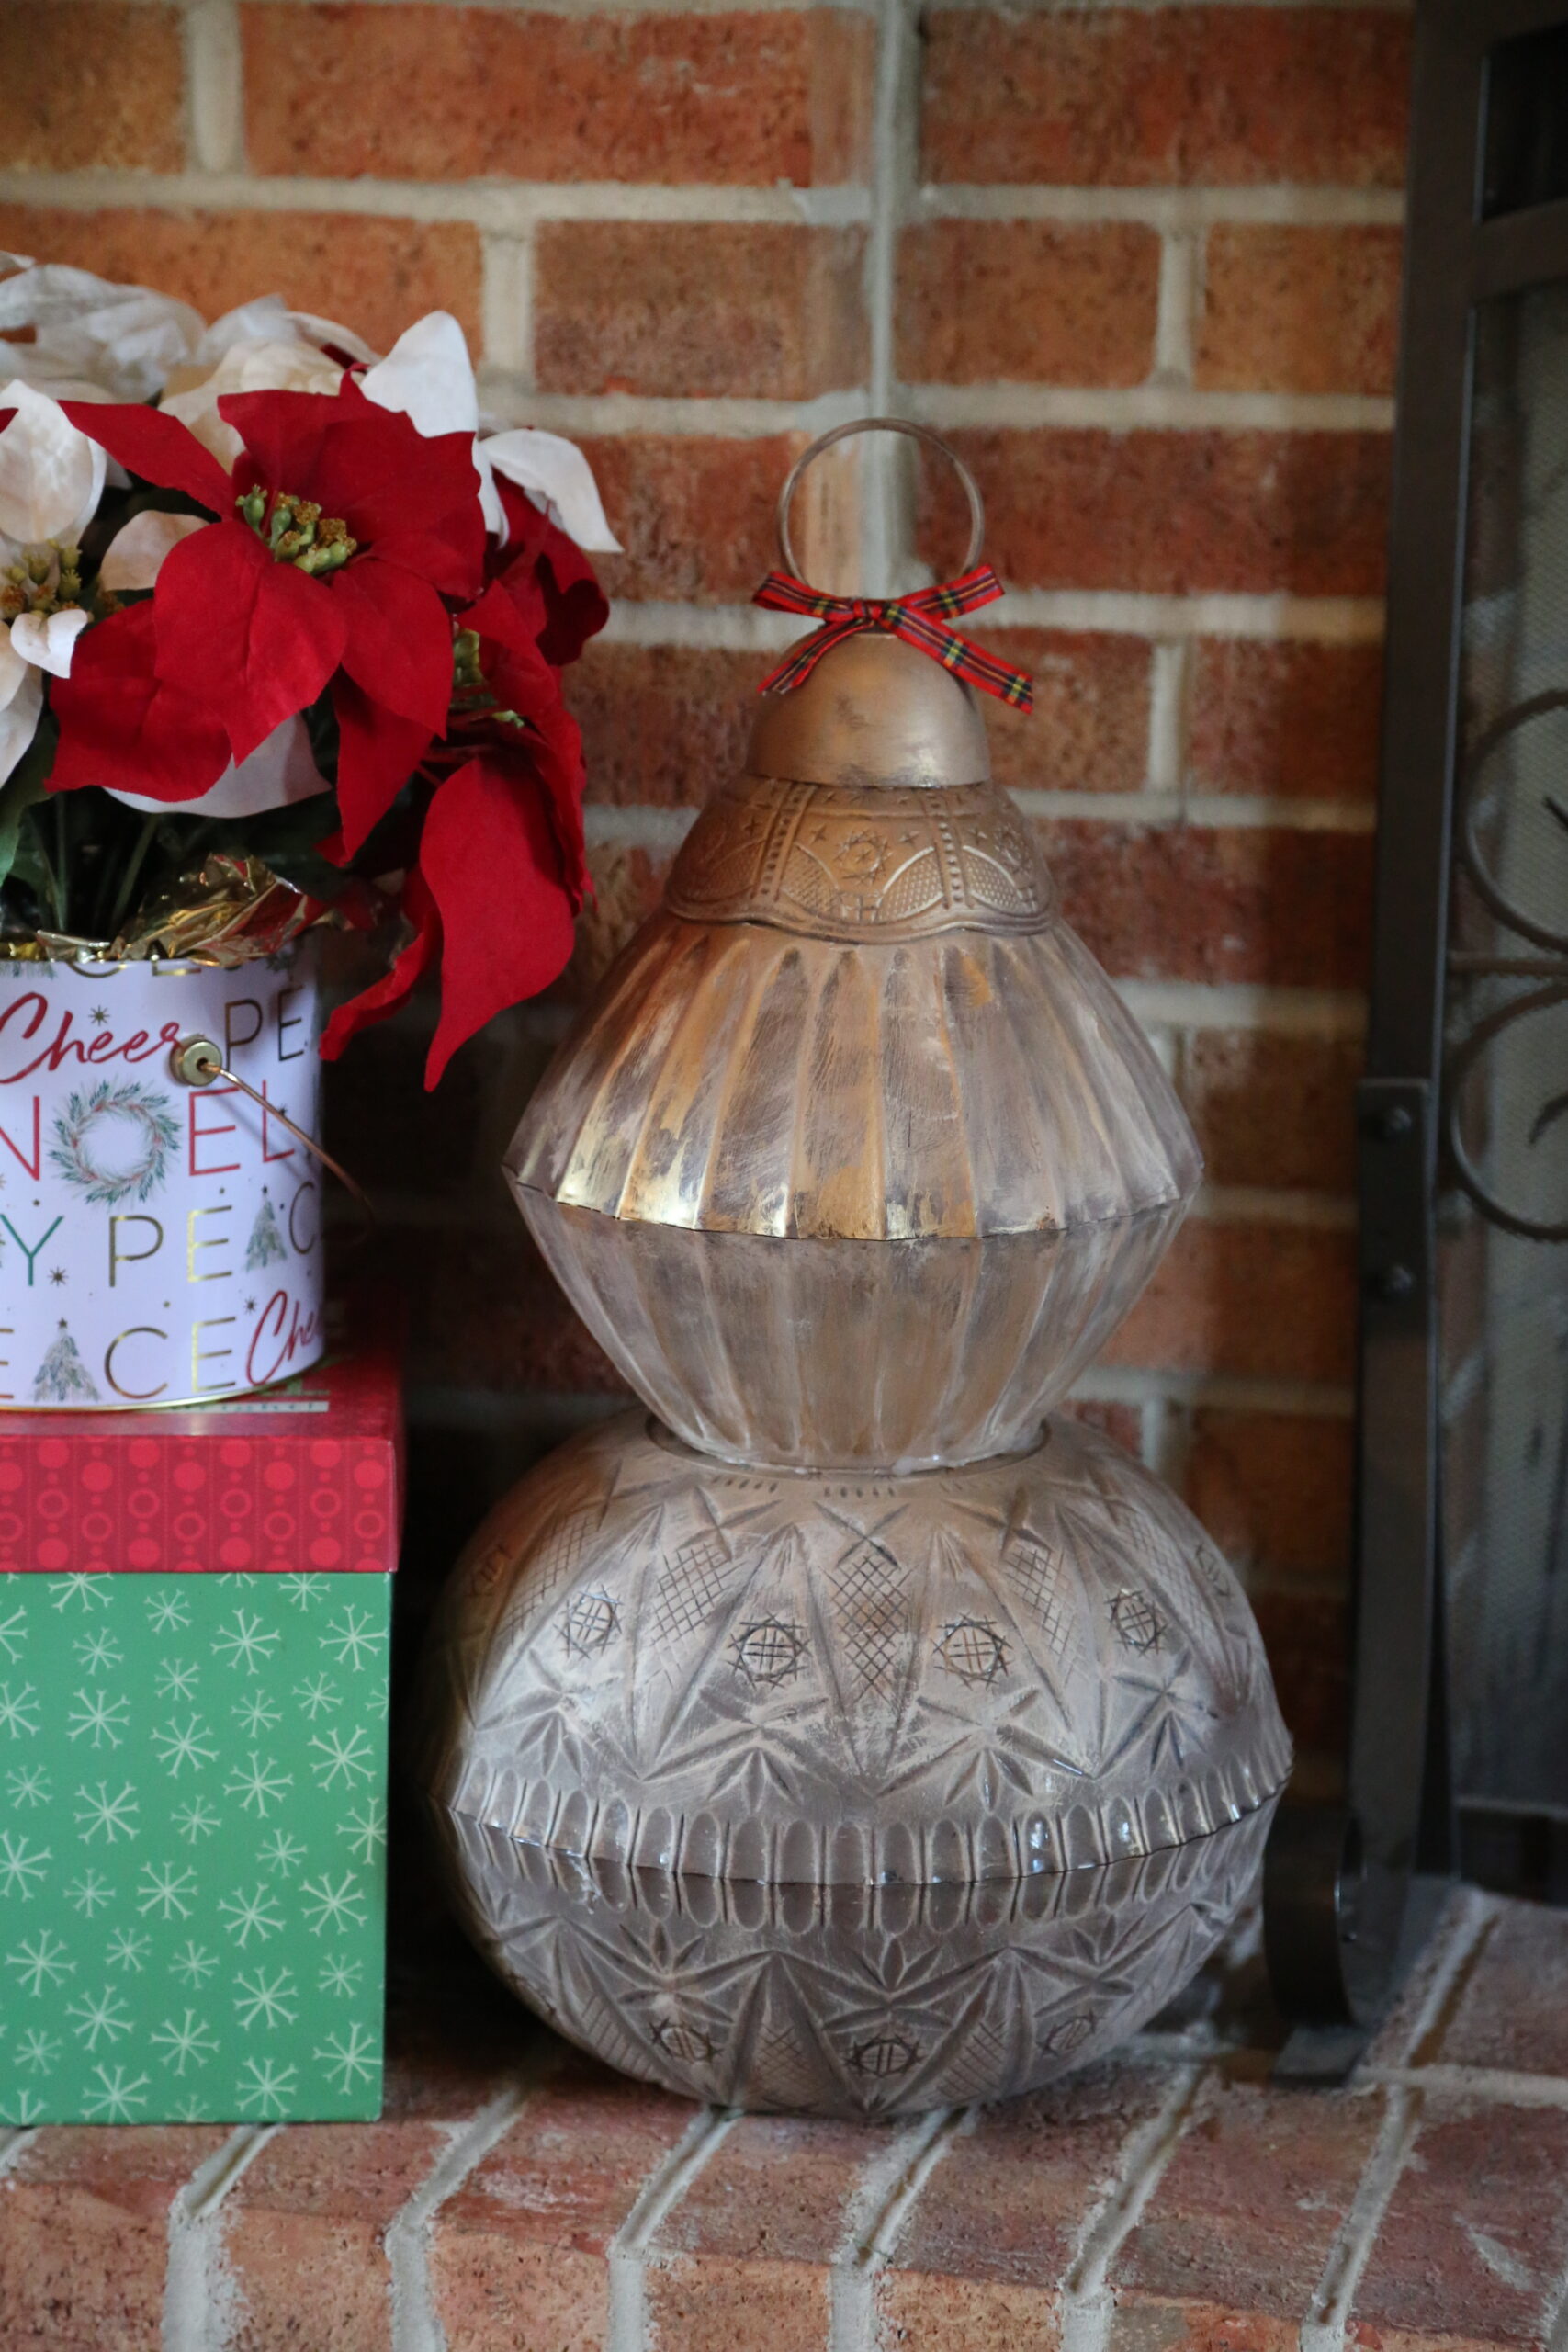
20. Style a Brick Hearth with Poinsettias and a Distressed Ornament
This festive arrangement works because of its masterful use of layering, both in height and visuals. The stacked gift boxes elevate the poinsettia tin, creating a taller silhouette that stands out against the low brick hearth. This verticality adds drama. Furthermore, the combination of patterns—the plaid on the bow, the text on the tin, the designs on the gift wrap, and the intricate pattern on the distressed ornament—creates a rich visual tapestry. It all feels connected through the traditional red, green, and white color story.
|
📋 Copy HEX 🔗 Share |
There’s a growing trend on Pinterest and Instagram for what’s being called ‘heritage holiday’ decor. It’s about mixing new items with pieces that feel like they have a history. This large, distressed metallic ornament is a perfect example. It looks like a treasured family heirloom, even if it’s a brand new DIY project. You can achieve this look by painting a large plastic Dollar Tree ornament with layers of metallic and dark craft paint, then sanding it back in places to reveal the layers beneath. It adds a sense of warmth and nostalgia that shiny, new decorations can’t always match.
21. Curate a Cozy Holiday Vignette on a Woven Tray
The fastest way to elevate a collection of small decor items from ‘clutter’ to a ‘vignette’ is to corral them on a tray. The woven round tray used here acts as a frame, defining the boundary of the display and making the separate elements feel like a cohesive unit. This trick works every time, whether on a coffee table, an ottoman, or a kitchen counter. For a dollar store version, look for their woven placemats or shallow plastic trays that you can spray paint.
|
📋 Copy HEX 🔗 Share |
While this scene looks incredibly cozy and inviting, let’s talk about fire safety for a second. Mixing open flames (the lit candles) with flammable materials like a woven tray, wooden decorations, and faux greenery is a significant fire hazard. Never leave lit candles unattended in a display like this. For a worry-free version that’s just as magical, swap the real candles for battery-operated LED votives from Dollar Tree. You get all the warm glow with none of the risk, which is especially important if you have kids or pets.
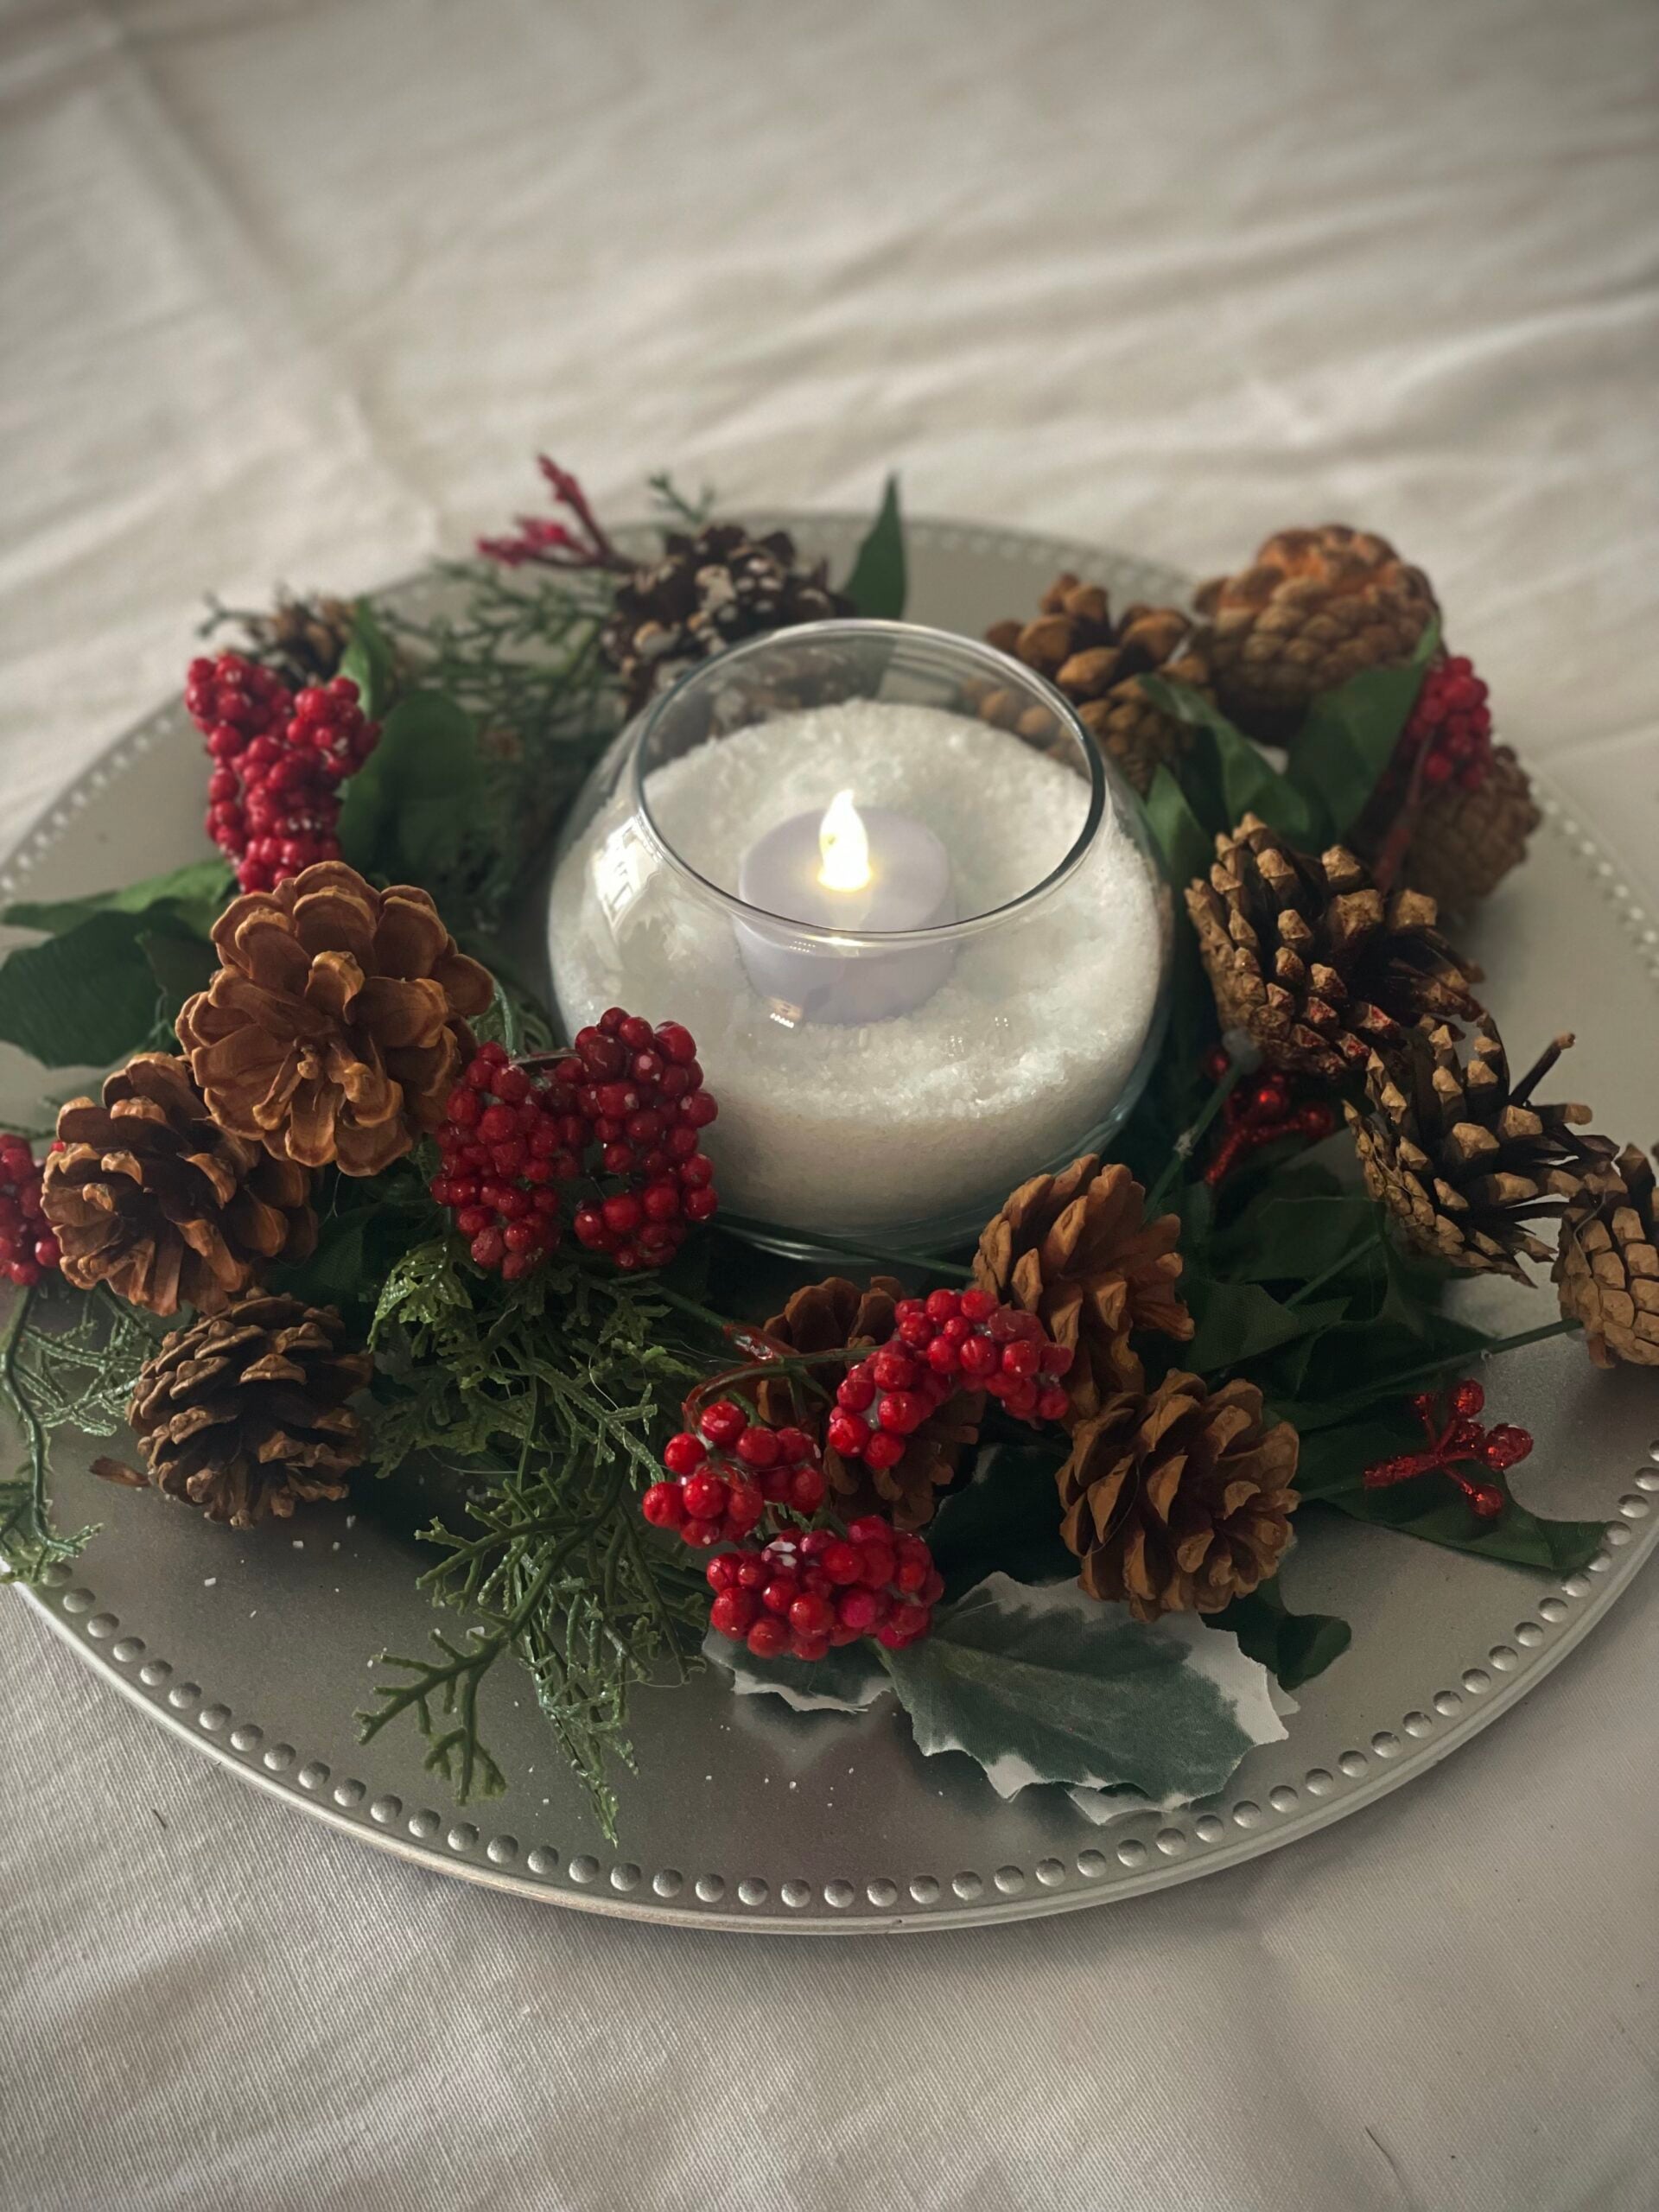
22. Assemble a Winter Centerpiece with Pinecones and Berries
What makes this centerpiece feel special is the mix of natural and glam elements. It’s the combination of the rustic, foraged pinecones with the shiny, almost mirrored, silver beaded platter. This contrast is what creates visual excitement. If everything were natural, it would be pretty but perhaps a bit plain. If everything were glam, it could feel cold. The interplay between the earthy and the elegant is what gives this arrangement its sophisticated charm.
|
📋 Copy HEX 🔗 Share |
You can create a beautiful version of this project for next to nothing. The pinecones can be foraged from your backyard (bake them on low heat in the oven for 30 mins to kill any bugs). The faux red berries and greenery are inexpensive staples in the Dollar Tree floral section. For the base, if you can’t find a silver platter, grab one of their plastic charger plates and give it a coat of metallic silver spray paint. Using an LED candle is a must for safety, and they sell those, too! The total cost could easily be under $8.
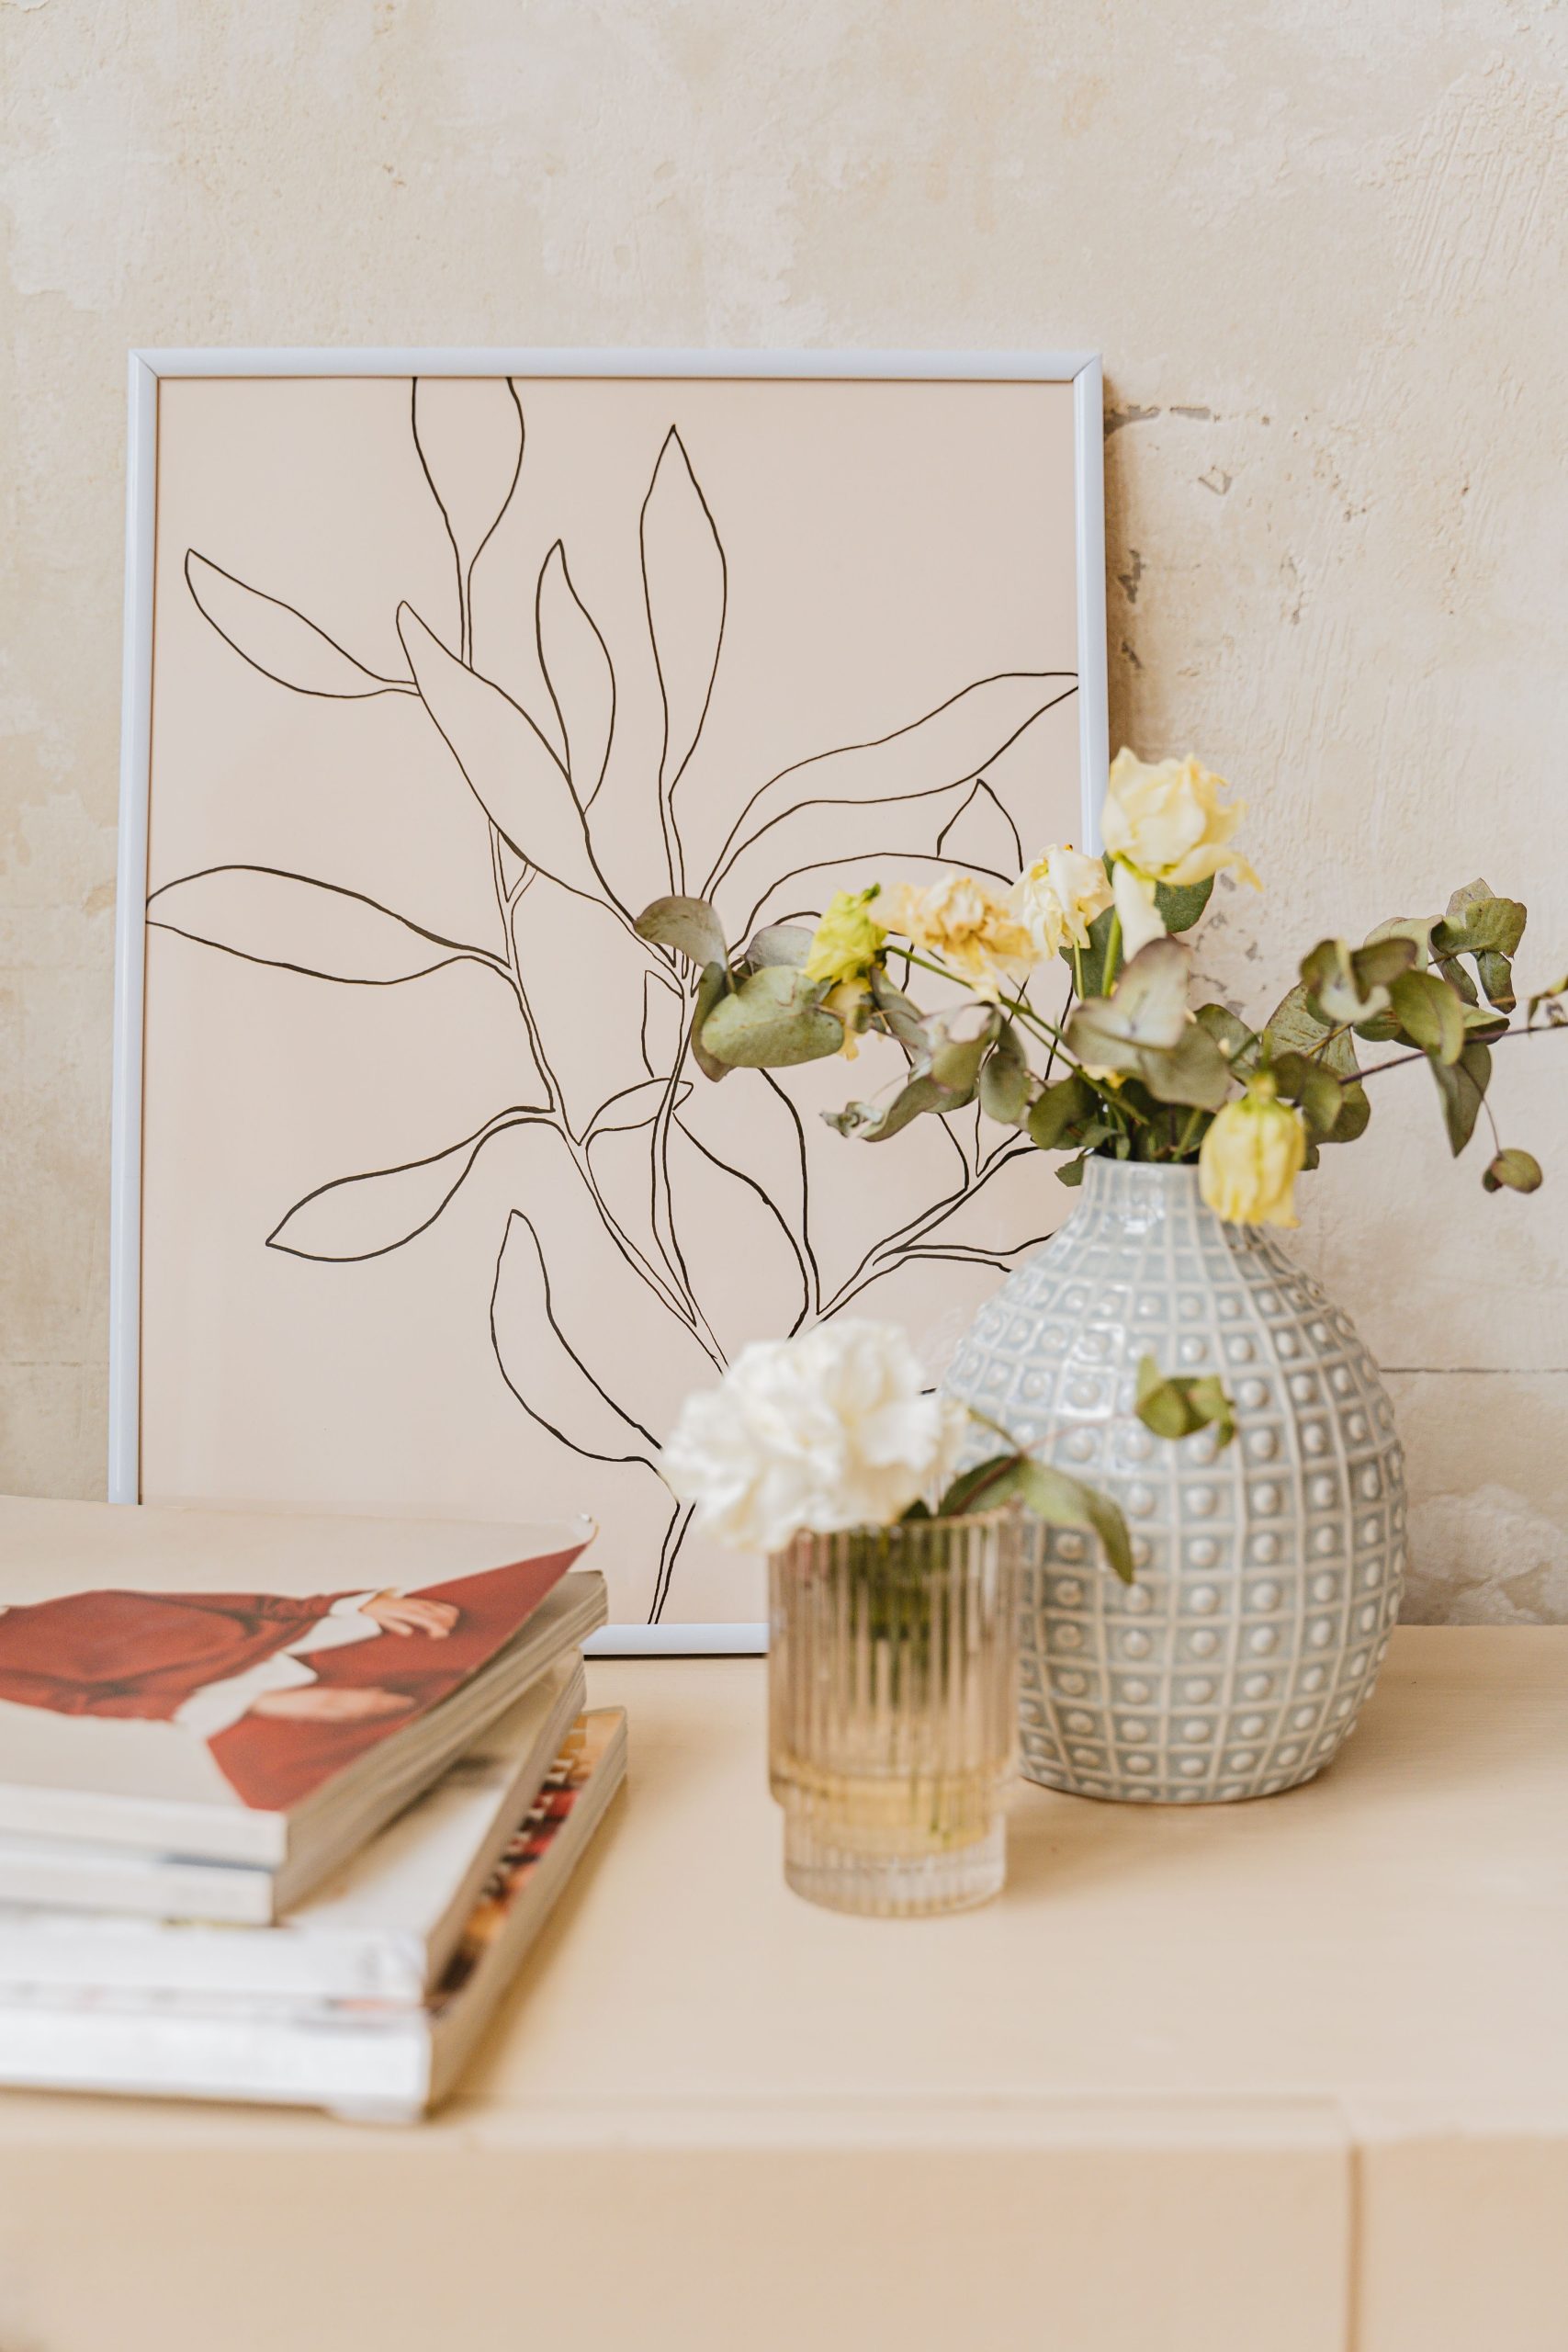
23. Arrange Neutral Botanical Art with Textured Vases
This serene corner is a study in soft minimalism. The formula is roughly 70% neutral tones, 20% subtle color, and 10% sharp contrast. The creamy wall, light-toned surface, and white in the art create a warm, neutral base. A gentle 20% of color comes from the light blue-grey vase and the softest pinks in the flowers. The crucial 10% of contrast is delivered by the fine black lines of the botanical art, which provide the whole arrangement a focal point and keep it from becoming washed out. It’s a very calm, controlled, and effective visual recipe.
|
📋 Copy HEX 🔗 Share |
This type of minimalist arrangement is ideal for smaller surfaces where you want to create a sense of style without adding clutter. It’s perfect for a bedside table, a narrow entryway console, or the corner of a desk. You only need a space about 2 feet wide by 1 foot deep to recreate this look. The key is to keep the elements appropriately scaled; a giant piece of art or a massive vase would overwhelm the delicate balance. This is about thoughtful curation in a compact space.
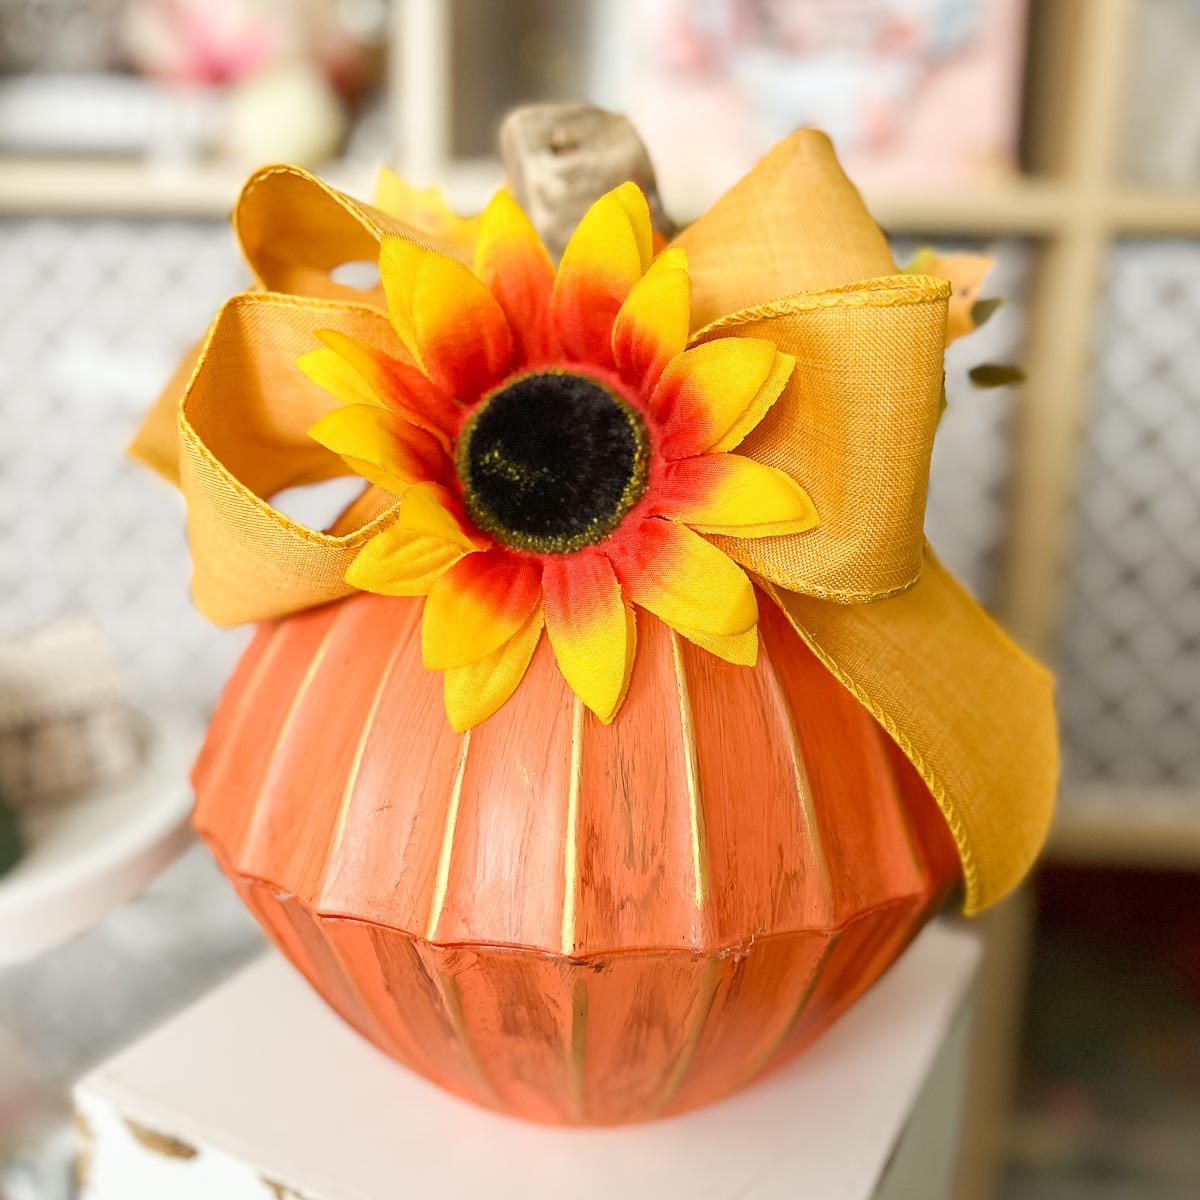
24. Adorn a Faux Pumpkin with a Sunflower and Gold Ribbon
Transforming a simple foam pumpkin from the dollar store into a chic piece of autumn decor is a quick and rewarding project. The key is adding texture and dimension with simple craft supplies.
Time: 15 minutes.
Cost: Under $5.
|
📋 Copy HEX 🔗 Share |
- Start with a small orange foam or plastic pumpkin from Dollar Tree.
- Use a gold paint pen or a fine brush with gold acrylic paint to trace along the vertical ribs of the pumpkin, creating stripes.
- Select a large, statement faux sunflower from the floral aisle. Snip the stem off close to the head of the flower.
- Take a piece of wide, textured gold ribbon and tie it into a simple, floppy bow.
- Using a hot glue gun, first glue the sunflower to the top of the pumpkin, near the stem.
- Then, glue the gold ribbon bow right next to the sunflower, slightly overlapping it to create a layered look.
When you’re working with faux florals from a budget store, the trick is to use them in a bold, confident way. Don’t just stick a single, sad stem somewhere. Here, using one large, oversized sunflower on a small pumpkin creates a dramatic and playful sense of scale. It feels intentional and stylish. Similarly, choosing a wide, textured ribbon adds a touch of luxury that elevates the entire piece. It’s not about how much the materials cost; it’s about how you use them.
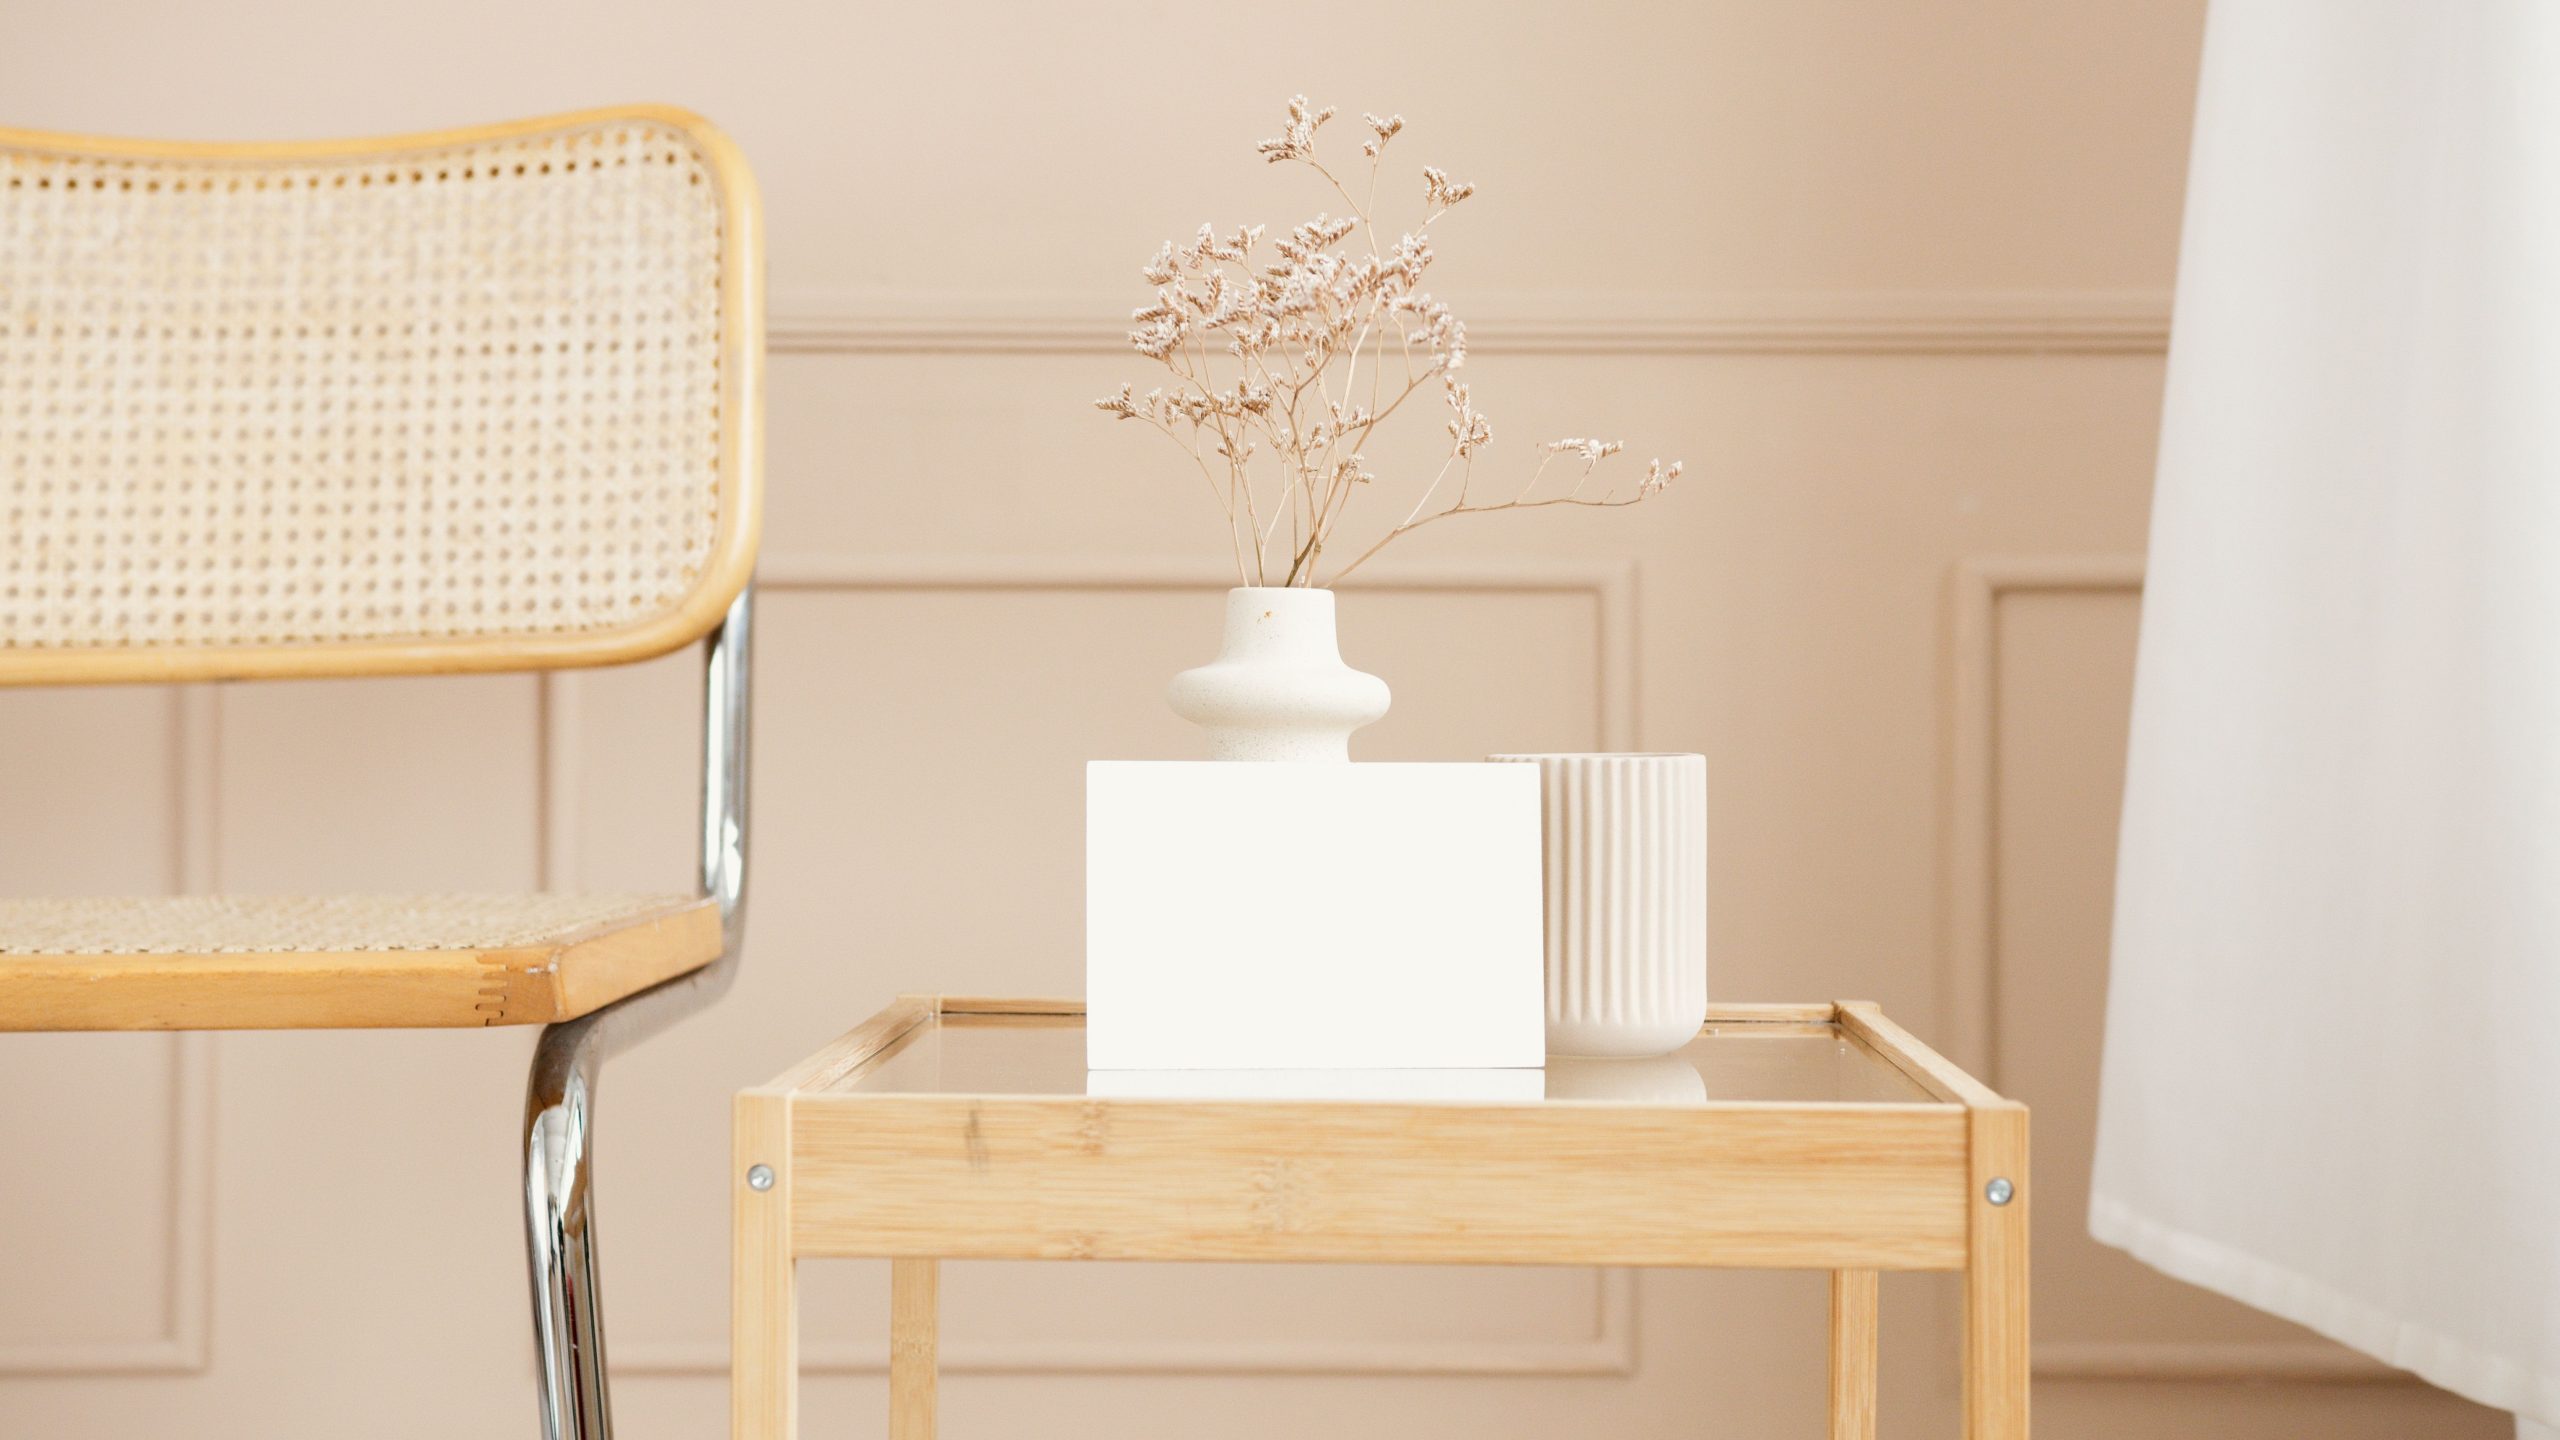
25. Create a Calm Corner with a Cane-Back Chair and Bamboo Table
This vignette is a masterclass in using a monochromatic neutral palette without being boring. The reason it works so well is the rich variety of textures. You have the open weave of the cane chair, the smooth and linear bamboo table, the reflective glass top, the matte finish of the ceramic vases, the soft fluff of the dried flora, and the subtle lines of the wall molding. It’s all in the same beige and white color family, but the textural diversity makes it feel incredibly rich, layered, and serene.
|
📋 Copy HEX 🔗 Share |
Cane and bamboo are beautiful, natural materials, but they do require a little thought. Keep them out of direct, prolonged sunlight, which can cause them to become brittle and fade over time. Dust them regularly with a soft brush or the vacuum’s brush attachment. If you spill something on the cane, blot it immediately with a damp cloth, but avoid over-saturating it, as the moisture can cause it to stretch or mildew. It’s a lower-maintenance option than upholstered furniture but requires more care than solid wood or metal.
26. Assemble a Thanksgiving Centerpiece from Dollar Store Finds
Crafting a centerpiece that looks full and festive for Thanksgiving doesn’t have to be expensive. By combining different elements from the Dollar Tree’s fall and craft sections, you can create a stunning focal point for your table. Let’s imagine the budget for a look like this.
|
📋 Copy HEX 🔗 Share |
- Base tray or container (e.g., a platter, a shallow basket): $1.25 – $5.00
- Faux pumpkins and gourds (2-3 bags): $3.75 – $5.00
- Faux fall leaf stems or garland: $2.50
- LED pillar or taper candles: $2.50
- Pinecone or acorn accents: $1.25 (or free from the yard!)
- TOTAL: $11.25 – $16.25
- Budget alternative: Focus the entire centerpiece around one large pumpkin (real or faux) and surround it with foraged leaves and pinecones. This could bring your cost down to just a few dollars.
Before you head to the store with visions of autumn splendor, do a quick check of your space and supplies. This will help you shop smarter and create a centerpiece that’s just right.
- Measure your table and decide on the ideal footprint for your centerpiece. You want it to be impactful but still leave room for place settings!
- Check your existing decor. Do you have any candles, trays, or vases you could incorporate to save money?
- Define your color palette. Will you go for traditional oranges and browns or a more modern look with white pumpkins and metallics? Having a plan prevents impulse buys.
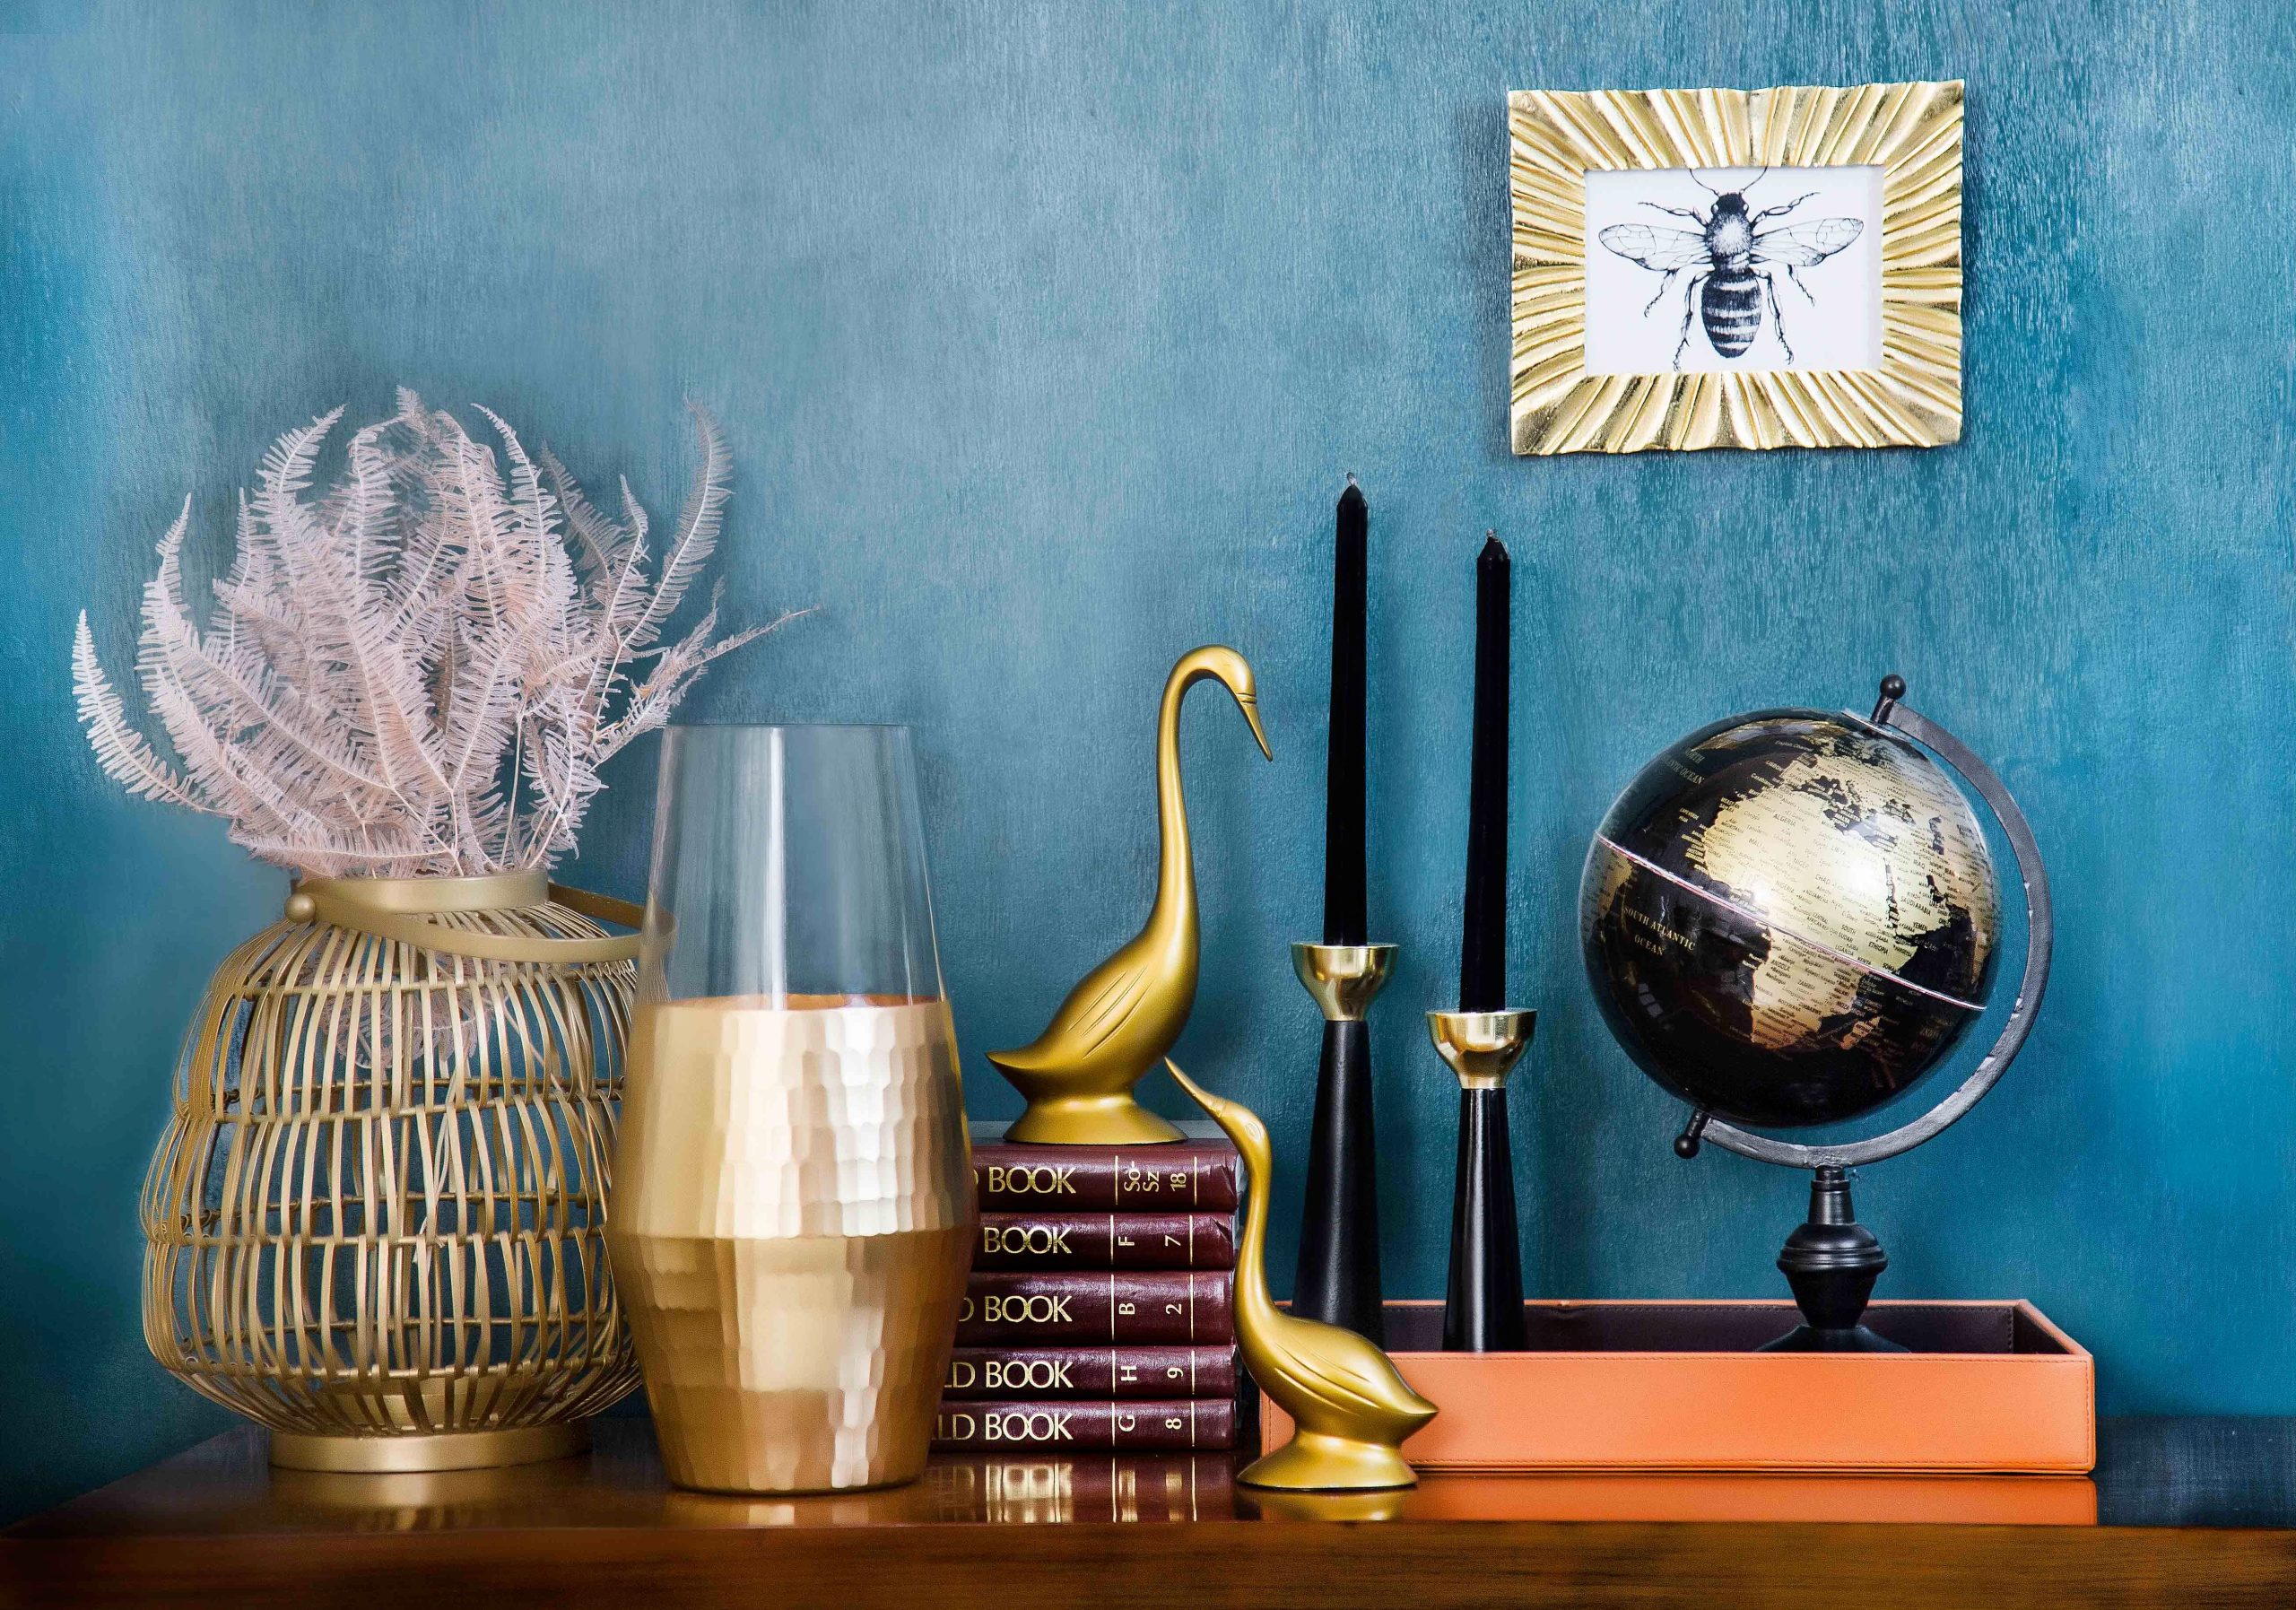
27. Style a Moody, Eclectic Shelf Against a Deep Teal Wall
The single element that makes this arrangement sing is the deep, textured teal wall. It’s the foundation of the entire mood. Without that rich, saturated color, the collection of gold and black objects would lack their dramatic punch. The wall color provides a luxurious, jewel-box backdrop that makes the metallic pieces gleam and the dark pieces look intentional and sophisticated. It proves that sometimes, the most impactful design choice is a bold can of paint.
|
📋 Copy HEX 🔗 Share |
This look follows a formula of moody elegance: 60% dramatic color, 30% gleaming metallic, and 10% deep shadow. The teal wall obviously provides the drama. The collection of gold items—the decorative objects, the frame, and the globe’s stand—bounces light around and adds glamour. The crucial 10% comes from the black candles and the dark wood surface, which ground the arrangement and prevent it from becoming too gaudy. This balance of light and dark against a rich color is what creates that coveted eclectic and sophisticated vibe.
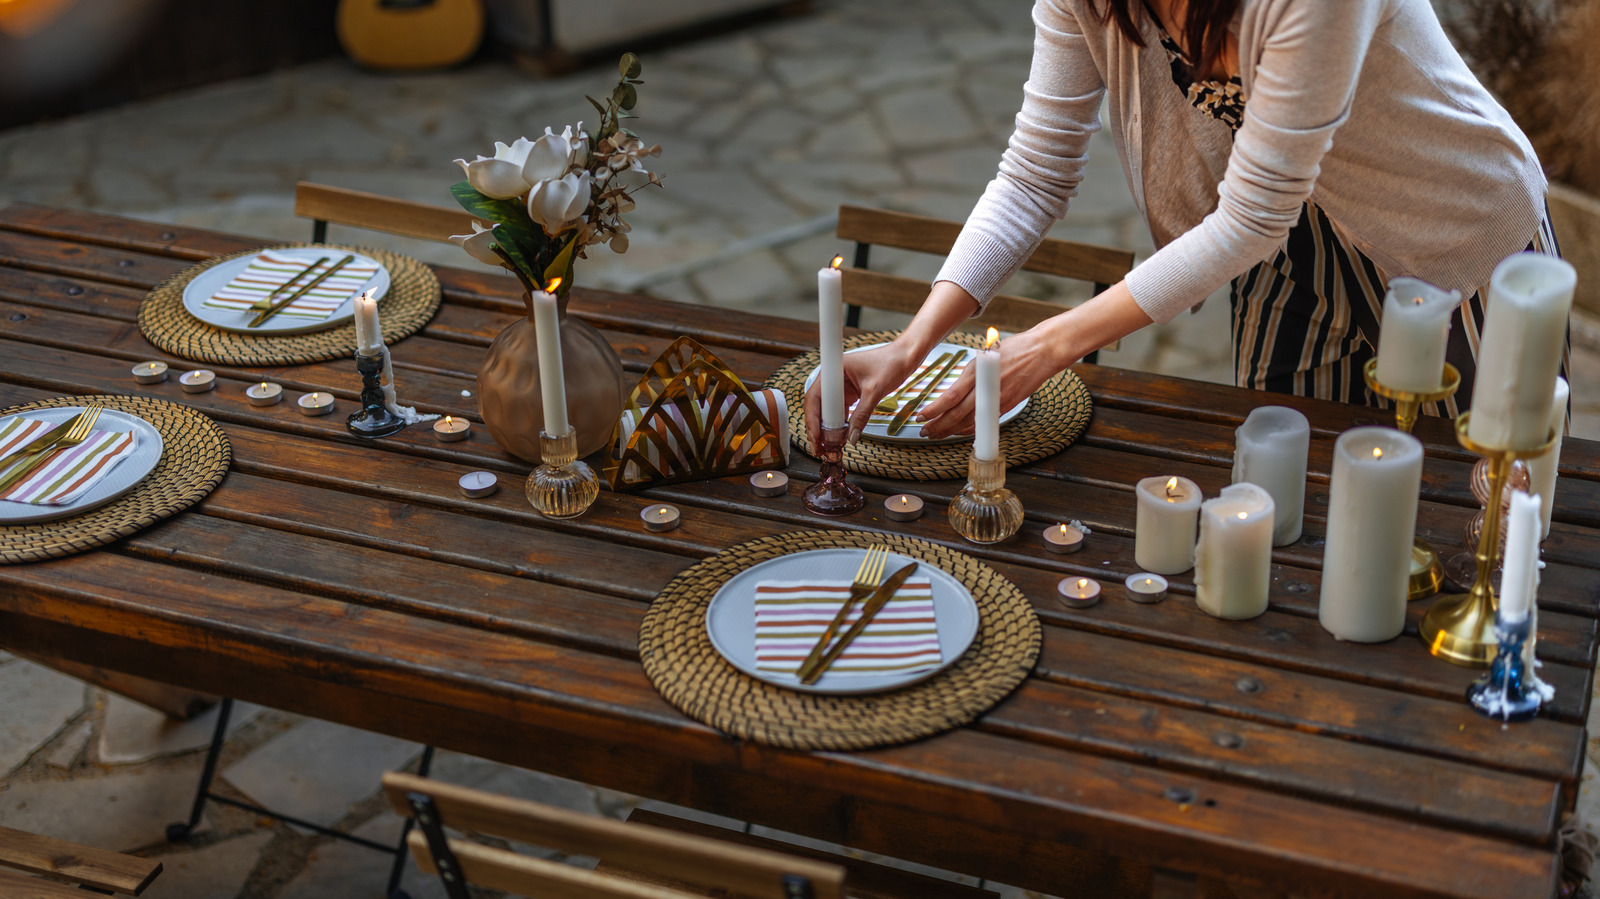
28. Create an Intimate Outdoor Table with Abundant Candlelight
This candlelit dinner scene is pure romance, but let’s have a moment of honesty about open flames, especially outdoors. A slight breeze can turn a beautiful glow into a fire hazard, especially with a wooden table and paper napkins nearby. Use candle holders that are deep and sturdy to protect the flame. Or, better yet, get this exact same magical ambiance with zero risk by using a variety of high-quality, outdoor-rated LED candles. They even have ones with a realistic flicker. Safety first, romance second!
|
📋 Copy HEX 🔗 Share |
This intimate, cozy setup is perfectly suited for a small patio, balcony, or a specific corner of a larger deck. The table itself is about 4-5 feet long, making it ideal for seating two to four people. To recreate this feeling of enclosure and intimacy, you don’t need a giant space. In fact, it works best in a more compact area, approximately 8×8 feet, where the glow of the candles can reflect off nearby walls or railings, enhancing the warm and inviting atmosphere.
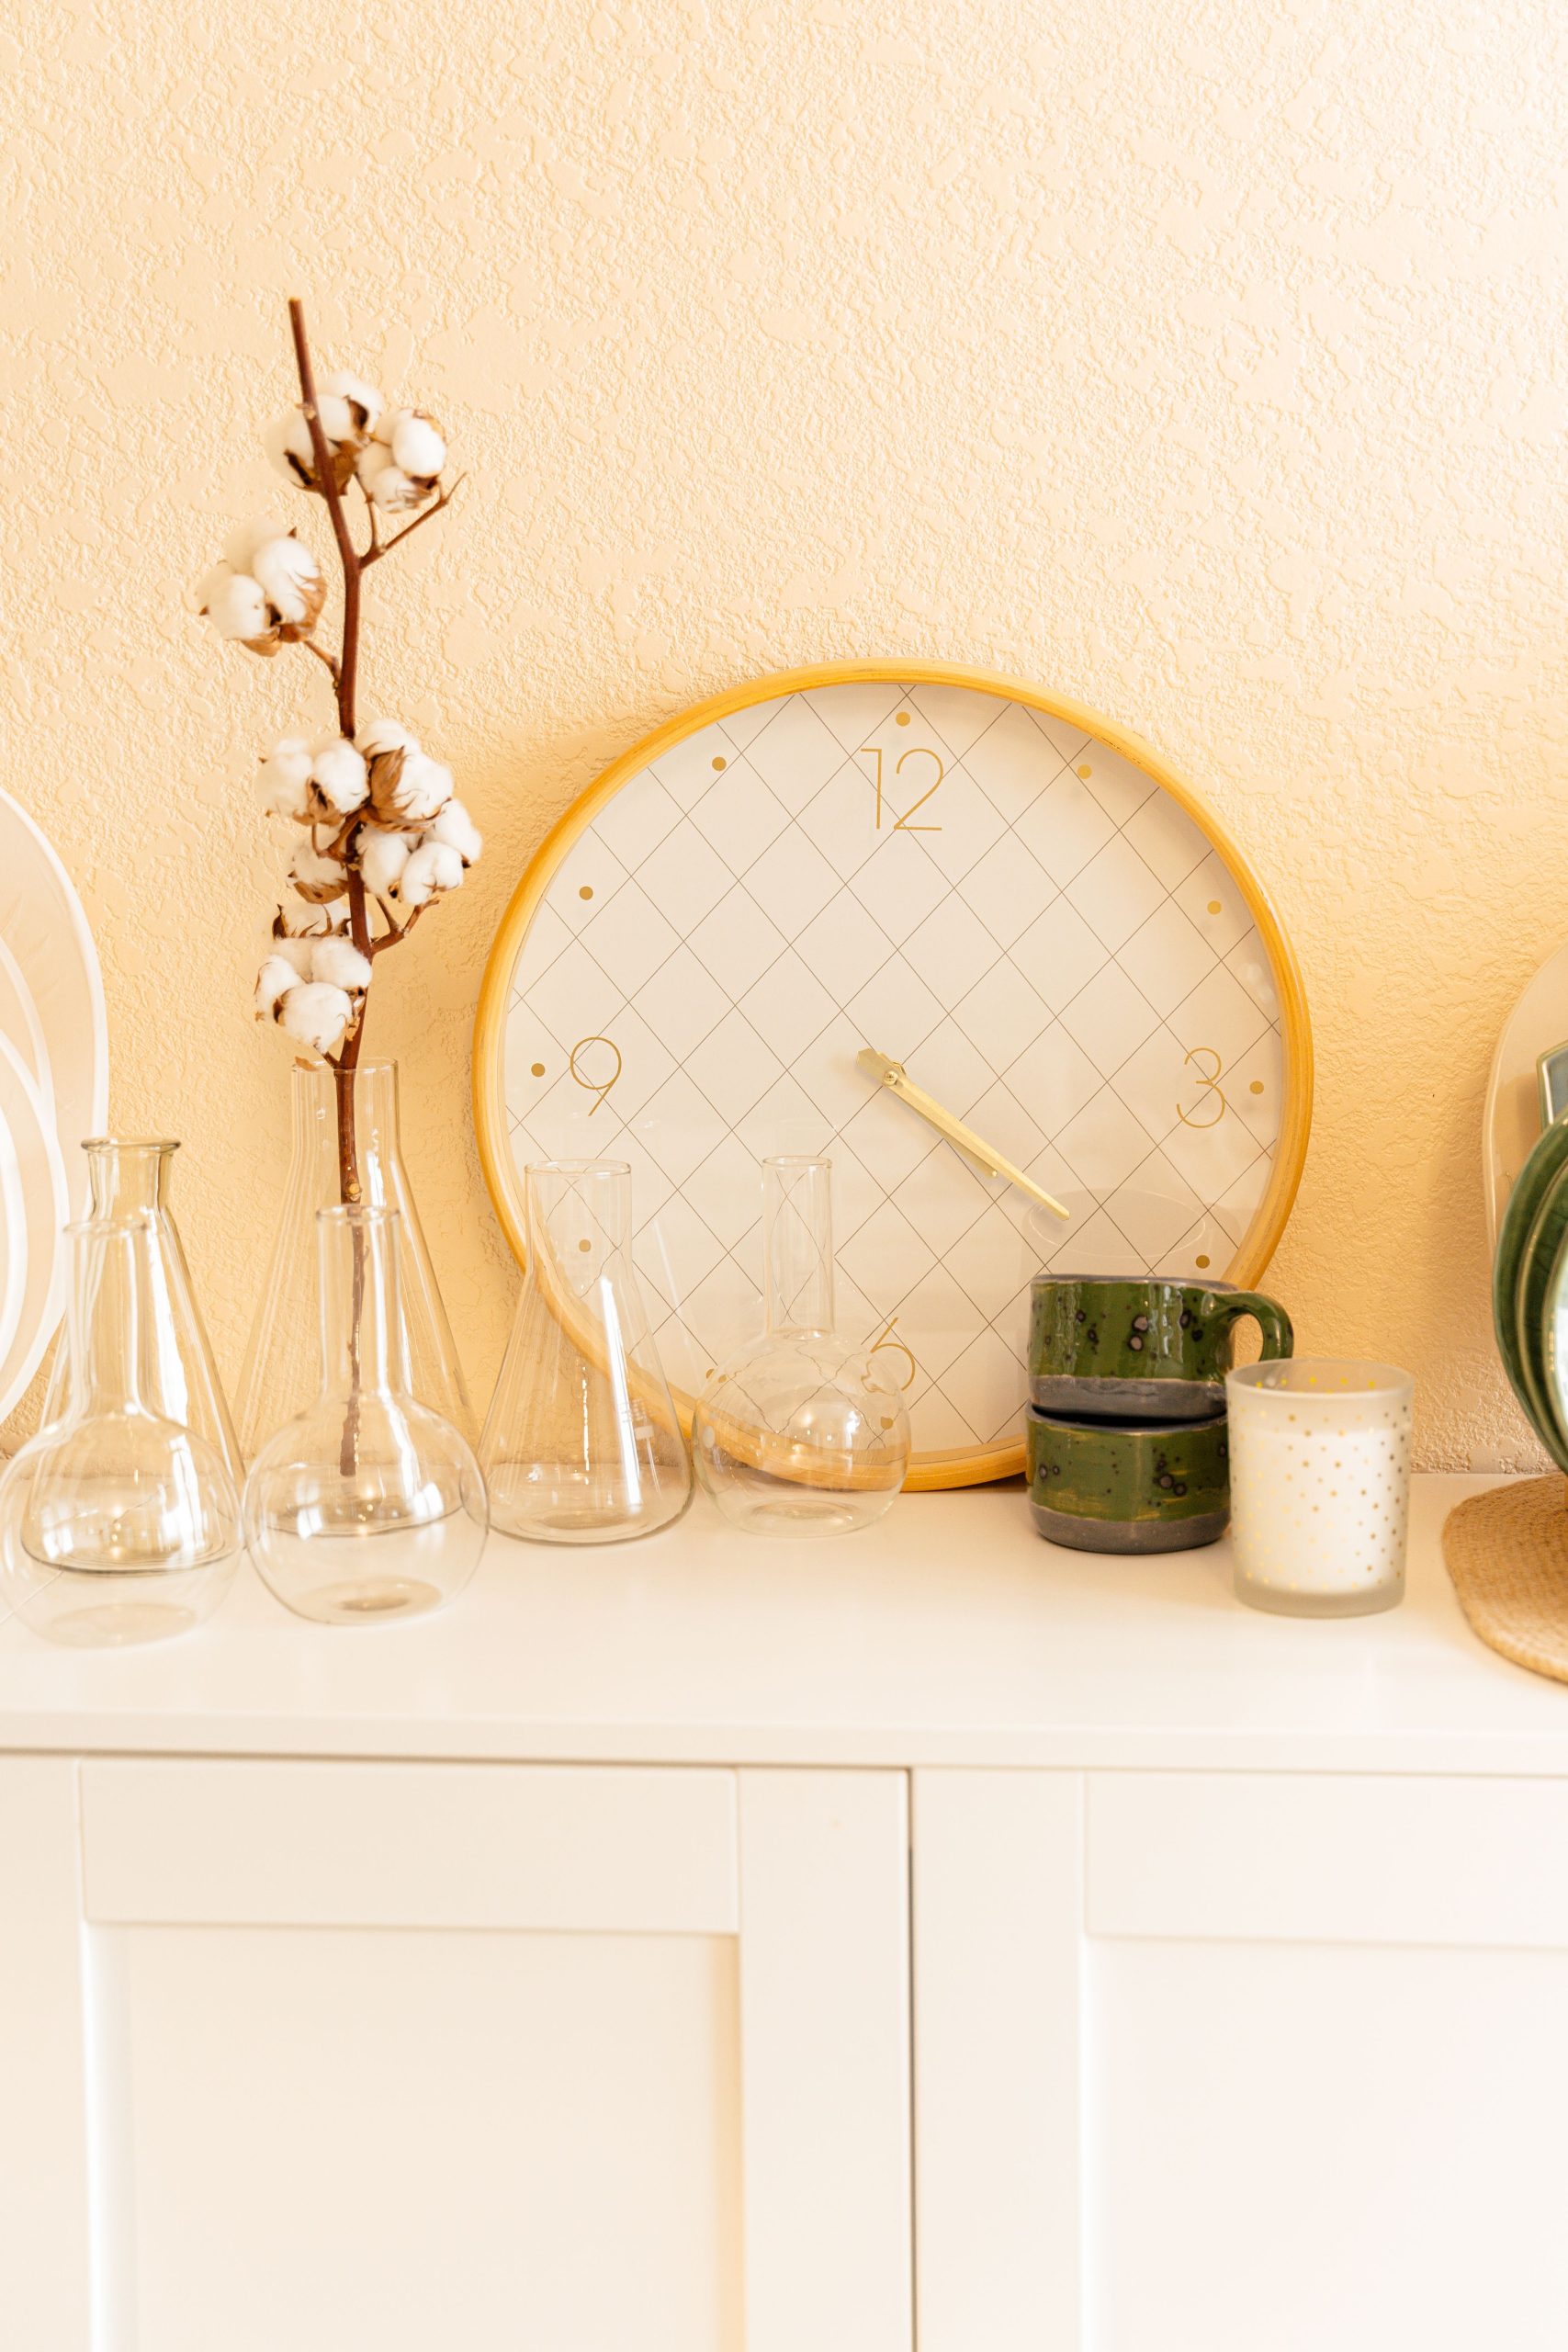
29. Arrange a Minimalist Vignette with Glass, Cotton, and a Gold Clock
When creating a minimalist display, varying the shapes of your objects is crucial to keep it engaging. Notice the strong geometry at play here: the crisp rectangular lines of the white cabinet, the tall, cylindrical shapes of the glass beakers, the soft, organic puffs of the cotton blooms, and the bold, perfect circle of the clock. This mix of shapes creates a dynamic composition that feels balanced and intentional, proving that minimalism is about more than just a lack of stuff—it’s about the careful selection of forms.
|
📋 Copy HEX 🔗 Share |
This arrangement feels so calm and clean due to a principle called ‘negative space.’ The designer hasn’t filled every inch of the cabinet’s surface. Instead, there is breathing room around each object—the vases, the mugs, the clock on the wall. This space allows your eye to rest and appreciate the form and texture of each individual item. It’s what makes the display feel curated and serene, not cluttered. The light yellow wall and white cabinet further enhance this airy, uncluttered feeling.
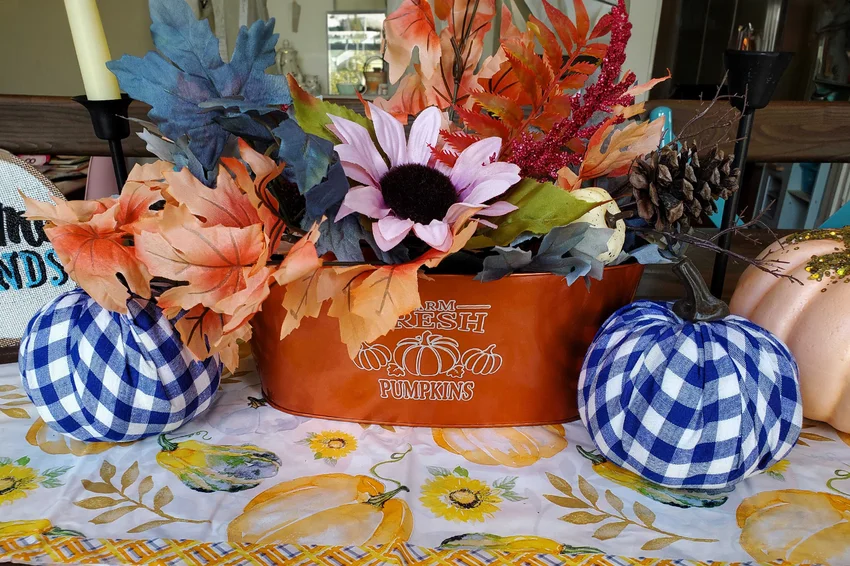
30. Design a Playful Fall Tablescape with Plaid Pumpkins
This cheerful centerpiece is easily recreated on a small budget. The orange metal tub is a common Dollar Tree item, as are the faux autumn leaves and glittery picks. The real DIY magic is in the plaid pumpkins. Simply buy some small foam pumpkins and a roll of plaid-patterned ribbon or fabric from the craft aisle. Use Mod Podge to cover the pumpkins in the fabric for a high-end, custom look. The patterned tablecloth can be swapped for a solid color runner to make the centerpiece pop even more.
|
📋 Copy HEX 🔗 Share |
This look taps right into the ‘dopamine decor’ trend that’s everywhere on Pinterest. It’s about using color, pattern, and playful elements to create a home that genuinely makes you feel good. This centerpiece isn’t trying to be a super-serious, elegant statement like the one in Idea #13. Instead, it’s embracing the fun of the season with bright colors, clashing patterns (plaid and sunflowers!), and a touch of glitter. It’s a joyful, energetic take on fall decorating that proves style doesn’t always have to be so serious.
Conclusion
Creating a home that feels like ‘you’ is a journey, not a destination. These 30 ideas are just starting points, ready for you to adapt, customize, and make entirely your own with a little help from your local dollar store. The best part of DIY is that there are no rules you can’t break. So grab that craft paint, fire up the glue gun, and start telling your story, one project at a time.
Ready for more inspiration? Follow us on Pinterest for the latest trends in affordable, stylish home decor. Remember, a home that feels like ‘you’ is a journey, not a destination. These ideas are just starting points, ready for you to adapt and make entirely your own. The best part of DIY is that there are no rules you can’t break. So get crafting and start telling your story, one brilliant, budget-friendly project at a time. Pin your favorite ideas to come back to them later!