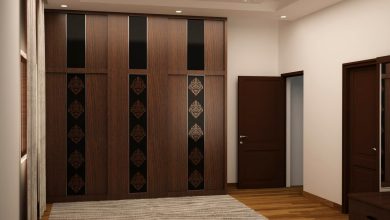
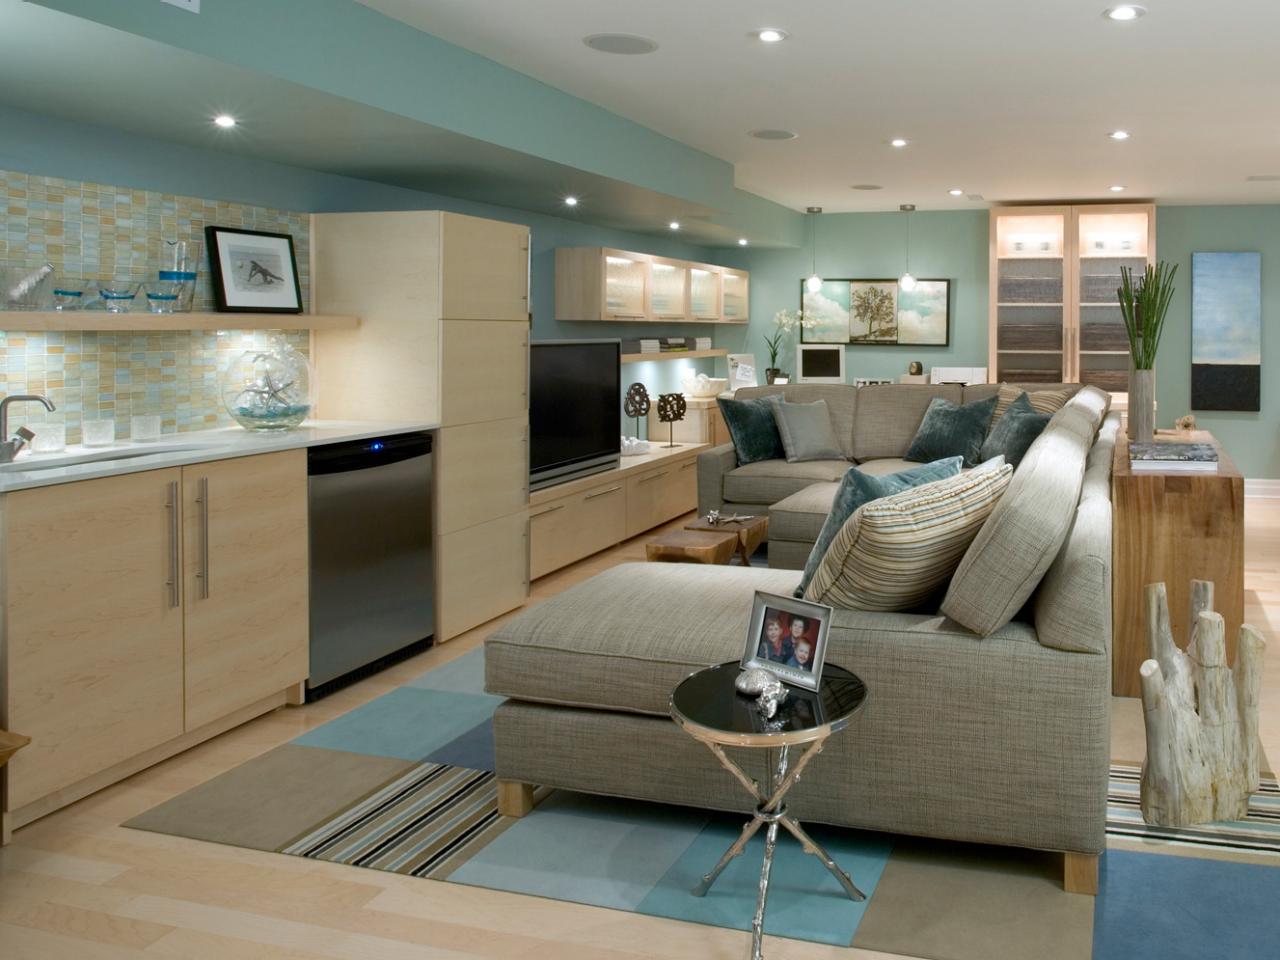
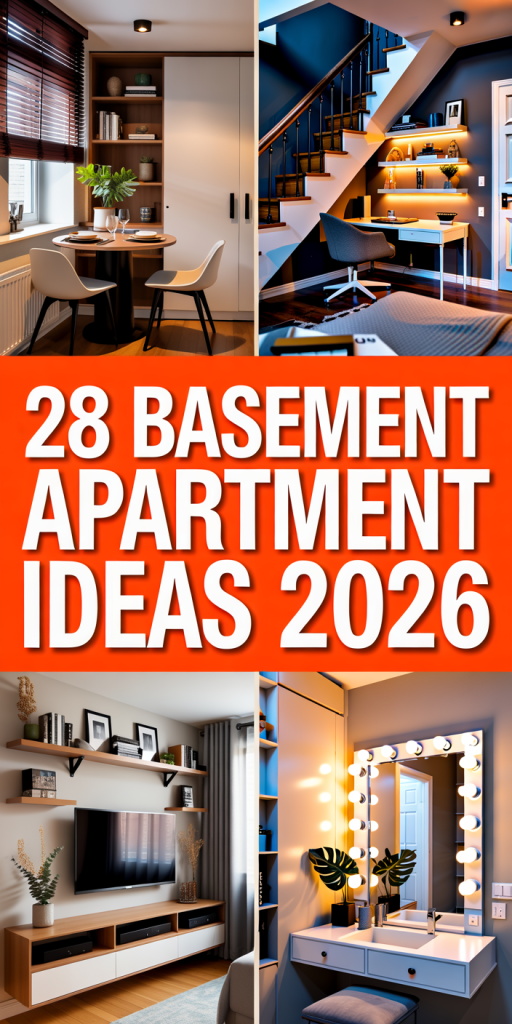
It’s the classic Pinterest rabbit hole: you start scrolling through basement apartment ideas, and suddenly three hours have passed. You’ve saved dozens of pins, but you’re no closer to a real plan. Basements can be tricky—the low light and awkward layouts are real challenges. But what if you could turn that challenging space into the most-loved spot in your home? We’re here to show you exactly how.
We’ve done the deep dive for you, curating 28 distinct, achievable ideas that work for real basement layouts and budgets. Forget generic advice; we’re talking about specific design formulas, from cozy bohemian retreats to sleek, modern multi-zone layouts. We analyzed what makes each space work, so you can steal these concepts with confidence. Stay with us until the end, because we also break down the most common design mistakes that can sabotage a basement renovation.
📌 Save this to Pinterest for later — you’ll want to revisit these ideas.
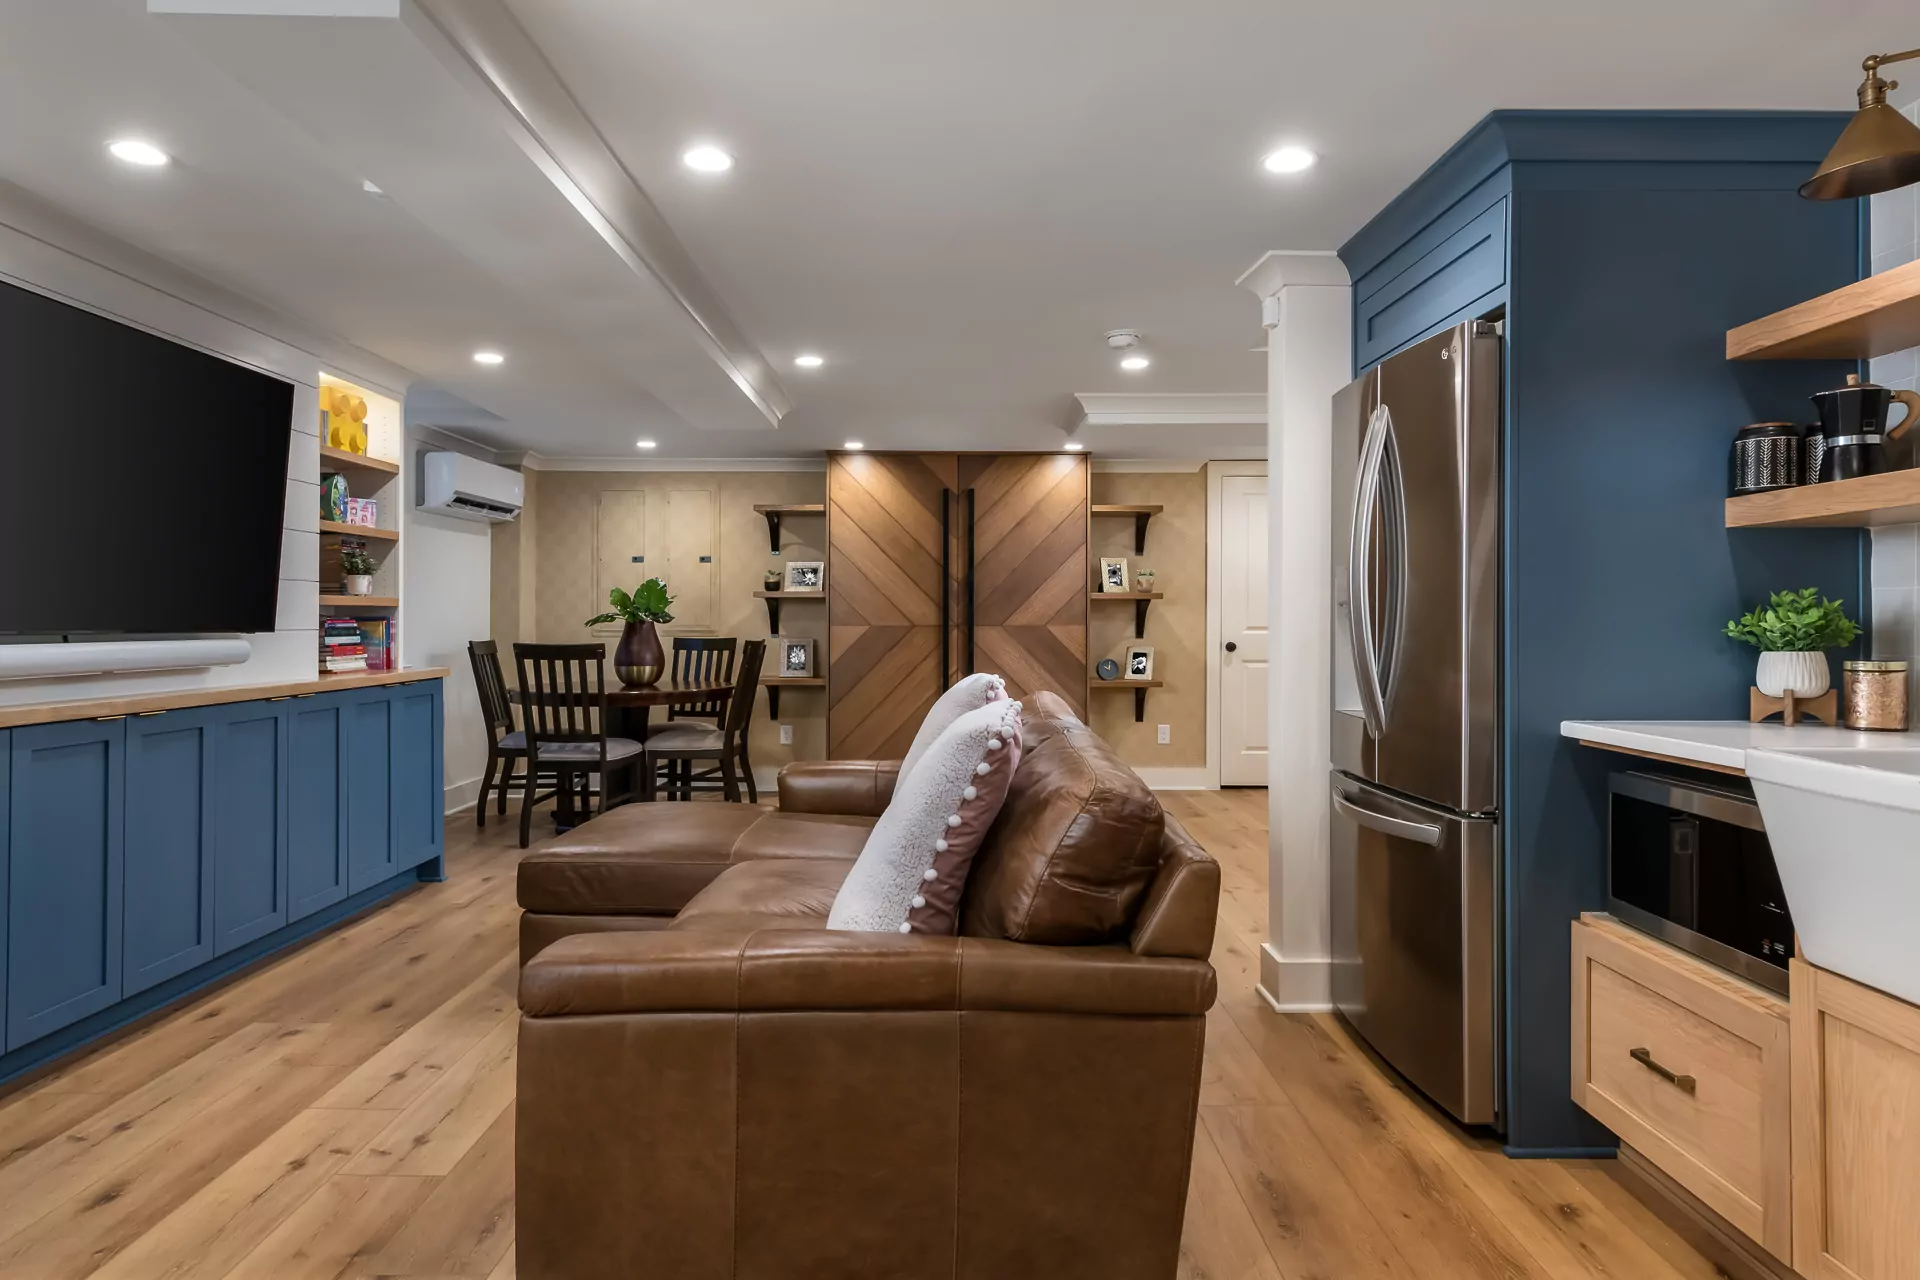
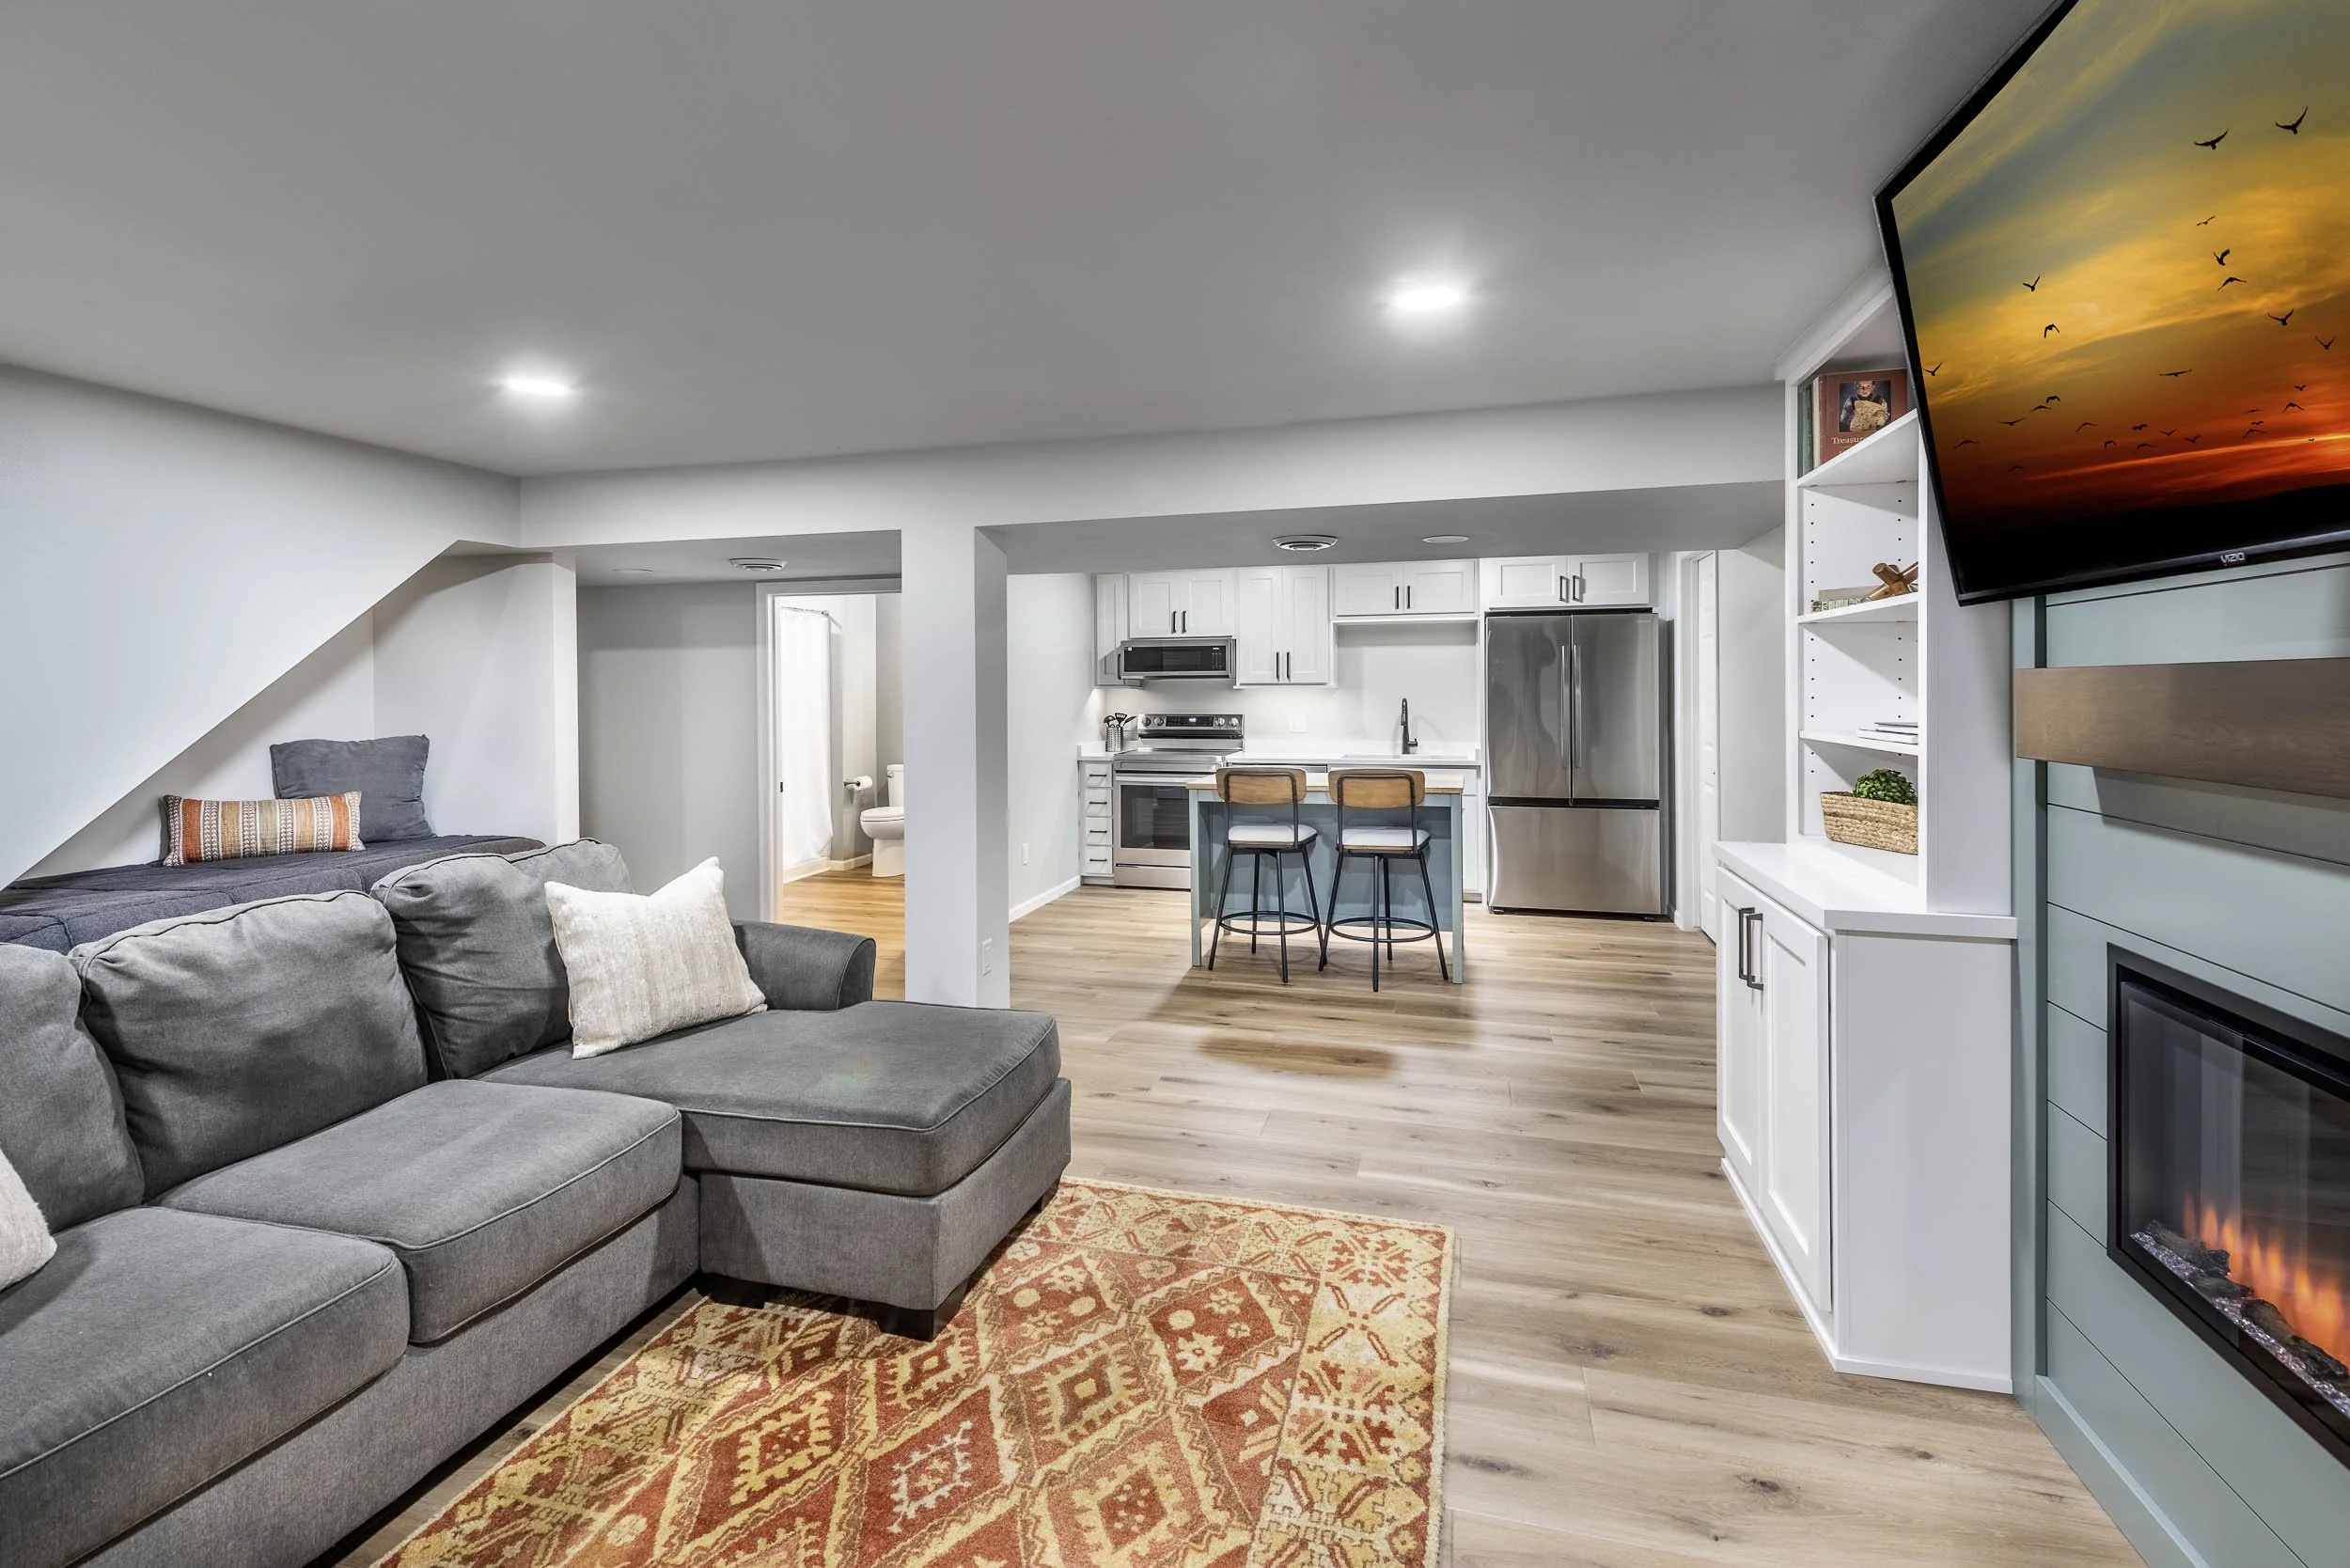
1. Unify Your Space with Navy Cabinetry and Rich Wood Accents
What makes this space feel so cohesive and welcoming is the masterful use of color and material repetition. The deep navy blue of the kitchen and media cabinets creates a strong visual anchor, grounding both zones and making them feel like part of a single, intentional design. This color is balanced by the warmth of the light wood, which appears not just on the floor but also in the stunning chevron-patterned built-ins. This repetition prevents the room from feeling disjointed, a common problem in open-plan basements.
|
📋 Copy HEX 🔗 Share |
When you have a combined kitchen and living area, lighting is key to defining zones. Use recessed ceiling lights on separate dimmer switches for general illumination. Then, add dedicated under-cabinet lighting in the kitchen for tasks. For the living area, ensure you have a floor or table lamp to create a cozier, lower-level light source for evenings. This layering gives you ultimate control, allowing you to brighten the whole space for cooking or dim it down for movie night.
2. Expand Your Space with a Light Blue Ceiling and Integrated Cabinetry
This room’s serene and airy feel comes from a simple but brilliant formula: 60% neutral base (the white walls and beige sofa), 30% natural texture (the light wood cabinetry that runs throughout), and 10% soft color (the light blue ceiling and throw pillows). By keeping the color to the upper third of the room, your eye is drawn upward, creating a sense of height. You could easily swap the light blue for a soft sage green or even a pale lilac to achieve the same breezy effect.
|
📋 Copy HEX 🔗 Share |
Painting a ceiling a color other than white can be a fantastic design choice, but it comes with a warning. In a basement with already low ceilings (under 8 feet), a dark or highly saturated color can make the space feel oppressive and even smaller. This look works best with ceilings that are at least 8 feet high. If you have low ceilings, consider painting the upper quarter of the wall the same color as the ceiling to create the illusion of height without closing it in.
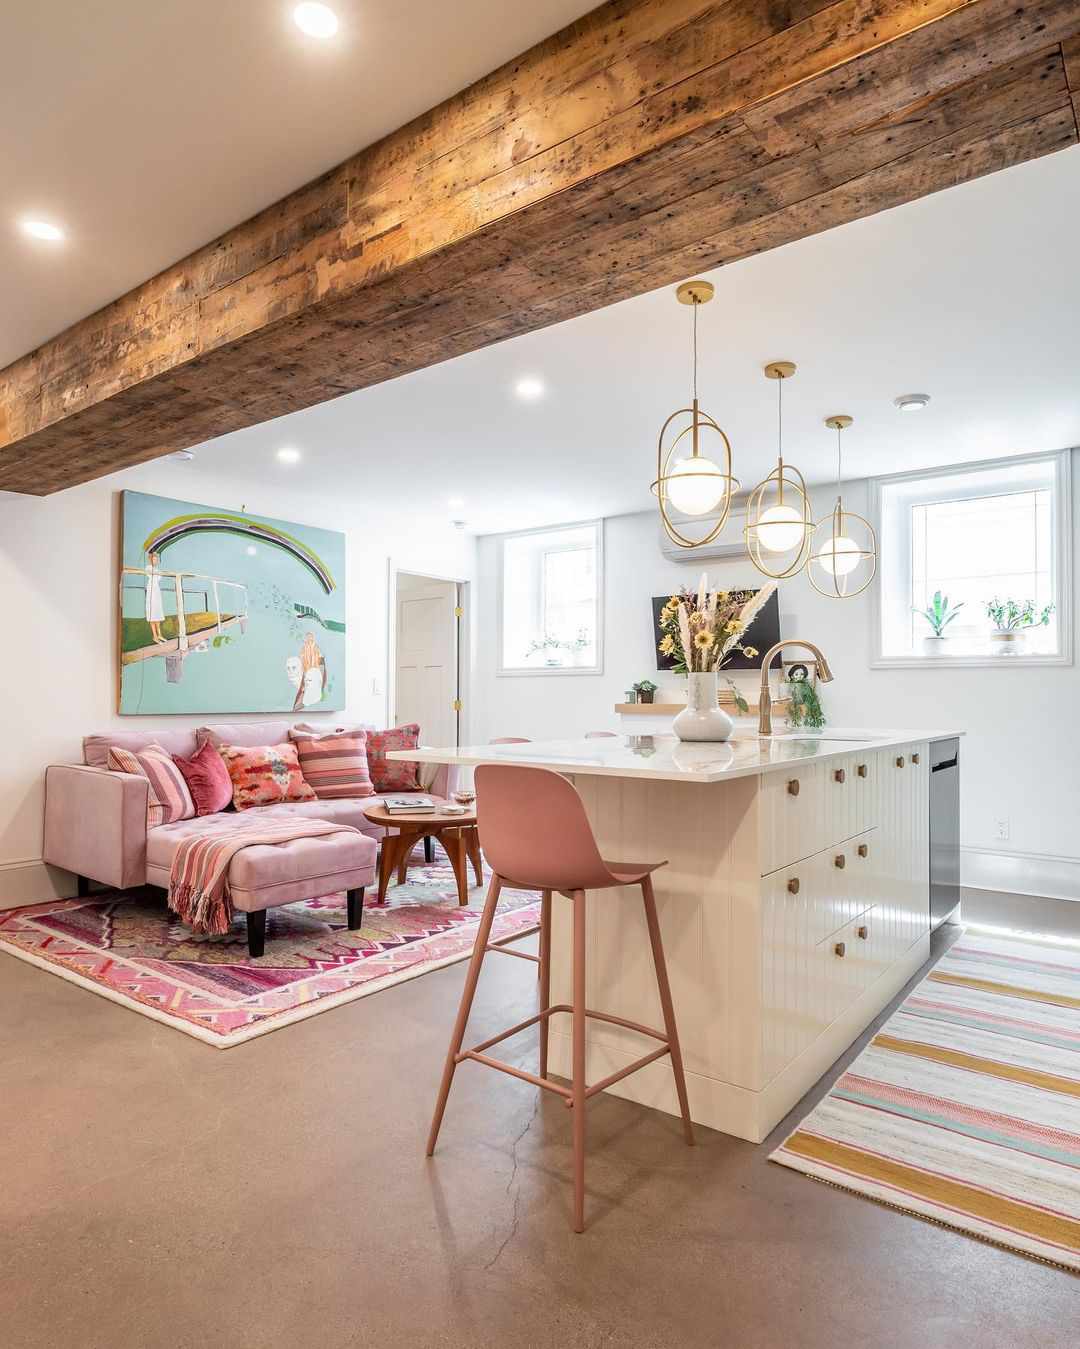
3. Add Character with an Exposed Beam and a Pop of Pink
The single element holding this entire design together is the rustic, exposed wooden beam. It does more than just add a textural element; it injects a dose of history and soul into a modern space. Without it, the pink sofa and gold lights might feel a bit ungrounded. The beam provides a crucial visual counterpoint, balancing the softness of the pink and the sleekness of the modern finishes with something raw and organic. It’s the perfect imperfection that makes the room feel authentic and curated over time.
|
📋 Copy HEX 🔗 Share |
You don’t need a massive budget to get this eclectic, personality-driven look. Find a similar-sized pink or colorful sectional on Facebook Marketplace for $400-$800. For the lighting, skip the high-end designer pendants and look for globe-style fixtures from IKEA or Target, which often cost under $50 each. A large, bold art print can be sourced from sites like Society6 for around $100, giving you that high-impact focal point without the gallery price tag. This strategy gives you the cool factor of Idea #21 on a much smaller scale.
4. Master a Studio Layout with Light Grays and Bold Accent Colors
This open-concept layout is ideal for a smaller rectangular basement, working beautifully in spaces from 300 to 500 square feet. The key is placing the bed against the shortest wall to maximize the main living area. By using a consistent light gray for the walls, cabinets, and floor, the transitions between the kitchen, sleeping, and living zones feel seamless, preventing the space from looking choppy or small. This is a much brighter approach than the layout seen in Idea #8, which works better for a slightly larger room.
|
📋 Copy HEX 🔗 Share |
Want to create a simple, high-impact art moment like the one above the bed? Here’s a quick guide to hanging a large, unframed canvas. Time: 20 minutes. Cost: $5-$10 for hardware.
- Measure the total width of your headboard. Your artwork should be between 2/3 and 3/4 of that width.
- Center the artwork over the bed, ensuring the bottom edge is 6-8 inches above the top of the headboard.
- Use a level to mark two spots on the wall for your picture hangers, corresponding to the D-rings or wire on the back of the canvas.
- Install heavy-duty picture hooks or screw-in anchors appropriate for your wall type (drywall or plaster).
- Hang your art, step back, and admire!
5. Define Zones in a Neutral Open-Plan with Black Accents
This layout is a masterclass in creating distinct ‘rooms’ without walls. The design works because of clear visual cues. The kitchen area is defined by its hard flooring (light grey tiles), which separates it functionally and visually from the living and dining areas, both of which are on soft, light beige carpet. Furthermore, the strategic use of black—in the sofa, the gallery wall frames, and the kitchen cabinet—acts as a unifying thread that pulls the different zones together into one cohesive palette. It’s a simple, effective trick for organizing an open space.
|
📋 Copy HEX 🔗 Share |
Before you commit to a multi-zone layout, run through this checklist to make sure it will work for your space:
- Do you have a clear, uninterrupted floor space of at least 15 feet by 25 feet? Smaller spaces can feel cluttered with this approach.
- Have you identified where your plumbing hookups are? This will dictate the location of your kitchenette and can impact the entire layout.
- Consider the flow of traffic. Can you walk from the entrance to the main seating area without awkwardly weaving around furniture?
- Check your lighting. You’ll need overhead lighting for the kitchen zone and options for softer, ambient light in the living area.
6. Embrace a Cozy Open Concept with a Built-in Bed Nook
The smartest feature in this entire basement is the built-in bed nook. In an open-concept studio, creating a sense of separation for the sleeping area is crucial for comfort and privacy. By recessing the bed into its own alcove, it feels like a distinct, cozy sanctuary rather than just a bed in the middle of a living room. This single architectural choice elevates the entire space from a simple studio to a thoughtfully designed home, providing psychological comfort and freeing up the rest of the floor plan for living.
|
📋 Copy HEX 🔗 Share |
To make a built-in bed nook feel intentional rather than like a closet, paint the interior of the nook a slightly darker or different color than the main walls. A deep gray, a soft navy, or even a textured wallpaper can create depth and a sense of enclosure. Then, install a wall-mounted reading sconce inside the nook. This not only provides practical task lighting but also reinforces the feeling that this is a purpose-built, cozy retreat. It’s a small detail with a huge psychological payoff.
7. Achieve a Sleek Look with Grey, Chrome, and Glass
The clean, modern aesthetic here is all about a disciplined material palette. Think of it as 50% soft texture, 30% reflective surfaces, and 20% neutral color. The large grey sectional and the area rug provide the soft, comfortable base. The chrome and glass elements—the coffee table base, the dining table, and bar stools—add that critical 30% of shine, reflecting light and making the space feel brighter and more open. The light grey walls act as a quiet, neutral backdrop that lets the textures and finishes take center stage.
|
📋 Copy HEX 🔗 Share |
While glass and chrome look incredibly chic, they are magnets for fingerprints, smudges, and dust. A glass-topped dining table and coffee table will require daily wiping to look their best, especially in a living space where they get constant use. A high-quality microfiber cloth is your best friend here. Be mindful that chrome can also show water spots or streaks easily. If you love the look but hate the cleaning, consider a frosted glass top or a brushed nickel finish instead of polished chrome for a more forgiving surface.
8. Warm Up a Modern Studio with Bohemian Textiles and Wood Tones
This space successfully avoids the cold, sterile feel some modern studios have by leaning into warm, bohemian-inspired textiles. While the core elements like the grey walls and simple furniture are modern, the magic is in the layers. The patterned curtains, the geometric rug, and the mix of throw pillows all introduce texture, pattern, and a soft, lived-in quality. This contrast between the clean, modern backdrop and the cozy, patterned foreground is what makes the apartment feel both stylish and incredibly inviting.
|
📋 Copy HEX 🔗 Share |
You can achieve this cozy bohemian vibe for less by being a savvy shopper. Hit up thrift stores or Facebook Marketplace for a vintage wooden dresser; a few scratches only add to the character ($50-$150). For textiles, check out stores like HomeGoods or Target for affordable patterned rugs and pillow covers. A set of patterned curtains from IKEA can completely transform a wall for under $40. The key is to hunt for texture and pattern, mixing and matching to create a collected, personal feel.
9. Layer Rugs for a Modern Rustic Look with Black Accents
The single most impactful choice in this room is the layering of the two area rugs. The large, light-colored textured rug establishes a cozy, neutral foundation that brightens the room and defines the seating area. But it’s the smaller, bold black-and-white geometric rug on top that injects all the personality and modern edge. It breaks up the sea of gray and beige, adds a graphic punch, and connects to the other black accents in the room, like the art and the barn door hardware. Without it, the room would be pleasant but forgettable.
|
📋 Copy HEX 🔗 Share |
Layering rugs can be tricky. The key is to get the proportions right. Your base rug should be large enough that at least the front legs of all your main furniture pieces are on it. Your top rug should be significantly smaller—about 2/3 the size of the base rug—and should be centered under the main conversation area, like the coffee table. For texture, always pair a low-pile or flatweave rug (like the geometric one here) on top of a higher-pile or more textured base (like the jute or shag one here).
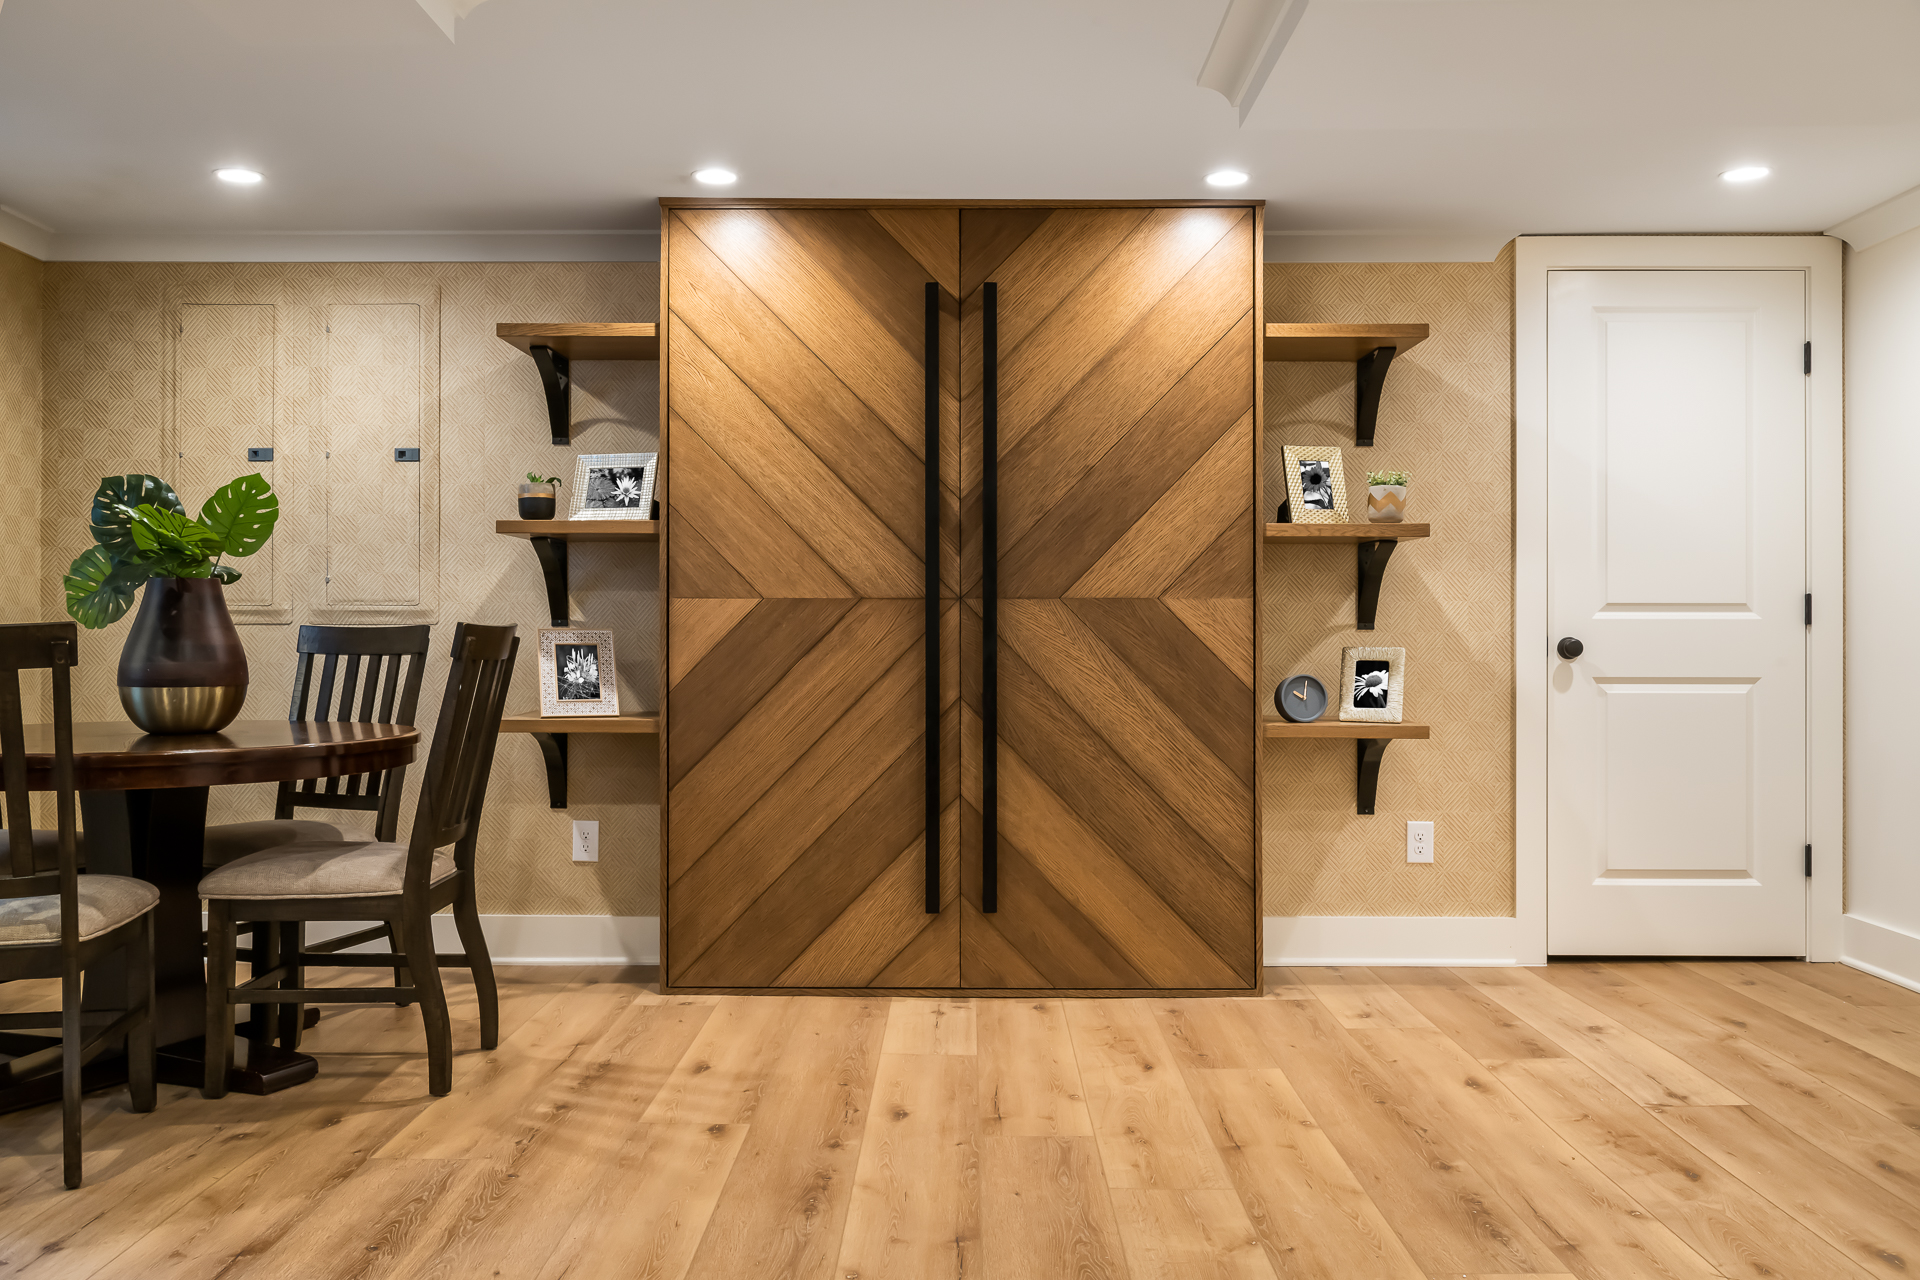
10. Maximize a Small Space with a Chevron Murphy Bed and Dining Nook
This design is a masterclass in functional, multi-use living. It works because it doesn’t try to hide its purpose. The Murphy bed isn’t just a plain cabinet; it’s a beautiful piece of furniture with its chevron wood pattern, making it a feature wall when closed. The choice to pair a darker wood dining set with the lighter wood of the bed and floors creates a subtle but effective zone separation. By embracing high-quality, transformative furniture, the space feels thoughtfully designed rather than temporarily arranged. It’s a permanent solution for a flexible need.
|
📋 Copy HEX 🔗 Share |
This integrated Murphy bed and dining concept is a game-changer for long, narrow basements or studio apartments under 400 square feet. It requires a solid wall with at least 9 feet of width to accommodate the bed cabinet and allow for clearance. The ceiling height should be a standard 8 feet to ensure the bed mechanism can operate fully. This approach is far more space-efficient than the separate bed and living areas seen in layouts like Idea #5, which requires a larger overall footprint.
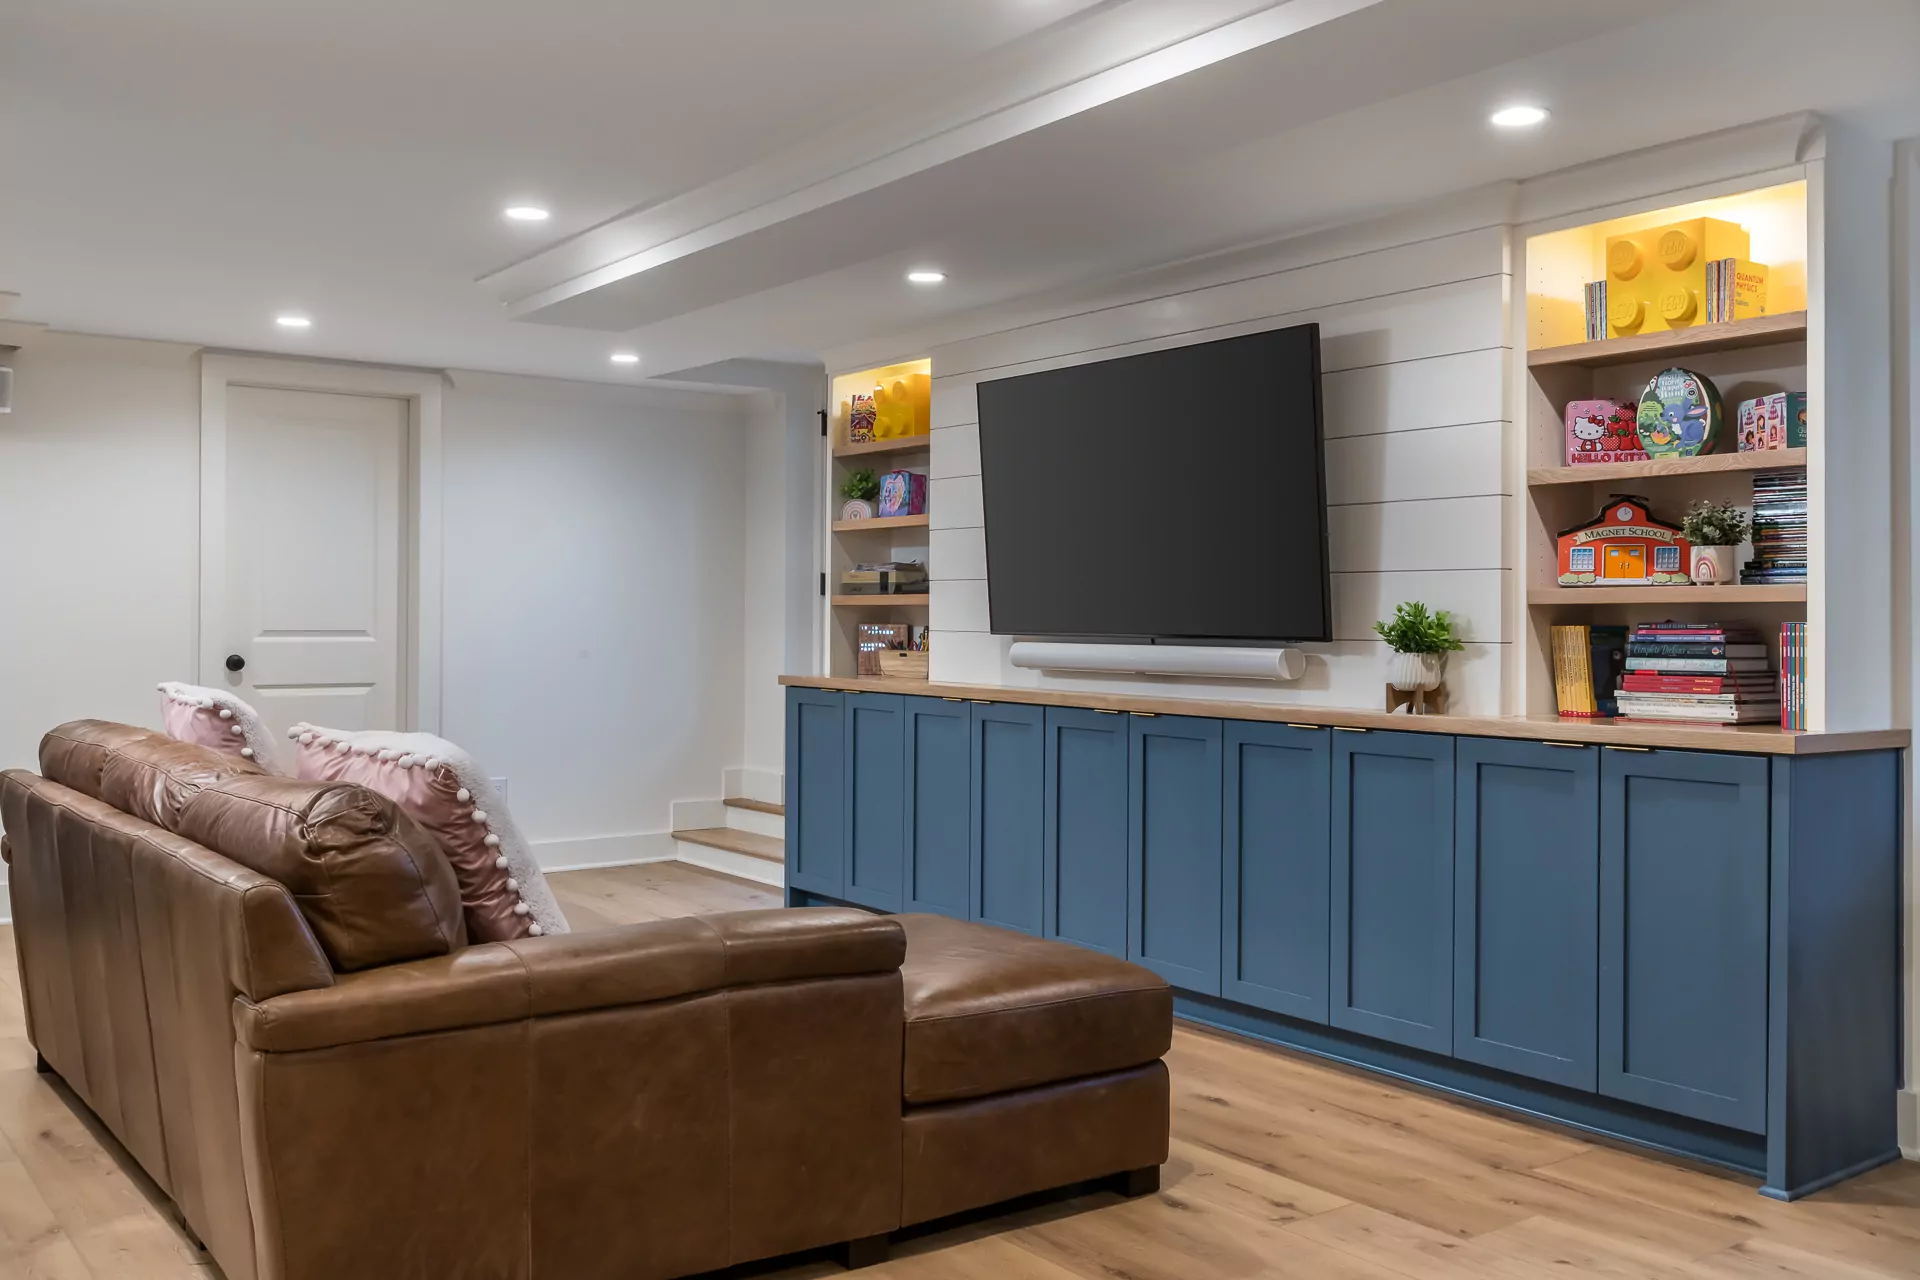
11. Build a Bold Media Center with Blue Shaker Cabinets
Recreating this custom built-in look requires a mix of cabinetry, lumber, and professional help. Here’s a potential cost breakdown:
|
📋 Copy HEX 🔗 Share |
- Semi-custom shaker cabinets (base): $1,500 – $3,000
- Butcher block or wood countertop: $400 – $900
- Lumber and materials for shiplap and shelves: $300 – $600
- Labor (carpentry and installation): $1,000 – $2,500
- Electrical for lighting: $300 – $700
- TOTAL: $3,500 – $7,700
Budget alternative: Use IKEA kitchen base cabinets (~$800) with custom doors, and place floating shelves above instead of fully built-in units to save significantly on labor.
A large, beautiful leather sectional is a fantastic investment piece, but it’s not always the most practical choice for a basement. Basements can sometimes have higher humidity levels, which can affect leather over the long term if not properly managed with a dehumidifier. More importantly, consider the logistics. Measure your stairwell, doorways, and any tight corners *before* you buy. A large, one-piece sectional is notoriously difficult to maneuver into a basement, and you don’t want to end up with a sofa you can’t get into the room.
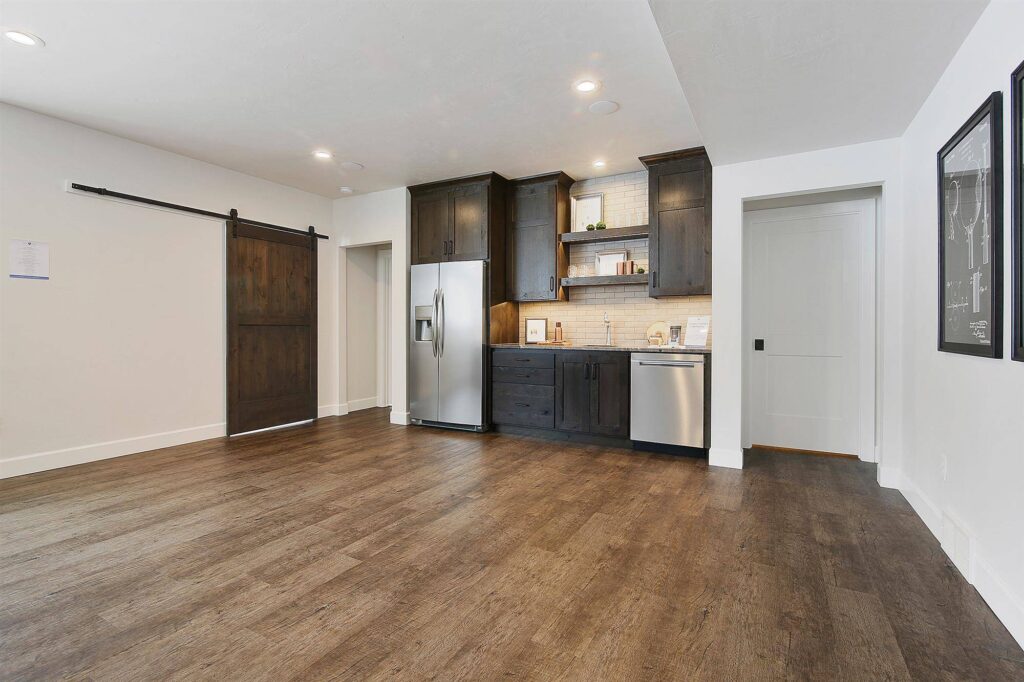
12. Go Moody with Dark Wood Cabinetry and a Sliding Barn Door
This kitchenette nails the moody, modern look with a simple equation: 60% dark, grounding elements + 30% light, reflective surfaces + 10% texture. The dark wood of the shaker cabinets, the barn door, and the flooring creates a rich, sophisticated base. The stainless steel appliances and glossy subway tiles provide the necessary brightness, bouncing light around and preventing the space from feeling like a cave. The wood grain and subtle texture of the tiles add the final layer of visual interest.
|
📋 Copy HEX 🔗 Share |
The sliding barn door has been a farmhouse staple for years, but its use here shows a shift in the trend for 2026. Instead of rustic and weathered, the door is sleek, dark, and modern, matching the cabinetry. This signals a move towards using barn doors less for a specific style (like farmhouse) and more for their functional space-saving benefits, especially in tight basement layouts where a swinging door would eat up valuable floor space. It’s becoming a practical architectural element rather than just a stylistic one.
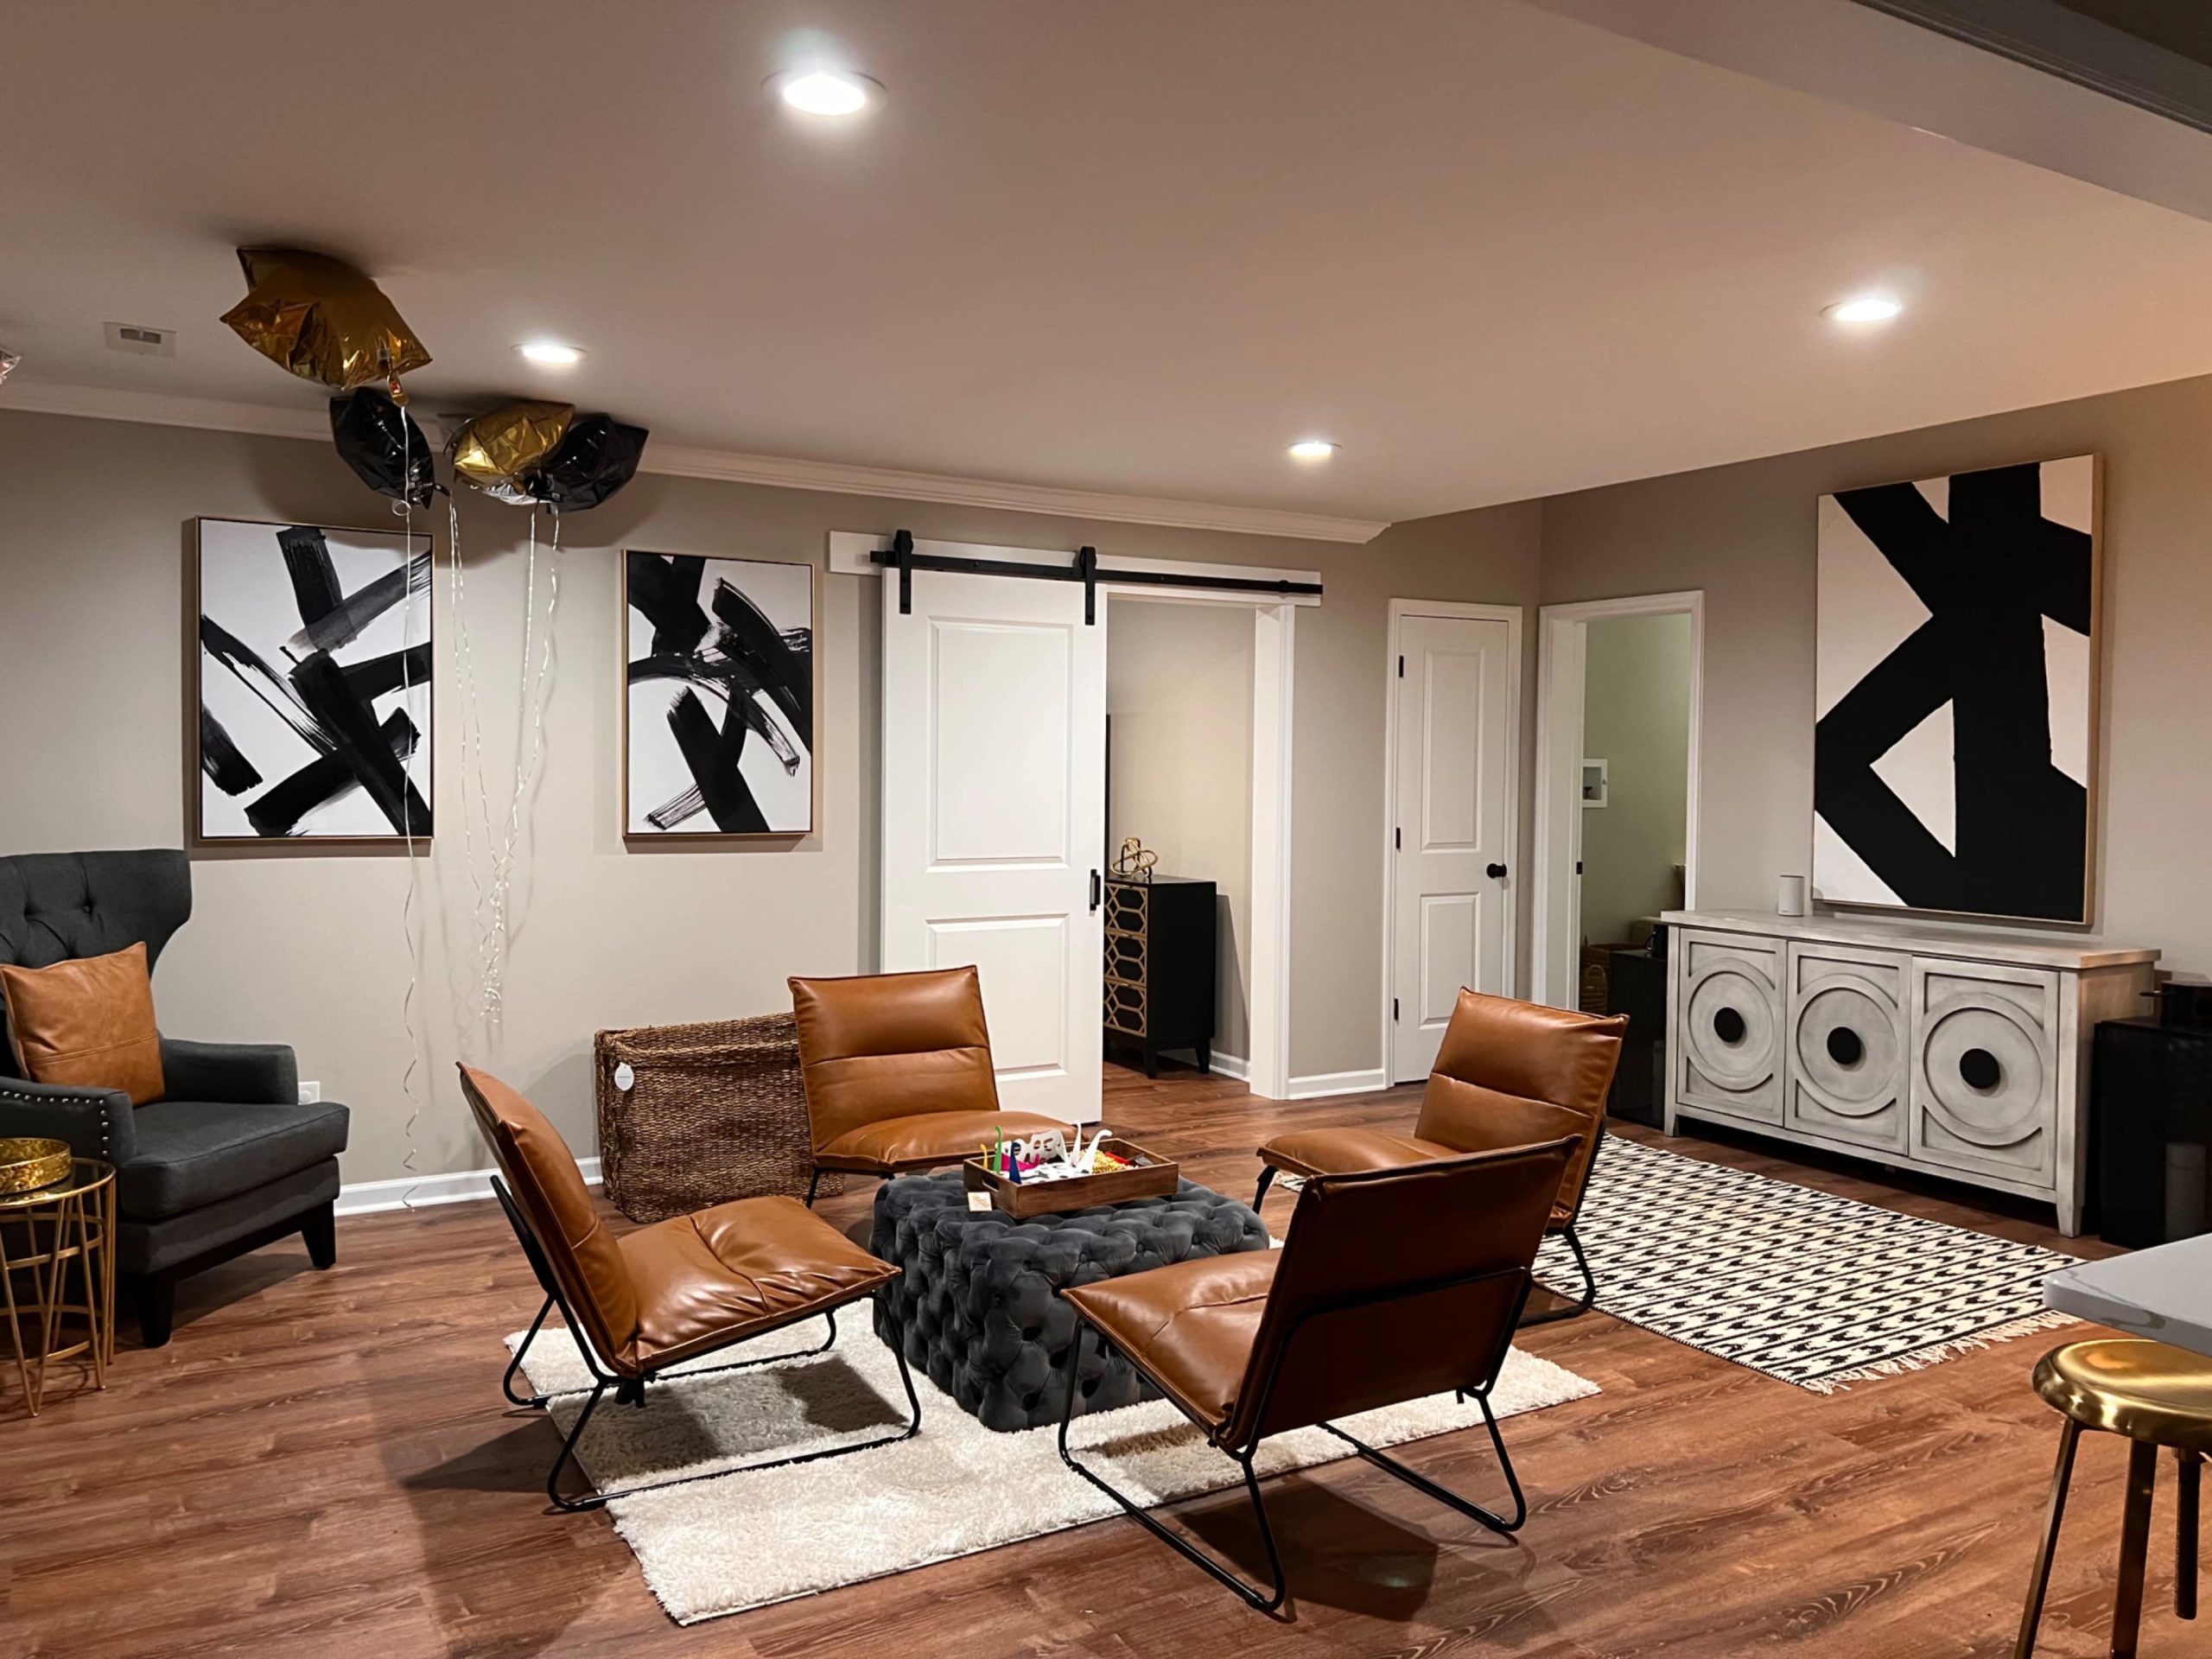
13. Create a Sophisticated Lounge with Brown Leather and Abstract Art
The defining feature of this room is the intentional seating arrangement. Instead of a typical sofa-and-loveseat combo, the four matching leather lounge chairs create a distinct, hotel-bar-inspired vibe. This choice signals that the room is for conversation, connection, and relaxing—not just passive TV watching. The symmetrical layout, centered on the tufted ottoman, feels deliberate and sophisticated. It’s an arrangement that encourages people to face each other, making the space feel instantly more intimate and social.
|
📋 Copy HEX 🔗 Share |
To recreate this look, the scale of the chairs is critical. Notice how they are low-slung with a wide footprint. The top of the chair backs should not be significantly higher than the top of the central ottoman or coffee table. A good rule of thumb is to keep your main seating furniture within a 6-inch height variance of each other to maintain a sleek, low profile. This creates a comfortable, unified horizon line in the room and makes the space feel more open and relaxed.
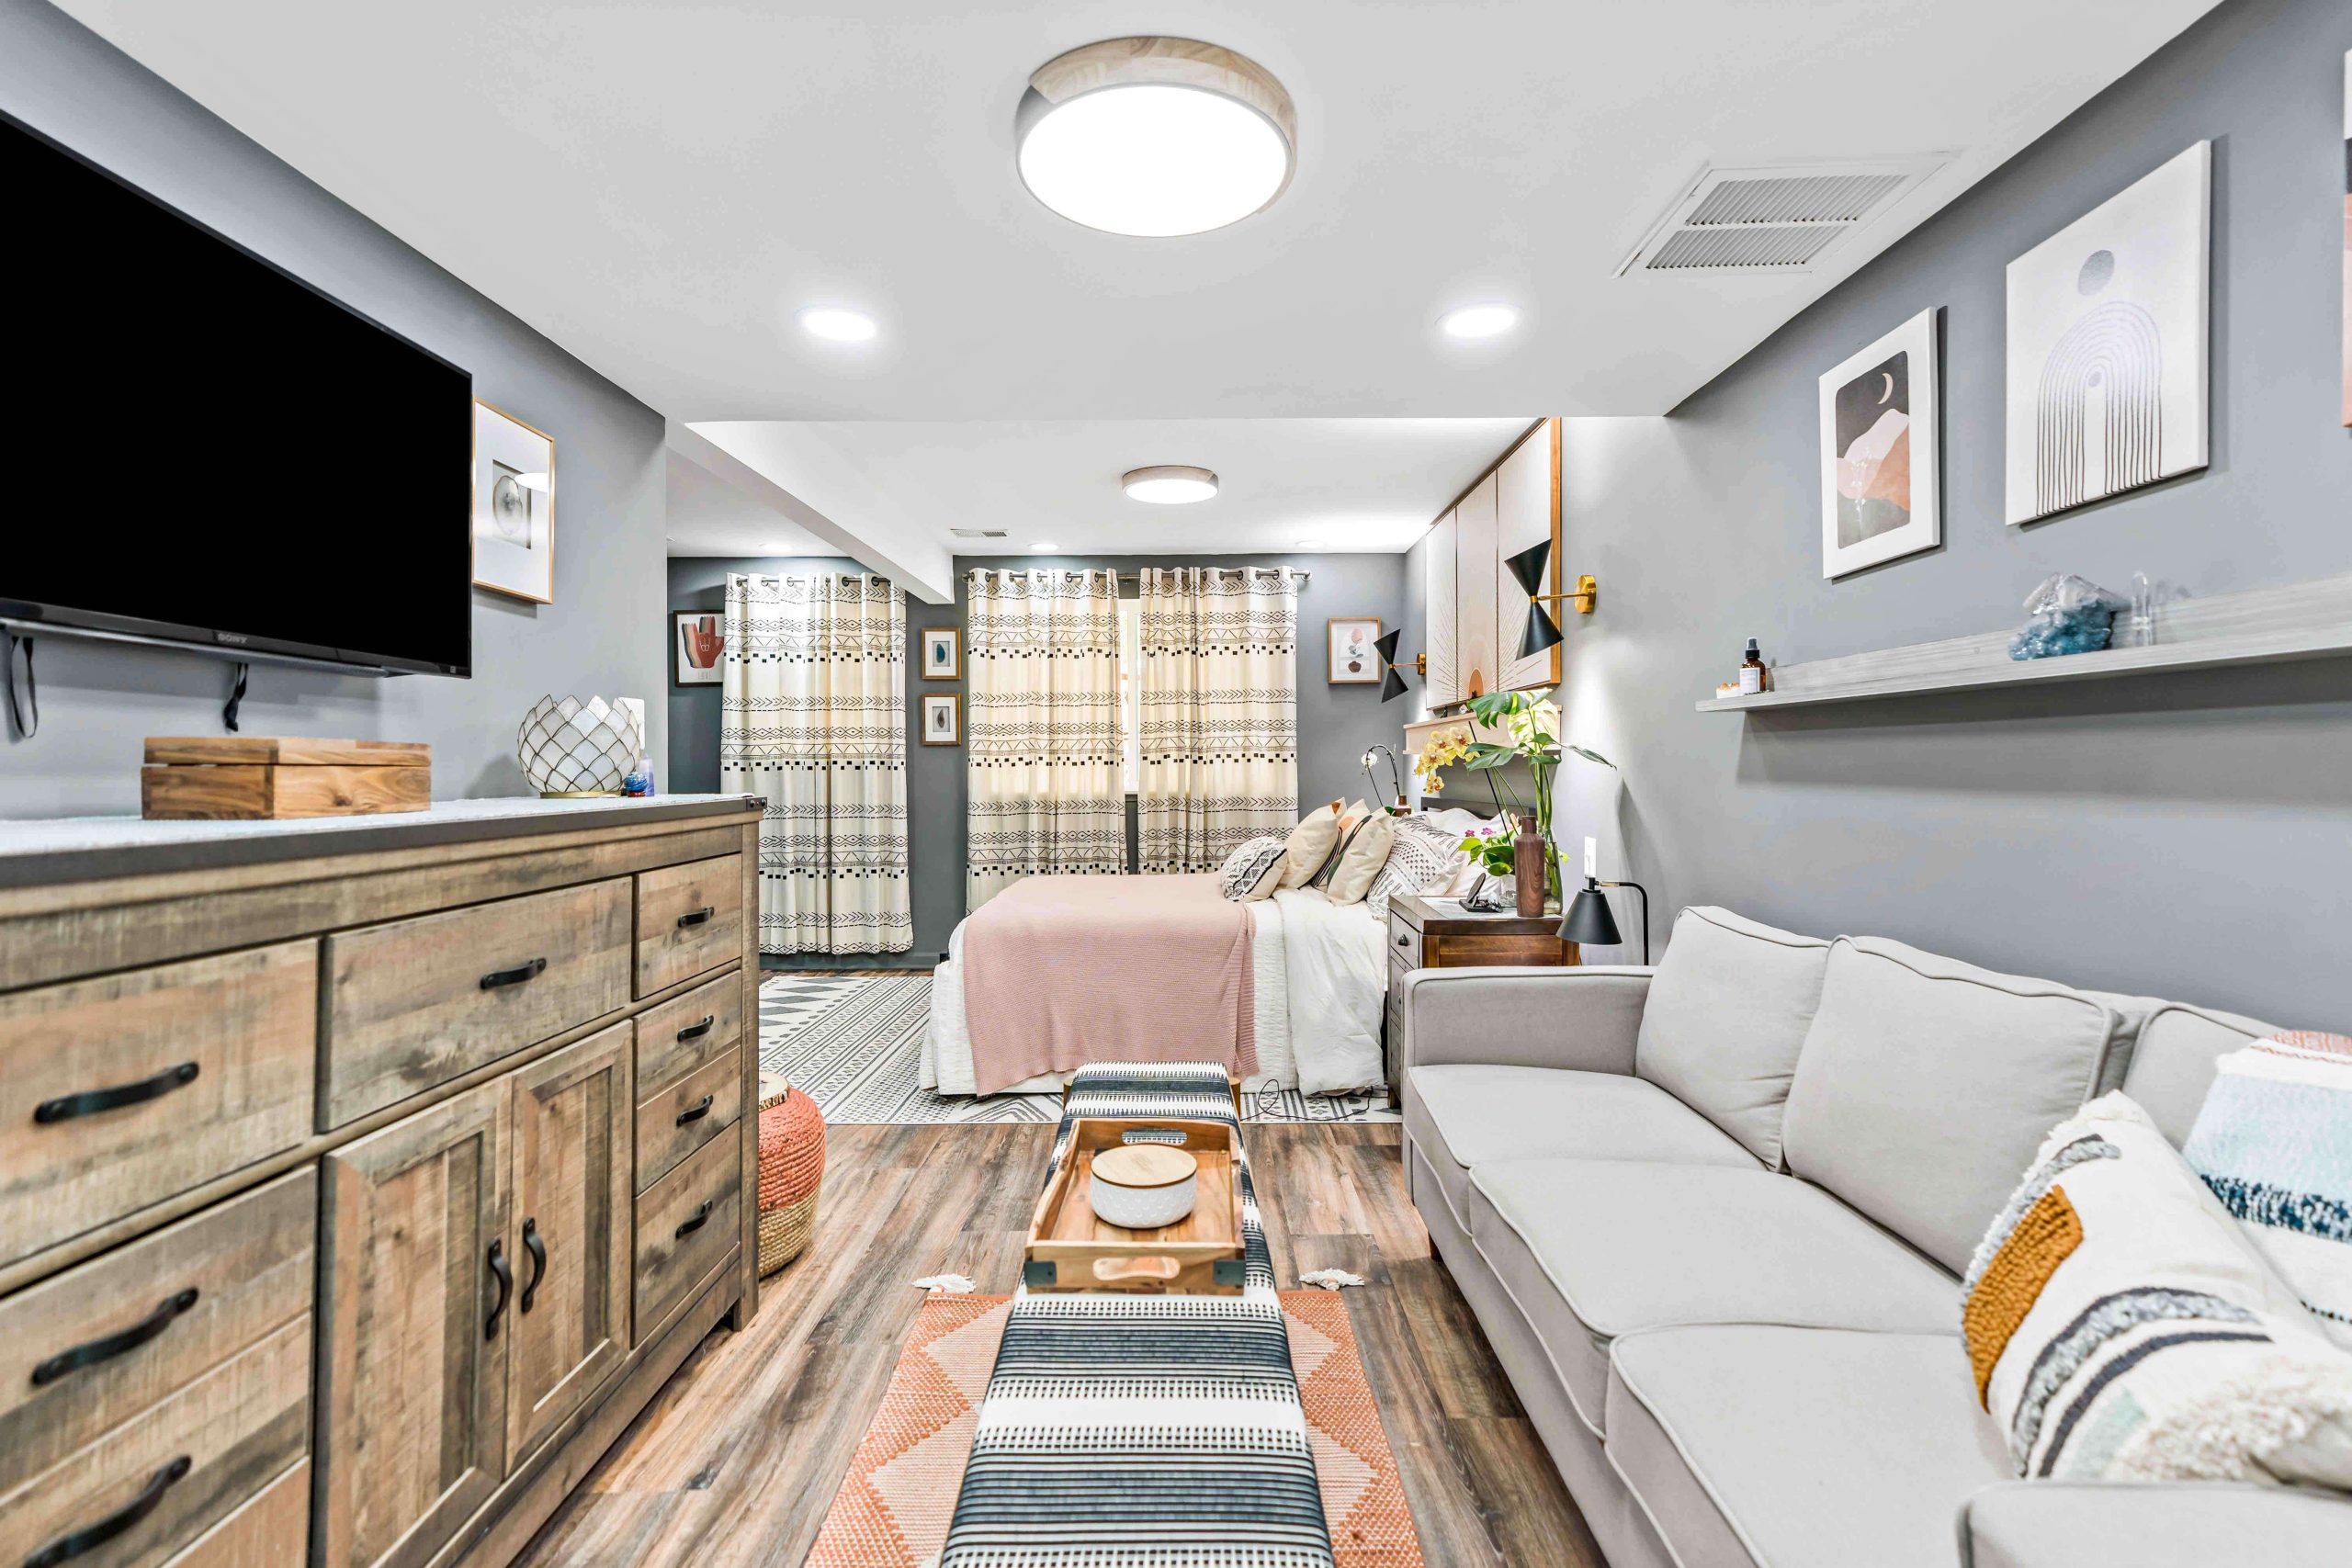
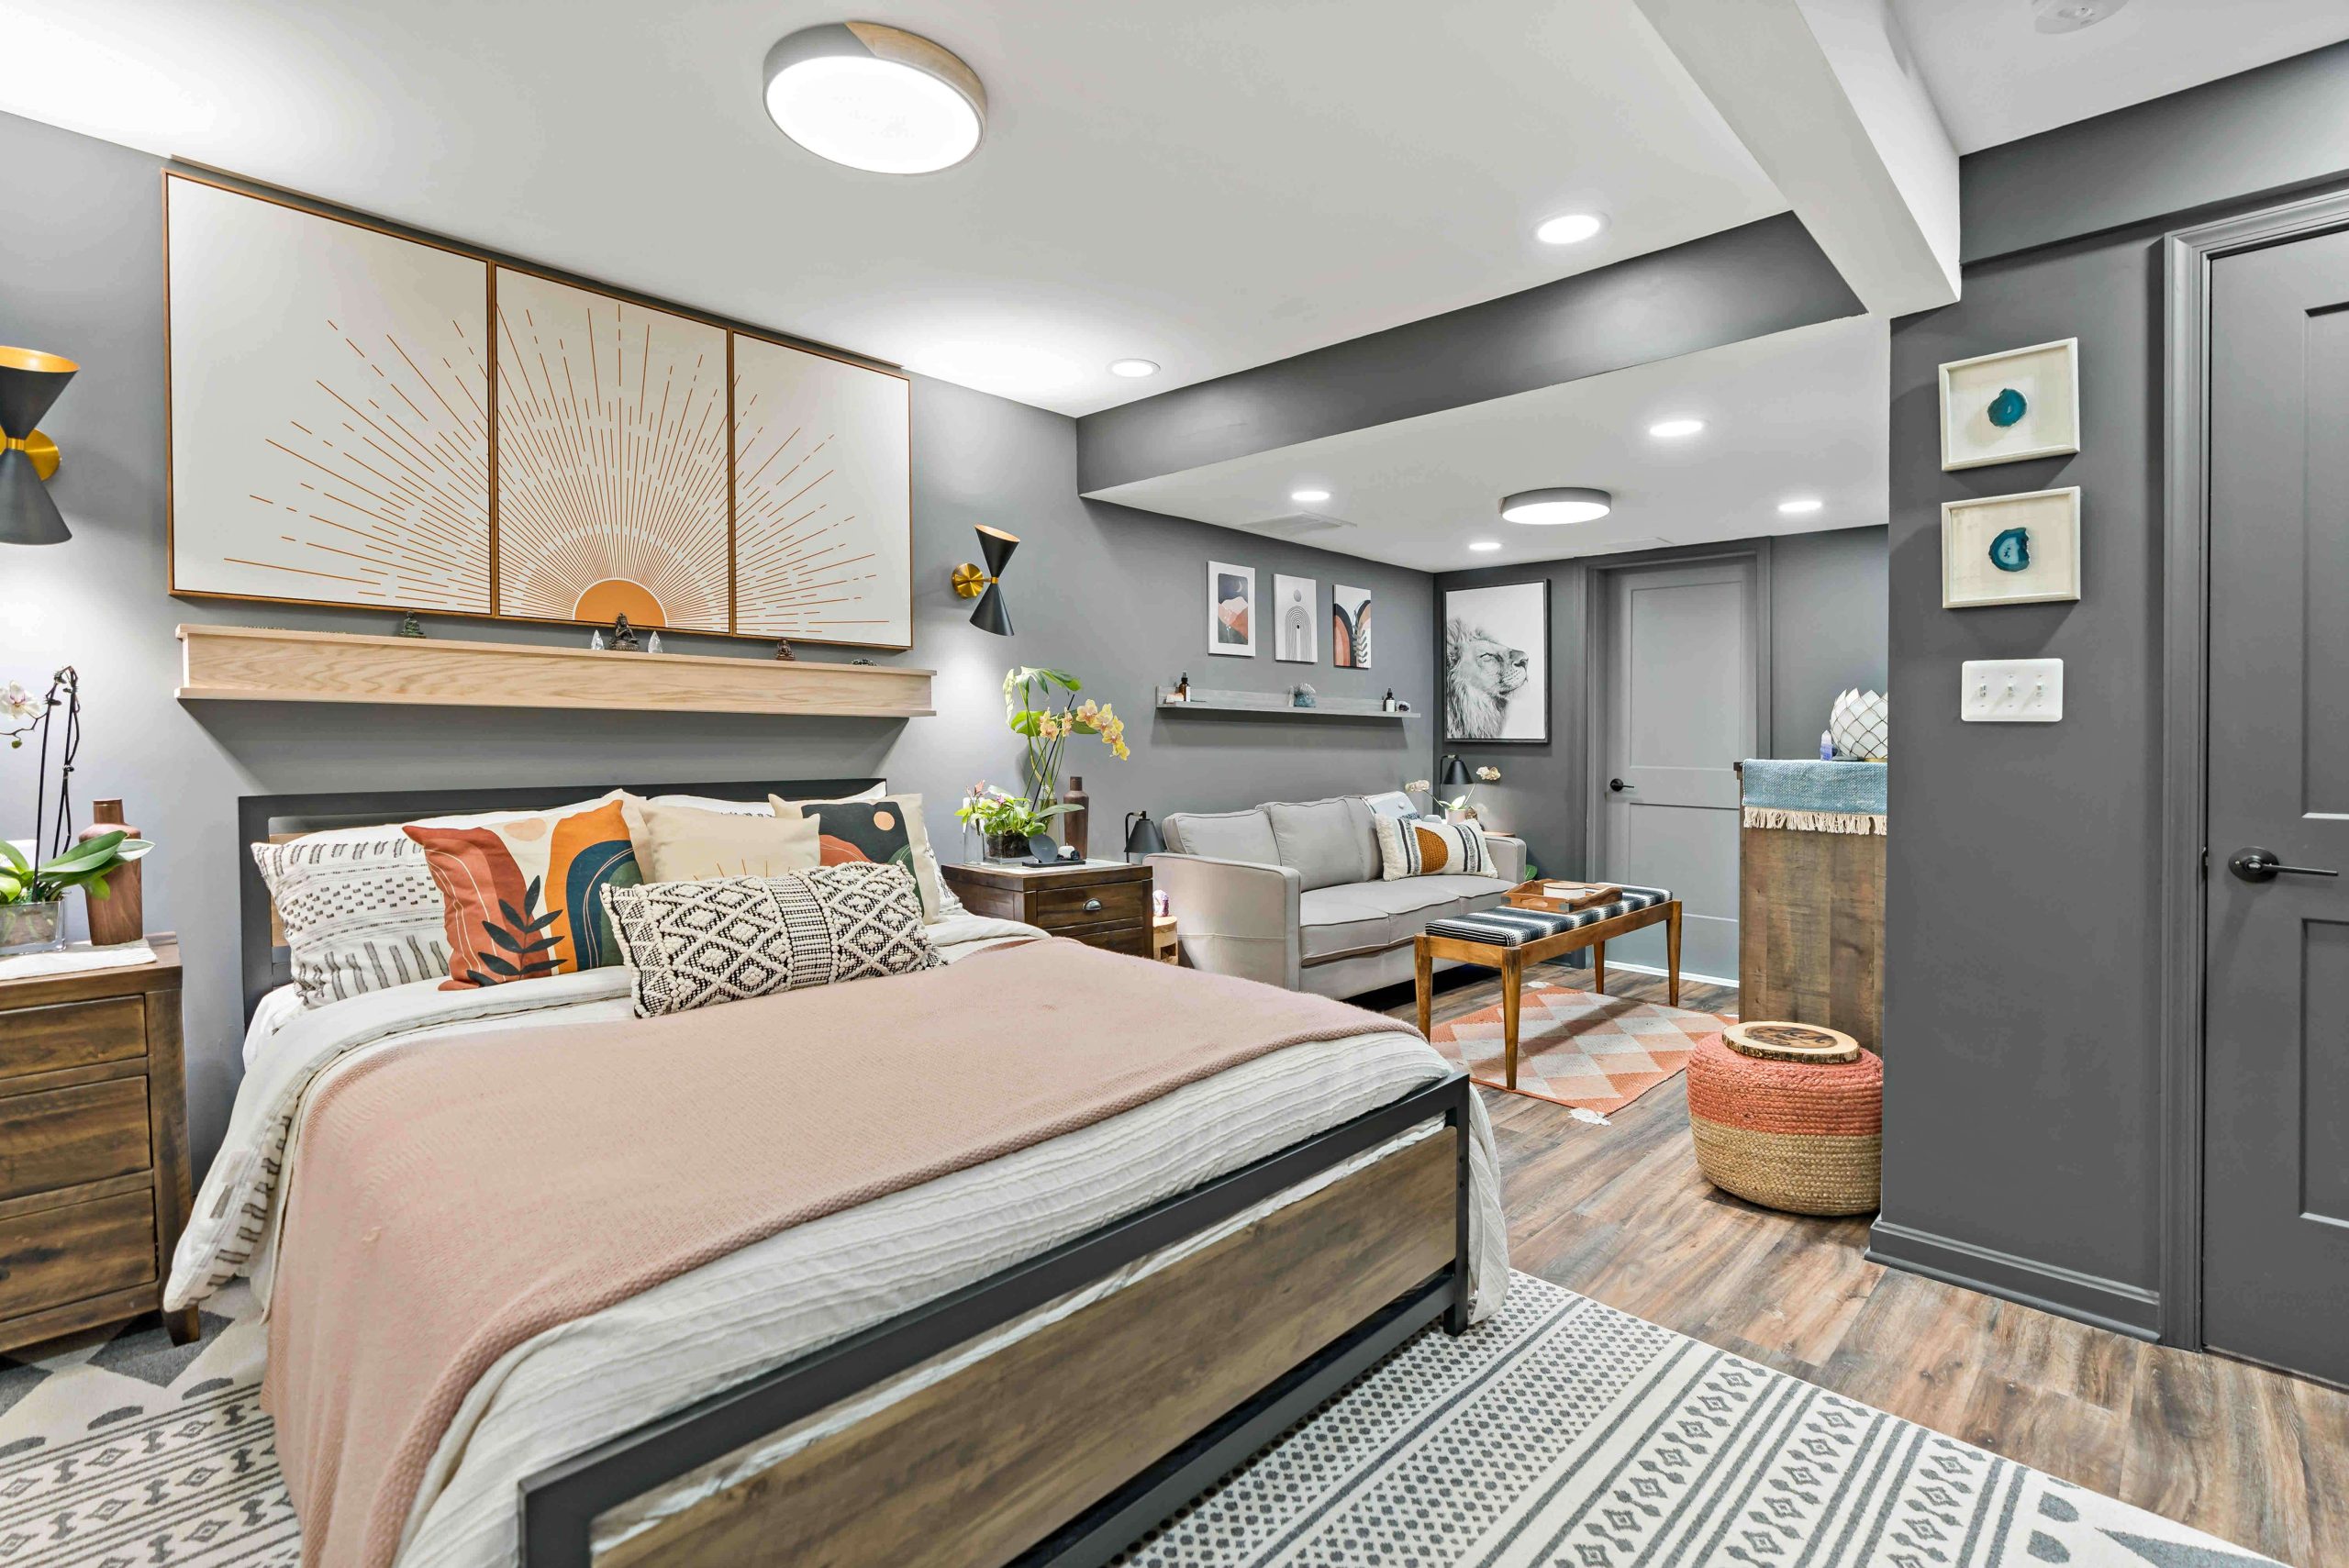
14. Combine Industrial and Bohemian in a Moody Bedroom Retreat
This room proves that “industrial” doesn’t have to mean cold. The design works because of a clever balance of hard and soft. The industrial-style bed frame and dark gray walls provide a cool, edgy foundation. But this is immediately softened by the introduction of bohemian elements: the vibrant, warm-toned sunrise artwork, the layers of patterned pillows, and the plush textures of the rugs. This fusion of styles creates a space that feels both cool and cozy, modern and deeply personal. It’s a perfect blend of two popular but opposing aesthetics.
|
📋 Copy HEX 🔗 Share |
You can get this look without splurging on high-end furniture. The key is to focus on the wall color and the accents. A can of dark gray paint is an affordable way to set a moody tone. Look for industrial-style bed frames from budget-friendly retailers like Wayfair or Overstock for under $300. Then, scour Etsy for large, downloadable art prints that you can have printed locally—this gives you the impact of a huge art piece for a fraction of the cost. Finally, layer on affordable pillows and throws from Target or IKEA to bring in that cozy, bohemian vibe.
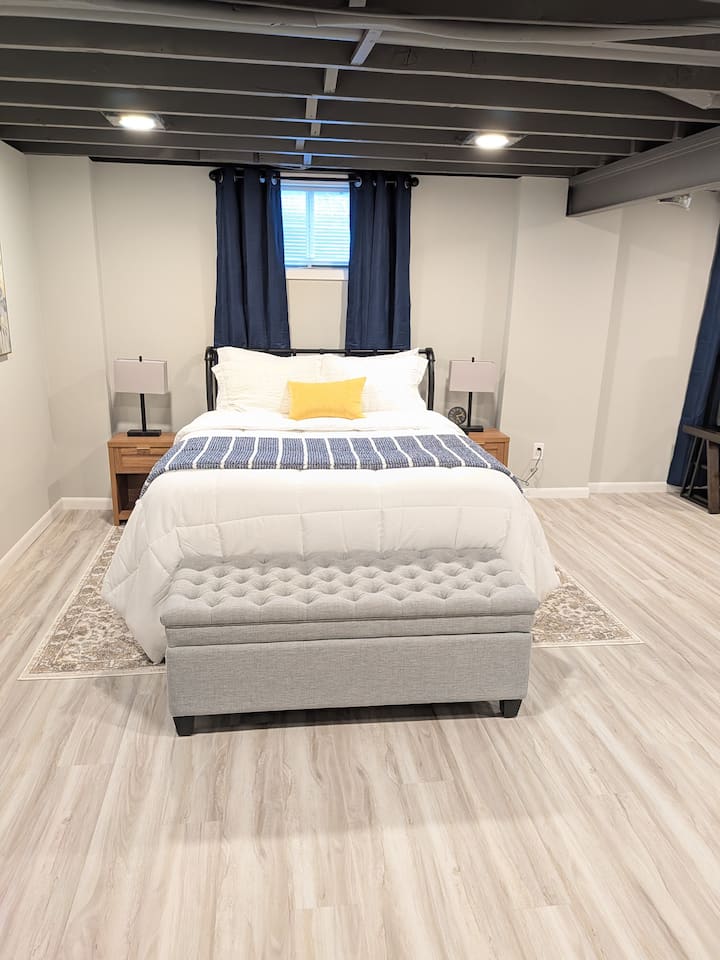
15. Brighten a Small Bedroom with Pops of Cheerful Yellow
Maximizing light from a small basement window is an art. Here’s how to make the most of it. Time: 1 hour. Cost: $20-$50.
|
📋 Copy HEX 🔗 Share |
- Start by cleaning the window thoroughly, inside and out. It’s surprising how much light is blocked by dust and grime.
- Paint the window well a bright, clean white. This will act as a light reflector, bouncing more natural light into the room.
- Avoid heavy curtains or blinds. Opt for a simple, translucent roller shade that can be fully retracted during the day.
- Place a small mirror on a wall opposite or adjacent to the window to bounce the light even further into the space.
- Decorate the sill with small, light-colored objects that won’t block the glass, as seen here with the small plants.
A basement bedroom with a small window can feel cozy, but it’s crucial to verify local building codes before designating it as a legal bedroom. In most parts of the US, a basement bedroom is required to have a means of egress—a window or door large enough and low enough to escape through in case of a fire or other emergency. This narrow horizontal window, while stylish, would likely not meet the legal requirements for a safe sleeping room. Always check with your local municipality before creating or listing a basement bedroom.
16. Embrace an Industrial Vibe with an Exposed Dark Ceiling
This room feels surprisingly bright and open despite the dark, industrial ceiling. The trick is a clever use of contrast. By painting the walls a light gray and using light wood-look flooring, the designer created a bright, neutral box. Painting the ceiling, ductwork, and all mechanicals a single, uniform dark gray doesn’t make the ceiling feel lower; instead, it makes it recede, almost like a dark night sky. This visual trick, known as ‘disappearing the ceiling,’ removes the visual clutter of the beams and pipes and makes the space feel more organized and intentionally designed.
|
📋 Copy HEX 🔗 Share |
An exposed, painted ceiling looks incredibly cool and adds a lot of character, but it comes with a unique cleaning challenge: dust. The complex surfaces of joists, pipes, and ductwork are major dust catchers. You will need to vacuum the ceiling with a brush attachment at least twice a year and likely more if you have allergies. Also, any future plumbing or electrical work becomes more complicated, as accessing the systems is easy, but patching and repainting the intricate ceiling to match perfectly can be a real headache.
17. Create a Minimalist Bedroom with a Dramatic Dark Ceiling
The success of this minimalist room lies in its strict color and texture formula: 70% light and smooth + 20% dark and industrial + 10% soft color. The light gray walls and light wood floors create a bright, expansive base. The exposed dark gray ceiling provides a dramatic, grounding contrast and an industrial edge. Finally, the strategic pops of navy blue in the curtains and throw provide just enough color to keep the room from feeling stark. This disciplined approach is what gives the space its clean, calming, and cohesive feel. It feels similar to Idea #16, but with a more serene, bedroom-focused energy.
|
📋 Copy HEX 🔗 Share |
While an exposed industrial ceiling adds architectural interest, it’s important to consider acoustics, especially in a bedroom. A standard drywall ceiling helps to dampen sound from the floor above. When you remove that and leave the joists and ductwork exposed, you also remove a significant layer of sound insulation. Footsteps, conversations, and any noise from the upper level of the house will be much more noticeable. If you’re a light sleeper, you may want to invest in sound-dampening insulation to spray between the joists before painting.
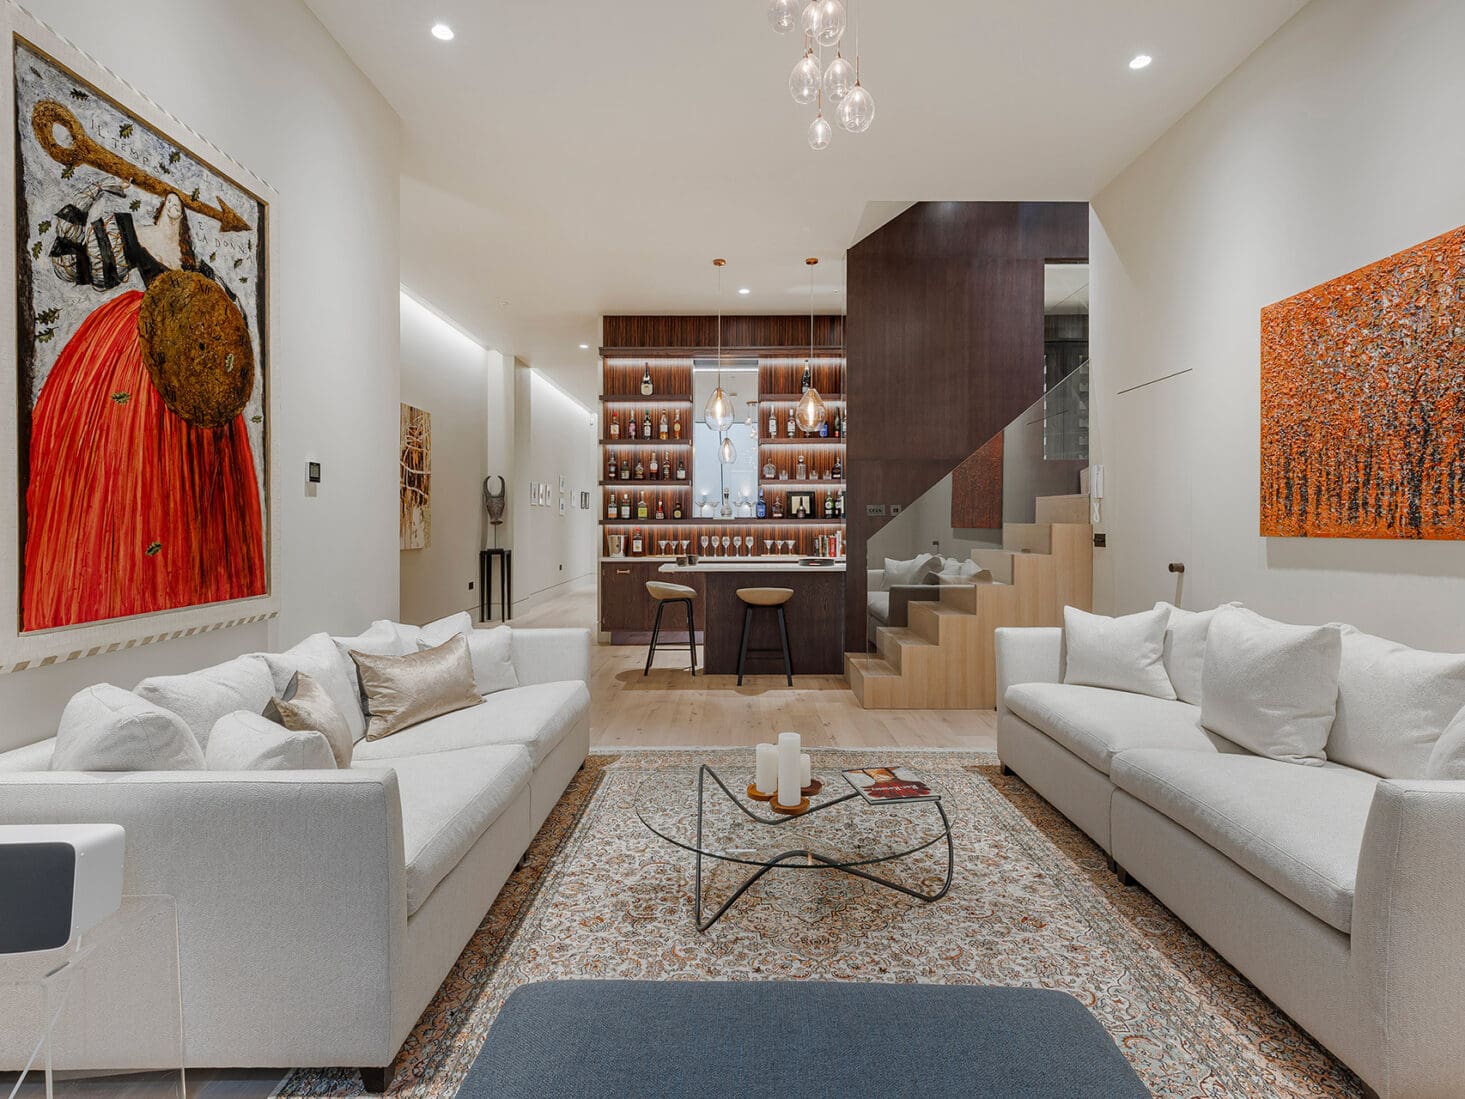
18. Design a Sophisticated Lounge with a Backlit Bar and Light Wood Stairs
The built-in bar is unequivocally the star of this show. It’s more than just a place to store drinks; it’s a glowing focal point that anchors the entire room. The combination of the dark wood, the warm backlighting, and the minimalist shelving creates a feature that feels both luxurious and seamlessly integrated. It elevates the space from a simple basement living room to a sophisticated entertaining lounge, providing a destination and a purpose for the far end of the room. Without it, the space would feel far less special.
|
📋 Copy HEX 🔗 Share |
When installing a glass railing on a staircase, the details make all the difference between looking high-end or just okay. Opt for “low-iron” glass (often sold under brand names like Starphire). Standard glass has a natural green tint that becomes very obvious on the thick, polished edges of a railing panel. Low-iron glass is almost perfectly clear, giving you a much cleaner, more luxurious, and truly transparent look that makes the investment worthwhile. It’s a subtle upgrade that makes a huge impact.
19. Craft a Playful Media Room with a Brick Accent Wall and Plank Ceiling
This room’s fun, casual energy comes from a bold mix of textures and colors that shouldn’t work together but do. The dark wood plank ceiling adds warmth and a rustic touch, while the distressed brick wallpaper provides an urban, industrial feel. Then, the deep navy blue wall injects a shot of modern, saturated color. The reason it all holds together is the consistent scale of the patterns and the simple, solid gray of the large sectional, which acts as a neutral anchor in a sea of visual information. It’s a confident, playful mix.
|
📋 Copy HEX 🔗 Share |
Want this high-energy look for less? The brick wall is the easiest place to save. Instead of real brick veneer, use a high-quality, realistic brick-patterned peel-and-stick wallpaper, which you can install yourself in an afternoon for under $200. For the ceiling, you can achieve a similar wood-plank look using lightweight, tongue-and-groove MDF boards (like Stikwood or similar products), which are much cheaper and easier to install than solid wood planks. Paint the accent wall yourself, and you’ve got the vibe for a fraction of the cost.
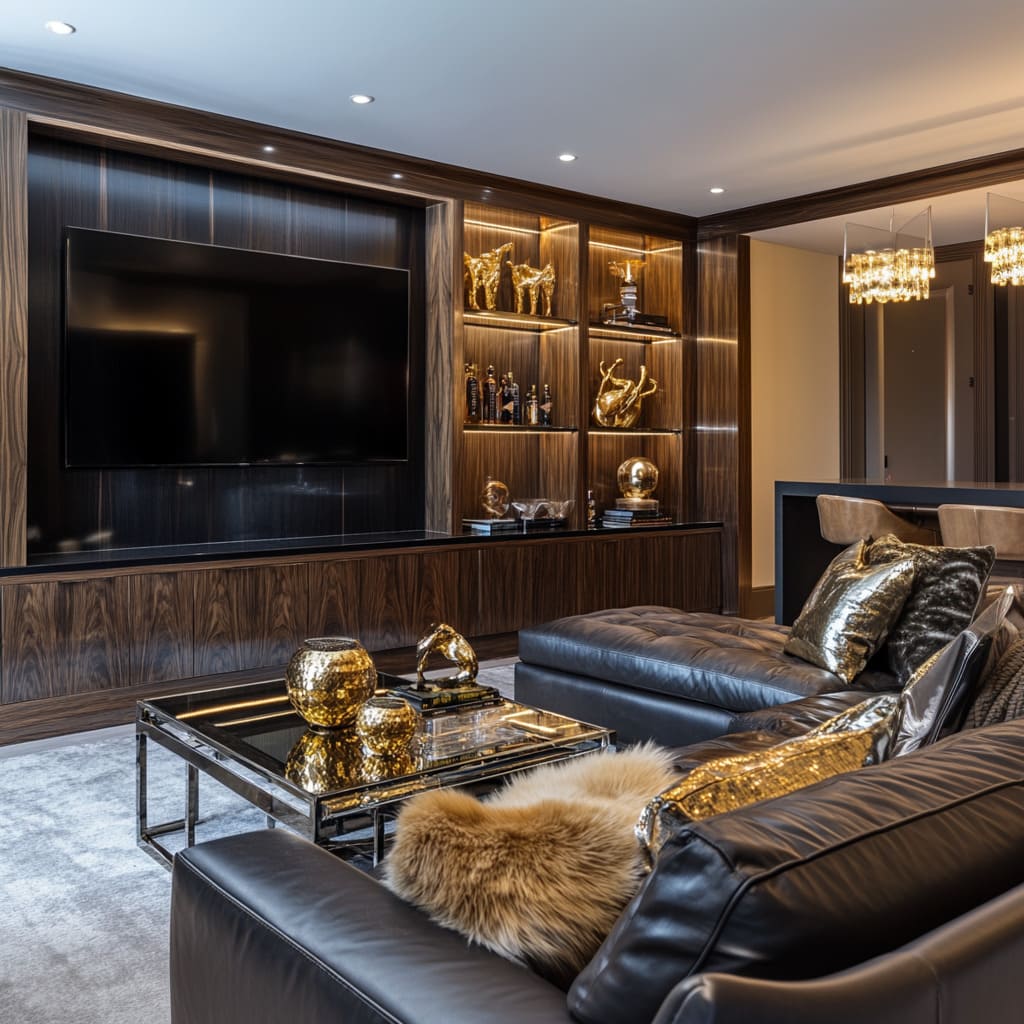
20. Embrace Glamour with a Dark Wood Media Wall and Gold Accents
Achieving this level of moody glamour is a significant investment in custom finishes and high-end materials. Here’s a rough estimate:
|
📋 Copy HEX 🔗 Share |
- Custom dark wood media wall with integrated lighting: $8,000 – $15,000+
- Large leather sectional sofa: $5,000 – $10,000
- Crystal chandeliers and other lighting: $2,000 – $5,000
- Glass and chrome coffee table: $500 – $1,500
- Decor, pillows, and accessories: $1,000 – $2,000
- TOTAL: $16,500 – $33,500+
Budget alternative: Create a similar media wall effect using dark wood-look laminate panels and pre-made floating shelves with LED strip lighting.
A room this dark and dramatic requires very specific lighting to work. The look relies entirely on artificial light sources—recessed lights, backlit shelves, and chandeliers—to create pools of warm, inviting light. This space will likely feel very dark and potentially gloomy during the daytime, especially if it has few or no windows. It’s a fantastic choice for a dedicated home theater or evening lounge, but it might not be the most practical or cheerful environment for a multi-purpose basement that needs to function as a bright, usable space during the day.
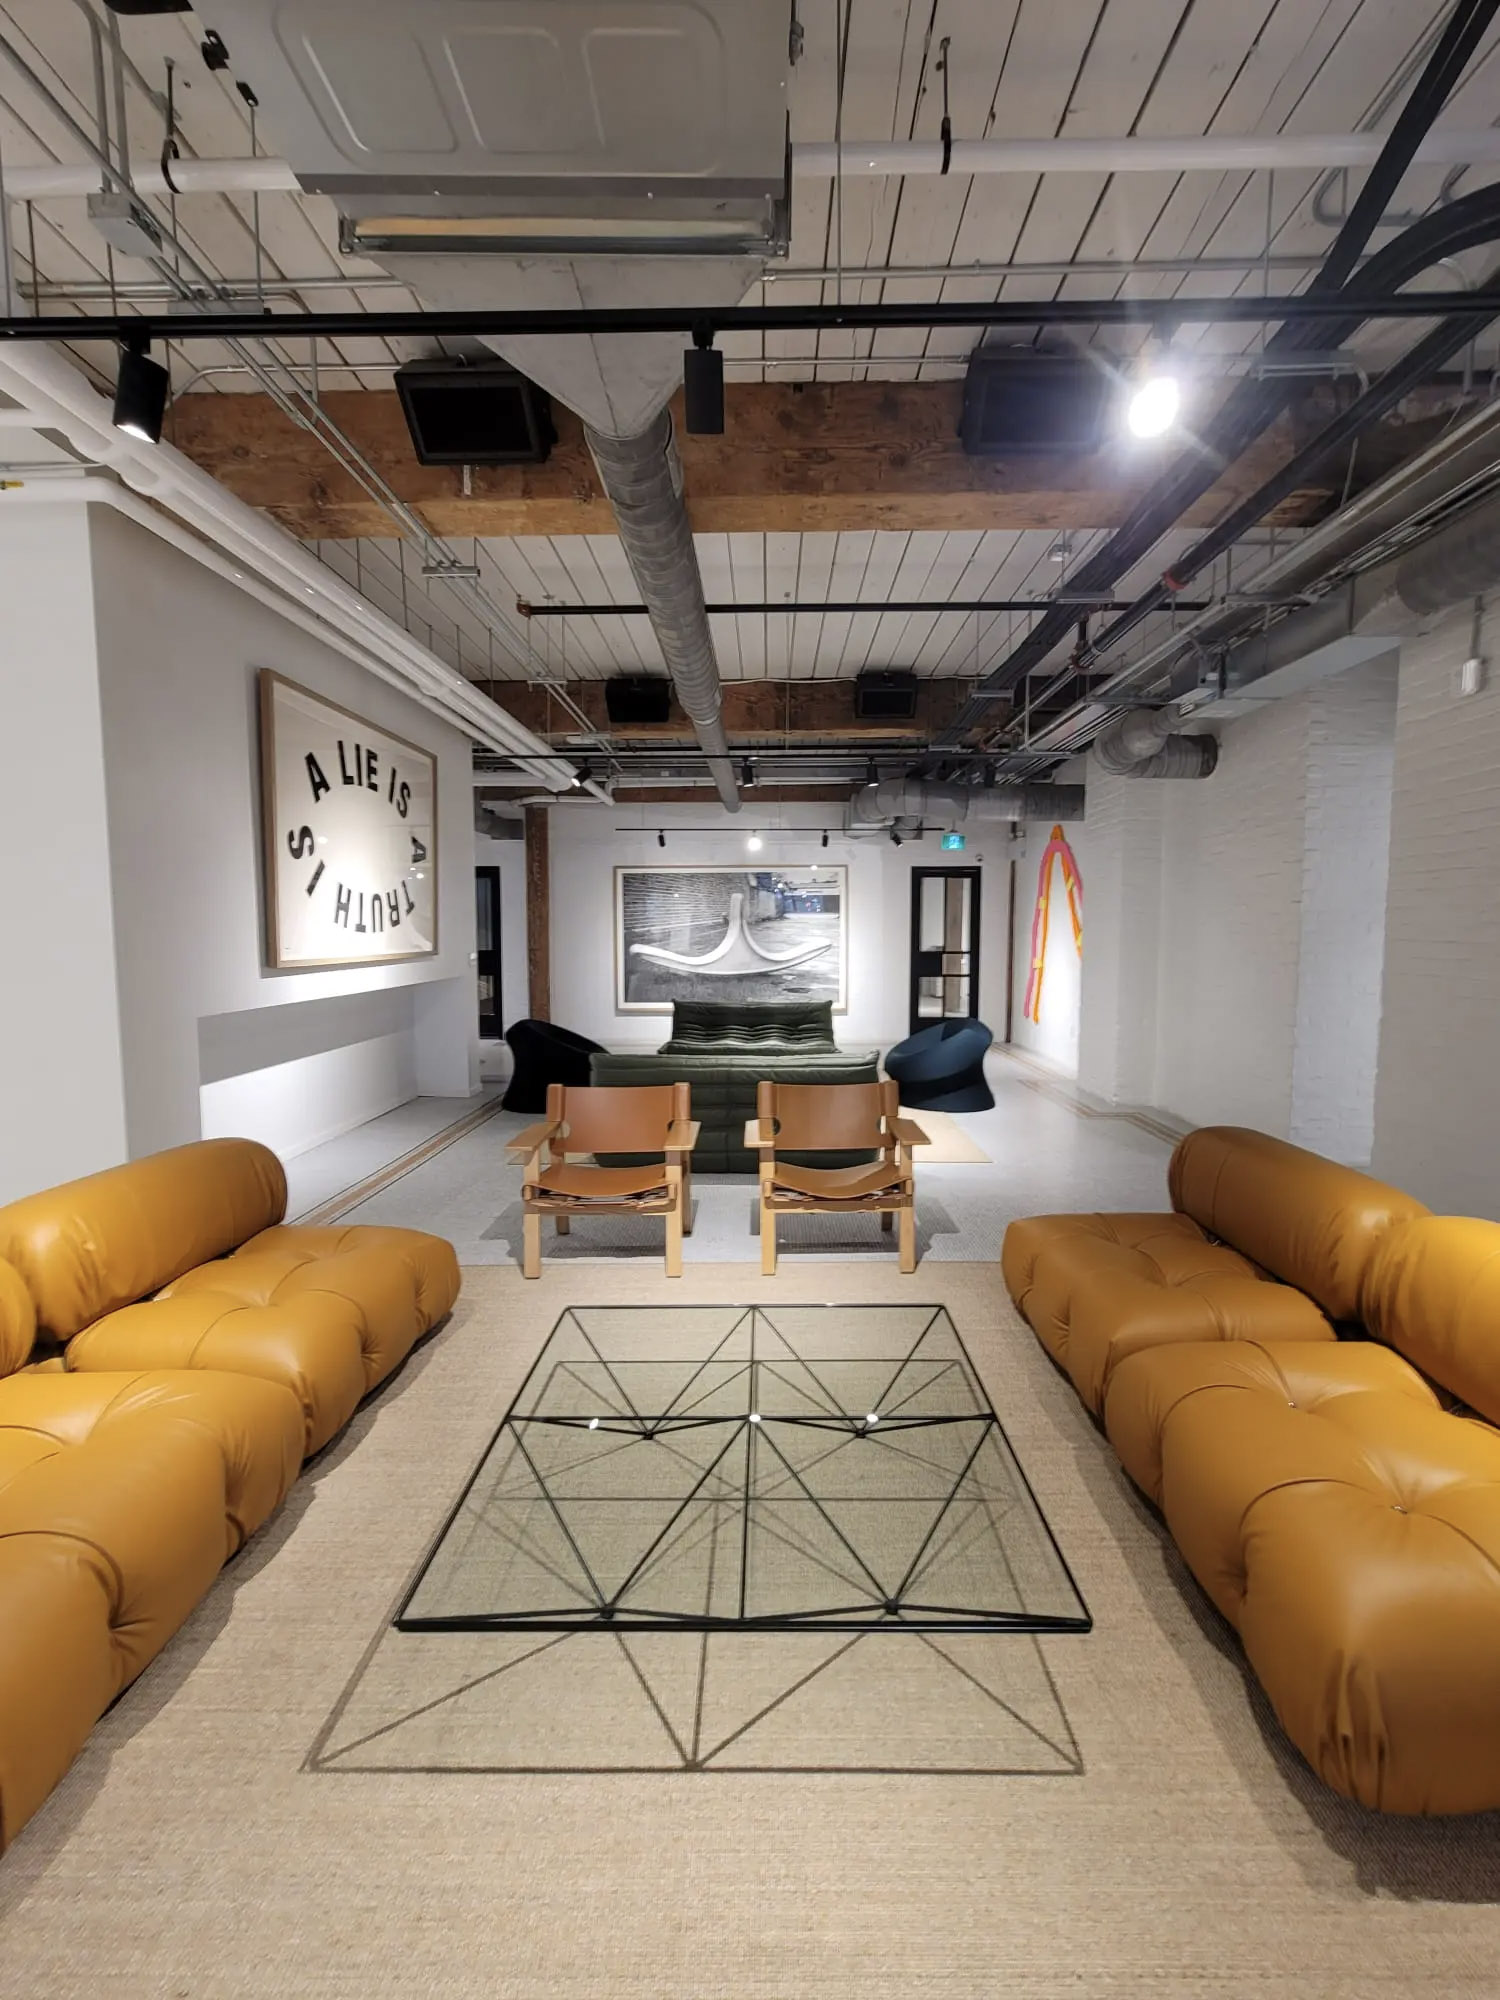
21. Curate an Industrial-Chic Lounge with Mustard Leather and Exposed Beams
The single element that defines this room’s unique character is the pair of long, tufted mustard-yellow leather sofas. In a space dominated by neutral and industrial elements—white brick, gray concrete, and exposed wood beams—the sofas are a jolt of unapologetic color and sophisticated style. They are the heart of the room’s aesthetic. Swapping them for gray or brown leather would still look good, but it would lose that specific, high-design tension between industrial grit and mid-century glamour that makes the space so memorable.
|
📋 Copy HEX 🔗 Share |
This space feels so effortlessly cool because it perfectly balances raw and refined elements. The exposed ceiling with its raw wood beams, visible ductwork, and industrial conduits is pure, unpolished texture. This is directly contrasted by the sleek, refined lines of the tan sling chairs, the geometric glass coffee table, and the sophisticated tufting on the sofas. By placing these highly designed objects within a raw architectural shell, the room creates a powerful visual dialogue between grit and grace, which is the essence of industrial-chic design.
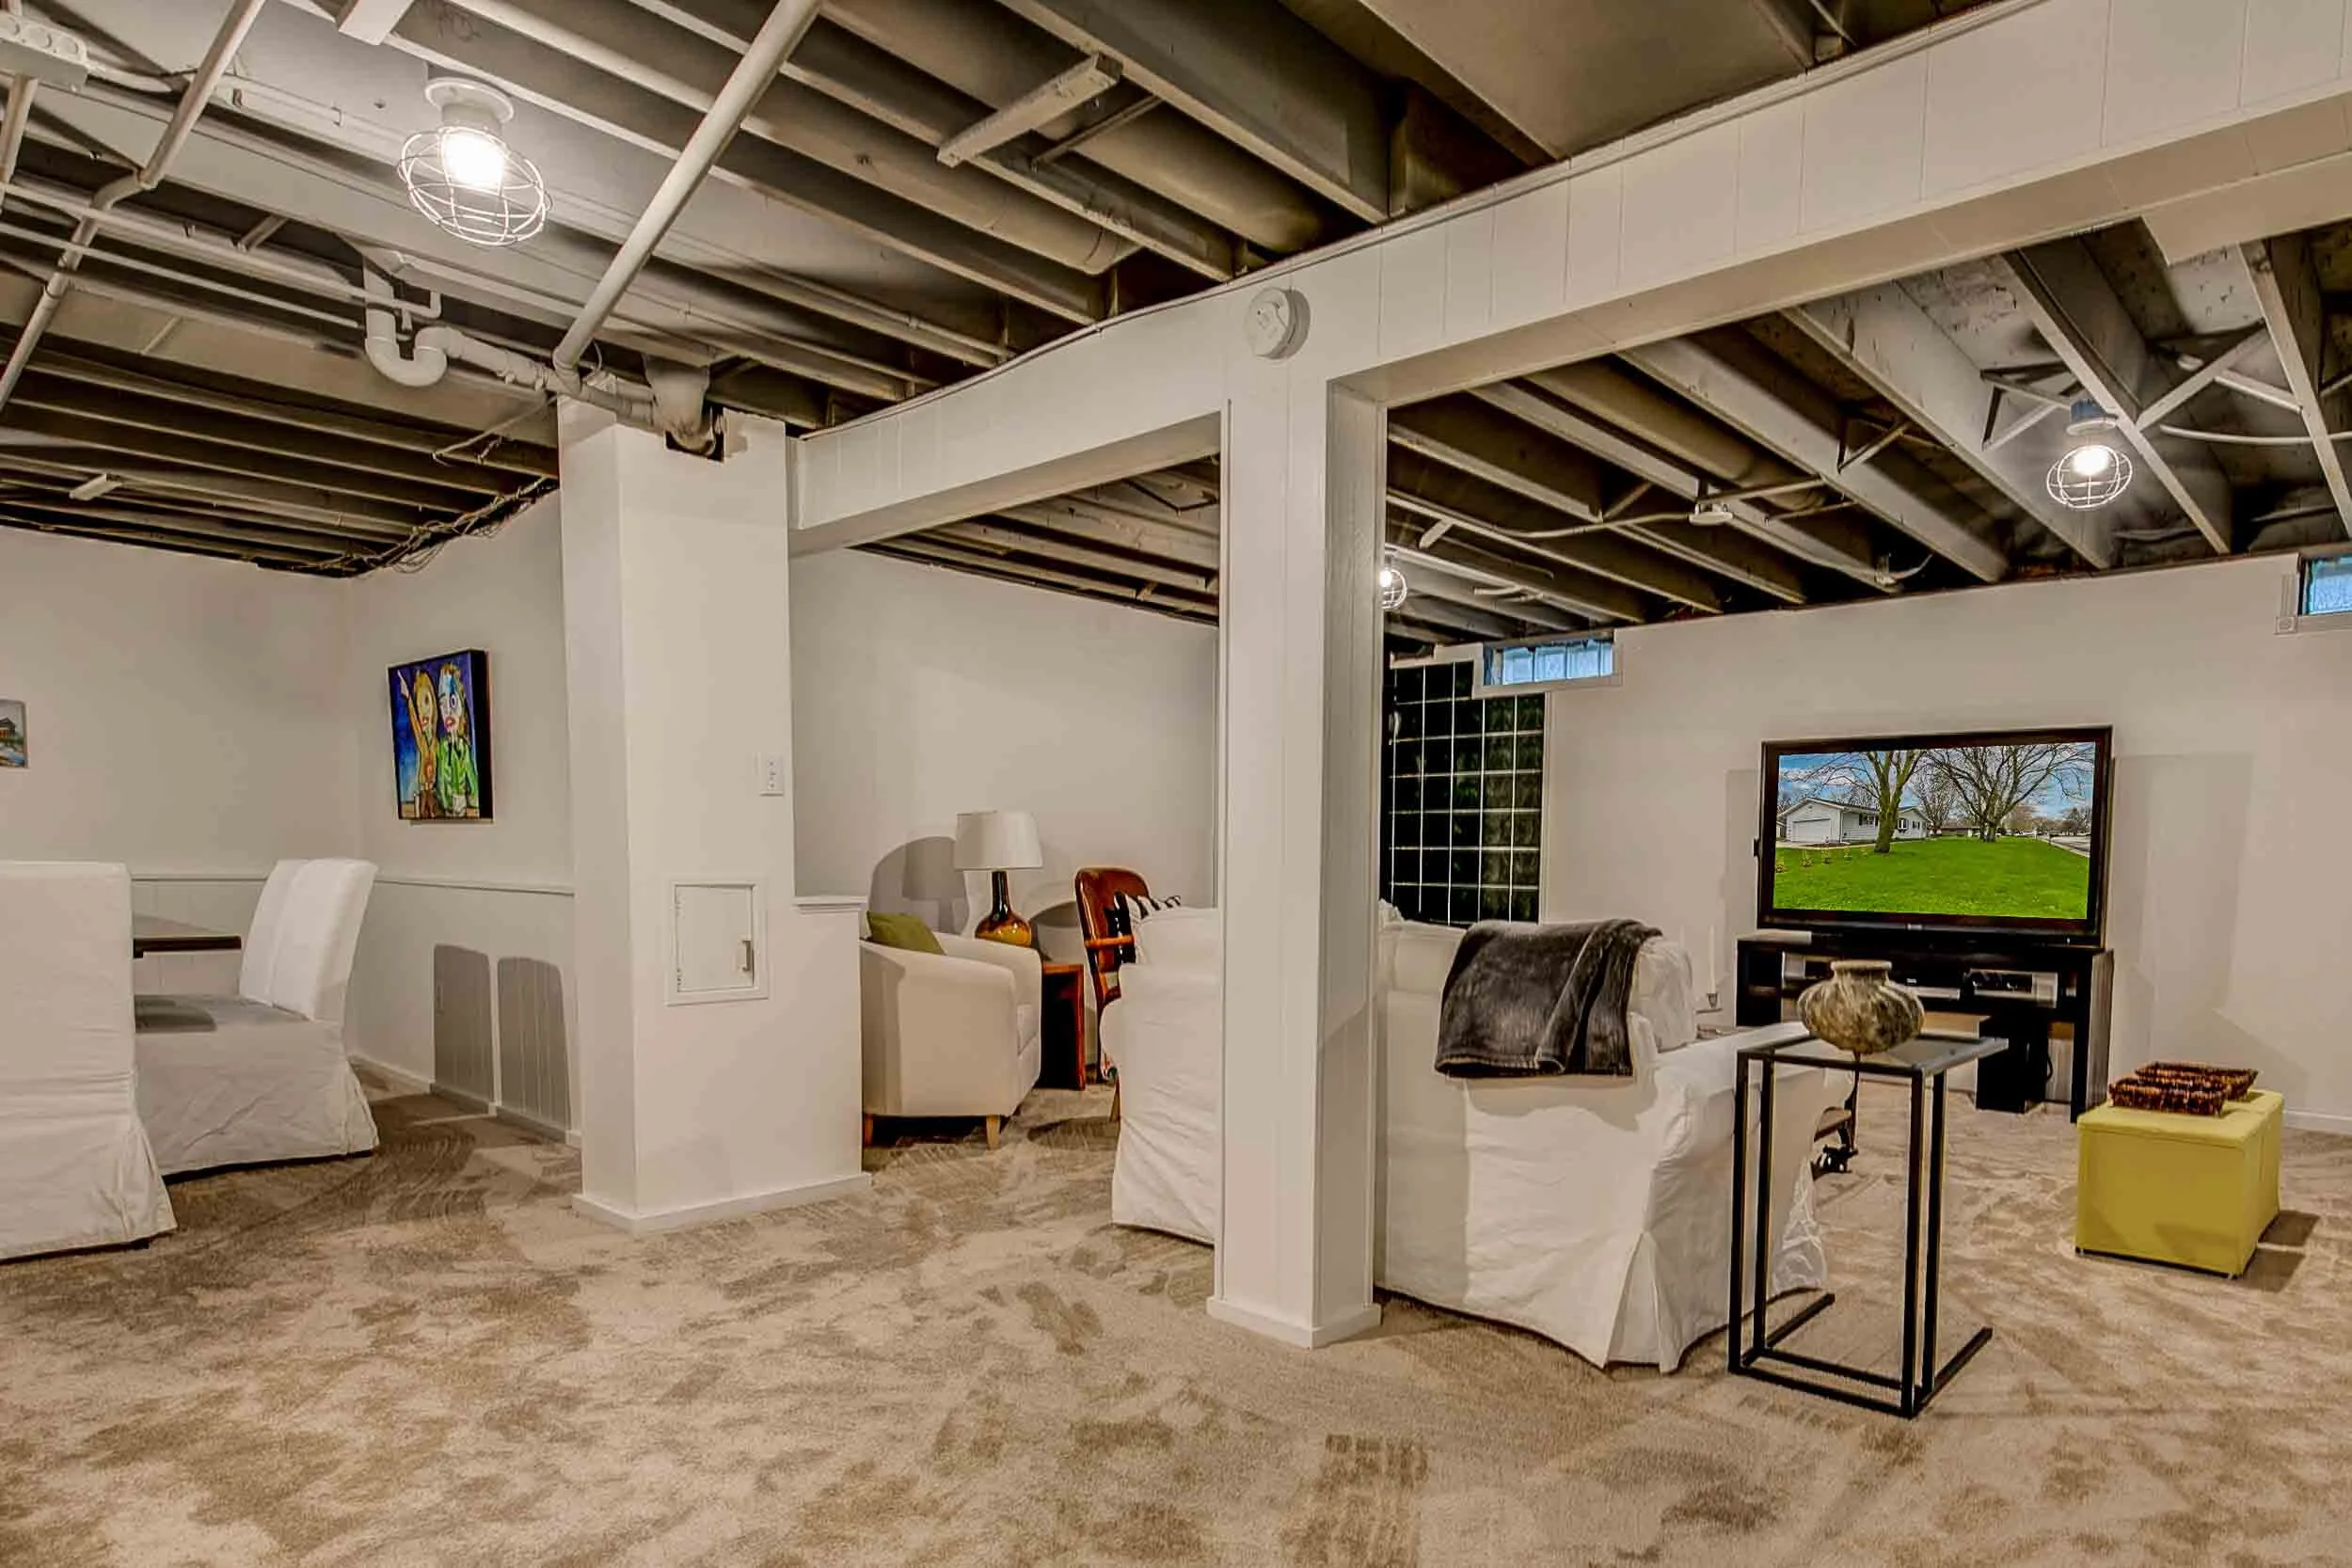
22. Achieve a Casual and Exposed Ceiling and Slipcovered Furniture
The relaxed, casual formula in this basement is about creating a bright, textured envelope: 70% light neutrals + 20% texture + 10% dark accents. The white walls and slipcovered furniture make up the vast majority of the visual space, creating a bright and airy feel. The texture comes from the exposed ceiling joists and the patterned carpet, which add depth and interest. The black window grids and the dark gray textile provide just enough dark contrast to ground the space and keep it from feeling washed out. This is a quieter, more casual version of the exposed ceiling in Idea #16.
|
📋 Copy HEX 🔗 Share |
Slipcovered furniture is a fantastic budget and family-friendly choice for a basement. You can often find high-quality used armchairs or sofas for a steal on Facebook Marketplace, and then purchase new, crisp white slipcovers from companies like Bemz or even Amazon to give them a fresh, unified look. This is far cheaper than buying new upholstered pieces. The best part? The covers are typically machine washable, which is a lifesaver in a casual, high-traffic space where spills are bound to happen.
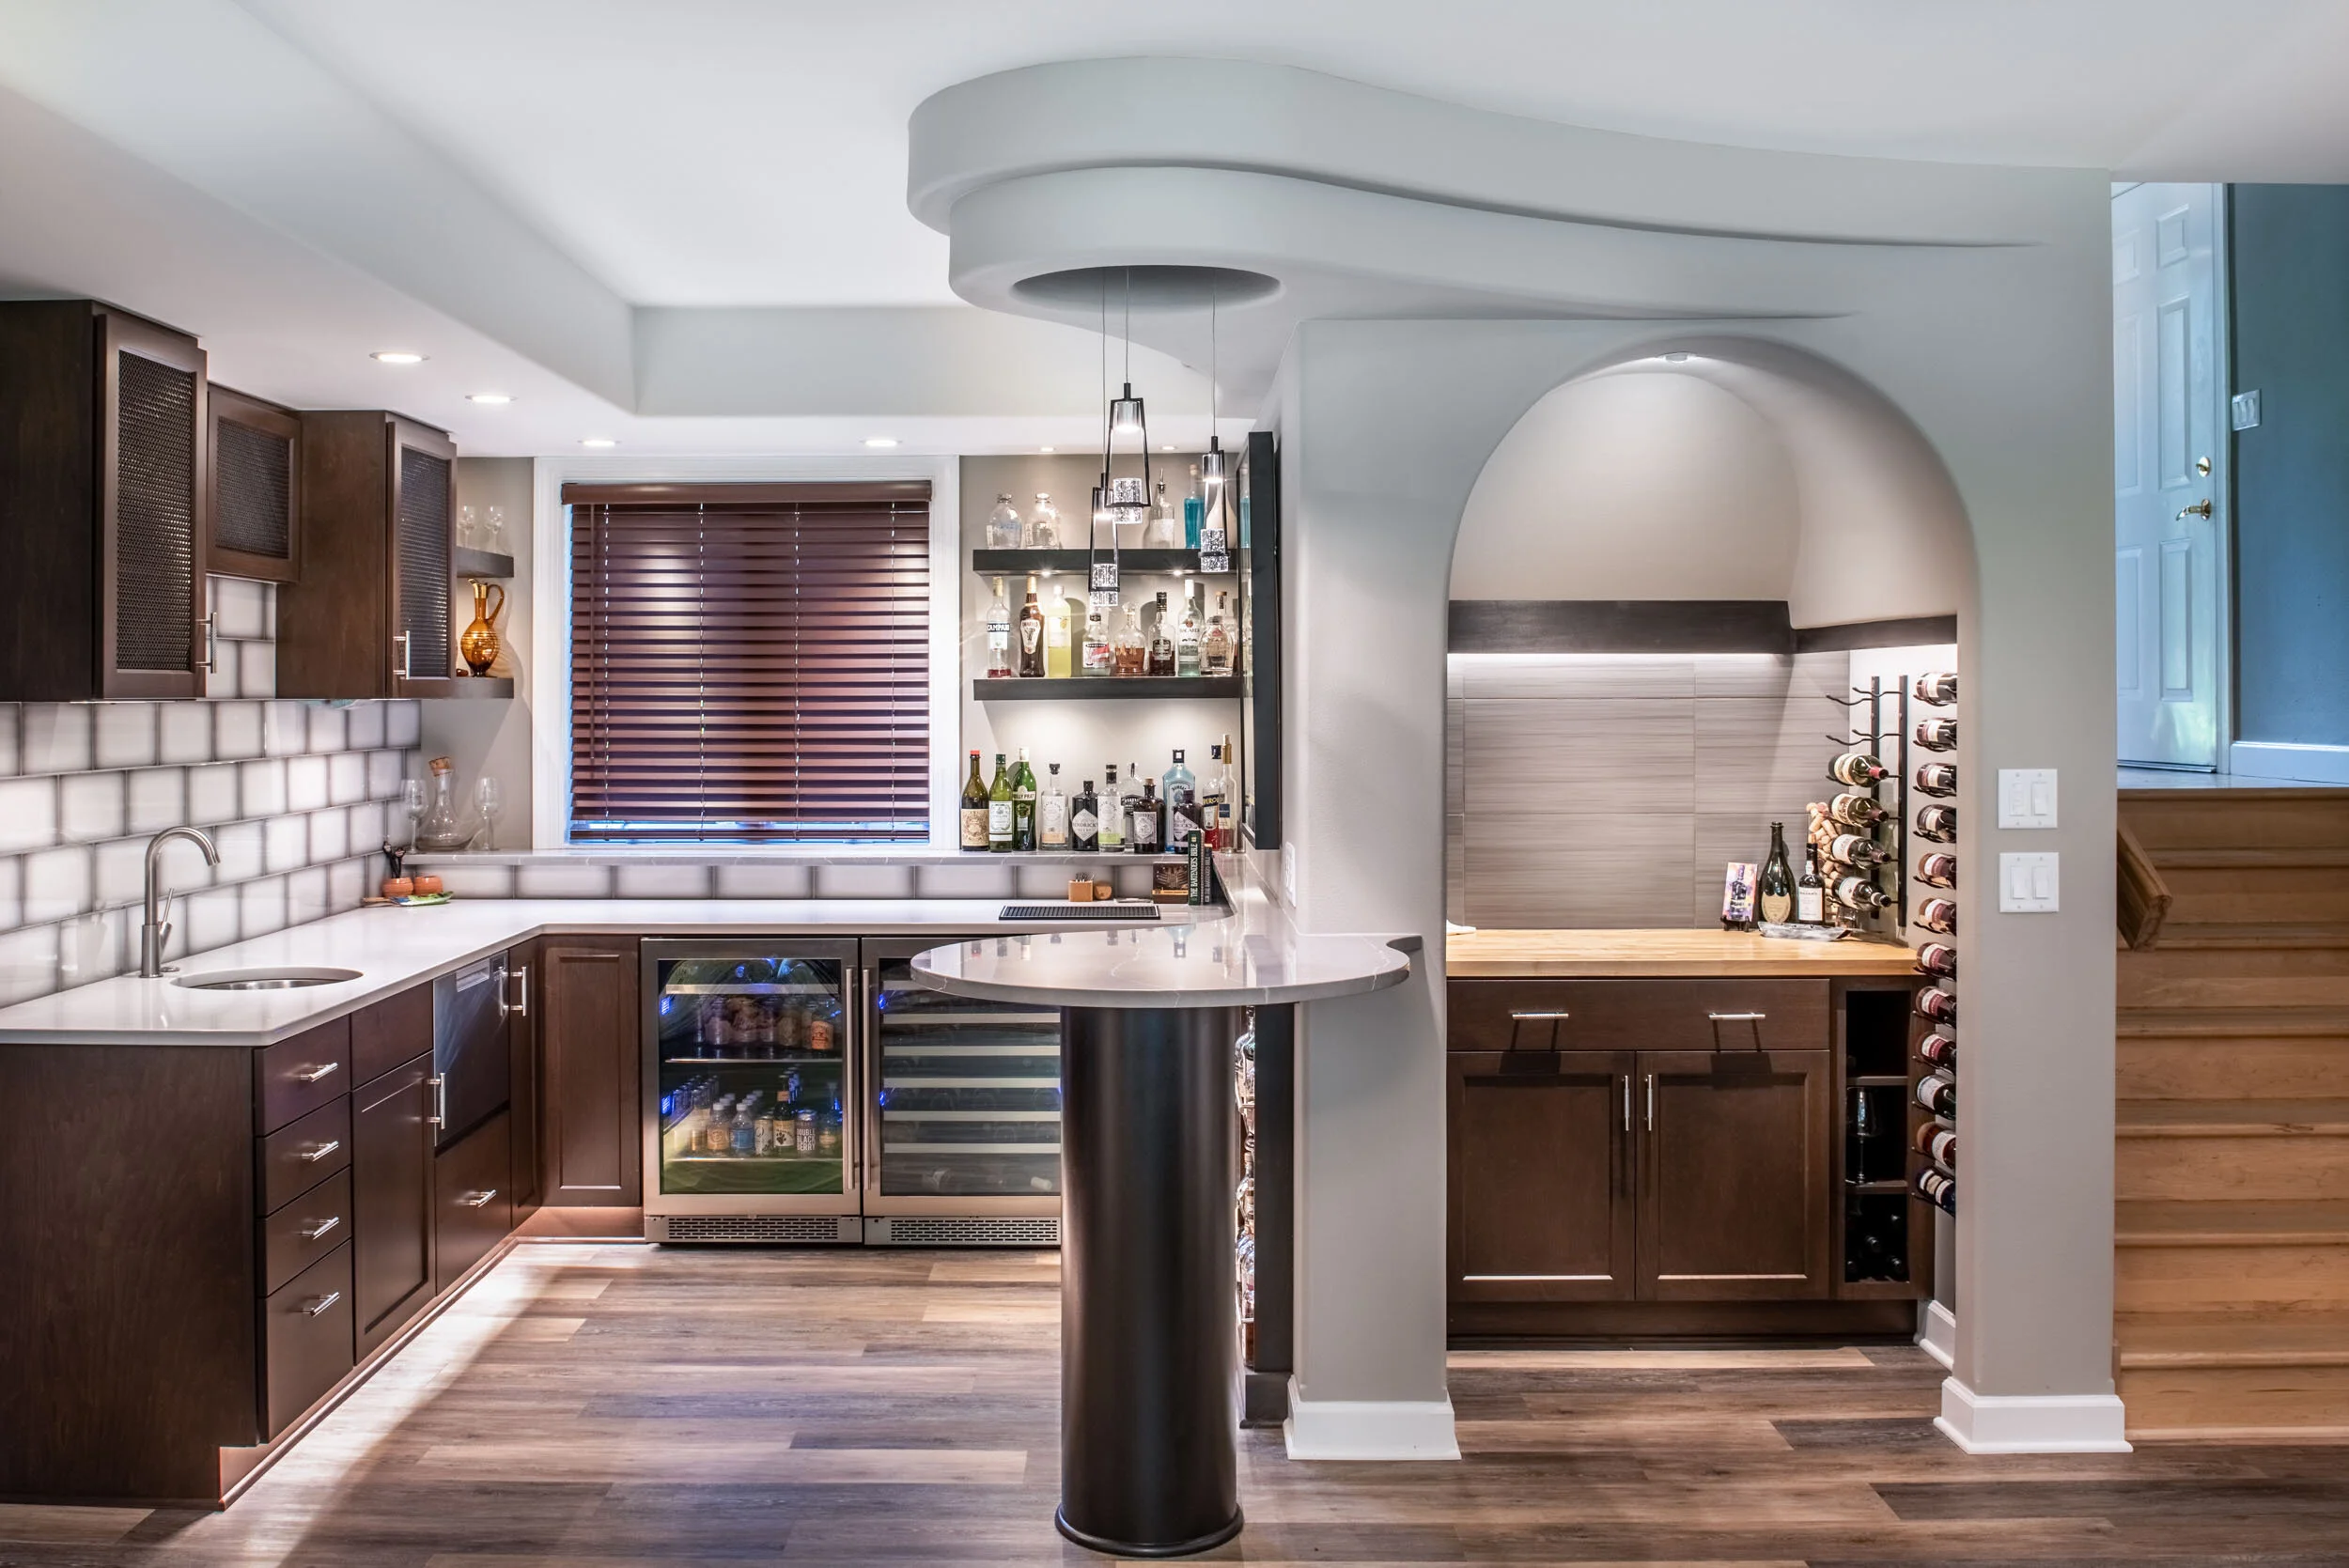
23. Install a Sophisticated Bar with a Sculpted Ceiling and Curved Wall
A full wet bar is a major project. Before you begin demolition, confirm these critical details:
|
📋 Copy HEX 🔗 Share |
- Plumbing Access: Locate your main drain and hot/cold water lines. The proximity and feasibility of tapping into these will be the biggest factor in your bar’s location and budget.
- Electrical Plan: Plan for more outlets than you think you need. Consider dedicated circuits for refrigerators, ice makers, and blenders. Don’t forget ambient and task lighting.
- Ventilation: While not always required for a simple wet bar, if you plan on any high-heat appliances or are concerned about humidity, consider how you will ventilate the space.
- Appliance Specs: Have the exact dimensions and power requirements for your under-counter fridges and dishwasher before the first cabinet is ordered.
When designing a U-shaped bar, pay close attention to the interior workspace dimensions. For one person to work comfortably, you need a minimum of 36 inches of clear floor space between the front and back counters. If you envision two people mixing drinks at the same time, you should aim for at least 42 to 48 inches. Anything less will feel cramped and create an awkward bottleneck, undermining the very function of your beautiful new bar.
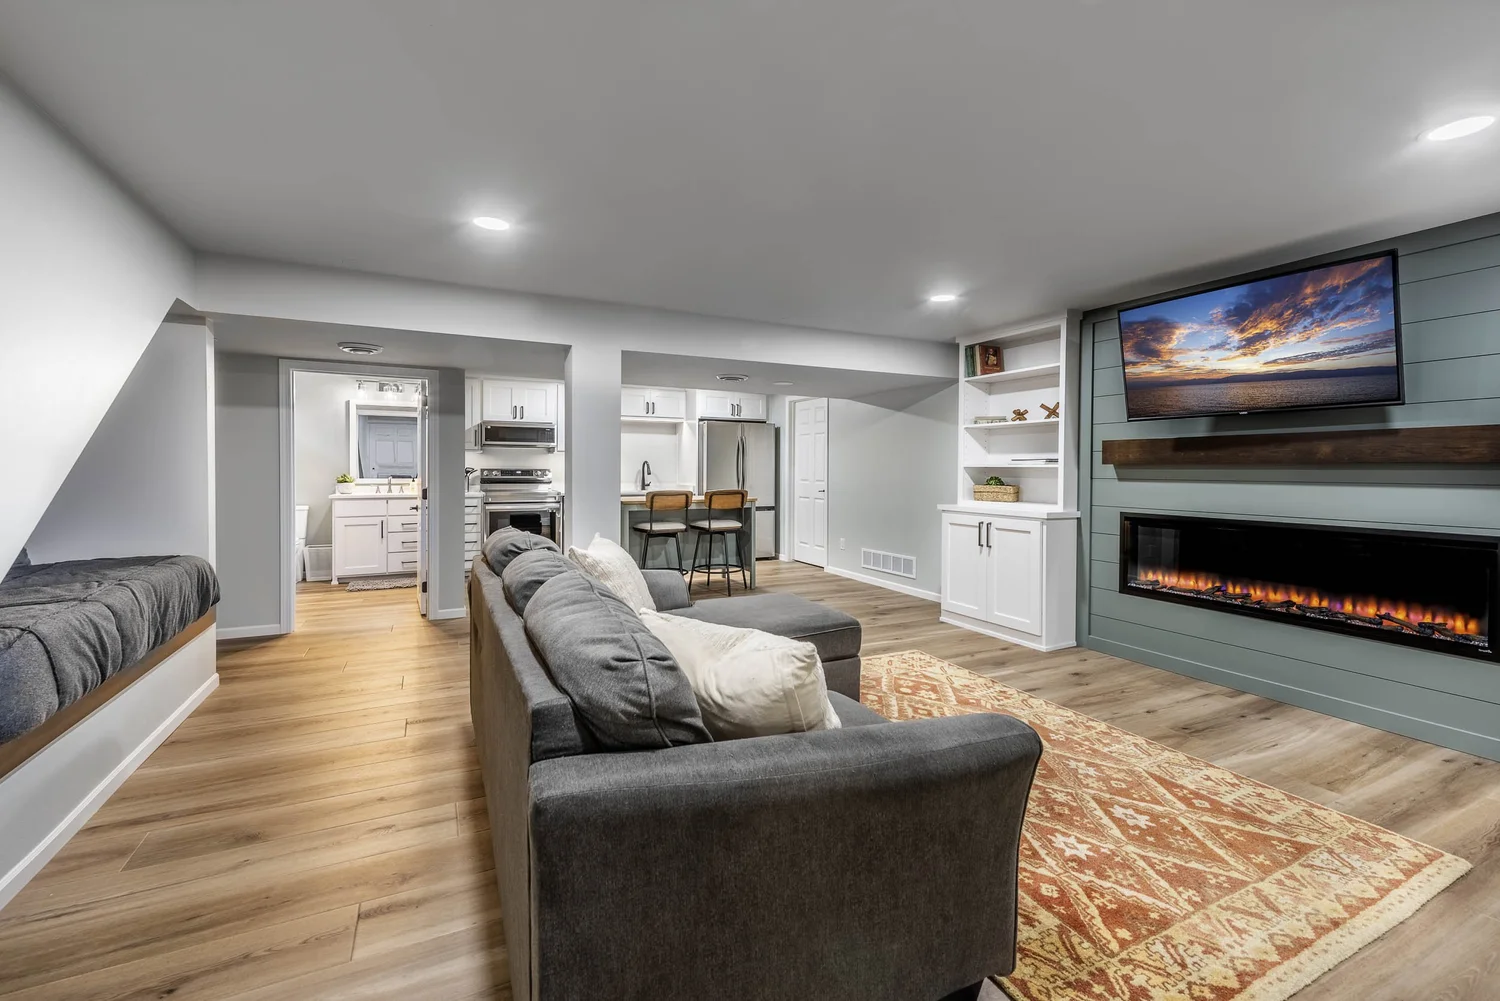
24. Integrate a Linear Fireplace into a Teal Shiplap Wall
The success of this open-plan layout comes down to the brilliant use of a feature wall. The living area is clearly anchored by the teal shiplap wall, which houses the TV and fireplace. This single, bold feature accomplishes three things: it provides a strong focal point, it injects a dose of vibrant color into the neutral space, and it functionally groups the media and heat source. By consolidating the room’s “main event” on one wall, the rest of the basement is free to be open and flexible, with clear sightlines to the kitchen and other areas.
|
📋 Copy HEX 🔗 Share |
Here’s a quick-start guide to installing a shiplap accent wall. Time: 1 weekend. Cost: $200-$500 for a typical wall.
- Measure your wall to determine the square footage and purchase 10% extra shiplap for cuts and mistakes.
- Find and mark the studs in your wall using a stud finder. This is where you’ll nail the boards.
- Paint the wall a dark color similar to your shiplap finish. This hides any small gaps that might show through.
- Starting from the bottom, use a level to install your first board, nailing it into the studs.
- Continue working your way up the wall, locking each new board into the one below it. Stagger your seams for a professional look.
- Cut boards to fit around outlets or other obstacles. Finish the job with trim if desired.
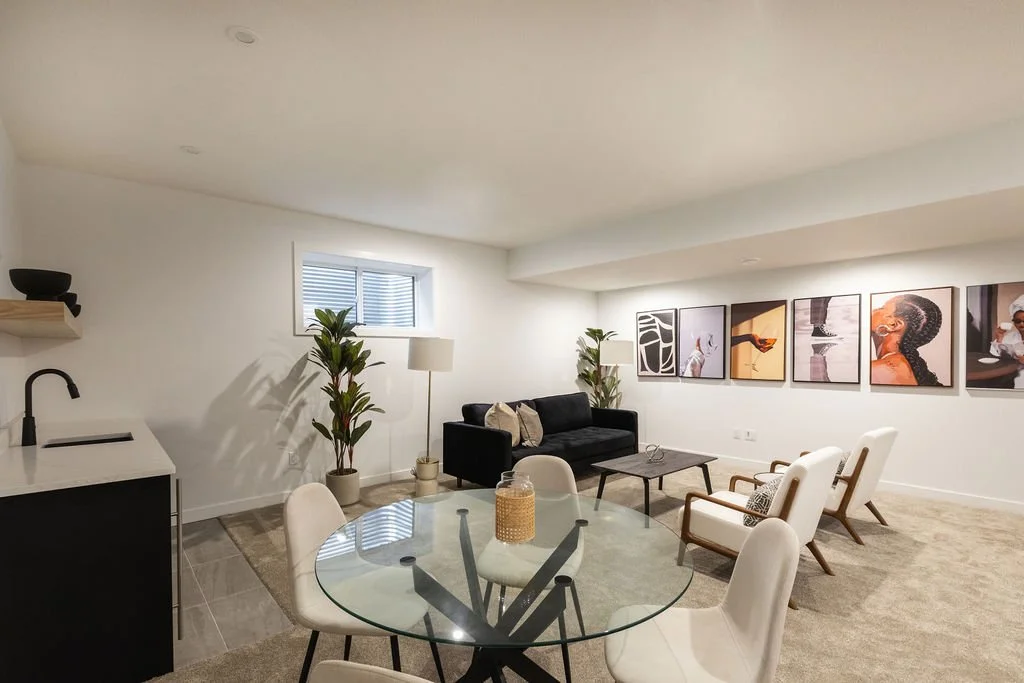
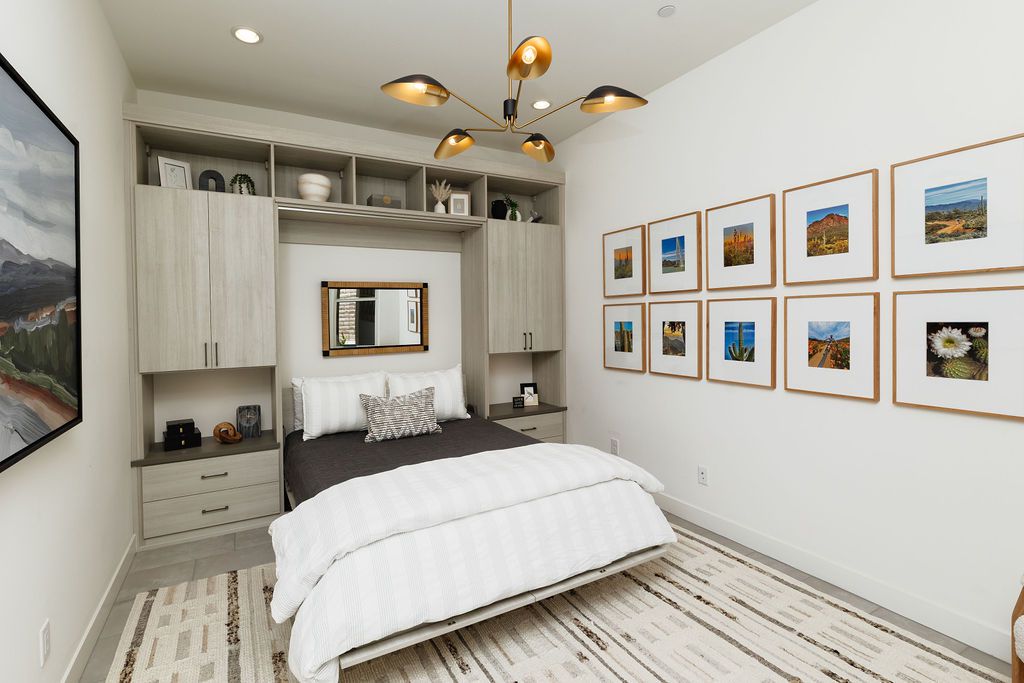
25. Design a Compact Bedroom Around an Integrated Storage Wall and Gallery
The single most important element in this room is, without a doubt, the gallery wall. In a compact, functional space dominated by the large, monolithic storage unit, the gallery wall provides all the soul and personality. It transforms the room from a mere sleeping-and-storage box into a personal sanctuary. The curated desert photos add warmth, color, and a sense of wanderlust. Removing them would leave the room feeling sterile and utilitarian, robbing it of its most human and interesting feature.
|
📋 Copy HEX 🔗 Share |
This is a brilliant solution for a very small bedroom, especially one in a basement where you might not have space for a separate closet. The idea works best for rooms under 120 square feet. It requires one clear wall at least 10-12 feet long to accommodate a queen-sized bed and integrated side storage. By building storage vertically around the bed, you eliminate the need for a separate dresser and closet, freeing up precious floor space and making a tiny room feel incredibly efficient and uncluttered.
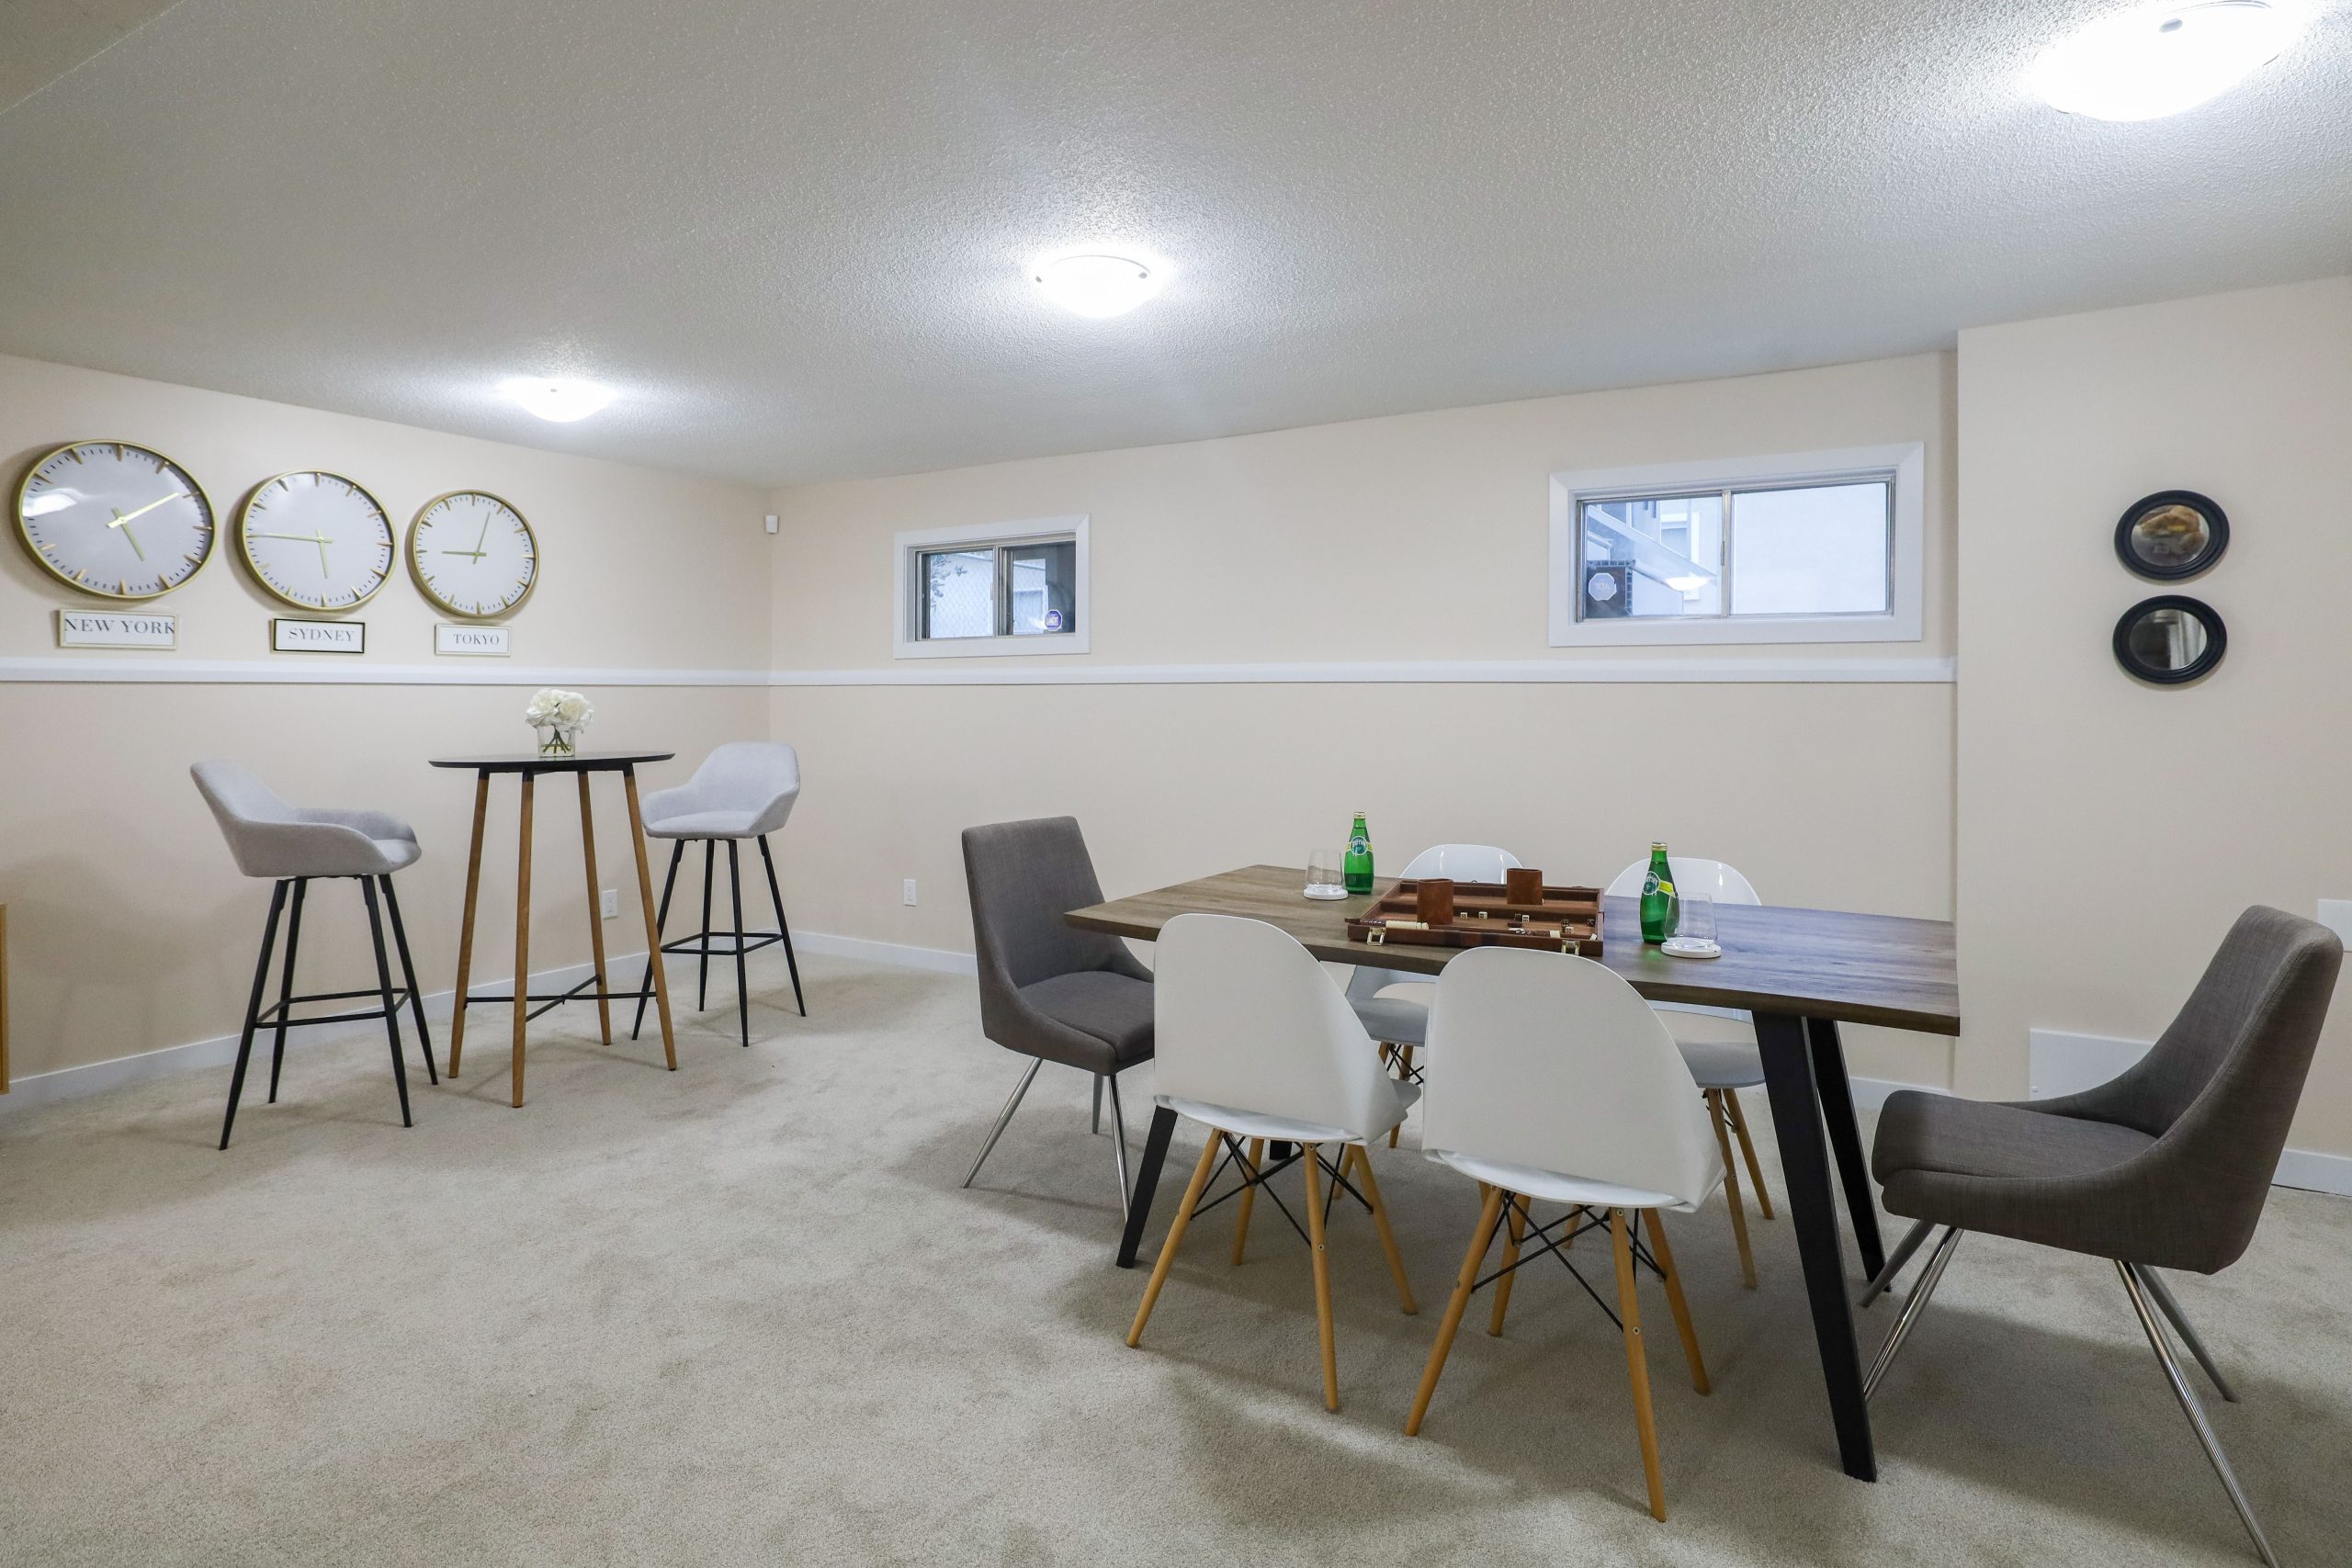
26. Mix and Match Seating in a Casual Dining and Bar Area
This space proves you don’t need a perfectly matched set of furniture to create a stylish, functional area. The design works because it embraces a “collected” look. The mix of white Eames-style chairs and gray upholstered chairs around the main dining table adds visual interest and a relaxed, informal feel. This is echoed in the separate bar area with its different style of stools. The look is held together by a tight color palette—sticking to shades of beige, white, gray, and black—which ensures that even with the varied furniture styles, the space feels cohesive and intentional.
|
📋 Copy HEX 🔗 Share |
Creating this eclectic look is often more budget-friendly than buying a full dining set. Here’s a possible breakdown for a similar setup:
- Dark wood dining table: $300 – $700
- Mixed-and-matched dining chairs (4-6 total): $400 – $900
- Small bar table and two stools: $250 – $600
- Wall decor (clocks, art): $100 – $300
- TOTAL: $1,050 – $2,500
Budget alternative: Source all items separately from Facebook Marketplace, thrift stores, and Target to achieve the look for under $700.
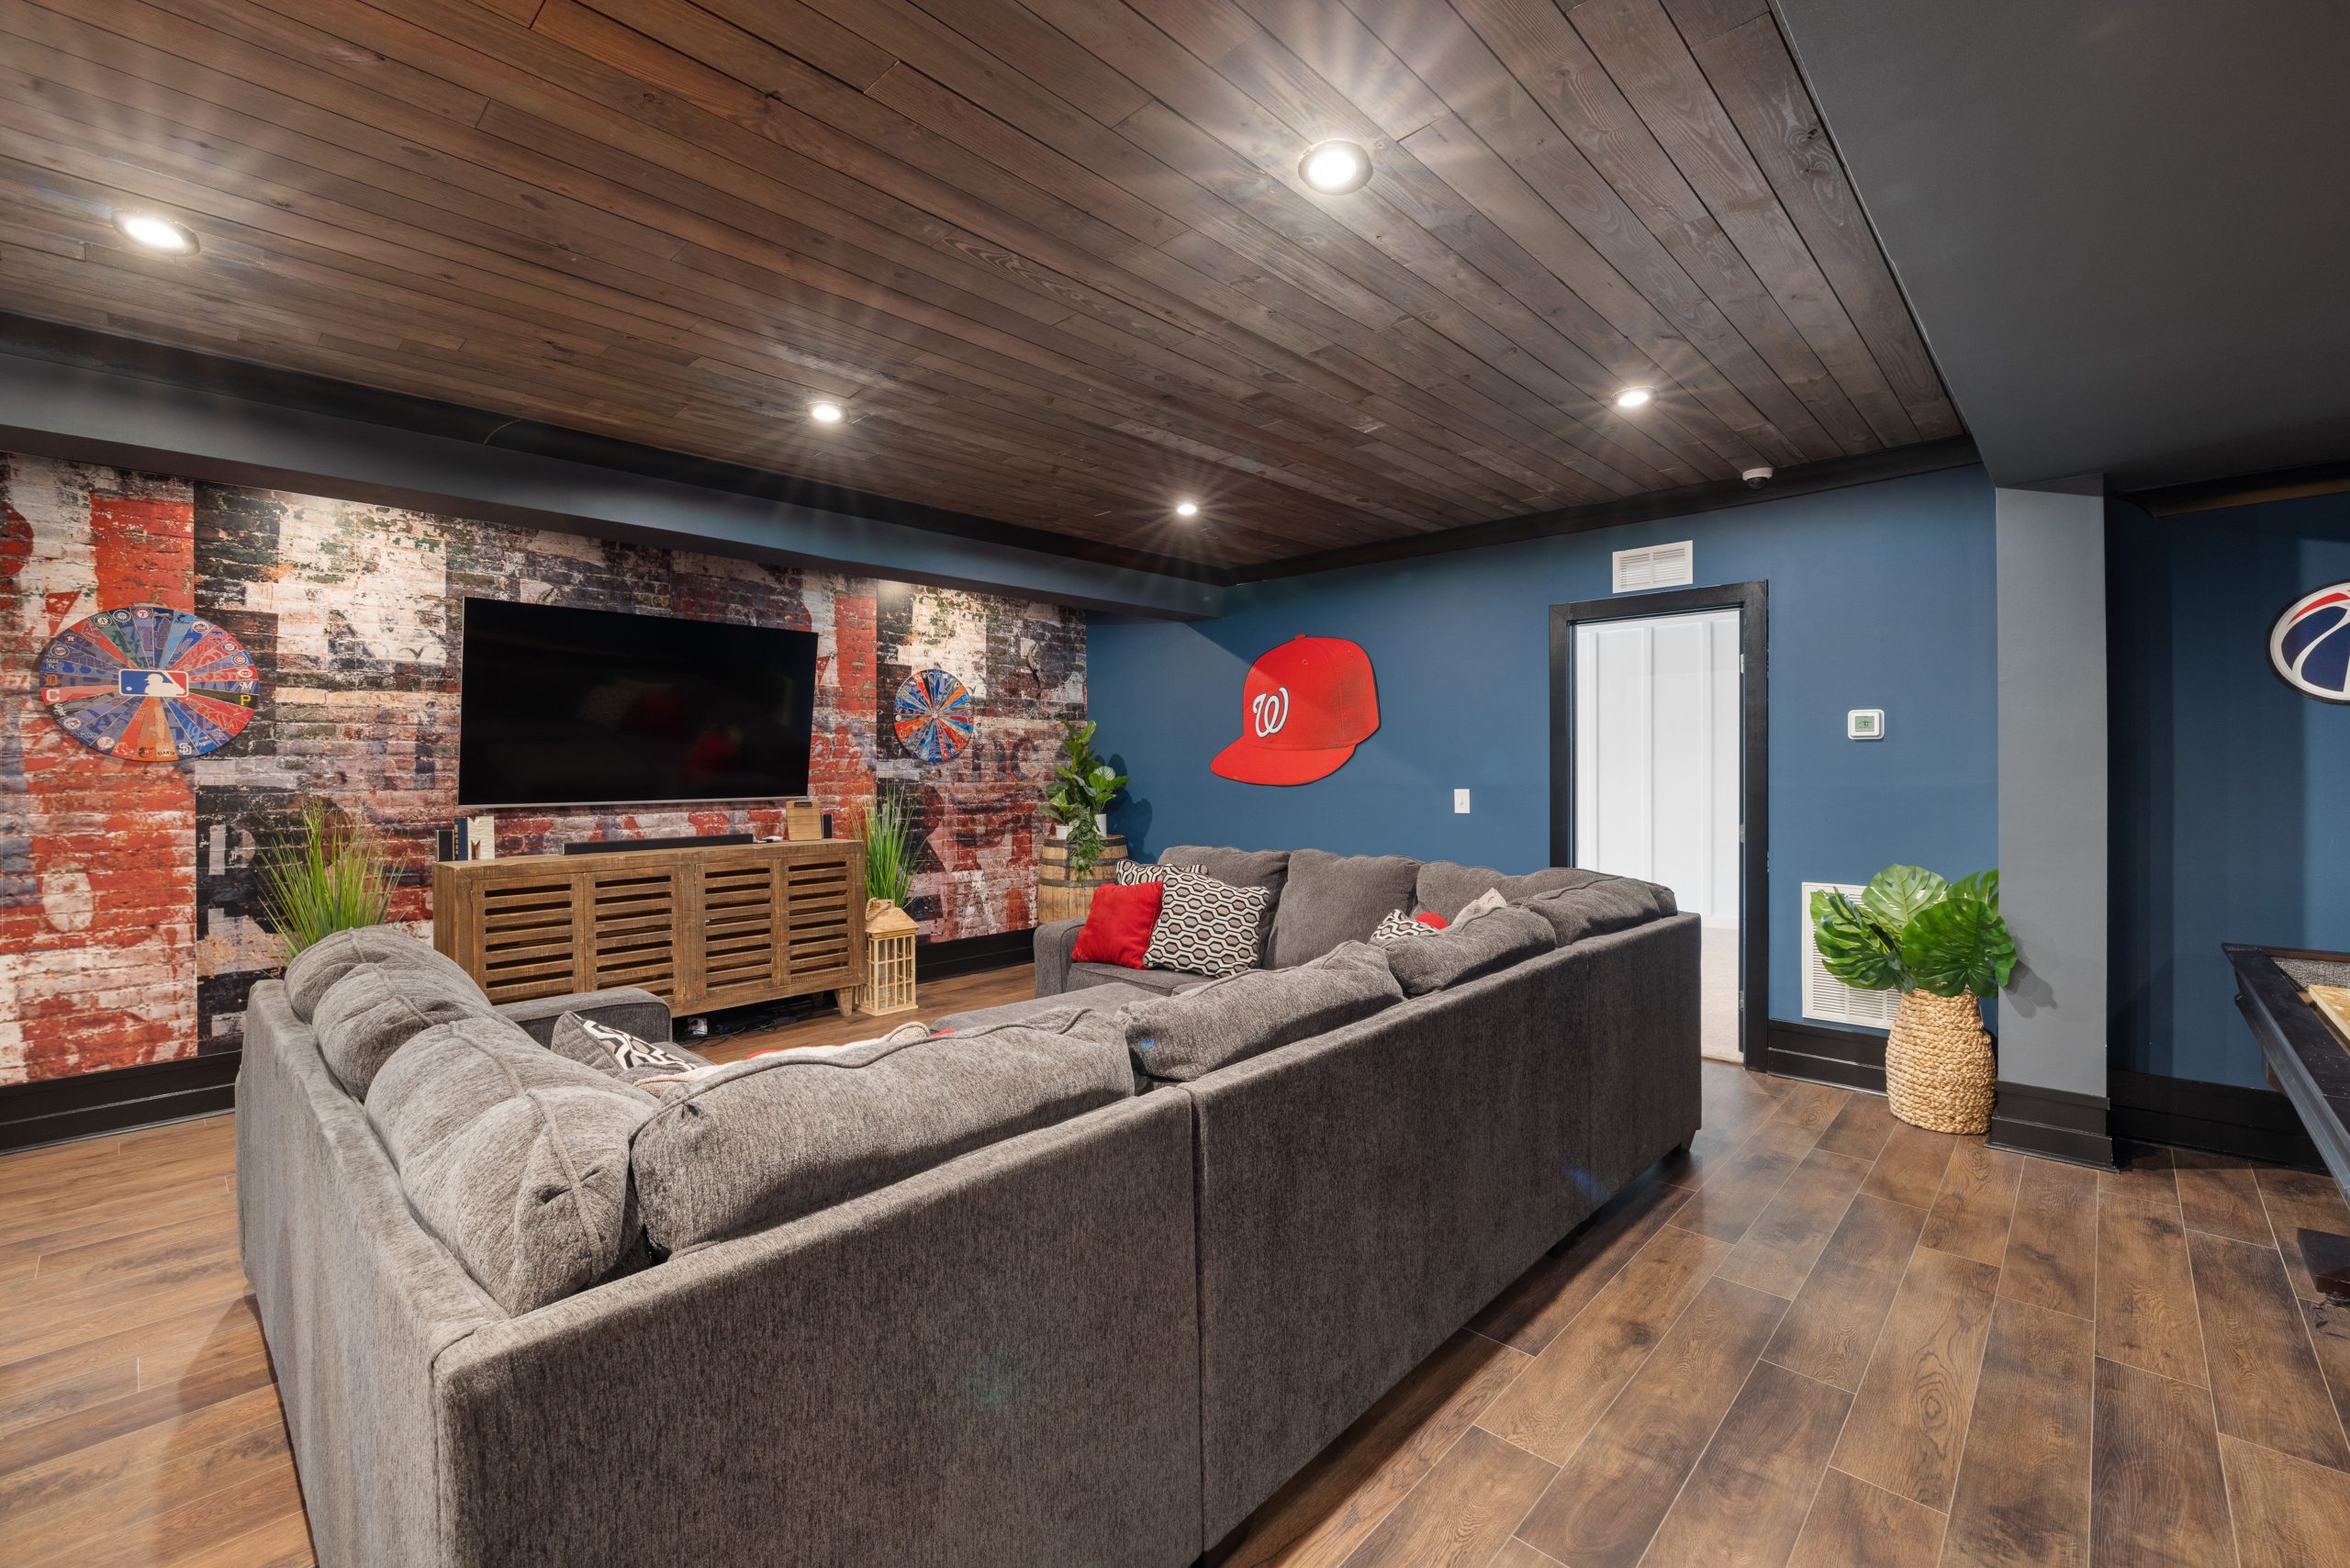
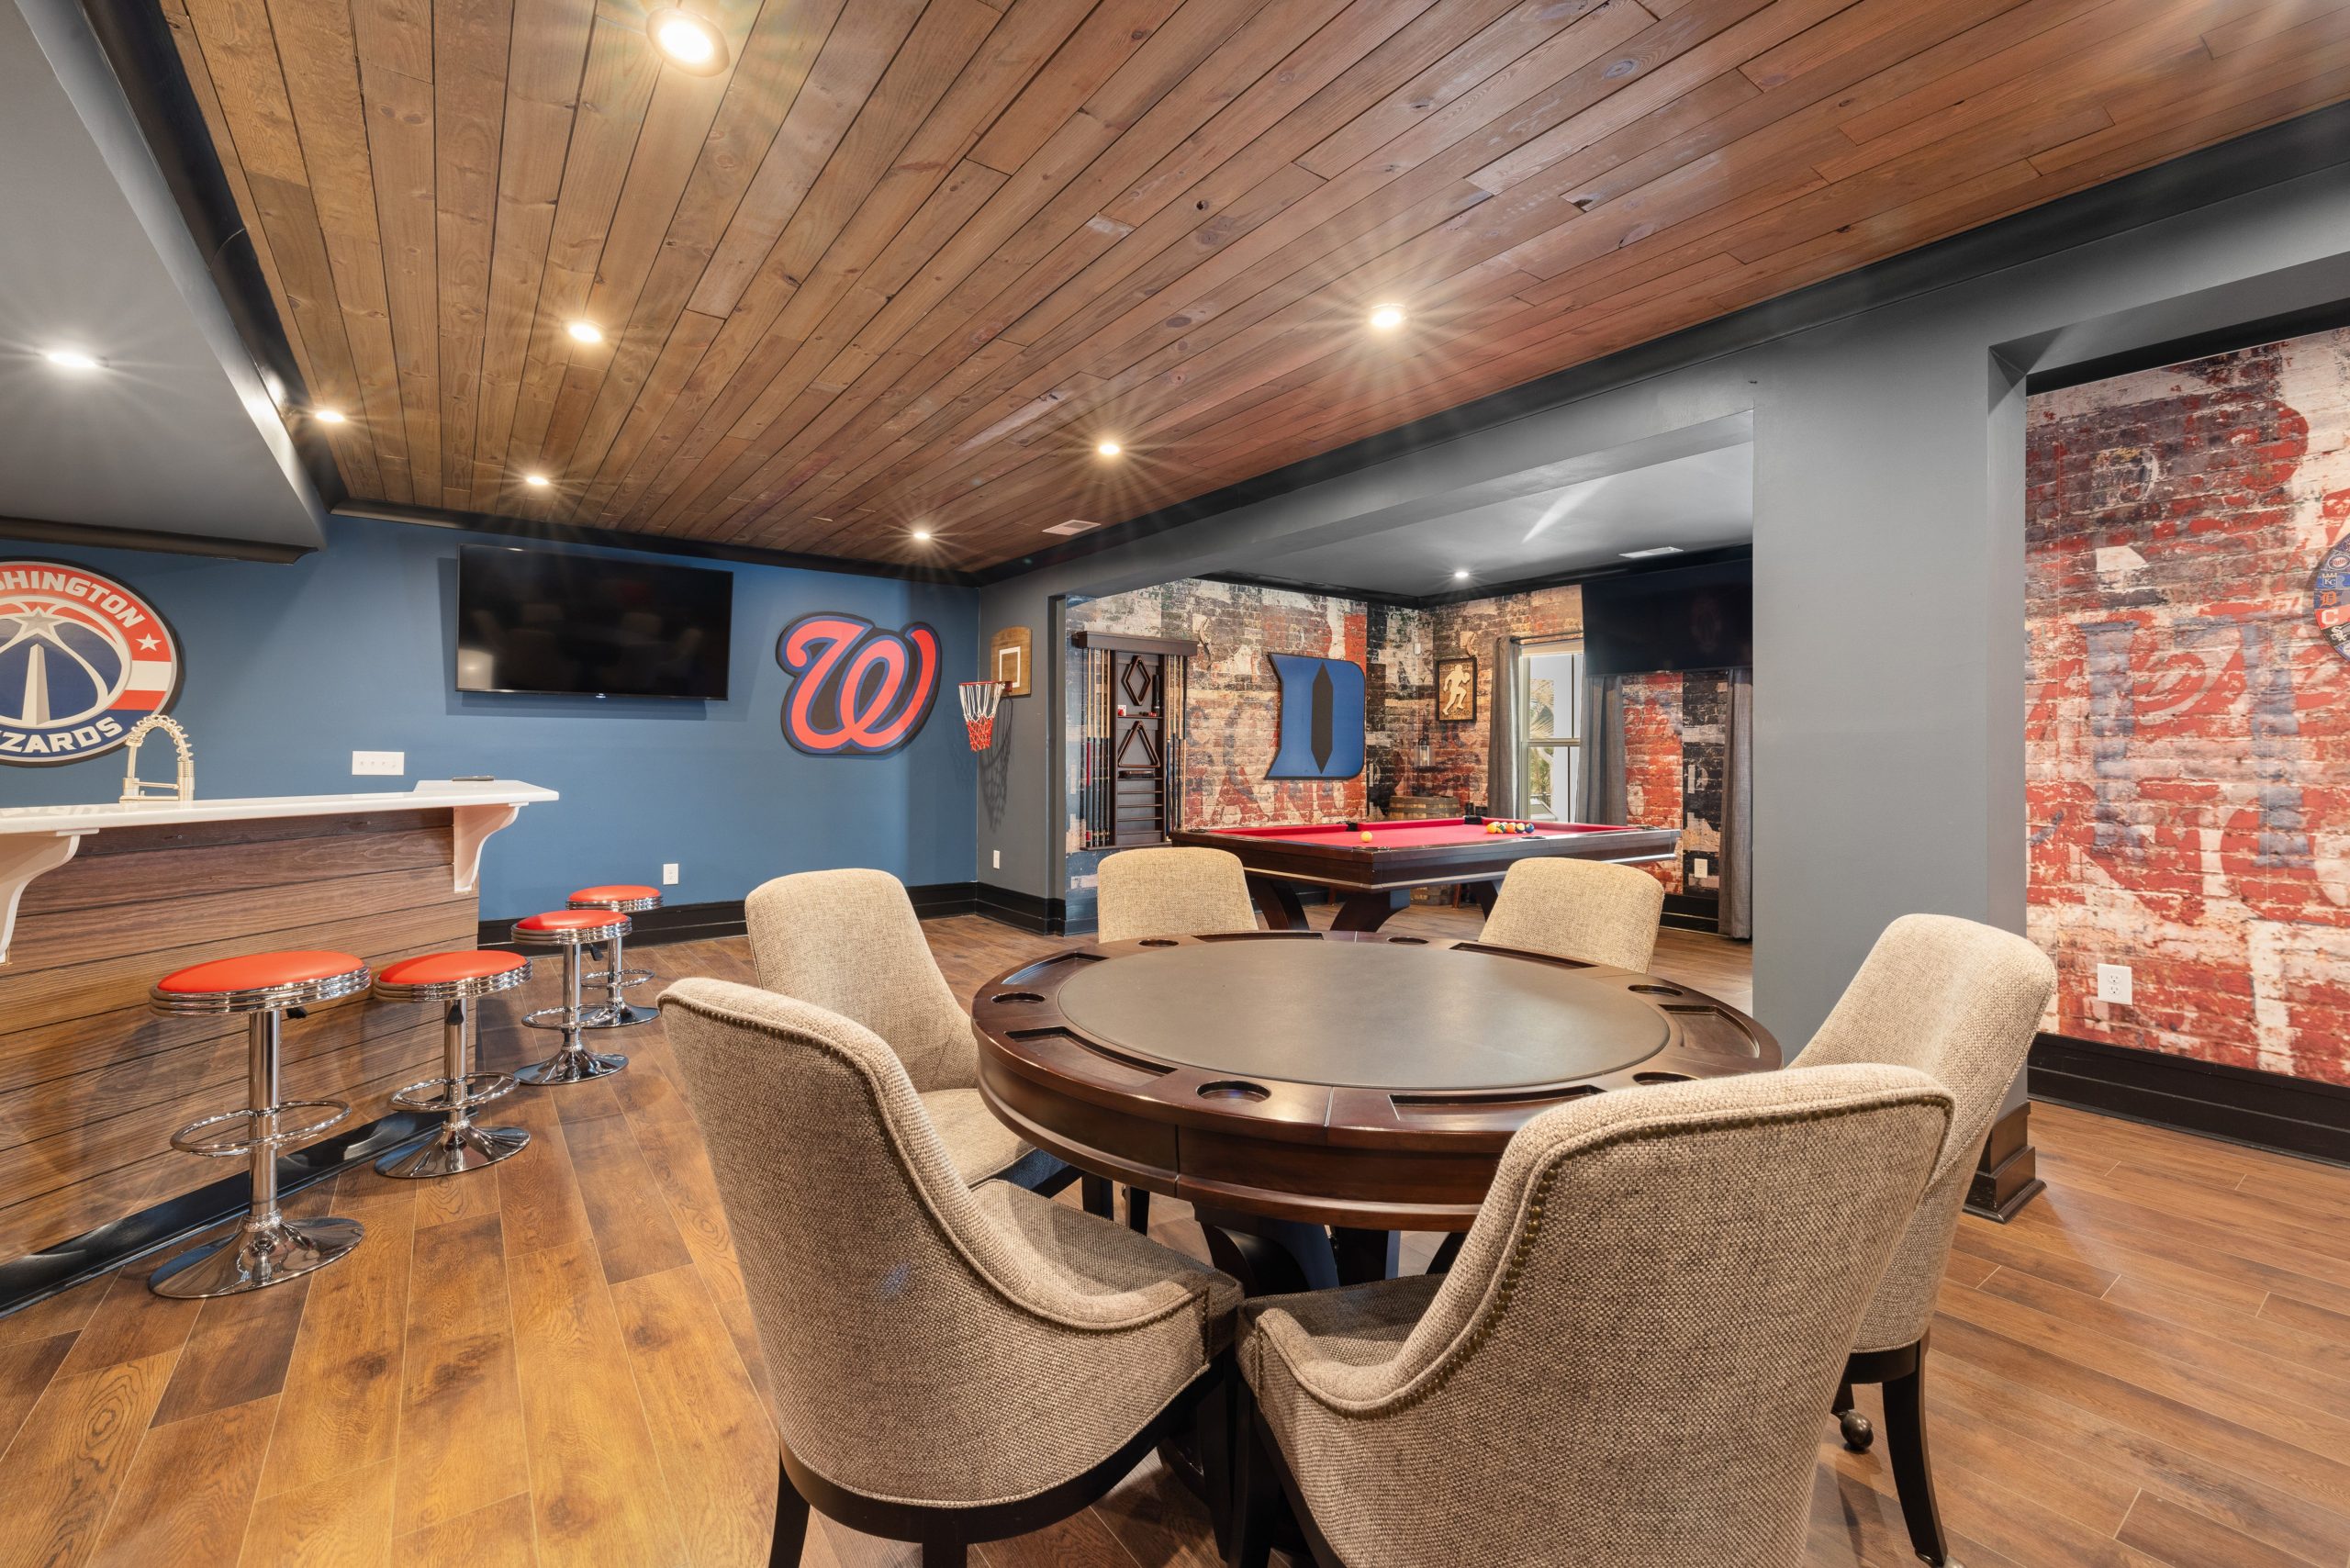
27. Go All-In on a Game Room with a Wood Ceiling and Brick Accents
The bold, unapologetic use of color is what makes this game room so successful. While the brick and wood provide a classic, rustic pub-like foundation, it’s the strategic injection of vibrant red and deep blue that gives the space its energy. The red bar stools, the red felt on the pool table, and the massive blue accent wall all signal that this is a room for fun and entertainment. Taking away the color would leave a handsome but generic basement; the color is what gives it its specific, playful personality. Compare this to the more subdued tones in Idea #28.
|
📋 Copy HEX 🔗 Share |
A basement game room is a fantastic idea, but think about the noise. The sounds of a lively poker game, clacking pool balls, and cheering during a sports match can easily travel up to the main levels of the house. If you’re planning a space like this, investing in sound insulation is not a luxury—it’s a necessity for household peace. Consider adding sound-dampening insulation in the ceiling joists before installing the wood planks, and use solid-core doors to help contain the noise within the room.
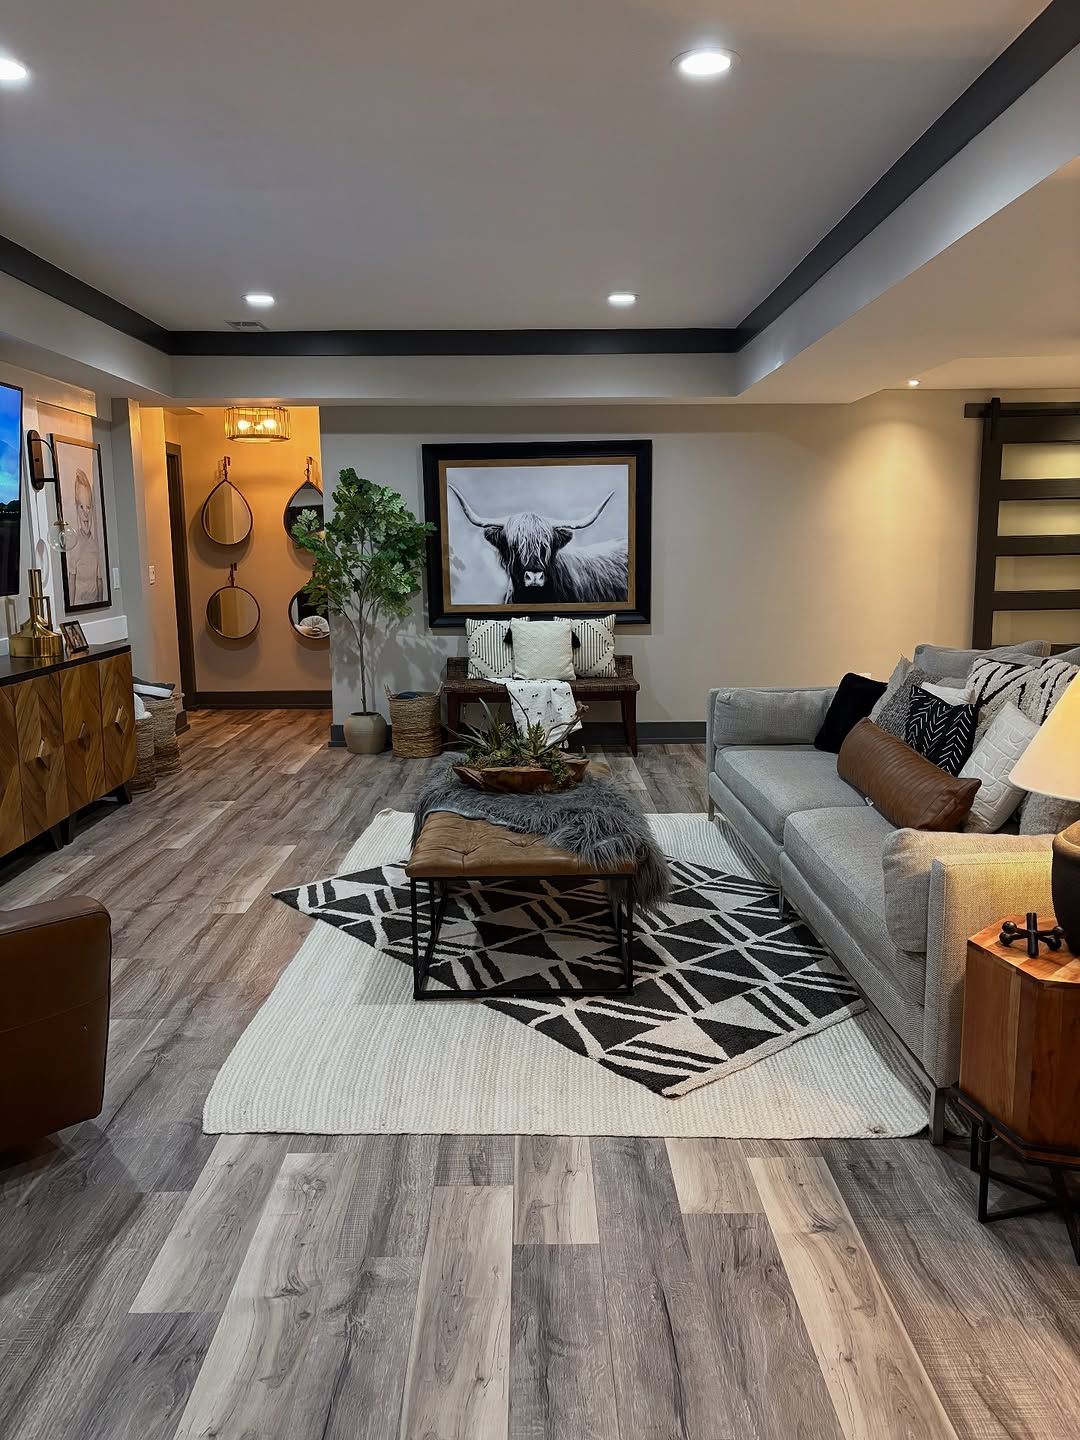
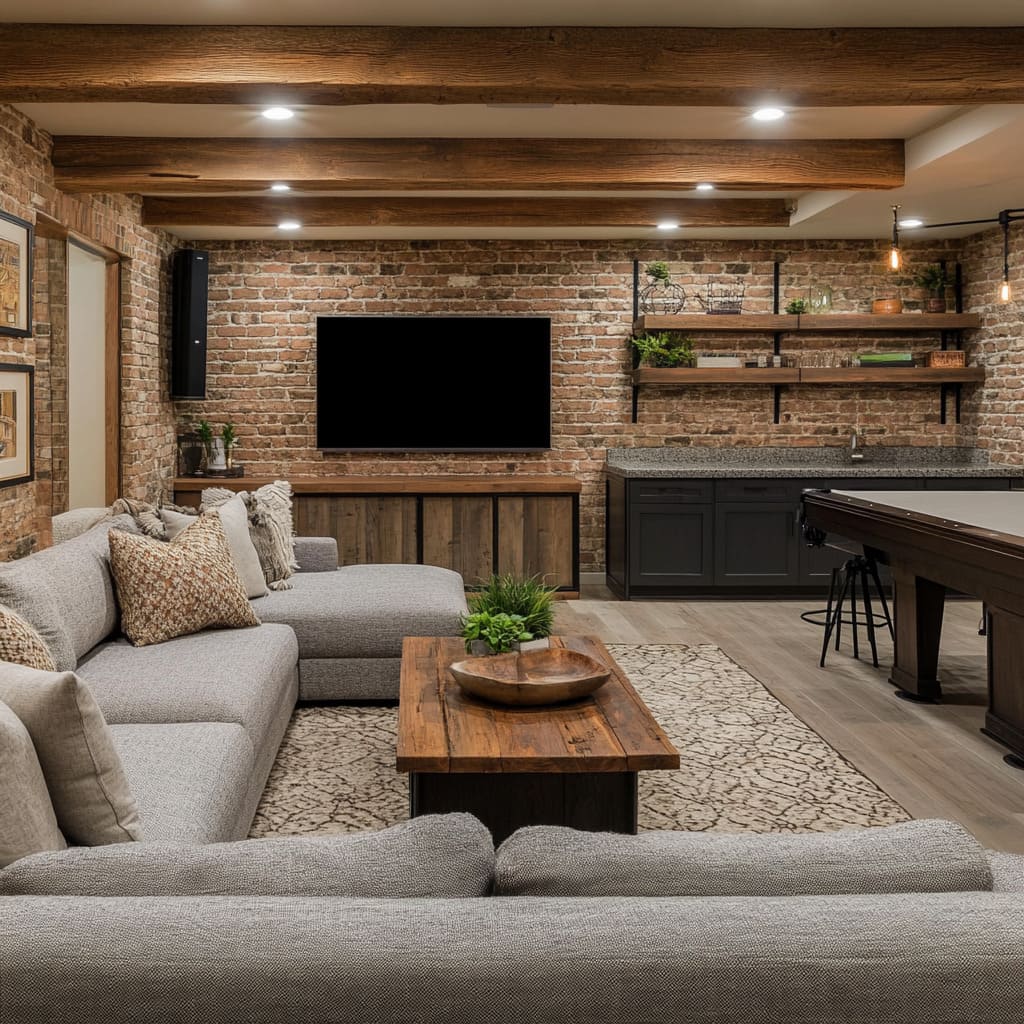
28. Create a Rustic Industrial Hangout with Exposed Brick and Beams
This room nails the rustic-industrial aesthetic by committing fully to its core materials: brick and wood. The rough texture of the exposed brick walls provides a powerful, historic backdrop that is beautifully complemented by the dark wooden beams on the ceiling. This creates a warm, textured envelope for the entire space. The modern, clean lines of the large grey sectional sofa provide a necessary contrast, preventing the room from looking like a period re-enactment. It’s the balance between the rough, rustic shell and the comfortable, modern furnishings that makes it work.
|
📋 Copy HEX 🔗 Share |
Exposed brick walls are beautiful but require specific care. They are porous and can be prone to efflorescence (a white, powdery mineral deposit) if there are any moisture issues in the basement—a common concern. It’s crucial to seal the brick with a good-quality matte-finish sealant to prevent this and to make it easier to clean. Dusting the rough surface can also be a chore; a vacuum with a soft brush attachment is the most effective tool. While stunning, it is a higher-maintenance finish than a simple painted wall.
Your Basement’s Next Chapter Awaits
A basement doesn’t have to be an afterthought. As these 28 ideas show, it can be a thoughtfully designed, functional, and beautiful part of your home. Whether you’re dreaming of a cozy media lounge, a functional studio apartment, or a full-blown entertainment zone, the right plan can turn a dark space into a destination.
Feeling inspired? Take another look at your favorite ideas, and start a new Pinterest board for your own project. It’s time to stop scrolling and start creating the basement you’ve always wanted.