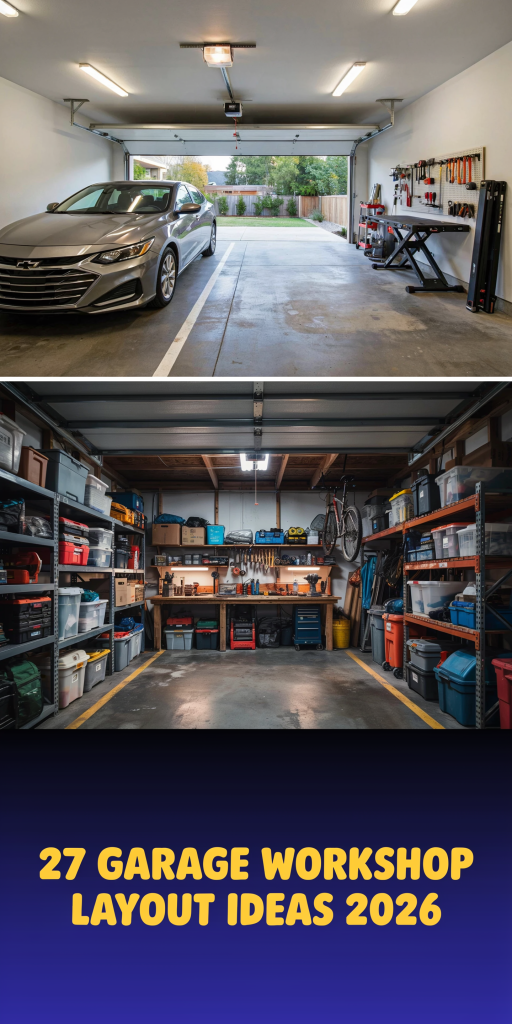
You know that feeling when you finally scroll past the hundredth garage photo and land on the one that just clicks? The layout that just clicks? Finding garage workshop ideas that are more than just a messy workbench can feel impossible. We spent serious time filtering through hundreds of real-home workshops to find layouts that actually work. Across these 27 ideas, you’ll discover inspiration for every style—from clean and modern setups to rustic woodworking havens and ultra-functional utilitarian spaces. With more people than ever turning hobbies into side hustles from home, a well-designed workshop is no longer a luxury—it’s the command center for creativity in 2026. And stay until the end — we break down the most common mistakes that can ruin these looks. 📌 Save this to Pinterest for later — you’ll want to revisit these ideas.
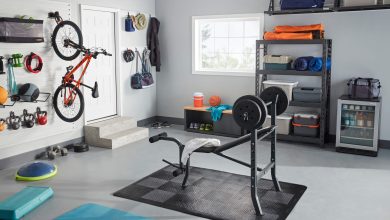
1. Maximize Headroom with Bright, Organized Overhead Storage
This layout is a masterclass in using vertical space. By installing sturdy overhead metal racks, the design keeps the entire floor clear, which is a game-changer in any garage. The bright, light-colored walls prevent the space from feeling crowded by the extensive shelving and reflect the natural light from the multiple windows. The combination of overhead racks for bulky items and wall-mounted shelves for smaller things creates a visual hierarchy that makes the organization feel intentional and straightforward to navigate.
|
📋 Copy HEX 🔗 Share |
This approach is perfect for a standard two-car garage, roughly 20×20 feet or larger. You need a ceiling height of at least 9 feet to comfortably fit storage racks above the garage door tracks and still have usable space. For single-car garages, this much overhead storage might feel overwhelming; a more focused wall-mounted system like the one in Idea #5 would be a better fit. This design is truly for those who need to store a lot without sacrificing a parking spot or a clear work area.
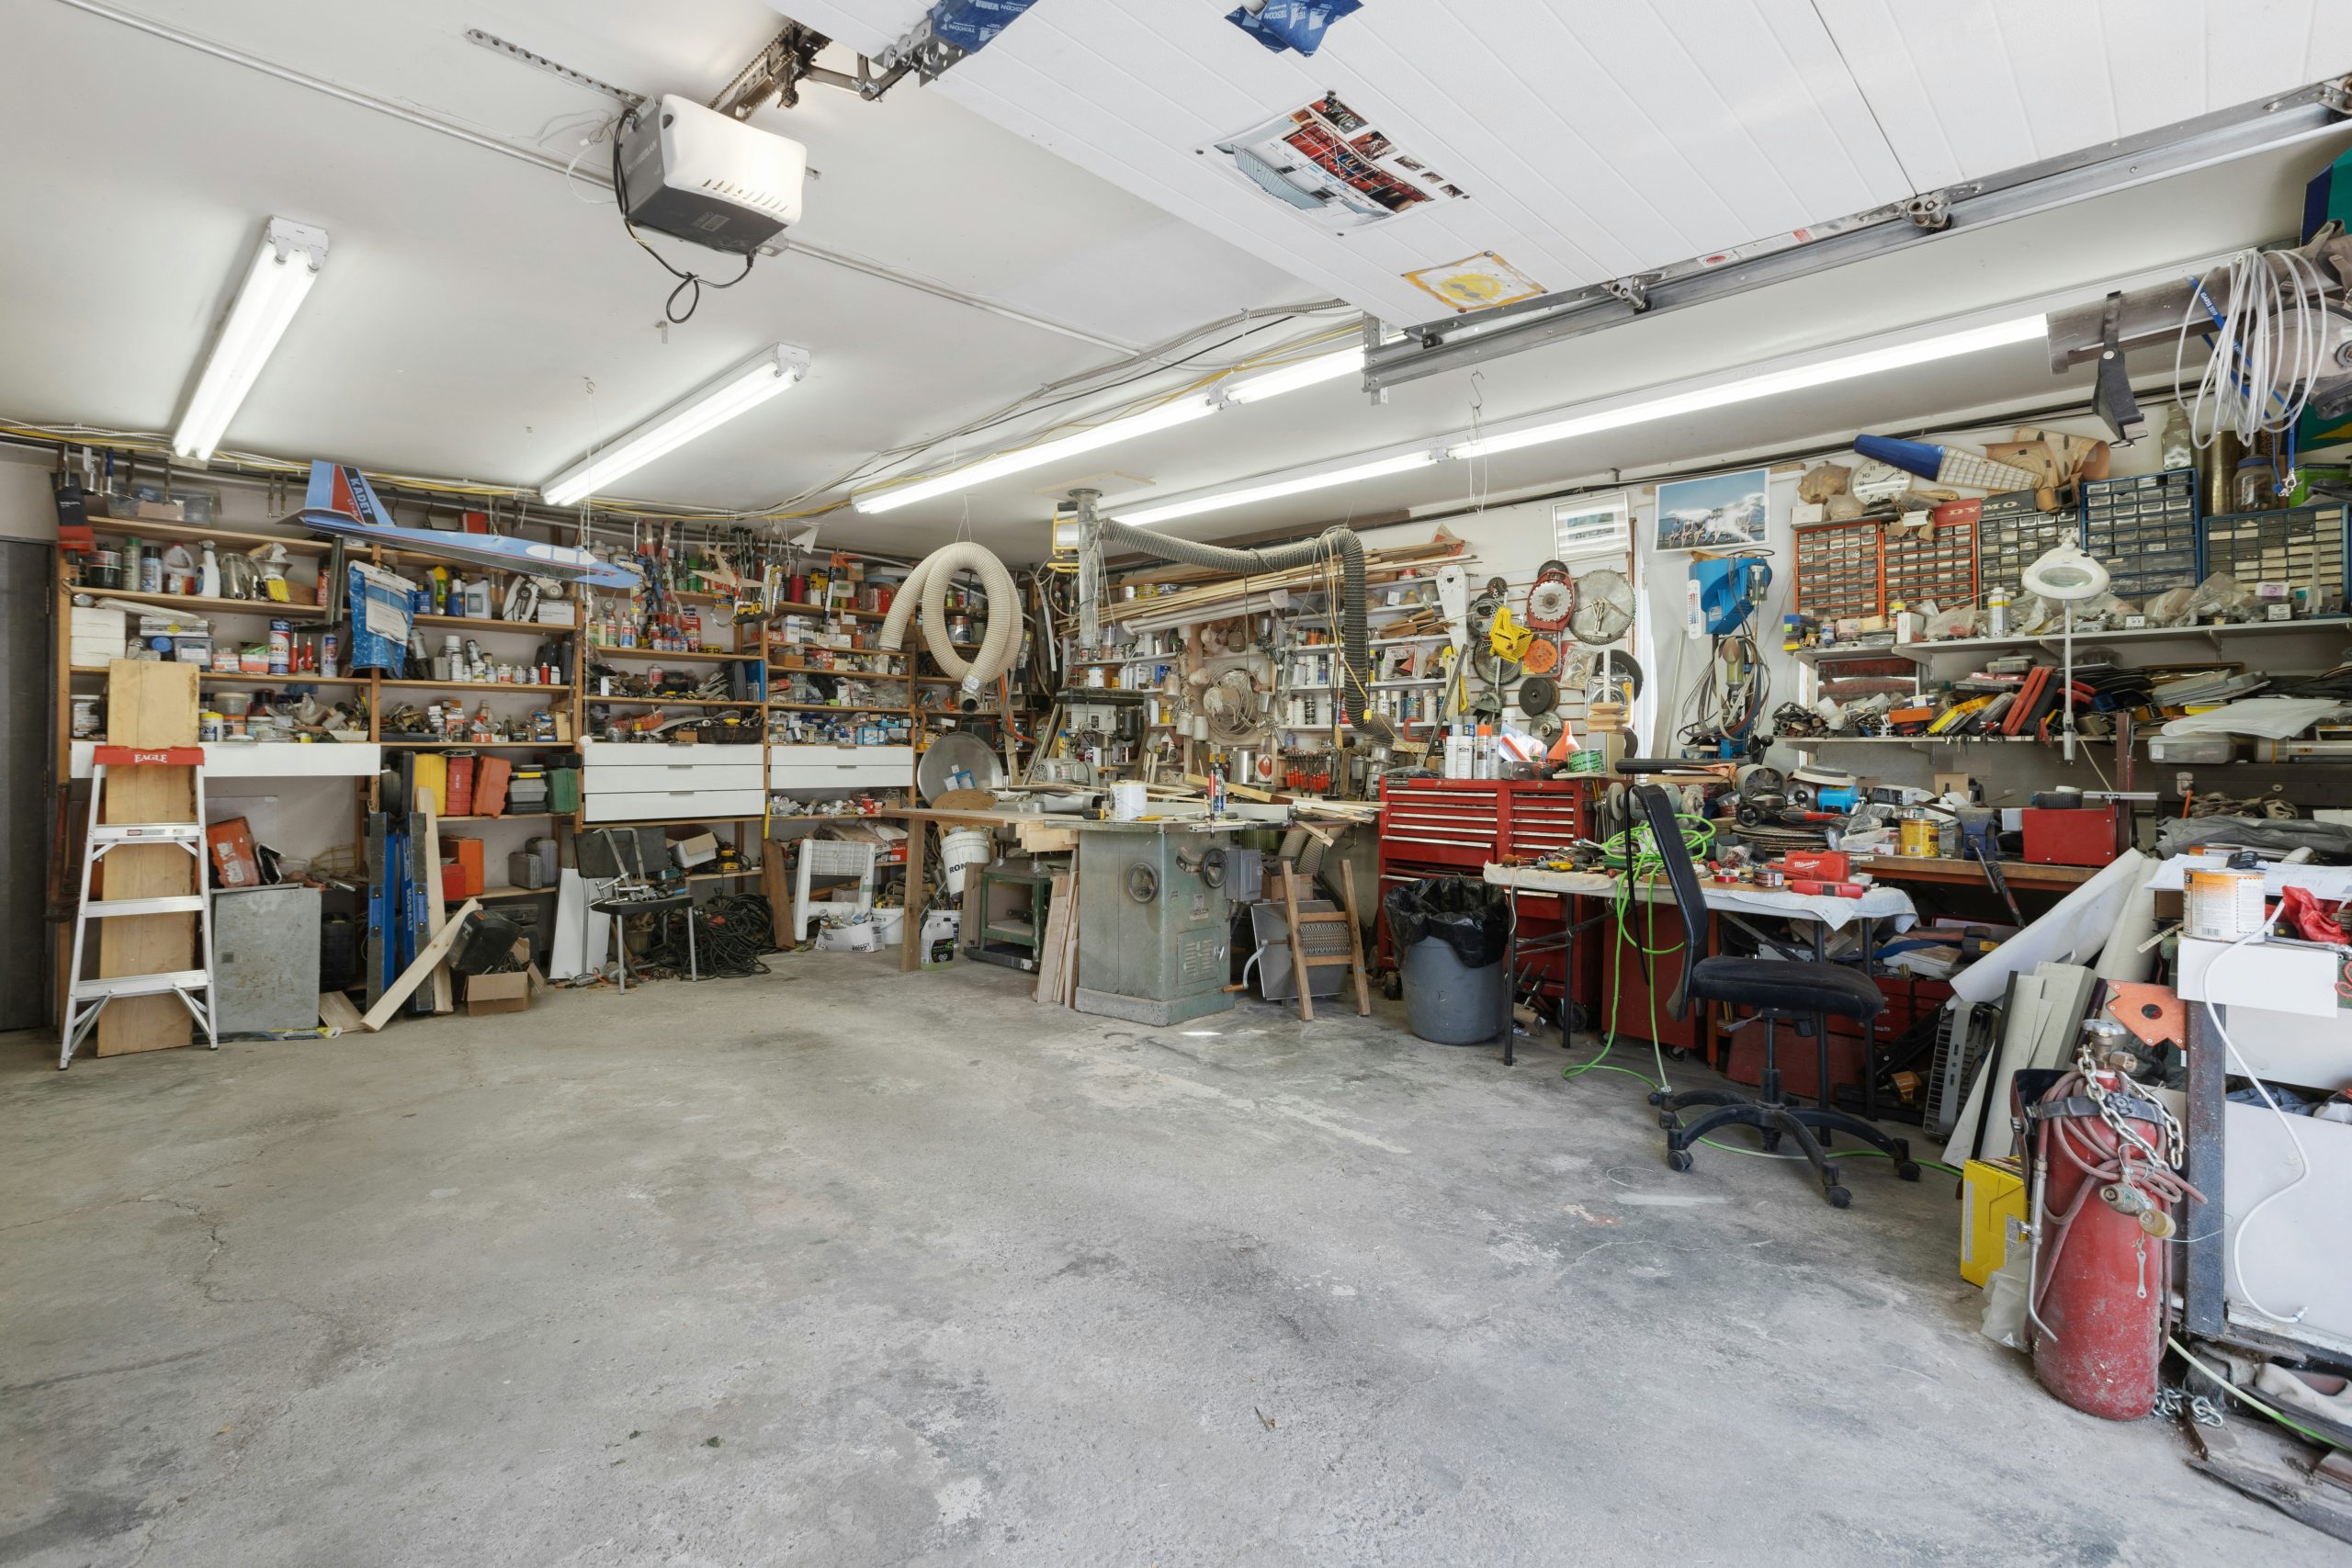
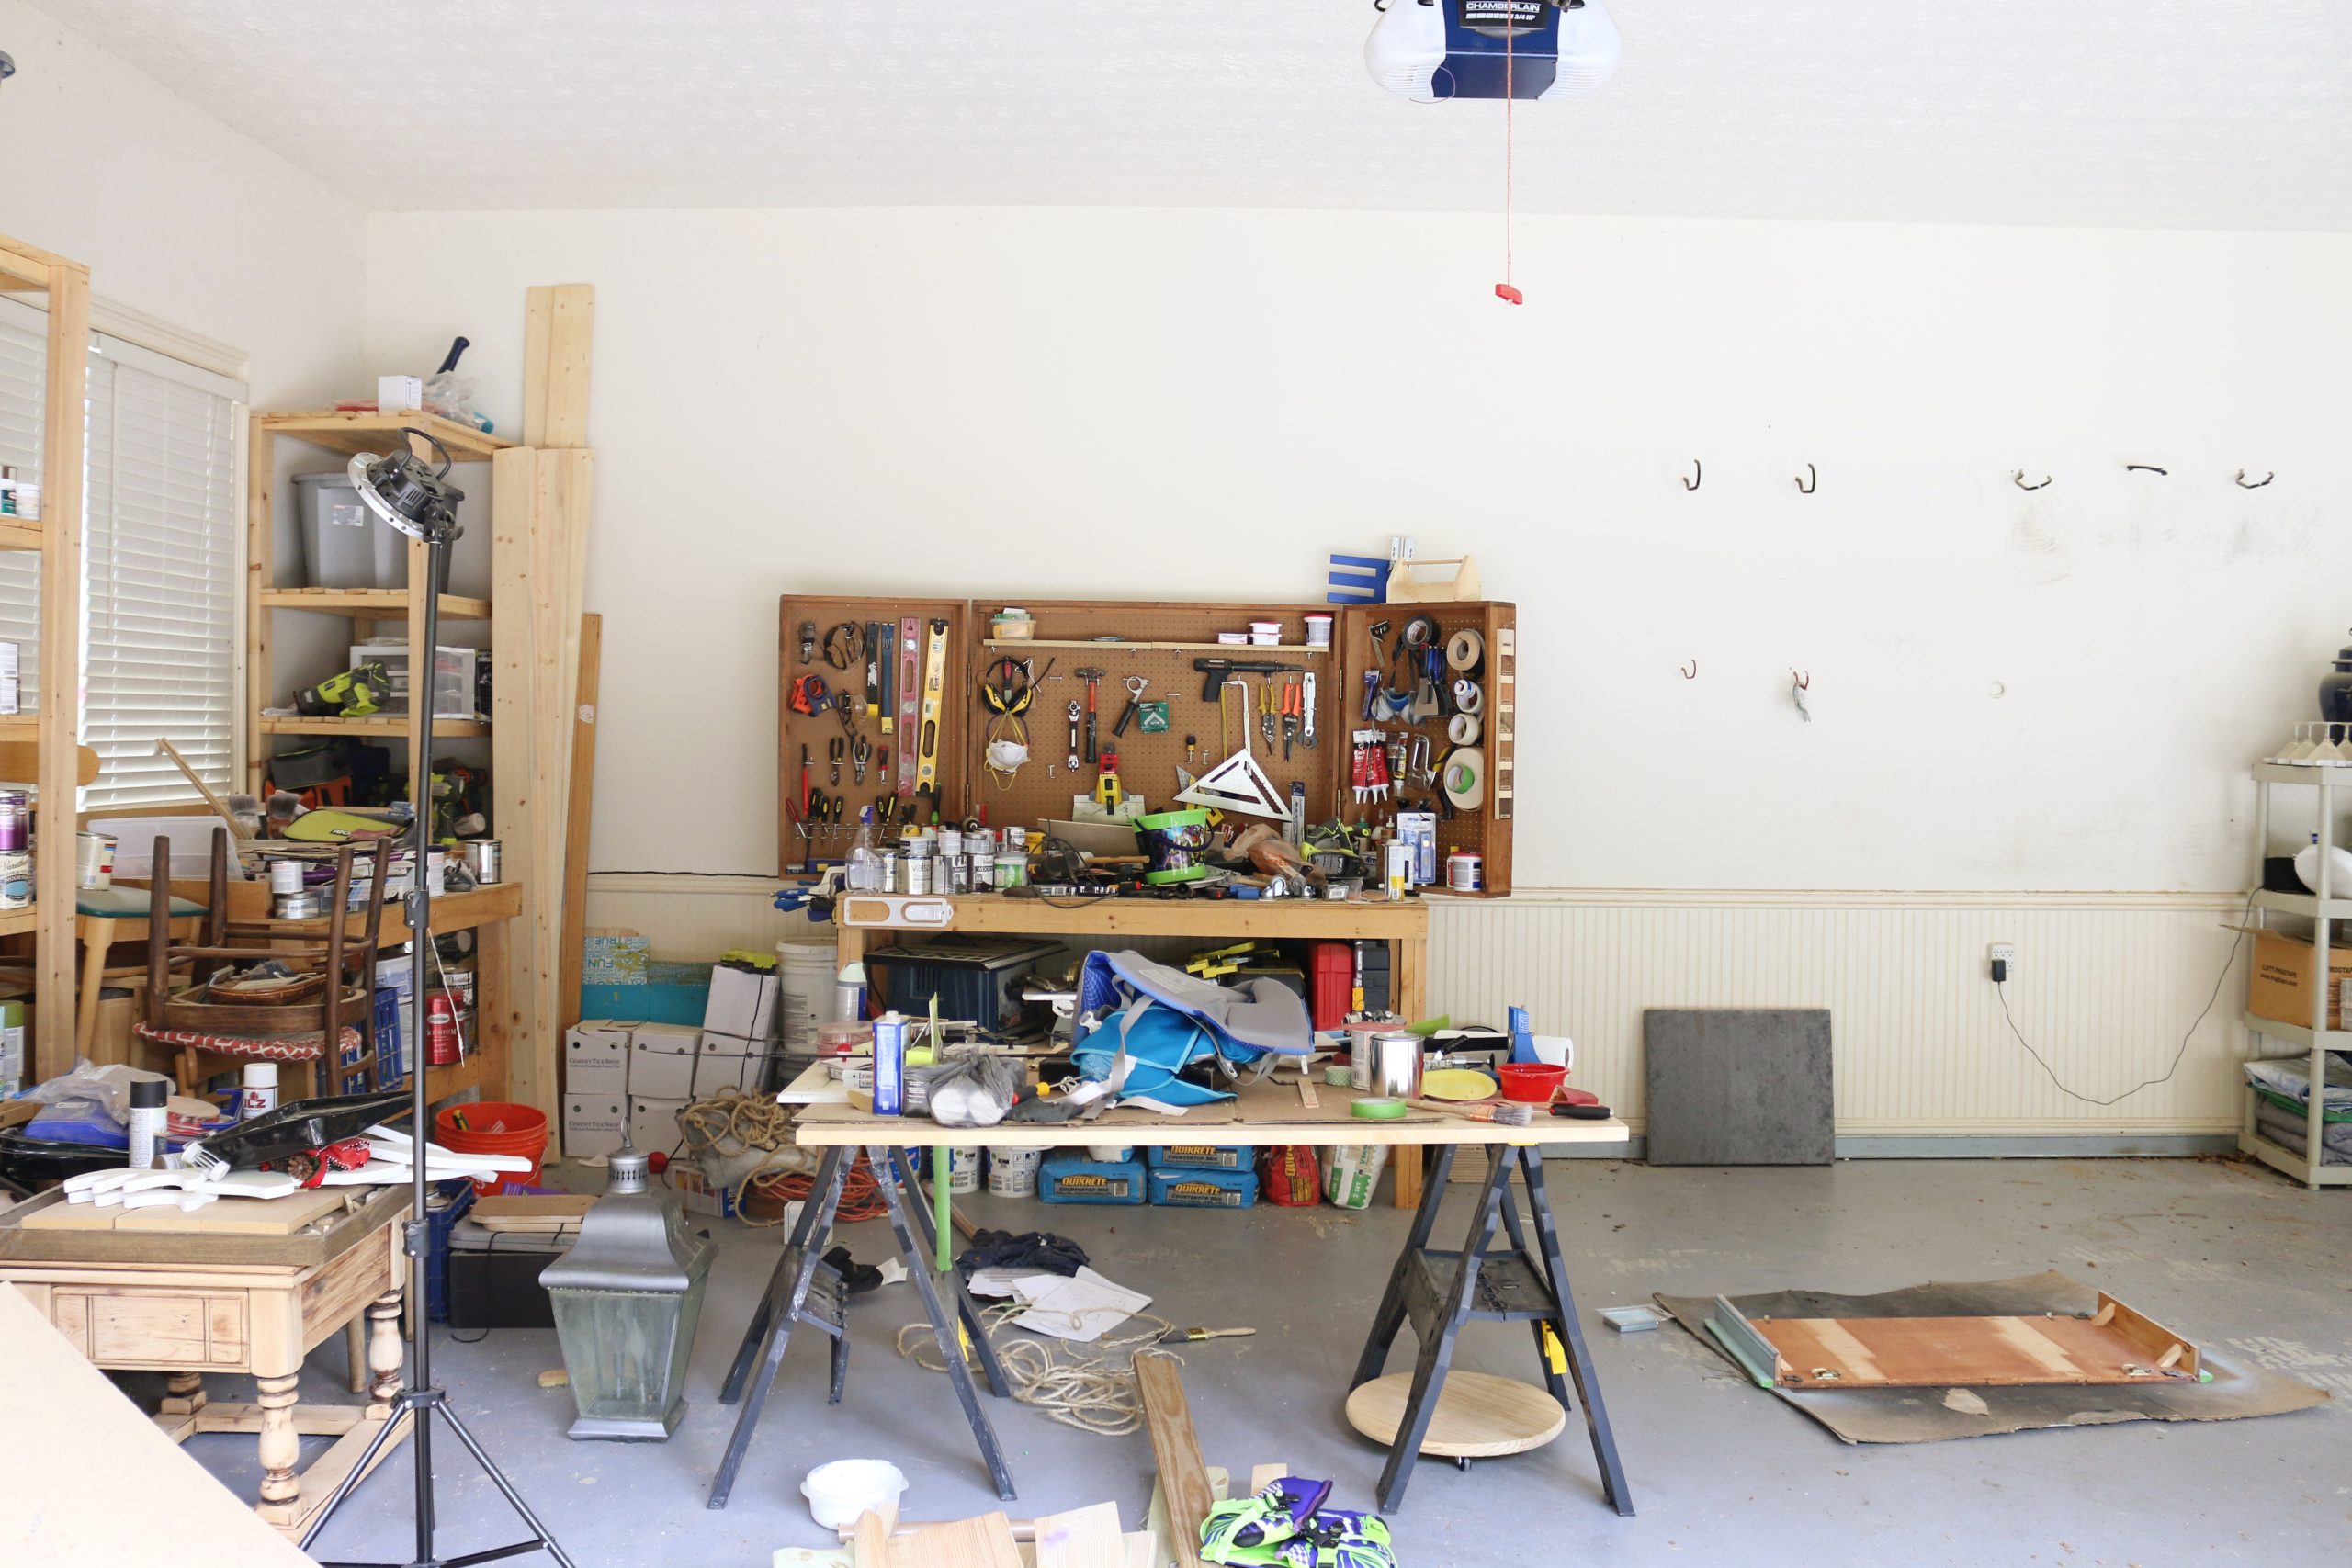
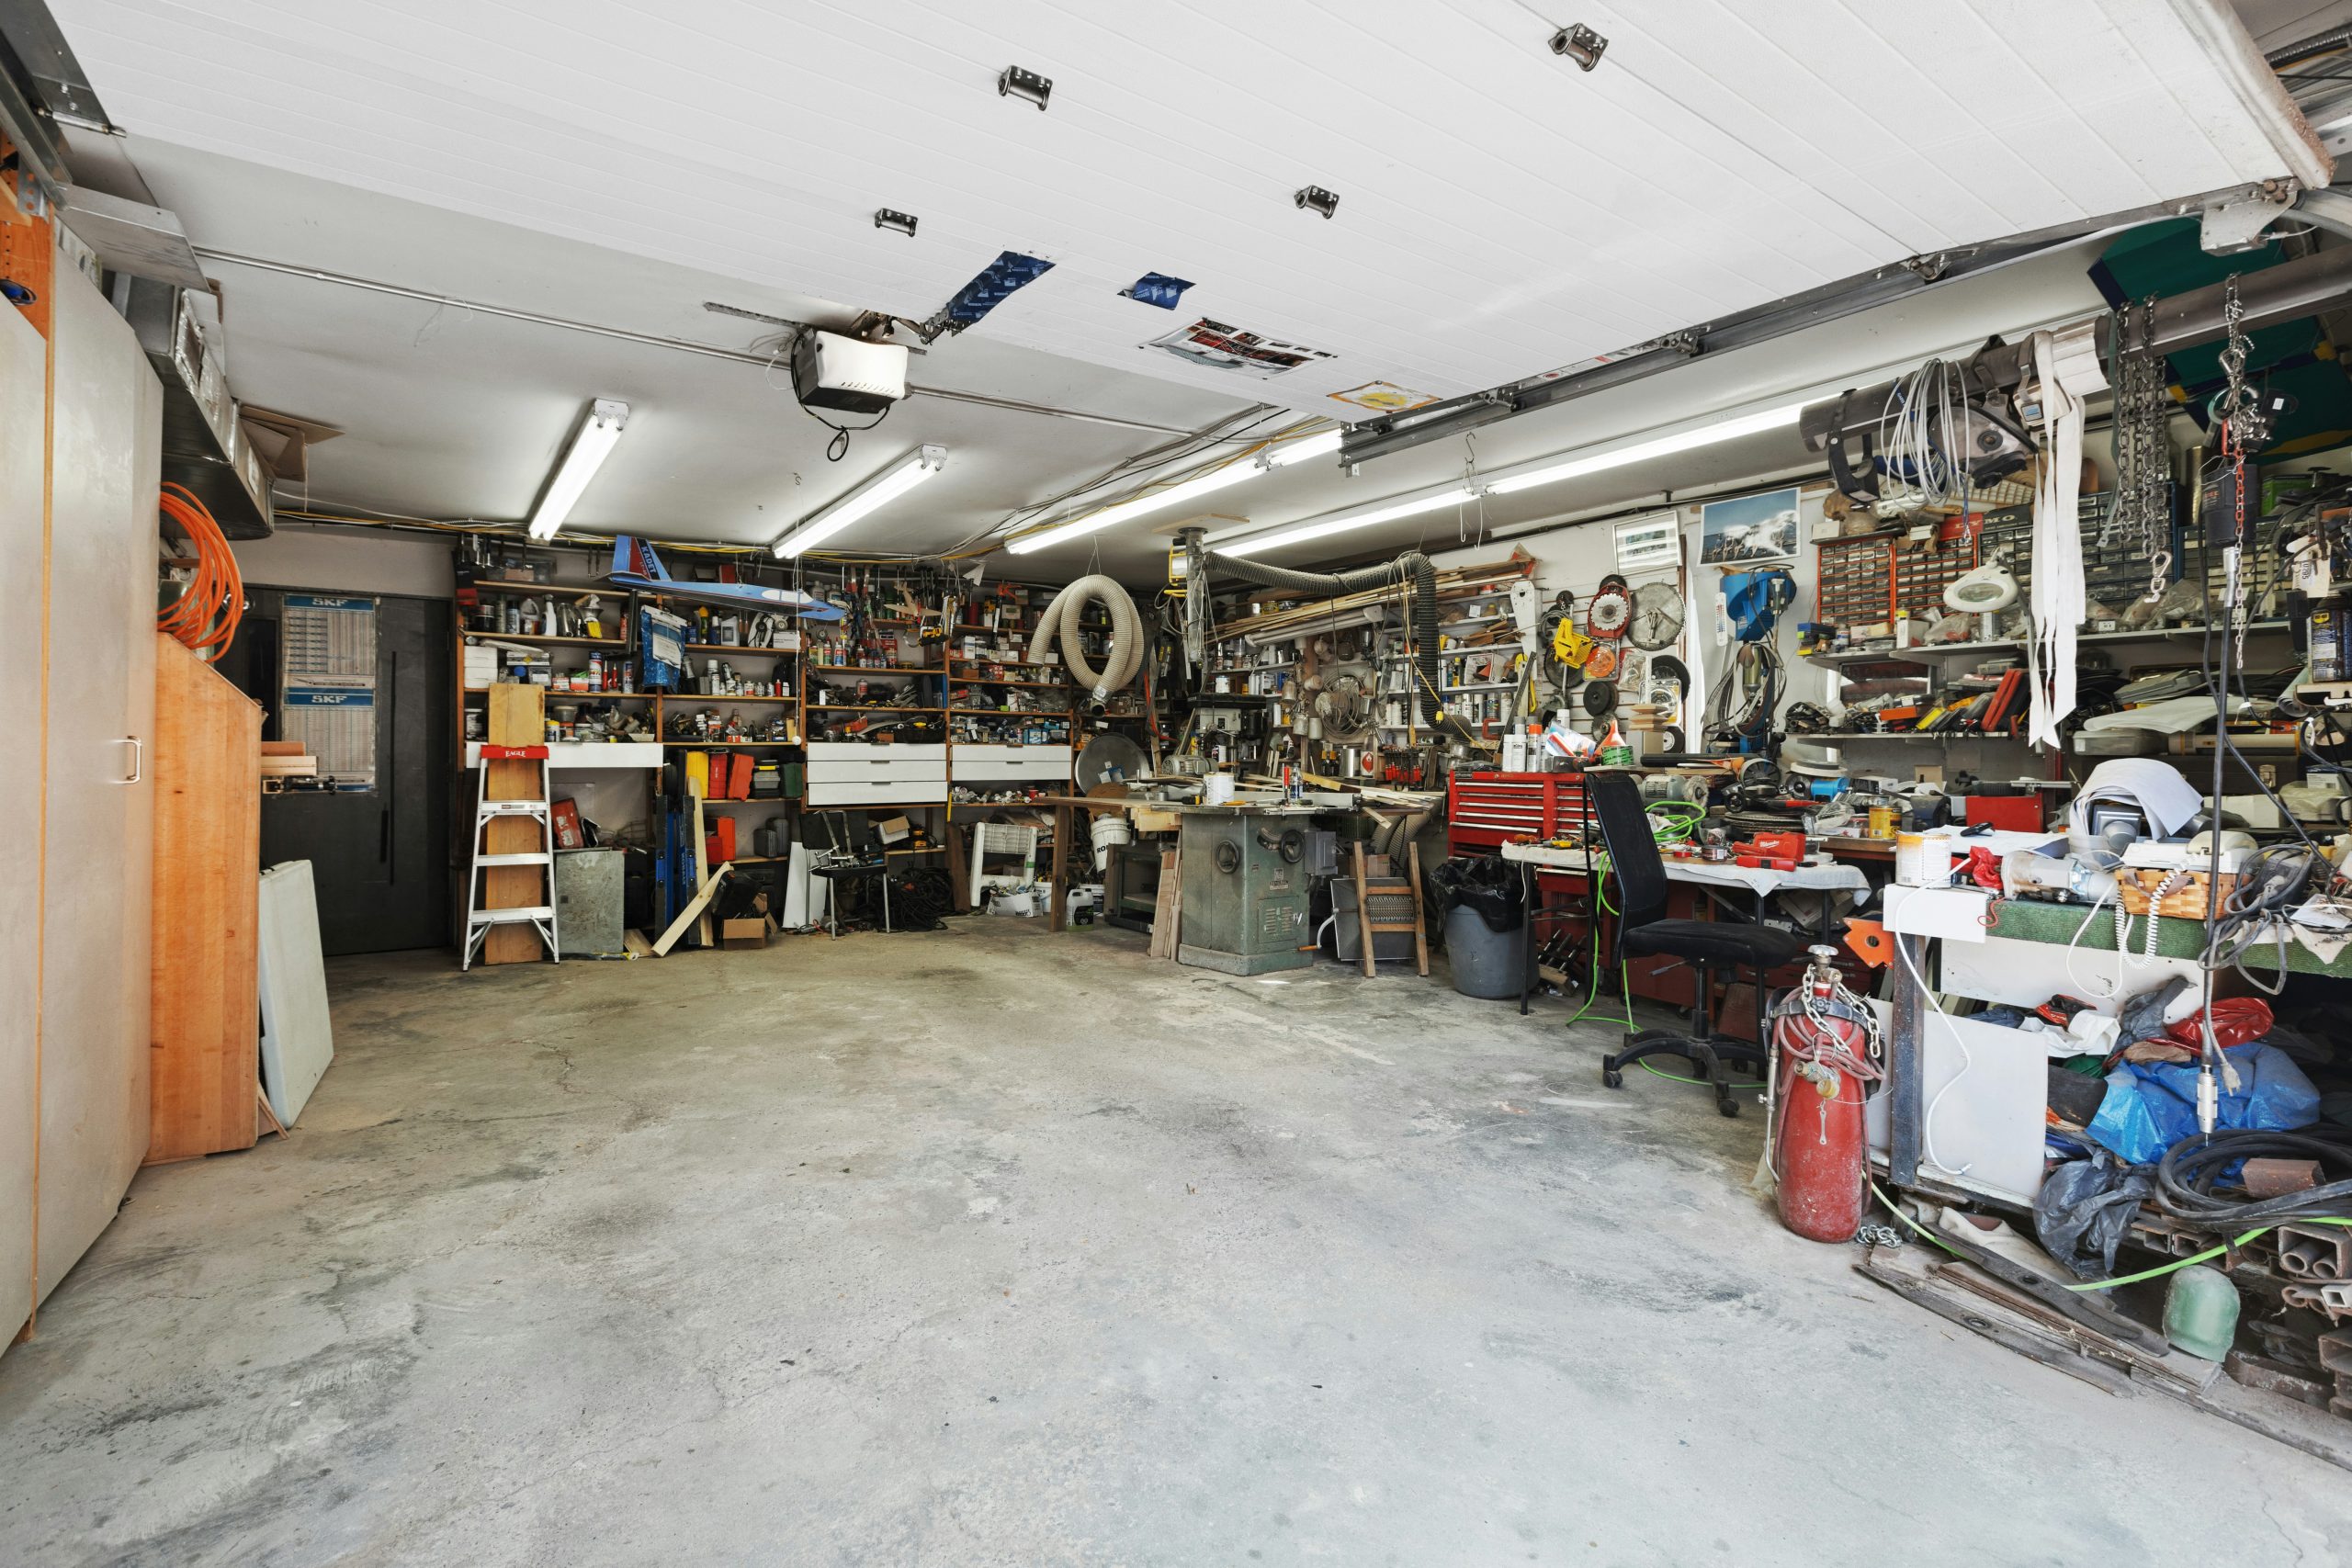
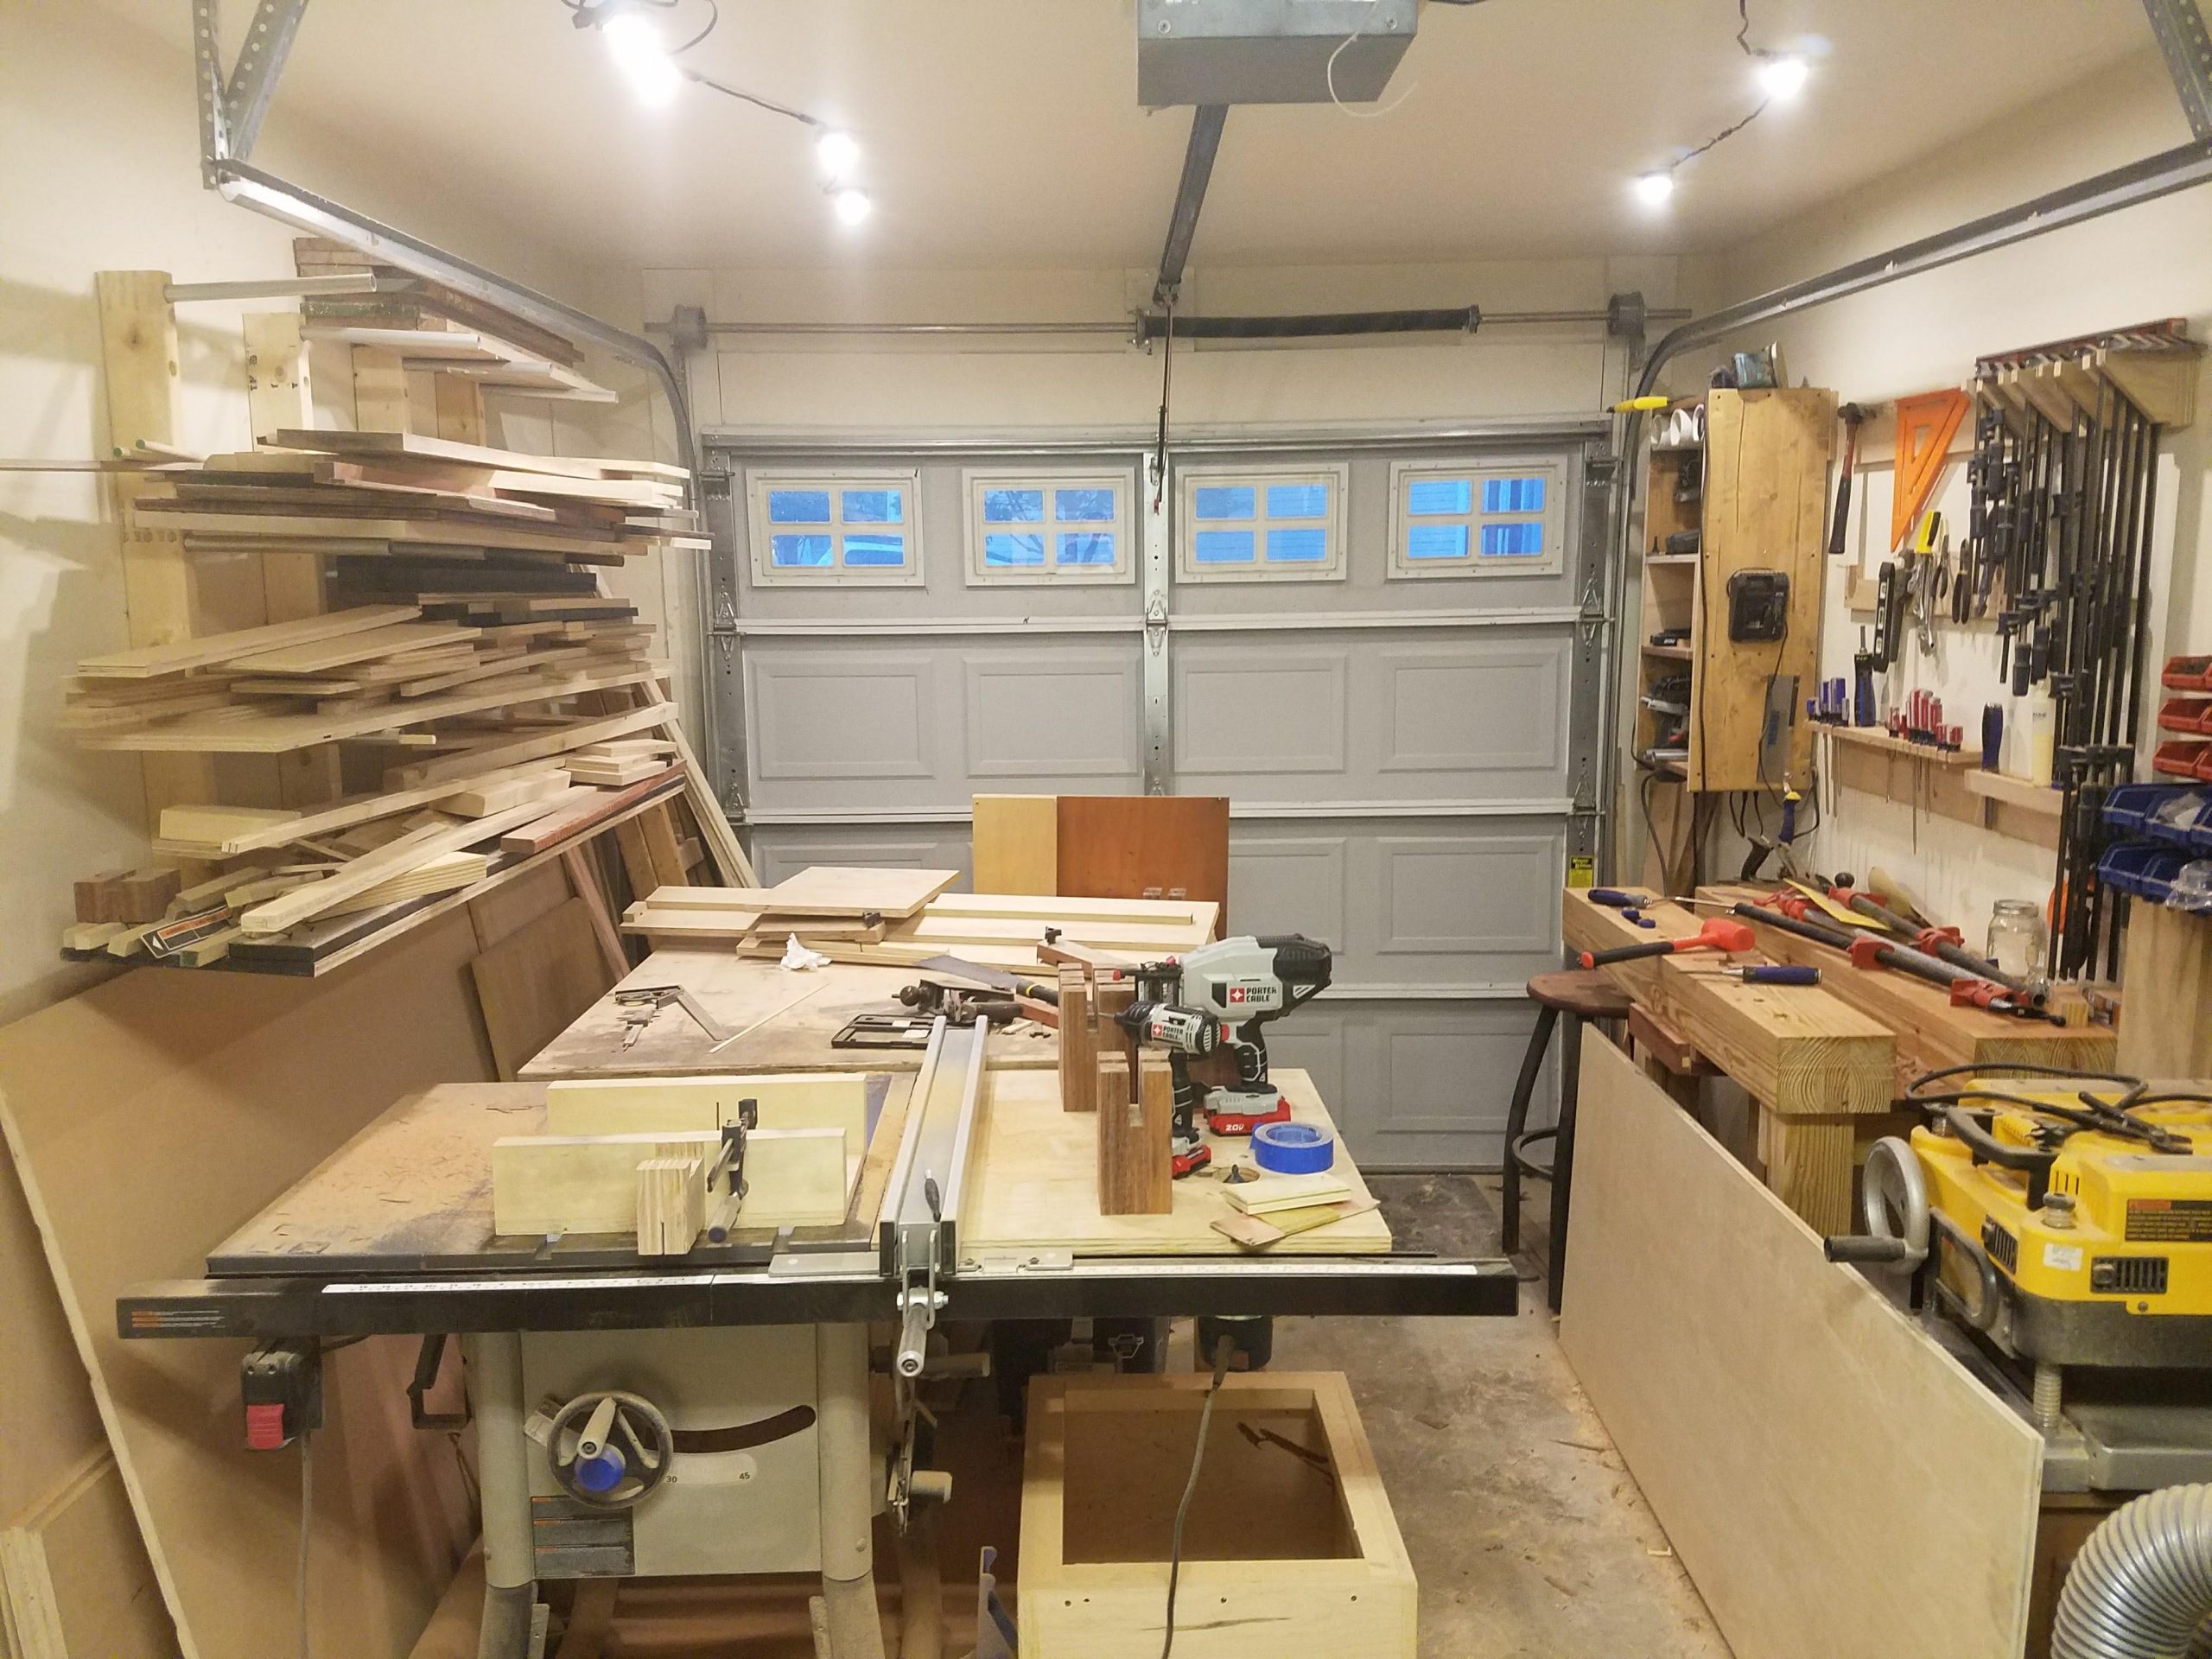
2. Embrace a Working Vibe with Wall-to-Wall Shelf Storage
Let’s be honest: a workshop this packed isn’t for everyone. The visual clutter can be distracting if you prefer a minimalist environment. Dust is also a major factor here; with so many items on open shelves, everything will need frequent cleaning, especially if you’re doing a lot of woodworking. While highly functional, this setup requires a commitment to knowing where everything is. If your organizational style is more “out of sight, out of mind,” you might struggle with the constant visual inventory check this layout demands.
|
📋 Copy HEX 🔗 Share |
It’s the sheer density of the storage. This isn’t about a few curated shelves; it’s about using every inch of wall space to keep tools, materials, and equipment within reach. Removing the extensive shelving would leave you with a pile of stuff on the floor and no functional system. The unapologetic, function-over-form shelving is the backbone of this entire layout, making it a truly productive (if beautifully chaotic) space for getting things done.
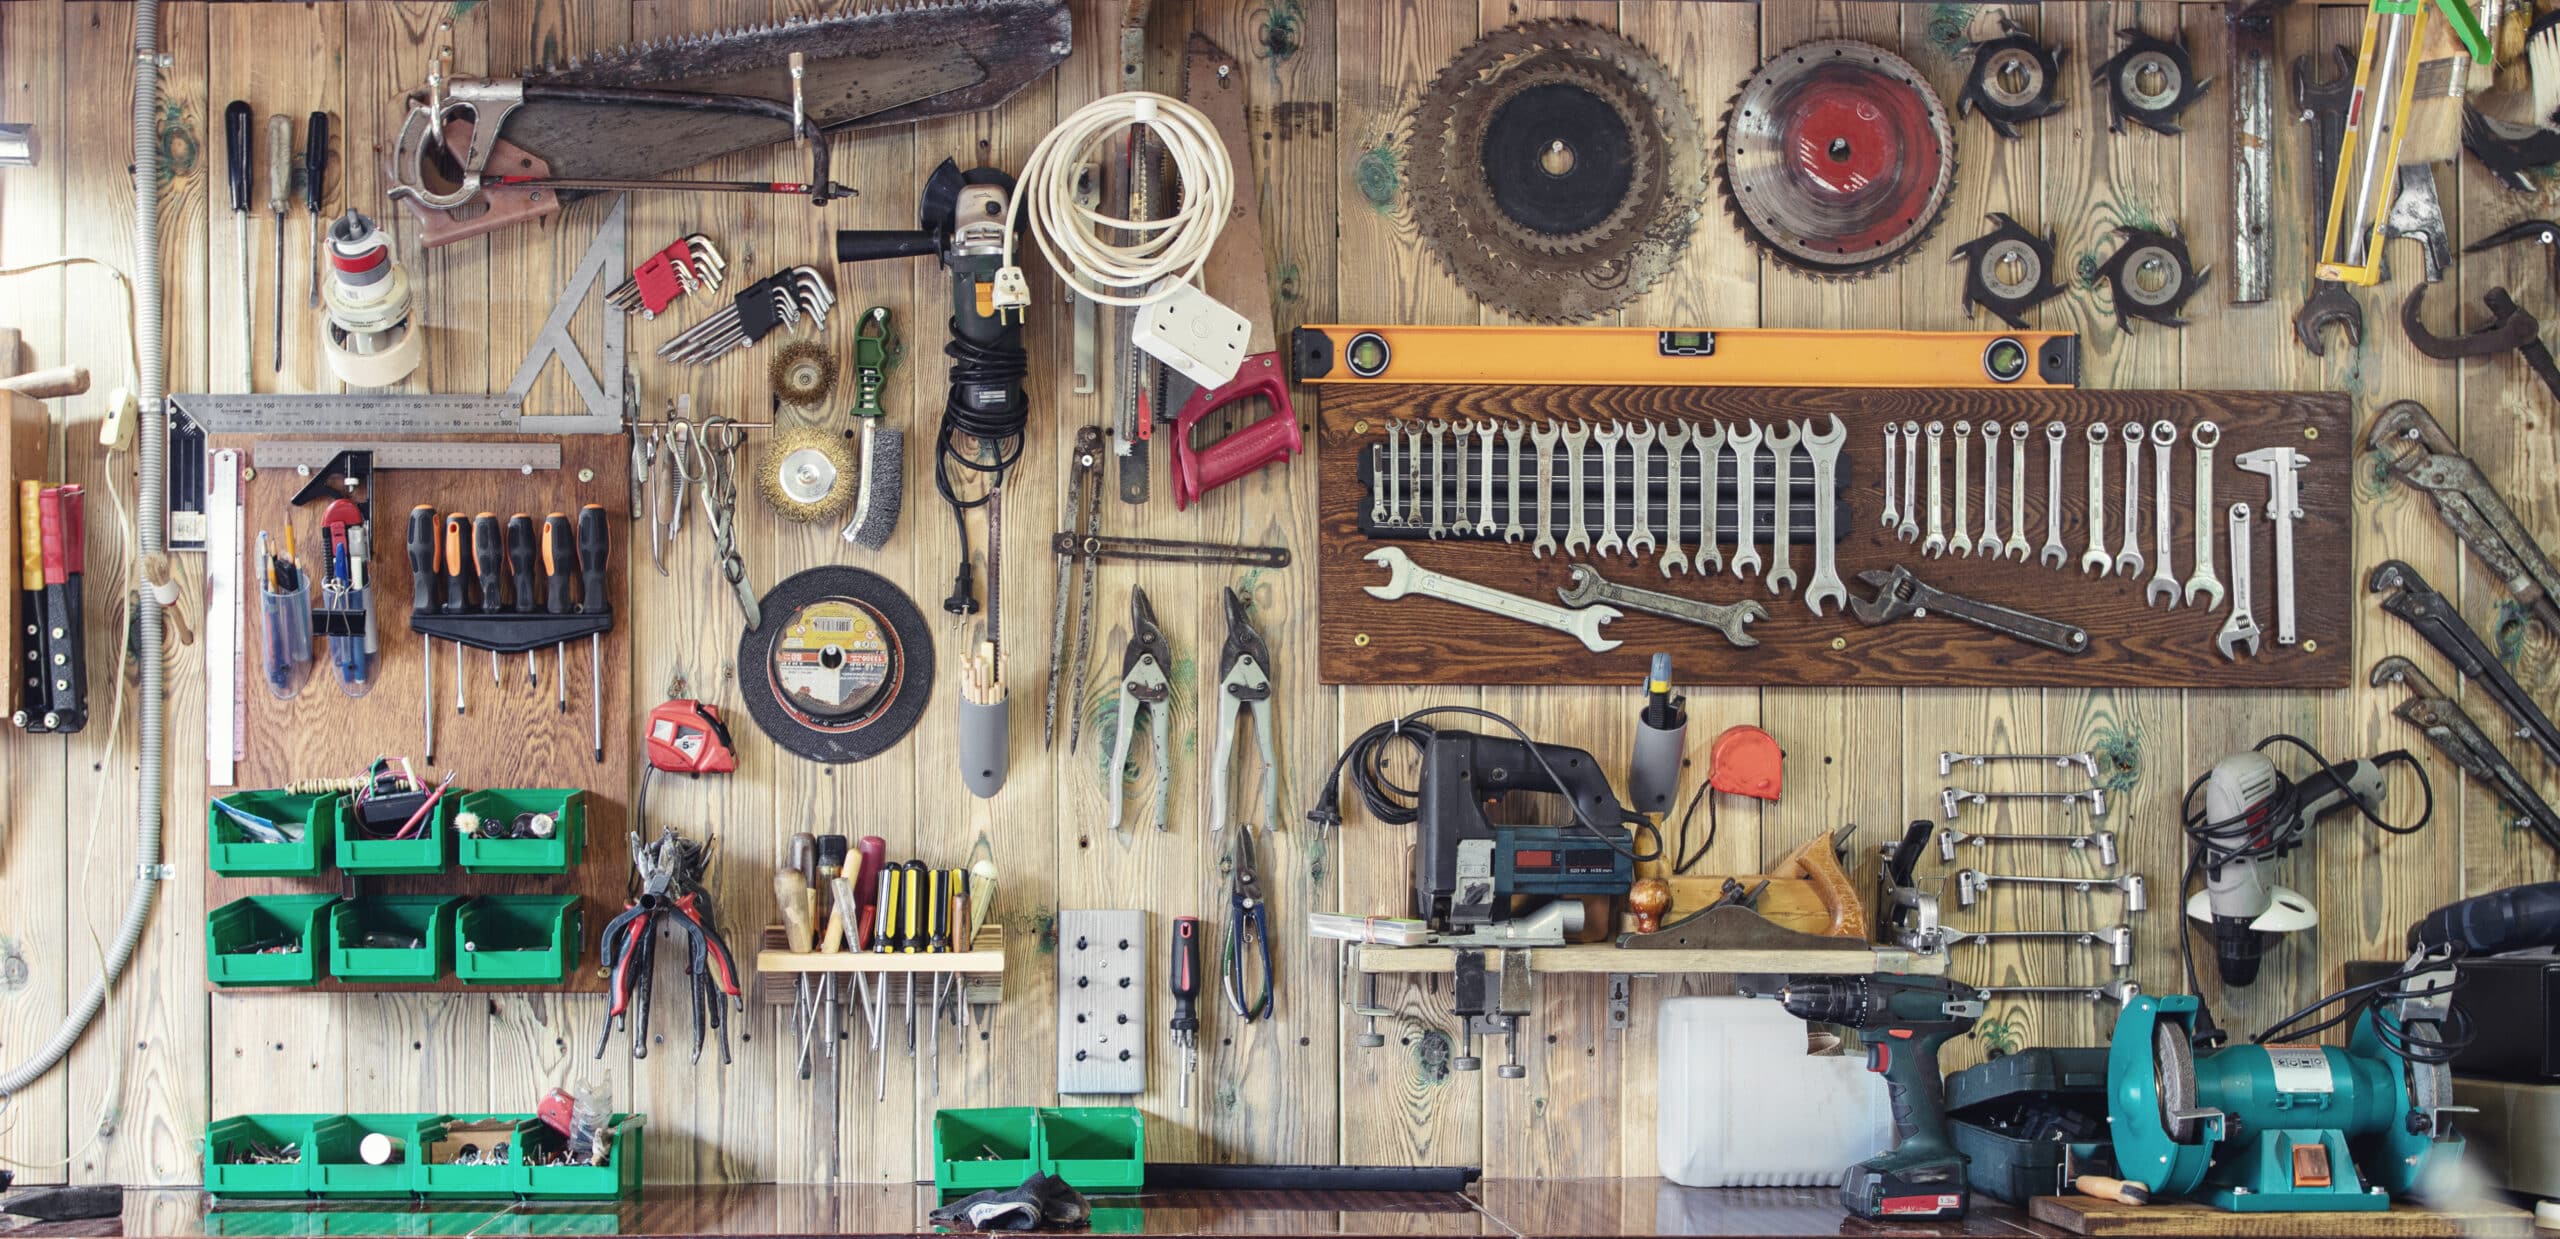
3. A Classic Workshop on a Beadboard Backdrop
You can achieve this practical and charming look for a surprisingly low cost. Start with a simple wooden workbench; you can often find them for under $100 on Facebook Marketplace or build your own with sawhorse legs from a hardware store for about $50. A large 4×8-foot sheet of pegboard is only around $20. The beadboard wainscoting adds a custom touch but isn’t essential for function—you could mimic the look with a stripe of white paint. Look for mismatched wooden shelves at thrift stores to complete the storage.
|
📋 Copy HEX 🔗 Share |
Don’t just slap a pegboard on the wall. Mount it on 1×2-inch wood furring strips to create a 3/4-inch gap between the board and the wall. This is the crucial space you need for the hooks to actually engage properly. Without this gap, your hooks will just fall out. For heavy tools, make sure you screw the furring strips directly into wall studs, not just the drywall. This small step is the difference between a functional tool wall and a frustrating mess.
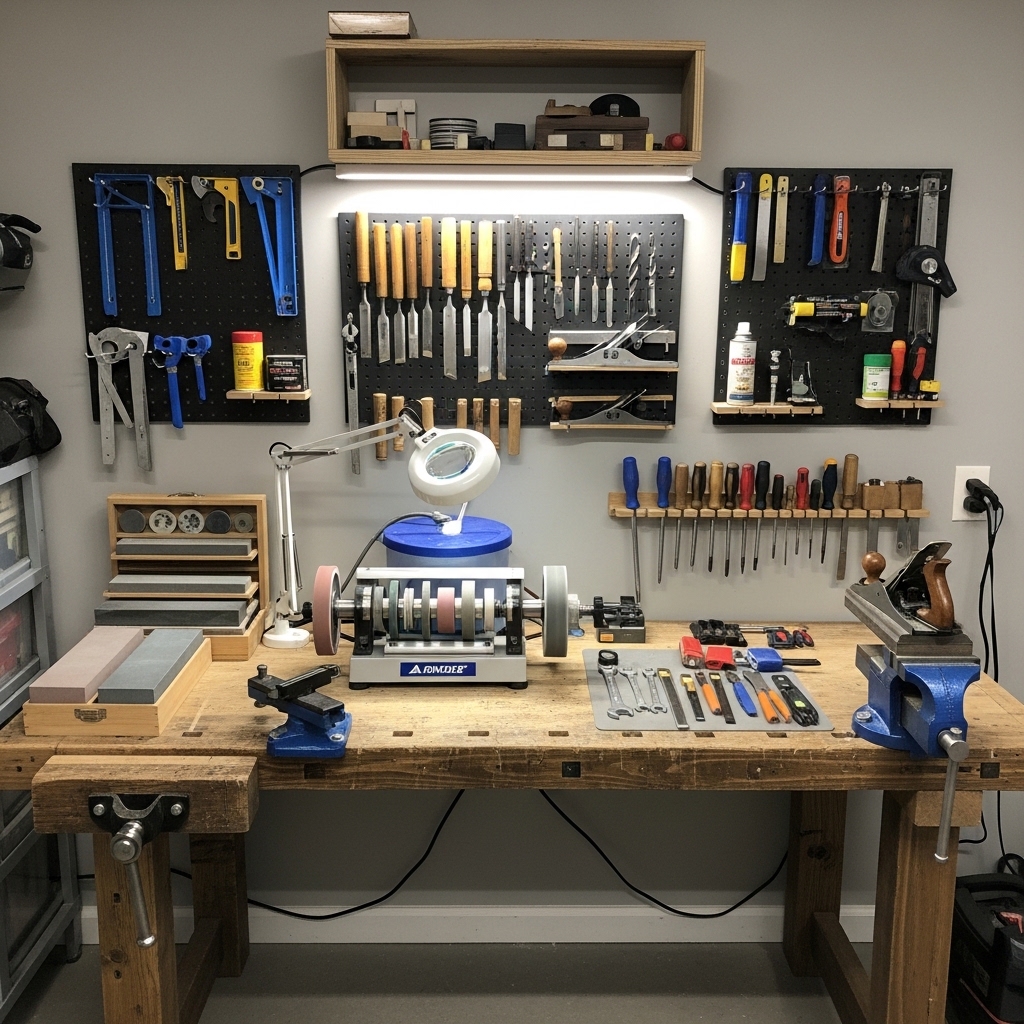
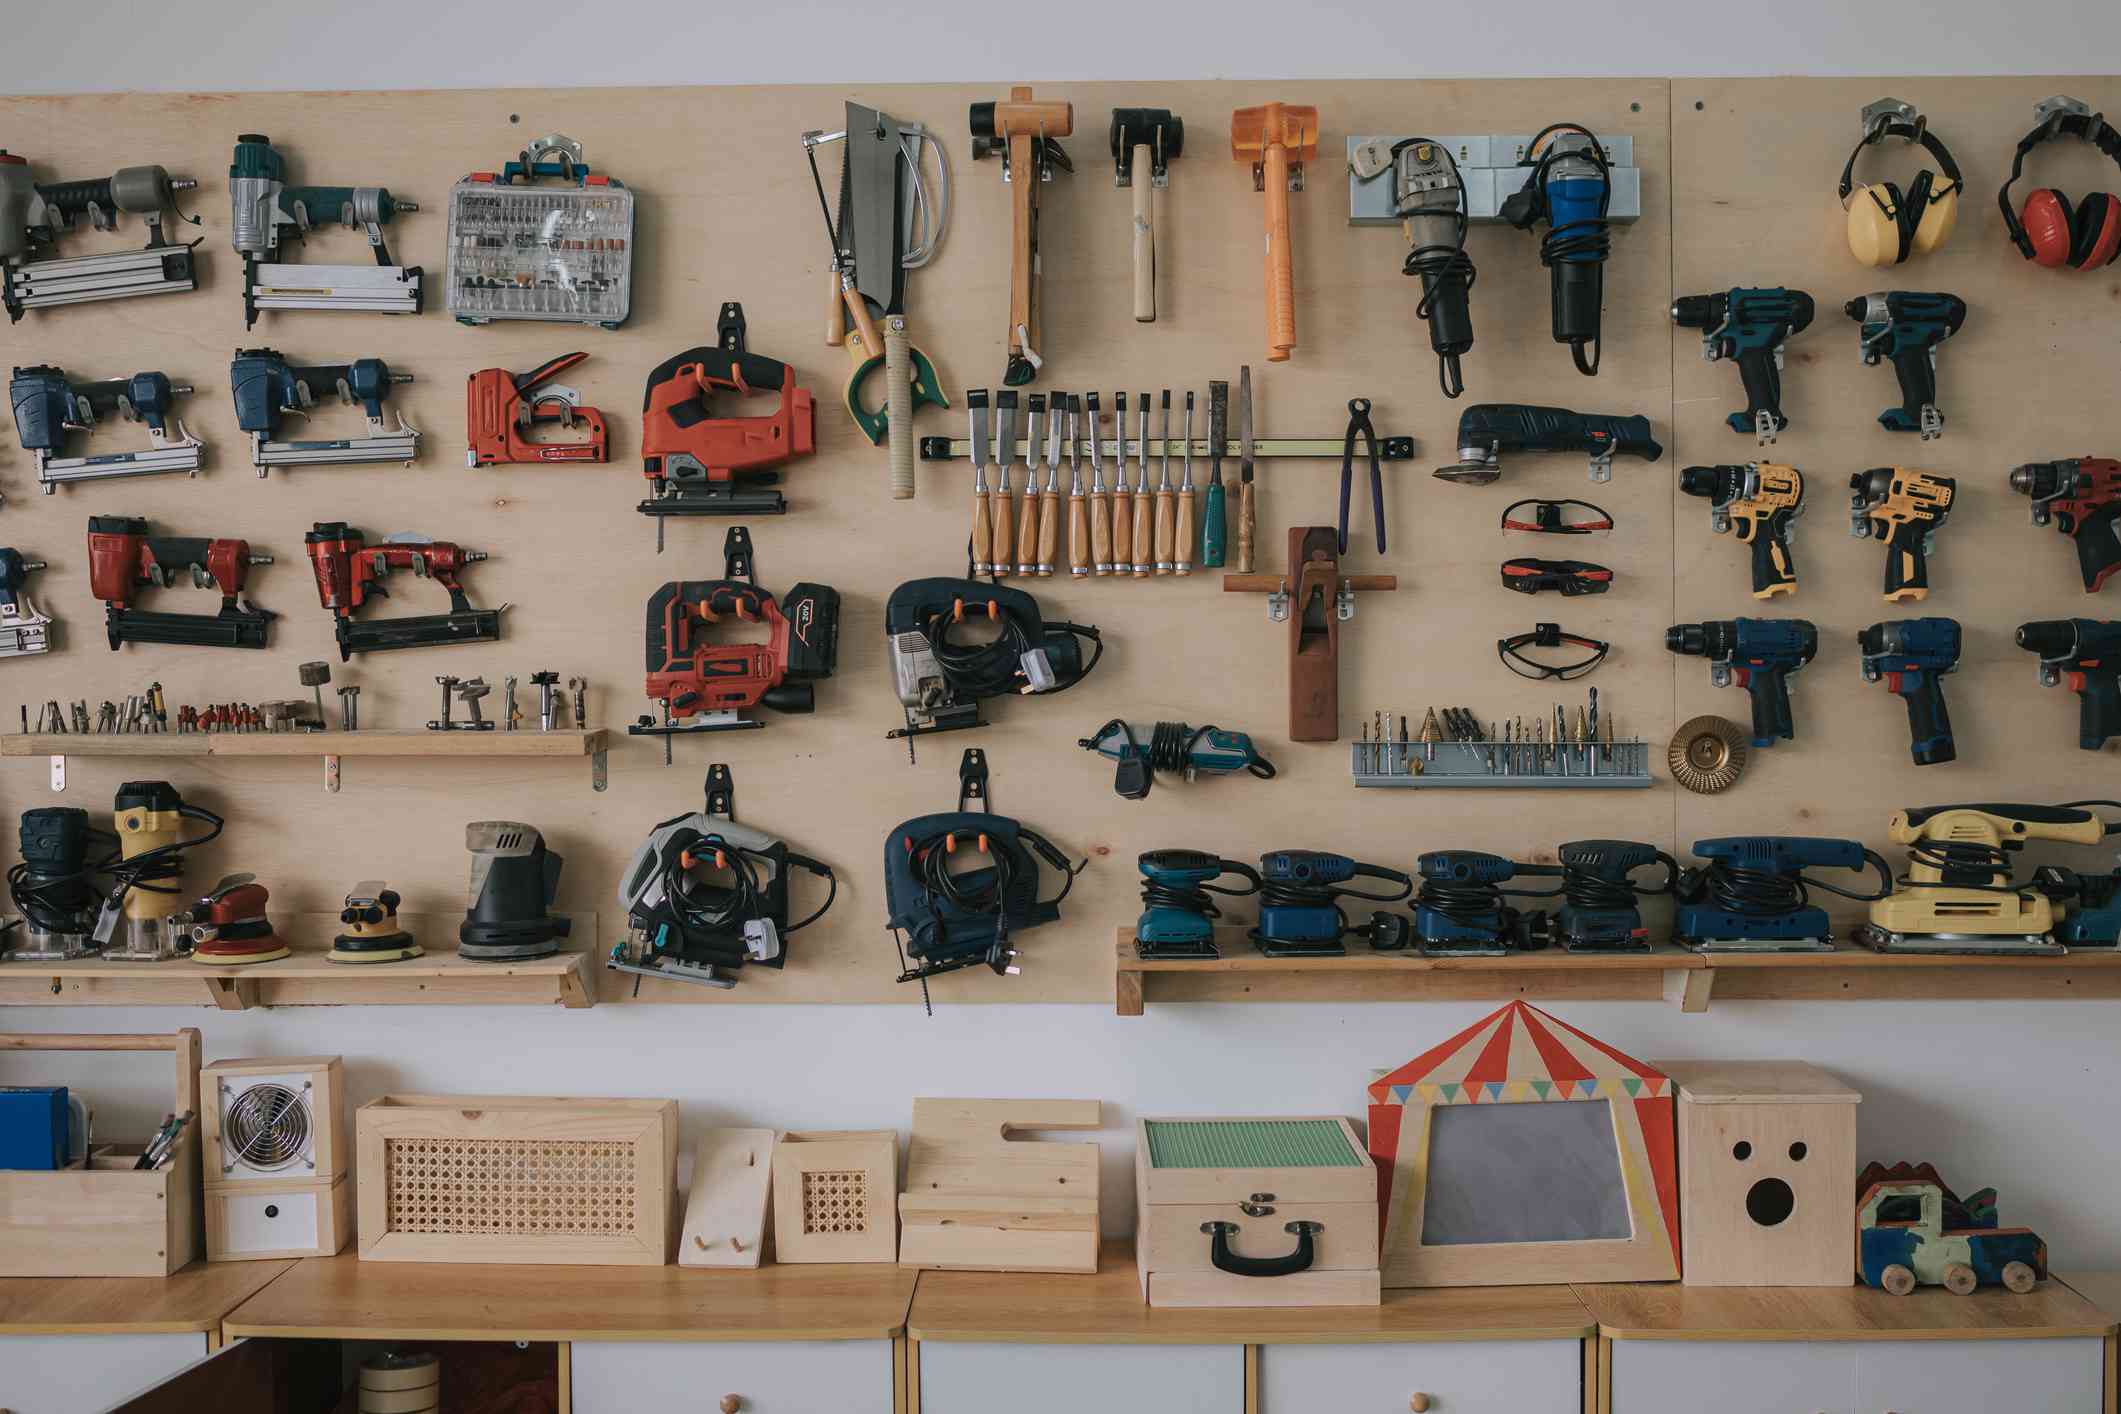
4. Precision Woodworking Station with Black Pegboard Organization
A dedicated sharpening station can take your woodworking to the next level. Here’s a quick guide to setting one up:
- Choose a stable, flat surface: A corner of your workbench is ideal. It needs to be an area where the grinder won’t vibrate the whole bench.
- Mount your grinder: Securely bolt the sharpening system to the workbench to prevent movement during use. Time: 15 minutes.
- Install effective task lighting: An adjustable lamp with a magnifying glass, like the one shown, is critical for seeing the fine edge of your tools. Cost: $30-$80.
- Organize your wheels: Keep your different grit grinding wheels nearby and clearly labeled so you can progress from coarse to fine without hunting for them.
Total setup time is under an hour, but the precision it brings is priceless.
|
📋 Copy HEX 🔗 Share |
This setup works because of its incredible visual order. The black pegboards create a high-contrast background that makes every shiny steel tool pop, turning the collection itself into a design element. This isn’t just storage; it’s a display. The heavy, natural wood of the workbench provides a warm, solid anchor for the entire scene, balancing the cool tones of the gray wall and metal tools. The organization is almost gallery-like, suggesting a space where precision and care are paramount. Compare this organized display to the more rustic approach in Idea #9.
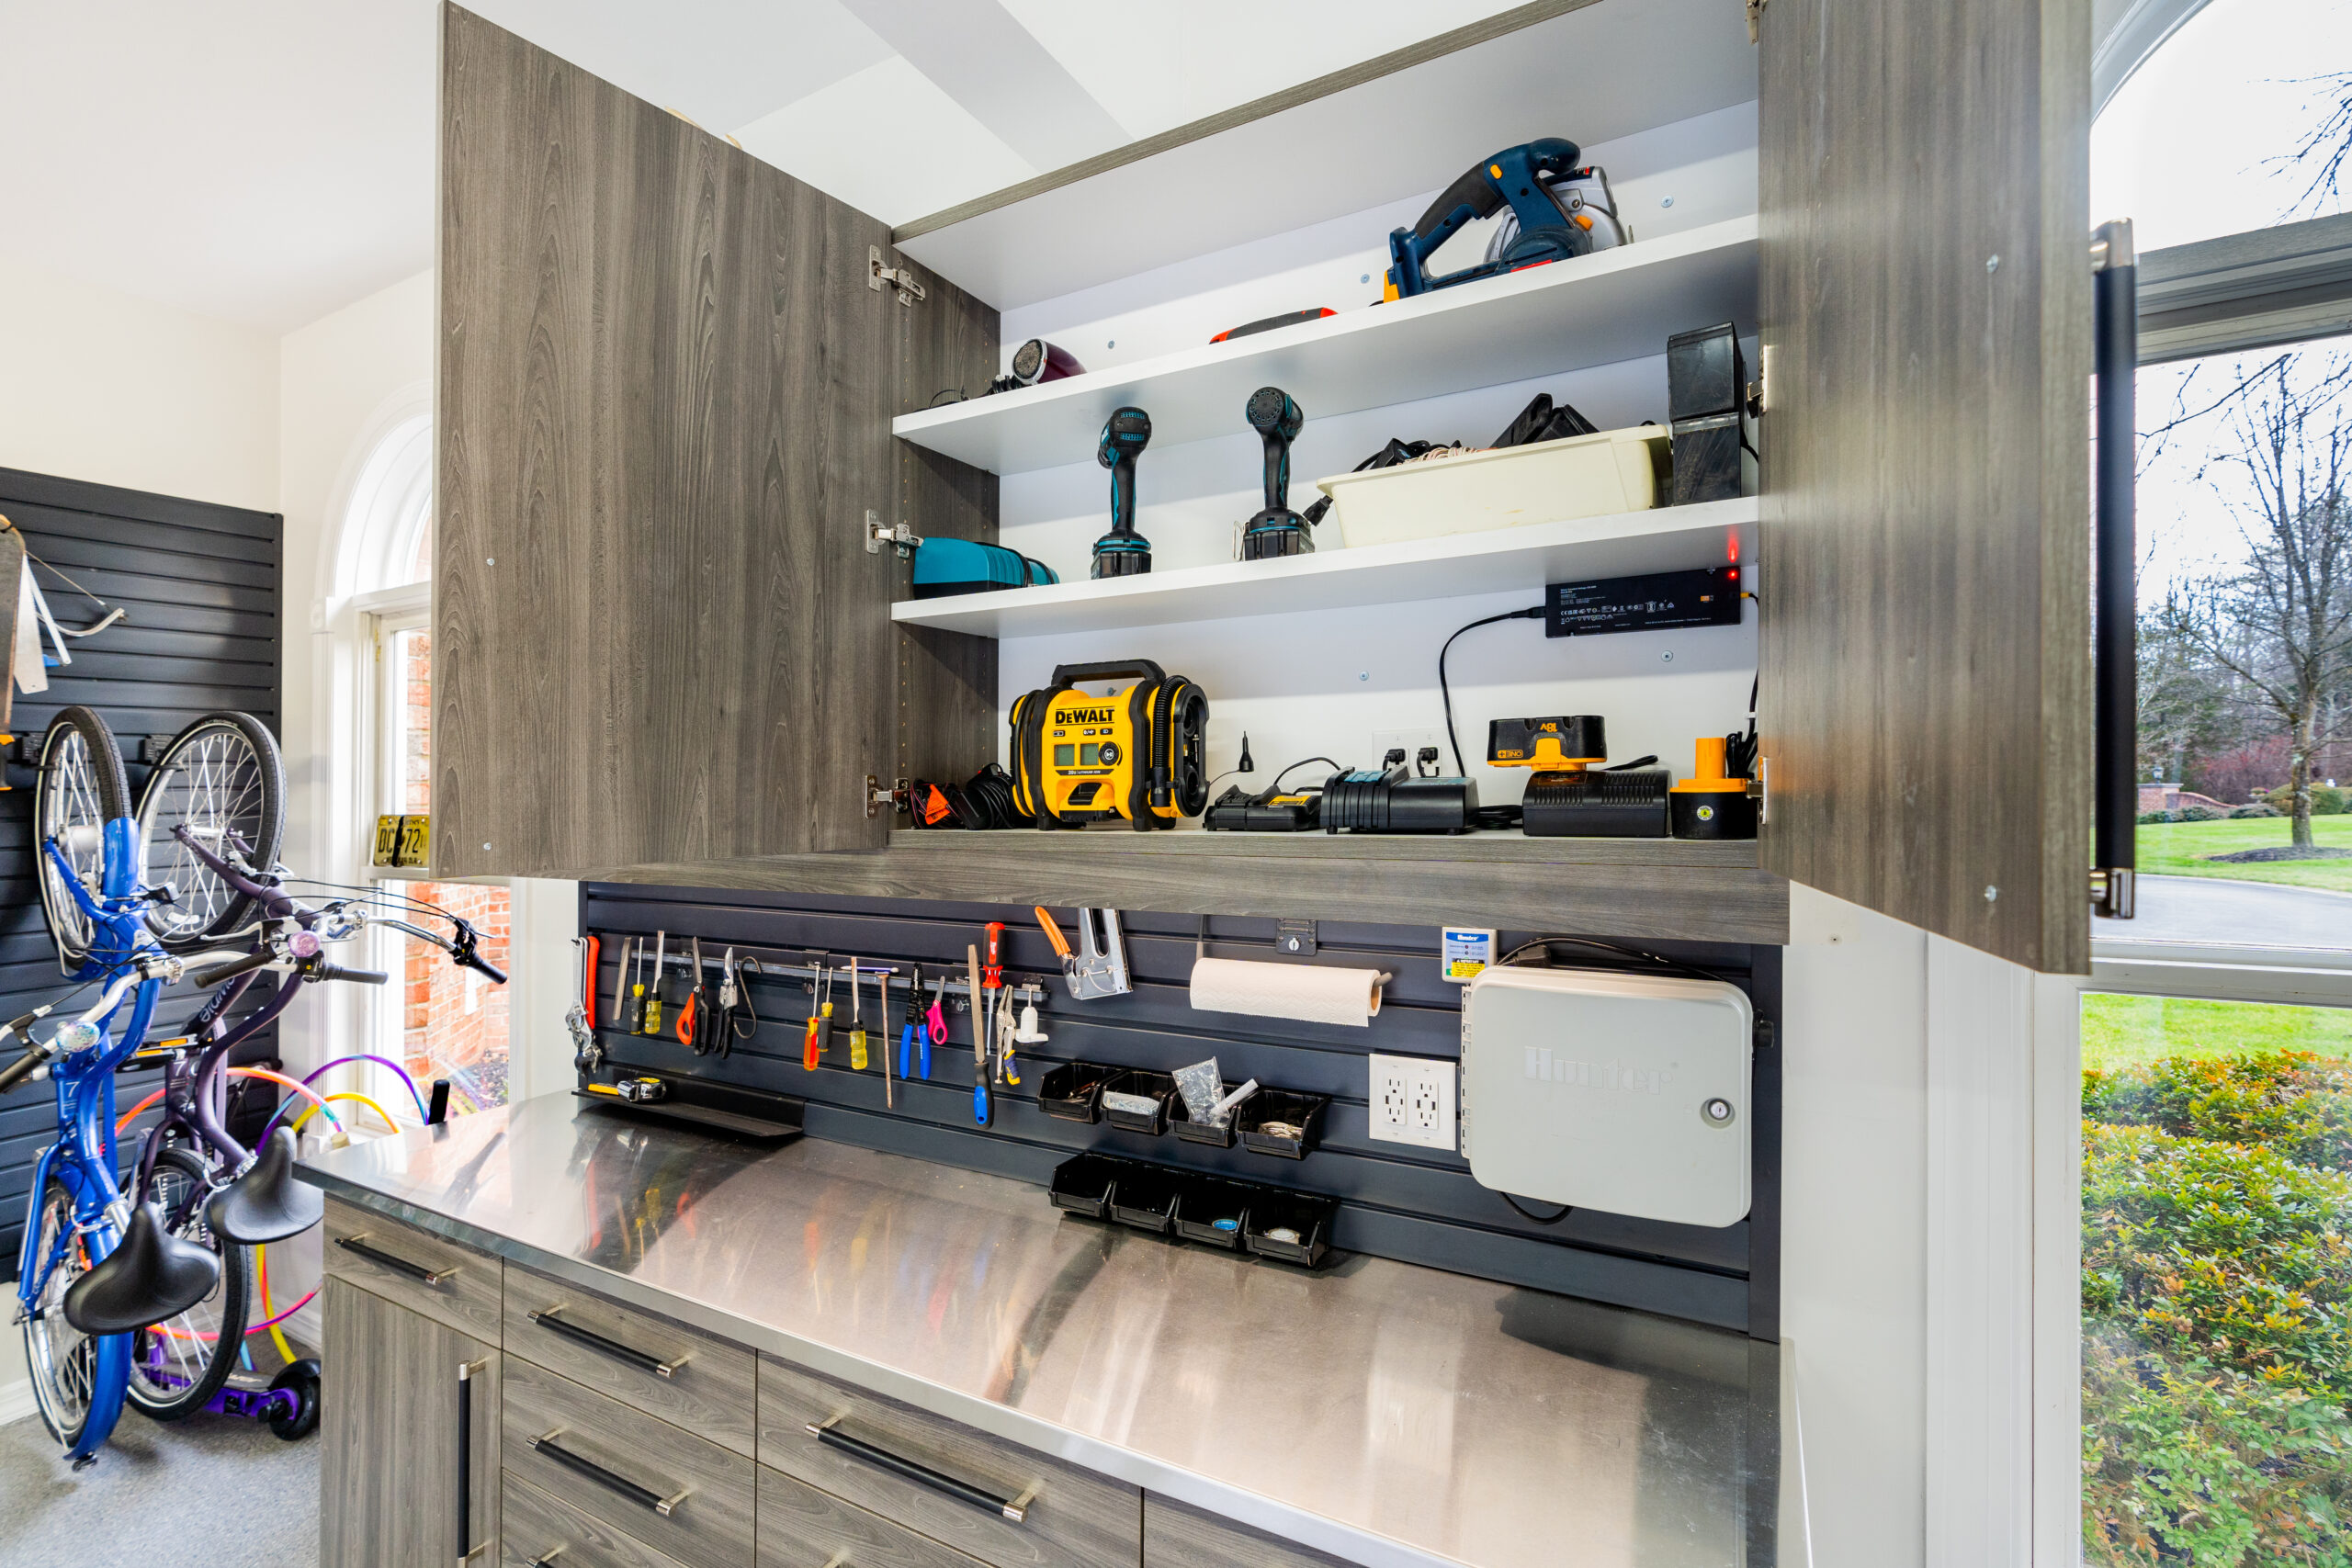
5. Sleek Gray Woodgrain Cabinets Meet a Stainless Steel Top
We’re seeing a huge move away from the purely utilitarian, unfinished garage and towards spaces that feel like a true extension of the home. This modern, clean aesthetic is driving the trend. The gray woodgrain cabinets and stainless steel workbench feel more like a high-end kitchen than a dusty workshop. This reflects a cultural shift where garages are becoming multi-purpose spaces—part workshop, part gym, part showroom. The integrated slatwall, similar to the one in Idea #21, reinforces this concept by offering a clean, modular look that feels polished and intentional.
|
📋 Copy HEX 🔗 Share |
That beautiful stainless steel workbench top looks wonderful, but it requires care to stay that way. It will show every fingerprint and smudge, so keep a microfiber cloth handy for frequent wipe-downs. More importantly, while stainless steel is durable, it is not scratch-proof. Dragging heavy tools or metal parts across it will leave permanent marks. To keep it looking its best, consider using a self-healing cutting mat or a piece of scrap plywood on top for heavy-duty tasks. The gray wood-grain cabinets are more forgiving, but still wipe up any oil or solvent spills immediately to prevent staining the finish.
6. Raw Concrete Walls Balanced by a Plywood Slat Organizer
The formula here is about balancing raw and refined materials. Think of it as 60% raw industrial + 30% natural wood + 10% black metal accents. The dominant feature is the unfinished concrete wall, providing a textured, neutral base. The large plywood slat wall organizer warms up the space immensely and adds a touch of craftsmanship. The black metal of the rolling cart and tool details provides the final punctuation. You could swap the plywood for dark-stained oak for a moodier look or use a white-painted pegboard instead of concrete for a brighter feel, but keeping that 60/30/10 ratio is key to the vibe.
|
📋 Copy HEX 🔗 Share |
If you have concrete walls, don’t drill a million little holes for individual tool hooks. Install a French cleat or slat wall system made of plywood first. This involves mounting horizontal wooden strips to the wall (use concrete anchors like Tapcons). Then you can create custom holders for all your tools that simply hook onto the strips. This allows you infinite flexibility to rearrange your layout as your tool collection grows, and it’s a single installation job instead of a thousand tiny ones.
7. Go Vertical with Floor-to-Ceiling Utilitarian Shelving
This floor-to-ceiling shelving approach is best suited for garages with generous proportions, ideally a 2.5-car or 3-car garage where you can dedicate an entire wall to storage without impeding vehicle access. A ceiling height of 10 feet or more is recommended to achieve the expansive verticality seen here. In a smaller, single-car garage, the same approach would feel incredibly oppressive and make the space feel smaller. In more compact areas, the overhead storage from Idea #1 can help preserve the feeling of open floor space.
|
📋 Copy HEX 🔗 Share |
A setup this dense can quickly turn into a black hole for lost items. Without a clear system, you’ll spend more time searching for that one specific bolt than you will on your actual project. It’s crucial to categorize everything and use clear, labeled bins. Furthermore, be mindful of what you store on the highest shelves; they are difficult to access and are best for long-term, deep storage items you don’t need regularly. Finally, the exposed utilities and fluorescent lights give it an industrial look, but ensure all wiring is safely routed and not a hazard.
8. Organize Supplies Visually with a Rainbow Spray Paint Rack
It is, without a doubt, the rainbow-ordered spray paint rack. Take it away, and you have a perfectly ordinary, functional workshop. But with it, you have a space with personality, joy, and a stunning visual centerpiece. It’s a brilliant example of how functional storage can also be a major decorative element. It instantly tells you the room is a creative space where color is celebrated. It’s not just practical; it’s an installation piece that turns utilitarian supplies into art, proving that a workshop doesn’t have to be visually boring.
|
📋 Copy HEX 🔗 Share |
You can build a vertical can rack like this in an afternoon. Here’s a quick guide:
- Measure your cans: Standard spray paint cans have a diameter of about 2.6 inches. Plan your rack accordingly.
- Cut your lumber: Use 1×3″ boards. Cut two long vertical pieces and shorter horizontal shelves. Tilt the shelves slightly (about 5-10 degrees) so the cans don’t slide off.
- Add a front lip: Nail or glue a thin strip of wood (like a lattice strip) to the front edge of each shelf to ensure cans can’t slide off. Cost: ~$25 in lumber.
- Assemble the frame: Screw the shelves between the two vertical supports.
- Mount to the wall: Securely screw the entire unit into wall studs.
Then comes the fun part: arranging all your cans by color!
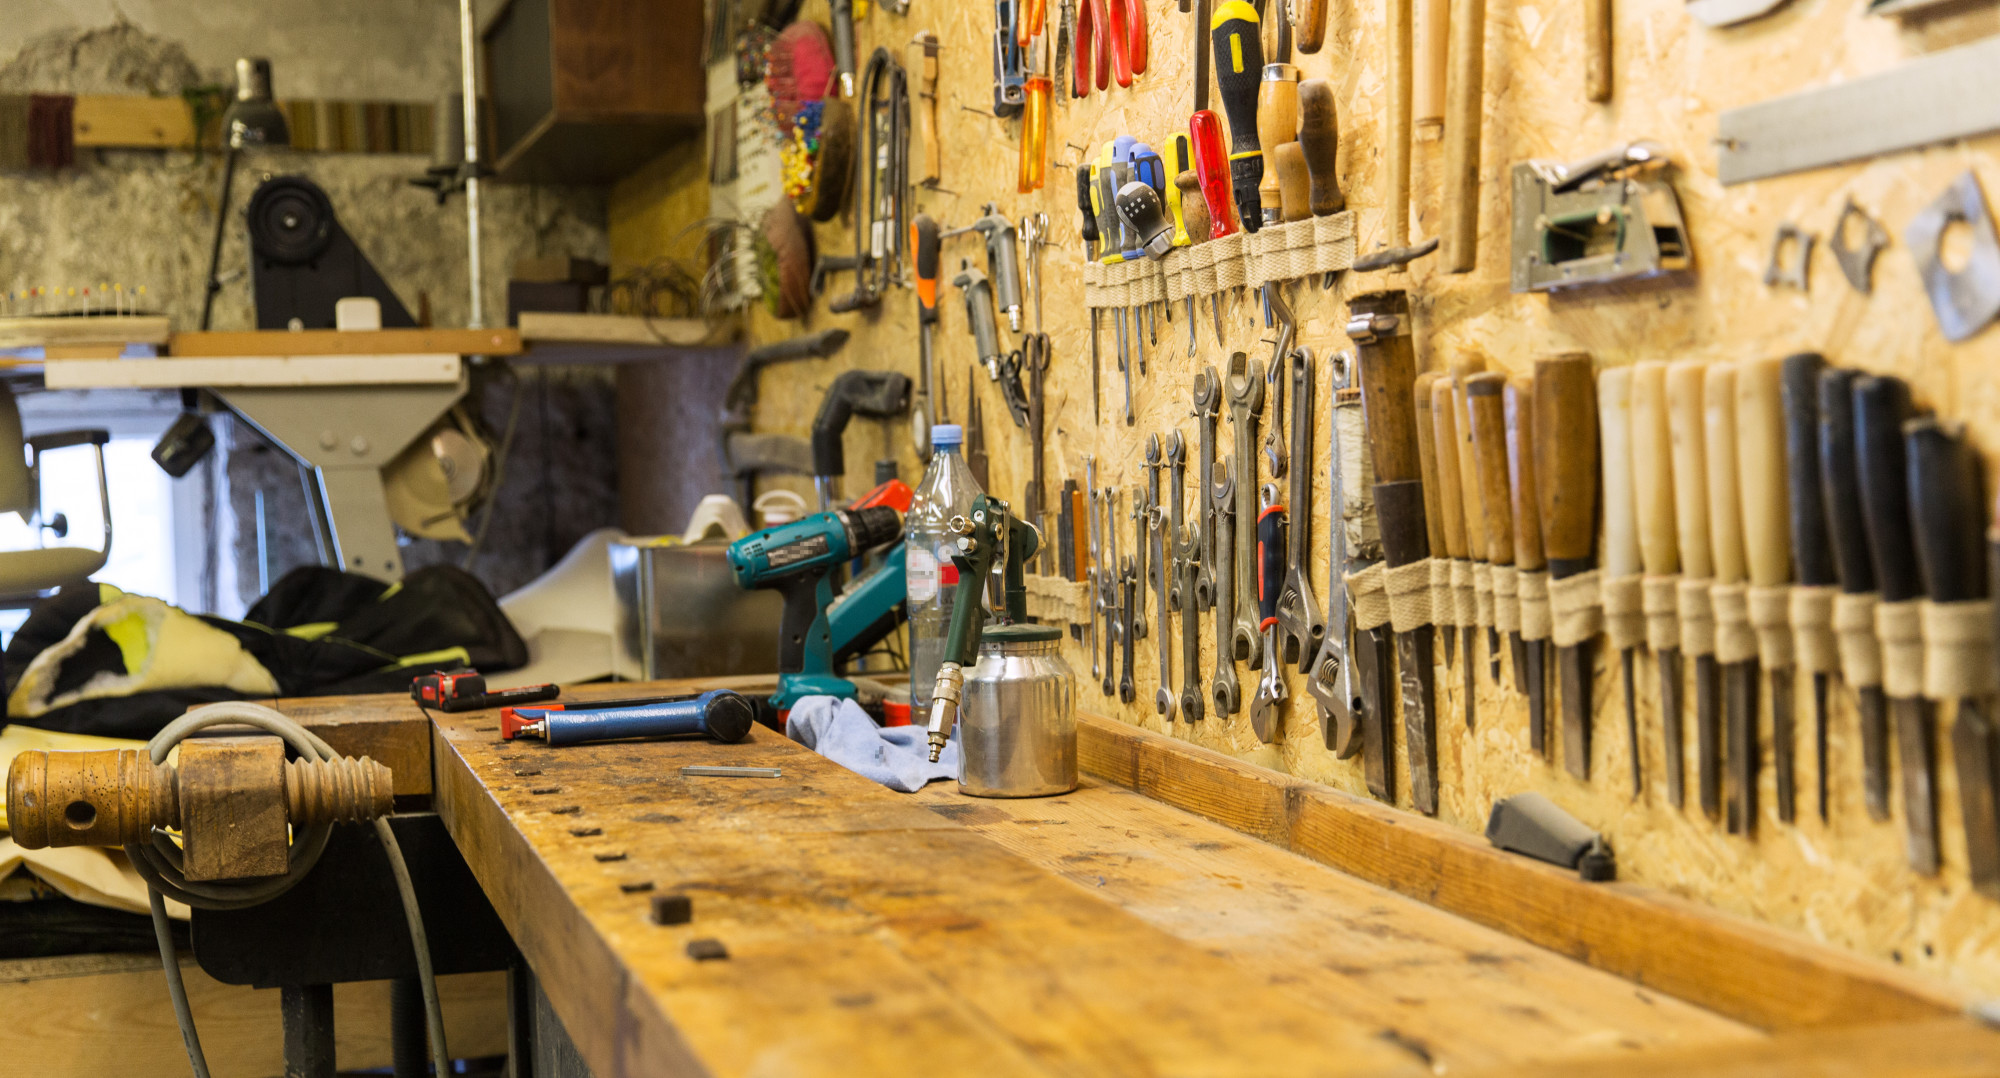
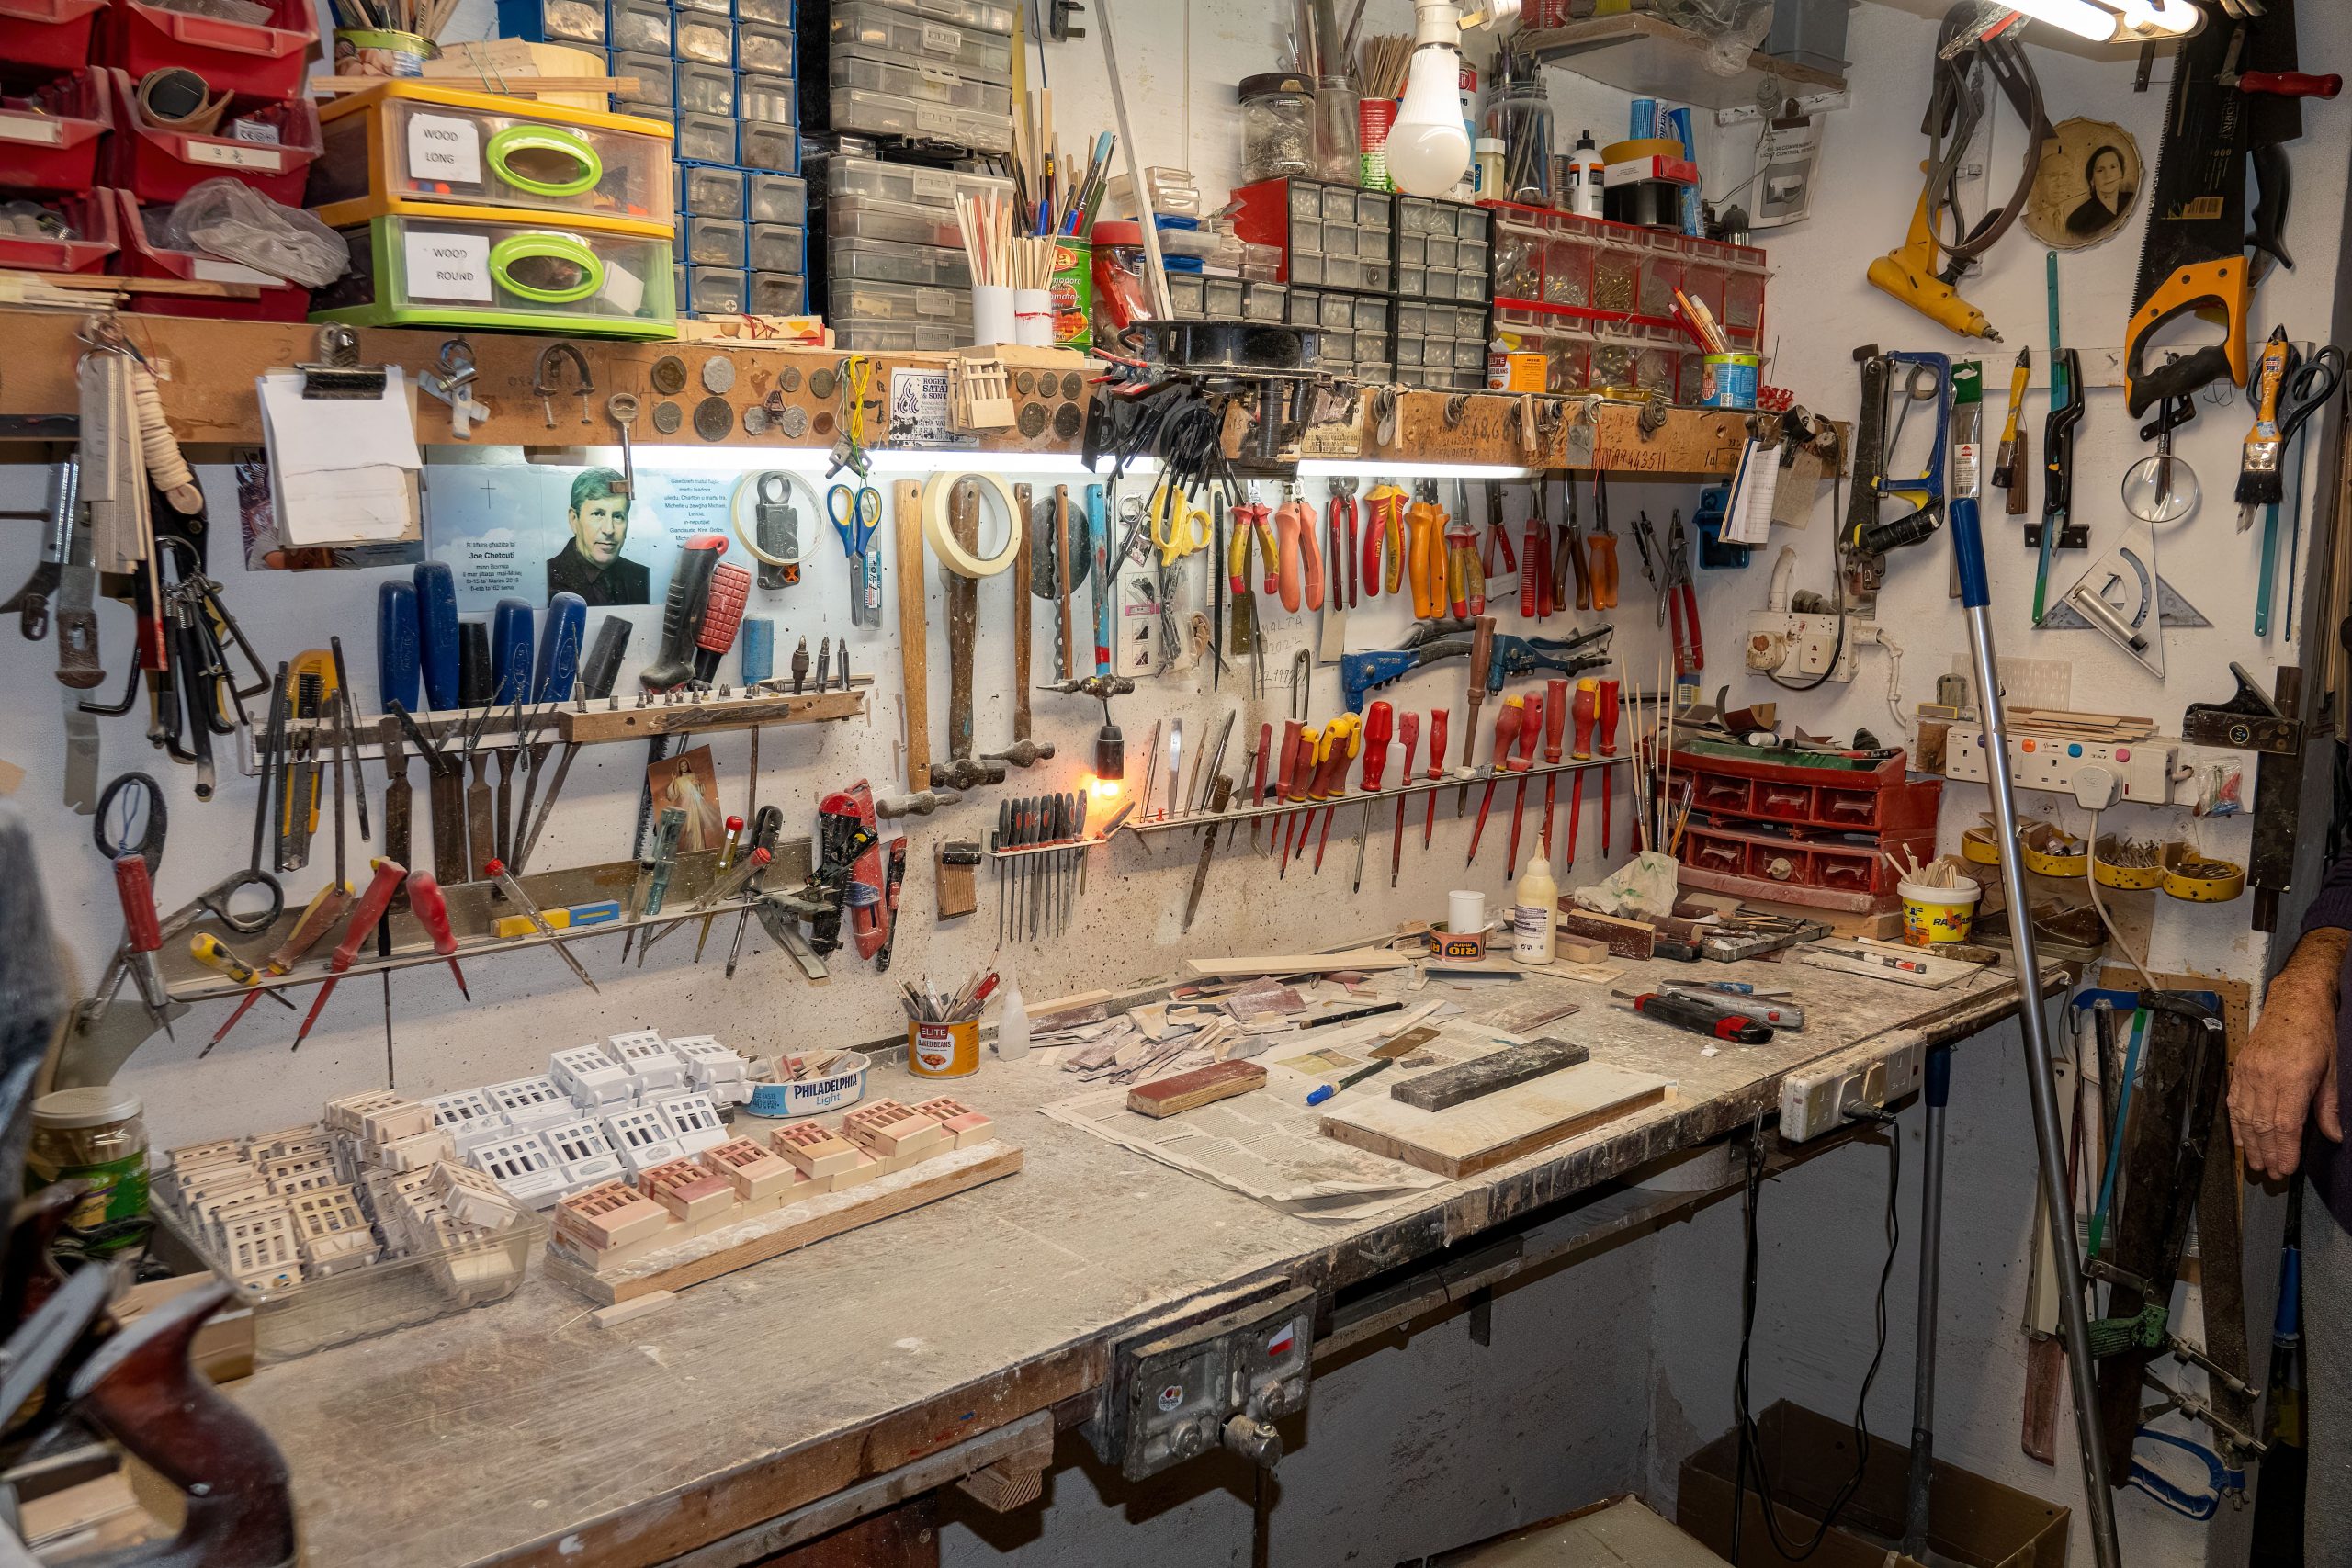
9. Create a Feature Wall with Pegboard Behind a Rustic Workbench
This look is all about accessible materials. A rustic workbench can be made from reclaimed lumber for next to nothing or by distressing new pine boards from a hardware store. For the top, glue and screw together several 2×6 boards. You can find large pegboard sheets at stores like Home Depot or Lowe’s for $20-$30. The key to the ‘rustic’ feel is embracing imperfection—so don’t worry about perfect finishes or precise joinery. The fabric chisel holders can be a simple DIY sewing project using a scrap of canvas, costing just a few dollars.
|
📋 Copy HEX 🔗 Share |
The magic of this space lies in its visual texture and density. The pegboard isn’t just sparsely populated; it’s an extensive array of tools, creating an engaging and interesting feature wall. The repetition of similar shapes—wrench heads, screwdriver handles, and chisel blades—brings a sense of rhythm and order to the potential chaos. The warm tones of the wooden workbench and tool handles provide a beautiful contrast against the cooler metallic silver of the tools, creating a balanced and inviting scene for any maker.
10. Industrial Meets Practical with a Built-in Workshop Sink
Adding a sink to your garage isn’t a casual weekend project. Before you fall in love with this idea, check these essentials:
- Plumbing Access: Is there a nearby water supply line and a drain you can tap into? The closer the better. Extending plumbing can get expensive fast.
- Local Building Codes: Check if you need a permit to add a sink in your garage. Some municipalities have specific rules about drainage and venting.
- Electrical Proximity: Water and electricity don’t mix. Ensure any new plumbing is a safe distance from existing outlets and panels or that you’re using GFCI-protected outlets.
- Water Heater Capacity: Do you want hot water? If so, is your current water heater close enough and large enough to handle the extra demand?
|
📋 Copy HEX 🔗 Share |
When you’re lighting a workshop, one overhead light is never enough. It creates shadows exactly where you don’t want them. The string lights here are a great start, but they’re more for vibe than task visibility. For a setup like this, you need layered lighting. Install bright, even overhead fixtures for general ambient light. Then, add dedicated under-cabinet or track lighting directly over the workbench to illuminate your work surface without casting shadows from your body.
11. Achieve a Custom Look with Horizontal Wood Plank Walls for Tool Storage
This handsome workshop follows a simple formula: 70% warm wood + 20% metallic tools + 10% accent color. The star of the show is the light wood planking that covers the walls, creating a warm, cabin-like feel. The tools themselves become the main decorative element, their silver and black forms standing out against the wood. The final 10% comes from the pops of green in the plastic storage bins, adding just enough color to keep it interesting. You could easily change the accent to red or blue for a different personality without losing the core design.
|
📋 Copy HEX 🔗 Share |
It’s the commitment to using wood for everything. The walls aren’t just drywall with a few shelves; they are fully clad in light wood planks, turning the entire wall surface into a potential mounting point. This creates an incredibly cohesive and high-end, custom-built feel. If you were to replace the wood walls with a standard pegboard or drywall, you’d lose that immersive, craftsman-like atmosphere that makes the space feel so special and elevated beyond a typical garage setup.
12. Build Your Own Flexible Tool Wall with Natural Wood Planks
While the ‘use any screw anywhere’ approach feels liberating, it has its downsides. Unlike a pegboard or slatwall system, every hook you install is a permanent hole. Rearranging your tools becomes a much bigger hassle, involving pulling out screws and leaving visible holes behind. It can also look cluttered more quickly than a gridded system. Be sure about your tool placement before you start drilling, and consider this a more permanent layout. For a more flexible but similar look, refer to the slat wall in Idea #6.
|
📋 Copy HEX 🔗 Share |
This is a fantastic budget-friendly alternative to expensive slatwall systems. All you need are standard pine or fir planks from a place like Lowe’s or Home Depot. Look for the cheapest grade of 1×6″ or 1×8″ boards. Mount them horizontally directly into the wall studs. You’re creating your own mounting surface for a fraction of the cost. The tool holders are just basic screws, nails, and simple metal brackets, which are far cheaper than proprietary slatwall hooks. You get a similar custom, wood-clad look for pennies on the dollar.
13. Exposed Brick Becomes a Rugged Backdrop for Heavy Machinery
This space works because of the powerful contrast between the rough, irregular texture of the terracotta brick and the smooth, engineered precision of the red metal machinery. The brick adds a layer of history and character that you just can’t achieve from drywall. It provides a warm, earthy-toned canvas that makes the industrial gray and red of the tools feel grounded. The organized chaos of the tools on the pegboard above adds another layer of functional texture, creating a space that feels both historic and highly productive.
|
📋 Copy HEX 🔗 Share |
Brick is incredibly durable, but it’s also porous. In a workshop setting, its porosity means it can absorb oil, grease, and other liquids, leading to permanent stains. More importantly, brick and the mortar between it can create a surprising amount of dust. If you’re doing woodworking, fine sawdust will get trapped in the rough surface and be very difficult to clean. Consider sealing the brick with a clear, matte-finish masonry sealer to make it easier to wipe down and to reduce dust and grit from the wall itself.
14. Bold Red Accents Energize This Organized Garage Layout
Recreating this organized and colorful setup involves a few key purchases. The bold red workbench and tool chest are the centerpiece.
- Main Furniture (Workbench/Tool Chest): $400 – $1,500
- Overhead Wire Shelving: $200 – $500
- Pegboard & Hooks: $50 – $150
- Decor/Accessories (Wall-hung tools): $100 – $400+
- Epoxy Floor Coating: $300 – $800 (for a 2-car garage, DIY)
- TOTAL: $1,050 – $3,350
Budget alternative: Paint a second-hand wooden workbench a bold red and find used wire shelving on Facebook Marketplace to get this look for 40-50% less.

|
📋 Copy HEX 🔗 Share |
This layout is a fantastic model for a standard one or two-car garage. By consolidating the primary workshop functions—workbench, tool storage, and pegboard—along one wall, you leave a significant amount of open floor space. This is crucial if you still need to park a car or have room for large projects. The use of overhead storage for bulky, less-frequently-used items is also key. This design would likely feel a bit sparse in a three-car garage, but it’s a highly efficient and realistic plan for the average suburban home.
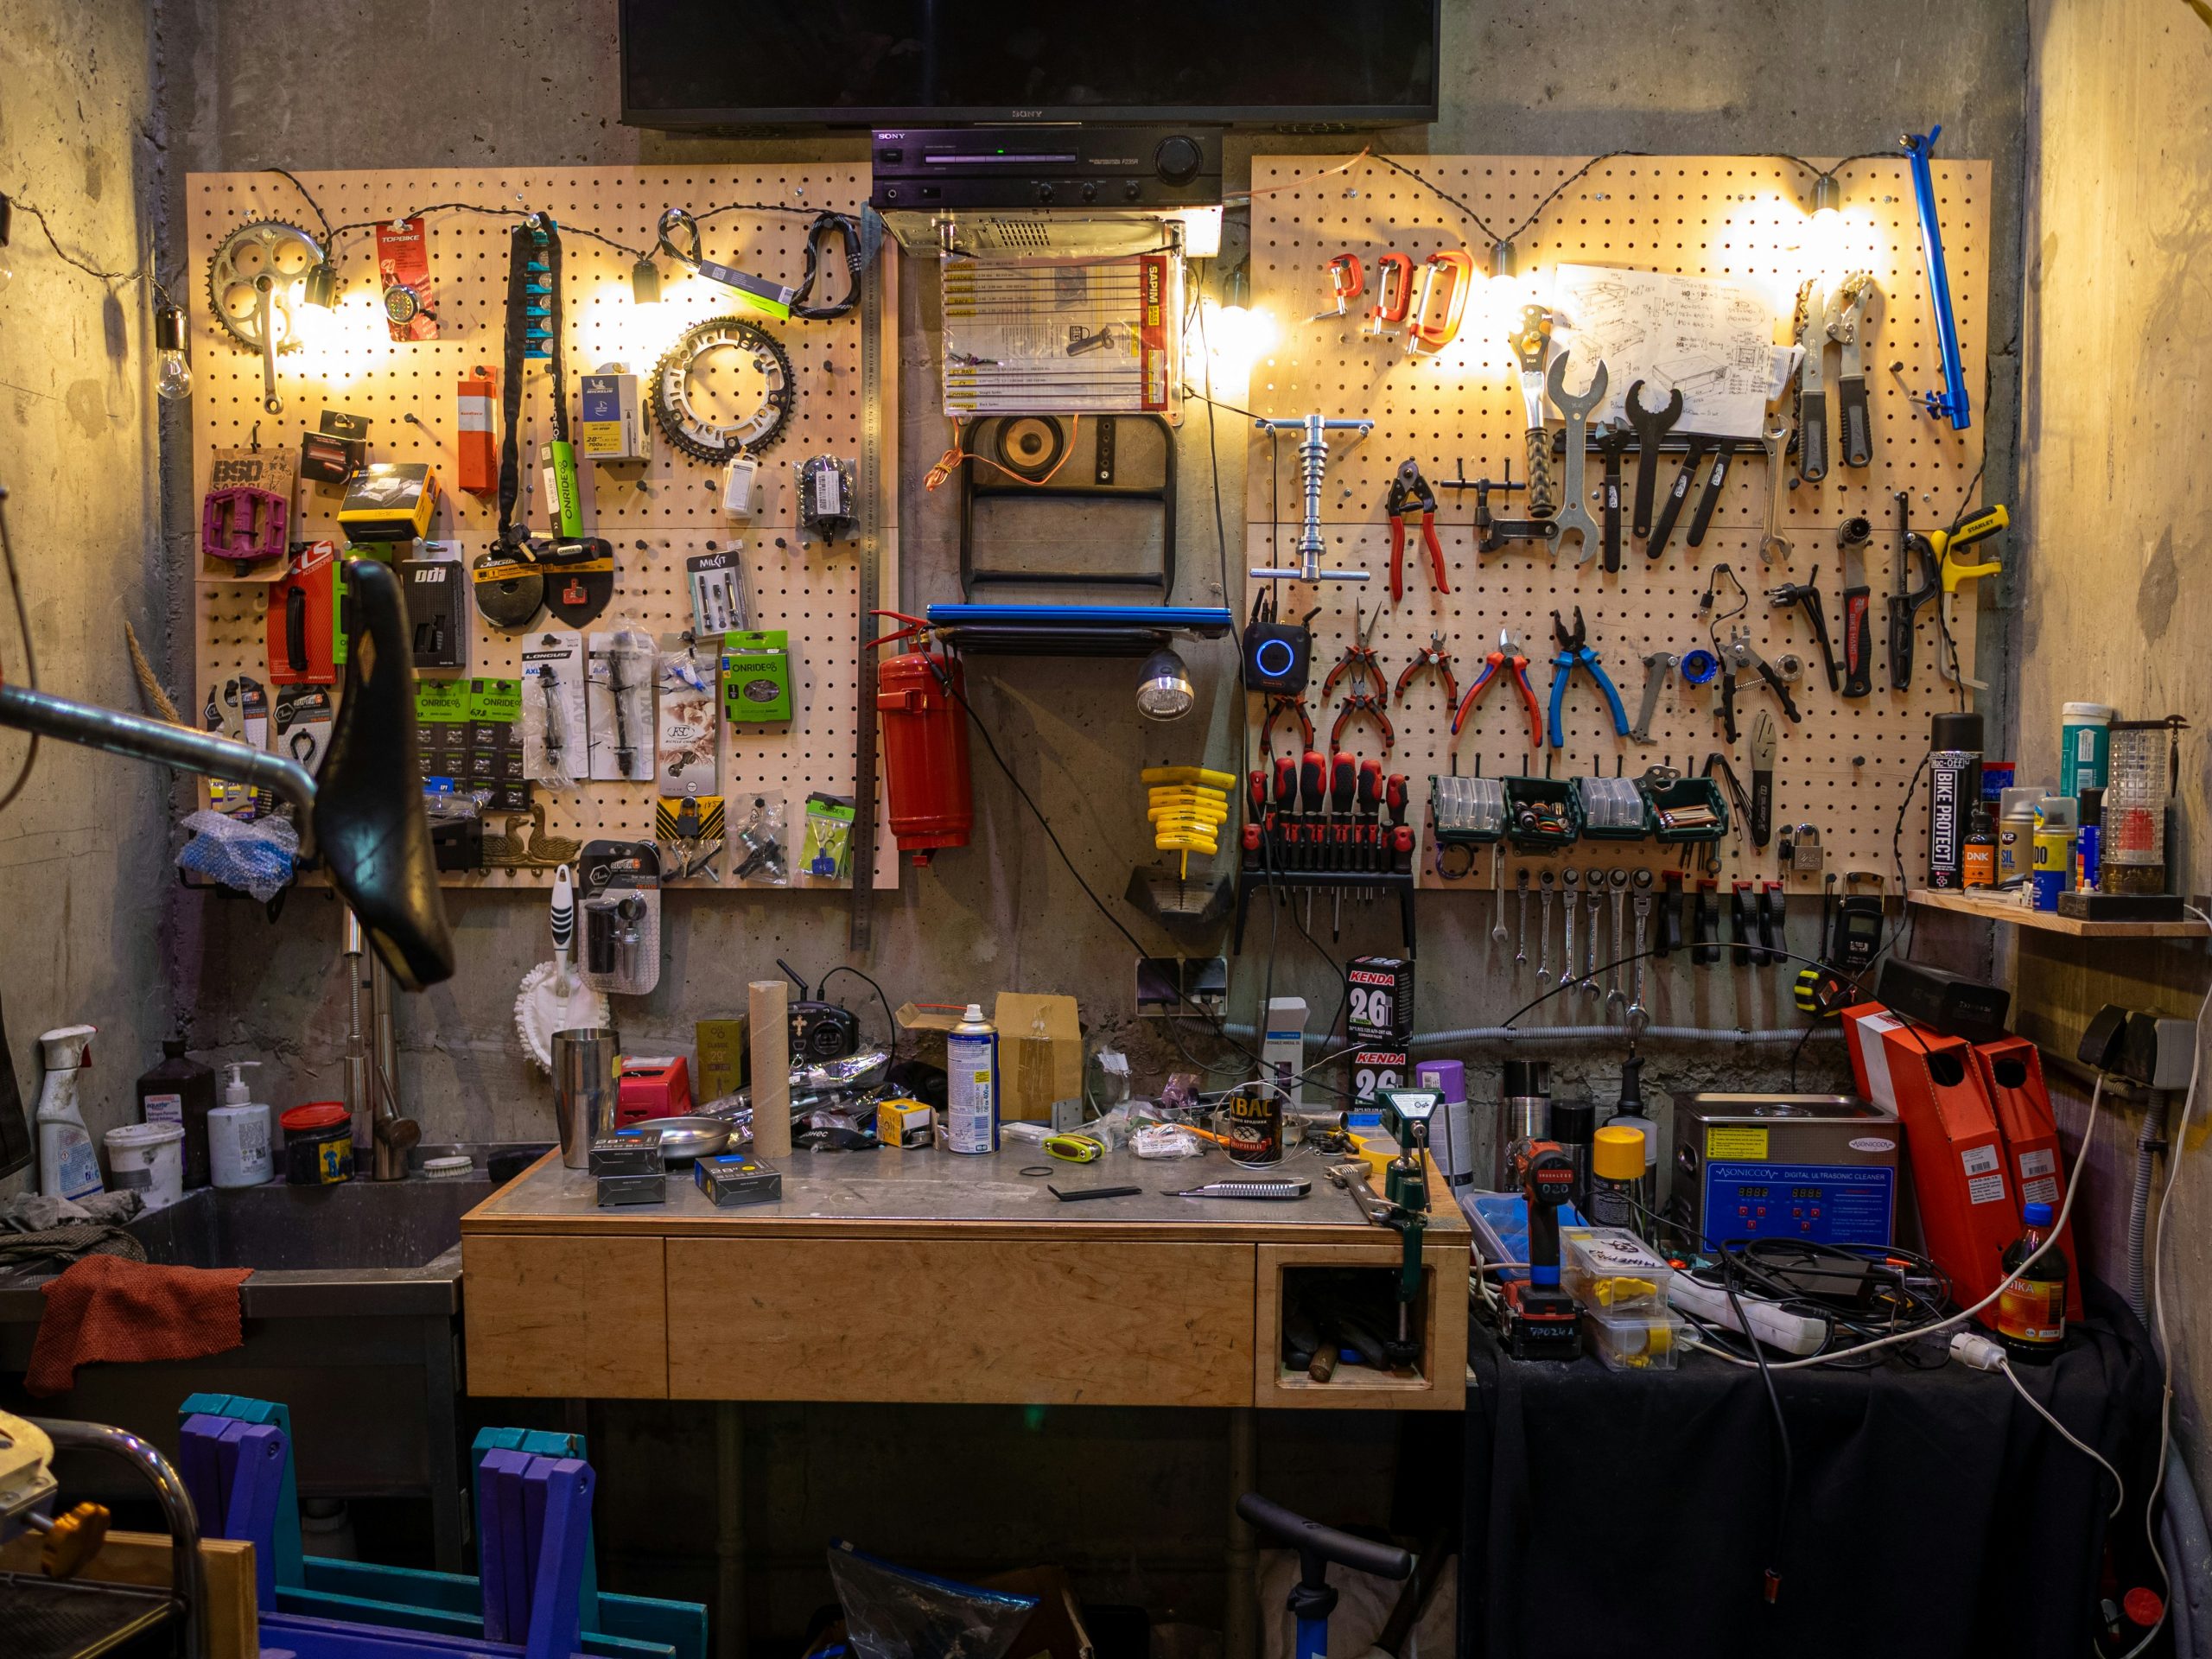
15. The ‘Productive Chaos’ Approach to Overhead Workstation Storage
The key element here is the layering of storage directly above the workbench. It’s not just one shelf; it’s a dense stack of wall-mounted hooks, ledges, and clear plastic organizers. This creates an extremely high-density storage zone where everything is visible and within immediate reach of the main workspace. While the rest of the garage might be organized differently, this concentrated hub of ‘organized chaos’ is what defines the workstation. Without it, the bench is just a flat surface; with it, it’s a complete, self-contained project ecosystem.
|
📋 Copy HEX 🔗 Share |
Stop hunting for screws and small parts. Get a set of those clear, multi-drawer organizers and mount them to the wall right above your workbench. But don’t just throw things in them—take 30 minutes to properly label every single drawer. Use a label maker for a clean look. This is the single best thing you can do to manage the tiny items that get lost in a busy workshop. You’ll save hours of searching in the long run. It’s a small investment in time that pays giant dividends in productivity.
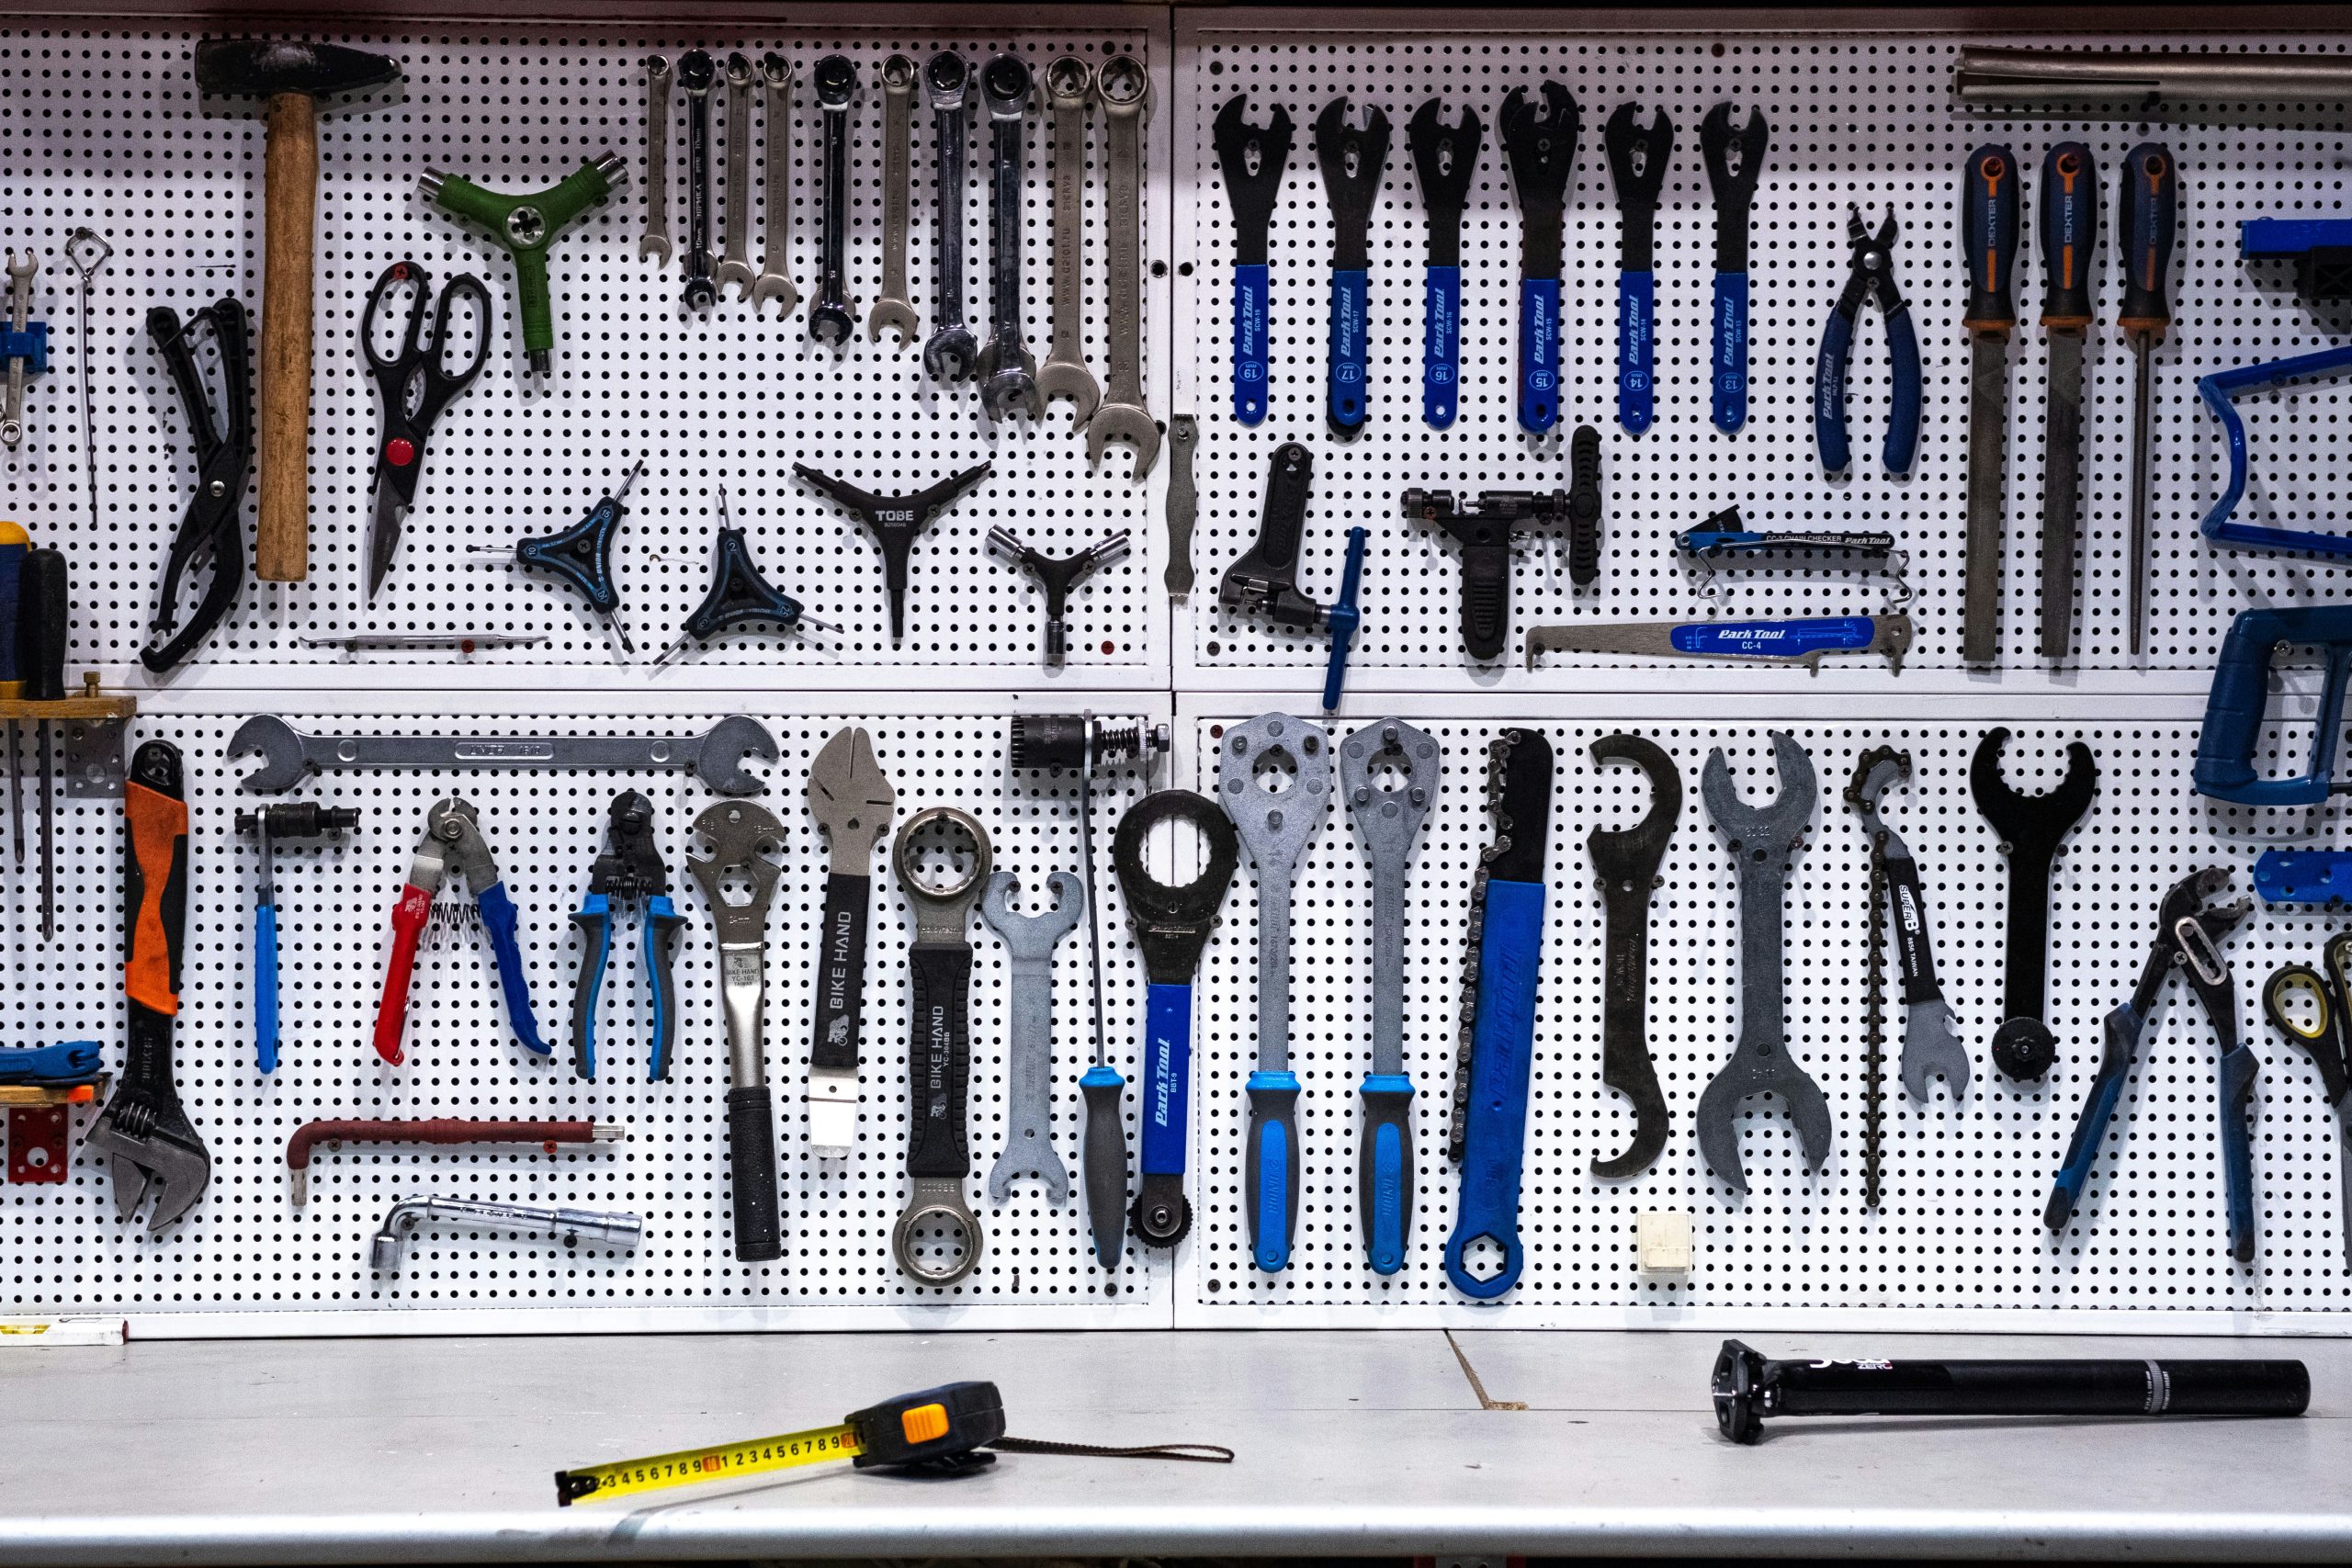
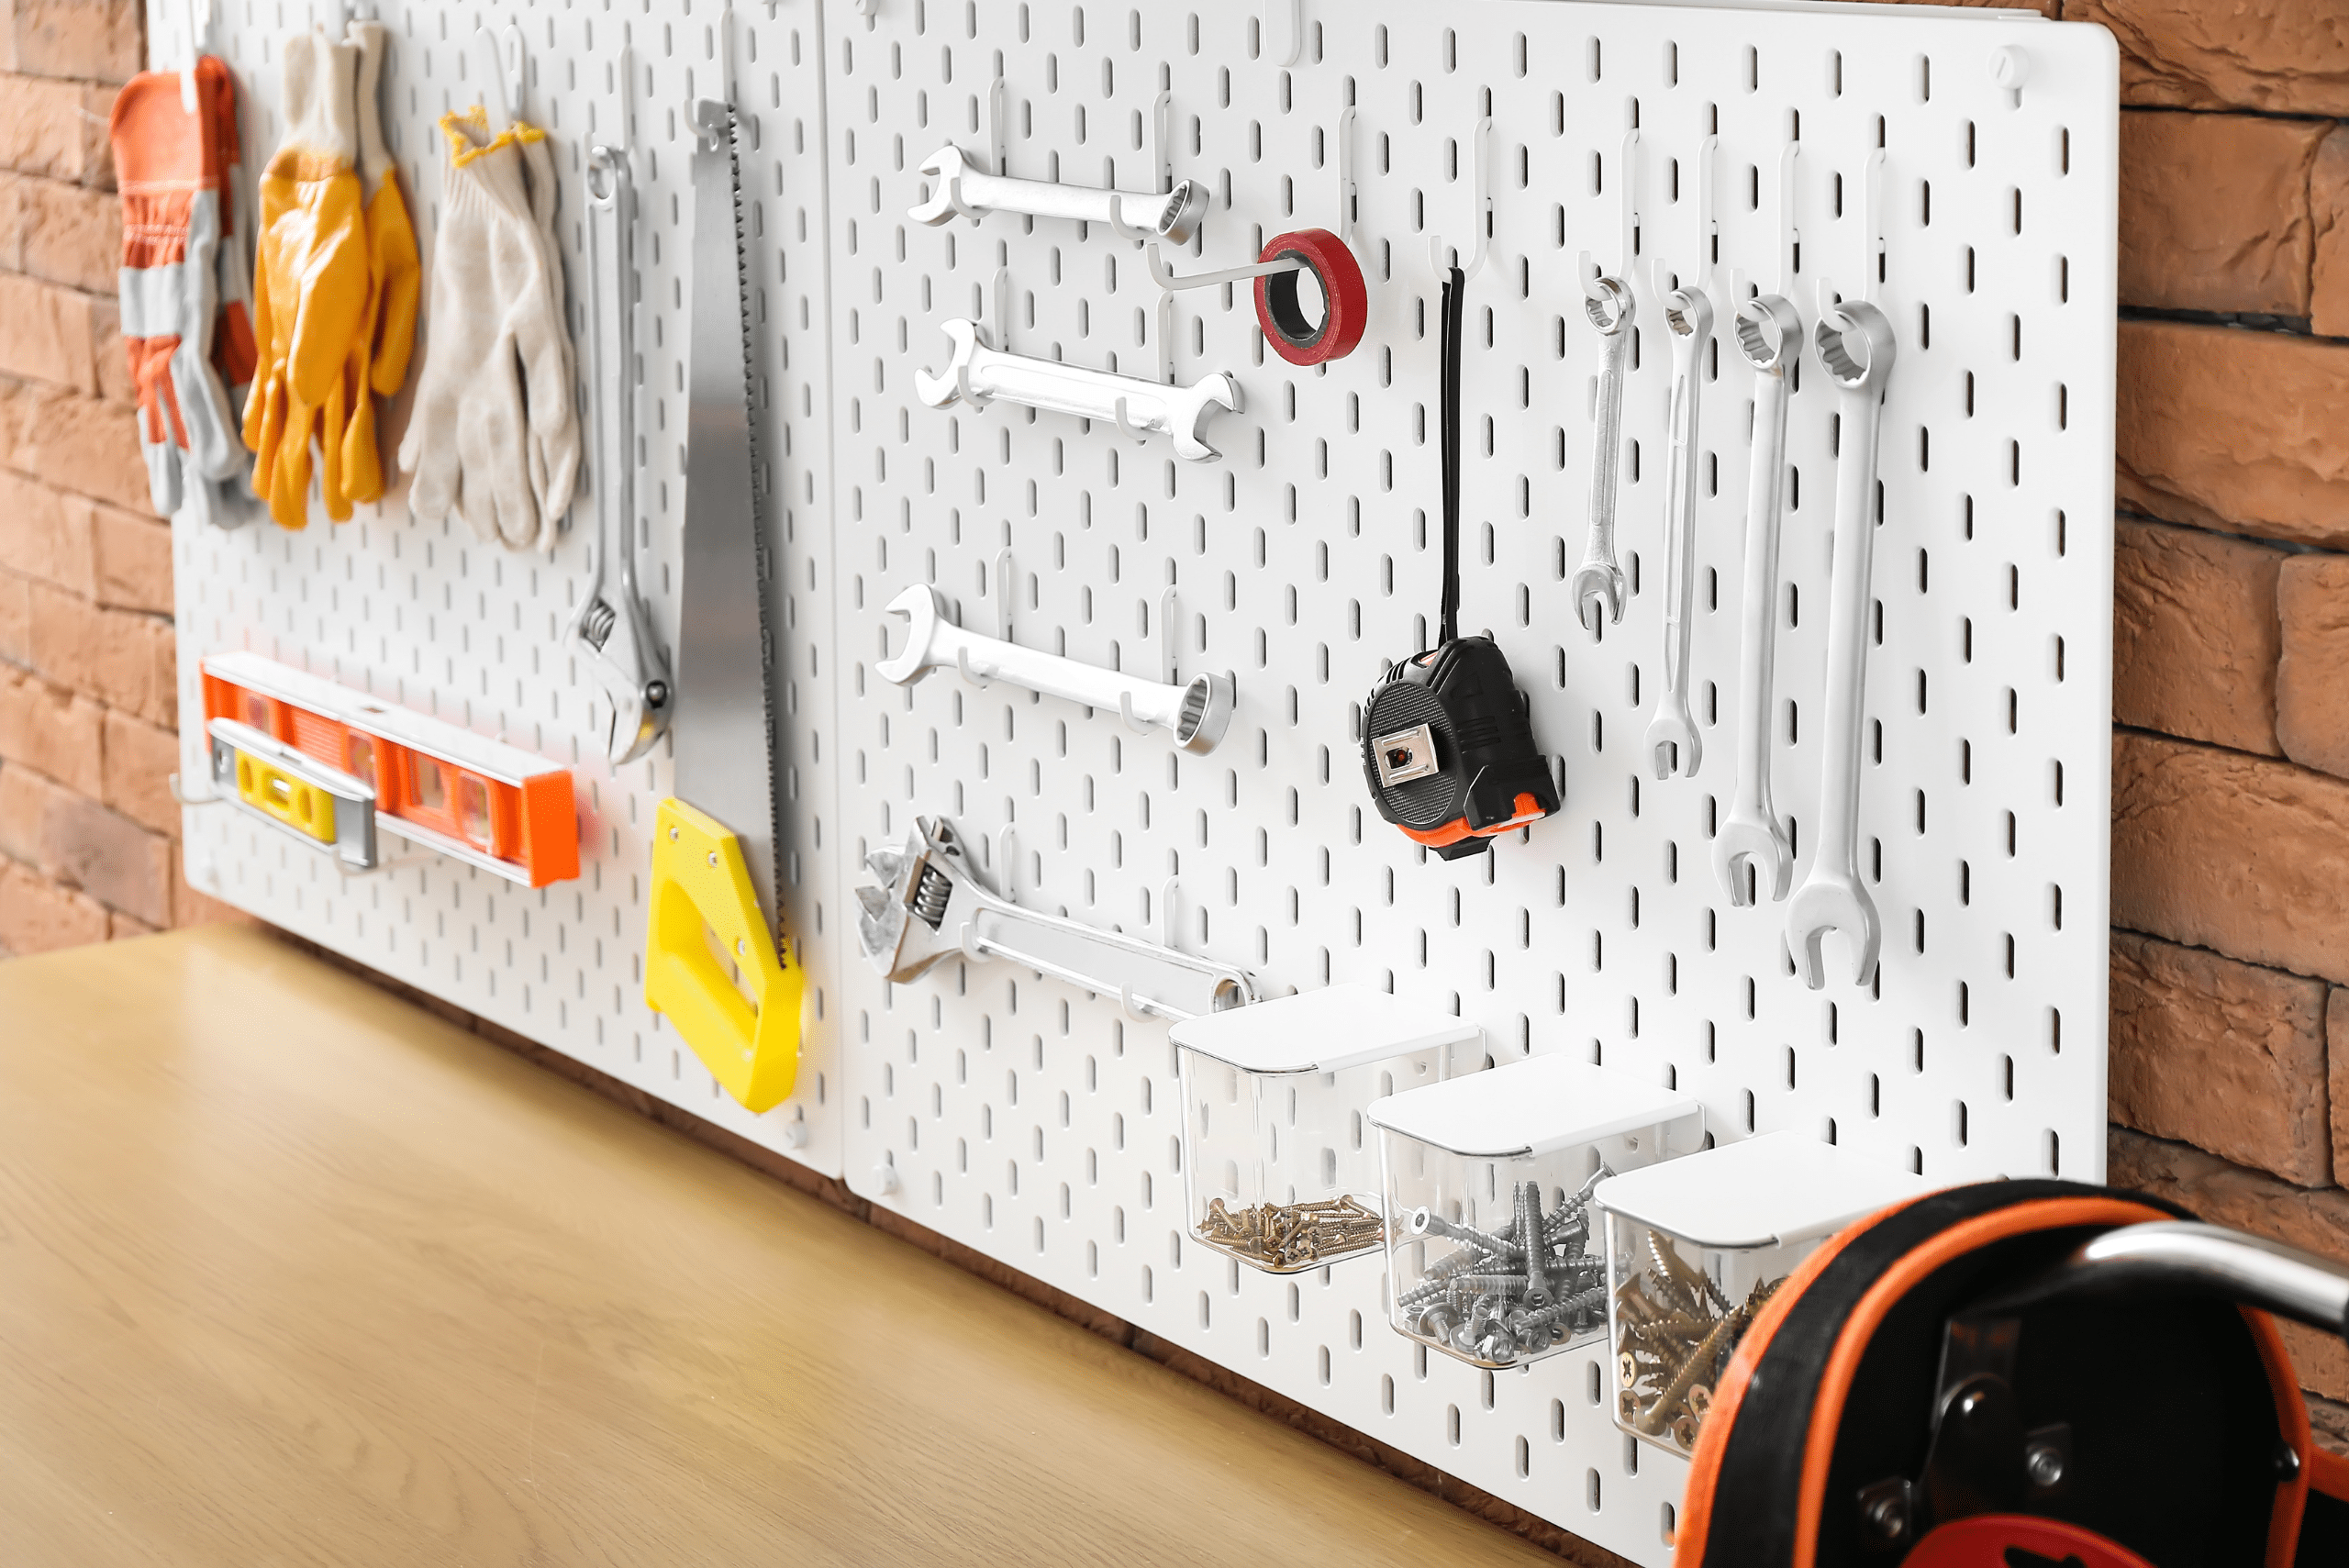
16. A Clean White Pegboard System for the Bicycle Mechanic
This clean and functional look is all about a high-contrast, minimalist formula: 70% white space + 20% metallic tools + 10% color accents. The large white pegboard provides a bright, grid-like canvas that feels clean and organized. The tools themselves, with their silver metal and black details, provide the primary visual interest. The final touch comes from the small pops of blue and red on the plier handles, which add a bit of personality without overwhelming the calm, controlled aesthetic. It feels professional and precise.
|
📋 Copy HEX 🔗 Share |
A white pegboard looks fantastic when it’s new, but it will show every speck of grease, oil, and dirt. If you’re working on greasy projects like bike repair or engine work, be prepared to wipe down the board and your tools frequently to maintain this clean look. A darker colored pegboard (like the black one in Idea #4) is much more forgiving of smudges and grime. The pristine white is a lifestyle choice; just make sure it’s one you’re willing to maintain!
17. Simple and Rustic: A Single Shelf on a White-Painted Brick Wall
This is the ultimate budget-friendly workshop wall. All you need is a single plank of wood and a few wall brackets from a hardware store for less than $20. The ‘hooks’ are just regular screws driven directly into the brick’s mortar joints (or into the brick itself with a masonry bit and anchor). The white paint is a great way to unify a rough or mismatched brick wall, and a gallon of basic white latex paint is around $30. The red tins add a lovely pop of color and can be found at thrift stores or flea markets for a dollar or two each.
|
📋 Copy HEX 🔗 Share |
Hanging a shelf on a brick wall is easier than you think, but it requires the right tools. Here’s how:
- Choose your location: Use a level to mark a straight line for your shelf brackets.
- Get the right bit: You need a masonry drill bit. A standard wood bit will be destroyed.
- Drill the holes: Drill into the brick itself, not the mortar, for the strongest hold. Go slow and steady.
- Insert wall anchors: Gently tap plastic or lead wall anchors into the holes until they are flush with the wall.
- Mount the brackets: Screw your shelf brackets securely into the anchors.
This process takes about 30 minutes and ensures your shelf can handle the weight of tools and supplies.
18. Layer Storage with Pegboard Over Corrugated Metal Walls
Don’t try to mount pegboard directly onto corrugated metal walls. The uneven surface will cause the board to warp, and the hooks will be unstable. Instead, first mount vertical wood furring strips (2x4s work well) to the wall. You may need specialized self-tapping screws designed for metal siding. Once you have this solid, flat wooden framework in place, you can easily and securely attach your pegboard to the wood. This step also creates the necessary gap behind the pegboard for the hooks to function properly.
|
📋 Copy HEX 🔗 Share |
This layered, industrial look is especially well-suited for outbuildings, sheds, or the kind of pre-fabricated metal garages that are common in more rural areas. The scale is highly adaptable; you can apply this treatment to a small 8×10-foot section of wall or cover the entire interior of a large 30×40-foot workshop. The key is the willingness to embrace the raw, unfinished look of the corrugated metal as a design element rather than trying to hide it completely behind the pegboard.
19. A Flexible Woodworker’s Garage with Plywood Cabinetry on Casters
The success of this workshop lies in its modularity. Nothing is permanently fixed. The plywood workbenches, cabinets, and even the tool stands are all on casters. This allows the layout to be completely reconfigured in minutes to accommodate different types of projects. You can roll a planer to the center for milling large boards, then push it back against the wall to create an open assembly area. This flexibility is what turns a standard garage into a highly efficient and adaptable woodworking studio. The consistent use of unfinished plywood unifies the different pieces into a cohesive set.
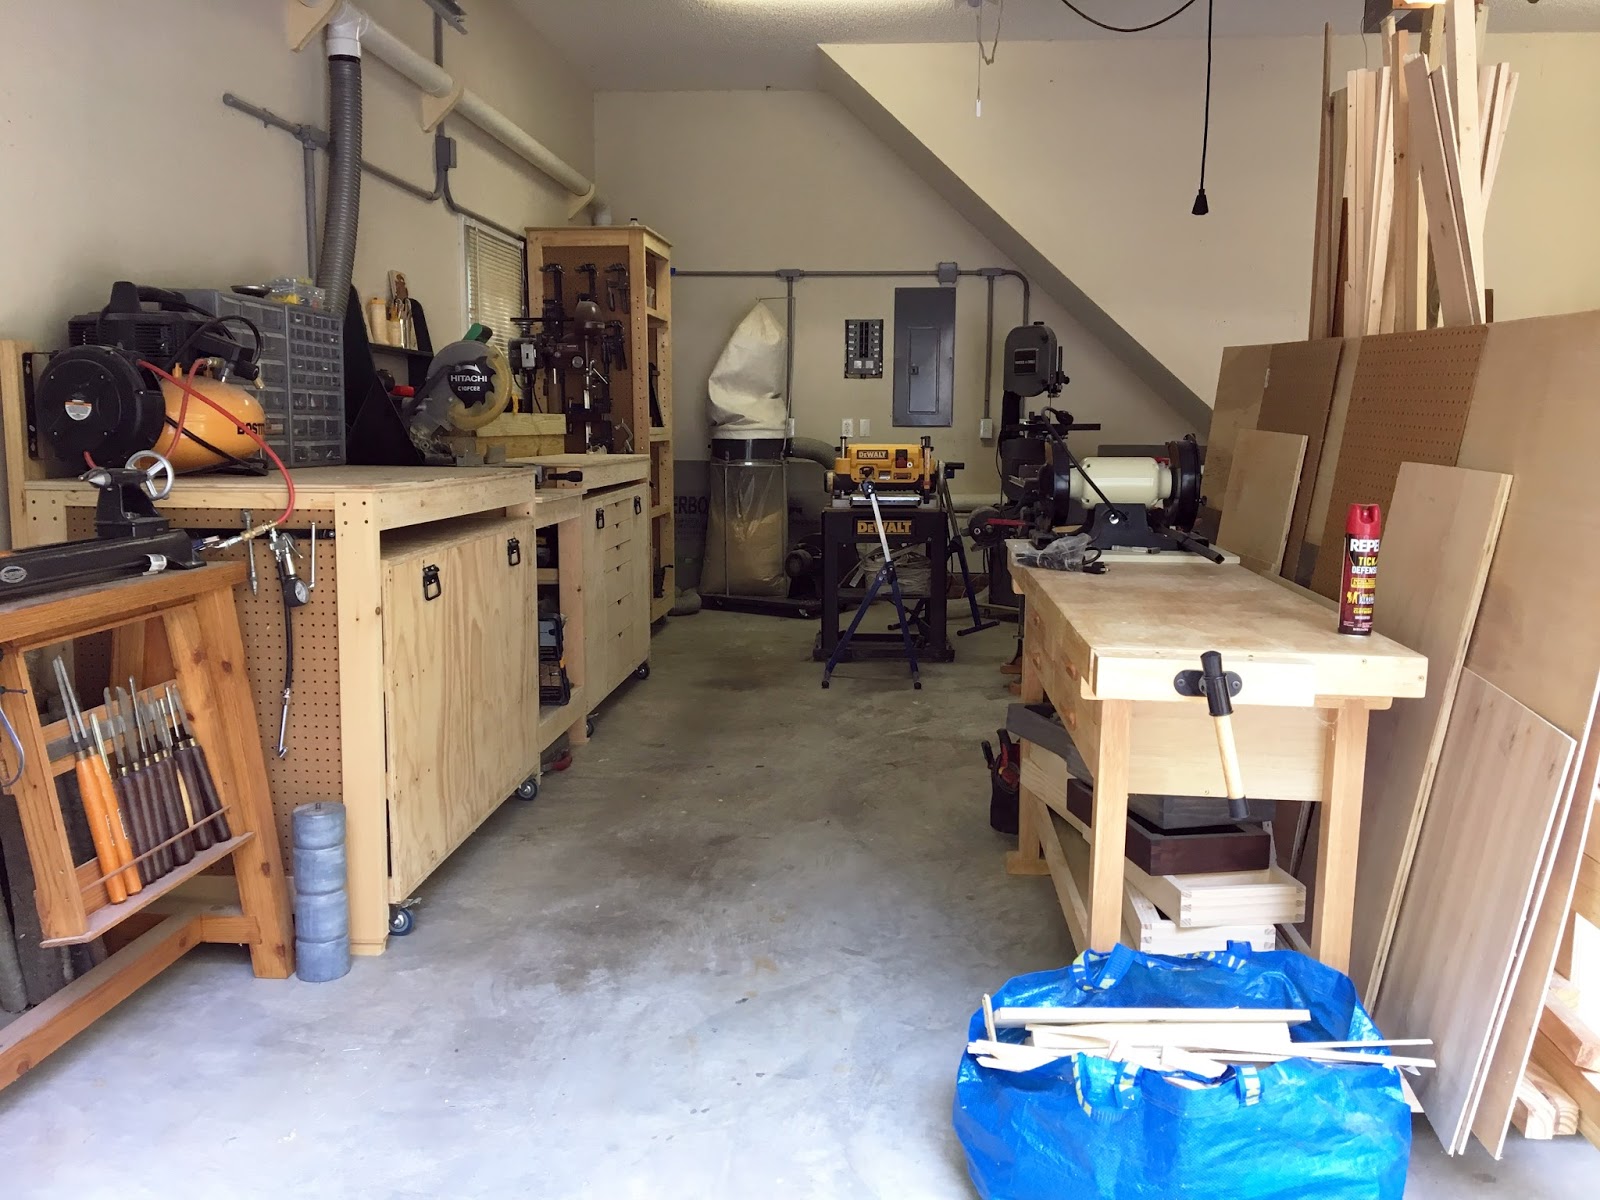
|
📋 Copy HEX 🔗 Share |
The single most important element is the casters. Without those wheels, the system is just a collection of heavy, static workbenches that would create a cramped and inflexible space. The ability to move every single piece is what makes the entire system work. It acknowledges that a workshop’s needs change from day to day and from project to project. If you take away the mobility, you take away the core intelligence of the design. If your space needs to be multi-functional, like the one in Idea #23, mobility is a non-negotiable feature.
20. Industrial Simplicity: A Metal Workbench and Vise as the Centerpiece
A heavy-duty metal workbench like this is a great addition, but it has a downside: it’s incredibly heavy. Once you have it in place, you are not going to move it easily. Plan your layout carefully beforehand and make sure you have a permanent spot picked out. Furthermore, the metal surface can be unforgiving. A dropped tool is more likely to break, and certain chemicals or intense heat can damage the bench itself. The green vise is a classic, but it needs to be maintained to prevent rust and to keep the screw mechanism moving smoothly.

|
📋 Copy HEX 🔗 Share |
This look is about celebrating industrial forms. The recipe is simple: 50% Heavy Metal + 30% Structural Color + 20% Ambient Light. The massive gray metal workbench is the undisputed hero piece. The bold orange of the structural I-beam provides a powerful, colorful counterpoint that draws the eye. The final 20% is the soft, diffused light from the window, which softens the sharp edges and prevents the space from feeling too cold or severe. The beauty is in the functional, unadorned forms of the objects themselves.
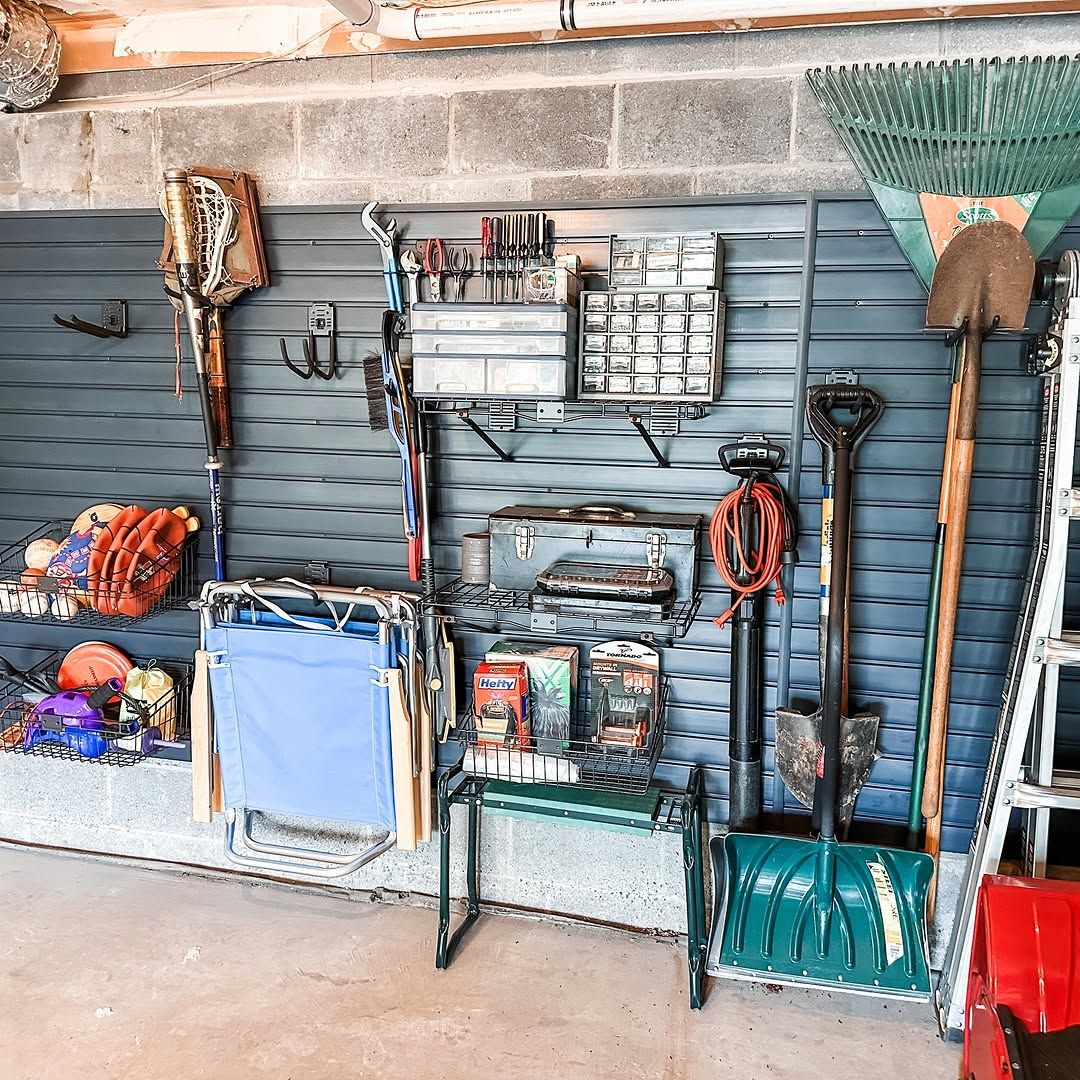
21. Modern Organization with a Dark Gray Slatwall System
Slatwall is becoming the go-to for garage organization in 2026, and for good reason. It offers the ultimate in modularity and a clean, high-end look that homeowners love. People are moving beyond simple hooks on drywall and demanding systems that look as good as they function. The dark gray color seen here is particularly on-trend, offering a sophisticated, modern alternative to basic white or wood. It hides dirt well and makes colorful tools and accessories pop. This system, which you can compare to the setup in Idea #5, transforms garage walls into a fully customizable storage canvas.
|
📋 Copy HEX 🔗 Share |
Before you invest in a slatwall system, do a quick inventory. What do you plan to hang up? Slatwall is fantastic for hand tools, sports equipment, and small bins, but it has its limits.
- Check the weight capacity: Not all slatwall panels and hooks are created equal. Verify the load rating per hook and per square foot to ensure it can handle your heavier items.
- Measure your bulkiest items: Will your largest tools or bins actually fit on the hooks and accessories available?
- Price out the accessories: The panels themselves are only part of the cost. The specialized hooks, baskets, and shelves can add up quickly. Make sure the total cost fits your budget.
22. A Bright, Sunlit Woodworking Shop with Natural Finishes
This workshop is so successful because it prioritizes natural light. The large, wooden-framed windows flood the space with bright, even light, which is ideal for detail-oriented work and makes it a genuinely pleasant place to be. The choice to use natural wood for the workbenches, window frames, and shelving creates a warm and cohesive environment. The light beige walls and white ceiling act as a neutral canvas, reflecting light and making the space feel even larger and more open. It feels less like a garage and more like a professional artisan’s studio.
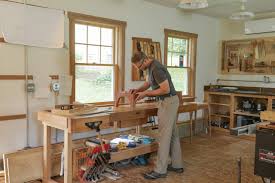
|
📋 Copy HEX 🔗 Share |
A well-lit, multi-station setup like this one requires a generous amount of space. This idea is best implemented in a large, detached garage or a dedicated outbuilding of at least 400-500 square feet (e.g., 20×25 feet). The long workbenches and dedicated zones for different tools demand a significant footprint. Trying to cram this much into a standard one-car garage would result in a very cramped and unsafe working environment. For smaller spaces, a more compact, single-wall layout is a much better approach.
23. A Central Table Saw Station for an Efficient Woodworking Layout
For any serious woodworker, the table saw is the heart of the shop. When planning your layout, give it the most prominent position. You need adequate ‘infeed’ and ‘outfeed’ clearance—at least 8 feet in front of and behind the blade—to safely cut full sheets of plywood or long boards. You also need clearance on the sides. By placing it centrally and orienting it diagonally or with the longest dimension of the room, you maximize your ability to handle large materials, which is the most common constraint in a garage workshop.
|
📋 Copy HEX 🔗 Share |
A setup with this much machinery and raw material presents a major dust problem. A simple shop vac won’t be enough. Fine wood dust is not only messy, but it’s also a serious health hazard. To make a space like this truly functional and safe, you need to budget for a dedicated dust collection system. This involves a central collector, ducting run to each major machine, and blast gates to control suction. Without it, every surface (including your lungs) will end up with a fine layer of sawdust after every single project.
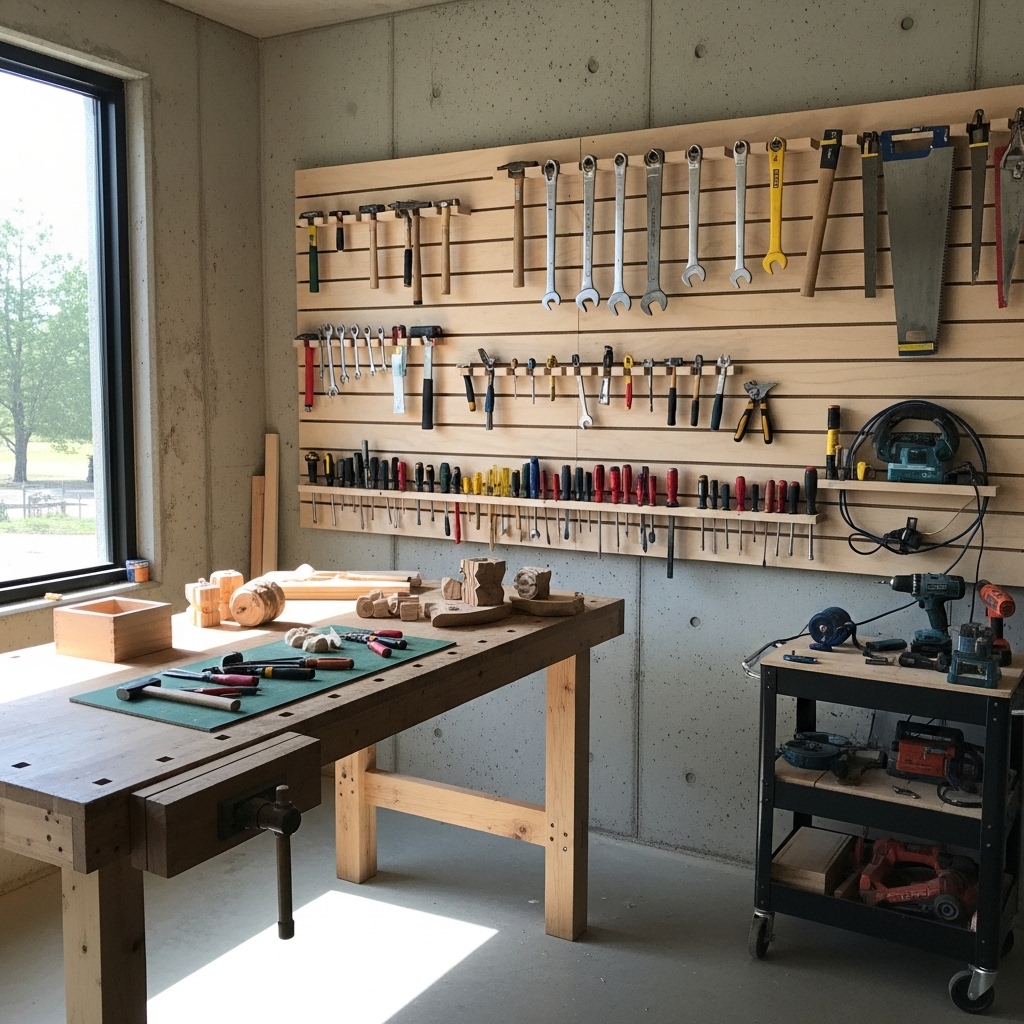
24. Warm Plywood Pegboard for a Creative and Organized Tool Display
The plywood pegboard wall is the undeniable heart of this space. It’s a warmer, more textural alternative to standard brown hardboard or metal pegboards. The natural wood grain adds a layer of visual interest and character that makes the wall feel like a deliberate design choice, not just a utilitarian afterthought. It perfectly complements the workbench and the decorative boxes, creating a cohesive, crafty aesthetic. It elevates the tool storage from purely functional to functionally beautiful. For another take on plywood walls, see Idea #6.
|
📋 Copy HEX 🔗 Share |
The visual recipe here is about texture and playful color. Let’s call it: 60% Warm Wood Textures + 30% Tool Shapes + 10% Color Pops. The plywood pegboard and light wood workbench create a dominant, warm-toned foundation. The black, silver, and assorted shapes of the tools themselves form a complex, patterned layer. The final 10% comes from the bright pops of orange, red, and teal on the tool bodies and handles. This dash of vibrant color is what gives the workshop its energetic and creative personality.
25. A Compact and Bright Plywood Shed Workshop
This idea works perfectly in a small, dedicated space like a backyard shed or a single-car garage. A footprint of around 8×12 feet to 10×16 feet is ideal. The key to making it work in a compact area is using vertical space effectively with tall shelving units. The unfinished plywood walls and exposed framing are a smart choice for a small space, as they add texture without the visual weight of color or drywall. The two windows are crucial, as natural light makes any small room feel larger and more workable.
|
📋 Copy HEX 🔗 Share |
Building a sturdy, freestanding shelving unit like this is a perfect weekend project for a budding woodworker. Material costs are around $60 to $100.
- Design your size: Measure your space and decide on the height, width, and depth. A depth of 16-18 inches works well for most tool cases.
- Build the side ladders: Construct two ‘ladders’ using 2x4s for the vertical uprights and 1x4s for the horizontal shelf supports.
- Cut the shelves: Cut your shelf surfaces from 3/4-inch plywood or MDF to your desired width.
- Assemble the unit: Stand the side ladders up and screw the shelves onto the horizontal supports. Start at the bottom and work your way up. Use a level!
This simple construction creates an incredibly strong and affordable storage solution.
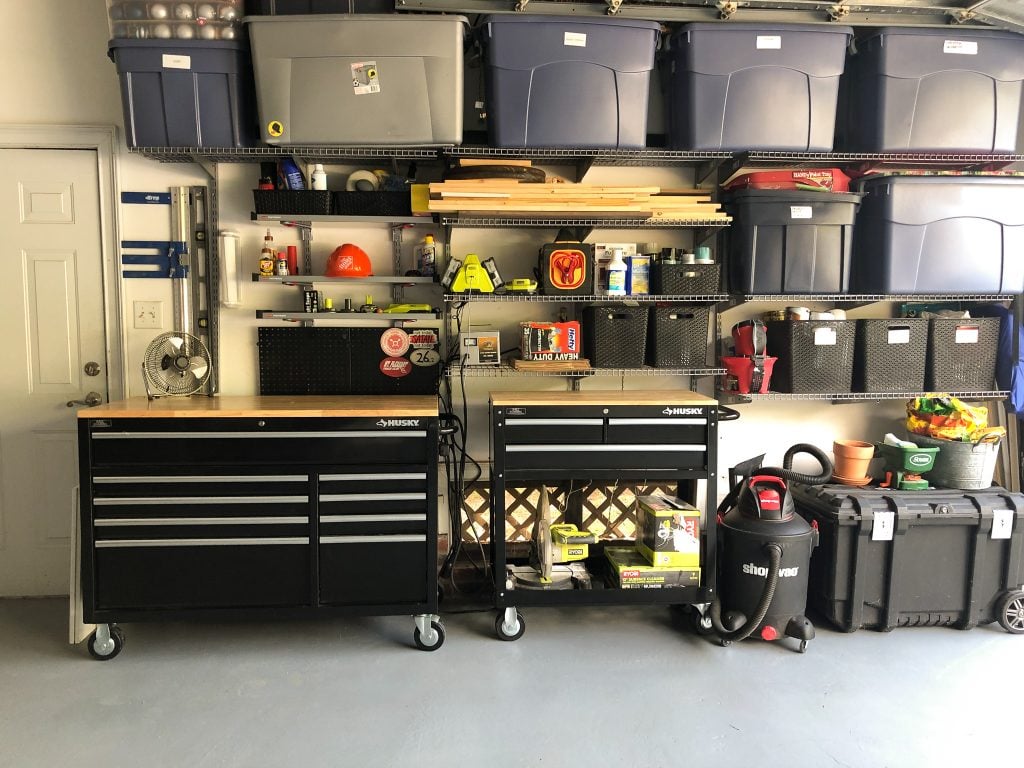
26. Combine Open Wire Shelving with Rolling Tool Chests
This layout masterfully combines two types of storage for maximum efficiency. The open wire shelving overhead is perfect for bulky items and stackable bins, allowing you to see everything at a glance. Below, the rolling tool chests provide secure, organized storage for precision tools and smaller items, and their wooden tops double as mobile work surfaces. This two-part system keeps frequently used, valuable tools safe in drawers while storing bulk supplies in cheaper, open shelving. It’s the best of both worlds—mass storage and precision organization.
|
📋 Copy HEX 🔗 Share |
This is a highly scalable and budget-conscious approach to outfitting a garage workshop.
- Rolling Tool Chests: $300 – $1,200 each (depending on size/quality)
- Industrial Wire Shelving: $80 – $250 per unit
- Plastic Storage Bins: $5 – $20 each; they can add up quickly. Say $200 for a decent starter set.
- Pegboard Section: $30 – $70
- TOTAL: $910 – $3,920+
Budget alternative: Start with one tool chest and one shelving unit. Buy used bins from restaurant supply stores and expand your collection over time. You can gradually expand this system as your budget allows.
27. Contrast a Red Brick Wall with a Clean White Pegboard
Don’t have a historic brick wall? You can get a similar high-contrast look by using thin brick veneer panels. They are much lighter than full bricks and can be installed over existing drywall with construction adhesive and mortar. It’s a weekend project that adds a massive amount of texture and character. Once the veneer is up, mounting the white pegboard on top (using furring strips to create a gap) will give you this exact industrial-chic vibe, even in a standard suburban garage.
|
📋 Copy HEX 🔗 Share |
This entire look can be created on a shoestring budget. A single large sheet of white pegboard runs about $25 at a home improvement store. A box of assorted pegboard hooks is usually under $20. If you don’t have a real brick wall, a panel of faux-brick wallboard can be had for around $40. For the countertop, a simple laminated pine board or even a solid-core door from a reuse center like Habitat for Humanity ReStore can provide a large, cheap, and durable work surface for under $50.
Conclusion
Your garage holds so much more potential than just a place to park your car. It can be a studio, a laboratory, and a sanctuary for making things with your own two hands. We hope these 27 ideas have sparked your imagination and shown you what’s possible. Pick the layout that speaks to you, and start planning your perfect workshop.
Feeling inspired? Pin your favorite ideas to your workshop board on Pinterest and start building the space you’ve always wanted!