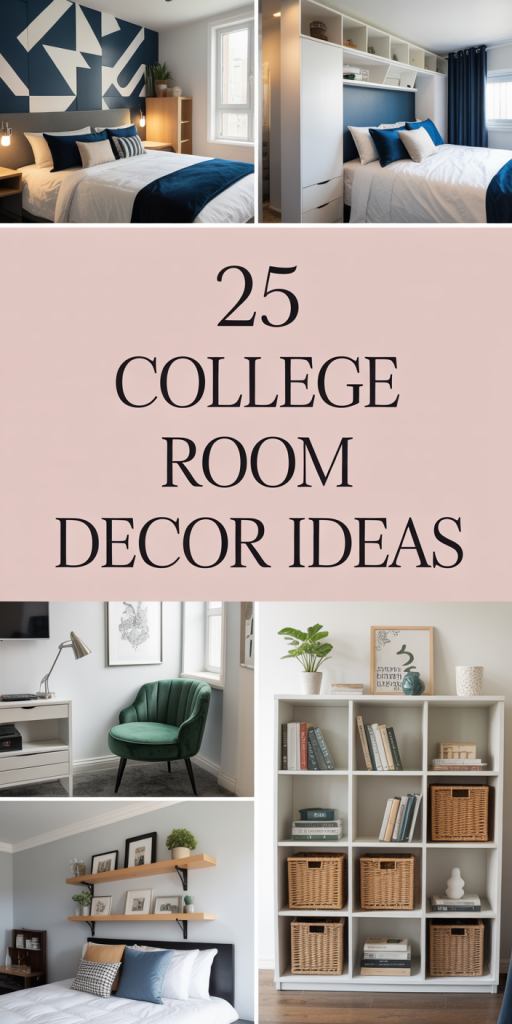
25 College Room Decor Ideas for 2026 That Will Transform Your Dorm into a Dream Space
That feeling when you’ve pinned hundreds of dorm room ideas but your space still feels… blah? We get it. Deciphering what actually works in a tiny, shared room is the real final exam. That’s why we did the homework for you. We filtered through hundreds of options from IKEA, Target, and Amazon to find looks you can genuinely pull off, whether your budget is $50 or $500.
Inside, you’ll find 25 distinct ideas, from chill boho escapes to super-functional modern setups—all using real photos from real rooms. We’re serving up inspiration that feels both aspirational and achievable for 2026. Forget generic advice; we’re talking specific paint colors, smart storage hacks, and the one thing that makes each space click. And stay until the end — we break down the most common mistakes that can ruin these looks.
📌 Save this to Pinterest for later — you’ll want to revisit these ideas.
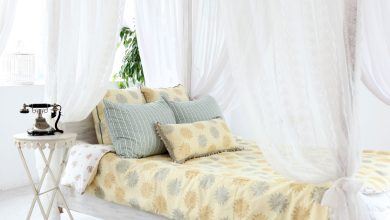
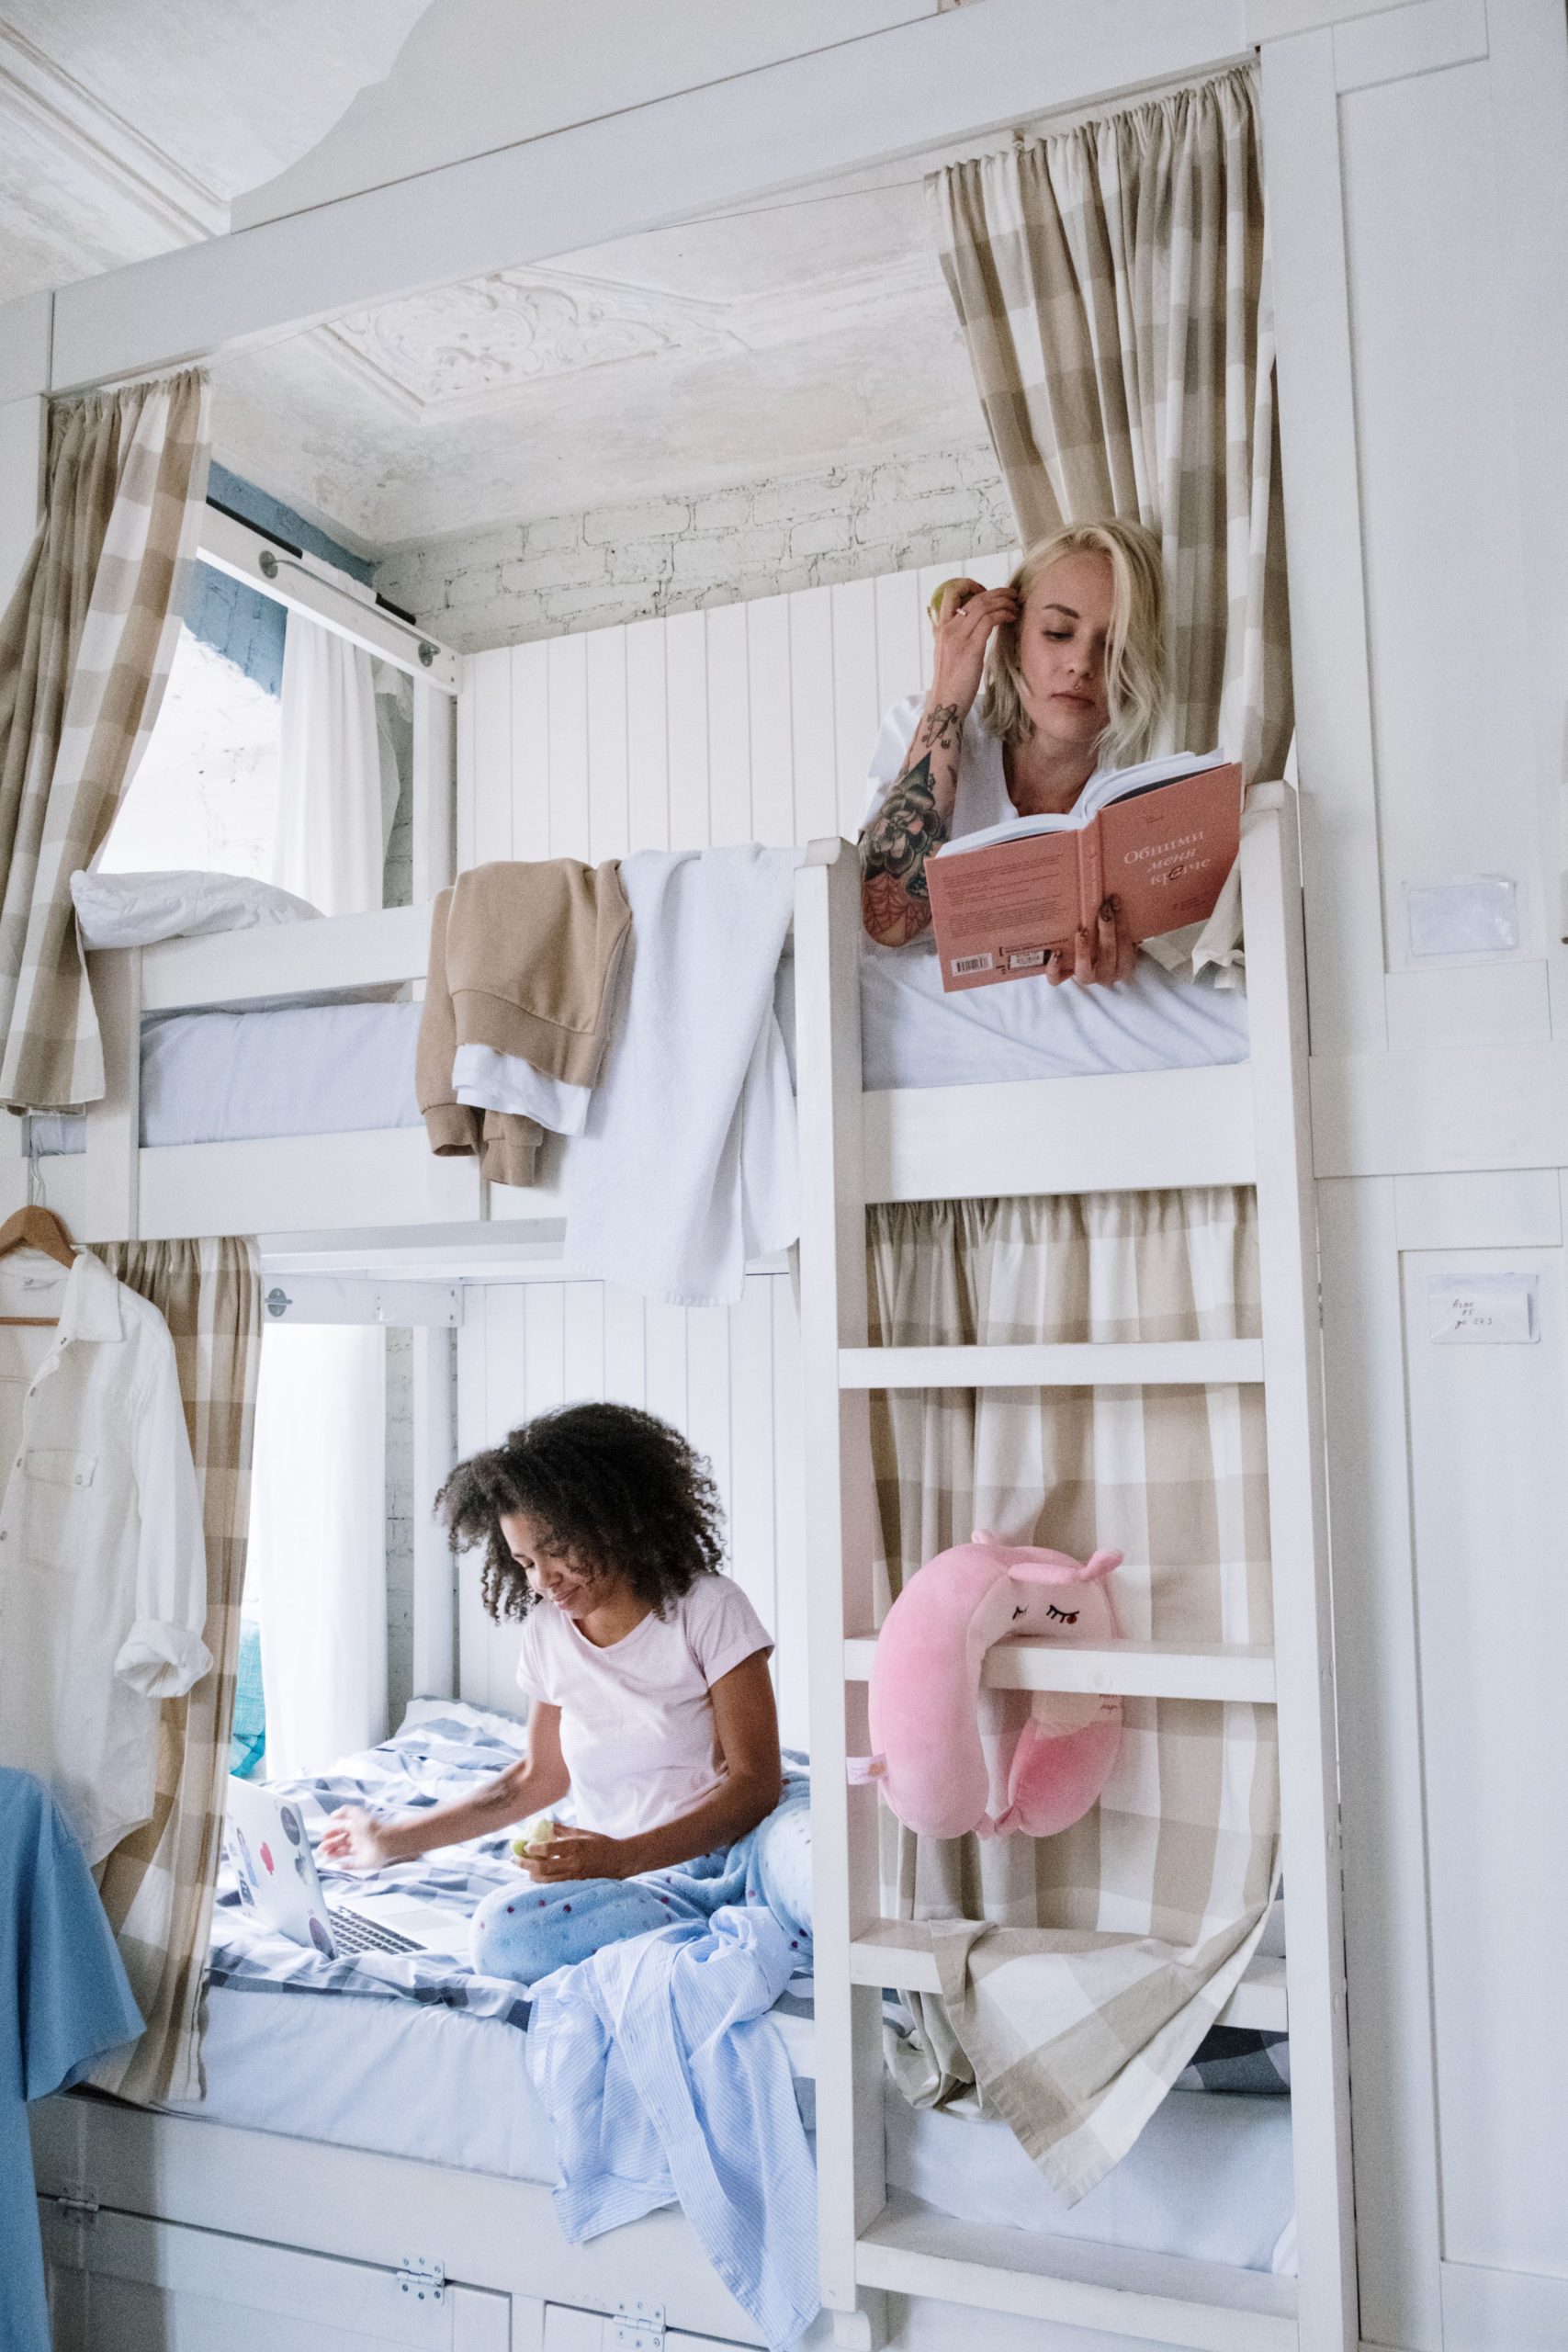
1. Embrace a Lived-in, Airy Vibe with Rustic Bunk Beds
This look is all about the magic of contrast. The chipped, light blue brick walls give the room a sense of history and texture, like a cool European hostel you’d find on a gap year. But instead of feeling grungy, it’s lifted up by the clean, simple lines of the white wooden bunk beds and the floods of natural light from the sheer-curtained windows. The rustic walls and polished wooden floors provide a warm, earthy base, while the crisp white furniture keeps it feeling fresh and modern, not dated.
|
📋 Copy HEX 🔗 Share |
Let’s be honest about the bunk bed life. While the privacy curtains are a brilliant touch for creating your own little cocoon, they don’t block out sound. Investing in some quality noise-canceling headphones is essential if your roommate is a notorious snorer or a late-night video gamer. Furthermore, a room with this many beds, while functional, can get messy fast. You have to be disciplined about keeping your personal area tidy to maintain the airy, uncluttered feeling that makes this room so inviting in the first place.
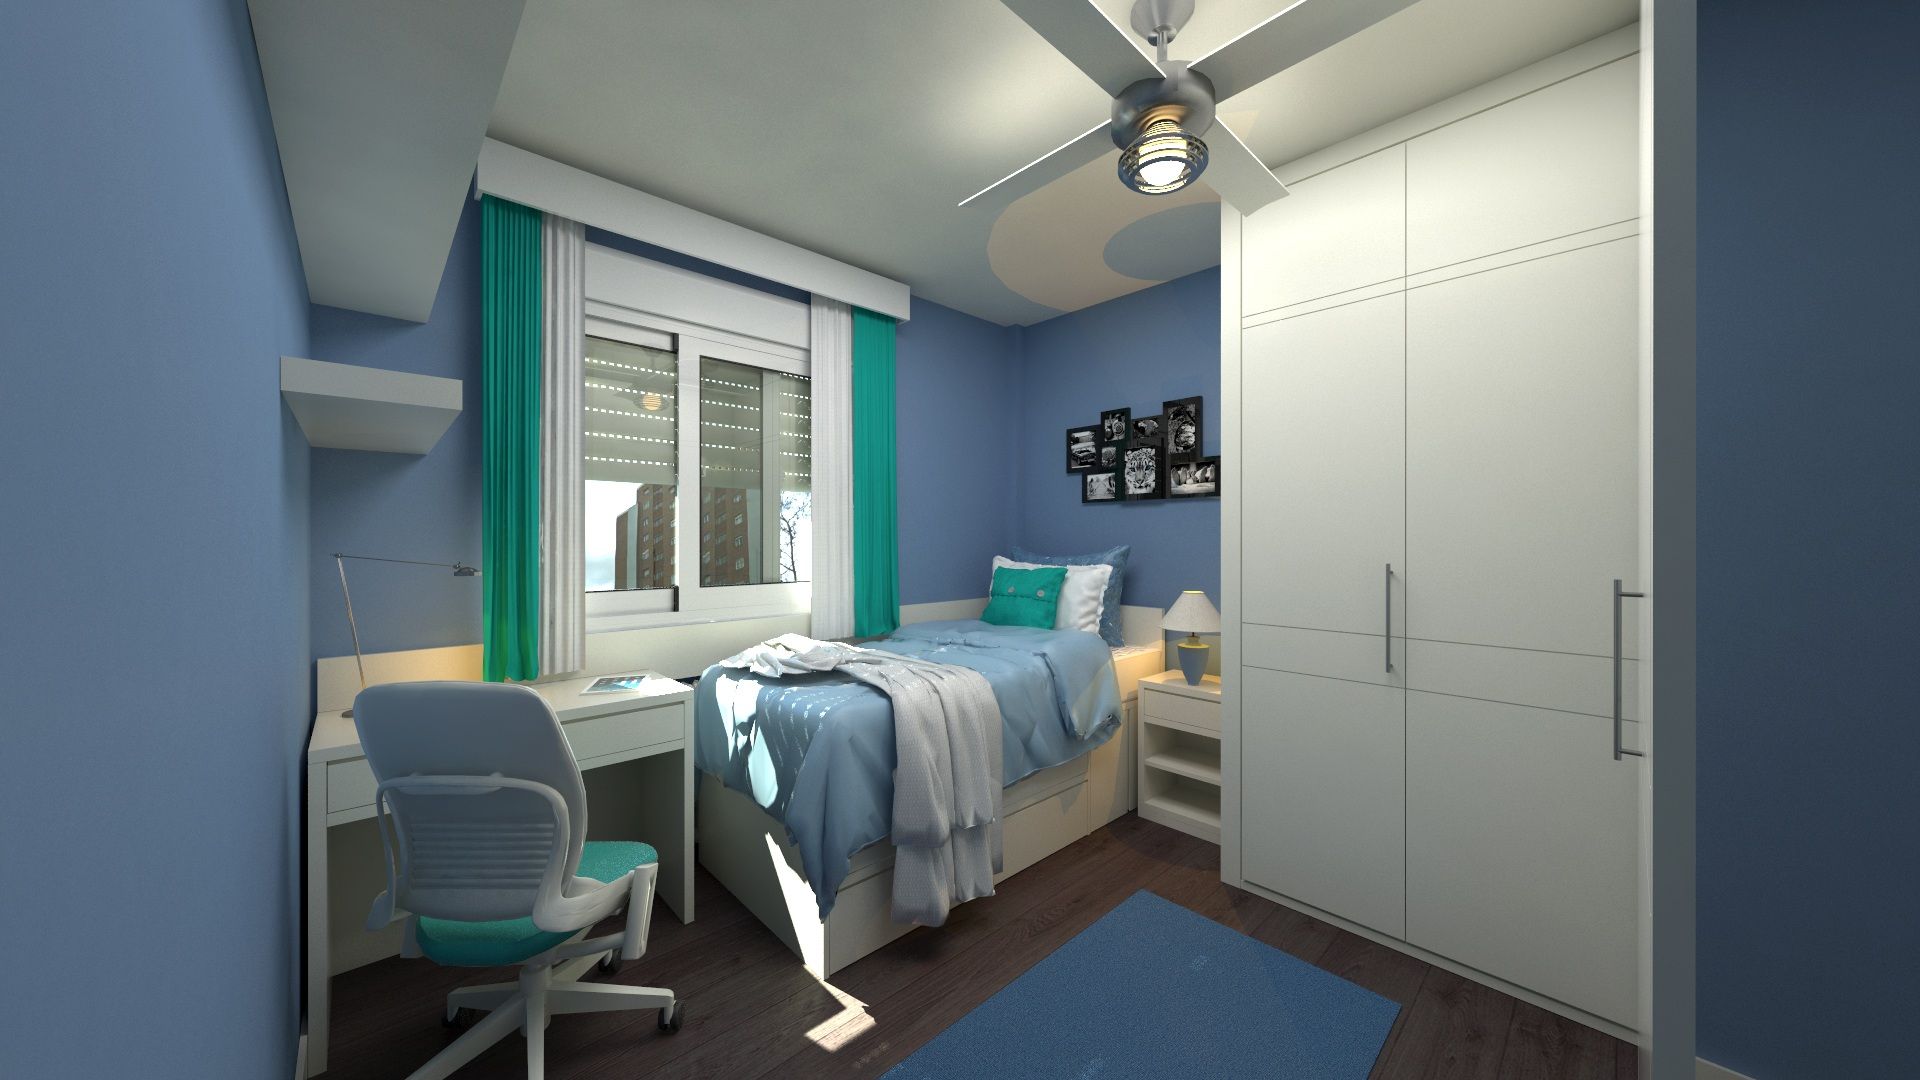
2. Go for a Cohesive Look with Blue, White, and Teal
The formula here is simple but so effective. Think 60% cool blues and crisp whites for your base—this includes the light blue walls and all the major furniture pieces like the integrated bed, desk, and wardrobe. Then, bring in 30% teal for your accent pops. You can see it in the ergonomic chair, the curtains, and a few key pillows. Finally, add 10% black and dark brown through the floor and the gallery wall frames. This small touch of a dark neutral grounds the entire space and keeps it from feeling too sweet.
|
📋 Copy HEX 🔗 Share |
When you have an integrated furniture unit like this, the key is to prevent it from looking like a monolithic block. The designer achieved this effect with subtle grooves on the wardrobe doors, creating texture and shadow lines. To replicate this effect, use a ruler and a pencil to mark out your lines, then carefully apply thin strips of pre-painted trim or even just high-quality pinstripe tape in a matching white. It’s a small detail that makes the furniture feel much more custom and high-end.
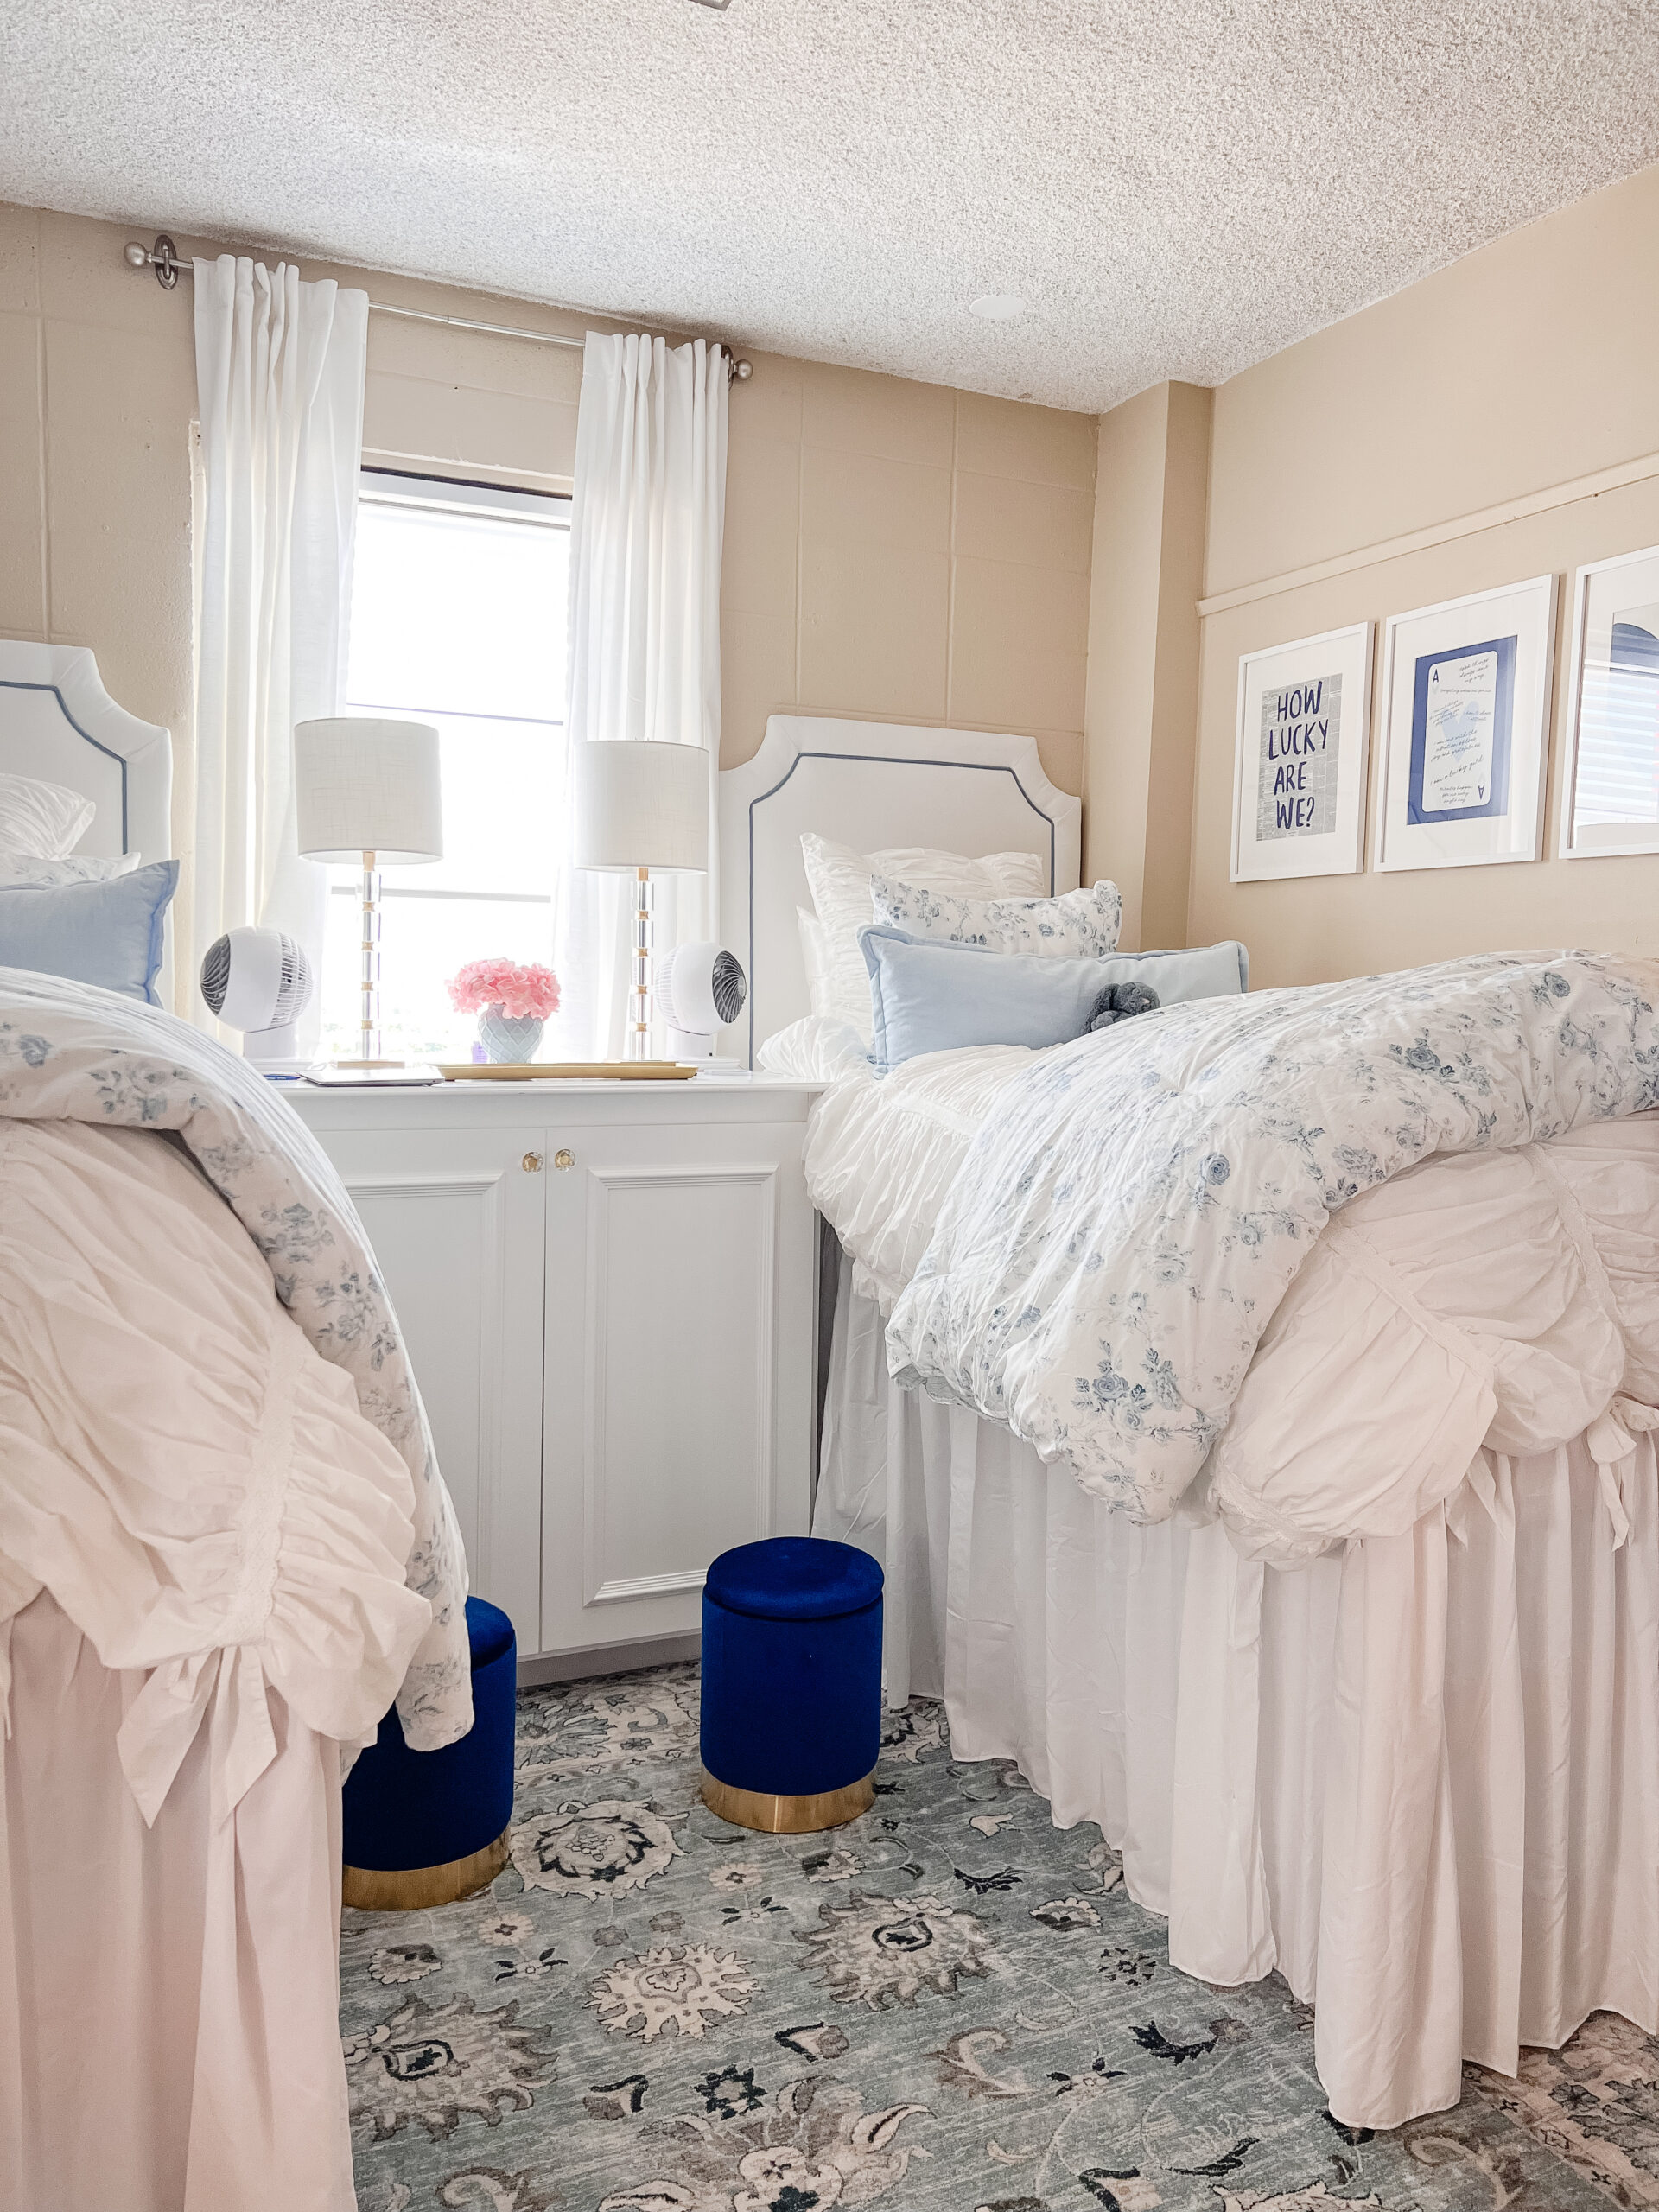
3. Achieve an Elegant, Coordinated Room with Upholstered Headboards
- Main Furniture (2 headboards, 2 bed frames, 1 cabinet): $600 – $1,500
- Bedding & Textiles (2 comforters, pillows, skirts, rug): $400 – $900
- Decor (ottomans, art, knobs): $250 – $600
- TOTAL: $1,250 – $3,000
- Budget Alternative: Create DIY upholstered headboards using plywood, foam, and fabric for under $100 each. Source a cabinet from a thrift store and paint it white, then swap the hardware. Find similar bedding at Target or HomeGoods for a total look closer to $600–$900.
|
📋 Copy HEX 🔗 Share |
What makes this shared space feel so upscale is the commitment to symmetry and repetition. The identical headboards, bedding arrangements, and even the blue velvet ottomans at the foot of each bed create a pleasing sense of order and balance. It reads less like two separate zones and more like one thoughtfully designed room. The strategic use of gold accents in the cabinet knobs and ottoman bases adds just the right amount of warmth and glamour to elevate the classic blue-and-white palette.
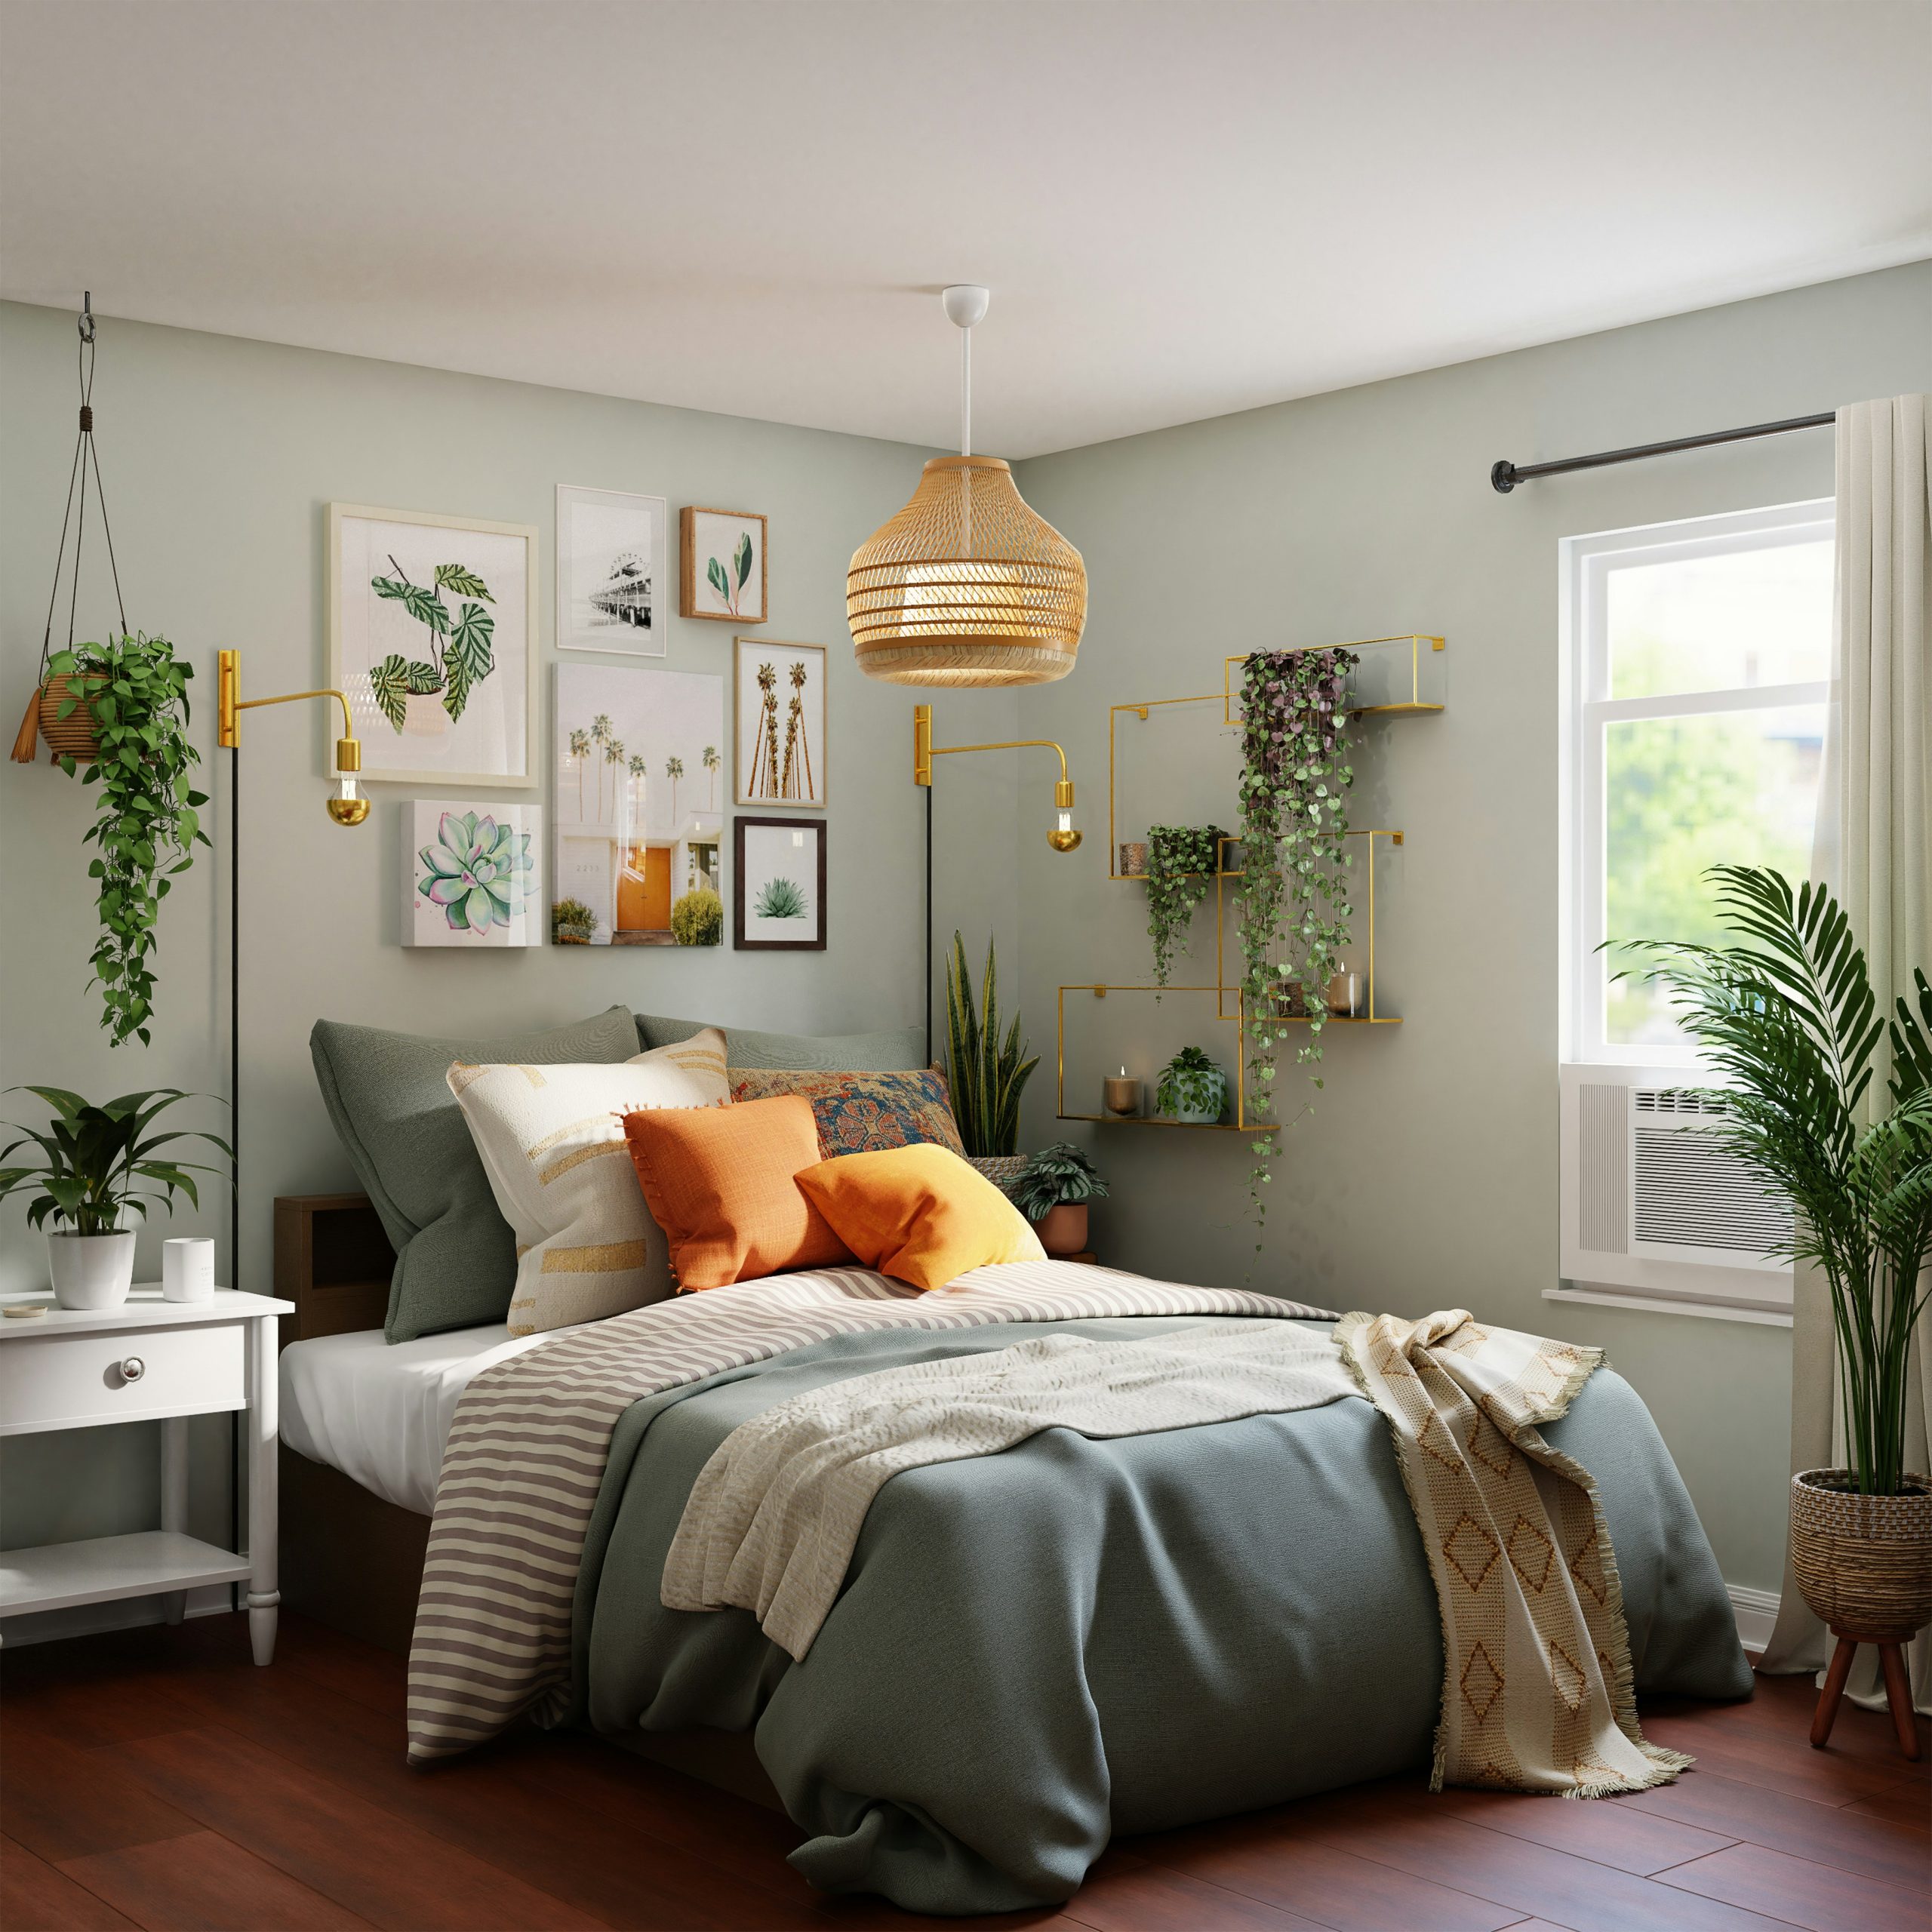
4. Create a Serene Escape with a Sage Green Wall and Botanical Art
What absolutely makes this room is the living greenery. Take away the dozen or so plants, and you still have a nice room with a pretty sage green wall. But with the plants, you have a sanctuary. They spill from shelves, hang from the ceiling, and sit proudly on the floor, turning a simple bedroom into a breathing, vibrant space. The botanical art gallery is a stunning touch, but it’s the real, living leaves that provide the texture, depth, and calming energy that defines the room’s entire personality.
|
📋 Copy HEX 🔗 Share |
A room full of plants is beautiful, but it’s also a part-time job. You’ll need to commit to a weekly watering schedule, and remember that different plants have different needs for light and moisture. Be prepared for some trial and error! You’ll also need to dust the leaves every few weeks to keep them healthy and looking their best. If you’re new to plant care, start with low-maintenance options like snake plants, ZZ plants, or pothos. For a lower-effort version of this look, refer to the greenery in Idea #23.
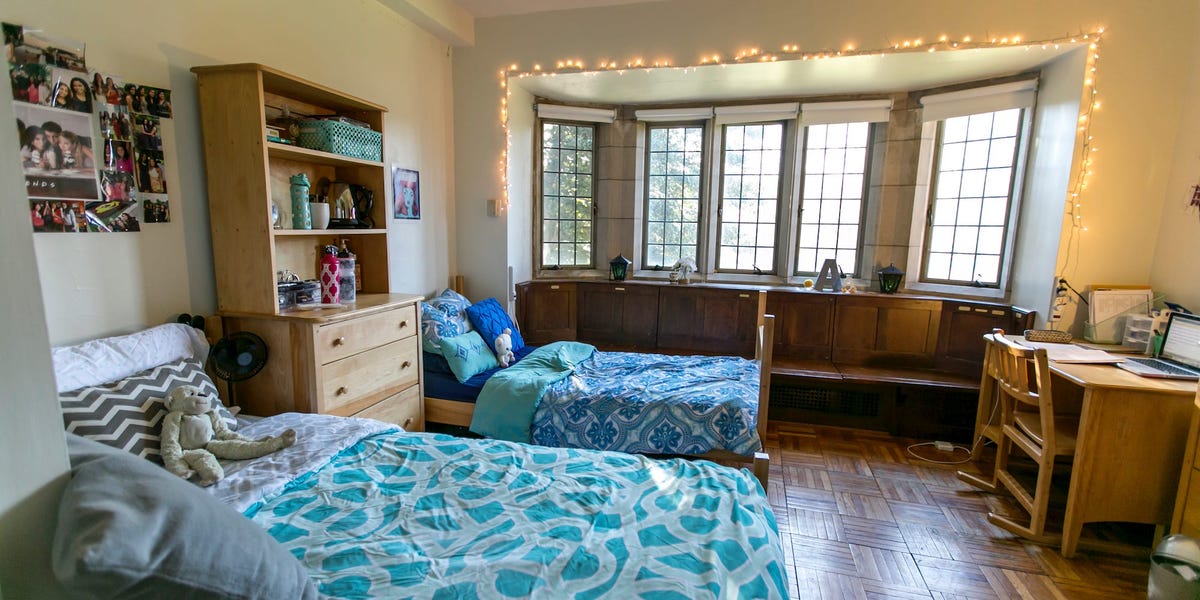
5. Get Cozy with Patterned Bedding and String Lights in a Bay Window
This room proves that you don’t need a perfectly matched set of everything to create a cohesive look. The mix of a gray chevron pattern on one bed and an intricate blue and white design on the other works because they share a similar cool color story. The real hero, however, is the architecture. The dark wood paneling of the bay window adds a layer of historic, collegiate charm that you just can’t fake. Leaning into that feature with the warm glow of string lights makes the whole space feel incredibly cozy and intentional.
|
📋 Copy HEX 🔗 Share |
Bay windows are a stunning feature, but they can be tricky. In older buildings, they can be drafty, so you might need to invest in heavier curtains or a window insulation kit for colder months. Furthermore, a feature this dominant can dictate your entire room layout. Here, it works beautifully as a backdrop for the beds, but it might limit your options if you wanted to rearrange the furniture. Accept the window as the focal point and plan everything else around it. Compare this design with the bold striped walls in Idea #8, which create a different kind of focal point.
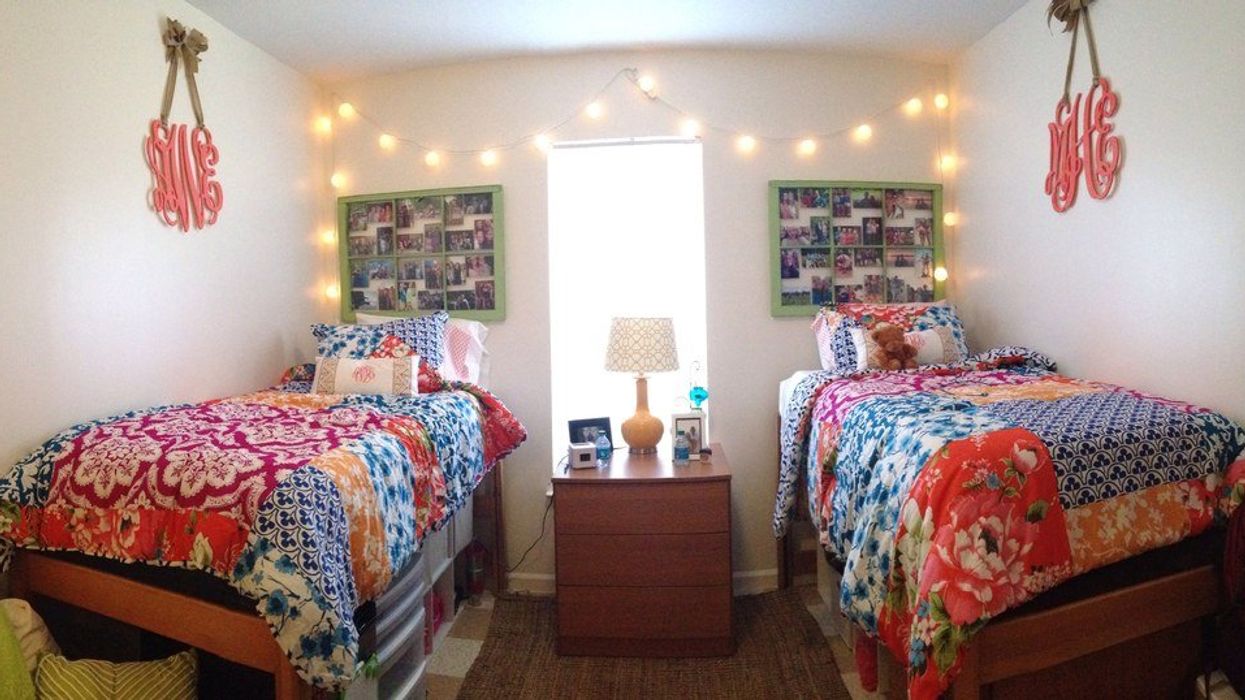
6. Add a Cheerful Vibe with Patchwork Quilts and String Lights
You don’t need to splurge to get this sweet, personalized look. The patchwork quilts are the star, and you can often find vintage or handmade ones on Facebook Marketplace or at thrift stores for $30-$60. Wooden bed frames are another marketplace staple. For the decor, get crafty! Paint inexpensive wooden letters from a craft store for the monograms ($5 each) and print your photos to fill frames from IKEA or Walmart ($10-$20 for a set). The string lights are a classic dorm trick for a reason—they’re cheap and add instant warmth.
|
📋 Copy HEX 🔗 Share |
The formula for this look is all about personality. Let’s call it 50% cozy textiles, 30% personal touches, and 20% warm lighting. The cozy textiles are the patchwork quilts—the main event. The personal touches come from the monogrammed wall art and the curated photo collages; they tell a story. The final 20% is the ambient glow from the string lights, which ties everything together and creates that ‘hug-in-a-room’ feeling. You could easily swap the quilts for bold floral duvets and still have the same charming effect.
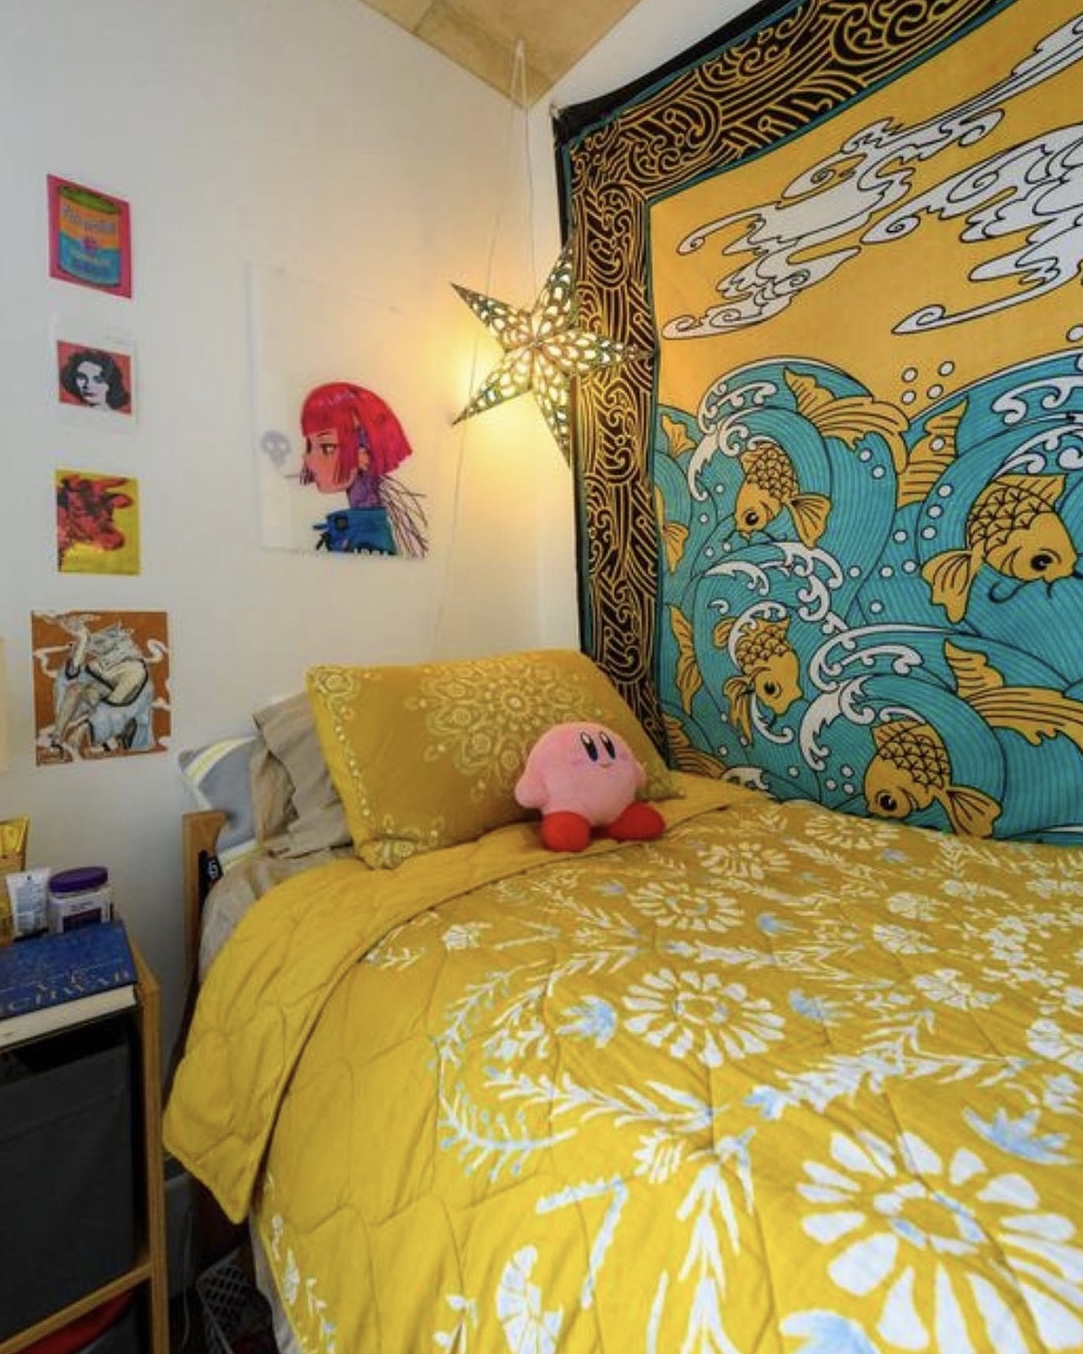
7. Create a Bold, Boho Corner with a Koi Fish Tapestry
The giant koi fish tapestry is, without a doubt, the element that transforms the room from a simple dorm bed into a statement. Its sheer scale and vibrant yellow, teal, and black color palette dictate the room’s entire motif. It serves as a headboard, a piece of art, and a way to build a world all at once. Without it, the yellow bedding would still be cheerful, but it wouldn’t have this dramatic, artistic anchor. It’s a perfect example of how one large, inexpensive piece can have more impact than a dozen smaller ones.
|
📋 Copy HEX 🔗 Share |
When hanging a large, unframed tapestry, avoid using just a few thumbtacks, which will cause it to sag and look sloppy. For a clean, taut look, use a thin wooden batten or dowel rod (you can get one at any hardware store for a few dollars). Staple the tapestry’s top edge to the wood, then mount it to the wall. This distributes the weight evenly and makes it look like a proper wall hanging. Make sure to use removable command strips designed for heavier items to avoid wall damage.
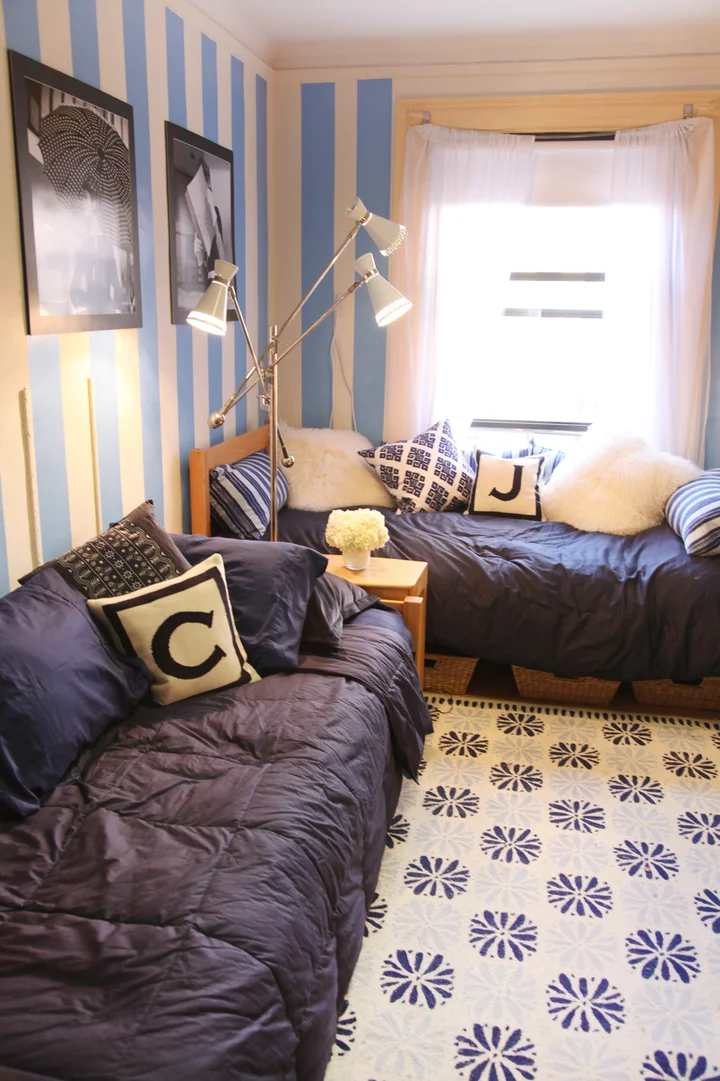
8. Design a Preppy, High-Contrast Room with Bold Blue Stripes
Vertical stripes are a fantastic trick for making a room feel taller, which is a blessing in dorms that often have standard 8-foot ceilings. This idea works best on a single accent wall, ideally the one your bed is against, to create a strong focal point without overwhelming the space. The room should be at least 10 feet wide to accommodate two twin beds and a nightstand comfortably without feeling cramped by the bold pattern. If your room is smaller, consider using thinner stripes or a more subtle color difference.
|
📋 Copy HEX 🔗 Share |
The success of this room lies in its fearless commitment to pattern mixing. You have the bold vertical stripes on the wall, a delicate floral pattern on the rug, and more stripes and monograms on the pillows. It works because everything is tied together by a strict color palette of light blue, dark blue, and off-white. This disciplined color story acts as a neutral foundation, allowing the different patterns to play together without creating chaos. The simple wooden bed frames provide a calm, natural resting point for the eyes. It feels energetic and fun, a striking contrast to the cozy vibe of Idea #5.
9. Warm Up a White Desk with Rustic and Feminine Accents
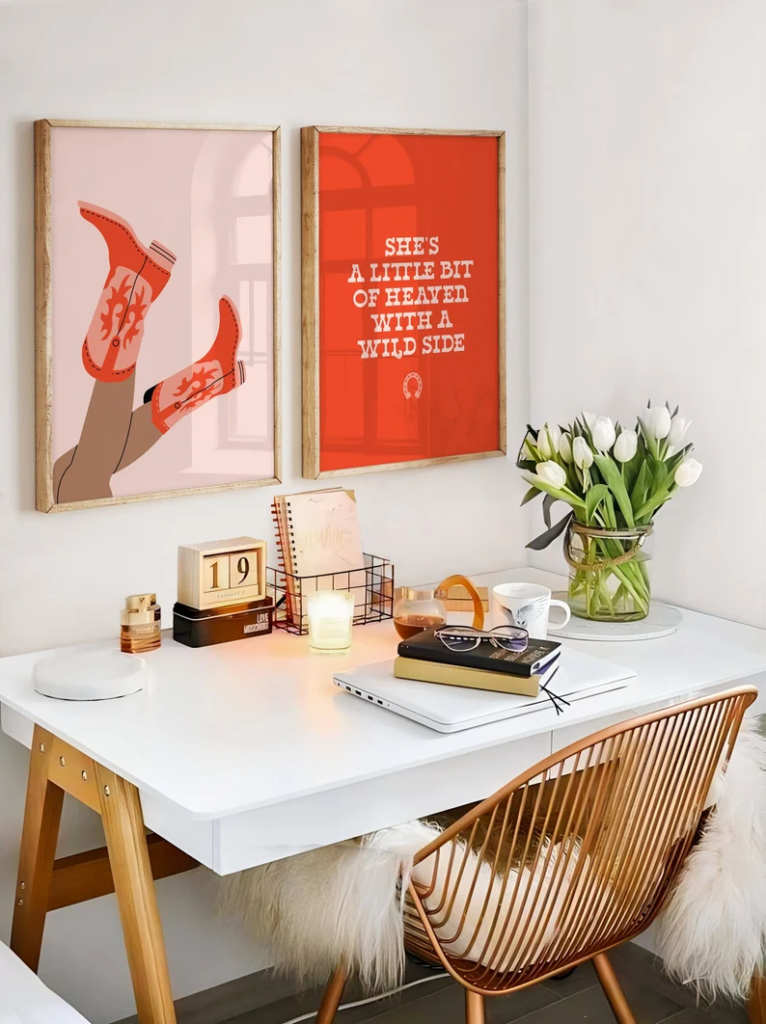
This look taps right into the ‘Western-chic’ or ‘Coastal Cowgirl’ aesthetic that’s been having a giant moment on Pinterest and TikTok. It’s a softer, more modern take on rustic decor. The key is mixing sleek, modern pieces (the white desk, the metal chair) with warm, organic textures (the faux fur throw, the light wood legs) and playful, thematic art. It’s popular because it feels both personal and stylish, allowing for a bit of kitsch (hello, pink cowboy boots) without sacrificing sophistication. It feels collected and cool, not like a pre-packaged dorm set.
|
📋 Copy HEX 🔗 Share |
While every element here is lovely, the single thing that gives this space its unique personality is the artwork. Specifically, the print of the cowboy boots against the soft pink background. It’s unexpected, playful, and sets the entire color palette for the accessories, from the burnt orange in the second print to the warm copper of the chair. Swap it out for a generic floral print, and the whole setup, while still nice, loses its specific, witty charm. It’s the art that tells the story.
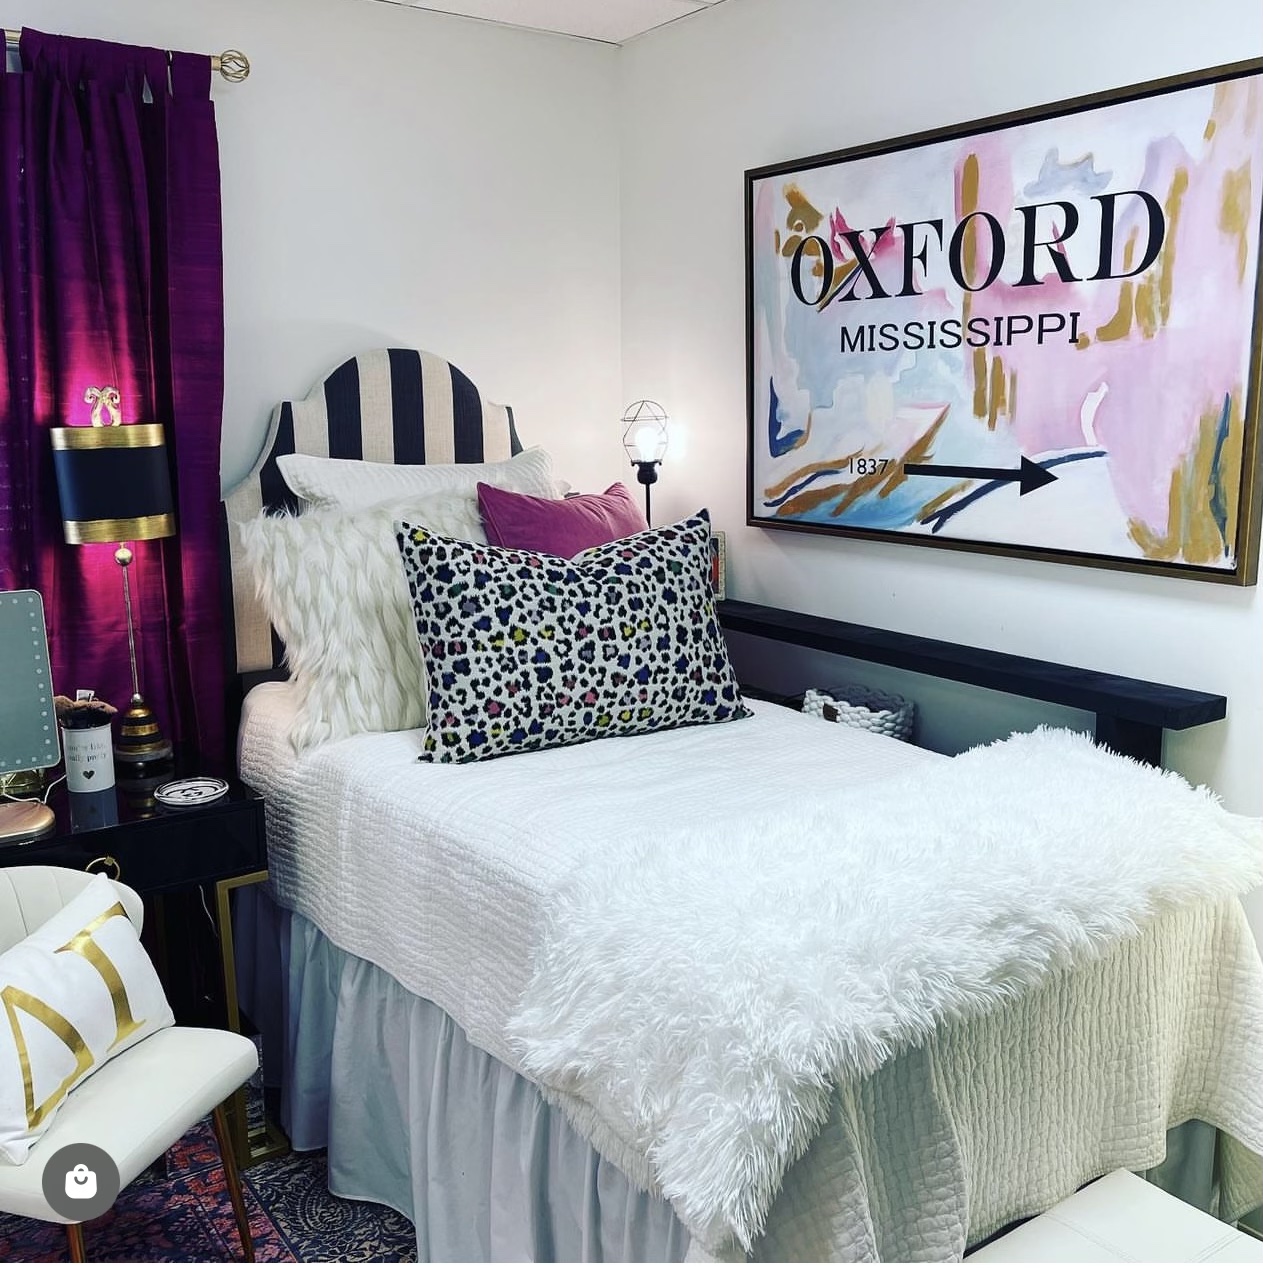
10. Make a Statement with Deep Purple and Leopard Print
This look is pure drama, and the formula is all about confidence. It’s roughly 50% bold color, 30% glam texture, and 20% graphic pattern. The deep, saturated purple of the velvet curtains provides the dominant color story. The glam textures come from the white faux fur blanket and the velvet of the curtains, adding a touch of luxury. The final 20% is that hit of graphic pattern from the leopard-print pillow and the black-and-white striped headboard. You could swap the purple for emerald green and the leopard for zebra print to achieve a totally different but equally bold vibe. Compare the boldness here with the playful colors in Idea #7.
|
📋 Copy HEX 🔗 Share |
A look this bold requires serious commitment. Deep purple, especially on a large scale like curtains, will absorb a lot of light. This room will feel significantly darker than a room with white or light-colored window treatments, so it’s best for a space that gets a ton of natural light to begin with. Furthermore, leopard print can be a tricky pattern to get right. Stick to one or two accent pieces; any more and you risk straying from ‘playful glam’ into ‘tacky’ territory. This is a high-personality look that might not be for everyone, especially a randomly assigned roommate.
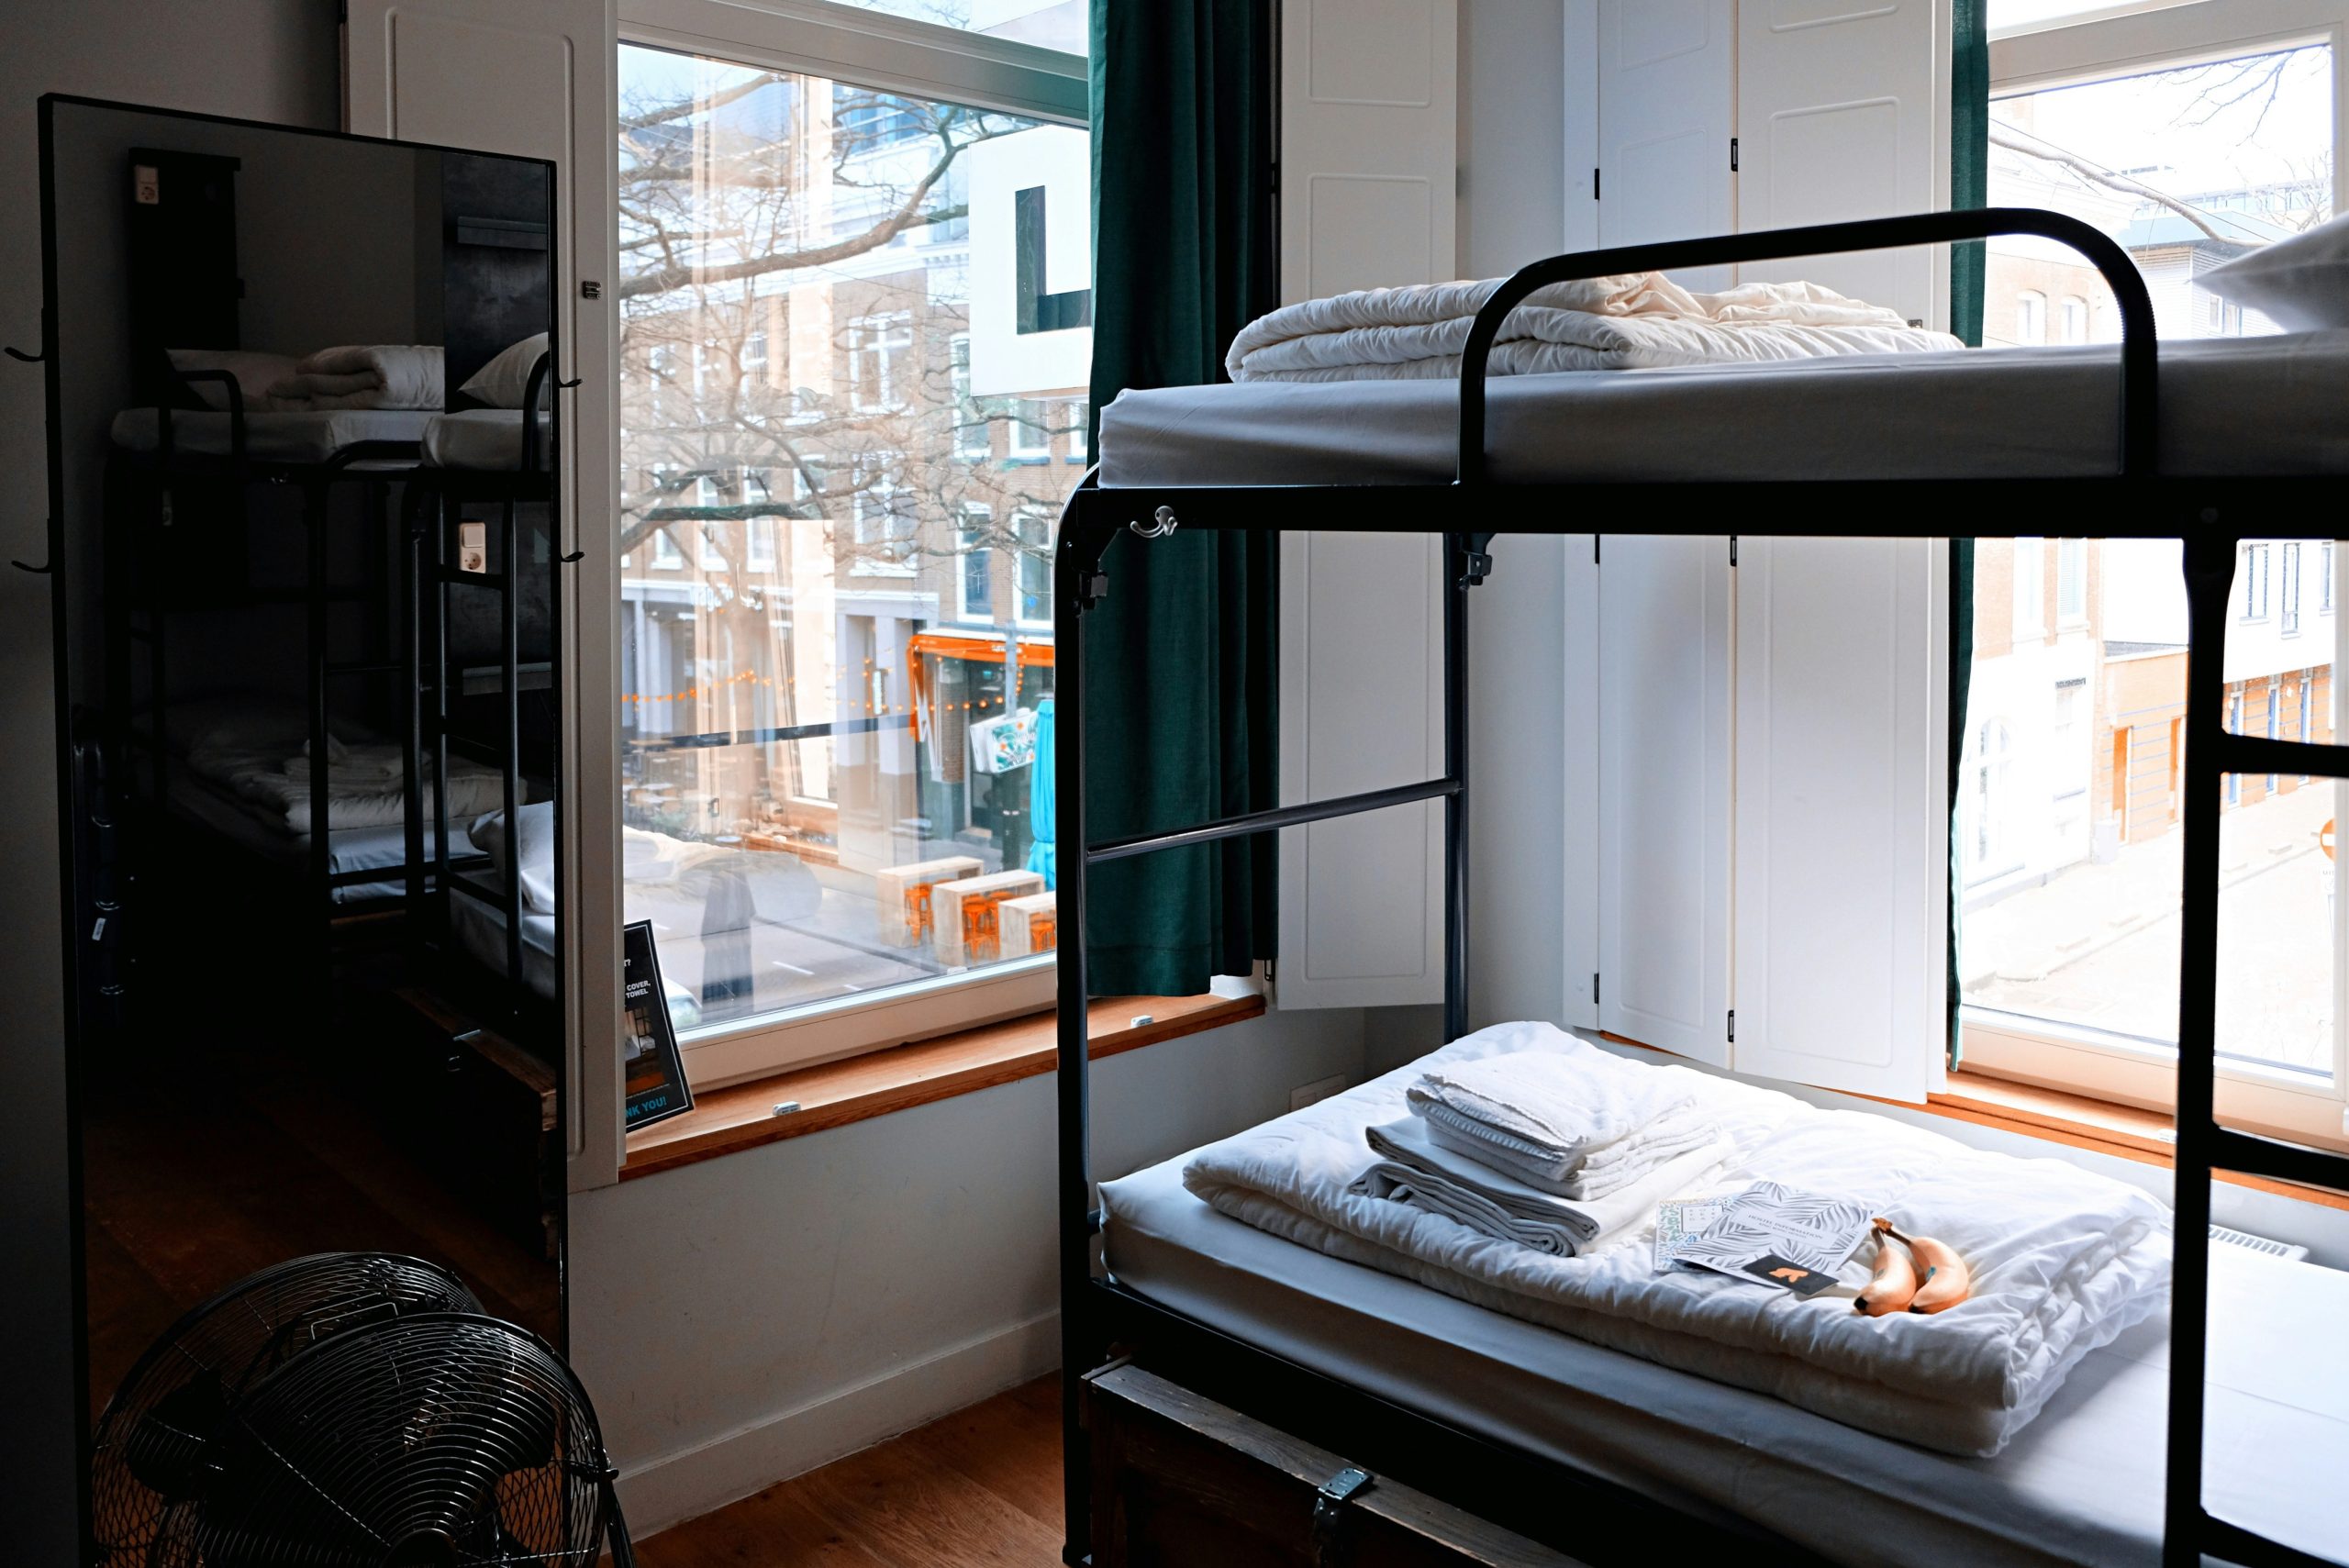
11. Maximize a Compact Space with Black Metal Bunk Beds
This setup is a masterclass in small-space functionality. The black metal of the bunk beds provides a strong, graphic outline without the visual bulk of wood, making the room feel more open. Placing the bed next to the large window maximizes natural light, which is crucial in a small room. The choice of all-white bedding enhances this effect, reflecting light around the space. Finally, the long wooden windowsill and matching floor add warmth and a continuous horizontal line that makes the room feel wider than it is.
|
📋 Copy HEX 🔗 Share |
- Measure your floor space AND vertical height. Bunk beds require sufficient ceiling clearance (at least 2 feet above the top bunk) to be safe and comfortable.
- Review your dorm’s rules. Many colleges have specific regulations regarding bed risers or bunk bed configurations, so please confirm what is allowed before making a purchase.
- Assess your natural light. This setup relies heavily on the large window. If your room has a small or north-facing window, a dark metal bed frame might make the space feel too gloomy.
- Plan for storage. This minimal setup requires clever storage. The full-length mirror with hooks is a great start, but you’ll need a plan for clothes, books, and more.
12. Coordinate Shared Styles with Glam Trim and Travel Posters
When sharing a room, creating individual zones that still feel connected is key. The glittery trim on these upholstered headboards is a perfect way to do so. It adds a touch of personal flair and glamour without being an overwhelming design choice. You can buy this kind of trim by the yard at a fabric store and apply it yourself with a hot glue gun to any existing fabric or wooden headboard. It creates a defined, custom look that feels much pricier than it is. It’s a unifying element that ties the two beds together.
|
📋 Copy HEX 🔗 Share |
You don’t need to splurge on fancy headboards to get this look. You can find basic upholstered headboards on Amazon or at Walmart for under $100. The real workhorses here are the 3-tier rolling utility carts, which you can get from IKEA, Michaels, or Target for about $30-$40. They’re way more versatile than a traditional nightstand. For the decor, browse sites like Etsy or Society6 for cool, downloadable travel posters that you can print yourself for a few dollars, which is much cheaper than buying pre-framed art. For a different take on a shared room, see Idea #5.
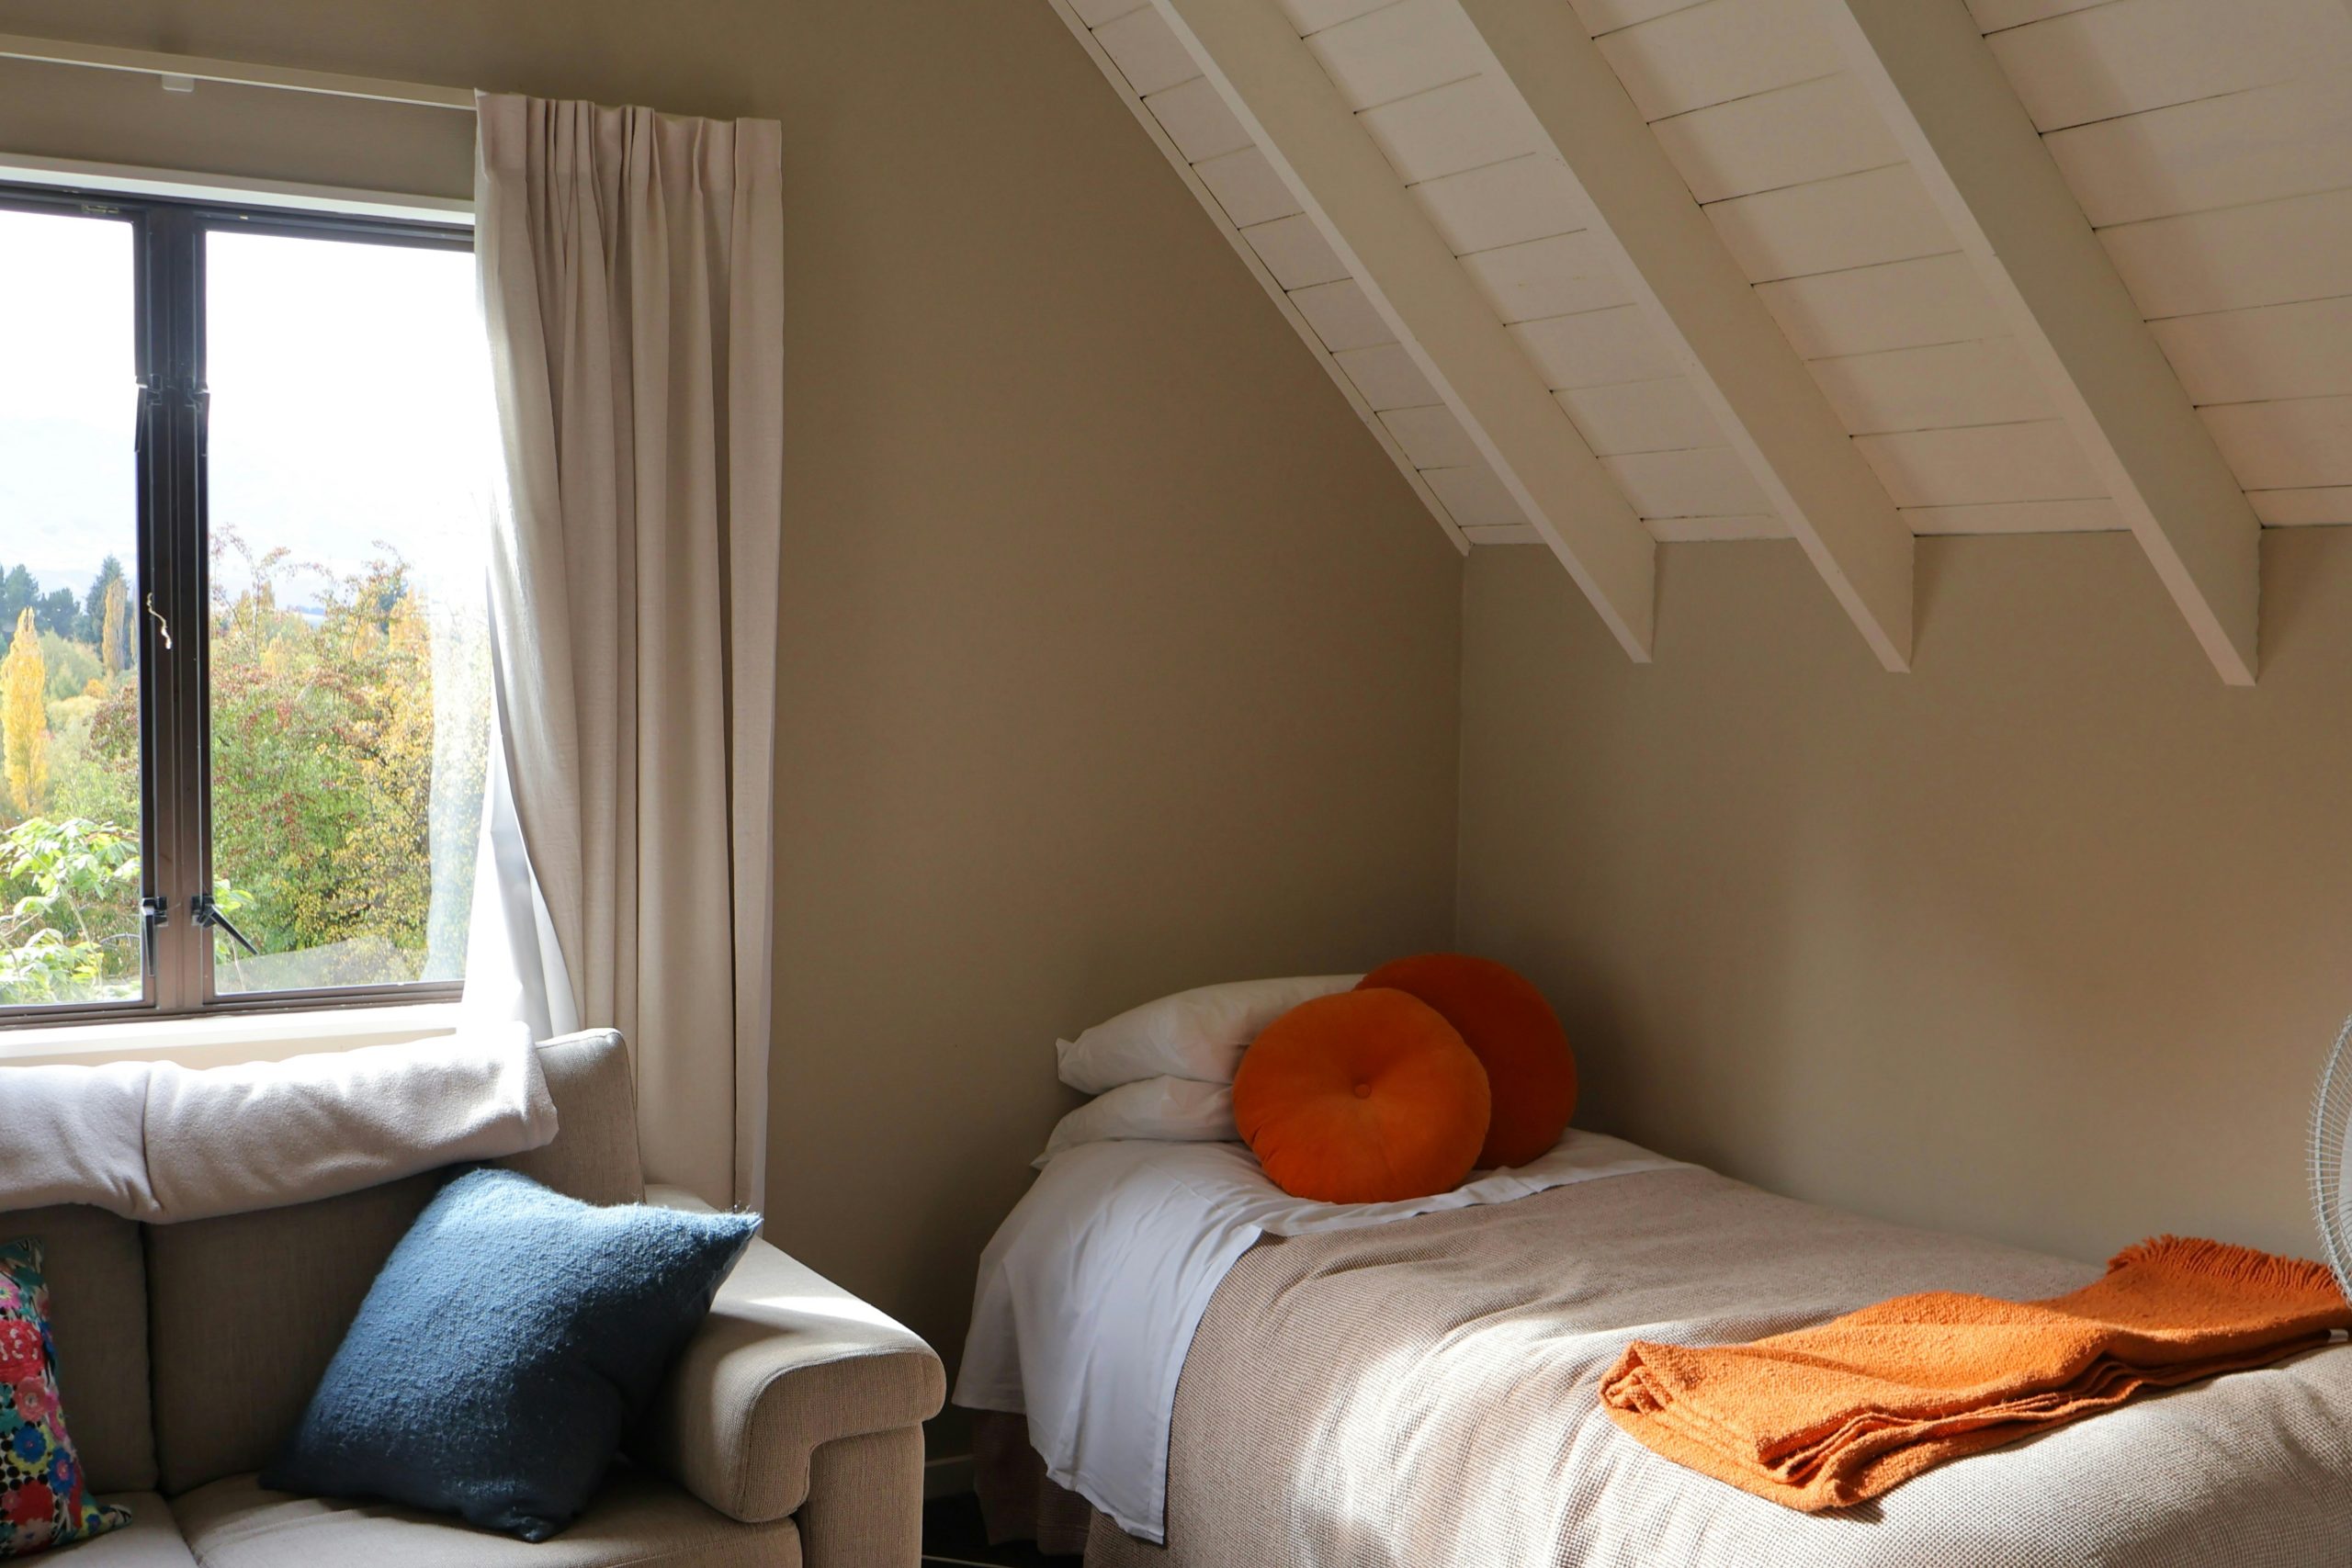
13. Embrace Awkward Architecture with a Cozy Attic Nook
This room works because it leans into its architectural quirks instead of fighting them. The slanted ceiling could feel oppressive, but by painting it and the exposed beams white, the designer made it a feature that adds character. The furniture is kept low-profile—a simple single bed and a compact sofa—to maximize the feeling of height. The pop of bright orange in the throw blanket and pillows draws your eye into the room and adds a burst of warmth that balances the cool, neutral taupe on the walls.
|
📋 Copy HEX 🔗 Share |
This idea is tailor-made for rooms with challenging architecture, like attics or spaces with dormer windows. A slanted ceiling requires careful furniture placement. This layout works best with a minimum floor space of around 100 square feet, but the key measurement is height. You need enough vertical clearance at the peak to stand comfortably, and you should place furniture like beds and sofas along the lowest parts of the wall, reserving the tallest area for walking space. It’s a solution for a specific problem, not a layout for a standard square room.
14. Energize a Study Space with a Bold Orange Accent Wall
A bright, saturated color like this orange is fantastic for energy, but it’s also prone to showing scuffs and marks more than a neutral color would. Keep a small sample pot of the paint for quick touch-ups. Be aware that such a strong color can also cause a ‘color cast,’ meaning it will reflect onto your white furniture and walls, giving them a slight orange glow, especially in artificial light. If you’re a stickler for pure white, you might want to choose a less saturated accent color. Furthermore, that white desk will require regular wipe-downs to stay looking crisp.
|
📋 Copy HEX 🔗 Share |
Want to recreate this focused study zone? It’s easier than it looks. Time: 2-3 hours. Cost: $50-$80.
- First, choose your accent wall—ideally one without windows or doors.
- Use painter’s tape to create a clean edge where the orange will meet the white walls and ceiling.
- Apply a coat of primer, especially if your current wall color is dark. This ensures the orange will be true and vibrant.
- Once the primer is dry, apply two coats of your chosen orange paint, allowing it to dry completely between coats.
- Carefully remove the painter’s tape while the second coat is still slightly damp for the sharpest line.
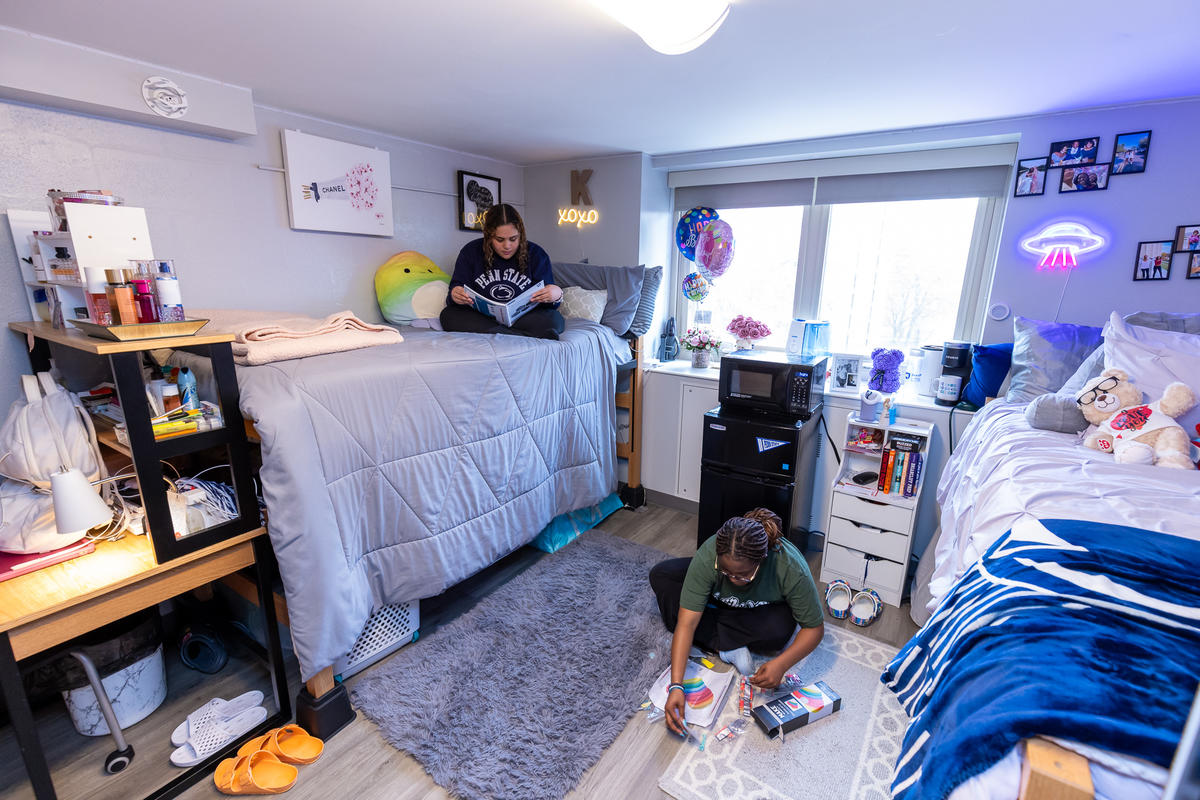
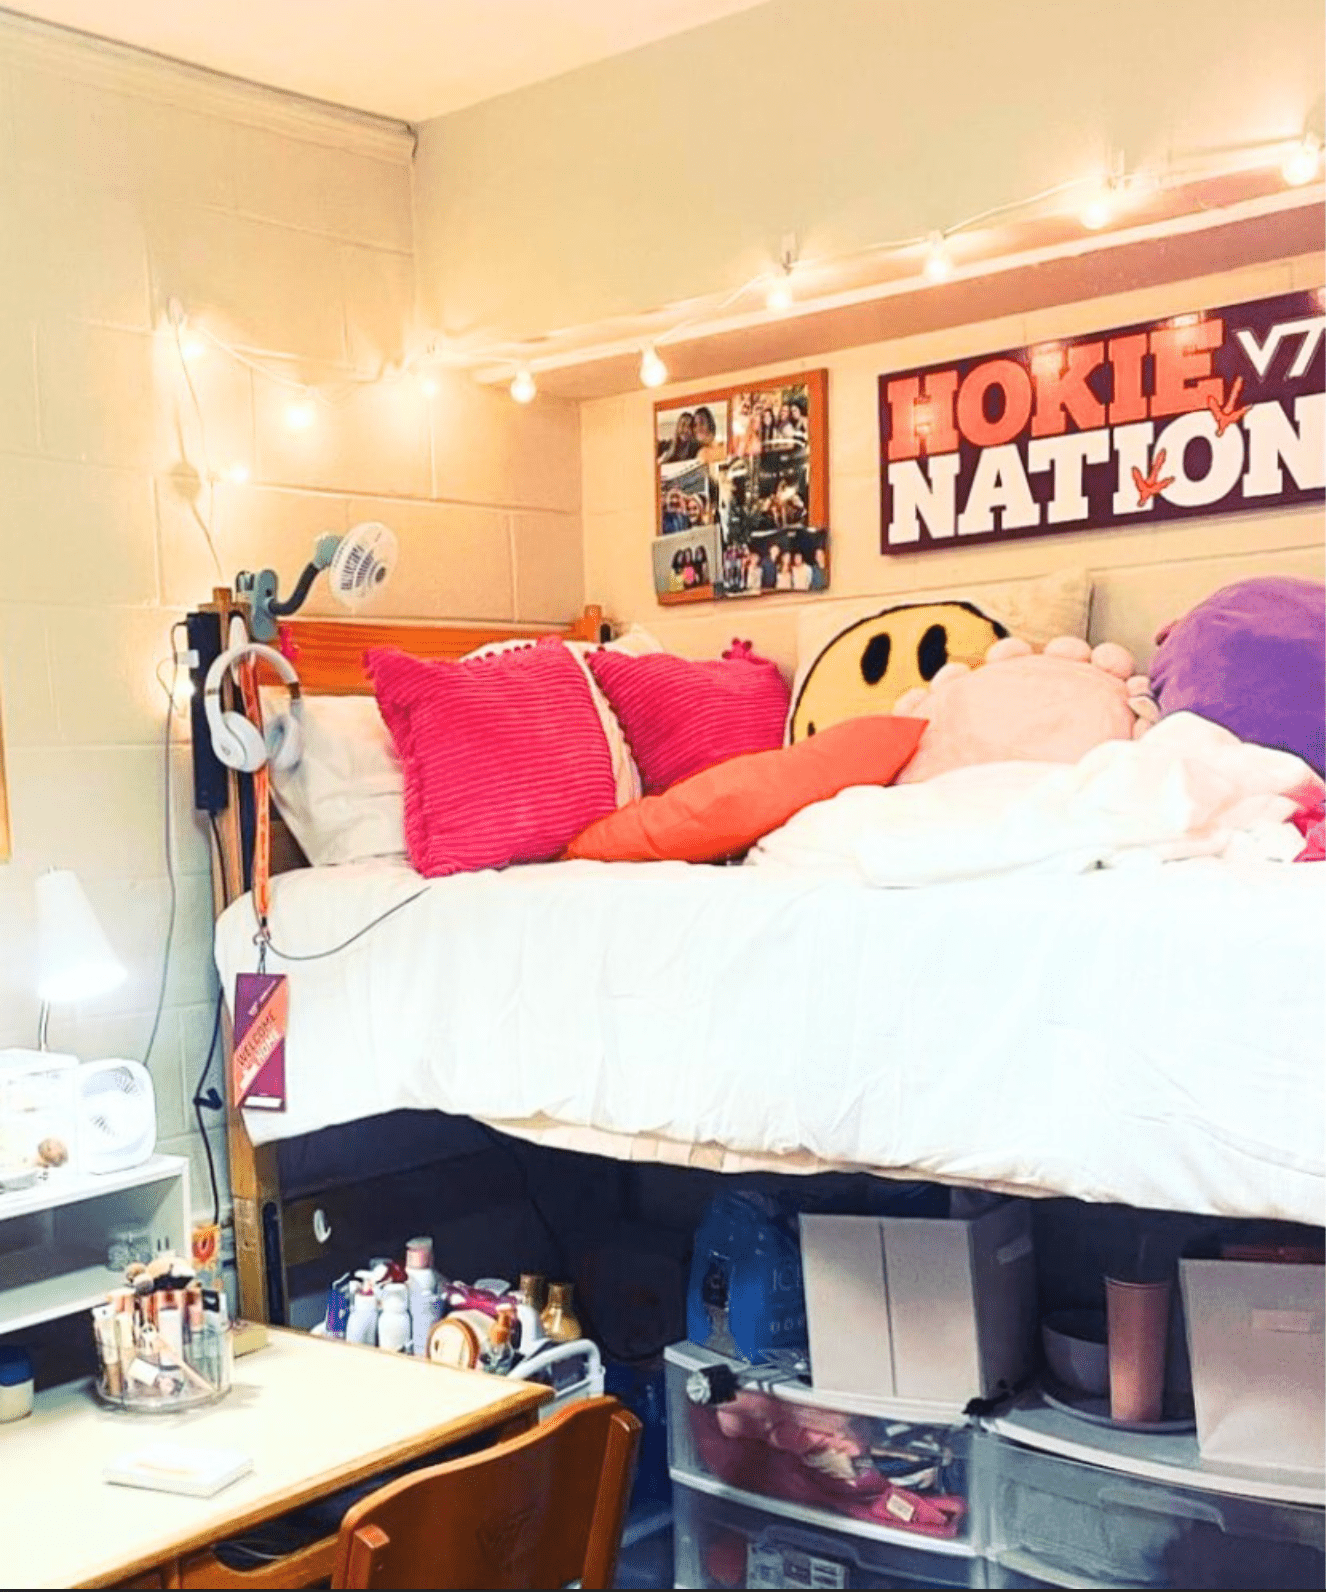
15. Create a Functional Shared Space with Personalized Zones
This dorm room perfectly demonstrates the ‘organized chaos’ that defines so many students’ living situations. It works because it designates clear zones for different activities. The lofted bed creates a distinct sleeping area, freeing up the floor space below for a dedicated study nook. The central utility station, which has a microwave and mini-fridge, consolidates the ‘kitchen’ into one spot, preventing clutter from spreading. While each area is packed with personal items, from neon signs to photo collages, this underlying structure prevents it from feeling completely overwhelming. See a more streamlined take on functionality in Idea #24.
|
📋 Copy HEX 🔗 Share |
This look reflects the broader trend of ‘hyper-personalization’ in interior design, amplified for the dorm room environment. In 2026, it’s not enough for a room to just be functional; it has to be an extension of your identity. The mix of a UFO neon sign with an ‘XOXO’ light, combined with personal photos and plush toys, shows a move away from a single, cohesive theme. Instead, students are curating eclectic collections of objects and art that represent their unique blend of interests and personality. It’s an authentic, unfiltered approach to decor.
16. Layer a Neutral Boho Bed with Natural Textures and Tones
The single element holding this entire look together is the collection of circular, woven wall hangings. They provide the bohemian, crafty spirit that defines the space. Without them, you’d have a pretty, neutral bed, but it would lack a focal point and a clear stylistic anchor. The varying textures—from smooth crochet to rougher weaves—and the repetition of the circular shape create a sense of harmony and intentionality. They transform a simple wall into a piece of soft, textural art. It’s a much softer approach than the botanical gallery wall in Idea #4.

|
📋 Copy HEX 🔗 Share |
This serene look is a study in texture. The formula is roughly: 50% soft textiles, 30% natural woven fibers, and 20% warm metallics. The soft textiles are the upholstered headboard, the layered bedding, the velvet throw, and that amazing butterfly pillow. The natural fibers come from the jute rug, the woven basket, and the wall decor. The final 20% is that little bit of glam from the gold lamp and the brass handles on the nightstand. This subtle warmth keeps the all-neutral palette from feeling flat or boring.
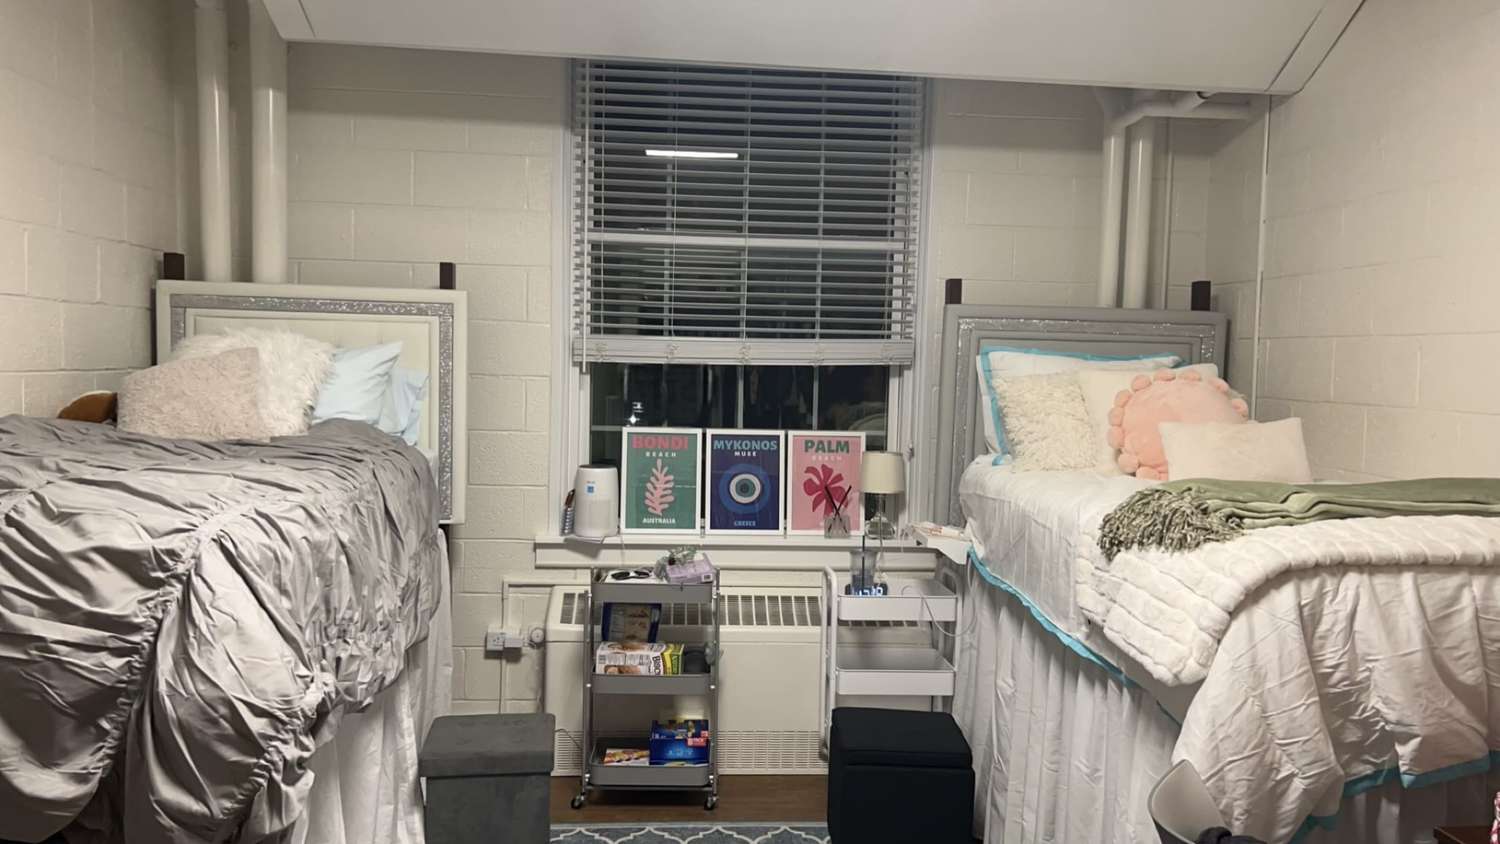
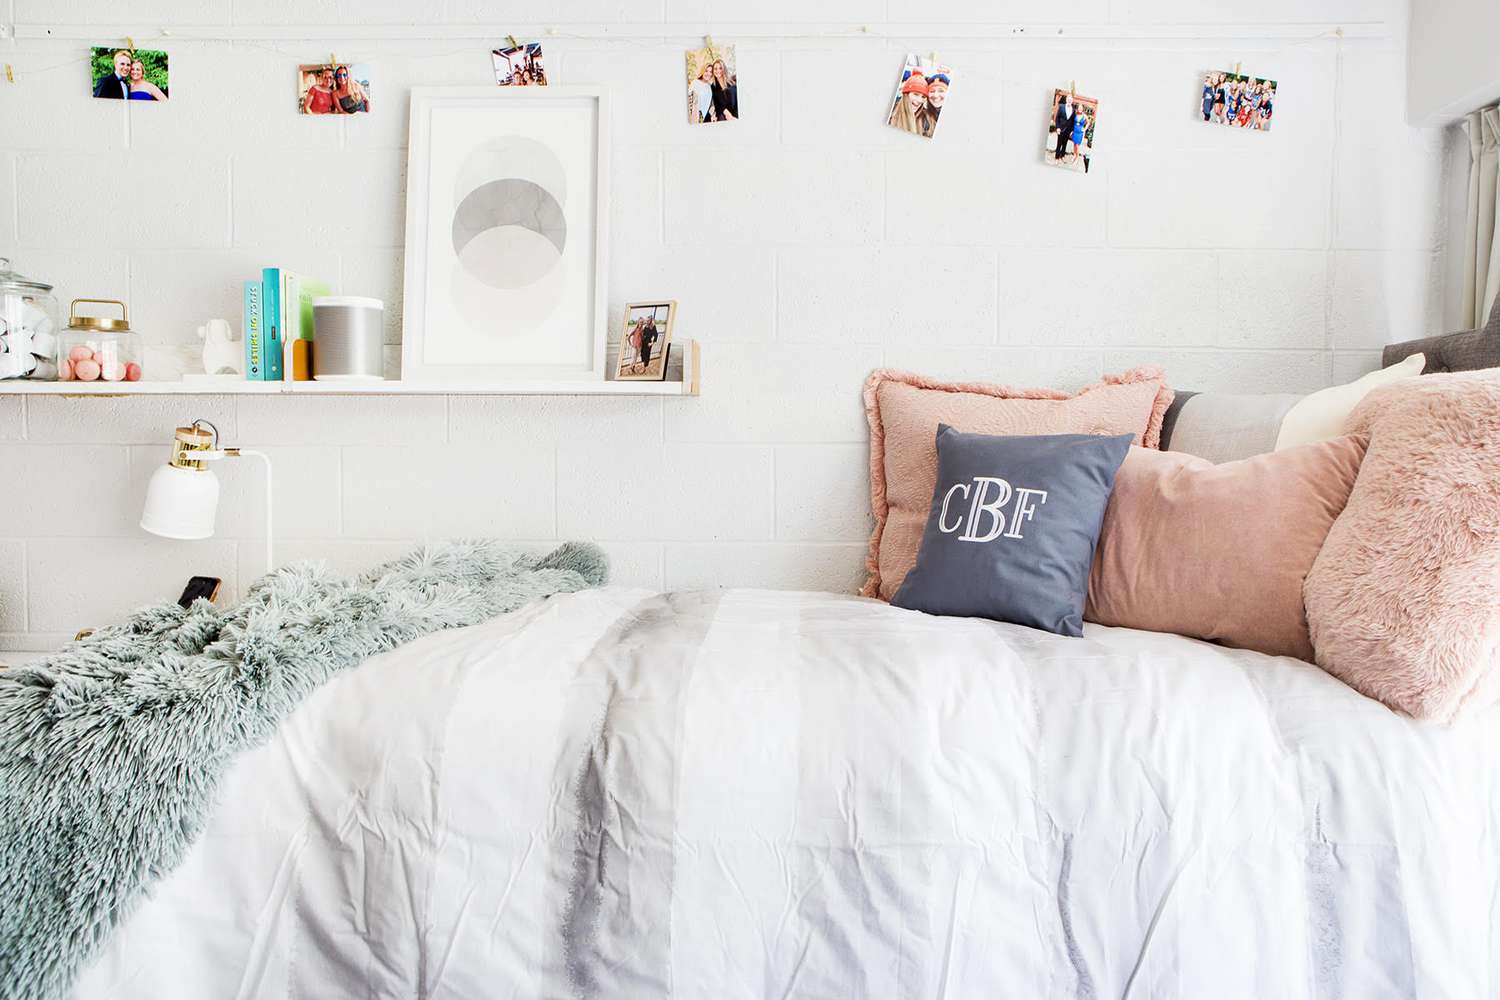
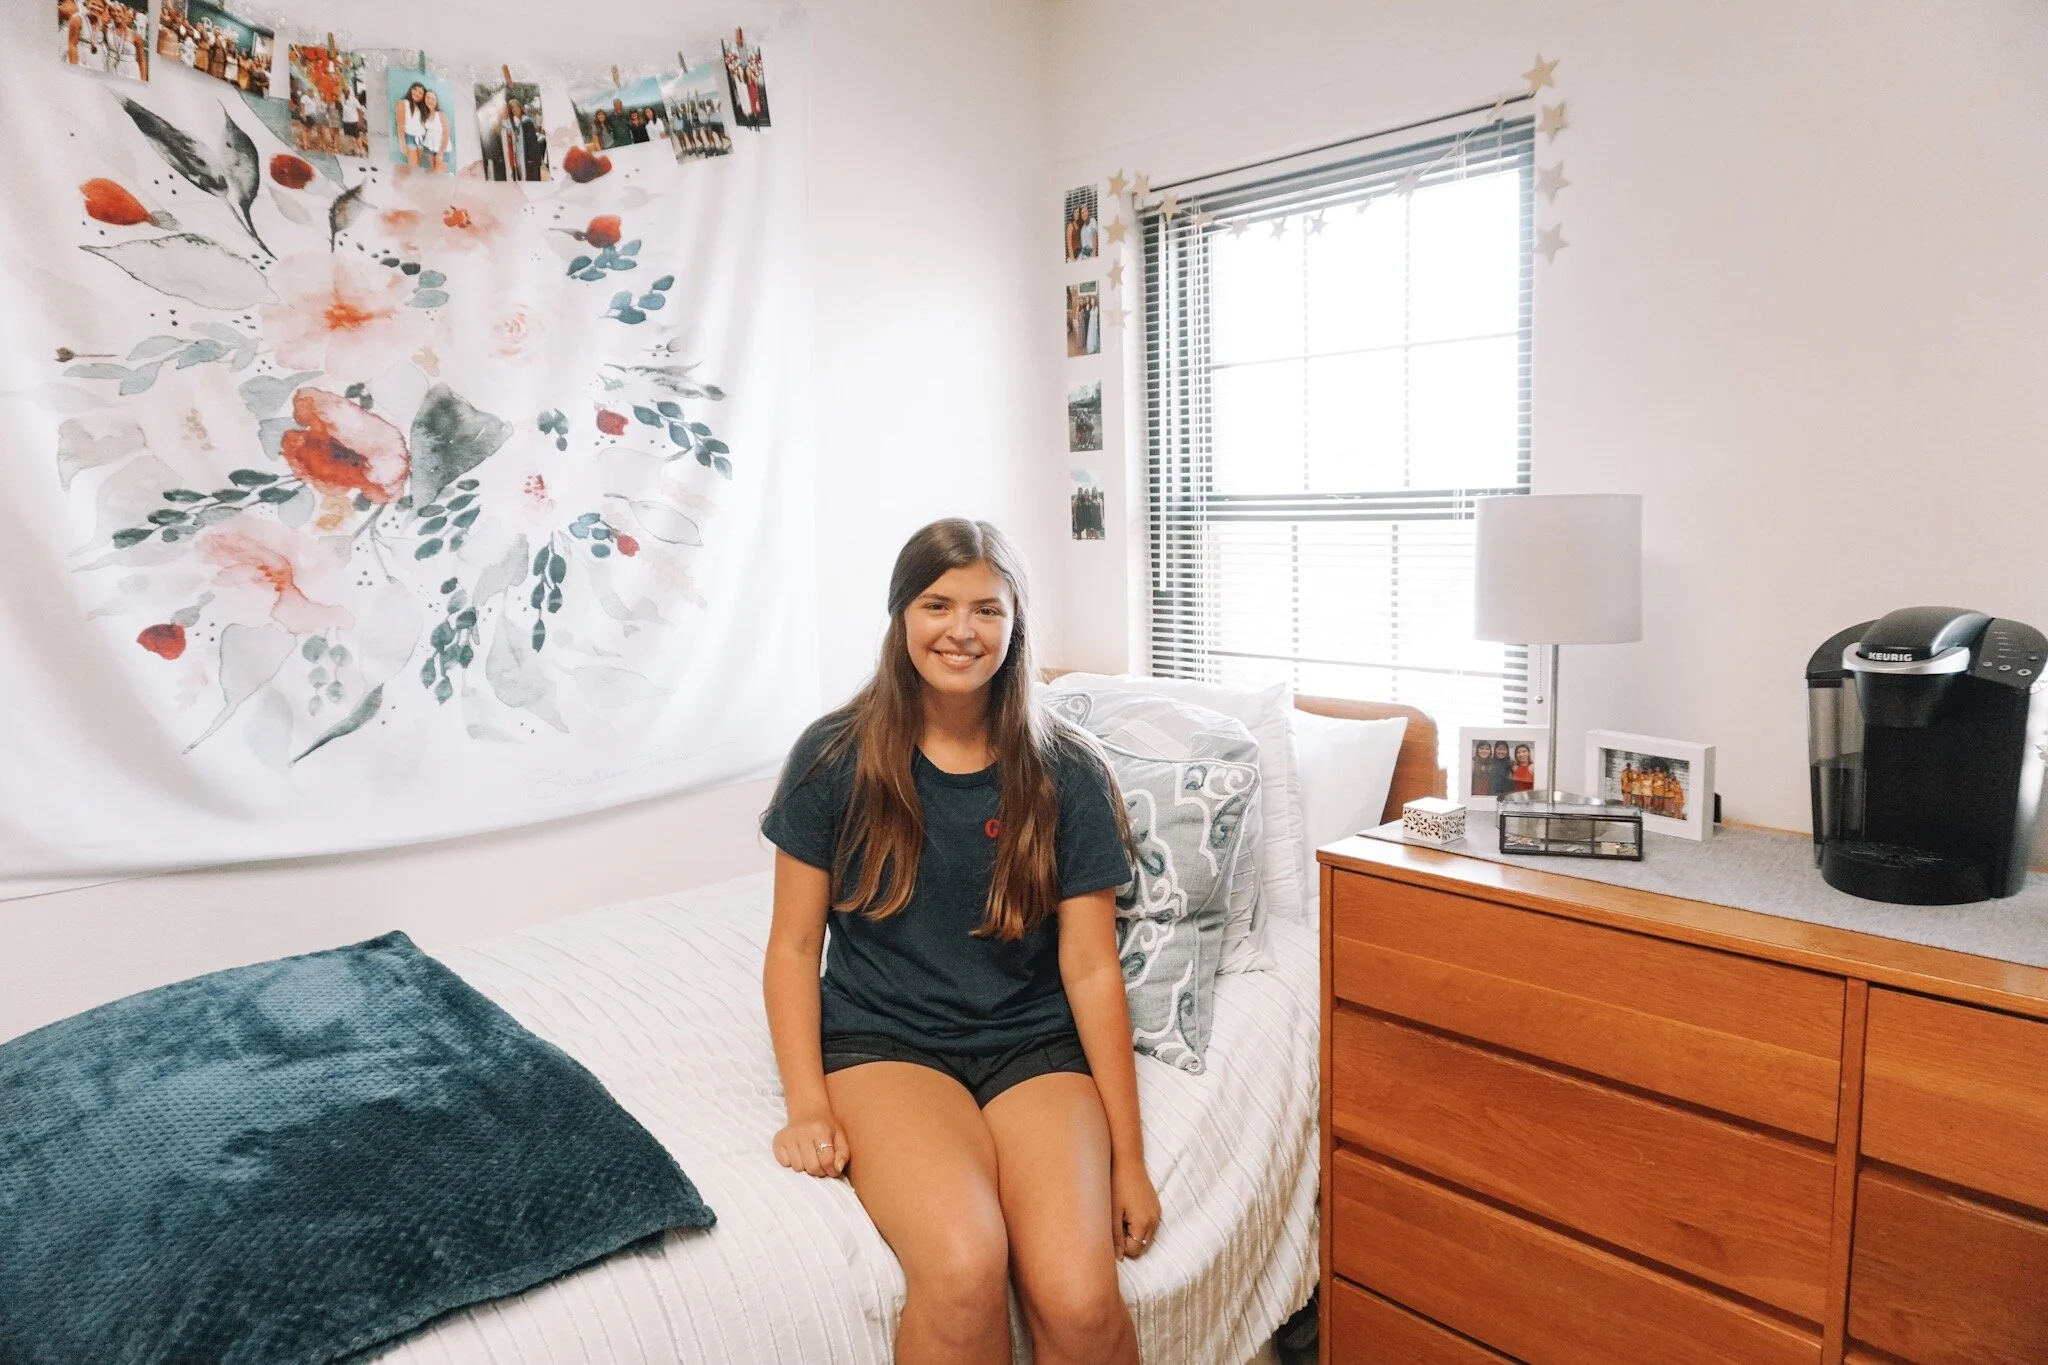
17. Personalize a Simple Bed with a Monogram and Photo Display
This style is a super achievable look on a tight budget. The key is to invest in textiles and personal touches. Find a simple striped comforter at Target or Walmart ($40-$60). The fuzzy blue throw and accent pillows can be found at stores like HomeGoods or TJ Maxx for under $20 each. For the wall, a simple floating shelf from IKEA is about $15, and the photo display can be made with a piece of wire, twine, and some miniature clothespins from a craft store for less than $10. The monogrammed pillow is the only potential splurge, but you can find iron-on letters to DIY one yourself.
|
📋 Copy HEX 🔗 Share |
The reason this simple setup looks so put-together is the curated color palette. The foundation is a neutral gray and white, seen in the cinder block wall and the main comforter. Then, a soft light blue and a soft pink are added as clear, consistent accent colors on the pillows and other decorations. A final hint of gold in the shelf accessories adds a tiny bit of warmth and sophistication. By sticking to these four colors, the space looks intentional and coordinated, not random. This proves you don’t need a giant budget to create a stylish, cohesive space.
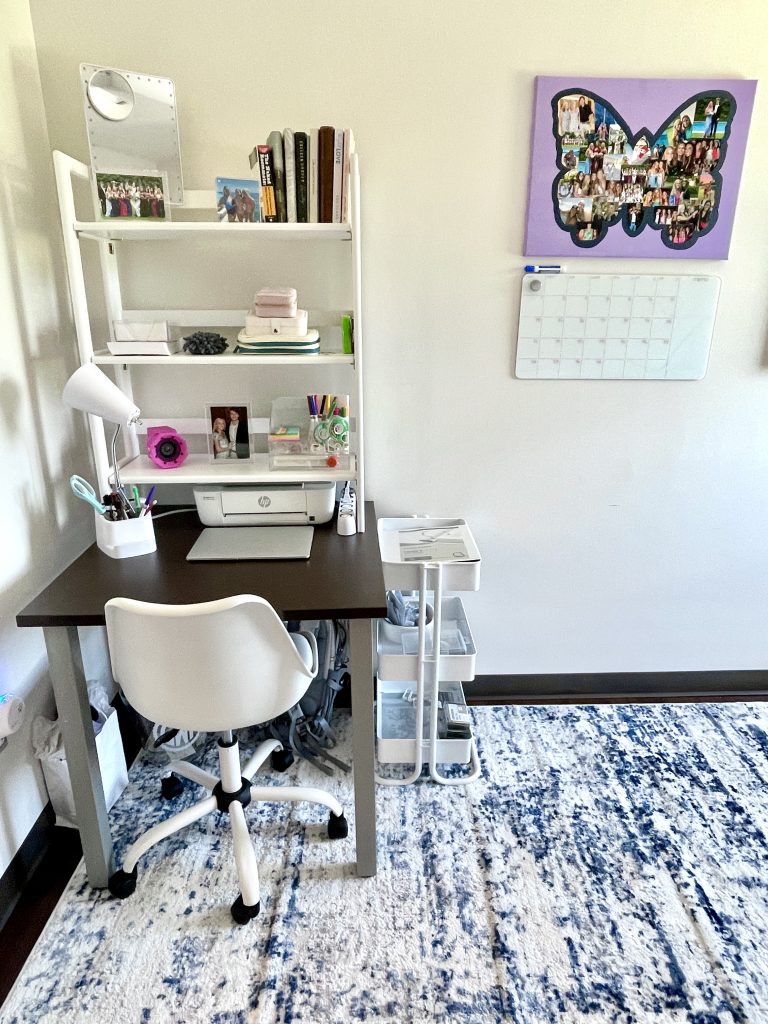
18. Balance Dark Wood and White Furniture with a Textured Rug
Creating a photo collage that looks curated, not chaotic, is an art. Here’s a quick guide to making a shape collage like the butterfly shown. Time: 1-2 hours. Cost: $10-$20.
- First, choose a simple, bold shape and lightly sketch it on your wall with a pencil.
- Gather your photos. For a cohesive look, edit them all with the same filter (like the lavender tint here) before printing.
- Start by placing the most important photos along the key outlines of your shape.
- Fill in the center, overlapping the photos slightly to avoid gaps. Use double-sided tape or sticky tack for effortless repositioning.
- Step back frequently to ensure the overall shape is still readable as you fill it in.
|
📋 Copy HEX 🔗 Share |
Mixing dark wood furniture (the desk) with white pieces (the chair and bookshelf) can be tricky. If not handled well, it can look disjointed. The key to making it work here is the textured blue and white area rug. The rug acts as a bridge between the two contrasting furniture colors. Its white base connects to the white furniture, while the hints of dark blue create a color harmony with the dark wood desk. It ties the whole zone together into one cohesive unit. Without that rug, the desk and the bookshelf would feel like they belong in two different rooms.
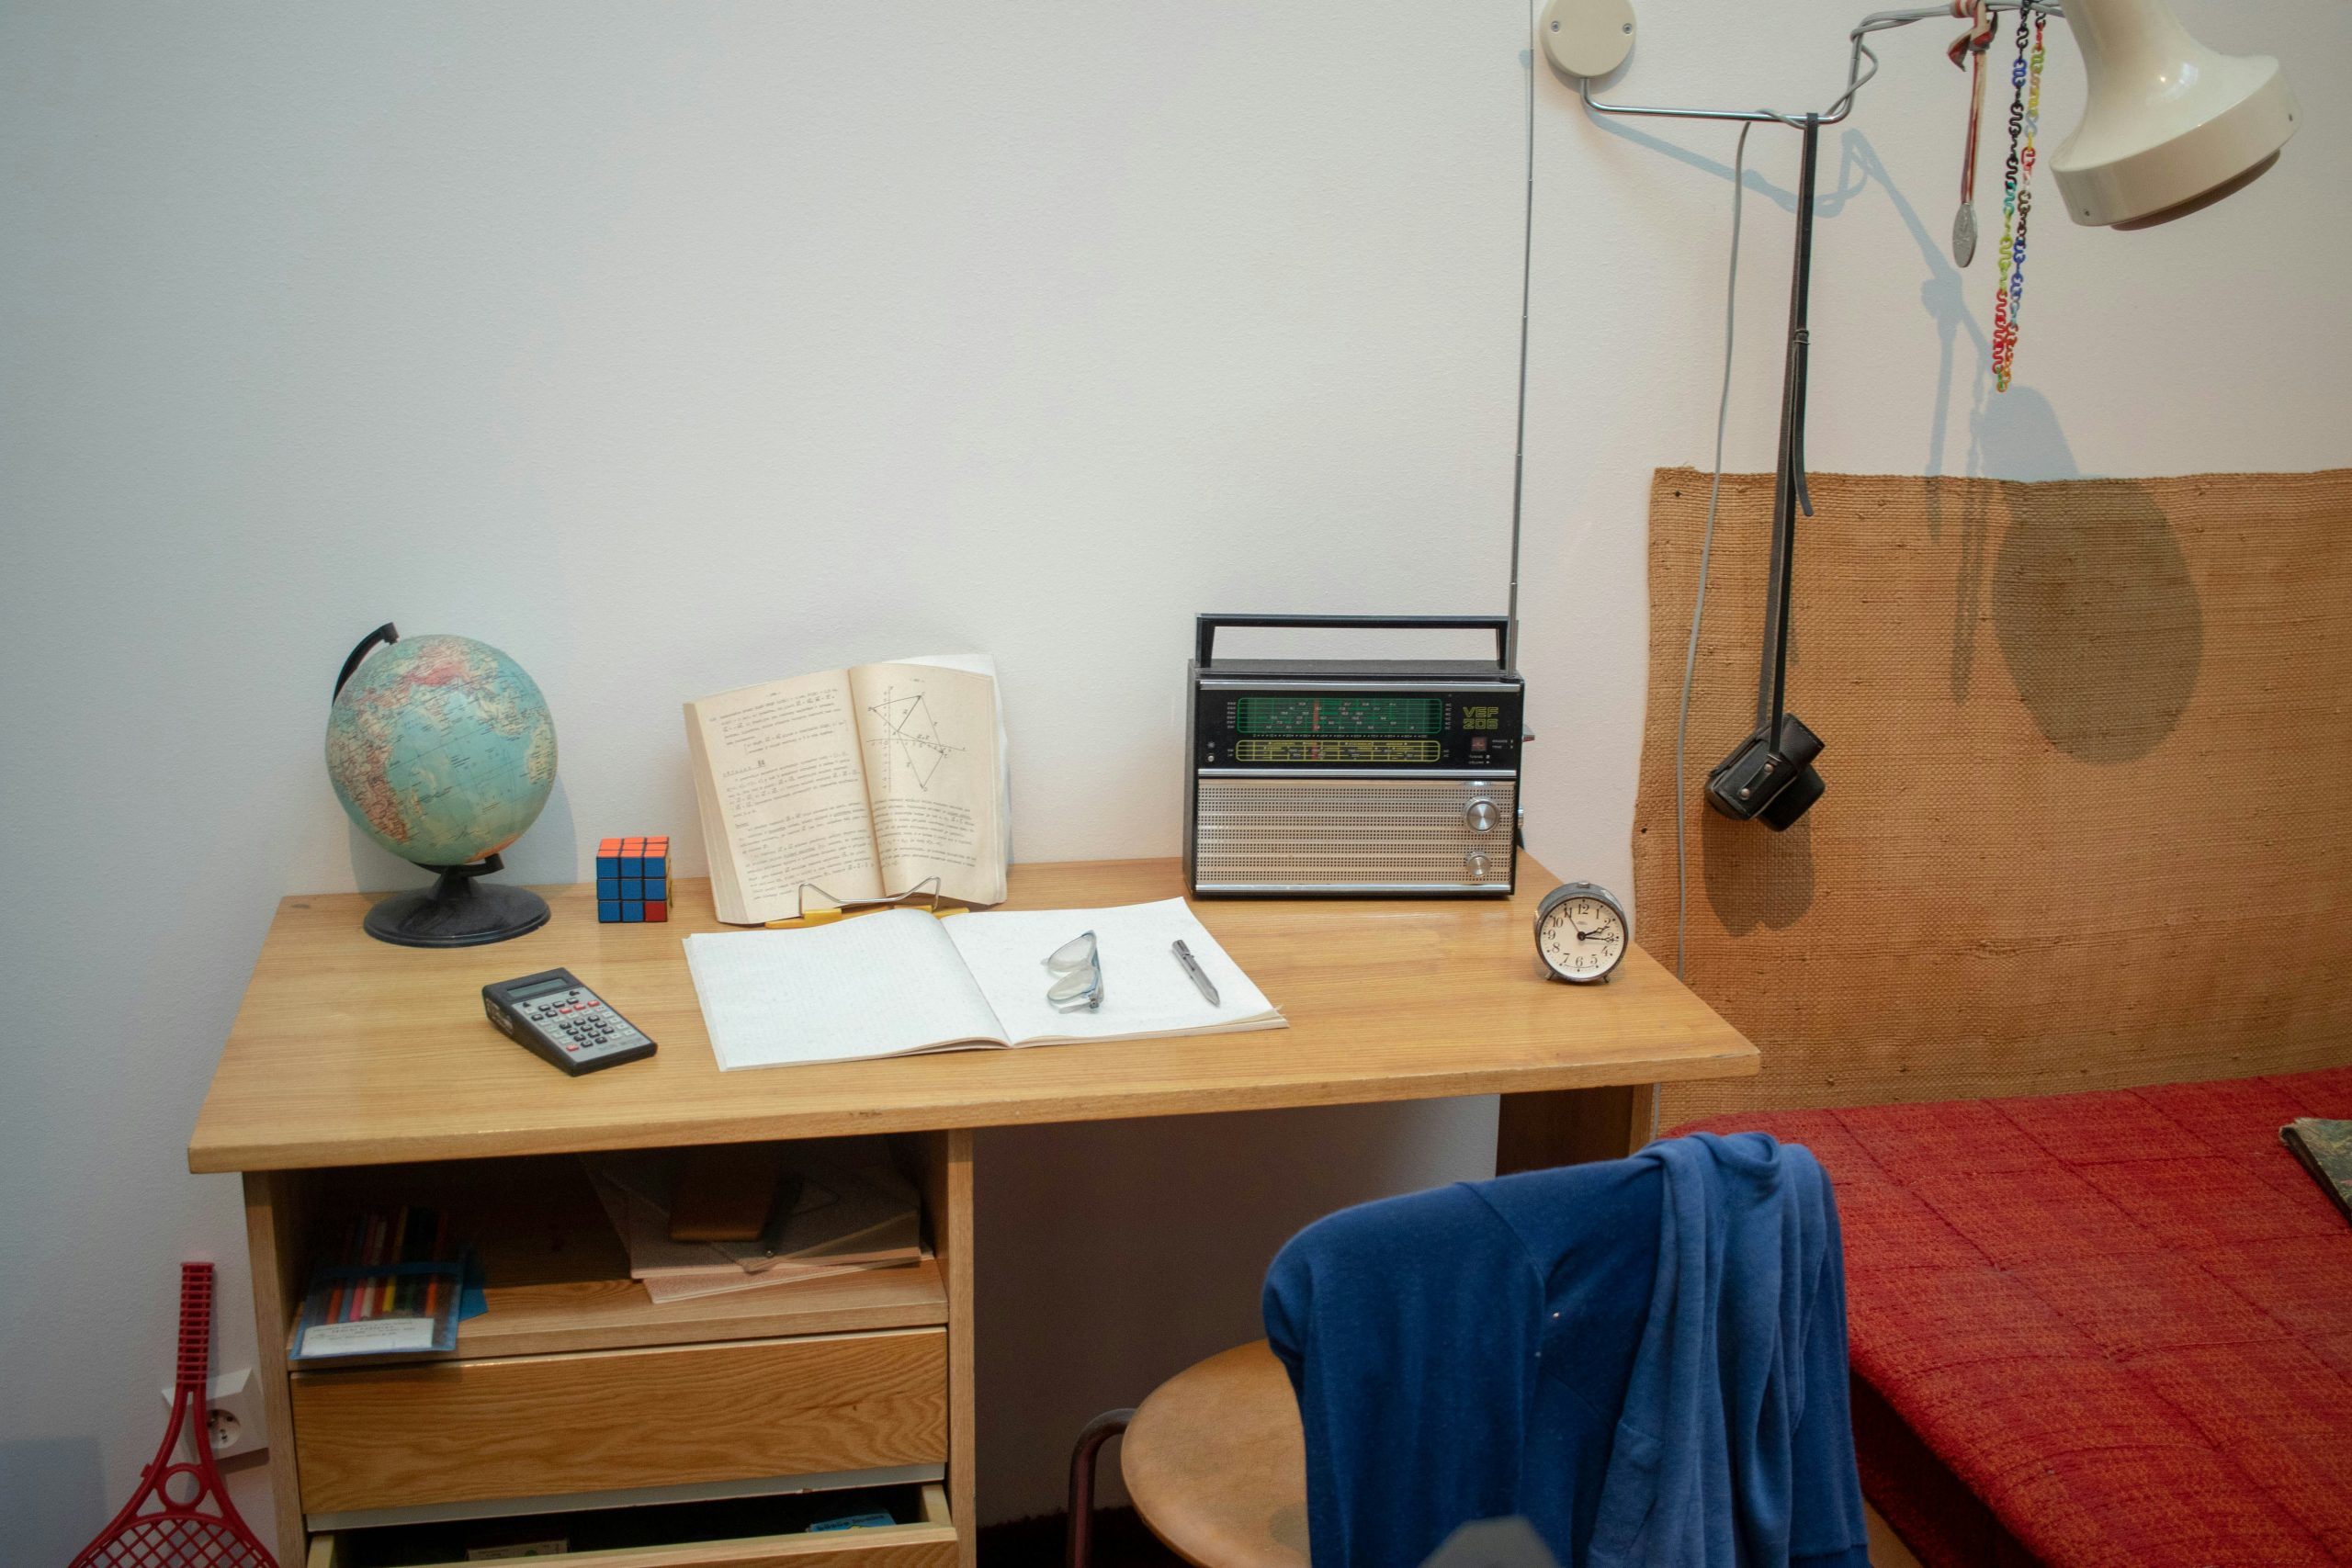
19. Curate a Studious Vibe with Vintage Accents and Natural Textures
This study nook feels so authentic because of its commitment to tangible, classic objects. In an age of digital everything, the presence of a physical globe, an open textbook, and a vintage-style radio creates a sense of grounding and focus. The textures reinforce this: the woven headboard, the light wood of the desk, and the crisp pages of the book all add to a tactile experience. The color palette is simple and warm—white, wood, and a pop of red—which keeps the focus on the studious task at hand without being stark or cold.
|
📋 Copy HEX 🔗 Share |
This look is part of the ‘Dark Academia’ and ‘Classic Academia’ trends, which continue to be massively popular, especially in student spaces. It Romanticizes learning and harkens back to a pre-digital university experience. The trend is about creating an environment that feels intellectual, cozy, and a little nostalgic. The vintage-style clock and radio, the globe, and the classic adjustable lamp are all hallmarks of this aesthetic. It’s a reaction against the sleek, minimalist tech-focused setups and a desire for a workspace with more soul and character.
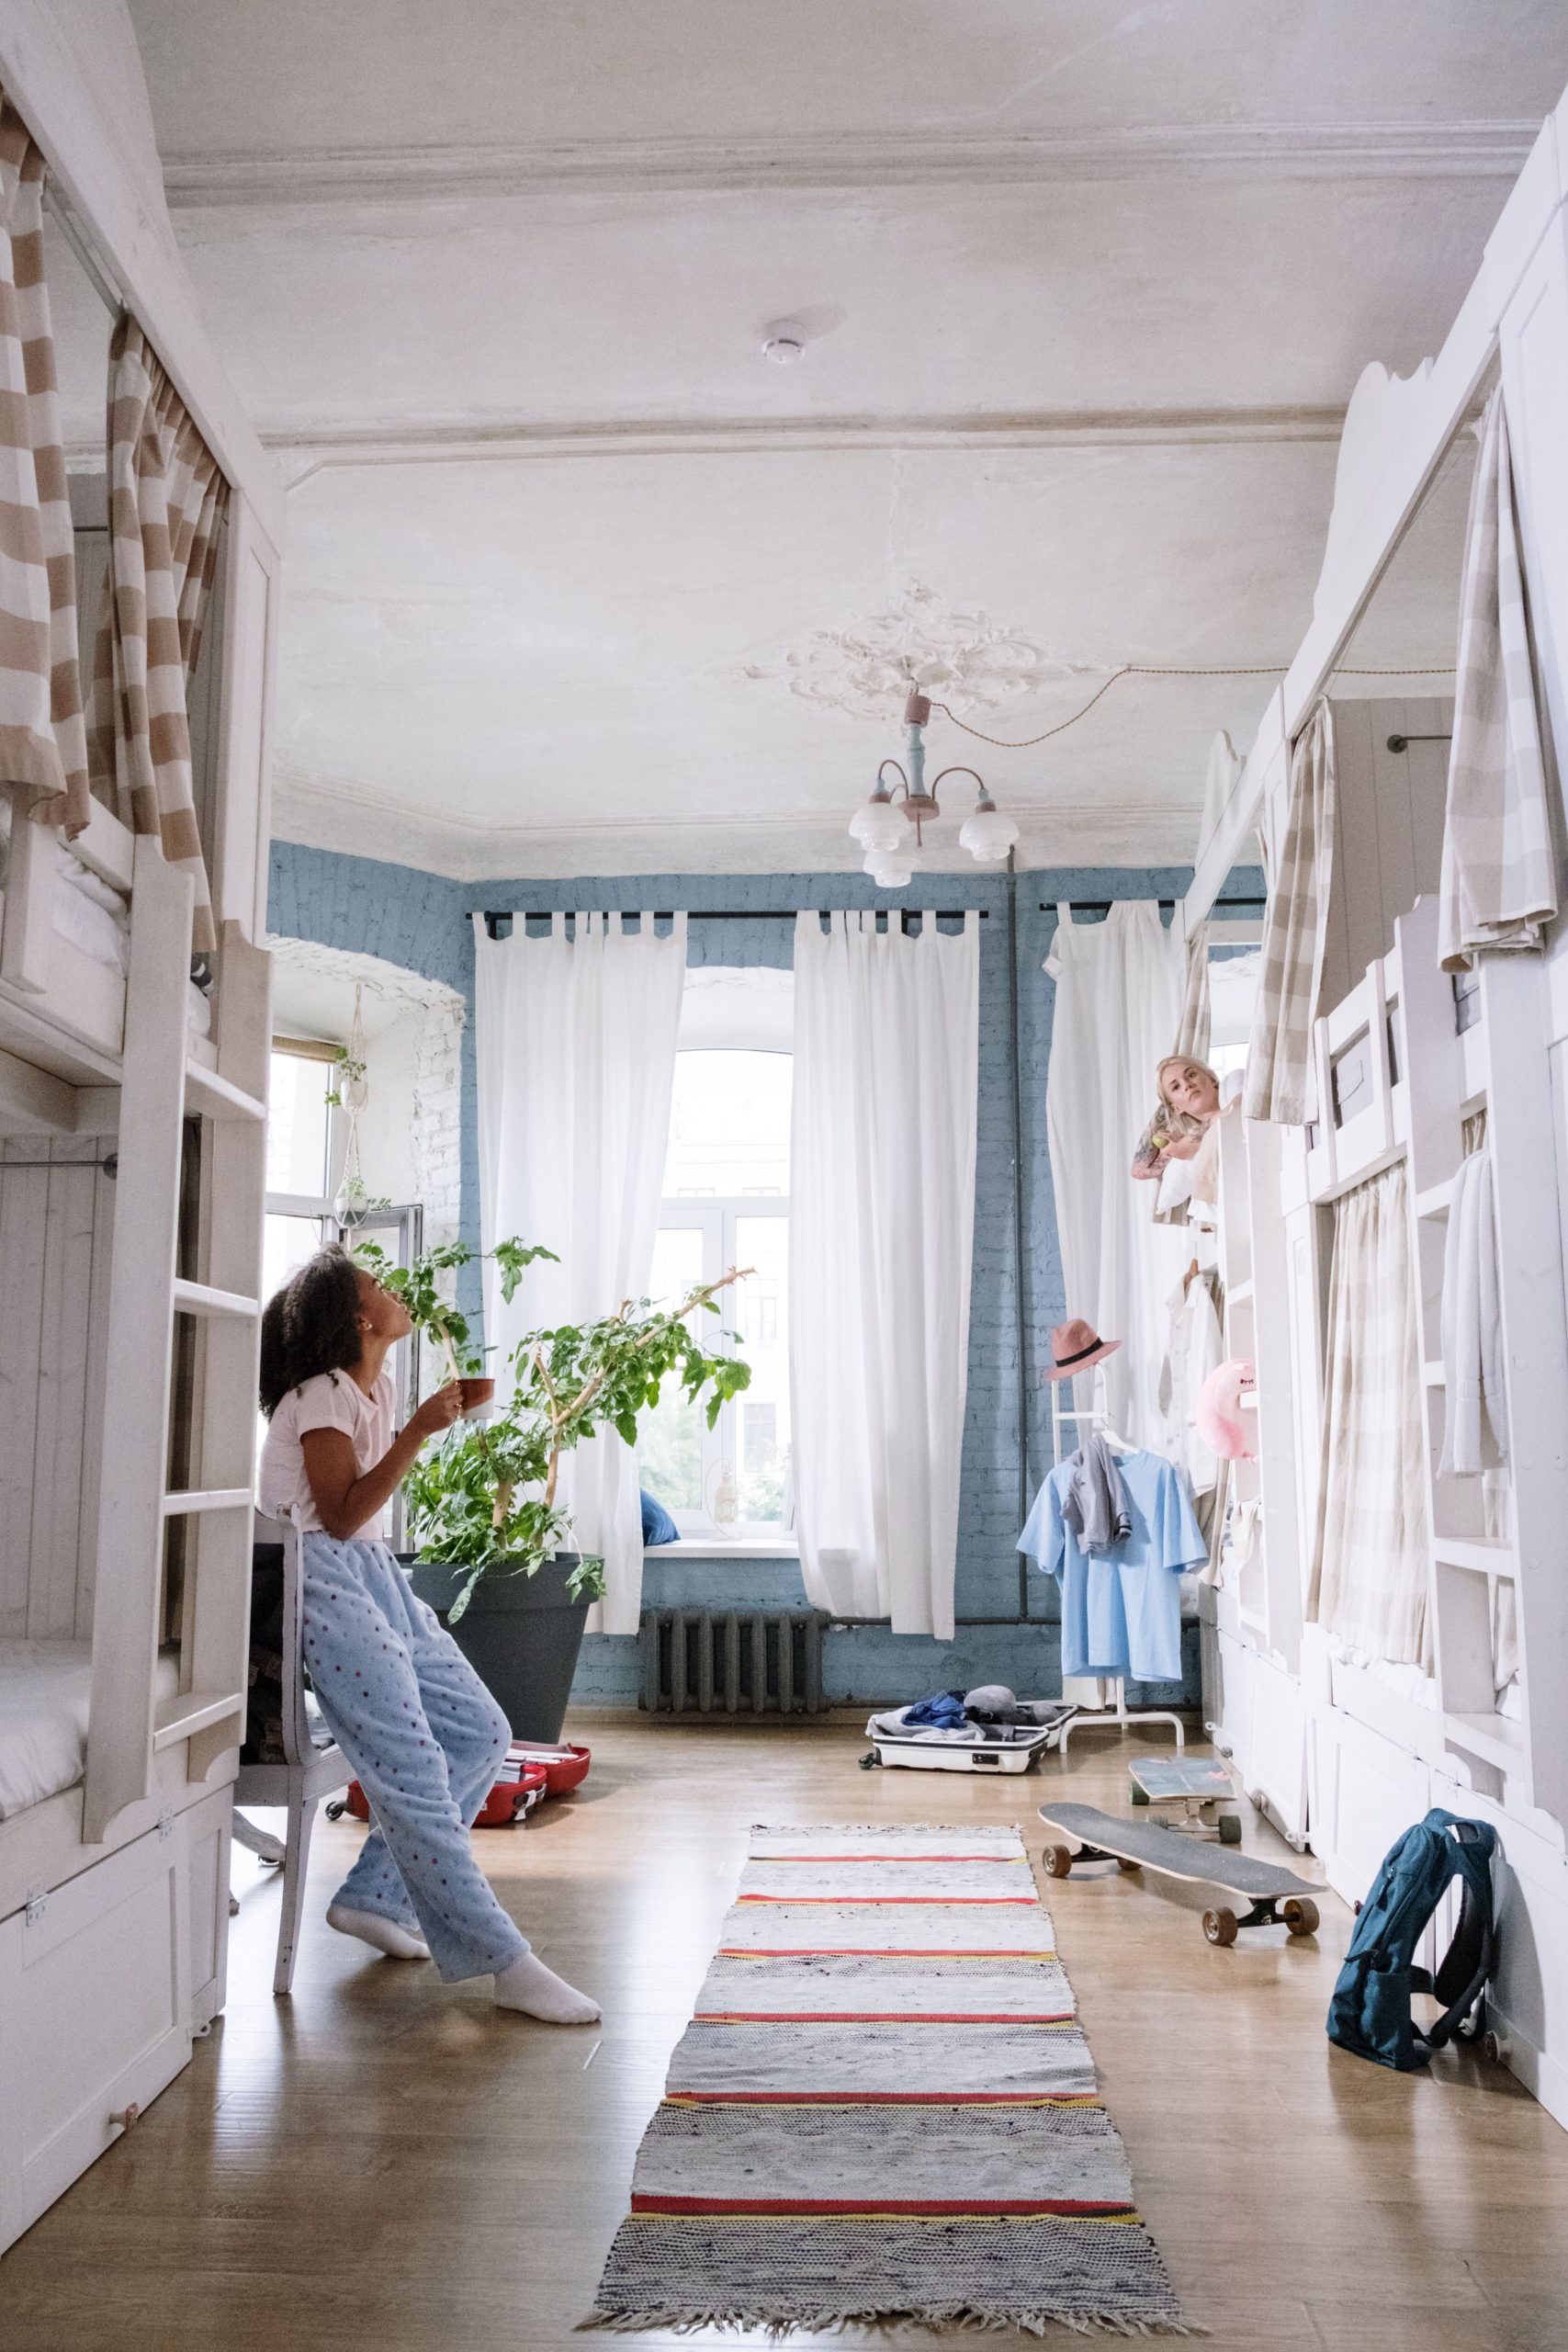
20. Add Privacy and Charm with Gingham Bunk Bed Curtains
The gingham privacy curtains are the single most transformative element in this room. They take a standard, functional white bunk bed and infuse it with an immense amount of charm and personality. The beige and white pattern is classic and sweet, evoking a cozy, cottage-like feel. More importantly, they offer a real solution to the challenge of sharing a small space, creating a private ‘micro-room’ for each occupant. They soften the hard lines of the bed frame and the brick wall, making the whole setup feel cozier and more inviting.
|
📋 Copy HEX 🔗 Share |
If you’re adding privacy curtains to a bunk bed, don’t just use a flimsy tension rod. It will sag and fall constantly. For a durable, smooth-gliding setup, install a proper curtain track system on the inside frame of the bunk. You can find flexible ceiling-mount tracks online (like from IKEA or Amazon) that are perfect for this purpose. They are low-profile and allow the curtains to slide effortlessly without snagging. It’s a small upgrade that makes a huge difference in the day-to-day functionality of the curtains.
21. Create Warmth with Layered Lighting and Personal Mementos
The inviting glow in this room comes from a smart lighting formula: 40% ambient, 40% task, and 20% personal flair. The ambient light is from the string lights wrapped around the bed frame—they provide a soft, all-over glow. The task lighting is the sturdy white desk lamp below, which is essential for late-night study sessions. The final 20% is the personality, seen in the school spirit sign and the colorful pillows. This layered approach ensures the room is functional for work but can instantly switch to a cozy, relaxing haven.
|
📋 Copy HEX 🔗 Share |
A lofted bed is a brilliant space-saver, but it comes with a reality check. Getting in and out of bed requires agility, which may not be ideal if you’re unwell or tired. Making the bed is also a mini workout. And, crucially, you need to be very mindful of ceiling height. A fan or low light fixture can be a real hazard if you sit up too quickly. Before committing to the loft life, make sure you have at least 30-36 inches of clearance between the top of your mattress and the ceiling.
22. Build a Calm and Neutral Space with Paisley Bedding
This room proves that ‘neutral’ doesn’t mean ‘boring.’ The key is a sophisticated layering of textures and subtle patterns. The paisley duvet cover provides the main visual interest, but it’s in a muted gray and beige palette that keeps it from feeling loud. The bedspread is then layered with a variety of textures in the throw pillows—from soft faux fur to knitted fabrics. The light wood furniture adds warmth, while the dark wood floor provides a grounding contrast. The brass desk lamp is the final touch, adding a small, warm metallic glint. The overall effect is calm, cozy, and collected. Compare this neutral setup to the more minimalist version in Idea #23.
|
📋 Copy HEX 🔗 Share |
You can easily pull this look together from budget-friendly stores. IKEA is your best friend for simple, light wood furniture like the desk and bed frame, as well as the brass lamp. For the textiles, which are key here, hit up Target or HomeGoods. They are masters of the ‘cozy neutral,’ and you can find paisley comforter sets and a wide variety of textured throw pillows for a fraction of the price of boutique bedding stores. You can often find a small patterned rug like this on sale at Wayfair or Overstock.
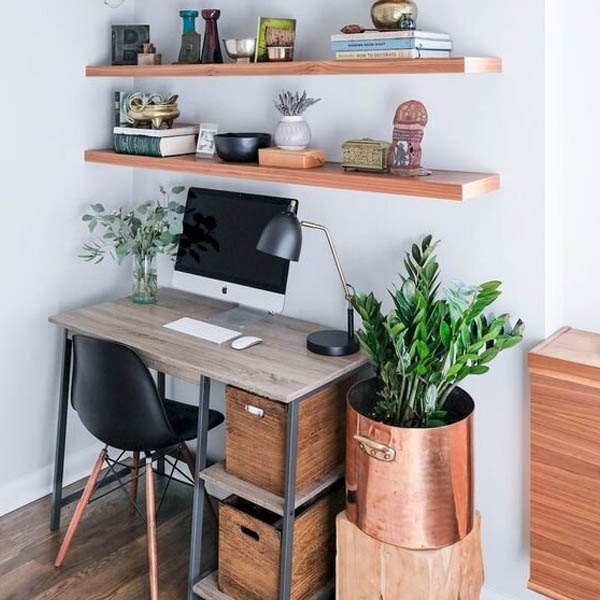
23. Design a Warm, Minimalist Workspace with Floating Shelves
When styling floating shelves, the rule of three is your best friend. Notice how items are grouped in odd numbers? This creates a more dynamic and visually appealing arrangement than symmetrical, even-numbered groupings. Also, vary the height and texture of your objects. On the top shelf, you have a tall plant, a medium-sized frame, and a short, squat pot. This visual triangle keeps the eye moving. Don’t just line things up; create little vignettes. And leave some space! Negative space is crucial to prevent the shelves from looking cluttered.
|
📋 Copy HEX 🔗 Share |
The single element that breathes life into this otherwise simple, functional workspace is the abundance of greenery. The large potted plant on the right is a vibrant, sculptural statement, and its copper planter adds a necessary touch of warmth and color. The smaller plants on the shelves echo this natural element, creating a cohesive theme. If you took away the plants, you’d have a perfectly sleek, minimalist desk setup. But with the plants, you have a workspace that feels fresh, airy, and inspiring. They’re not just decor; they’re an essential part of the room’s atmosphere.
24. Combine Function and Flora with a Dresser Coffee Station
This is a brilliant example of multi-purpose design, a must in any dorm room. The wooden dresser isn’t just for clothes; it’s a vanity, a display space for photos, and, most cleverly, a coffee station. Placing the Keurig here frees up valuable desk space. The large floral tapestry above the bed serves as an inexpensive, high-impact headboard and art piece, setting the color palette for the rest of the room’s accents, like the teal cushion. Every major piece in this corner is doing at least two jobs, which is the secret to successful small-space living. Compare this functional setup to the one in Idea #15.
|
📋 Copy HEX 🔗 Share |
Running a coffee machine on a wooden dresser requires a little bit of caution. Heat and potential steam can damage the wood finish over time. Be sure to place the Keurig on a small, heat-resistant mat or a decorative tray to protect the surface. Furthermore, be mindful of spills. A stray splash of coffee or water left to sit on the wood can leave a permanent stain. It’s a super convenient setup, but you have to be diligent about keeping the area clean and dry to preserve your furniture.
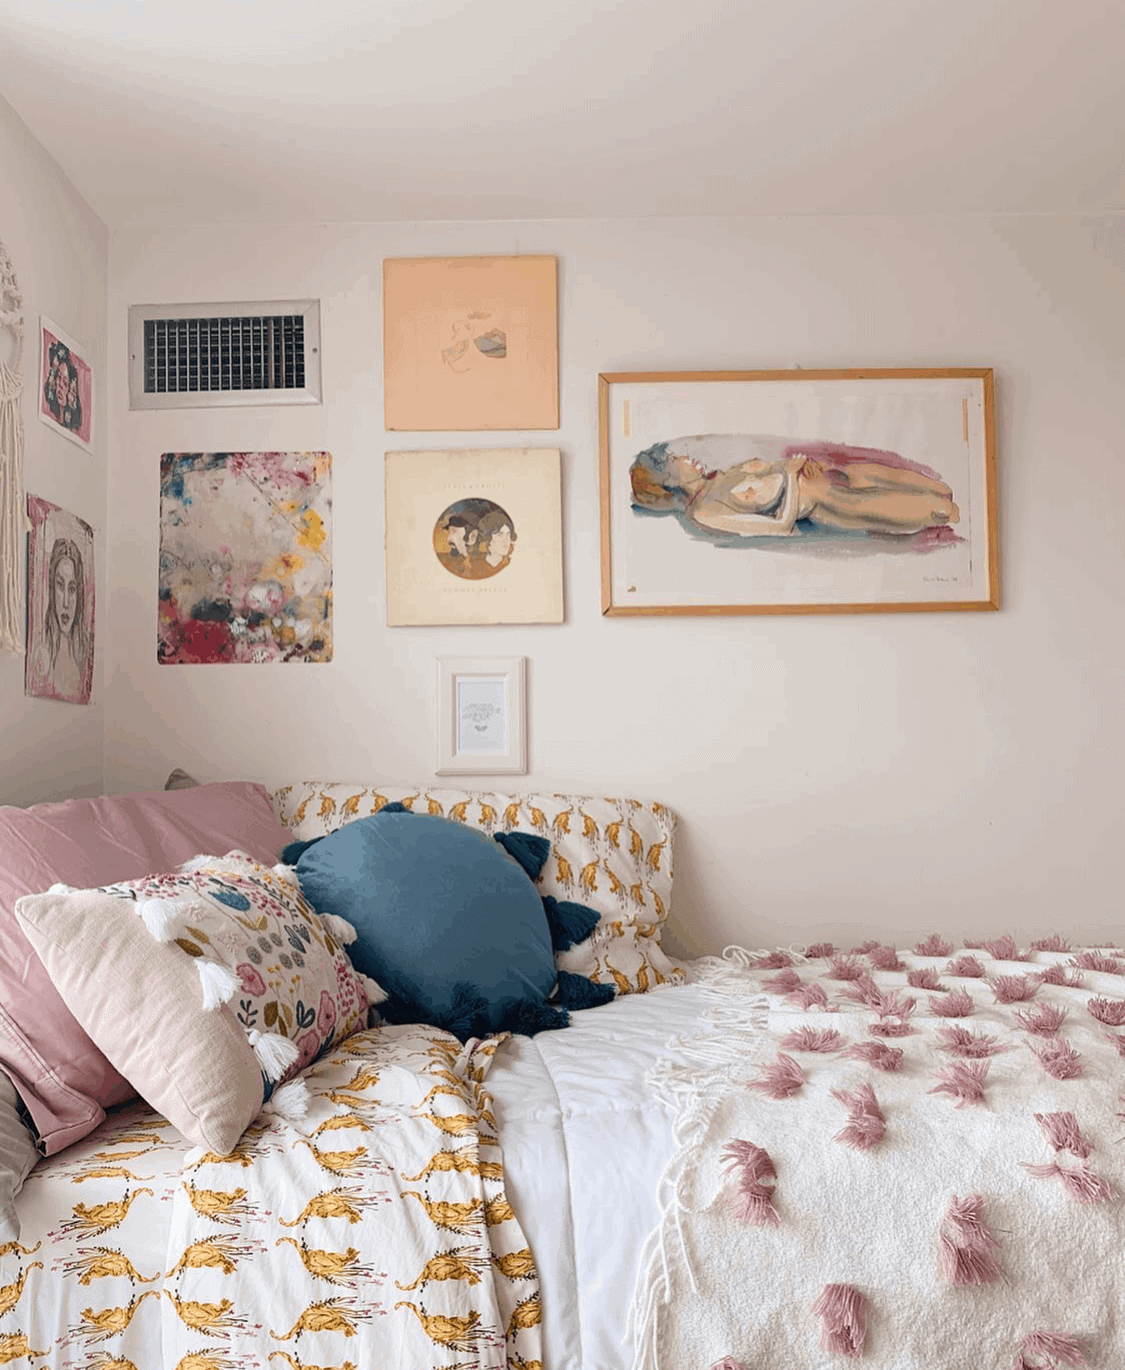
25. Curate an Eclectic Gallery Wall Above a Patterned Bed
The formula for this artistic corner is a careful balance of pattern, texture, and color. It’s about 40% eclectic wall art, 40% layered textiles, and 20% curated color. The gallery wall is the main event, but it works because the equally busy pattern on the duvet cover below balances it. The soft, nubby texture of the white and pink throw blanket provides a resting place for the eyes amongst all the patterns. The color palette—teal, pink, and mustard—is pulled directly from the artwork and bedding, making the whole composition feel harmonious and intentional.
|
📋 Copy HEX 🔗 Share |
When creating a gallery wall with many different pieces, the secret to making it look cohesive is to establish a consistent spacing between the frames. Aim for 2-3 inches of space between each piece. Before you hammer a single nail, lay all your artwork out on the floor and arrange it until you find a composition you love. Take a photo of the final layout to reference as you hang it. Start by hanging the largest, central piece first and then build outwards from there. This creates a much more balanced result.

Conclusion
Think of your dorm not just as a temporary room but as the first chapter in your own design story. It’s a space to experiment, to be bold, and to create a corner of the world that feels entirely like you. Take these ideas, mix them up, and make them your own.
Ready for more inspiration? Head over to Pinterest and start creating a board for your future space. Happy decorating!