
You know that feeling when you finally find the DIY Christmas ornament idea that looks exactly right for your tree? We’ve sifted through countless projects, focusing on materials you can find at places like Jo-Ann or Michaels, to bring you only the best. We’ve found inspiration for every budget, from simple paper crafts costing less than $5 to intricate crochet projects. Inside, you’ll find 24 curated ideas that go way beyond basic. We’re covering the biggest trends: charming crochet characters, rustic felt designs, and elegant paper creations. For 2026, it’s all about making your holiday decor deeply personal. After years of mass-produced everything, there’s a huge shift toward unique, handmade pieces that tell a story—and your Christmas tree is the perfect place to start. And stay until the end—we break down the most common mistakes that can ruin these looks. 📌 Save this to Pinterest for later—you’ll want to revisit these ideas.
1. Hanging Illuminated Paper Star Lanterns with Christmas Greenery
There’s something magical about creating a canopy of light. This look swaps individual ornaments for a grand gesture, hanging large, glowing paper stars in red, green, and gold amidst fragrant pine boughs. It feels less like decorating a tree and more like transforming the entire room into a festive wonderland. The warm light filtering through the paper creates an instant cozy atmosphere that’s perfect for holiday gatherings. It’s a statement that feels both dramatic and incredibly welcoming.
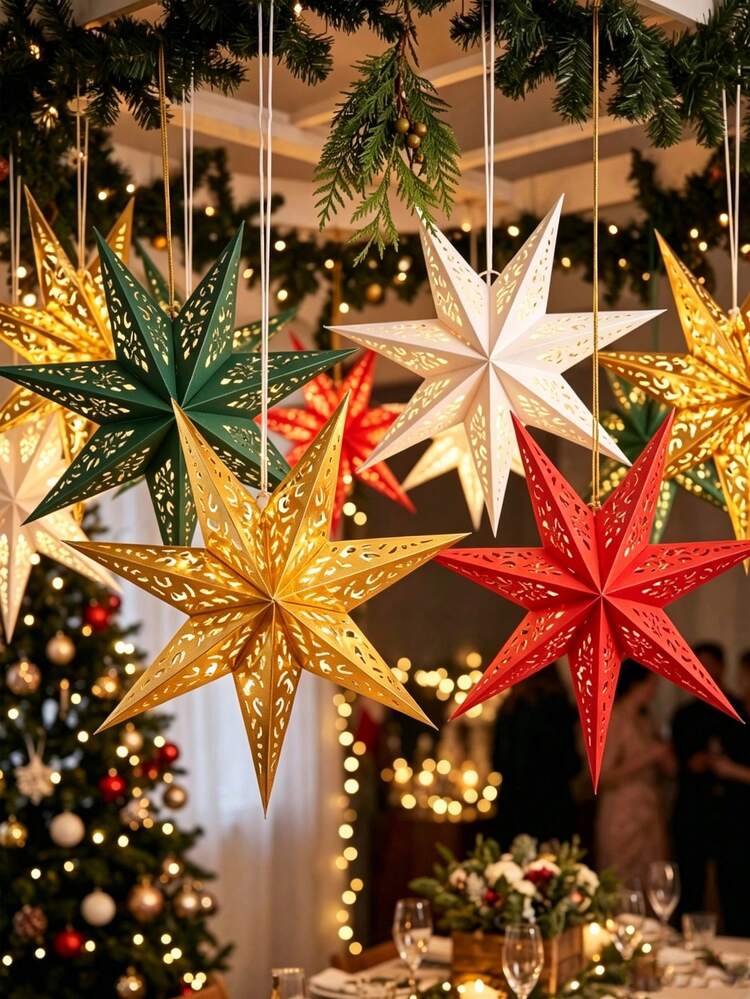
This design is a masterclass in layering light and texture. You have the soft, diffused glow from the paper lanterns, the pinpoint sparkle from the tree’s string lights, and the ambient light of the room. This creates incredible depth. The material contrast is also key: the crisp, geometric paper stars play beautifully against the soft, organic texture of the natural pine boughs. It’s a dynamic pairing that feels balanced and visually rich.
This idea is all about impact, so it works best in spaces that can handle the scale. You’ll want a room with ceilings at least 9 feet high to prevent the stars from feeling overwhelming or low. It’s a fantastic solution for a dining room, suspended over the table, or in a living room with a vaulted ceiling. For a smaller space, adapt the concept by hanging a cluster of 3-5 smaller stars (12-16 inches) in a corner or above an accent chair to create a festive nook.
2. Crocheted Gingerbread & Beaded Tree Ornaments
This is where crochet gets adorably specific. Forget simple spheres—we’re talking a gingerbread tree with delicate white ‘icing’ and a classic green tree sparkling with tiny, colorful beads. These aren’t just ornaments; they’re miniature textile sculptures. The detail in the white snowflake stitching and the little crocheted trunk shows a real love for the craft. Displayed on a simple fabric, their handmade charm really takes center stage.
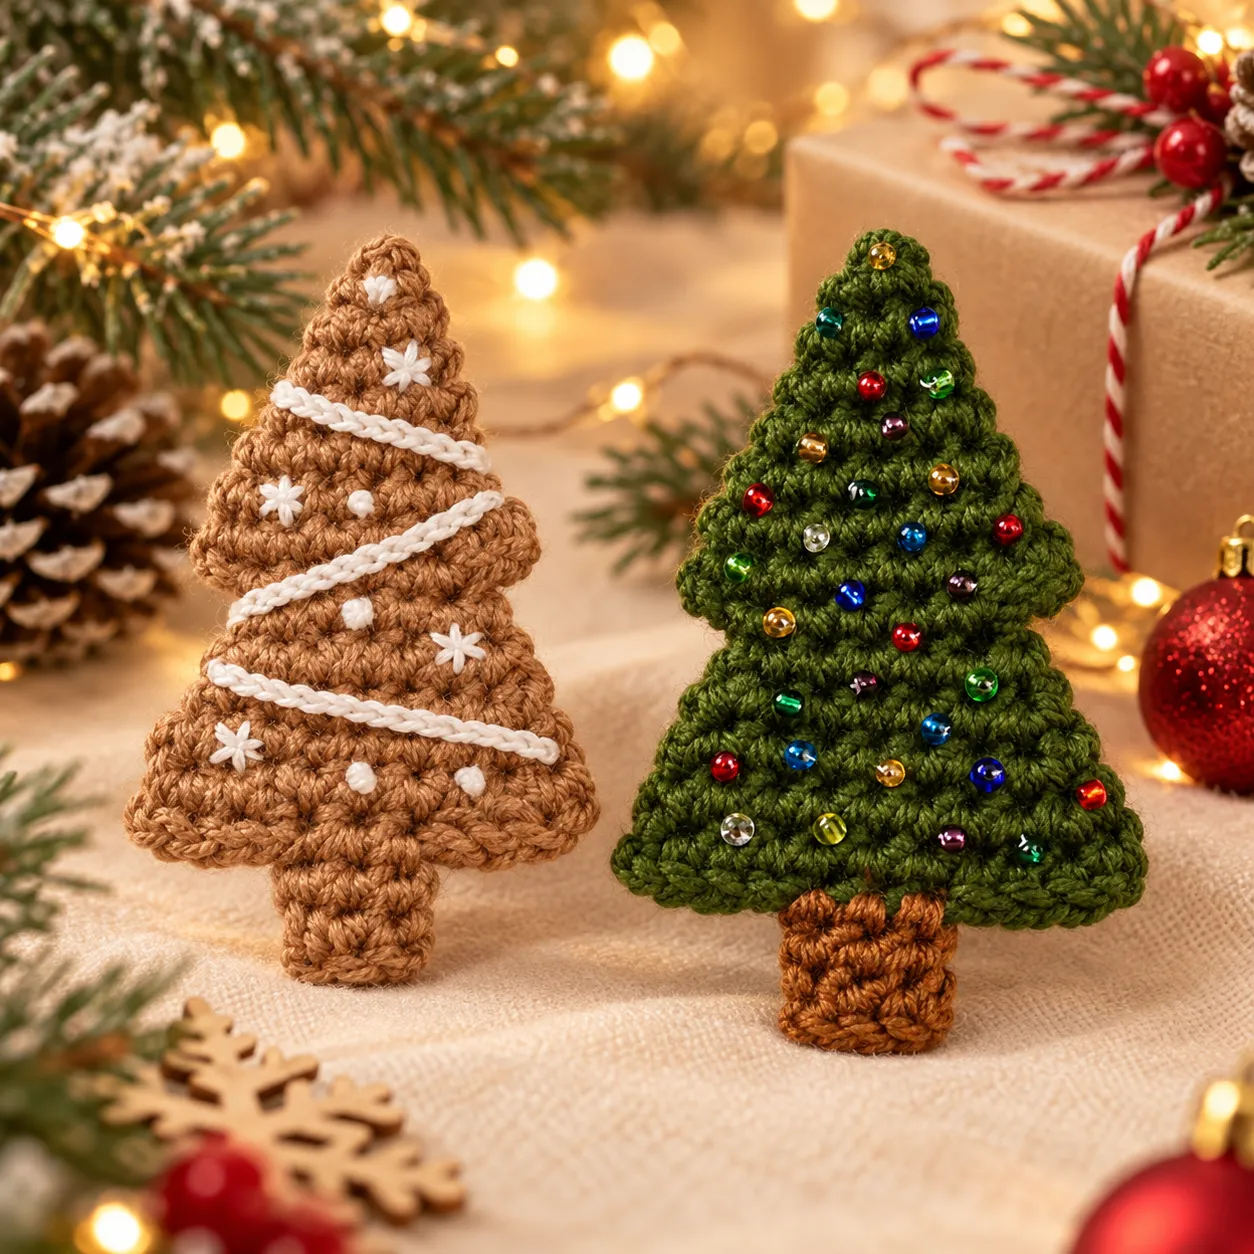
Adding beads to your crochet projects is easier than it looks and adds a perfect touch of sparkle. This should take about 15-20 minutes per ornament, with minimal material cost.
- First, choose your beads. Make sure the hole is large enough for your yarn or a thin needle to pass through.
- Before you begin your project, thread all the beads you plan to use onto your working yarn.
- As you crochet, simply slide a bead down the yarn until it’s right next to your hook before you make your next stitch (typically a single crochet).
- Complete the stitch as normal. The bead will be locked securely in place on the ‘front’ side of your work.
For small, detailed ornaments like these, yarn weight is everything. Use a sport (size 2) or fingering (size 1) weight yarn. A standard Worsted (size 4) weight yarn, while great for blankets, will make your stitches too bulky, and you’ll lose all that beautiful detail in the icing or the texture of the tree. A smaller yarn with the corresponding smaller hook (e.g., 2.25 mm – 3.5 mm) is the secret to crisp, professional-looking results.
3. Whimsical Crocheted Christmas Character Ornaments
Get ready for a dose of pure, handcrafted fun. This collection of crocheted ornaments brings the whole North Pole crew to your tree. We see a reindeer, a snowman, and even a little cat, alongside clever designs that look like Santa’s and an elf’s belt. Arranging them on a fluffy grey faux fur mat is a genius styling choice, making them look like precious little treasures. The tiny fairy lights in the background just add to the magic.
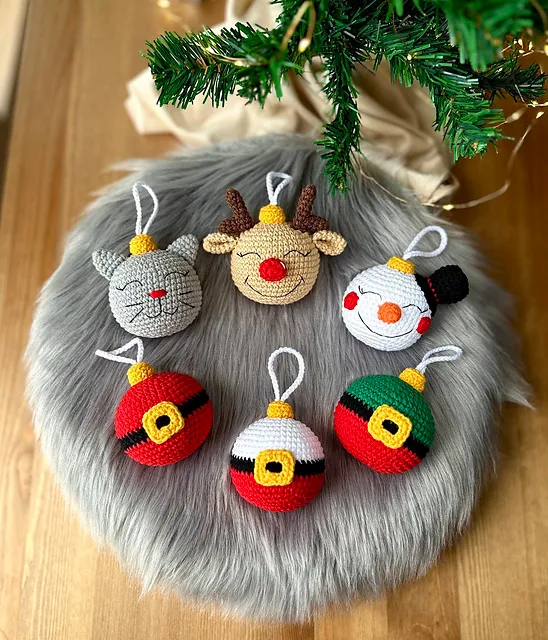
It’s the personality. Without the character-driven designs, these would just be well-made crocheted spheres and shapes. The addition of a reindeer’s antlers, a snowman’s face, or a Santa belt buckle transforms them from simple crafts into story-telling objects. They invite you to look closer and smile. This element of playful narrative is what elevates the entire collection and makes it feel so special and memorable.
Handmade yarn ornaments need a little TLC to last for years. The biggest enemy is dust and getting crushed in storage. For dusting, a can of compressed air (used for keyboards) held about 8-10 inches away is your best friend. Never throw them in the washing machine. When packing them away, avoid just tossing them in a box. Wrap each one individually in acid-free tissue paper and store them in a sturdy container so they don’t get flattened.
4. Miniature Crocheted Christmas Tree with Tiny Ornaments
This isn’t an ornament for your tree; it’s a whole tree as an ornament! This tiny, dark green crocheted masterpiece is a project for a patient crafter. It’s fully decorated with its own set of micro-crocheted baubles: a Santa face, a reindeer, bells, and even little crocheted gift boxes at its base. Standing on a simple scalloped brown stand, it’s a completely self-contained piece of holiday cheer, perfect for a desk or mantelpiece.
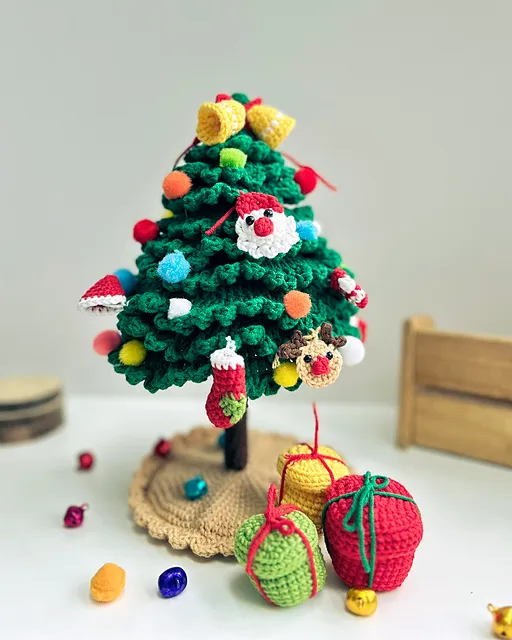
The visual recipe for this charming piece is all about balanced detail. Think of it as 60% Green Tree Structure + 30% Colorful Micro-Ornaments + 10% Neutral Base. The majority of the visual weight is the dark green tree, providing a classic foundation. The pops of red, yellow, and white in the tiny ornaments and gifts create festive energy without overwhelming the small scale. The simple brown base grounds the whole piece, keeping it from feeling too busy.
Let’s be honest: this is adorable, but it’s not a toy. Due to its small, delicate parts (especially the tiny ornaments), this is definitely a display only piece. It’s best placed on a high shelf, a fireplace mantel, or a desk where it can be admired but not touched. It’s not suitable for a home with curious toddlers or a cat who loves to investigate new things on the counter. Think of it as a fragile, handmade decoration to be treasured.
5. Rustic Garland with Birch Bark and Fabric Ornaments
This is rustic charm at its finest. Instead of hanging on a tree, these handmade-style ornaments are clipped with simple wooden clothespins to a length of jute twine. The backdrop of weathered grey wood planks makes the colors pop. You have a mix of textures—a soft red fabric heart, ornaments made from actual birch bark, and a painted wooden reindeer. It’s a beautifully simple and effective way to create a festive focal point on any wall.
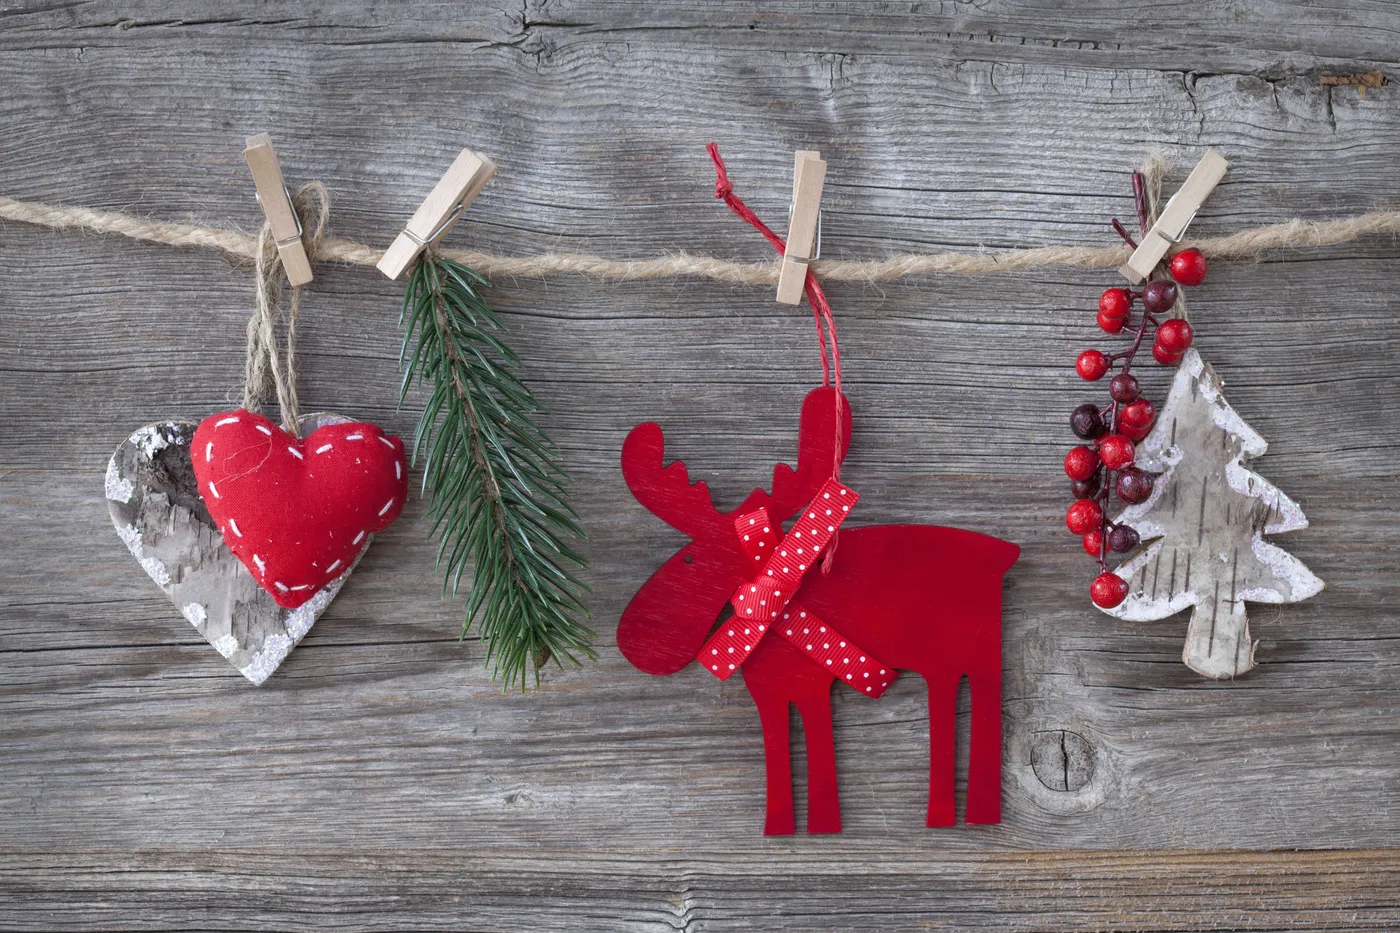
- Jute Twine & Clothespins: $5 – $10
- Fabric Scraps & Batting: $5 – $15 (or free if you have them!)
- Birch Bark Slices/Sheets (from craft store): $10 – $20
- Wood Cutouts & Red Paint: $8 – $15
- TOTAL: $28 – $60
- Budget alternative: Forage for birch bark (where permitted), use old flannel shirts for fabric, and find fallen twigs to hang instead of buying wood cutouts for a version under $15.
This look taps directly into the enduring Modern Farmhouse and Cottagecore aesthetics that are still dominating Pinterest boards in 2026. The emphasis on natural materials (wood, jute, bark) and handmade elements speaks to a collective desire for authenticity and a connection to nature. It feels less commercial and more personal. This trend has staying power because it’s not about a specific color or pattern but a feeling of cozy, lived-in comfort.
6. Folded Red and Gold Fabric Button Ornament
This ornament feels like a treasured family heirloom. It’s a square, padded ornament using a clever fabric-folding technique. Four ‘petals’ of a rich red fabric with a gold scroll pattern are gathered around a stunning antique gold button. The base fabric is a lighter, gold-speckled cream, providing a beautiful contrast. It’s a sophisticated craft that looks much more complicated to make than it is, making it a perfect project for an afternoon.
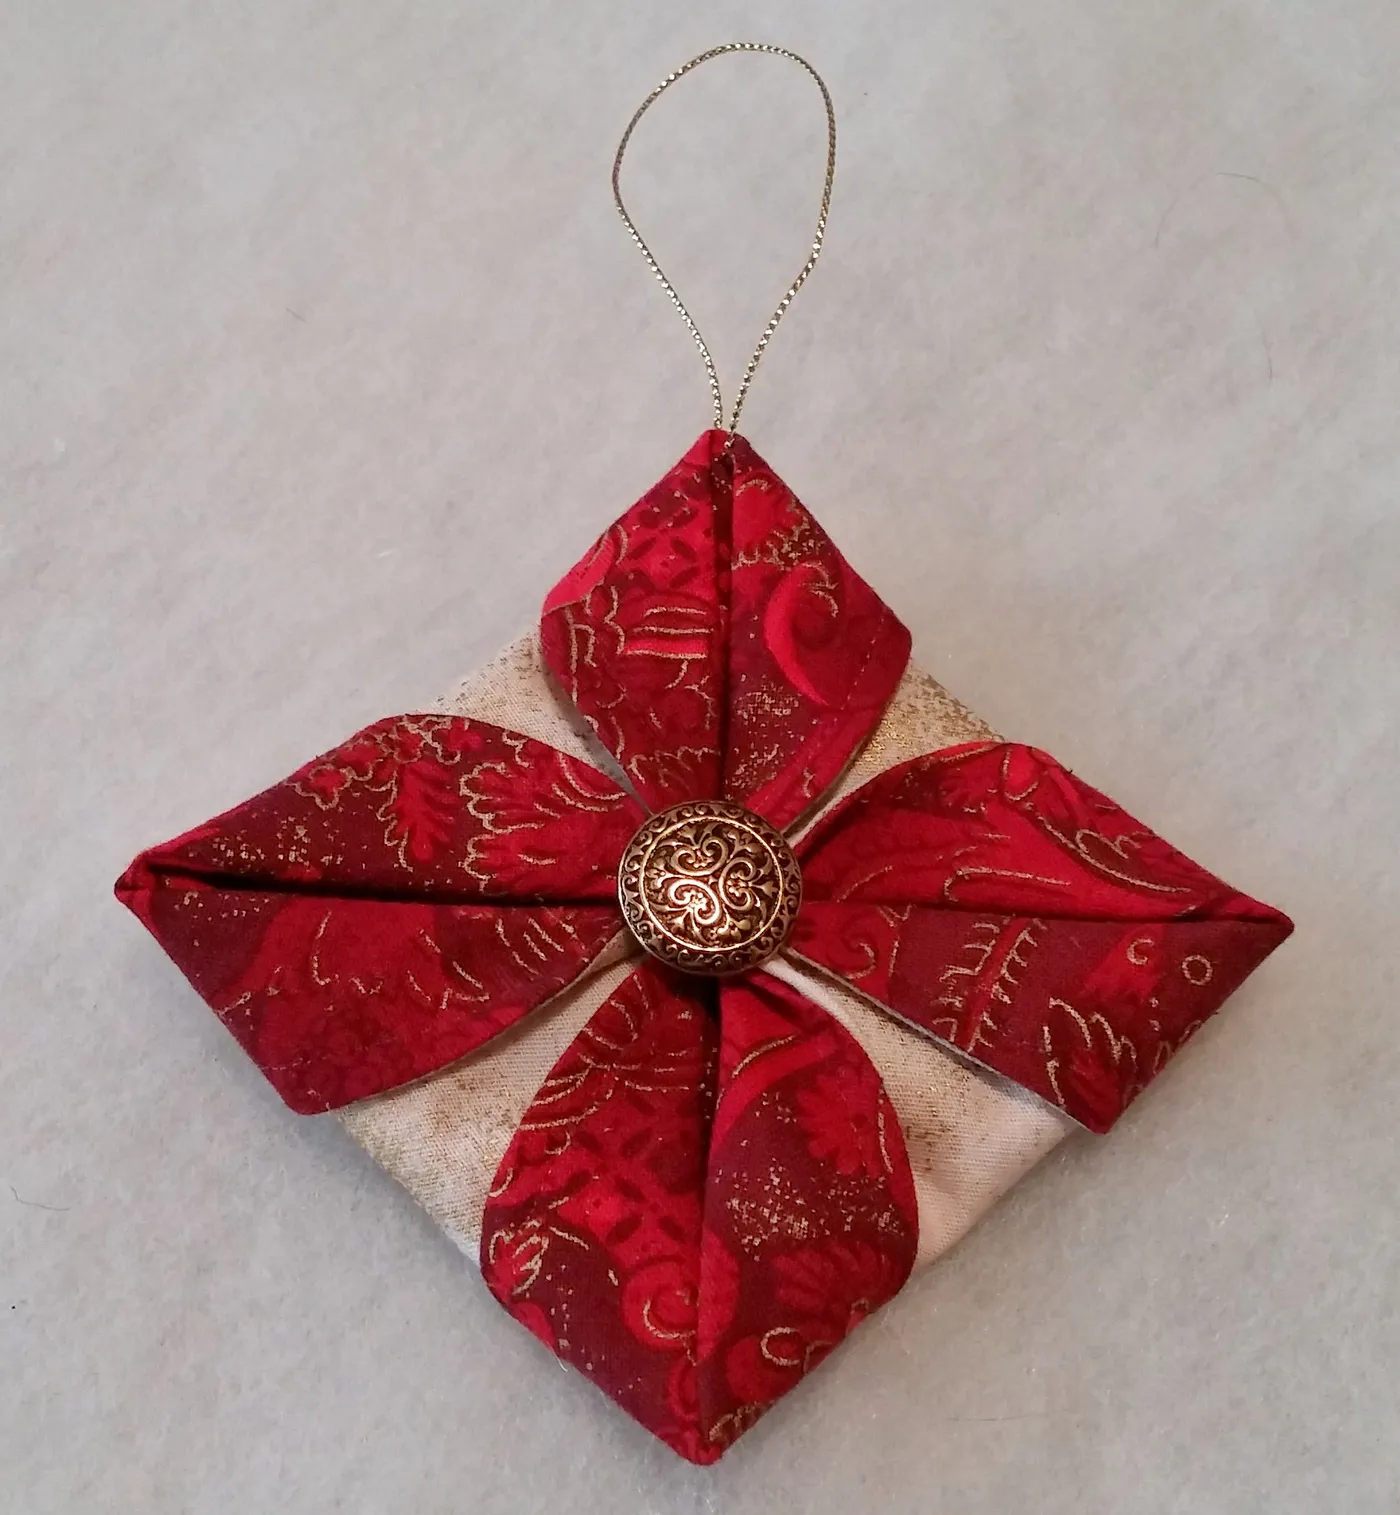
The secret to making this ornament look truly high-end is the button. Don’t just grab any old plastic button from a sewing kit. Splurge a little on a single, beautiful vintage or metal button. Look on Etsy for antique gold buttons or vintage shank buttons for options around $3-$8. A button with intricate detail and a bit of weight will elevate the entire piece from a simple craft to something that looks like it came from a specialty boutique.
This design succeeds because of its thoughtful use of contrast and focal point. The color contrast between the deep red and the light cream base makes both fabrics stand out. There’s also a pattern contrast: the busy scrollwork on the red against the simple speckle on the cream. Most importantly, the entire design—the folded petals, the square shape—is built to draw your eye directly to the center. The ornate gold button acts as the undeniable focal point, giving the piece a sense of purpose and elegance.
7. Hand-Crocheted Blue and Green Sphere Ornament
Who says Christmas has to be only red and green? This hand-crocheted sphere ornament dives into a cooler, more modern palette with variegated yarn that shifts from light green to turquoise to deep blue. It adds a wonderful, unexpected pop of color to the traditional evergreen. In the background, the warm glow of classic gold and red ornaments proves that you can absolutely mix cool and warm tones on your tree for a rich, layered look.
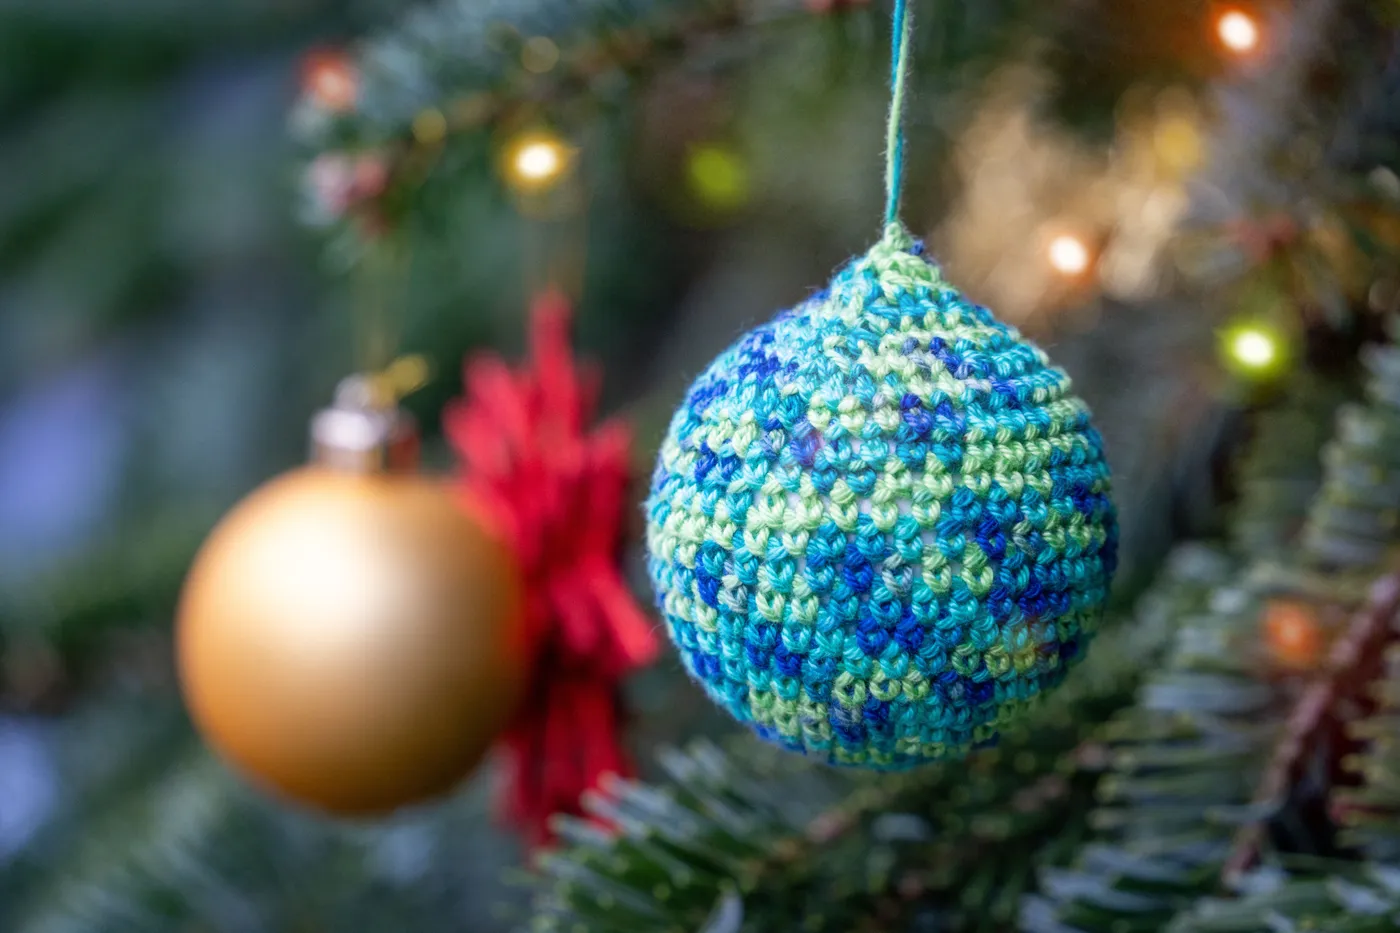
The formula here is about embracing an unexpected accent color. Think of your tree’s palette as: 70% Traditional Base + 30% Cool-Toned Accent. The base is your classic green tree, warm lights, and maybe some gold or red baubles. Then, you introduce that 30% of something different—like this teal and blue. The key is to repeat the accent color in at least 5-7 spots on the tree to make it feel intentional, not like a random stray ornament.
Variegated yarn can be tricky. Sometimes the color changes are short and can look splotchy and chaotic on a small project. Other times, the changes are long, and you might end up with an ornament that’s mostly one color. Before you start, unwind a few feet of the yarn to see how the colors transition. If the changes are very rapid, the finished ornament will have a confetti-like look. If they’re slow, you’ll get broader stripes of color.
8. Handcrafted Crochet Tree Ornaments with Leather Straps
This is a perfect example of rustic-modern style. The core is a simple green crochet Christmas tree, but the styling is what makes it feel current. Tiny gold beads add a touch of glam, while the brown faux leather straps and fluffy white pom-poms provide a beautiful textural contrast. Displaying them with natural pinecones on a rustic, frayed-edge fabric completes the cozy, organic-inspired story. It’s a brilliant mix of soft yarn and rugged accents. If you love this crocheted look but want a full character, check out the adorable set in Idea #2.
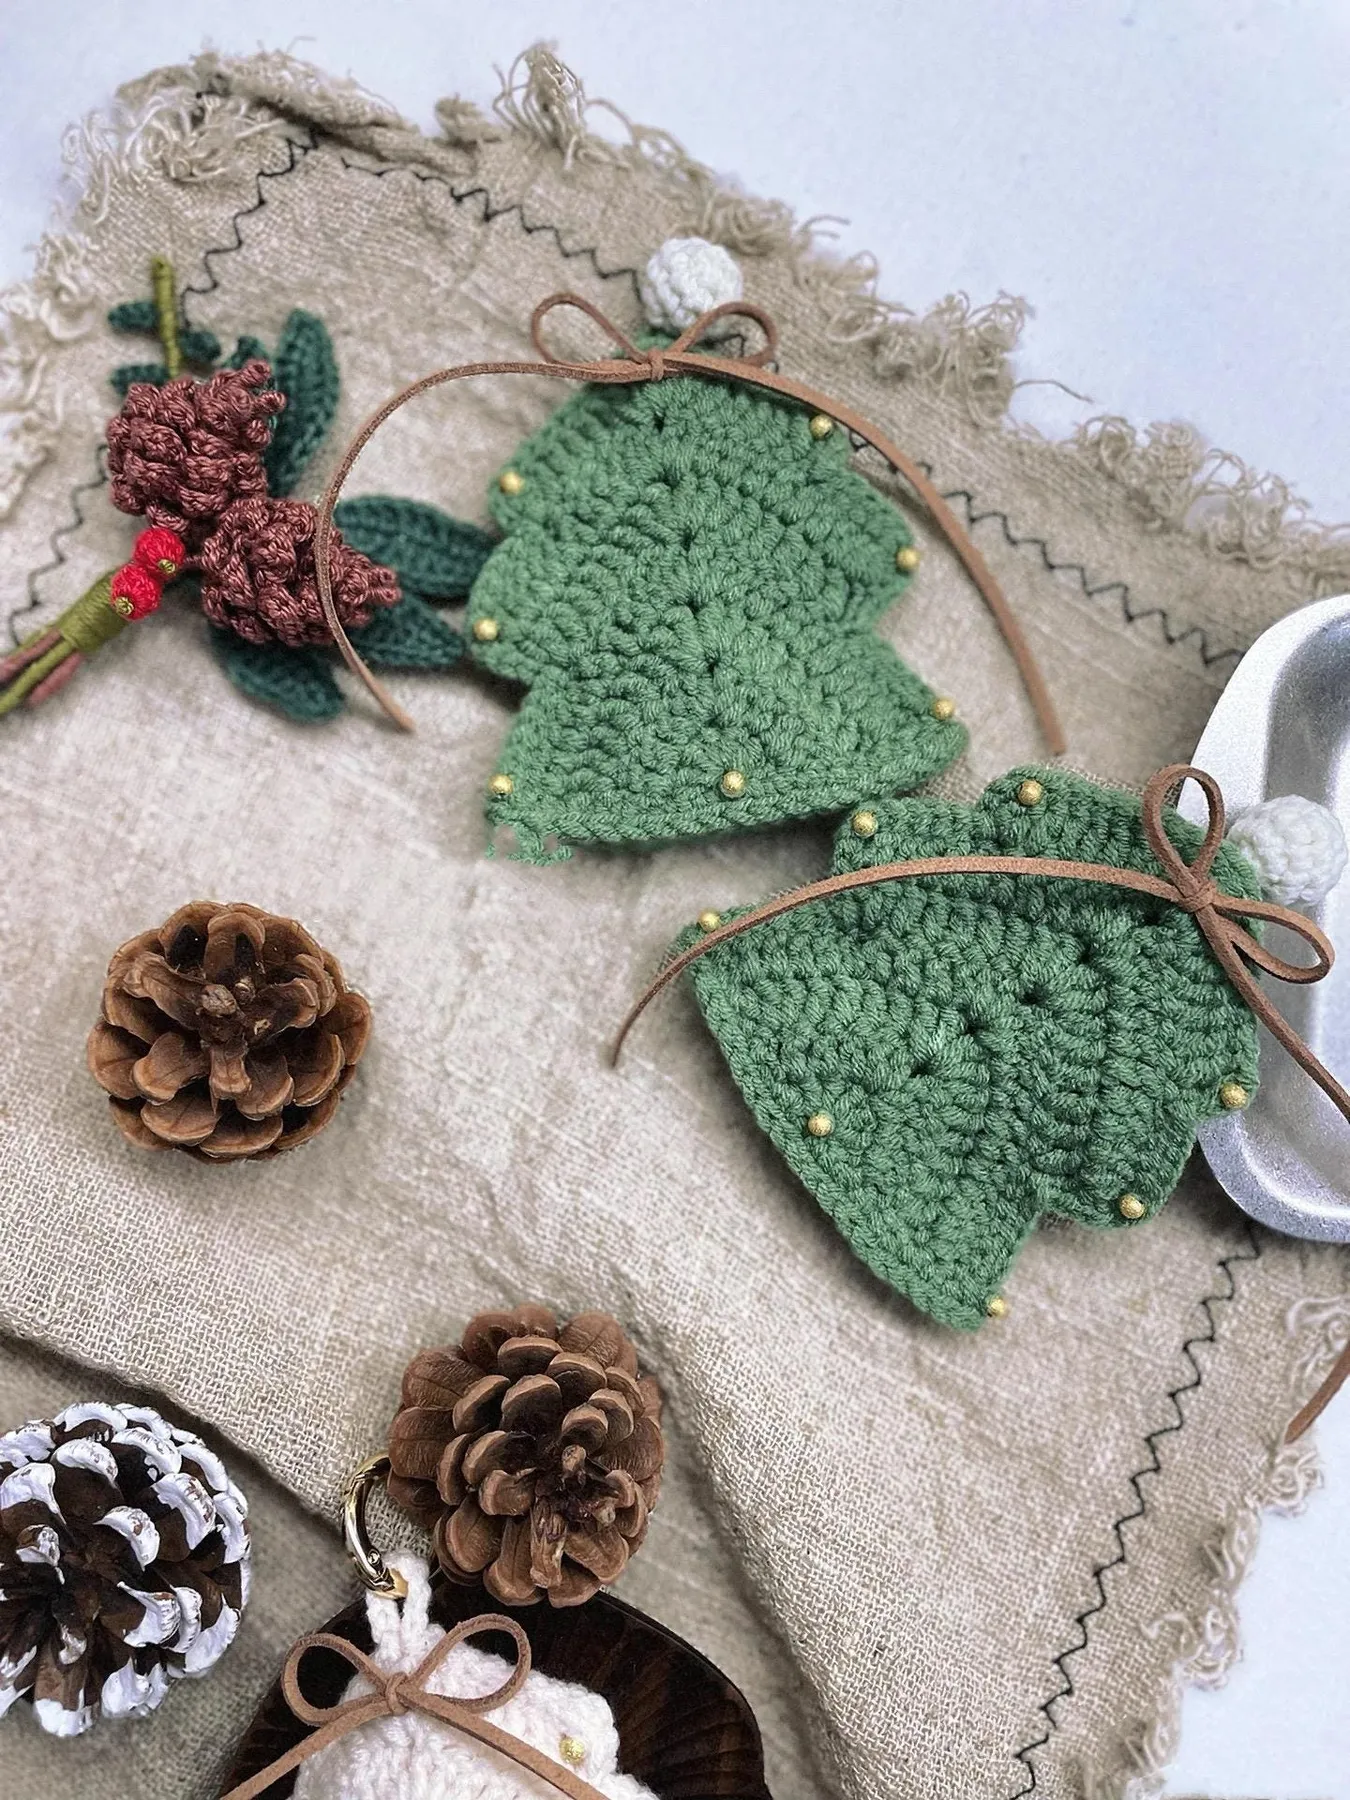
This design is all about mixing materials with similar color temperatures. The forest green yarn, the warm brown of the leather and pinecones, and the creamy beige of the fabric all belong to the same warm, earthy palette. This creates a cohesive and harmonious look, even with different textures. The small, shiny gold beads and the fluffy white pom-pom act as highlights, providing just enough contrast to keep the eye interested without disrupting the calm, natural vibe.
Don’t have faux leather straps? No problem. The key is adding a contrasting textural element. Try using a strip of thick felt in a caramel or charcoal color. You could also use a piece of wide, natural-colored ribbon like grosgrain or even a strip of canvas. The goal is to introduce a material with a smoother, flatter surface to play against the bumpy texture of the crochet stitches. This simple swap can completely change the ornament’s style.
9. Cream Felt Ornaments with Green Embroidered Snowflakes
Soft, simple, and utterly charming. This trio of ornaments—a star, a tree, and a heart—is made from off-white felt and displayed on a fluffy white background, creating a dreamy, winter-white scene. The magic is in the details: each one features a beautifully hand-embroidered snowflake in green thread, accented with tiny red dots. The natural jute string hangers add a touch of rustic warmth that keeps the look from feeling too stark. For a more whimsical take on felt, check out the felted tractor in Idea #25.
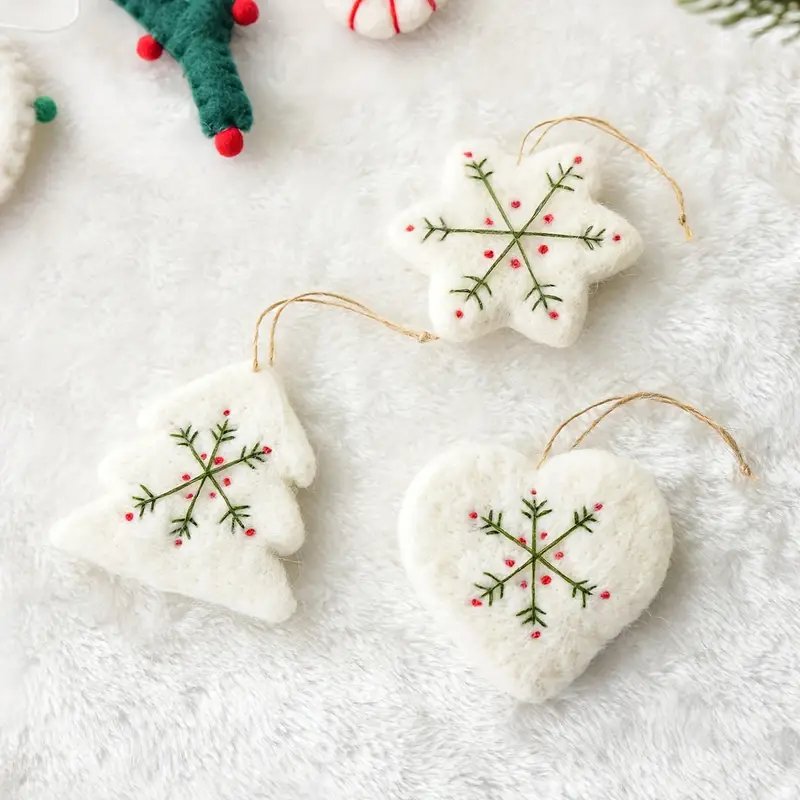
This is one of the most budget-friendly yet high-impact DIYs you can do. Felt sheets at a craft store like Michaels or Jo-Ann are often under $1. A skein of green and red embroidery floss costs about 60 cents each and will be enough for dozens of ornaments. You can get a whole roll of jute twine for a few dollars. If you don’t have stuffing, you can use cotton balls or even scraps from old t-shirts. You can make an entire set of 20+ of these for well under $15.
The hand-embroidery is what elevates these from a simple kid’s craft to a beautiful, artisanal decoration. Without the stitched snowflake, they would be plain felt shapes. The embroidery adds intricacy, color, and a clear sense of personal touch and time spent. It’s a testament to the fact that you don’t need expensive materials to create something truly lovely; sometimes, a bit of thread and patience is all it takes.
10. White and Gold Hand-Painted Ornaments on Evergreen
There’s a delicate, rustic elegance to these ornaments. Small, round wooden baubles are painted a clean, crisp white and then adorned with simple, free-handed gold patterns and stars. Paired with natural elements like dark red berries and tiny white wooden beads on a fresh evergreen branch, the look is both festive and grounded in nature. It’s a wonderful alternative to glitter and plastic, feeling both modern and timeless.
Get this hand-painted look in under an hour. Material cost is low, especially if you buy unfinished wood ornaments in bulk.
- Start with unfinished wooden ball ornaments. Lightly sand them if the surface is rough.
- Apply one to two coats of white acrylic craft paint. Let it dry completely—this is the most important step for clean lines.
- Using a gold paint pen with a fine tip, draw your designs. Don’t overthink it! Simple stars, dots, and wavy lines work beautifully. Embrace the imperfections of hand-drawing.
- Let the gold paint dry for at least 30 minutes.
- (Optional) Apply a thin coat of clear matte sealant spray to protect the paint from chipping over time.
Paint pens on wood can be prone to chipping or scratching, especially if they’re rattling against other ornaments in a storage box. The best way to keep them pristine is to wrap each one individually in tissue paper before storing. Also, be aware that if you use a sealant, choose your finish wisely. A glossy sealant will make them look more commercial and less rustic, while a matte finish will preserve that soft, hand-painted feel.
11. Hand-Held Small Crocheted Christmas Tree Ornaments
These tiny crocheted trees are just bursting with handmade charm. Held in hand, you can really appreciate their small scale and texture. One is a vibrant lime green, while the other is a classic forest green with subtle stripes. The details make them pop: one is decorated with cheerful red and yellow crocheted bobbles, and both have sturdy little brown trunks. They look quick to make and would be a perfect project for using up leftover yarn scraps.
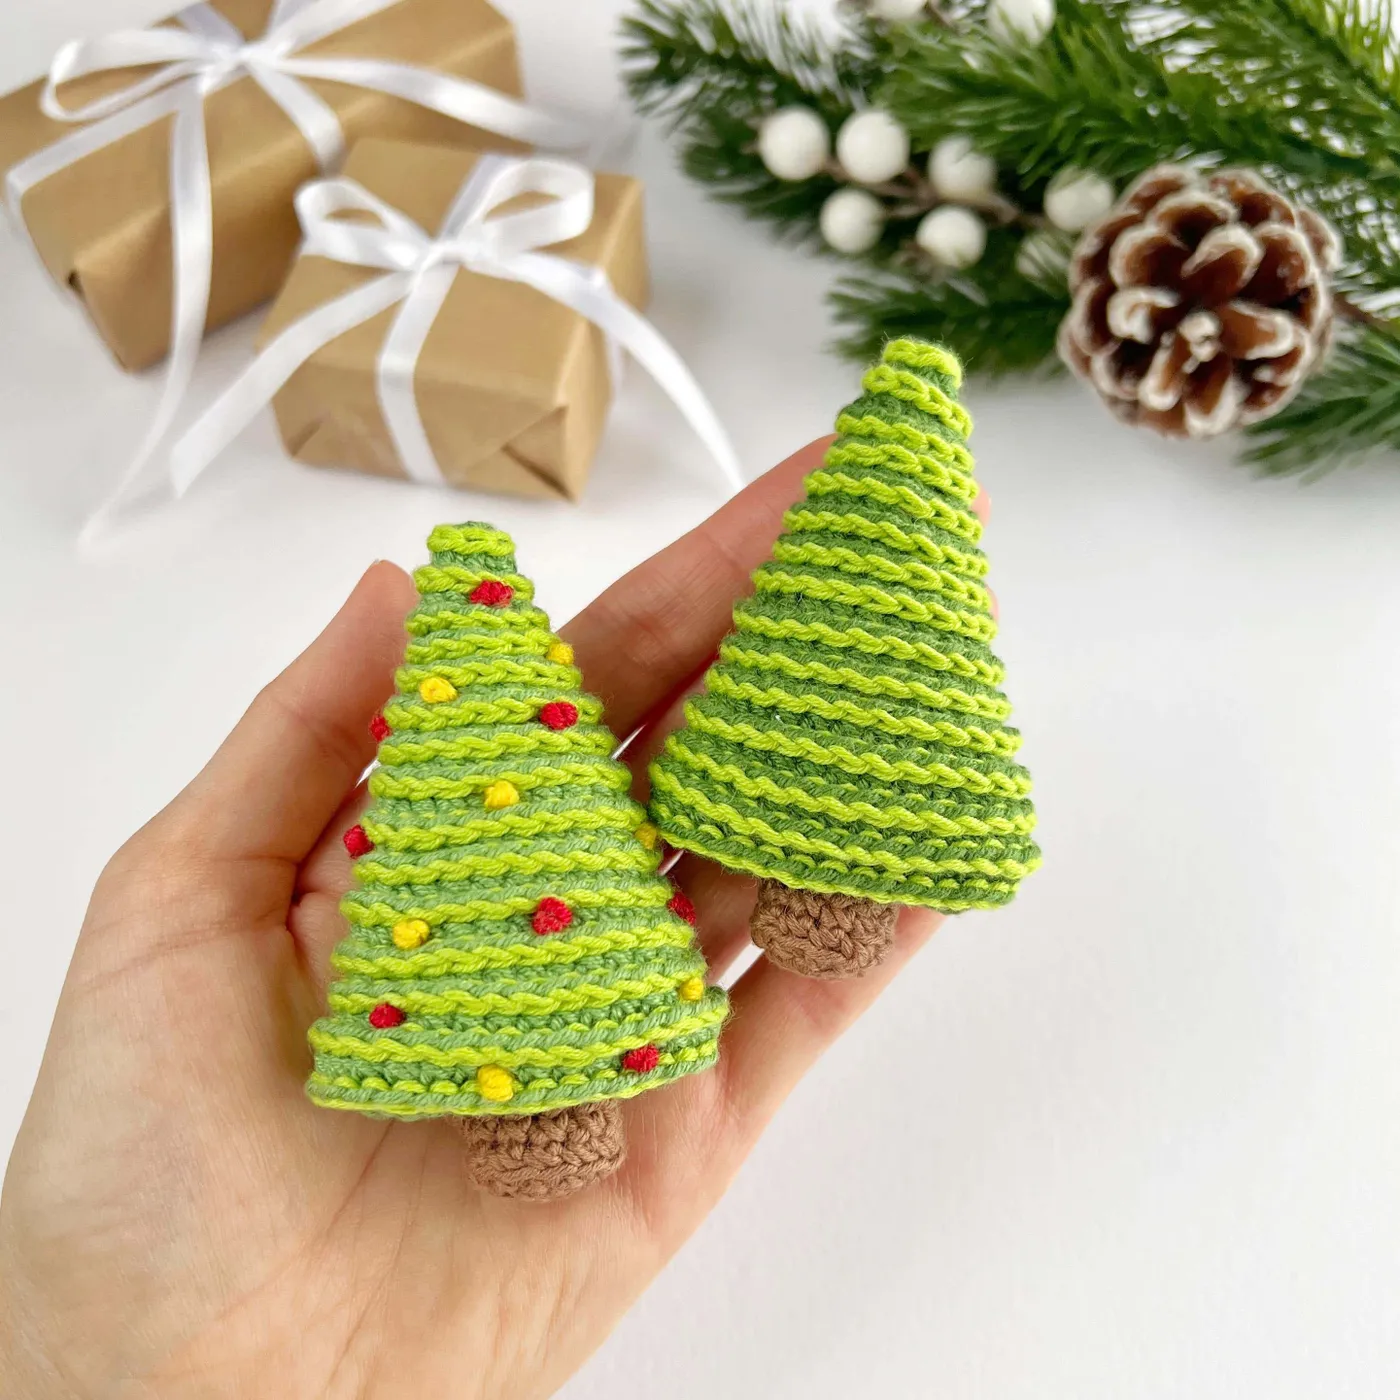
The formula for these little guys is simple and effective: 80% Monochromatic Tree + 15% Colorful Accents + 5% Neutral Base. The tree itself is the main event, created with a single color (or subtle stripes) of green yarn. The fun comes from the 15% of bright, contrasting bobbles in red and yellow. They’re just enough to add a playful spirit. The small brown trunk grounds the piece, making it instantly recognizable as a tree.
The appeal here lies in the power of repetition and variation. You have two objects that are the exact same shape, which is visually satisfying. However, the slight variations in color (lime vs. forest green) and decoration (bobbles vs. plain) create interest and make them feel like a coordinated set rather than identical copies. This simple design trick makes a collection of similar items feel curated and dynamic.
12. Three Handmade Crochet Christmas Characters in a Gift Box
Gifting a handmade ornament is special, and the presentation here is perfect. A trio of adorable crochet characters—a reindeer, a snowman, and an elf—are nestled in a simple brown cardboard box filled with shredded paper. It turns a cute craft into a thoughtful, boutique-style gift. Each character is packed with personality, from the reindeer’s antlers to the elf’s pointy hat. The simple gold hanging loops add a touch of polish.
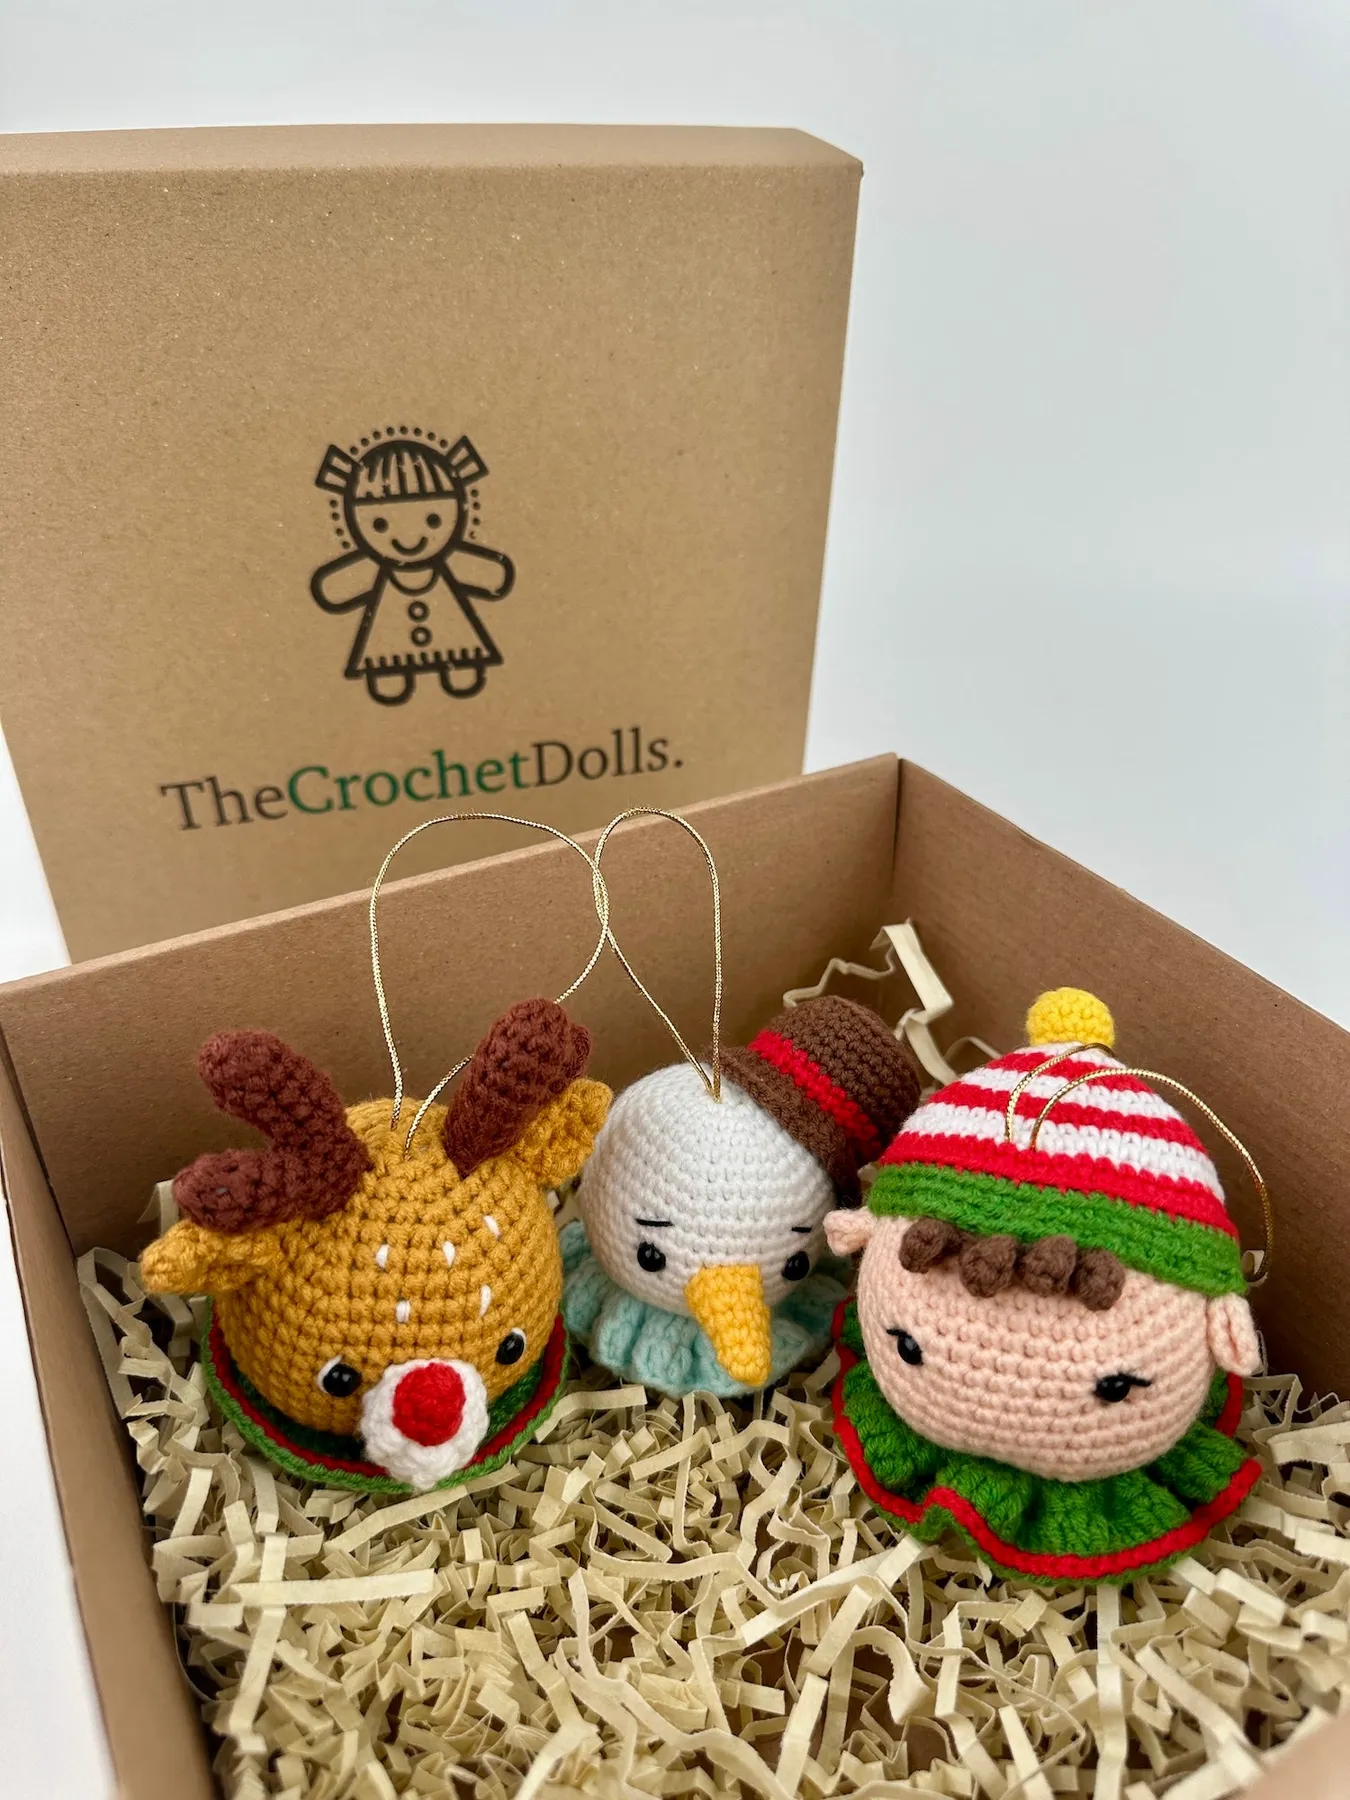
It’s the thoughtful presentation. You could hand someone a crochet snowman and it would be nice. But placing it in a box, nestled in protective filler, transforms it into a proper gift. It communicates value and care beyond the time it took to make the ornament itself. It shows the recipient that this isn’t just something you whipped up; it’s a special item to be treasured. This simple act of careful packaging elevates the entire experience.
This taps into the huge trend of unboxing and curated gift boxes. We see it all over social media—the experience of opening a gift is almost as important as the gift itself. By packaging handmade items this way, you’re creating a special moment for the recipient. It also aligns with the push toward more sustainable and meaningful gift-giving. Instead of a mass-produced item, this is a unique, personal gift that feels both modern in its presentation and timeless in its sentiment.
13. Felted Summer-Themed Christmas Ornaments with Santa Hats
Who says Christmas has to be all snow and pine trees? This hilarious and adorable set of felted ornaments brings a beachy vibe to the holidays. A penguin and a polar bear on surfboards, a happy little starfish, and a spotted whale are all ready to hang on the tree. The single unifying element? A tiny red and white Santa hat on each one. It’s a wonderfully quirky and unexpected theme that’s guaranteed to make you smile.
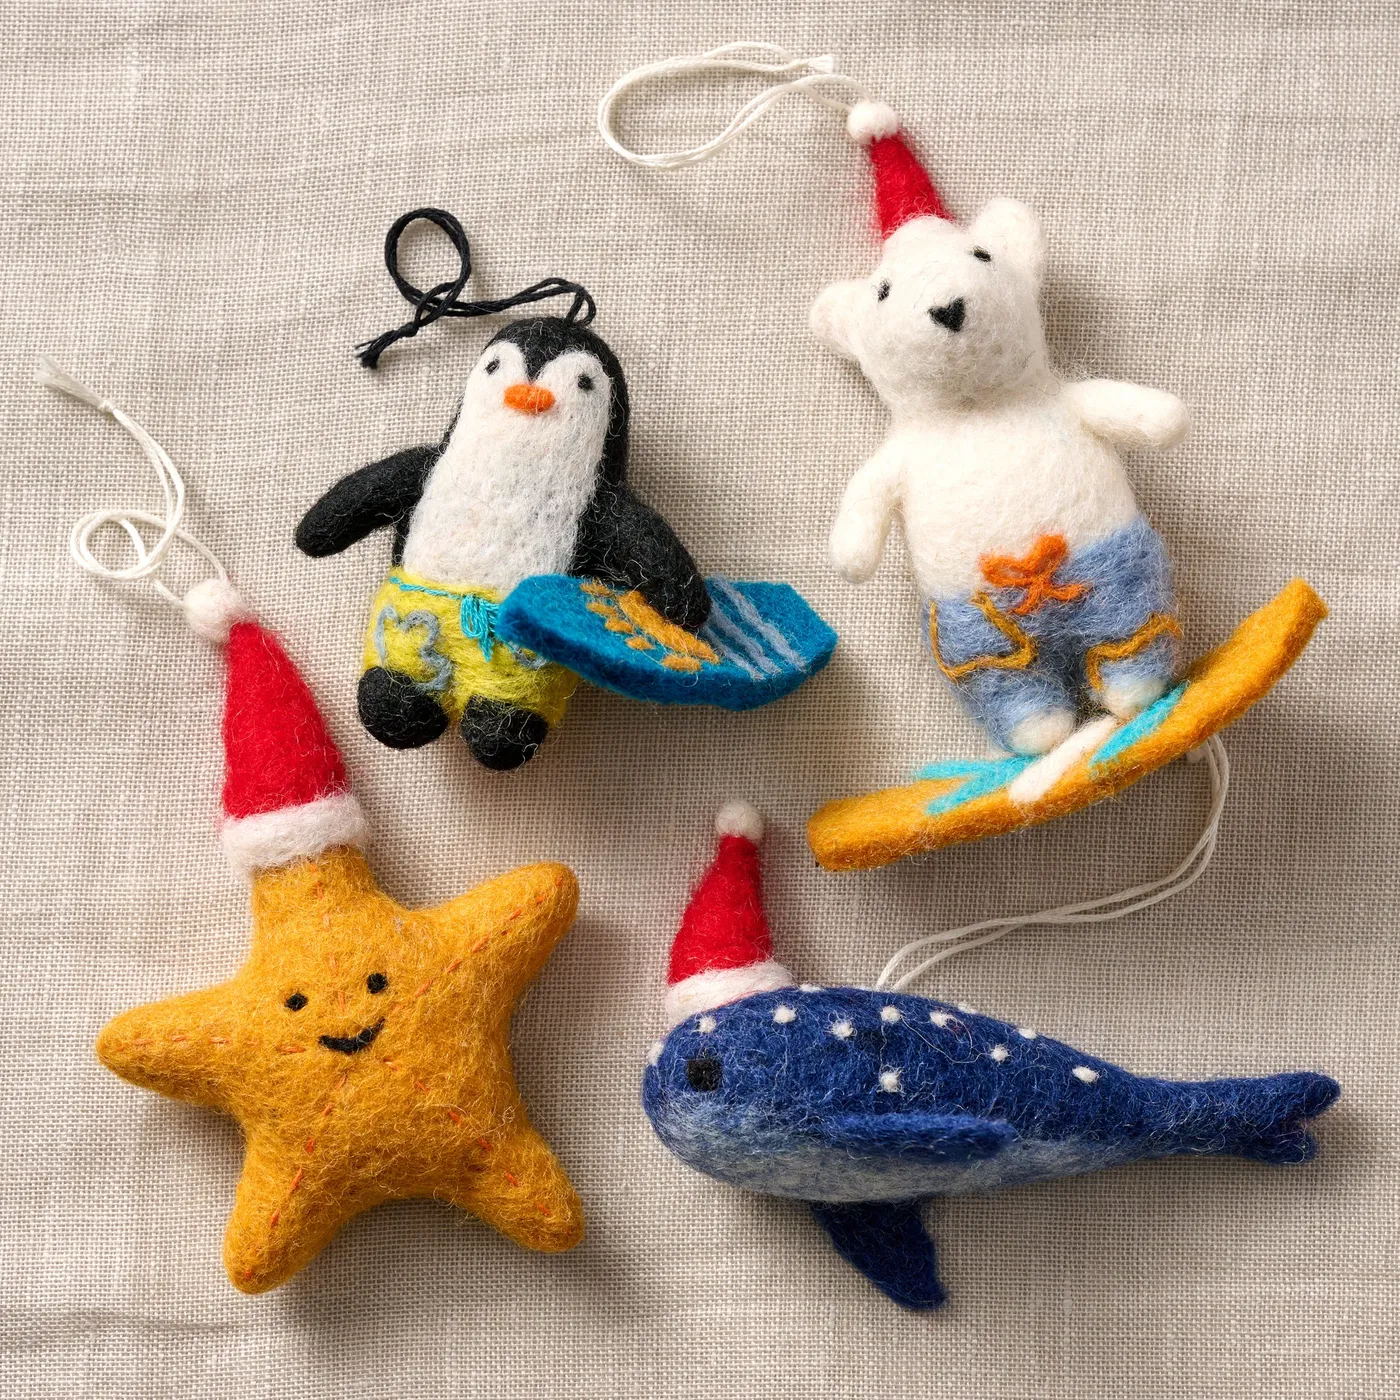
The humor and charm of this set work because of a classic design principle: unity with variety. The variety is the completely unexpected summer/ocean theme and the different characters. The unity comes from two things: the consistent material (felt) and, most importantly, the repeated motif of the Santa hat. The hat is the visual cue that ties this eclectic group together and firmly places them in the Christmas ornament category. Without it, it would just be a collection of cute felt sea creatures.
Needle felting looks magical, but it has a learning curve. And yes, the needles are incredibly sharp. This is not a craft to do while distracted or with small children helping. You will poke yourself, probably more than once. Start with a simple shape, like the starfish, to get a feel for how to compact the wool. The more complex shapes, like the penguin on a surfboard, require more skill in joining different colored pieces smoothly. Be patient and keep bandaids handy!
14. Handheld Small Crocheted Santa Gnome Hats
These little creations are pure holiday whimsy. Part Santa hat, part gnome, they are an incredibly clever and simple crochet project. A bright red conical hat sits atop a fluffy white base, and a little beige knot in the middle creates the perfect suggestion of a gnome’s nose. Held in hand, you can see just how small and charming they are. They’d be adorable on a tree, as part of a garland, or even as a festive gift topper.
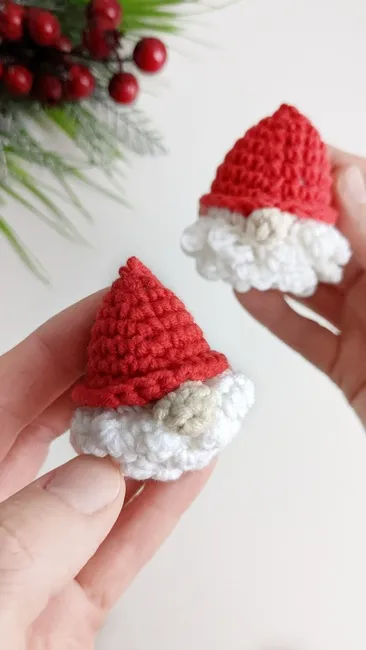
The texture of the fluffy white base is key. To get this look, don’t just use regular white yarn. Search for a boucle, eyelash, or faux fur yarn in white. These novelty yarns are specifically designed to be fuzzy and textured, and they will create that cloud-like effect with very little effort. Crocheting with them can be tricky as it’s hard to see your stitches, so go slow and count carefully. The stunning result is well worth the extra focus.
Because these are so small and simple, they are perfect for a miniature Christmas tree on a tabletop or desk. On a large 7-foot tree, a single one might get lost. If you’re using them on a full-size tree, make a bunch! A group of 10-15 of them clustered together in one section of the tree will create a much bigger impact than scattering them around individually. You could also string them together with baker’s twine to create a mini garland to drape on the upper, more delicate branches.
15. Felt Snowman and Patterned Fabric Christmas Ornaments
This is a fantastic way to use up fabric scraps and create a cheerful, coordinated set of ornaments. The collection features circular ornaments, some with adorable felt snowman faces wearing little hats, and others covered in festive fabrics like a red swirl or a pinecone print. The repetition of the simple circle shape makes the different patterns and designs feel cohesive and part of a happy family. The ribbon loops make them ready to hang.
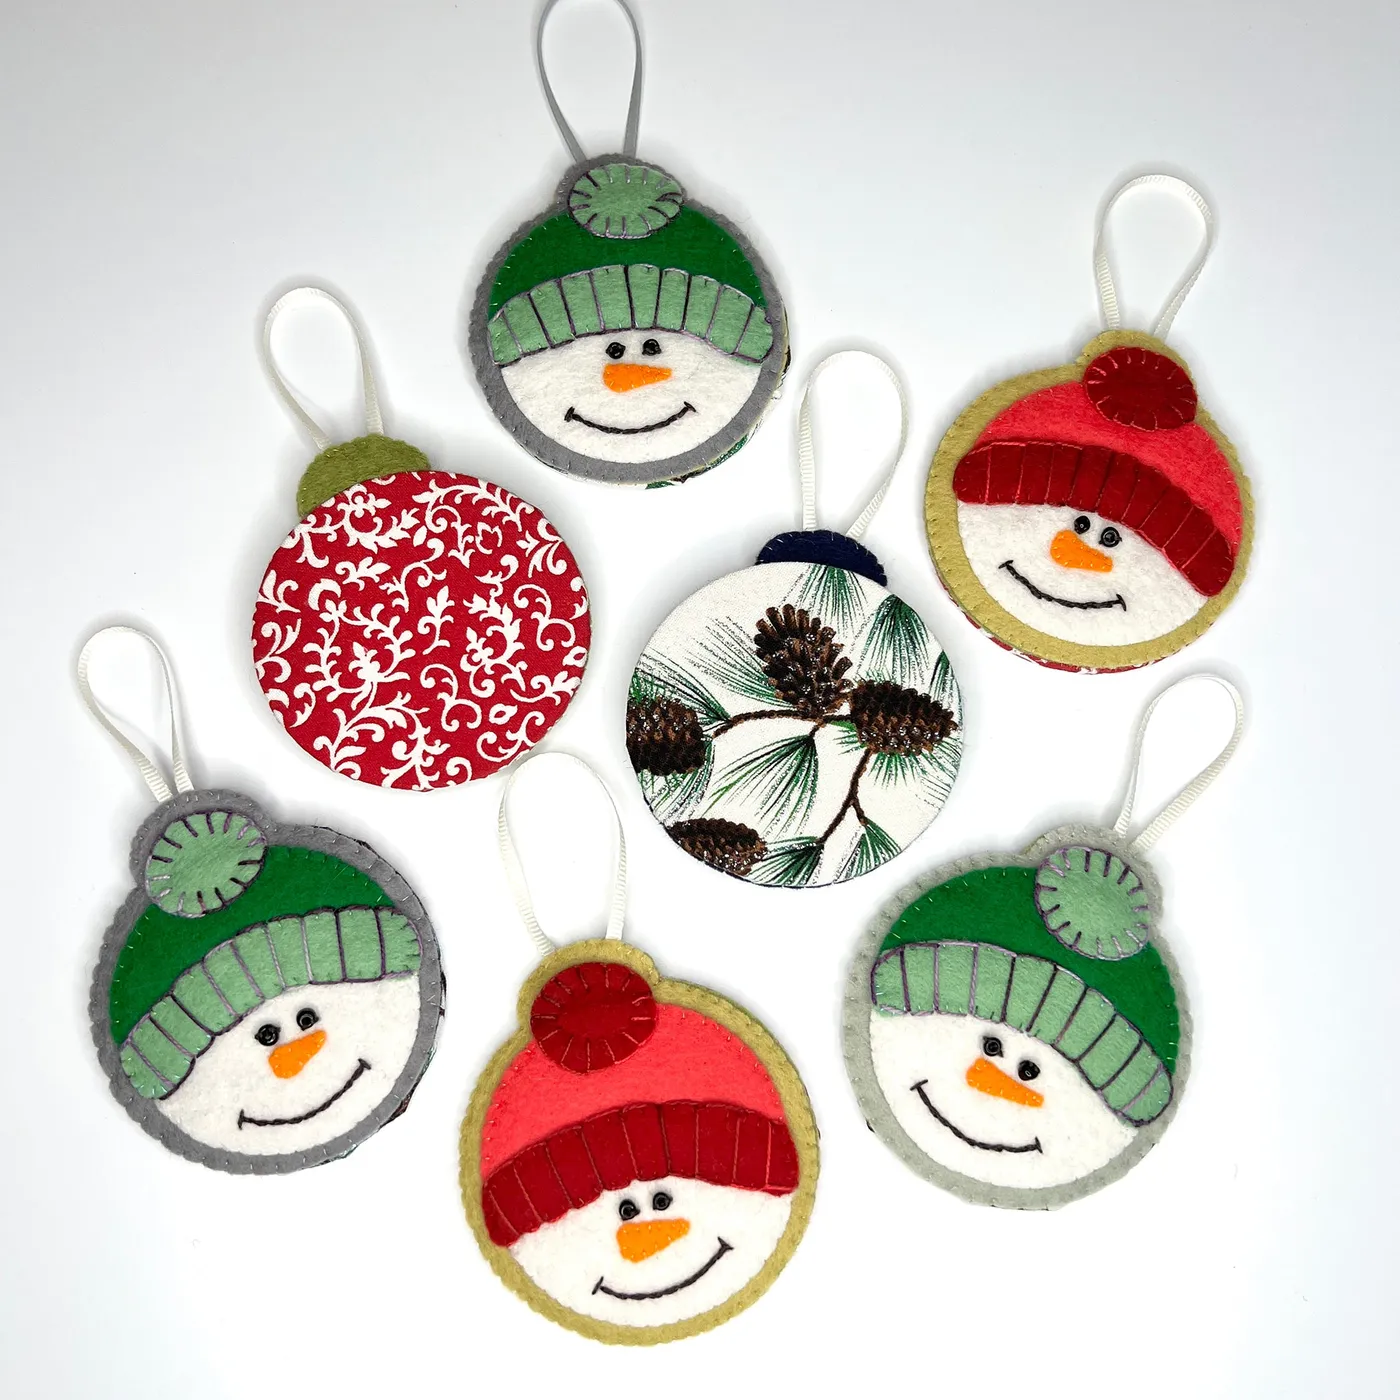
To get this coordinated-but-not-matching look, use this formula: 50% Character Ornaments + 50% Patterned Ornaments. Half of your ornaments should be the ‘stars’—in this case, the snowmen. They draw the eye and add personality. The other half should be simpler, fabric-covered circles using patterns that share a color palette with the character ornaments (here, red, white, and green). This creates balance and allows the special snowman ornaments to truly shine.
- Check your fabric scraps: Do you have enough variety in a coordinated color palette? Look for small-scale patterns that won’t get lost on a small circle.
- Gather your bases: You can buy flat wooden or cardboard discs, or simply cut circles from a sturdy cereal box. Make sure they are all the same size for a cohesive look.
- Decide on your characters: Will you stick to snowmen, or add reindeer or gingerbread faces? Sketch them out first to simplify the shapes.
- Get the right glue: A good fabric glue or a hot glue gun is essential for a clean, long-lasting finish.
16. Intricate White Paper Snowflake Ornaments on Faux Snow
This is winter elegance, personified. These large, incredibly intricate paper snowflakes look like they were captured from a winter storm. They are three-dimensional and complex, a huge step up from the simple paper snowflakes we cut as kids. Displayed on a bed of fluffy faux snow with a few metallic baubles, they create a stunning, monochromatic winter scene. The woven basket and evergreen branches in the background add a touch of natural warmth.
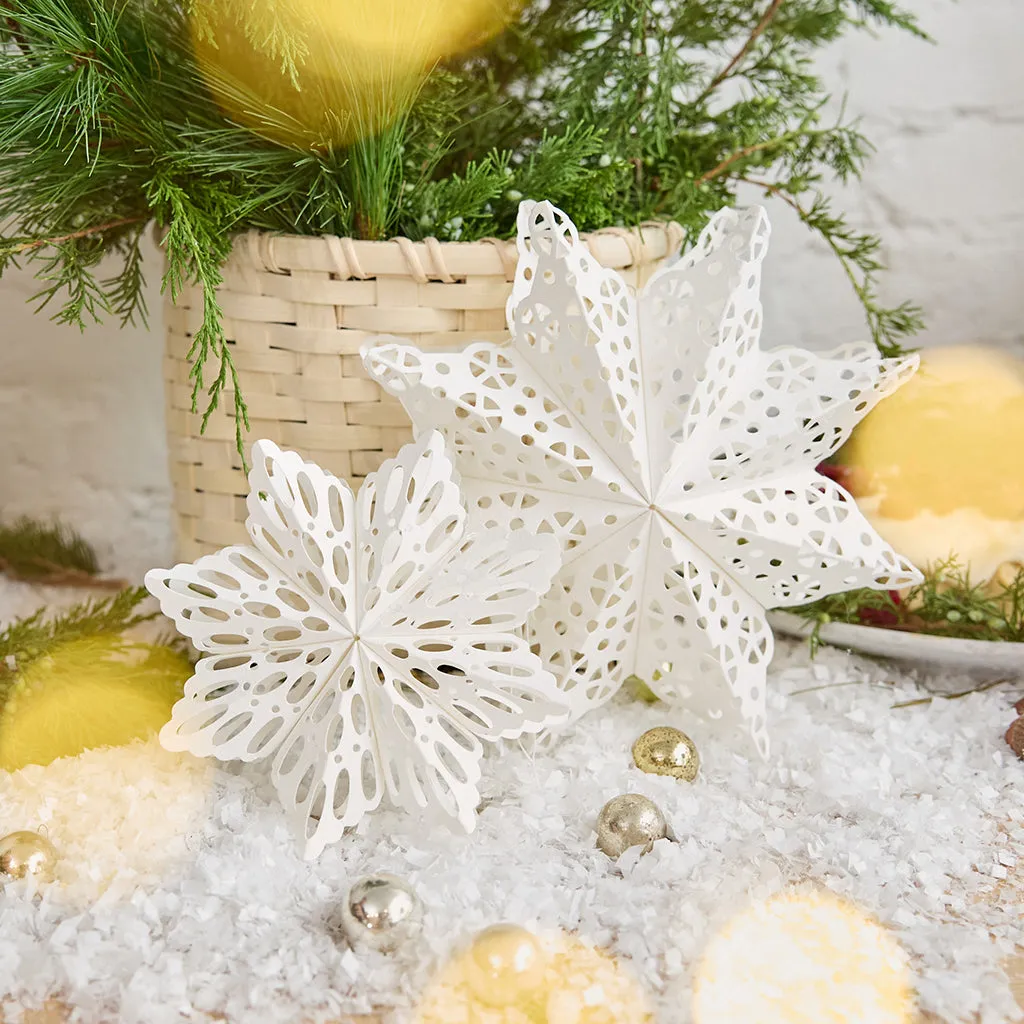
The power of this look comes from its monochromatic color scheme. By sticking almost exclusively to white, the focus shifts entirely to texture and form. You notice the crisp folds of the paper, the fluffy texture of the snow, the smooth surface of the baubles, and the rough texture of the brick wall. This lack of color creates a serene, sophisticated, and very intentional look. The tiny pops of green and gold are just enough to keep it from feeling sterile.
Paper ornaments are beautiful but incredibly delicate. They are susceptible to moisture, which can cause them to warp or discolor, so they’re not ideal for a real tree that needs watering. They can also get crushed easily in storage. Store them in a rigid box, not a bag. To keep them bright white, store them away from direct sunlight, which can cause the paper to yellow over time. Give them a gentle dusting with compressed air before packing them away each year.
17. Crocheted Bird Ornament with Santa Hat on Flocked Tree
This is just pure, concentrated charm. A sweet little cream-colored bird, crocheted by hand, is all dressed up for the holidays with a tiny red Santa hat and festive green leaves. Placing it on a heavily flocked (snow-covered) tree is a brilliant choice, as the white backdrop makes the cream and red of the bird pop. Surrounded by pinecones, red berries, and silver accents, this little guy is the undeniable star of his branch.
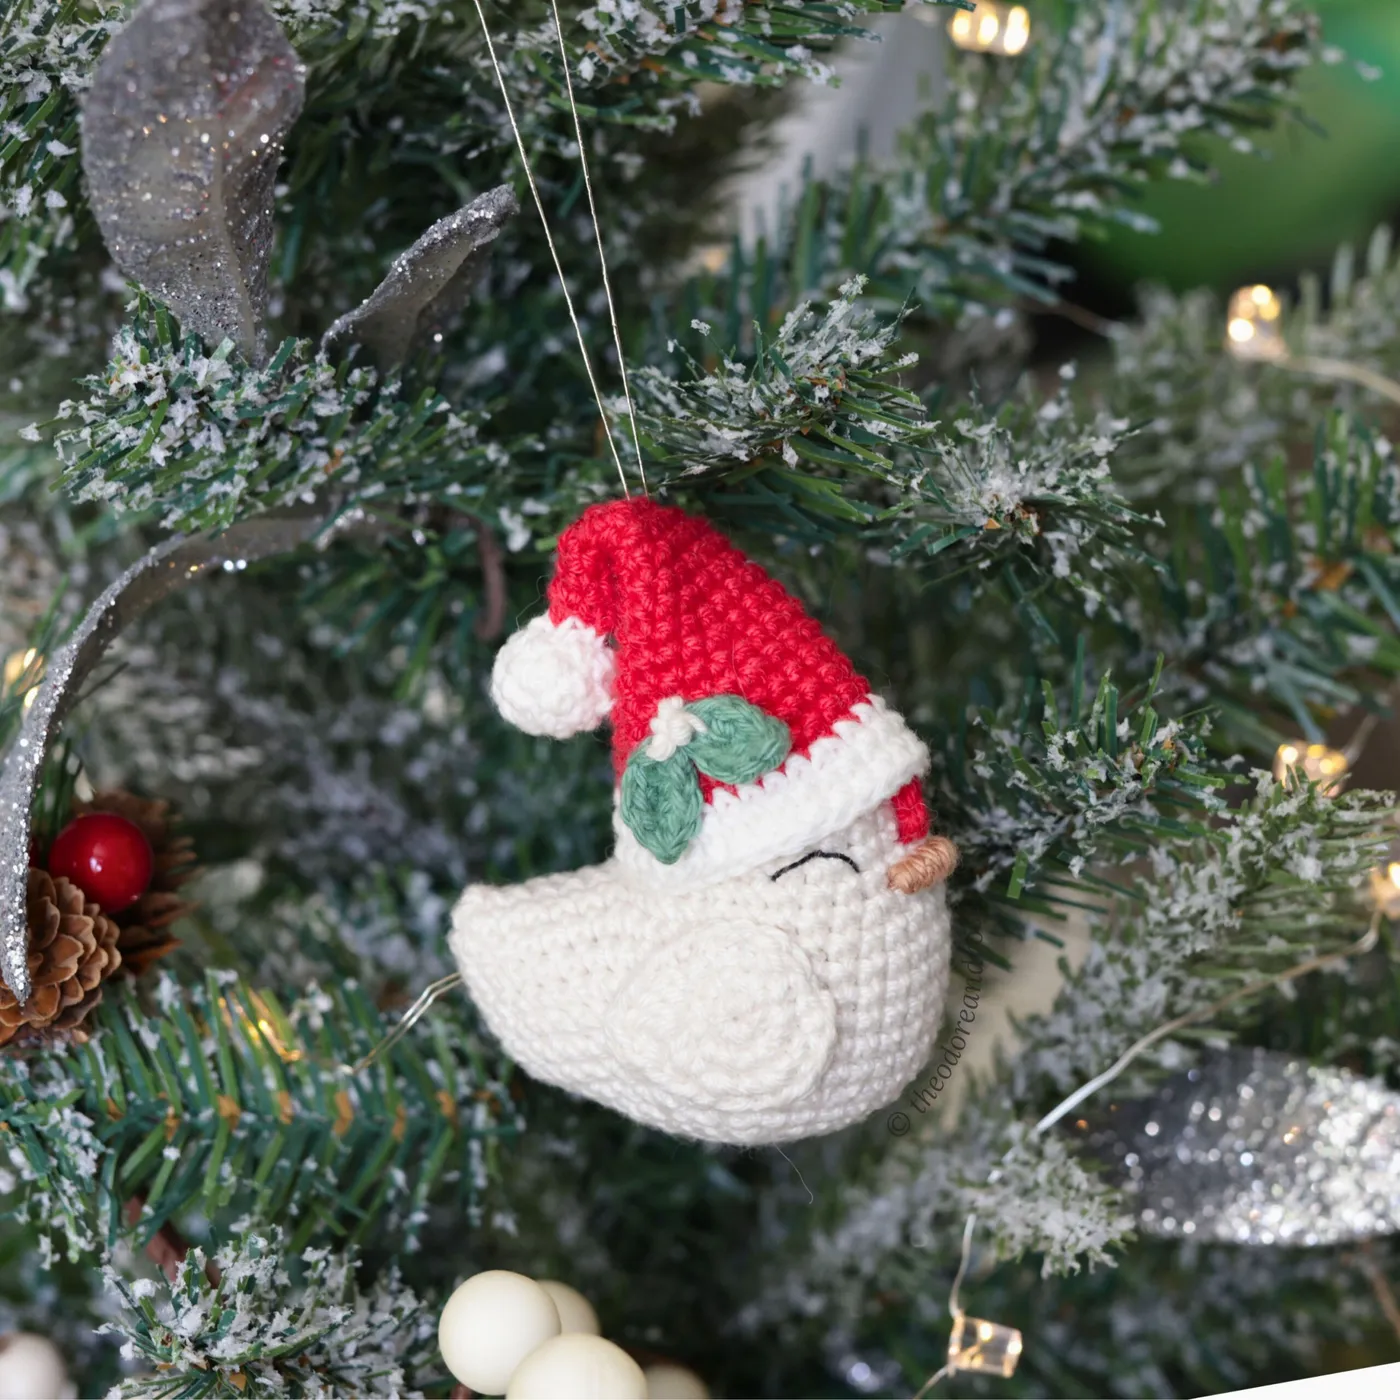
It’s the anthropomorphism—giving the bird a hat. A simple crocheted bird ornament is lovely on its own, a nod to nature. But the second you add that tiny Santa hat, it gains a personality and a story. It’s no longer just a bird; it’s a festive character celebrating Christmas. This small, whimsical detail is what transforms the ornament from pretty to completely endearing and memorable. It’s what makes you smile.
When placing a special, detailed ornament like this, create a visual clearing for it. Don’t crowd it with other large or busy ornaments. Prune a few small twigs from the branch if you need to, creating a bit of negative space around it. Then, make sure it’s lit properly. Tuck a single bulb from your light string just behind or below the ornament to illuminate it. You put in the work to make it; make sure everyone can see it!
18. Crocheted Tiered Christmas Tree with Candy Cane
This little ornament is a celebration of crochet techniques. The tree itself is built from tiered layers in different shades of green and blue, giving it wonderful dimension. It’s topped with a yellow star and decorated with tiny pearl beads, a gingham ribbon, and even a miniature crocheted candy cane. Standing on a simple wood disc, it’s a detailed and delightful piece that showcases a lot of different crafting skills in one small package.
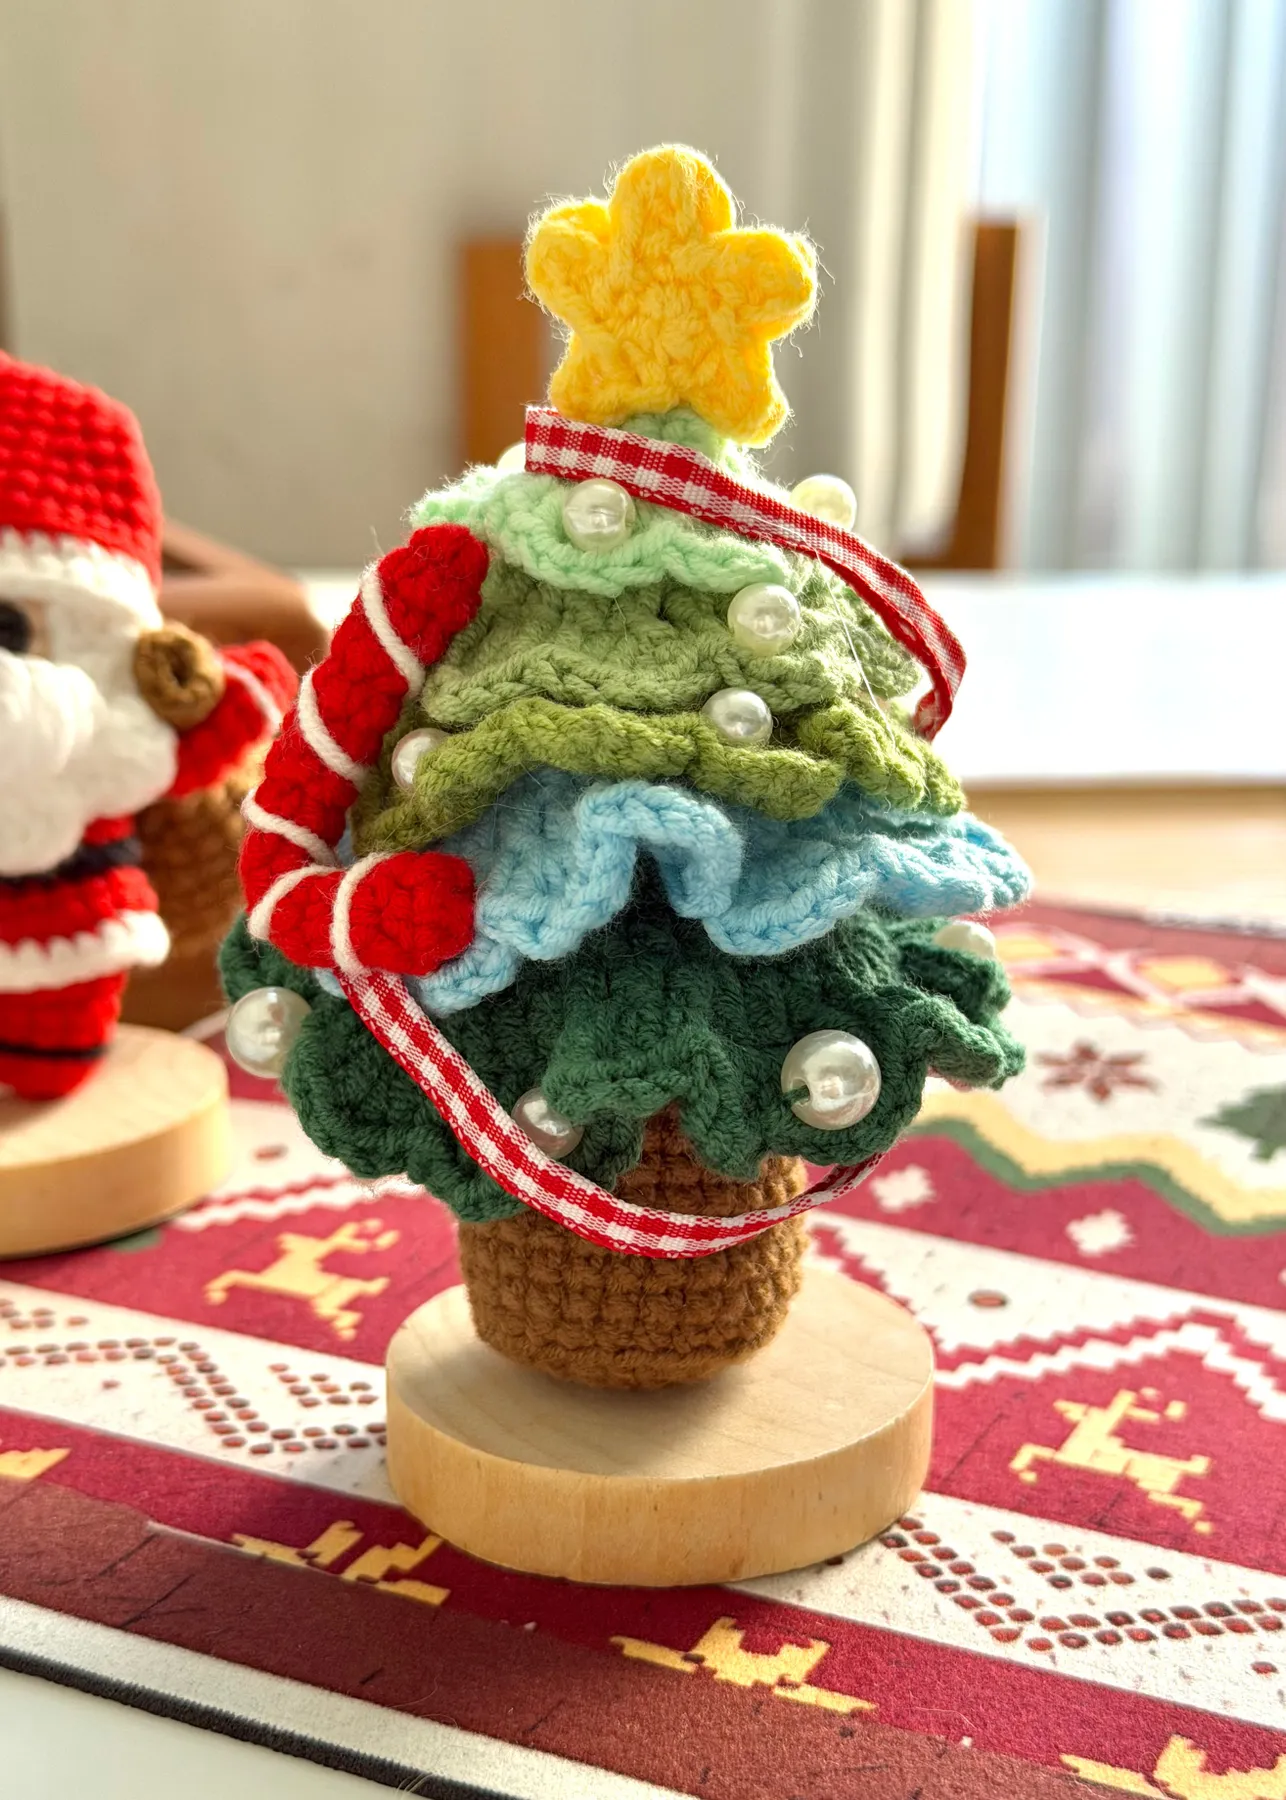
A project with this many small, separate parts (tree, star, candy cane, ribbon, beads) can feel overwhelming. The key is to work in batches. Make all your green tree tiers first. Then make your star and candy cane. Then do all the assembly at once. If you try to make and attach each piece one by one, you’ll constantly be changing yarns and tools, which can be frustrating and slow you down. Batching your tasks is the secret to sanity on a detailed project.
Making a tiny crochet candy cane takes less than 10 minutes and adds a perfect festive touch. Materials: Red and white fingering weight yarn, a small crochet hook (2.5mm).
- Hold the red and white yarn together as if they were one strand.
- Make a slip knot and chain 15.
- Starting in the second chain from the hook, make 2 single crochet stitches in each chain across.
- Working into every stitch will force the chain to curl into a tight spiral.
- Fasten off, leaving a tail. Use a needle to weave in the ends.
- Gently bend the top of the spiral to form the candy cane hook. Done!
19. Handmade Yarn-Wrapped Star Ornament with Red Ribbon
Sometimes the simplest ideas are the most beautiful. This star-shaped ornament is made by tightly wrapping light grey yarn around a star form, creating a wonderfully textured and cozy look. The soft grey is a modern, neutral choice that feels calm and sophisticated. A simple, bright red satin ribbon loop provides a classic pop of color and a way to hang it. In the background, the blurred Christmas tree shows how well this neutral ornament pairs with traditional red and gold.

|
📋 Copy HEX 🔗 Share |
- Cardboard Star Forms (pre-cut or DIY from a box): $0 – $8
- Skein of Grey Yarn: $4 – $7
- Red Ribbon: $2 – $5
- Hot Glue Gun/Sticks: $5 – $10 (if you don’t own one)
- TOTAL: $11 – $30
- Budget alternative: This is already a very low-cost DIY! Use cardboard from a shipping box and yarn you already own to make this project for free. Raid your gift-wrapping supplies for a scrap of ribbon.
The secret to a neat, professional finish on a yarn-wrapped ornament is tension. Wrap the yarn tightly and consistently, making sure each new strand snuggles up right next to the previous one with no gaps. To secure the end, don’t just tie a knot. Use a hot glue gun to place a small dot of glue on the back of the ornament and press the yarn tail into it for a clean, invisible finish. Do the same when you start a new piece of yarn.
20. Crocheted Christmas Tree Gnome with Yellow Star Topper
This is next-level adorable. The gnome trend and the Christmas tree theme have been combined into one perfect, whimsical creation. The gnome’s body and pointy hat are one and the same, crafted with layers of green and white yarn to look like a snow-dusted tree. A fluffy white beard, a little tan nose, and a bright yellow star on top complete the look. This is a character with so much personality, it’s destined to be a family favorite. This simple yarn-wrapping technique is a great entry point. Once you master it, try a more complex shape like the crocheted gnomes in Idea #15.
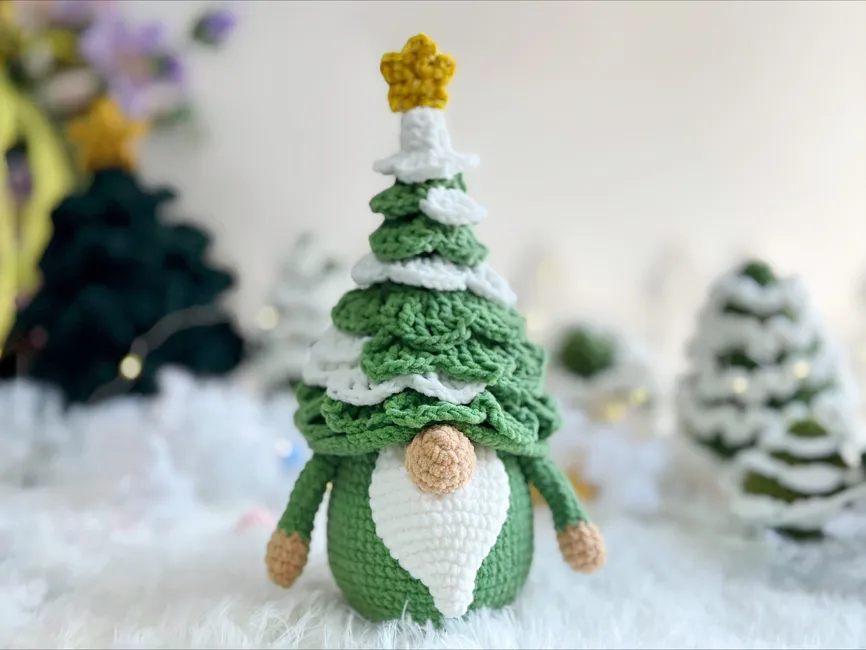
This design is a brilliant example of visual blending, where two different objects (a gnome and a tree) are combined into a single, cohesive figure. The success lies in keeping the most recognizable features of both: the conical shape and green color of the tree, and the beard/nose combination of the gnome. The eye understands both references simultaneously, which creates a delightful and clever visual surprise. The single yellow star acts as the perfect focal point.
This is a sitter ornament, not a hanger. Because of its flat, stable base and three-dimensional shape, it’s designed to sit on a surface rather than hang from a branch. It would be perfect for a mantelpiece, a tiered tray display, or nestled on a bookshelf among holiday cards. If you made several in different sizes, you could create a whole gnome family or village across your fireplace hearth for a huge decorative impact.
21. White Crocheted Angel Ornaments with String Lights
There’s a timeless, ethereal beauty to these crocheted angels. Crafted in pure white yarn, they feature delicate openwork patterns on their skirts and simple, solid heads. Hanging them directly in front of warm string lights is a genius move—the light glows through the lacework, making them look almost heavenly. The simple silver chains for hanging and the hint of red fabric in the background add just enough color to this serene and graceful display.
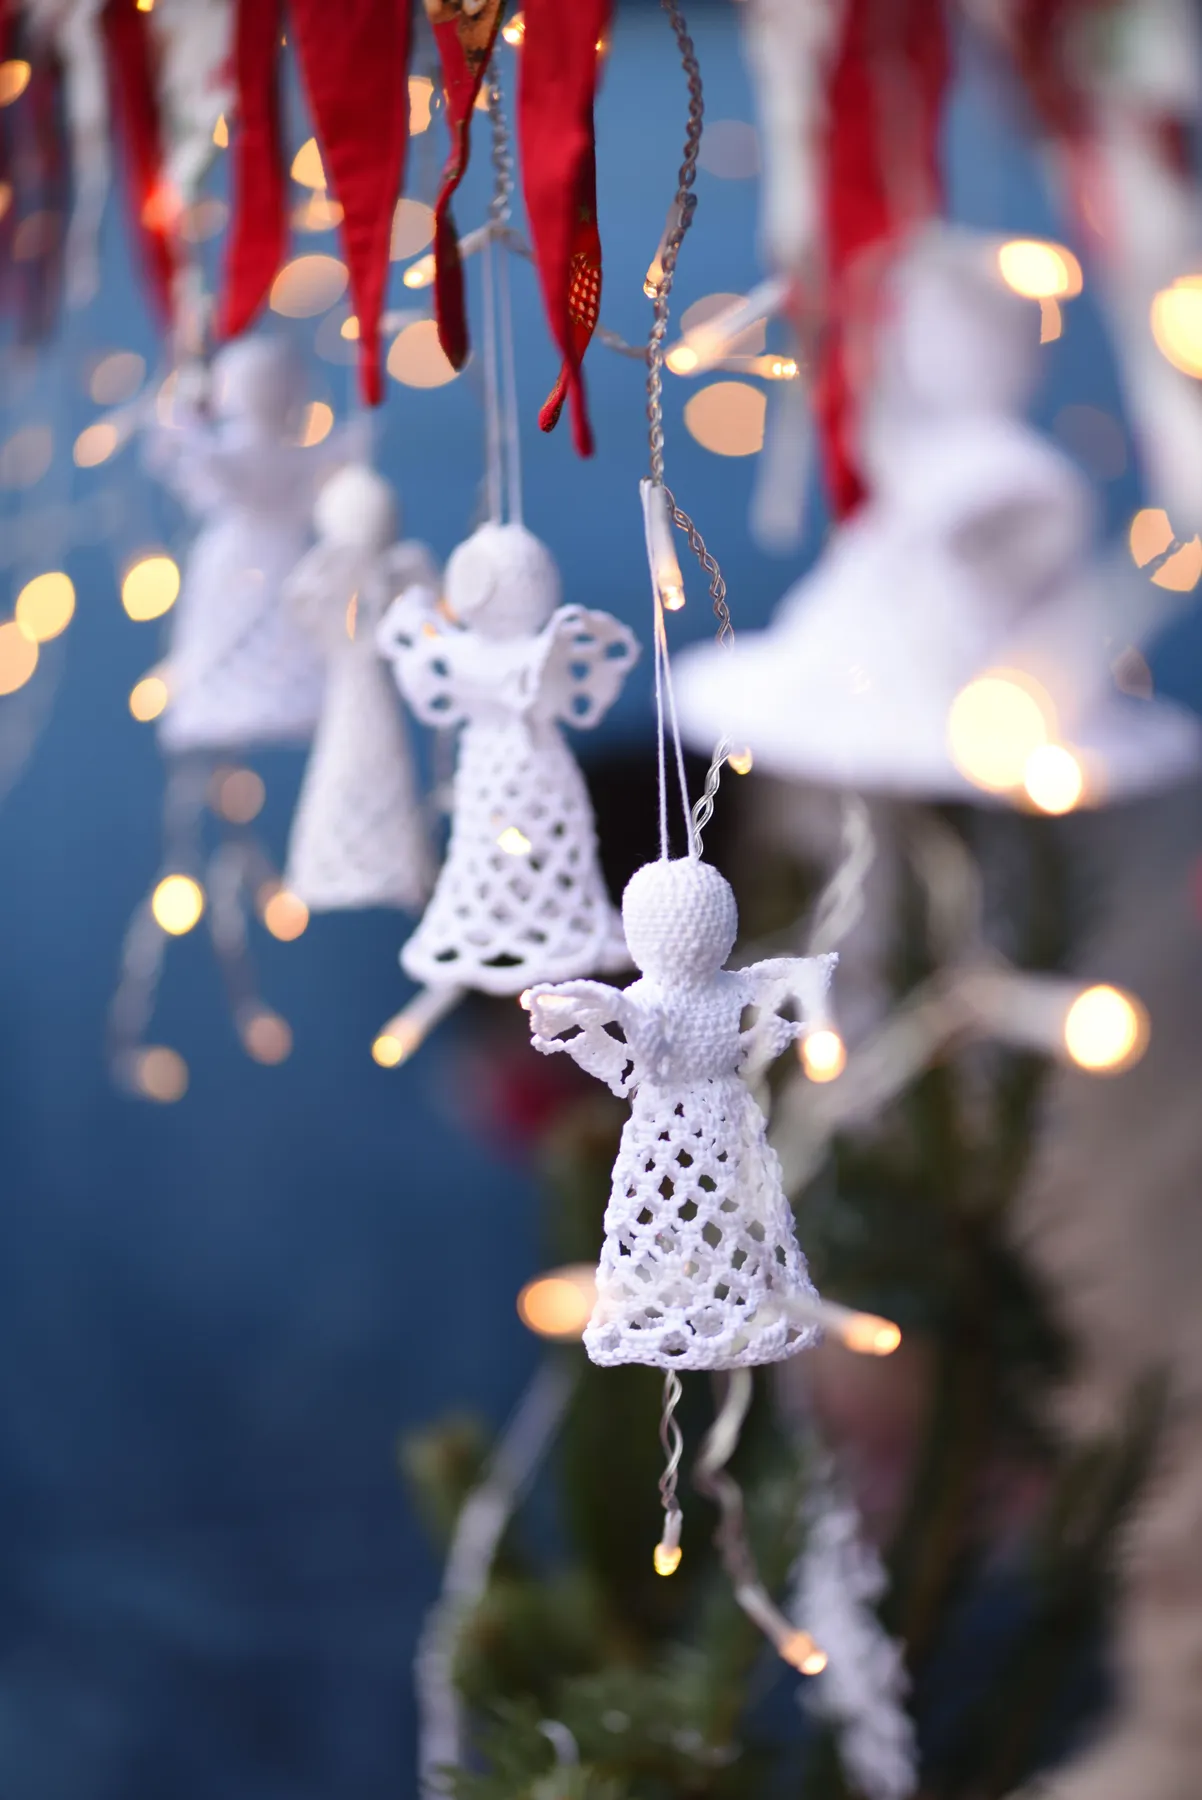
The backlighting is everything. If these angels were just hanging on a tree branch in normal light, they would be pretty. But by placing them directly in front of the warm glow of string lights, they are transformed. The light filtering through the open crochet stitches highlights the intricate pattern, creates a beautiful halo effect, and gives the entire scene a magical, glowing quality. This deliberate use of light is the single element that makes the display truly special.
To get that stiff, perfect angel shape, you can’t just rely on crochet alone. These ornaments need to be treated with a fabric stiffener. You can buy commercial products like Stiffy, or make your own with a 50/50 mix of white school glue and water. You’ll need to thoroughly soak the finished angel, squeeze out the excess, shape it perfectly over a cone-shaped form (a paper cone covered in plastic wrap works well), and let it dry completely for 24 hours. It’s a messy but necessary step.
22. Handmade Felted Fox Ornament with Twine Hanger
This little fox is straight out of a storybook. The needle-felted ornament is simple in its form but so effective. It has a classic orange-brown body, a white belly and muzzle, and tiny black details for its nose and paws. Hanging from a simple loop of rustic twine against a warm wooden background, it has an earthy, natural charm. This is a perfect project for someone new to felting, as the shape is straightforward but the result is incredibly cute. This natural, woodsy vibe is a great complement to the rustic garland shown in Idea #5.
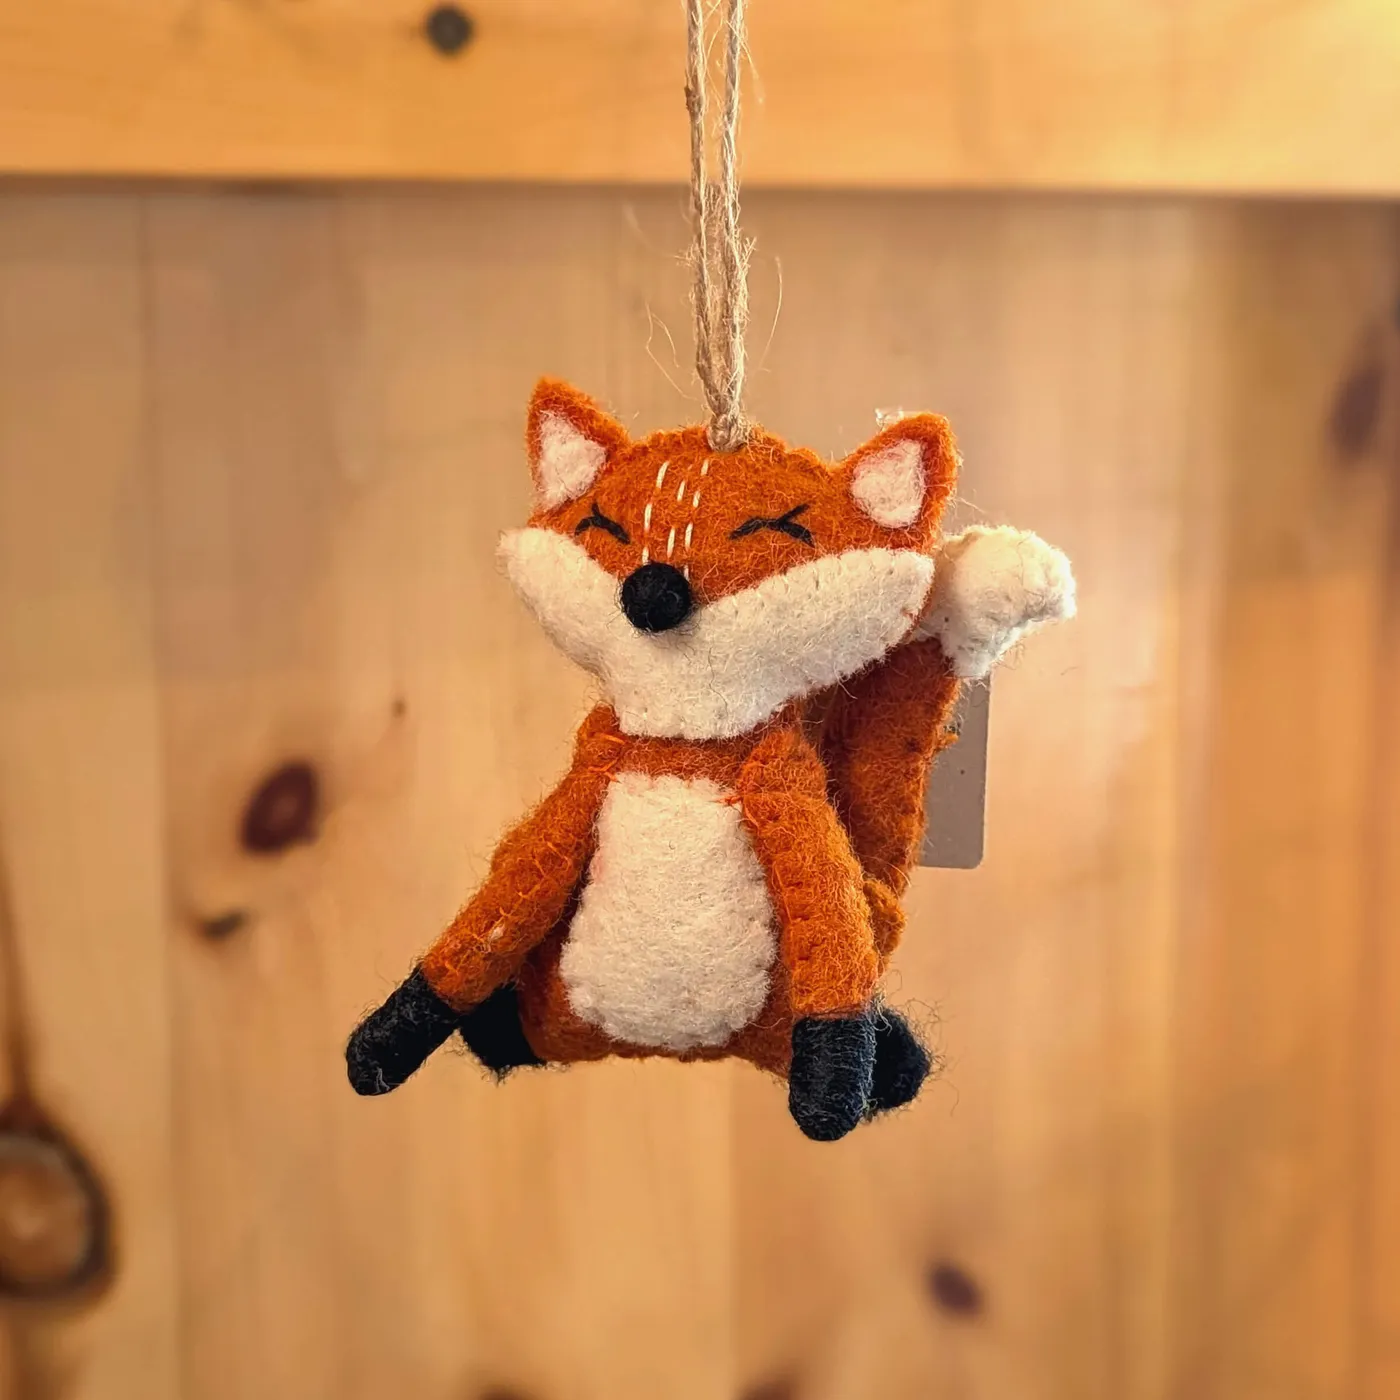
The charm here comes from the simplicity and the limited color palette. With just four colors—orange, white, black, and the tan of the twine—the design is clean and graphic. The artist didn’t overcomplicate it with extra details. This restraint allows the viewer to appreciate the soft texture of the felted wool and the simple, sweet shape of the fox. The rustic twine hanger perfectly complements the woodland theme.
Felting starter kits on Amazon or Etsy can seem pricey, but you can get the look for less. All you really need is the wool roving and the needles. You can buy individual colors of wool from craft stores for a few dollars each. Instead of a fancy foam block, you can use a dense household sponge or a folded-up old towel as your work surface. A set of felting needles costs less than $10. For under $20, you can get enough supplies to make a whole forest of these little guys.
23. Hand-Held Felt Green Tractor Christmas Ornament
For the little farmer or tractor lover in your life, this handmade felt ornament is an absolute winner. It’s a surprisingly detailed creation, with a dark green tractor body, a light blue cab window, and black wheels with fun orange spiral centers. The visible stitching adds to its handmade appeal. Held up against a Christmas tree, its bright, primary colors really pop against the green needles. The red and white twisted string for hanging is the perfect finishing touch.
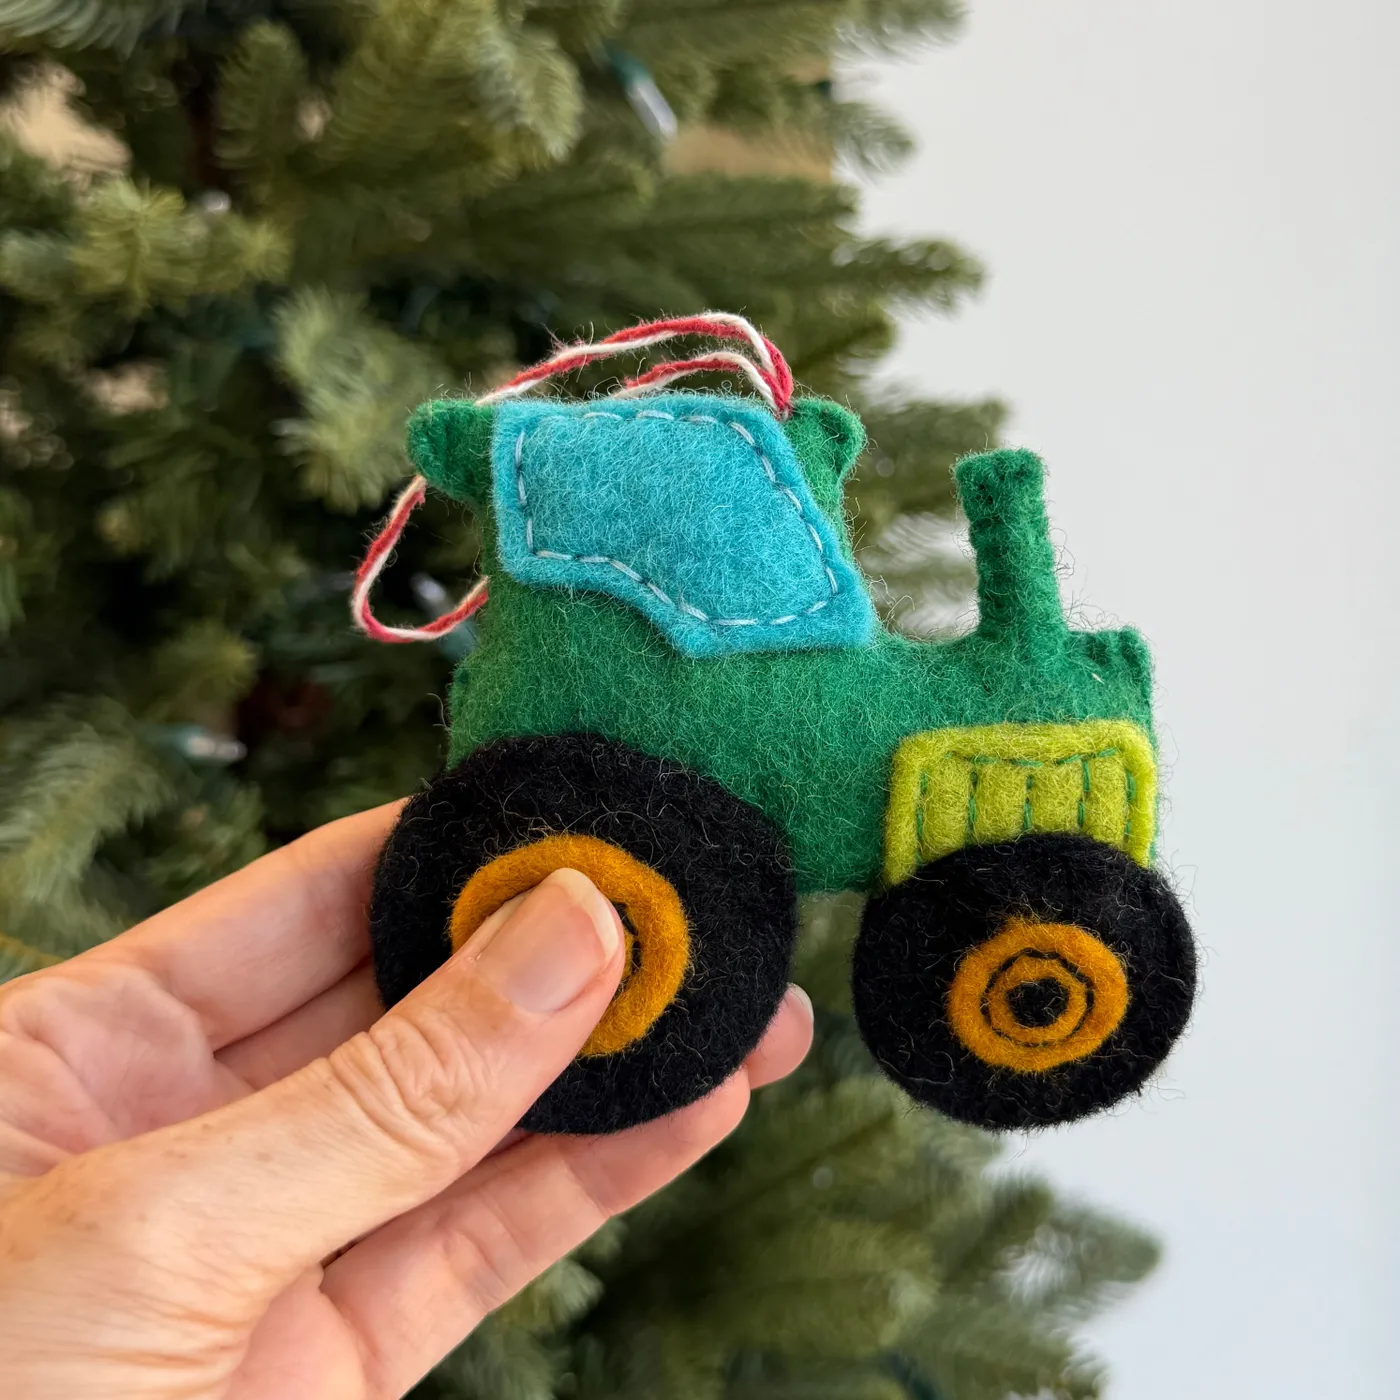
The unexpected subject matter is what makes this ornament so special. We’ve all seen felt Santas, stars, and trees. But a tractor? It’s specific, personal, and delightfully out of the ordinary. It’s the kind of ornament that reflects a real person’s hobby or passion, which makes it infinitely more meaningful than a generic shape. It tells a little story and is guaranteed to be a conversation starter on the tree.
When working with multiple small, layered felt pieces like this, use a temporary fabric adhesive spray. Lightly spray the back of a small piece (like the blue window), and it will stay perfectly in place on the green tractor body while you stitch around it. This is much easier and less messy than trying to use pins on tiny pieces, and it prevents the layers from shifting and creating a sloppy look. The adhesive washes out later or simply dissipates.
24. White Felt Unicorn Ornament with Rainbow Horn and Yarn Mane
Bring a little magic to your tree with this whimsical felt unicorn ornament. The body is a simple white felt, but the details are what bring it to life. It has sweet, closed embroidered eyes, pink felt cheeks, and a fantastic rainbow-striped horn. The mane isn’t felt at all but a cascade of colorful pink, blue, and gold yarn. It’s a joyful and colorful creation that will appeal to kids and anyone who’s still a kid at heart.
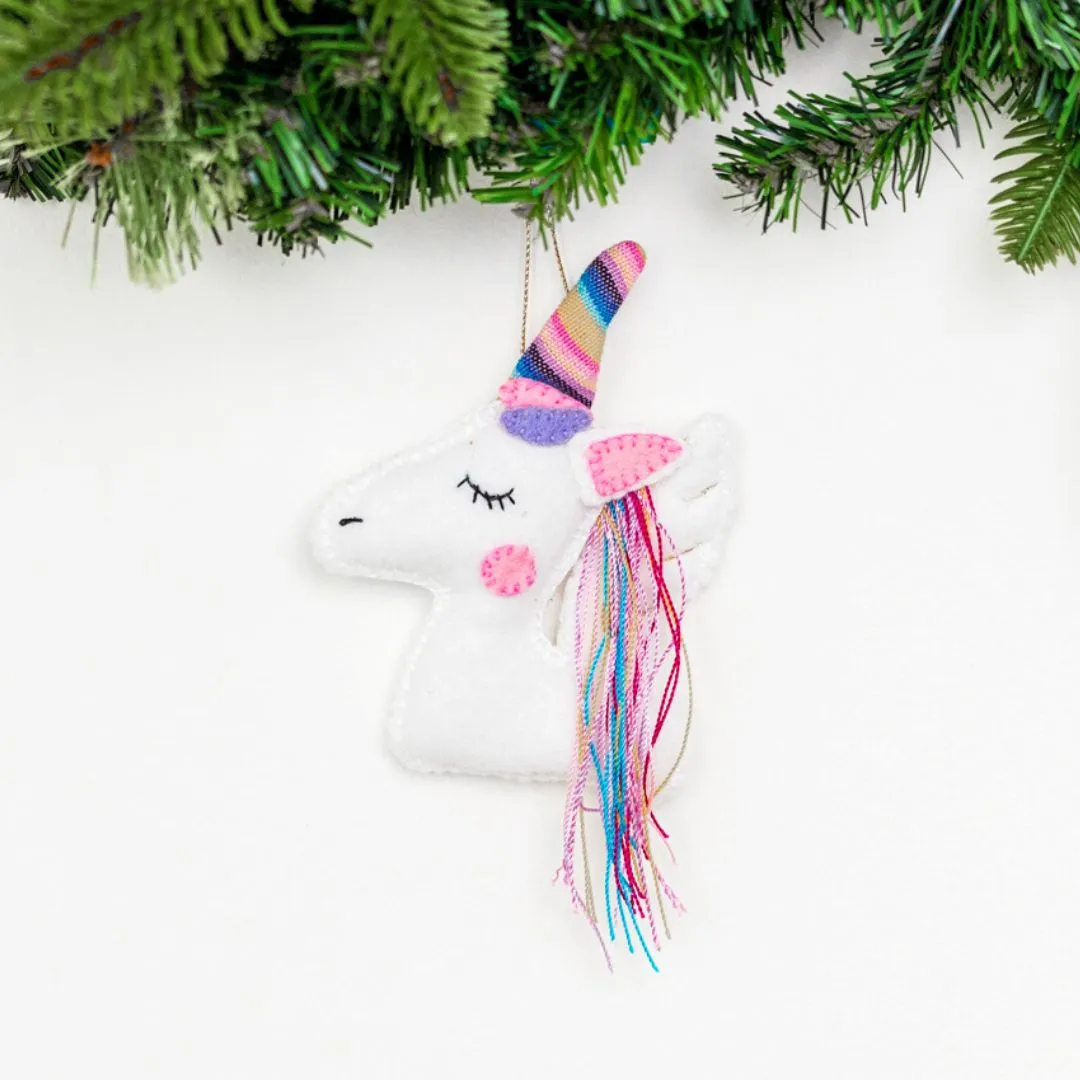
This design masterfully combines different materials to create a rich textural experience. You have the flat, soft surface of the white felt, the smooth thread of the embroidery, the slightly fuzzy texture of the pink felt cheeks, and the loose, flowing strands of the yarn mane. This mix of textures makes the ornament far more interesting to look at and touch than if it were made from only one material. It creates depth and a playful, tactile quality.
The visual recipe for this magical creature is: 60% Neutral Base + 30% Multi-Color Accents + 10% Metallic Sparkle. The white felt unicorn head is the clean, simple canvas. The rainbow horn and colorful yarn mane provide a big dose of playful energy. And that final 10% of sparkle, coming from the single strand of gold yarn in the mane, is the finishing touch. It catches the light and adds that essential bit of magic that every unicorn needs.
Your Tree’s Story, Made By You
Hopefully, these ideas have sparked some genuine excitement to get crafting! Remember, the goal isn’t perfection; it’s about creating something that feels uniquely yours. Pick a project that speaks to you, put on some holiday music, and enjoy the process. Don’t forget to save your favorites to your Pinterest board for when inspiration strikes!