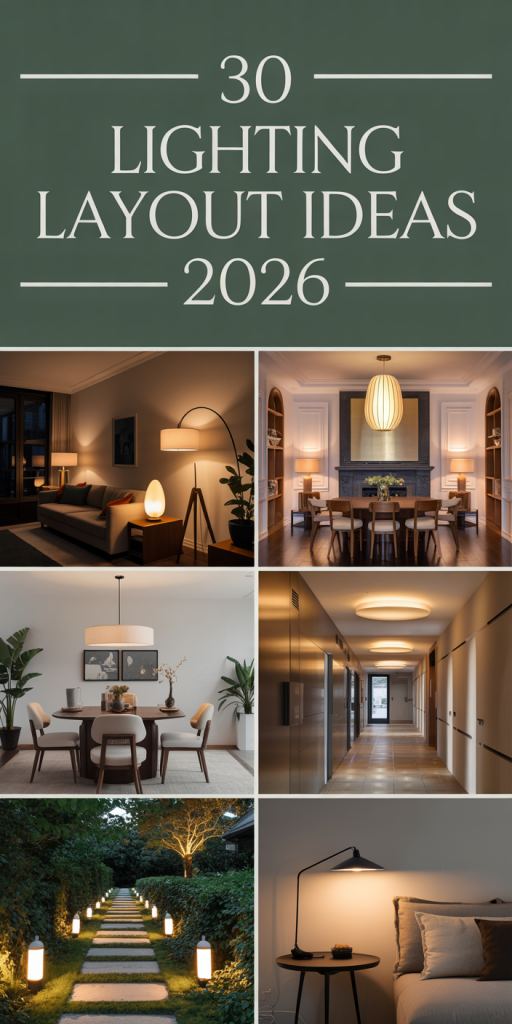
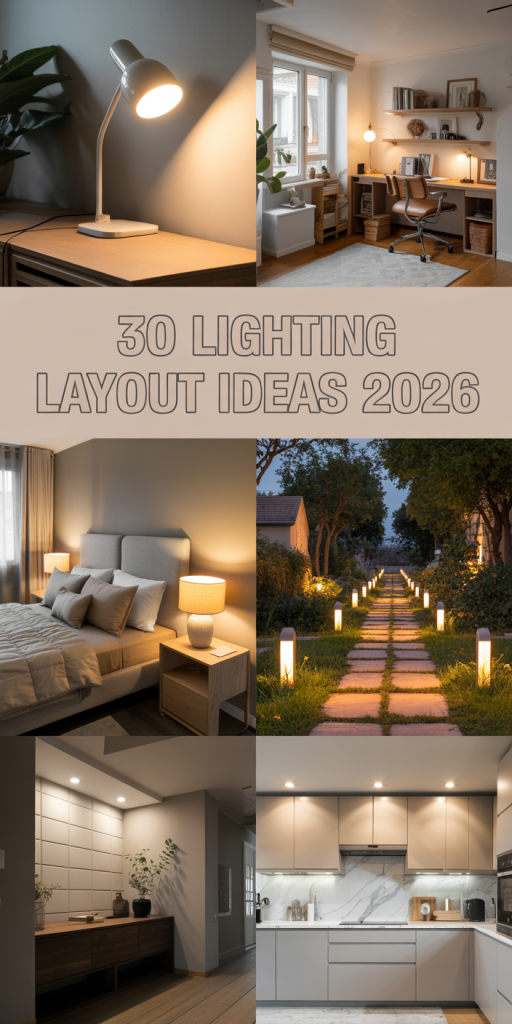
You know that feeling. You’ve scrolled through what feels like a million lighting photos, and you finally find the one that looks exactly right for your space. But then the questions hit: How high? How many? How do I actually make it look like the picture? We’ve been there. That’s why we dived deep into the world of lighting to figure out what’s not just beautiful but actually works for real homes in 2026. This isn’t just a gallery; it’s a game plan.
We’ve broken down 30 distinct lighting layouts, from kitchens to bedrooms, complete with the specific fixtures that bring them to life. These are real designs, using a mix of recessed lights, statement pendants, and subtle sconces to create layers of light. And stay until the end — we break down the most common mistakes that can ruin even the best-laid plans. 📌 Save this to Pinterest for later — you’ll want to revisit these ideas.
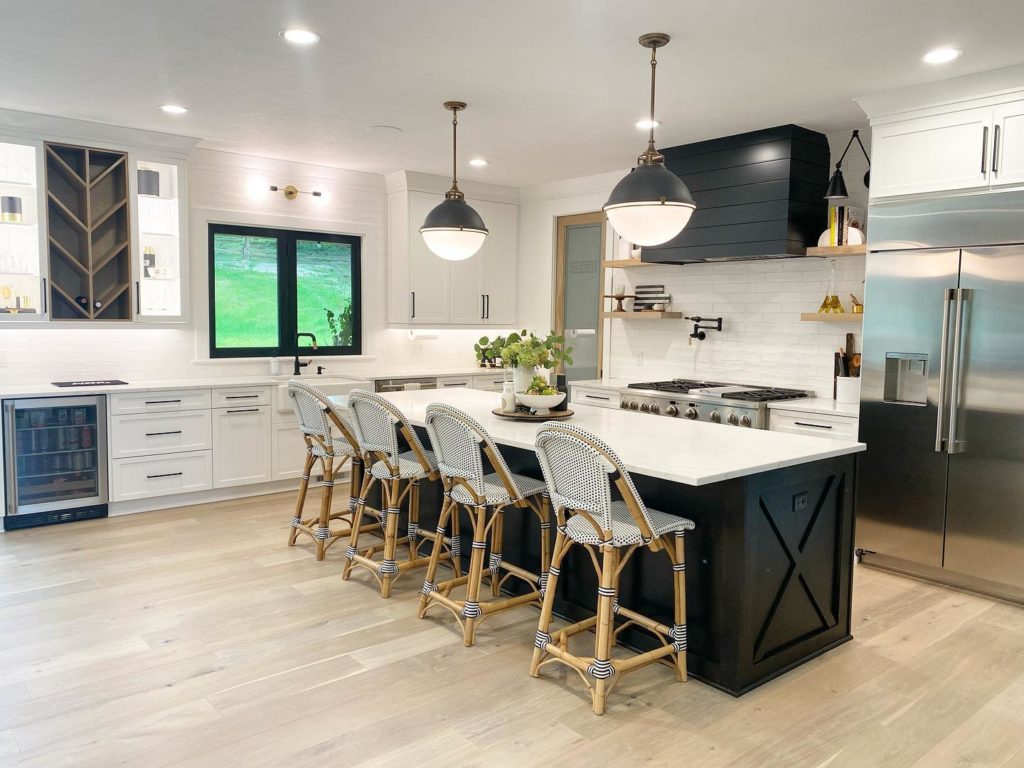
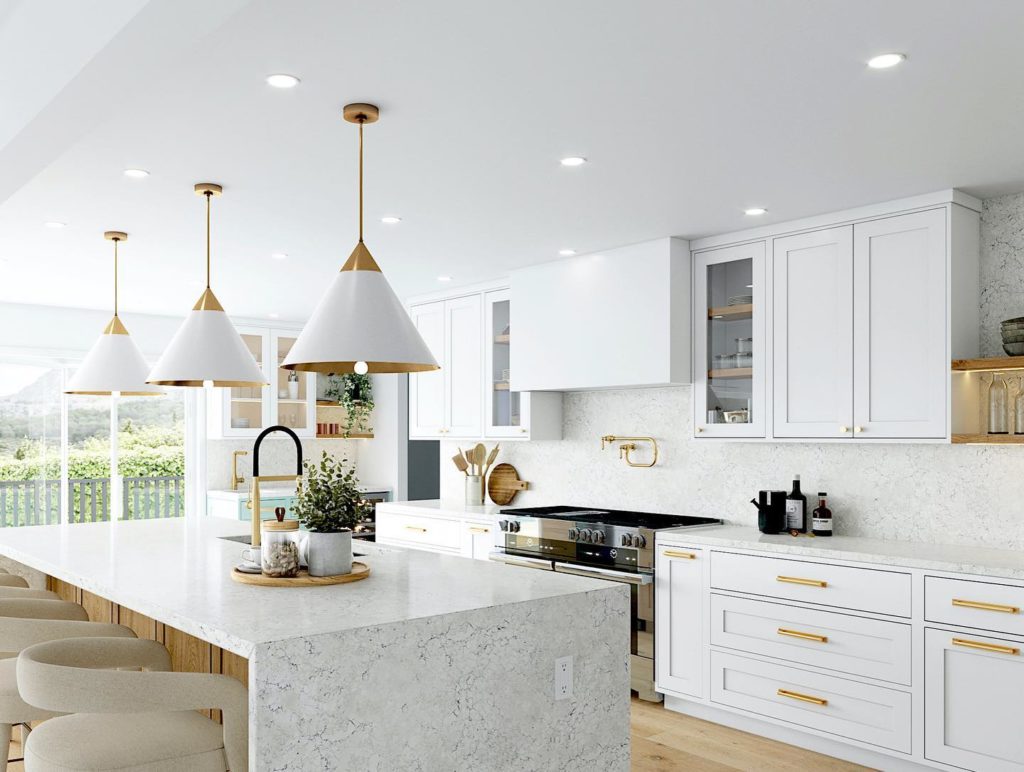
1. Modern Farmhouse Kitchen with Mixed Lighting Sources
The magic here is in the mix. This kitchen masterfully avoids the one-note feel of using a single lighting type. recessed lights provide the functional, all-over ambient light you need for cooking and cleaning. The two large globe pendants over the island are the statement pieces; they draw the eye, define the island as a social hub, and add a dose of modern style. Finally, the wall sconces (though not the main feature) add another layer, washing the walls with a softer glow and creating depth. This three-pronged approach ensures the room is functional, beautiful, and feels professionally designed.
|
📋 Copy HEX 🔗 Share |
When hanging pendants over a kitchen island, the standard rule is 30-36 inches from the countertop to the bottom of the fixture. However, for large, visually solid pendants like these globes, you can cheat it up to 40 inches. This keeps them from feeling like a visual barrier, especially when you have two. It preserves the open sightlines across the kitchen while still keeping the island well-lit and anchored in the space. Measure twice and have a friend hold them up before you commit to the final height!
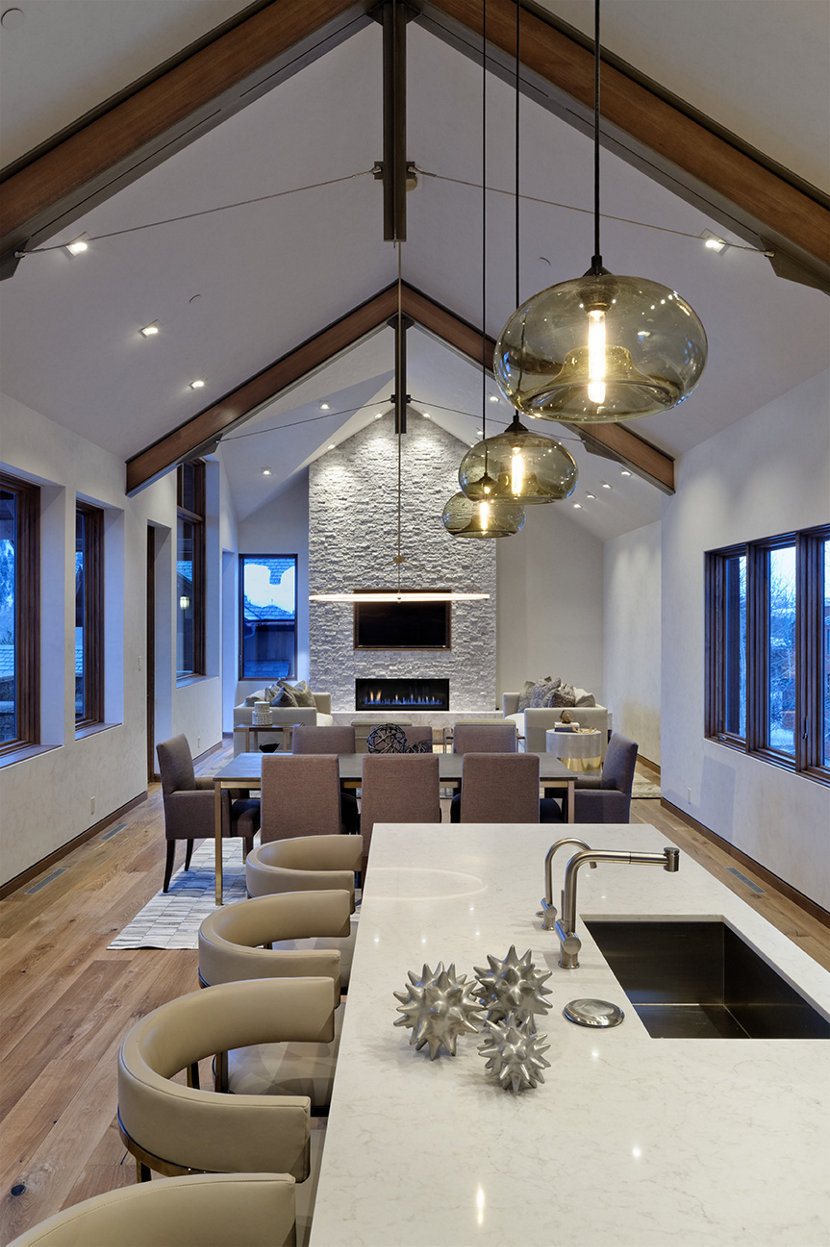
2. Layered Lighting on a Vaulted Ceiling with Wood Beams
What makes this space so successful is the sheer diversity of its lighting fixtures. Removing any single type would diminish the room’s character. The amber glass globes add warmth and a focal point over the counter. The track lighting provides flexible, aimable light to highlight the architectural wood beams and wash the vaulted ceiling in light. The recessed spotlights handle the general illumination, and the linear fixture over the fireplace adds a sleek, modern touch. It’s a symphony of light where each instrument plays a crucial role.
|
📋 Copy HEX 🔗 Share |
A vaulted ceiling design like this thrives in a room with a substantial footprint, ideally at least 20×25 feet. The ceiling height, reaching maybe 15-18 feet at its peak, is what allows for this complex layering. Trying to cram this many fixture types into a room with standard 8-foot ceilings would feel chaotic and cluttered. This layout is perfect for open-concept great rooms where the kitchen, dining, and living areas flow into one another, requiring distinct but cohesive lighting zones.
3. White & Gold Kitchen with Cone Pendants
The visual formula for this bright and airy kitchen is all about balance. Think of it as 70% Neutral Base + 20% Metallic Accent + 10% Natural Texture. The neutral base is the sea of white shaker cabinets and marble-patterned surfaces. The gold accents, found in the pendant lights, hardware, and faucet, bring in warmth and a touch of luxury. The final 10% comes from the light wood flooring, which keeps the space from feeling sterile. You could swap the gold for matte black or the white marble for a soft gray quartz, and the formula would still work perfectly.
|
📋 Copy HEX 🔗 Share |
- Main Furniture (Island, Cabinets): $8,000 – $15,000
- Lighting (3 Pendants + Recessed): $1,200 – $3,000
- Countertops & Backsplash (Marble-look Quartz): $5,000 – $9,000
- Fixtures (Faucet, Hardware): $800 – $2,000
- TOTAL: $15,000 – $29,000
- Budget alternative: Use butcher block countertops, look for pendants on Wayfair or Overstock, and find hardware on Amazon to achieve a similar vibe for around $7,000 – $12,000.
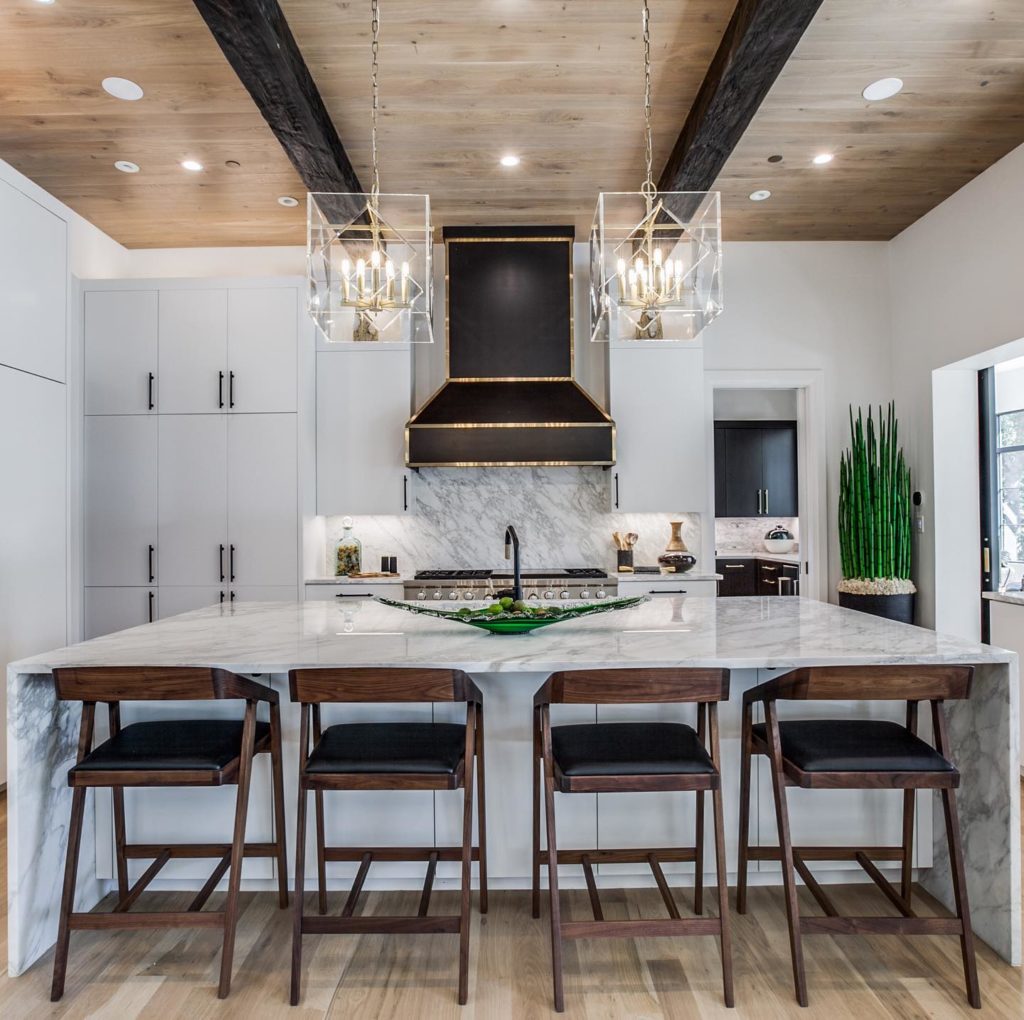
4. Statement Cube Chandeliers Over a Marble Waterfall Island
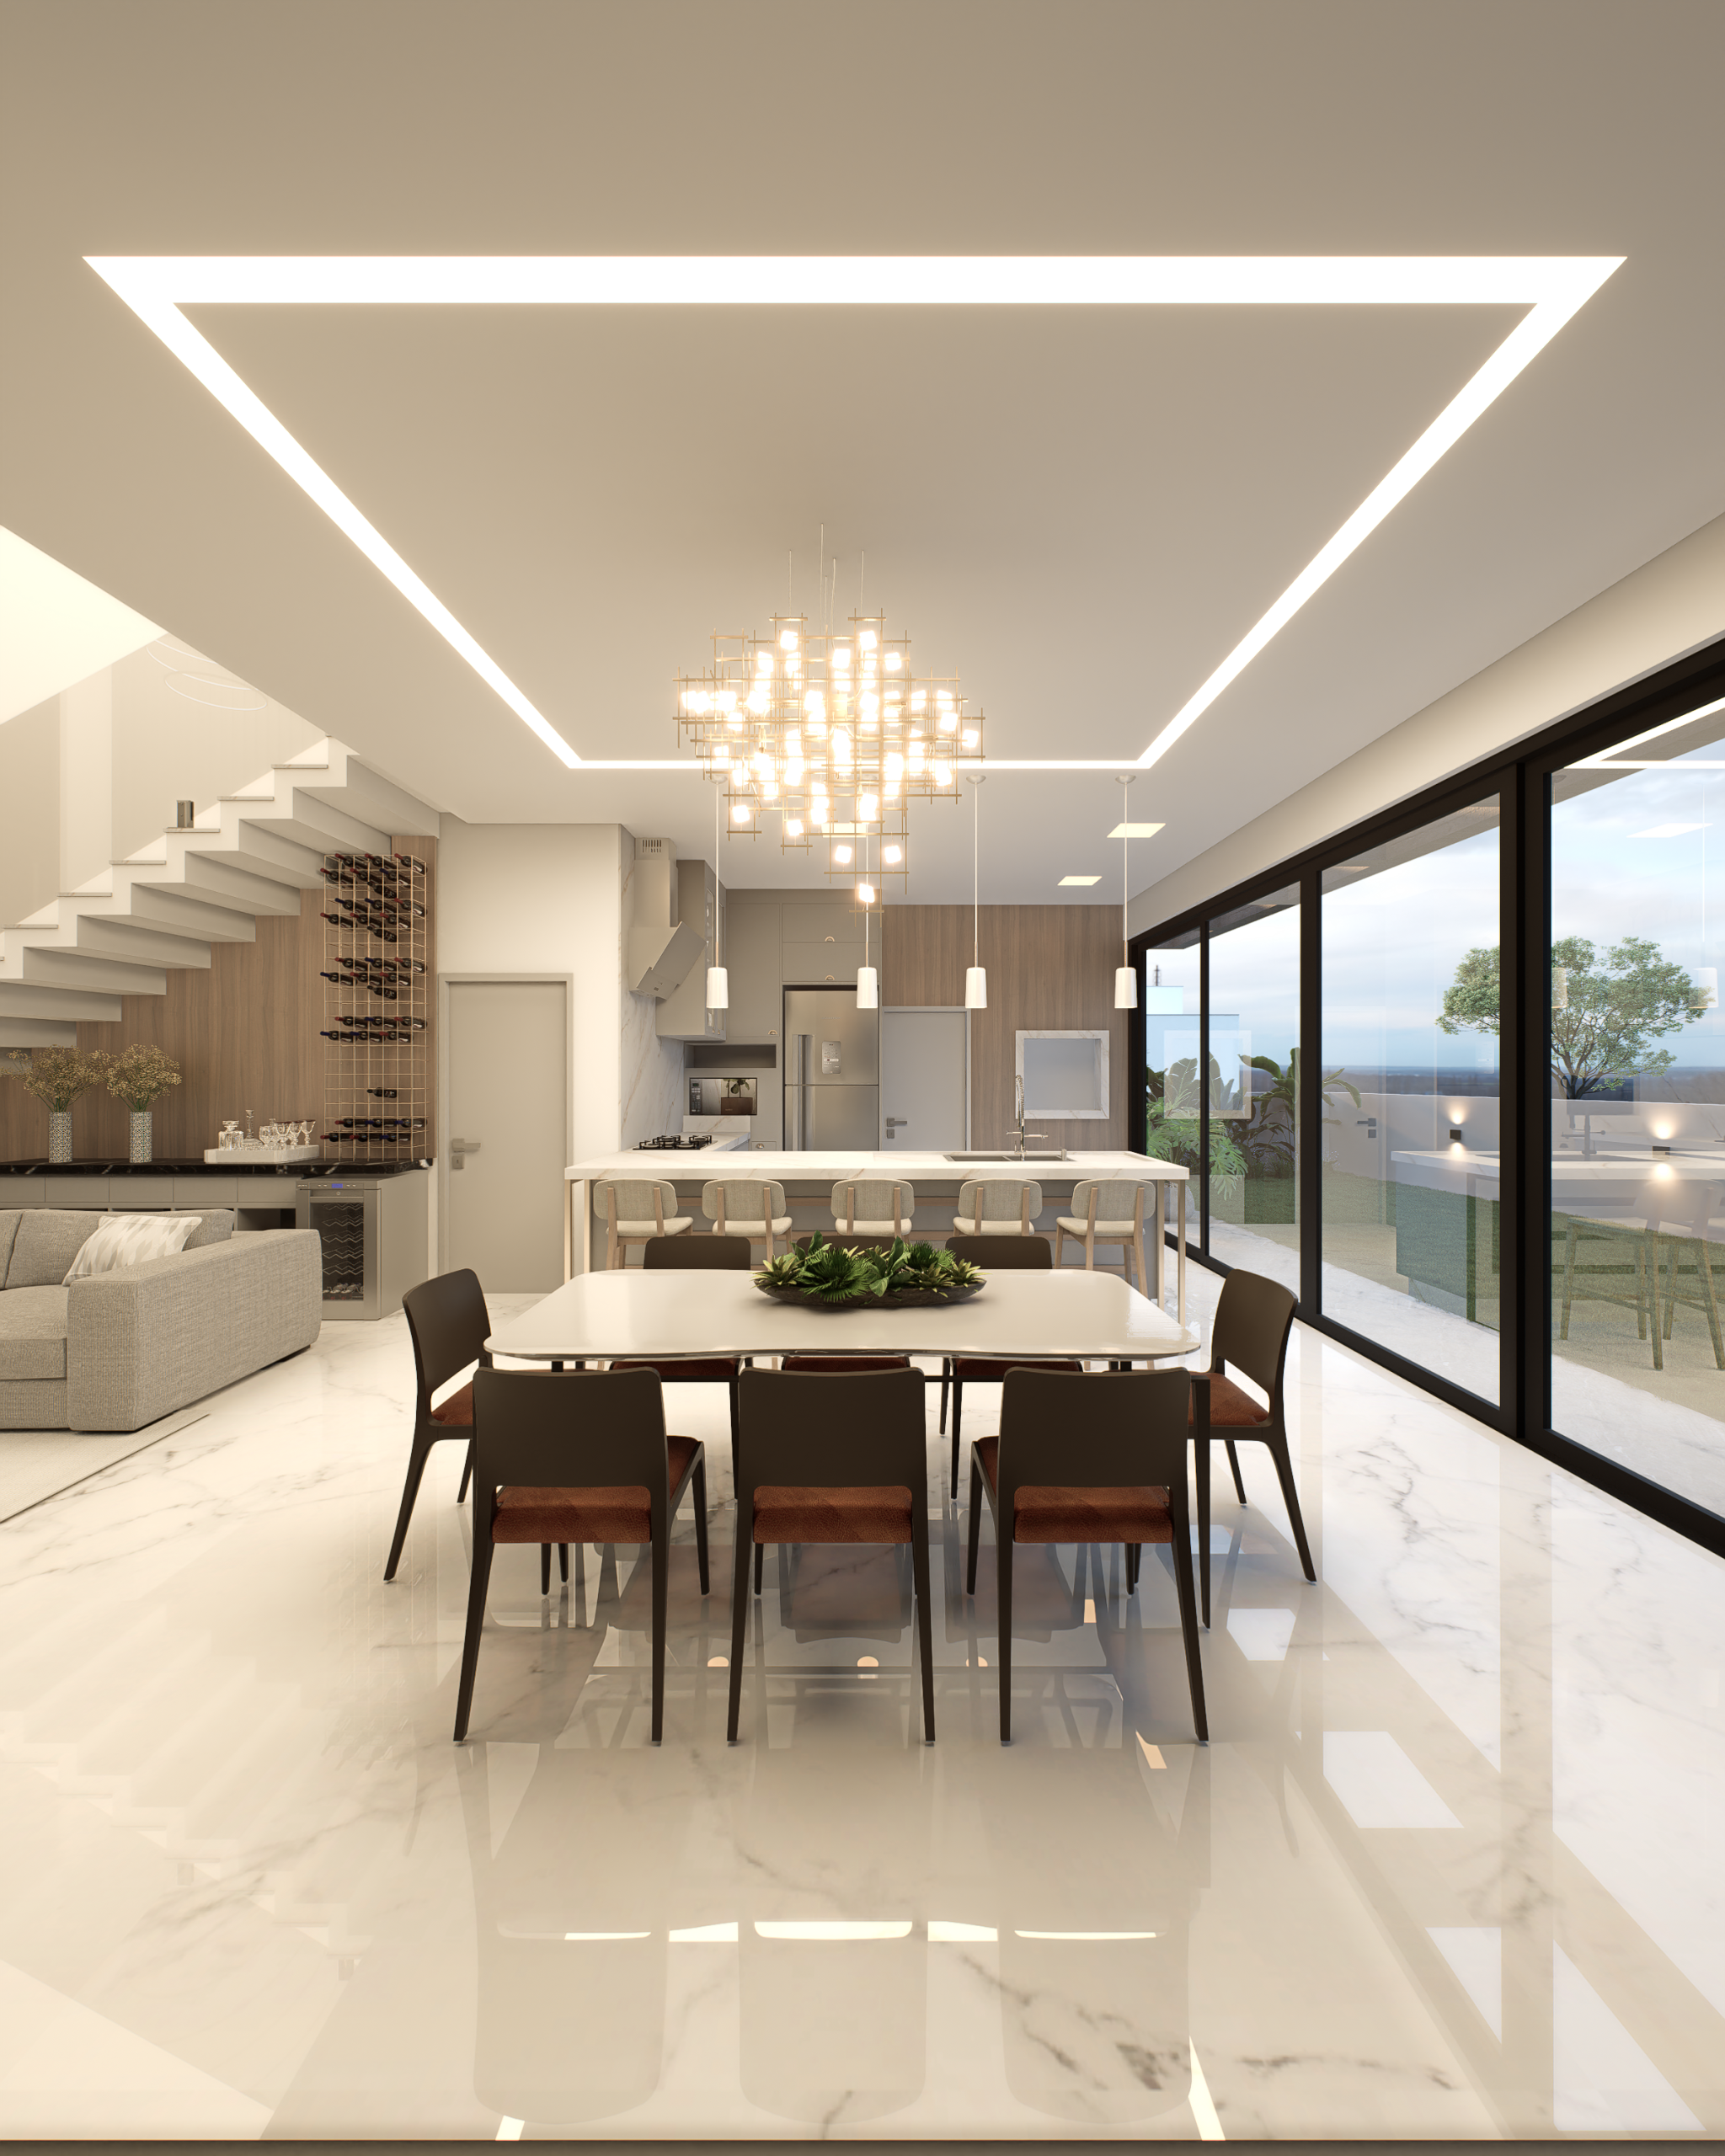
Let’s be honest: a white marble waterfall island is a commitment. While stunning, it’s a softer, more porous stone than granite or quartz. This means it’s more susceptible to staining from things like red wine, lemon juice, or coffee, and it can be scratched or chipped more easily. You have to be diligent about using coasters, trivets, and wiping up spills immediately. If you have a busy family or love to host big, messy gatherings, you might consider a durable marble-look quartz to get the same luxe look without the high maintenance. It’s a know-thyself moment.
|
📋 Copy HEX 🔗 Share |
Without a doubt, the single element that elevates this kitchen is the pair of cube-shaped chandeliers. They are the jewelry of the room. While the marble waterfall island and wood-planked ceiling are gorgeous architectural elements, the chandeliers are the art. They provide warm, multi-directional light, and their geometric form contrasts beautifully with the organic veining in the marble. Remove them, and you have a lovely, high-end kitchen. With them, you have a showstopper. This is a perfect example of lighting as a focal point, not just a utility.
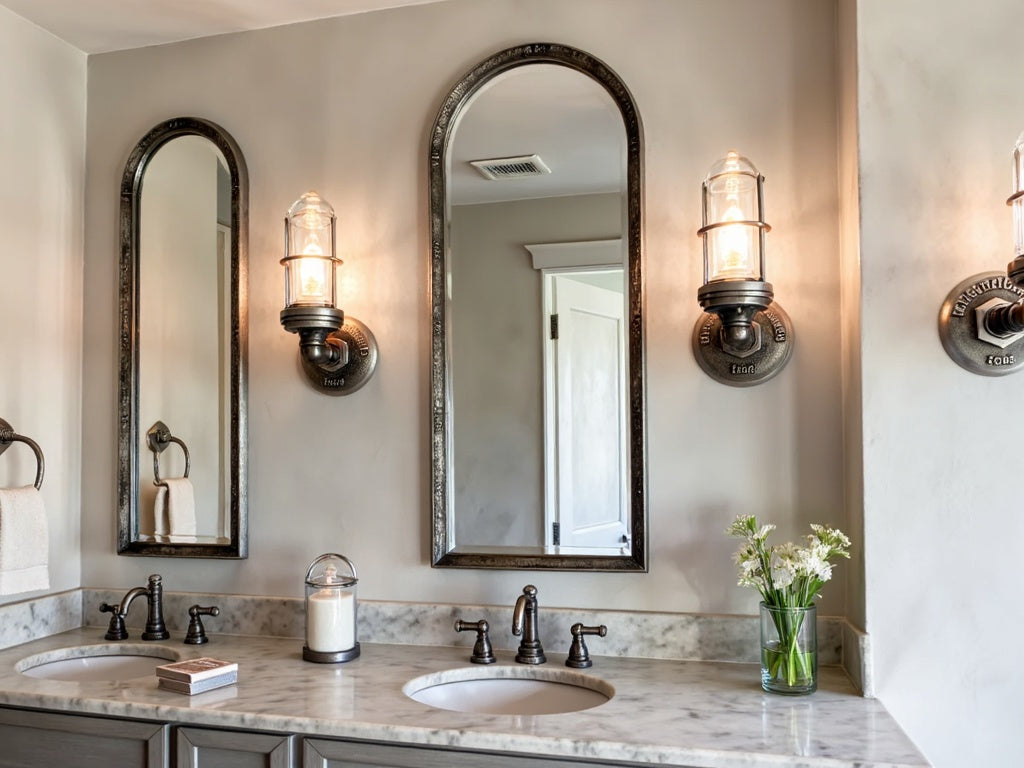
5. Industrial Sconces Flanking Arched Bathroom Mirrors
For the most flattering light at a vanity, always prioritize side lighting over overhead lighting. Mounting sconces on either side of the mirror, like the ones here, illuminates your face evenly and eliminates shadows under your eyes, chin, and nose. For a double vanity, a good rule of thumb is to place the center of each sconce backplate about 4-6 inches from the side of its respective mirror and at a height of 60-66 inches from the finished floor. This puts the light source right around face-level for the average person.
|
📋 Copy HEX 🔗 Share |
This bathroom design works because it perfectly balances hard and soft, and warm and cool. The hard, industrial lines of the sconces and the dark metal of the mirrors are softened by the gentle curve of the arches and the fresh flowers. The cool tones of the light gray walls and vanity are warmed up by the exposed filament bulbs and the dark bronze finish on the fixtures. It’s a study in thoughtful contrast that feels cohesive and intentional. This is a much more inviting look than the budget version seen in Idea #12.
6. Kitchen Island with Two Large White Globe Pendants
Using two oversized globe pendants works best on a kitchen island that is at least 8 to 10 feet long. This allows for proper spacing so the fixtures don’t feel cramped. You’ll want to space them so their centers are at least 30 inches apart, and they should be centered over the length of the island. With large pendants like these (likely 18-24 inches in diameter), you also need adequate ceiling height. Standard 8-foot ceilings might feel a bit low; this look is ideal for ceilings that are 9 feet or higher to allow the pendants to breathe.
|
📋 Copy HEX 🔗 Share |
You don’t need a custom kitchen budget to get this look. IKEA’s TÄLLBYN pendant has a similar globe shape and modern feel for a fraction of the designer price. Pair it with their VEDHAMN or TORHAMN wooden cabinet fronts for that warm, natural vibe. For the hexagonal backsplash, check out options from Home Depot or Lowe’s, which are often very affordable. A high-quality laminate countertop from a brand like Formica can give you that white marble look for less. This is a great example of how to replicate the feel of Idea #3 on a tighter budget.
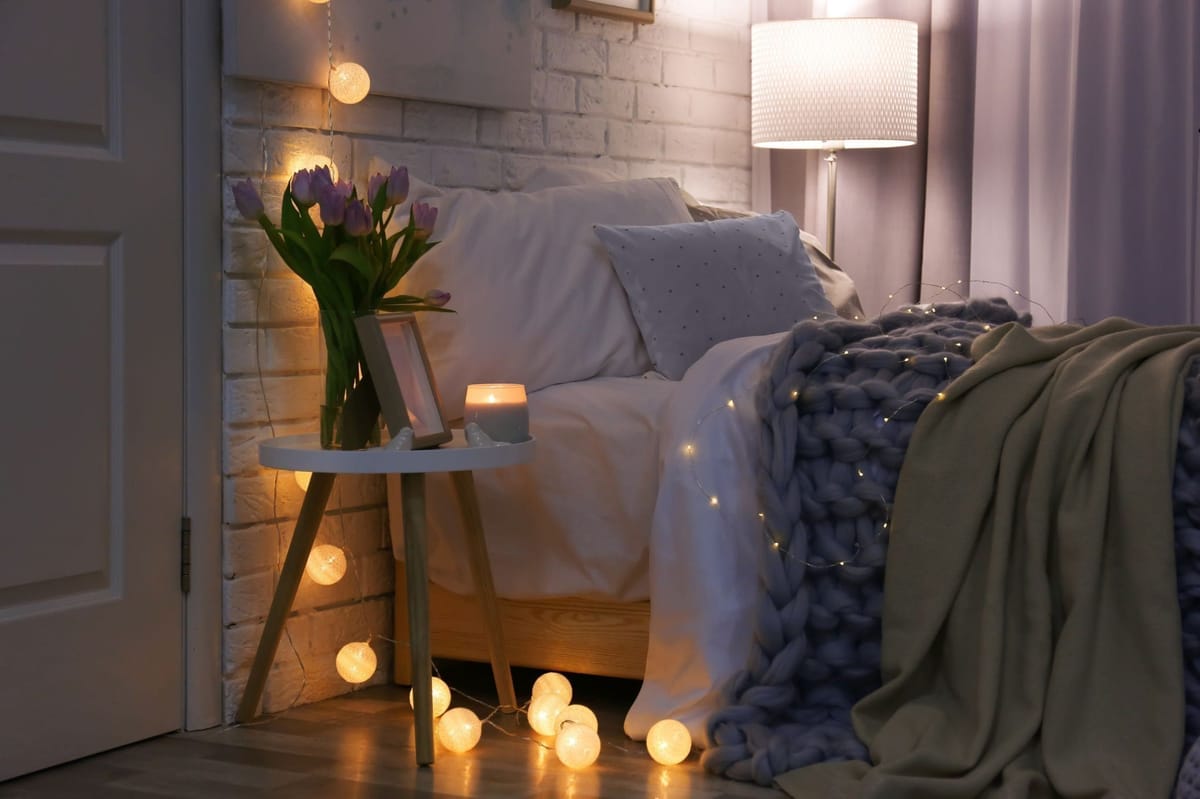
7. Cozy Bedroom Layered with String Lights and Ambient Lamps
This is all about creating a bubble of warmth, and you can do it in an afternoon. Here’s a quick guide to layering your bedroom light like this:
|
📋 Copy HEX 🔗 Share |
- Start with a base: Place your main ambient light source, like the upright floor lamp, in a corner where it can diffuse light softly across the room. (Time: 5 mins)
- Add the sparkle: Drape string lights with globe covers either behind the headboard or along the top of the brick wall. Use small, clear Command hooks to secure them without damage. (Time: 20 mins)
- Introduce a task light: Even if it’s just for show, a small side table lamp or a lit candle adds a lower-level layer of light that makes the space feel intimate. (Time: 2 mins)
- Choose warm bulbs: Make sure all your bulbs are in the 2200K-2700K temperature range to produce that cozy, amber glow. Avoid anything labeled “daylight” or “cool white.” (Cost: $20-40 for bulbs)
A white painted brick wall looks incredibly chic and textural, but it’s not always the most practical choice. The deep crevices are a magnet for dust and cobwebs, requiring regular vacuuming with a brush attachment to keep it looking clean. Also, if the brick wasn’t properly sealed before painting, you could experience issues with moisture wicking through, which can cause the paint to flake or peel over time. It’s a gorgeous look, but be prepared for a bit more maintenance than a standard drywall surface.
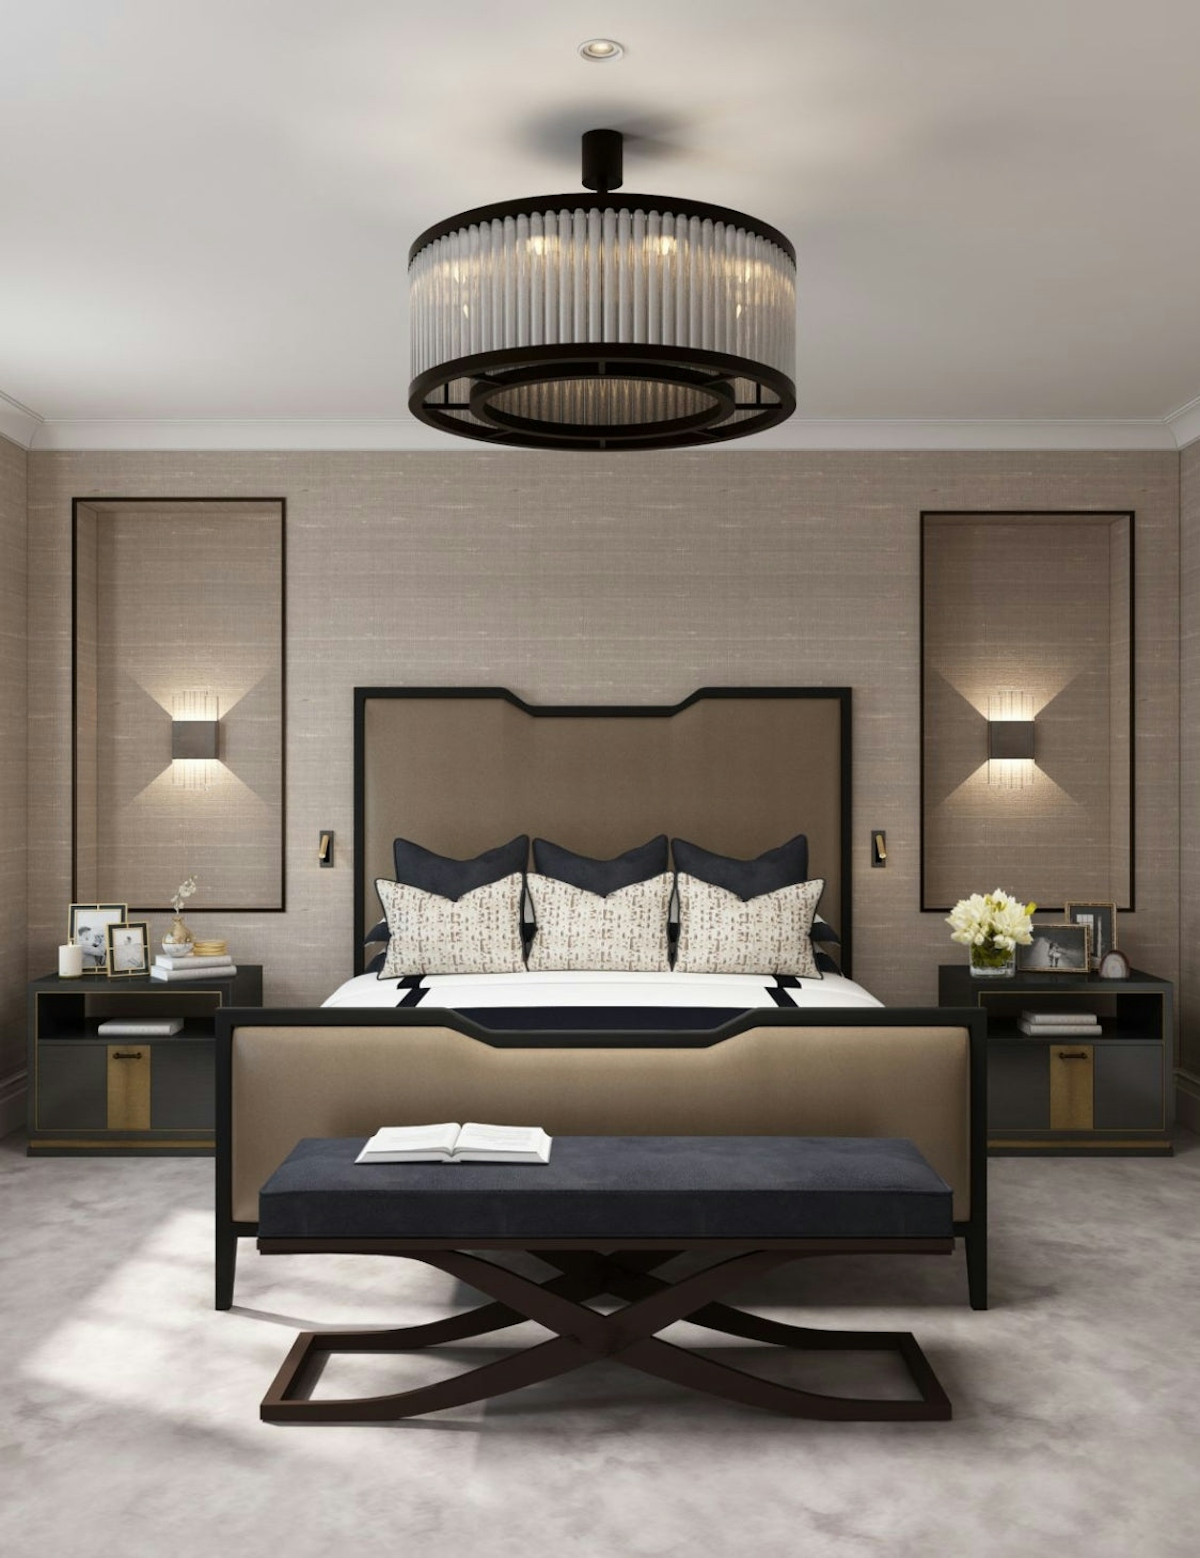
8. Elegant Bedroom with a Glass Rod Chandelier and Wall Sconces
This bedroom’s lighting design is a masterclass in creating mood. It works by establishing a clear hierarchy of light. The cylindrical glass rod chandelier is the undeniable centerpiece—a piece of jewelry for the ceiling that provides glittering, diffused ambient light. The recessed light is a quiet supporting actor, there to fill in any gaps. The real magic, however, comes from the square wall sconces behind the nightstands. They wash the textured wall panels with light, highlighting their dimension and creating a soft, indirect glow perfect for winding down at night. This layering creates a rich, sophisticated atmosphere that a single light source could never achieve.
|
📋 Copy HEX 🔗 Share |
A beautiful glass rod chandelier like this one is a statement, but it doesn’t stay pristine on its own. Dust and fingerprints will dull its sparkle over time. Plan for a detailed cleaning every 6-12 months. You’ll need to turn off the power, and then carefully wipe down each individual glass rod with a lint-free microfiber cloth, sometimes with a gentle glass cleaner. It can be a tedious job, taking an hour or more, but it’s essential to maintain the fixture’s intended beauty and light-refracting qualities.
9. Symmetrical Bedroom Sconces with Rattan Shades
The single element that defines this room’s serene mood is the texture of the rattan sconce shades. Rattan is a natural material that immediately brings warmth and an organic, handmade quality to a space. It filters the light, casting a soft, patterned glow that’s much more atmospheric than a plain fabric or glass shade. Paired with the deep teal wall, the warm light from the rattan creates a color story that feels both calming and incredibly sophisticated. Without that specific texture, the design would be far less impactful.
|
📋 Copy HEX 🔗 Share |
When using sconces for bedside lighting, especially those that cast light both up and down, consider the beam spread. You want the downward light to be wide enough to illuminate a book, but not so wide that it spills onto your pillow and into your eyes. Mount them so the bottom of the sconce is about 20-24 inches above the mattress top. This usually places them at a comfortable height to reach the switch from bed and provides effective task lighting without creating glare. The symmetry is key here; measure carefully so they are perfect mirror images of each other.
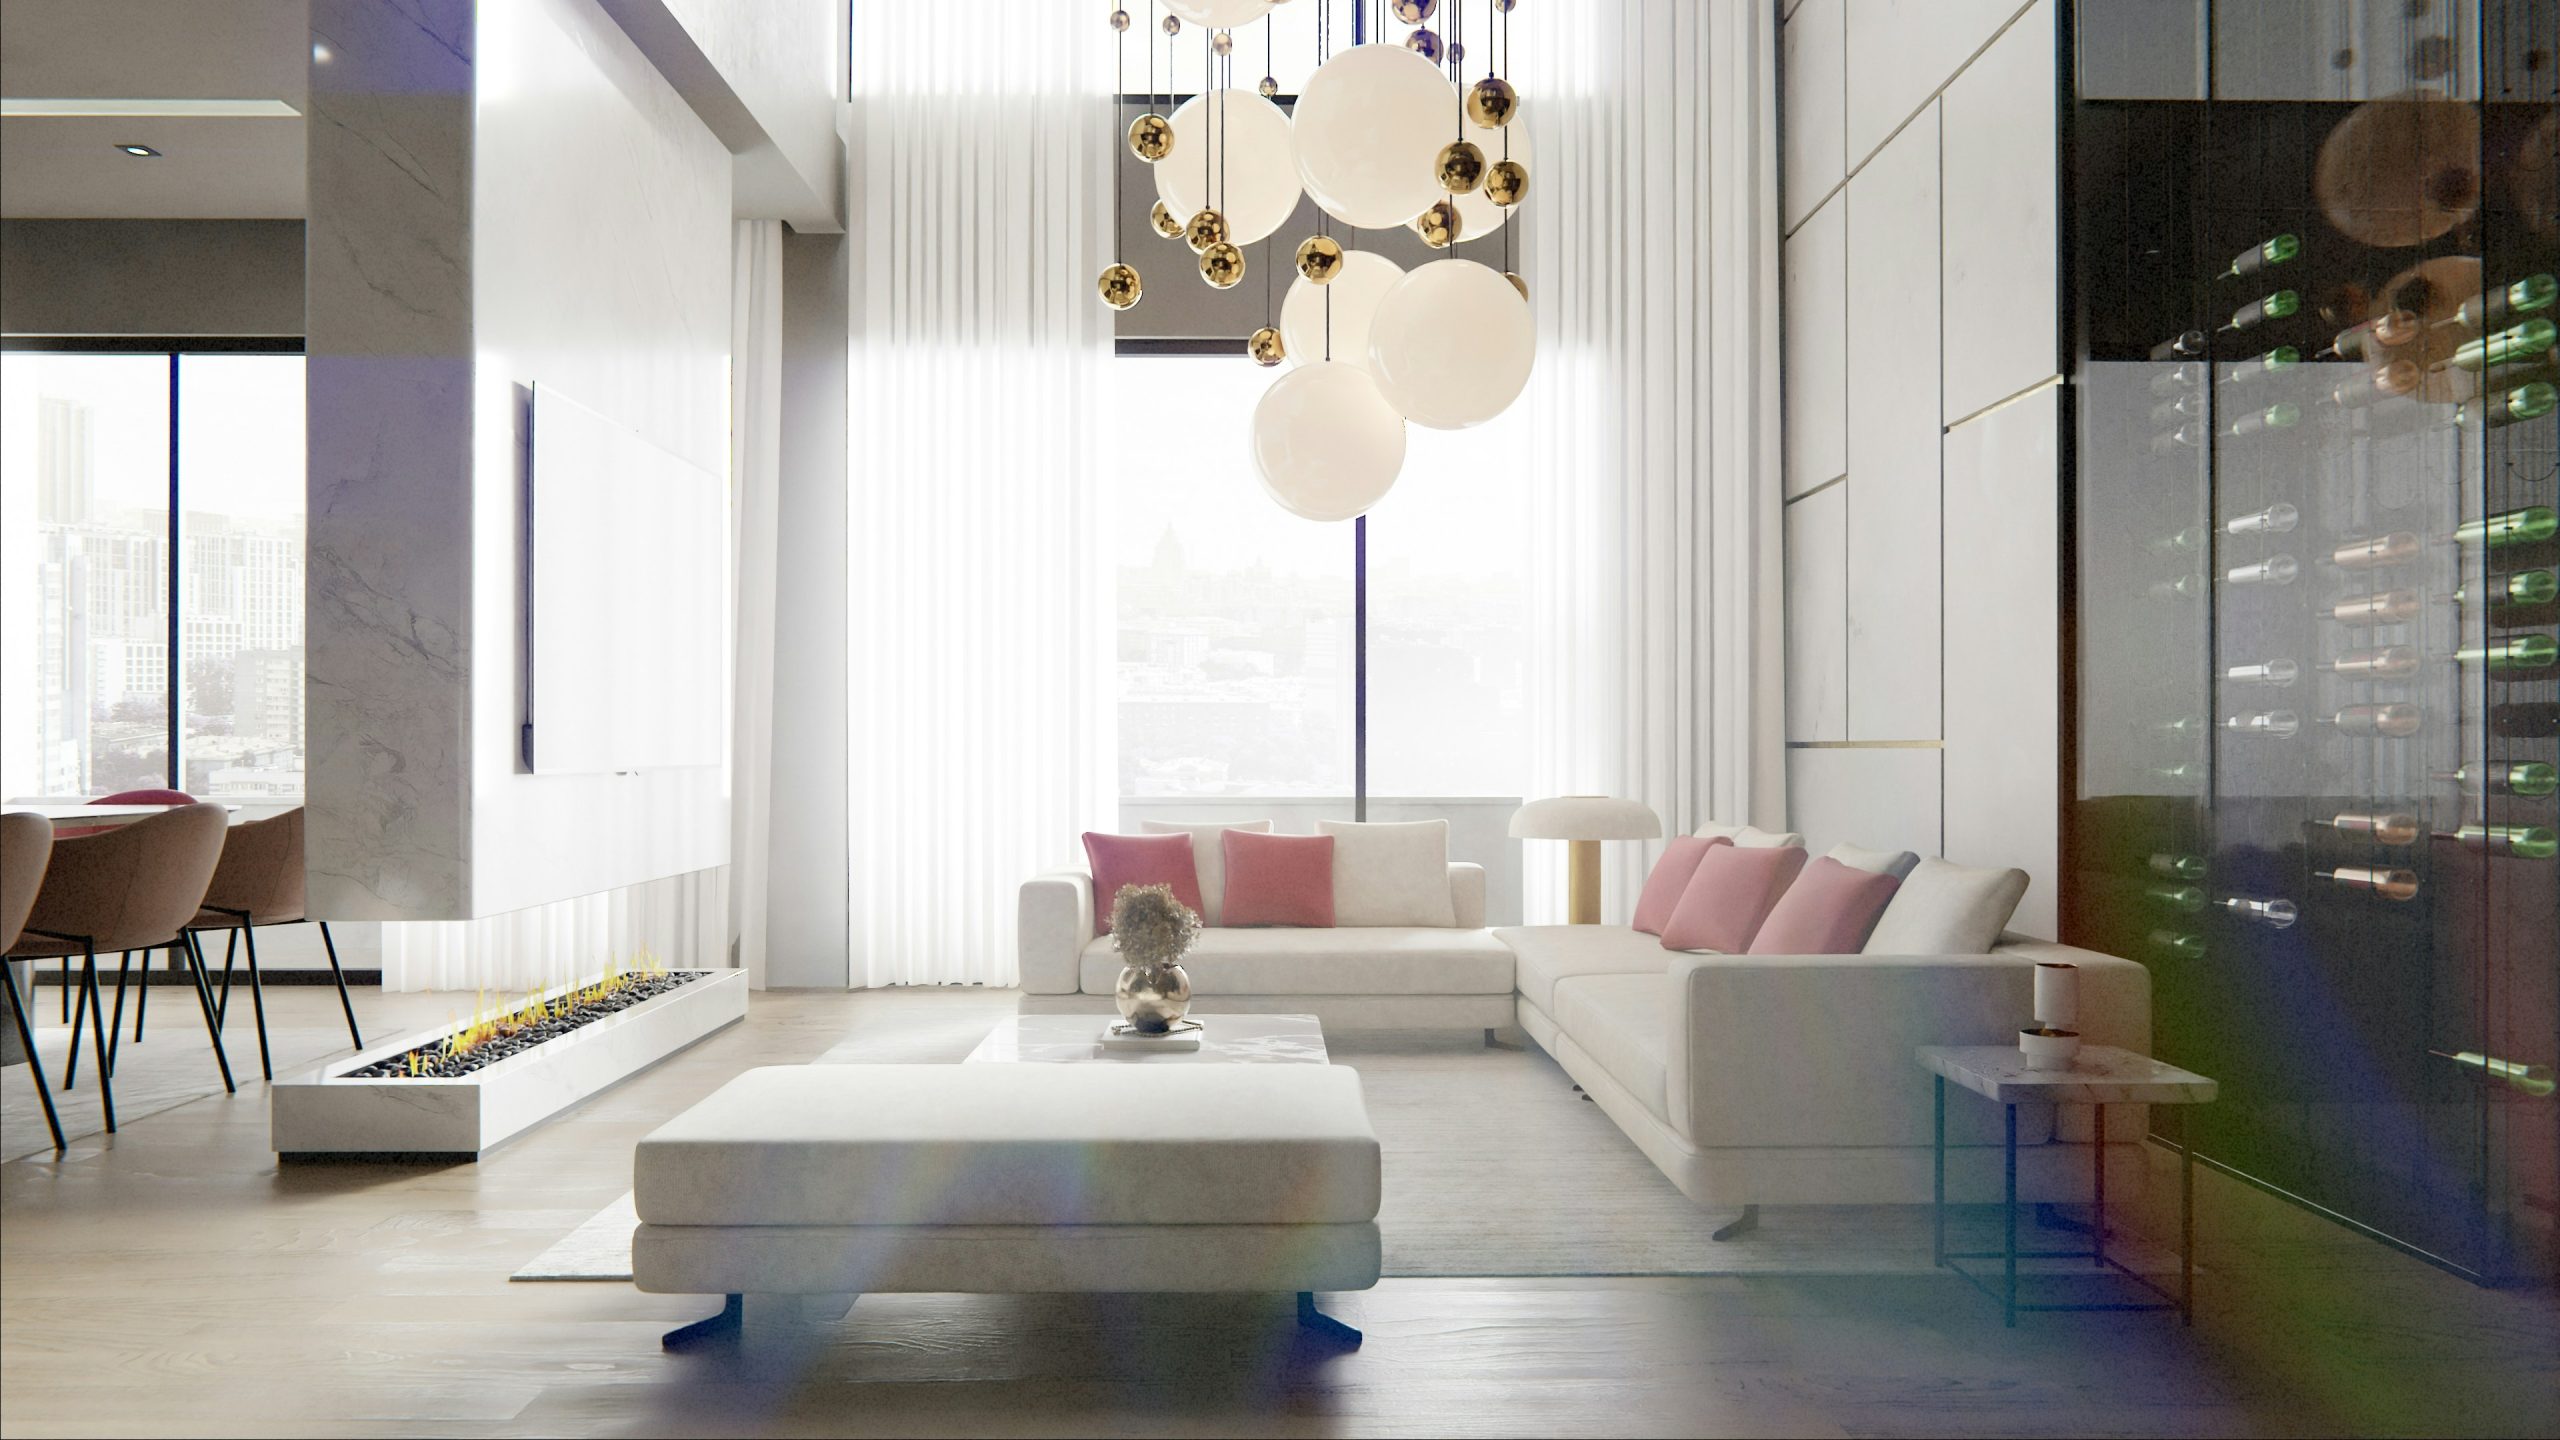
10. Modern Living Room with a Statement Sphere Chandelier
We’re seeing a huge move away from single, simple light fixtures and toward these large-scale, sculptural chandeliers that act as the primary piece of art in a room. It’s a trend fueled by our desire to make our homes feel more custom and curated. On Pinterest, boards are filled with lights that are conversation starters. This sphere chandelier, with its mix of opaque and metallic globes, fits right into that movement. It’s less about pure function and more about creating a memorable, high-design moment. This trend has staying power because it treats lighting as an integral part of the decor, not an afterthought.
|
📋 Copy HEX 🔗 Share |
A large, low-hanging chandelier is a stunning focal point, but it dictates your furniture layout. You can’t just float a sofa underneath it or place a coffee table off to the side; the fixture demands to be centered over your main seating arrangement. This works well in a dedicated formal living room but can be restrictive in a multi-purpose family room where you might want to rearrange furniture for holidays or parties. Before committing to a fixture this dominant, be sure you’re happy with a fixed furniture plan for the long haul.
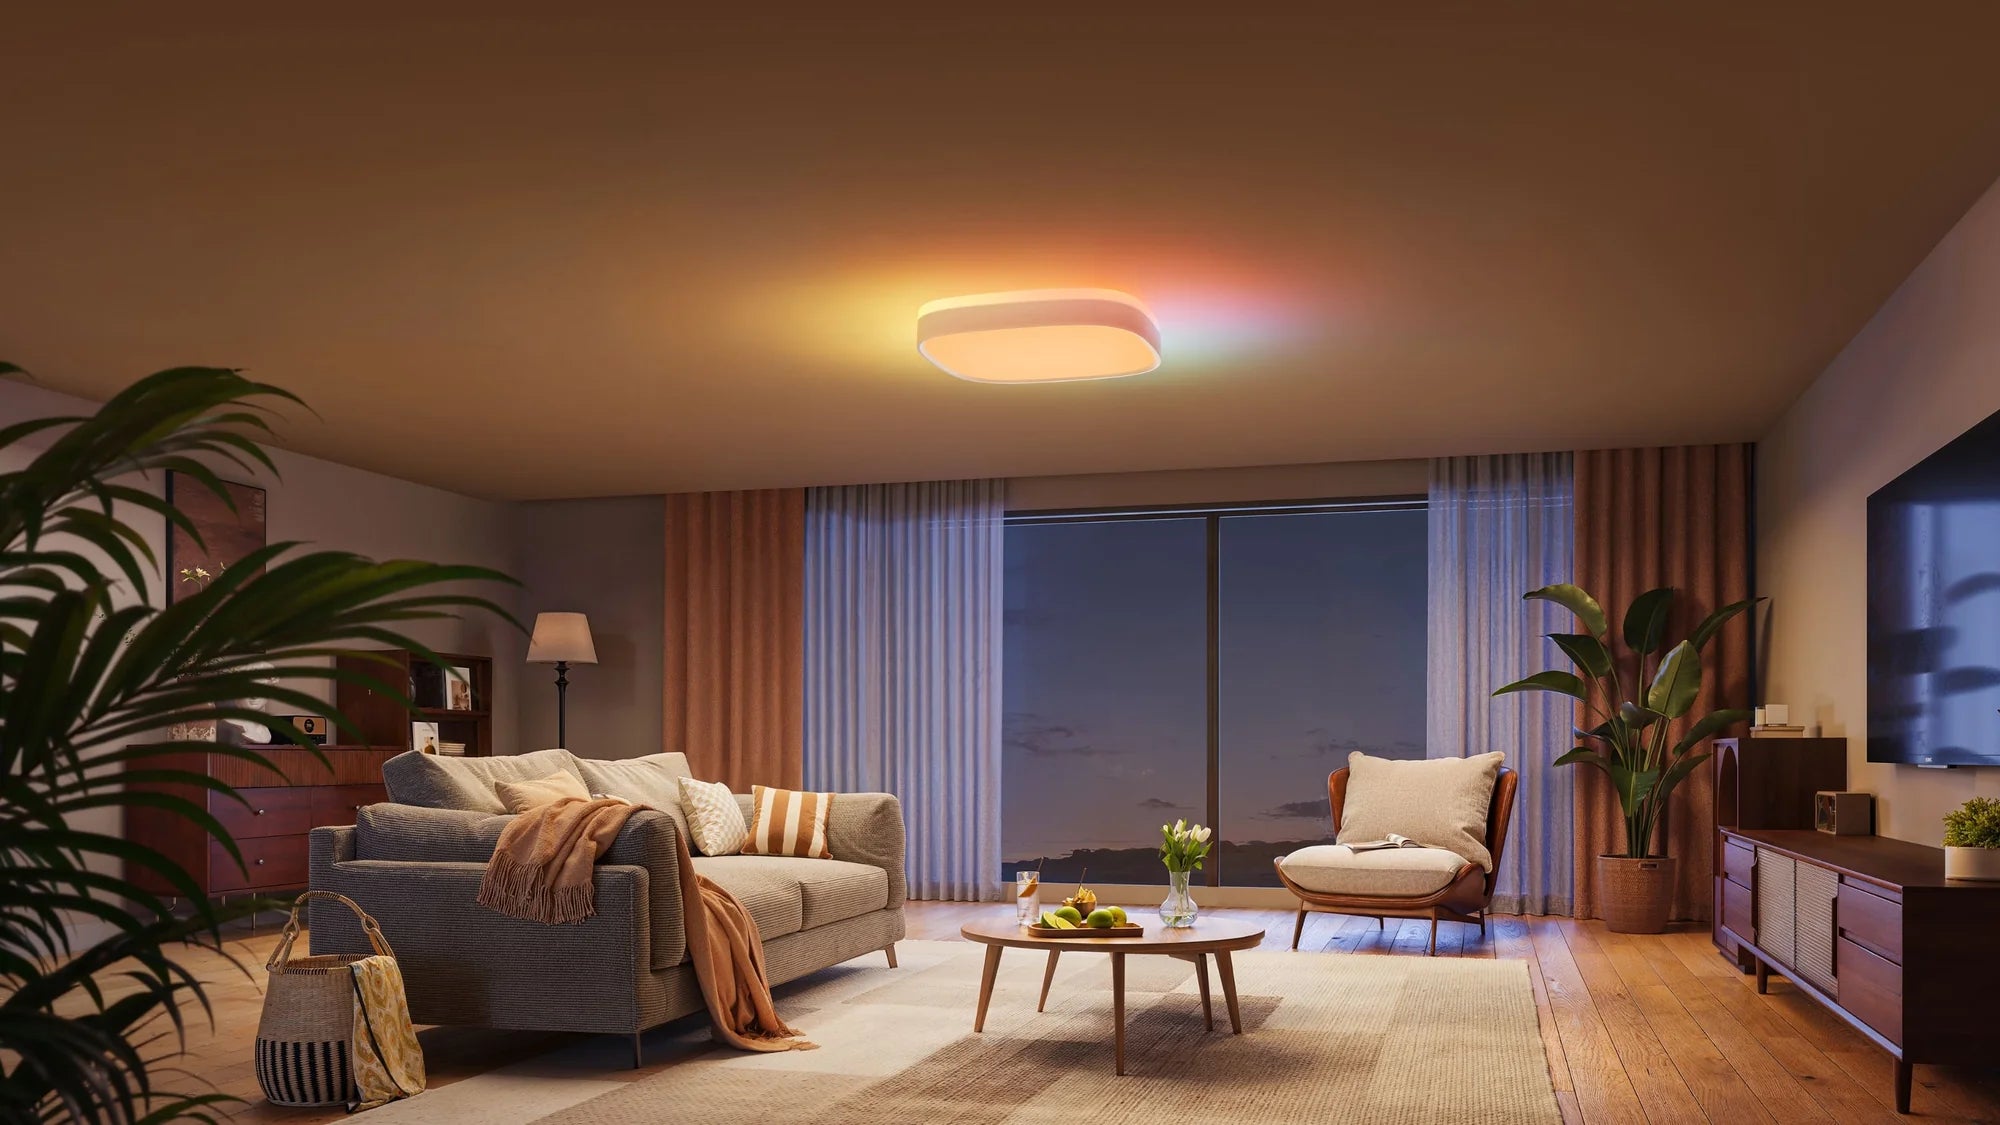
11. Living Room Featuring a Recessed Color-Changing Smart Light
The formula here is about creating a dynamic mood with minimal hardware. It’s 80% Neutral Foundation + 20% Digital Chromatics. The neutral foundation consists of the gray sofa, wooden furniture, and earthy-toned textiles. This calm, cohesive base acts as a perfect canvas. The magic comes from the 20%—the smart recessed light. It allows you to transform the entire feel of the room on demand, shifting from a vibrant party atmosphere to a calm, focused blue or a warm, sunset orange without changing a single physical object. It’s a high-tech approach to setting a mood.
|
📋 Copy HEX 🔗 Share |
Installing a recessed color-changing smart light is a great weekend DIY project. Here’s a basic overview:
- Safety First: Turn off the power to the corresponding circuit at your breaker box. ALWAYS. (Time: 2 mins)
- Prep the Spot: If replacing an old fixture, remove it. If it’s a new installation, use the template provided with your light kit to trace and cut a hole in the ceiling drywall. (Time: 30-60 mins)
- Wiring: Connect the smart light’s junction box to your home’s wiring, matching the black (hot), white (neutral), and copper/green (ground) wires and securing with wire nuts. (Time: 15 mins)
- Install and Pair: Push the junction box into the ceiling hole and clip the light fixture into place. Turn the power back on and follow the manufacturer’s app instructions to pair the light with your phone or smart home hub. (Time: 10 mins) (Material Cost: $50 – $150 per light)
12. Vertical Sconces Flanking a Mirror Over a Pedestal Sink
The success of this small space lies in its commitment to a cohesive material palette and elegant vertical lines. The repetition of the warm brass finish on the sconces, faucet, and towel bar creates a unified, high-end look. The verticality of the sconces and the paneling on the walls draws the eye upward, making the room feel taller than it is. This is a classic design trick that works every time. The soft green of the paneling provides a gentle, sophisticated color base that allows the brass and black accents to pop without overwhelming the senses. It feels polished and intentional.

|
📋 Copy HEX 🔗 Share |
You can capture this refined, traditional feeling for much less. Instead of custom paneling, look into paintable beadboard panels from a hardware store. A fresh coat of a soft green paint like Benjamin Moore’s “Hollingsworth Green” will do wonders. Search for similar vertical sconces and arched mirrors on sites like Wayfair or Amazon. For the faucet and towel bar, Kingston Brass and Delta offer more affordable options with a high-end look. A classic pedestal sink can often be found for a great price at big-box stores like Lowe’s. Compare this with the similar but more industrial look in Idea #4.
13. Symmetrical Living Room with Geometric Pendant Lights
The single element holding this entire room together is symmetry. It’s a powerful design tool that creates a sense of calm, order, and formality. The two matching geometric pendant lights are perfect mirror images, as are the two striped sofas facing each other. Even the table lamps at the far ends of the sofas are a matched pair. This rigorous symmetry allows the more varied elements, like the textured walls and the modular coffee table, to feel grounded and intentional rather than chaotic. Remove that symmetry, and the room’s entire composition would fall apart.
|
📋 Copy HEX 🔗 Share |
Before you commit to a perfectly symmetrical layout like this, double-check these crucial points:
- Measure your centerline: Is the room perfectly balanced? Ensure your windows, fireplace, or other architectural focal point is truly centered. If it’s off by even a few inches, a symmetrical layout will highlight the flaw.
- Check traffic flow: Will placing two sofas directly opposite each other create an awkward path for walking through the room? Ensure you have at least 36 inches for major walkways.
- Confirm your lighting placement: The junction boxes for those pendant lights need to be perfectly symmetrical. Moving a junction box is a job for an electrician and adds cost, so make sure the placement is right from the start.
14. Kitchen with Linear Suspension Lights and a Plank Ceiling
Here’s the visual recipe for this breezy, classic kitchen: 50% Crisp White + 30% Warm Wood + 20% Soft Color. The crisp white comes from the classic shaker cabinets and the plank ceiling, making the space feel bright and expansive. The warm wood tones of the floor and bar stools provide a necessary grounding element, adding natural texture and preventing the white from feeling too stark. The final 20% is that lovely pop of soft teal blue on the island base, which brings in personality and a coastal, homey feel. You could swap the teal for a sage green or a buttery yellow to achieve a similar effect.
|
📋 Copy HEX 🔗 Share |
Linear suspension lights are fantastic for evenly illuminating a long kitchen island, but be mindful of the light quality. Some fixtures with integrated LEDs can cast a very cool, almost bluish light that can make food and skin tones look unflattering. Look for fixtures that specify a warm color temperature (2700K to 3000K) and a high Color Rendering Index (CRI) of 90 or above. A high CRI ensures that colors in the room, from your cabinets to your vegetables, appear true and vibrant, not washed out or strange.
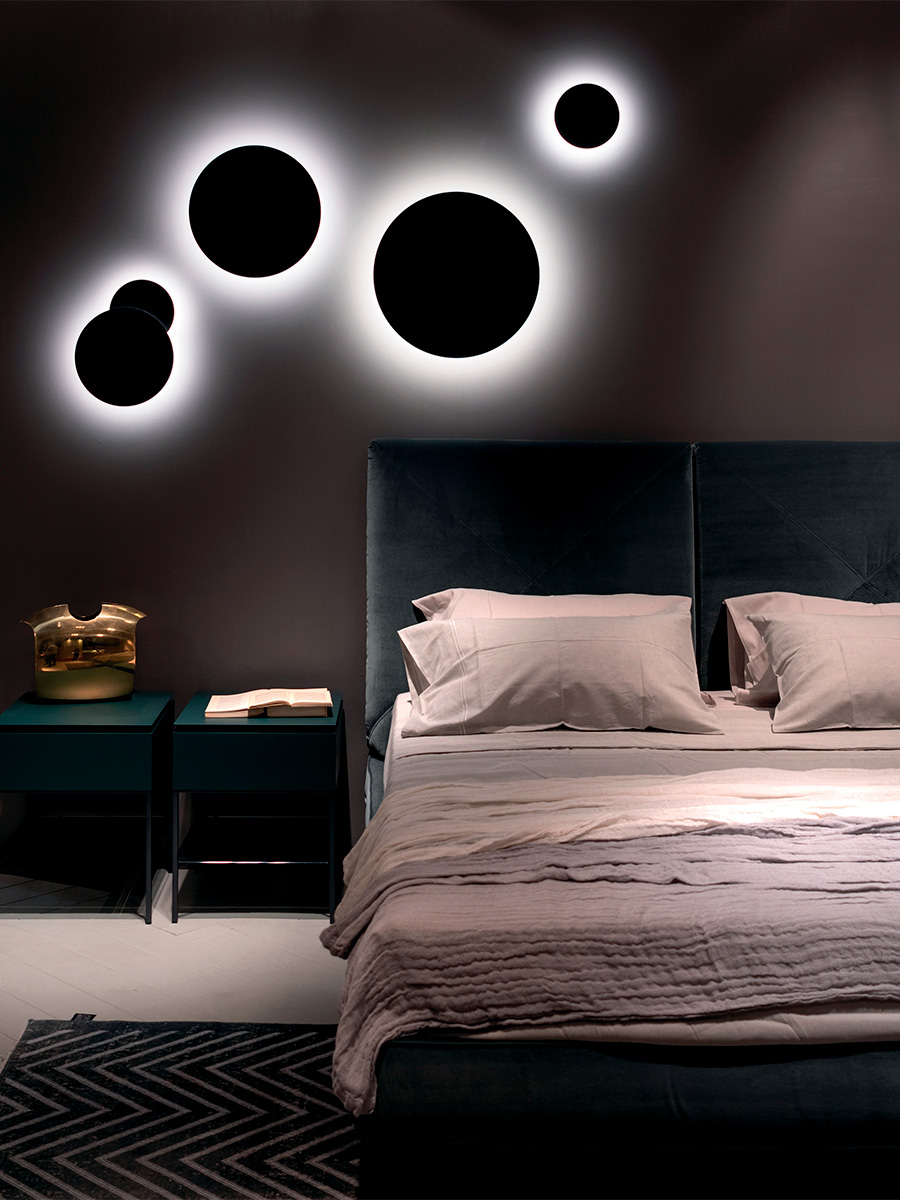
15. Bedroom Wall Featuring a Cluster of Circular Backlit Sconces
This dramatic feature wall is easier to create than it looks. Here’s a quick guide:
|
📋 Copy HEX 🔗 Share |
- Plan Your Layout: Arrange the different-sized circular sconces on the floor first to get a composition you love. Take a picture with your phone. A good starting point is to have the largest one slightly off-center and cluster the smaller ones around it. (Time: 15 mins)
- Mark and Wire: Transfer your layout to the wall, marking the center for each sconce. This step requires an electrician to run wiring to each location from a single switch. This is the most complex part of the job. (Time: 2-4 hours, professional help needed)
- Patch and Paint: After the wiring is done, you’ll need to patch the drywall and paint the entire wall in your desired dark, moody color. (Time: 2-3 hours)
- Install and Enjoy: Once the paint is dry, mount the sconces to their respective junction boxes. The final result is a custom art installation that doubles as ambient lighting. (Material Cost: $300 – $800+ for sconces)
When creating a lighting installation like this, the key is to use fixtures that provide indirect, back-lit light. The goal isn’t to illuminate the room but to create a soft, ethereal glow that highlights the shapes of the fixtures themselves. This is mood lighting at its finest. Always connect them to a dimmer switch. This allows you to dial the intensity way down for a subtle, pre-sleep ambiance or turn it up slightly to make more of a statement when you have guests. Full brightness is rarely the goal with a feature like this.
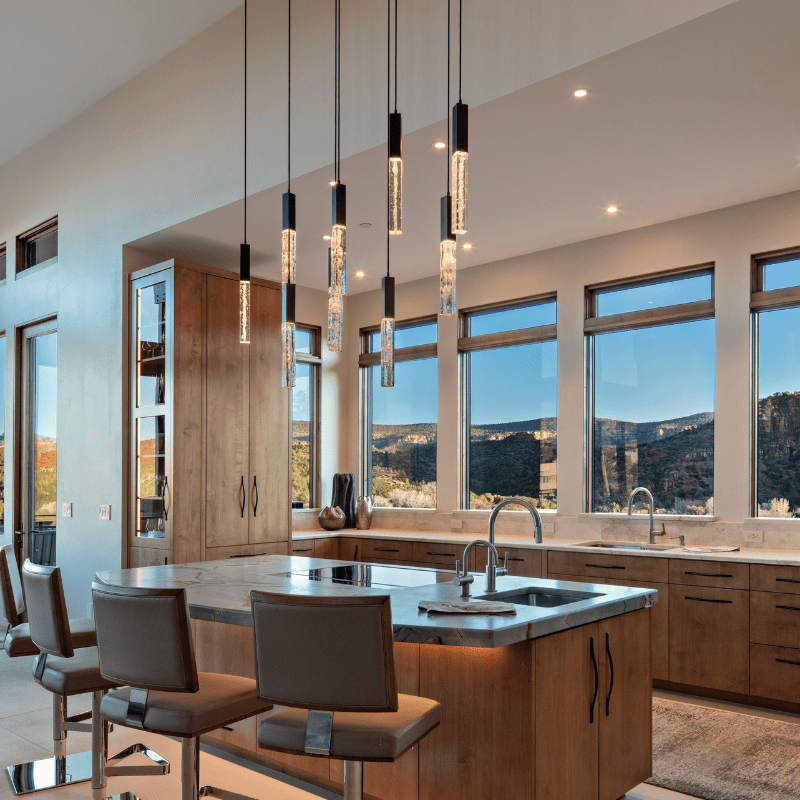
16. Modern Kitchen with Textured Glass Cylinder Pendants
This kitchen’s lighting succeeds through the principle of repetition. The design uses a long row of eight individual pendant lights instead of two or three larger ones. This repetition creates a powerful visual rhythm that draws your eye down the length of the expansive island. The choice of clear, textured glass is also key. The glass allows light to pass through without creating a heavy visual barrier, preserving the open, panoramic view through the windows. The texture adds a layer of subtle detail and refracts the light beautifully, preventing the glare that can come from a simple clear glass shade.
|
📋 Copy HEX 🔗 Share |
While a row of individual glass pendants looks sleek and modern, it also means more surfaces to clean. Kitchens generate grease and dust, which will inevitably create a film on those glass cylinders. To keep them looking crystal clear, plan on cleaning them every 1-2 months. Using a microfiber cloth with a bit of glass cleaner or a vinegar-water solution is effective. Because there are eight of them, this task will be more time-consuming than cleaning a simpler fixture, but it’s crucial for keeping the look sharp and the light bright.
17. Open-Plan Living with a Mix of Recessed, Strip, and Pendant Lights
The formula for this chic, multi-zone space is all about layering finishes and light sources. Let’s call it 60% Cool Neutrals + 30% Warm Metallics + 10% Bold Color. The cool neutrals are the white surfaces and light grey/taupe upholstery, which create a calm, expansive backdrop. The warm gold/brass tones in the spherical pendants, sconces, and other details provide the crucial warmth and sense of luxury. The final 10% is the pop of rich blue in the chairs, which adds personality and a focal point. This balanced approach ensures the space feels cohesive yet visually interesting.
|
📋 Copy HEX 🔗 Share |
Integrated lighting—like the under-cabinet strips and the linear ceiling fixtures seen here—is a huge trend driven by a desire for cleaner, more architectural design. Instead of seeing the light source, you just see the effect of the light itself. It makes a space feel high-end and custom. Homeowners on Pinterest are moving away from purely decorative fixtures and embracing these built-in solutions that highlight the forms of the room, like washing a wall in light or making cabinets appear to float. It’s a more subtle, sophisticated approach to illumination.
18. Modern Living Room with Layered Ambient and Accent Lighting
The single element that truly defines this room’s luxurious atmosphere is the backlit wall paneling and shelving. While the chandelier is a beautiful focal point, the integrated backlighting is what creates that high-end, custom-designed feel. It turns standard architectural features into sources of soft, ambient light, adding incredible depth and warmth. It highlights the texture of the fluted panels and makes the displayed objects on the shelves pop. This technique is what separates a nicely decorated room from a truly designer space. It’s subtle, sophisticated, and incredibly effective.
|
📋 Copy HEX 🔗 Share |
- Main Furniture (Sofa, Coffee Table): $4,000 – $10,000
- Lighting (Chandelier, Recessed, Linear): $2,500 – $7,000
- Wall Treatments (Marble, Paneling, Backlighting): $6,000 – $15,000+
- Rug & Decor: $1,000 – $3,000
- TOTAL: $13,500 – $35,000+
- Budget alternative: Get a similar feel by using a dramatic plug-in chandelier from CB2, finding a large neutral sofa on Facebook Marketplace, and using peel-and-stick fluted panels or marble-effect contact paper for accent walls. You could achieve a similar vibe for around $4,000 – $7,000.
19. Open-Plan Space with Recessed Spotlights and Cove Lighting
This extensive use of cove and recessed lighting is best suited for large, open-plan spaces with ceilings of 9 feet or higher. The multi-tiered ceiling design itself requires a certain amount of vertical space to be effective, typically taking up at least 6-12 inches of height. In a room with low ceilings, this would feel oppressive. The combined brightness from so many sources is ideal for a large area (400+ sq ft) that needs consistent, even illumination throughout, connecting a living zone, dining zone, and kitchen without any dark spots.

|
📋 Copy HEX 🔗 Share |
To avoid a sterile, office-like environment with so many lights, put everything on a dimmer. And I mean everything. The cove lighting, the recessed spotlights, the pendants, and the table lamps should all have their own separate dimmer controls. This gives you ultimate flexibility to craft different moods. For a dinner party, you might have the coves and pendants at 70% and the spotlights at 20%. For a cozy movie night, you might turn everything off except the table lamps and the cove lighting, dimmed down to 10%. This level of control is what turns a brightly lit space into a beautifully lit home.
20. Modern Minimal Living Room with Paper Pendants and a Floor Lamp
This room feels so calming because of its masterful use of soft, diffused light and a restrained color palette. The cluster of paper-like spherical pendants provides a gentle, all-over ambient glow, much like a Japanese lantern. There are no harsh shadows here. The tall floor lamp adds a second layer of light that is more focused but still soft, thanks to its conical shades. The light wood floors, light grey sofa, and muted artwork all work together to reflect this gentle light around the room, creating an atmosphere of serene minimalism. The strategic pops of black and gold add just enough contrast to keep it interesting.
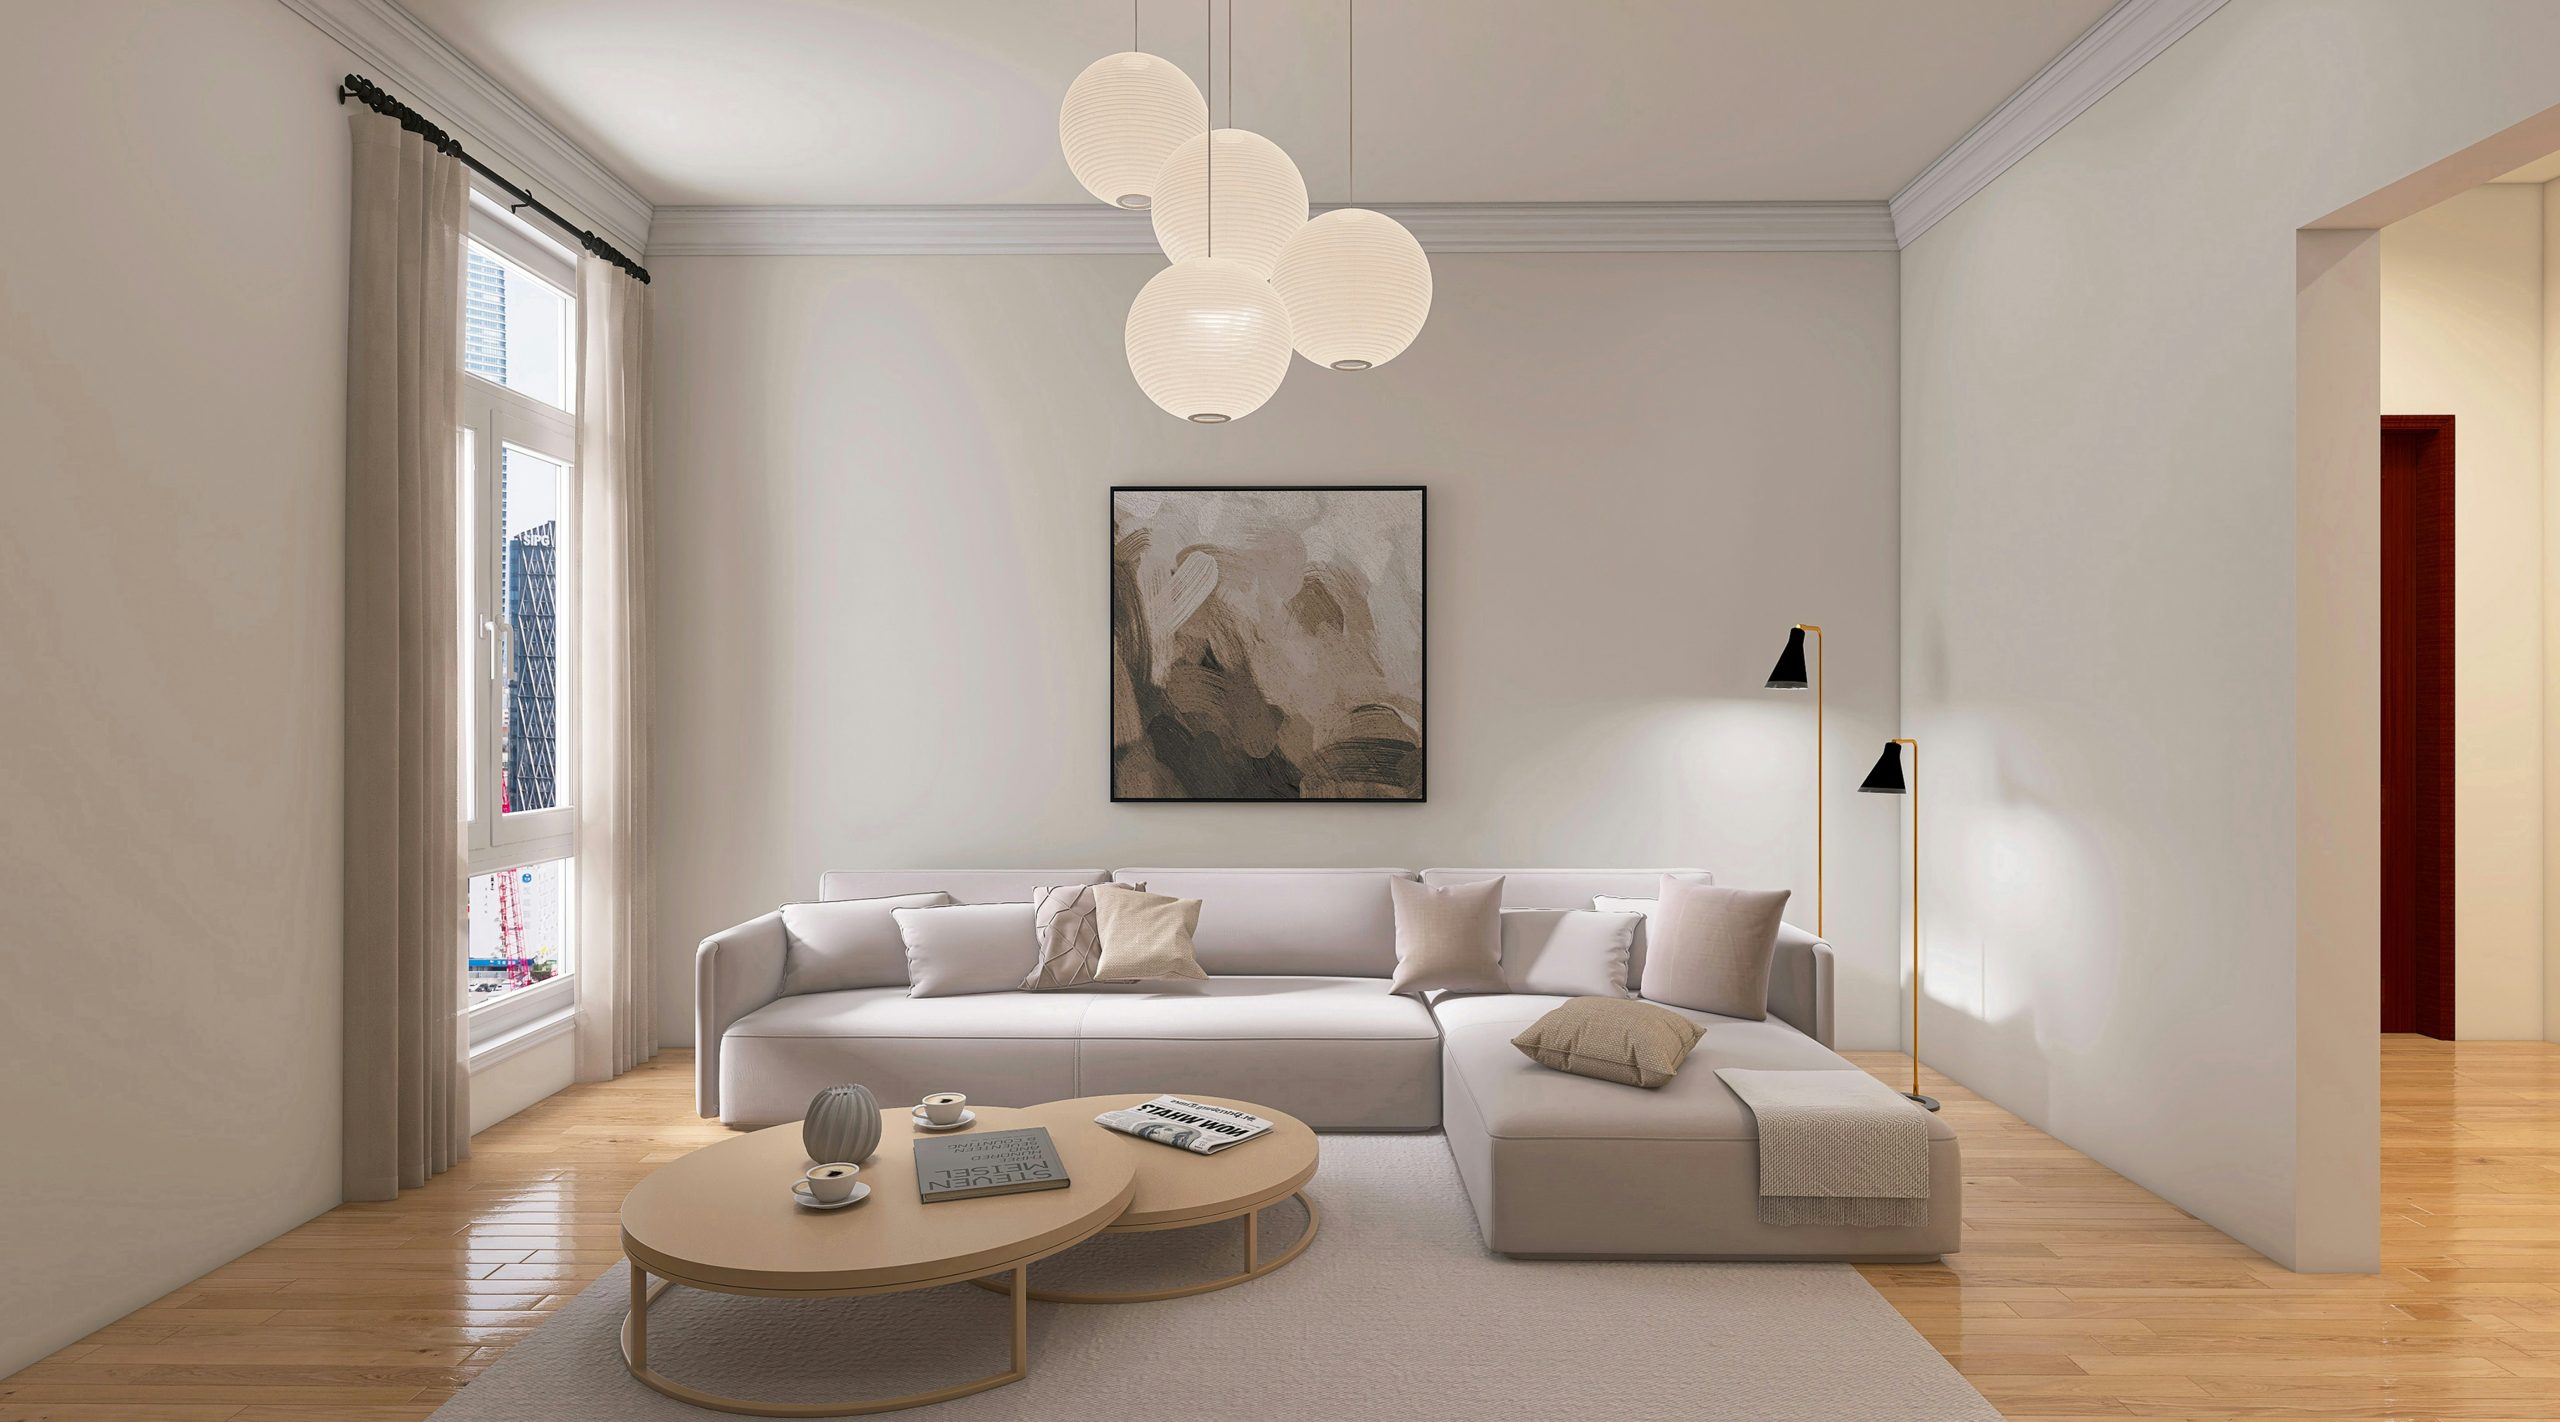
|
📋 Copy HEX 🔗 Share |
This serene and modern look is very achievable on a budget. The sectional is reminiscent of IKEA’s SÖDERHAMN or KIVIK series, which are perennial favorites for a reason. The paper lantern pendants are a clear nod to Isamu Noguchi’s Akari lamps, but you can find very similar and affordable versions at stores like IKEA (the REGOLIT is a classic) or even on Amazon. For the floor lamp, look to Target’s Studio McGee or Threshold collections, which often feature similar black and gold designs. An abstract canvas from HomeGoods or Society6 can complete the look without the gallery price tag.
21. Two-Story Living Room with a Cascading Bulb Chandelier
A dramatic, multi-bulb chandelier like this is specifically designed for spaces with high or multi-story ceilings. It absolutely requires a ceiling height of at least 15 feet to have the intended cascading effect without overwhelming the seating area below. The bottom of the fixture should hang no lower than 7-8 feet from the floor if people will be walking under it, but it can hang lower if it’s directly over a coffee table, as seen here. This fixture would look completely out of place and comically large in a room with standard 8 or 9-foot ceilings.
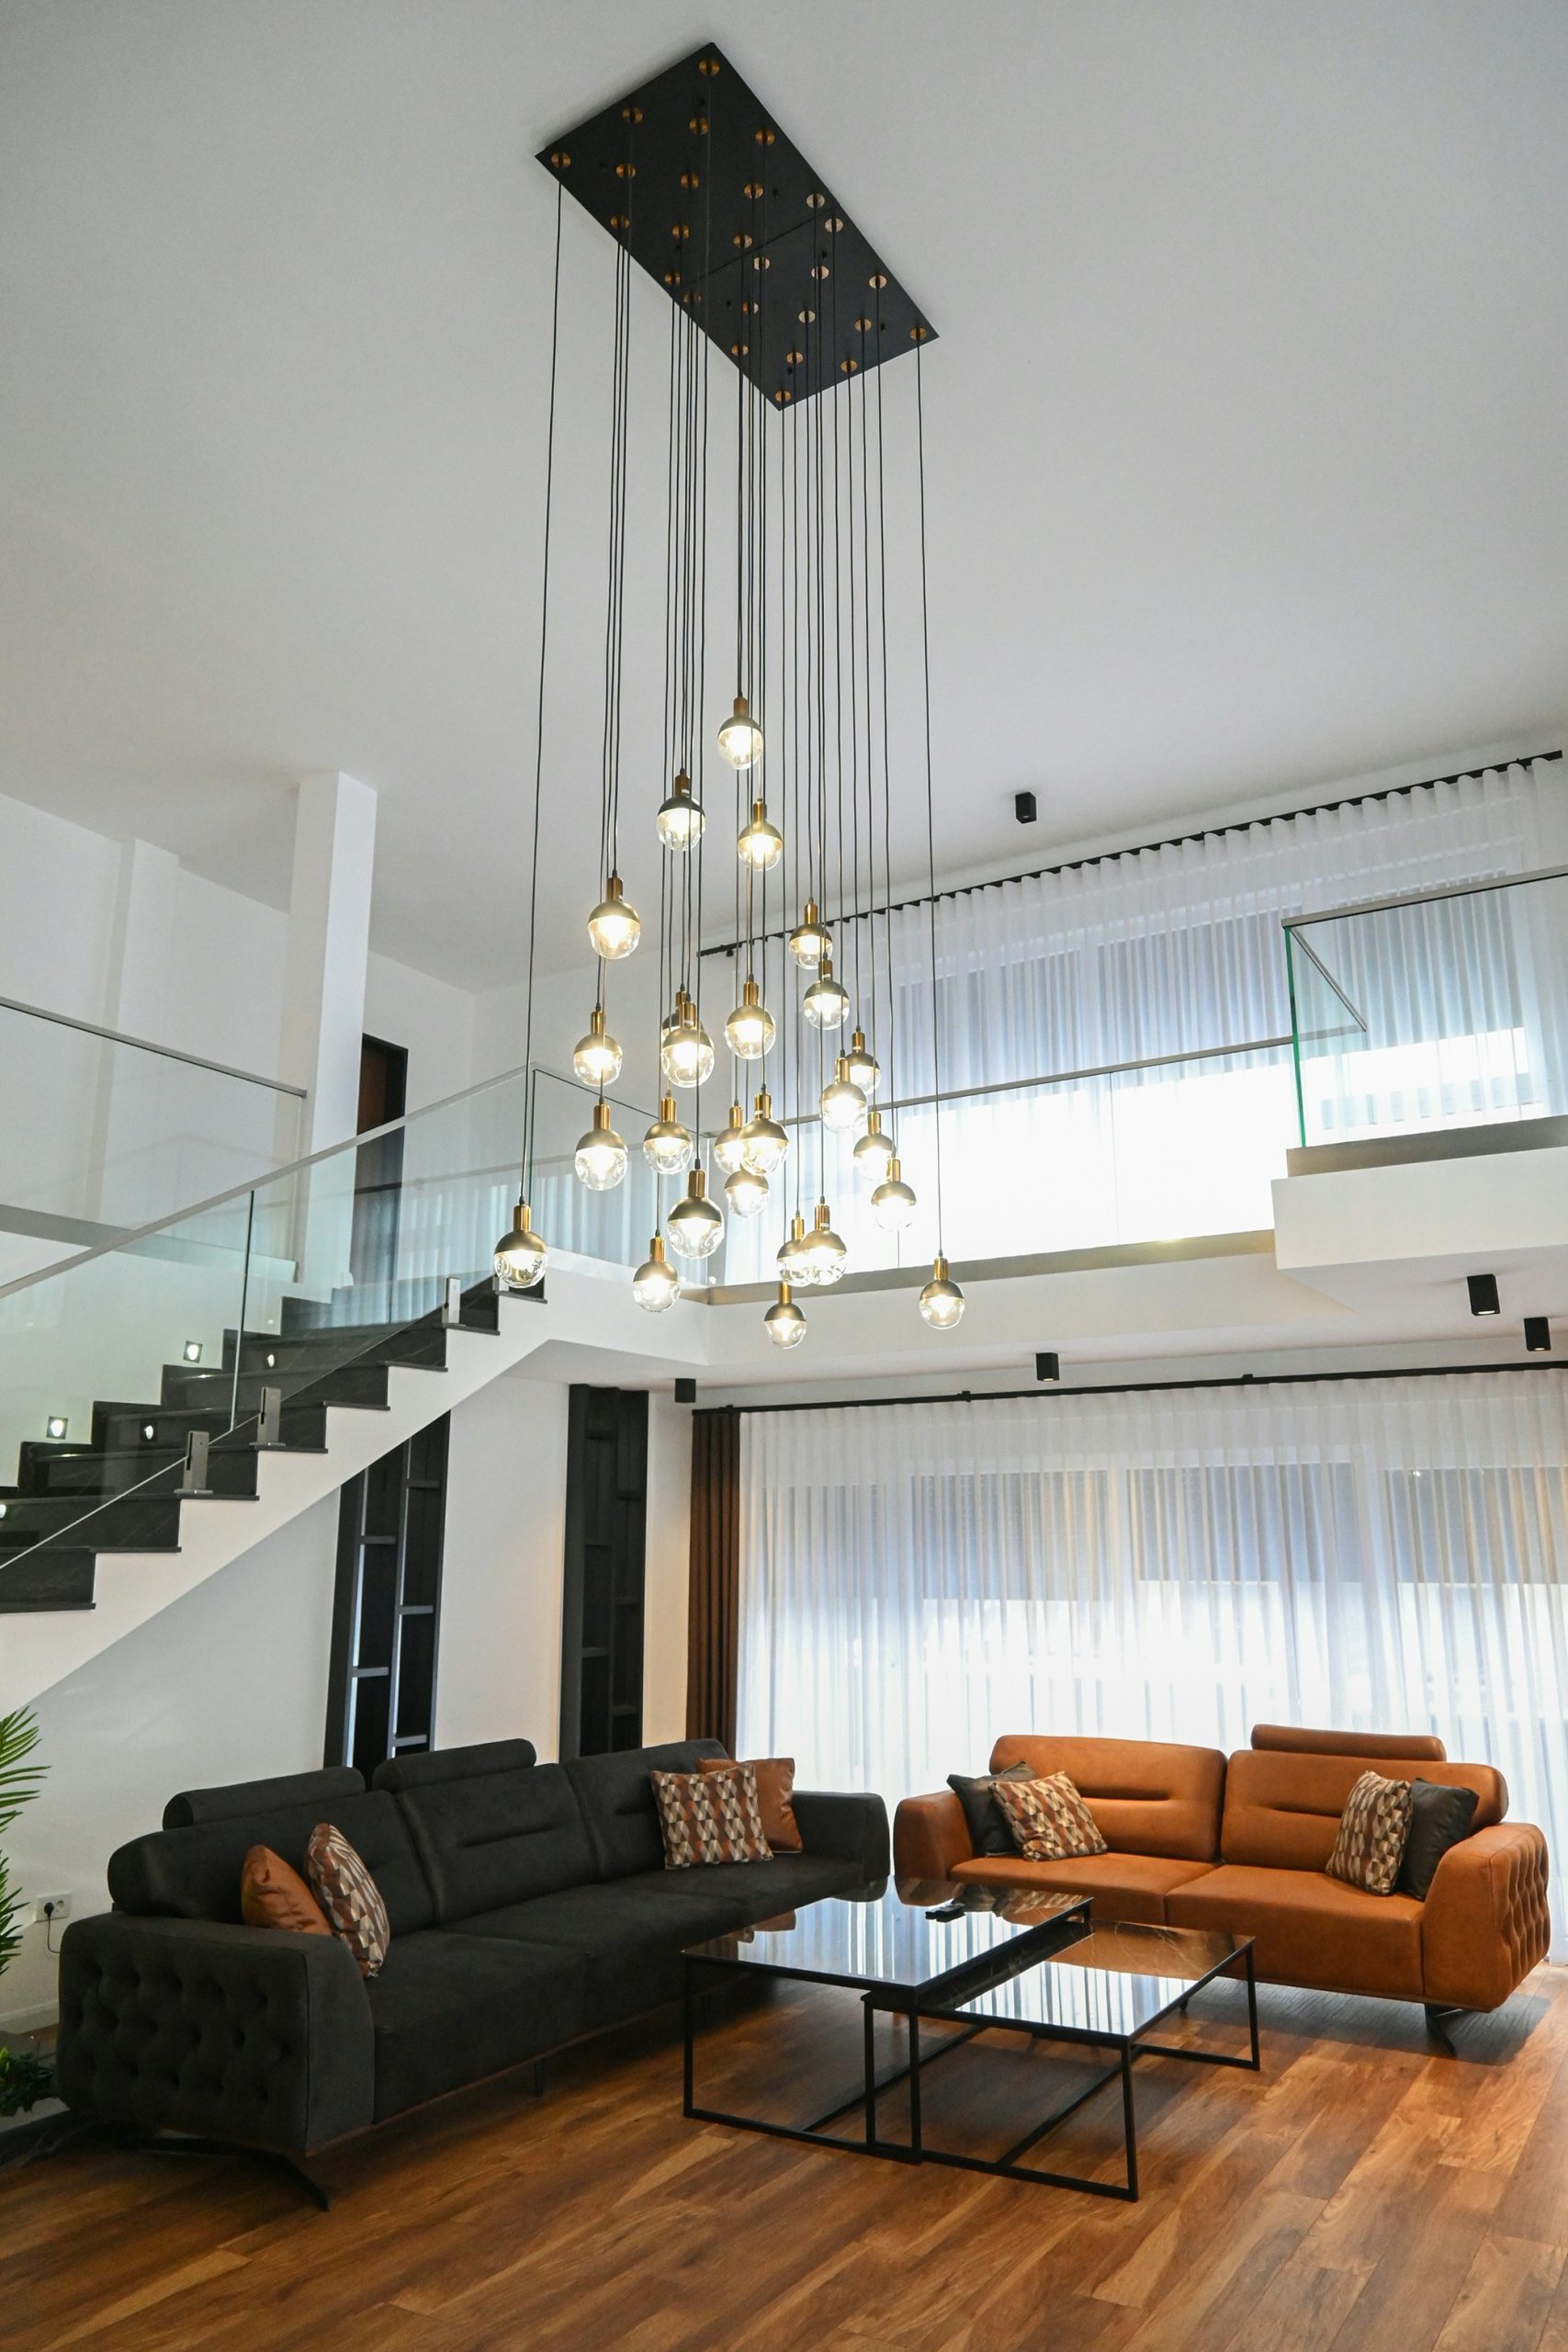
|
📋 Copy HEX 🔗 Share |
Changing the lightbulbs in a fixture this high and complex is not a simple task. You will need a very tall A-frame ladder (likely 12-16 feet) and a steady hand. Given the number of individual bulbs, this isn’t a 5-minute job, and depending on your comfort with heights, you might need to hire a handyman or electrician to do it for you. To minimize this hassle, invest in high-quality, long-life LED filament bulbs from the start. They may cost more upfront, but they can last for 15,000 hours or more, meaning you might only have to tackle this job once a decade.
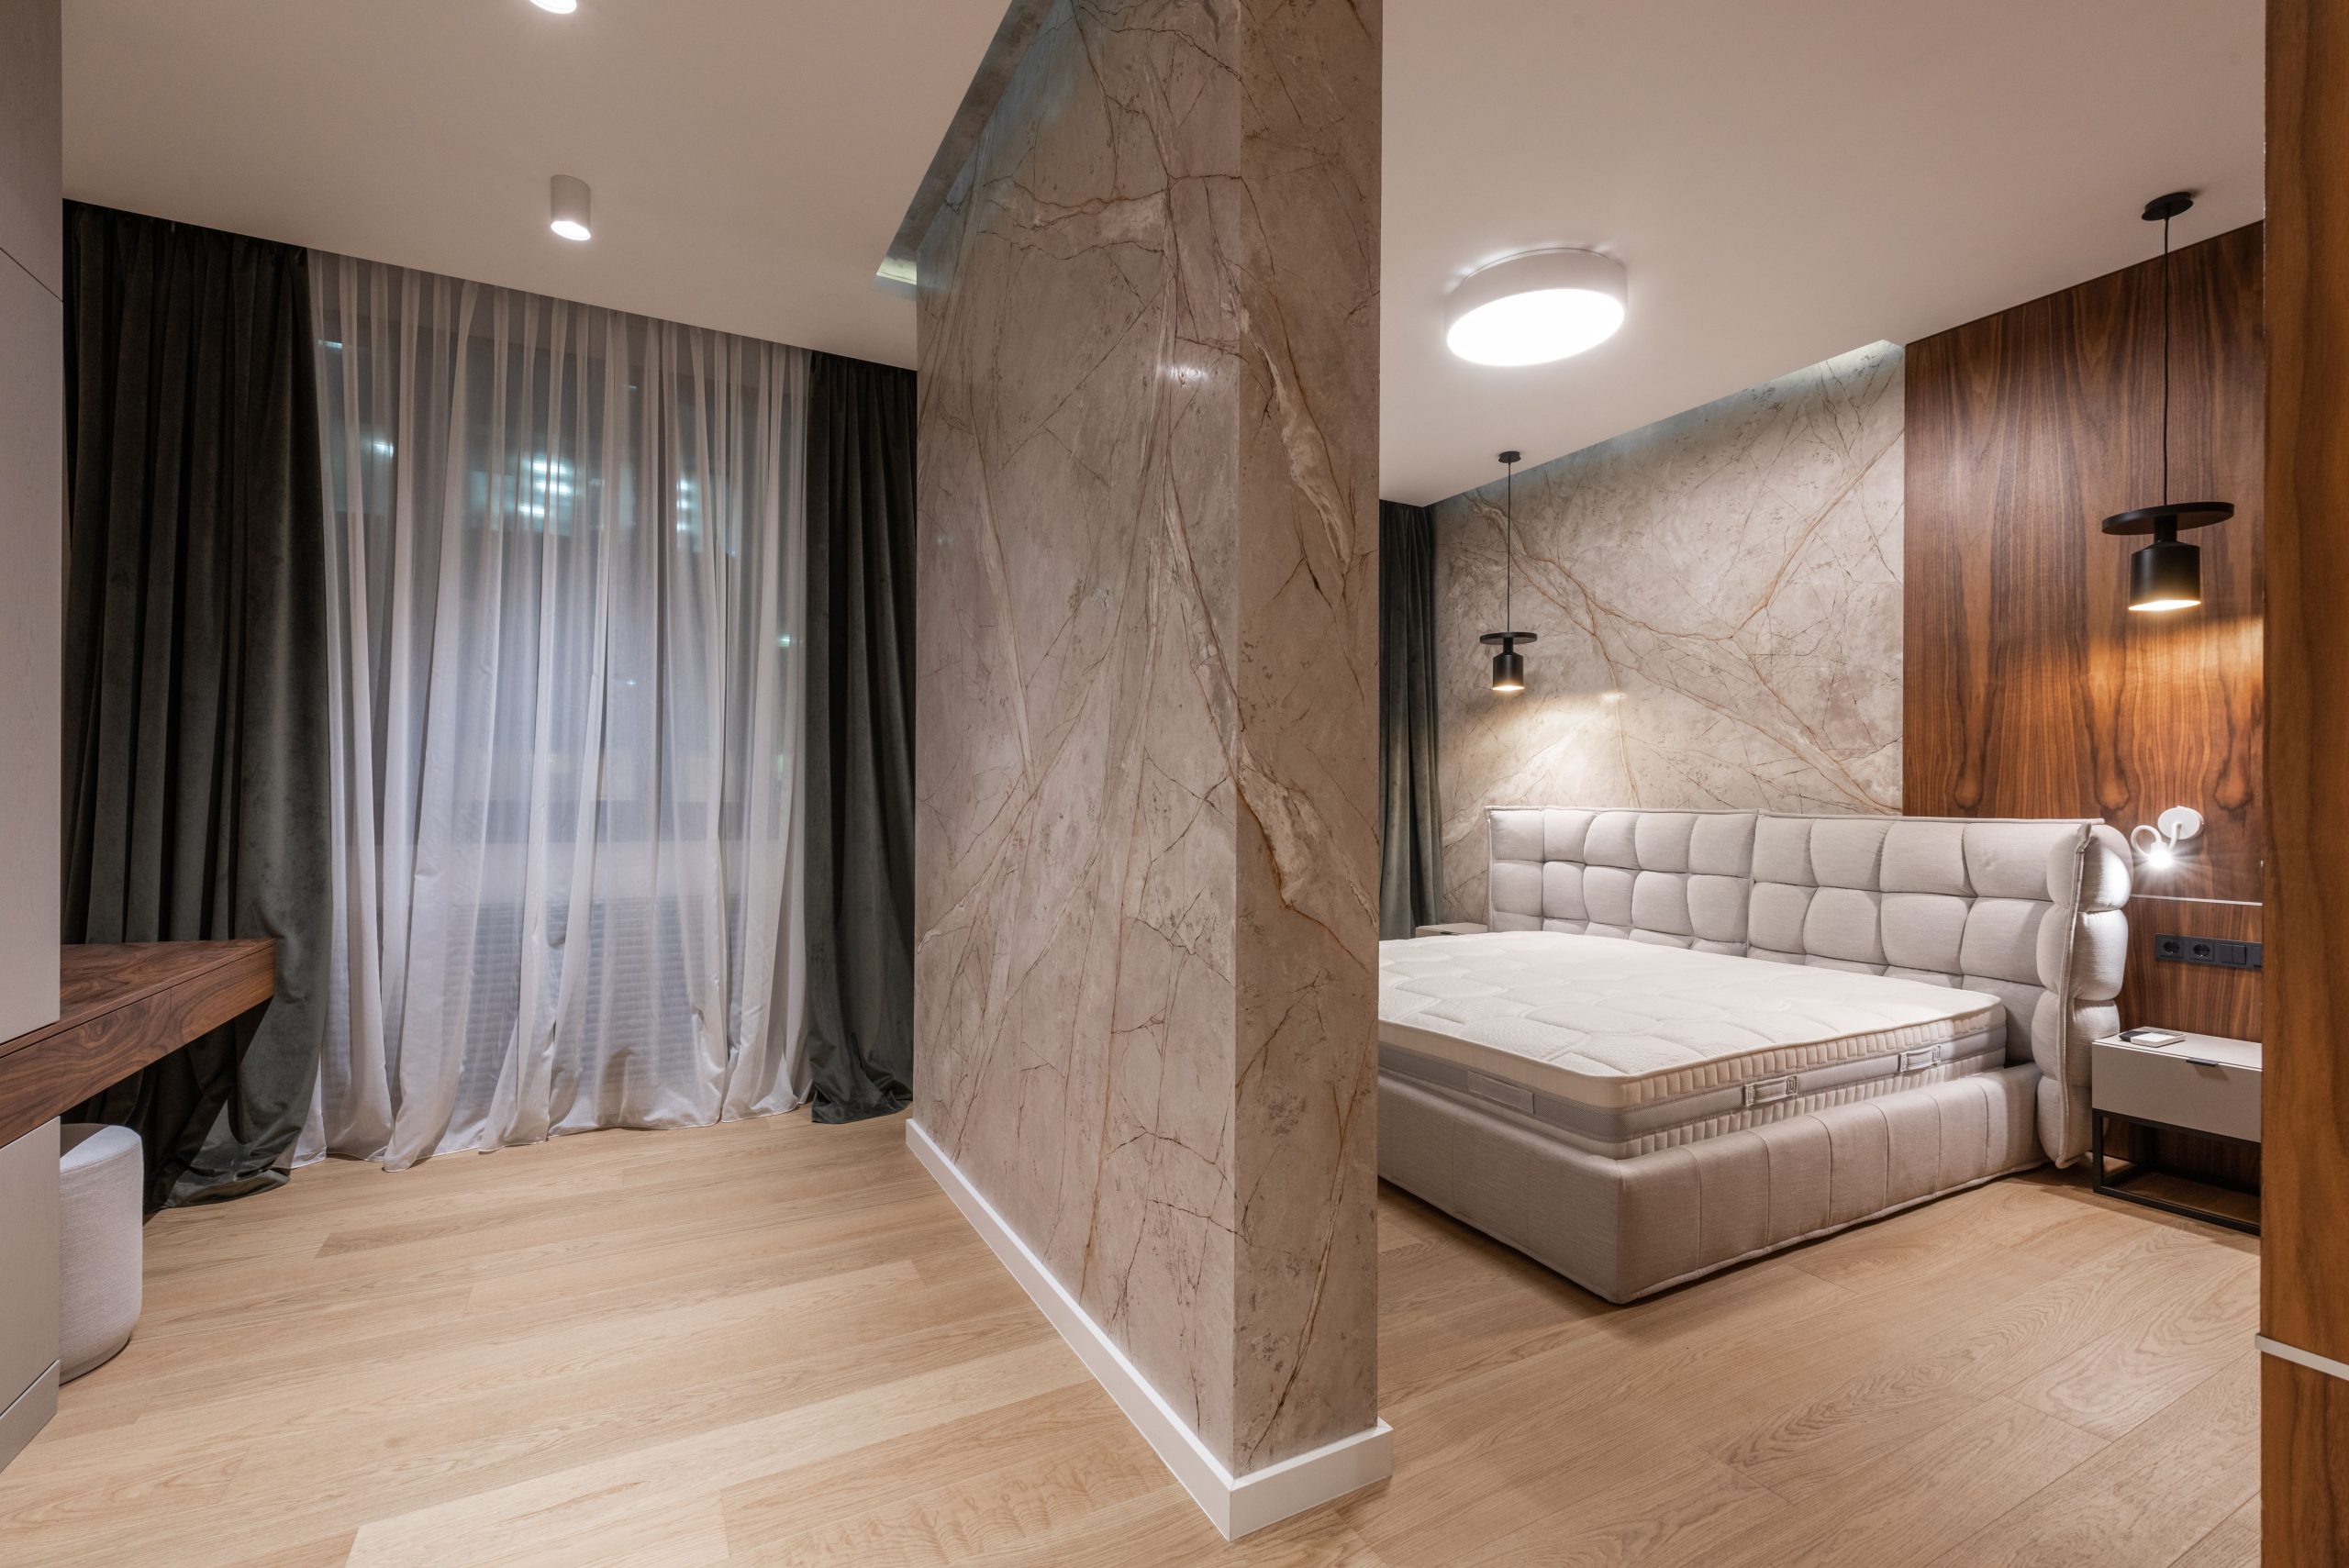
22. Contemporary Bedroom with a Stone Accent Wall and Layered Lighting
When lighting a textured accent wall, like this marble-look stone, the key is to use “grazing” light. By placing the ceiling spotlights close to the wall (about 12-18 inches away), the light hits the surface at a steep angle. This technique dramatically highlights the texture, creating beautiful shadows and depth that a light source further away would wash out. The pendant lights provide the more general, ambient light for the bedside, but those spotlights are what make the accent wall the true star of the show. It’s a purposeful and dramatic choice.
|
📋 Copy HEX 🔗 Share |
This room’s sophisticated palette can be broken down into a simple formula: 60% Soft Neutrals + 30% Dark Drama + 10% Natural Texture. The soft neutrals are the light beige tones of the upholstered bed and the stone accent wall. This creates a calm and inviting base. The dark drama comes from the black pendant lights and the deep brown of the curtains and wood paneling, which add contrast and a sense of refined elegance. The final 10% is the natural wood flooring, which adds warmth and organic texture to ground the space.
23. Modern Dining Area with Perimeter Cove and a Central Chandelier
This lighting design is effective because it perfectly marries ambient and decorative lighting. The rectangular LED cove lighting running along the perimeter of the ceiling provides flawless, indirect ambient light. It washes the room in a soft, even glow and makes the ceiling appear to float, enhancing the sense of space. At the same time, the large, geometric chandelier over the dining table acts as a stunning focal point and a piece of sculpture. It provides more direct, intimate light for the dining area. Neither one competes with the other; they work in perfect harmony.
|
📋 Copy HEX 🔗 Share |
The single element that makes this room feel truly high-end and custom is the ceiling perimeter cove lighting. While the chandelier is beautiful, it’s a fixture you can buy. The cove lighting is an architectural feature that is integrated directly into the home’s design. It requires planning and construction, and that level of integration is a hallmark of luxury design. It’s what creates the seamless, glowing ambiance that you can’t achieve by simply adding more lamps. It’s the difference between decorating a room and designing a space.
24. Modern Open Plan with a Gold Spherical Chandelier
A common mistake in open-plan layouts is trying to light the entire space with one type of fixture, like only recessed lights. While this room has plenty of those for general illumination, it wisely uses a decorative chandelier to define the dining zone. This creates a visual anchor, making the dining area feel like a distinct ‘room’ within the larger space. Without the chandelier, the dining table would feel like it’s just floating. The same principle applies in Idea #1, where pendants define the island. It’s a crucial tool for creating intimacy and structure in an open concept.

|
📋 Copy HEX 🔗 Share |
When selecting a chandelier for your dining area, size matters. A common mistake is choosing a fixture that’s too small. A good guideline is to choose a chandelier with a diameter that is about 1/2 to 2/3 the width of your dining table. For example, a 42-inch wide table would look best with a chandelier that is 21 to 28 inches in diameter. Also, the bottom of the chandelier should hang approximately 30-36 inches above the tabletop to illuminate the space without obstructing views across the table.
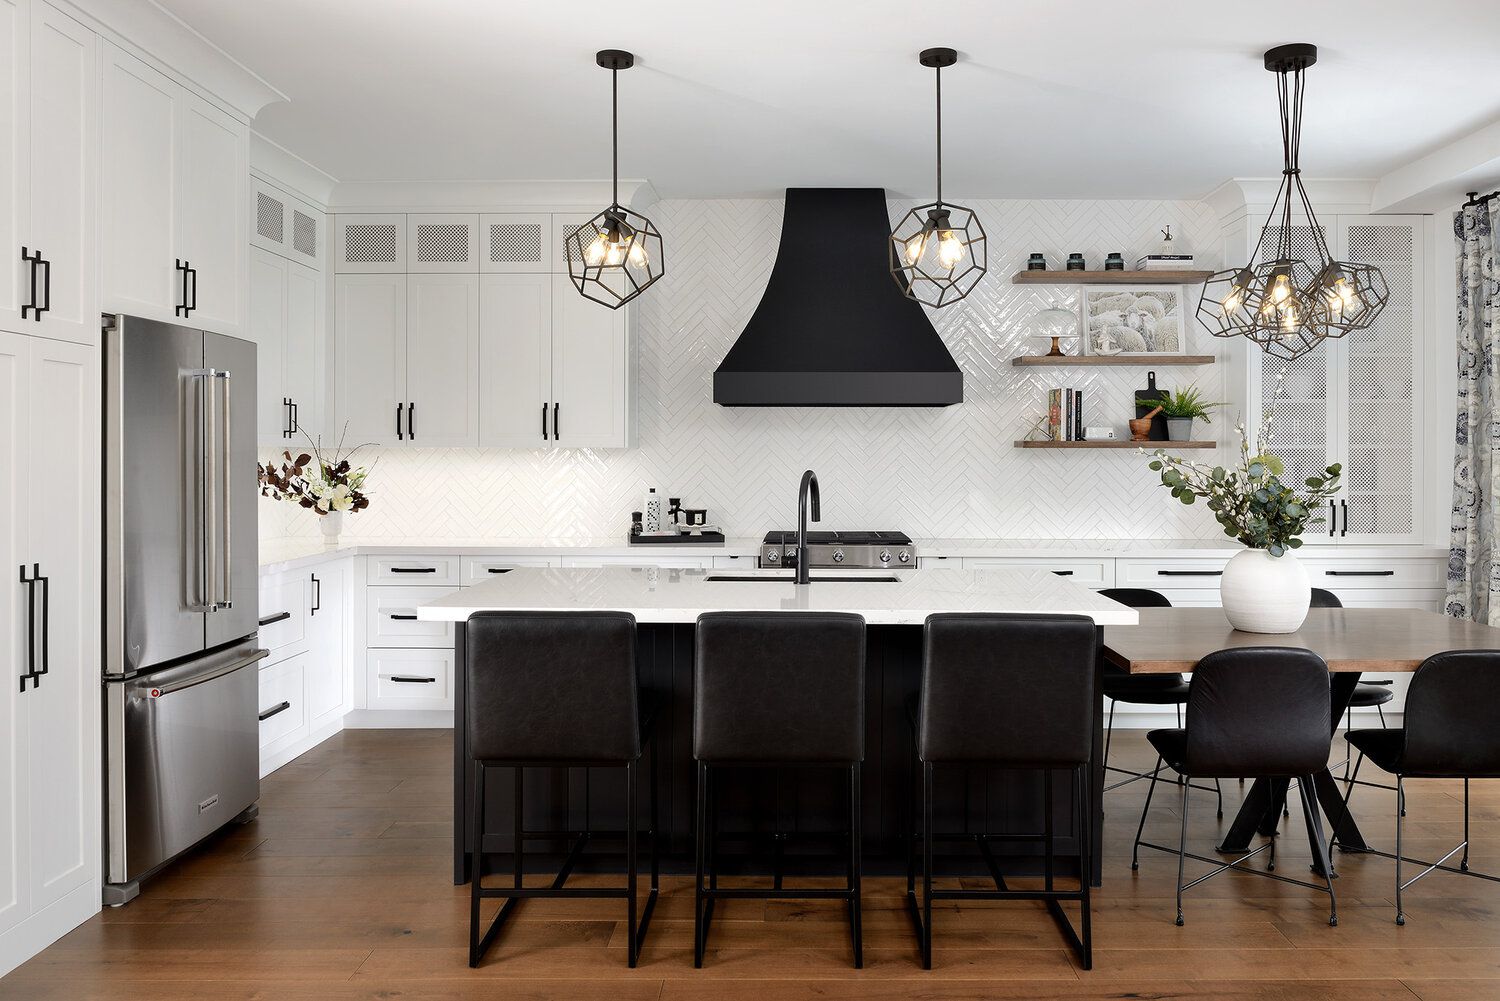
25. Black and White Kitchen with Geometric Wireframe Pendants
This kitchen’s strong graphic appeal comes from the powerful use of contrast and repetition. The stark difference between the matte black elements (pendant lights, hood, island, hardware) and the crisp white surfaces (cabinets, backsplash, countertops) creates a clean, high-energy look. The repetition of the geometric wireframe shape in the pendant lights provides a visual rhythm and a focal point. The herringbone pattern of the backsplash adds another layer of geometric texture, keeping the black-and-white theme from feeling flat. It’s a bold, confident design.
|
📋 Copy HEX 🔗 Share |
Before you commit to a high-contrast, black-and-white kitchen, think about these key details:
- Sheen Levels: Matte black finishes are very trendy but can show fingerprints and grease more than satin or semi-gloss. Consider high-use items like cabinet pulls carefully. Similarly, decide if you want glossy or matte tiles and countertops, as it will affect how light plays in the room.
- Lighting Temperature: The color temperature of your bulbs is critical. A cool white light (4000K+) will make the space feel stark and modern, while a warm white light (2700K-3000K) will soften the contrast and make it feel more inviting.
- Grout Color: For that white herringbone backsplash, are you using white grout for a subtle look, or gray or black grout to emphasize the pattern and tie into the black accents? This small choice makes a huge impact.
26. Modern Bedroom with Multiple Layers of Coordinated Lighting
The standout feature here is the thoughtful coordination of different lighting fixtures that share a common design language. You have the ring-shaped central pendants, the geometric black pendants flanking the bed, and the simple recessed spotlights. They are all different, serving different functions (ambient, task, accent), but they all feel like they belong to the same family. They share a modern aesthetic, a clean-lined profile, and a restrained color palette. This is what creates a truly cohesive and professionally designed feel, as opposed to just picking a bunch of random lights you like.
![Ceiling Mood Lighting Ideas 25 Bedroom Lighting Ideas For Every Mood [June 2026]](https://placeideal.com/wp-content/uploads/2026/06/ceiling-mood-lighting-ideas-25-bedroom-l-2.jpg)
|
📋 Copy HEX 🔗 Share |
This layered lighting approach works best in a primary bedroom with generous proportions, likely at least 15×15 feet. You need enough ceiling space to accommodate both central pendants and recessed spotlights without them feeling crowded. The use of separate pendant lights flanking the bed instead of table lamps requires a wide-enough wall to prevent them from feeling cramped next to the headboard. The scale here is key; trying to force this many fixtures into a small 10×12-foot bedroom would overwhelm the space and look cluttered.
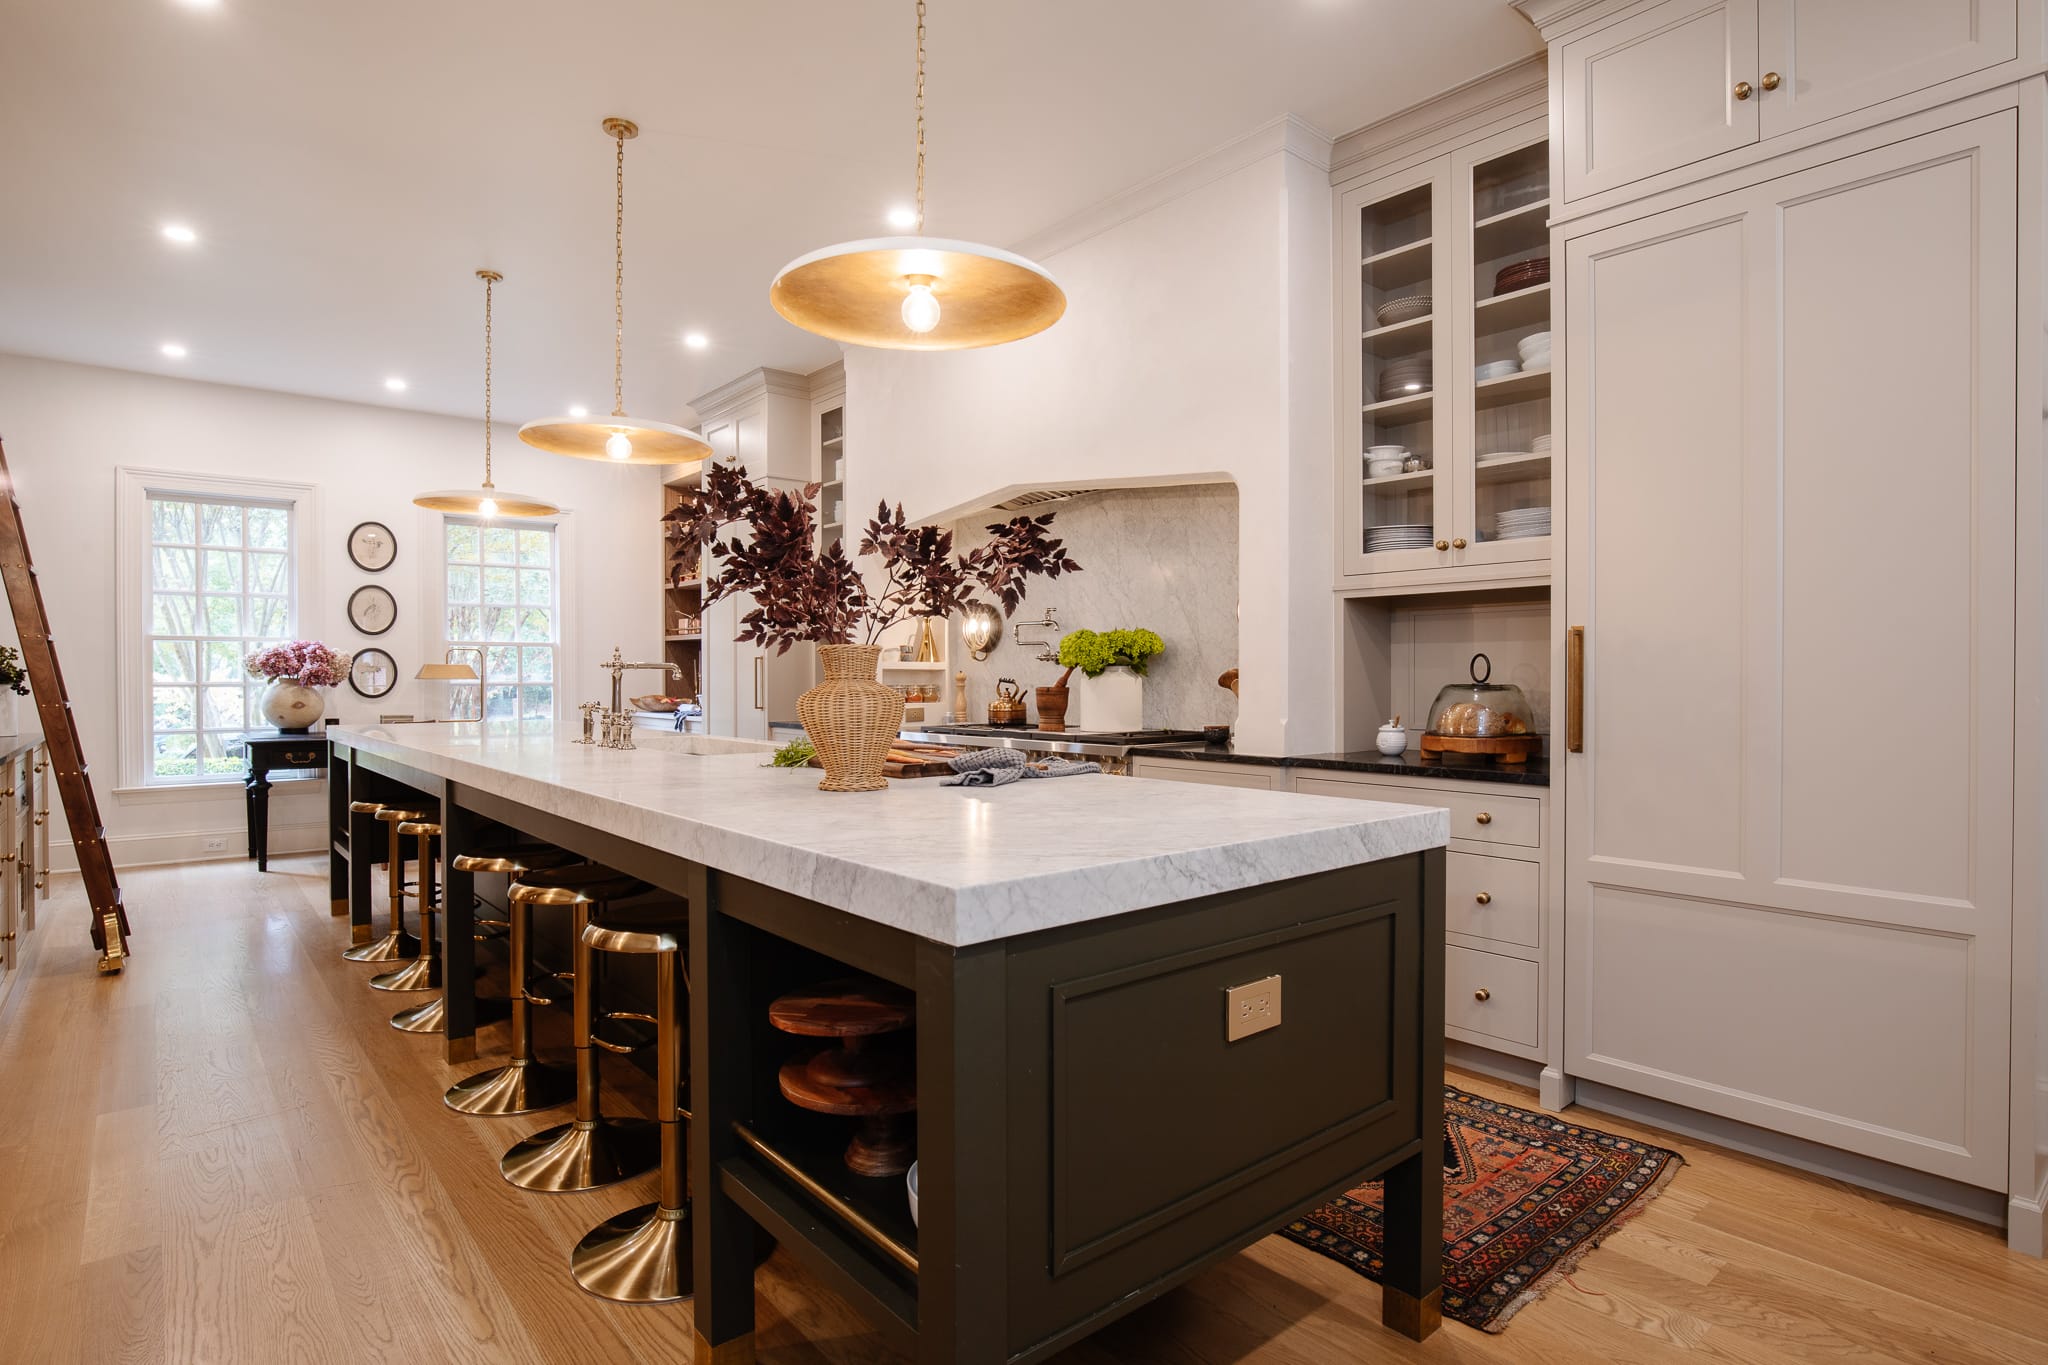
27. Layered Kitchen Lighting with Glass Pendants and Track Lights
- Main Furniture (Custom Cabinetry): $10,000 – $20,000
- Lighting (3 Pendants + Track Lights): $1,000 – $2,500
- Countertops & Backsplash (Marble-look Quartz): $6,000 – $10,000
- Appliances (Built-in Ovens, Cooktop): $4,000 – $8,000
- TOTAL: $21,000 – $40,500
- Budget alternative: Use IKEA cabinets with custom-painted fronts (like Semihandmade), find similar track lighting at Home Depot, and look for a remnant piece of quartz for a smaller job to get a similar refined look for around $9,000 – $15,000.
|
📋 Copy HEX 🔗 Share |
This kitchen successfully layers multiple types of light for maximum function. The spherical glass pendants over the island provide both ambient light for the room and dedicated task light for island prep. The multi-spot track lights offer crucial flexibility; they can be aimed at workspaces along the perimeter counters, highlight the details on the shaker cabinets, or wash the walls in light. Finally, the under-cabinet lighting (implied by the bright counters) and the integrated oven lights provide focused, close-range task illumination right where it’s needed most. This is a workhorse kitchen that’s also beautiful.
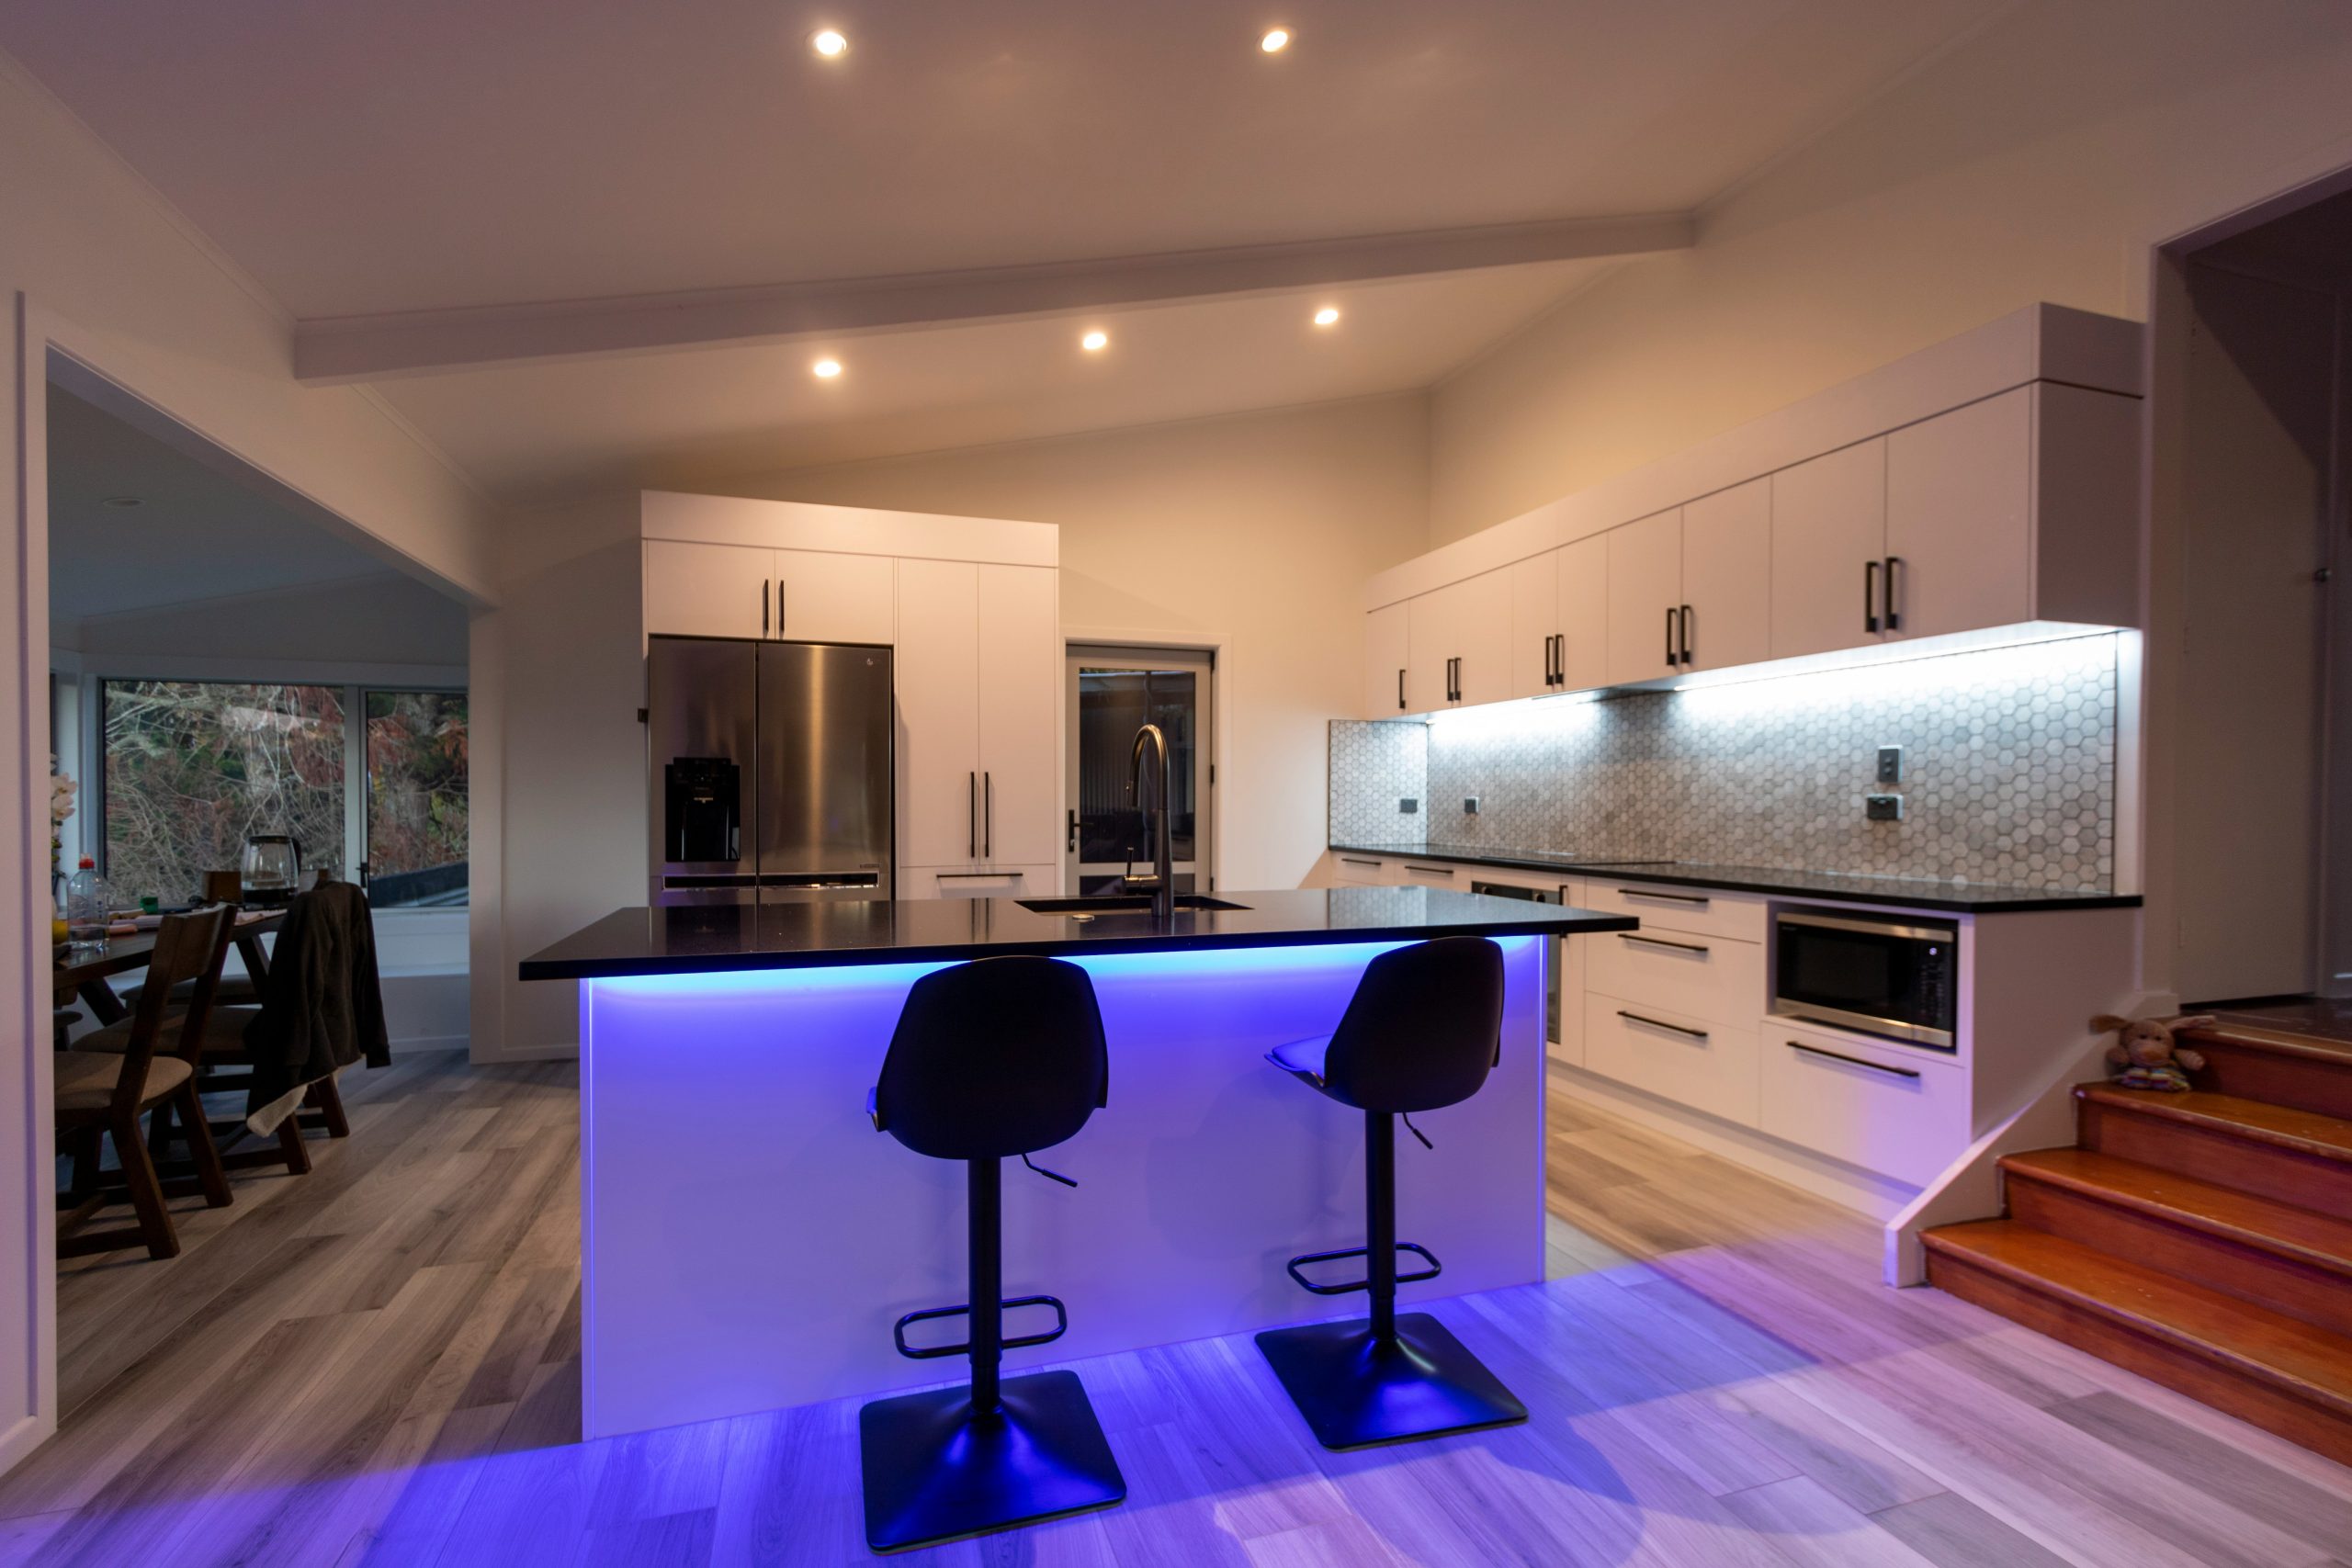
28. Modern Kitchen with Integrated LED Strip Lighting
Integrated LED strip lighting is becoming a defining feature of modern kitchen design in 2026. What used to be a high-end, custom feature is now more accessible than ever. We’re seeing it on Pinterest and in designer portfolios everywhere, used not just for under-cabinet task lighting but as a design element in its own right. The blue LED strip along the island base here is a perfect example—it turns a standard kitchen island into a futuristic focal point. It’s about using light to add color, create mood, and highlight architecture in a sleek, seamless way.
|
📋 Copy HEX 🔗 Share |
While a colorful LED strip under an island looks super cool, think about its longevity. Will you still love that bright blue glow in three years? Or five? Unlike a paint color, this is a more integrated feature that’s not as simple to change. For greater flexibility, opt for an RGB (Red, Green, Blue) or RGBW (…plus White) LED strip that can be programmed to any color you want, including a simple, clean warm or cool white. This allows you to have your fun with color but also gives you the option for a more timeless look down the road.
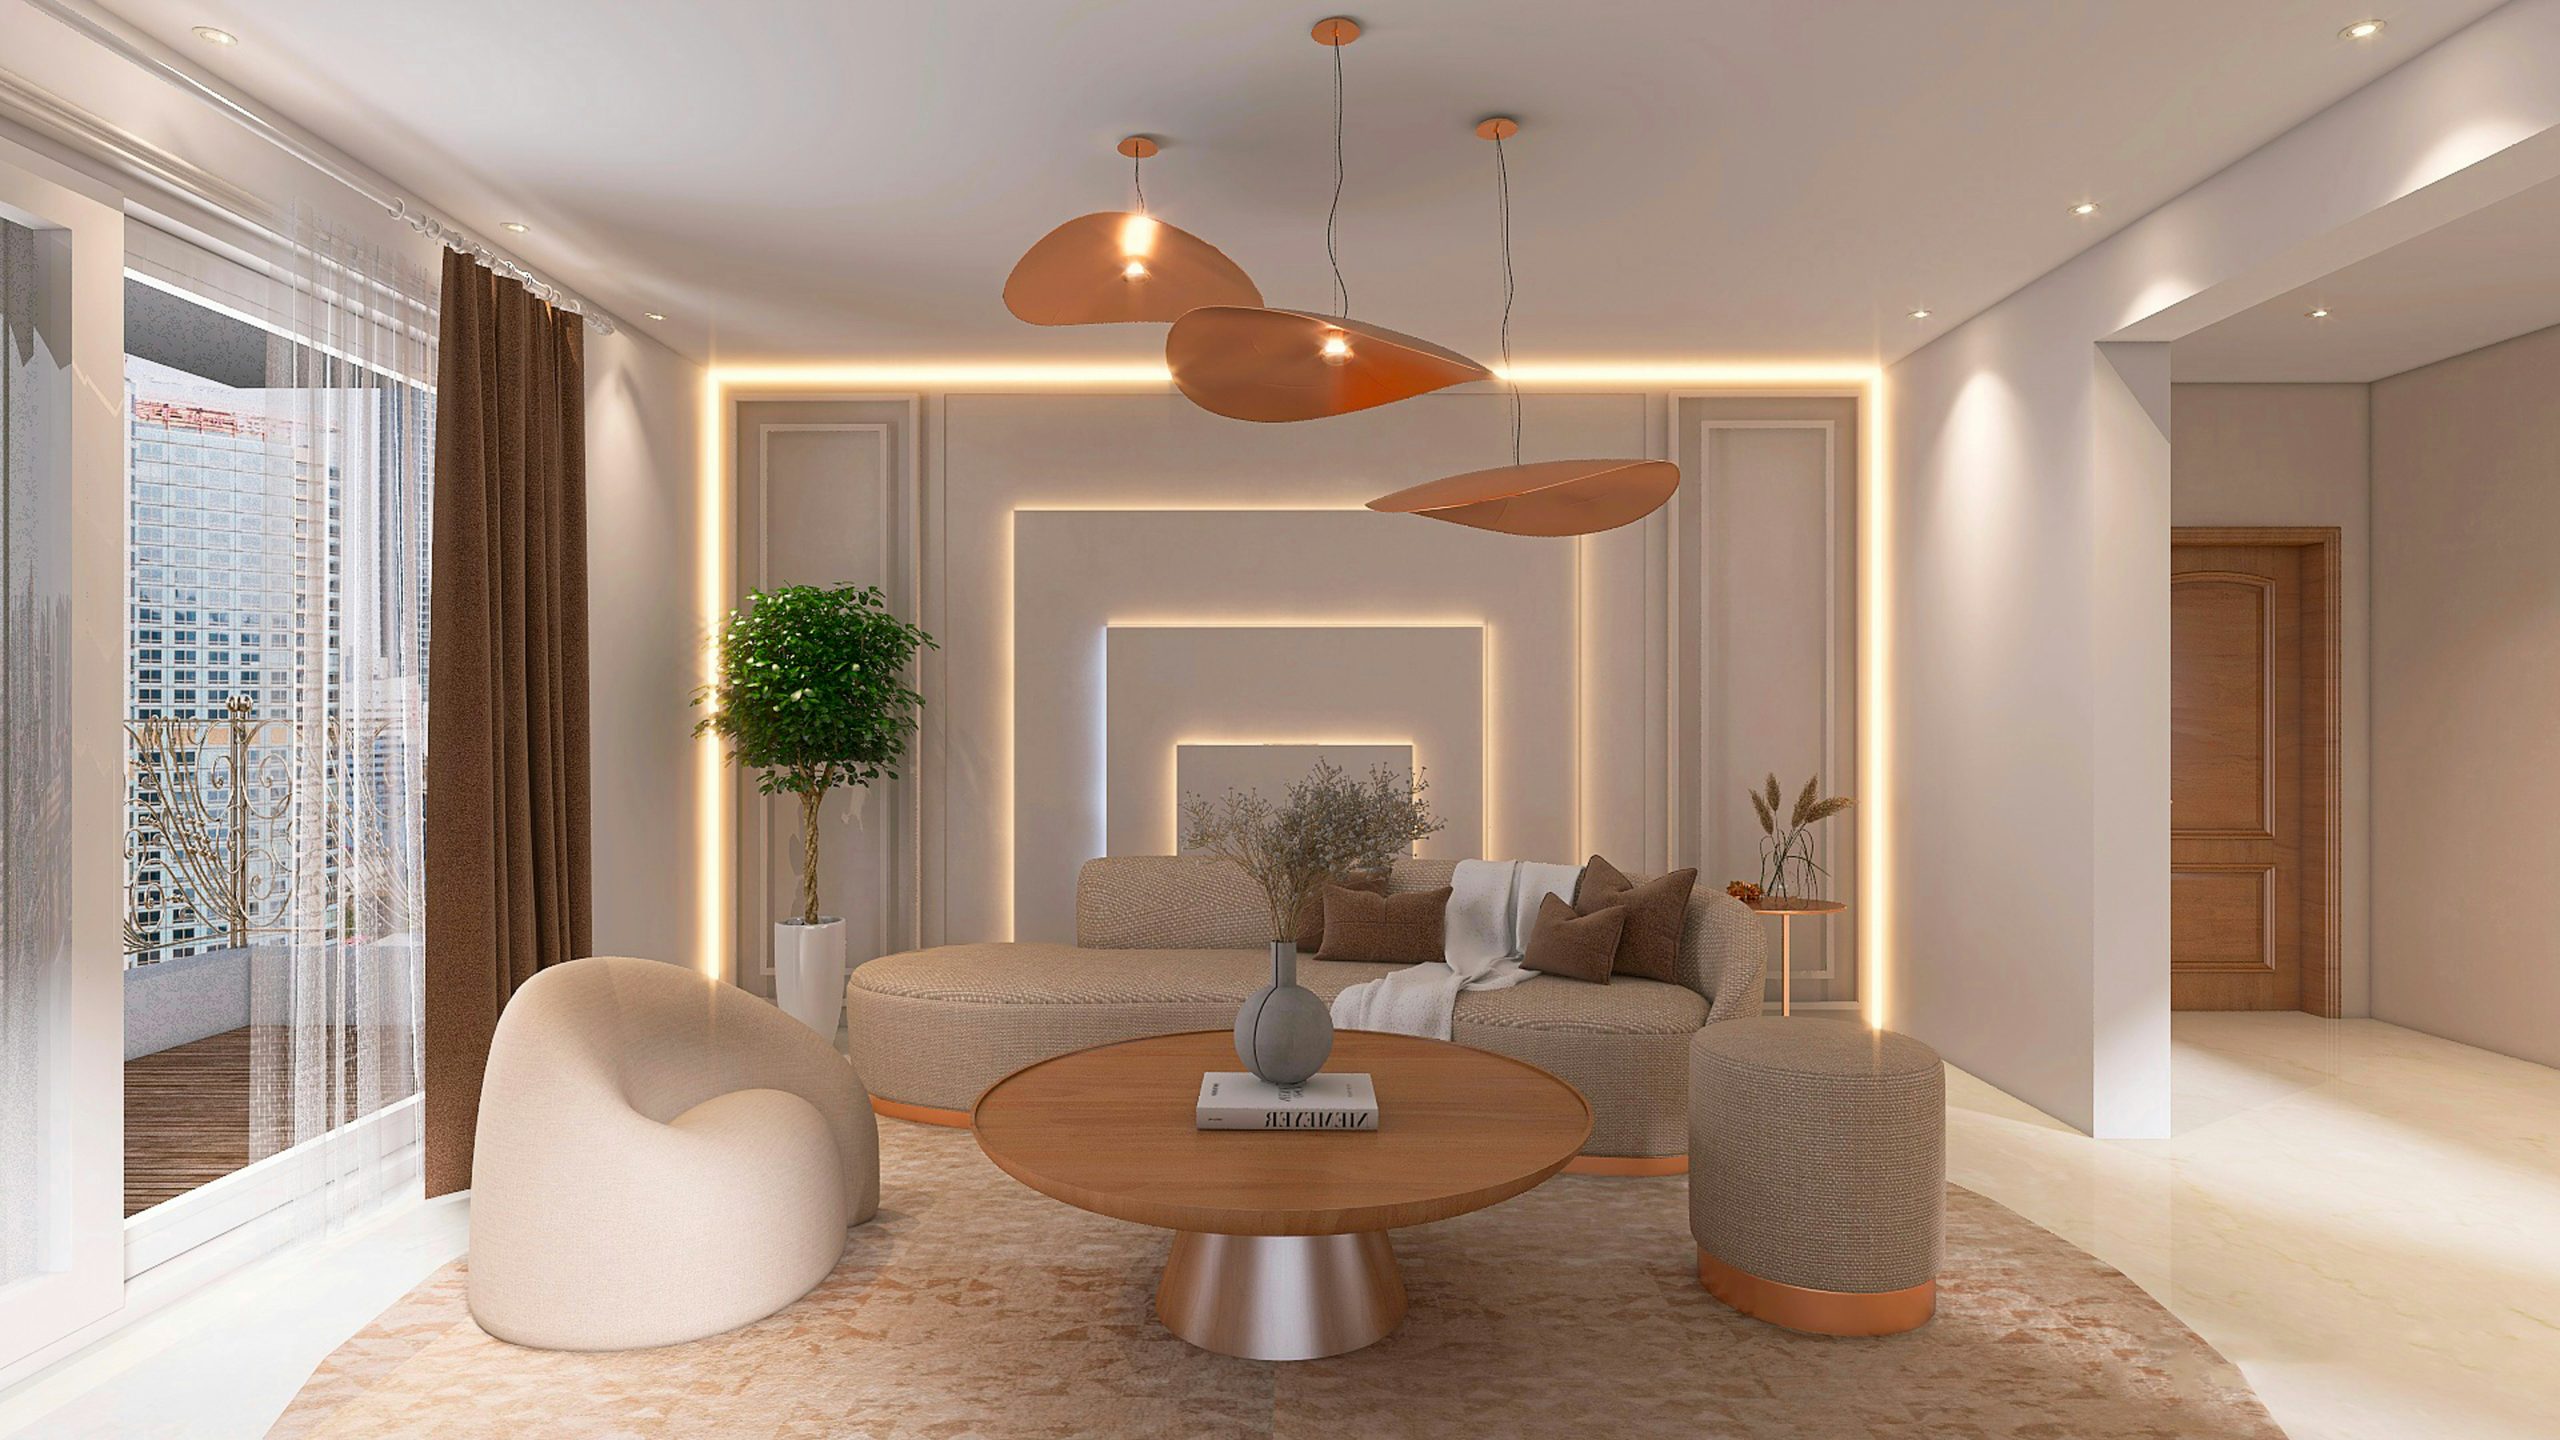
29. Warm Modern Living Room with Copper Pendants and Strip Lighting
The single element that gives this room its unique personality is the trio of organic-shaped copper pendant lights. In a room full of clean lines and neutral tones—the modular sofa, the round coffee table, and the recessed lighting—these pendants introduce an element of artful irregularity. Their warm, metallic finish and soft, sculptural forms provide a crucial counterpoint to the room’s prevailing modernism. They feel handmade and special, elevating the entire space from simply nice to truly memorable. Compare them to the more traditional pendants in Idea #13 to see the difference in style.
|
📋 Copy HEX 🔗 Share |
This space feels so warm and inviting because it masterfully mixes different temperatures and directions of light. The recessed spotlights provide crisp, direct, downward light. The wall-mounted LED strips offer a soft, indirect, upward glow that washes the wall panels. And the copper pendants cast a warm, contained, downward light over the coffee table area. This combination of direct and indirect, cool and warm light creates a rich, layered effect that’s far more interesting and comfortable than a single type of lighting could ever be.
30. Kitchen Island with Gold-Lined Disk Pendants
The design formula here is a modern classic: 50% Light Neutrals + 30% Deep Color + 20% Metallic Warmth. The light neutrals—light grey cabinets, white marble countertop, and light wood floors—create a bright and airy foundation. The deep, dramatic color comes from the dark green kitchen island, which acts as a sophisticated and grounding anchor for the room. The crucial 20% is the metallic warmth from the gold-lined pendants and brass bar stools. This touch of gold elevates the entire palette and ties the look together with a bit of glamor.
|
📋 Copy HEX 🔗 Share |
Want this chic kitchen look for less? The dark green island is an easy DIY with a high-quality paint like Benjamin Moore’s “Salamander.” For the pendants, look for similar disk or dome shapes on sites like Amazon or Wayfair; the key is the metallic interior. You can even find spray paint designed to create a gold-leaf effect to customize a basic pendant. Affordable and stylish brass-look bar stools can often be found at Target or Walmart. By being savvy with your sources, you can get this elegant look without the designer price tag. This provides a color-based alternative to the monochrome of Idea #24.
Conclusion
Lighting is so much more than just sticking a few bulbs in the ceiling. It’s about crafting a feeling, setting a mood, and making your house truly feel like a home. Don’t be afraid to mix, match, and layer different styles to tell your own story. Take these ideas as a starting point and see which ones spark joy—then check your Pinterest boards and start planning.