
You know that feeling when you save a dozen DIY room decor pins but your own room still looks… exactly the same? Let’s finally change that. This isn’t about impossible-to-replicate crafts; it’s about real, achievable style you can create this weekend. Inside, you’ll find 24 curated DIY ideas covering everything from cozy Bohemian bedrooms to vibrant, playful kids spaces. In 2026, it’s all about hyper-personalization, and these projects are about making your space a true reflection of you. And stay until the end—we break down the most common mistakes that can ruin these looks. 📌 Save this to Pinterest for later—you’ll want to revisit these ideas.
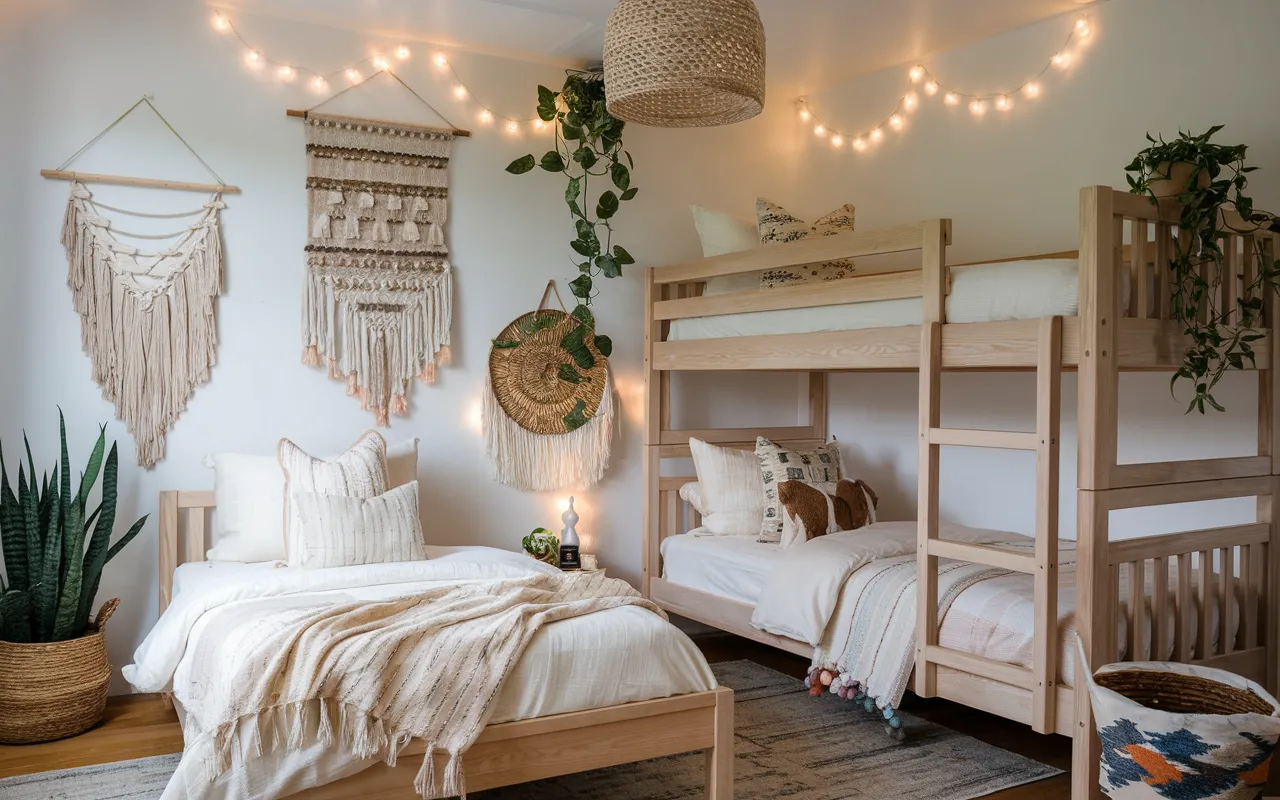
1. Bohemian Bedroom with Layered Macrame and Warm String Lights
This look feels so inviting because it masters the art of layering textures. You have the soft-knot macrame against the smooth white walls, the cozy knit blankets on the bed, and the natural grain of the light wood furniture and bunk bed. It’s a masterclass in creating depth without overwhelming the space with color. The warmth of the string lights also plays a crucial role, casting a soft glow that makes everything feel cozier and more intimate than harsh overhead lighting would.
|
📋 Copy HEX 🔗 Share |
When draping string lights, aim for an imperfect, organic look. Instead of pulling them taut in straight lines, let them swag naturally. Use small, clear adhesive hooks to secure them to the wall or ceiling without causing damage. For this specific look, a single 33-foot strand of warm white LED fairy lights is usually perfect for draping over a headboard area and along one adjacent wall. This creates an ambient light source that’s much softer than a main ceiling fixture.
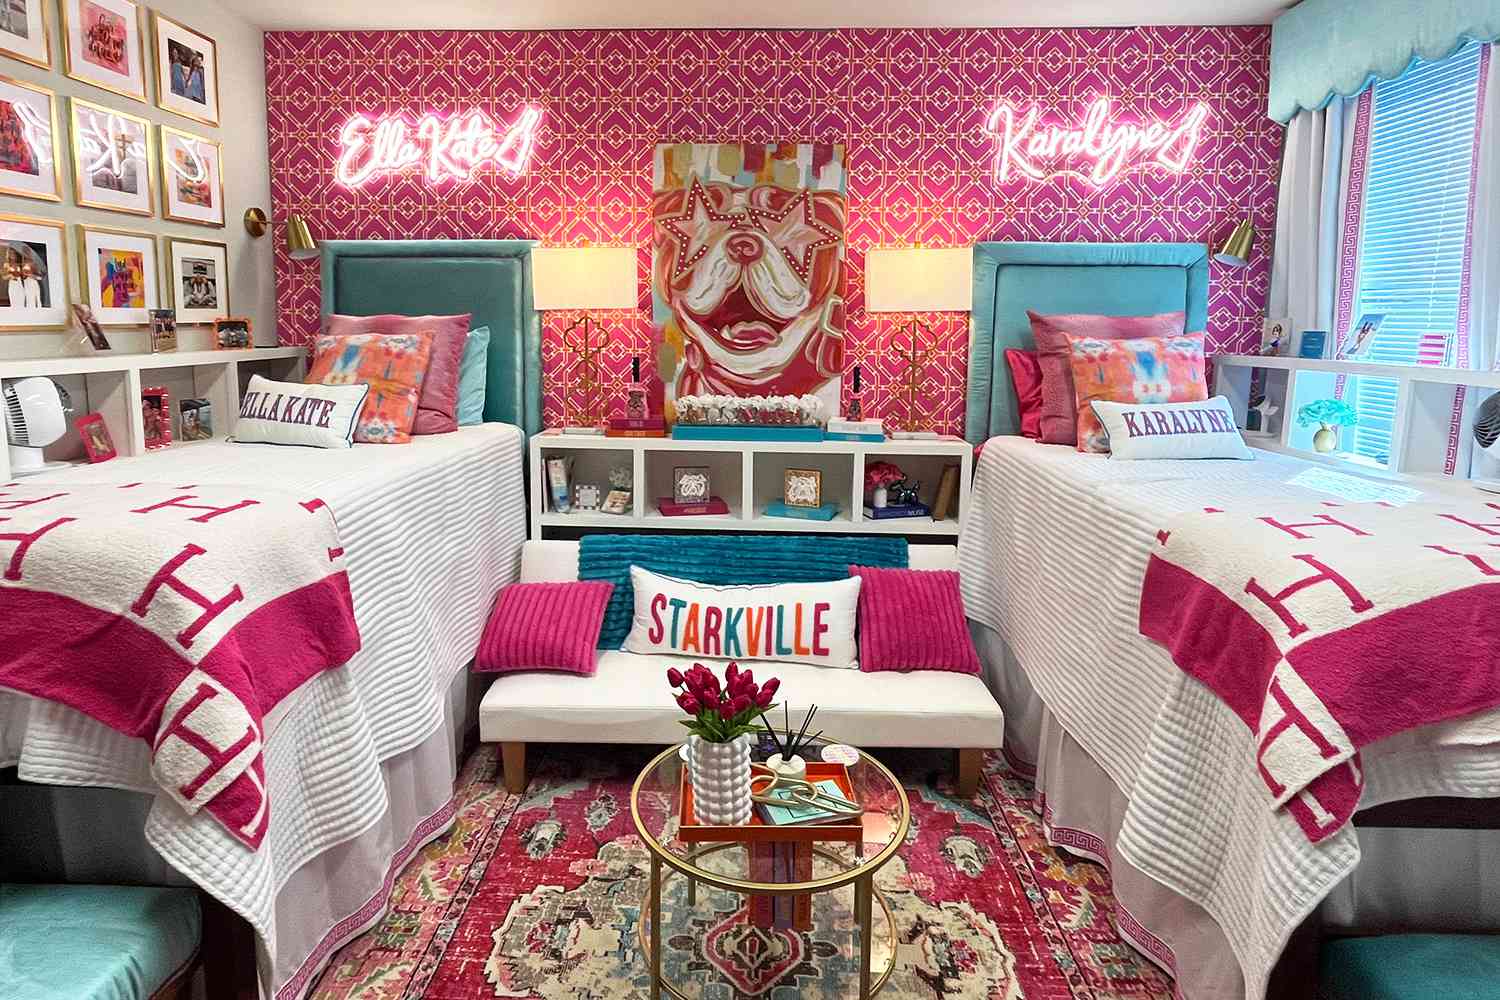
2. Vibrant Pink Geometric Wallpaper and Teal Velvet Headboards
The formula here is all about confident color pairing. Think of it as 60% bold pattern (the hot pink wallpaper), 30% saturated solid (the teal velvet headboards and fuchsia throws), and 10% glamorous accent (the gold lamps and table). This balance keeps the room from feeling chaotic. The large swath of white on the bedding and bookshelf acts as negative space, giving your eyes a place to rest and making the colors pop even more. You could swap the pink for a bold navy and the teal for mustard yellow to get a completely different but equally balanced vibe.
|
📋 Copy HEX 🔗 Share |
A bold wallpaper like this is a major commitment. It can be costly to install and even more of a pain to remove. If you’re a renter or someone who likes to change their mind often, consider using peel-and-stick wallpaper instead. It gives you the same high-impact look with a much lower risk. Also, be mindful of the custom neon signs—ensure they’re installed correctly by a professional to avoid electrical issues, and know that they can cast a very specific color glow that affects how other colors in the room appear at night.
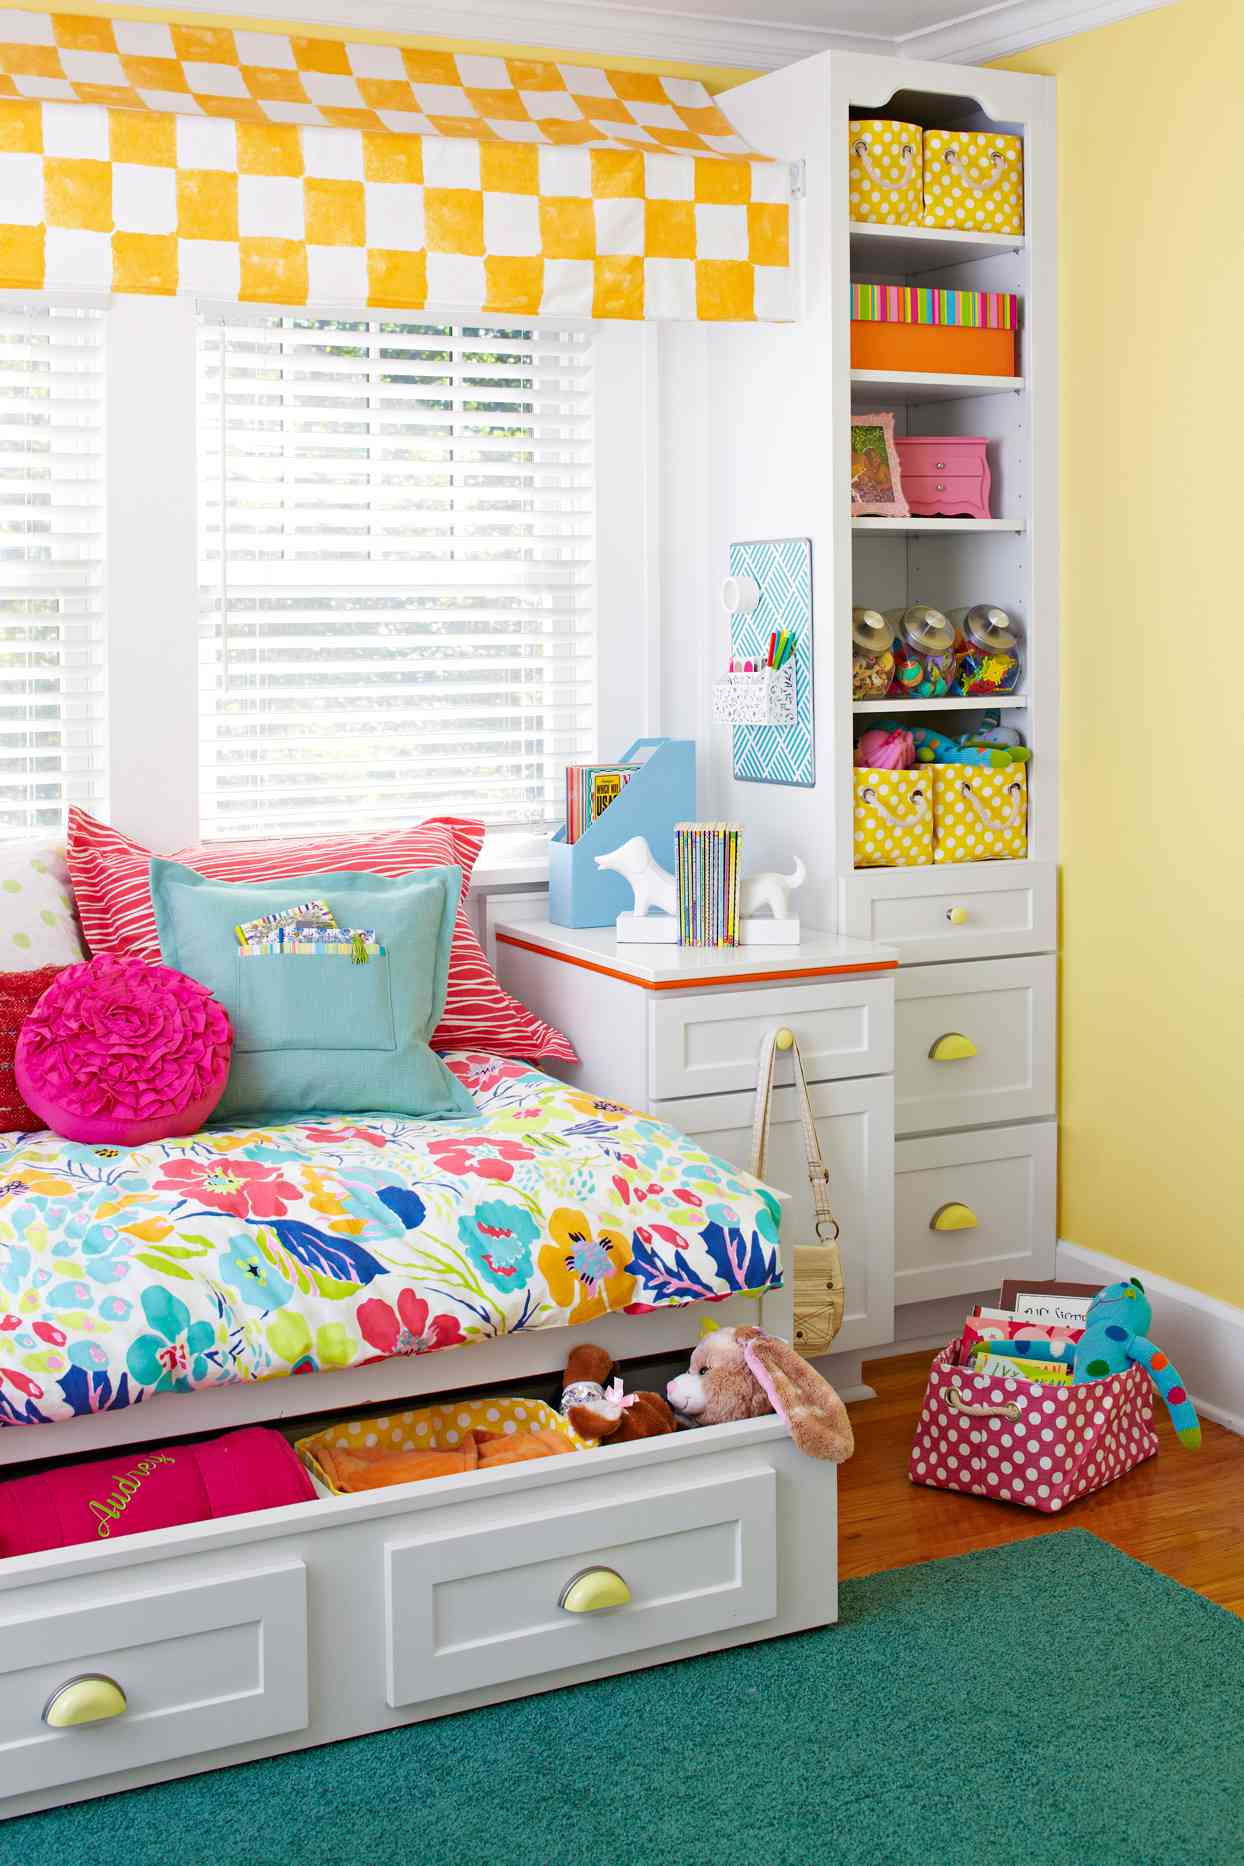
3. Bright Kids’ Room with Cheerful Yellow Walls and Built-in Storage
You can create a similar custom built-in look with stock cabinetry. Here’s a quick guide:
- Measure your wall space carefully. Purchase two tall, narrow bookcases (like the IKEA Billy) and a horizontal cubby unit that fits between them.
- Assemble all three units according to their instructions.
- Secure the tall bookcases to the wall with anti-tip hardware. Place the horizontal unit between them.
- To make it look truly built-in, use wood trim or quarter-round molding to cover the seams where the units meet each other and the wall. Caulk and paint the trim to match the bookcases.
This weekend project costs around $200-$300 in materials.
|
📋 Copy HEX 🔗 Share |
The core of this room is smart storage and a sunny color palette. You can get this look for much less. Instead of custom built-ins, look for secondhand bookcases and a simple bed frame with drawers on Facebook Marketplace. A fresh coat of white paint will make mismatched pieces look cohesive. For the textiles, skip designer fabrics and check out Target or Walmart for fun floral duvets and checkered patterns, often for under $50. A gallon of light yellow paint is an inexpensive way to bring in that cheerful feeling.
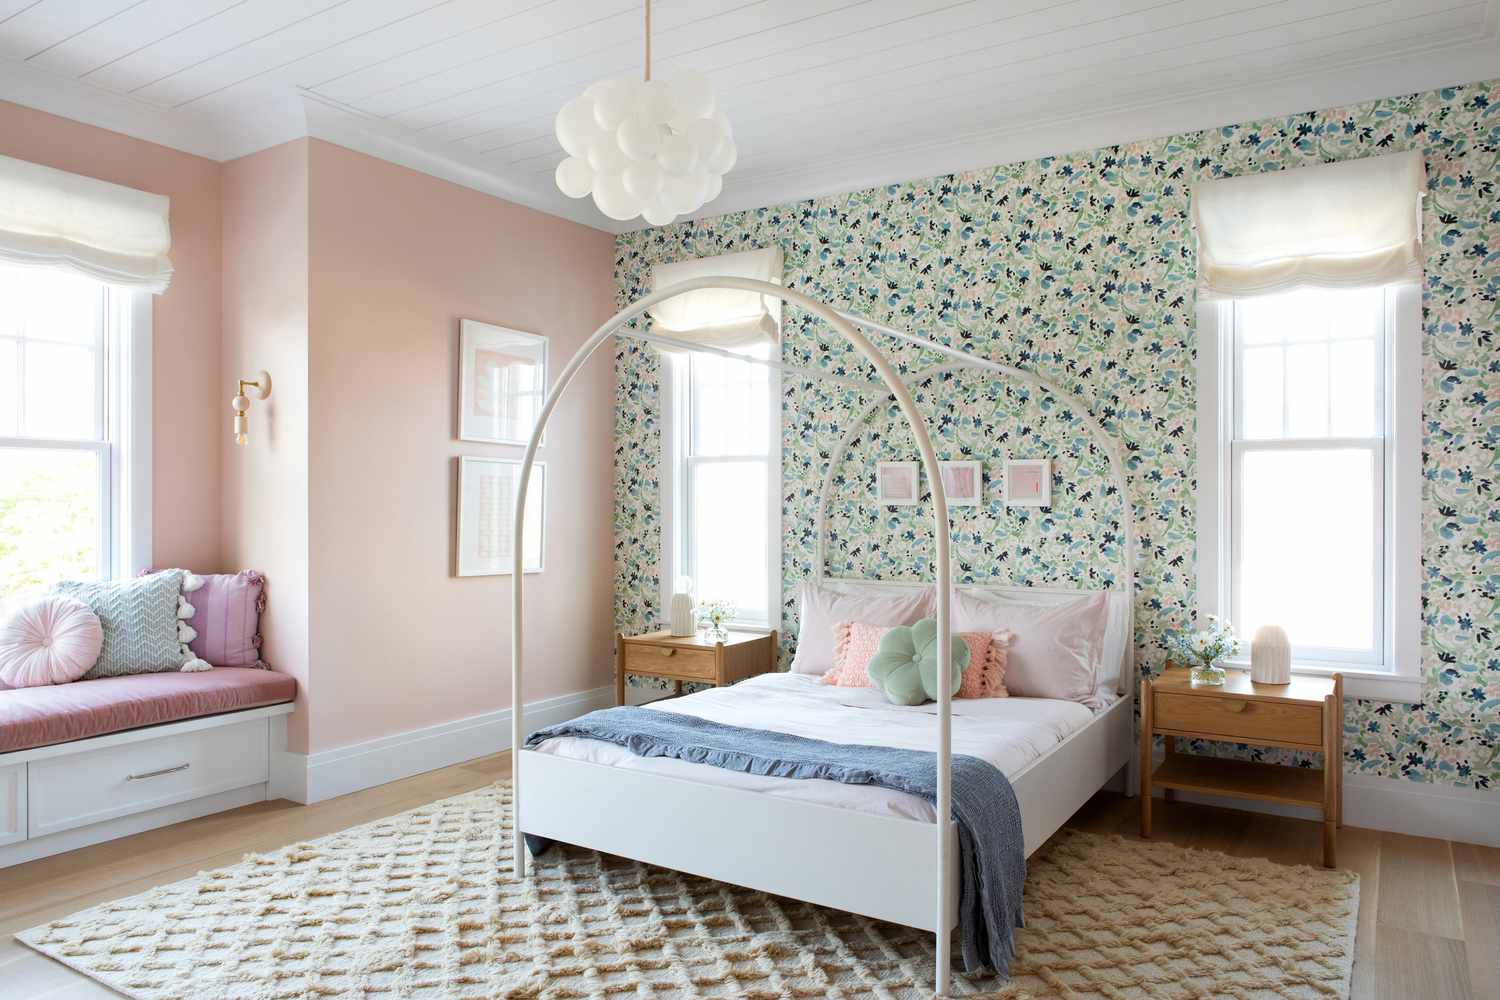
4. Feminine Bedroom with an Arched Canopy Bed and Floral Accent Wall
The single element holding this entire design together is the floral wallpaper. Without it, you’d have a sweet but simple pink bedroom. The wallpaper introduces a sophisticated color palette—pulling in blues and greens—that elevates the space beyond a one-note feminine theme. It acts as a stunning piece of large-scale art, providing pattern, color, and a focal point that makes the arched canopy bed feel intentional and grand. Every other choice, from the soft pink walls to the wooden nightstands, complements that one feature wall.
|
📋 Copy HEX 🔗 Share |
This look, with its canopy bed and distinct zones (sleeping, window seat), works best in a room that’s at least 12 feet by 12 feet. You need enough space to walk comfortably around the bed without feeling cramped by the frame. Ceiling height is also a factor; an arched canopy needs at least 8-foot ceilings, but 9 feet is ideal to avoid making the room feel squat. For smaller rooms, consider getting a similar vibe by using the floral wallpaper on a smaller scale, perhaps behind a simple headboard instead of a full canopy bed.
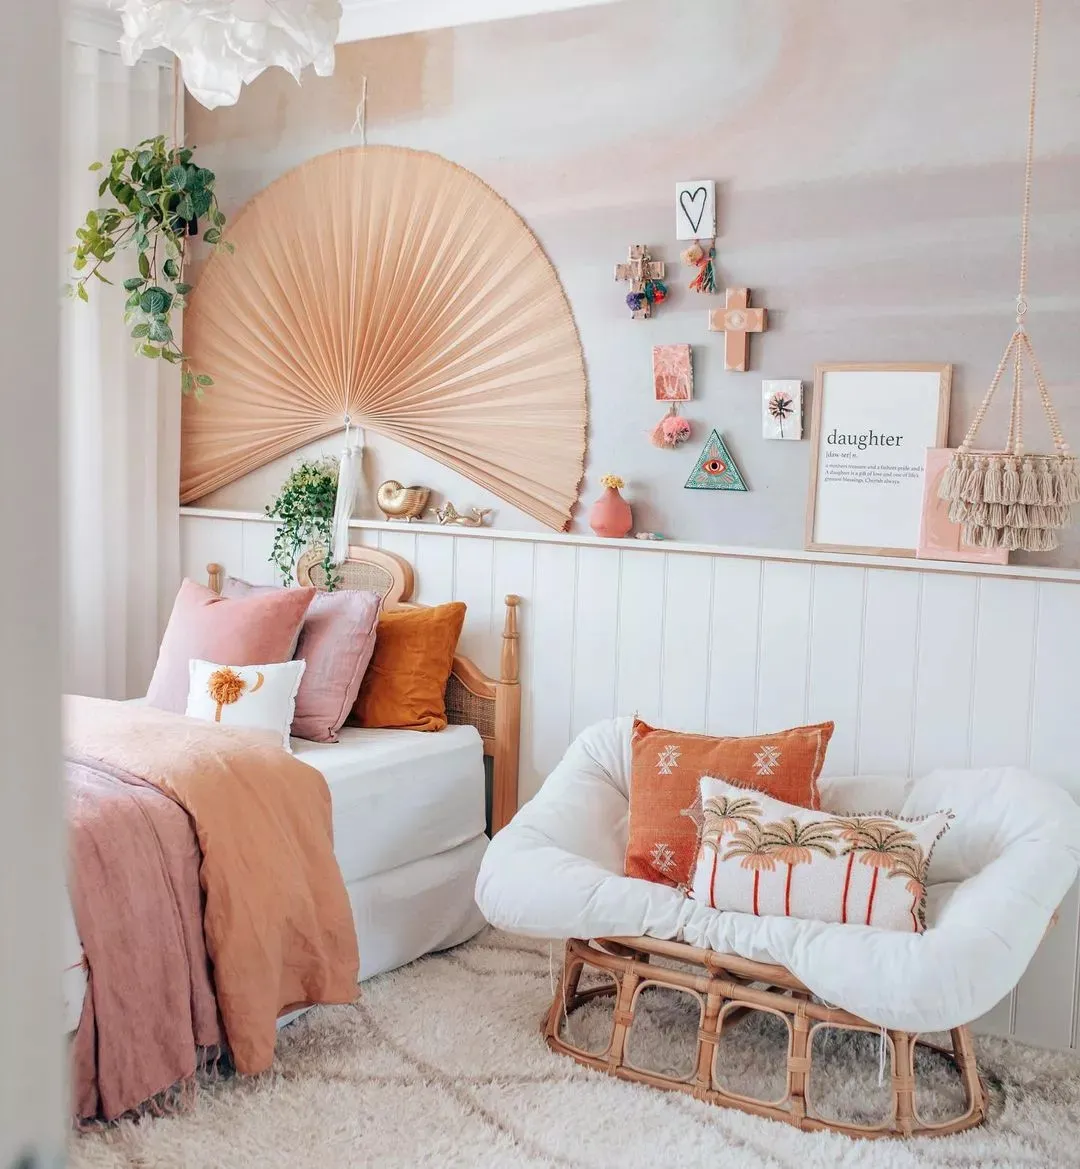
5. Boho-Chic Room with a Natural Fiber Wall Fan and Peach Walls
This soft, earthy boho look is a gentle evolution of the full-blown macrame and terracotta trend from a few years ago. It’s becoming more popular because it’s easier to live with and feels more personal. Instead of sticking to a strict bohemian formula, it’s about incorporating natural textures—like the rattan bed frame and wall fan—into a more classic space with elements like wainscoting. It reflects a broader shift towards creating calming, sanctuary-like bedrooms that feel collected over time rather than decorated all at once.
|
📋 Copy HEX 🔗 Share |
To get that soft, washed-out paint effect above the wainscoting, try a technique called color washing. After painting your base color (in this case, the light peach), mix a slightly darker shade of the same color with a clear glaze (about 1 part paint to 4 parts glaze). Apply the glaze mixture over the base coat with a rag or a soft brush in sweeping, random strokes. This creates a subtle, watercolor-like depth that you can’t get with a single flat color, adding a beautiful handmade touch to the room.
6. Cozy Bedroom with a Sculpted Wood Headboard and Eclectic Wall Art
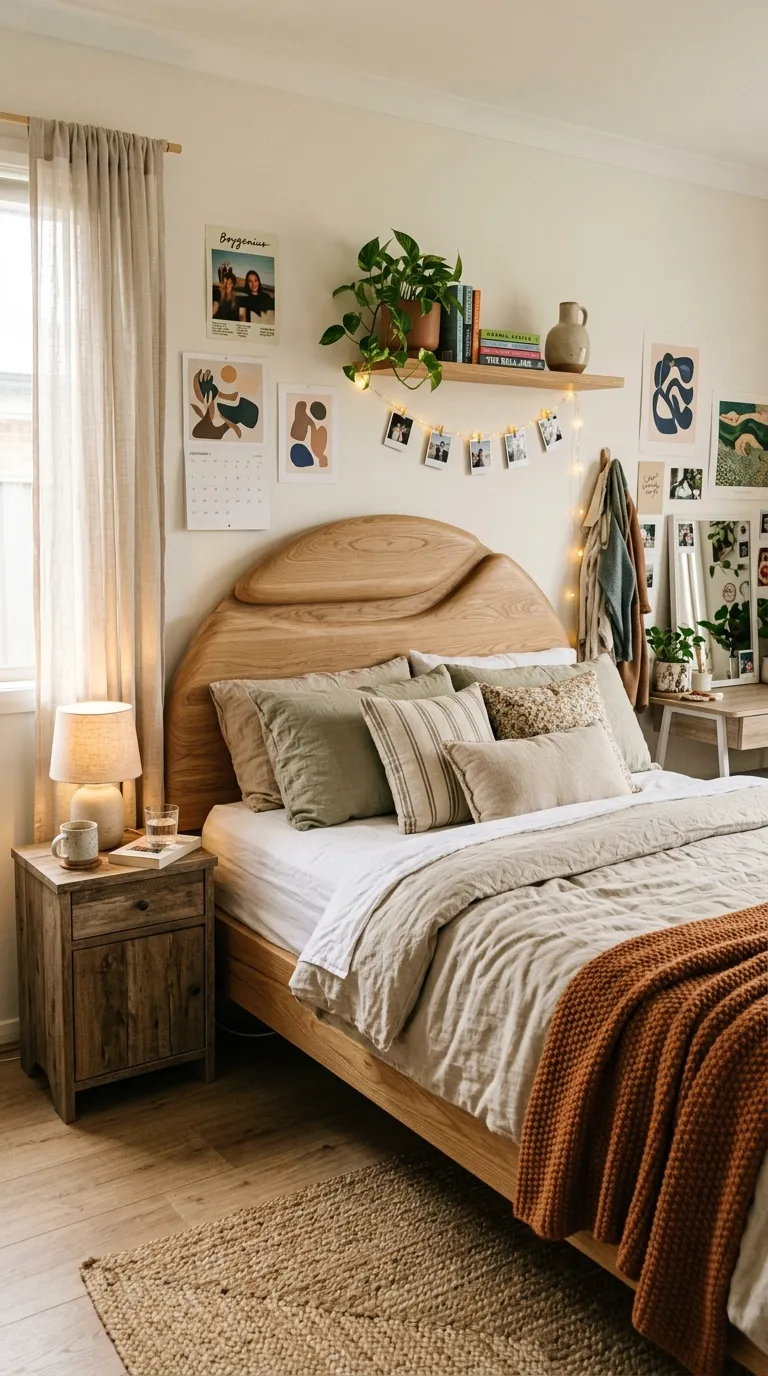
This room works because it perfectly balances personal touches with a cohesive color story. The gallery wall feels authentic and collected, not staged, because it includes a mix of prints, a calendar, and personal photos on a string. The visual anchor is the consistent color palette of warm wood, sage green, and rust orange, which is repeated in the bedding, nightstand, and even the plant pot. This thoughtful repetition makes the eclectic mix of items feel harmonious rather than cluttered. It feels like a real person’s sanctuary.
|
📋 Copy HEX 🔗 Share |
A room with this many natural materials requires a bit of specific care. The light wood furniture, especially if it has a matte or oiled finish, is susceptible to water rings, so always use coasters on the nightstand. Linen bedding gets softer with every wash, but it also wrinkles very easily. If you hate wrinkles, this isn’t the fabric for you. Embrace the casual, slightly rumpled look. The potted plant will also need regular watering and dusting to keep it looking its best and contributing to the room’s fresh feel.
7. Warm and Inviting Bedroom with String Lights and Trailing Plants
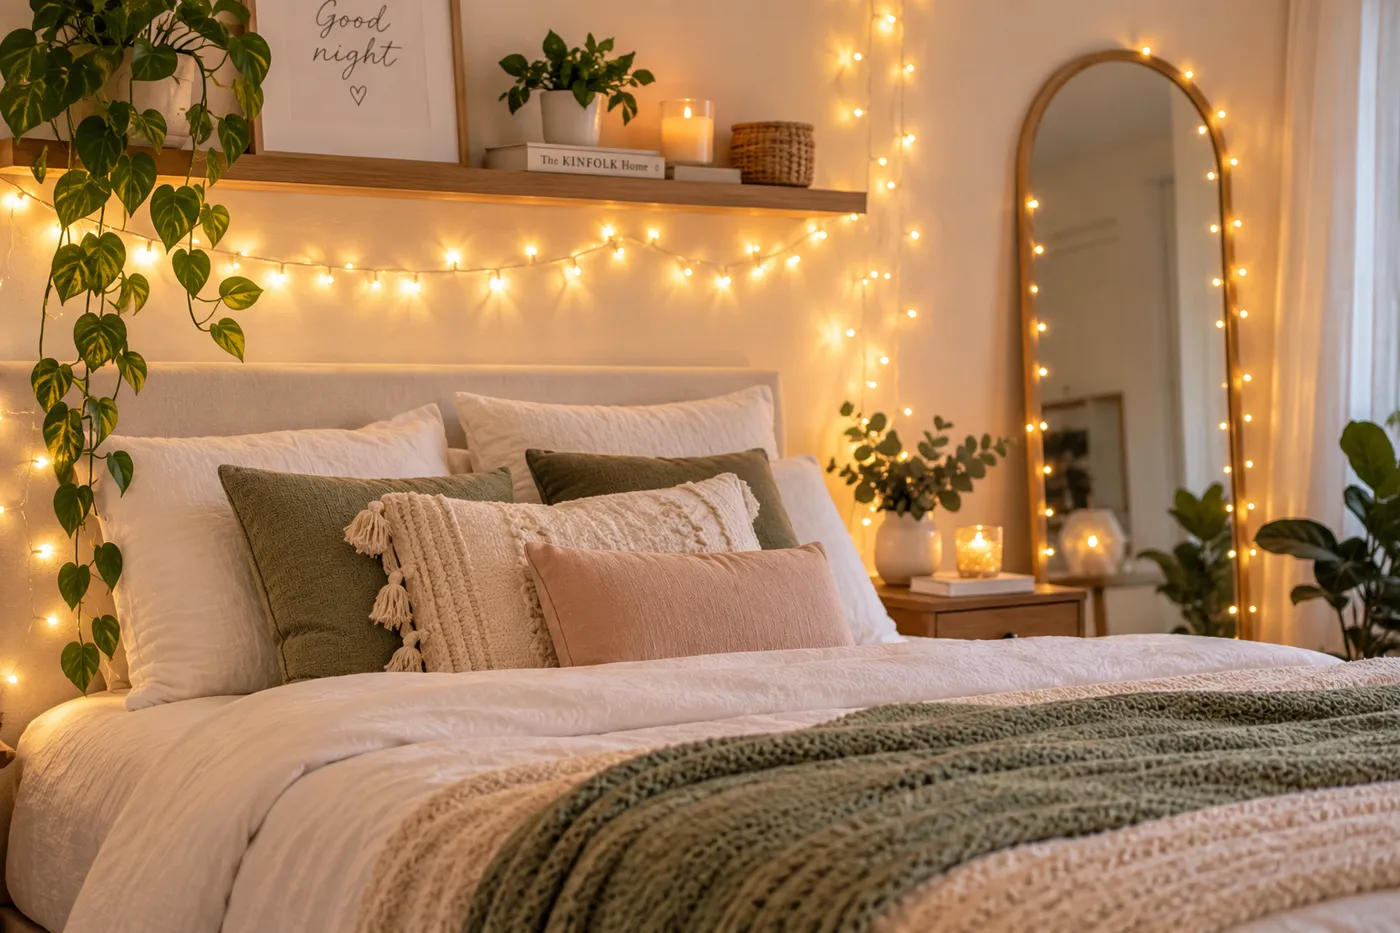
Before you commit to this cozy, plant-filled look, run through this quick checklist:
- Check your outlets: Do you have a convenient, safe outlet for the string lights that won’t require a messy extension cord?
- Assess your light: The spot above your headboard needs enough indirect sunlight to keep those trailing plants happy. A north-facing window is often ideal.
- Measure the shelf: Make sure a floating shelf is deep enough for your pots (at least 5-6 inches) and that you install it into studs so it can safely hold the weight.
- Consider your headboard: This works best with a simple, low-profile upholstered headboard that lets the lights and shelf be the star.
|
📋 Copy HEX 🔗 Share |
The MVP of this entire room is the string lights. Take them away, and you have a nicely decorated bed. But with them, you have an atmosphere. They provide a soft, ambient glow that instantly makes the space feel cozier and more intimate. They highlight the texture of the pillows and the green of the plants, turning a simple decor arrangement into a magical focal point. Compare this to the similar look in Idea #1, where they create a broader bohemian feel; here, they are used for pure cozy intimacy.
8. Easy, Renter-Friendly Ideas for a Teen Bedroom Makeover
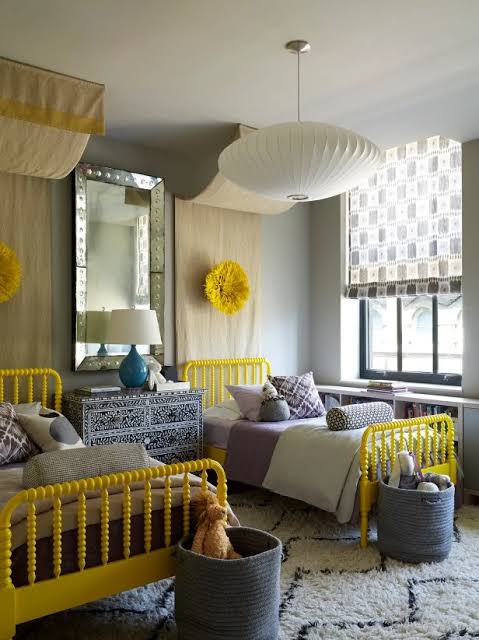
One of the biggest challenges for renters, especially in dorms or teen rooms, is the inability to paint or drill holes. This means you have to get creative with adding personality. Avoid dark, heavy furniture, which can make a small, standard room feel even smaller. Instead, focus on textiles, removable wall treatments (like decals or tapestries), and lighting to create a mood. Remember that anything you stick to the walls might still cause damage, so always test products like adhesive strips in an inconspicuous spot first.
|
📋 Copy HEX 🔗 Share |
A removable accent wall is a game-changer. Here’s how to do it with fabric and liquid starch:
- Choose a lightweight cotton fabric with a pattern you love.
- Cut the fabric to the height of your wall, leaving a few extra inches.
- Using a paint roller, apply a generous coat of liquid starch to a section of the wall.
- Smooth the fabric onto the starched section, working from the top down.
- Repeat in sections until the wall is covered. Use a craft knife to trim the excess.
When you’re ready to move, just peel the fabric off and wash the wall with warm water!
9. Playful Kids’ Room with a Bunk Bed, Slide, and Superhero Accents
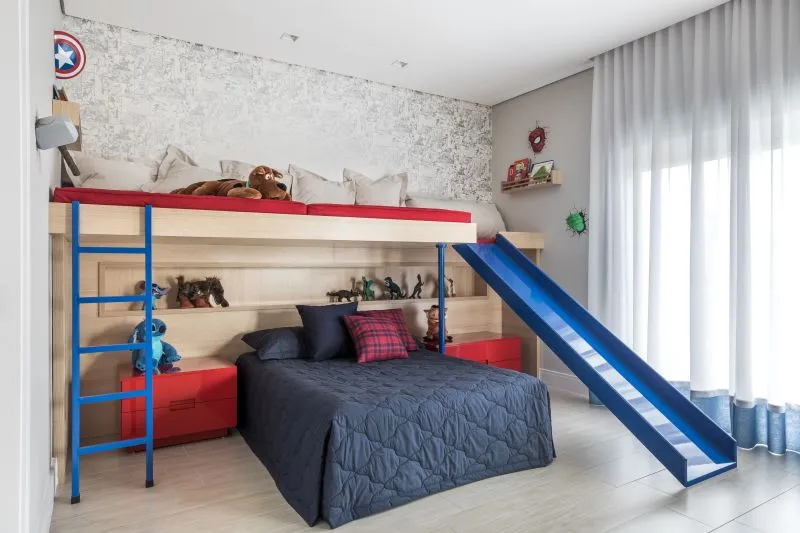
A large feature piece like this bunk bed with a slide needs ample space to not feel overwhelming. You’ll want a room that is at least 10 feet by 12 feet, with at least 8-foot ceilings to ensure there’s safe clearance for the top bunk. The slide itself requires a clear landing zone of about 4-5 feet, so be sure to account for that in your furniture layout. This idea is fantastic for combining sleep and play, but it’s not well-suited for very small or narrow rooms where it would dominate the entire space.
|
📋 Copy HEX 🔗 Share |
Recreating this fun-filled room can vary wildly in cost, depending on the centerpiece bed.
- Bunk Bed/Slide Combo: $700 – $2,500
- Bedding & Textiles: $150 – $400
- Nightstands (2): $100 – $300
- Superhero Wall Decor: $50 – $150
- Wallpaper/Paint: $100 – $300
- TOTAL: $1,100 – $3,650
Budget alternative: Find a basic light wood bunk bed on Marketplace ($200) and purchase a separate toddler slide ($50). Paint existing nightstands a bright red and find printable superhero art on Etsy to frame yourself.
10. Twin Canopy Beds with Textured Frames and Vibrant Orange Accents
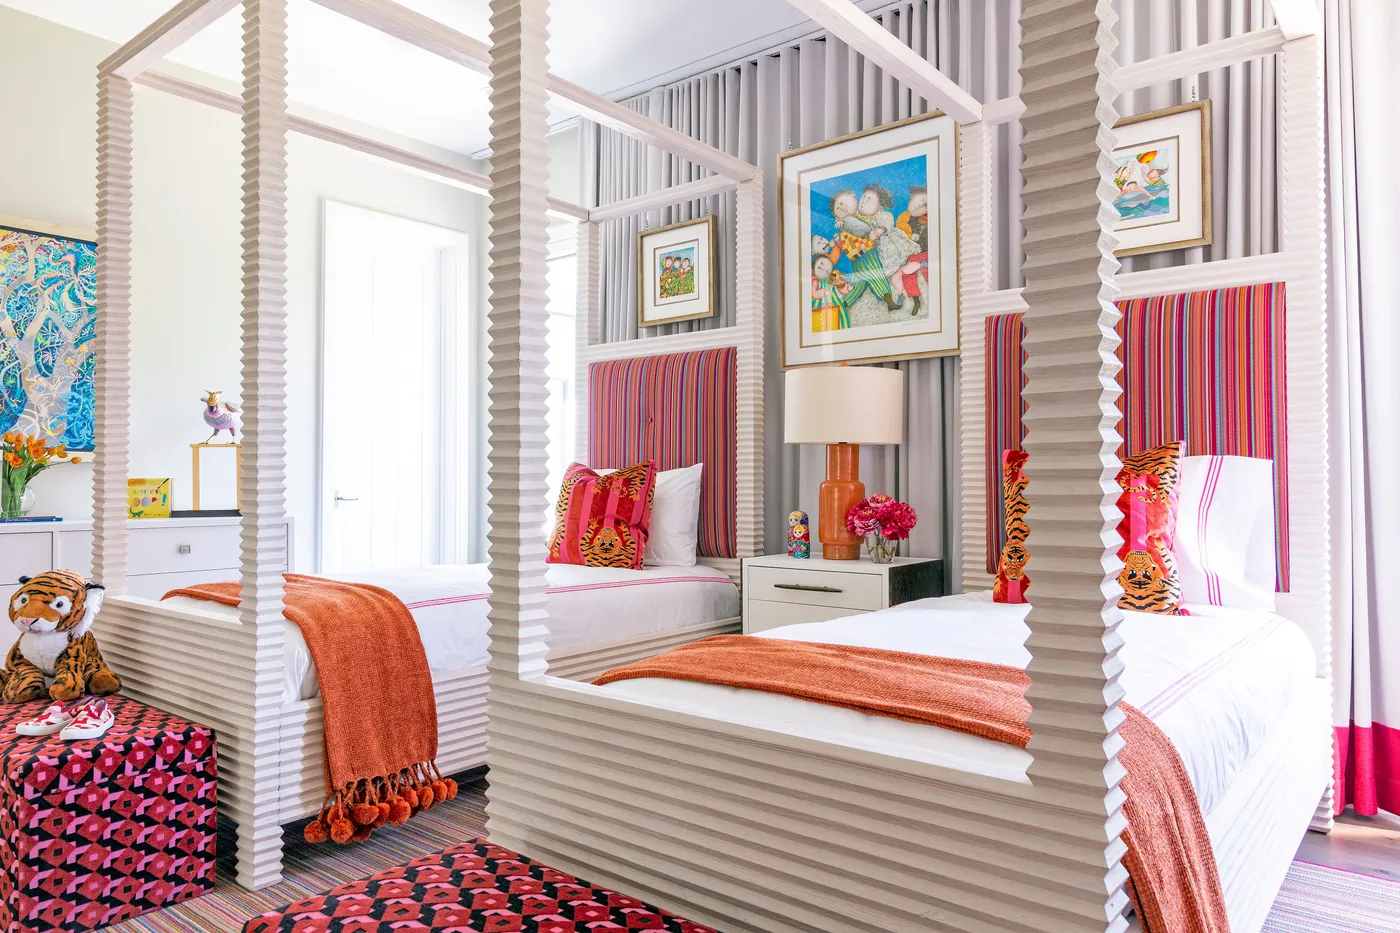
This room’s energy comes from a bold yet simple formula: 70% neutral foundation (white walls, light wood beds), 20% vibrant accent color (the bright orange throws and lamp), and 10% playful pattern (the striped headboards and tiger pillows). The neutral base keeps the look from becoming overwhelming, while the single, strong accent color provides a huge dose of personality. The small touch of pattern adds a final layer of curated fun. It’s a sophisticated way to do a colorful kids room that doesn’t feel chaotic.
|
📋 Copy HEX 🔗 Share |
The undeniable star here is the texture on the wooden canopy beds. It’s a unique, almost hand-carved detail that elevates them from simple bed frames to statement pieces of furniture. This single element adds a layer of bespoke craftsmanship and visual interest that makes the entire room feel special and thoughtfully designed. Without that texture, the beds would be basic, and the room would lose its most distinctive and charming feature. It’s a reminder that sometimes, one great detail is all you need.
11. Create a Personal Story with an Eclectic Photo Collage Wall
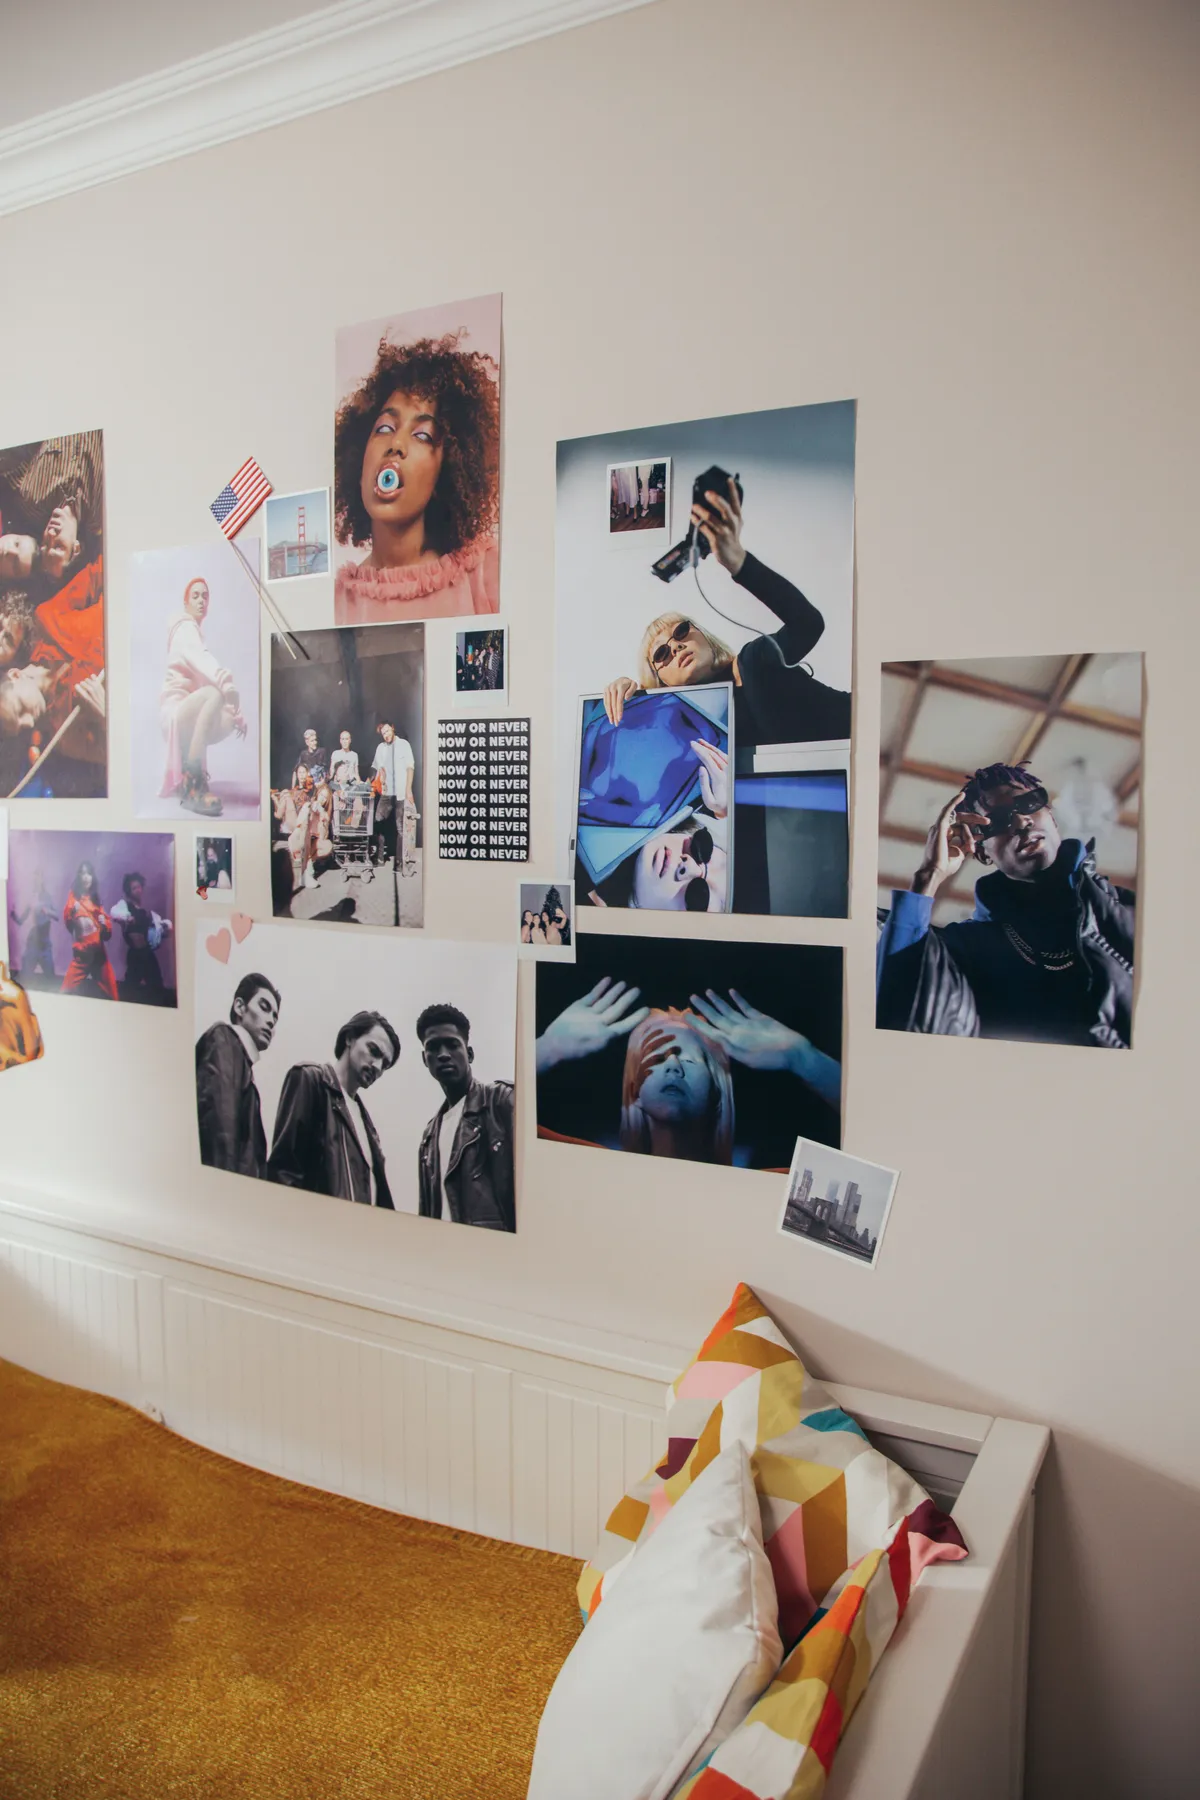
A great photo wall looks effortless, but it requires a little planning.
- Start by laying out your photos and prints on the floor to find an arrangement you love before you stick anything to the wall.
- Mix sizes and orientations—a few 5x7s, mostly 4x6s, and maybe a square print or a postcard.
- For this casual look, use a single type of adhesive, like light-colored washi tape or clear mounting putty, for cohesion.
- Begin from the center of your desired area and work your way out, keeping spacing relatively consistent but not perfectly rigid.
- Step back often to check the overall balance. This whole project should take under an hour and cost less than $20 for prints and supplies!
|
📋 Copy HEX 🔗 Share |
You don’t need professional prints for a high-impact collage. Get photos printed at your local drugstore for pennies apiece—the quality is perfect for this casual, taped-up style. Supplement with postcards, ticket stubs, or even cool pages torn from a magazine. The mustard yellow bedspread look can be found at Target’s Room Essentials line for around $30, which is a fantastic way to anchor the collage with a pop of color without a huge investment. This is a super affordable version of the more curated gallery walls seen in Idea #22.
12. Organize and Display with a Blonde Plywood Pegboard Wall
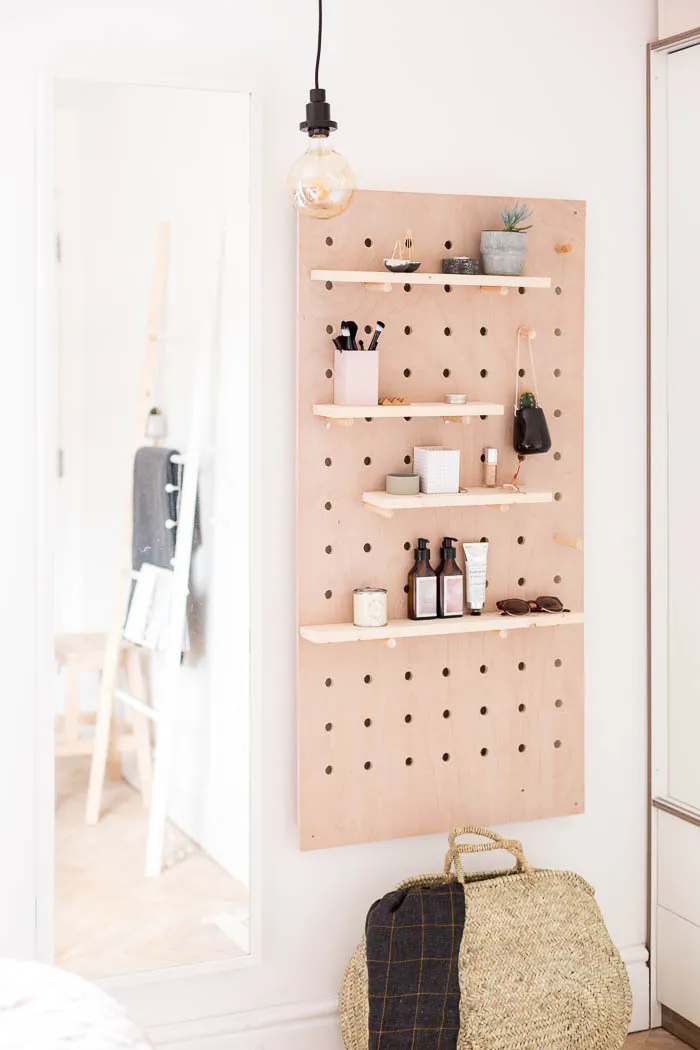
This pegboard system is brilliant because it combines form and function so beautifully. It works by turning an entire vertical surface into flexible, customizable storage. The light blonde plywood adds natural warmth and texture to the white wall, preventing it from looking sterile. The genius is in its adaptability; the shelves and pegs can be moved around as needs change, making it a perfect solution for a craft room, entryway, or a kid’s room that needs to evolve over time. The mix of displayed items—plants, books, tools—becomes the decor itself.
|
📋 Copy HEX 🔗 Share |
Creating a large-scale pegboard feature is a very approachable DIY project.
- Plywood Pegboard (4’x8′ sheet): $50 – $90
- Pegs and Dowels: $20 – $40
- Wood for Shelves (Pine boards): $30 – $60
- Mounting Hardware (Spacers & Screws): $15 – $25
- Sandpaper & Optional Sealant: $10 – $20
- TOTAL: $125 – $235
Budget alternative: Instead of a full wall, buy smaller, pre-made metal or plastic pegboard panels from a hardware store and mount them side-by-side for a more industrial look at about half the cost.
13. Personalized Teen Room with Photo-Clip String Lights and a Letter Board
While this is a super cute and personal look, be mindful of what you’re attaching to the walls. The iridescent star decorations and other stick-on items can sometimes peel paint off when removed, especially on matte-finish paint. Use a hairdryer to gently warm the adhesive before you peel for a cleaner removal. Also, fairy lights with clips, while charming, aren’t the best way to preserve precious photos long-term. The direct light can cause fading over time, so use copies of your most important pictures for this display.
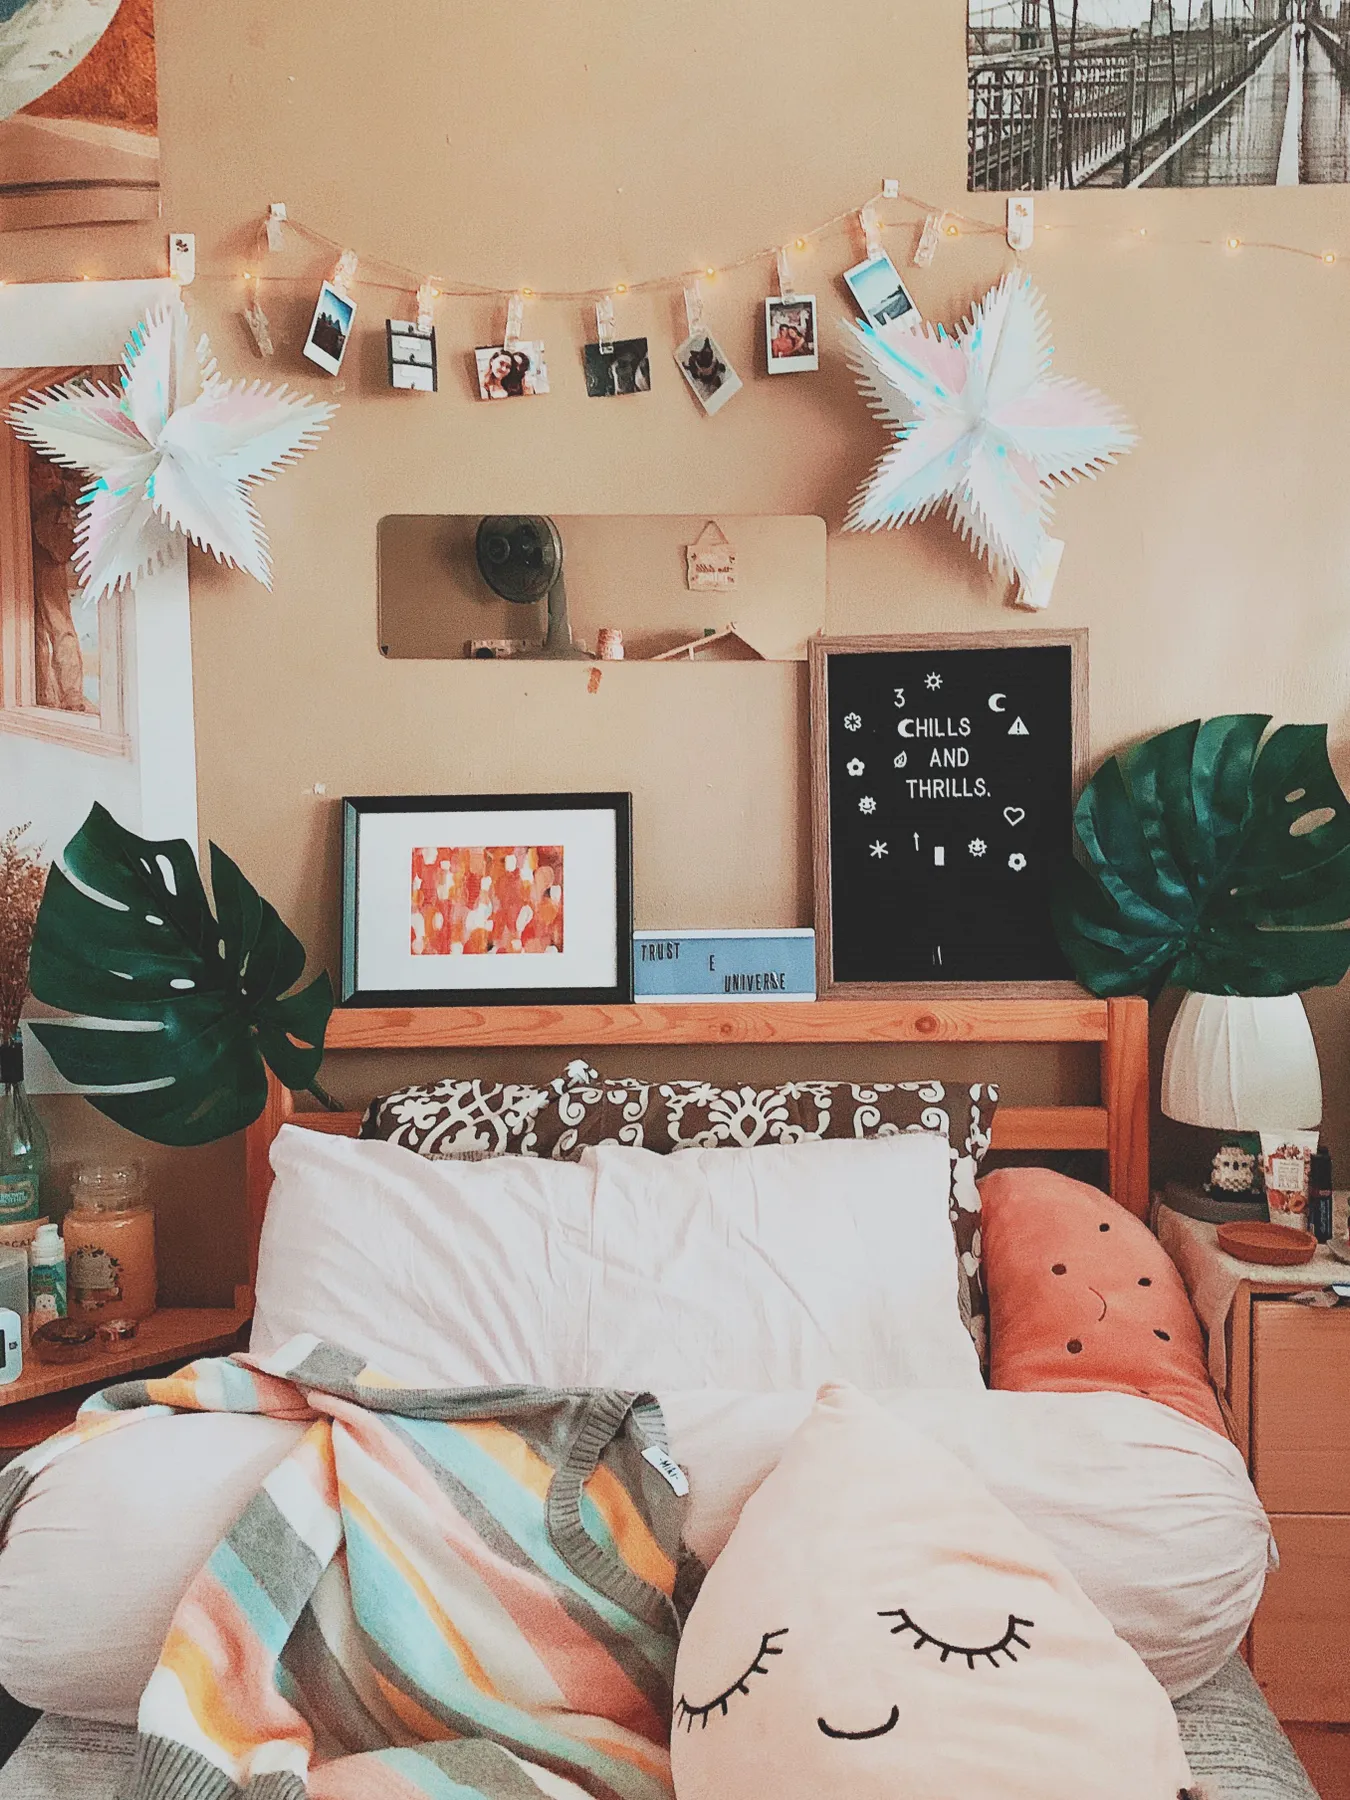
|
📋 Copy HEX 🔗 Share |
The magic here is personalization. It’s not one single item but the combination of photos, the letter board with a custom message, and the specific decor choices that makes this space feel unique and deeply personal. If you took away the specific photos and the message, the room would lose its soul. It’s a powerful reminder that the best DIY decor is often not about a craft project, but about displaying your own life and memories in a creative way. The string lights are just the vehicle for that personal story. Check out Idea #11 for another take on a photo wall.
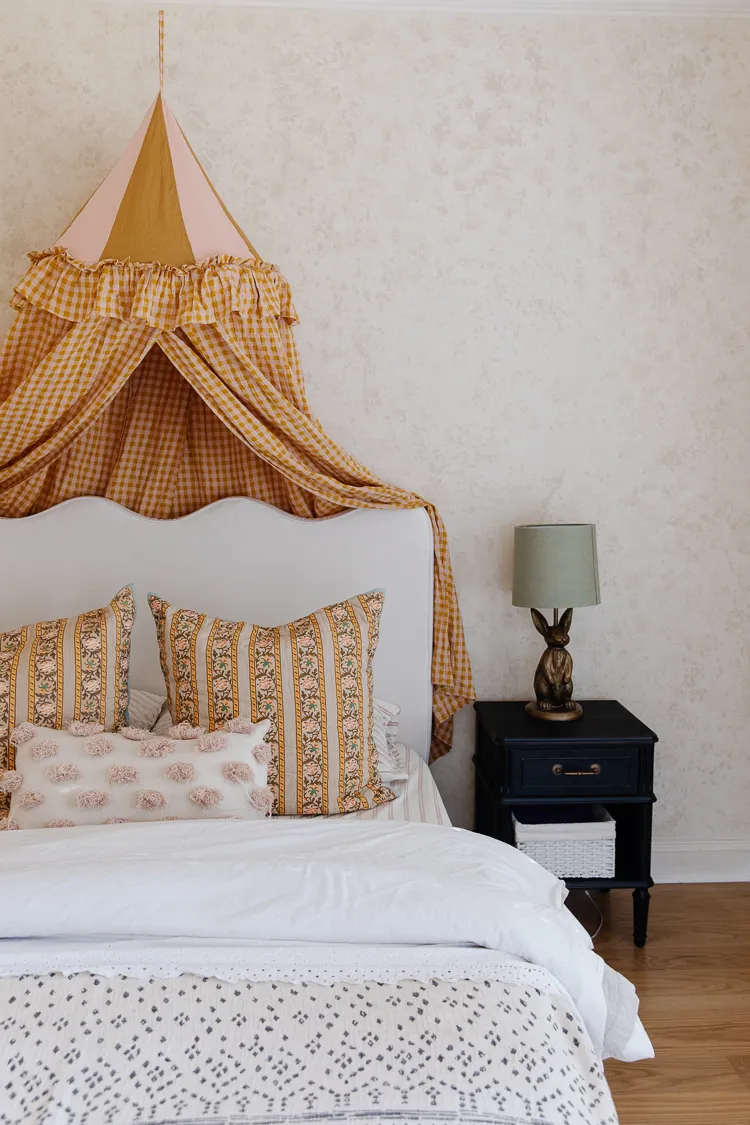
14. Whimsical Bedroom with a Gingham Canopy and Bunny Lamp
This room is a perfect example of the Cottagecore and Grandmillennial trends trickling down into kids decor. It’s a move away from minimalism and character-themed rooms towards a more nostalgic, layered, and slightly whimsical style. The use of traditional patterns like gingham and floral stripes, paired with unique pieces like the scalloped headboard and bunny lamp, feels charming and timeless. It’s popular because it feels collected and cozy, creating a space that can easily grow with a child.
|
📋 Copy HEX 🔗 Share |
Creating a DIY canopy is easier than it looks. You don’t need a four-poster bed. Simply install two ceiling hooks about 12 inches from the wall and slightly wider than the bed. Drape a long piece of lightweight fabric—like this mustard gingham—over the hooks, letting it swag gracefully over the headboard and down the sides. For a no-drill option, you can use a tension rod suspended between two walls in an alcove or a removable, ceiling-mounted curtain track. This creates a cozy, defined sleeping nook in any room.
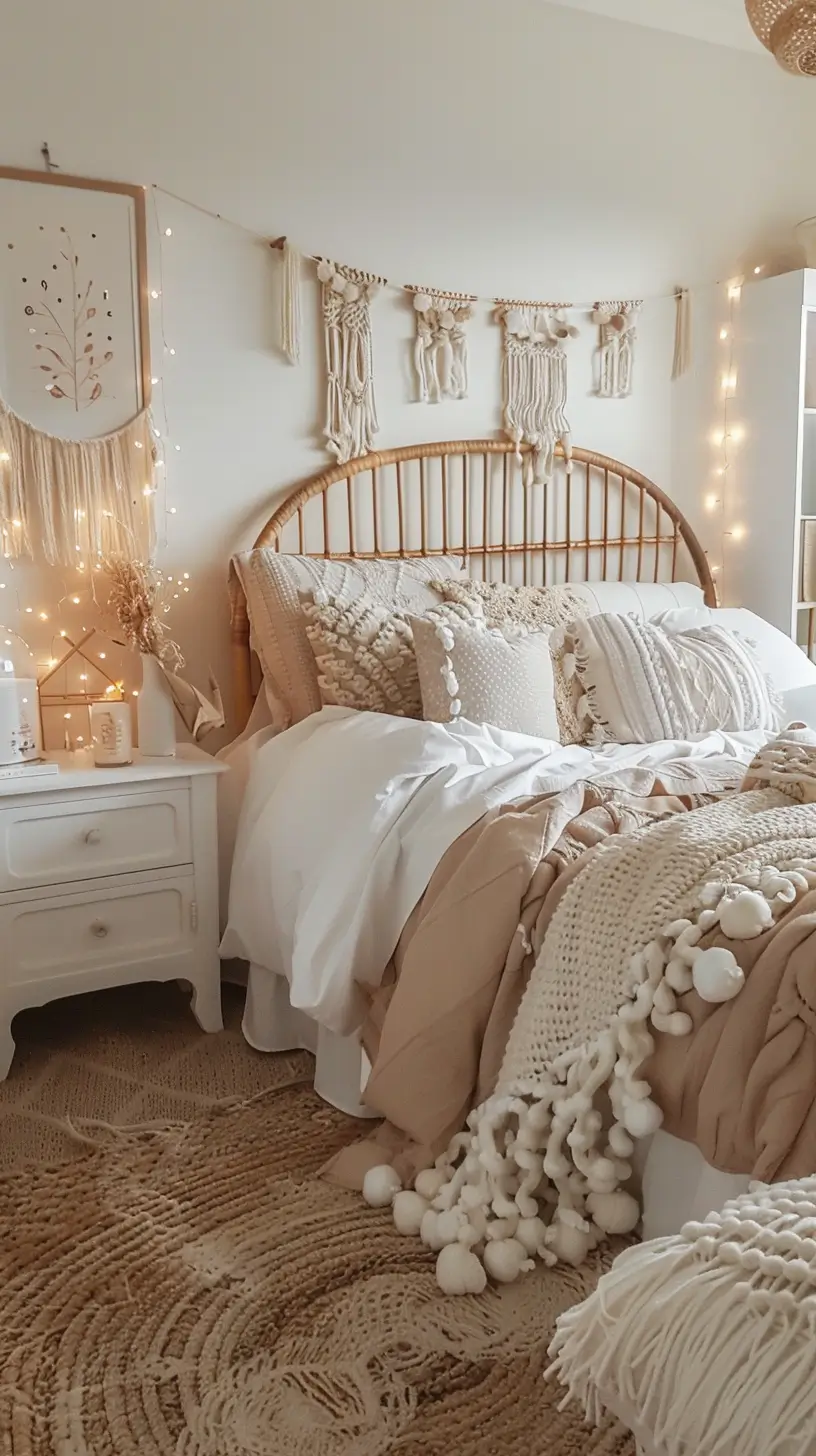
15. Cozy Bohemian Retreat with a Woven Rattan Headboard
This space is successful because it commits fully to a soft, textural palette. Every single element, from the rattan headboard to the macrame garland and the pom-pom throw, contributes to a tactile experience. The color palette is intentionally restrained—sticking to beige, cream, and white—which allows the different textures to take center stage without competing with bright colors. It’s a sophisticated take on the boho look seen in Idea #1, feeling more serene and less eclectic. The warm glow from the string lights enhances this softness.
|
📋 Copy HEX 🔗 Share |
Rattan headboards can be pricey, but you can achieve this look on a budget. Search Facebook Marketplace or thrift stores for vintage wicker or rattan headboards, which can often be found for under $50. For the bedding, look for affordable textured pillow covers on Amazon or at H&M Home. A simple DIY project is to make your own pom-pom garland or macrame wall hanging using yarn from a craft store—there are thousands of free tutorials online. A cozy, layered bed is the key, and it can be built with budget-friendly pieces.
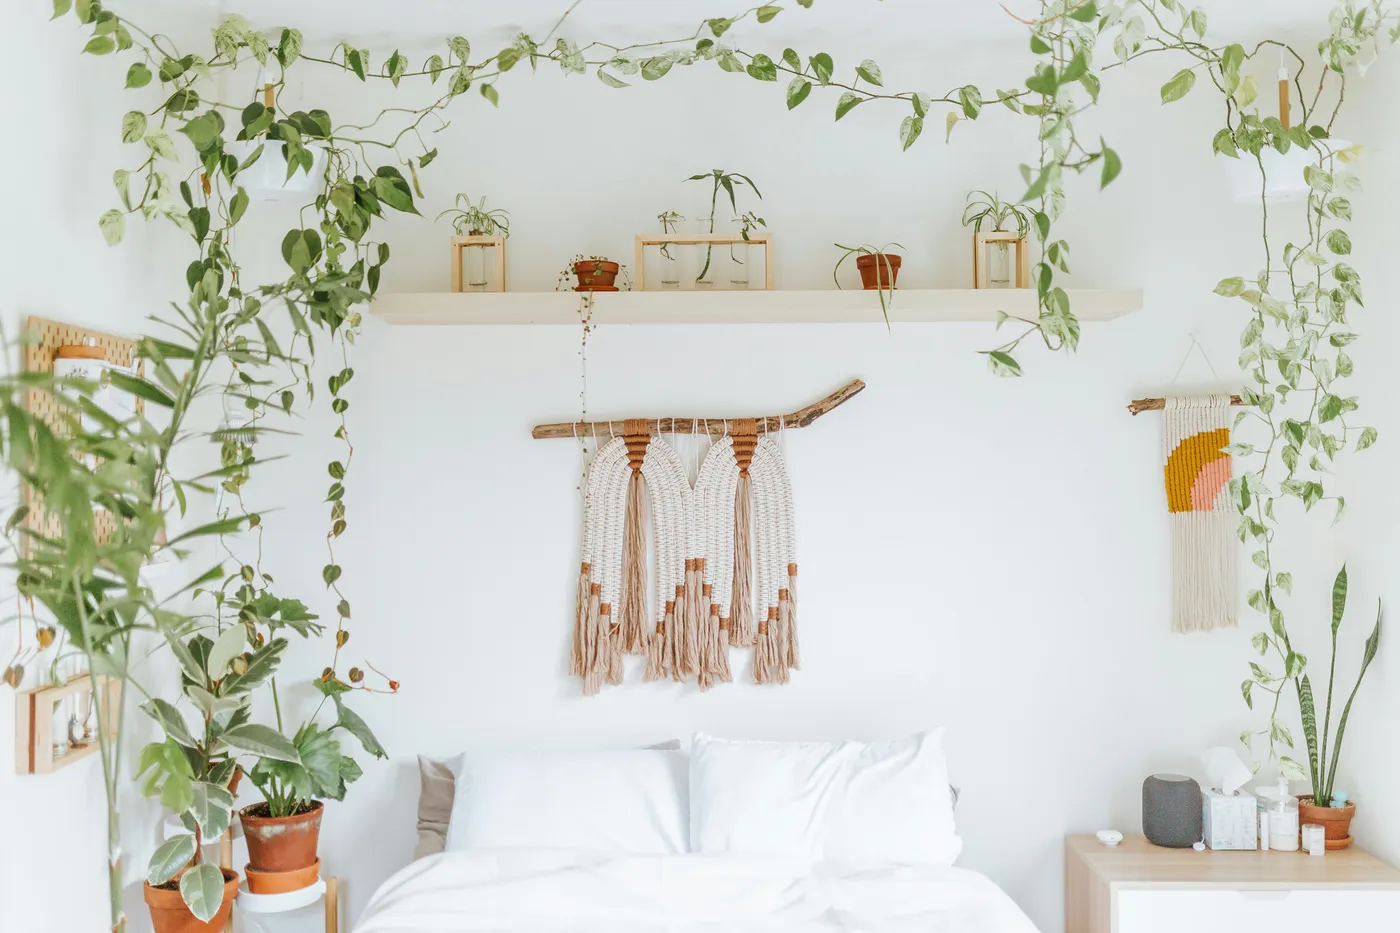
16. Lush Bedroom Oasis with Trailing Plants and Macrame Art
A room this full of live plants is beautiful, but it’s a commitment. Those long, trailing vines need consistent watering (likely once a week) and good indirect sunlight to thrive. You’ll also need to dust their leaves every few weeks to keep them healthy and looking vibrant. Be prepared for occasional leaf drop and the need to prune them back. If you’re not a dedicated plant parent, you could get a similar look with high-quality artificial plants, though you’ll miss out on the air-purifying benefits of the real thing.
|
📋 Copy HEX 🔗 Share |
Creating a simple propagation station, like the ones seen on the shelf, is a lovely DIY project.
- Find some small glass vials or jars.
- Take a healthy cutting from an existing plant (like a pothos or philodendron), making sure it has at least one node.
- Place the cutting in the vial with water, ensuring the node is submerged.
- Mount the vial to a small piece of wood or directly to the wall with a clip.
- Change the water weekly and watch the roots grow!
It’s a nearly free way to create more plants and add a scientific, beautiful touch to your decor.
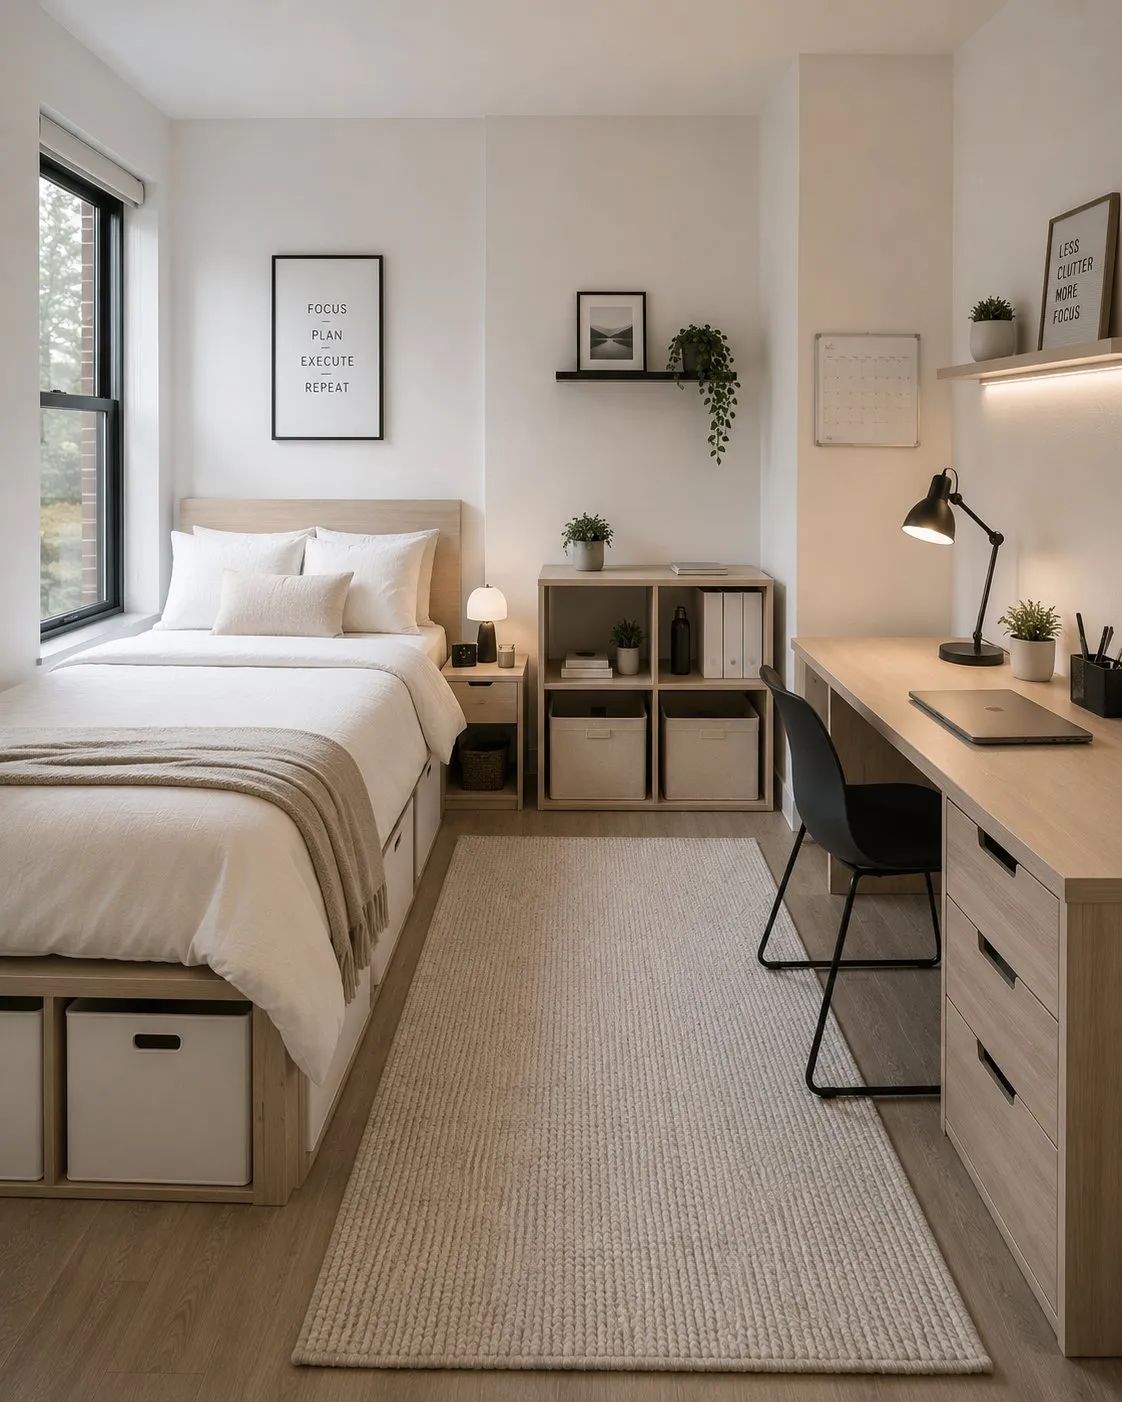
17. Clean and Serene Dorm Room with Light Wood Furniture
This minimalist approach is perfectly suited for small spaces like dorm rooms or studio apartments, typically ranging from 100 to 250 square feet. The use of light-colored wood furniture, white walls, and a light-colored rug makes the space feel larger and more open than it is. The key is multifunctional furniture, like the bed with under-bed storage and the desk that doubles as a vanity or display area. This setup maximizes every square inch without introducing visual clutter, which is essential when you have limited floor space.
|
📋 Copy HEX 🔗 Share |
Before you try to replicate this clean, organized look, do a major declutter. This aesthetic only works if you have a place for everything.
- Assess your storage: Do you have enough closed storage (like the drawers under the bed and desk) to hide away the less-than-beautiful necessities?
- Commit to minimalism: Are you willing to keep your surfaces mostly clear, displaying only a few select items?
- Plan your layout: Measure your room and your potential furniture pieces to create clear zones for sleeping, studying, and relaxing, even if they’re tiny.
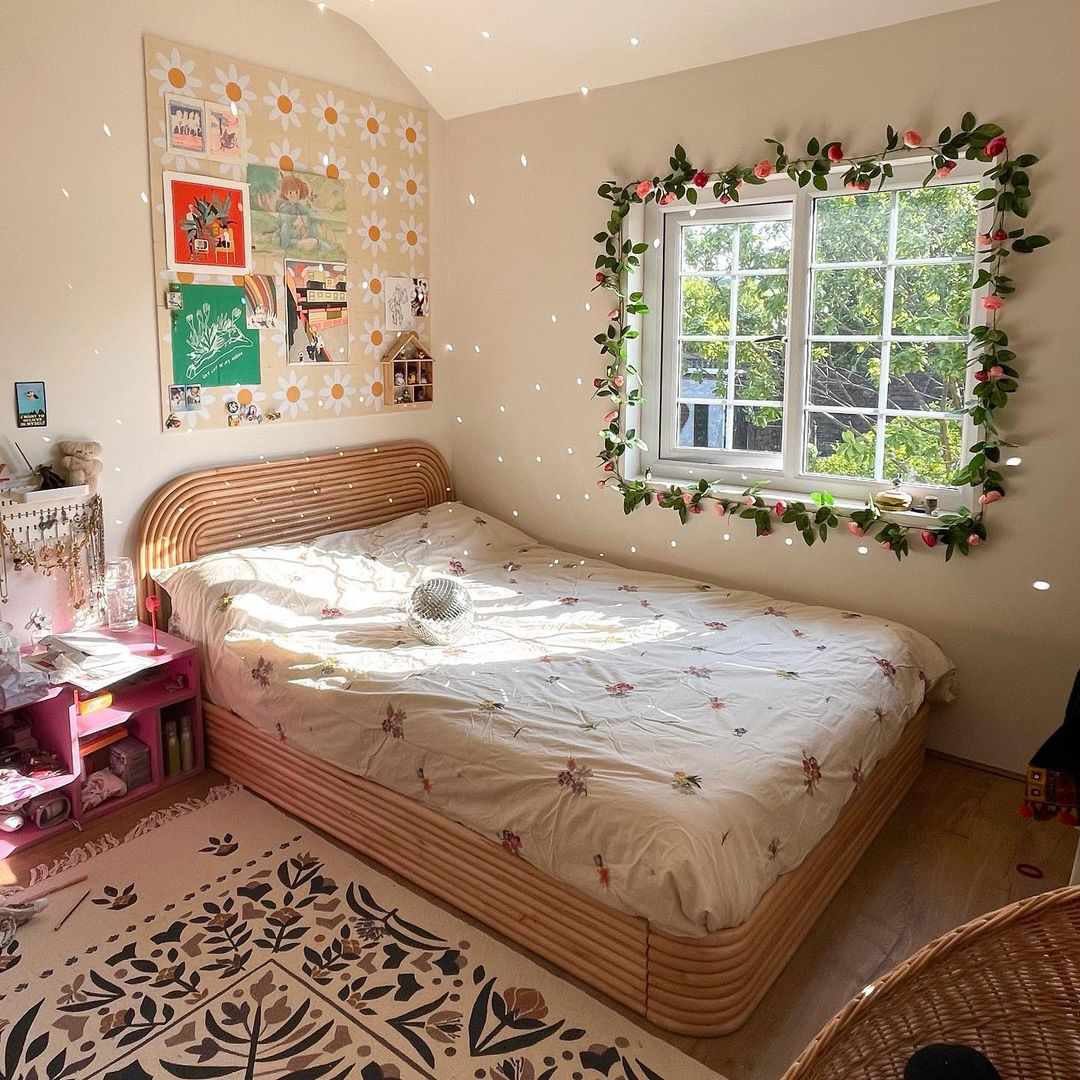
18. Whimsical Bedroom with Daisy Wall Art and a Flower Garland
The visual recipe for this room is about playful layering: 50% natural texture (the rattan bed frame, wooden shelf), 30% whimsical elements (the daisy art, flower garland, disco ball), and 20% soft color (the pink side table and floral duvet). The natural elements ground the space and keep it from feeling too saccharine, while the whimsical touches inject a huge dose of personality. The soft color acts as the connective tissue, tying all the fun pieces together. This balance is what makes it feel creative and fun, not childish.
|
📋 Copy HEX 🔗 Share |
The daisy wall art is the heart of this room. It’s not just a backdrop; it’s a statement piece that establishes the cheerful, slightly retro, and playful theme. It functions like wallpaper but on a more manageable and affordable scale. Everything else—the posters, the shelf, the garland—is layered on top of it, creating a rich and personal display. If you removed the daisy art, the collection of smaller items would feel lost and cluttered. It provides the essential structure and theme for the entire wall.
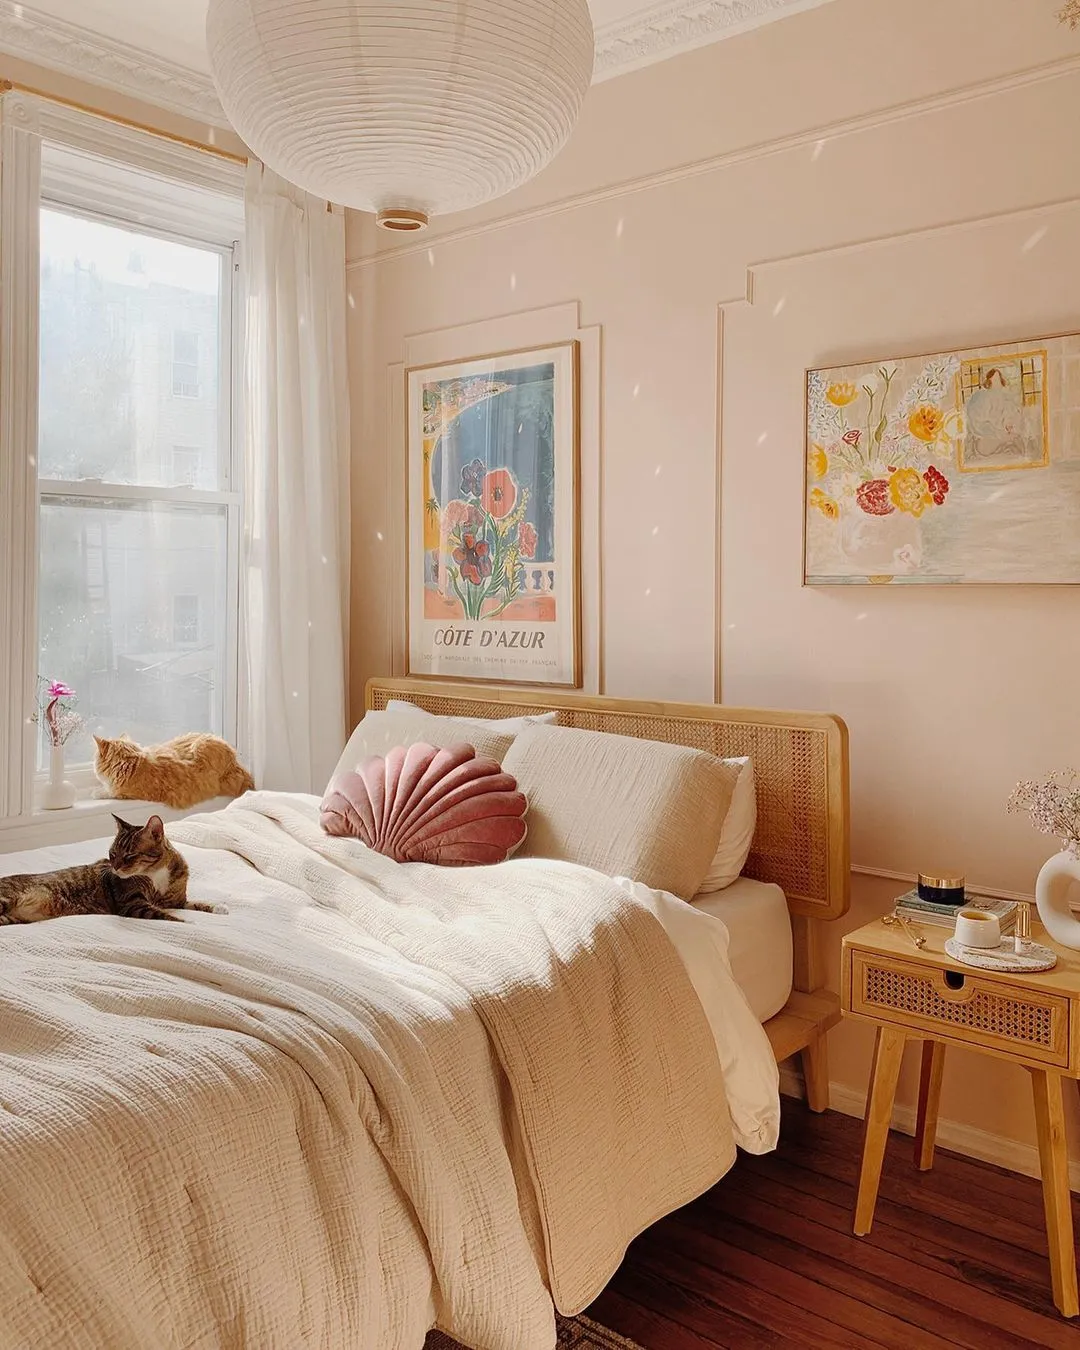
19. Cozy Retreat with Blush Pink Walls and Rattan Furniture
This room is a masterclass in monochromatic design that doesn’t feel flat. The success lies in using various tones and textures within the same color family. The walls are a soft blush pink, while the seashell pillow is a slightly more saturated, velvety pink. The light beige bedding adds another layer of warmth. The natural texture of the rattan bed and nightstand provides the necessary contrast to all the softness, keeping the room from feeling one-note. The decorative molding on the wall adds architectural interest and shadow lines, creating even more depth.
|
📋 Copy HEX 🔗 Share |
To make a small or medium-sized room feel more luxe and intentional, add decorative picture frame molding like this. You can buy pre-made lightweight molding at any home improvement store. Plan out your boxes on the wall with painter’s tape first to get the proportions right. A good rule of thumb is to leave 3-4 inches between boxes and from the ceiling, floor, and corners. Cut the molding with a miter box, attach it with a nail gun or strong construction adhesive, then caulk the seams and paint it the same color as the wall for a chic, high-end look.
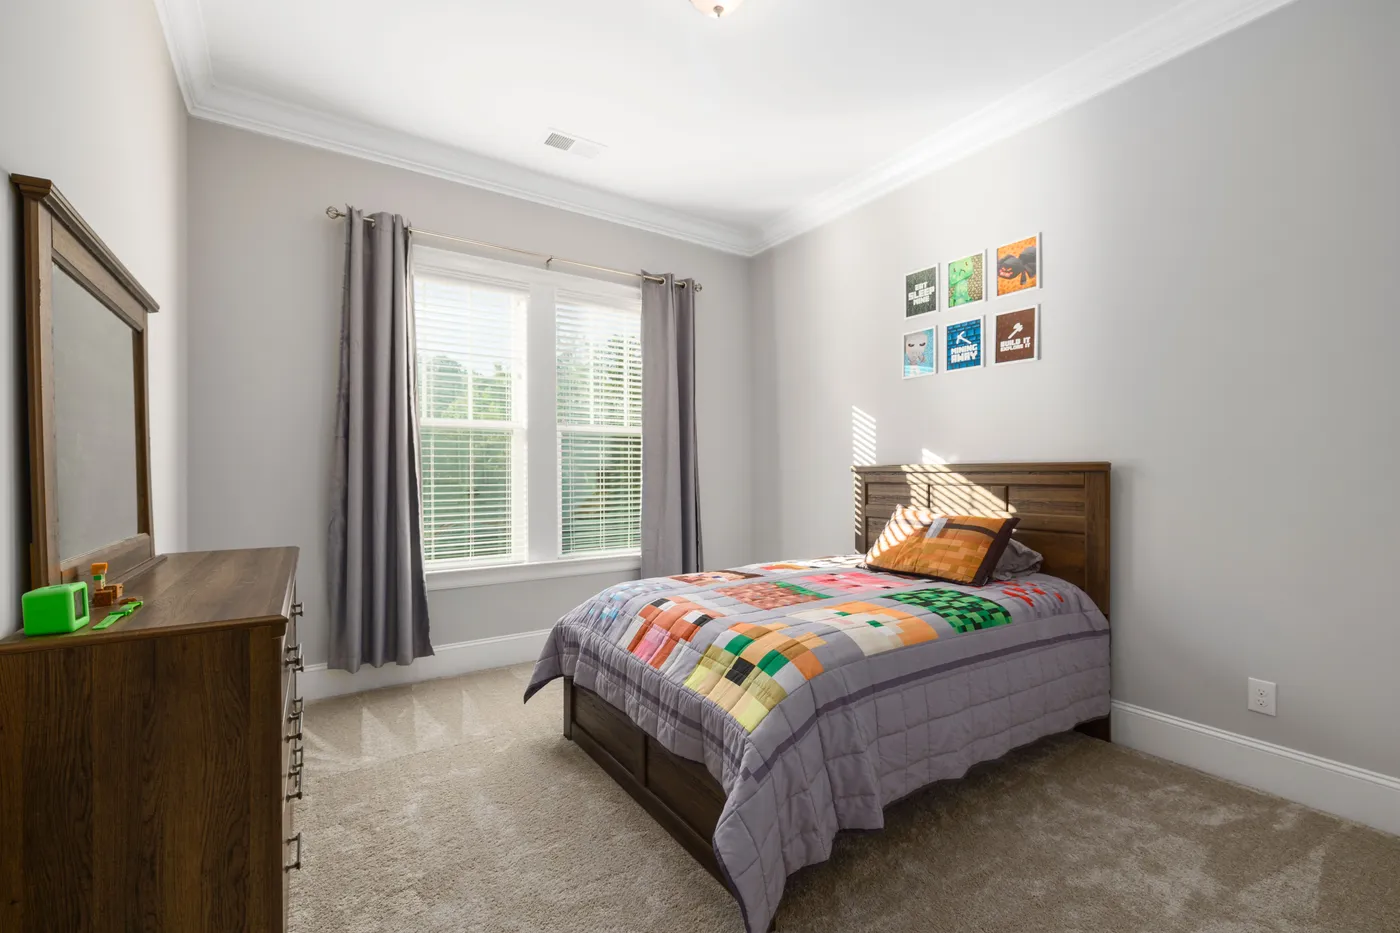
20. Gaming-Themed Bedroom with Pixelated Bedding and Framed Art
Going with a strong theme like Minecraft can be fun, but kids interests change fast. The key to doing this well is to keep the expensive, permanent parts of the room neutral. Here, the walls are a versatile light gray, the carpet is neutral, and the bed frame is a classic dark wood. The theme is expressed entirely through easily swappable, less expensive items: the bedding and the wall art. This means that in a few years, when the next favorite game comes along, the room can be updated with minimal cost and effort.
|
📋 Copy HEX 🔗 Share |
Official themed bedding can be surprisingly expensive. To get this look for less, start with a solid-colored gray or green duvet from a budget-friendly store like IKEA or Target ($30-$50). Then, focus the theme on a few key accessories. You can often find Minecraft-themed decorative pillows or throws for a fraction of the cost of a full bedding set. For the wall art, search for high-resolution printable game art on Etsy, where digital downloads can cost as little as $5. Print them at home or at a local print shop and place them in simple, affordable frames.
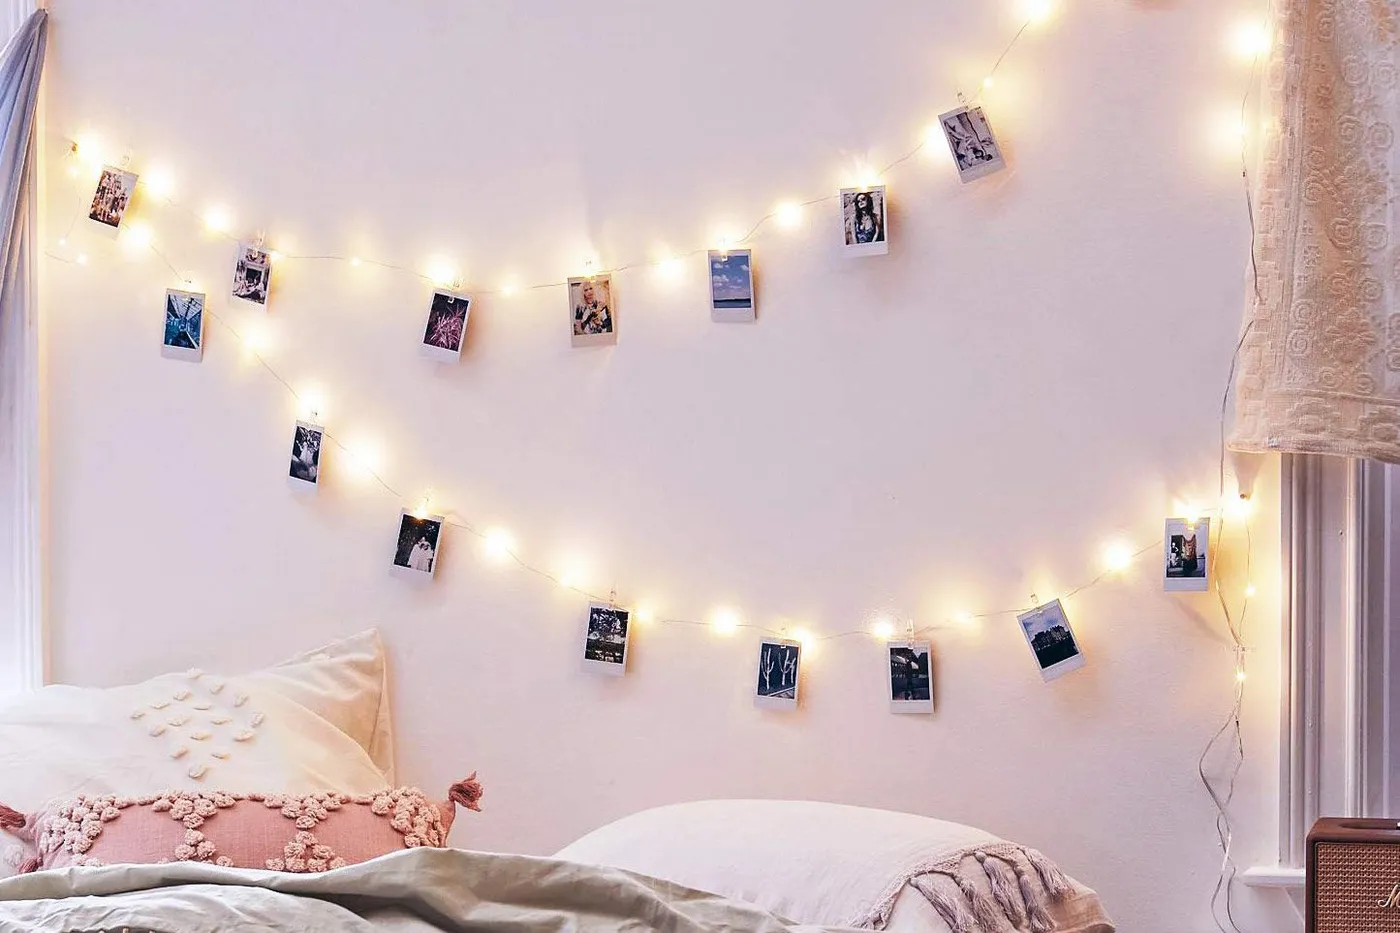
21. Personalized Photo Display with Fairy Lights on a Pink Wall
Here’s the secret to hanging fairy lights without damaging your walls, perfect for renters or dorm rooms.
- Clean the wall surface with a little rubbing alcohol to ensure good adhesion.
- Use small, clear decorating clips with removable adhesive strips (like Command brand). They are designed for this exact purpose.
- Plan your swag. Place a clip at each high point where you want the lights to drape from.
- Press each clip firmly to the wall for 30 seconds.
- Wait at least an hour before hanging the lights to allow the adhesive to cure.
- Drape your lights and add your photos with mini clothespins!
|
📋 Copy HEX 🔗 Share |
The magic of this decor isn’t the lights themselves, but the photos they illuminate. This is the ultimate DIY because it costs very little and is 100% unique to you. It turns a blank wall into a glowing, dynamic scrapbook of your favorite people and memories. The warm light draws you in and makes the photos feel even more special and sentimental. While the pink wall and textured pillows are lovely, the display of personal photos is what gives this simple corner its heart and soul. It’s storytelling masquerading as decor.
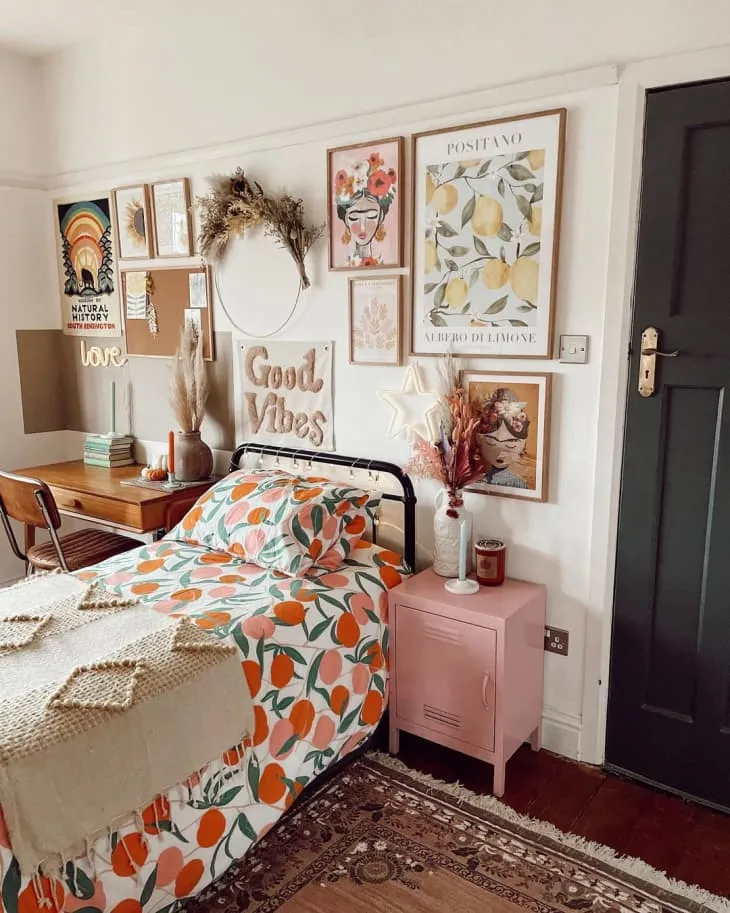
22. Bohemian Desk Corner with a Gallery Wall and Citrus Bedding
This cheerful boho vibe follows a clear recipe: 40% eclectic wall decor (the mixed-media gallery wall), 30% natural materials (the wooden desk and chair), 20% bold color/pattern (the citrus bedding and pink nightstand), and 10% soft texture (the cream bed throw). The eclectic wall is the main event, but it’s balanced by the grounding warmth of the wood and the softness of the textiles. The pops of orange and pink are the fun, unexpected elements that give the space its youthful energy. Compare this to the plant-focused gallery wall in Idea #23.
|
📋 Copy HEX 🔗 Share |
An eclectic gallery wall like this can easily look messy if not planned. Before you start hammering nails, do this:
- Define your zone: Use painter’s tape to outline the maximum height and width of your gallery wall on the wall itself. This creates boundaries.
- Gather your pieces: Collect everything you want to hang—art, photos, dried flowers, cork boards.
- Trace and arrange: Trace each item onto paper, cut them out, and arrange the paper templates on the floor or wall with tape until you find a layout you love. This lets you visualize the final look without making a single hole.
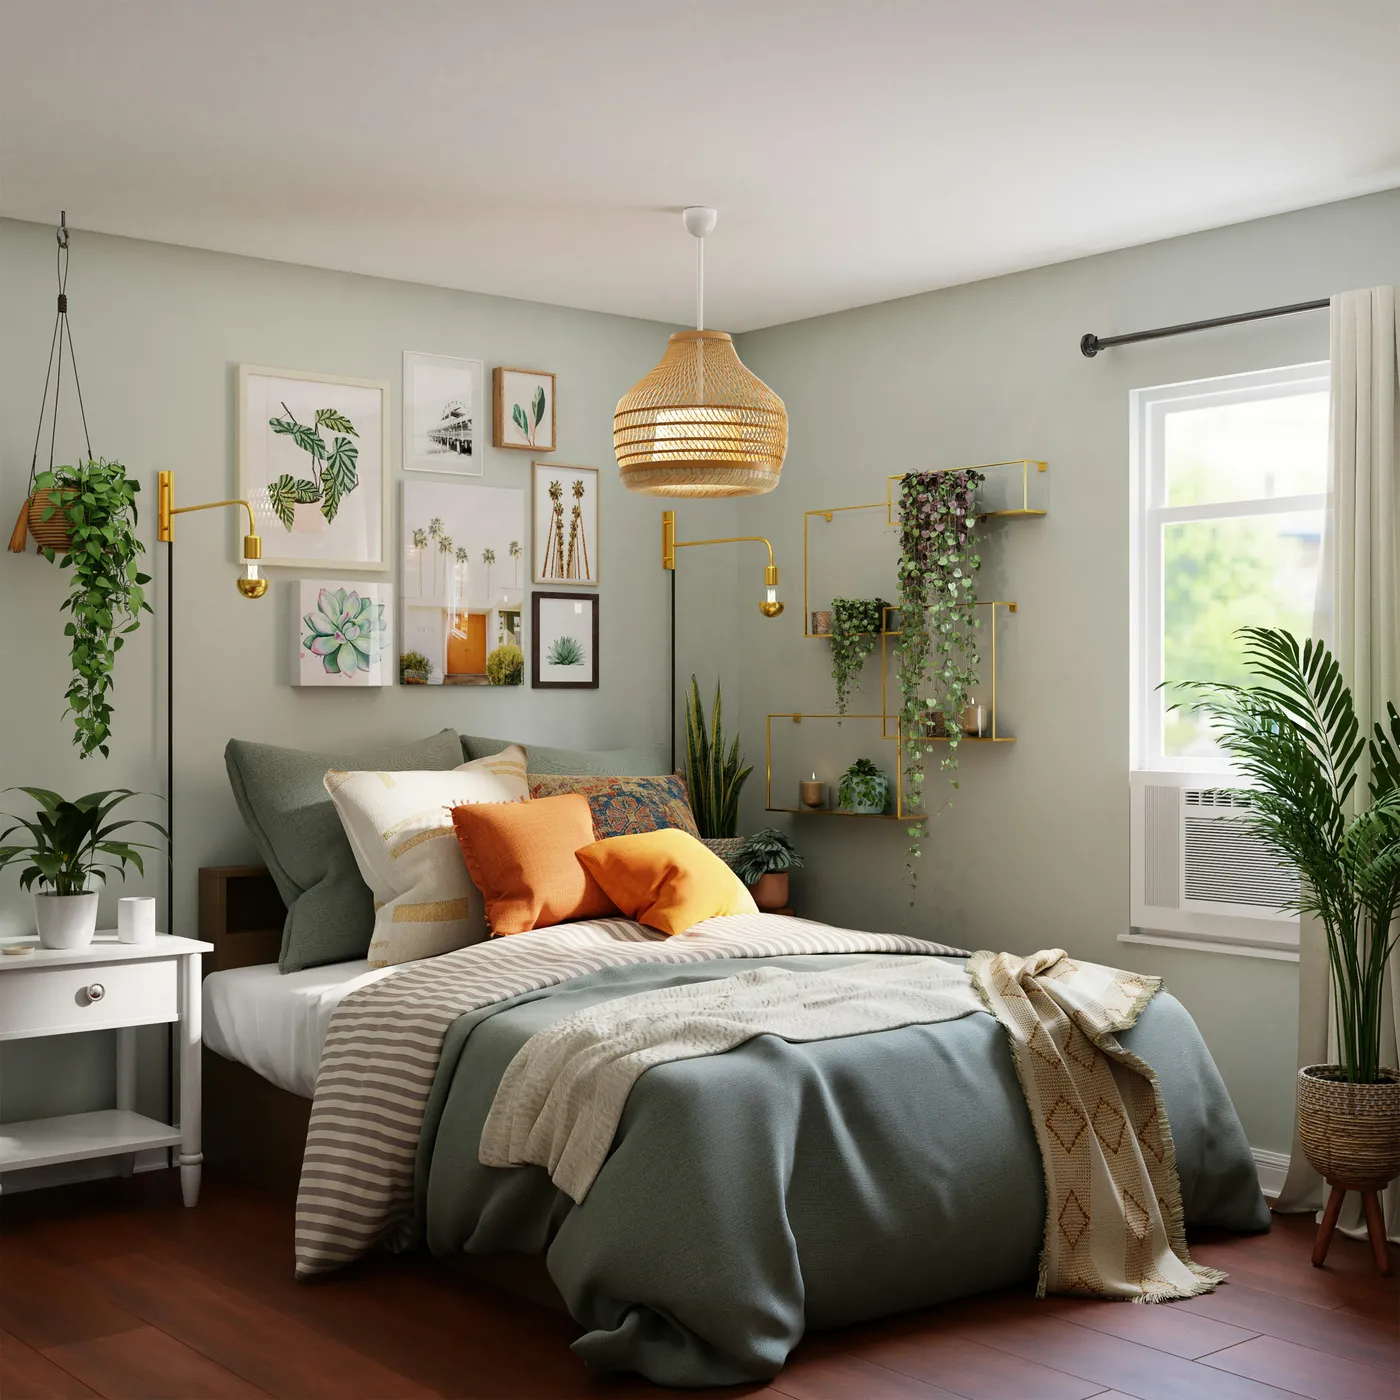
23. Earthy Bedroom with a Botanical Gallery Wall and Brass Sconces
The success of this room lies in its sophisticated color and material palette. The light sage green on the walls provides a soft, natural backdrop that makes the other elements pop. The design uses the principle of repetition effectively: the warm tones of the terracotta pots are echoed in the patterned throws on the bed, and the metallic sheen of the brass sconces is picked up by the gold frame on the shelving unit. This thoughtful repetition of color and finish makes the eclectic mix of plants, art, and furniture feel cohesive and intentional.
|
📋 Copy HEX 🔗 Share |
This room is gorgeous, but brass and live plants both require upkeep. Unlacquered brass sconces will tarnish over time, developing a patina. If you love that aged look, great! If not, you’ll need to polish them every few months. The numerous potted plants will require a regular watering schedule, and you’ll need to be diligent about checking for pests that can sometimes come with houseplants. The dark wood floors are beautiful but will show dust and pet hair more readily than lighter floors, requiring more frequent sweeping or vacuuming.
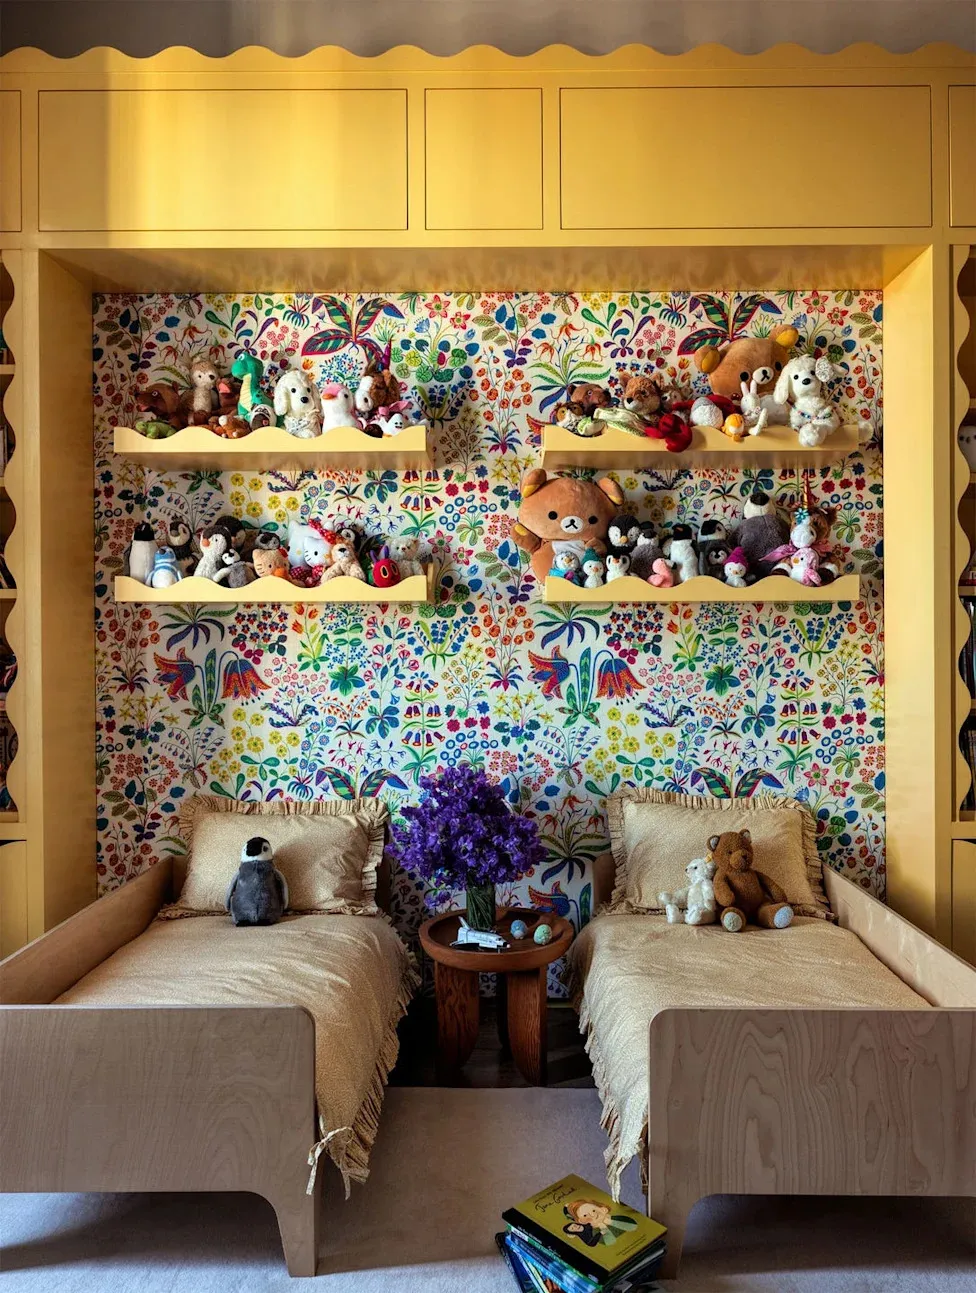
24. Playful Kids’ Room with Floral Wallpaper and Scalloped Shelving
A custom built-in feature like this yellow shelving unit is a significant investment, but it makes a huge impact. Here’s a possible cost breakdown:
- Wallpaper (High-Quality): $300 – $800
- Custom Built-in Shelving Unit (Labor & Materials): $1,500 – $4,000+
- Two Twin Beds (Light Wood): $400 – $1,000
- Bedding & Textiles (2 sets): $200 – $500
- Side Table & Decor: $100 – $250
- TOTAL: $2,500 – $6,550+
Budget alternative: Use a floral peel-and-stick wallpaper mural ($150), flank two simple beds with standard bookcases you’ve painted yellow, and add scalloped trim (available on Etsy) to the top for a custom look.
|
📋 Copy HEX 🔗 Share |
This design, featuring two twin beds and a central built-in unit, is ideal for a standard-sized kids’ bedroom, roughly 11 feet by 12 feet or larger. You need a long, uninterrupted wall to accommodate the full width of the beds and the storage unit without it feeling cramped. This layout is excellent for maximizing floor space in the center of the room for play. For a smaller room, you could adapt the concept by using just one bed and a narrower version of the yellow shelving unit on a single wall.
Your Walls, Your Story
Armed with these ideas, that blank wall or boring corner doesn’t stand a chance. Remember that the best DIY is about making your space feel more like you. Choose a project that sparks joy and don’t be afraid to put your own spin on it. Now, which one are you ready to save to your Pinterest board and actually try this weekend?