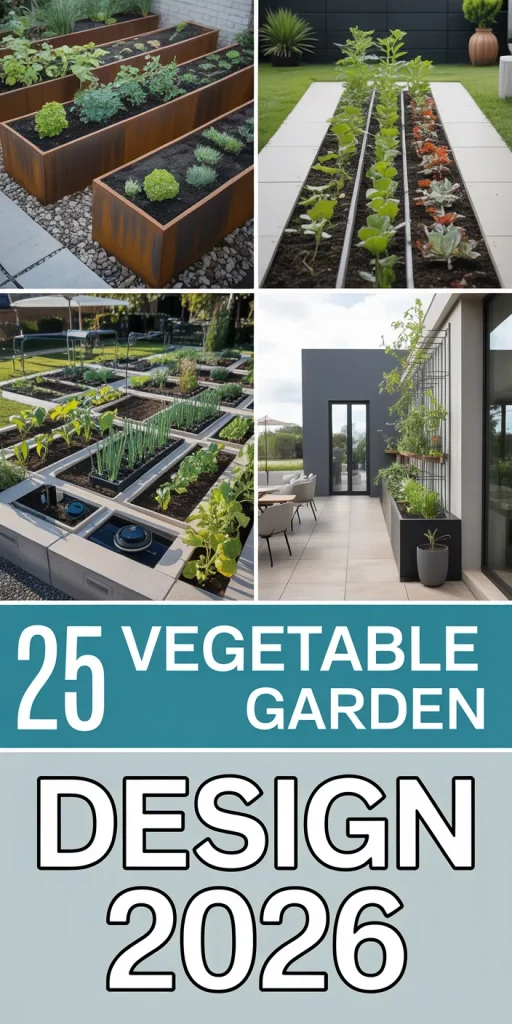
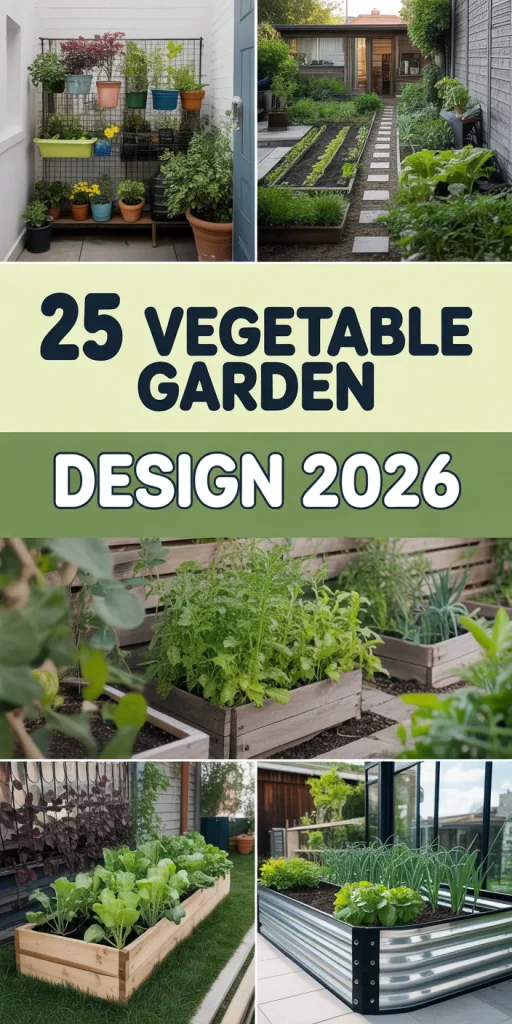
25 Stunning Vegetable Garden Design Ideas for 2026 That Will Transform Your Yard
Still scrolling through vegetable garden design 2026 photos without knowing where to start? You’re not alone. Most of us crave that lush, productive garden without a clue how to actually make it happen.
This post may contain affiliate links. As an Amazon Associate, we earn from qualifying purchases at no extra cost to you.
We spent serious time browsing Gardener’s Supply Company, Lee Valley Tools, and Johnny’s Selected Seeds to bring you only what’s worth your attention this year. This curated guide features 25 fresh ideas, covering everything from rustic charm to modern minimalism, with options ranging from an accessible $50 to a more substantial $2,500.
You’ll discover a spectrum of styles, including compact urban designs, expansive rural plots, and clever vertical solutions. Each idea is packed with actionable advice, whether you’re looking for budget-friendly alternatives or a designer’s insider tip. Vegetable garden design in 2026 is all about blending functionality with aesthetic appeal, making your edible garden a true extension of your home’s style.
Pin this guide for later—your future self will thank you when it’s time to actually do this.
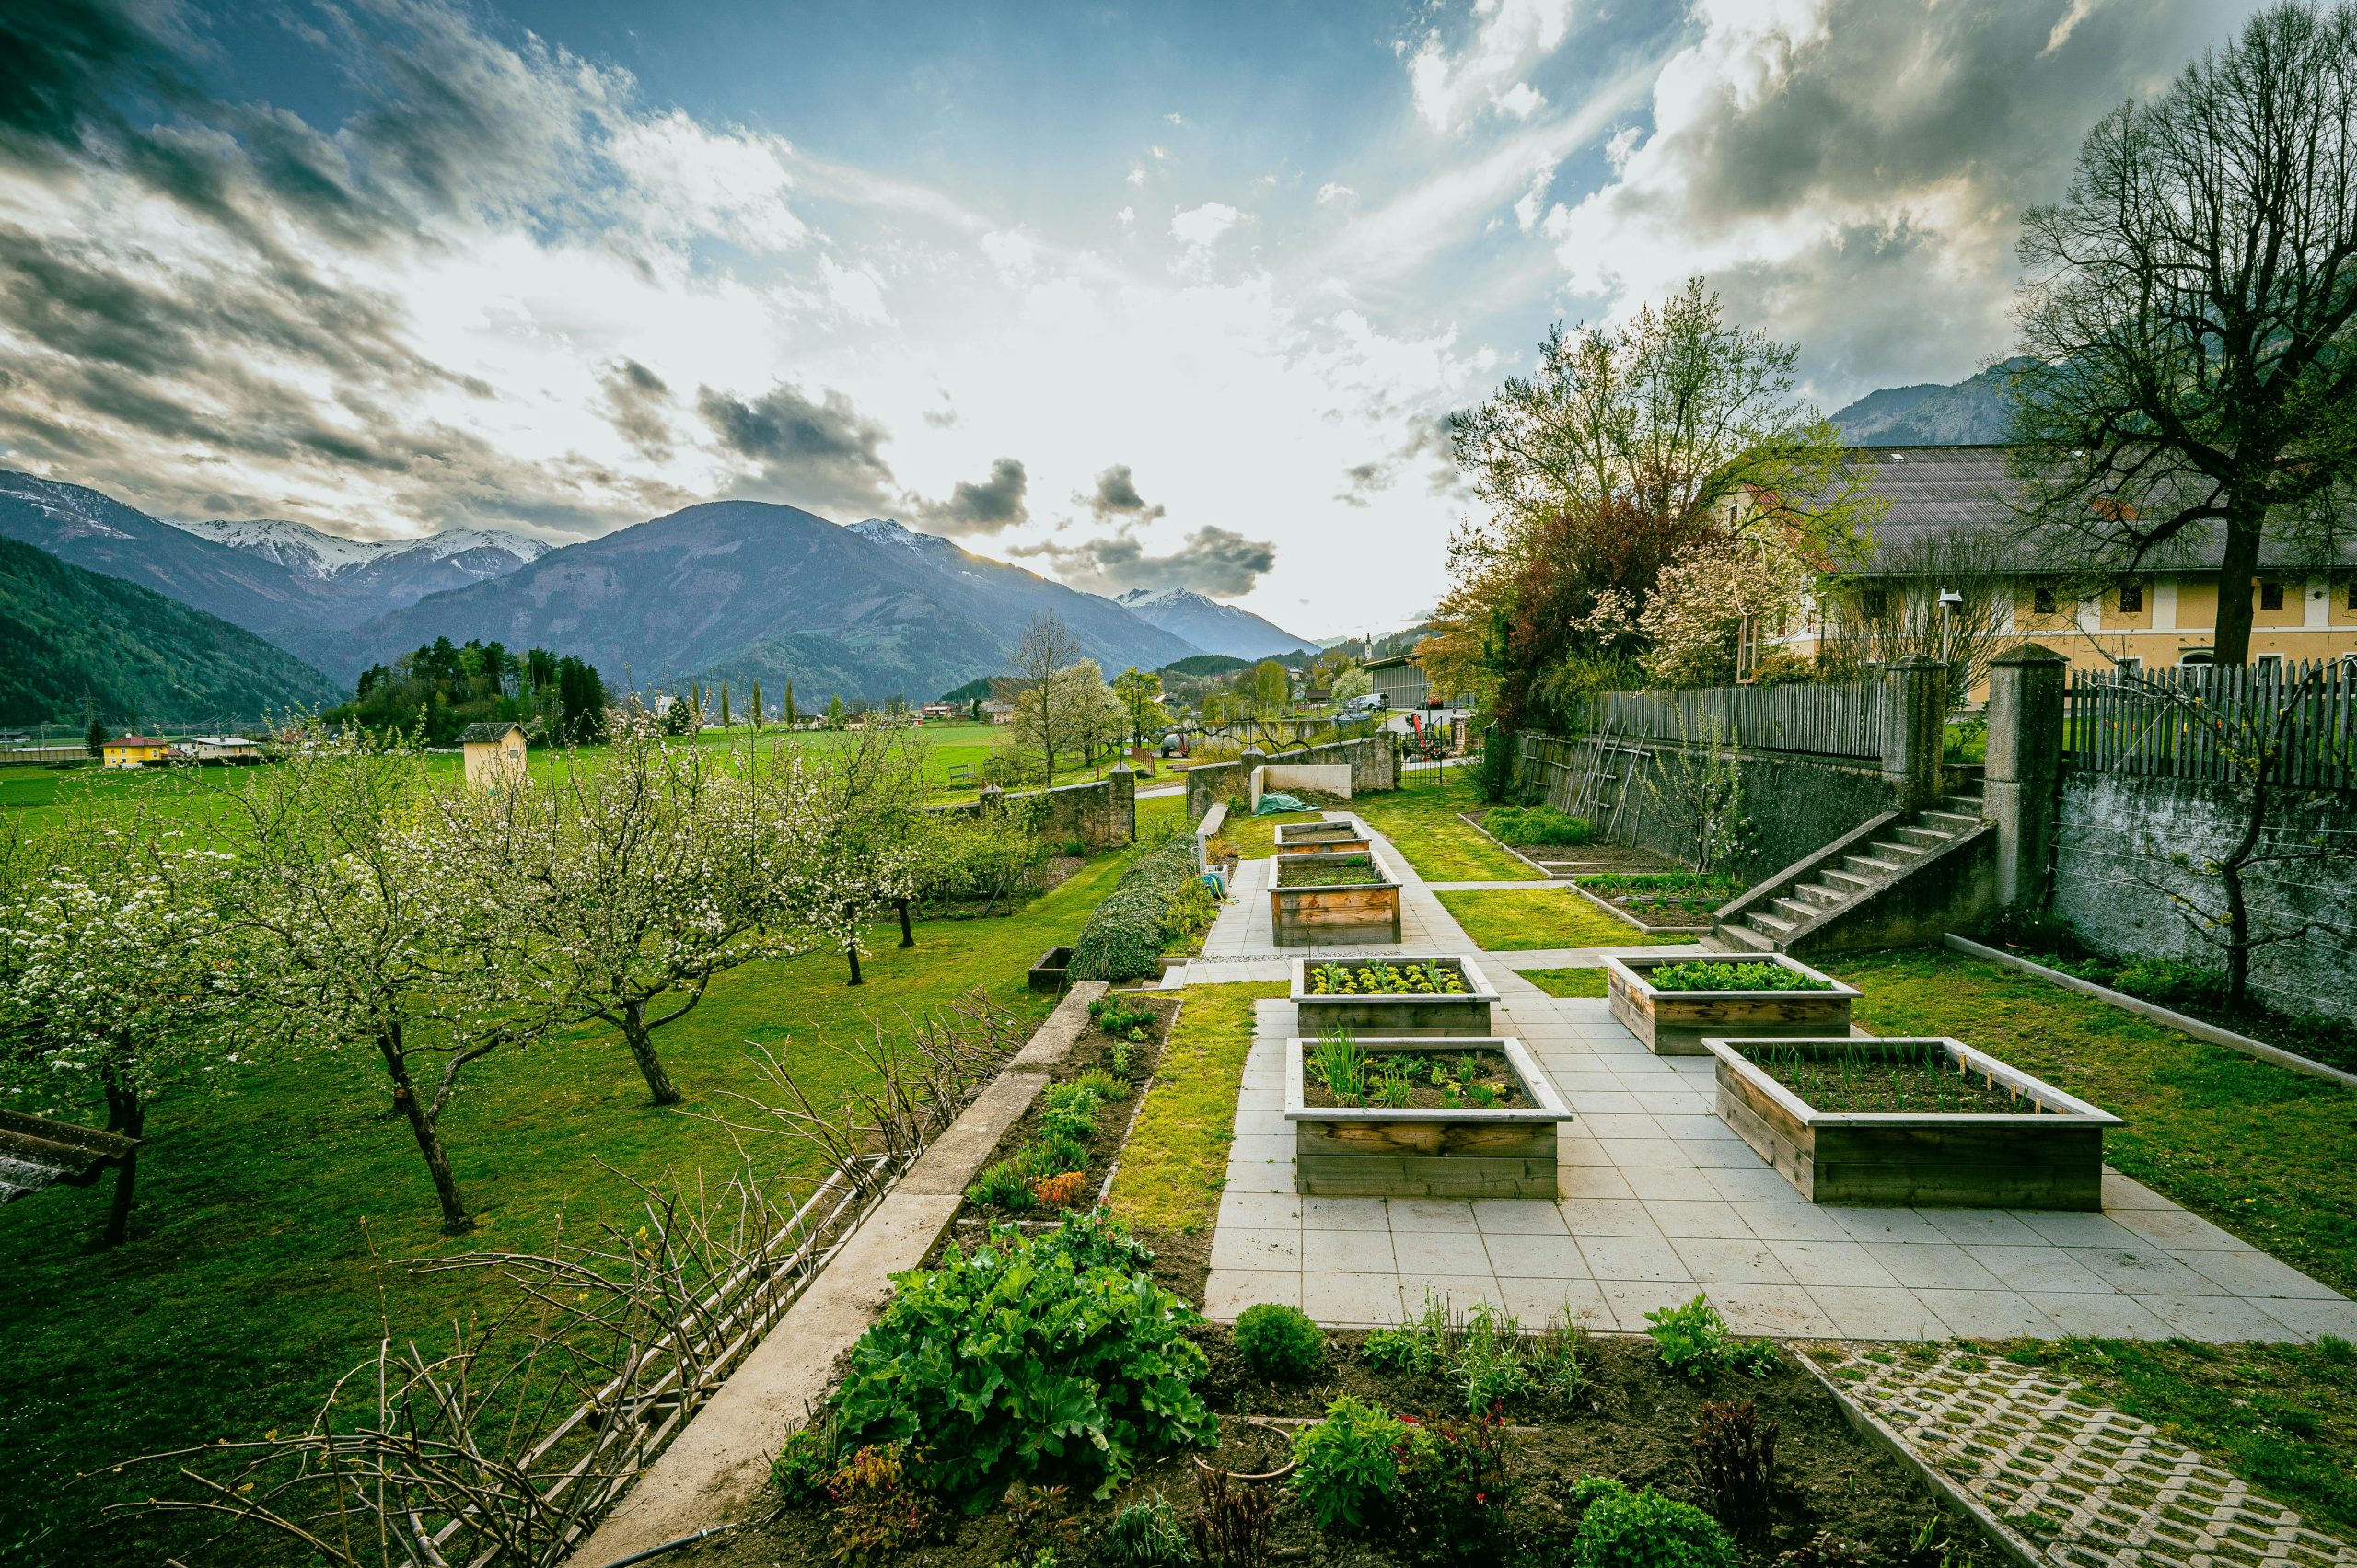
1. Terraced Garden with Raised Beds and Mountain Backdrop
This terraced garden marries functionality with breathtaking views, proving that your vegetable oasis can be a true landscape feature. The wooden raised beds are perfectly scaled to the mountain backdrop, creating a serene and productive space. Notice how the concrete paving stones define clear, walkable pathways, keeping the lush greenery contained and organized.
|
📋 Copy HEX 🔗 Share |
|
$183.00
|
$4.49
|
$39.99
|


The visual formula here is a clear progression from natural to cultivated. Imagine 70% natural elements like the mountains, grass, and flowering trees, balanced with 30% structured garden elements, including the raised beds and paved paths. This ratio ensures the garden feels intentional without losing its connection to the expansive natural environment. You could swap the concrete for permeable gravel paths if you want a softer, more integrated look, but keep the strong lines of the raised beds to maintain definition.
The magic of this design lies in its thoughtful use of layering and contrast. The strong horizontal lines of the raised beds and paved paths offer a grounding structure against the dramatic verticality of the distant mountains. The vibrant green of the grass and garden plants pops against the neutral gray of the pavers and the earthy tones of the wood, creating visual harmony. It’s a masterclass in making a large space feel both intimate and grand.
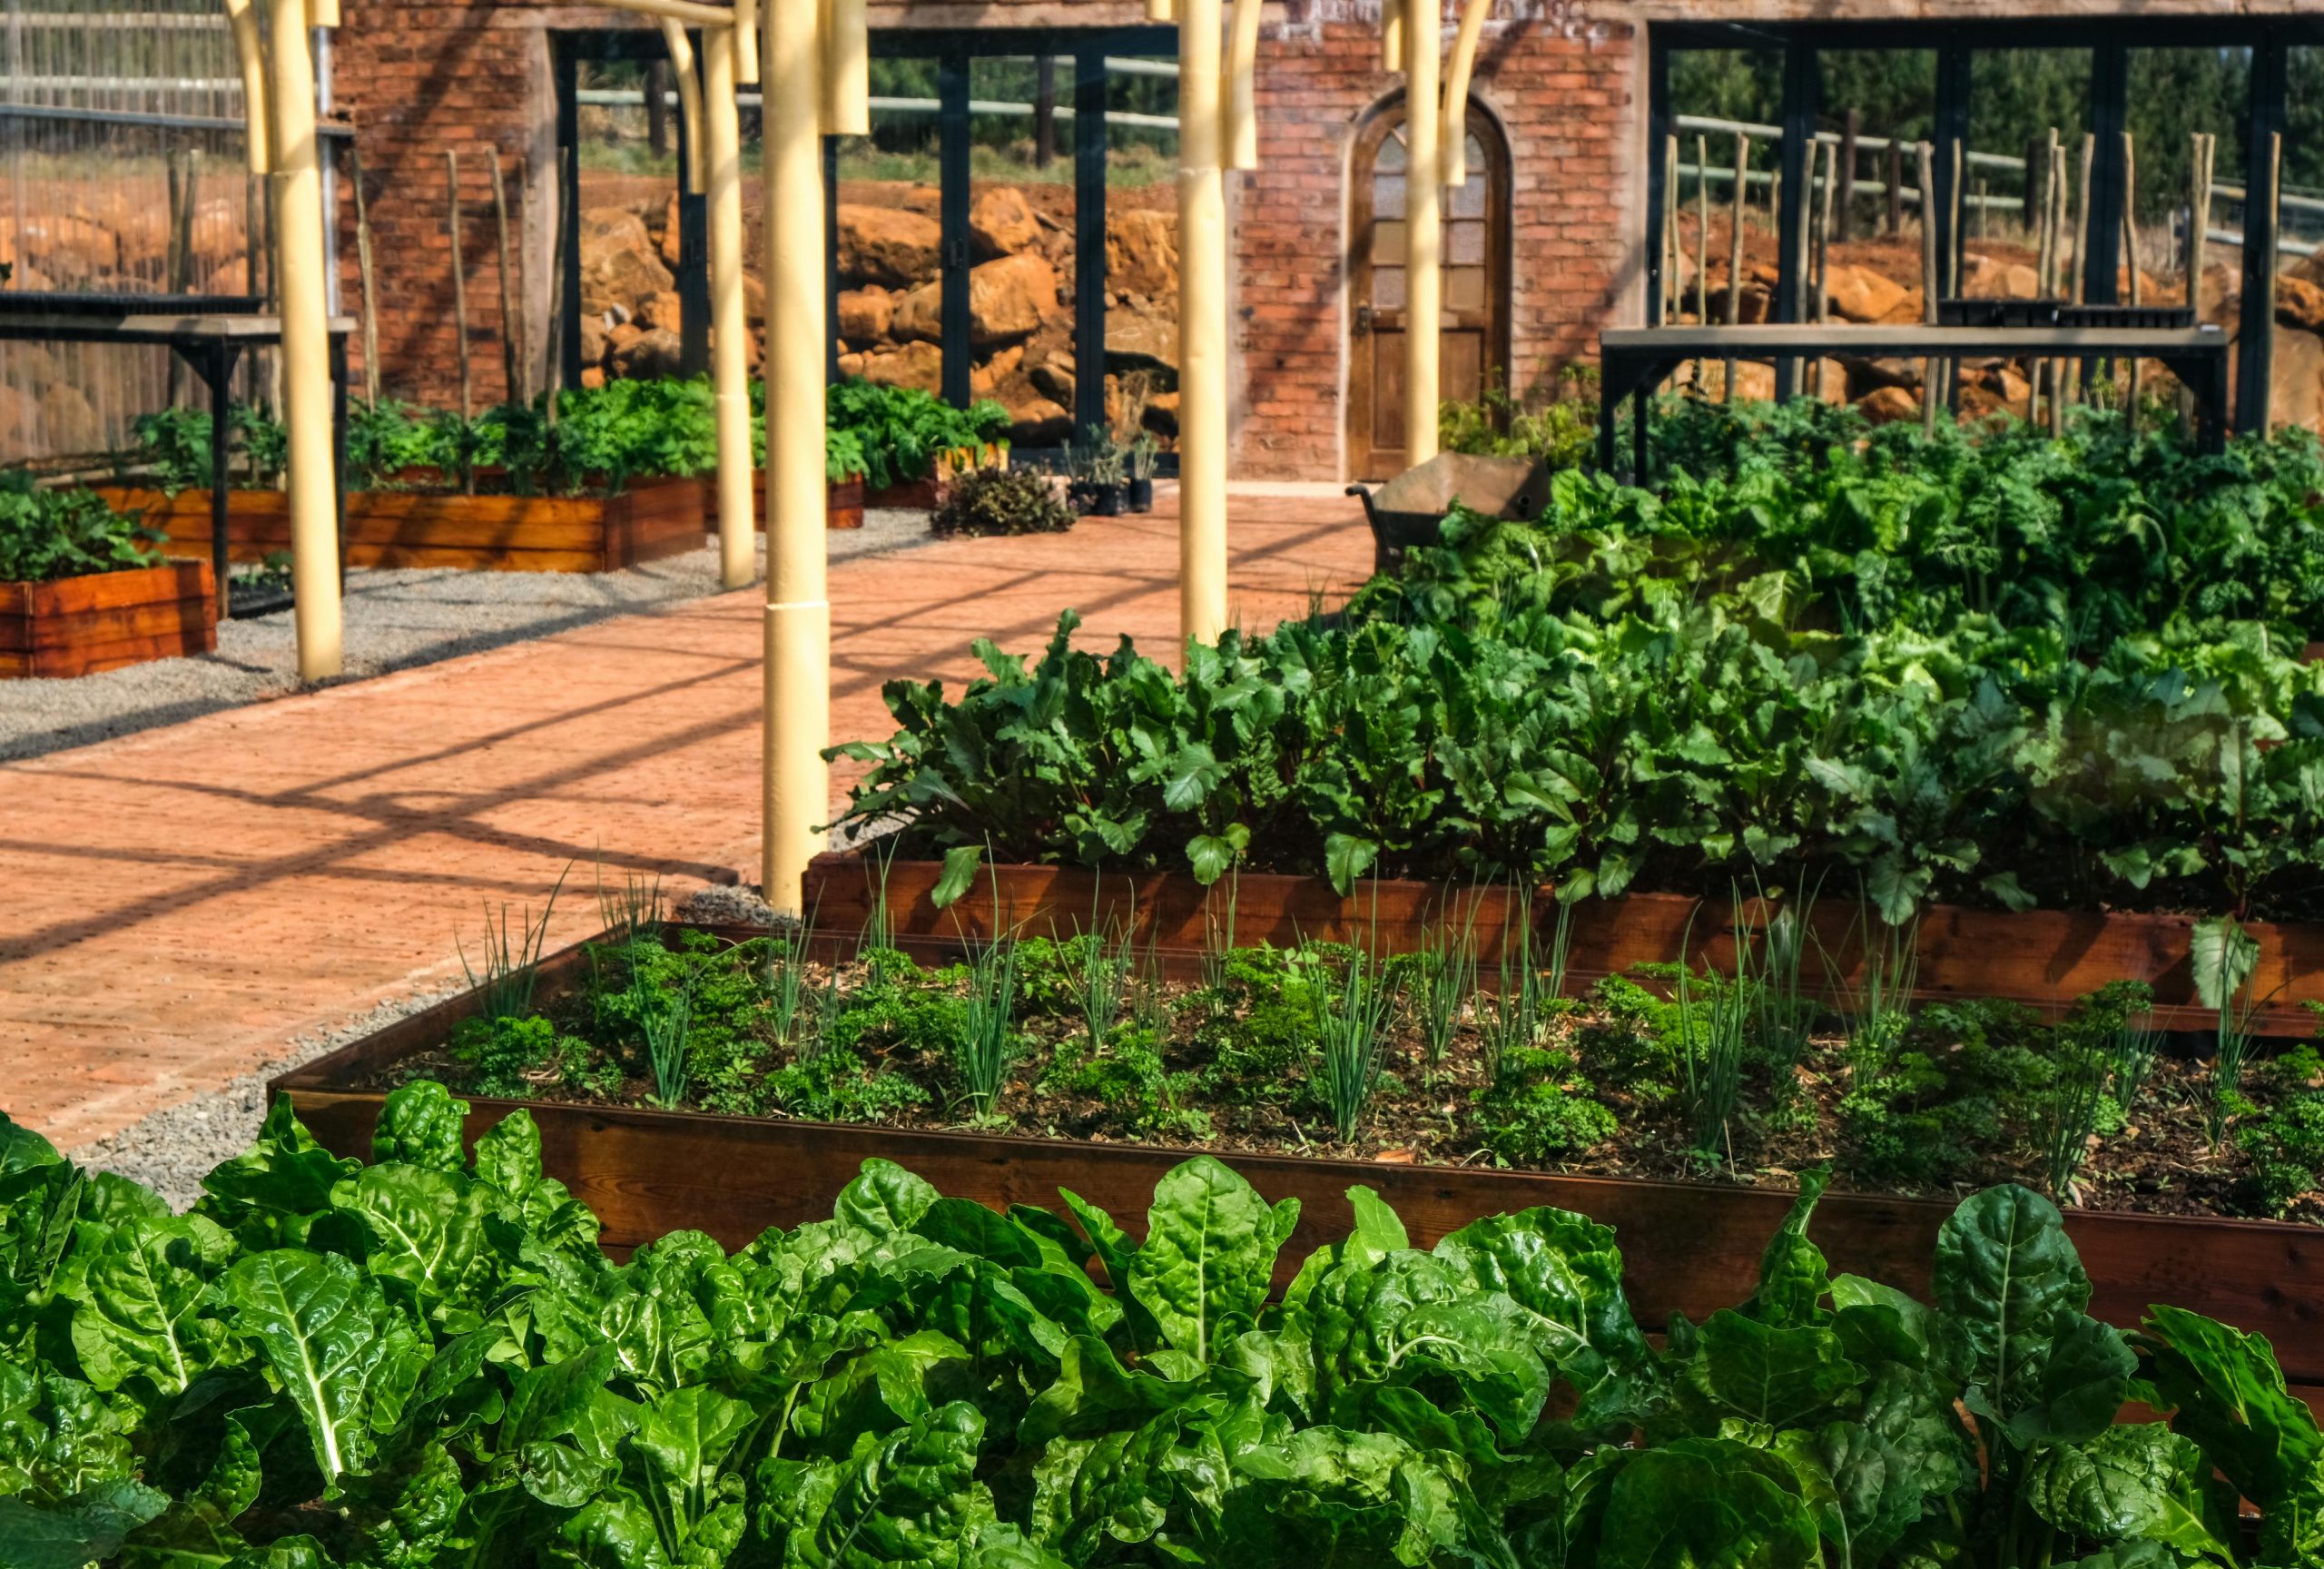
2. Raised Wooden Garden Beds with Brick Path and Pavilion
When you’ve got the space, creating a defined garden zone like this with a brick-paved path adds so much character and usability. The multiple wooden raised beds keep everything tidy, while the light-colored support posts for the pavilion hint at a shaded retreat right in the middle of your veggies. It’s practical, pretty, and productive all at once.
|
$17.00
|
$74.97
|
$0.68
|
$167.92
|
Here’s a designer tip for nailing the look: when you’re laying out your raised beds and pathways, think about zones. Aim for a main path at least 3 feet wide for easy access with a wheelbarrow and secondary paths around 18-24 inches if you’re just walking. The consistent height of these wooden beds, around 10-12 inches, is ideal for most shallow-rooted vegetables and looks cohesive.
You don’t need a massive budget to get this kind of organized, lush vibe. For a similar look for less, swap the custom brick path for reclaimed bricks or even gravel. Instead of a full pavilion with structural posts, you could use simple cedar posts and a shade sail for a fraction of the cost. Look for untreated pine or cedar lumber for your raised beds at your local hardware store—you can build several for under $300. This entire setup could be achieved for around $800-$1,200 by utilizing DIY skills and smart material choices.
3. Cozy Red Cabin Amidst Lush Garden with Raised Beds
This garden is straight out of a storybook, with the charming red cabin acting as a vibrant focal point amidst all the lush greenery. The dark wood raised beds and the pop of blue netting add texture and color, while those apple trees promise a sweet harvest. It’s truly a productive paradise.

|
📋 Copy HEX 🔗 Share |
|
$134.95
|
$43.08
|
$4,349.00
|
Let’s talk real talk for a moment: while protective netting is fantastic for keeping critters away from your precious produce, it does require a bit of thought. Make sure it’s taut and properly secured, especially if you live in a windy area; otherwise, it can become a tangled mess or blow away. Also, remember to choose a mesh size appropriate for the pests you’re trying to deter—smaller for tiny insects, larger for birds or deer.
What truly makes this garden sing is the integration of the red cabin. It’s not just a shed; it’s an anchor, a vibrant backdrop that elevates the entire garden into a cohesive, enchanting space. Without that pop of color and architectural charm, the garden, while still productive, would lose much of its unique character and cozy appeal. It turns a functional space into a destination.
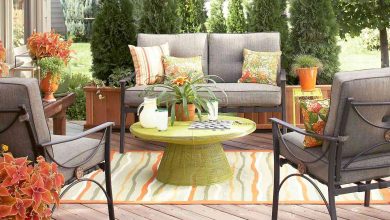
4. Symmetrical Raised Bed Vegetable Garden With Gravel Paths
An organized gardener’s dream! This symmetrical layout with weathered wood raised beds and crisp reddish-brown gravel paths feels incredibly serene and productive. The white picket fence in the background adds that touch of classic charm, making the whole setting feel both contained and expansive. You can practically smell the fresh herbs.
|
$75.00
|
$32.98
|
$19.99
|

- Main furniture (raised beds, wood): $400 – $1,000
- Lighting (paths, ambient): $100 – $300
- Textiles (weed barrier, netting): $50 – $150
- Decor/Accessories (fence, plant markers): $300 – $800
- Paint/Wall Treatment (fence paint): $50 – $100
- Total: $900 – $2,350
Budget alternative: For 40-60% less, use reclaimed wood or pallet wood for your raised beds, and opt for pea gravel or bark chips instead of a professionally installed gravel path. A DIY fence from recycled materials or simple chicken wire can also cut costs significantly.
Let’s be honest about maintenance: gravel paths look fantastic, but they do require some upkeep. You’ll need to occasionally rake them to keep them even and prevent weeds from sprouting. A good weed barrier underneath is critical, but even then, persistent little green invaders will find a way through. Plan for a quick rake and weeding session once a month to keep this look pristine. Compare with Idea #20 for another beautiful gravel path option.
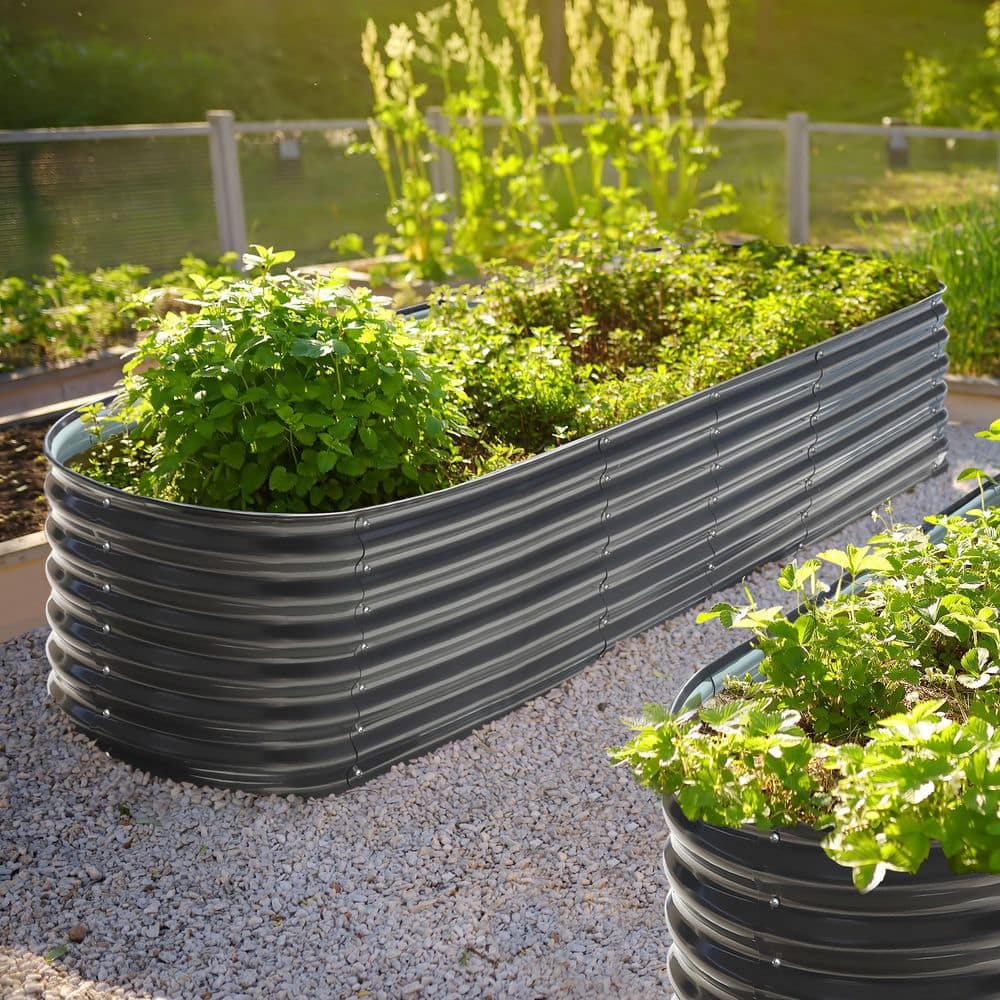
5. Community Garden Raised Beds with Wood Chips and Metal Planters
There’s something so warm and inviting about this community garden setup. The weathered wood beds, combined with the soft textures of wood chips underfoot, create a truly organic feel. And how clever are those corrugated metal planters for adding a different shape and material! It really highlights how diverse a garden can be.
|
📋 Copy HEX 🔗 Share |
|
$418.60
|
$2.00
|

This style of community-focused, accessible gardening is absolutely booming in 2026. With more people seeking connection, local food sources, and sustainable practices, shared garden spaces are becoming vital hubs. This particular aesthetic, with its mix of rustic materials and practical functionality, perfectly aligns with the current desire for genuine, unpretentious outdoor living that feels both productive and beautiful. It’s a trend with serious staying power, fostering well-being and local engagement.
- Measure your space thoroughly, especially if you’re considering a shade structure.
- Check local community garden rules or HOA guidelines if applicable.
- Assess existing soil quality – you might need to amend heavily or rely solely on raised beds.
- Determine your sun exposure throughout the day; different vegetables have different light needs.
6. Lush Allotment Garden with Raised Beds and Graveled Path
What an explosion of life! This allotment garden is a fantastic example of maximizing every inch for growth, with a mix of leafy greens, small trees, and those cheerful sunflowers. The graveled path offers just enough structure to keep things navigable without feeling too formal. It’s living proof that abundance and beauty can coexist.
|
$109.26
|
$14.98
|
$16.49
|
Here’s a pro tip for creating an abundant-looking garden like this: use varying plant heights and textures. Notice how the large leafy vegetables create a full base, while taller elements like sunflowers draw the eye upwards. This layering prevents the garden from looking flat or sparse. When designing, plan for at least three distinct height zones—low ground cover, mid-height bushier plants, and tall vertical accents.
This design absolutely hums with the principle of organic abundance, balanced by just enough structure. The narrow gravel path creates a crucial visual break and practical access point amidst the riot of greenery. Without it, the garden would feel overwhelming. The diverse plant palette also ensures interest all season long, with different forms and colors creating a dynamic, ever-changing landscape. It works because it’s a controlled wildness, a productive jungle with a thoughtful spine.
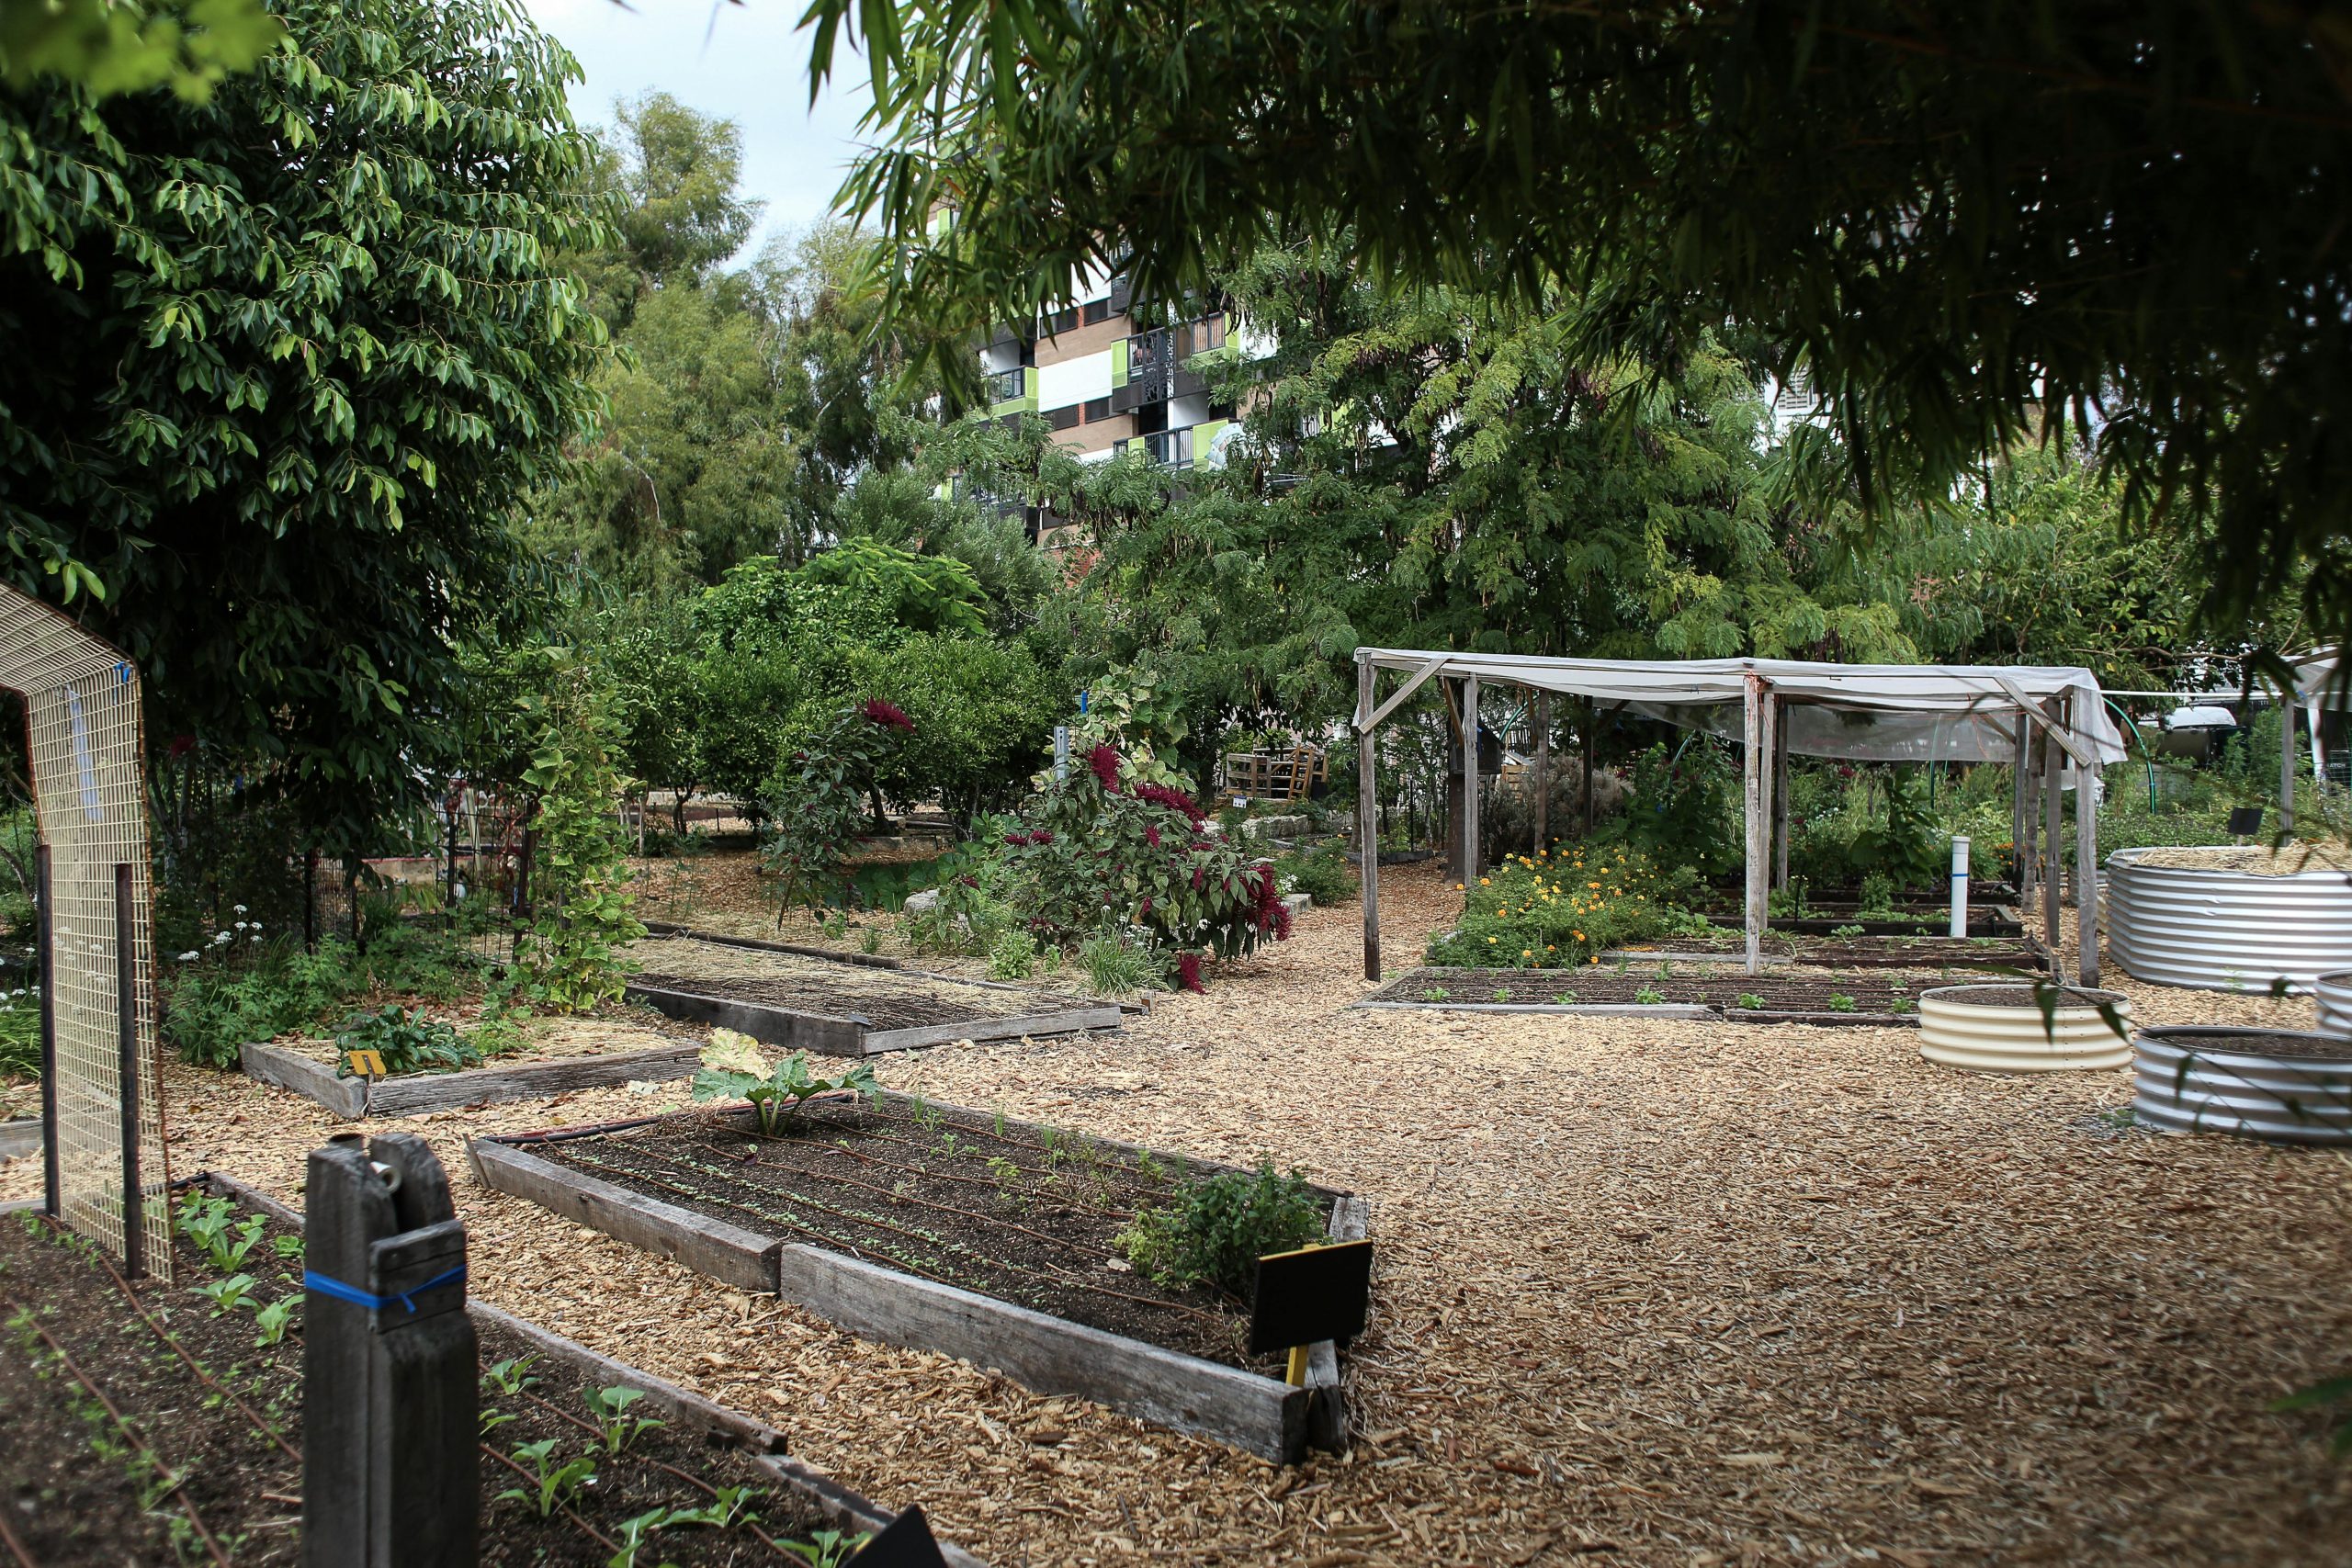
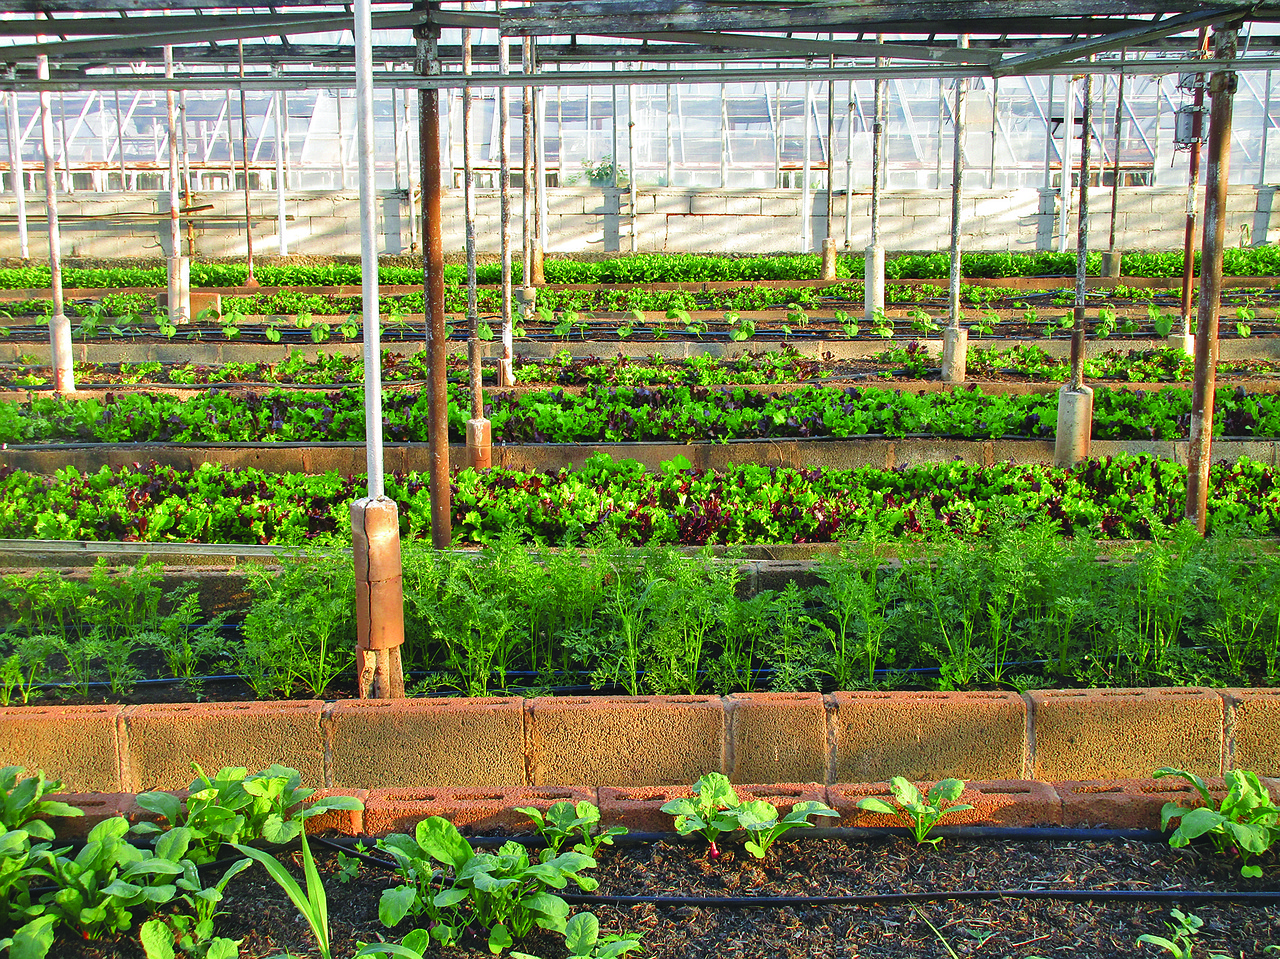
7. Urban Allotment Garden with Polytunnel and Raised Beds
This urban allotment is a powerhouse of productivity! The clear polytunnel is a fantastic feature for season extension, and the mix of raised beds and in-ground planting shows smart space utilization. Even with residential homes in the background, this garden manages to feel like its own thriving ecosystem.

|
📋 Copy HEX 🔗 Share |
|
$59.98
|
$150.00
|
$119.99
|
$42.88
|


A bit of real talk about polytunnels: they’re incredible for growing, but they can get scorching hot on sunny days, potentially cooking your plants if not properly ventilated. You’ll need to be diligent about opening vents or rolling up sides to ensure good airflow. Also, assess your local wind conditions; a large polytunnel needs to be securely anchored to prevent it from becoming a kite in a storm.
This setup, with its mix of large structures and smaller raised beds, is pretty versatile. It works best in a mid-sized backyard (think a minimum of 300-500 sq ft), where you have enough room for both the polytunnel and flexible planting areas. Ceiling height isn’t a concern here, but good sun exposure for most of the day is essential for the polytunnel’s effectiveness. For smaller spaces, check out vertical garden solutions like Idea #23.
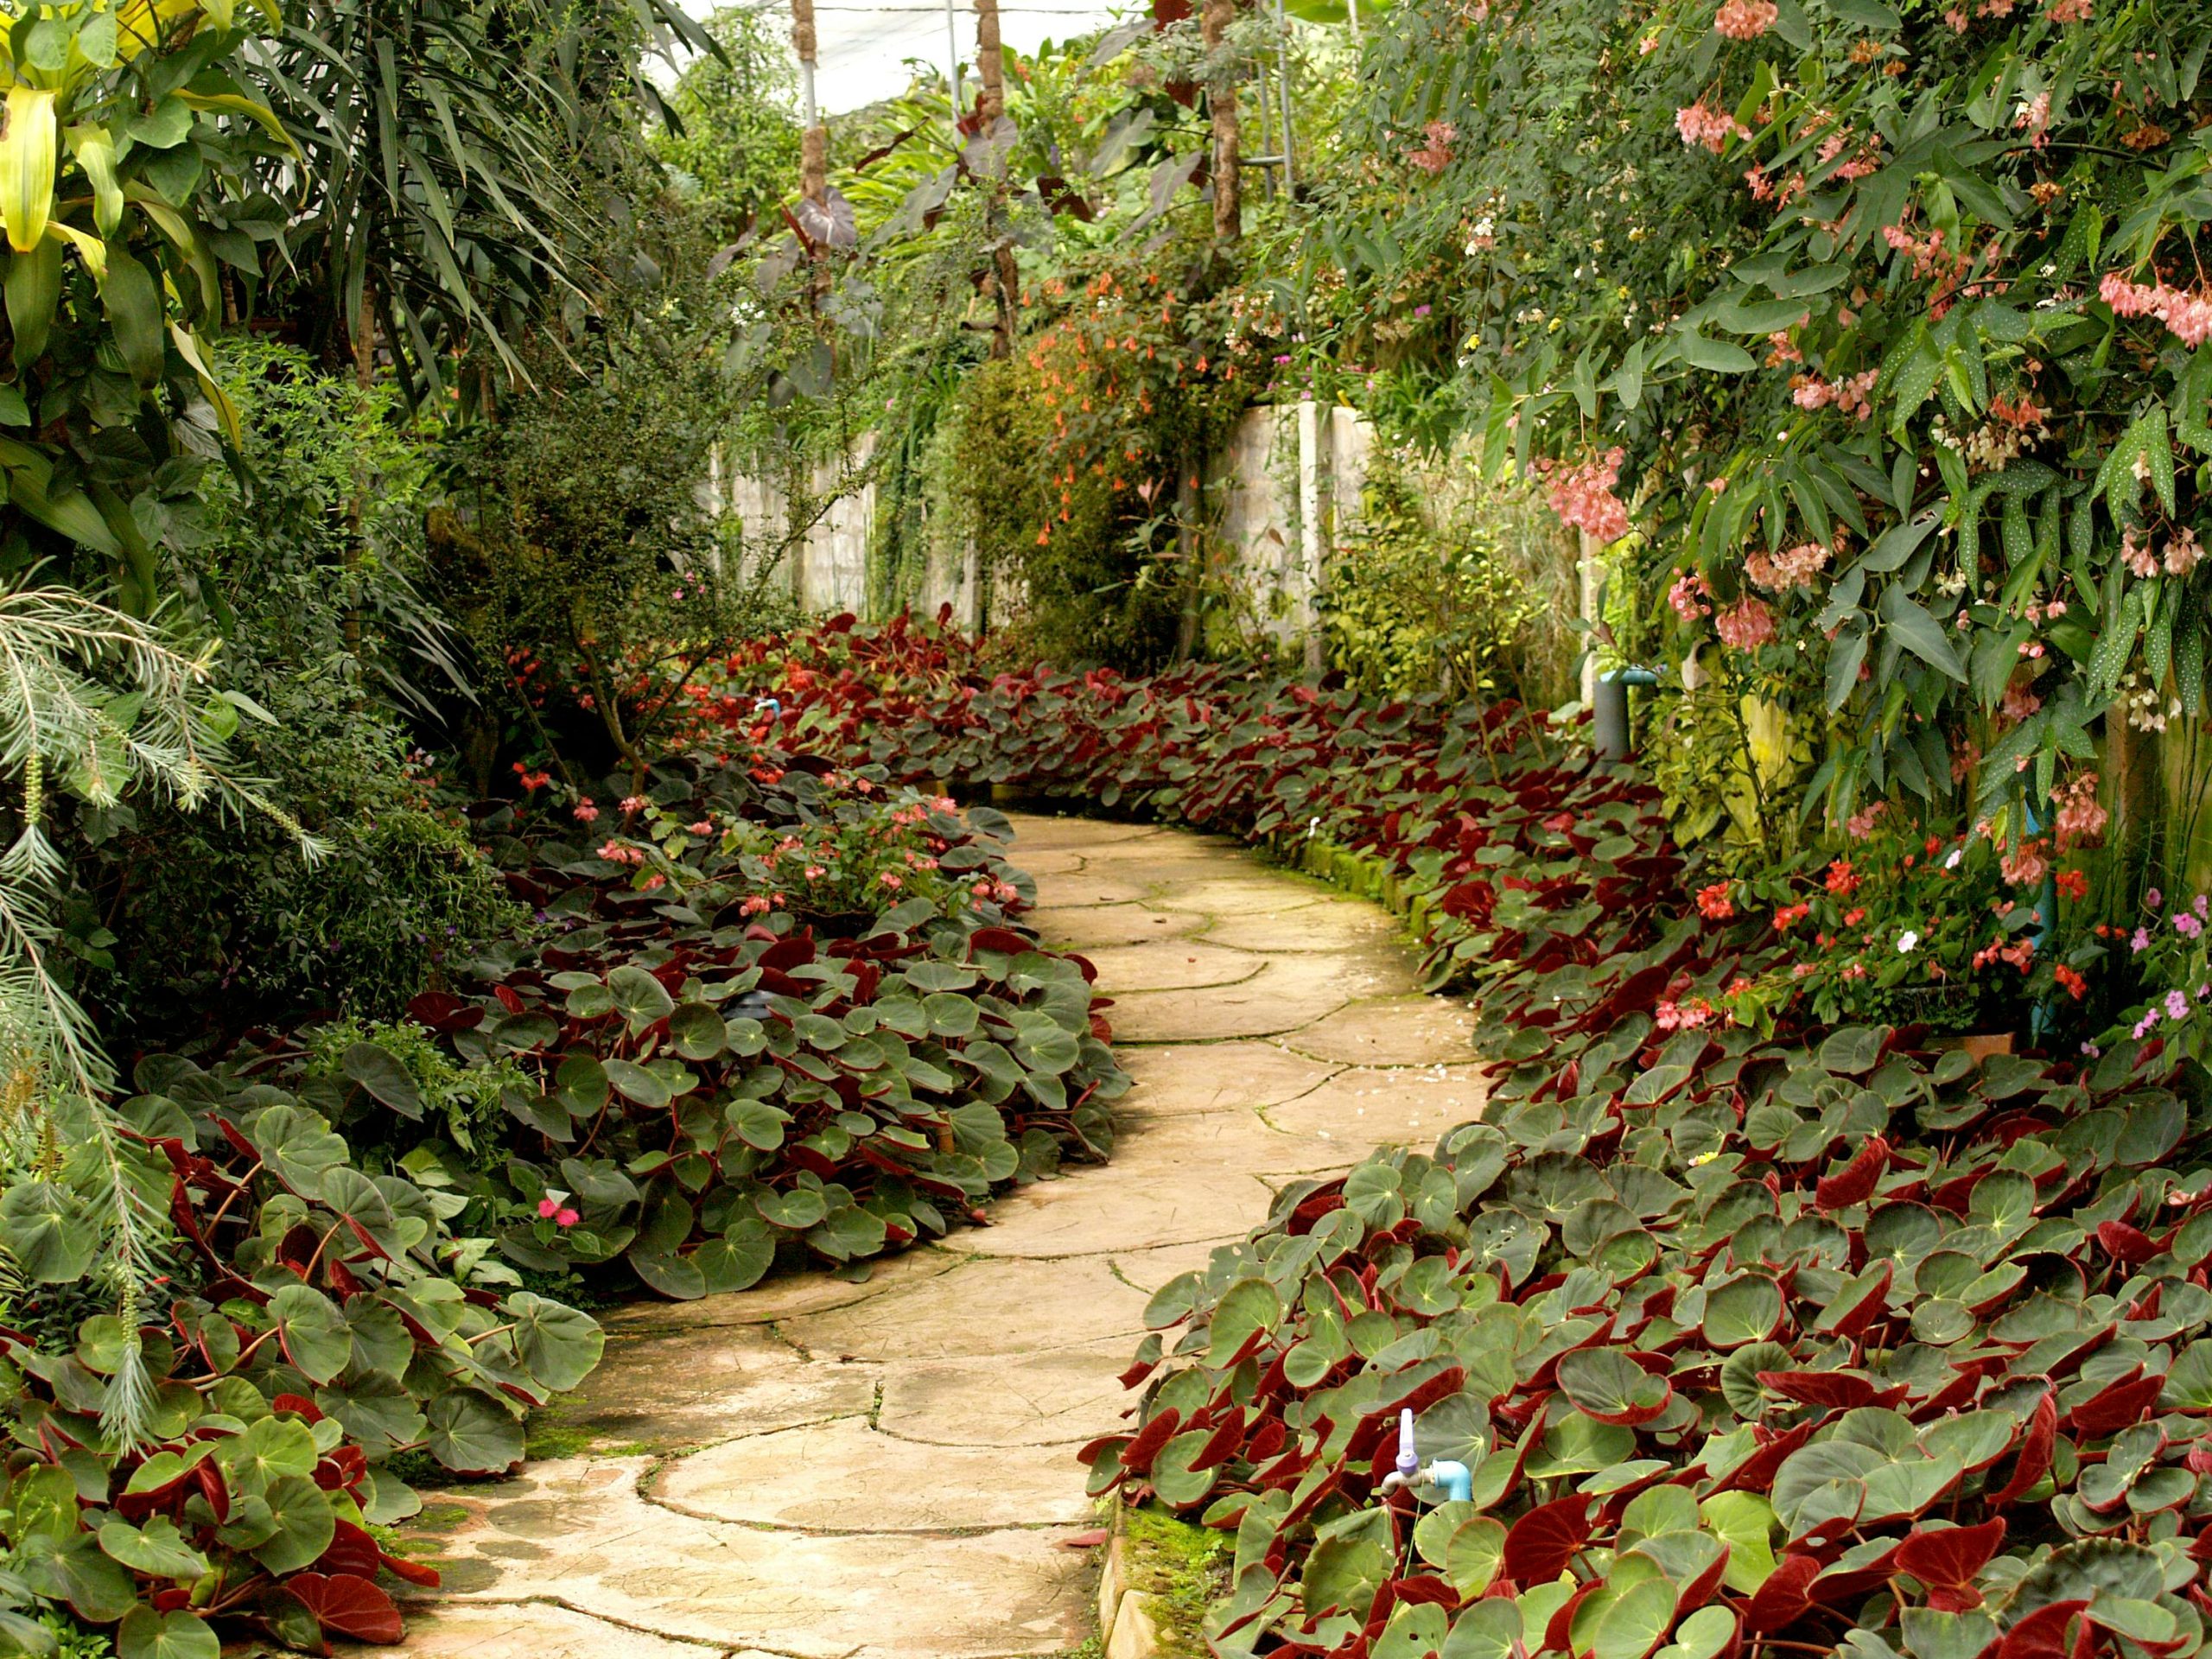
8. Winding Stone Path Through Lush, Flowering Greenhouse Garden
Stepping into this greenhouse garden feels like entering a secret, magical realm. The winding stone path invites you to explore, and the dense layers of green and red foliage, punctuated by vibrant flowers, create an incredibly immersive experience. It’s a true escape.
|
$524.99
|
$15.95
|
$45.90
|


What absolutely transforms this space is the winding stone slab path. It breaks up the dense foliage, creating a sense of journey and discovery rather than just a collection of plants. If this path were straight or absent, the space would feel much flatter and less enchanting. It’s the thread that weaves the entire lush tapestry together.
Here’s a mini how-to for creating a simple winding stone path like this:
- Sketch your path: Use a hose or rope to lay out your desired winding shape directly on the ground.
- Excavate: Dig down 4-6 inches along your path outline, removing any grass or large roots.
- Base layer: Add 2-3 inches of crushed gravel or sand, compacting it firmly.
- Place stones: Arrange irregular stone slabs, leaving small gaps for ground cover or pebbles. Use a rubber mallet to gently tap them into place so they’re level.
- Fill gaps: Sweep sand or small pebbles into the gaps between stones to stabilize them.
Time: 4-6 hours (for a small path section). Material cost: $100-$300 (depending on stone choice).
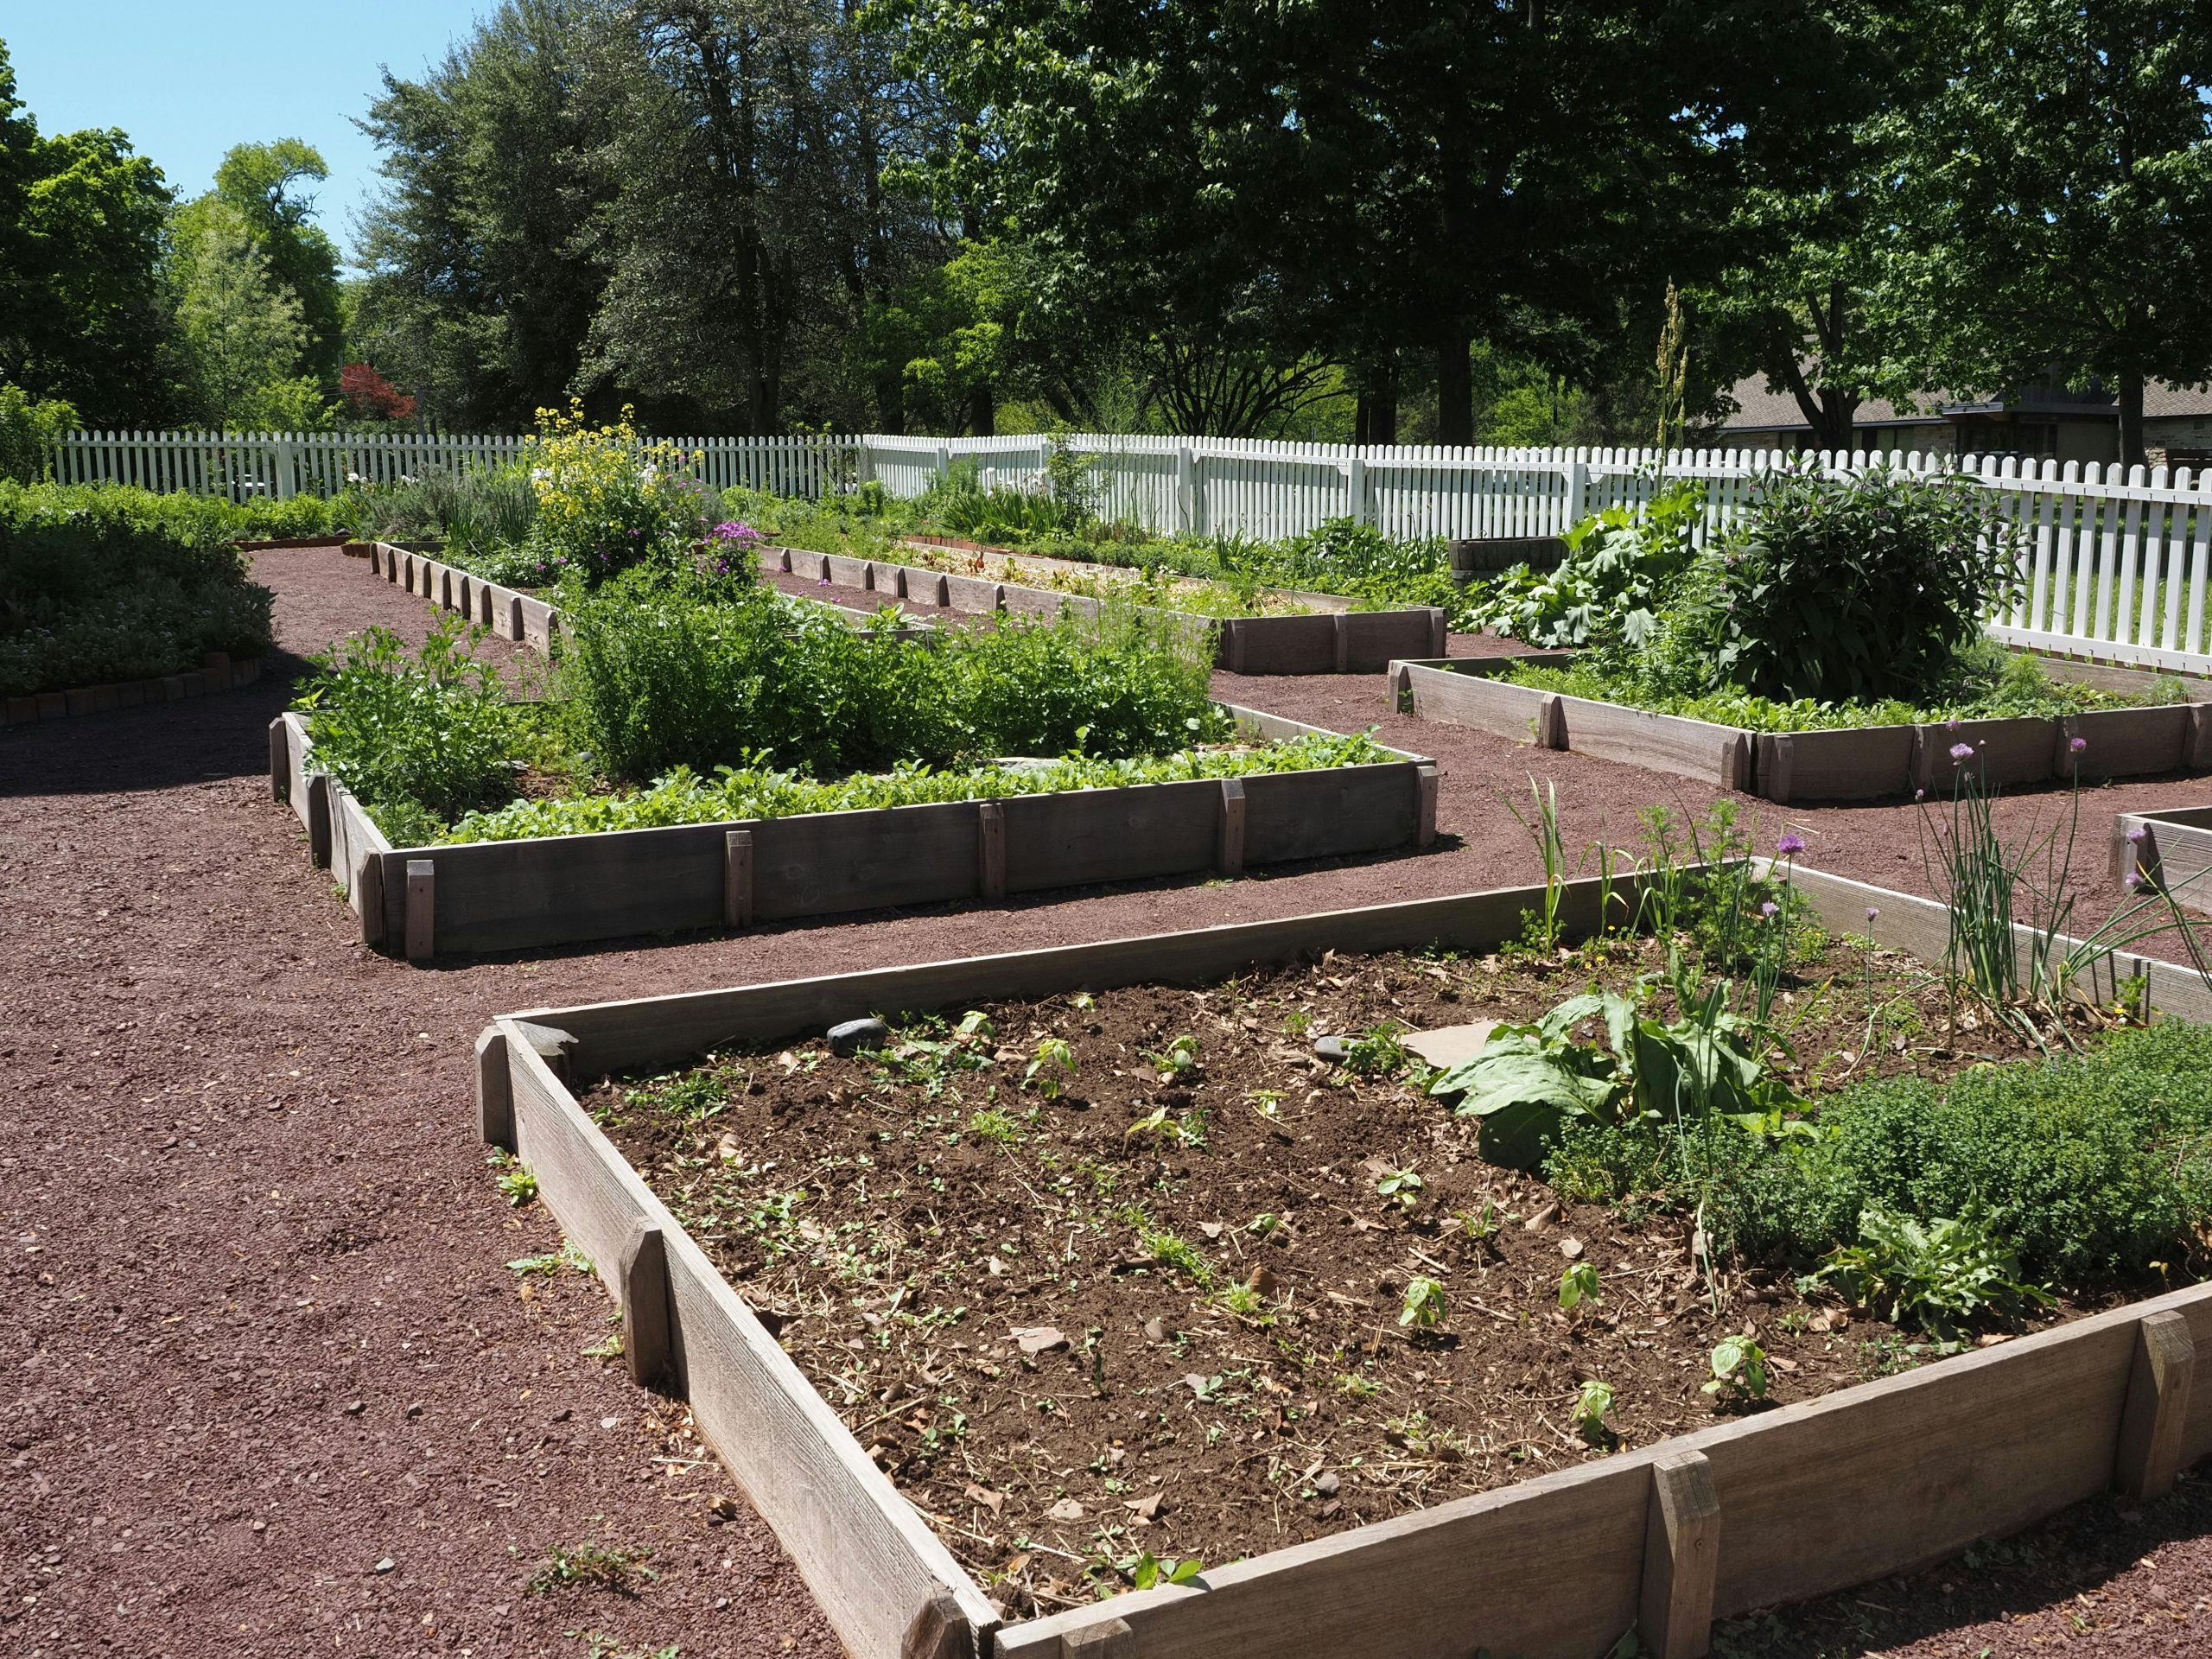
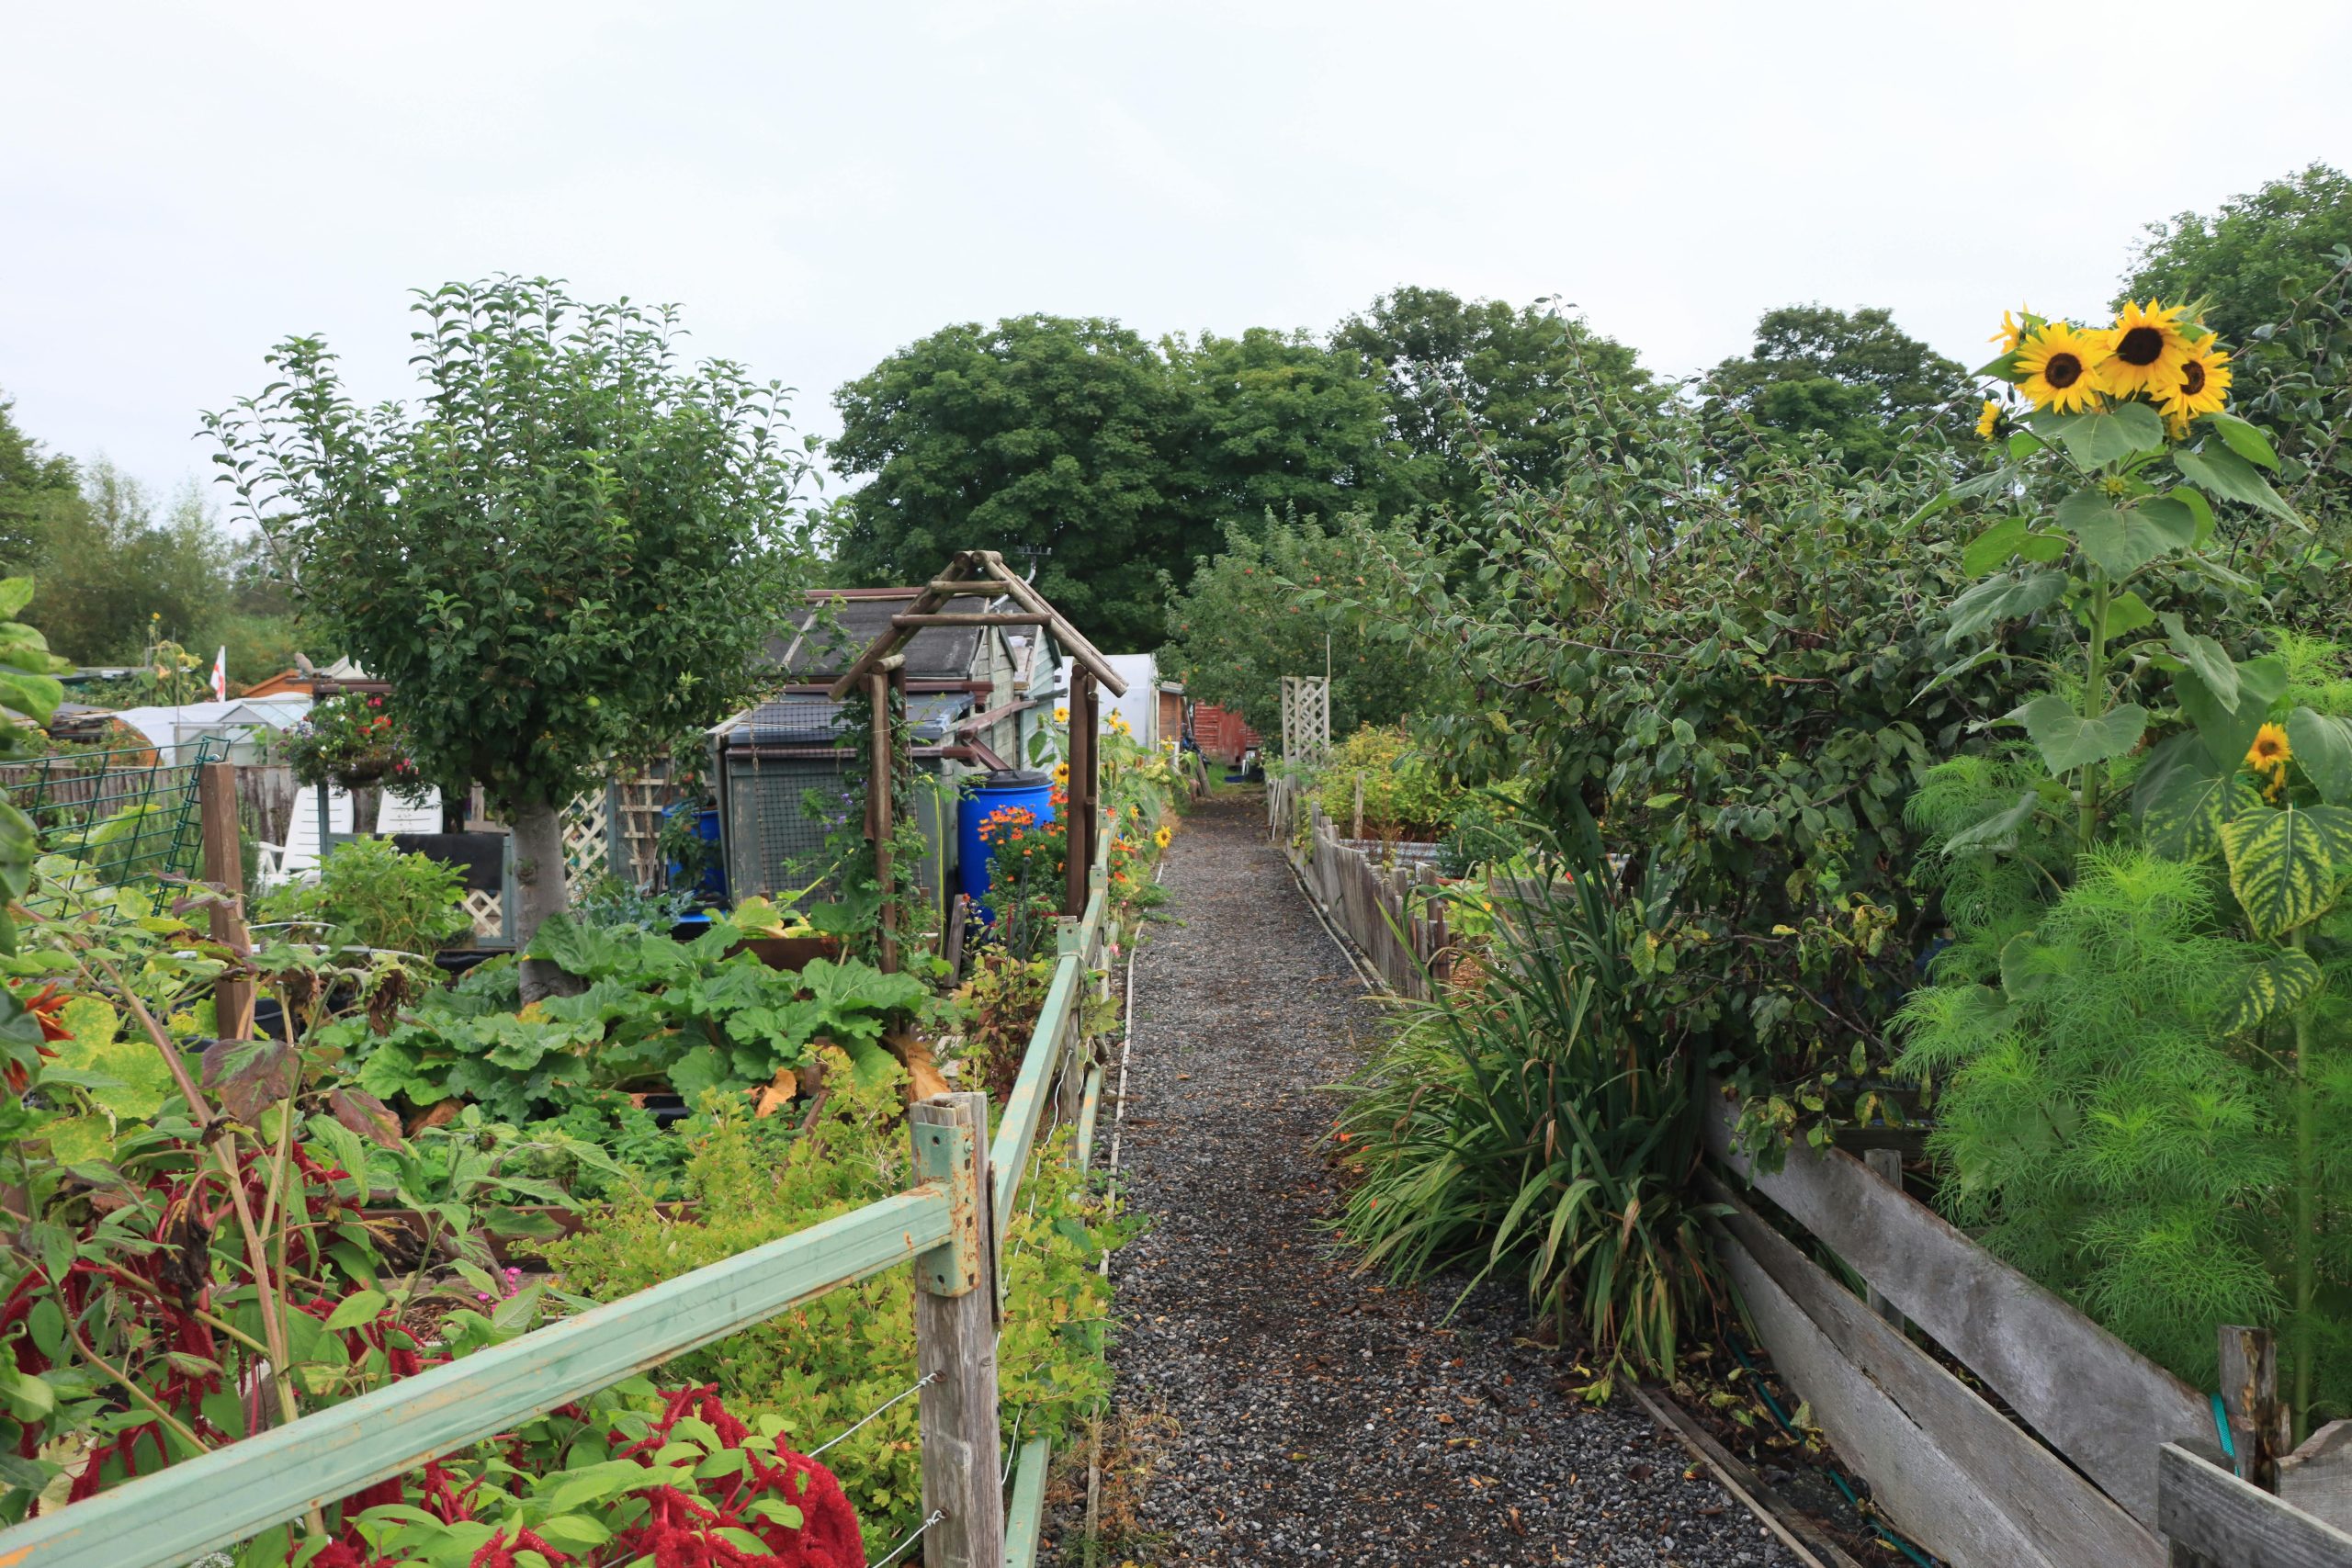
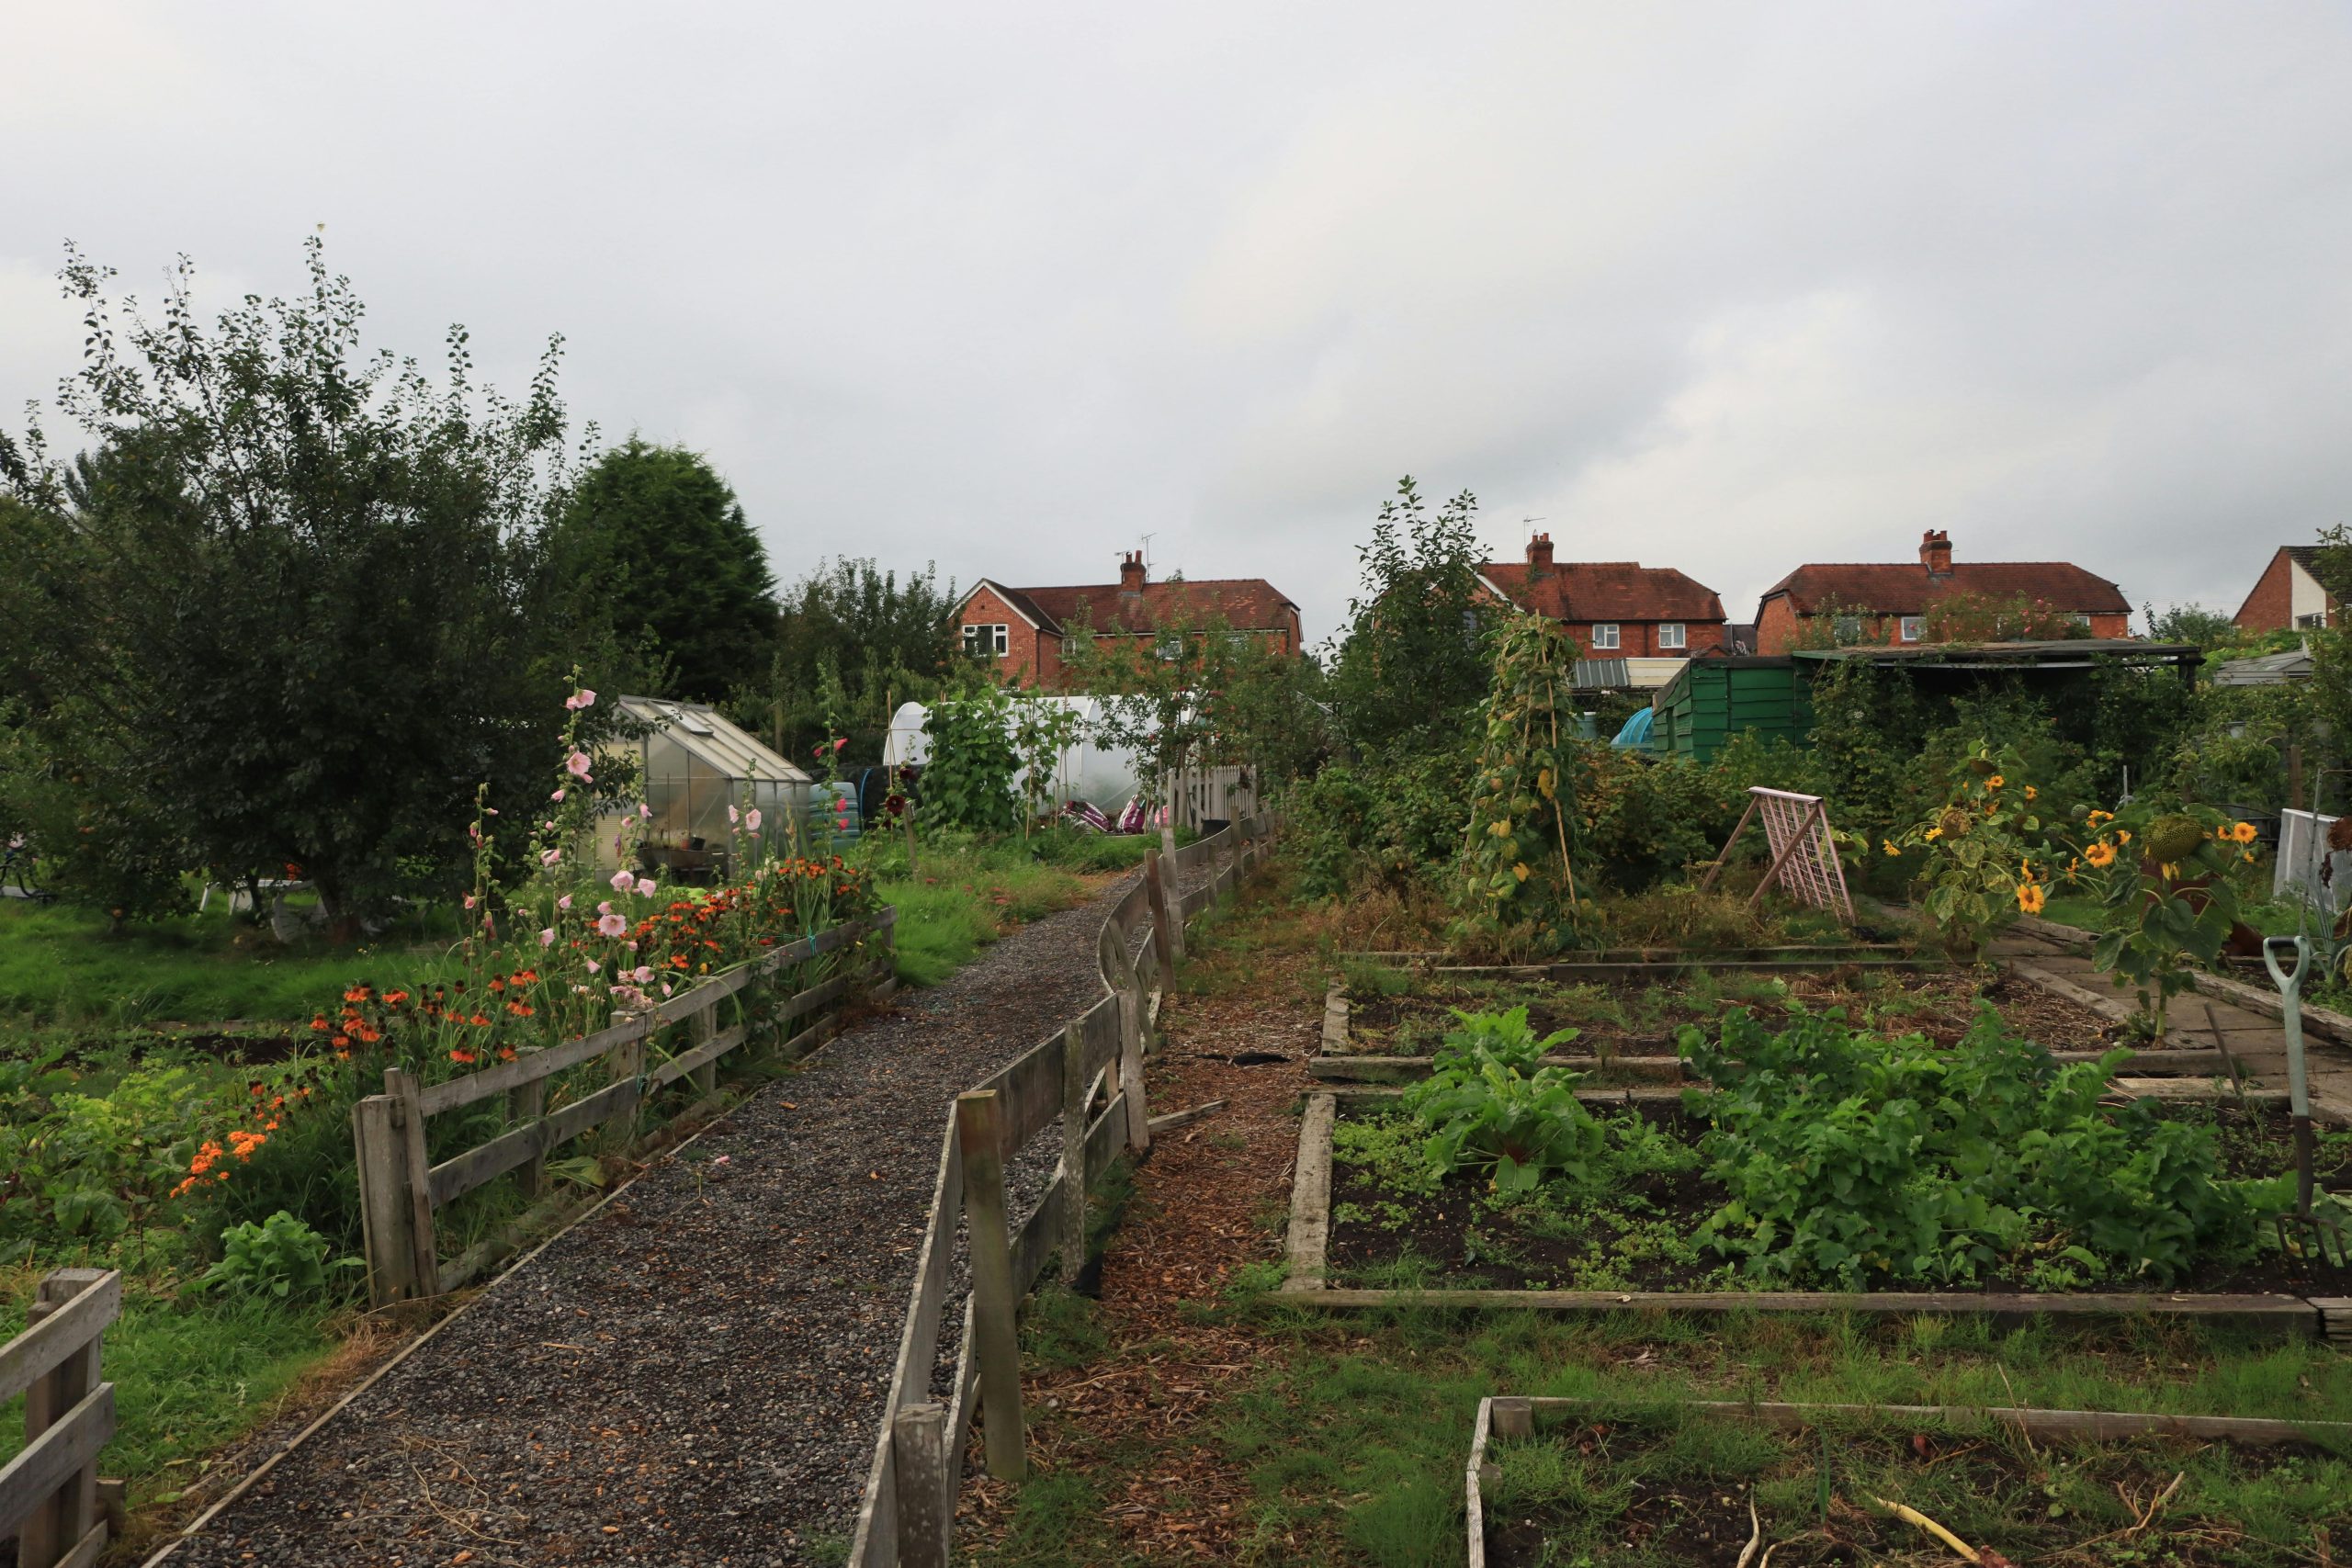
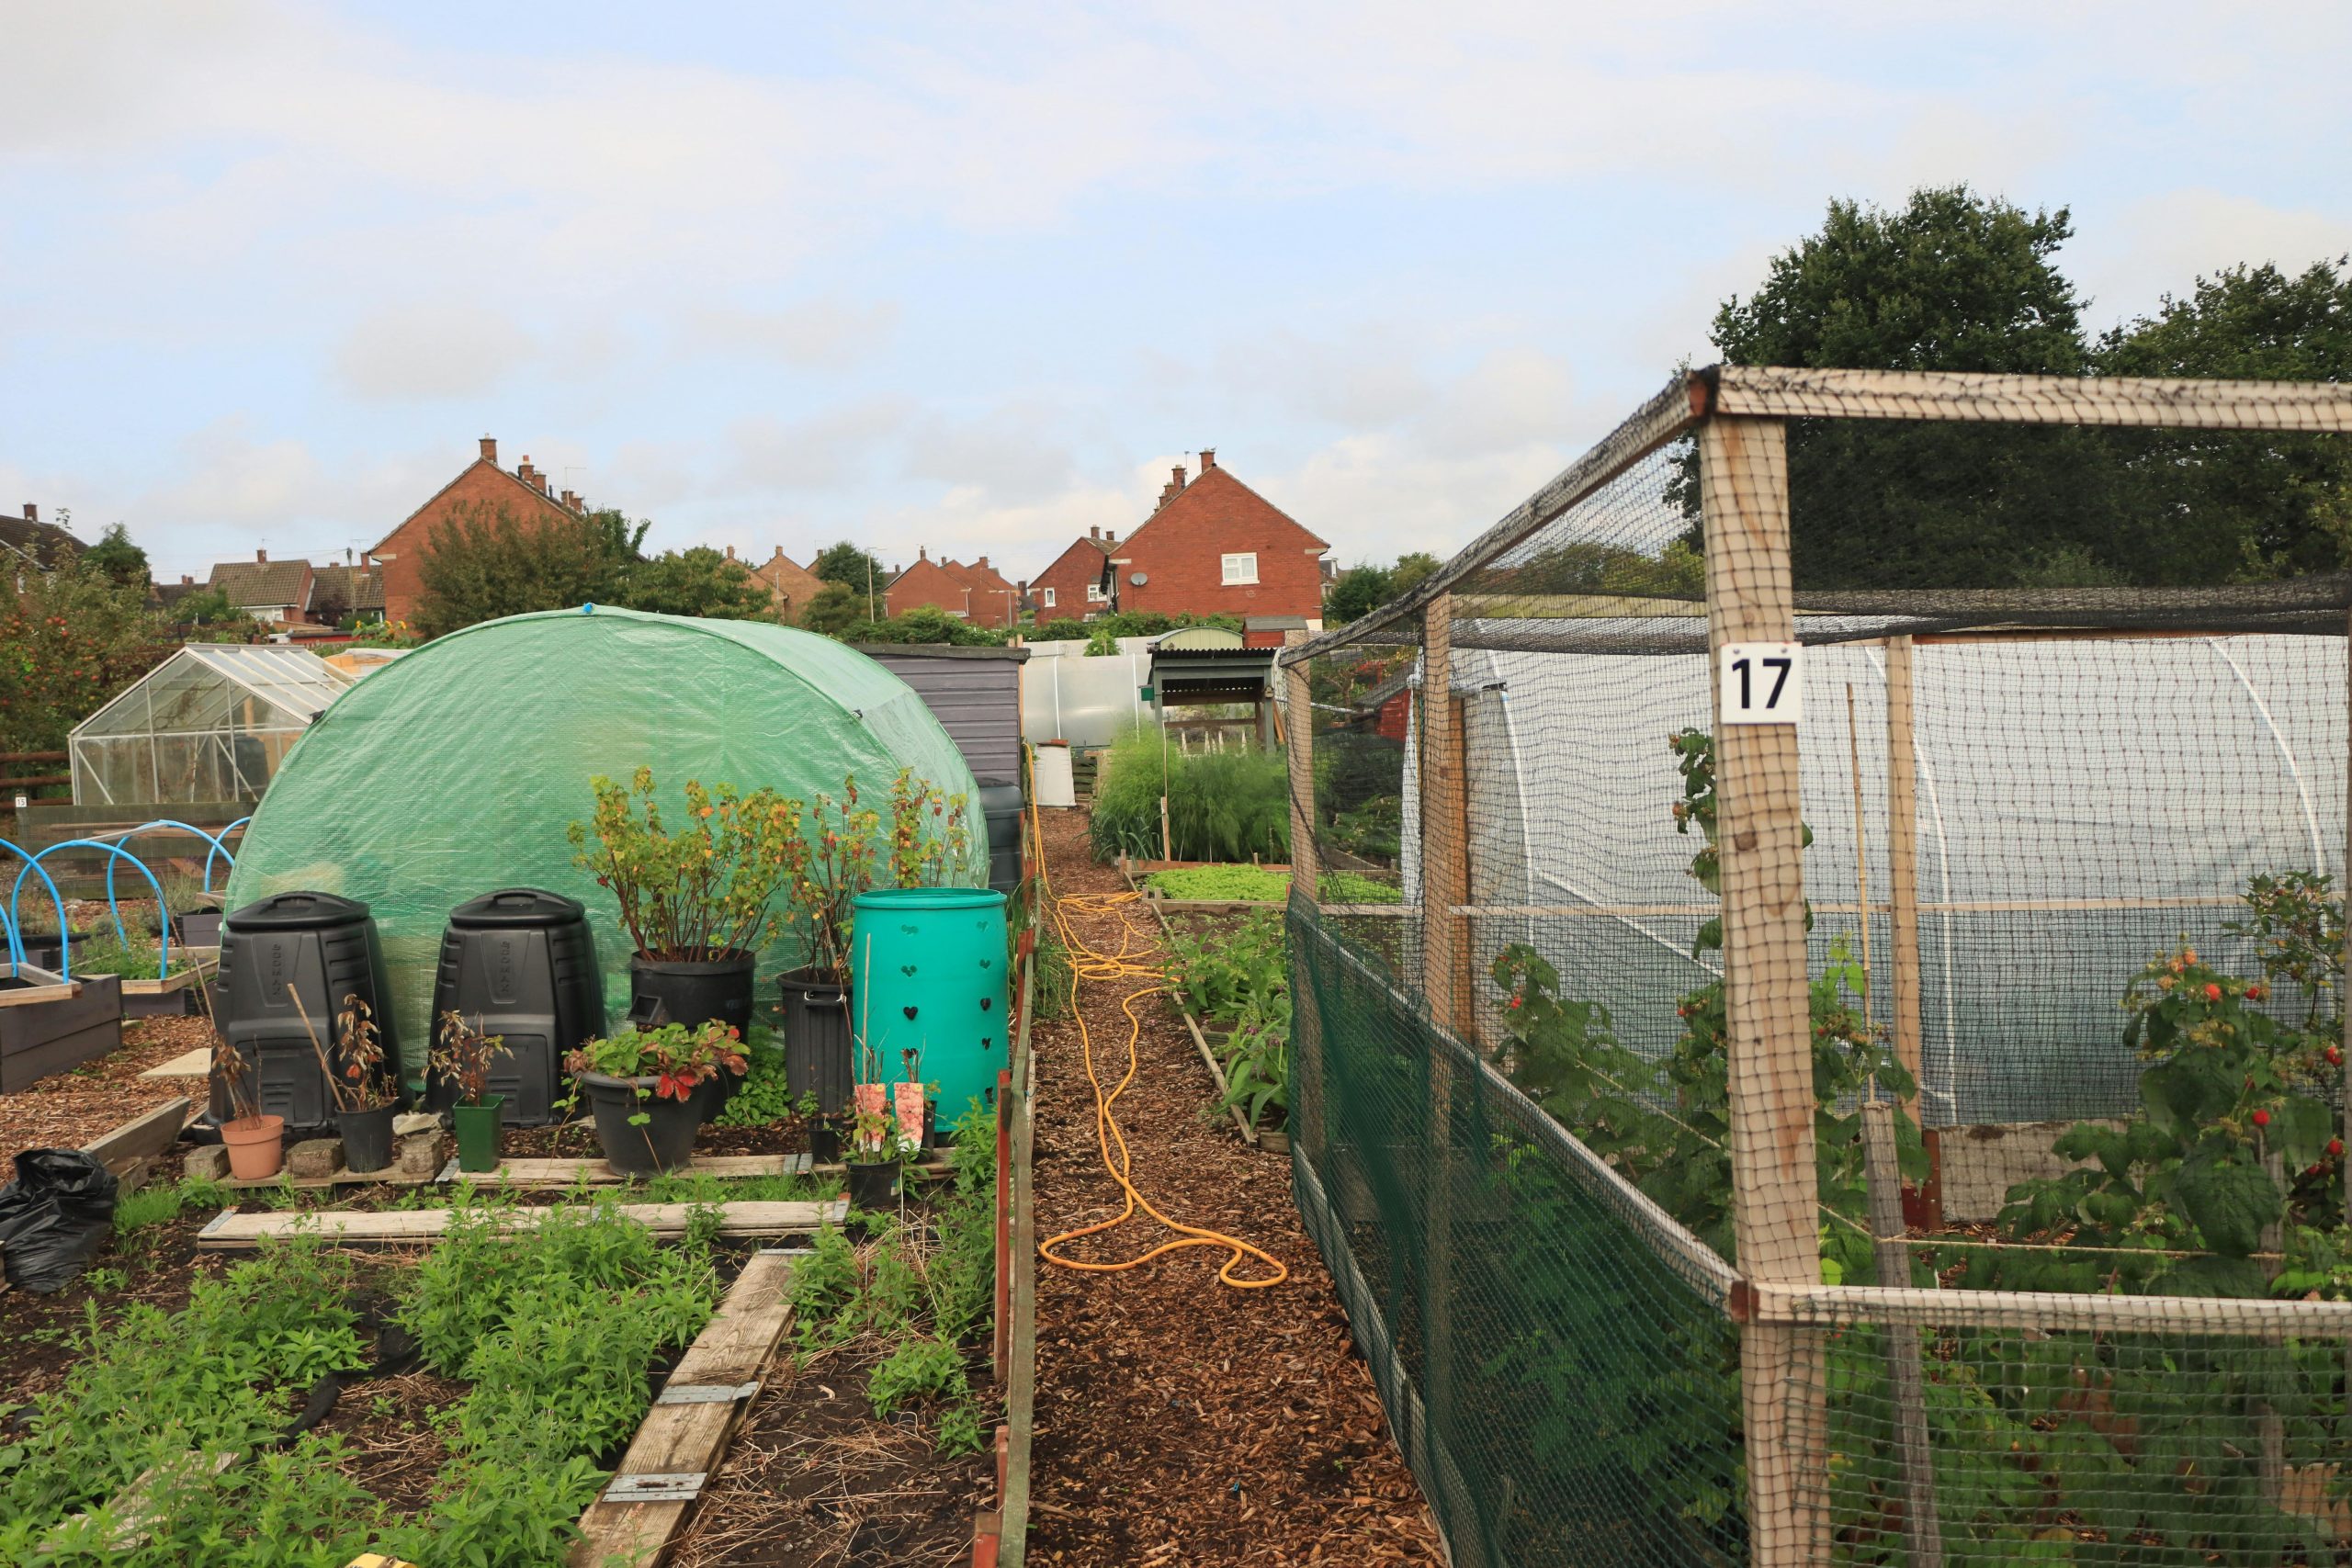
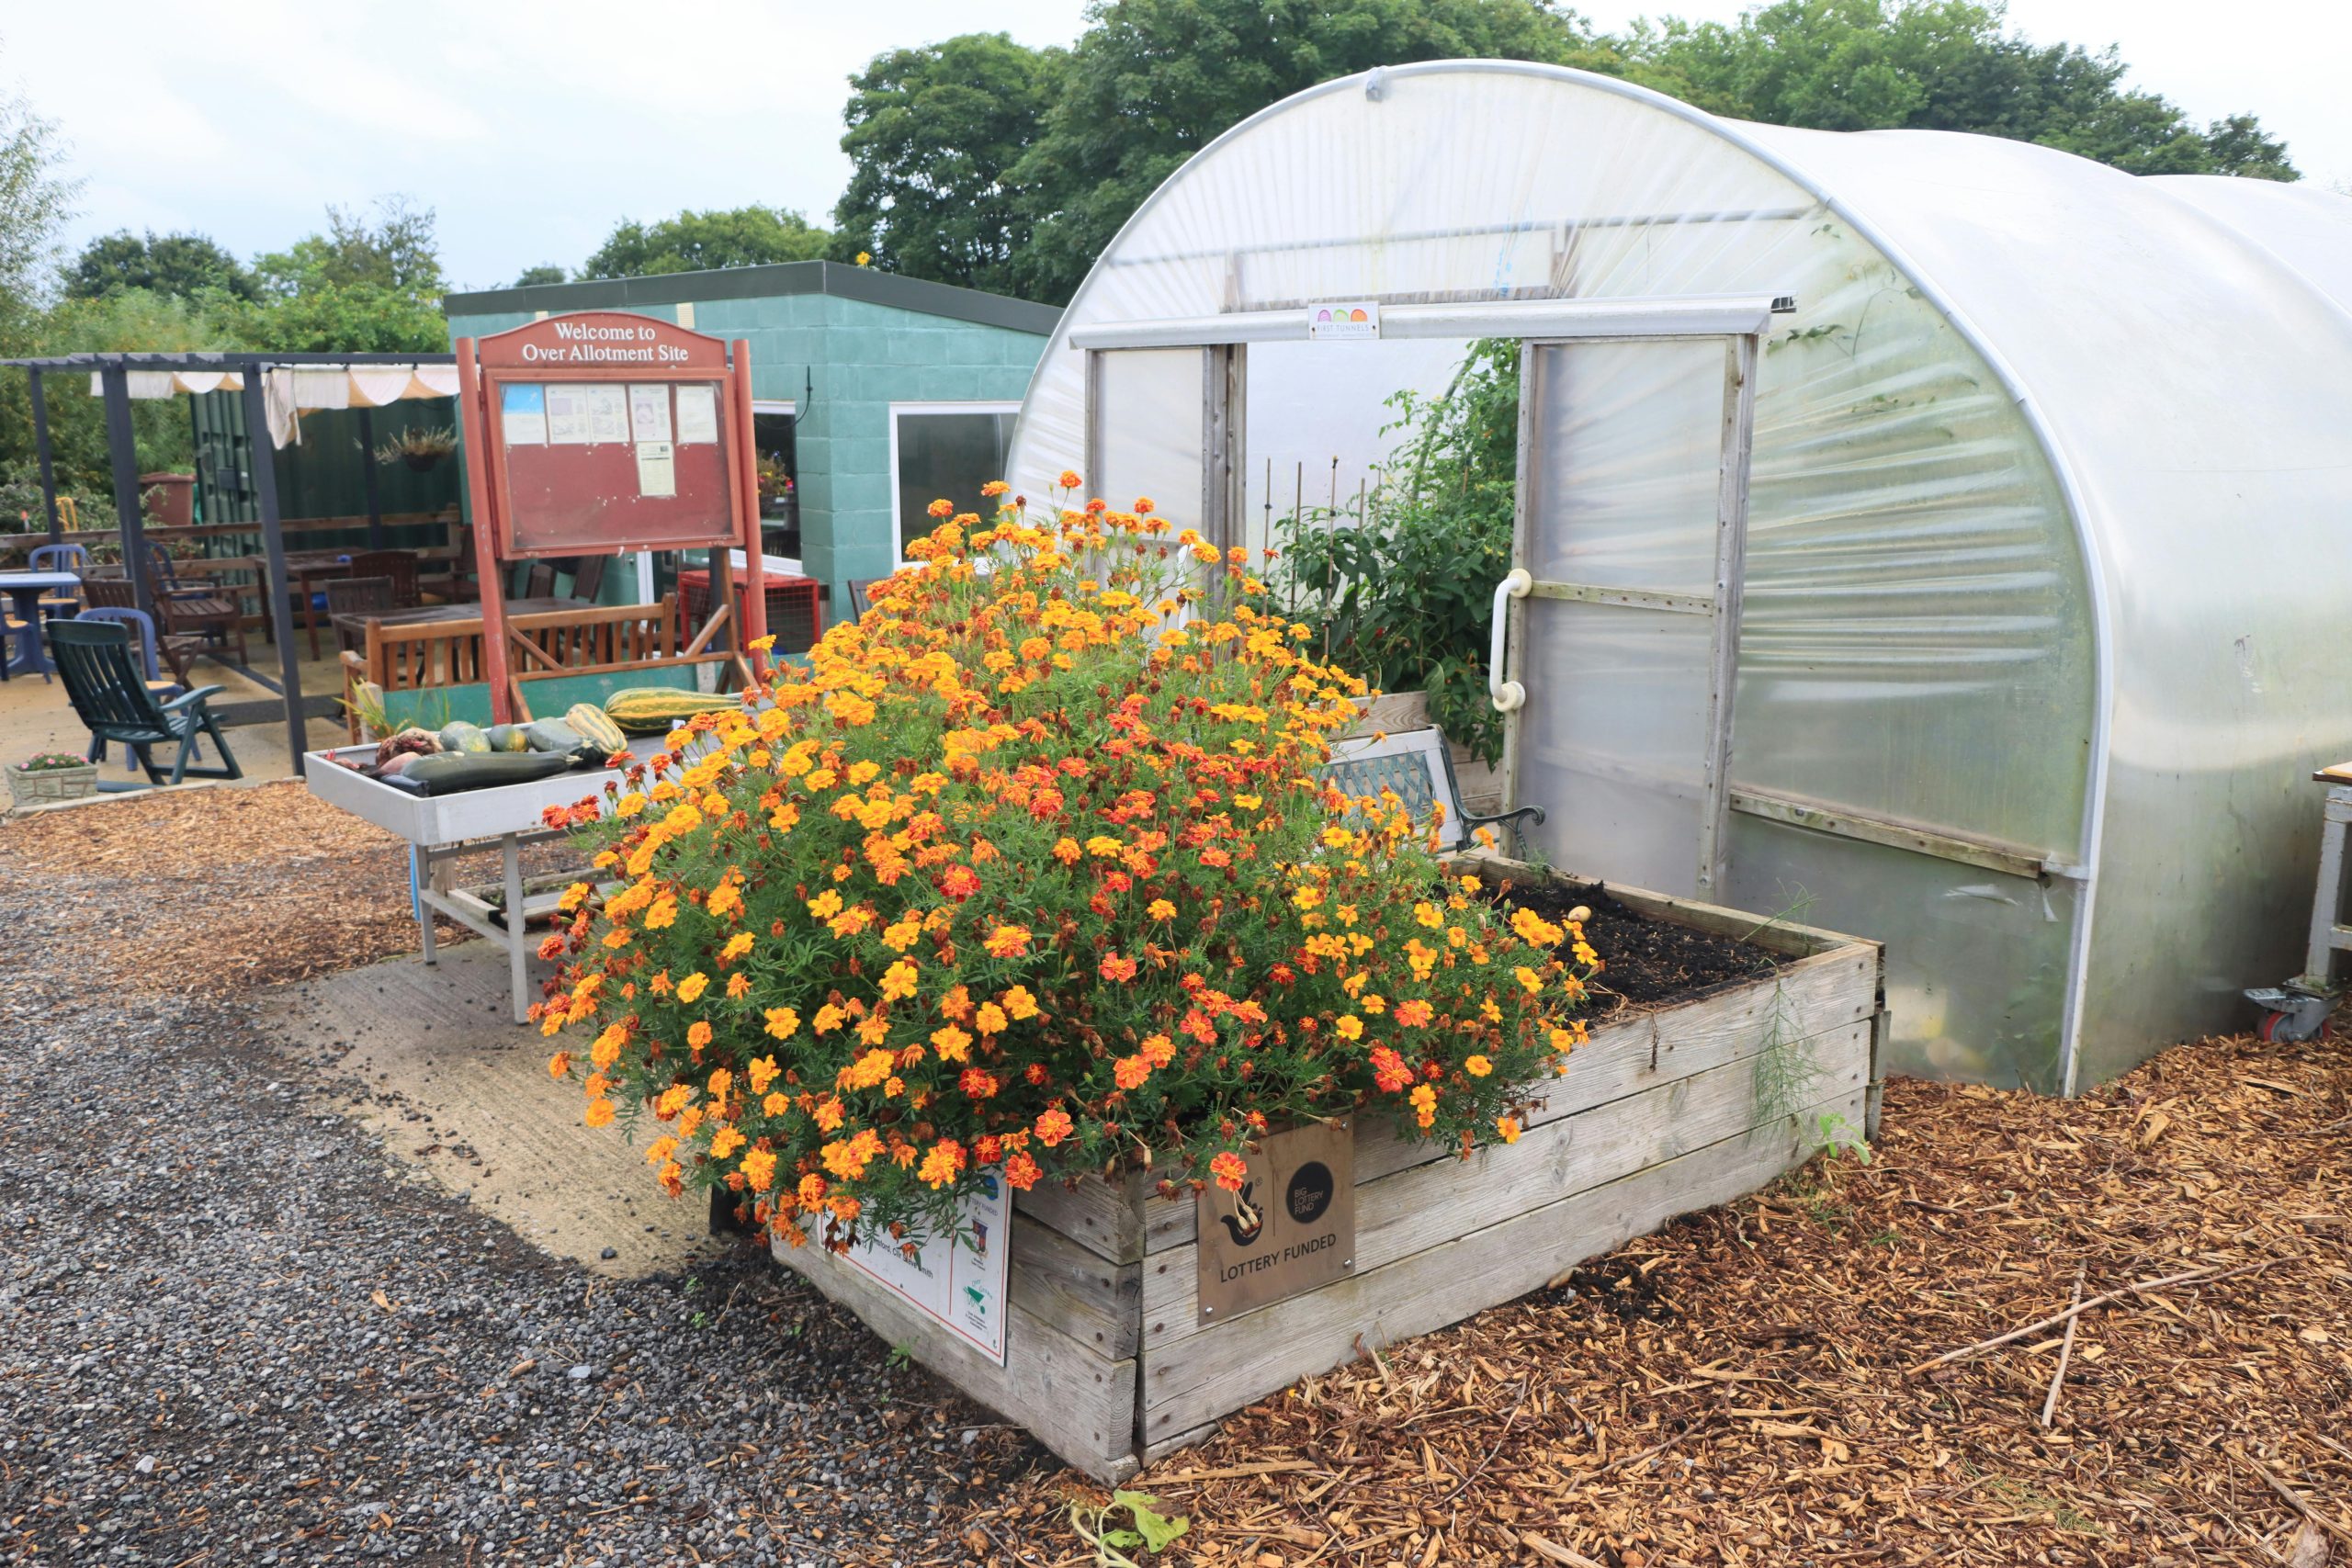
9. Pathway Through Community Vegetable Allotments with Raised Beds and Greenhouses
This view of a bustling community garden is so inspiring! The gravel pathway acts as a clear artery, guiding you through the various raised beds and past those essential greenhouses and sheds. It perfectly balances individual plots with a sense of collective purpose, all framed by those distant residential buildings.
|
📋 Copy HEX 🔗 Share |
|
$38.95
|
$41.99
|
$49.99
|

This design’s success hinges on visual consistency and clear zoning. The uniform gravel pathway provides a cohesive backbone that ties all the individual garden plots together, preventing a chaotic look. The raised beds, while varied in their plantings, share similar structural elements (like the weathered wood), creating a sense of order. This approach allows for individual expression within a larger, organized framework, making it feel productive rather than messy.
To get this rustic, functional community garden look without a huge cash outlay, focus on repurposed materials. Your raised beds could be constructed from free pallets or reclaimed lumber from construction sites (always check for chemical treatments!). Instead of buying new gravel, check Facebook Marketplace or local landscaping companies for leftover batches or recycled crushed concrete. For greenhouses, look for DIY plans that utilize PVC pipe and heavy-duty clear plastic sheeting. This approach could realistically bring the cost of a small version of this setup down to $300-$600.
10. Allotment Garden with Polytunnels, Raised Beds, and Netting
Talk about a productive hub! This allotment garden has it all—impressive polytunnels, neat raised beds, and practical netting to protect precious crops. The wood chip path offers a soft, natural base, creating a wonderful working environment. Even the compost bins are thoughtfully integrated!
|
$549.99
|
$70.39
|
$29.99
|
$28.49
|


Let’s talk maintenance realities for a comprehensive setup like this. Polytunnels require regular inspection for tears or damage, especially after strong winds. You’ll also need to consider annual film replacement every 5-7 years, which can be an unexpected cost (typically $200-$500 depending on size). Raised beds need consistent watering as they can dry out faster than in-ground beds, and pest control efforts are continuous, especially with netting that needs to be properly sealed to be effective.
Here’s a designer tip for managing diverse plantings in a space like this: implement a smart crop rotation plan. This not only optimizes soil health but also helps manage pests and diseases organically. Dedicate specific beds or sections of beds to ‘families’ of plants (e.g., brassicas, legumes, and solanaceae) and rotate them annually. This systematic approach ensures long-term productivity and reduces the workload of constantly fighting plant-specific issues.
11. Polytunnel Entrance with Planter and Fresh Produce Display
This isn’t just a polytunnel entrance; it’s practically a welcoming market stand! The raised wooden planter overflowing with bright orange and yellow flowers instantly adds cheer, while the display table laden with fresh vegetables is truly inspiring. It speaks to the bounty that can come from a well-tended garden.
|
📋 Copy HEX 🔗 Share |
|
$528.99
|
$24.99
|
$14.99
|

What elevates this functional entrance into something truly special is the display table of harvested vegetables. It instantly communicates the success and purpose of the garden behind the polytunnel, turning a utilitarian space into a celebration of fresh produce. Without that visual promise of bounty, it would just be an entrance; with it, it’s an invitation to a harvest festival.
This focus on local, homegrown produce — often showcased directly by the grower — is a huge trend in 2026. People are deeply invested in knowing where their food comes from, appreciating the journey from soil to plate. This kind of display taps into that desire for transparency and connection, making the garden feel like an essential part of a healthier, more sustainable lifestyle. It also inspires visitors to get their hands dirty themselves!
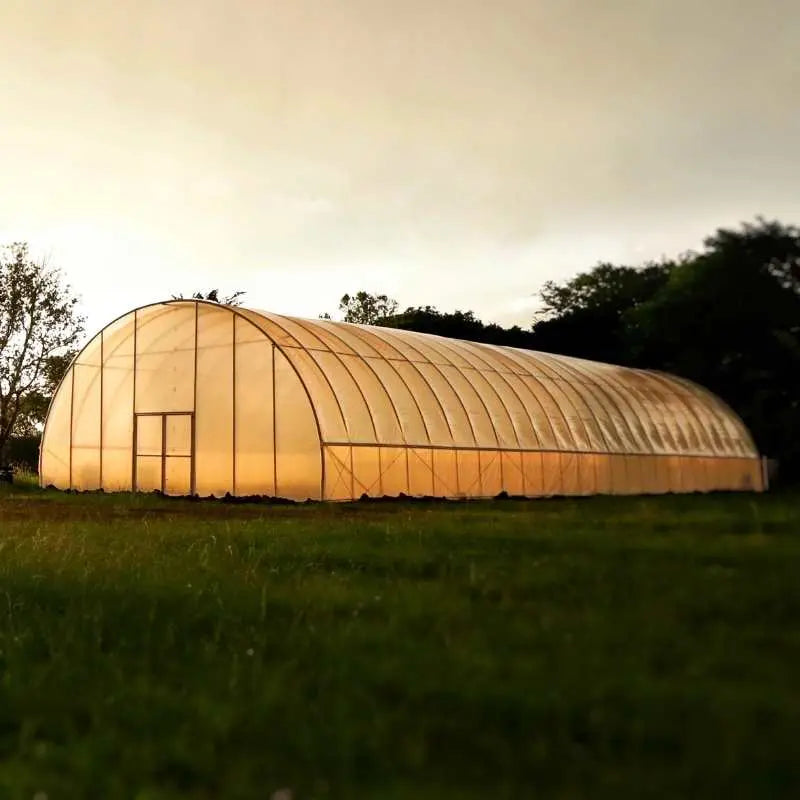
12. Rural Raised Bed Garden with Hoop House Greenhouse
This rural setup is the epitome of practical gardening. The rectangular raised beds on gravel are neatly organized, and that large hoop house greenhouse in the background signals serious growing power. It’s functional, integrated into the natural landscape, and ready for a bountiful harvest.
|
$188.31
|
$175.65
|
$204.99
|

- Main furniture (raised beds, wood): $300 – $800
- Lighting (solar path lights): $50 – $150
- Textiles (weed barrier, hoop house cover): $200 – $600
- Decor/Accessories (plant markers, watering can): $30 – $100
- Paint/Wall Treatment (wood sealer): $20 – $50
- Total: $600 – $1,700
Budget alternative: Achieve this look for 40-60% less by constructing your raised beds from salvaged materials, using a DIY hoop house kit with simpler framing, and opting for free wood chips or straw for pathways instead of gravel. This could reduce the cost to $300-$800, making it very accessible.
Here’s a bit of real talk about gravel paths bordered by wild grasses: they can be lovely, but they’re also an open invitation for weeds to creep in. Be prepared for regular weeding along the edges where the gravel meets the grass. If you’re not diligent, those tidy paths can quickly disappear beneath opportunistic wild growth. Consider a more substantial edging material if low maintenance is a top priority for you.
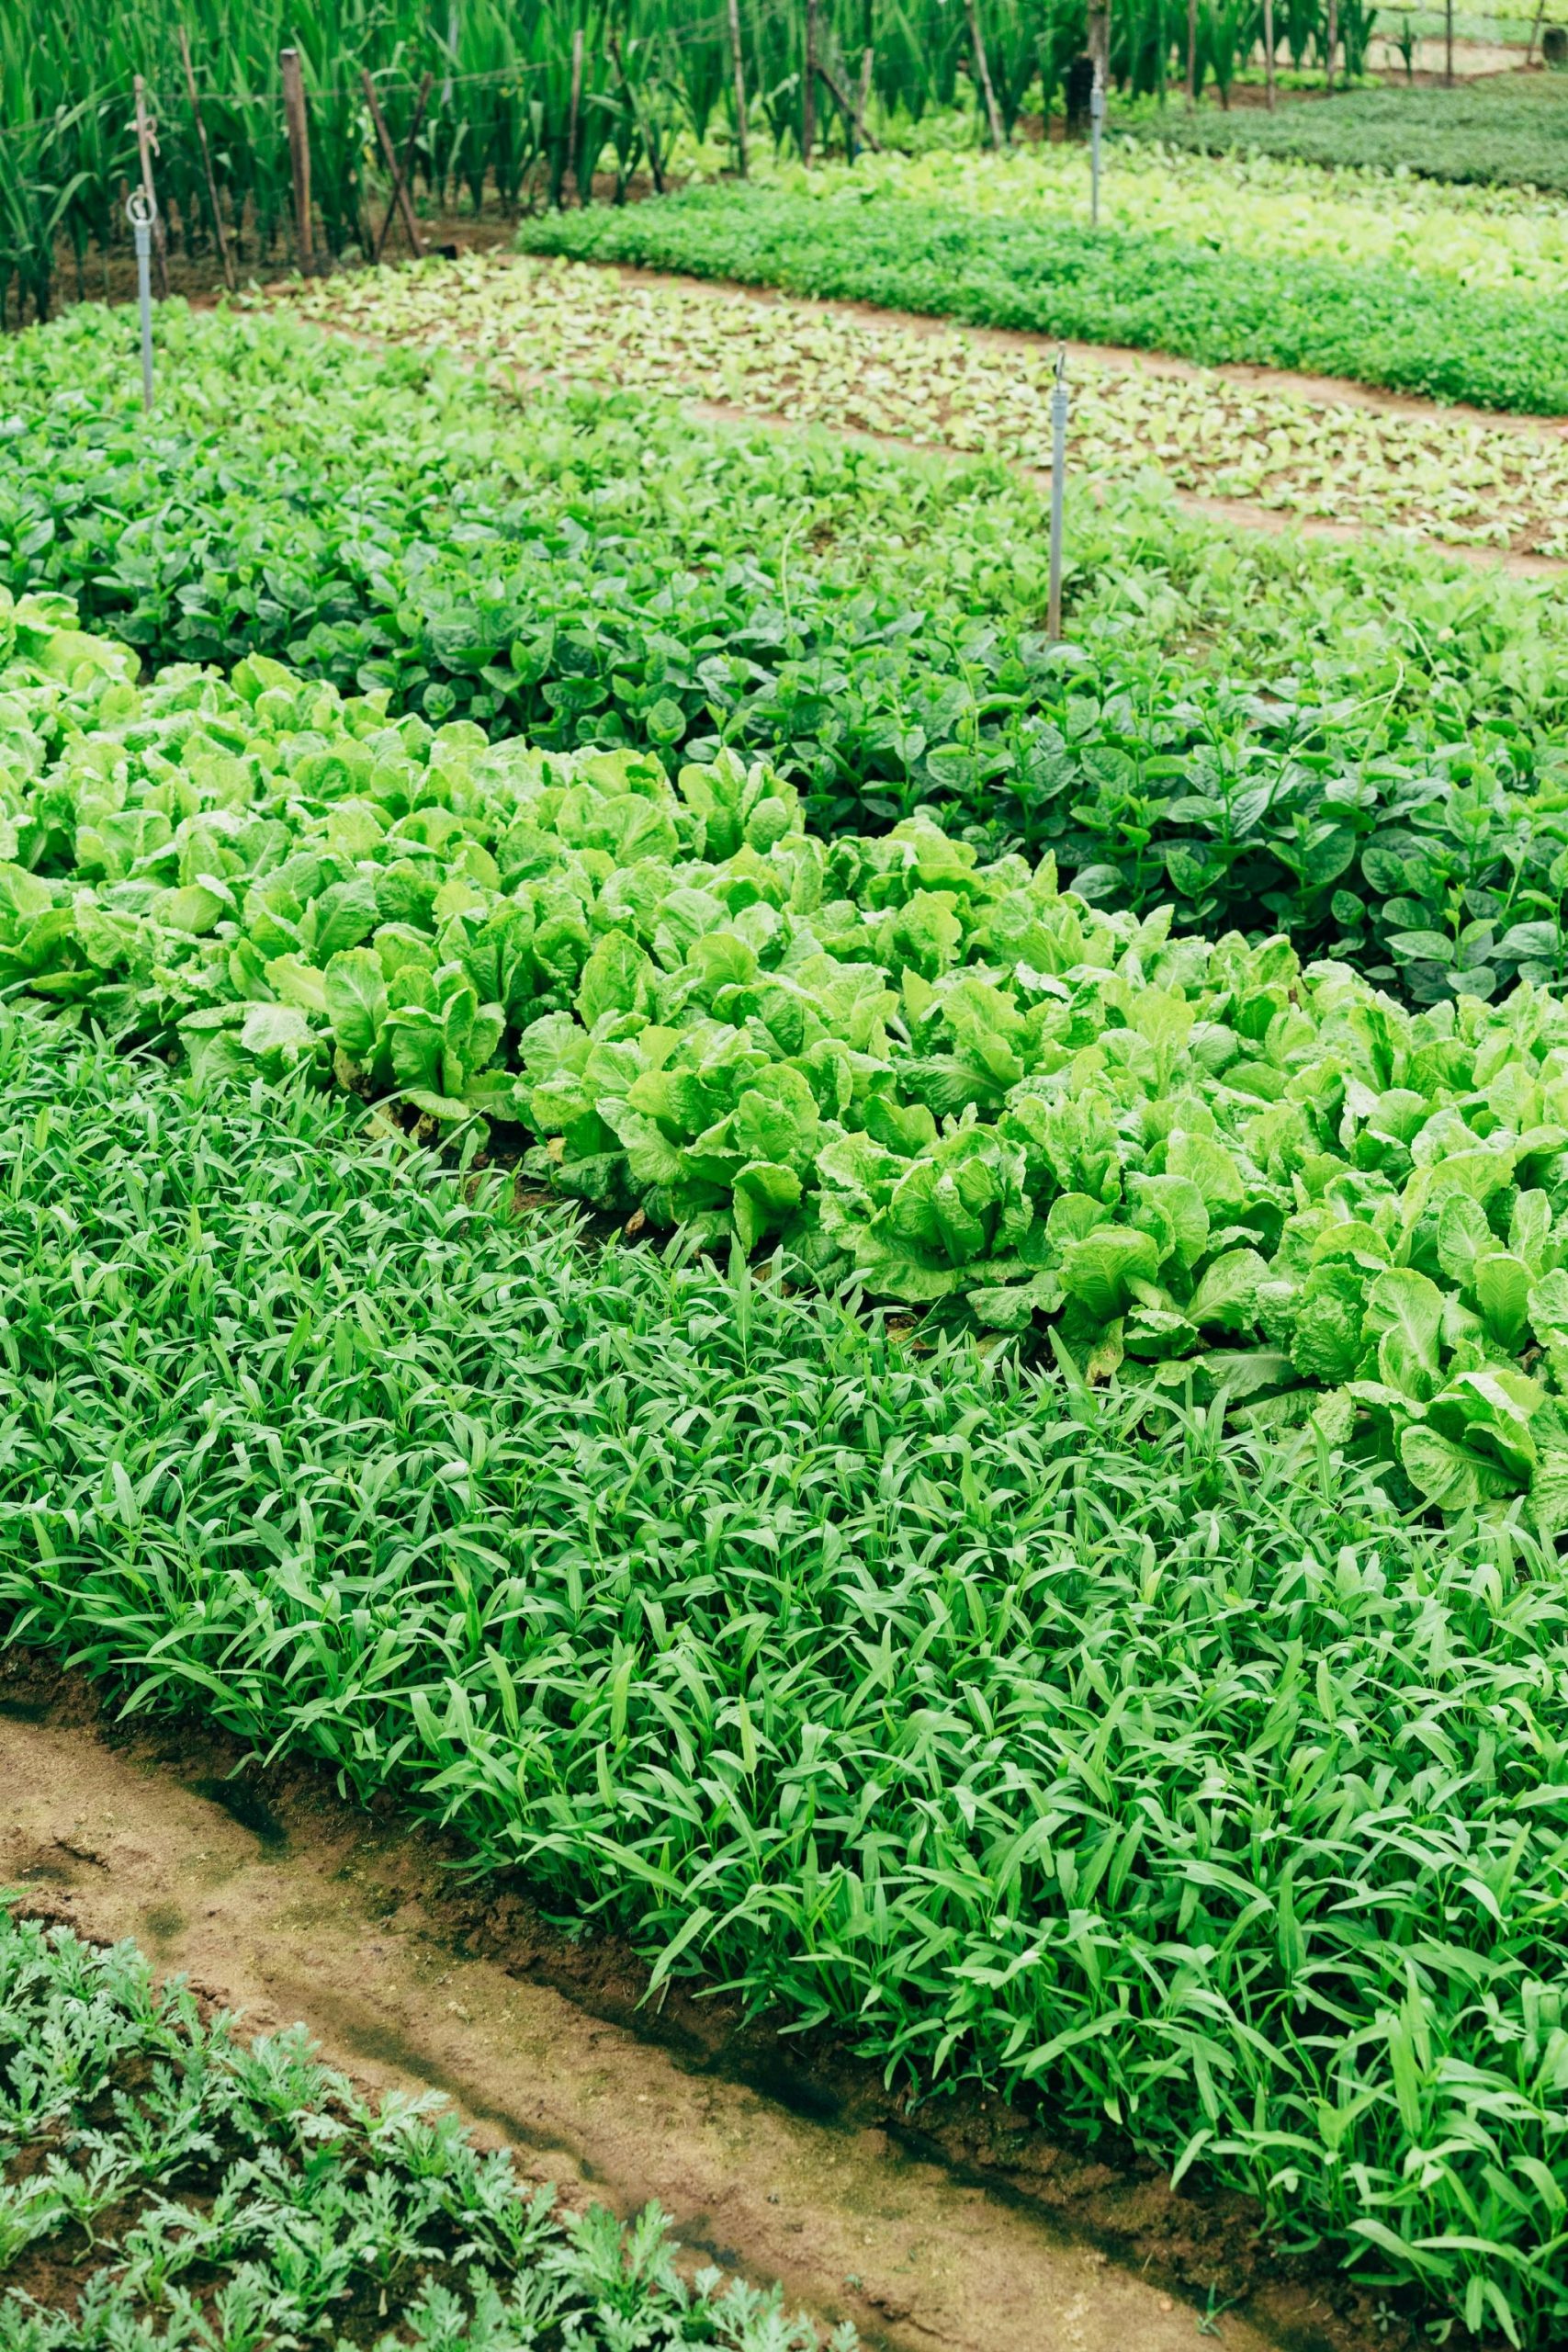
13. Lush Green Rows of Fresh Vegetable Crops in a Garden
There’s nothing quite as satisfying as neat, flourishing rows of fresh vegetables! This photo perfectly captures the vibrancy and abundance of a well-tended garden, with various shades of green popping against the rich earth. And that sprinkler in the background is a testament to mindful irrigation.
|
📋 Copy HEX 🔗 Share |
What makes this simple, row-style garden so effective? It’s all about the power of repetition and clear definition. The parallel lines of different crops create a strong visual rhythm, implying order and careful cultivation. The bare earth pathways between the rows not only provide practical access but also highlight the lushness of the plants, making each crop stand out. It’s minimalist in its structure but maximalist in its yield.
- Test your soil pH and nutrient levels—this is crucial for healthy vegetable growth.
- Map your sun exposure throughout the day to ensure each crop gets its ideal light.
- Plan your rows based on plant mature size; give them enough space to thrive without overcrowding them.
- Consider your water source and irrigation methods before planting a large in-ground garden.
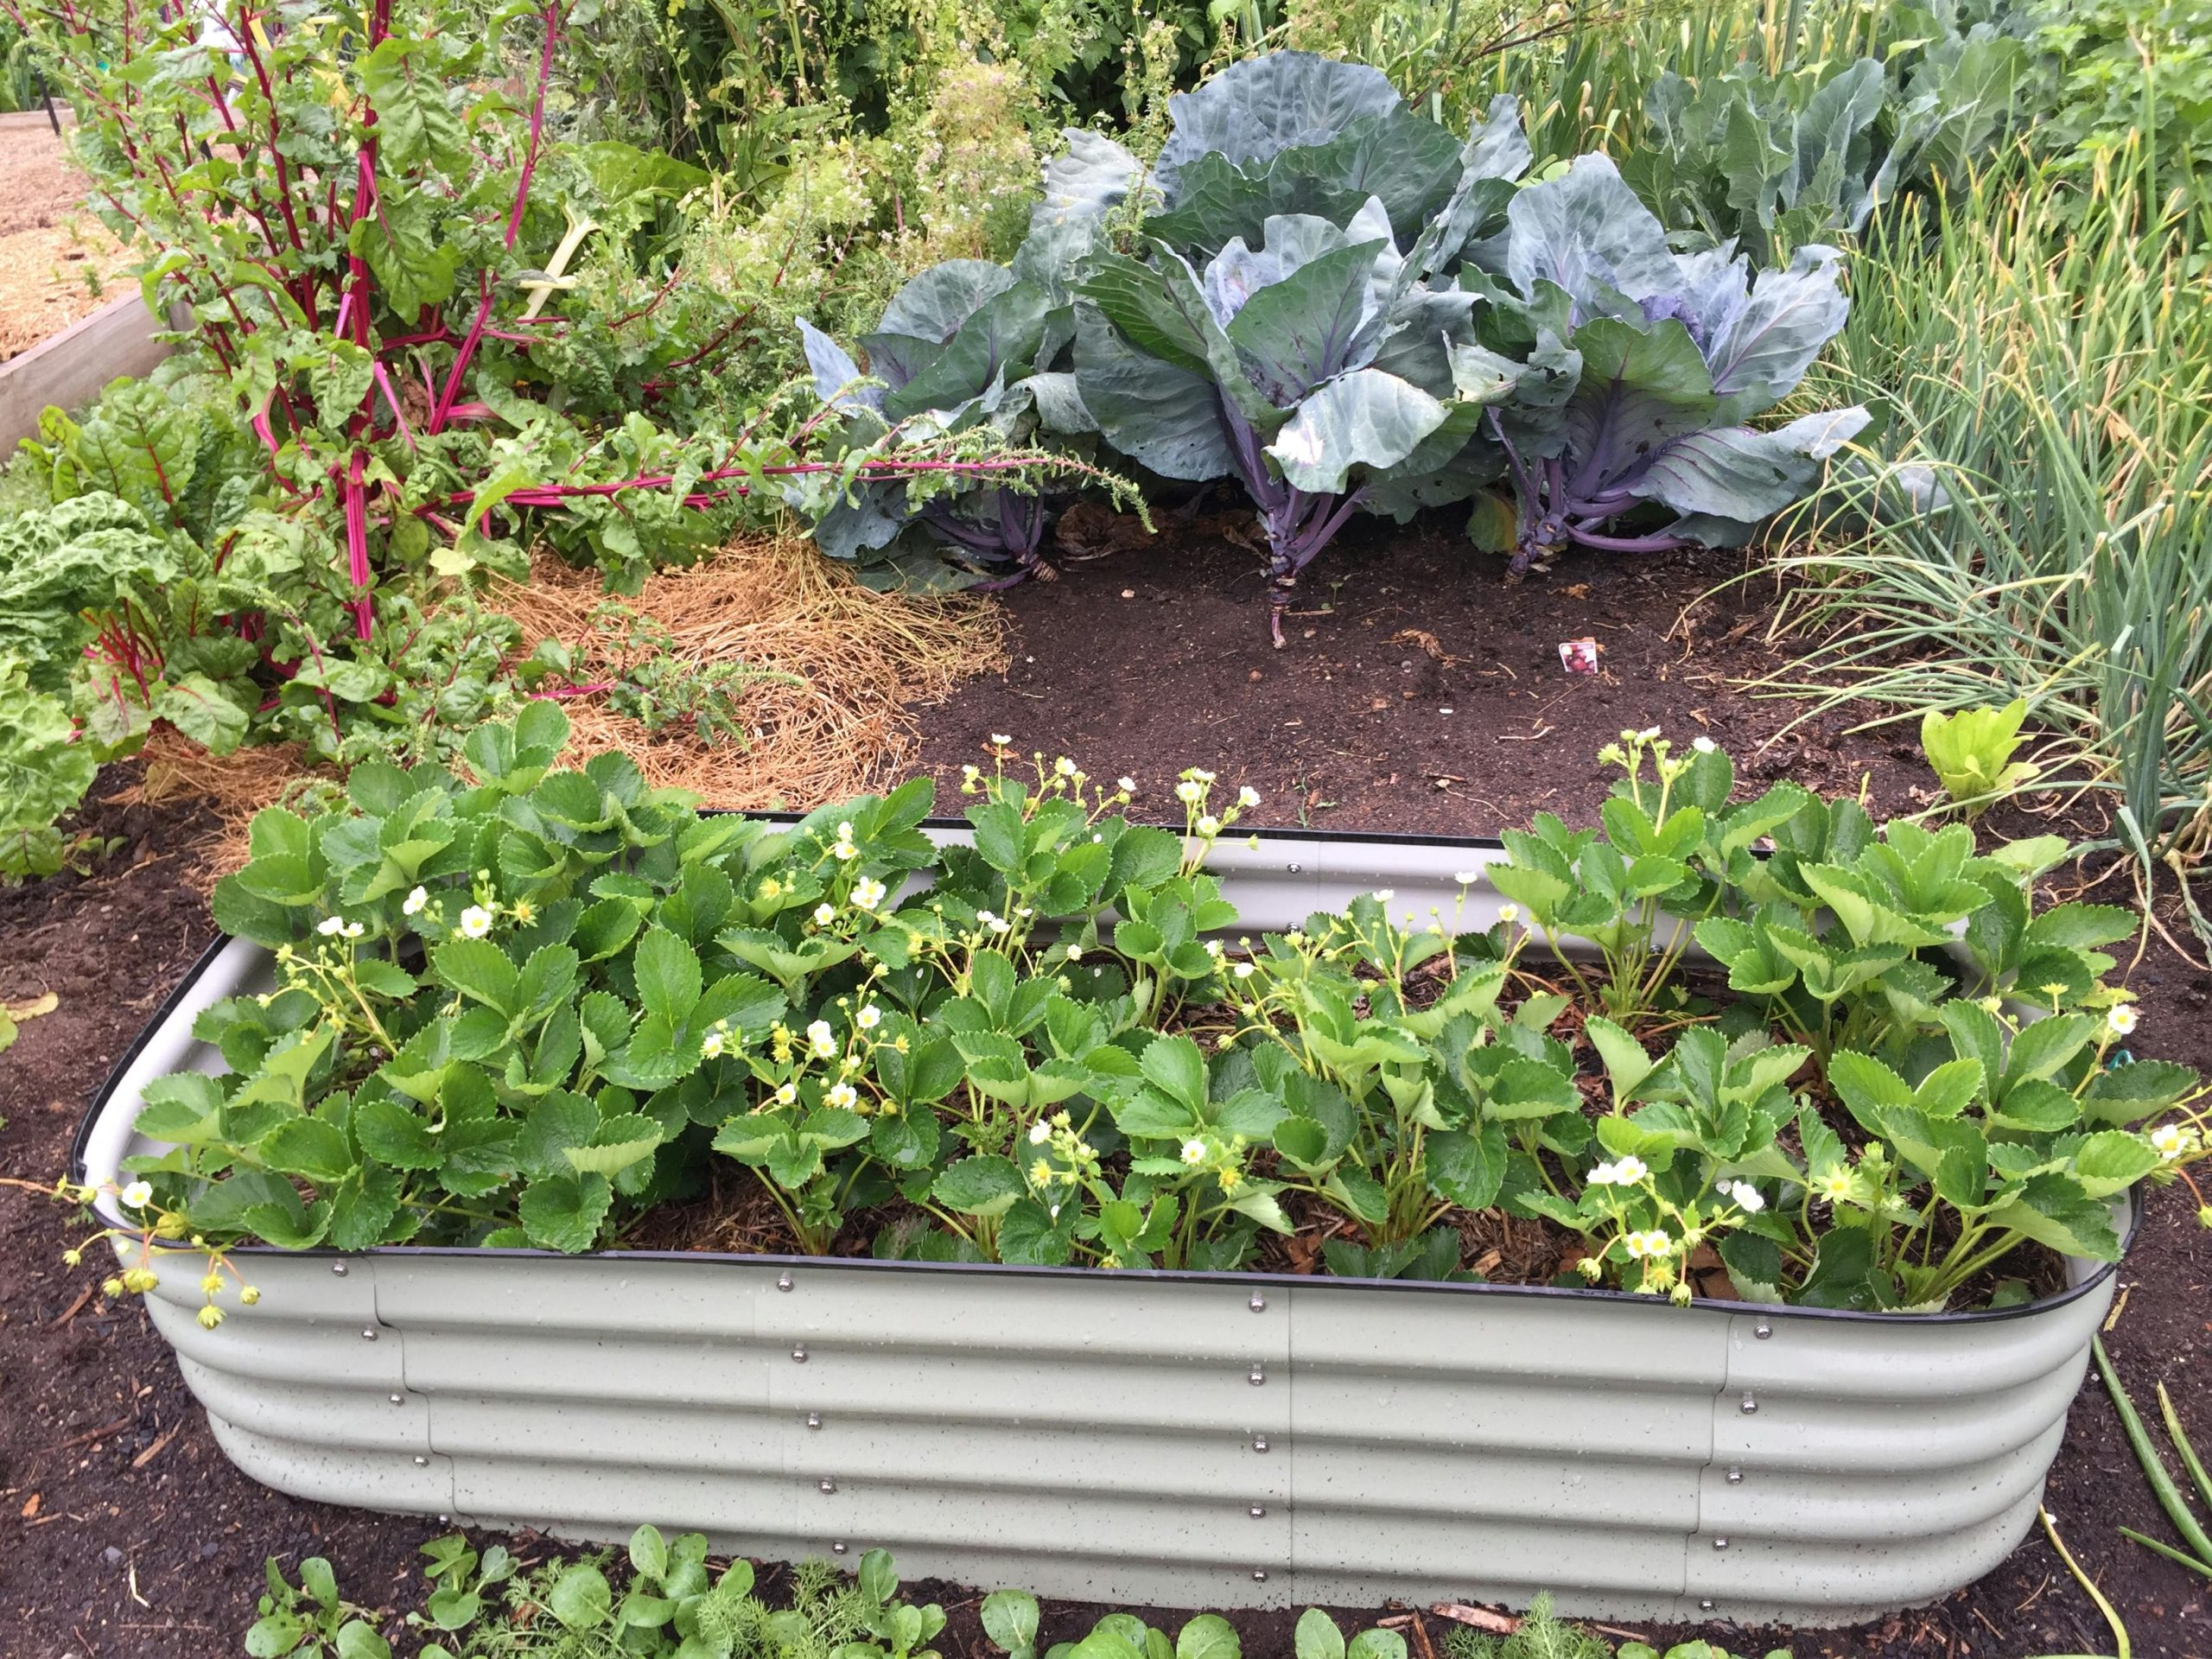
14. Raised Garden Bed with Strawberries, Chard, and Cabbage
This is such a happy, colorful raised bed! The curved corrugated metal forms a striking planter, and the mix of flowering strawberries, vibrant red chard, and purple cabbage creates a miniature edible landscape. It proves that even a single bed can be a work of art loaded with deliciousness.
|
$79.98
|
$17.98
|
$20.97
|
You can break down the visual appeal of this bed into a simple style math: 50% lush green foliage (strawberries, dark green leaves) + 30% vibrant accent color (magenta chard, purple cabbage) + 20% textural contrast (corrugated metal, straw mulch). You could easily swap out the accent colors for bright yellows from marigolds or deep blues from kale, as long as you maintain the proportion and textural interest. This formula ensures a dynamic and appealing composition.
When using a single, prominent raised bed like this, think about planting for year-round interest, not just peak harvest. The flowering strawberries provide early beauty, followed by the colorful chard and cabbage, which can hold their own well into cooler weather. Mixing edibles with a few beneficial companion flowers can also add visual appeal and attract pollinators, making your bed both pretty and productive.
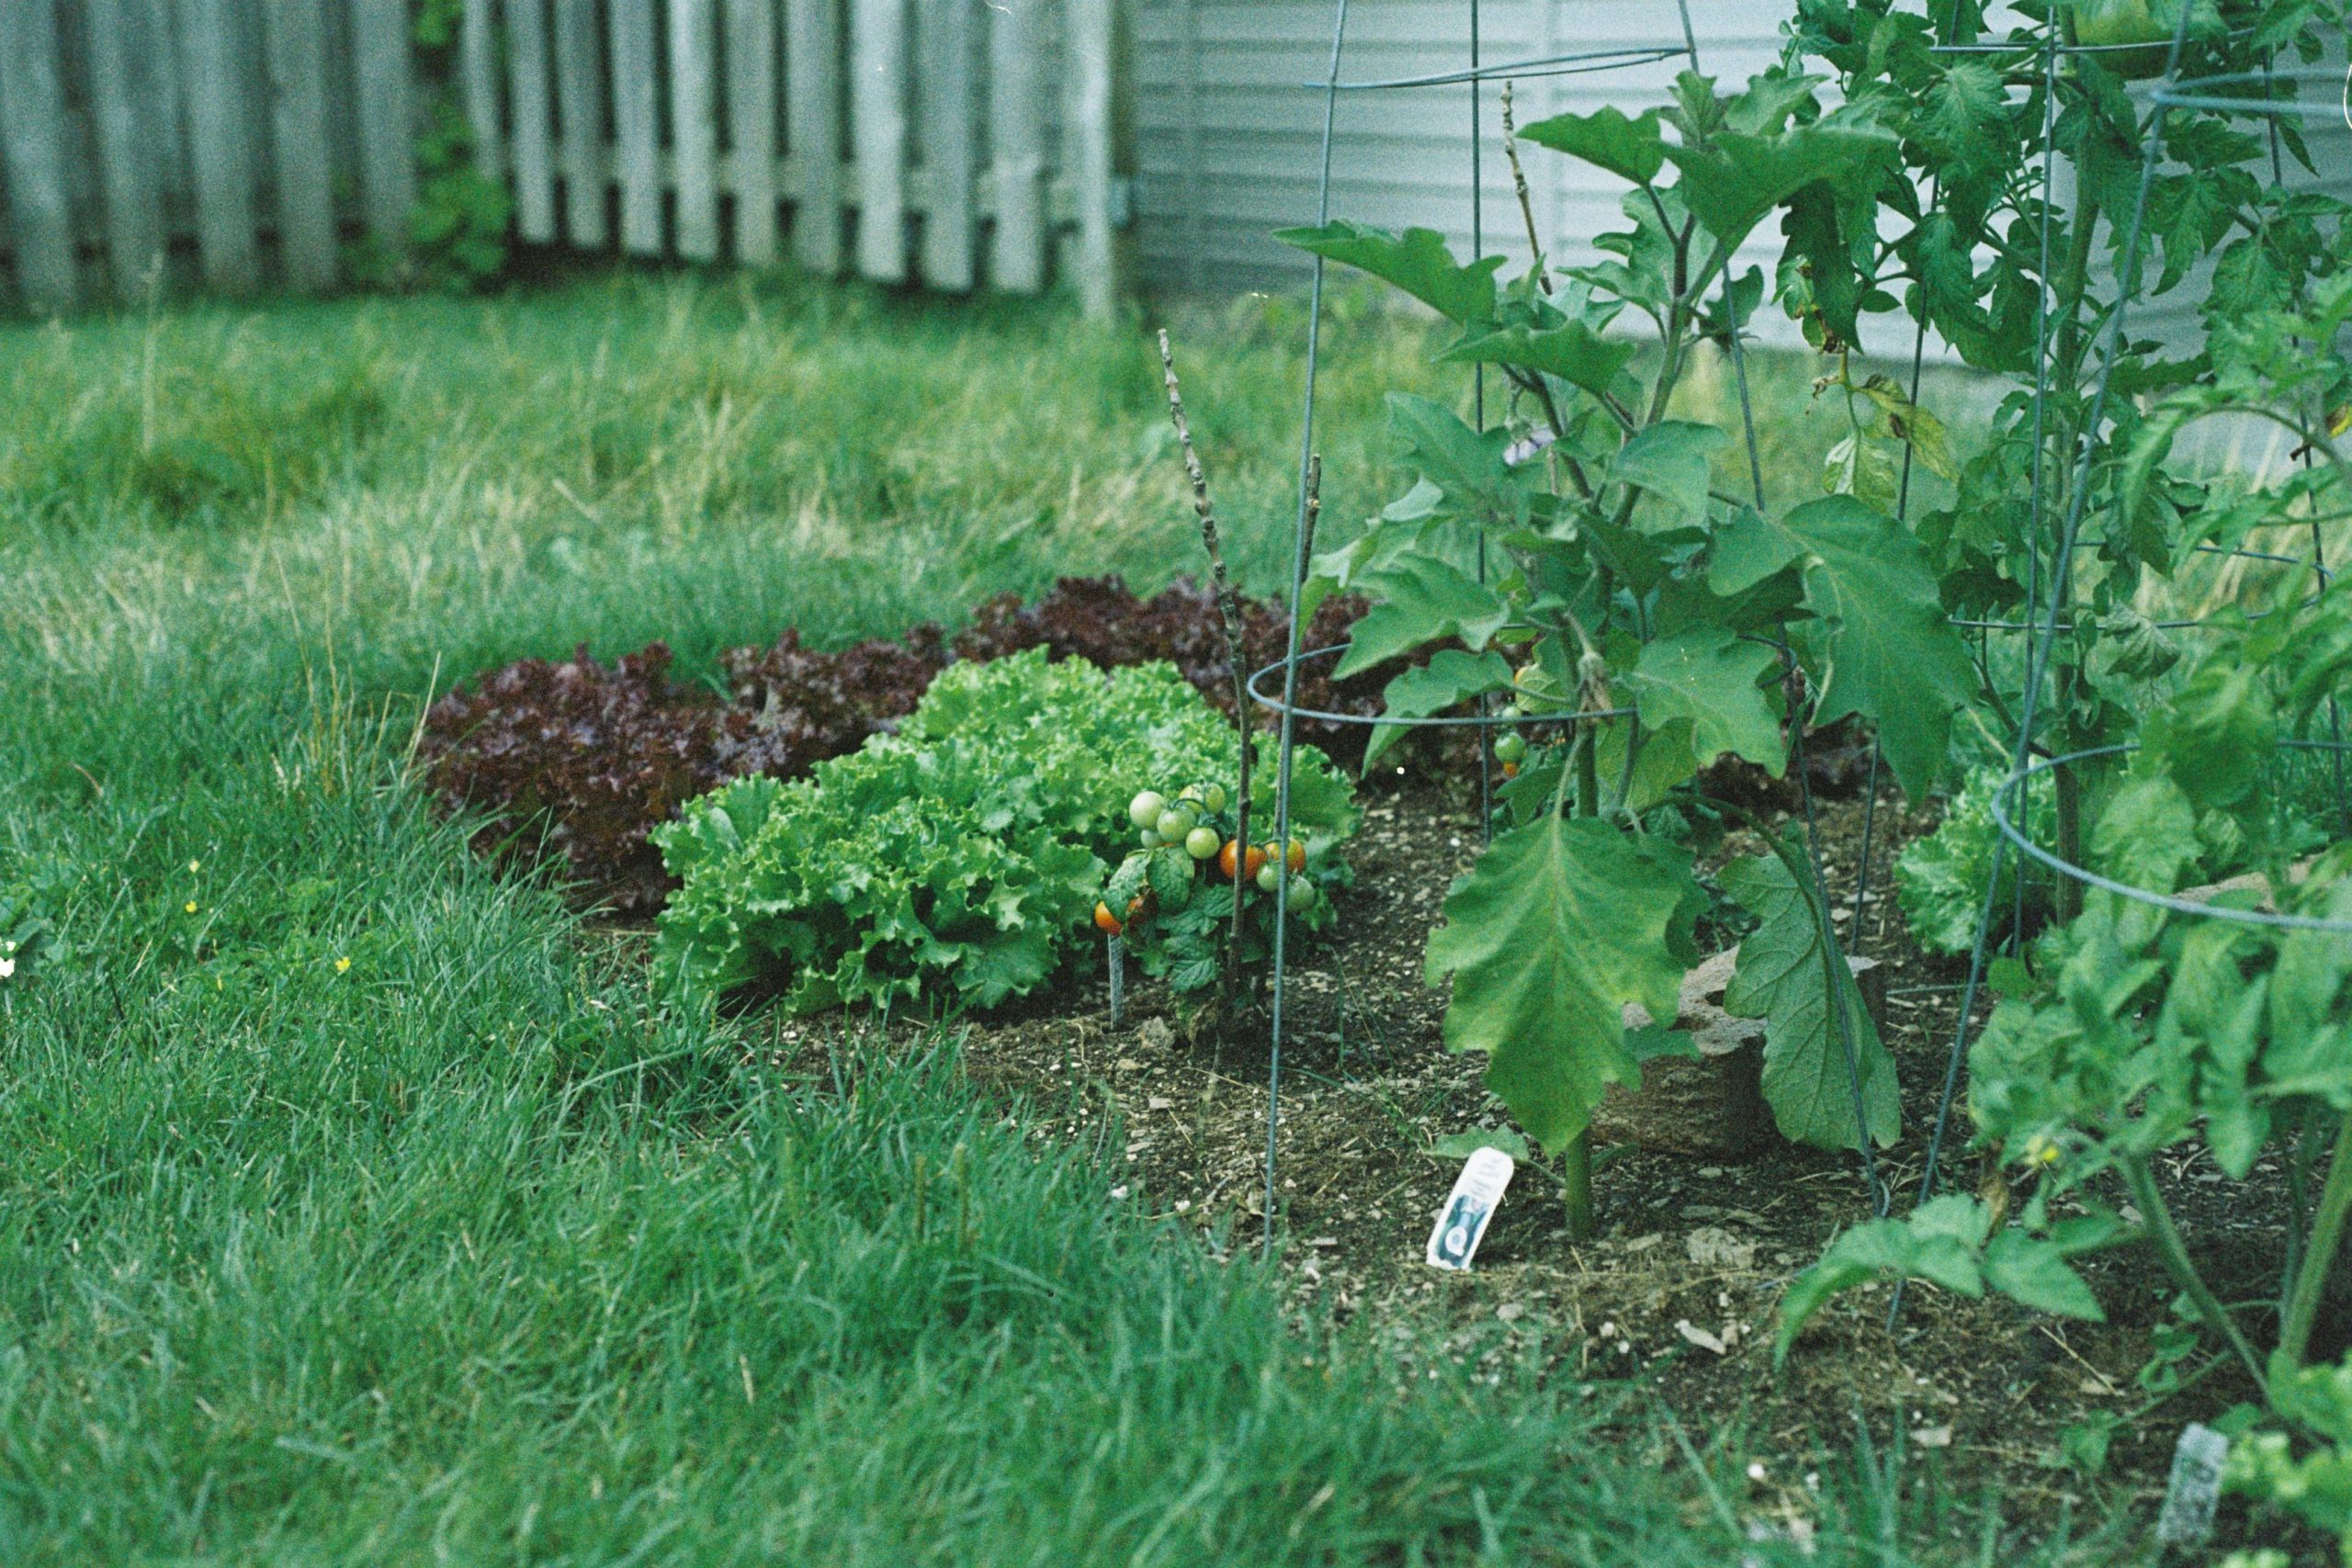
15. Home Garden with Lettuce, Tomato, and Eggplant Plants
This home garden plot is a fantastic example of getting a lot of edibles into a relatively small space. The mix of leafy greens, ripening tomatoes, and eggplants, all supported by wire cages, shows smart planning. It’s truly a microcosm of homegrown goodness, right there in the yard.
|
📋 Copy HEX 🔗 Share |
|
$2.75
|
$154.99
|
$3.48
|

You absolutely don’t need fancy raised beds to get this productive look! This entire vibe can be achieved for less than $100. Grab some tomato cages or stakes from your local hardware store (around $5-15 each), choose your favorite vegetable seedlings (often $3-5 per plant), and put your spade to work. A bag of compost or good topsoil for amending your garden bed will set you back about $10-$20. It’s the ultimate budget-friendly way to enjoy fresh produce straight from your yard.
This particular garden style is ideal for smaller backyards or even a dedicated side yard plot, requiring a minimum of about 50-100 square feet for a diverse harvest. It’s perfect if you’re just starting out or only want to grow a few key crops. For larger harvests or more formal arrangements, Idea #4 offers a more expansive symmetrical approach, but this focused plot excels in efficiency for compact spaces.
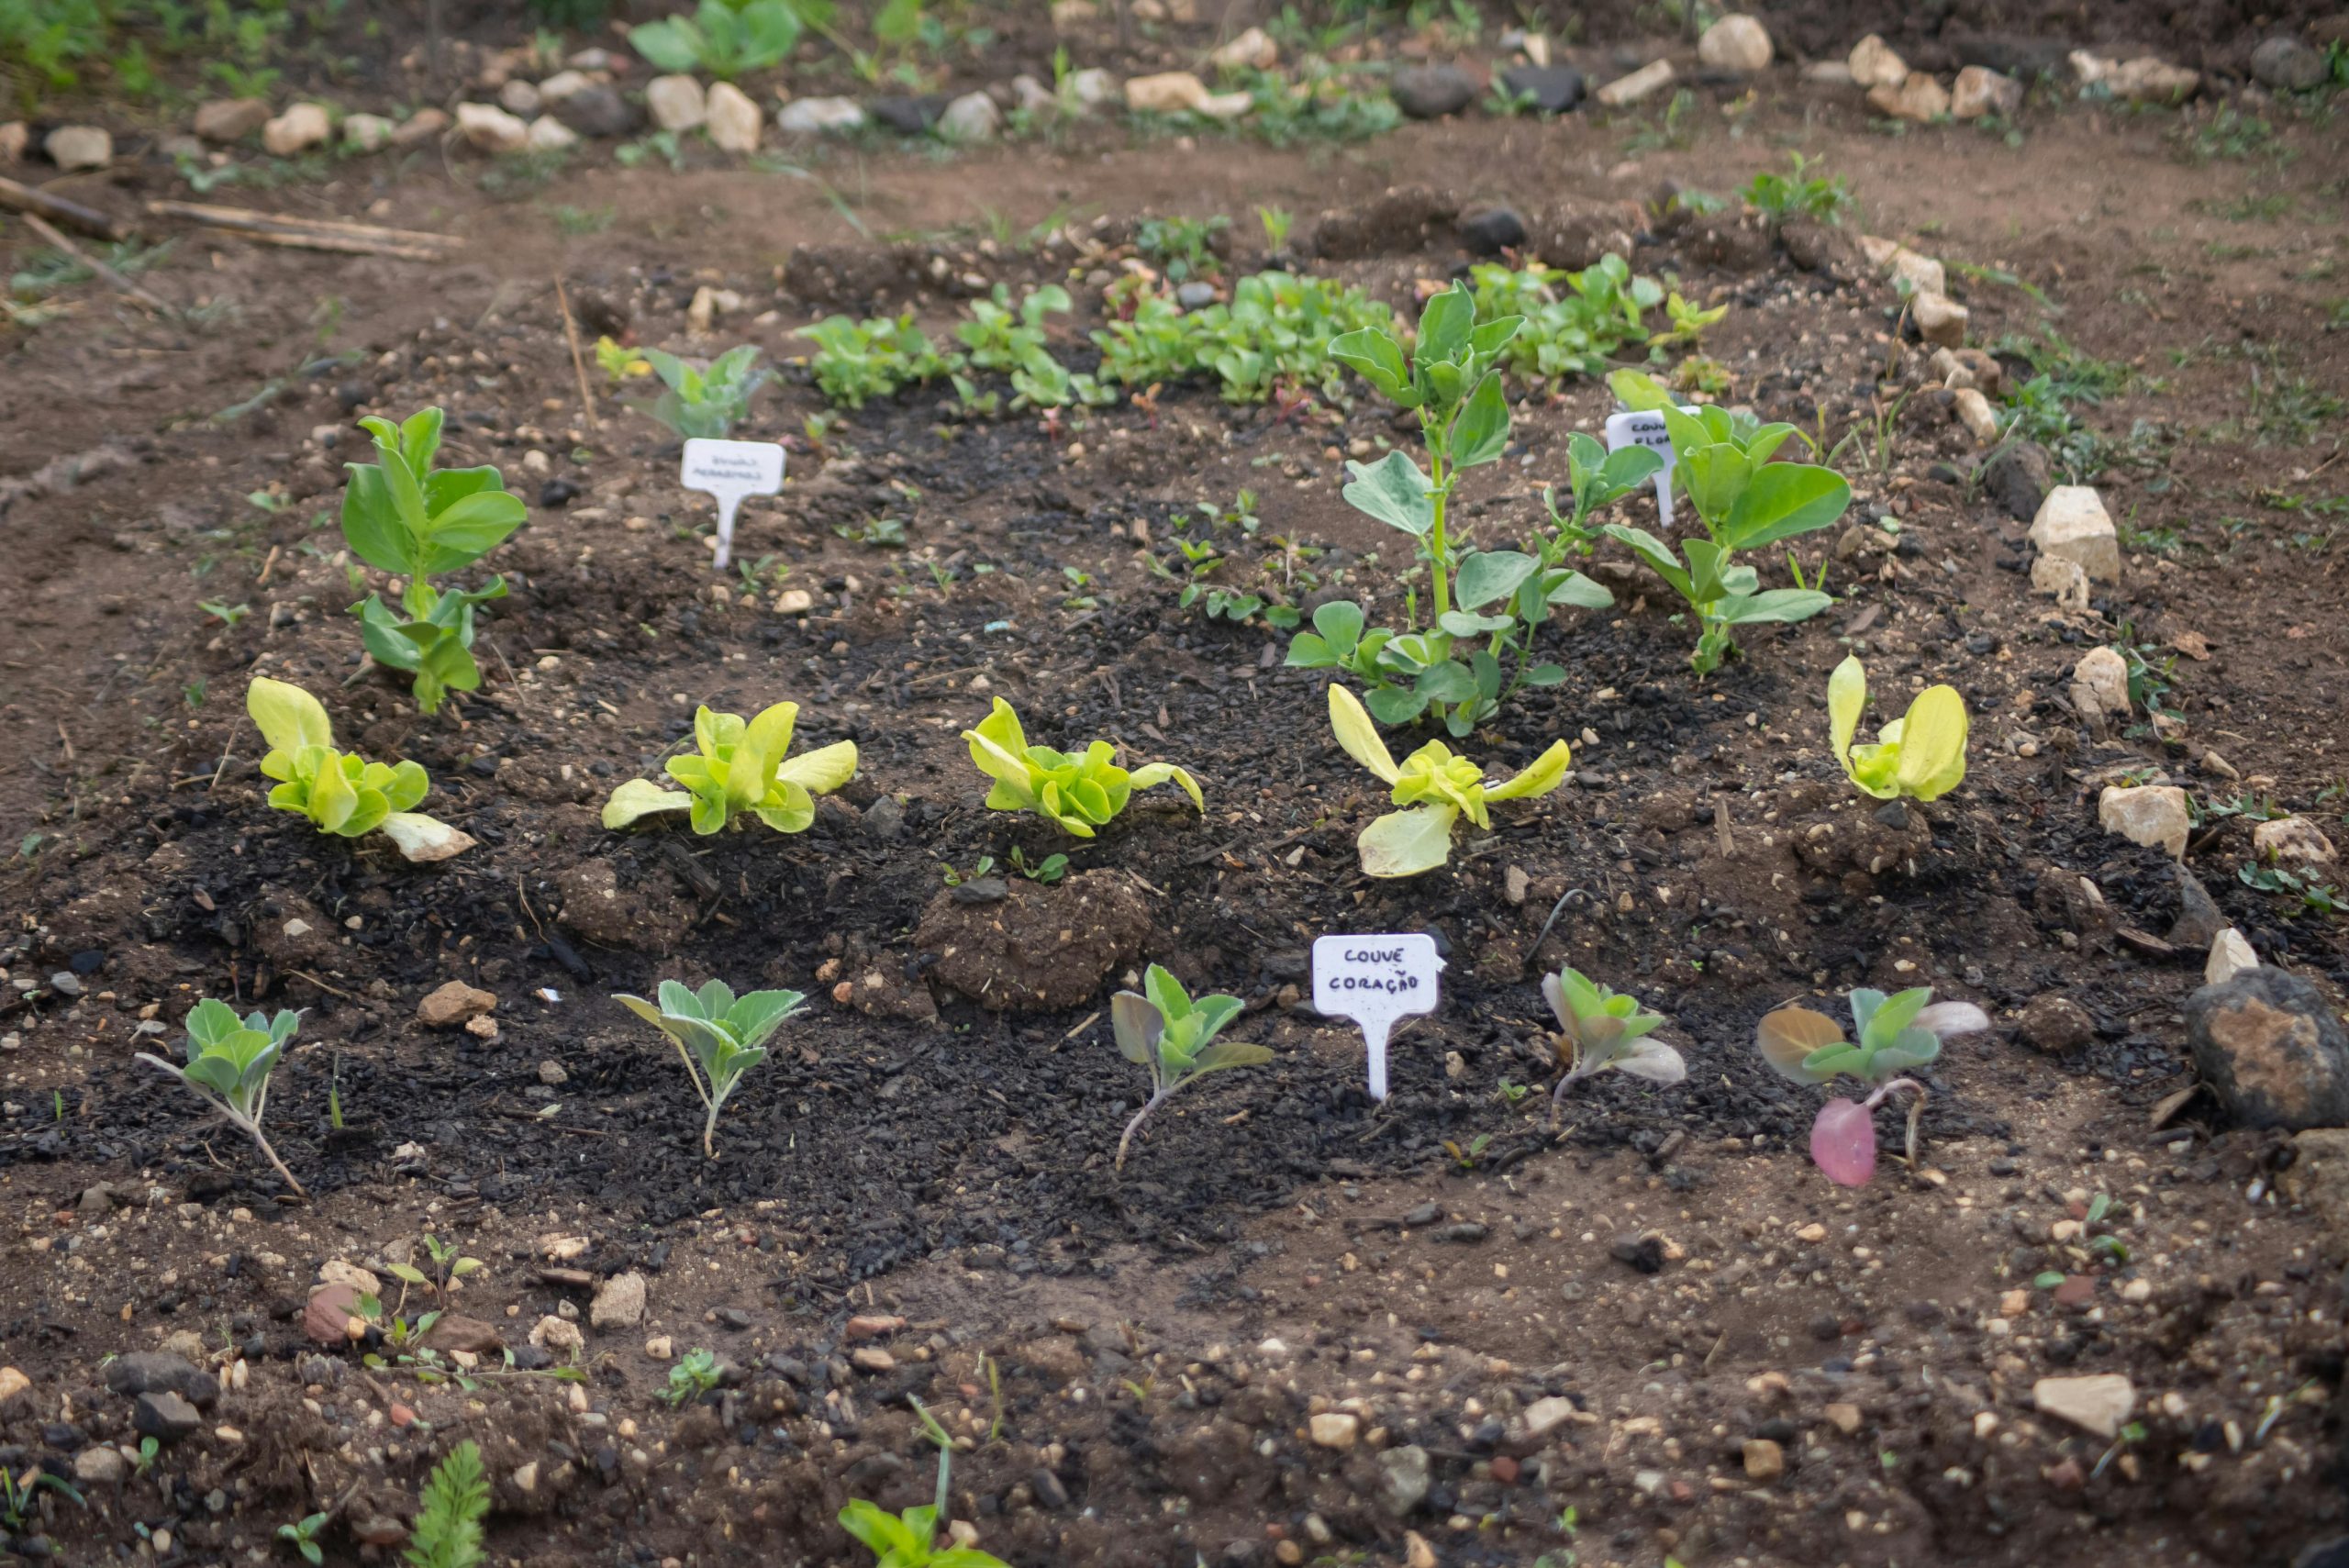
16. Newly Planted Small Vegetable Garden with Labeled Rows
There’s something so hopeful about a newly planted garden! This small, in-ground vegetable plot, with its neat rows of young green plants and clear labels, is a testament to organized beginnings. You can almost feel the promise of future harvests here.
|
$12.00
|
$10.99
|
$59.49
|
$58.98
|


that immediately tells you this garden is well-planned and cared for, even at its earliest stage, is the presence of the white plastic plant labels. They might seem like a small detail, but they transform a scattering of seedlings into an organized, intentional planting. Without them, it would be a guessing game; with them, it’s a clear roadmap to what’s growing where, making future care and harvesting a breeze.
To set up a simple in-ground garden bed like this:
- Clear the area: Remove all existing grass and weeds from your desired garden plot.
- Double dig: Loosen the soil to a depth of 12-18 inches, incorporating plenty of compost and organic matter.
- Shape your rows: Use twine and stakes to create straight, evenly spaced rows for planting.
- Plant seedlings: Carefully transplant your young vegetable plants, giving them adequate spacing.
- Label everything: Insert your plant labels immediately after planting the last seedling.
Time: 2-4 hours. Material Cost: $50-$150 (for soil amendments).
17. Purple Raised Garden Bed with Young Green Plants
Talk about a pop of personality! This rectangular raised bed with its bold purple paint instantly catches the eye, creating a fun and unexpected accent in the garden. The young green plants against the dark soil promise growth, making this a truly vibrant and budding space.
|
📋 Copy HEX 🔗 Share |
|
$159.99
|
$2.00
|
$1.79
|


The visual success of this bed is pure style math: 70% natural elements (dark soil, green plants) + 30% unexpected color boost (purple bed frame). This strong contrast is what makes it unique. You can totally adapt this formula: imagine a bed painted a vibrant teal or a sunny yellow. The key is to keep the majority of the view natural, allowing that one bold color to truly shine and elevate the entire planting.
Bright, unexpected colors in the garden structure itself are a trending choice in 2026, especially as people look to infuse personal style into every corner of their homes, indoors and out. This move away from purely utilitarian garden beds towards aesthetically expressive ones is all about making the outdoor space feel as curated and interesting as any interior room. It highlights a desire for joy and individuality in typically functional areas.
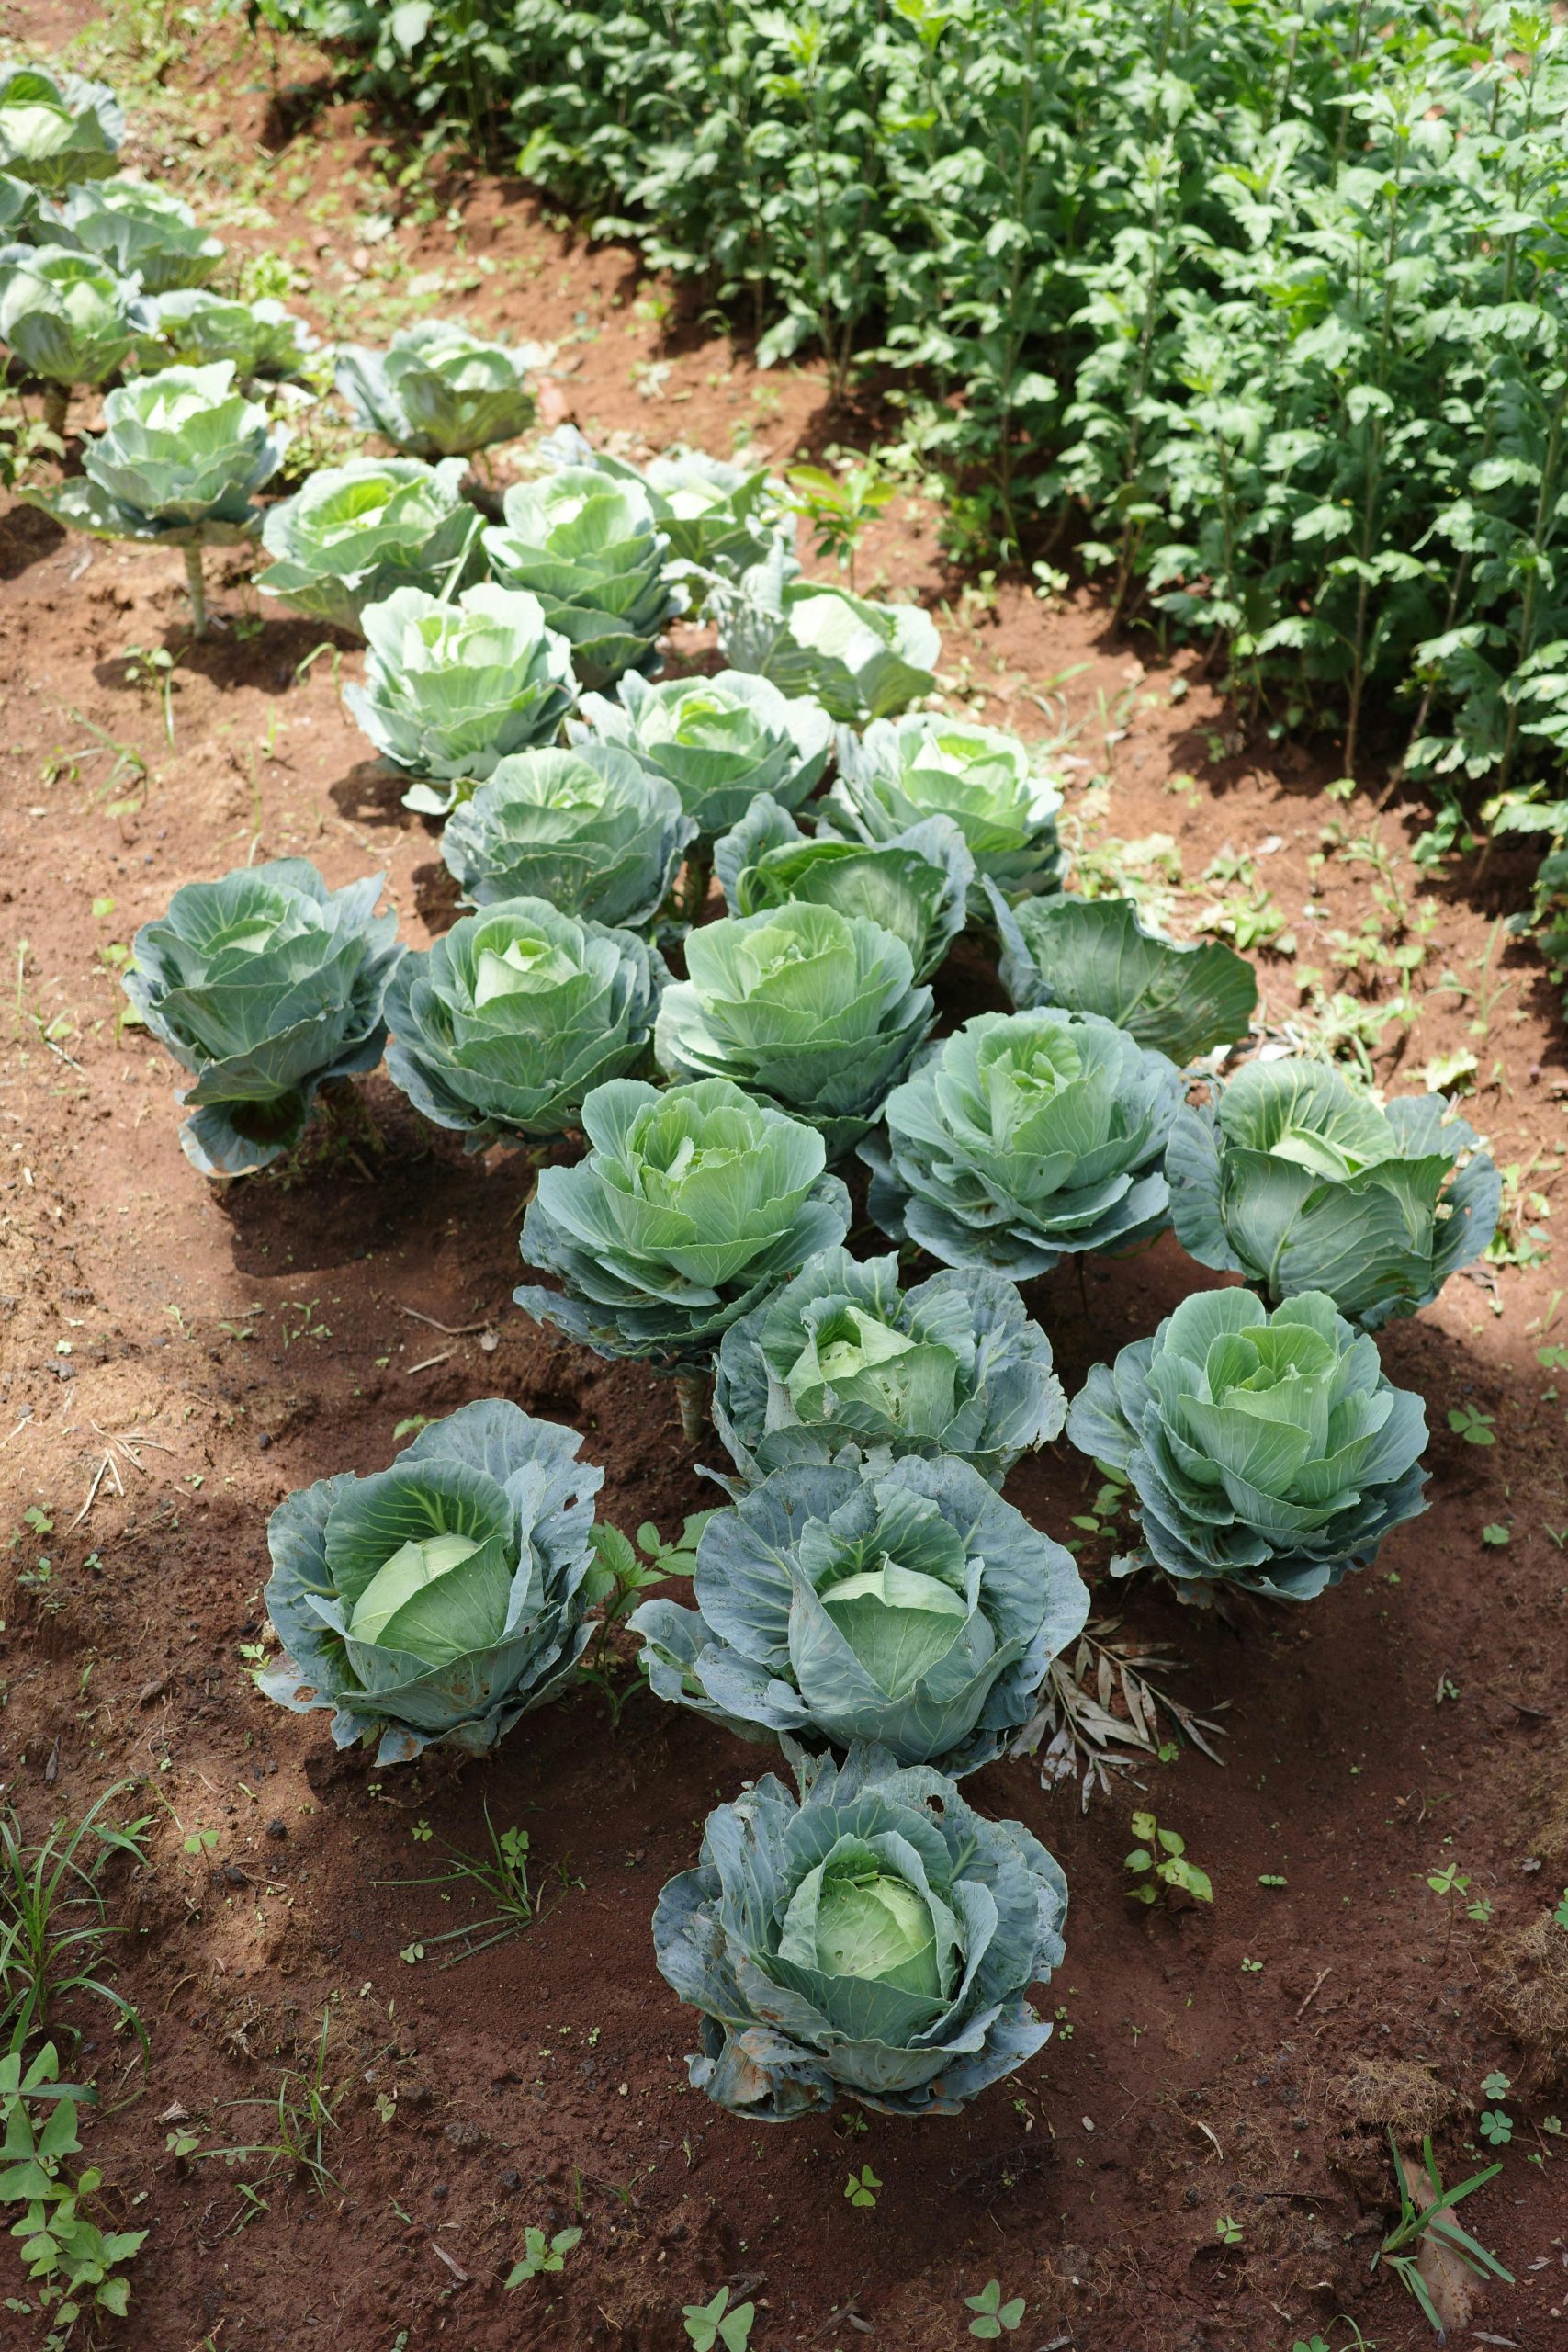
18. Rows of large green cabbages in red soil
There’s something so satisfying about perfectly aligned rows of abundant crops! These large green cabbages, thriving in rich reddish-brown soil, speak to disciplined and successful cultivation. It’s simple, striking, and incredibly productive.
|
$2.97
|
$21.99
|

Here’s a designer tip for achieving this kind of lush, productive look in an open field setting: focus on amending your soil annually. The rich color of this soil isn’t by accident; it’s a sign of high organic matter. Before planting each season, add a thick layer of compost or well-rotted manure and work it into the top 6-8 inches. This feeds your plants and improves soil structure, leading to those impressive, large cabbages.
This image works because of its powerful demonstration of repetition and contrast. The strong, rhythmic rows of identical cabbages create a sense of order and abundance, while the vibrant green of the foliage pops dramatically against the rich, reddish-brown soil. It’s a very clean, agricultural aesthetic that highlights the raw beauty of cultivation. The uniformity of the plants also creates an impressive visual impact, showing the potential for a really substantial harvest.
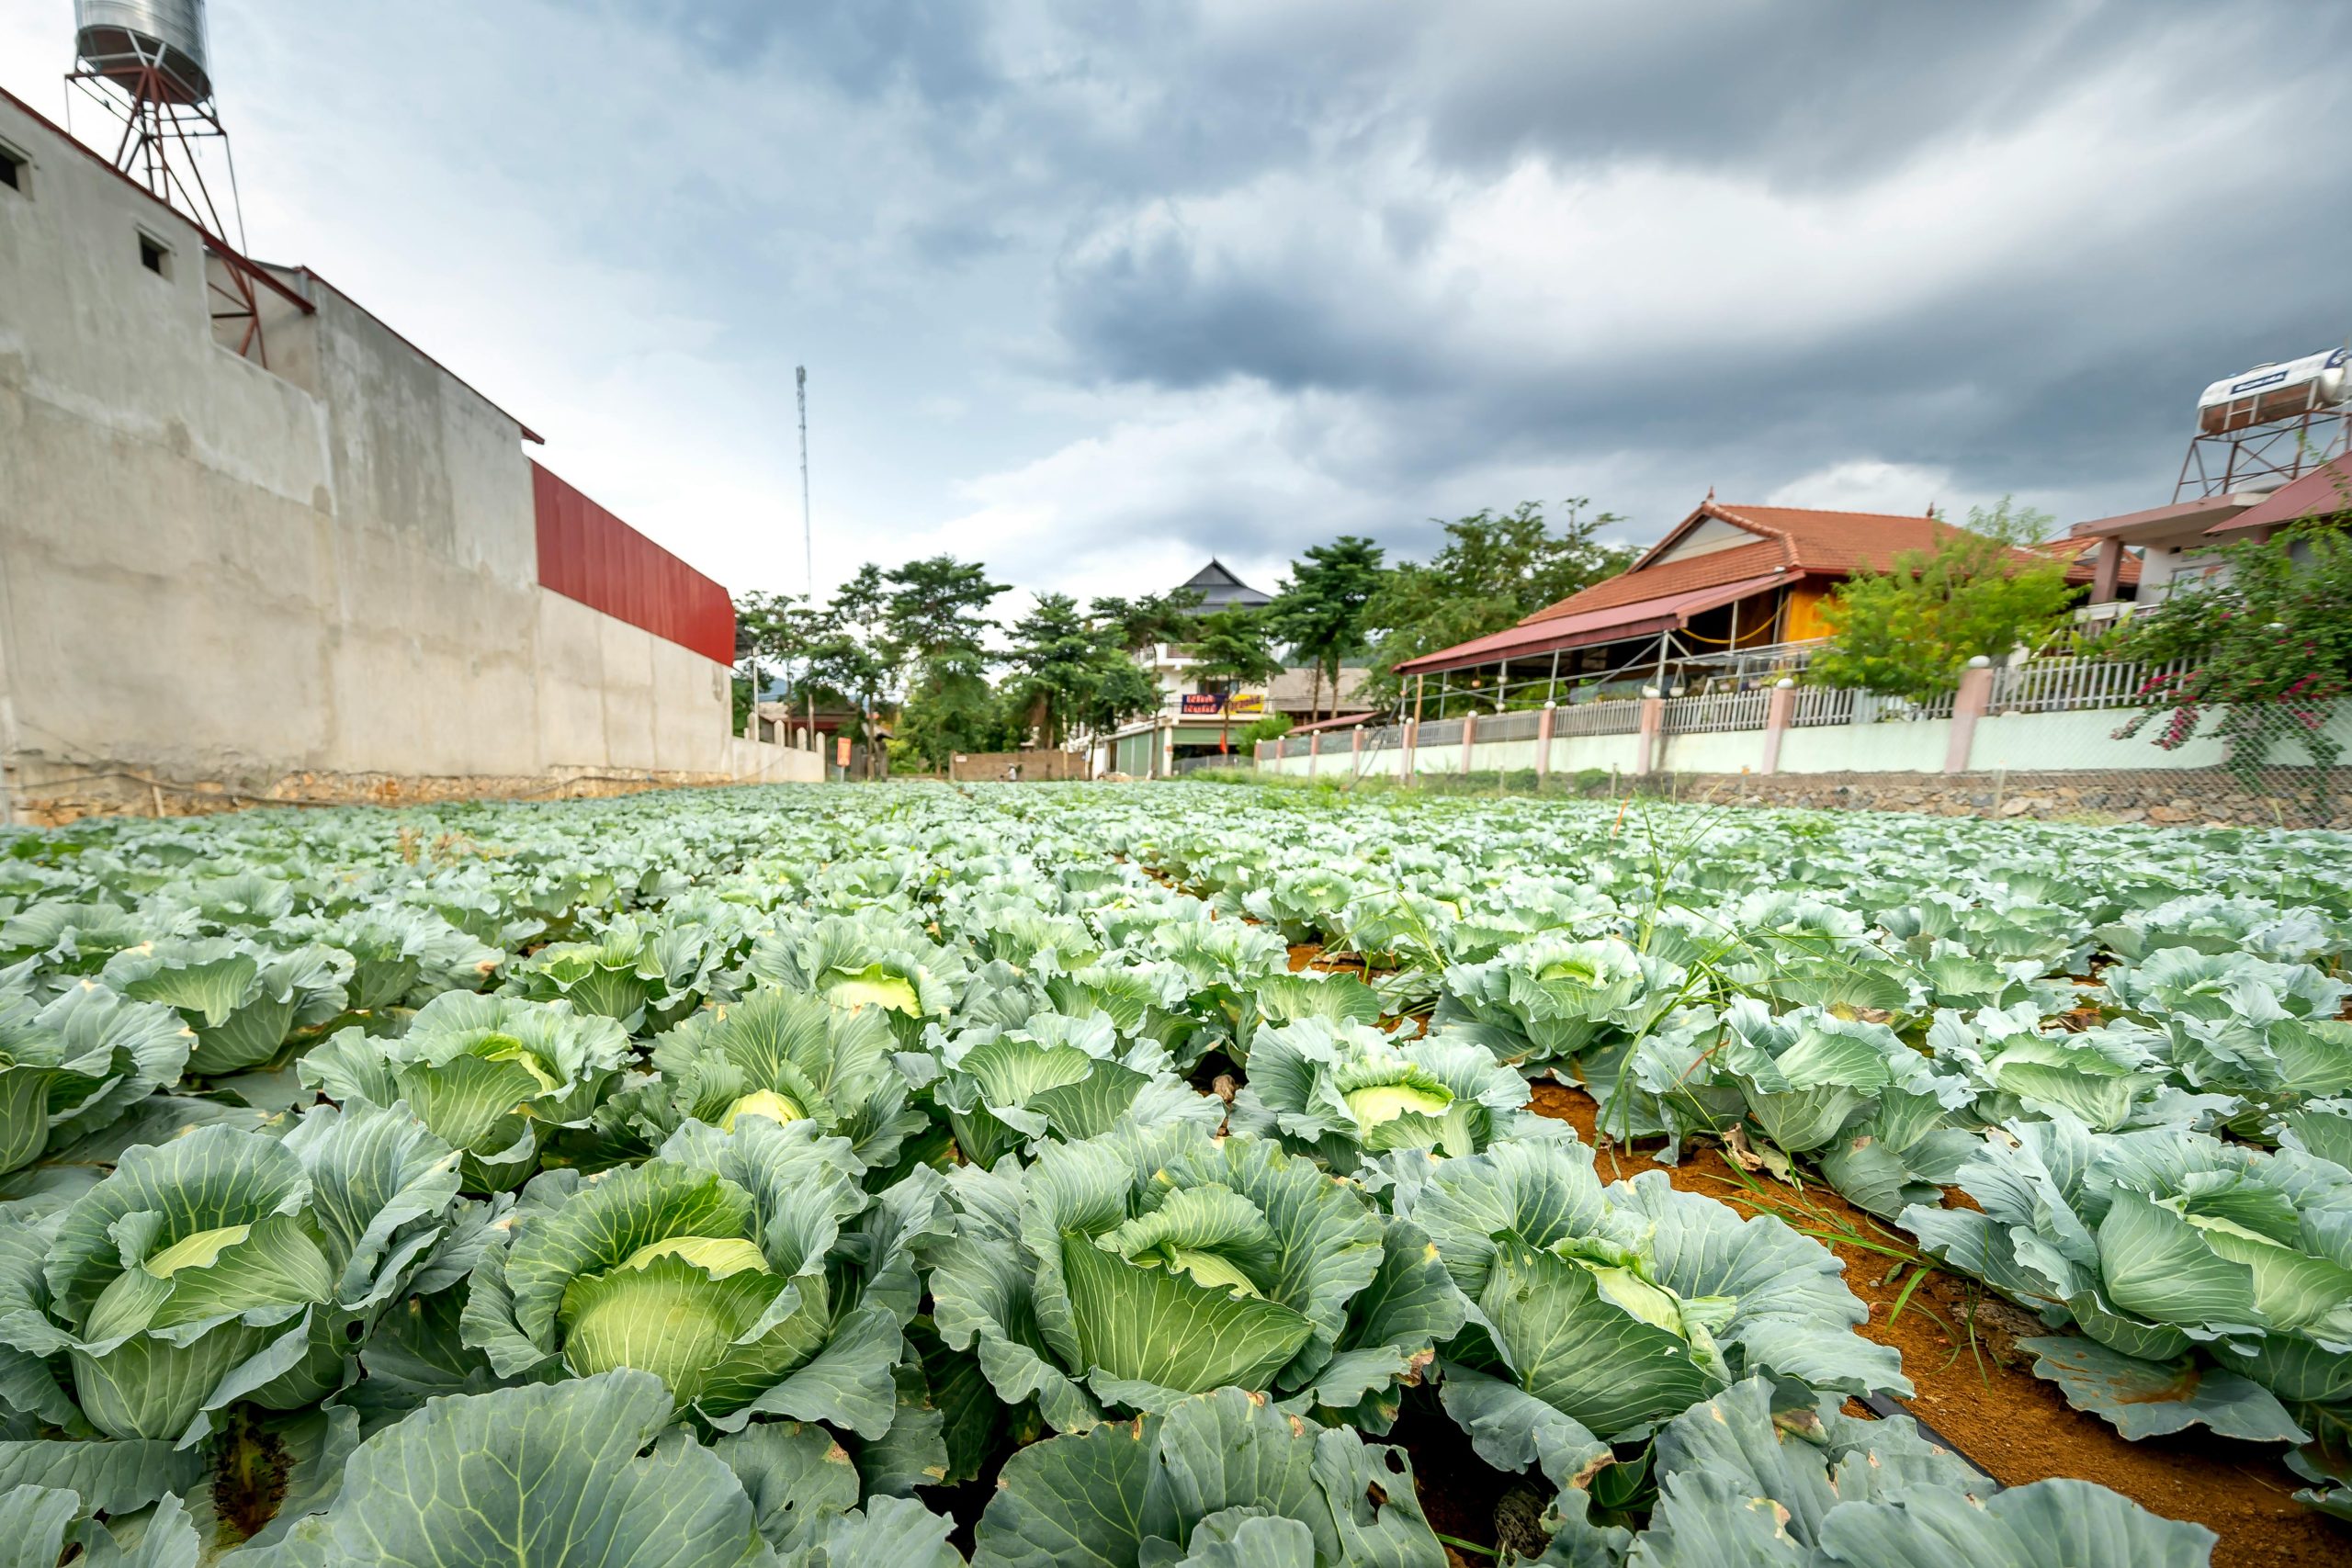
19. Urban Cabbage Field with Residential Backdrop Under Cloudy Sky
This urban cabbage patch offers a surprisingly charming blend of productive agriculture and residential life. The vast expanse of green cabbages creates a striking foreground against the terracotta roofs and light-colored buildings, all under a beautifully moody sky. It really shows how food production can coexist gracefully in close quarters with neighborhoods.
|
📋 Copy HEX 🔗 Share |
- Consider noise from neighbors if you plan to introduce machinery.
- Be aware of potential light pollution from nearby homes at night.
- Confirm local zoning laws for agricultural use in residential areas.
- Assess potential runoff issues from residential properties adjacent to your field.
Let’s have some real talk about growing large-scale crops next to residential areas. You’ll need to be mindful of your neighbors. Pest control methods, irrigation schedules (especially sprinklers), and even the smell of certain organic fertilizers can impact those living nearby. Communication and consideration are key to maintaining good relationships while still achieving your abundant harvest.
This style of large-scale planting, even with a clear residential backdrop, requires a substantial plot of land—we’re talking hundreds to thousands of square feet. It’s not typically a backyard project but rather for a larger communal plot, school garden, or small urban farm. While the principles of neat rows can scale down, the sheer visual impact of this ‘field’ look demands considerable space. If you have only a small plot, consider more intensive planting methods, perhaps with trellises or vertical elements, like Idea #23, to maximize yield without needing a vast footprint.
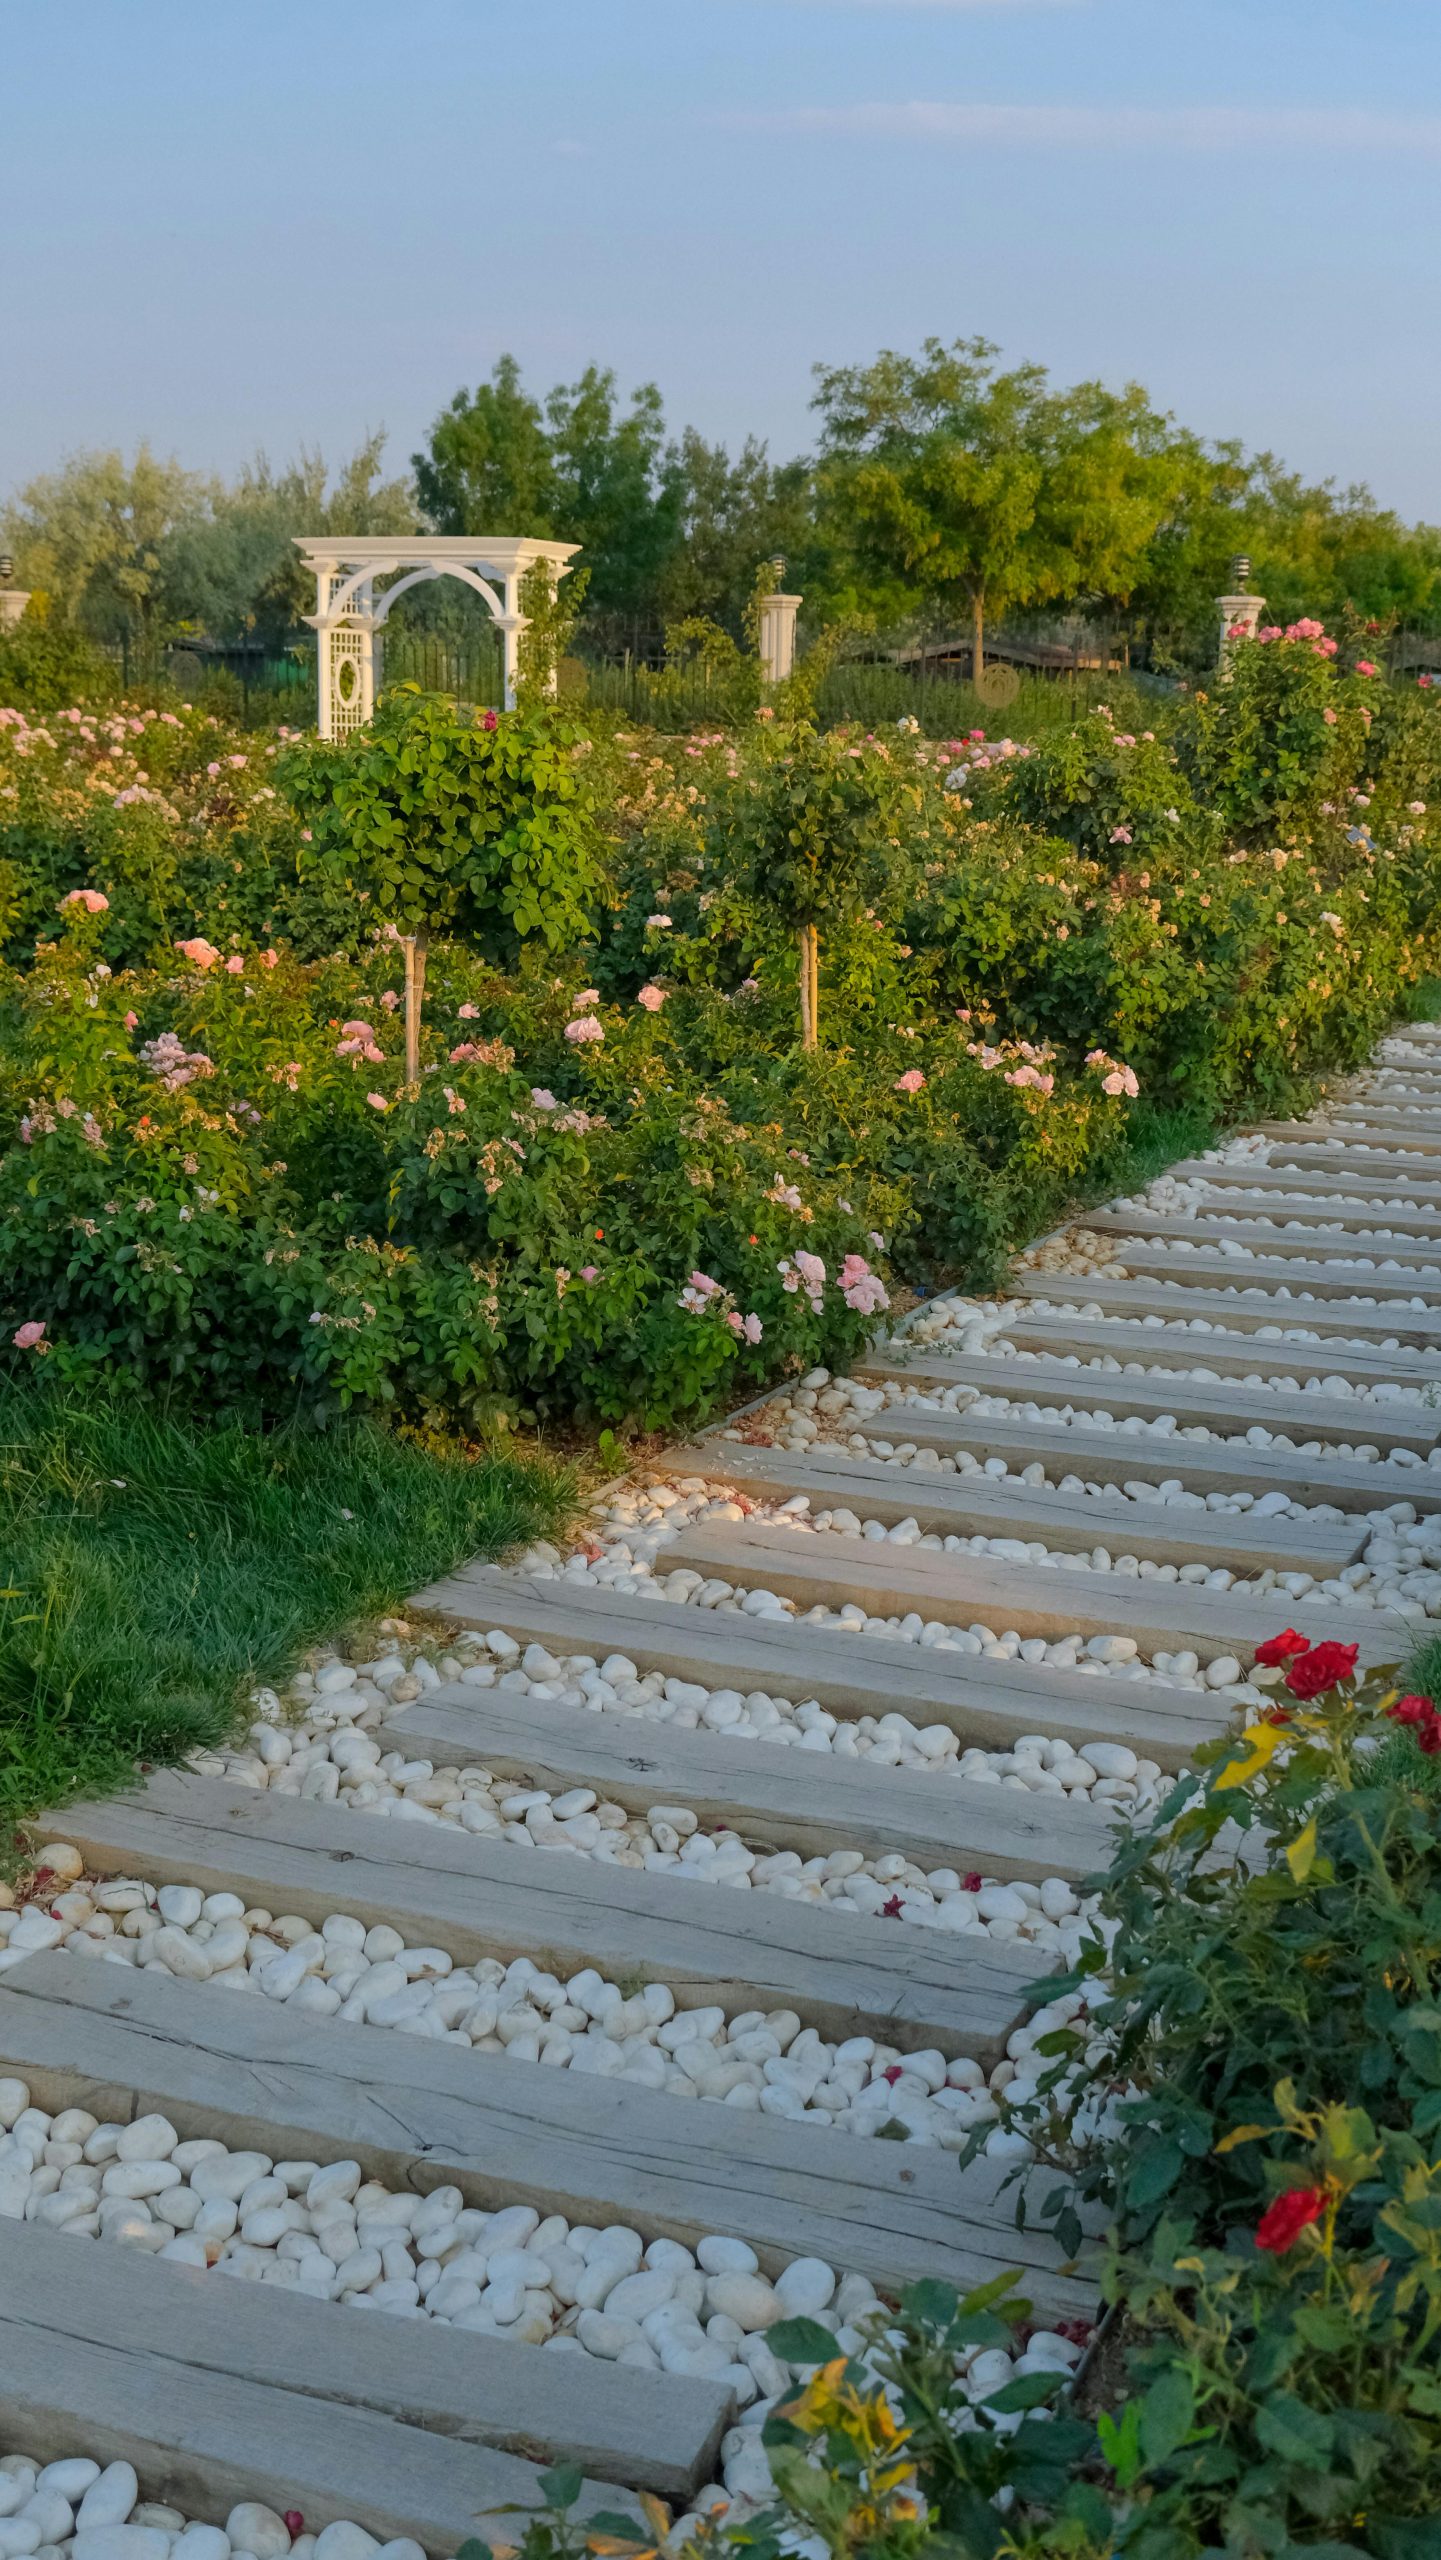
20. Weathered Wood Plank and White Pebble Garden Path with Rose Bushes
What a wonderfully inviting garden path! The weathered grey wood planks paired with crisp white pebbles create a serene, almost meditative walkway. Bordered by those lush rose bushes bursting with pink and red blooms, it feels like a path to a secret garden. The white archway in the background adds a touch of classic elegance.
|
$89.99
|
$1.00
|
$29.98
|
$99.99
|

What truly makes this path special is the meticulous combination of weathered grey wood planks and bright white pebbles. This blend creates a striking textural and color contrast that is both rustic and refined. If it were just wood or just pebbles, it wouldn’t have the same inviting, curated sensibility. This interplay of materials is what elevates a simple path into a defining garden feature.
To create a similar plank and pebble path section:
- Level the ground: Ensure the pathway area is flat and slightly sloped for drainage.
- Dig a shallow trench: Excavate about 2-3 inches deep for your planks and pebbles.
- Lay weed fabric: Place a permeable weed barrier cloth across the trench to prevent growth.
- Arrange planks: Position your weathered wood planks horizontally, leaving consistent gaps (2-4 inches) between them.
- Fill with pebbles: Pour white pebbles into the gaps and gently brush them into place, ensuring they are level with the planks.
Time: 3-5 hours (for a 10-foot section). Material Cost: $150-$400 (depending on wood and pebble type).
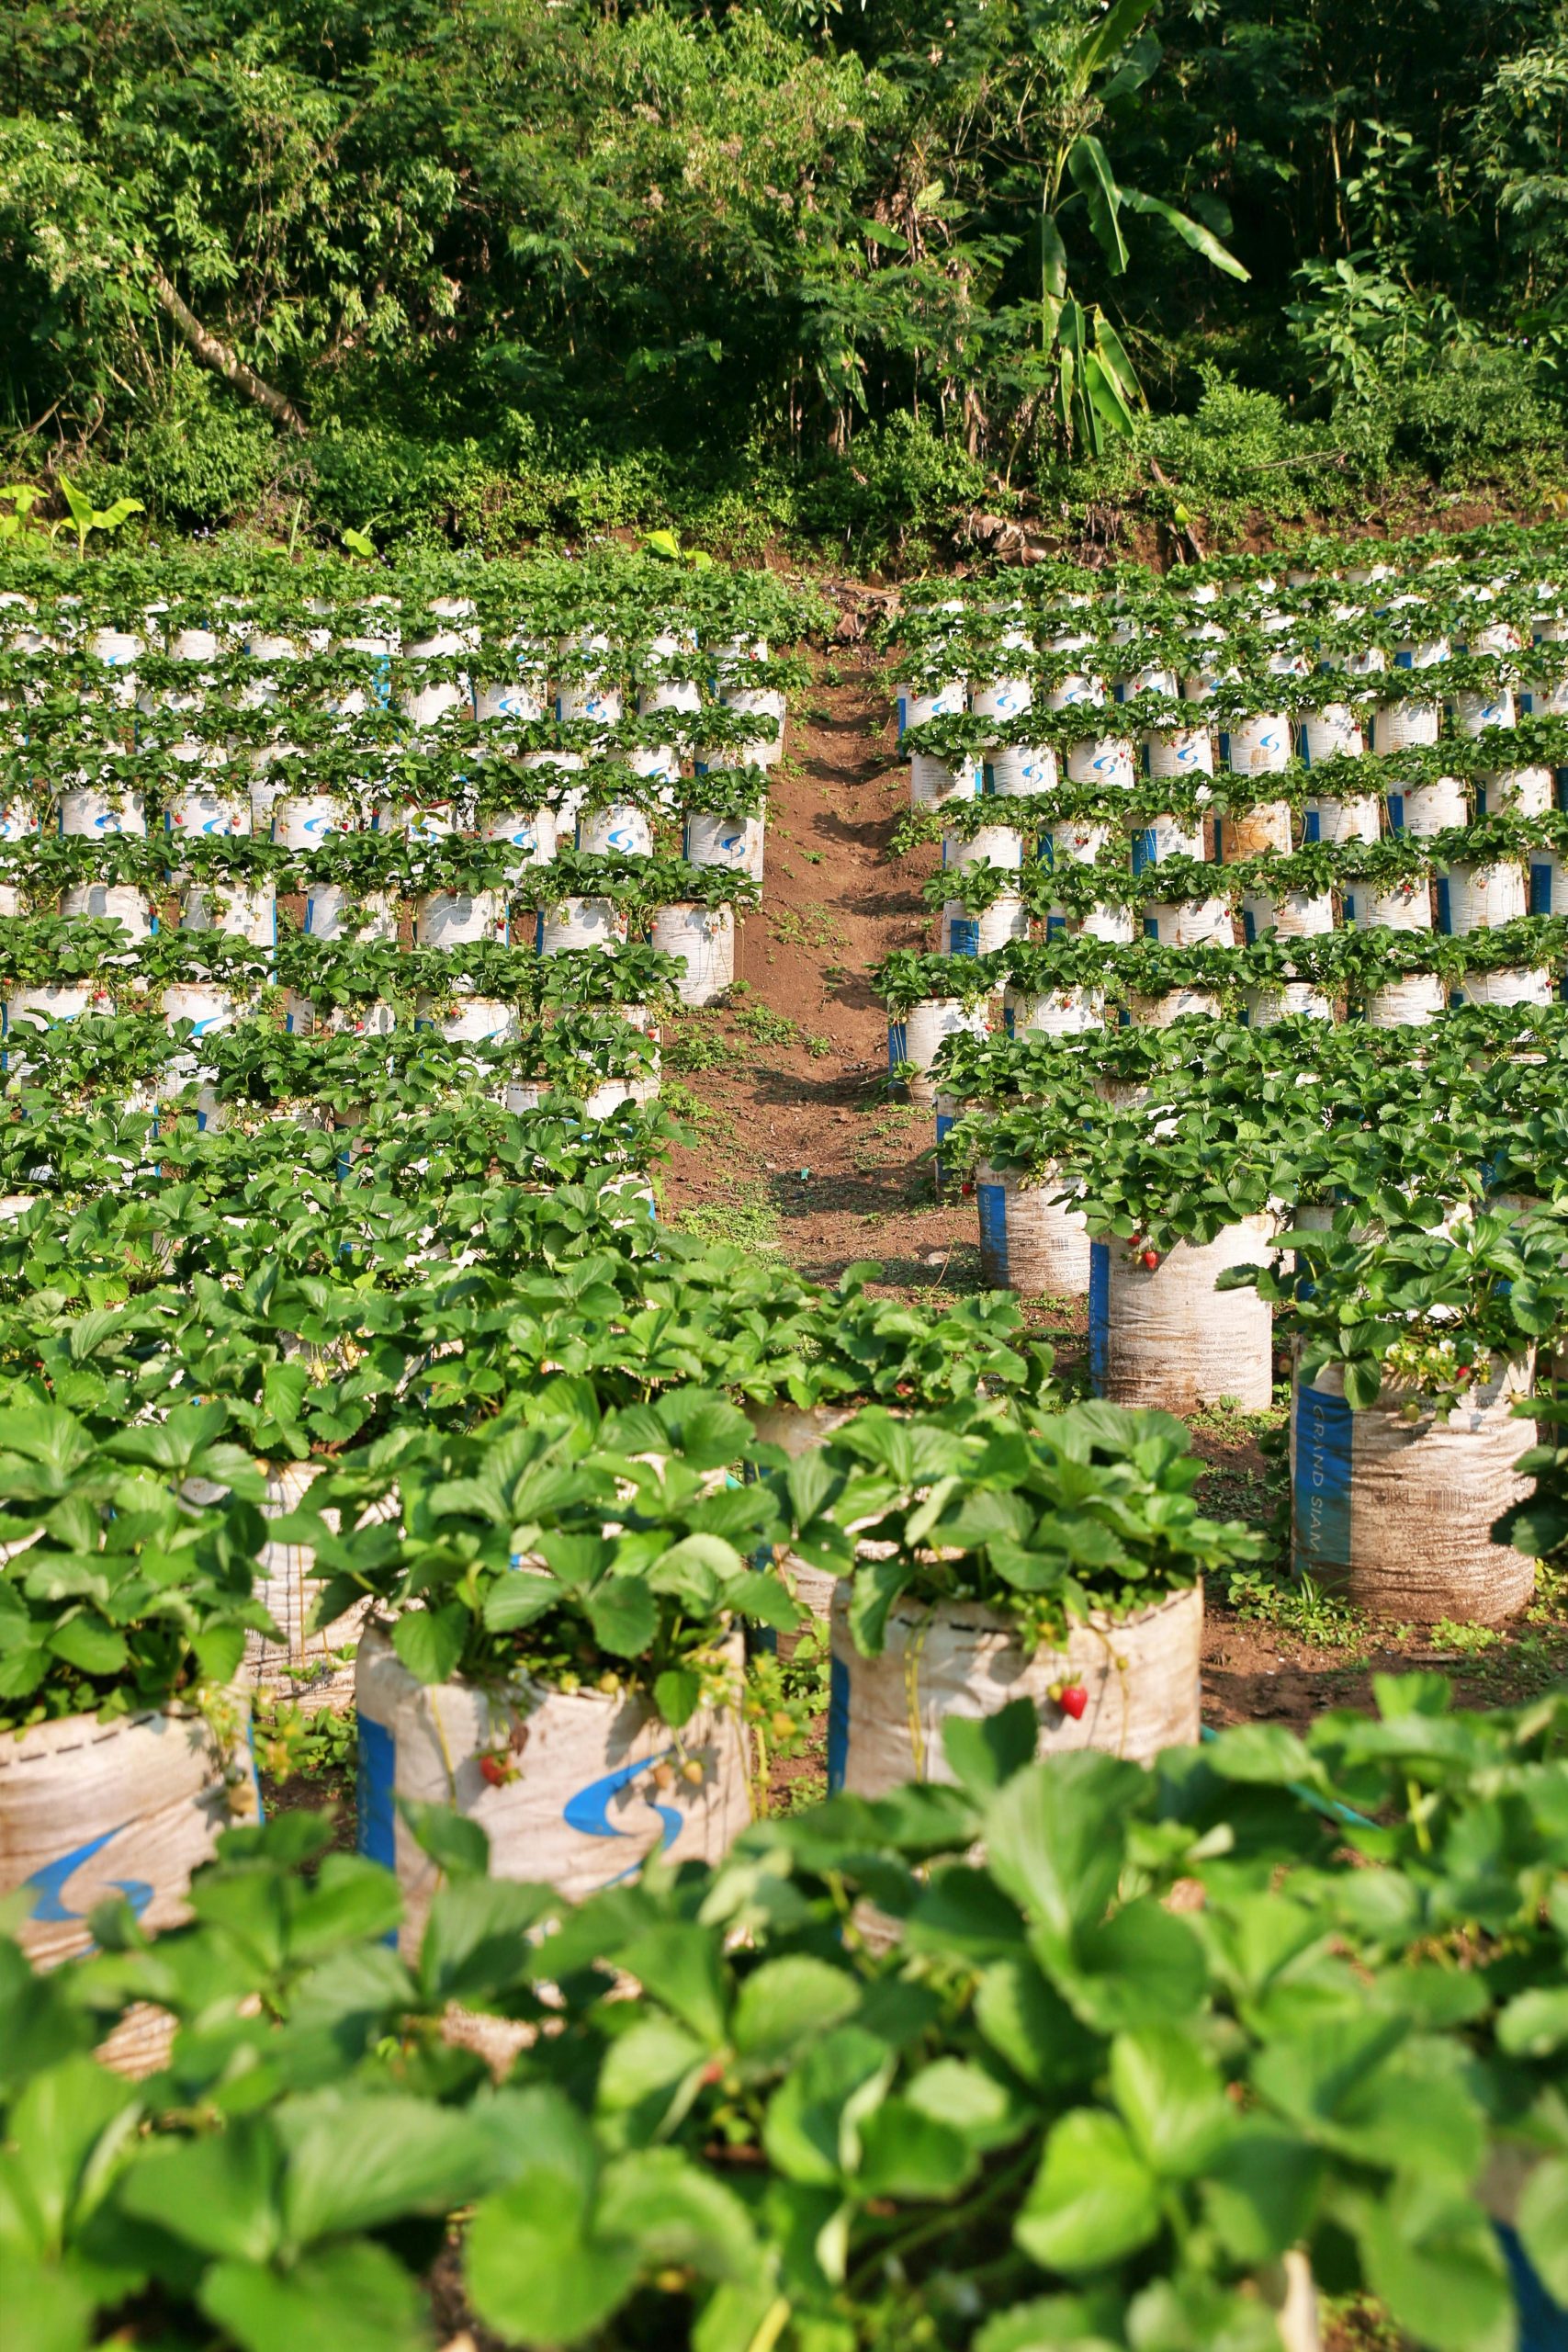
21. Terraced Strawberry Farm with White Grow Bags and Natural Foliage
This terraced strawberry farm is a feast for the eyes and promises a sweet harvest! The rows of white cylindrical grow bags create a striking, modern look against the lush green foliage, while the natural dirt path adds a rustic touch. It’s a clever and efficient way to maximize yield on sloped land.
|
📋 Copy HEX 🔗 Share |
|
$7.12
|

This design is incredibly effective because it harmonizes utilitarian elements with natural surroundings. The clean, repetitive lines of the white grow bags create a strong sense of order and modern agriculture, contrasting beautifully with the organic chaos of the natural background foliage. This visual tension between cultivation and wilderness is what makes it so engaging. Plus, the terracing itself is a brilliant application of design to maximize usable space on challenging terrain.
- Assess the slope and stability of your land—terracing requires specific considerations.
- Calculate the number of grow bags you’ll need based on your yield goals.
- Plan for an efficient irrigation system; grow bags dry out faster than in-ground beds.
- Research the right kind of strawberry varieties for grow bags in your climate.
22. Expansive outdoor garden with diverse green plants and irrigation system
This expansive outdoor garden truly showcases the beauty of a well-tended plot. The long, narrow beds overflowing with various green plants and cheerful yellow marigolds promise a bountiful harvest, and the visible irrigation system speaks to serious efficiency. It’s functional, organized, and absolutely flourishing.
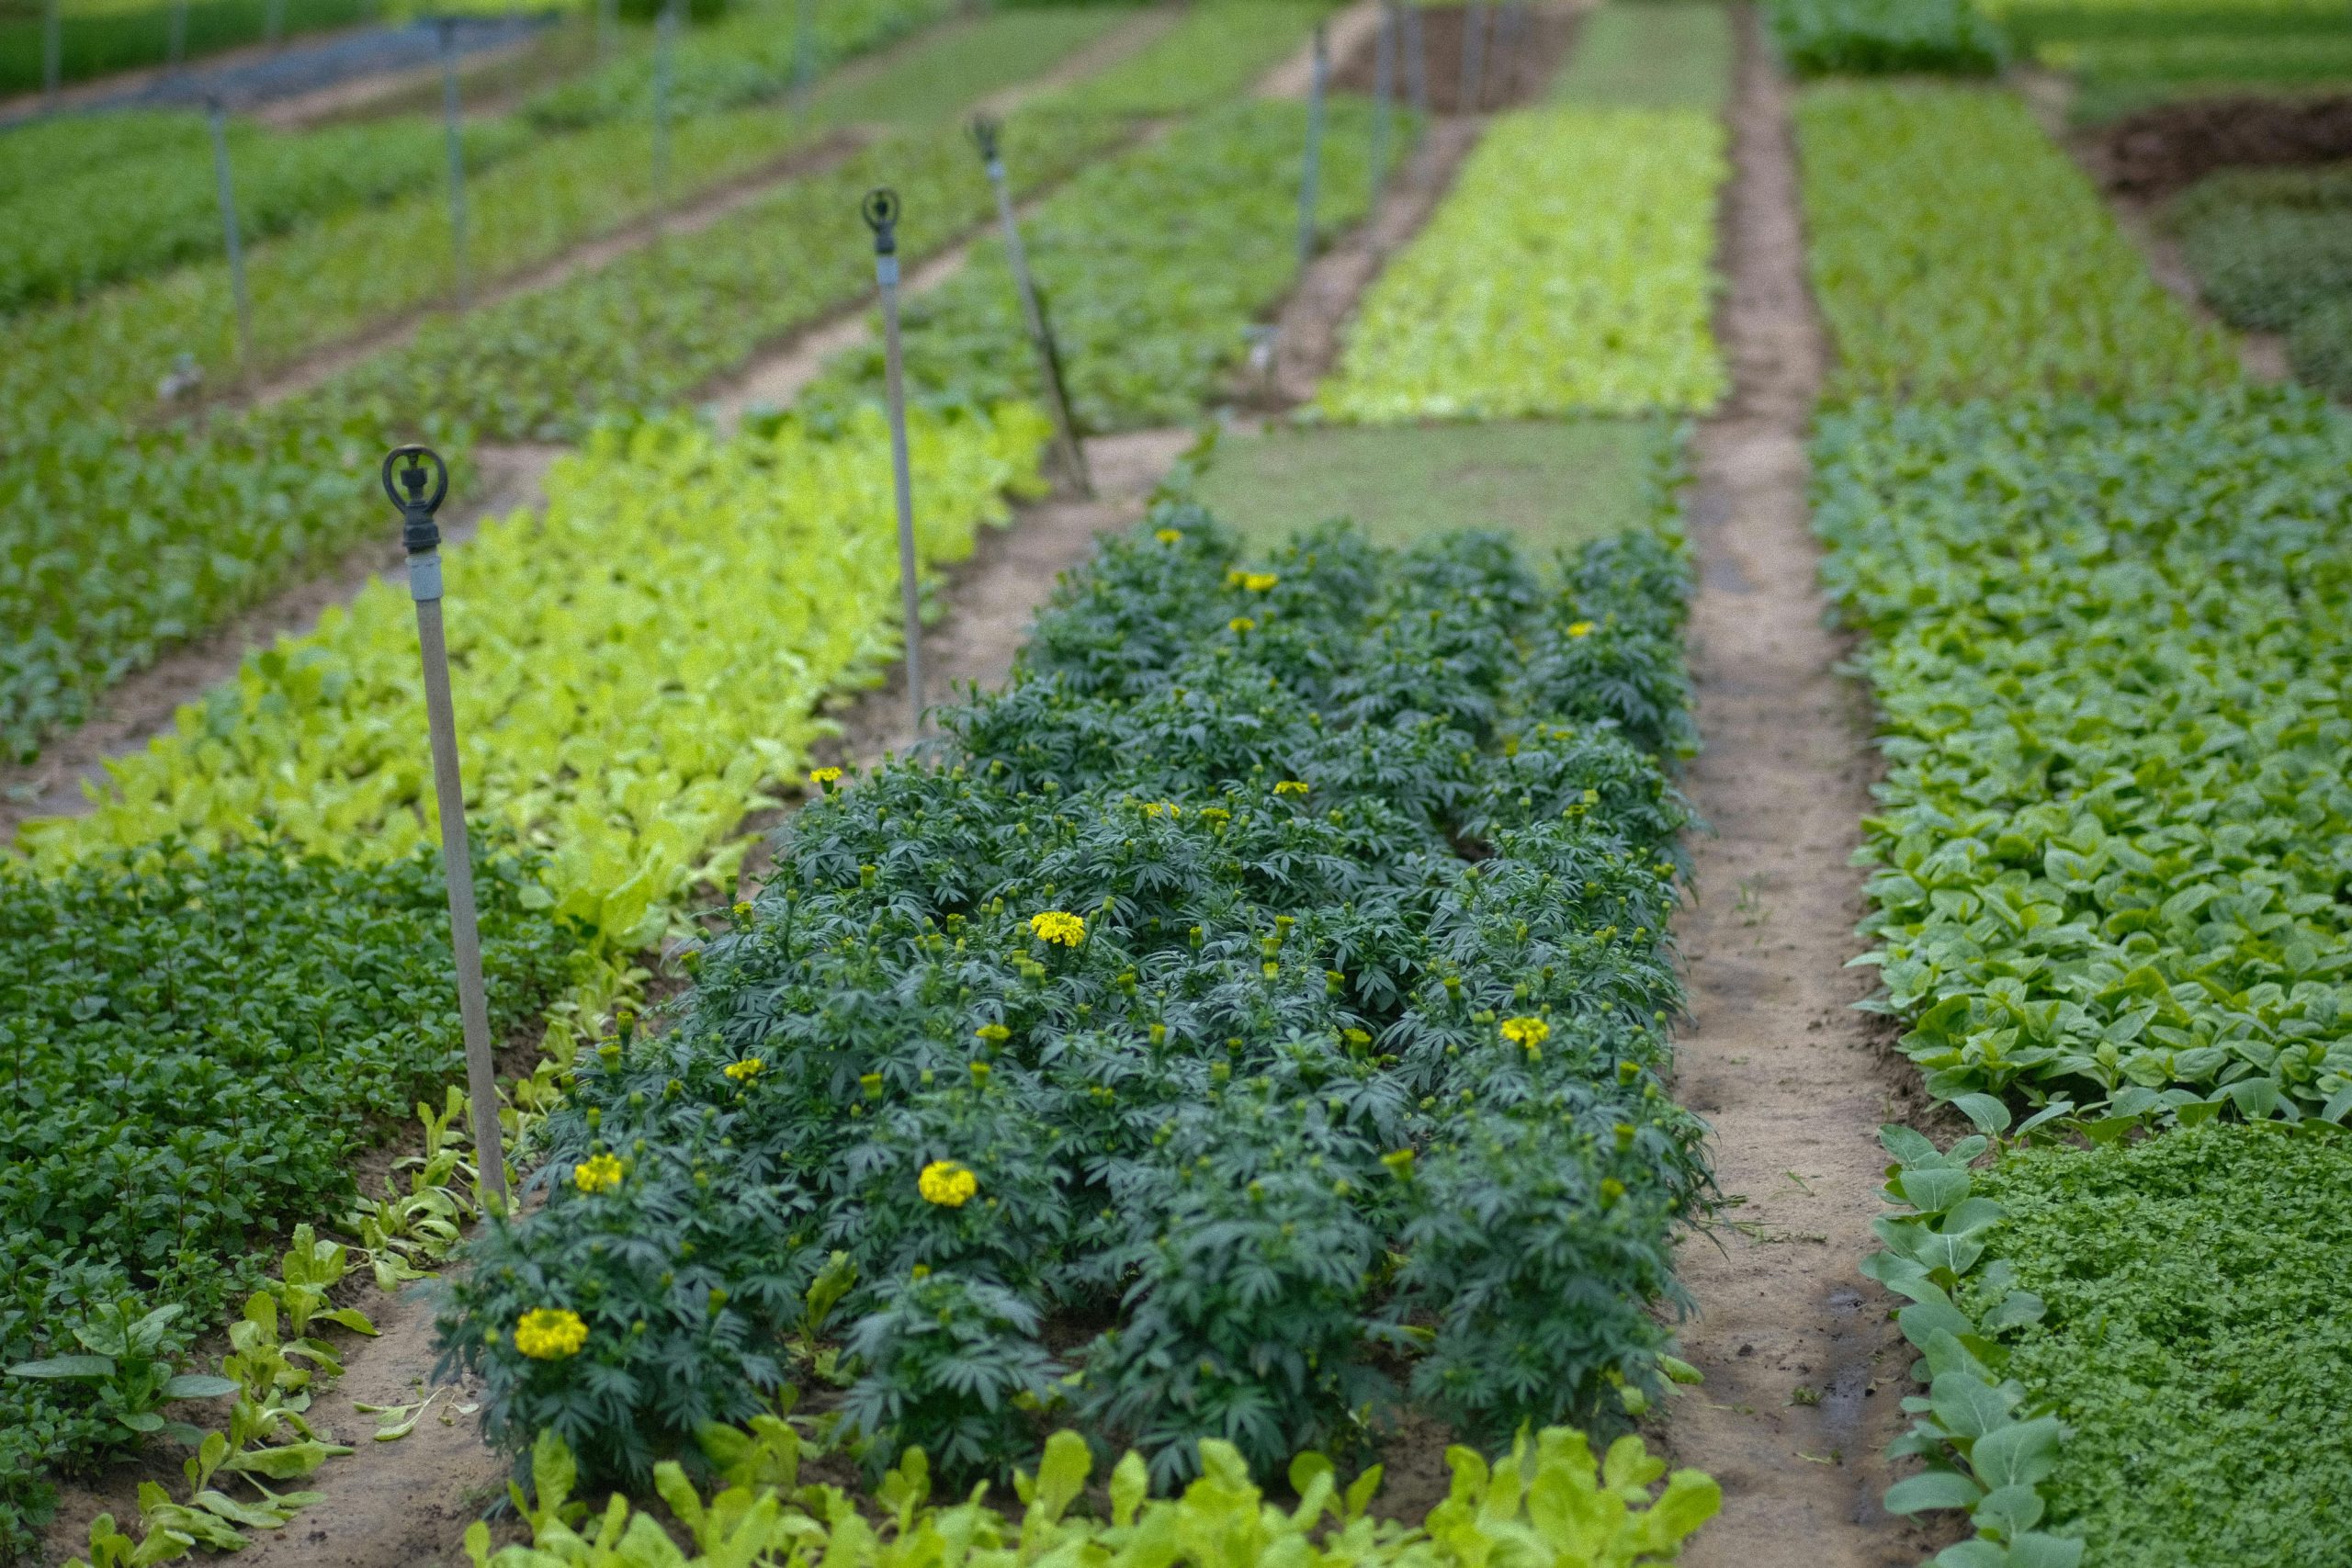
- Main furniture (bed borders, if any): $50 – $200 (for simple wood or cinderblock)
- Lighting (none visible, optional solar path lights): $0 – $100
- Textiles (weed barrier, row covers): $100 – $300
- Decor/Accessories (plant markers, tools): $50 – $150
- Paint/Wall Treatment (none): $0
- Total: $200 – $750
Budget alternative: For 40-60% less, use found rocks or logs to delineate beds, scavenge for used irrigation components, and rely on hand-weeding rather than extensive weed barriers. This could bring your costs down to as little as $100-$300 for a similar plot, making fresh homegrown food incredibly accessible.
While an irrigation system like this is a huge time-saver, it’s not entirely hands-off. Sprinklers need regular checks for clogs, proper coverage, and adjustments as plants grow. Over time, heads can break or get knocked out of alignment, requiring replacement. Also, remember that spray irrigation can encourage some foliar diseases, so observe your plants closely. Plan for daily or weekly checks during the growing season to ensure everything is running smoothly and your plants are happy.
23. White Textured Wall with Colorful Mounted Plant Pots and Lush Greenery
Who says you need a huge yard for a lush garden? This vibrant vertical garden on a textured white wall is absolutely genius! The mounted plastic pots, bursting with green and reddish-green plants, create a dynamic living art installation. It’s fresh, stylish, and brilliantly space-saving.
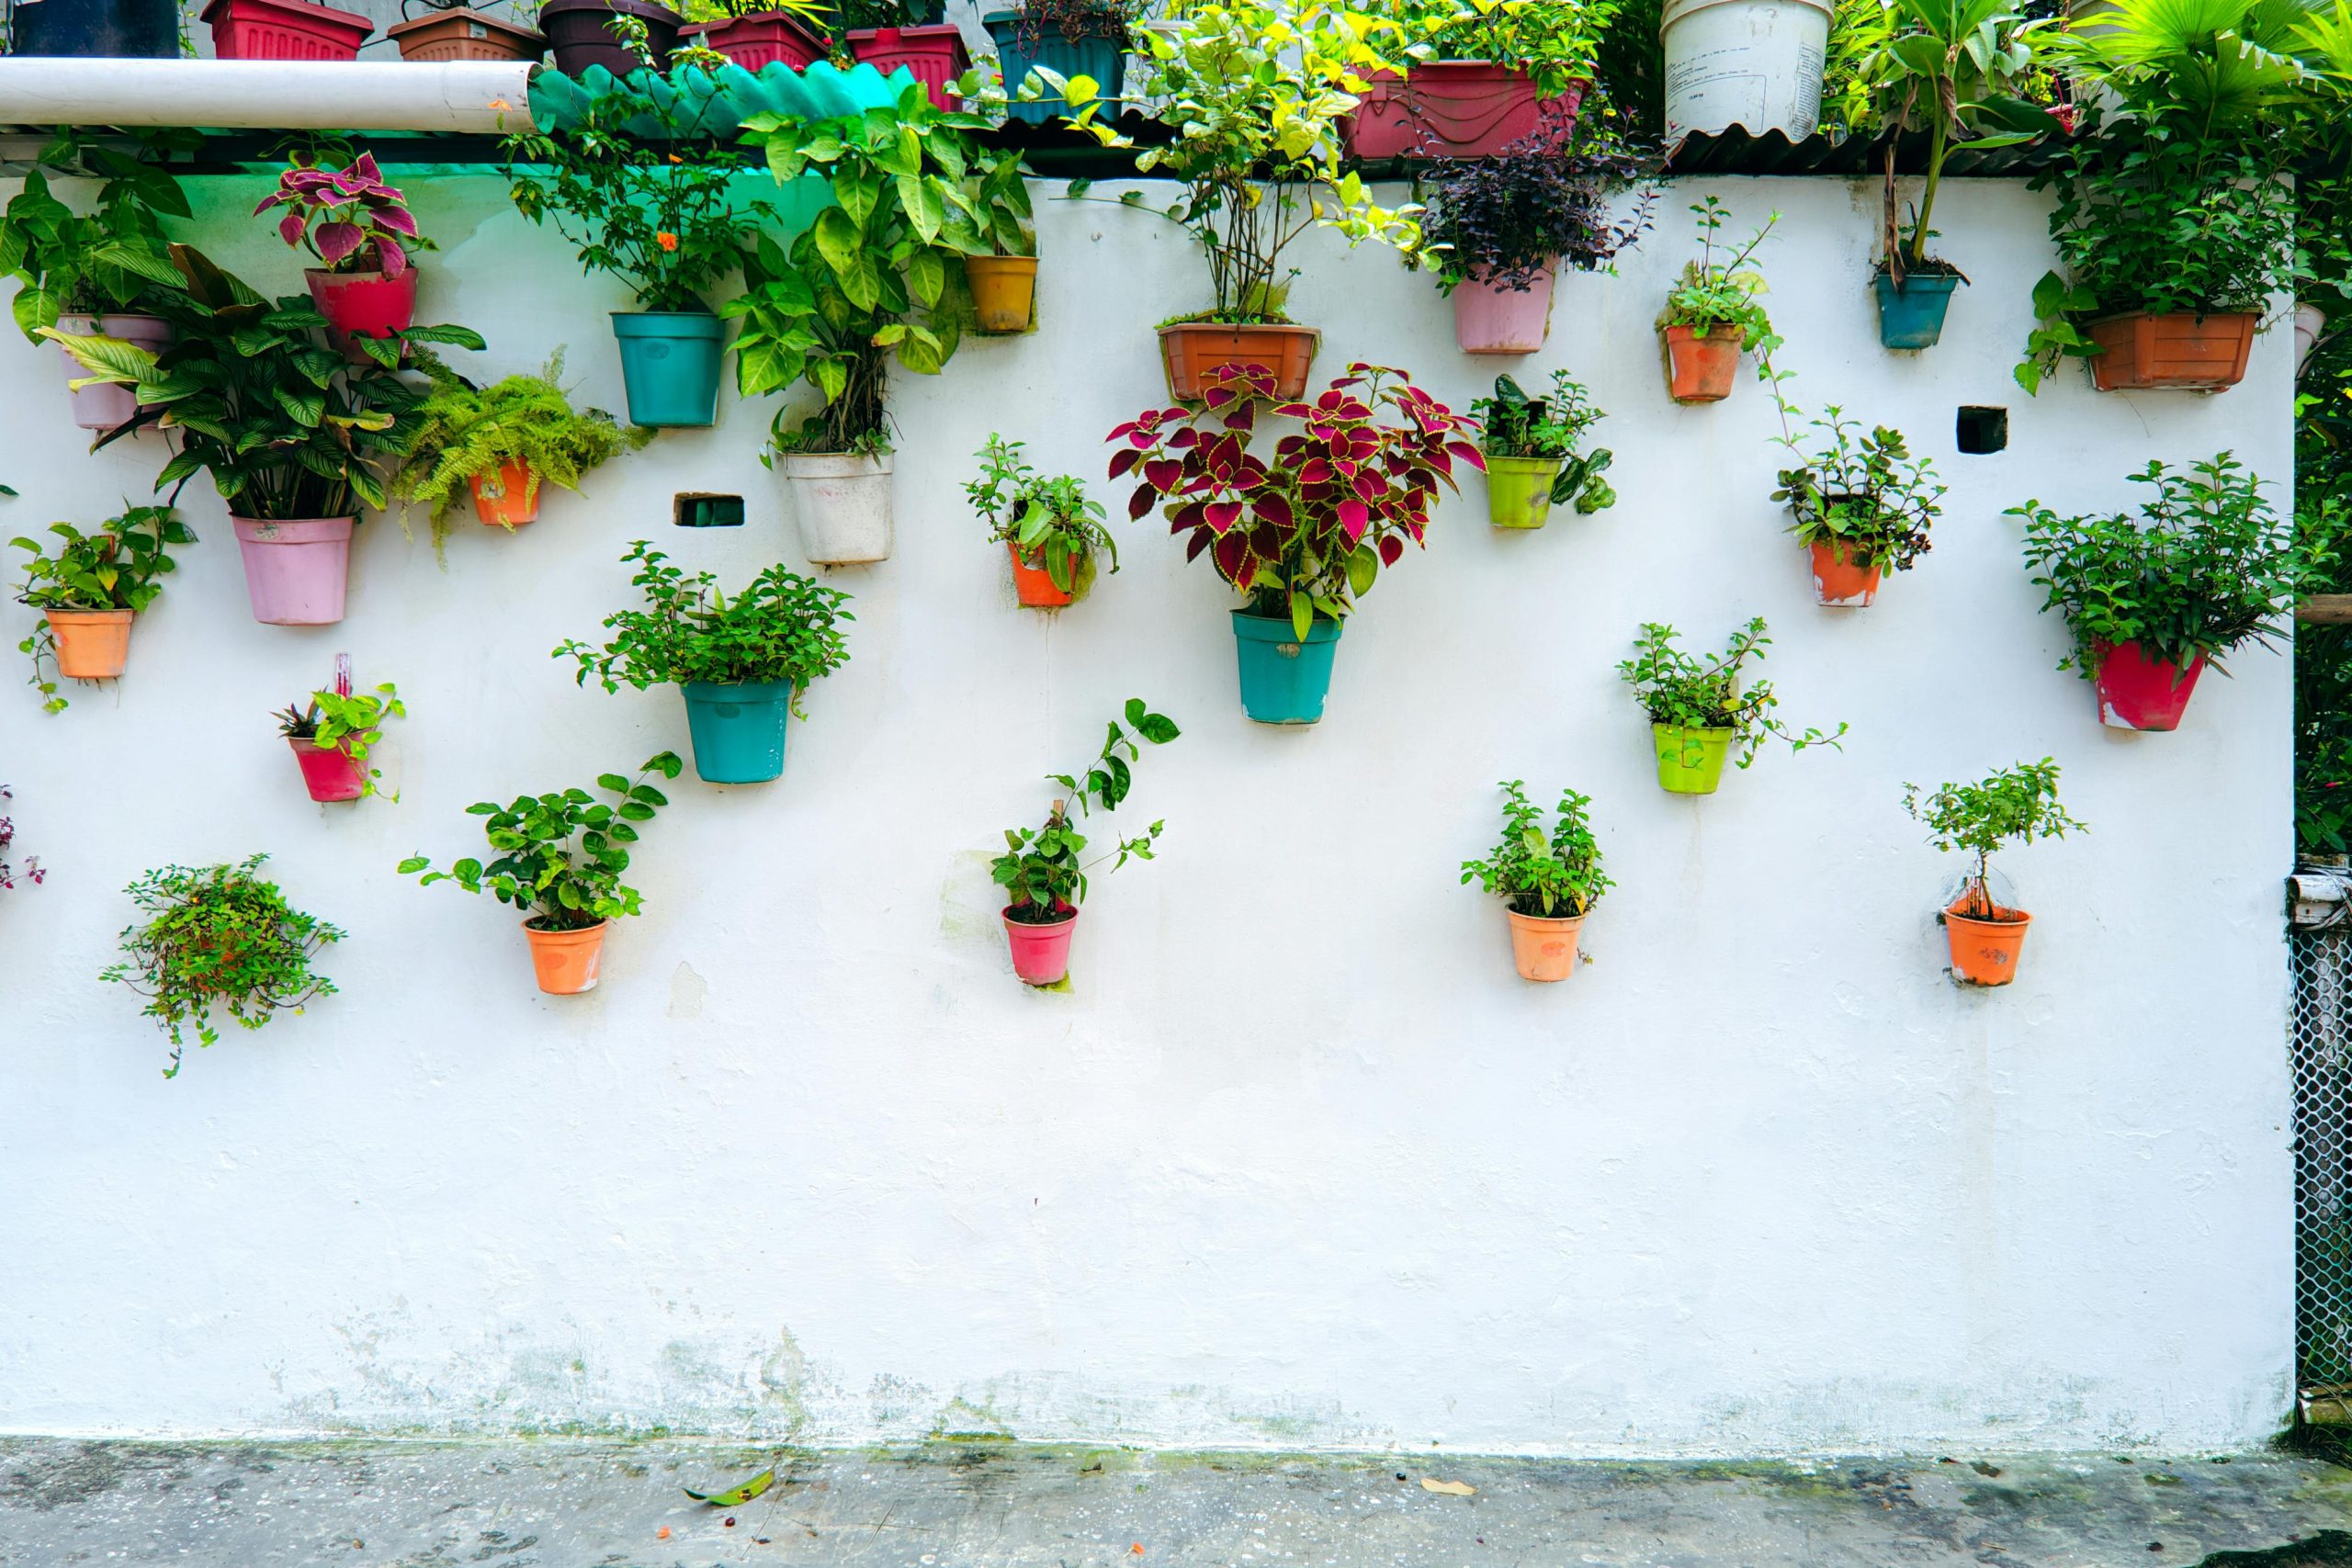
|
📋 Copy HEX 🔗 Share |
|
$91.99
|
$18.99
|
$15.88
|
$12.98
|

When creating a vertical garden like this, use a mix of plant forms. Include some trailing plants to soften the edges of the pots, upright plants for structure, and a few with colorful foliage (like the reddish-green ones here) to add visual interest. This variety prevents the wall from looking too uniform or flat, making it feel more like a mini ecosystem.
What absolutely elevates this idea is the choice of a textured white wall as the backdrop. It allows the vibrant greens and reds of the plants and the simple forms of the pots to truly pop, creating a gallery-like presentation. Against a darker or more patterned wall, these plants would recede; here, they are foregrounded as living sculptures. It’s what transforms a functional planting into a dynamic piece of outdoor art.
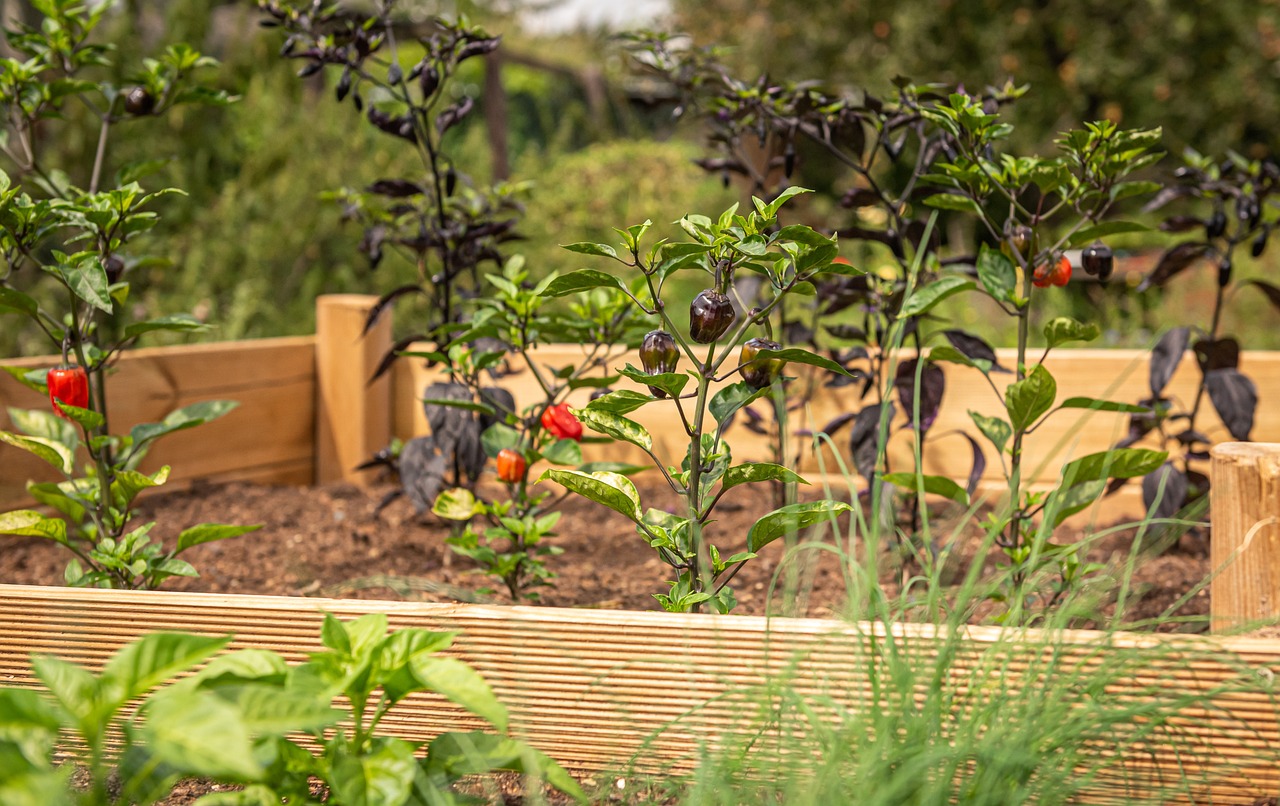
24. Raised Garden Beds with Varied Pepper Plants
This close-up of raised garden beds brimming with colorful pepper plants is just delightful! The light-colored wood of the beds provides a clean frame for the vibrant reds, dark purples, and greens of the peppers themselves. It’s a true celebration of homegrown deliciousness.
|
$6.97
|
$7.99
|
$4.68
|
To build a simple raised garden bed like these:
- Choose your spot: Ensure it gets at least 6-8 hours of direct sunlight.
- Gather materials: Untreated cedar or pine (pressure-treated can leach chemicals), screws or nails, and corner brackets.
- Cut boards: Determine your desired length and width, cutting boards to create a rectangle or square.
- Assemble: Screw or nail the boards together at the corners, reinforcing with brackets.
- Line (optional): Staple a layer of landscape fabric to the inside bottom to deter weeds and gophers.
- Fill: Add a mix of good quality topsoil, compost, and manure, leaving an inch or two from the top.
Time: 1-2 hours per bed. Material Cost: $50-$150 per bed.
A bit of real talk about growing peppers: while rewarding, they can be a bit finicky. They need consistent warmth, protection from strong winds, and steady moisture. Erratic watering can lead to blossom-end rot, and if it gets too cold, they’ll stop producing. Be prepared to provide some shelter if you live in a climate with cool nights or unexpected dips in temperature. This is crucial for getting those beautiful, varied peppers.
25. Greenhouse with Tiered Garden Beds and Drip Irrigation
This greenhouse interior is a marvel of organized productivity! The tiered garden beds, constructed from sturdy concrete blocks, maximize vertical growing space, while the black drip irrigation lines promise efficient watering. It’s clear, deliberate, and designed for serious cultivation.
|
📋 Copy HEX 🔗 Share |
|
$18.99
|
$3.98
|
$339.99
|
$14.99
|

- Verify the structural integrity and ventilation capabilities of your greenhouse.
- Measure the interior dimensions carefully to plan your tiered beds effectively.
- Calculate the total weight of soil and plants for safety with tiered structures.
- Plan your irrigation system layout before constructing beds to ensure optimal coverage.
Here’s a designer tip for working with tiered beds in a greenhouse: consider the light requirements of your plants on each level. Place taller, sun-hungry plants on the top tiers and shorter, more shade-tolerant varieties on the lower tiers to avoid shading issues. This optimizes every square inch of your growing space and ensures all your plants are getting the light they need to thrive. Also, use the How-To Brief in Idea #23 for building basic raised beds, then adapt for height!
Conclusion
There you have it—25 inspiring ideas to kickstart your vegetable garden design journey in 2026. From sprawling rural plots to charming urban oases, remember that your garden is a living canvas, reflecting your style and aspirations. Don’t be afraid to experiment, blend styles, and most importantly, get your hands dirty!
We hope these ideas and practical tips empower you to create a garden that’s not only productive but also a true source of joy and beauty. Now go forth and grow something amazing. Be sure to save your favorite looks to Pinterest — your future green thumb will thank you!
Photo credits: Magda Ehlers, Alois Lackner, Markus Winkler, Jason Youngman, Sayeed Chowdhury, Ian Probets, Quang Nguyen Vinh, Jan Wright, Heru Dharma, Gene Samit, Kampus Production, Hatice Şahin, Tom Fisk, Rachel Claire, icon0.com, Tony Wu, Nhà văn, Coline Chazot, LUIS GALLARDO / Pexels, AndreasGoellner, wiselywoven / Pixabay