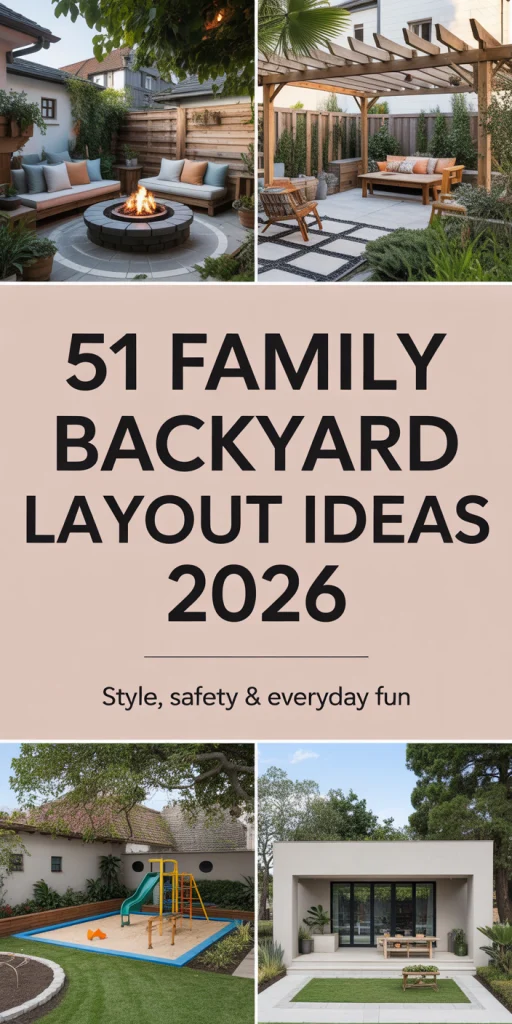
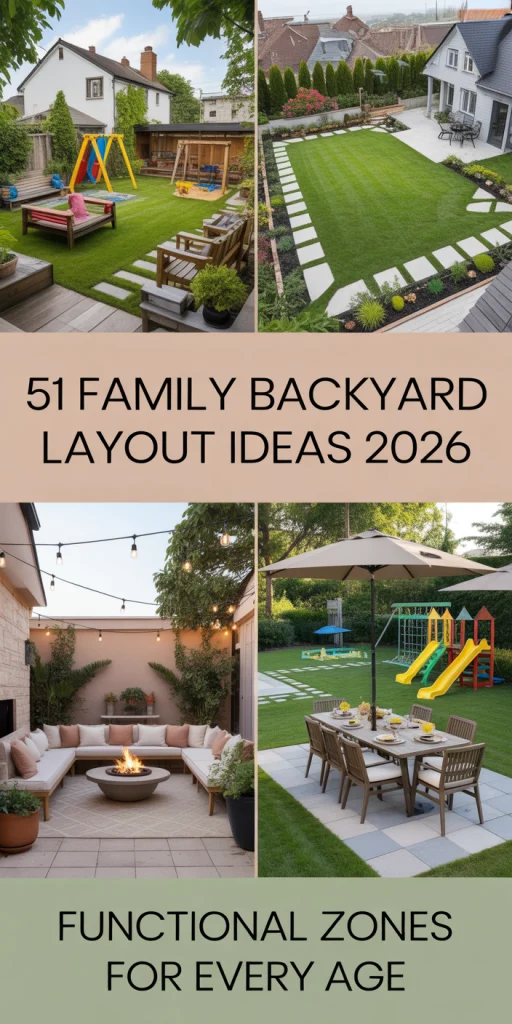
51 Family Backyard Layout Ideas 2026: Transform Your Outdoor Space Into a Paradise
Reimagining outdoor space as a functional extension of the home is a trend for 2026 American families. Homeowners are discovering family layout designs that balance play, rest, and entertainment, as evidenced by the increase in Pinterest searches for family backyard designs. Thoughtful planning allows the transformation of any yard, whether a small city space or a large country lot. This guide provides family layouts that meet specific needs, such as active play and peaceful garden retreats, all with style and practicality.
1. A multi-Zone Family Hub with Defined Areas
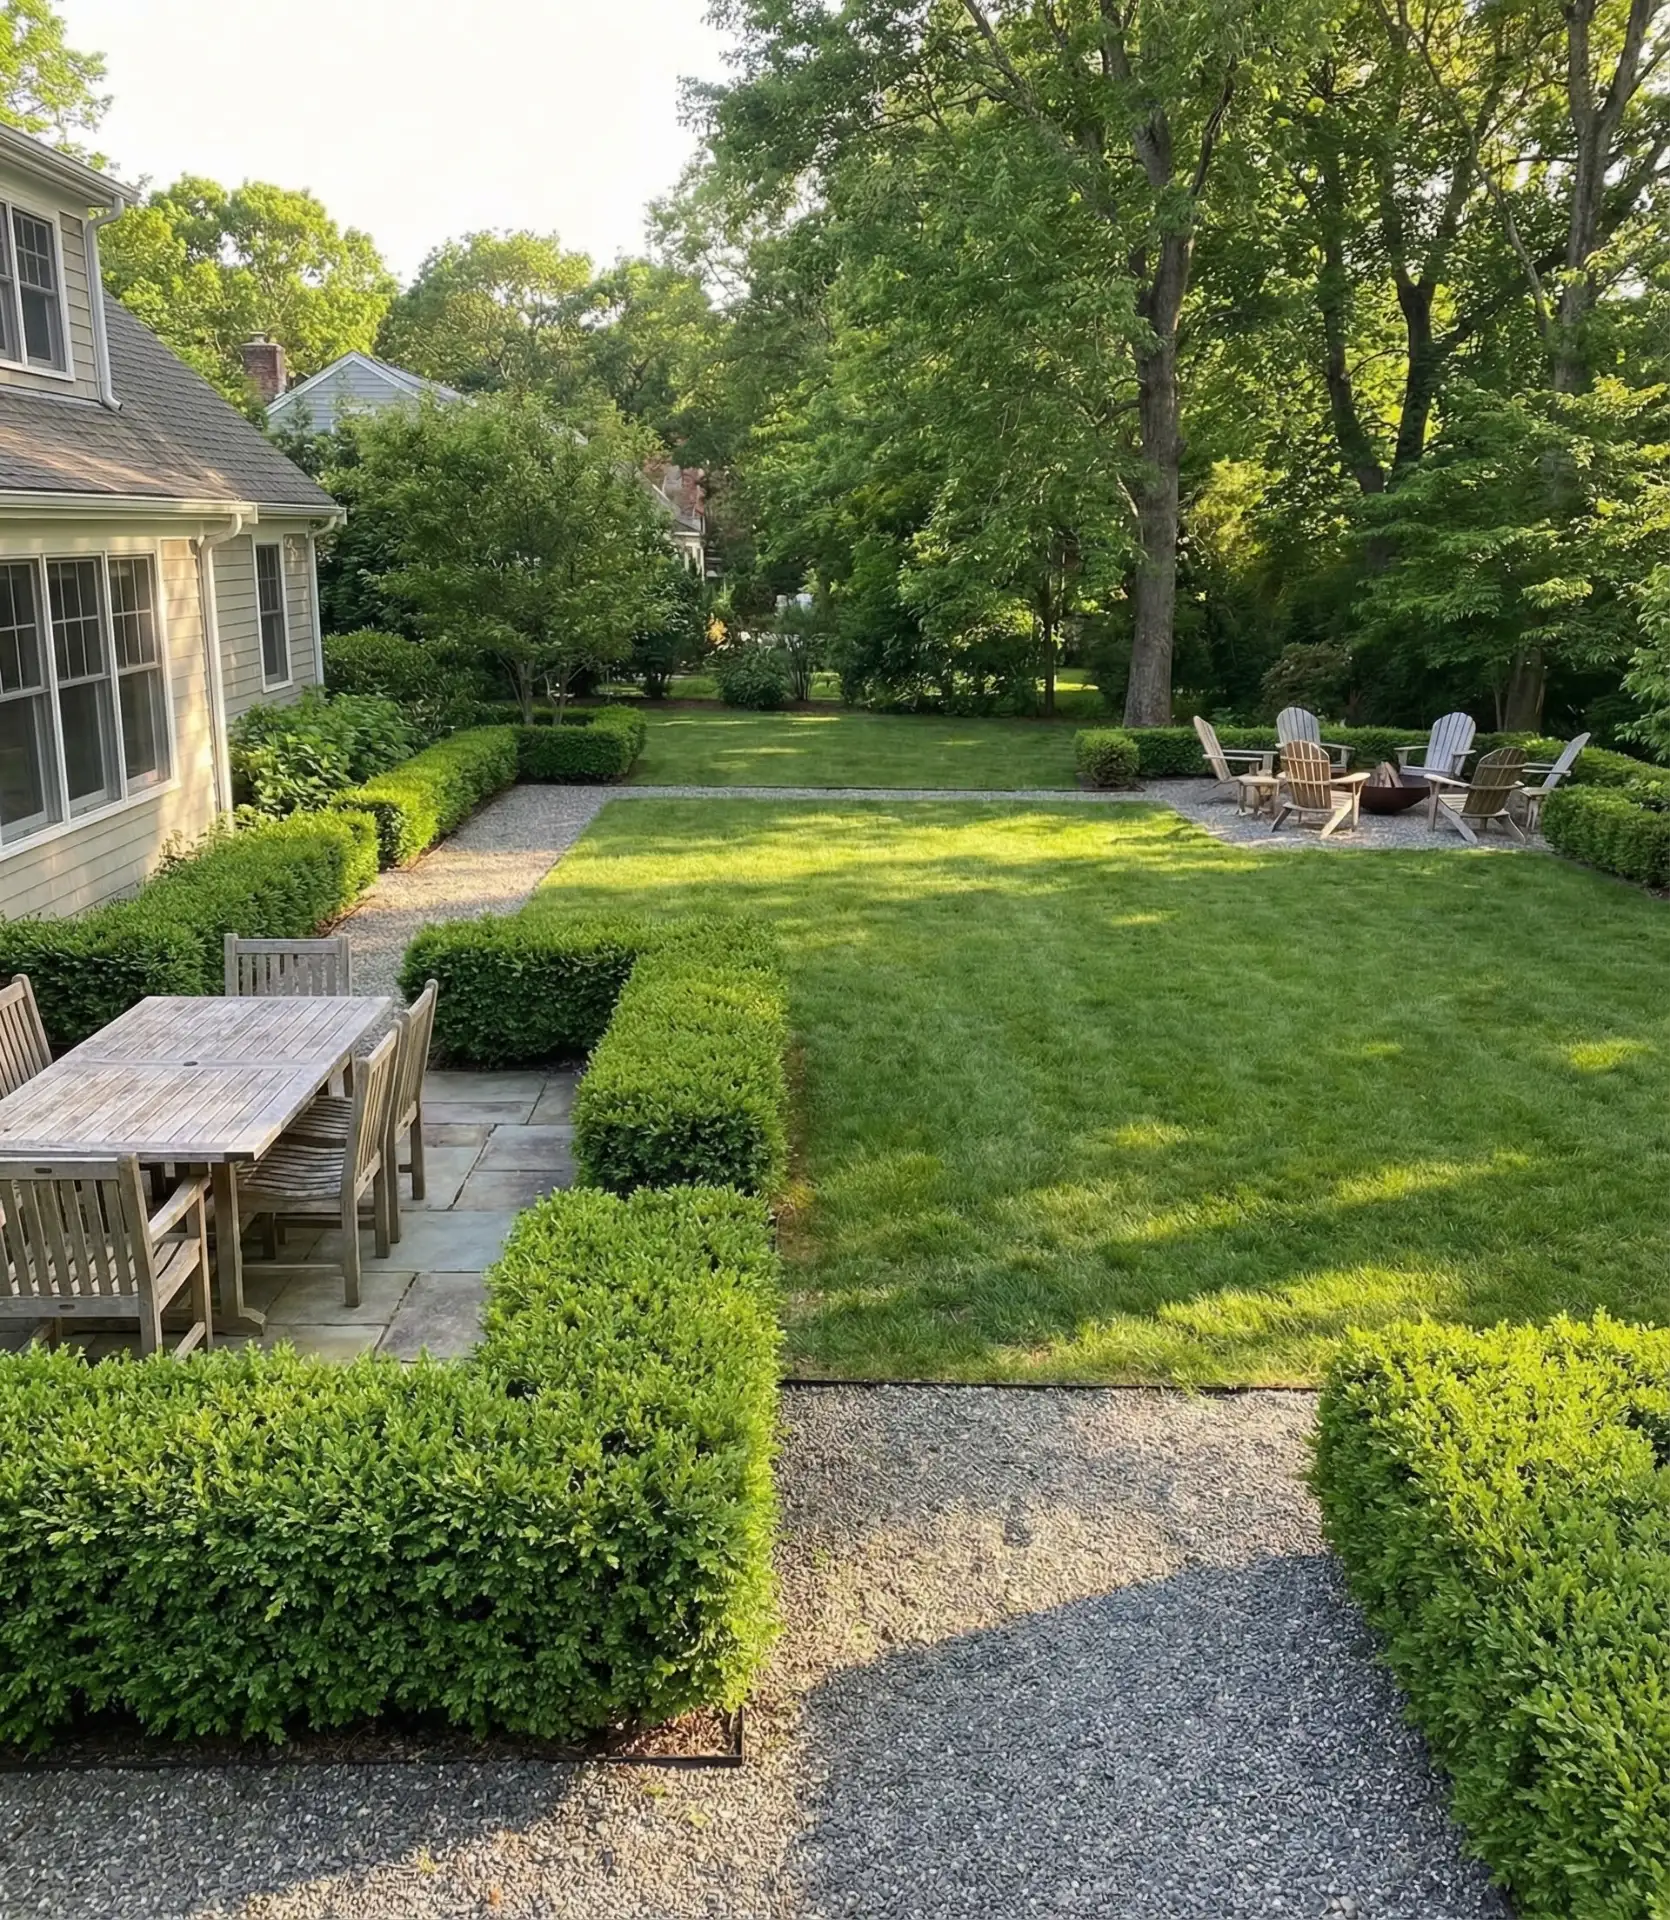
Zoning is the first step to a well-planned backyard. Assign specific areas for different activities, such as a dining space that is close to the house, a kid supervision space in the center that is an active play area, and a quiet adult garden retreat. Low hedges, decorative fencing, or simple gravel paths can create visual borders that separate zones while maintaining sight lines. This technique is an ideal approach for large backyards where the multiple activities can be zoned to make the space organized while also keeping an open concept. 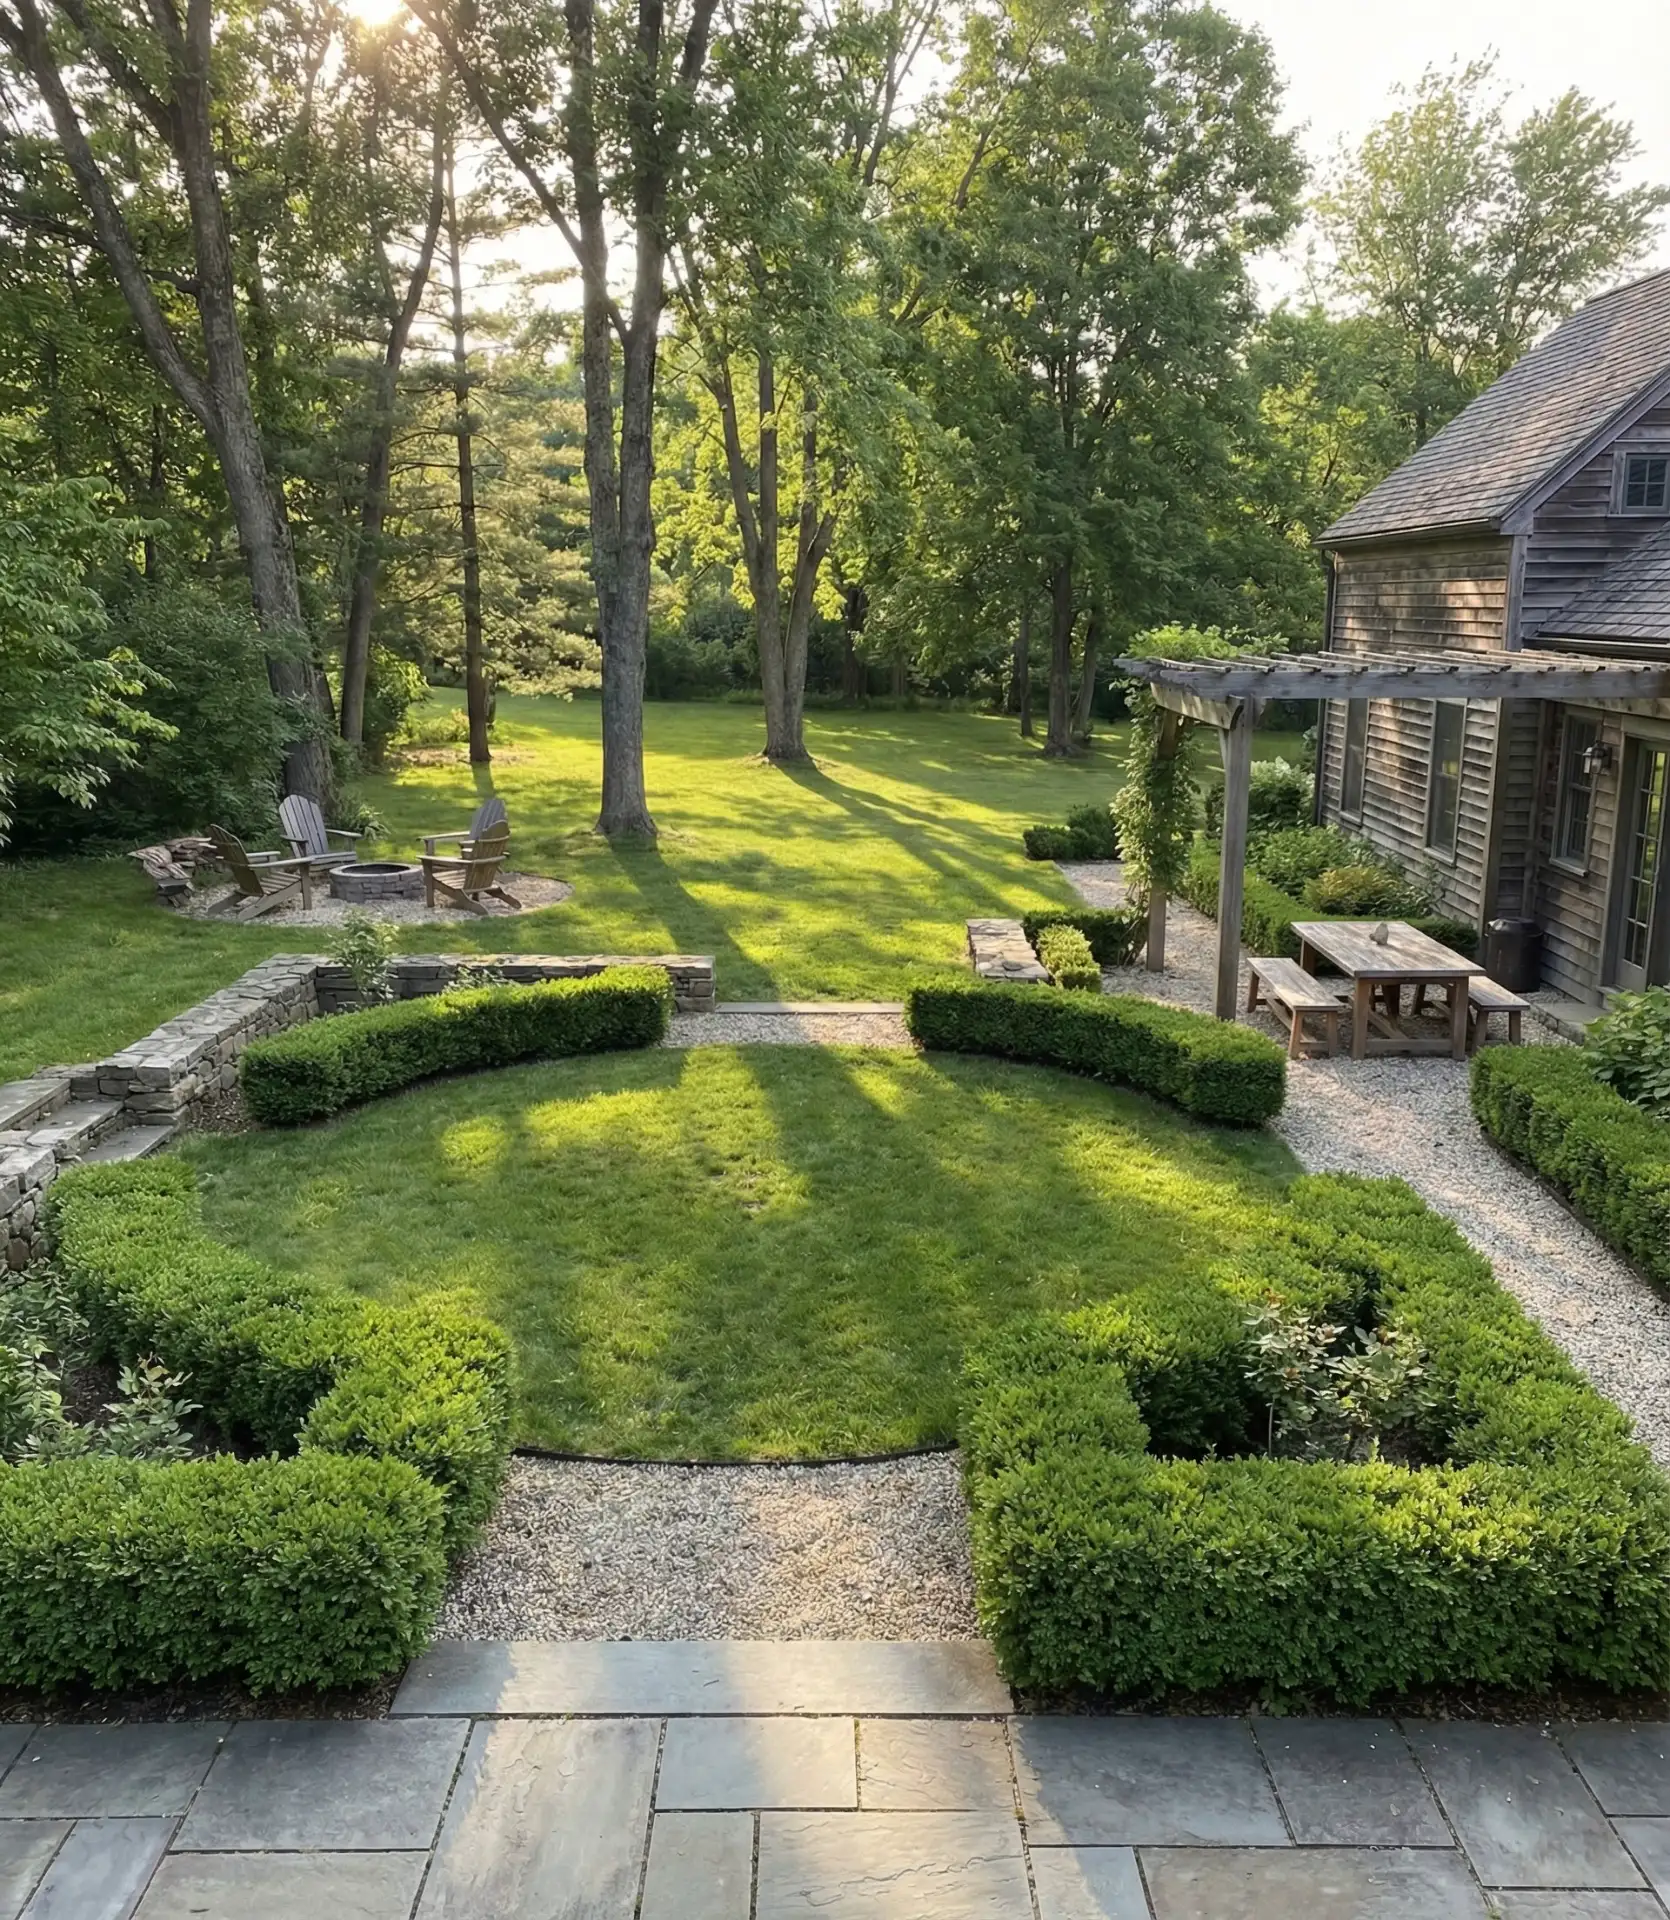
This layout prevents the backyard from feeling chaotic during busy weekends. Many suburban families find that separating activities reduces conflicts—kids play freely while adults enjoy conversation nearby.
Keeping visual connections across zones allows parents to relax and supervise kids as they play. Use permeable borders, like ornamental grasses, and avoid solid walls to keep an open feel while establishing a clearer purpose for each space.
2. Sunken Fire Pit Gathering Space
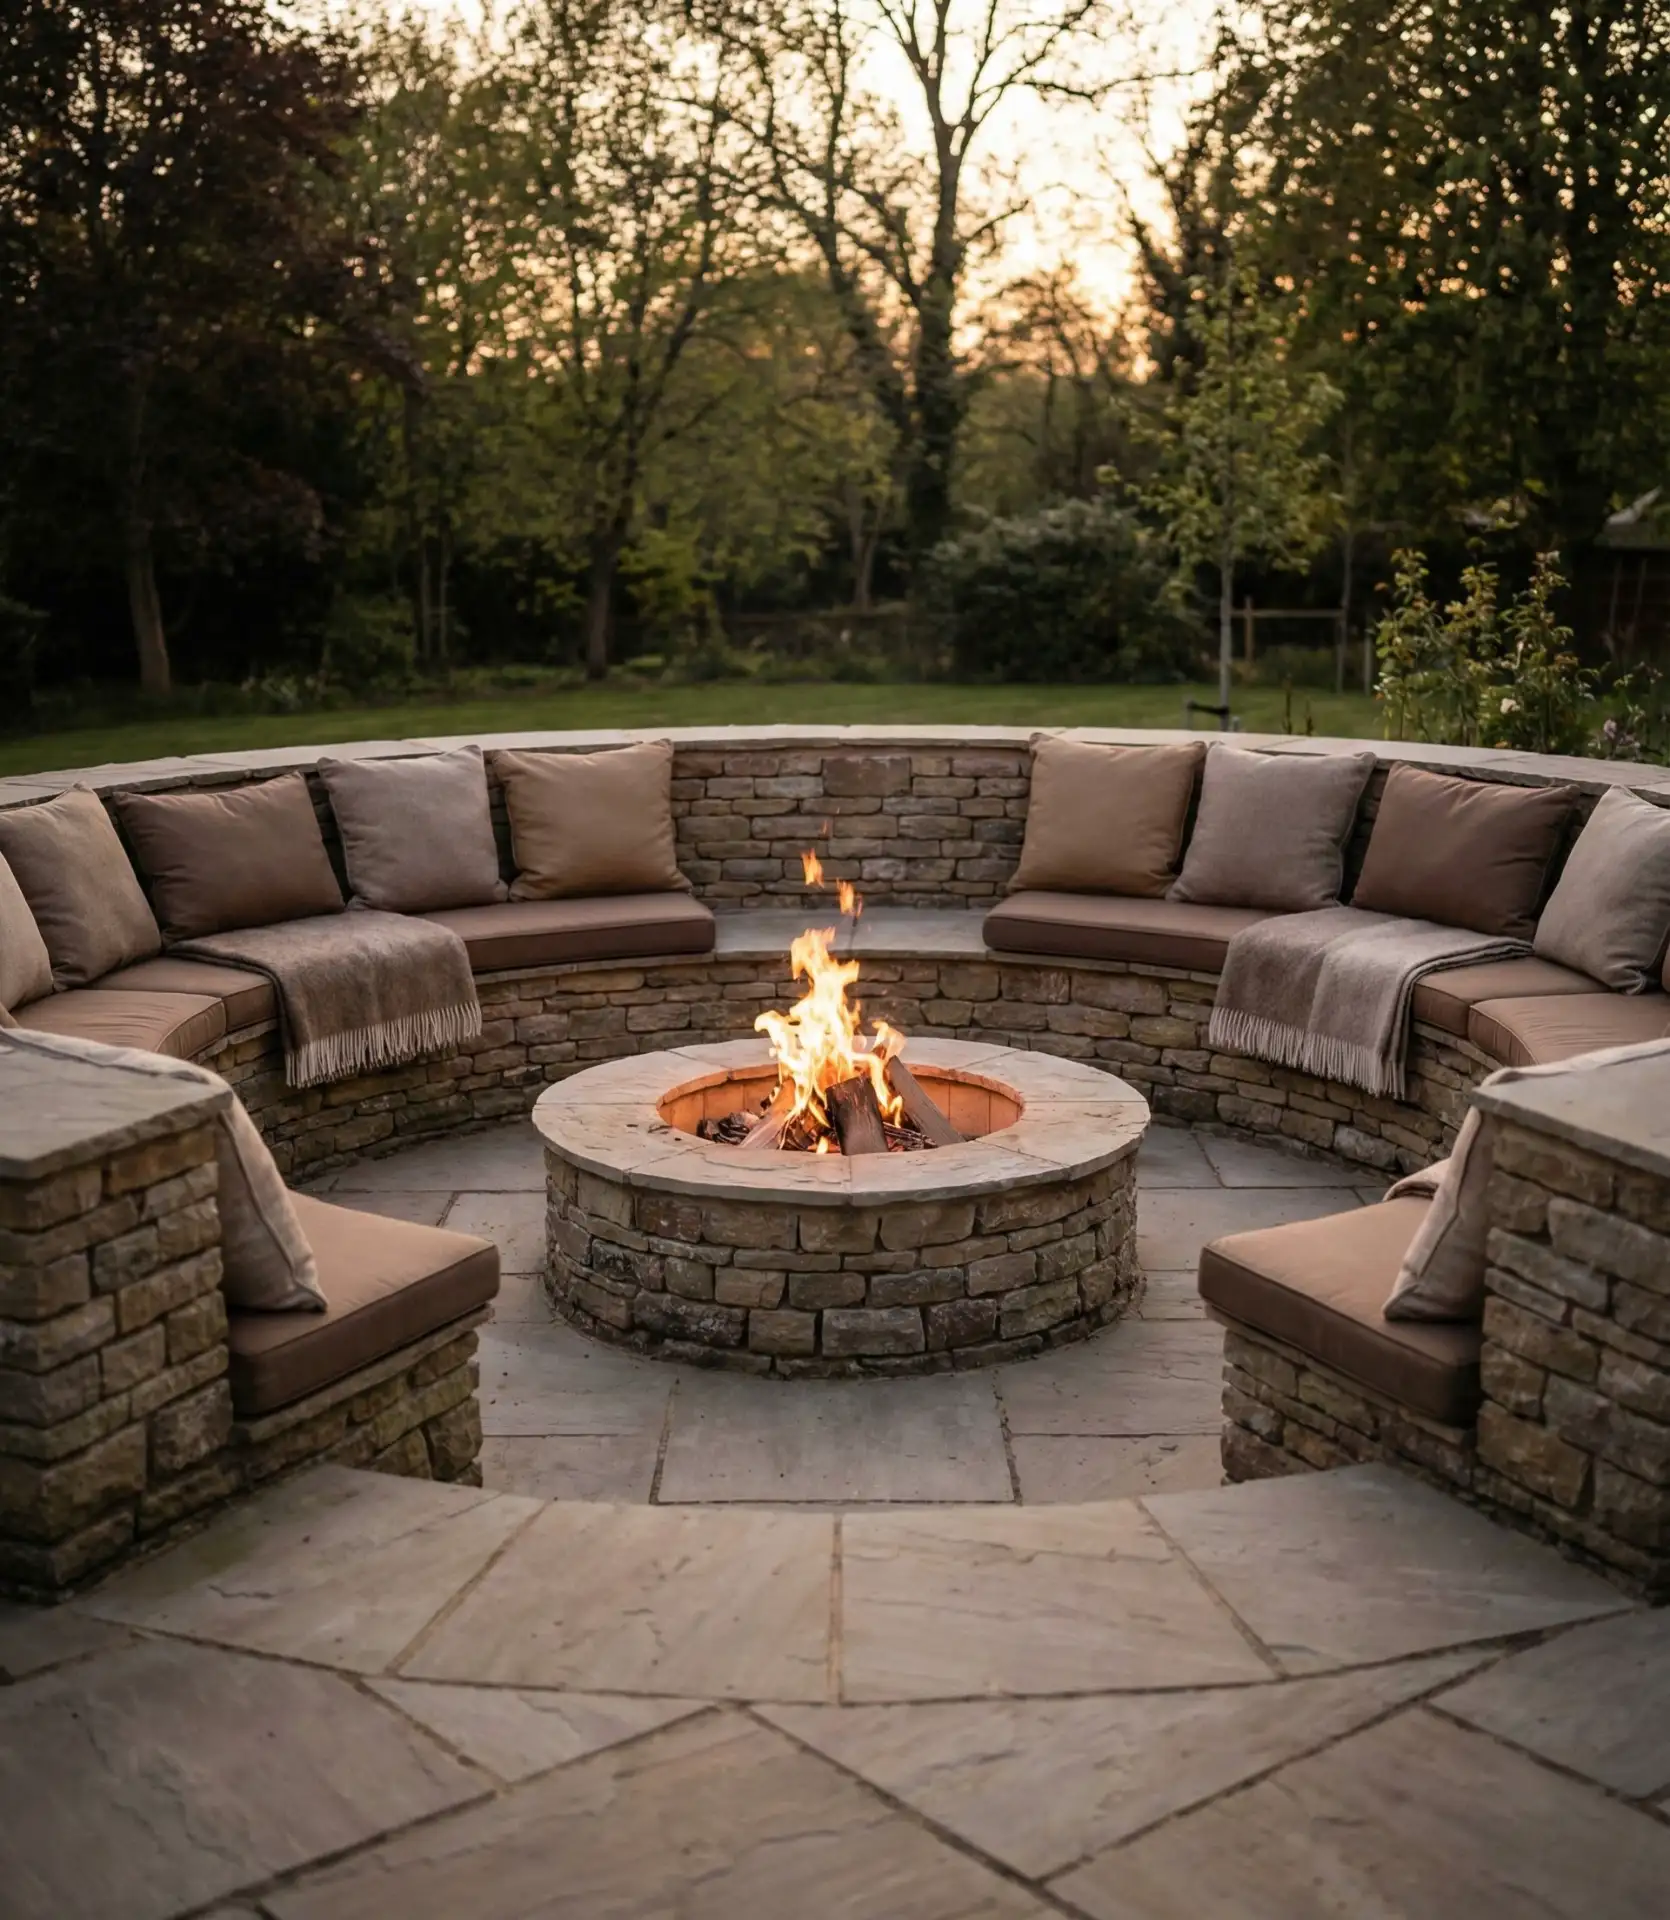
An intimate family gathering focal point is created with a central fire pit and sunken seating area. Cozy designs include excavating circular zones 18 inches deep, lining them with retaining wall blocks, and installing built-in bench seating around a gas or wood-burning fire feature. Conversation is enhanced with sunken seating and natural wind protection. This turns your yard into a year-round outdoor living space ideal for storytelling and s’mores traditions.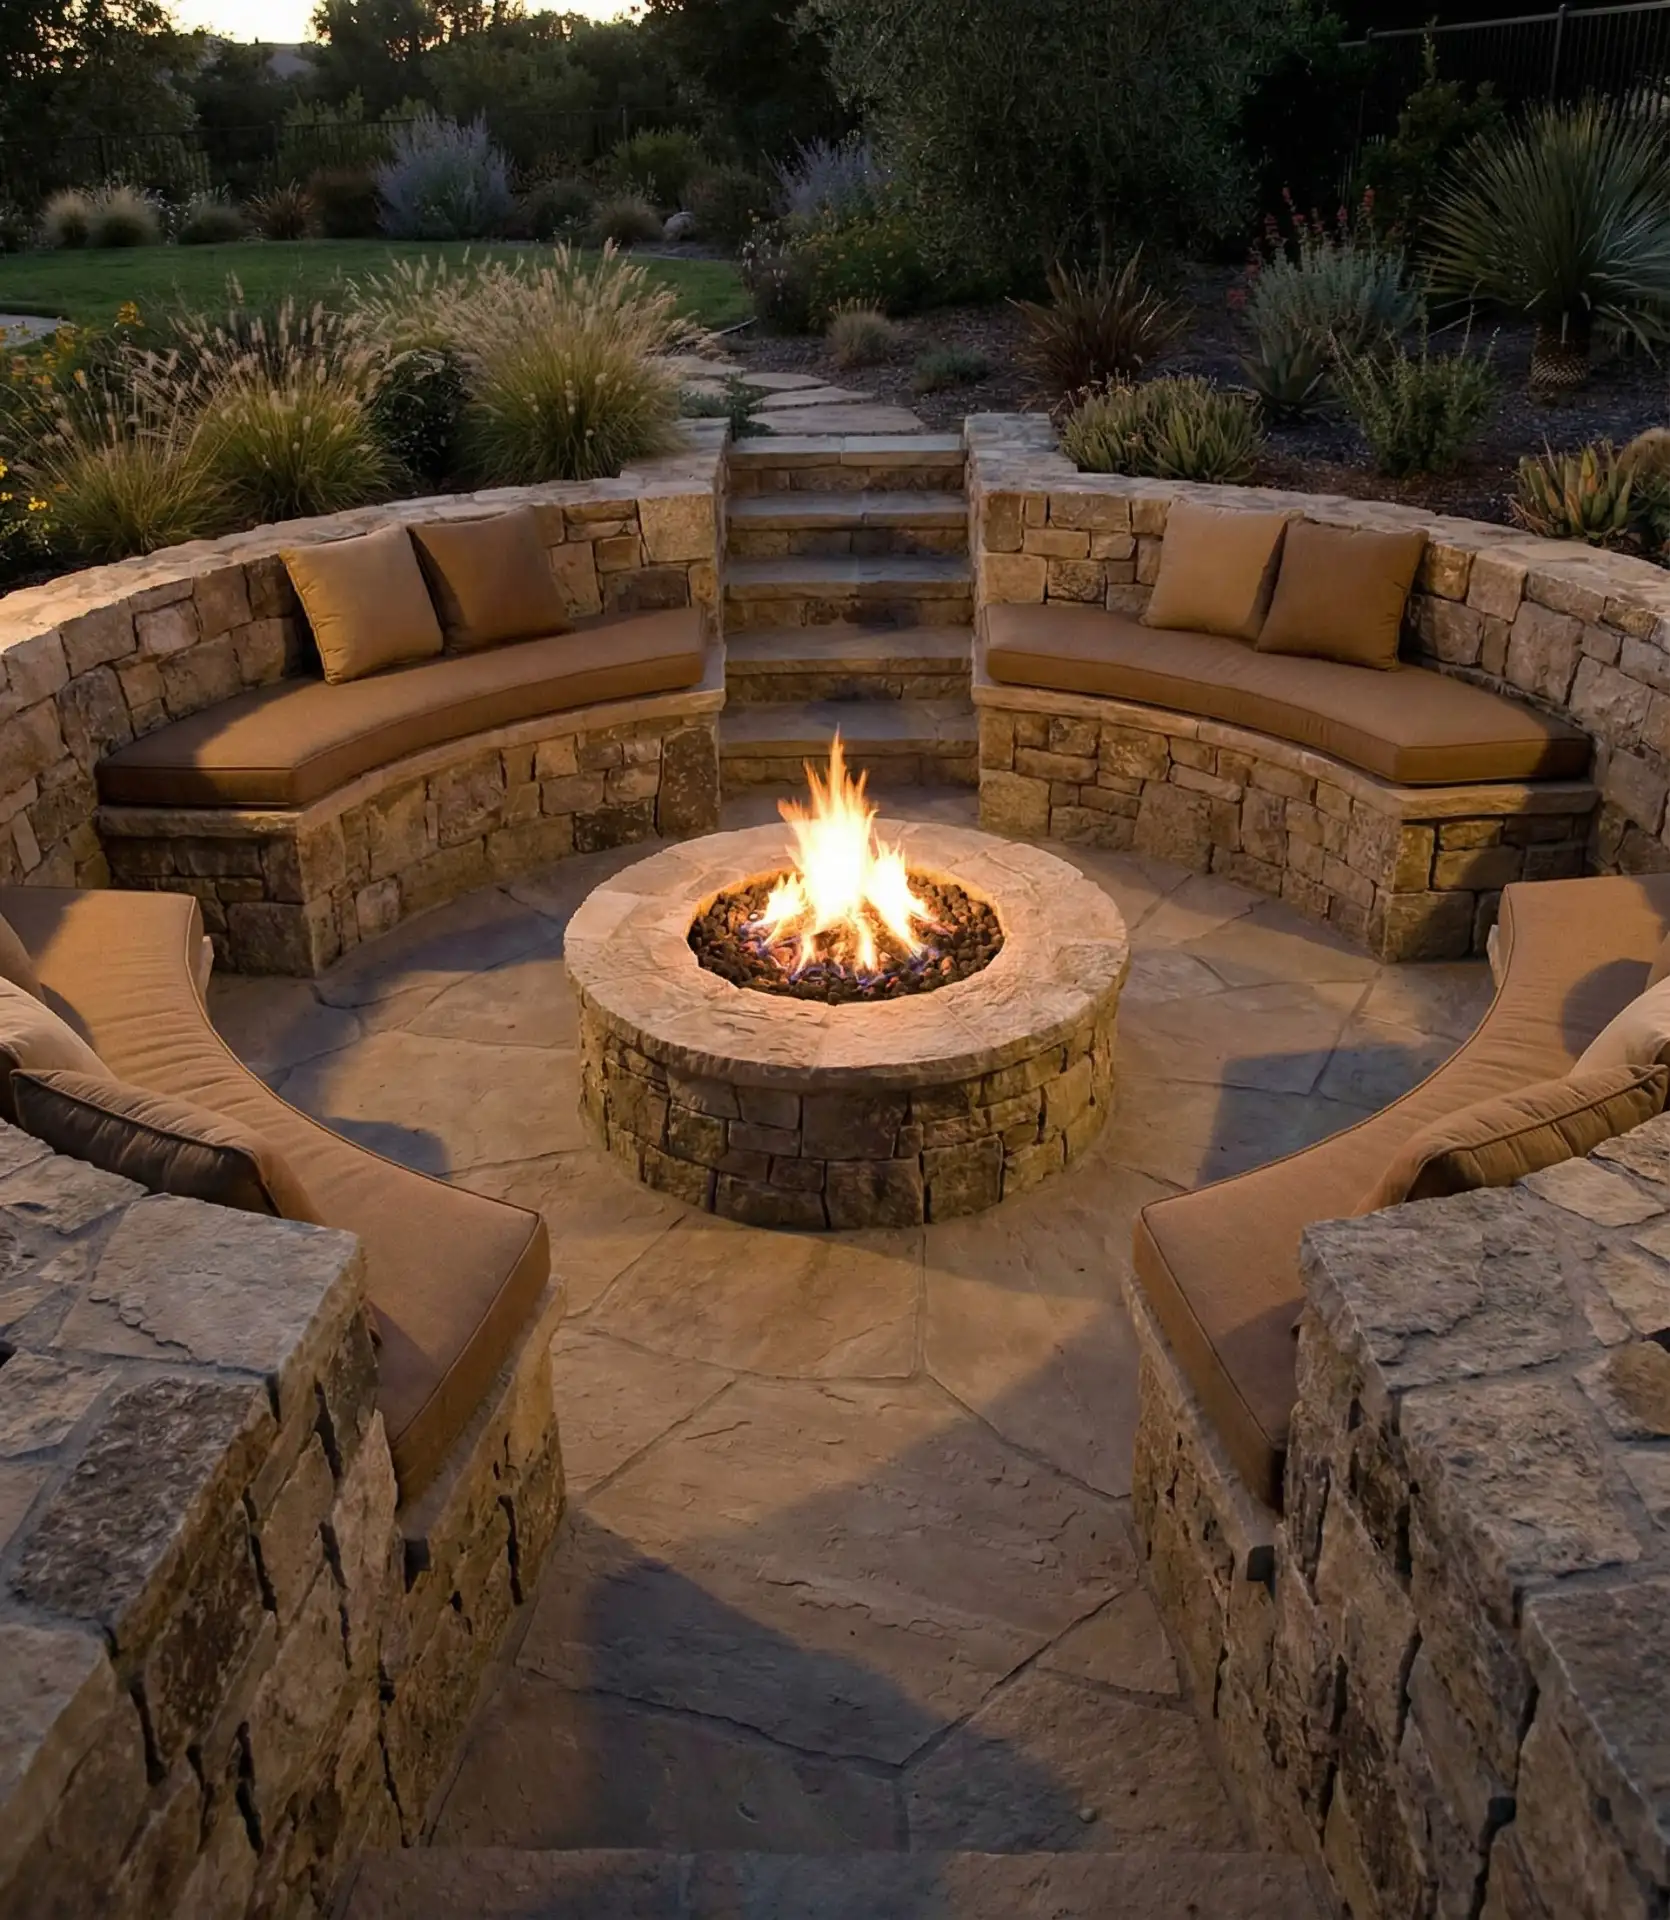
In areas like the Pacific Northwest and Northeast, where even summer evenings turn cool, sunken fire pits are more usable for several months, extending the outdoor season. The excavation also helps with drainage in flat yards. For budget-conscious families using a simple fire ring and concrete blocks, the process is doable for $2,000-$4,000, while more luxurious versions with custom stonework and gas systems run $8,000-$15,000.
In any case, the investment pays dividends in family time and backyard appeal.
3. L-Shaped Deck with Integrated Play Zone
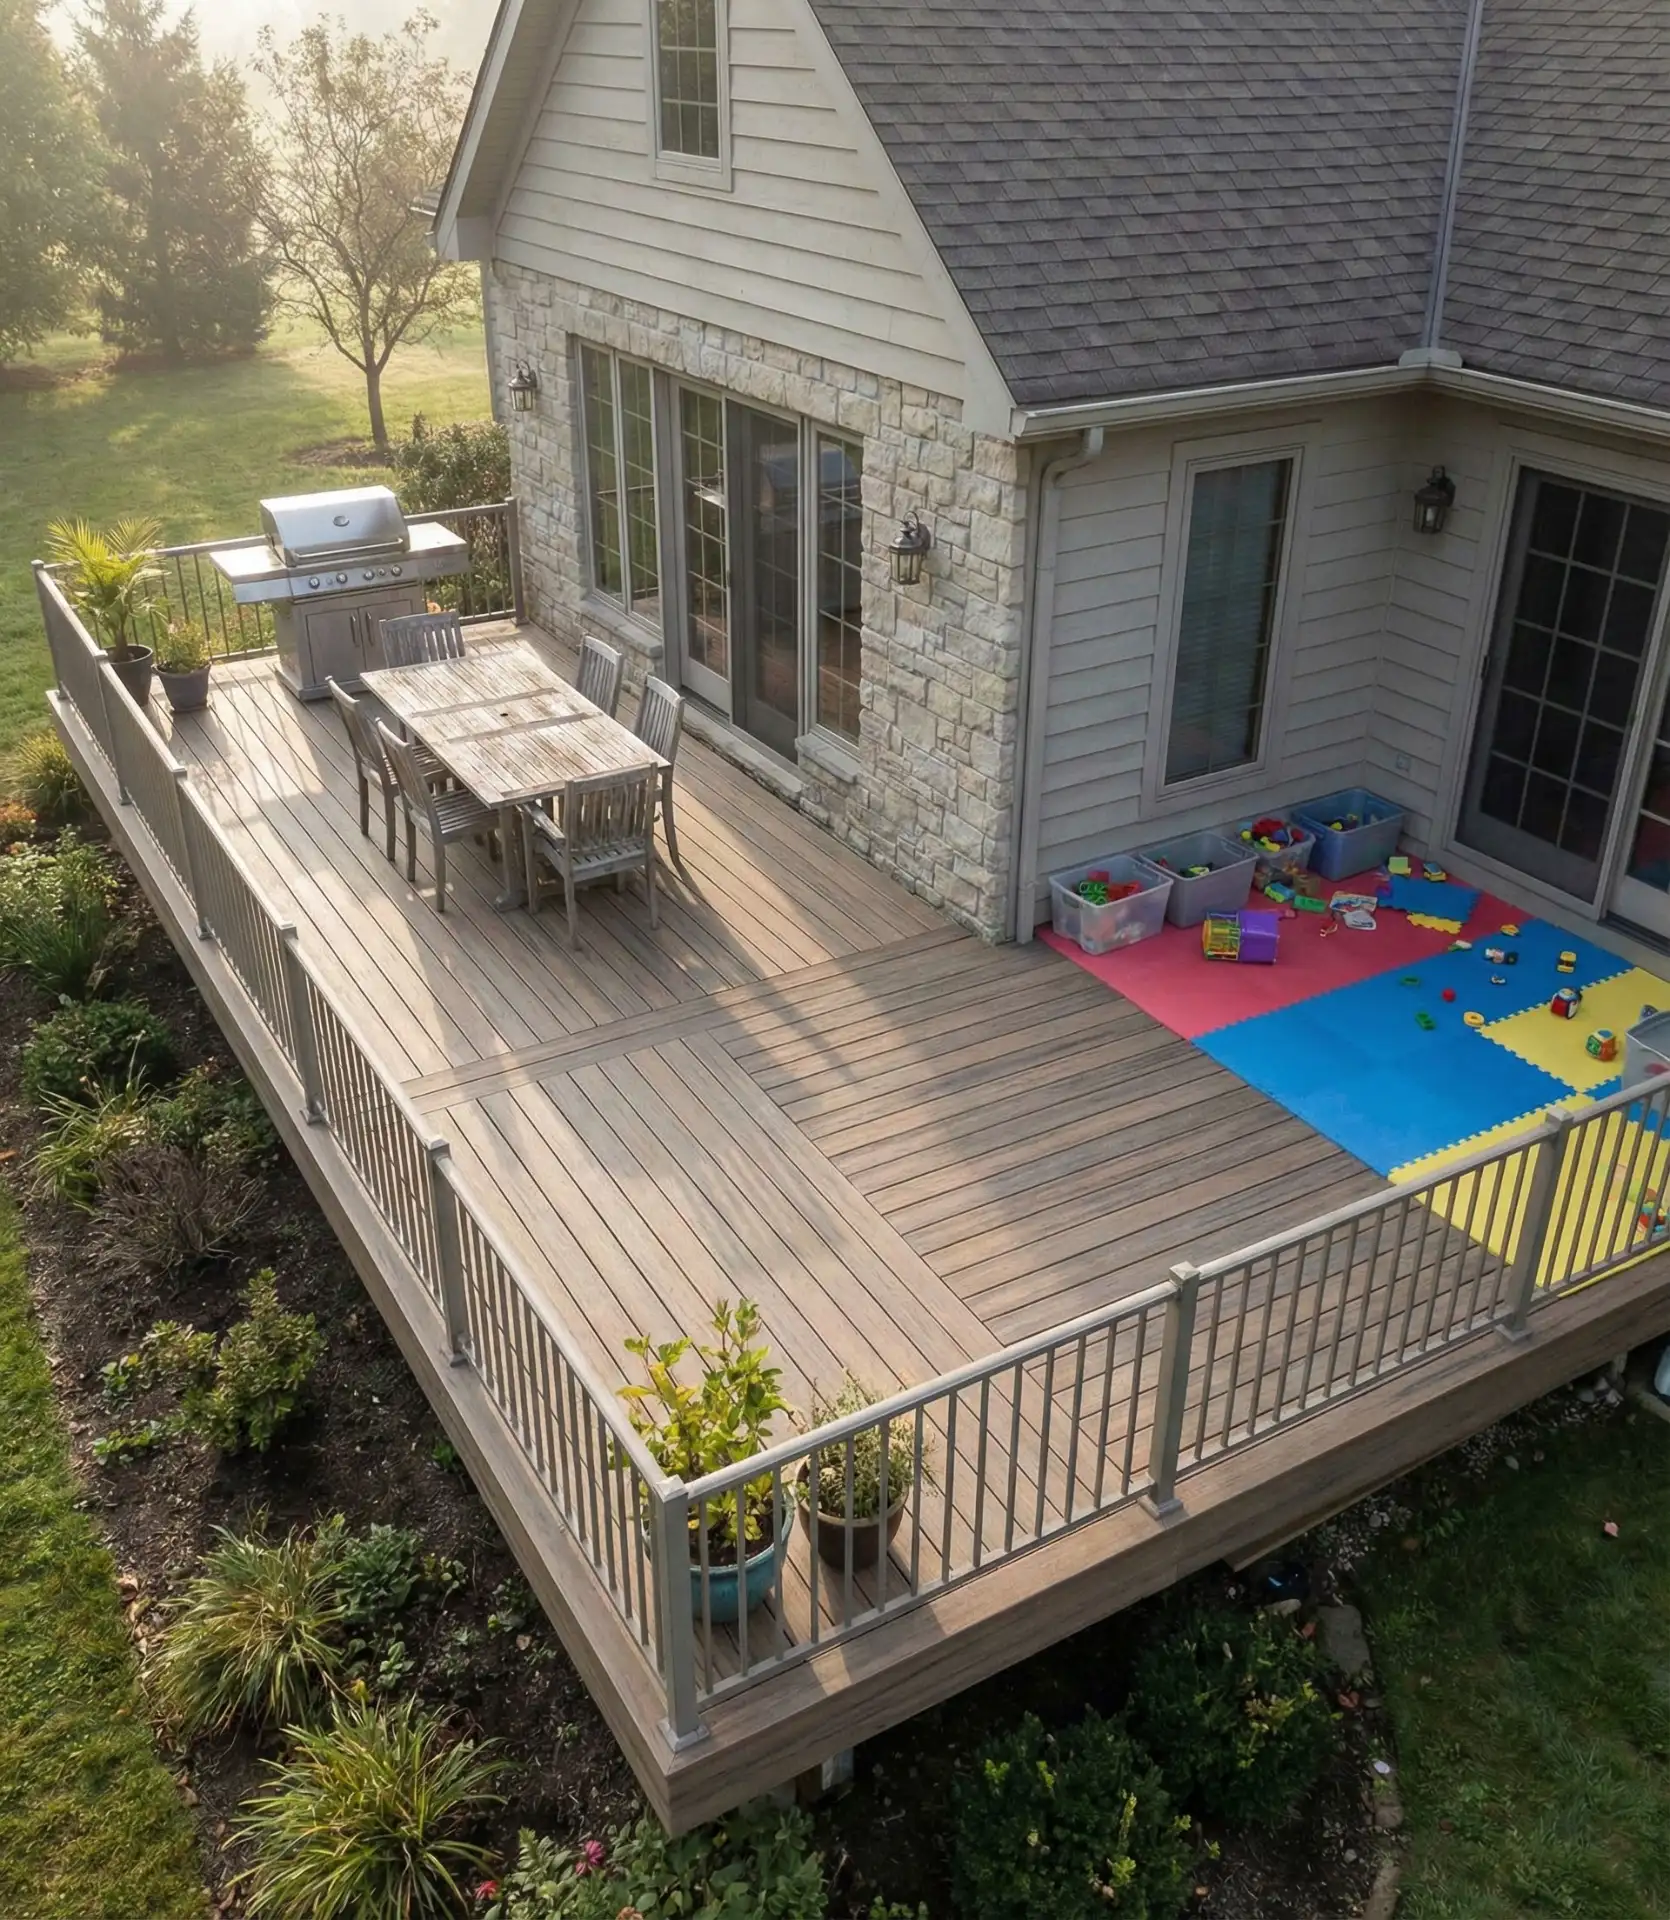
An L-shaped deck wraps around two sides of your home, with one wing dedicated to dining and grilling while the other serves as a kid-friendly activity space. Rubber playground tiles or outdoor carpet can be installed to cushion falls. This blueprint keeps children in view of the kitchen window while adults prepare, and the elevated platform naturally separates messy play from clean entertaining areas. Works brilliantly on sloped lots where a deck levels out otherwise unusable terrain. 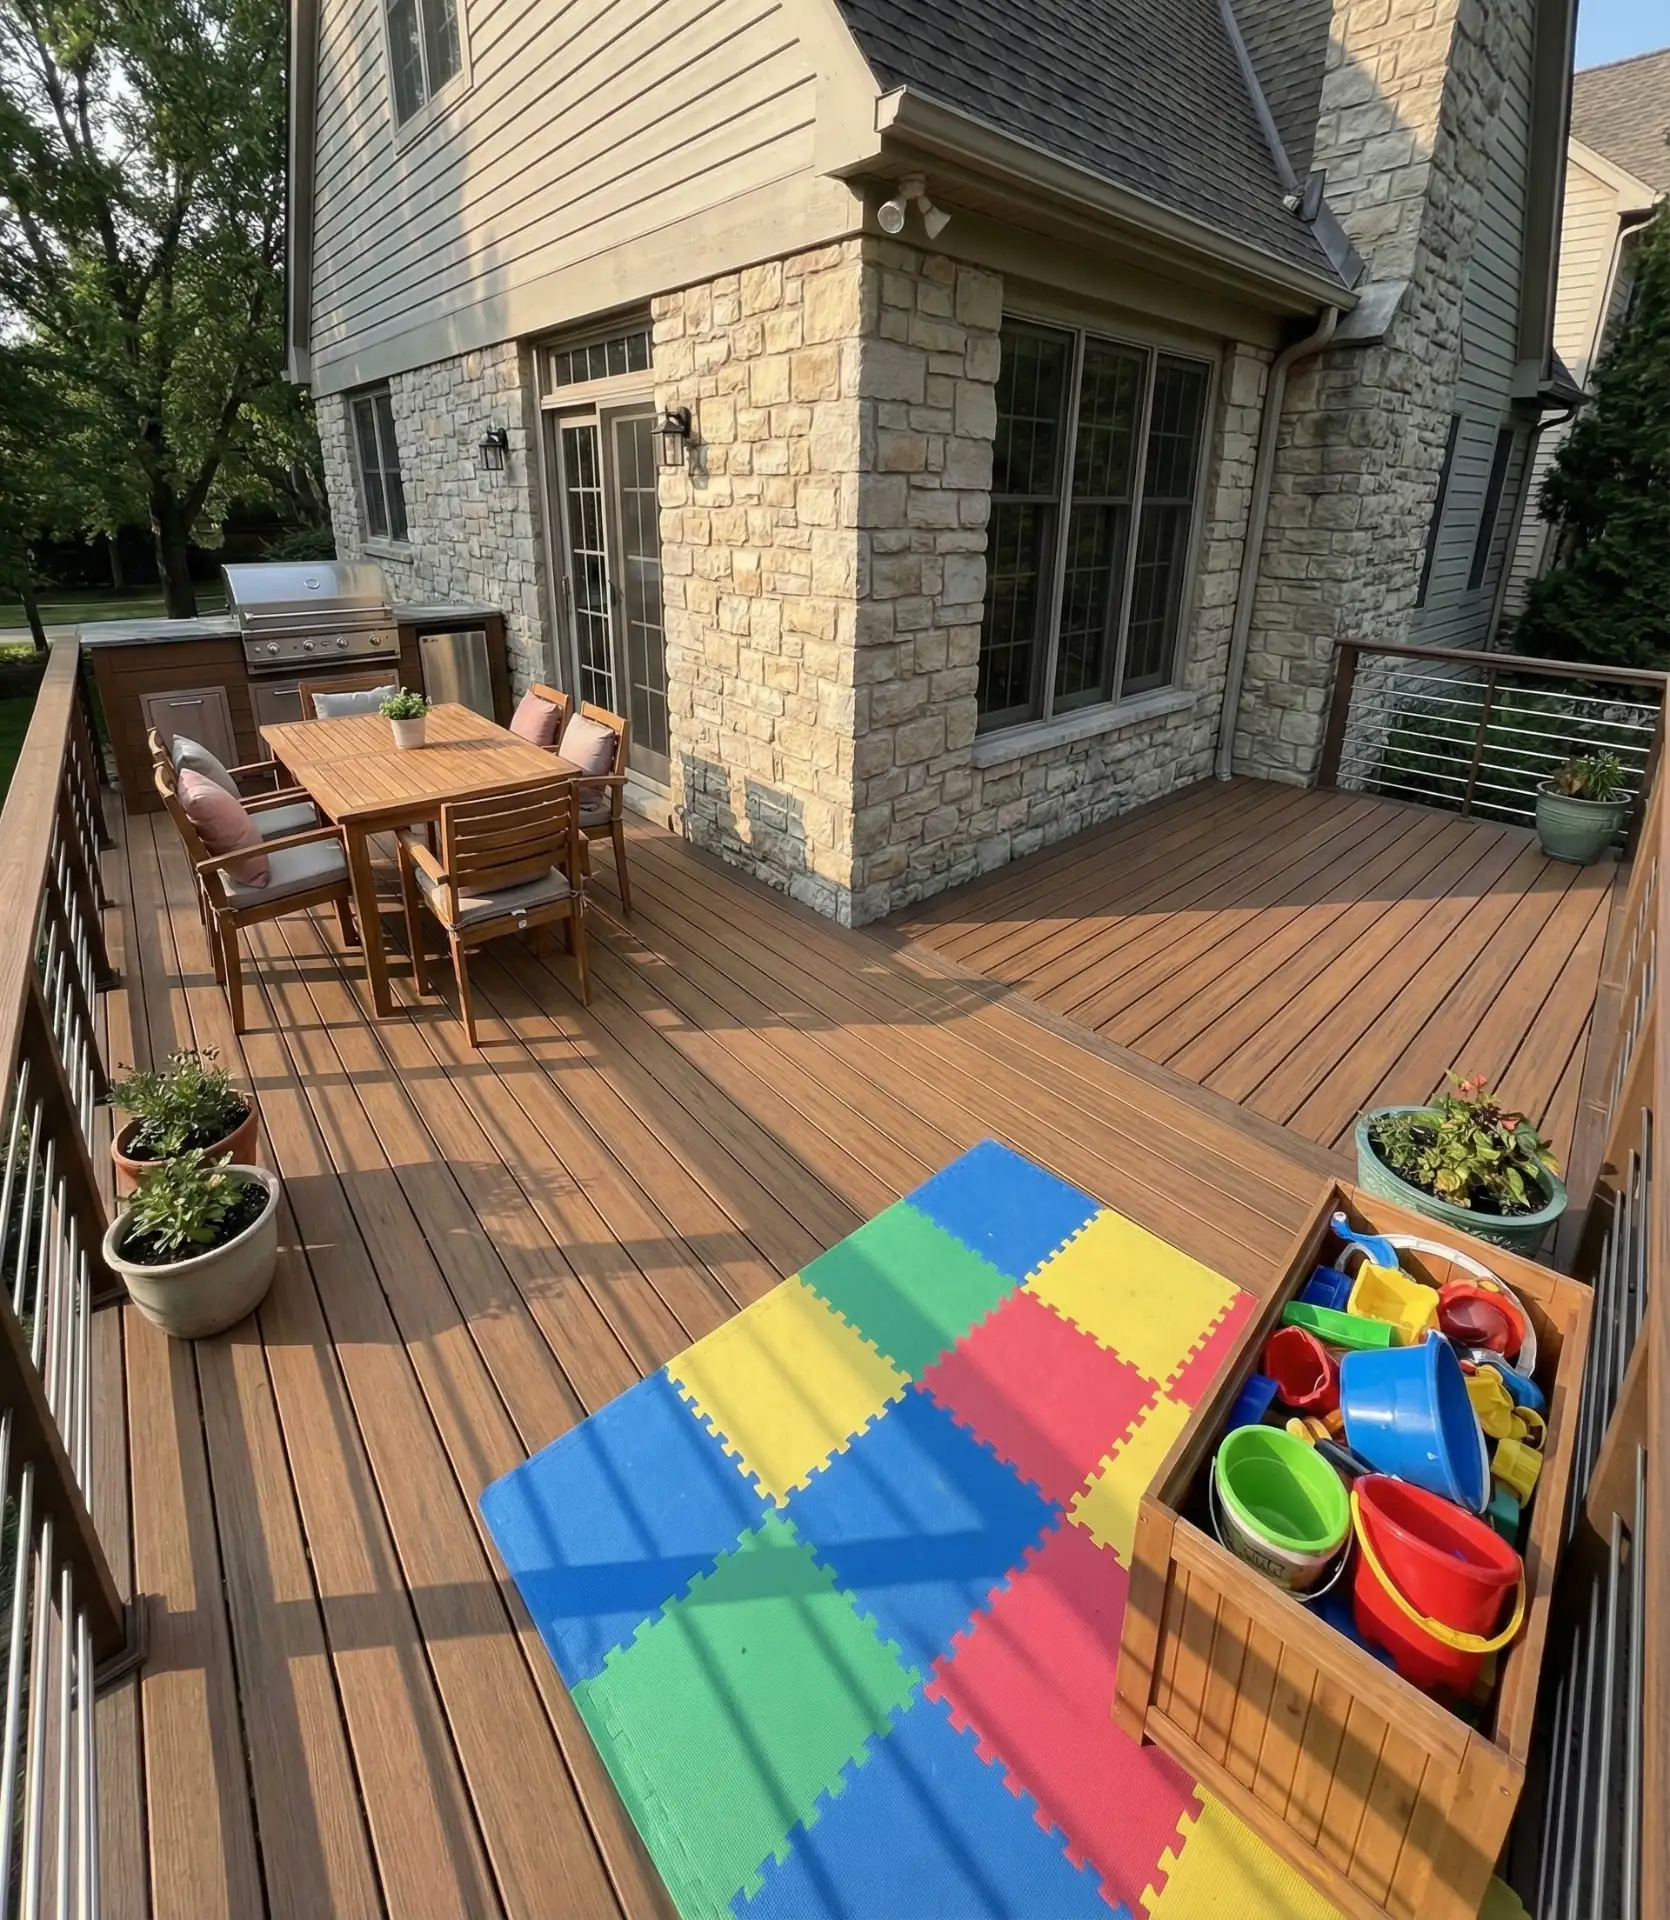
Where the design works best: homes with kitchen or family room access to the backyard. The sight lines from inside make supervision effortless during meal prep. Consider composite decking materials that won’t splinter—crucial for bare feet and crawling toddlers. Add storage benches along the railing to corral outdoor toys, keeping the space tidy when guests arrive. This design particularly shines in suburban settings where neighbors are close and elevated decks provide a bit of privacy.
4. Central Lawn Oasis Surrounded by Gardens
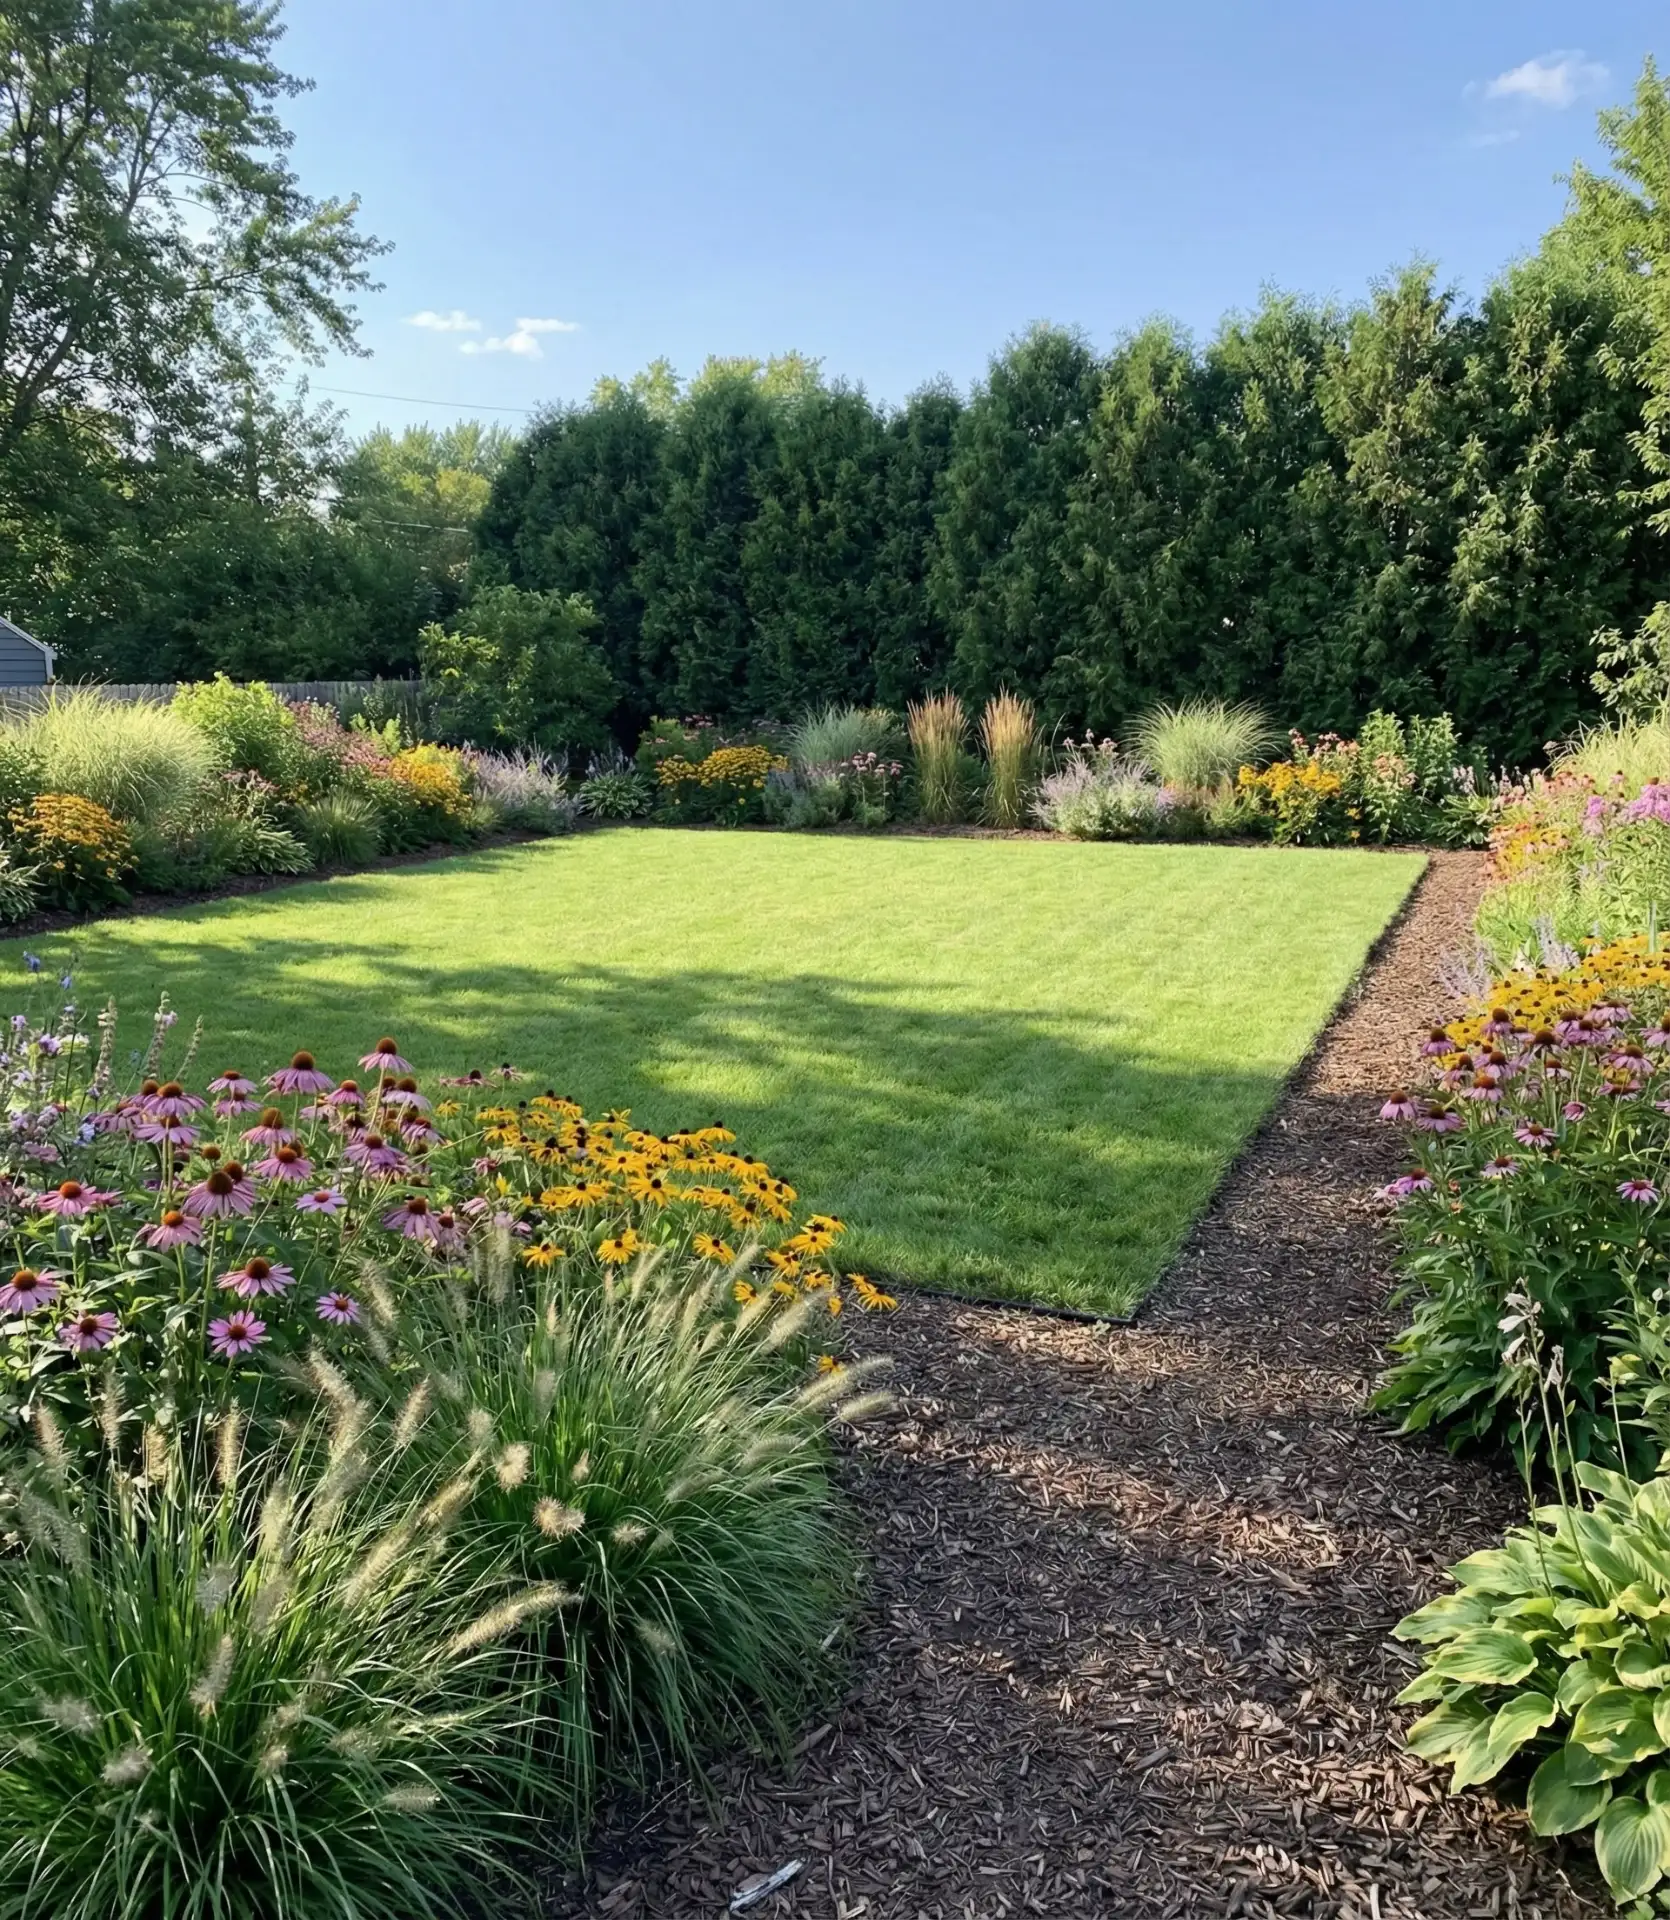
Keep a generous rectangle of open grass in your yard’s center, bordered by deep garden beds filled with perennials, flowering shrubs, and ornamental grasses. This classic plan balances beauty with function—the lawn handles everything from soccer practice to picnic blankets, while the surrounding plantings add seasonal color and privacy. Install a simple paver or mulch path around the lawn’s perimeter for mowing access and to prevent grass from invading garden beds. 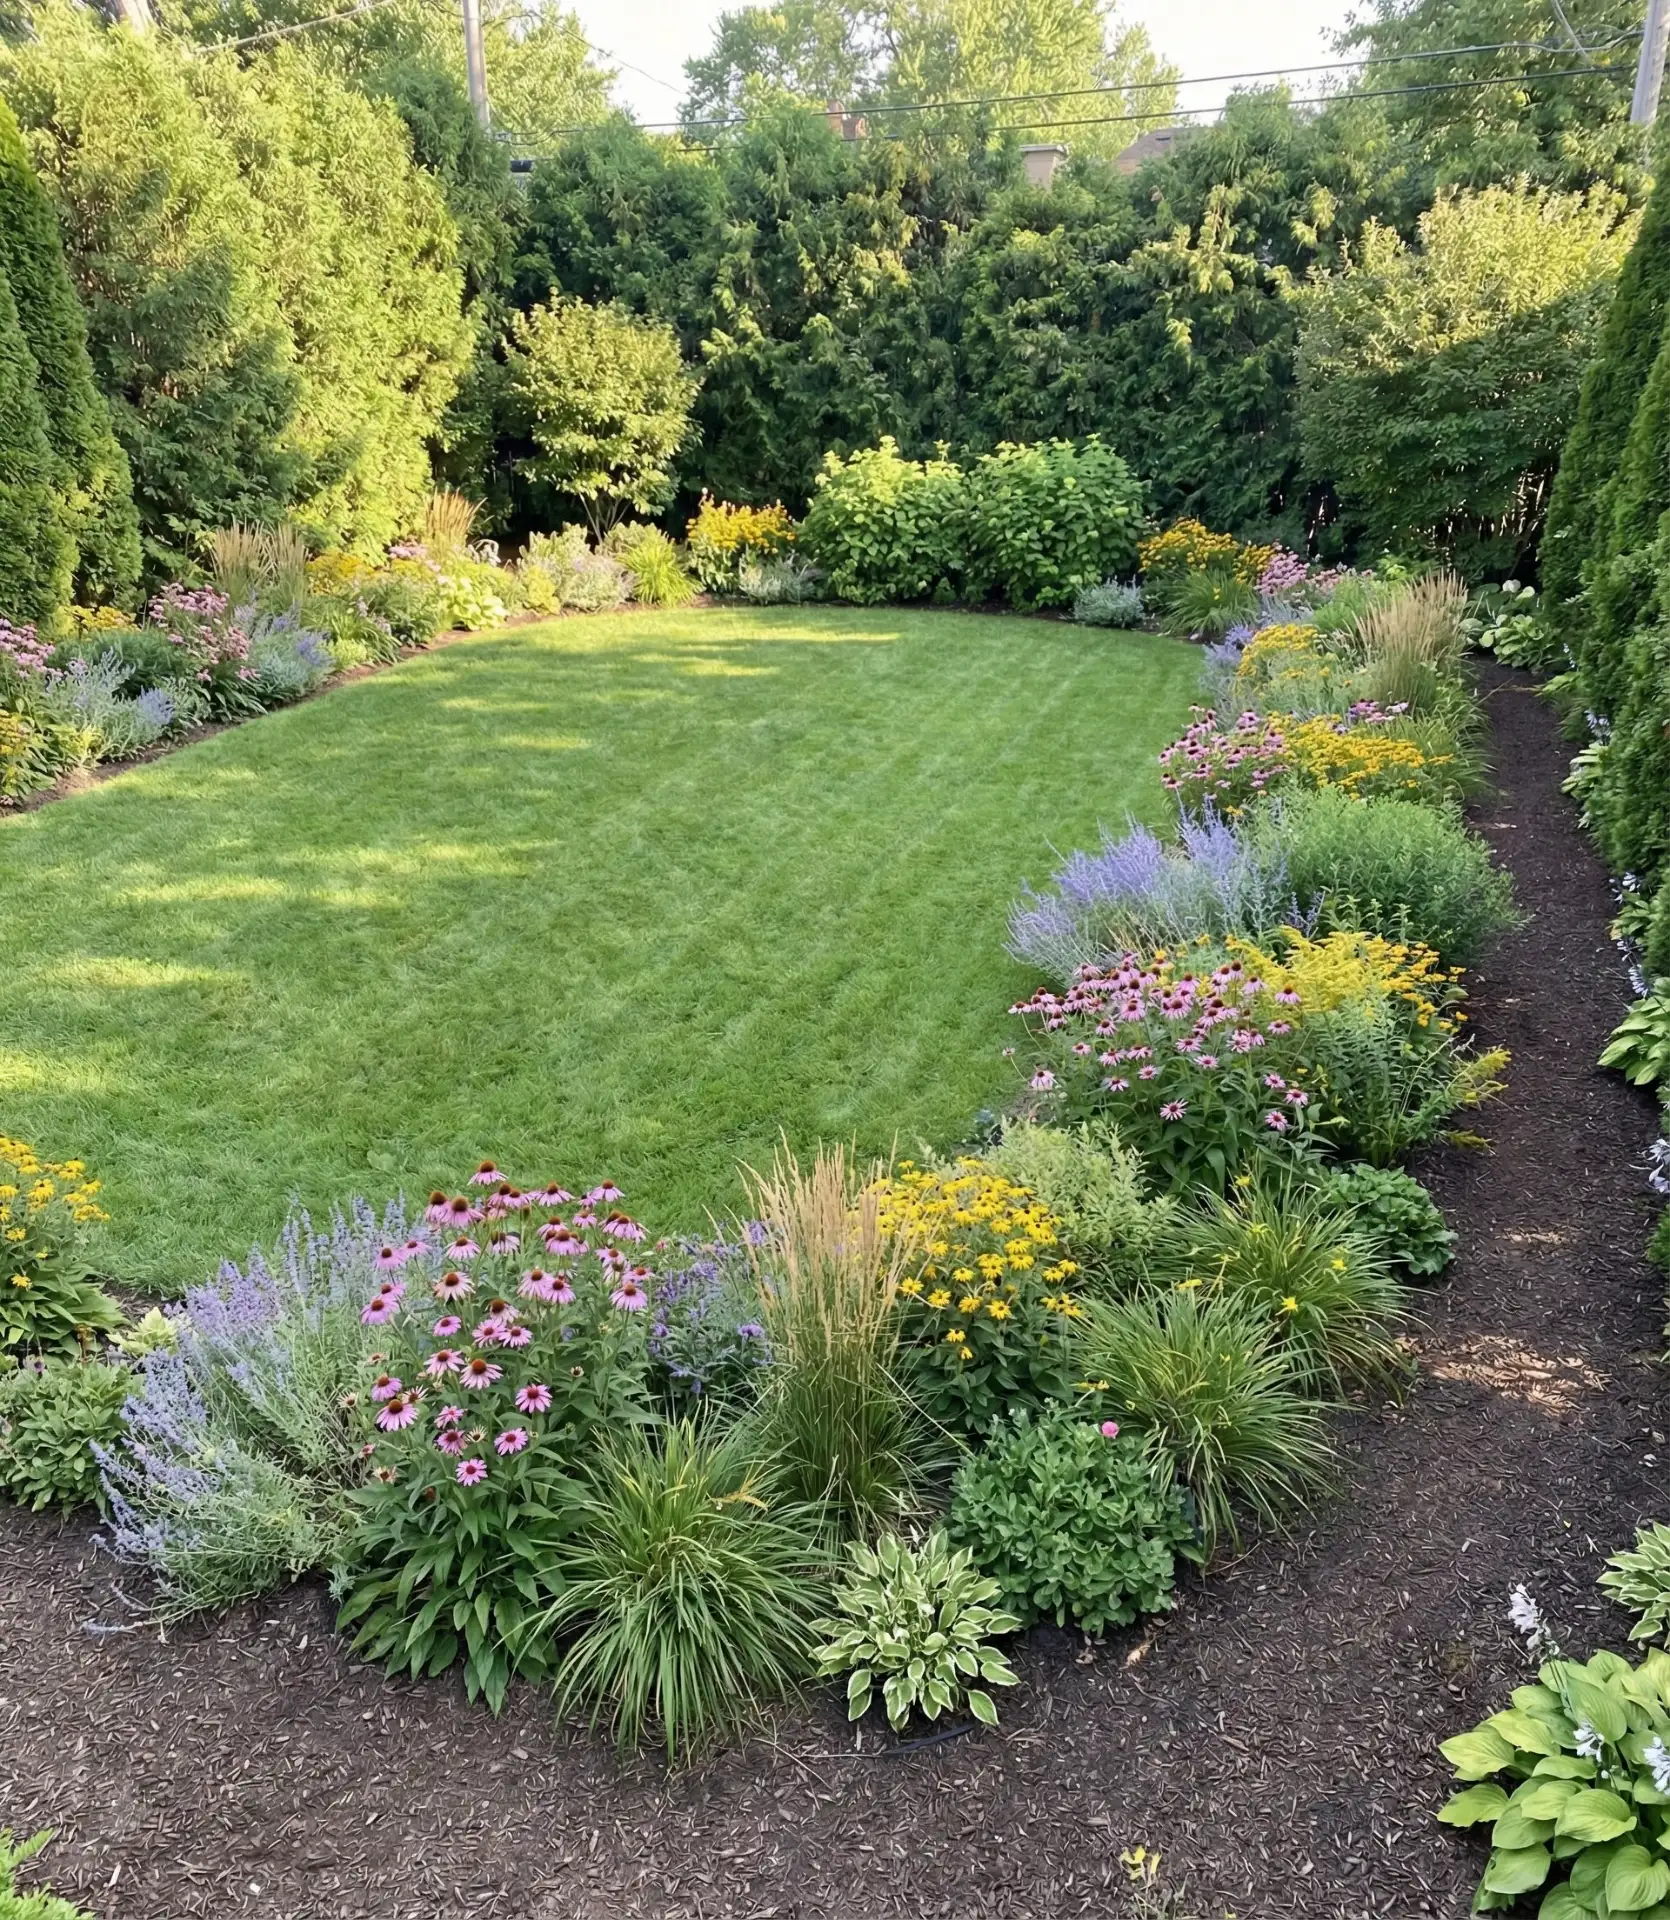
A common mistake families make is planting gardens too narrow—aim for beds at least 4-6 feet deep to create visual impact and give plants room to mature. Shallow borders look sparse and require constant maintenance. Also avoid high-maintenance annuals if you’re busy; stick with hardy perennials like coneflowers, black-eyed Susans, and ornamental grasses that return each year with minimal fuss. The lawn should be large enough for active play but not so vast that mowing becomes a weekend burden.
5. Pool Deck with Shallow Play Area
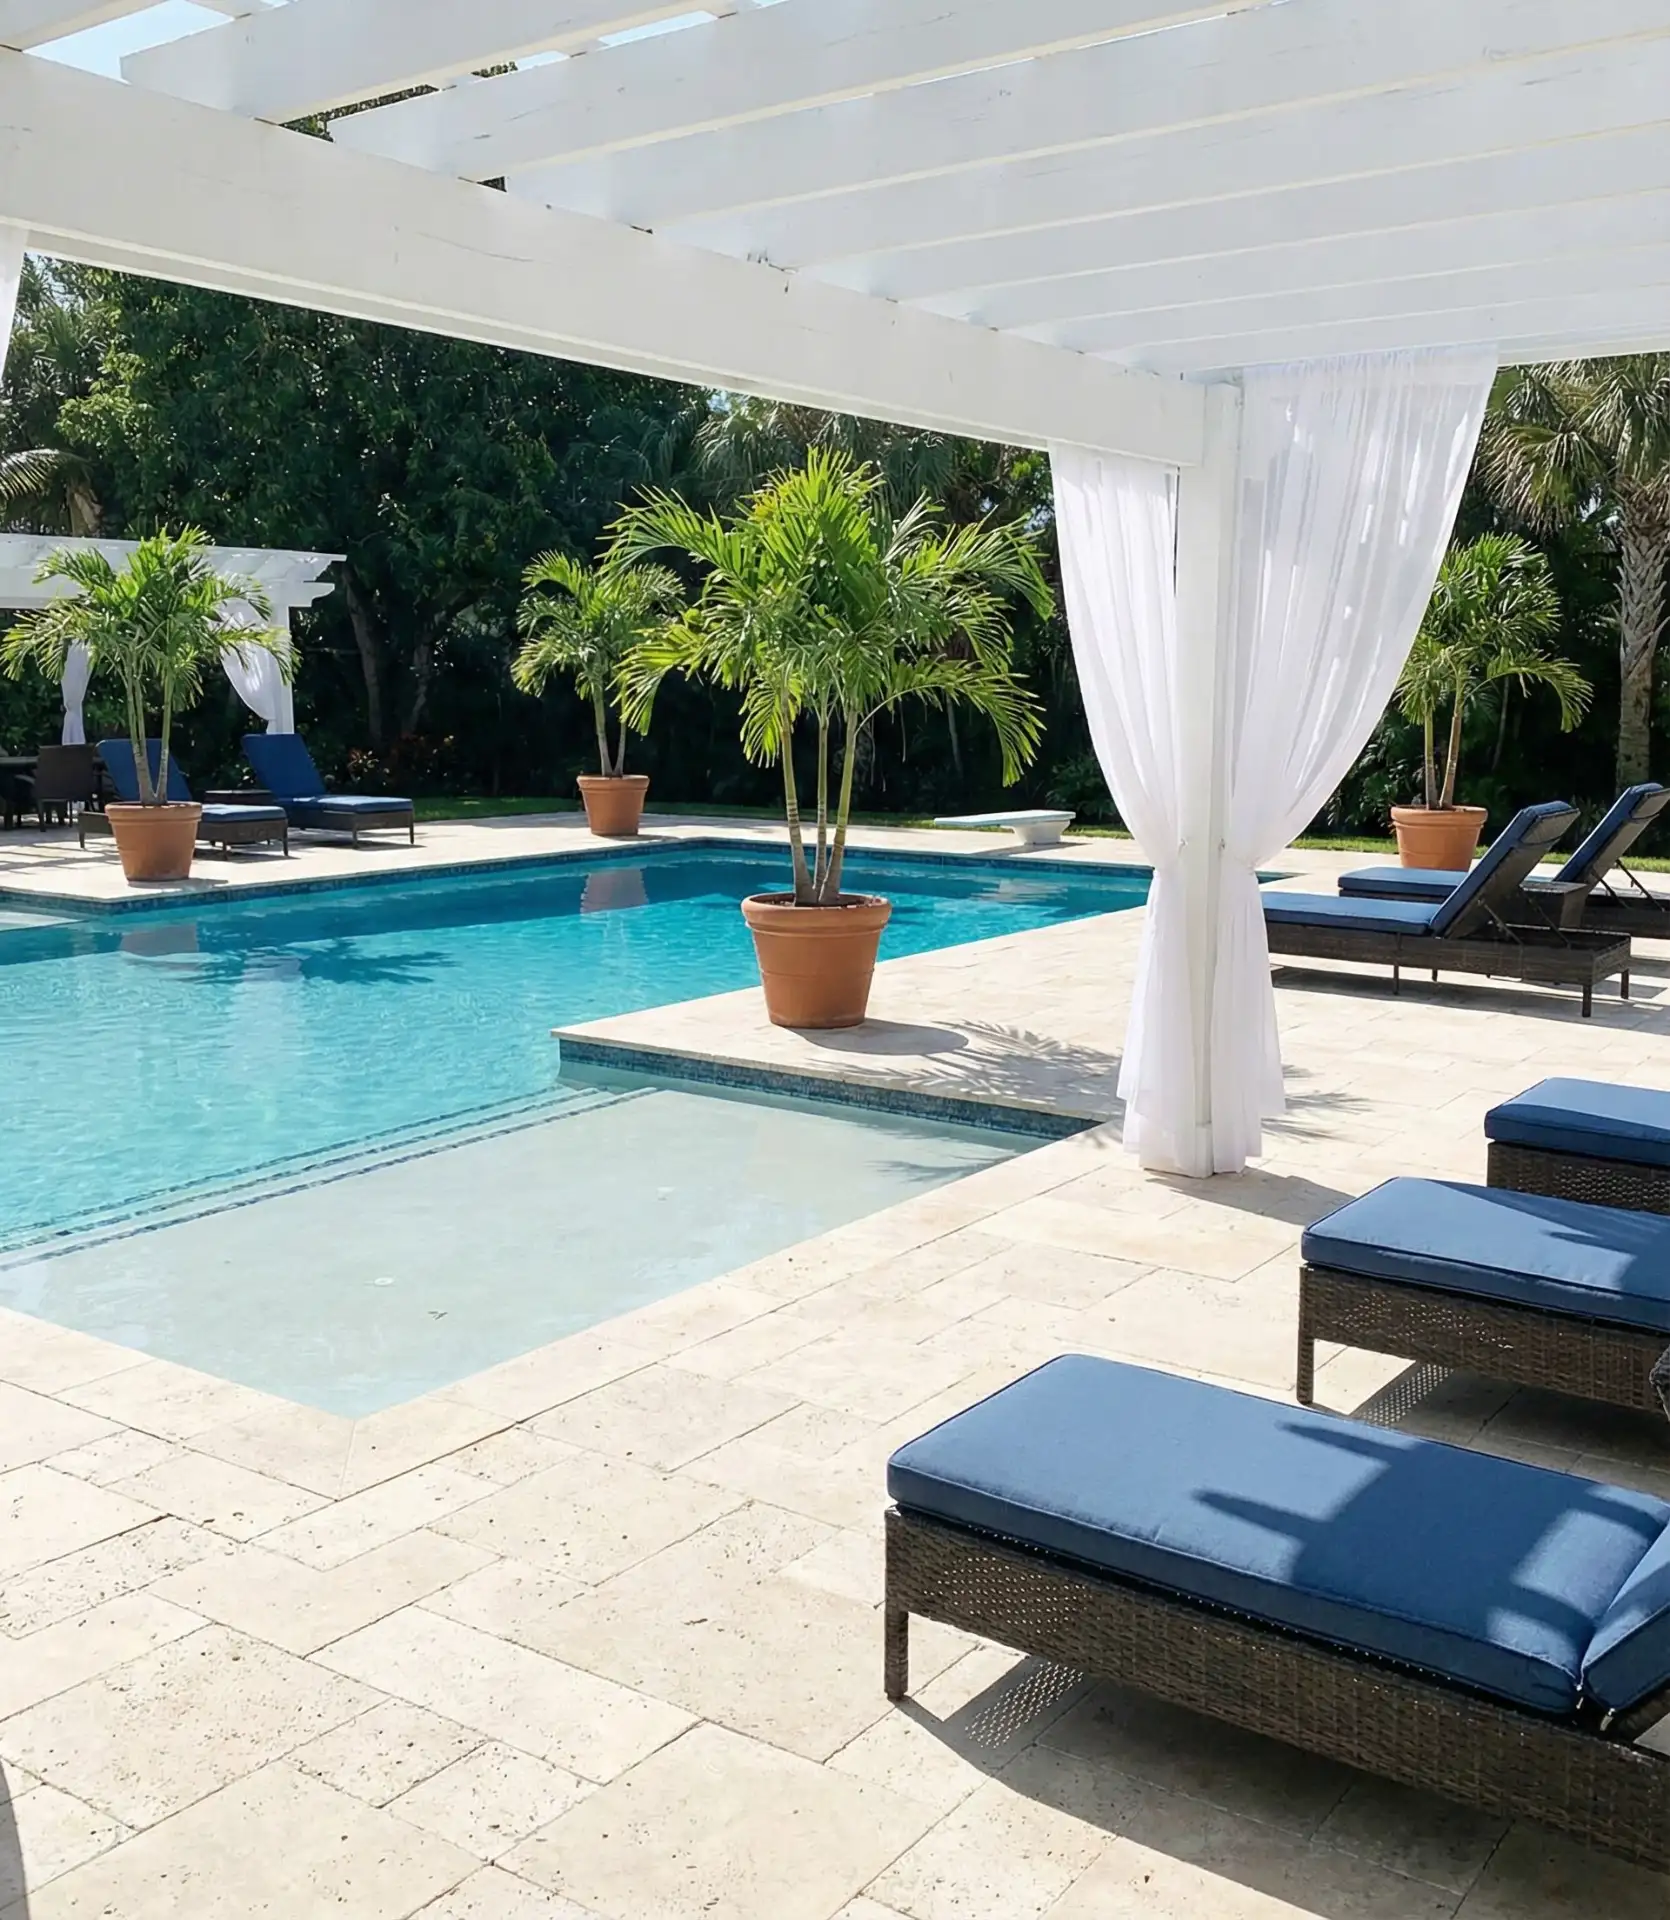
Design your pool with a generous shallow end or attached splash pad for younger children. Surround the water with slip-resistant decking in light colors to reduce heat absorption—crucial in Southern states. Include a covered cabana or pergola on one side for shade, and position lounge chairs to give parents clear sightlines to all water zones. This luxury setup transforms summer days and adds significant property value, especially in warm-climate markets. 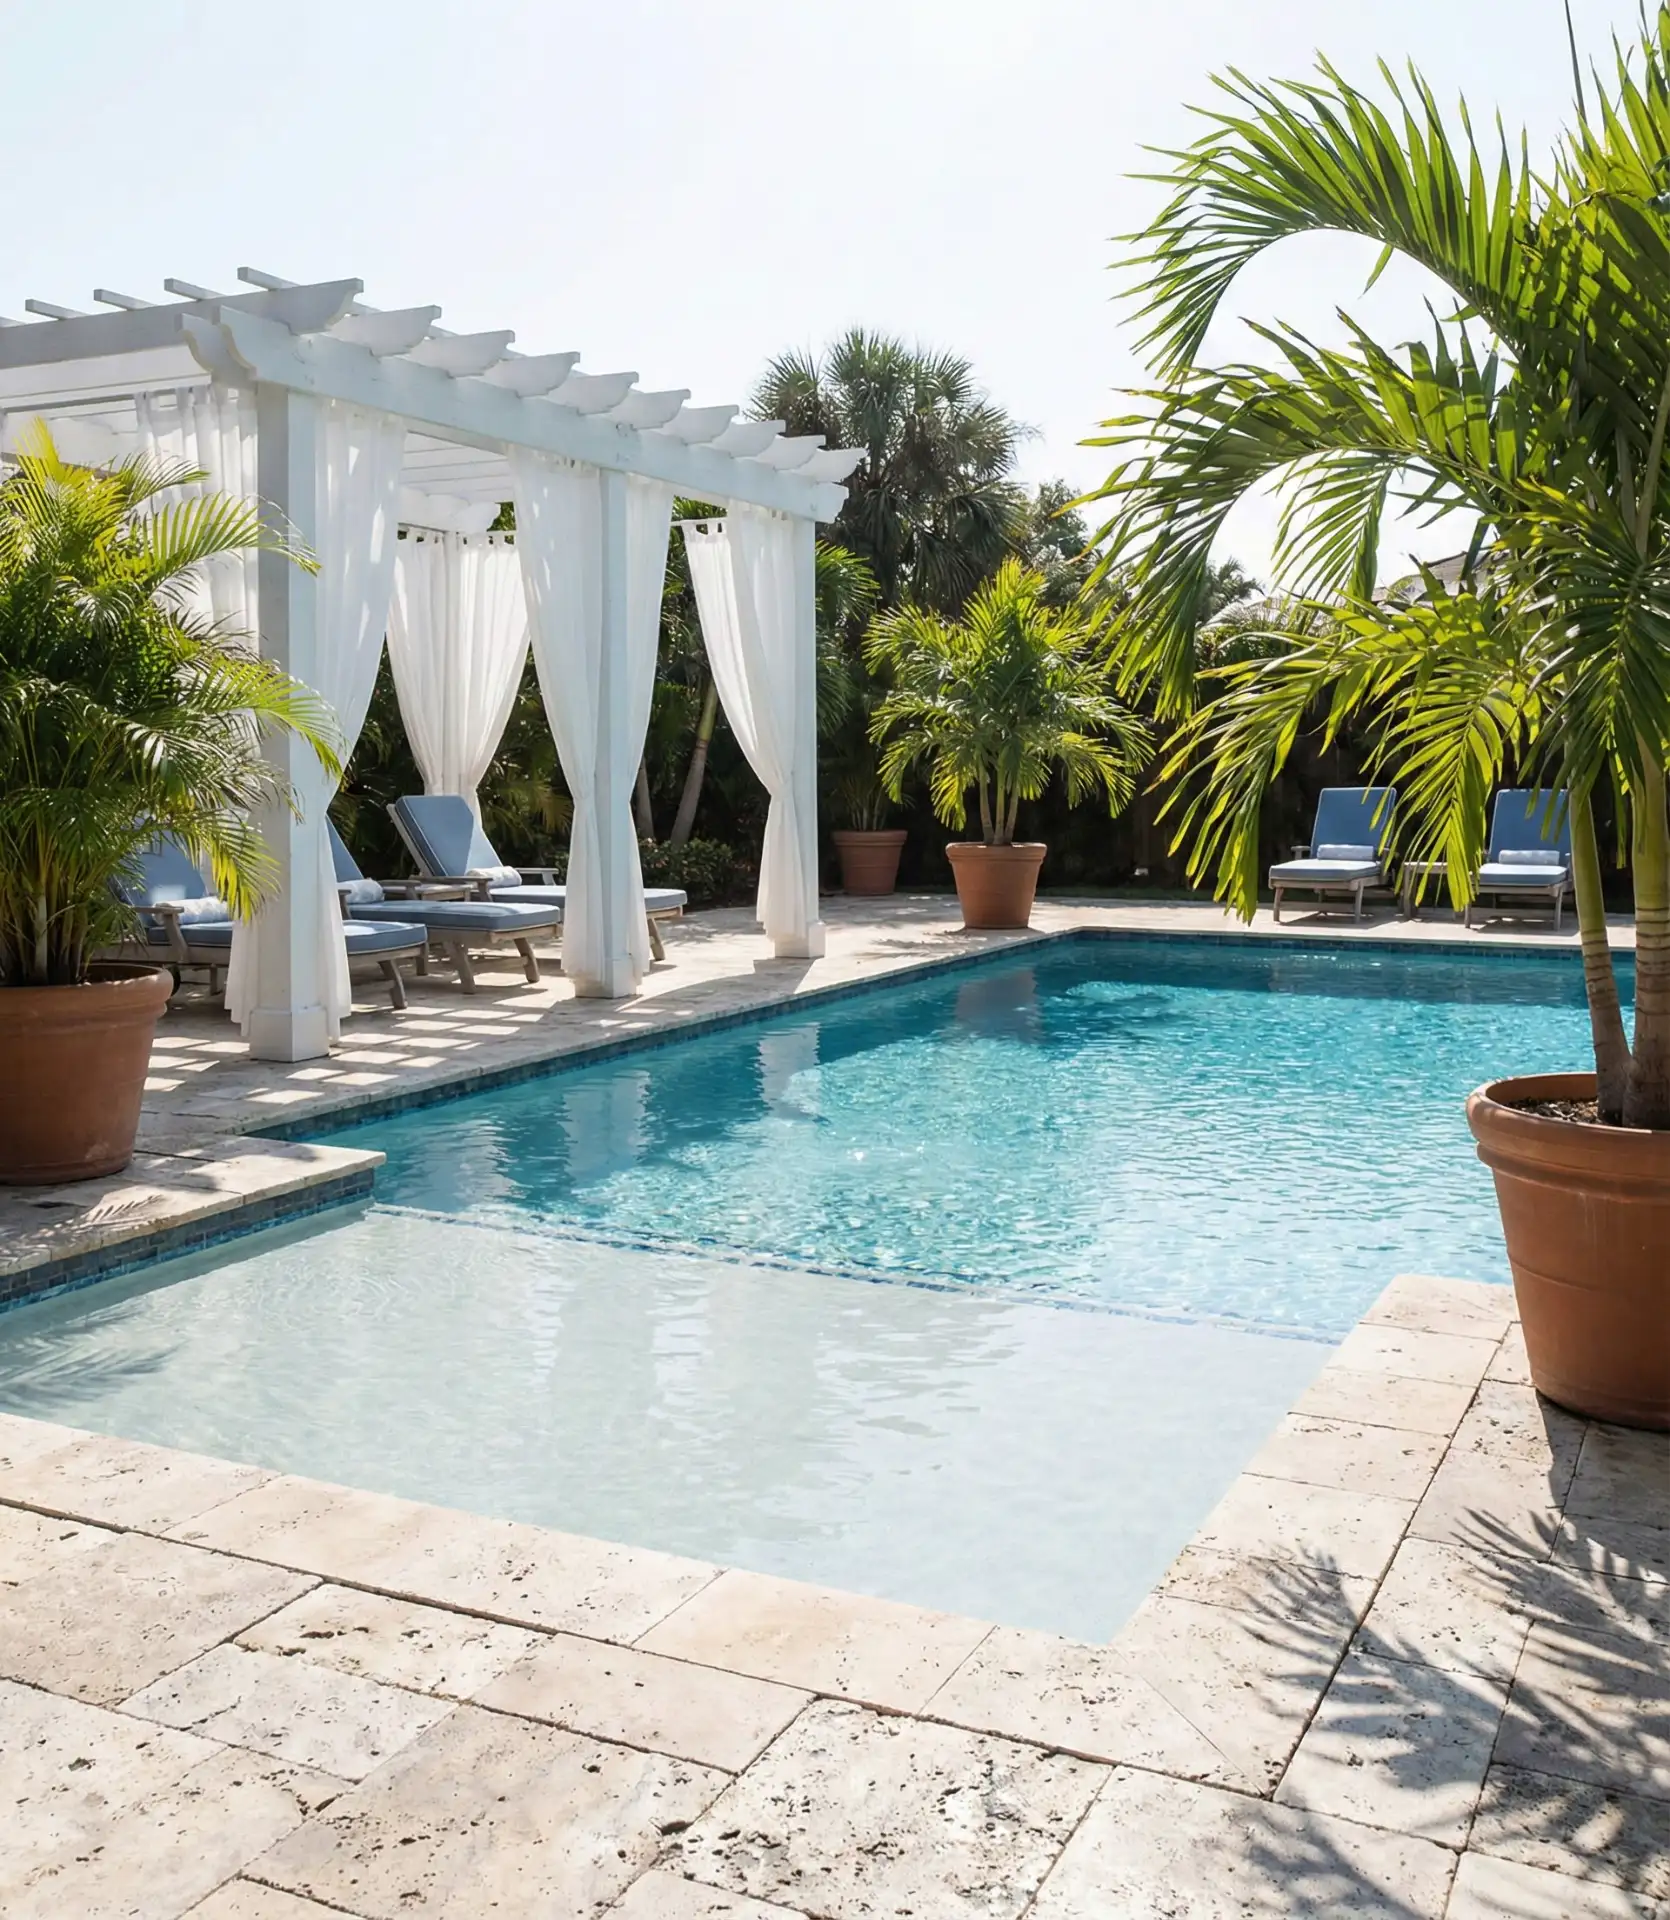
Pool-centered backyards are almost a given for family homes in Texas and Florida. The range of investment is from $35,000 for a basic in-ground to $100,000 plus for custom builds with water features and integrated spas. Moderate climates like the Mid-Atlantic also experience this; families who added pools tend to use them more than they thought, typically from May through September. In most jurisdictions, safety fencing is a must, so try out the more appealing, see-through aluminum options that lack visibility.
6. Adventure Playground Corner with Mulch Base
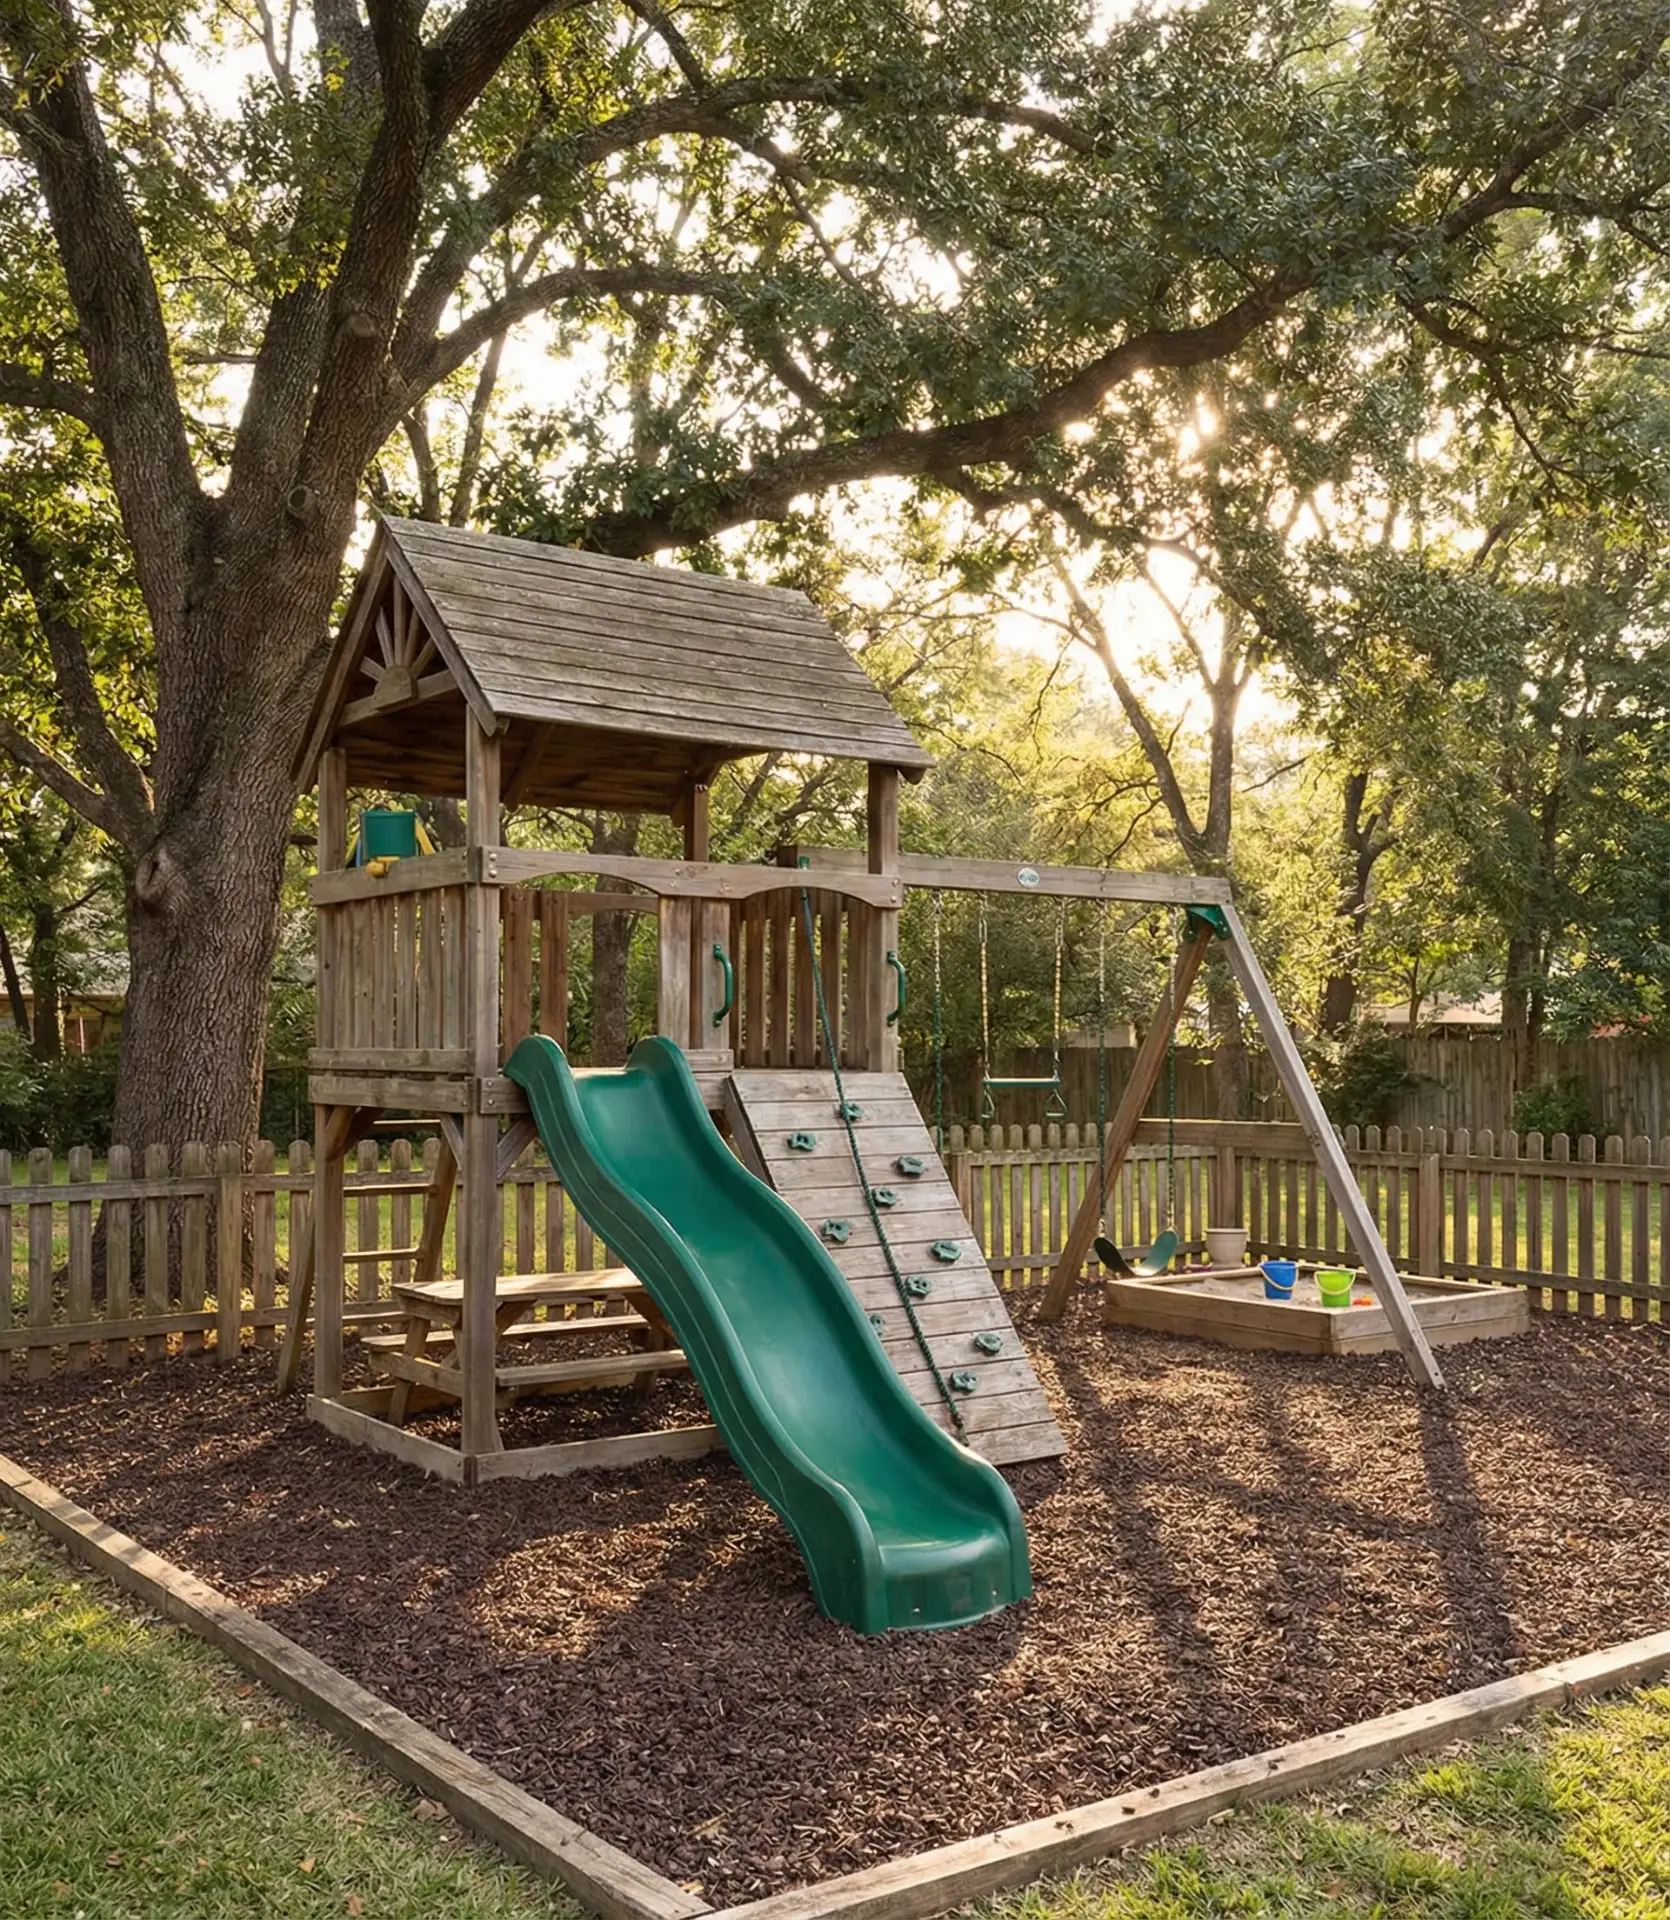
Allocate a corner of your yard for a complete play zone with a climbing structure, swings, and a slide all set in a deep area of playground mulch. Place this zone where you can see it from outside your main living areas but away from areas where you entertain adults.
This setup can help kids manage their outdoor toys and prevent the grass from deteriorating around the swing sets. For younger siblings, you might think about putting a small sandbox in the mulched area. 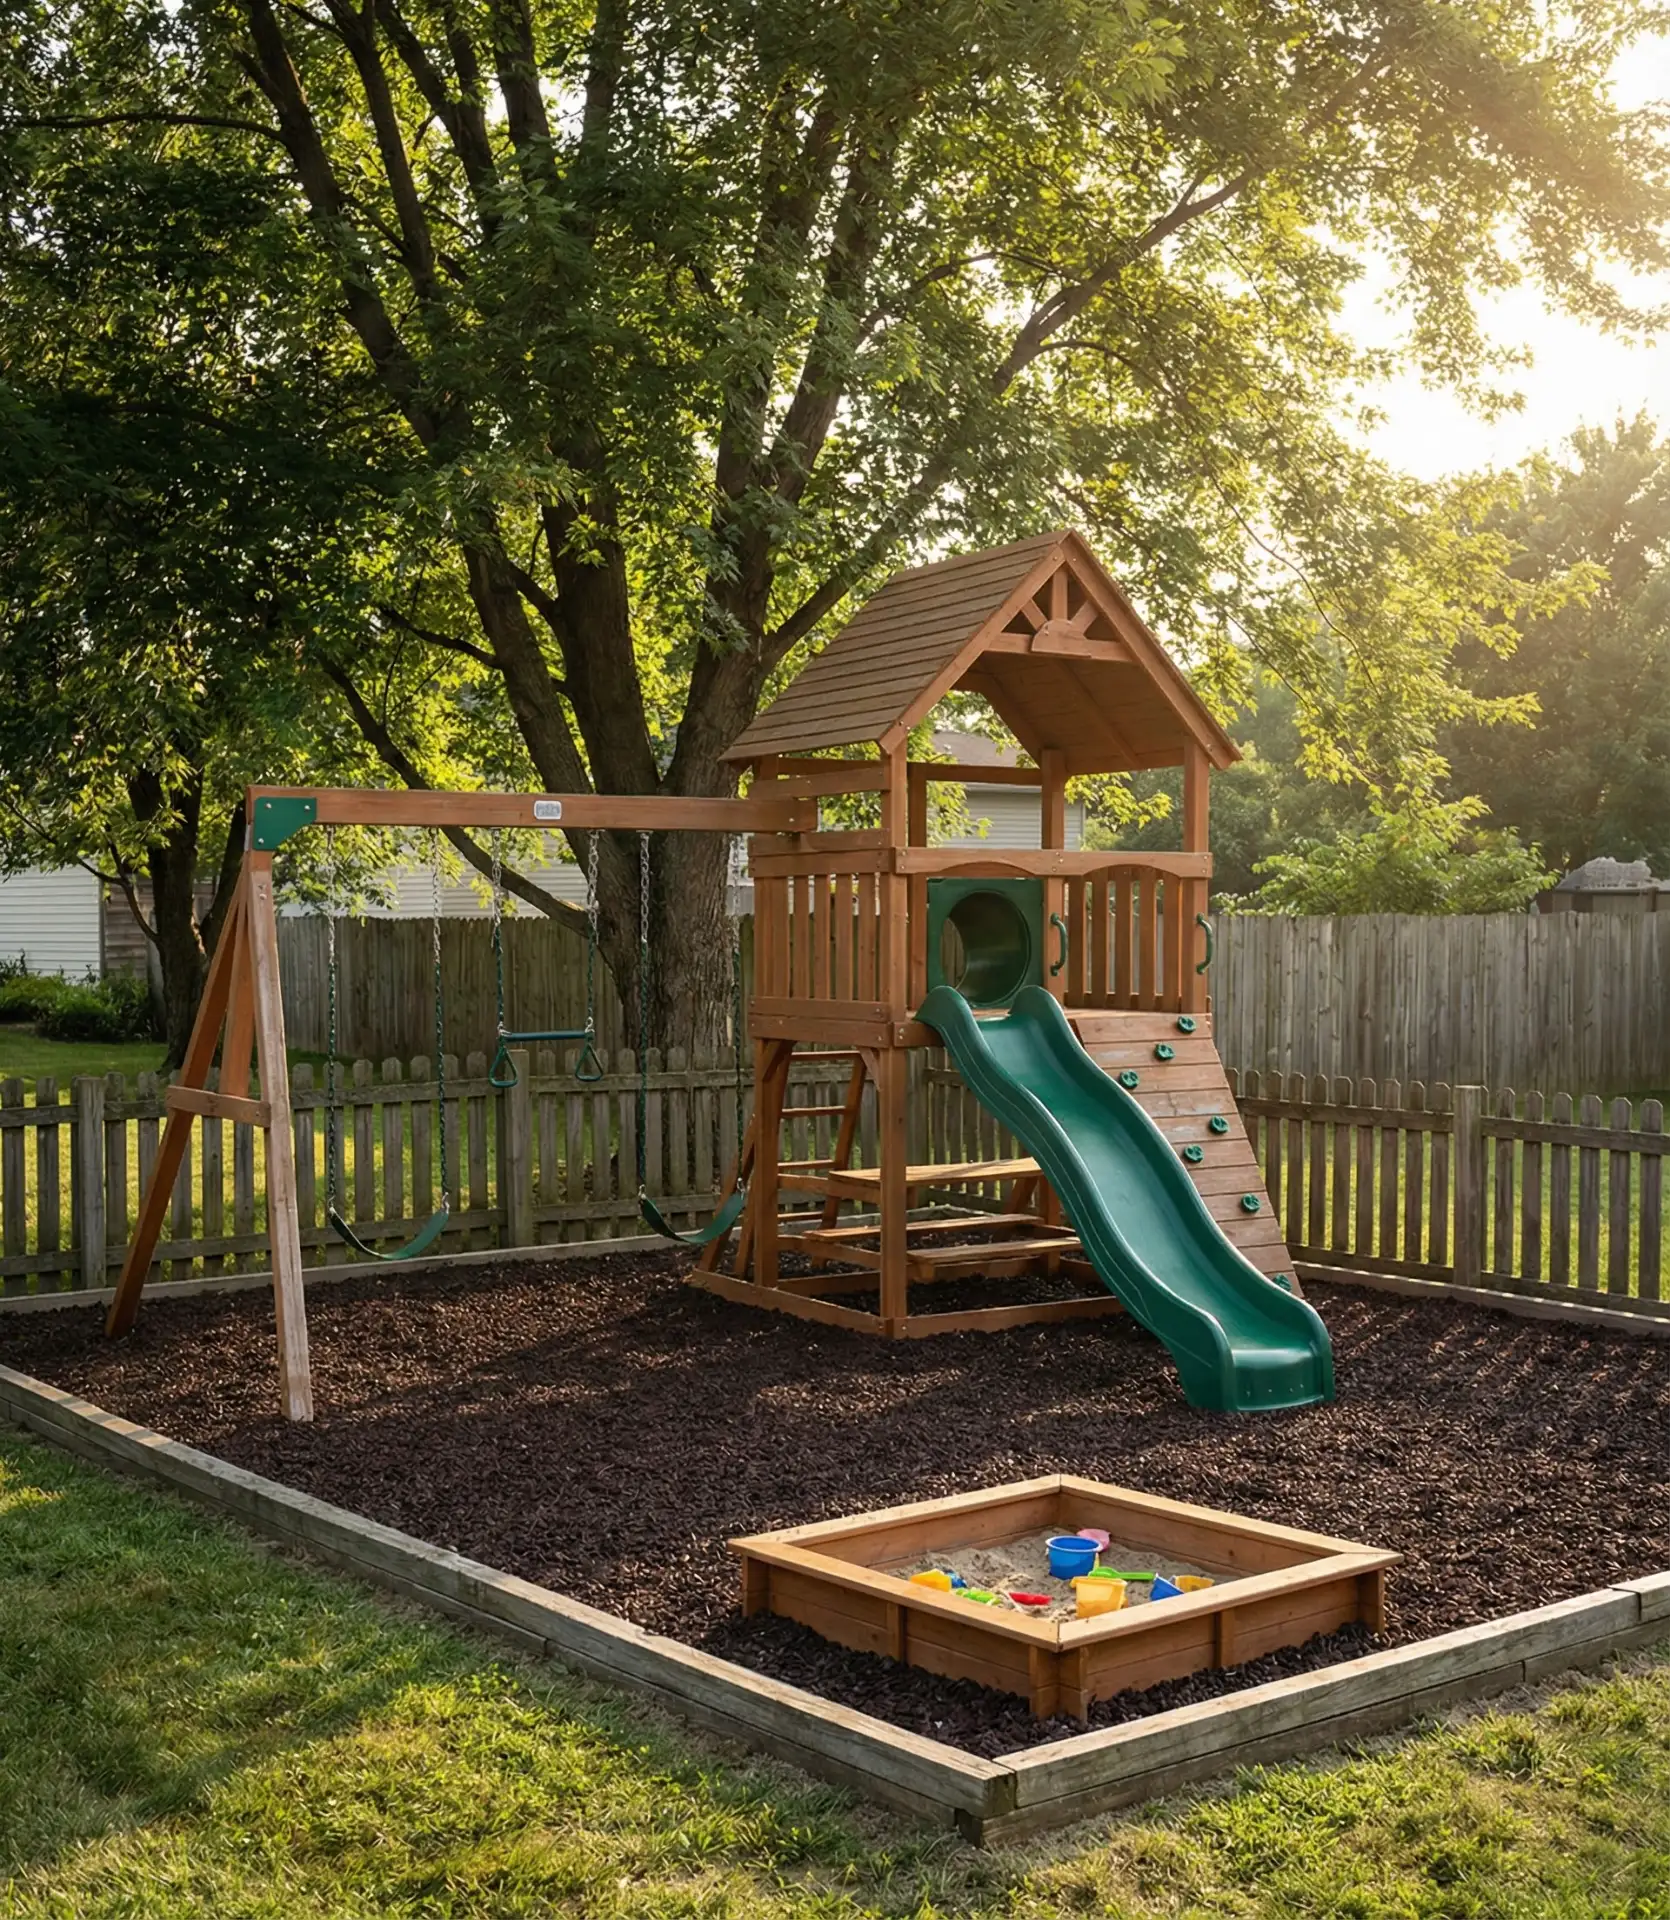
One neighbor in a suburban Atlanta neighborhood set up their play equipment under mature oak trees to provide natural shade. In the summer afternoons, the canopy lowered the surface temperature by 15-20 degrees. The trees also protected wooden structures from constant sun exposure, extending the equipment’s lifespan. If your yard has no fully grown trees, a basic shade sail above the play area is a viable alternative. Your kids will be more likely to use the equipment at noon when the surfaces are cooler than when they leave due to the heat.
7. Kid Planting Zones with Raised Garden Beds
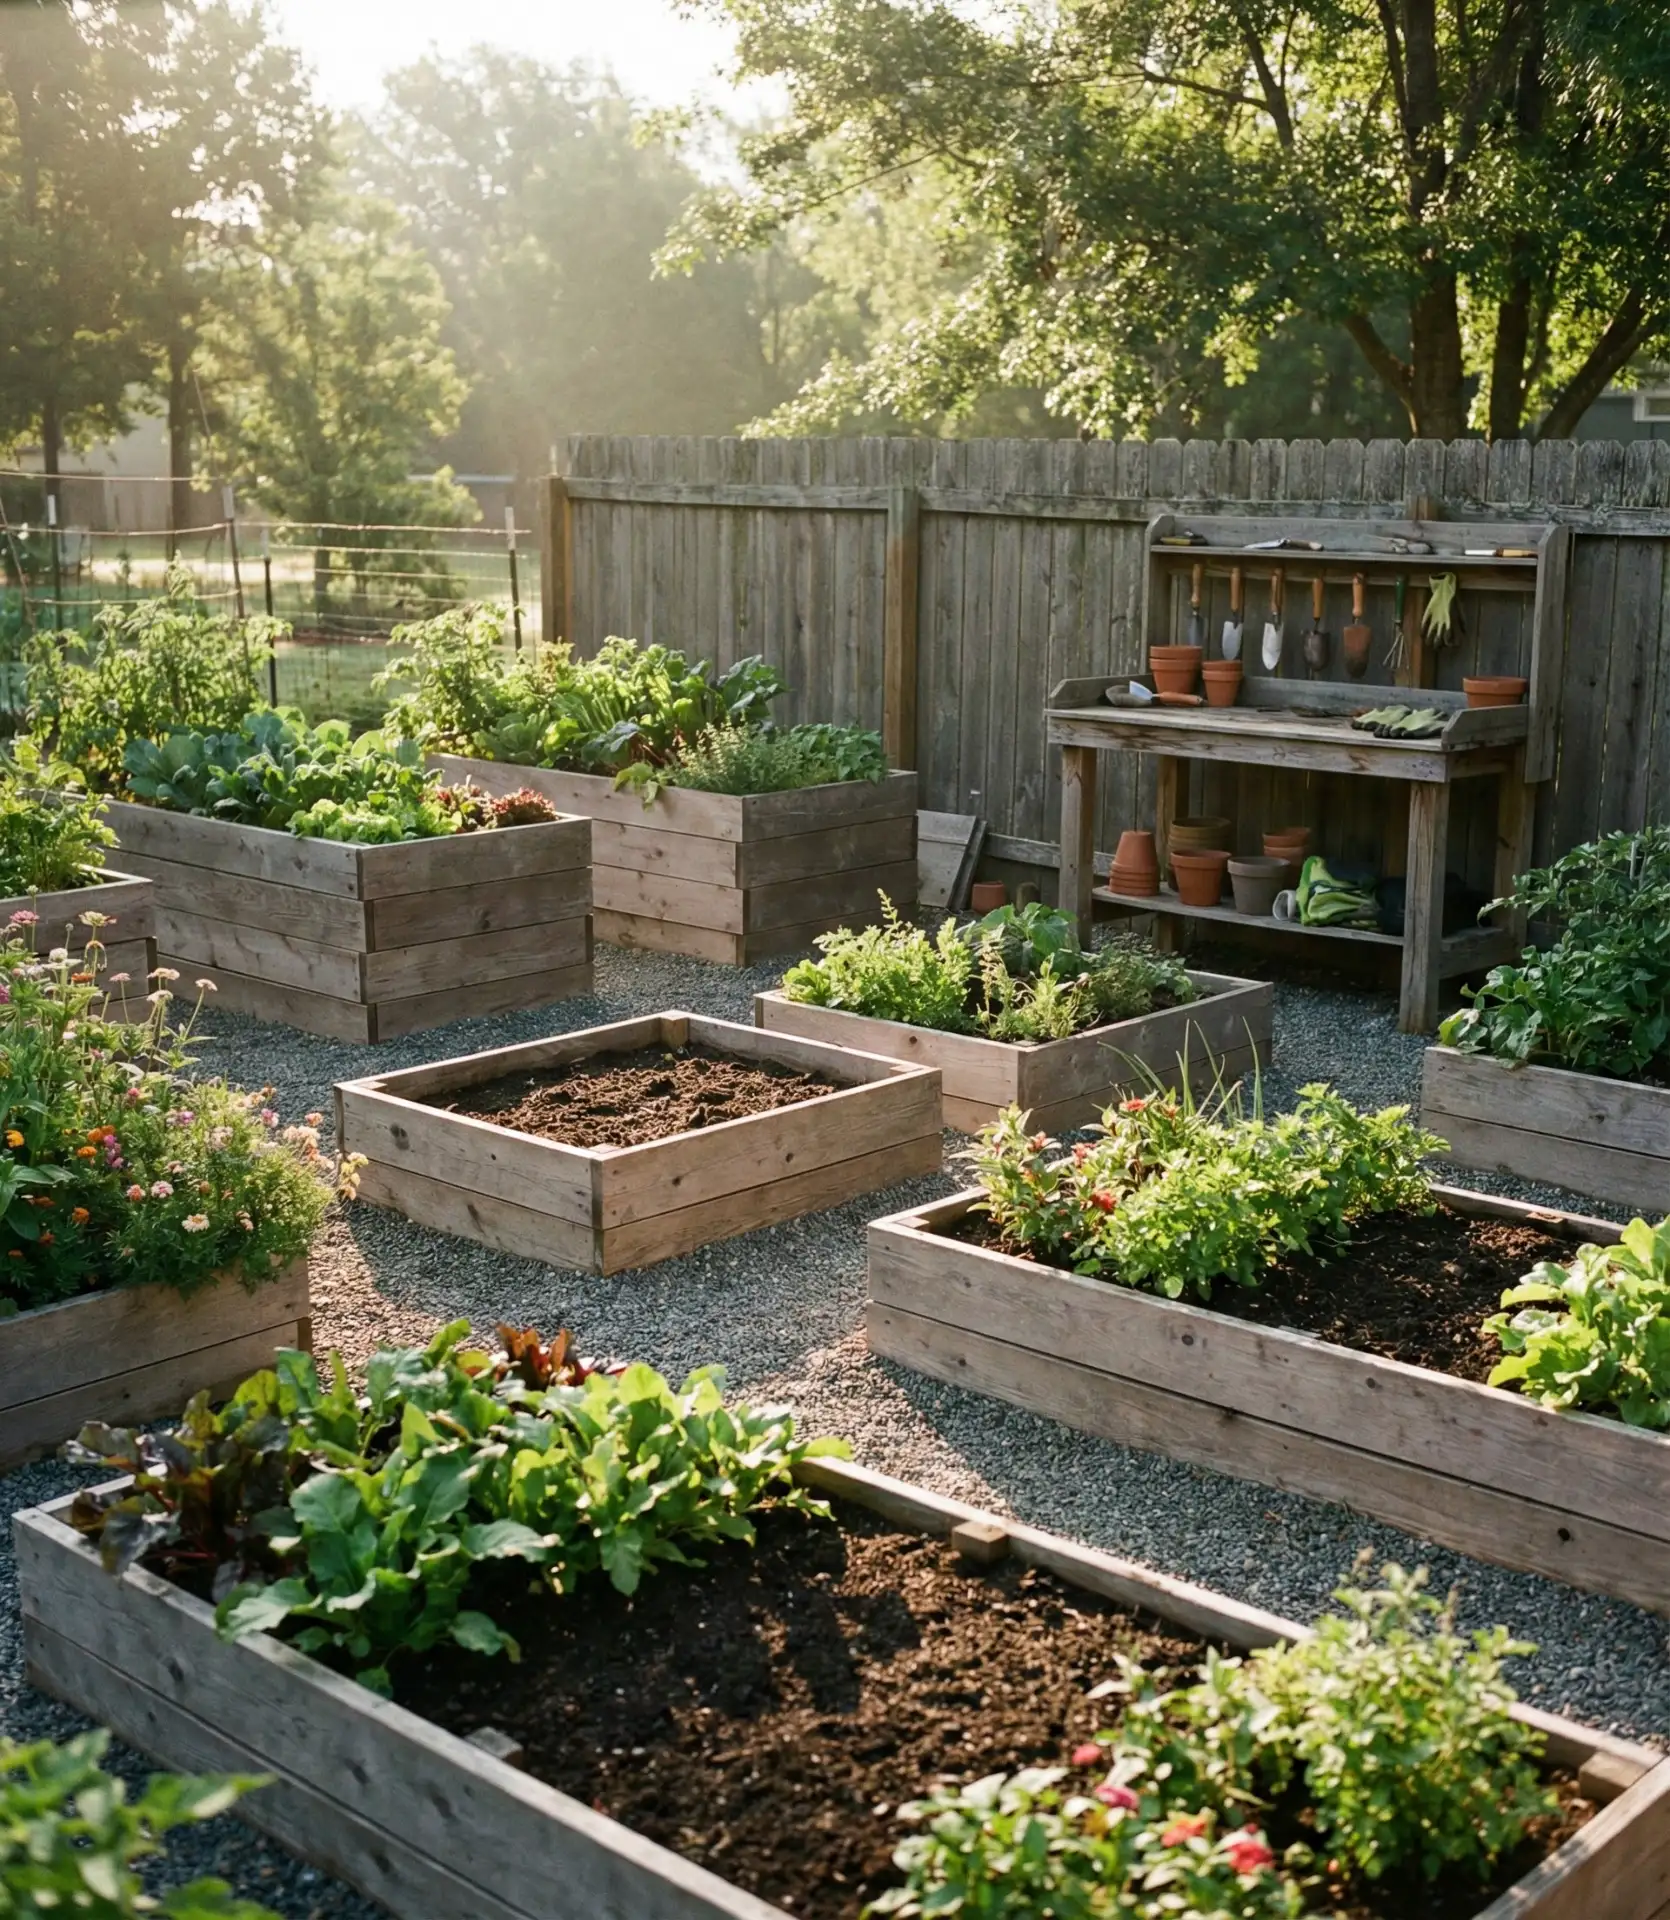
Build a series of raised garden beds using cedar or composite lumber, designating the lower, smaller beds specifically for children. This idea teaches kids about growing food while keeping their planting separate from your main vegetable production. Position beds in the sunniest part of your yard, with gravel or paver pathways between them for all-weather access. Include a simple potting bench and tool storage nearby to make gardening sessions more convenient. 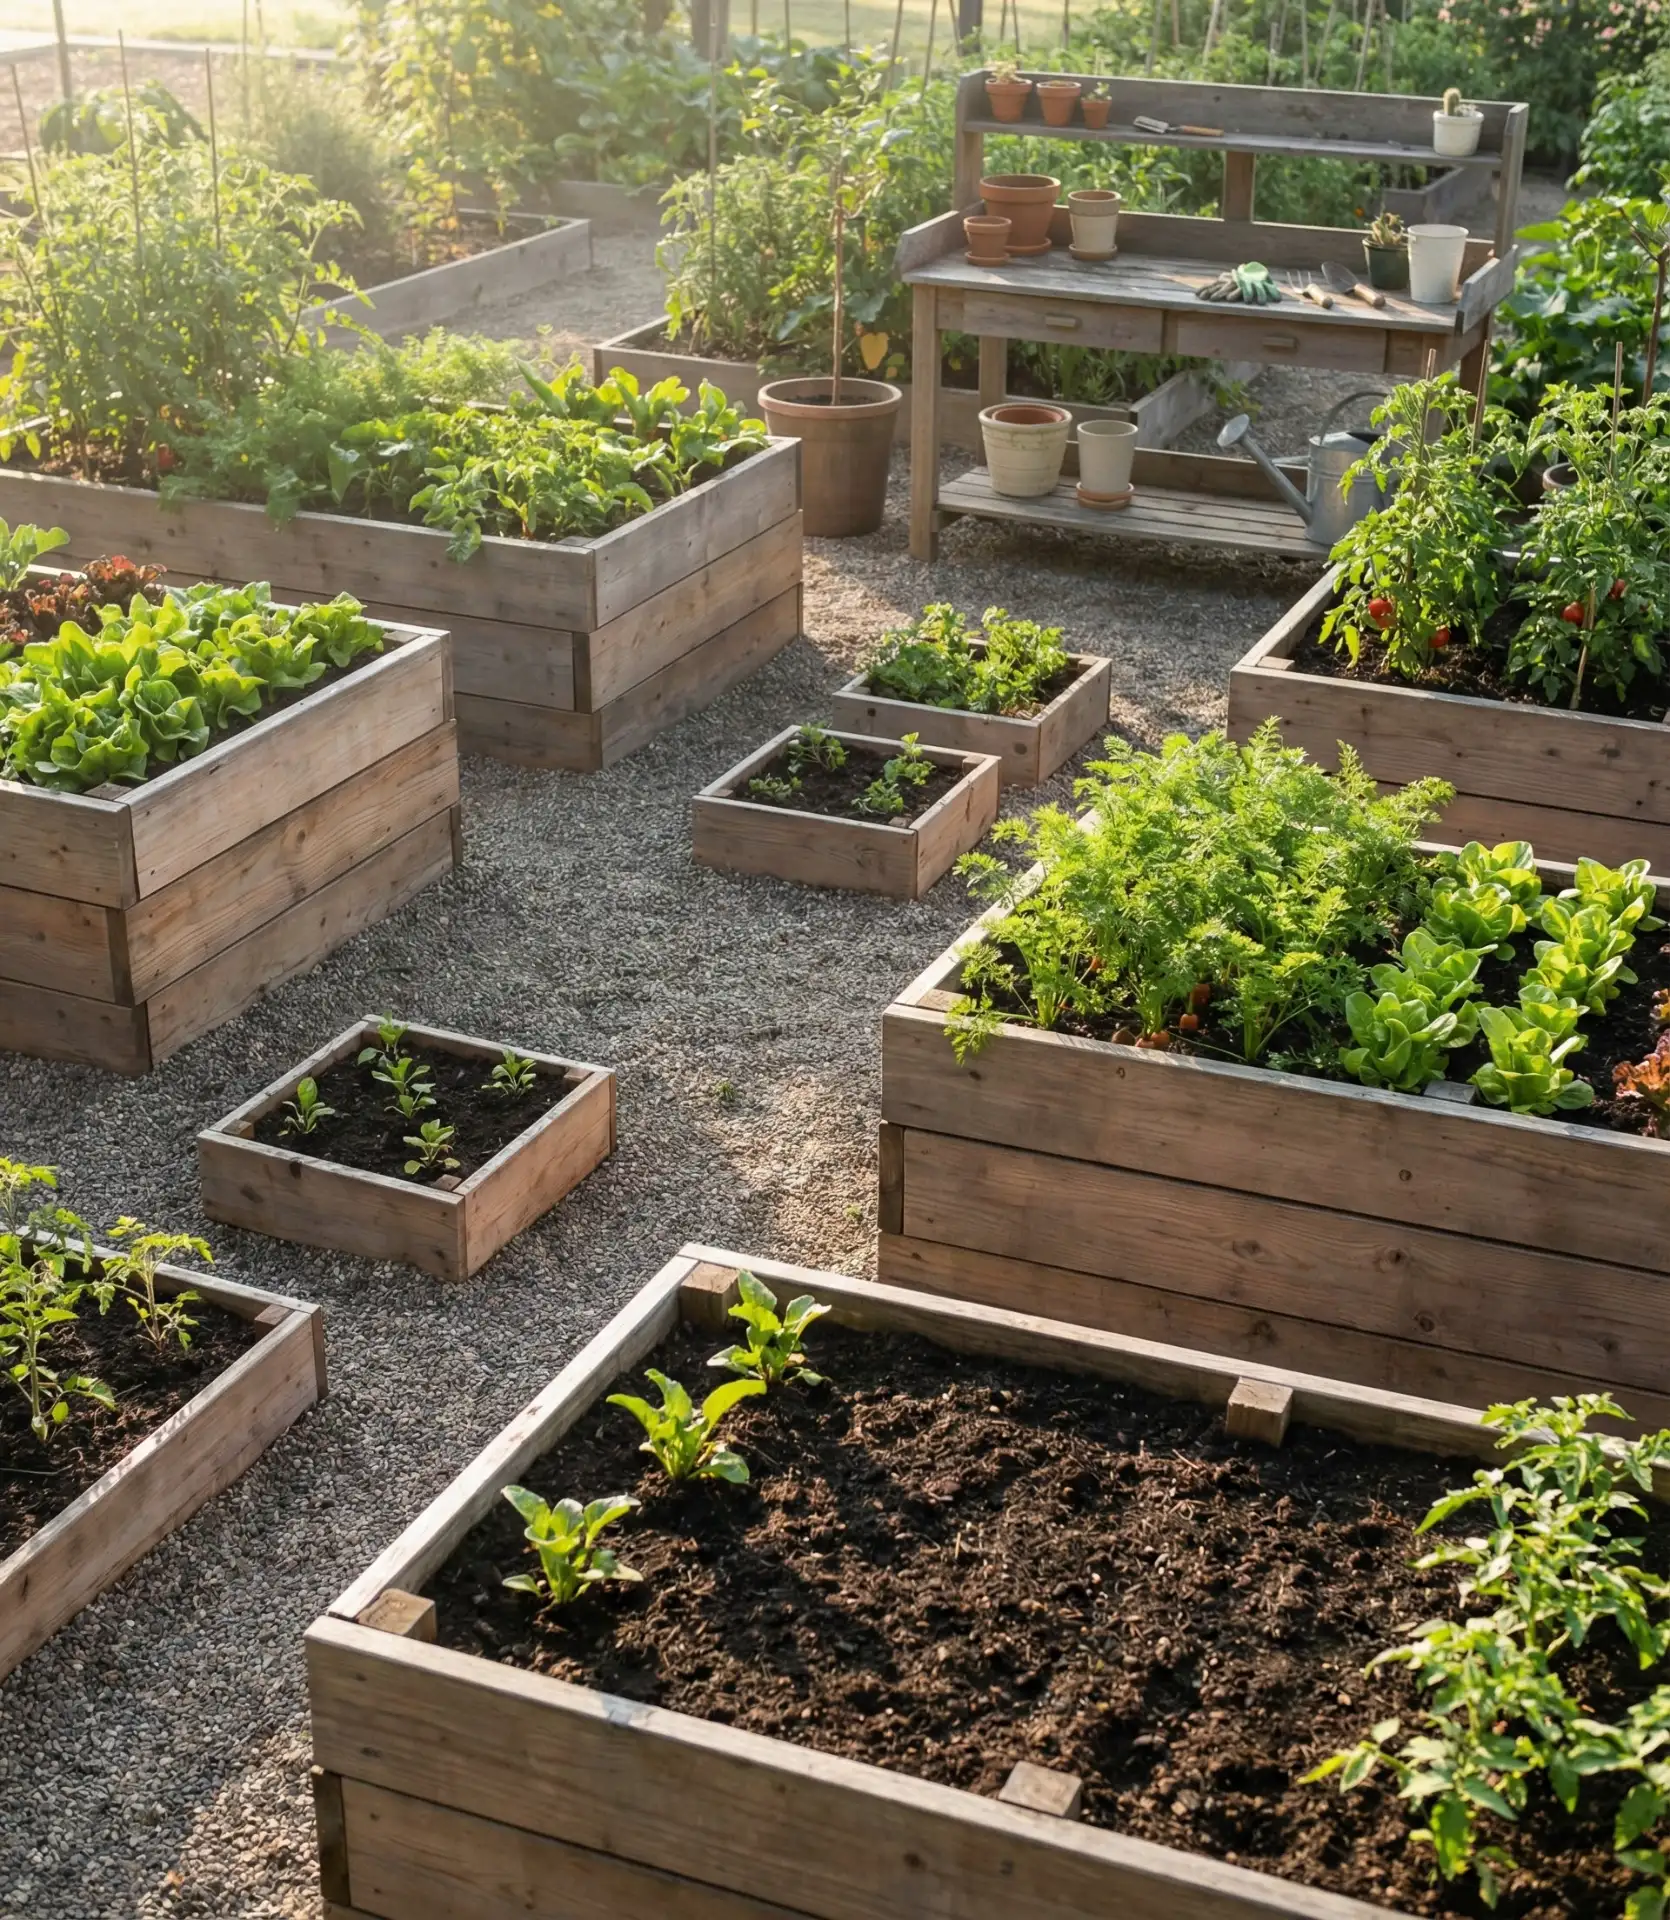
Raised beds solve drainage issues common in clay-heavy soils across the Midwest and South. They also warm up faster in spring, extending the growing season by 2-3 weeks—meaningful when you’re eager to start tomatoes and peppers. Smart families plant fast-growing, kid-friendly crops in the children’s beds: radishes (ready in 25 days), lettuce, snap peas, cherry tomatoes, and sunflowers. The quick results keep young gardeners engaged rather than losing interest during long waits for harvest.
8. Covered Outdoor Kitchen and Dining Pavilion
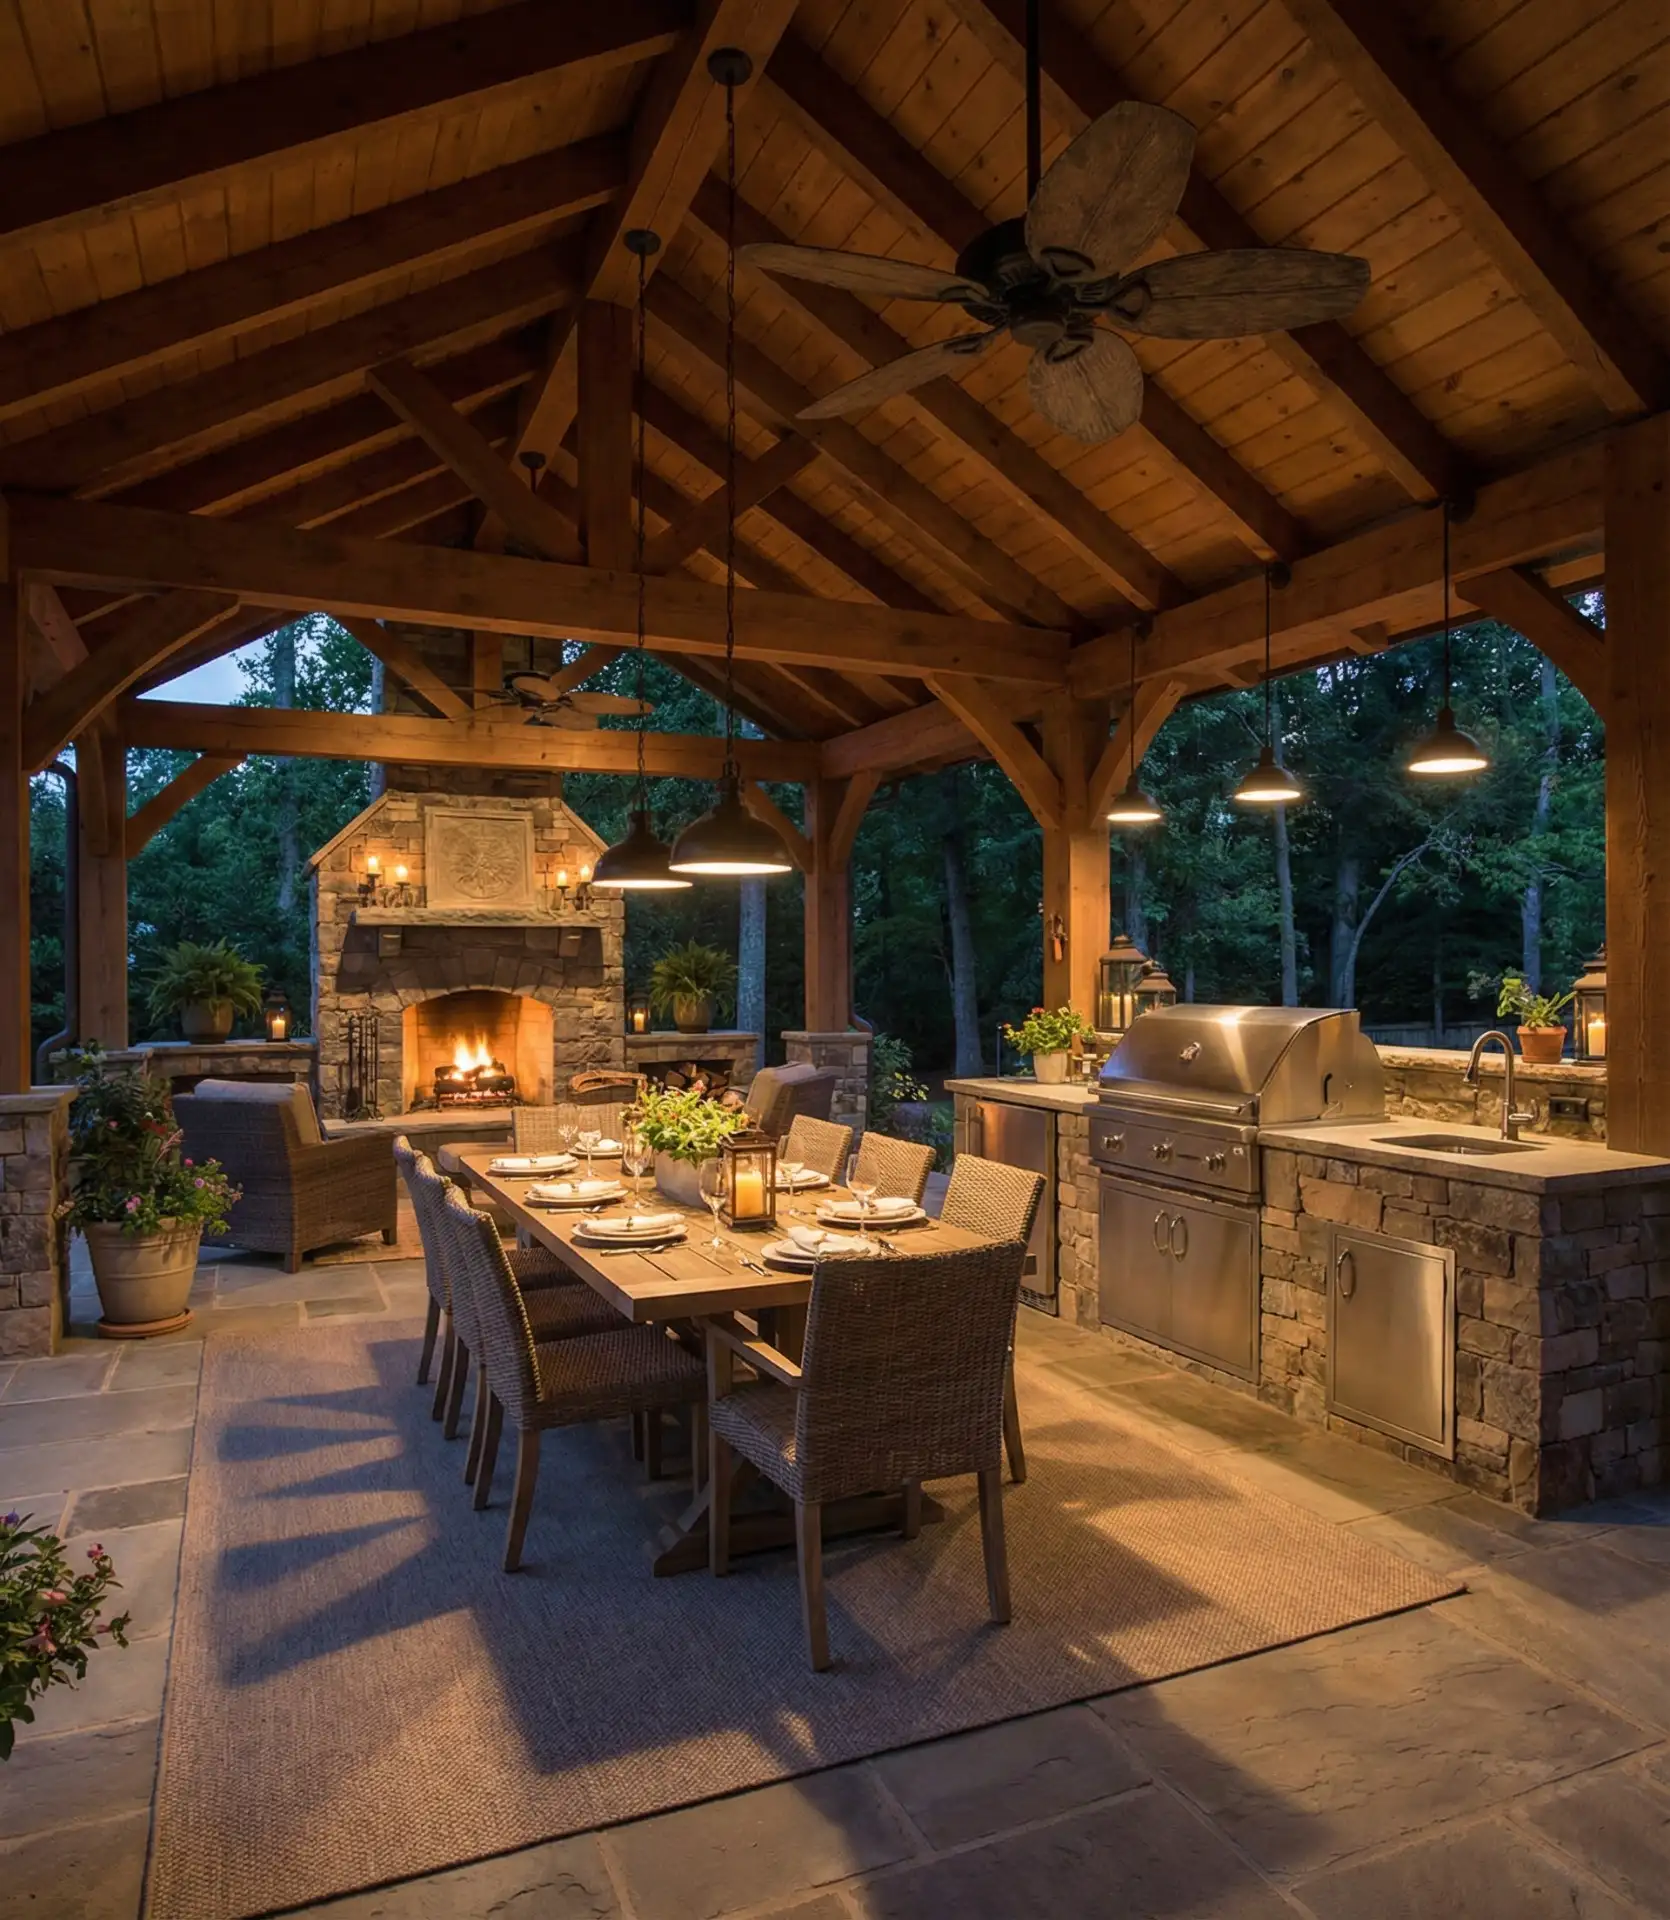
Install a permanent roof structure over your patio to create an all-weather cooking and dining zone. Include a built-in grill, sink, refrigerator, and ample counter space for meal prep. A luxury addition like a pergola essentially adds a room to your home, usable from spring through fall in most climates and year-round in the South. Position ceiling fans and outdoor-rated lights to make evening gatherings comfortable and extend functionality after sunset. 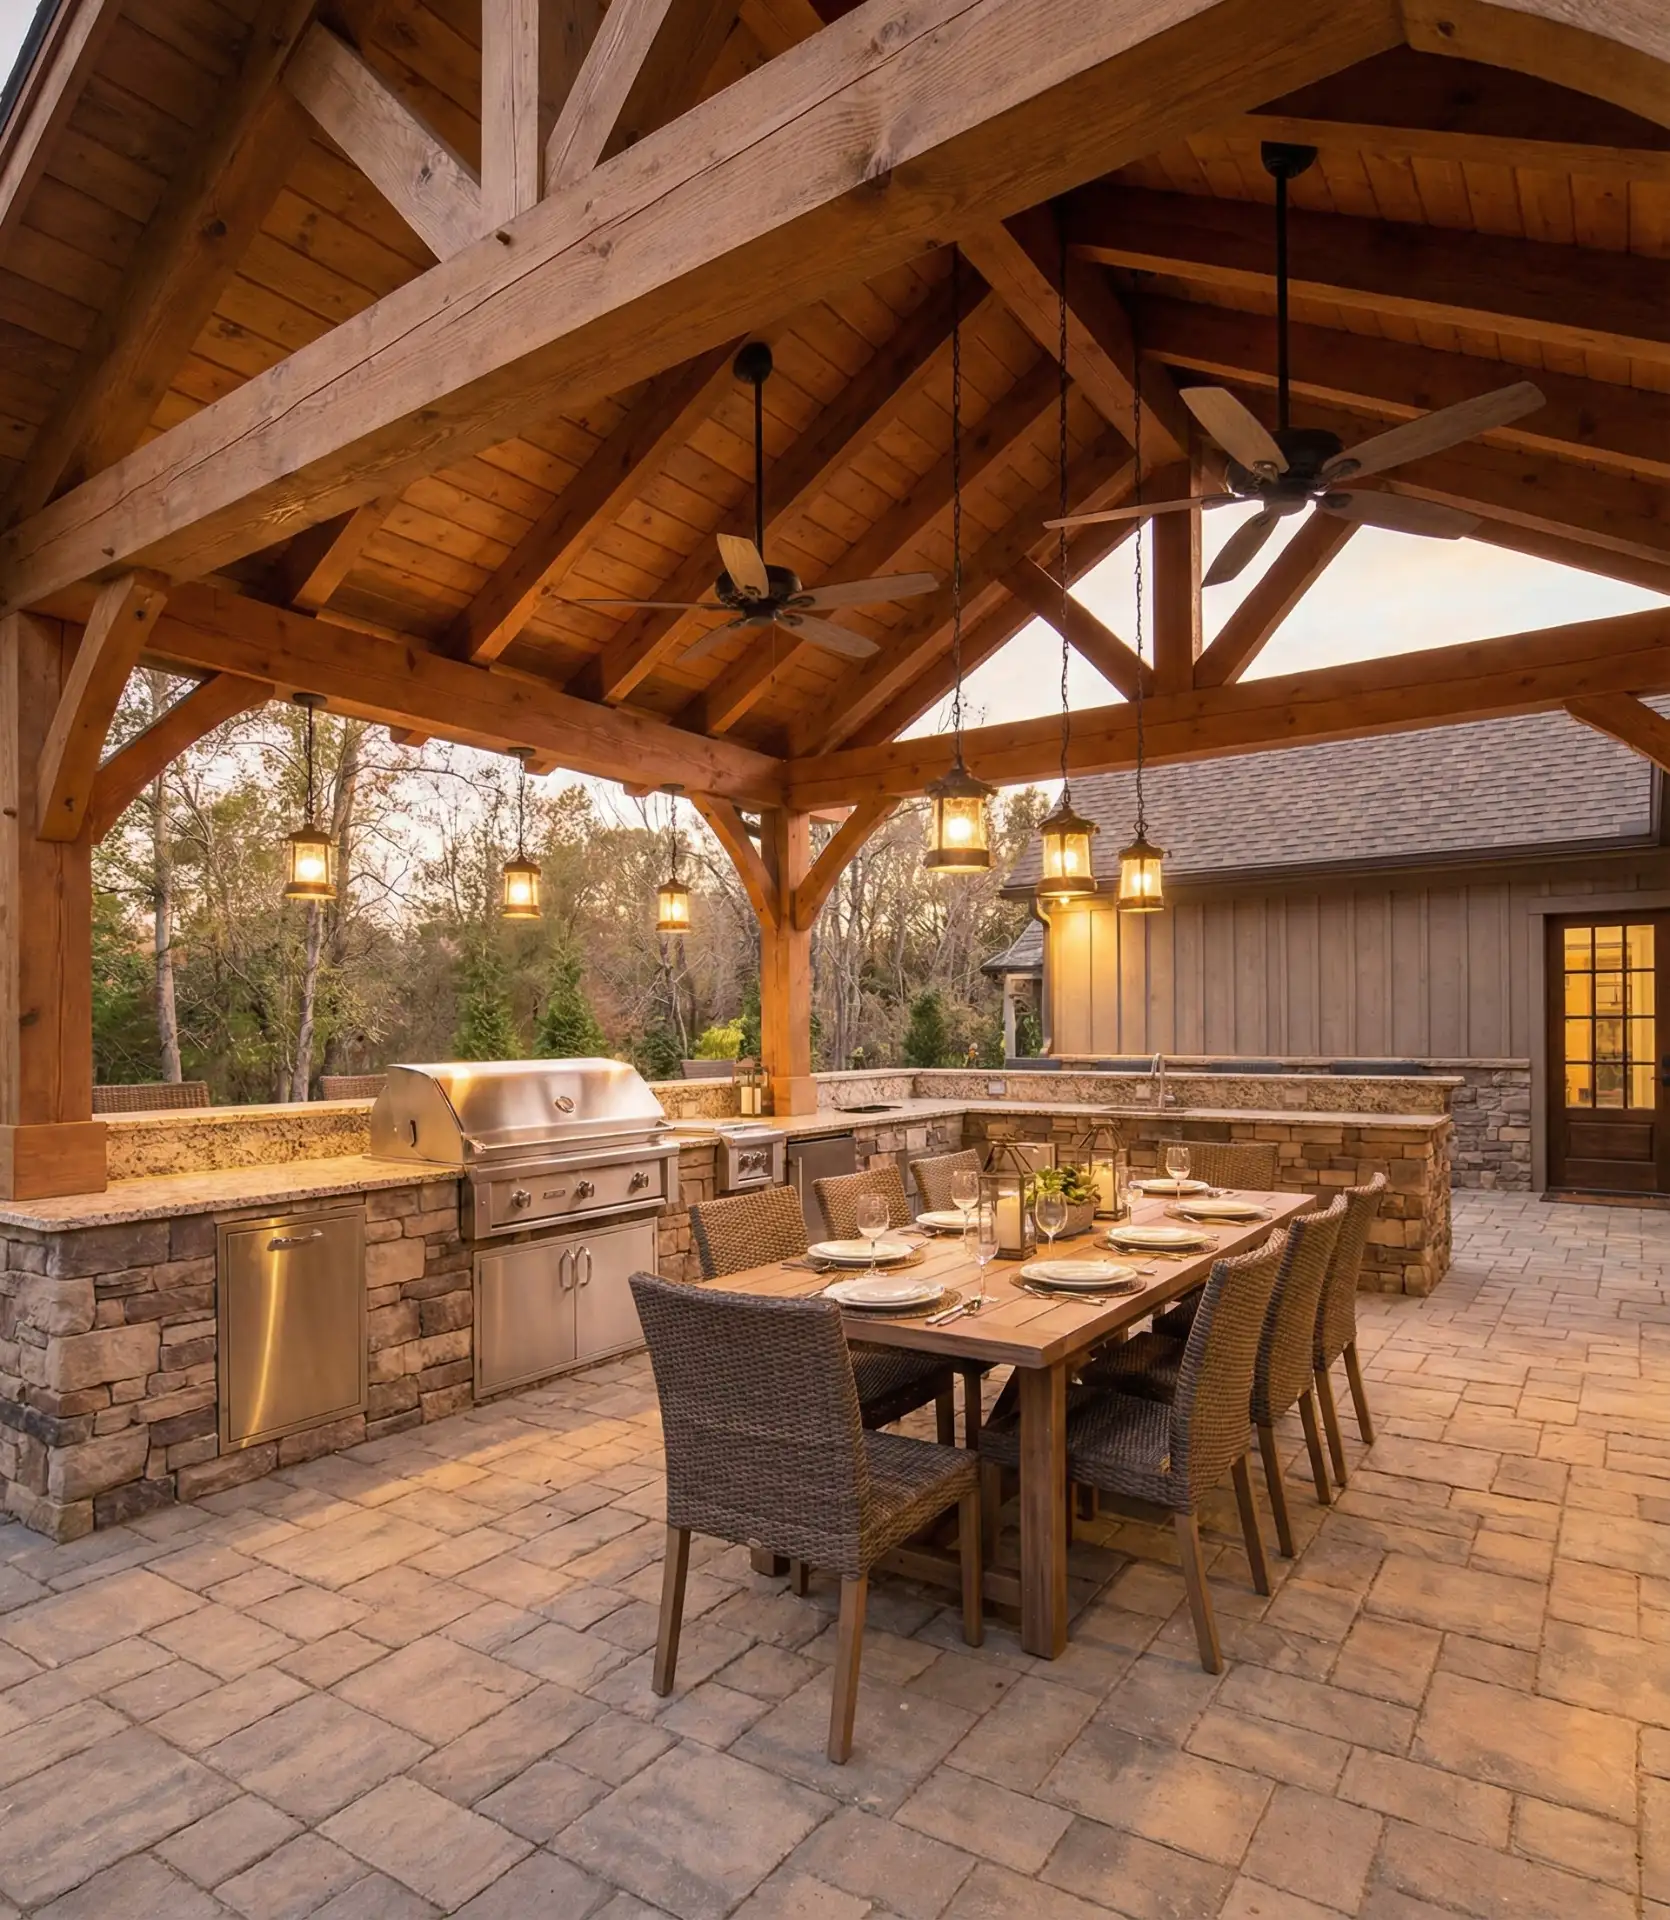
Real homeowner behavior reveals that they occasionally use uncovered grills, but from April through October, covered outdoor kitchens become the primary cooking zone. Families report eating outside four to five nights per week once they install a pavilion, fundamentally changing their daily routine. The roof protects furniture from weather, eliminating the constant cycle of covering and uncovering that discourages patio use. In rainy climates like the Pacific Northwest, a solid roof rather than a pergola makes the difference between occasional and constant outdoor living.
9. Above-Ground Pool with Wraparound Deck
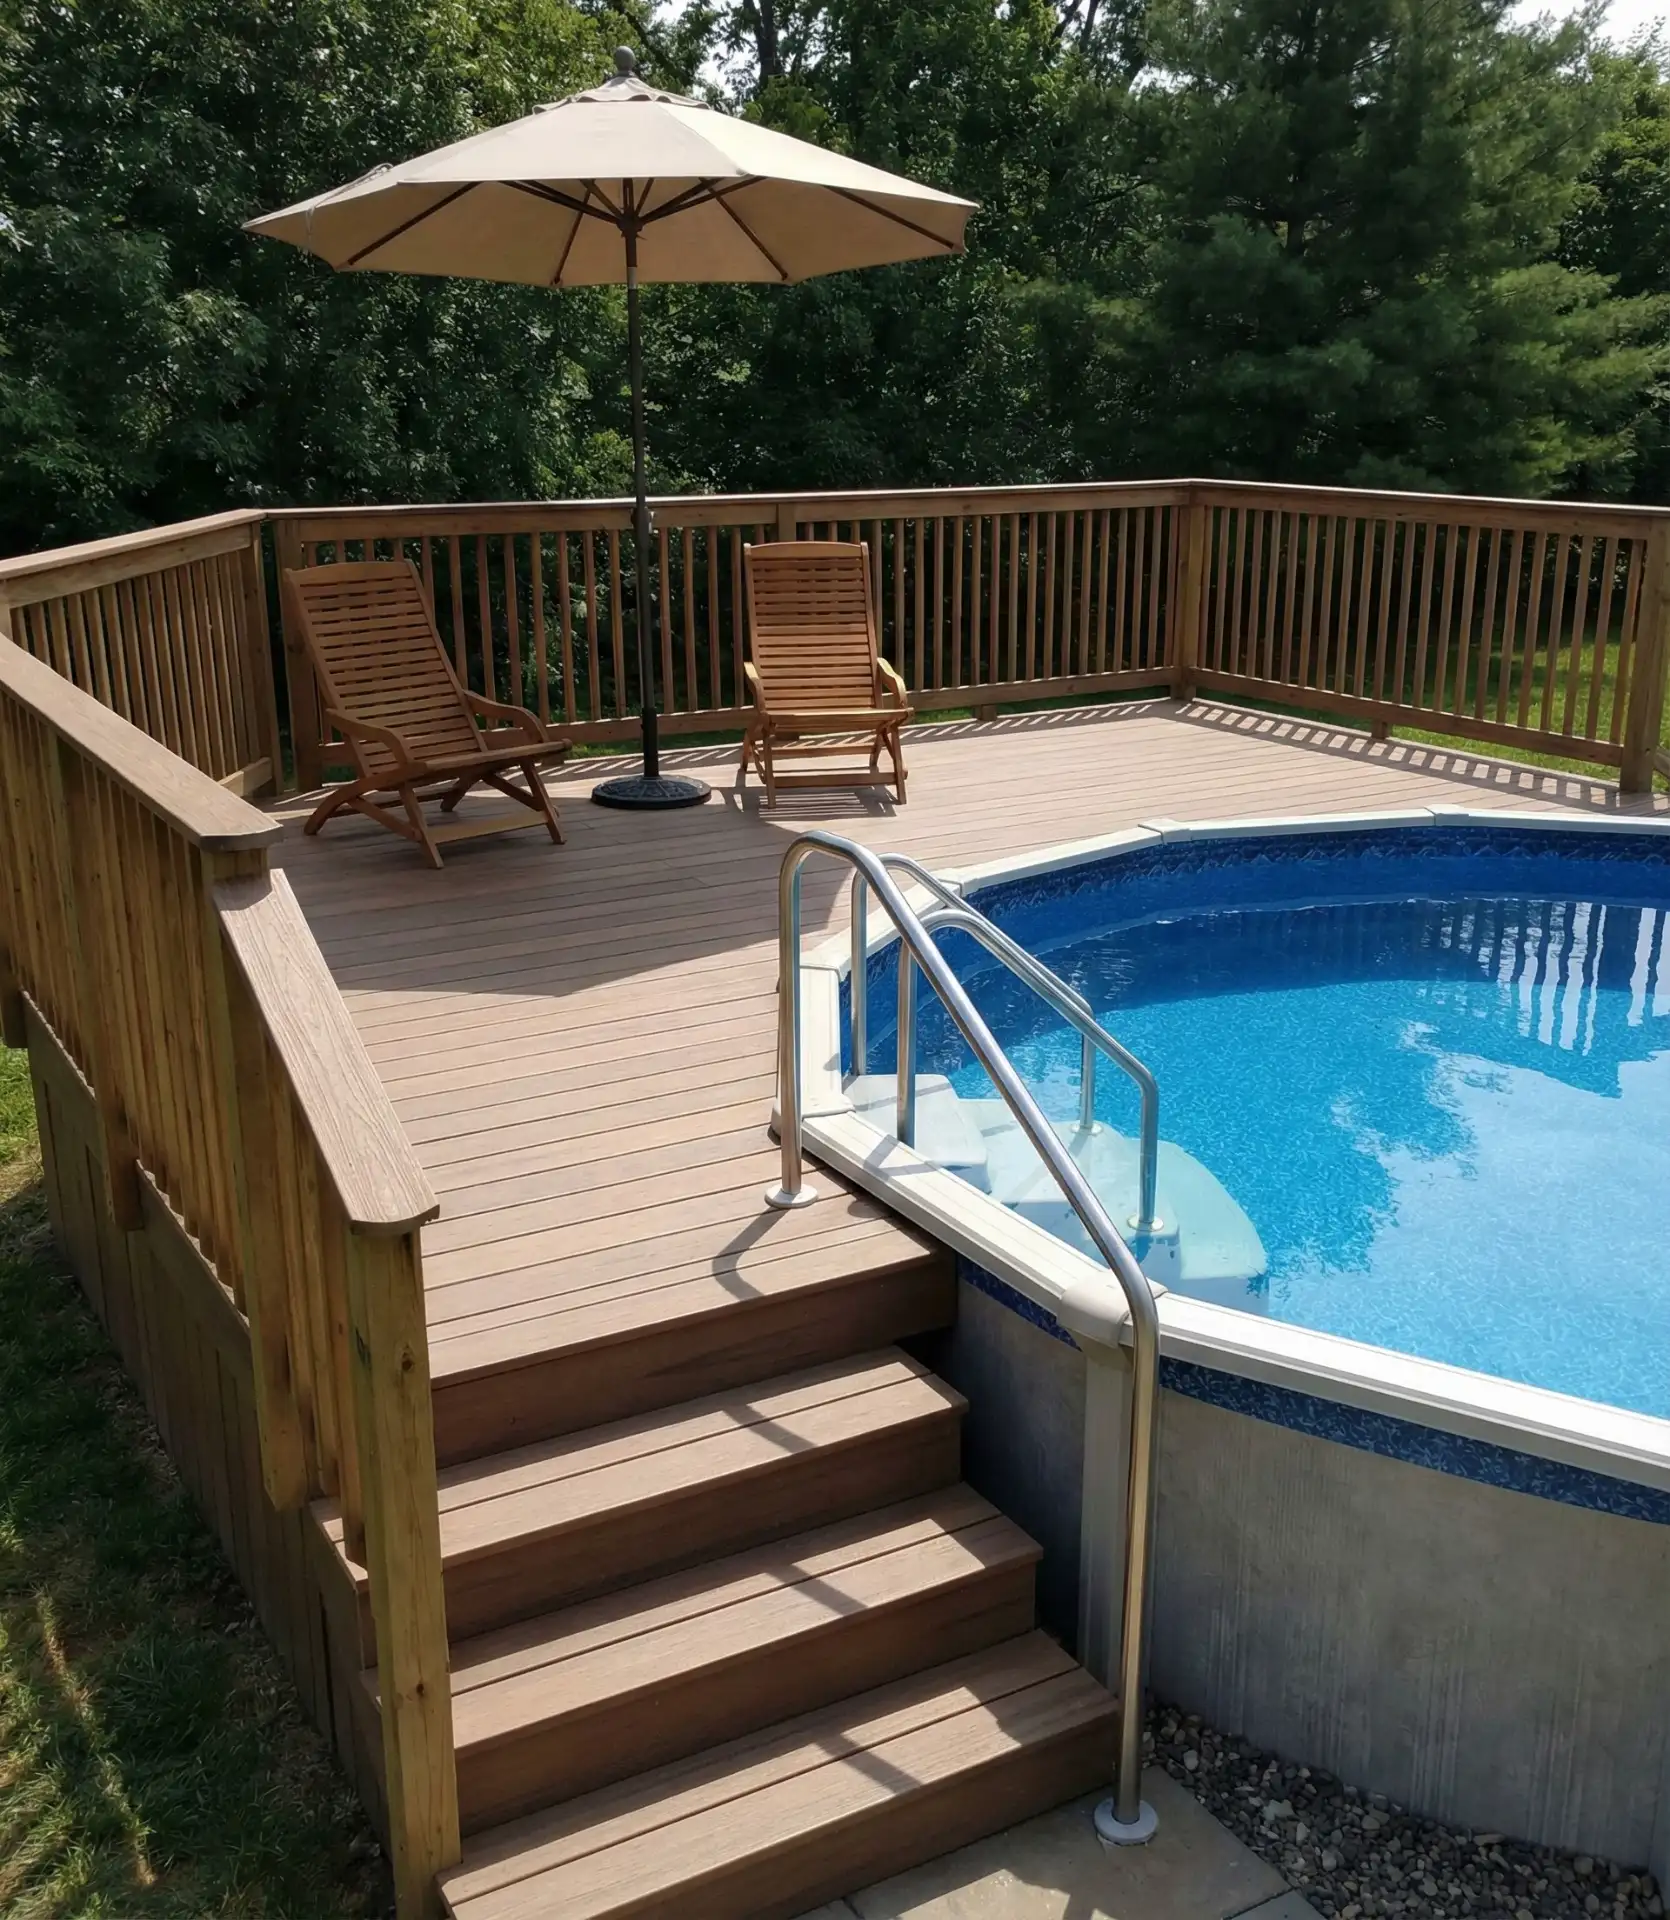
CUSTOM BUILT Above-ground pools with surround-decking offer a more affordable option in comparison to the price of in-ground pools. The surround-decking hides the walls of the pool and provides space for lounging, making it a more polished design in comparison to standard ladder access. This option provides summer fun for a significantly lower cost of about 8,000 to 15,000 in comparison to 35,000+ for basic in-ground pools. Opt for pools that are at least 24+ feet in diameter to allow for swimming rather than just wading. 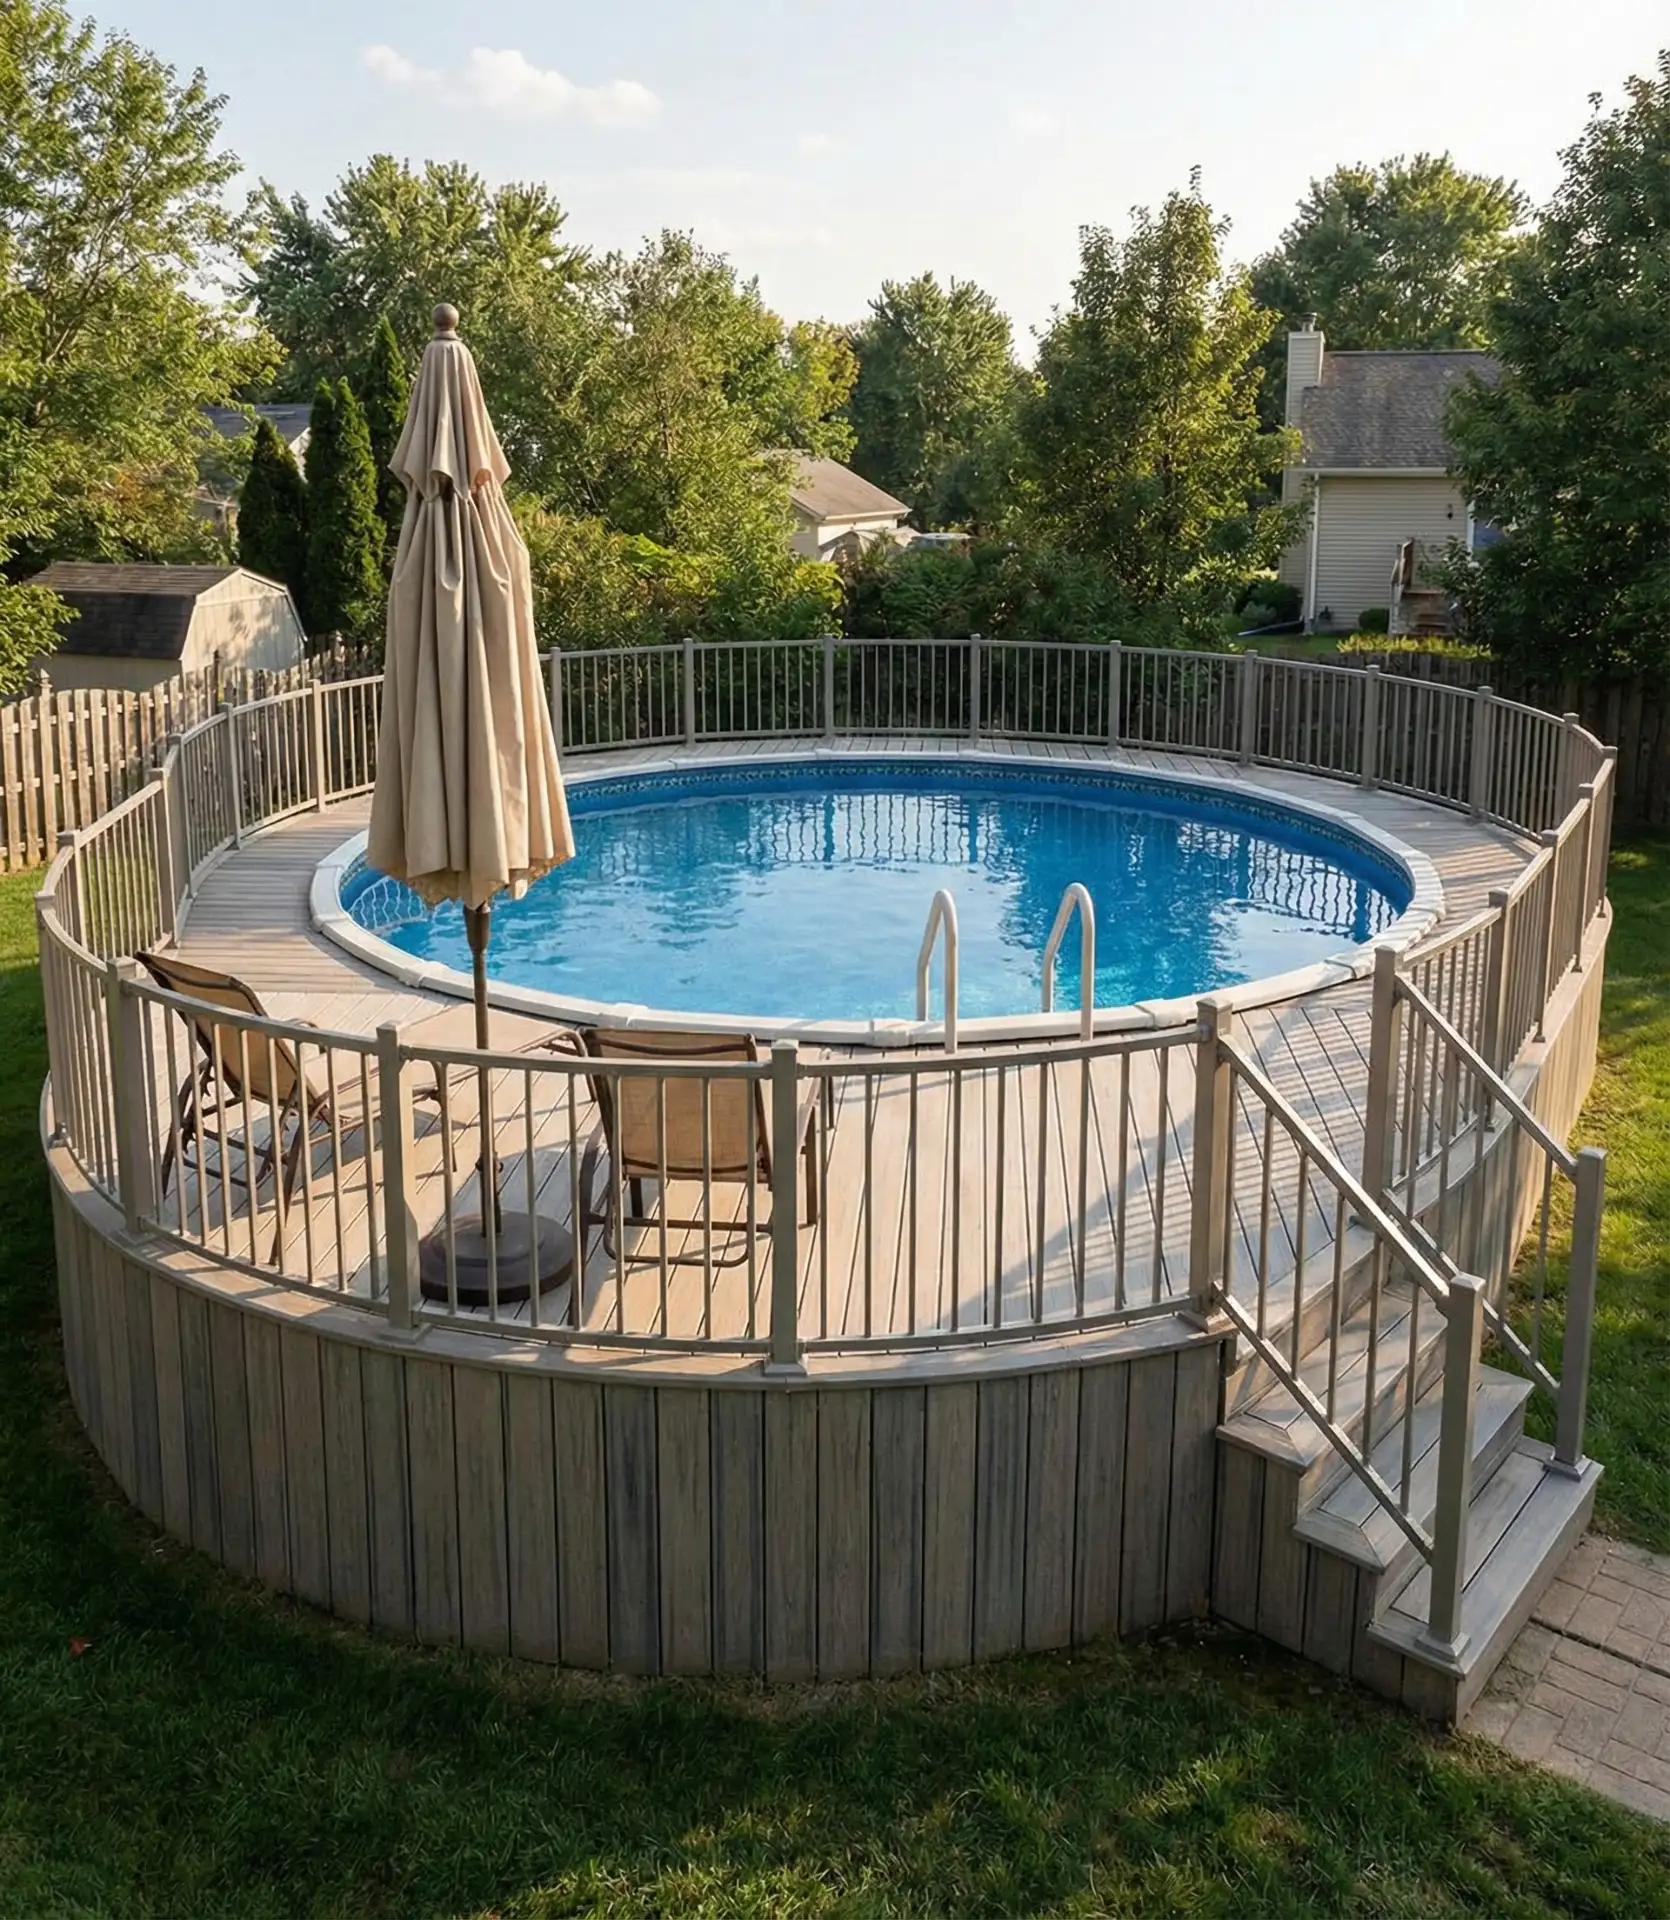
Expert advice: for best results, above-ground pools are optimal in flat backyards where the in-ground option would come at a high cost due to excavation. Families with younger children are likely to underuse the pool during its 10-15 year lifespan. The pool will be simple to remove when its useful life is over, giving you back yard space.
To put in a deck and widen the use of your pool by making it a fun family hangout spot, you’ll need to pick a better quality pool to go with it. Avoid the cheapest pool models; mid-range options with resin frames last significantly longer.
10. Separate Play Lawn and Entertaining Patio
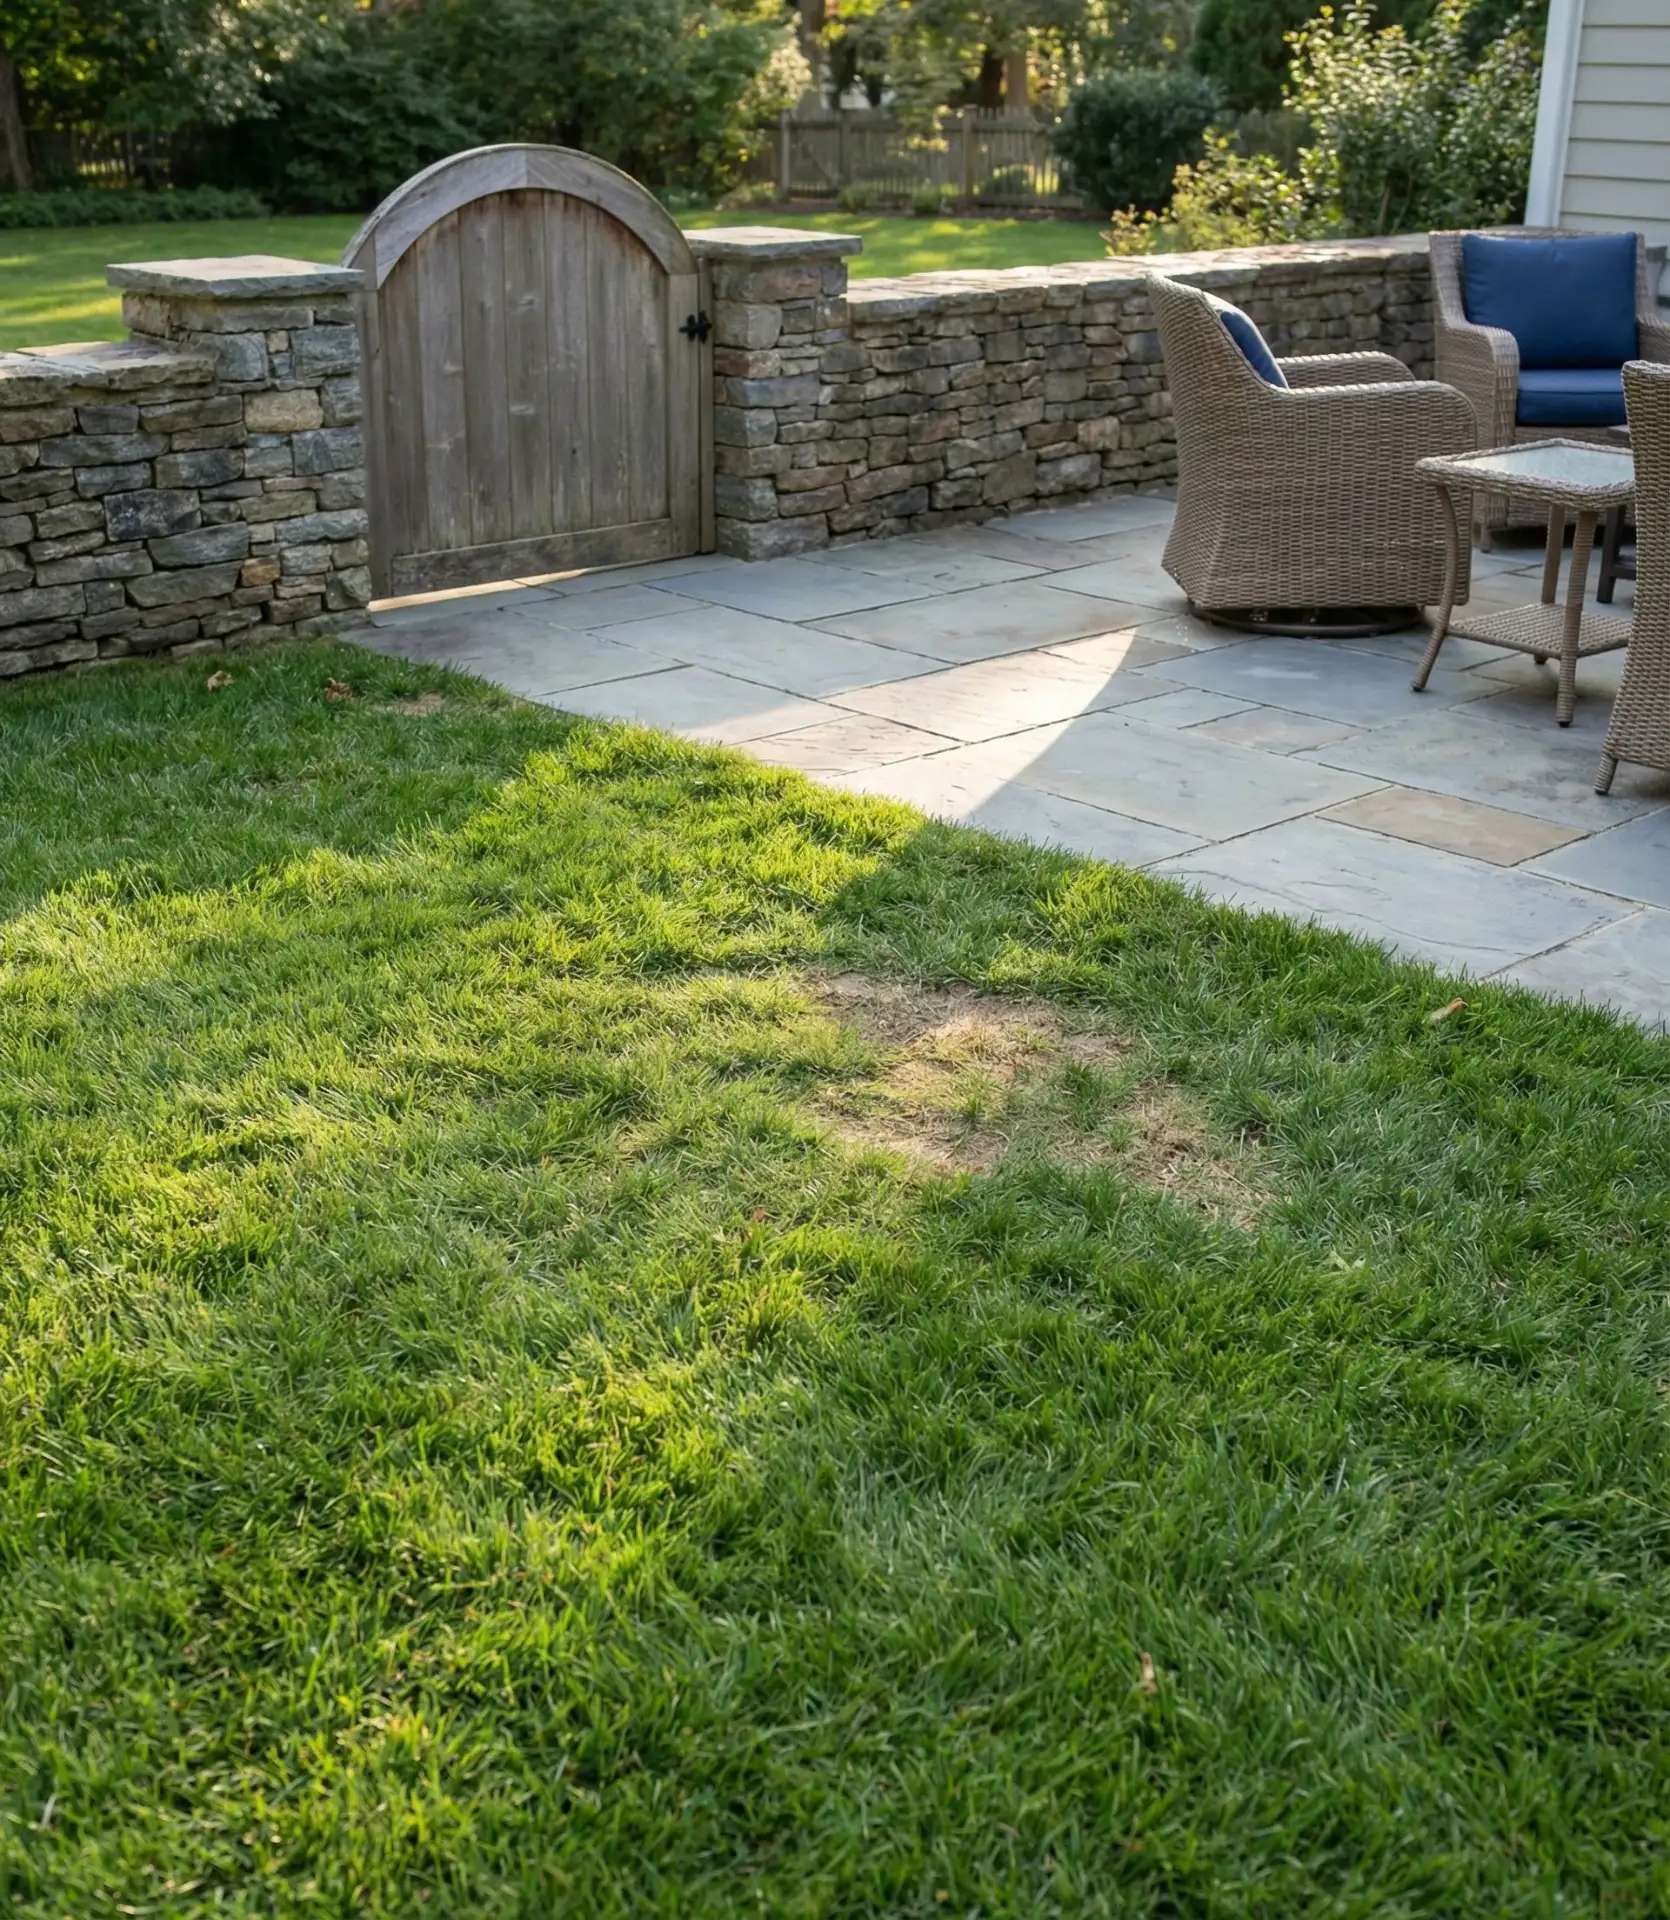
Design two distinct areas. There should be a robust turfgrass section for active play (think soccer and tag). The other should be a separate paved patio with furniture for adults. Connect both with a walkway, and use landscaping to create visual separation. You can use a low stone wall with a gate or a row of columnar evergreens. This setup keeps toys from dominating your entertaining area while also providing a space where kids can expend energy without adults fretting about furniture or plantings. 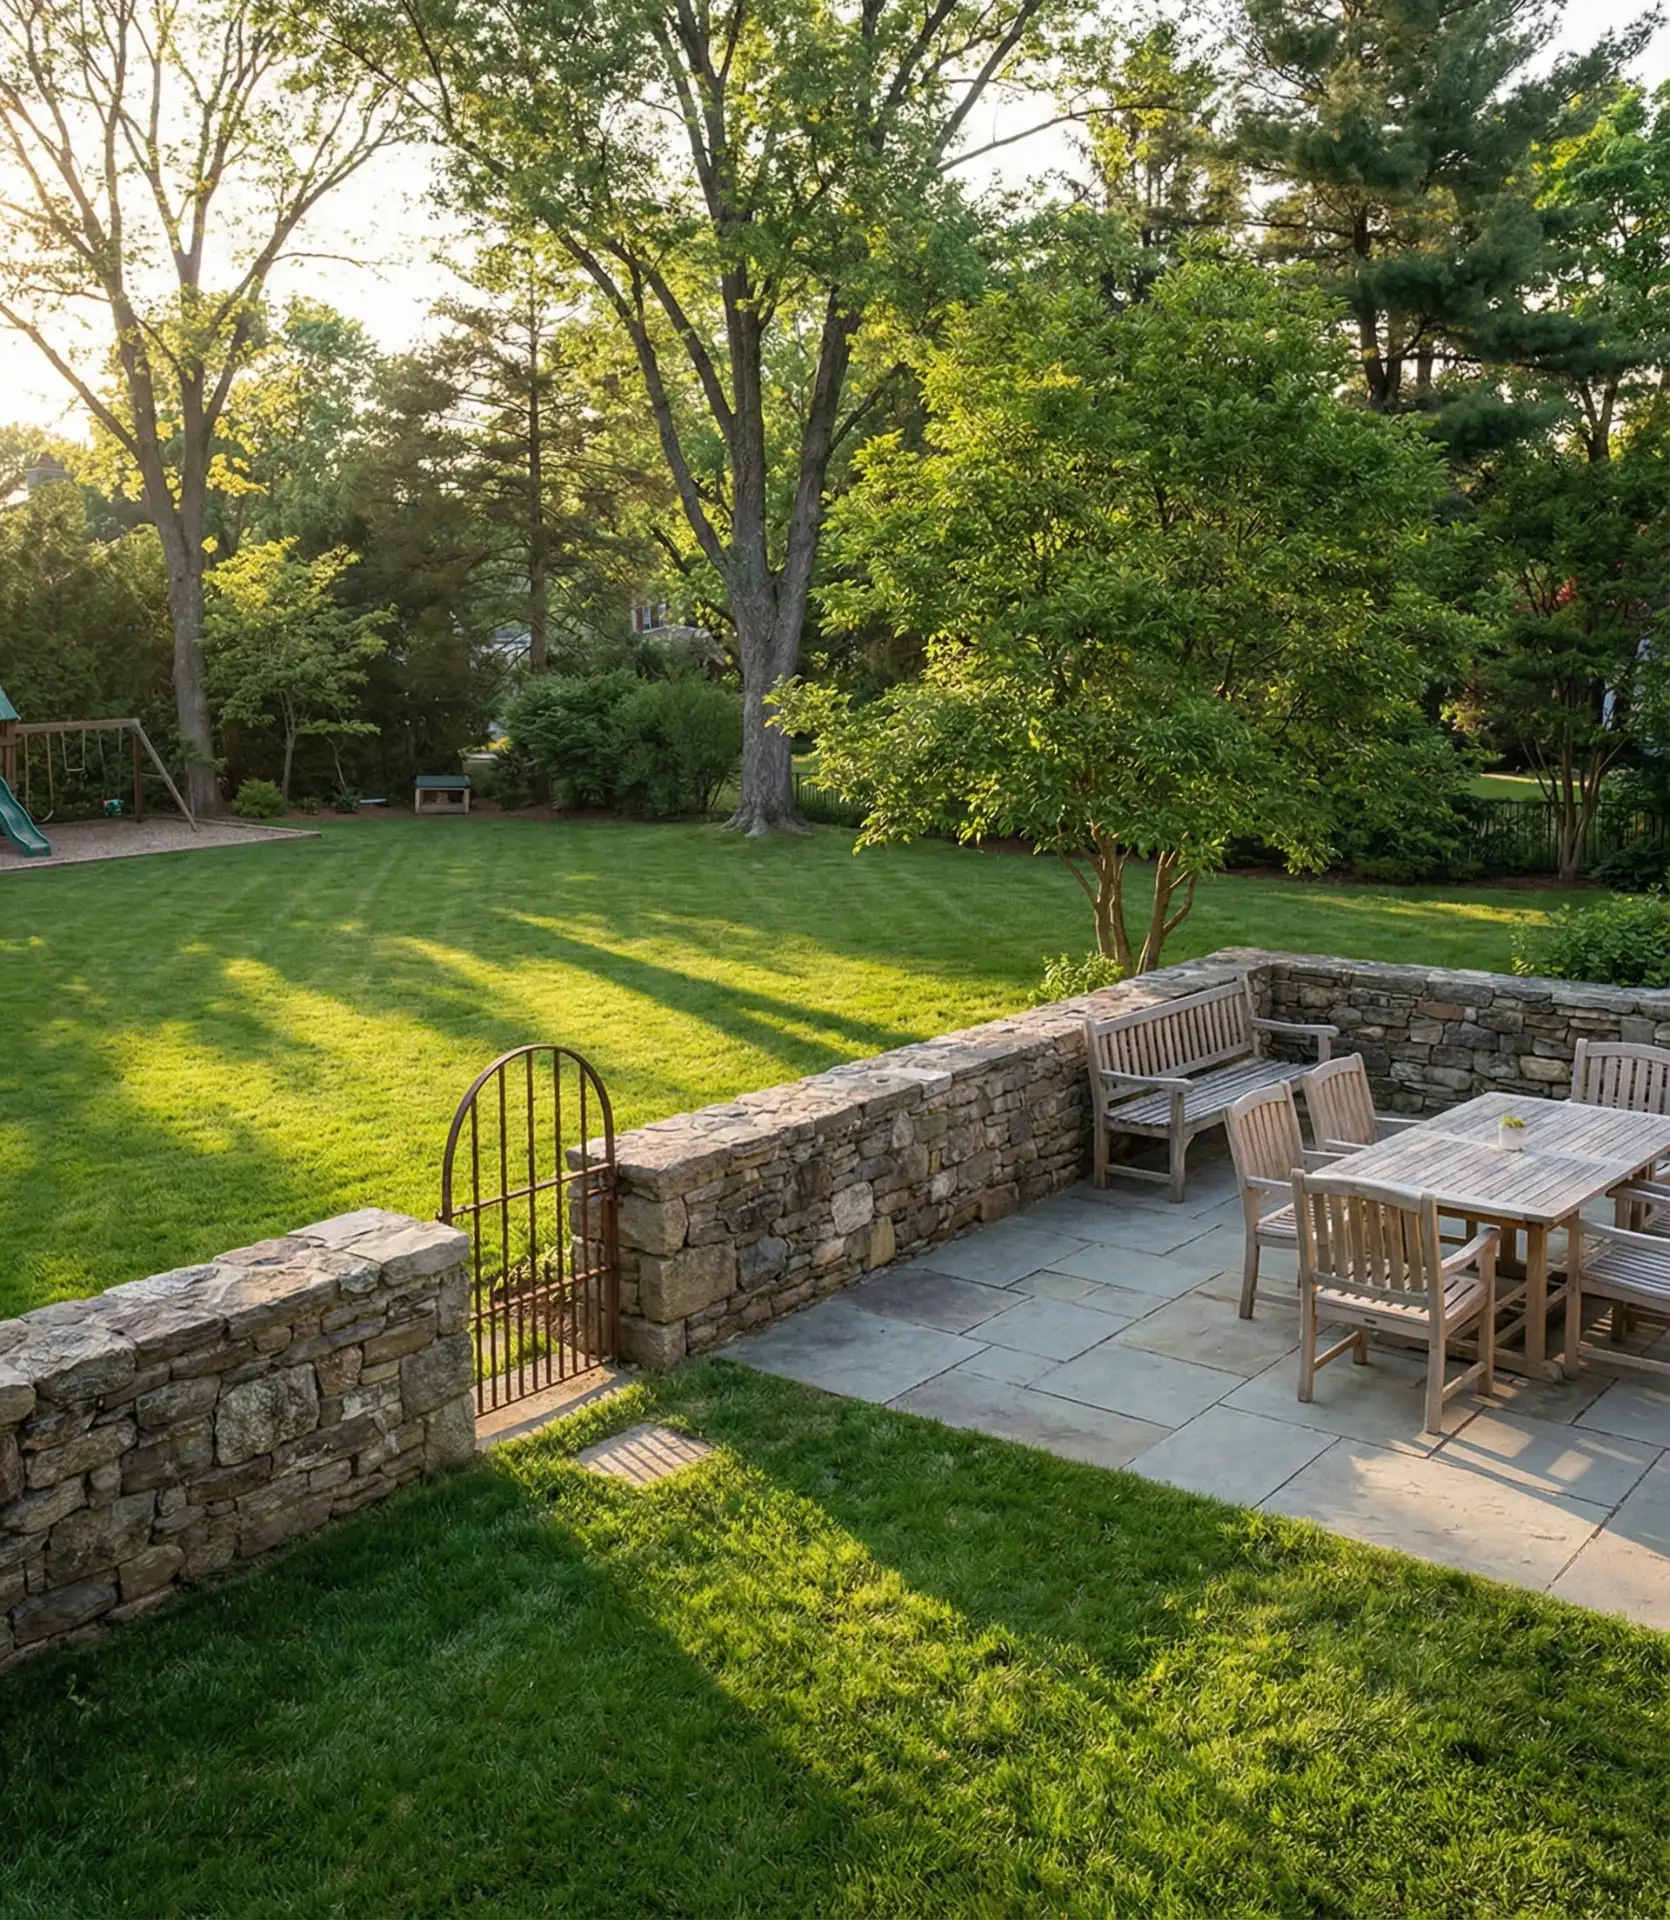
In California and Arizona, families often reverse this setup—the play zone gets artificial turf to conserve water and stay green year-round, while the entertaining area uses permeable pavers or decomposed granite. The artificial turf costs more upfront ($8-12 per square foot installed) but eliminates mowing, fertilizing, and irrigation. For families tired of brown summer lawns in drought-prone regions, this switch delivers consistent green play space for children while significantly reducing water bills and weekend maintenance.
11. Country-Style Split Rail Fence Perimeter
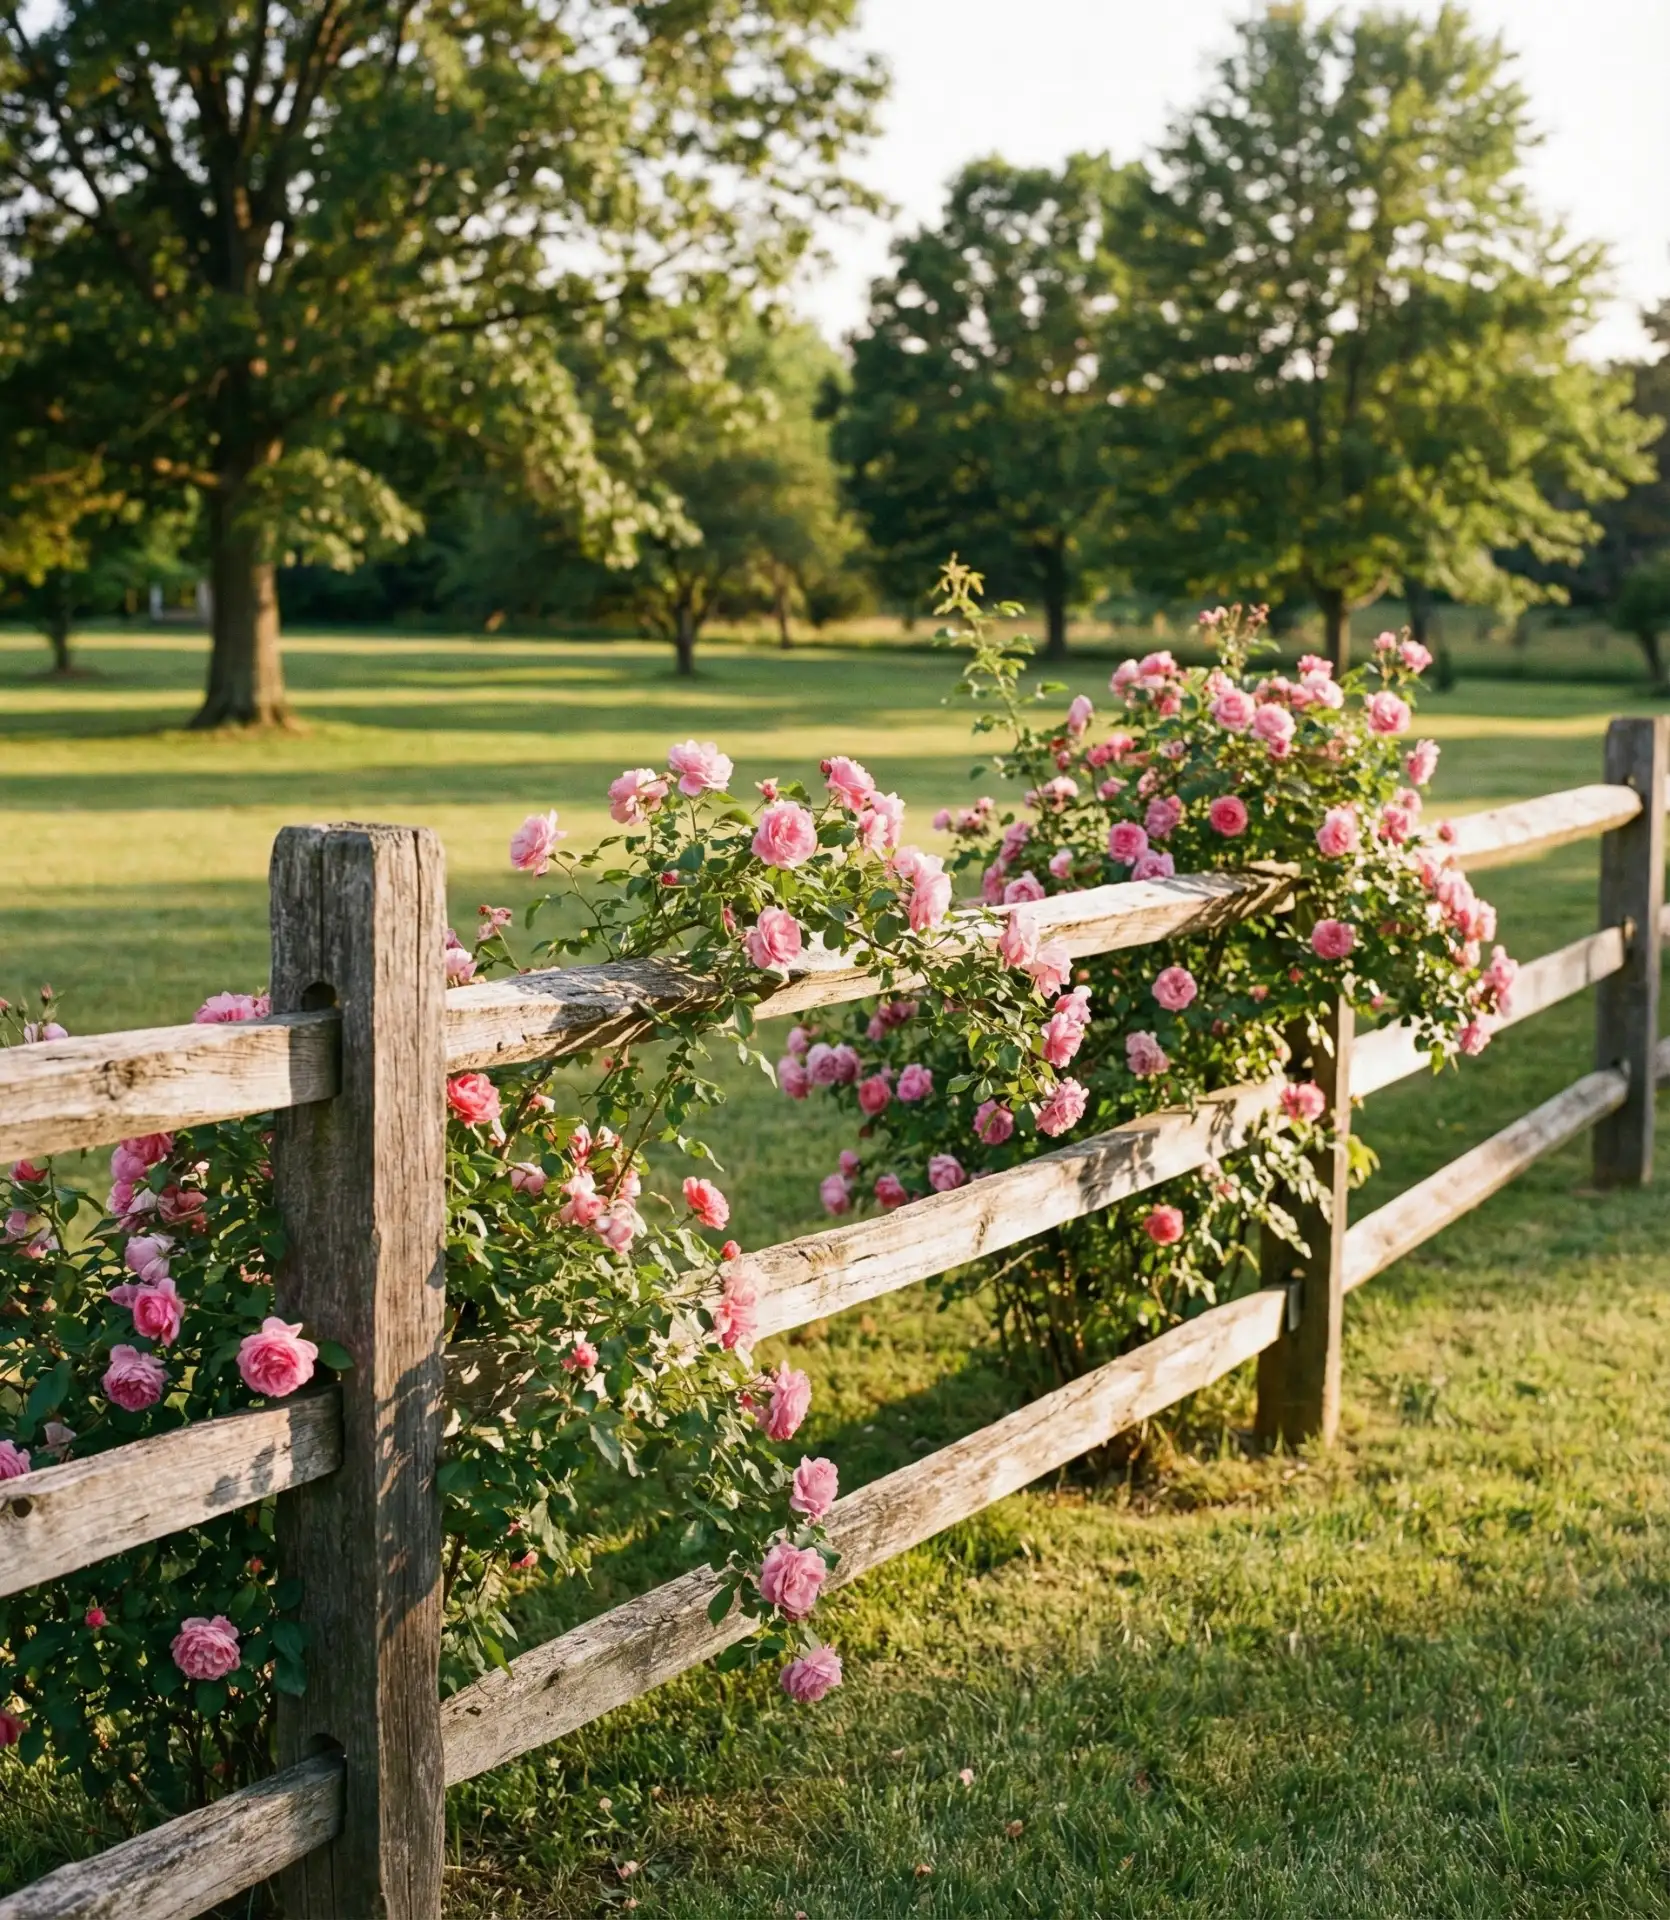
A country split-rail fence maintains both property boundaries and the open fence aesthetic. The horizontal rails, unlike the privacy types, keep views open and foster a more relaxed, rural feel, which is appropriate for suburban areas with large lots. Climbing roses or clematis can be planted along the fence for seasonal shade and color. Gaps can be left for gates that provide access to side yards or neighboring properties. This enduring design captures the essence of the cottage and farmhouse architectural designs. 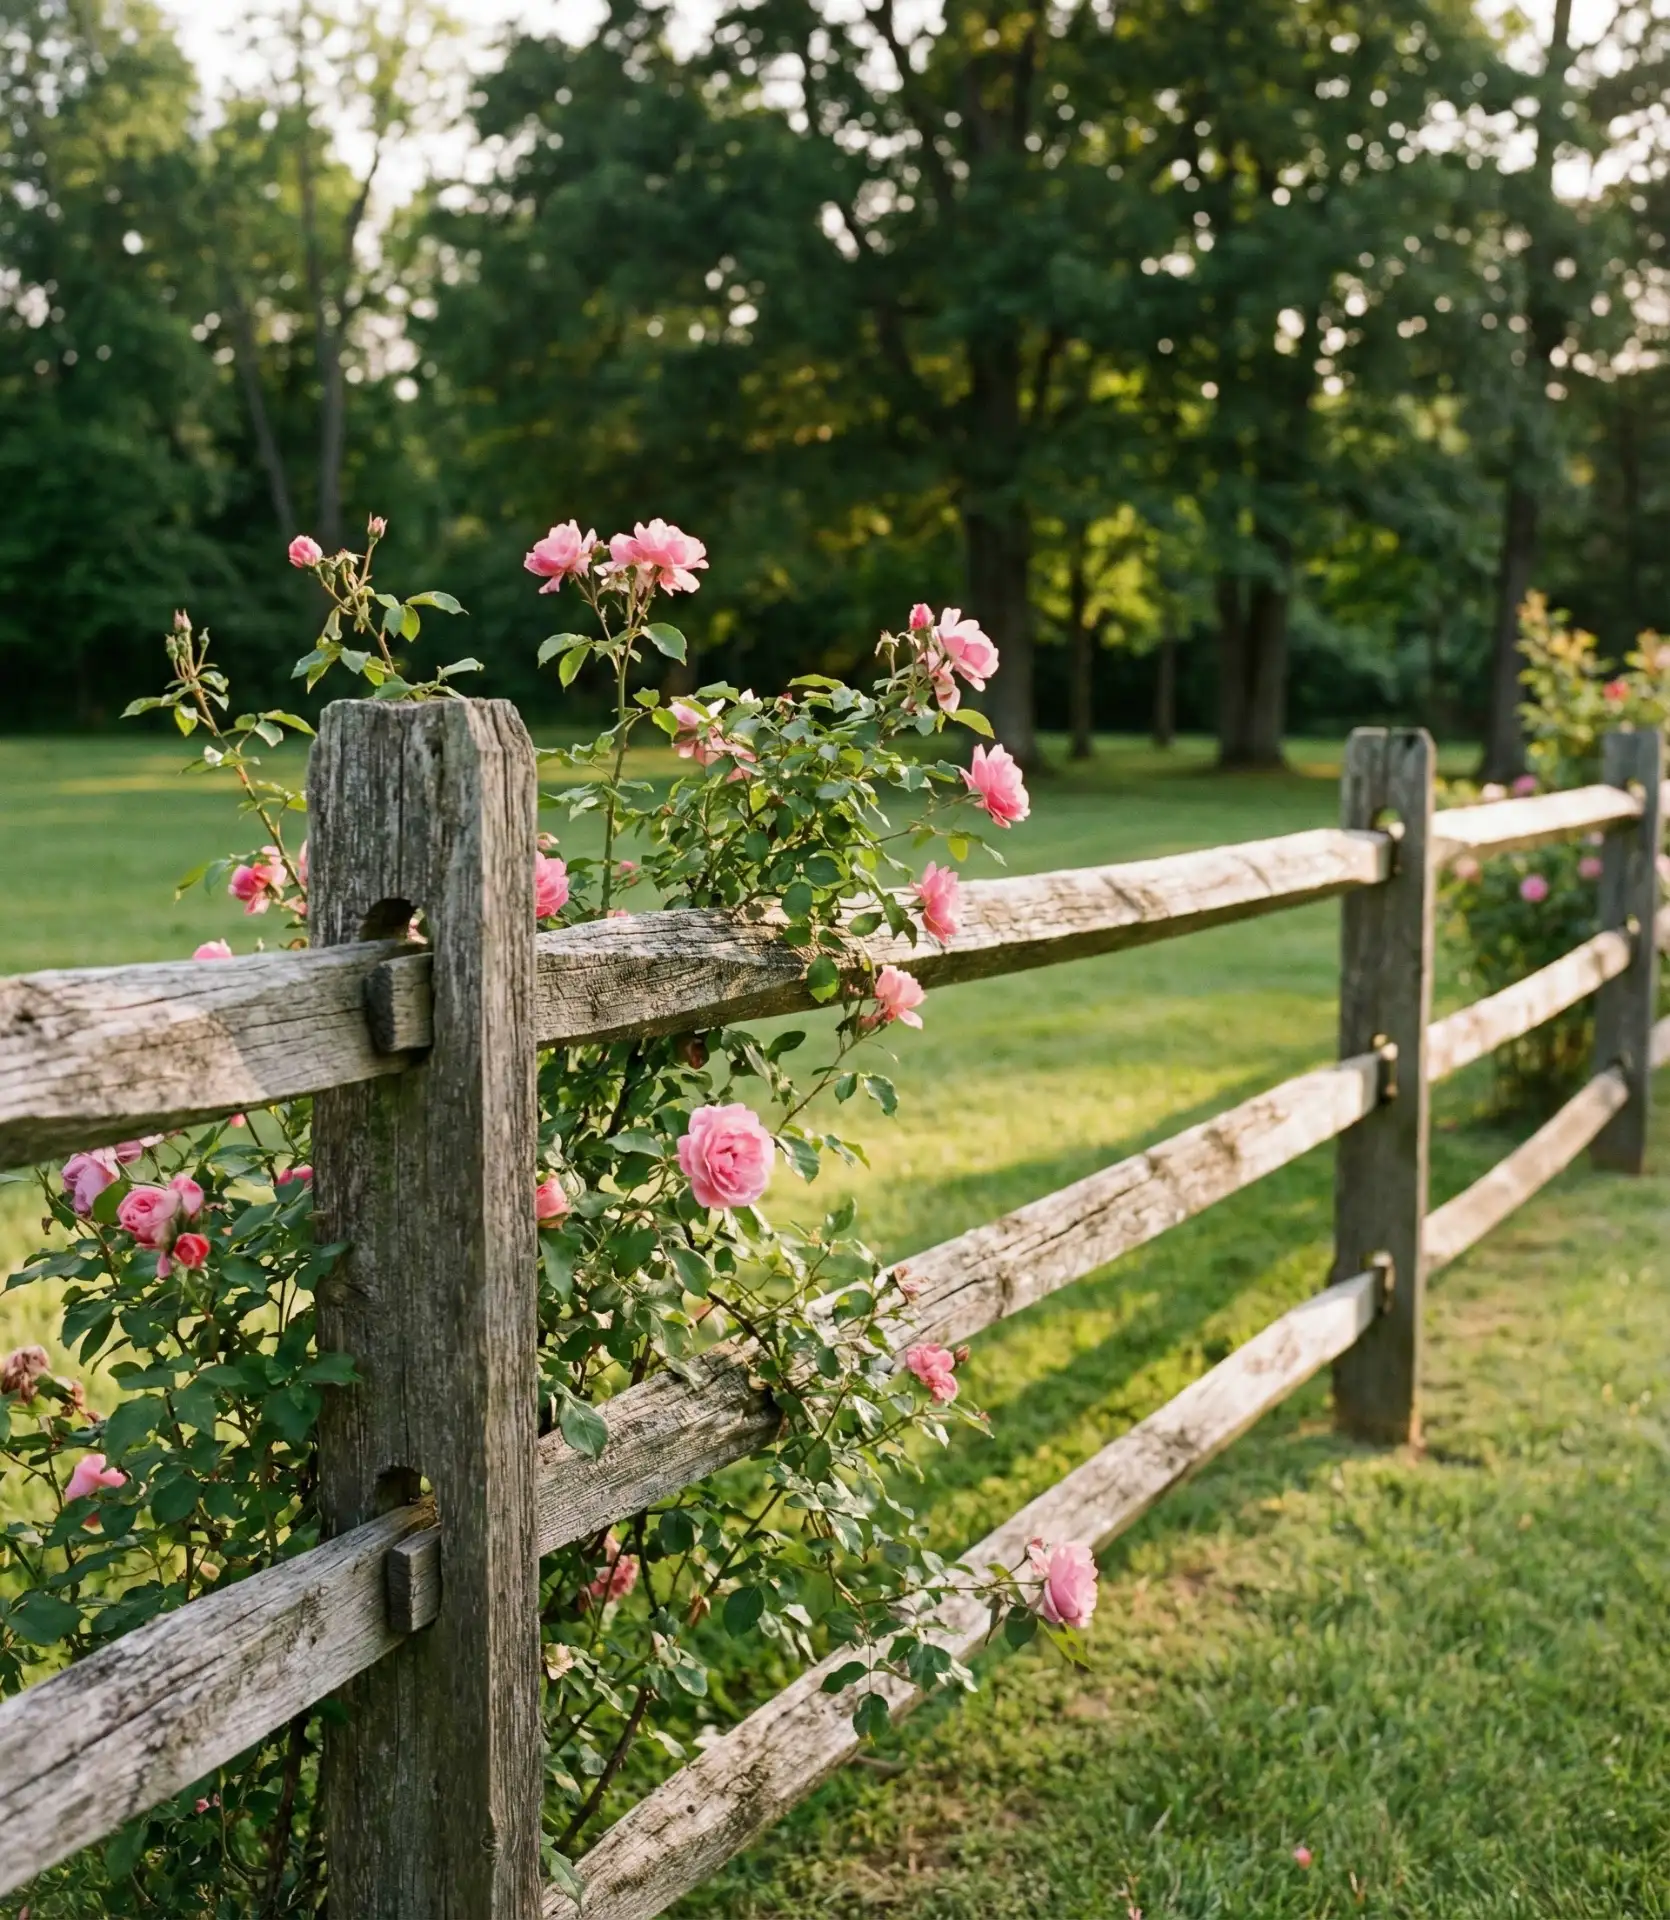
Where this style works best: properties larger than half an acre where privacy fencing would look harsh and disconnected from the landscape. Split rail fencing costs roughly $10-15 per linear foot installed—about half the price of privacy fence. It won’t contain small children or pets, so families with toddlers should wait or add wire mesh to the back side. However, for marking boundaries and adding rustic charm without creating visual barriers, few options match this classic approach.
12. In-Ground Trampoline Installation
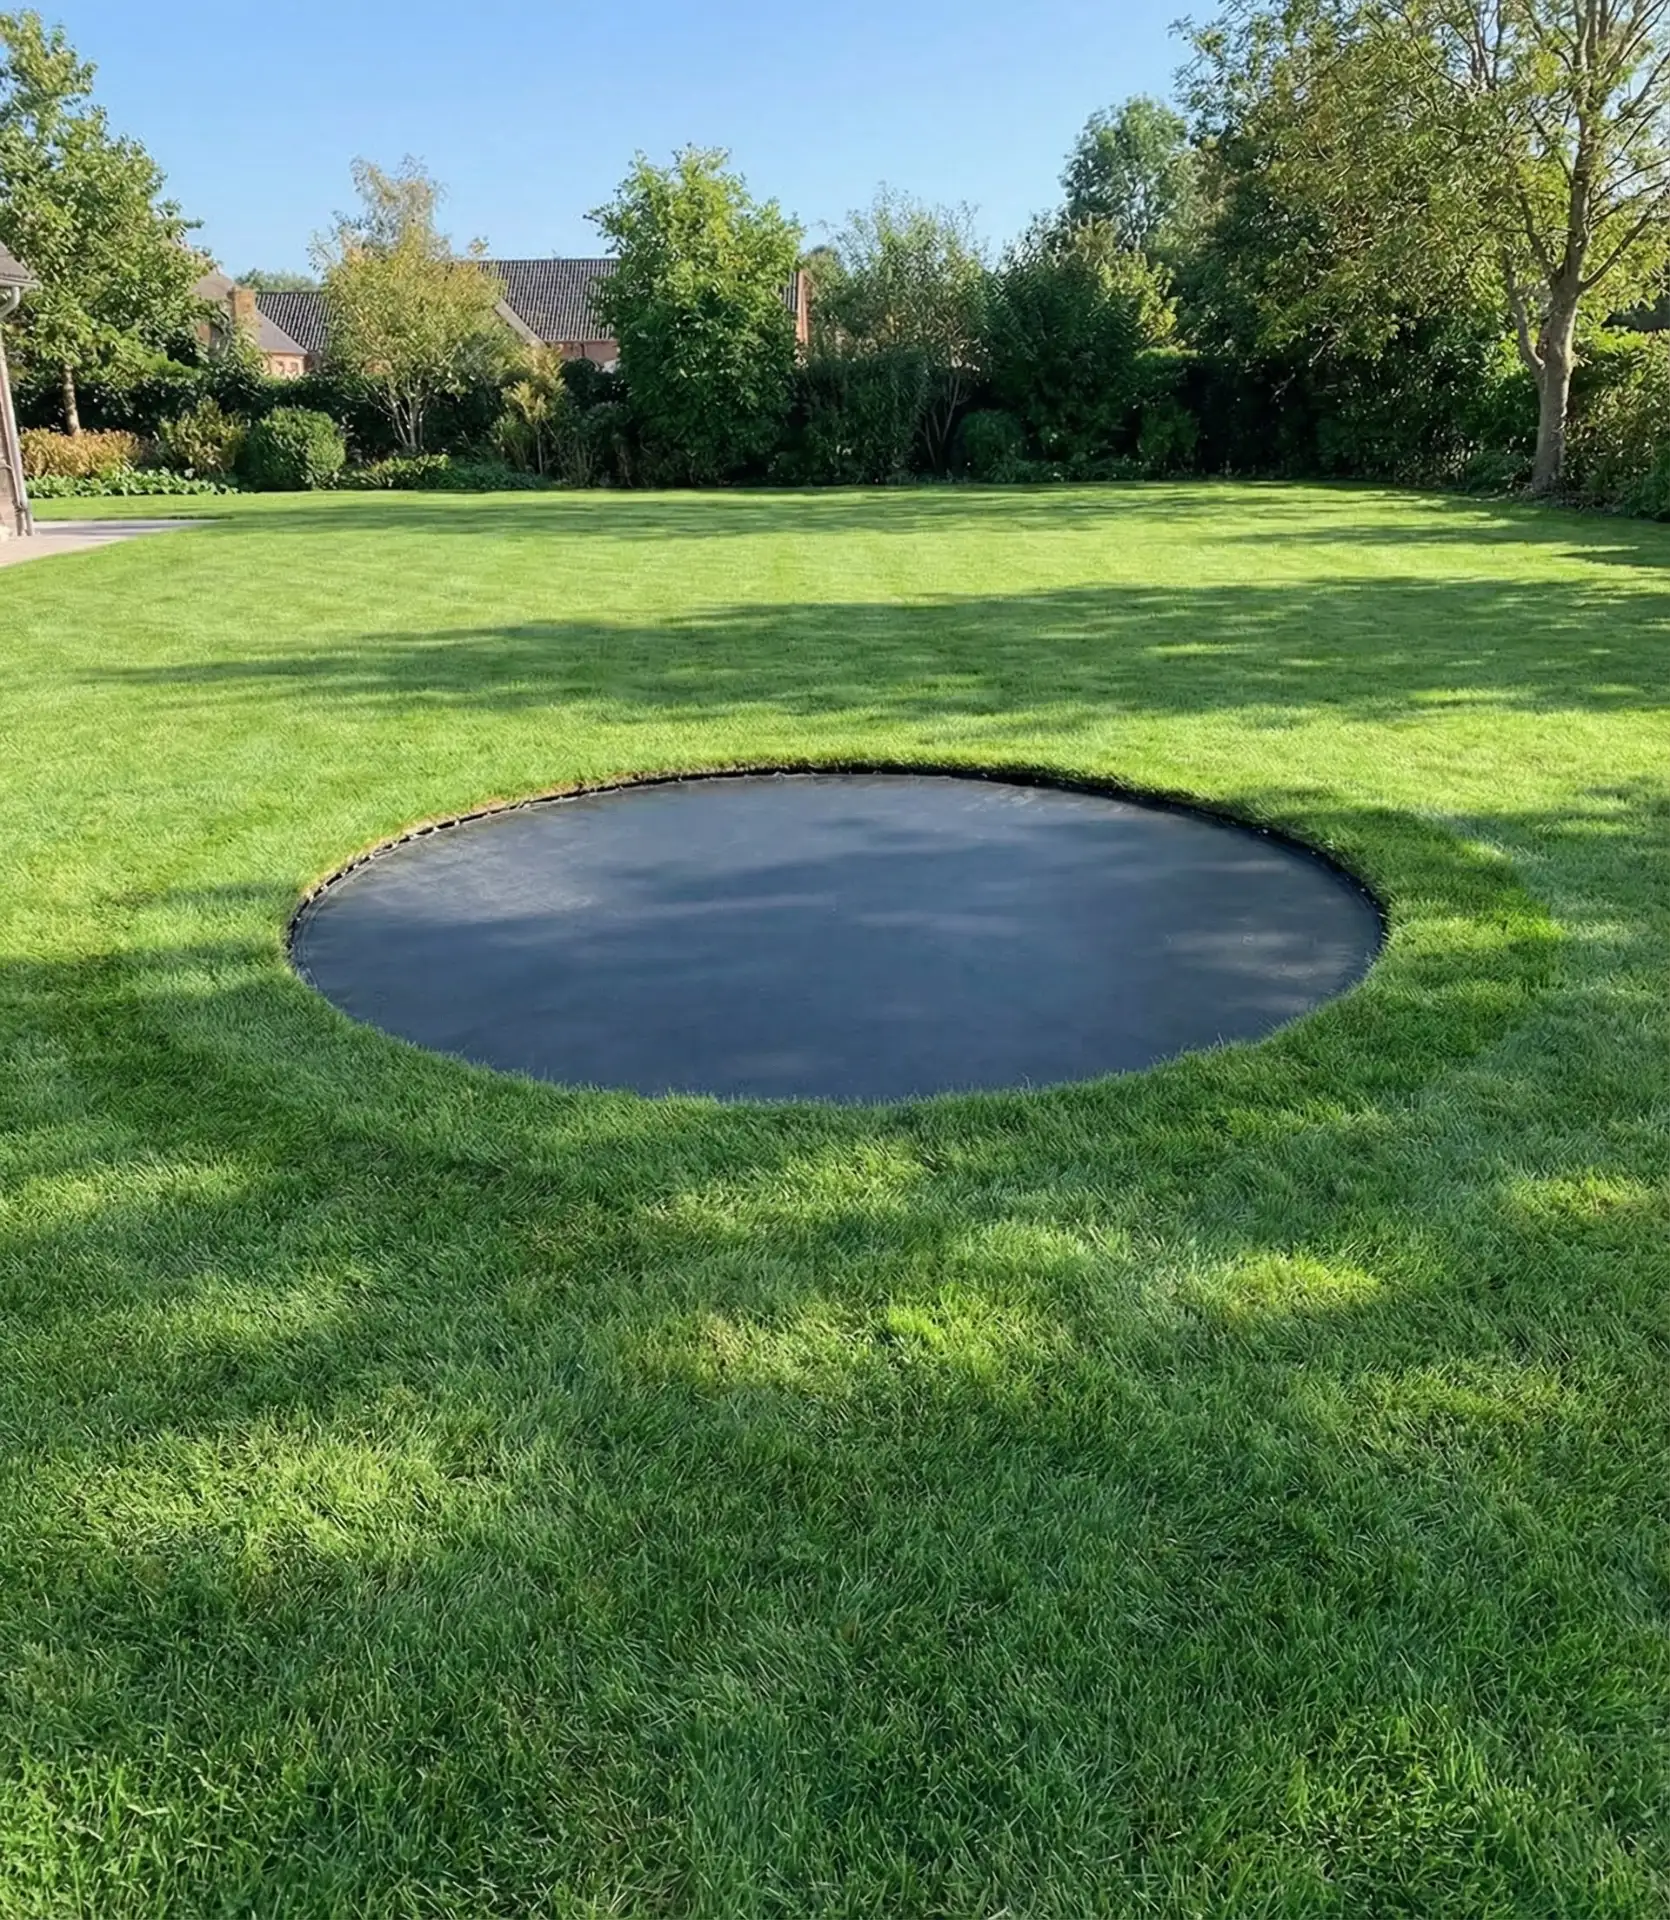
For a sleeker look and improved safety, a trampoline can be sunk flush with the ground.
This setup eliminates the need for height-adjustable safety nets and reduces fall distance, which is one of the main concerns parents have about trampolines. The surrounding turf completely covers the frame, and instead of a ladder, children can step directly onto the jumping surface. Excavation, along with some drainage and ventilation, is needed for some installations, but this method makes it more integrated into your yard design. The result is a seamless addition to your yard. 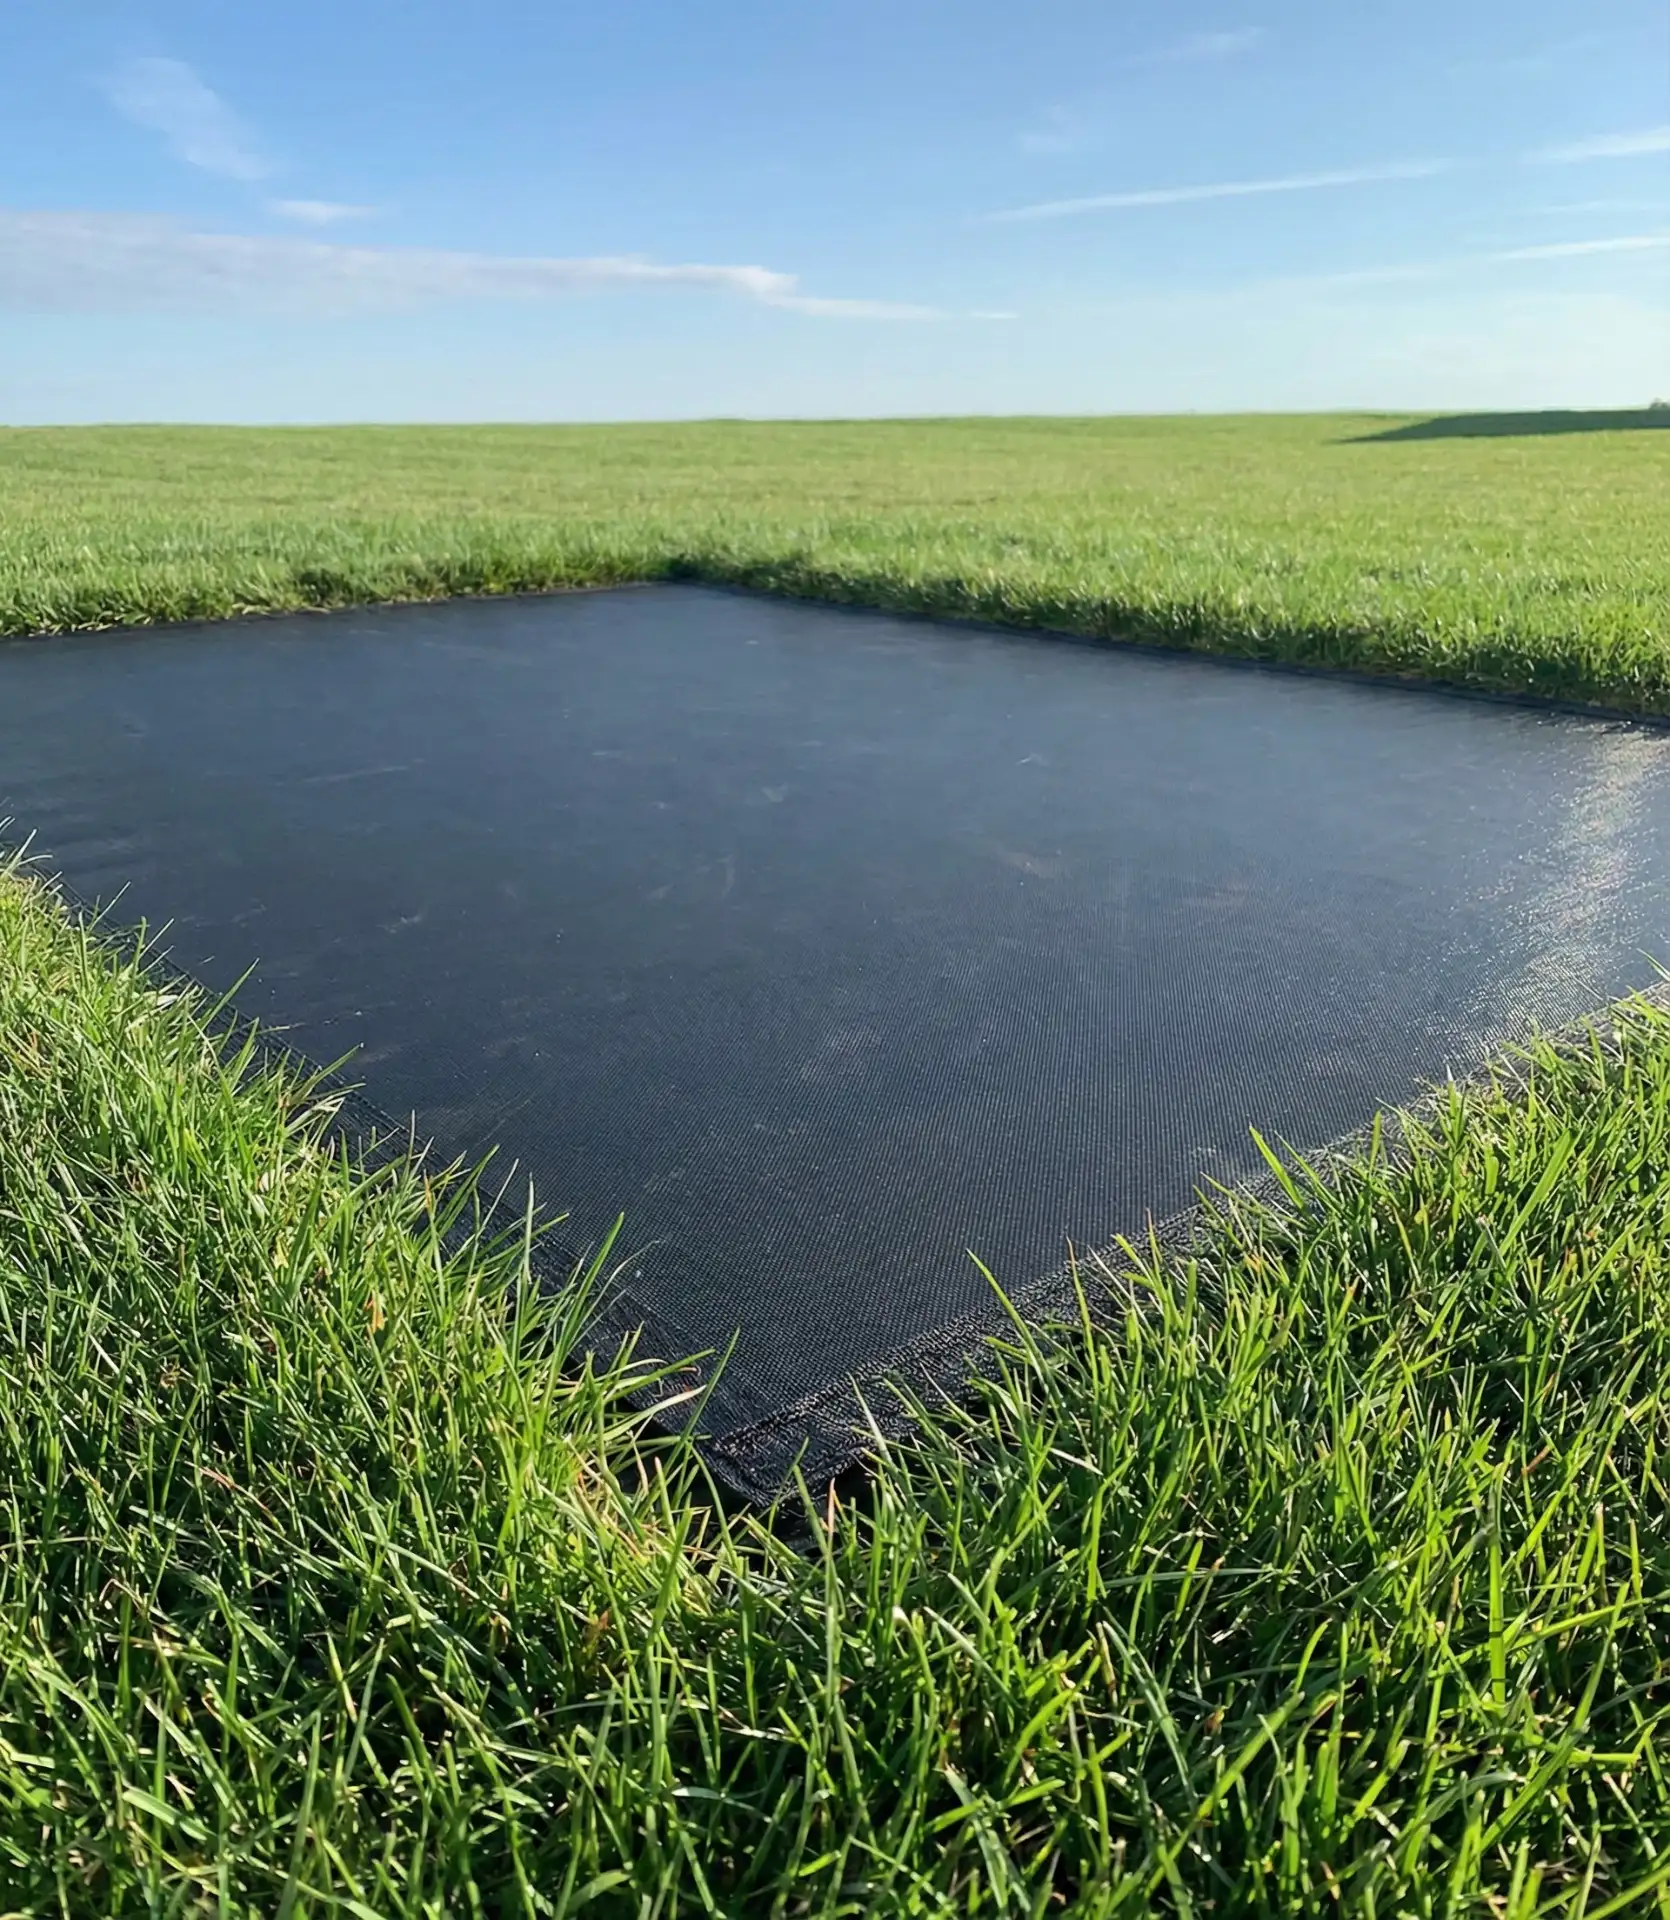
A family in suburban Denver excavated their trampoline installation themselves over a weekend, cutting costs from $2,500 to under $1,000 by renting a small excavator. The key challenge is drainage—you must create gaps for air circulation and install a gravel base so water doesn’t pool underneath. Most families position in-ground trampolines away from trees to prevent leaf accumulation and damage from falling branches. While installation is more complex than surface models, the visual improvement and safety benefits make this upgrade increasingly popular.
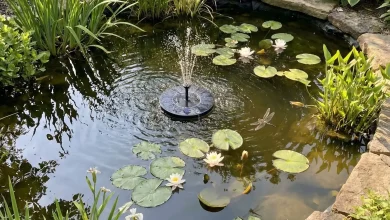
13. Linear Water Feature Along Fence Line
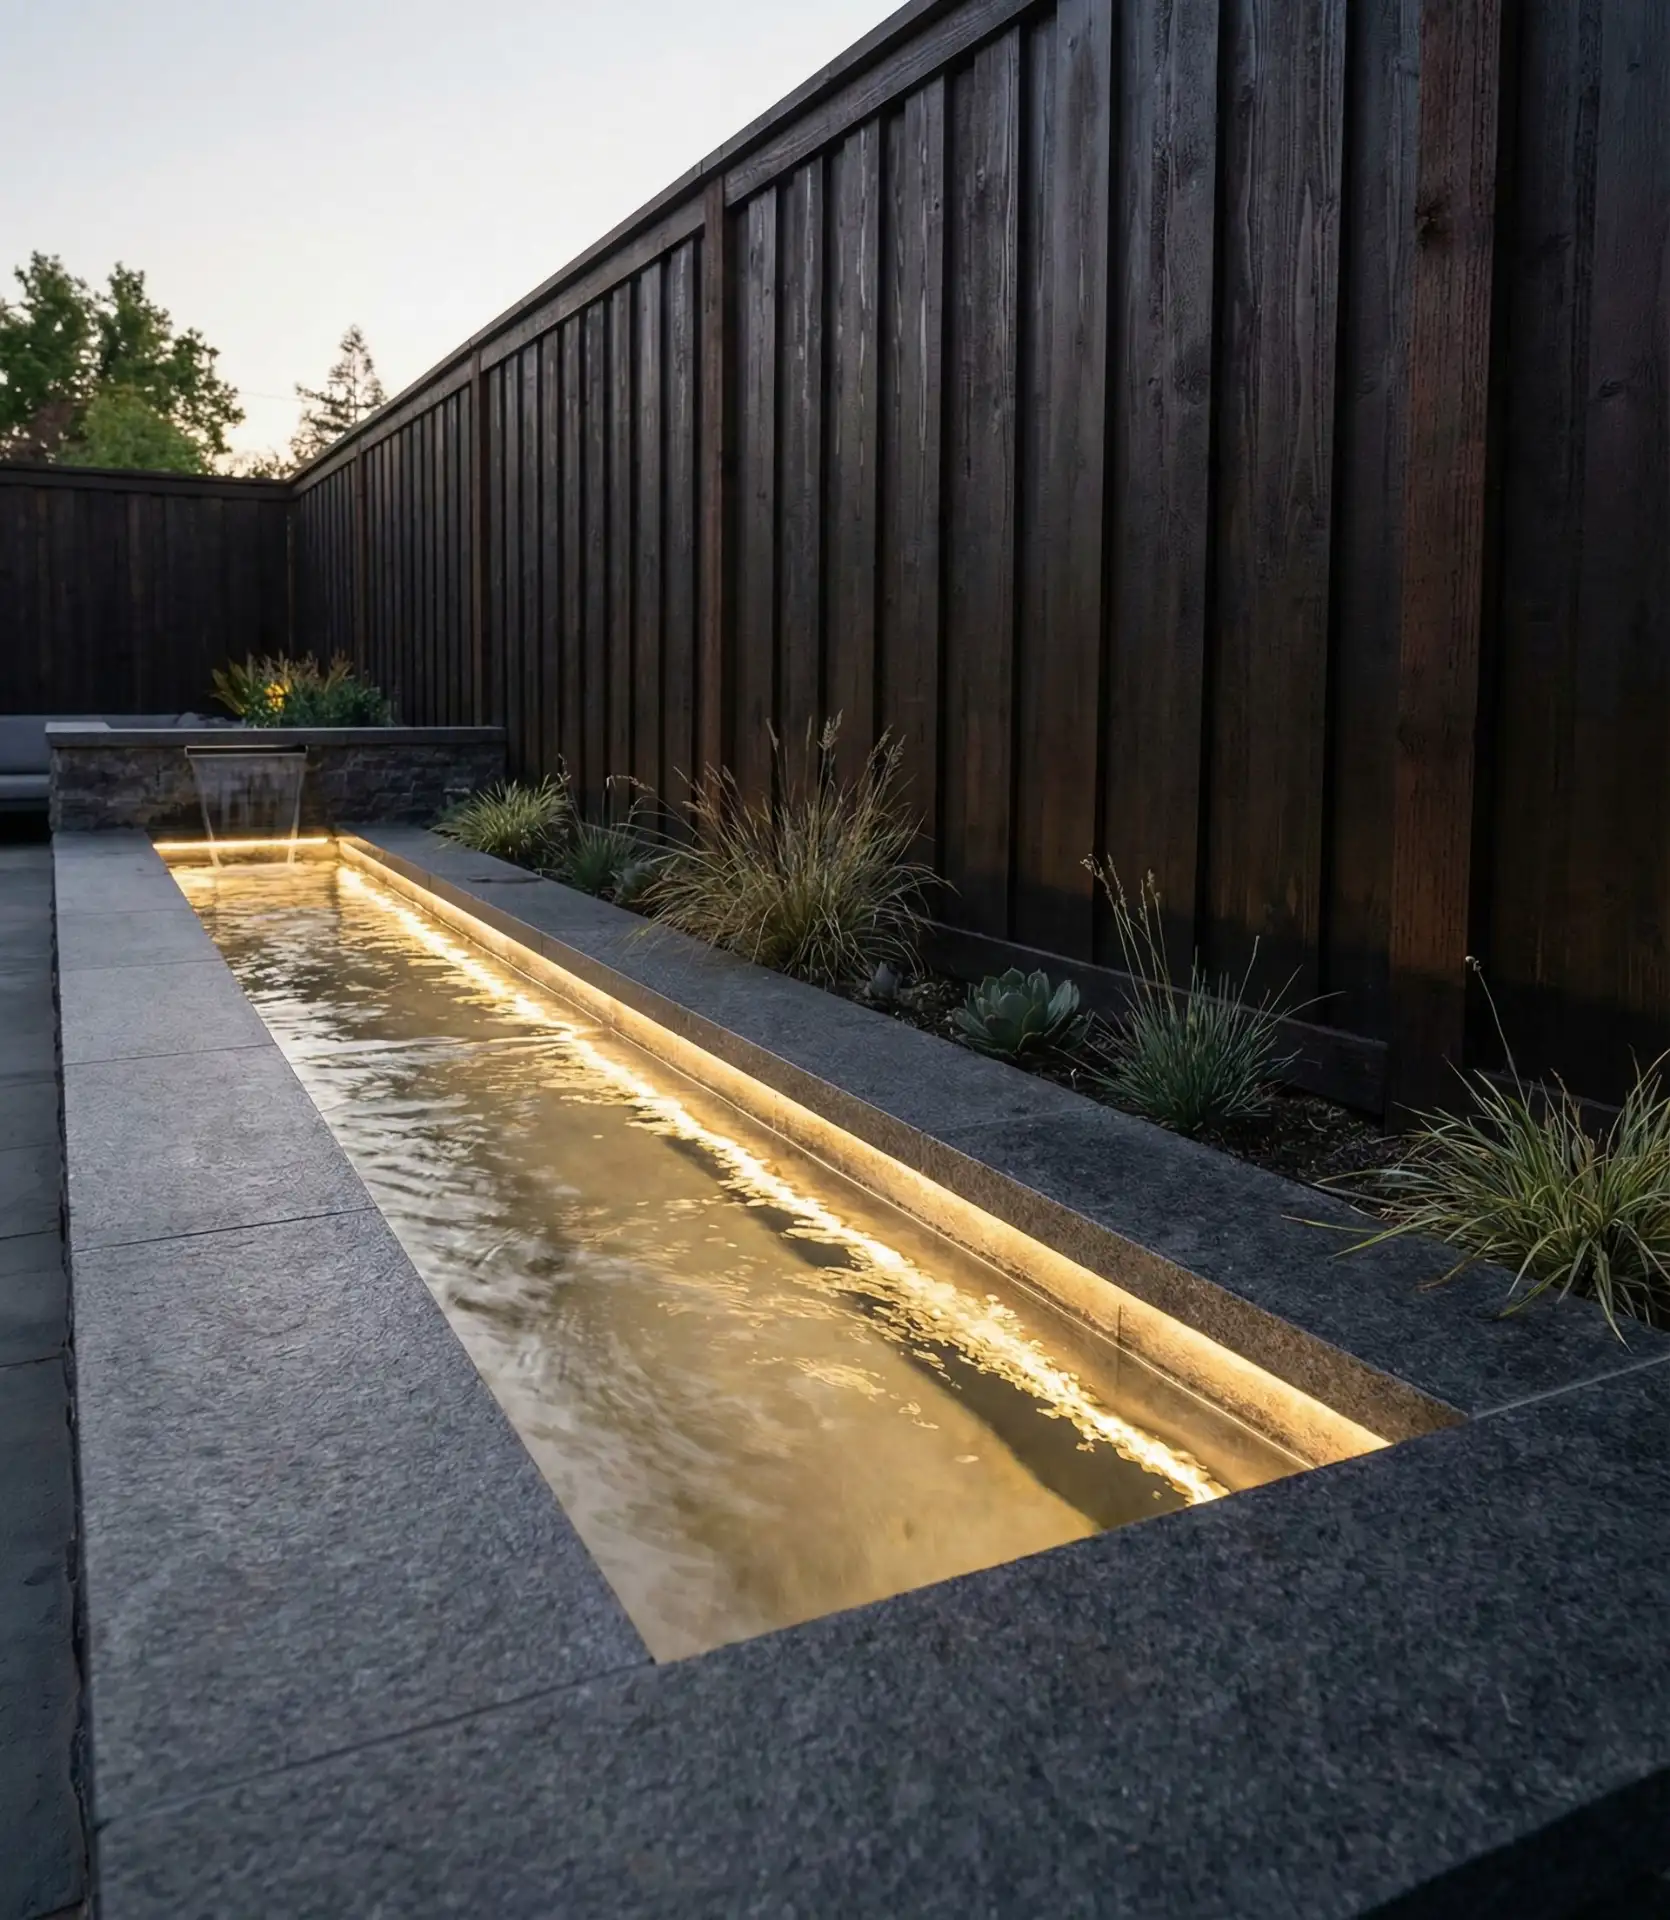
Install a contemporary rill or linear fountain along your back fence to add soothing water sounds while maximizing usable yard space. These narrow water features—typically 12-18 inches wide and 10-20 feet long—take up minimal room while delivering visual and auditory impact. The design works especially well in cozy urban yards where every square foot counts. Simple recirculating pumps keep maintenance minimal, and LED lights transform the feature into a nighttime focal point. 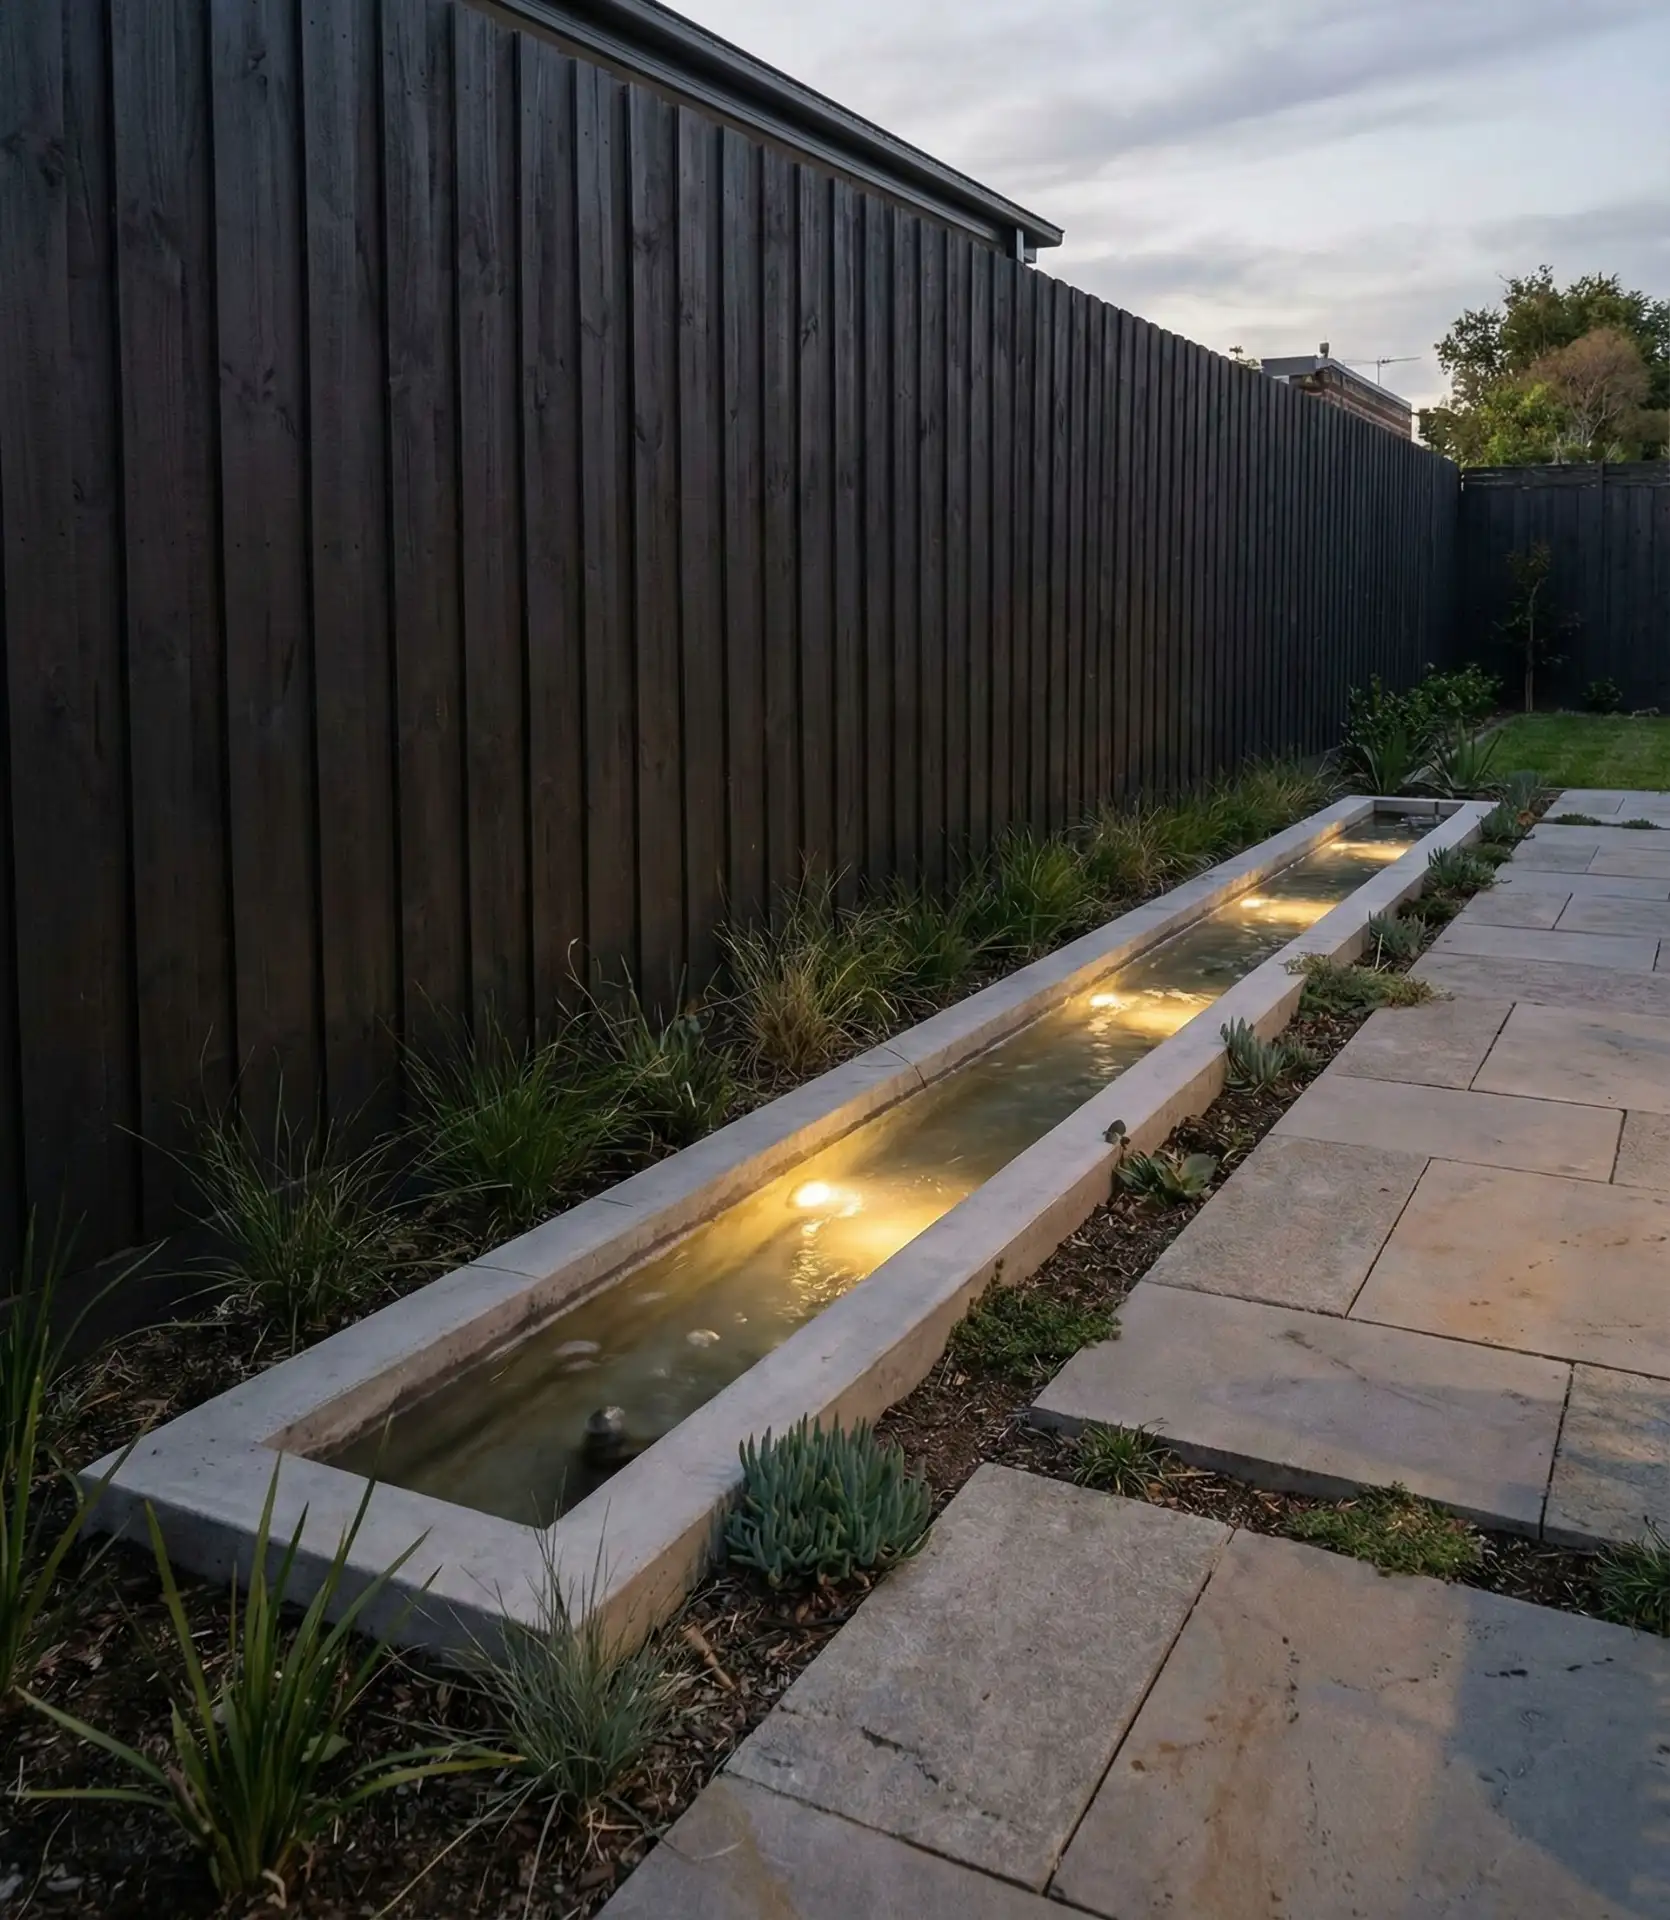
Common mistake: positioning water features in full sun where algae blooms constantly. Partial shade—under a tree canopy or along a north-facing fence—dramatically reduces maintenance. Furthermore, many homeowners undersize their pumps; invest in a slightly larger model than recommended to ensure adequate flow and prevent mosquito breeding in stagnant water. In desert climates like Nevada and Arizona, evaporation requires weekly top-ups, so install an automatic fill valve connected to your irrigation system rather than filling it manually.
14. Bocce Ball Court With Pea Gravel Surface
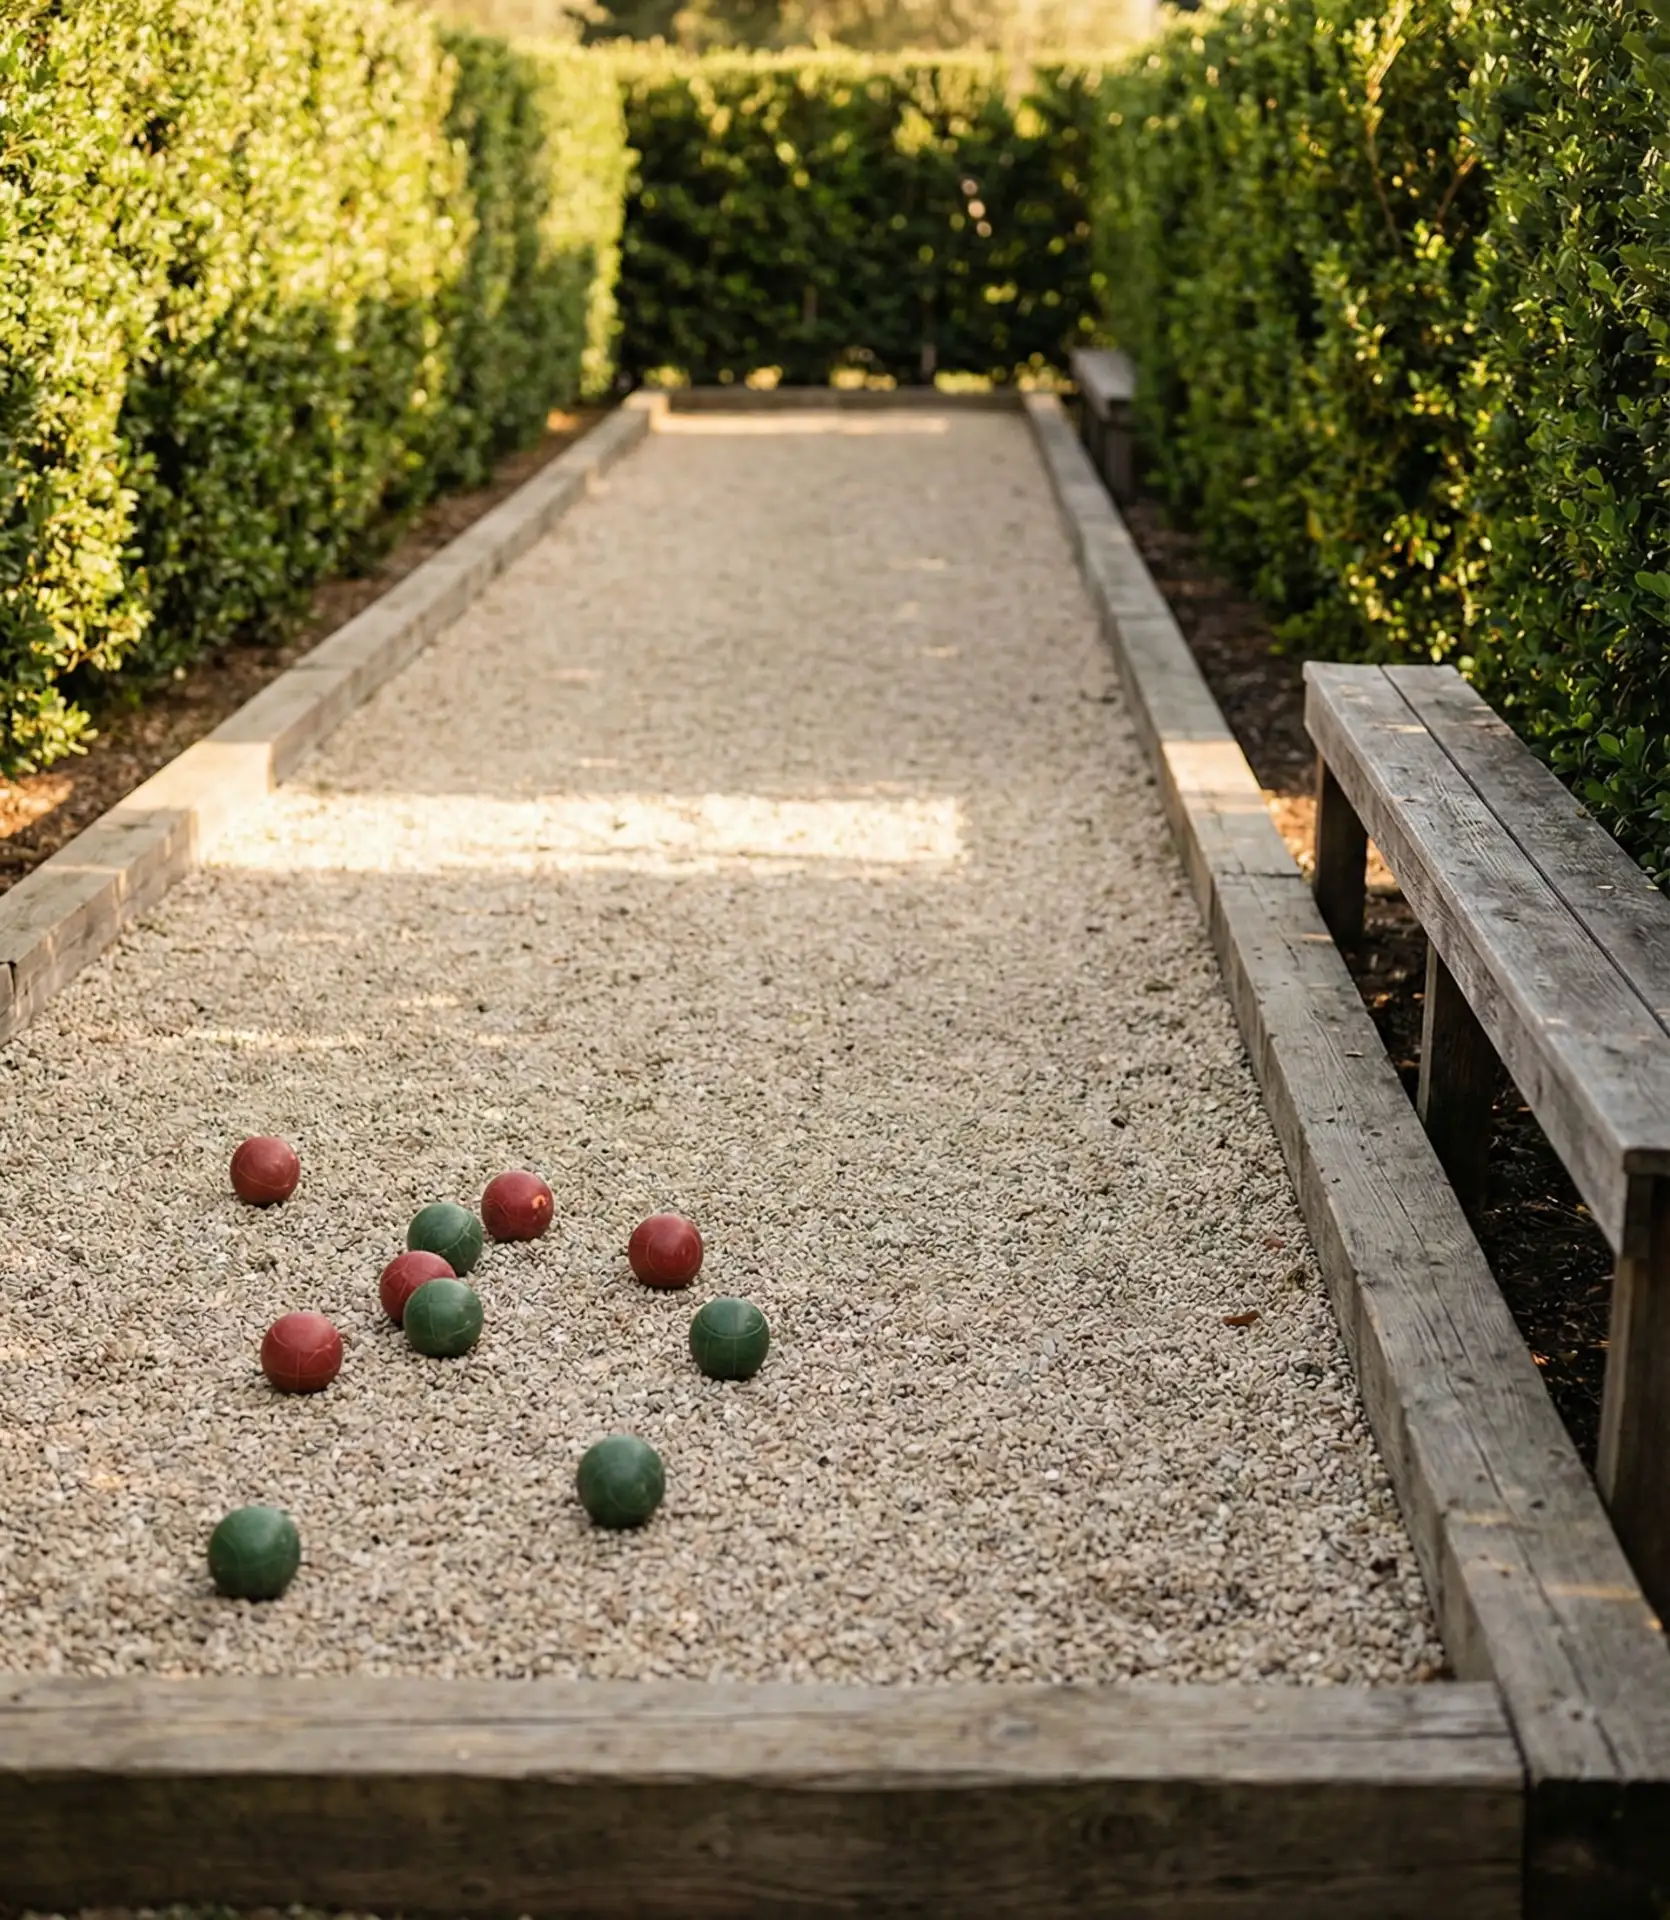
A standard bocce court is 13×60 feet. This is a wonderful feature for a side yard or a big backyard property line. You can buy some landscape timber and make a simple frame, then add crushed oyster shell or pea gravel, and you will have a wonderful court. These steps will create a feature that the whole family will enjoy, including the adults. This feature is ideal for neighborhood gatherings and only costs $500 to $1,000 for materials. A bocce court will make gatherings more fun and intriguing and will make it the place to be. 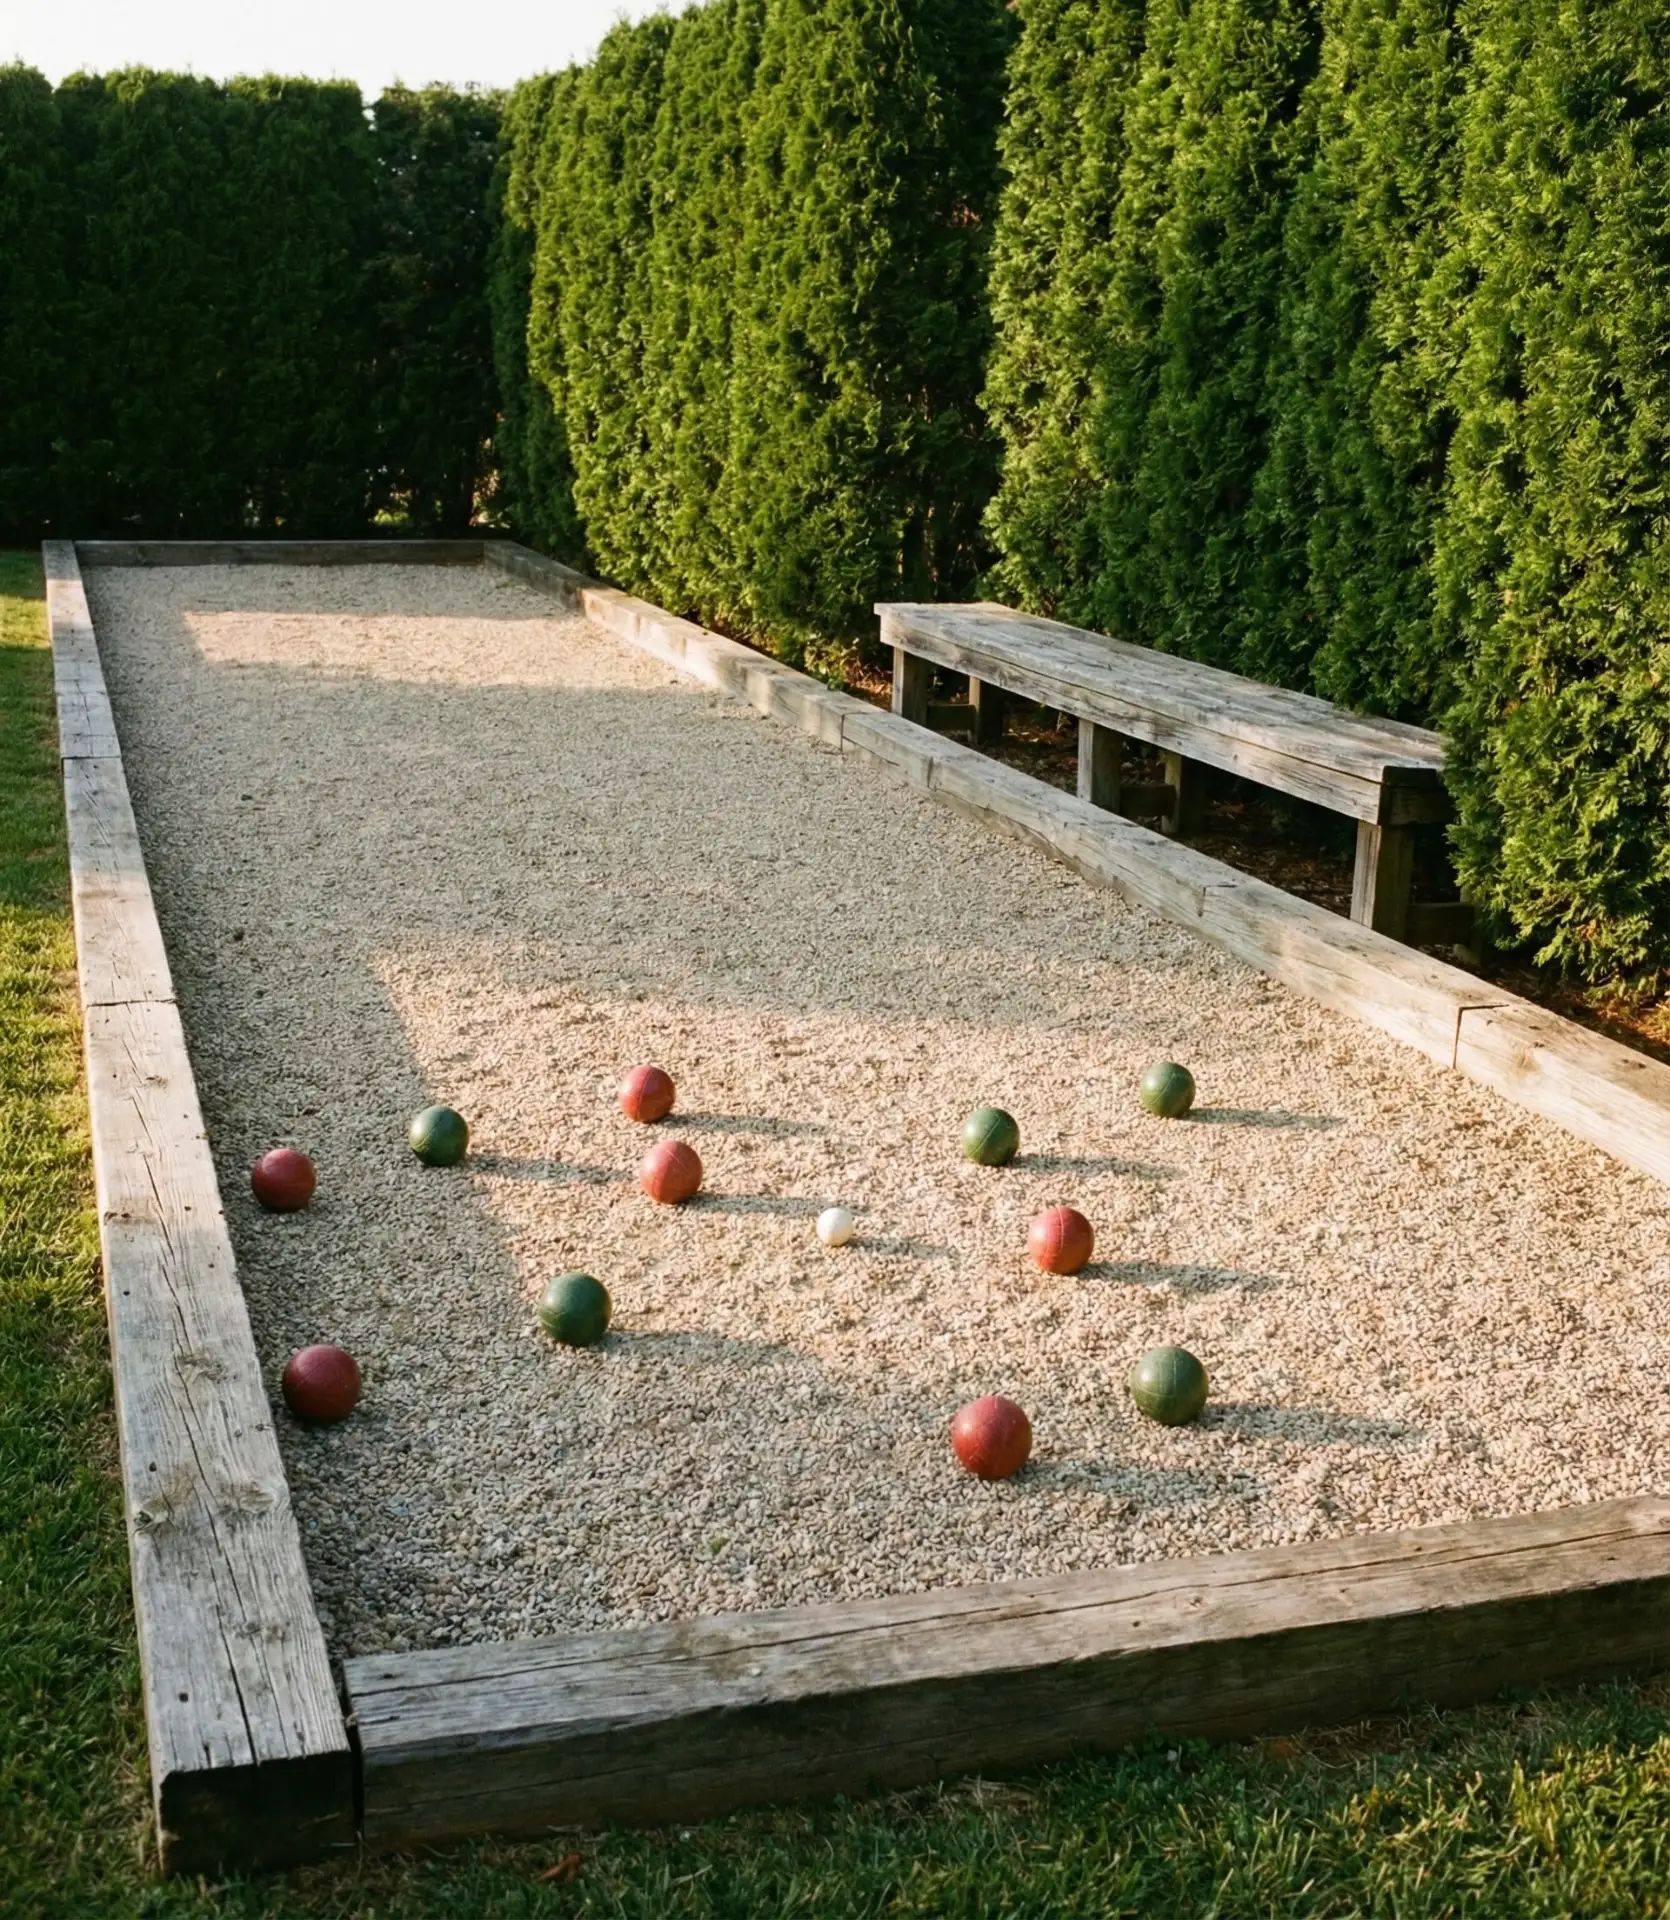
Real homeowner surveys indicate that bocce courts see surprisingly heavy use during casual gatherings because games accommodate any number of players and all skill levels. Families report that yard games like bocce keep guests outside longer rather than migrating indoors after dinner. The court also doubles as a dog run for pet owners or a safe bike-riding track for toddlers learning to balance. Make sure to install fabric underneath the gravel to prevent weed growth—this single step eliminates most maintenance headaches.
15. Screened Porch Addition Off Main House

A screened porch attached to your home’s rear elevation provides bug-free outdoor living without the expense of a full addition. This idea works particularly well in regions with mosquito pressure—the Southeast, Midwest, and anywhere near bodies of water. Include ceiling fans for air circulation, and furnish with weather-resistant pieces that can handle humidity. Families use screened porches more consistently than open patios because comfort isn’t weather-dependent. 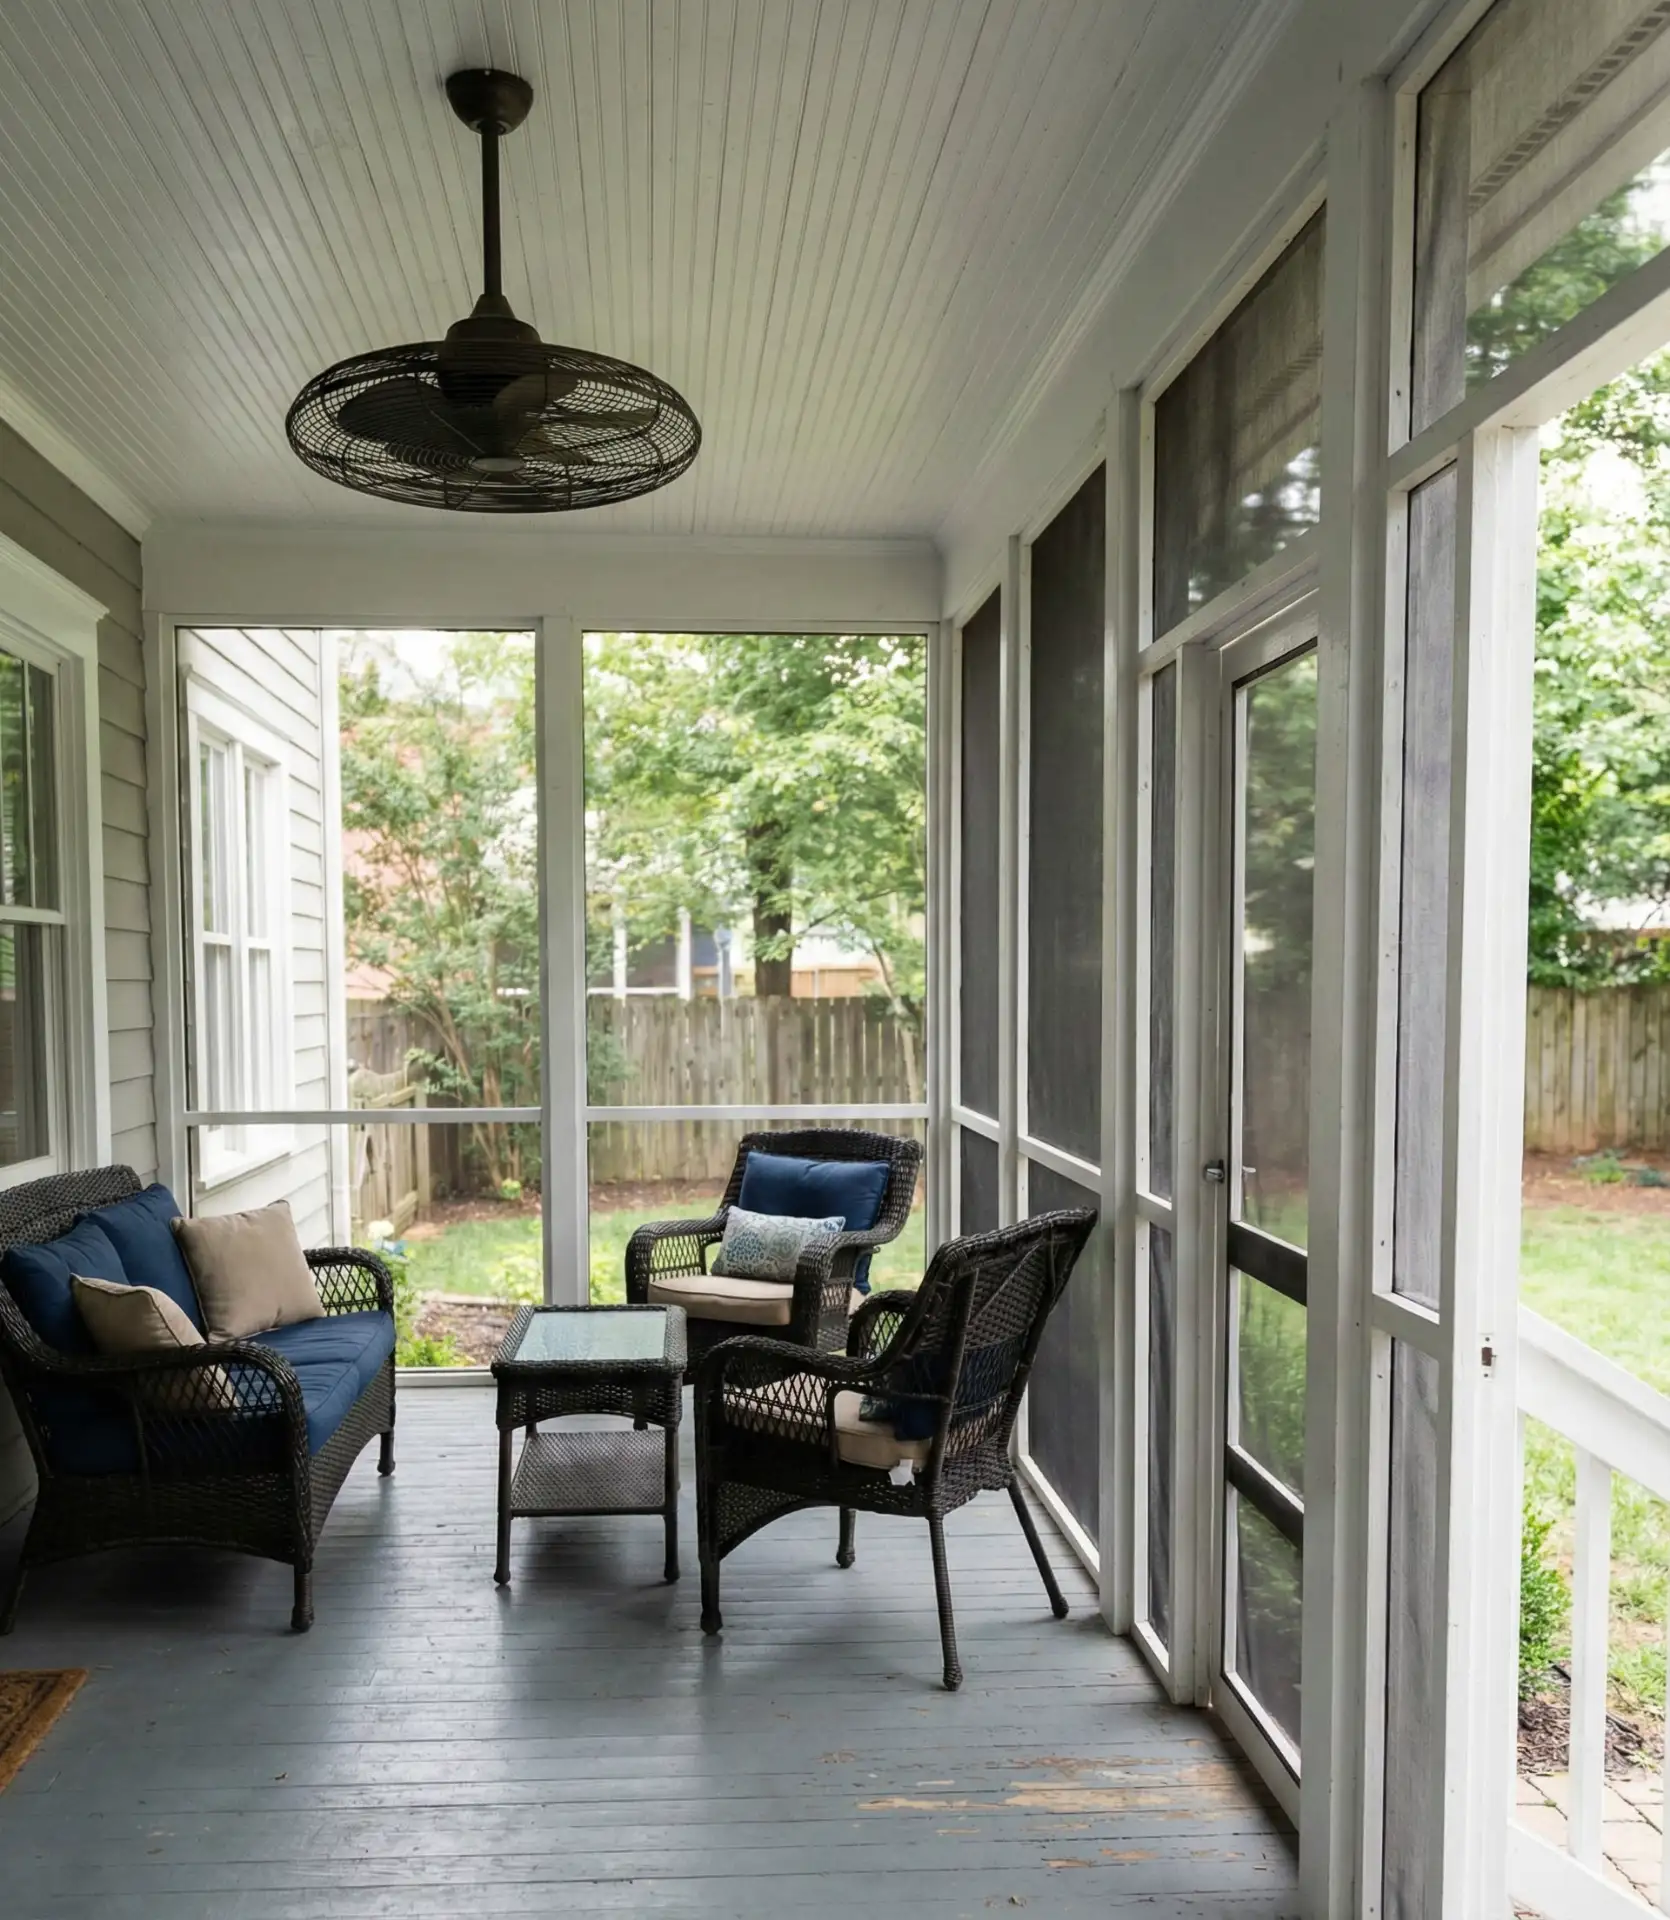
Budget angle: screened porches run $25,000-$50,000 depending on size and finishes, positioned between simple patio costs and full room additions. The value proposition is strong in Southern states, where the outdoor living season extends 8–9 months annually. Families can DIY screen installation on existing covered patios for $2,000–$4,000 using screen-tight systems from big box stores. Even basic screening transforms patio usability by eliminating the constant battle with insects during evening hours.
16. Separate Garden Shed and Potting Station
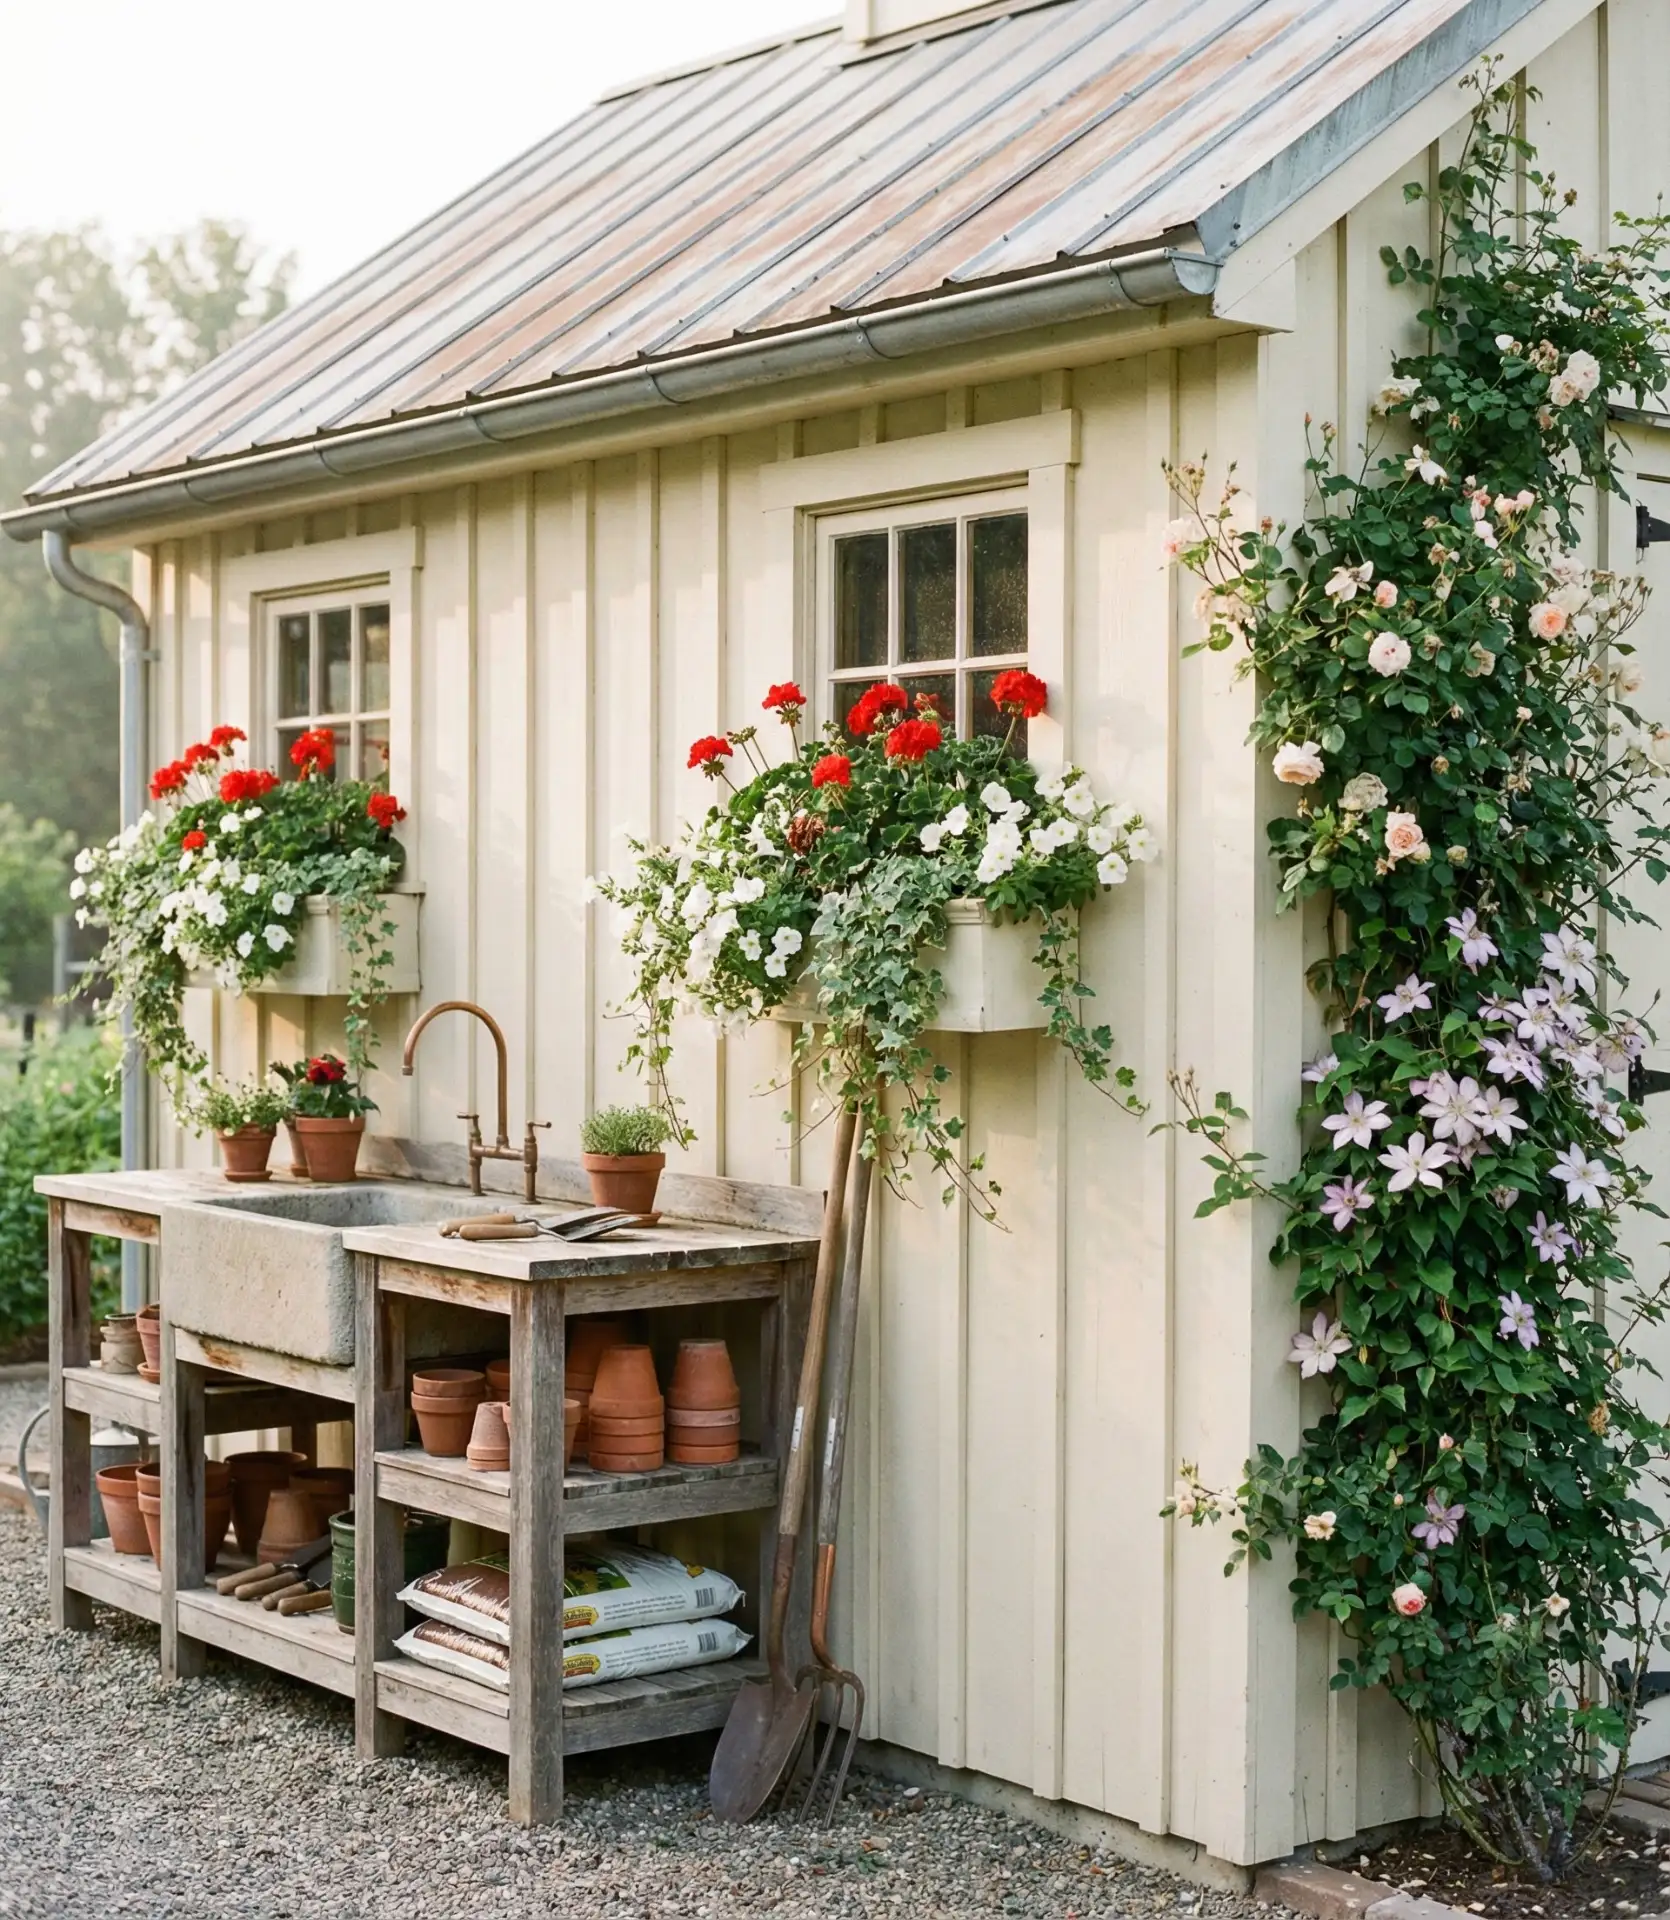
Position a well-designed garden shed in a back corner to store tools, supplies, and seasonal items out of sight. Add an attached or adjacent potting bench with a sink, work surface, and storage for pots and soil. This dedicated garden headquarters keeps yard care organized and makes projects more enjoyable. Choose shed designs that complement your home’s architecture—modern structures for contemporary homes and barn-style for traditional settings. 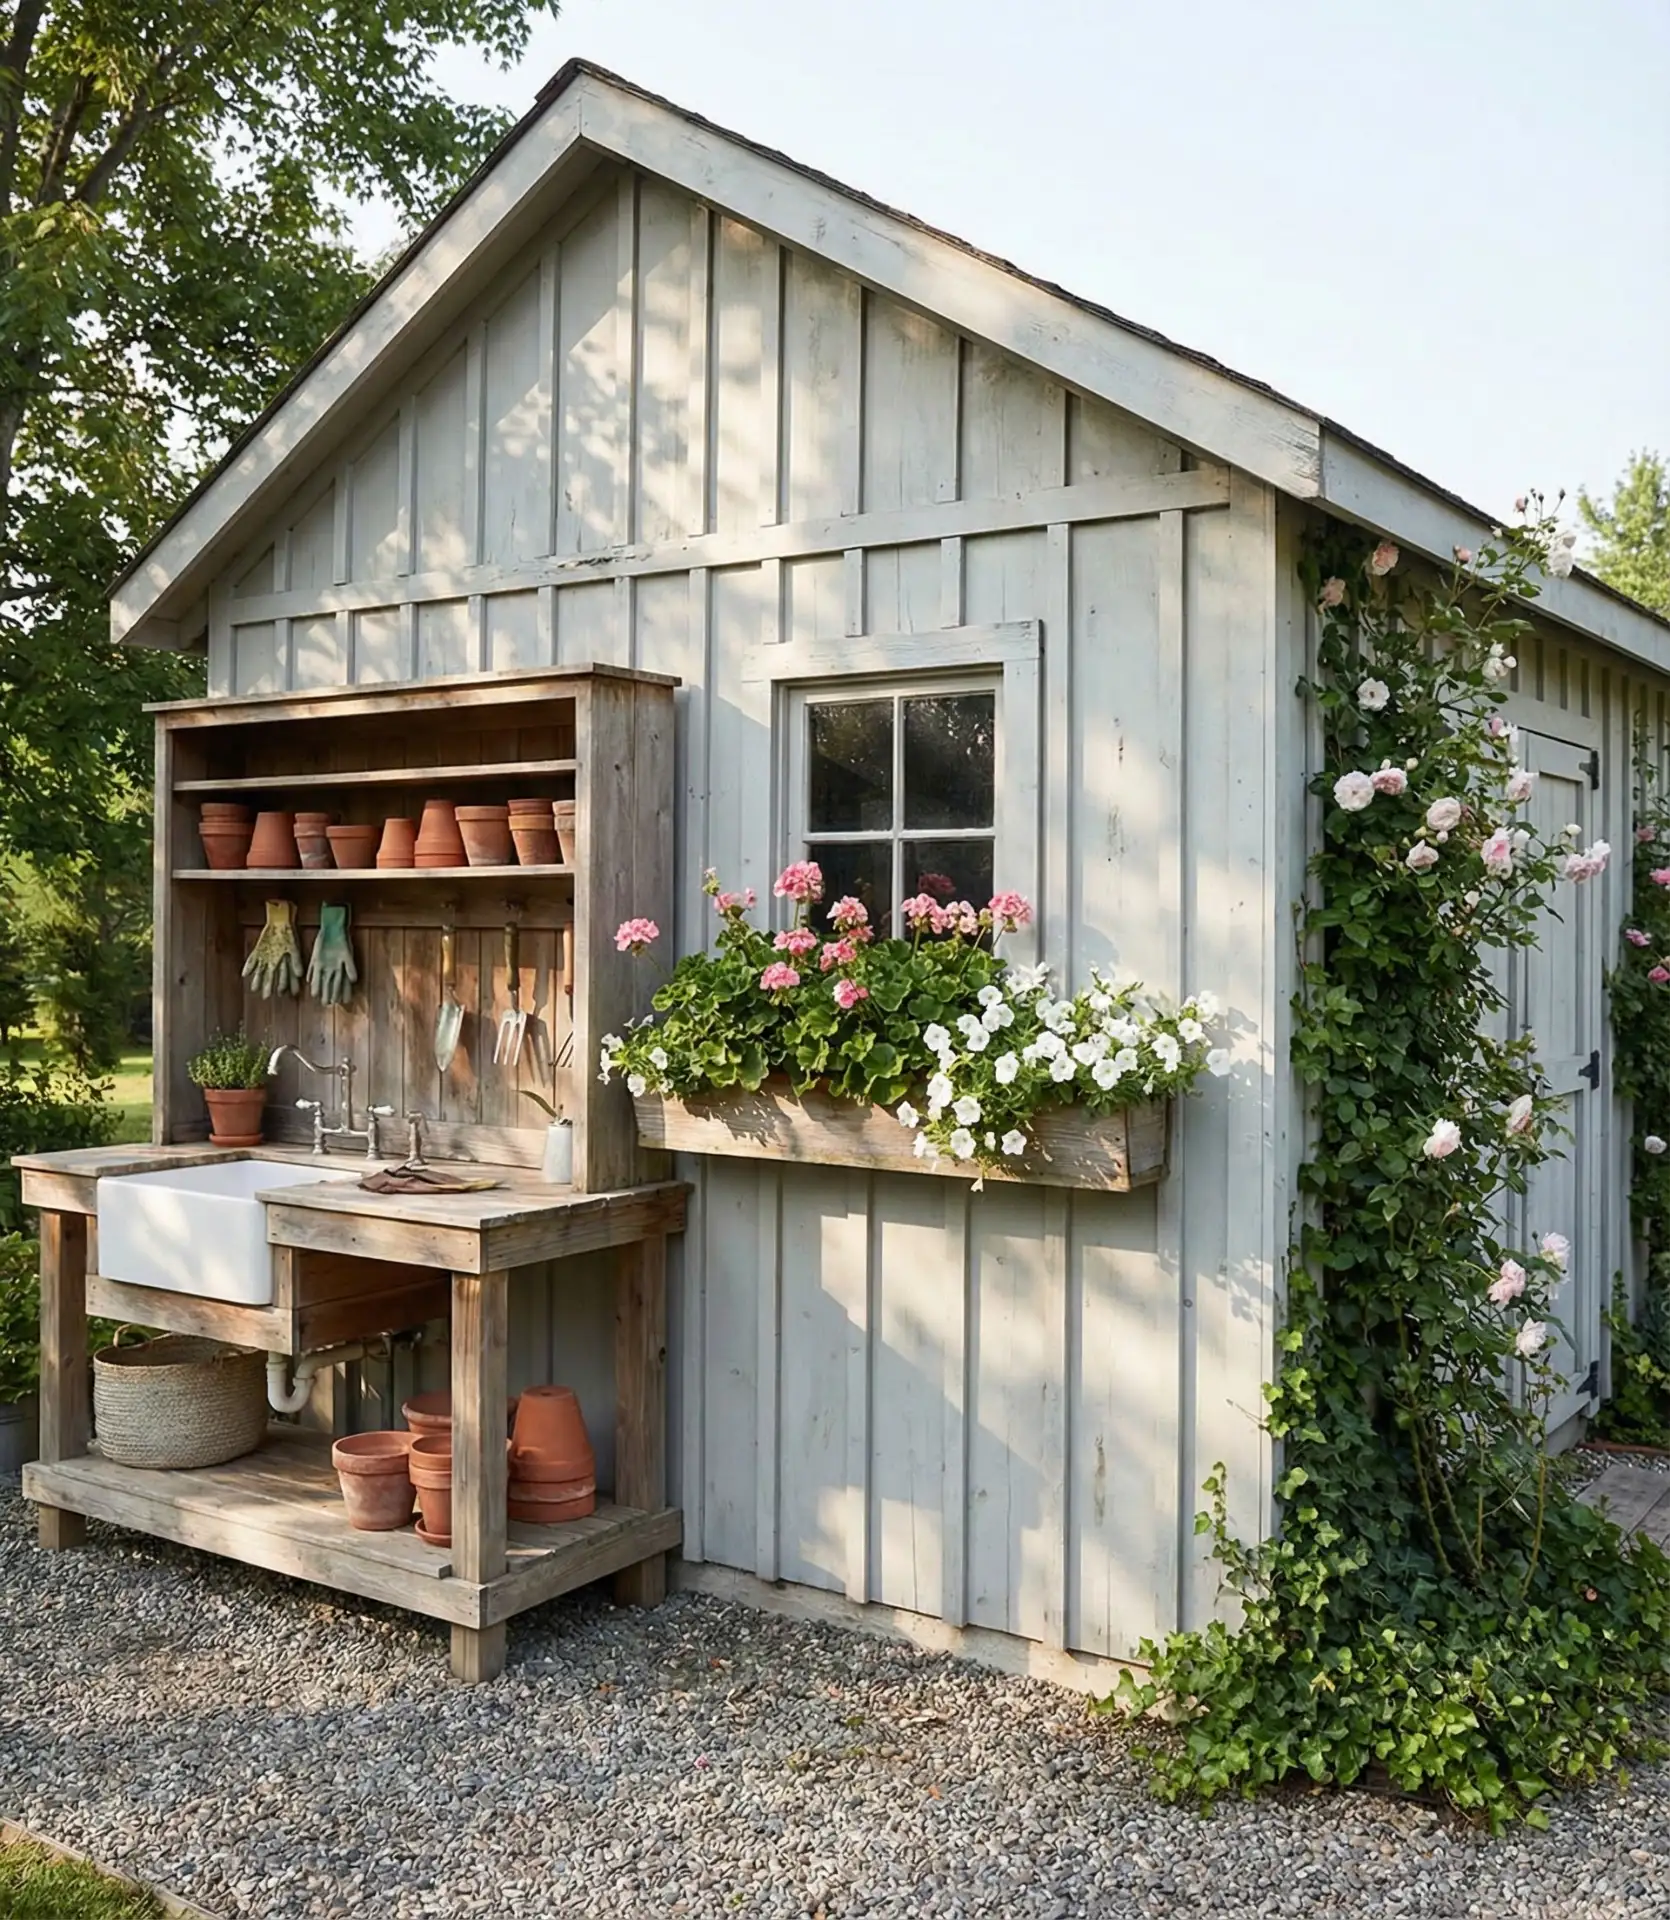
In areas with strict HOA rules or setback requirements, check regulations before installing structures. Most allow sheds under 120 square feet without permits, but rules vary significantly. Practical insight: position the shed within 50 feet of an outdoor water spigot and electrical outlet—running utilities farther gets expensive quickly. Families who garden seriously appreciate having everything in one location rather than trekking to a garage. The time saved over a season is substantial when you’re not constantly searching for gloves, pruners, or fertilizer.
17. Gravel Patio with Container Garden Display
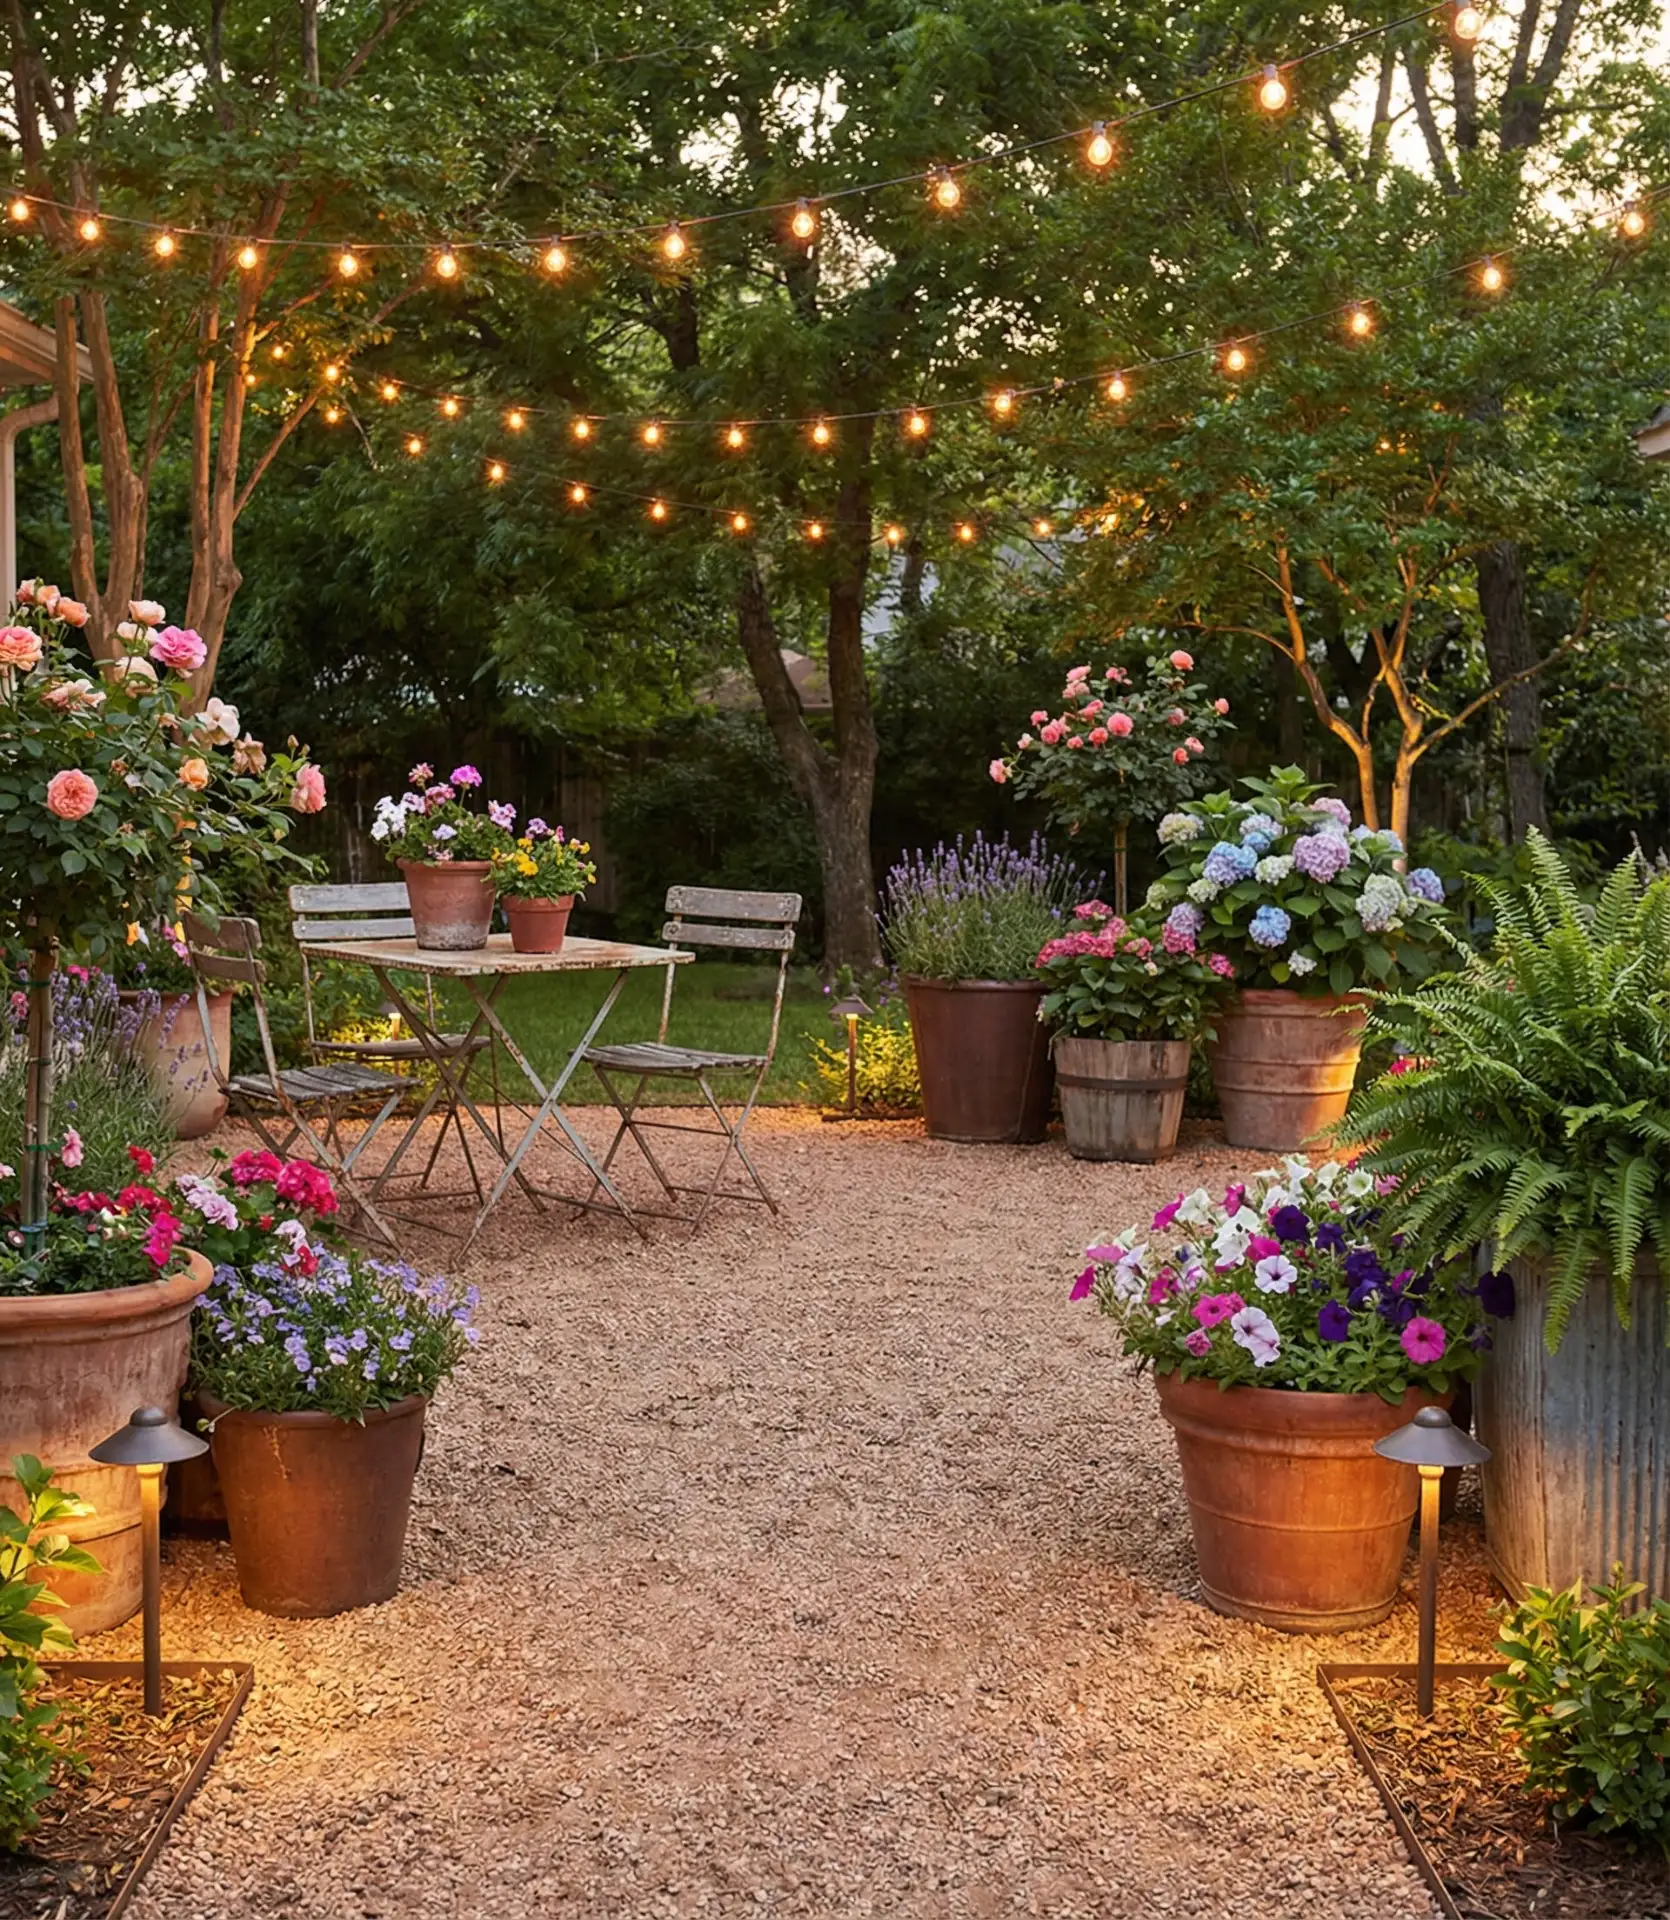
Create an affordable patio by excavating 4-6 inches, laying landscape fabric, adding a crushed stone base, and topping with decorative pea gravel or crushed granite. Arrange large containers—ceramic pots, galvanized tubs, wooden planter boxes—throughout the space for a flexible garden design you can rearrange seasonally. This approach costs $3-5 per square foot compared to $15-25 for pavers, making it budget-friendly for families wanting outdoor living space without major investment.
Where this works best: informal cottage-style and farmhouse aesthetics where the casual nature of gravel feels intentional. It’s also ideal for renters who want outdoor living space they can remove when moving—simply rake the gravel aside and the patio disappears. Use 3/8-inch pea gravel for walking comfort; larger stones are harder on bare feet. Edging is crucial—without it, gravel migrates into lawn areas. Steel or aluminum edging strips keep boundaries crisp and mowing manageable.
18. Tiered Deck Levels for Sloped Yards
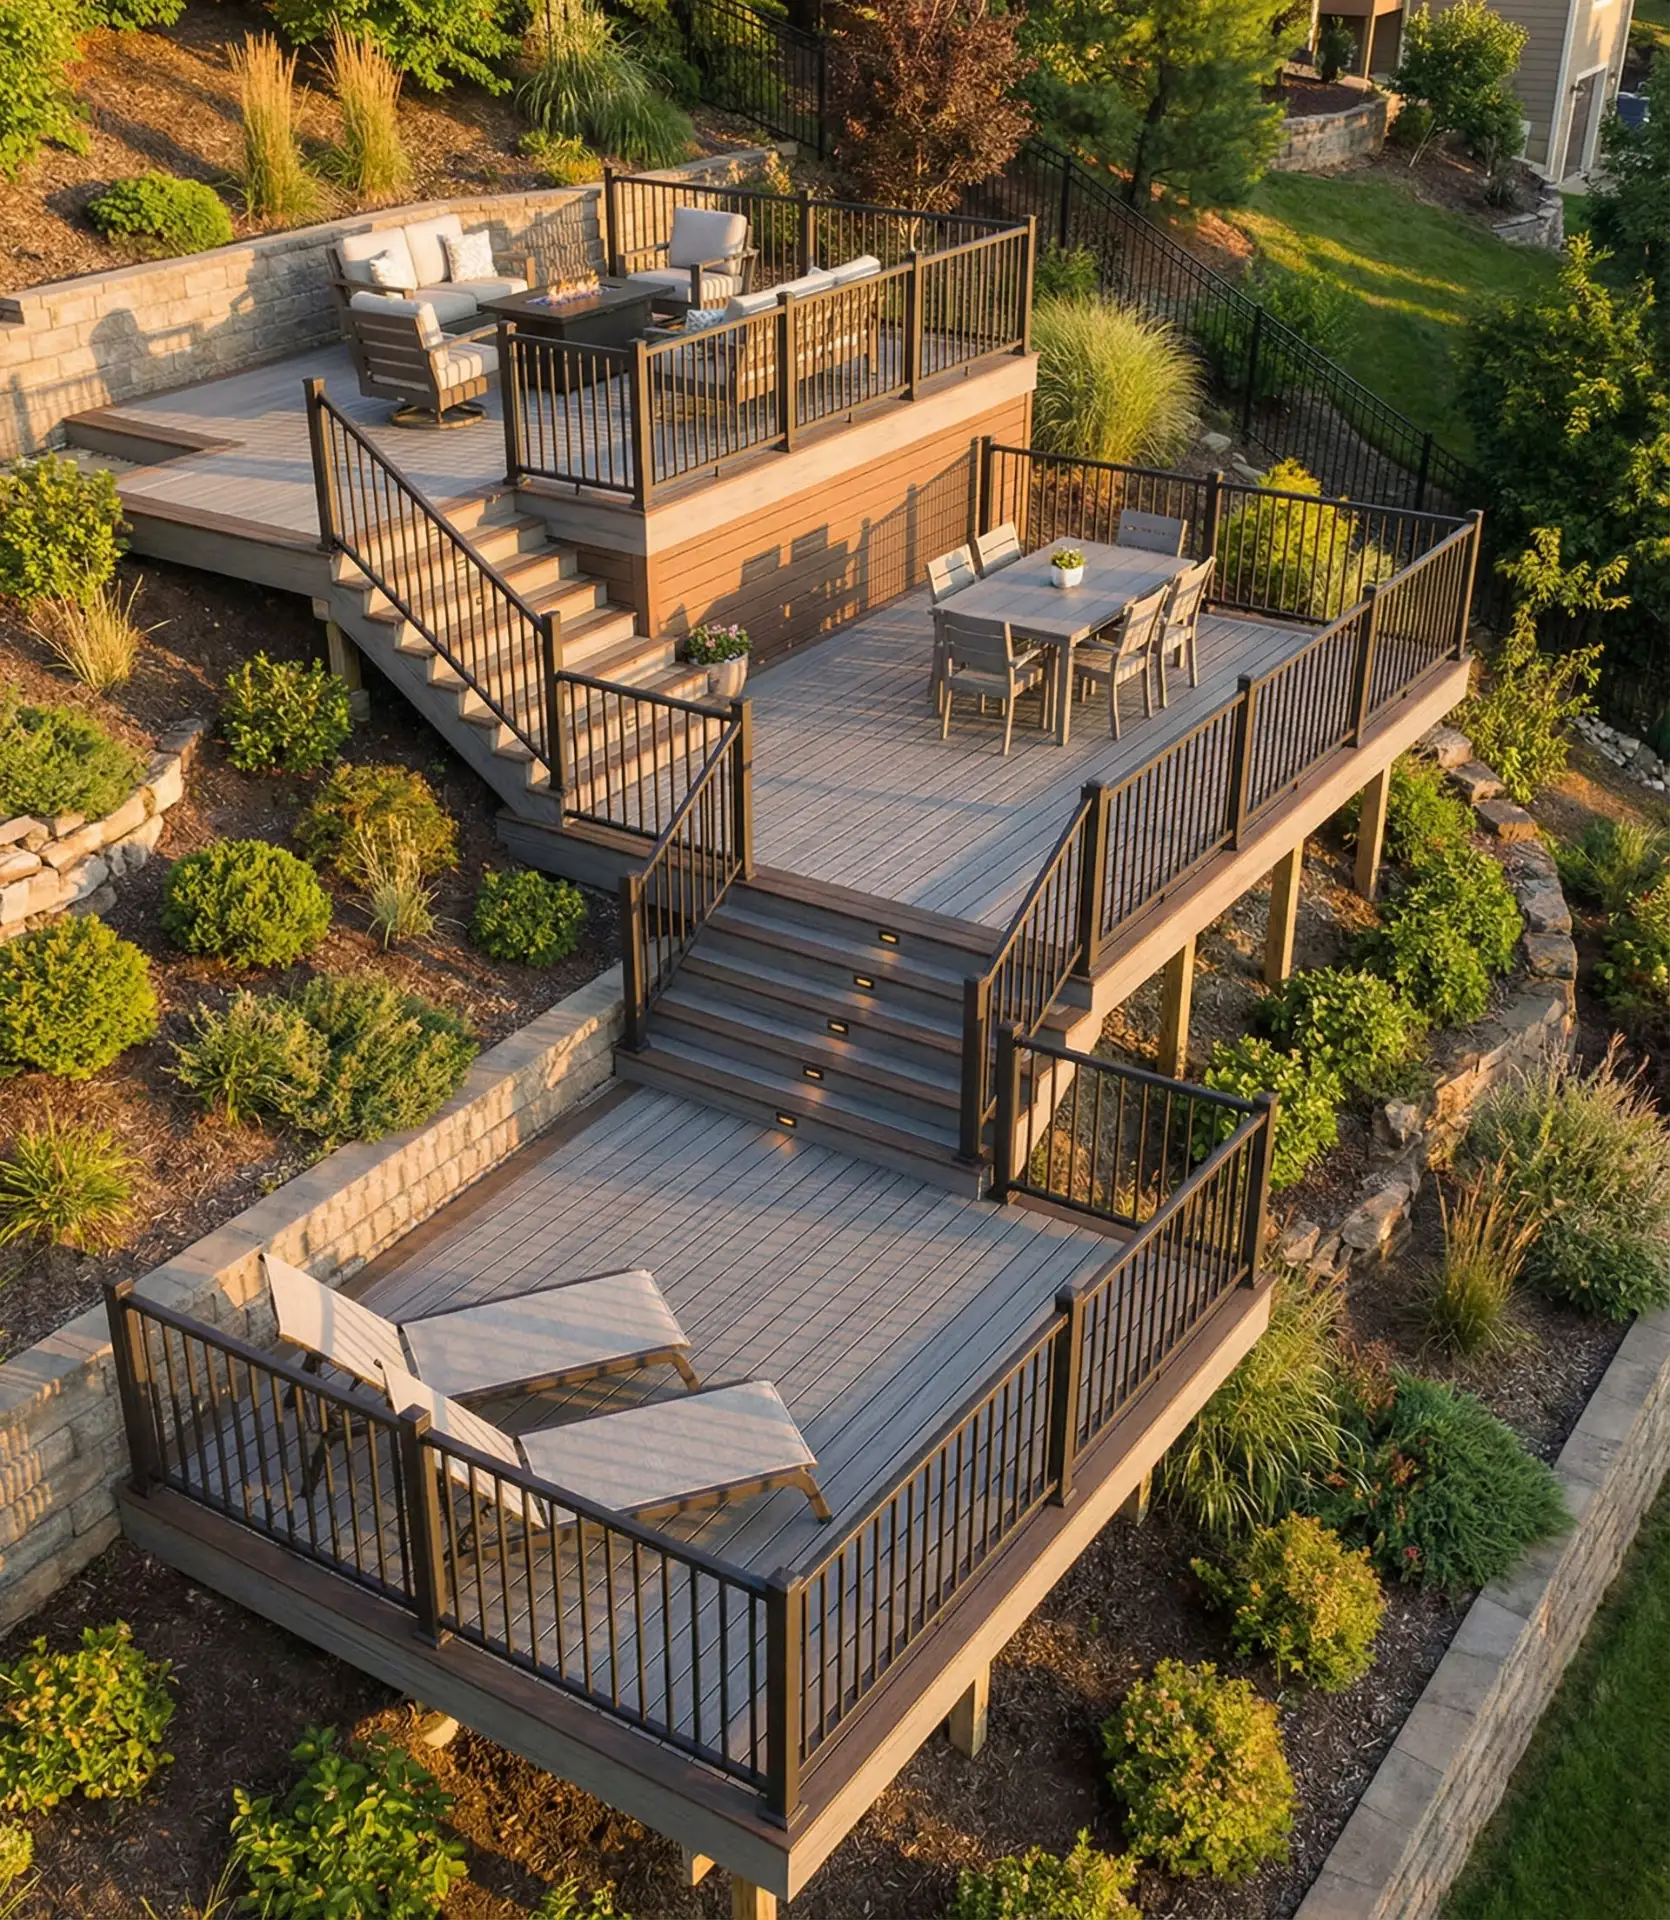
On sloped lots, build a multi-level deck that steps down the hillside, creating distinct zones at different elevations. The upper level near the house serves dining and grilling, while lower platforms become lounging or play areas. This blueprint transforms challenging topography into a design asset, providing multiple vantage points and visual interest. During parties, the wide stairs that connect the levels can also be used as casual seating.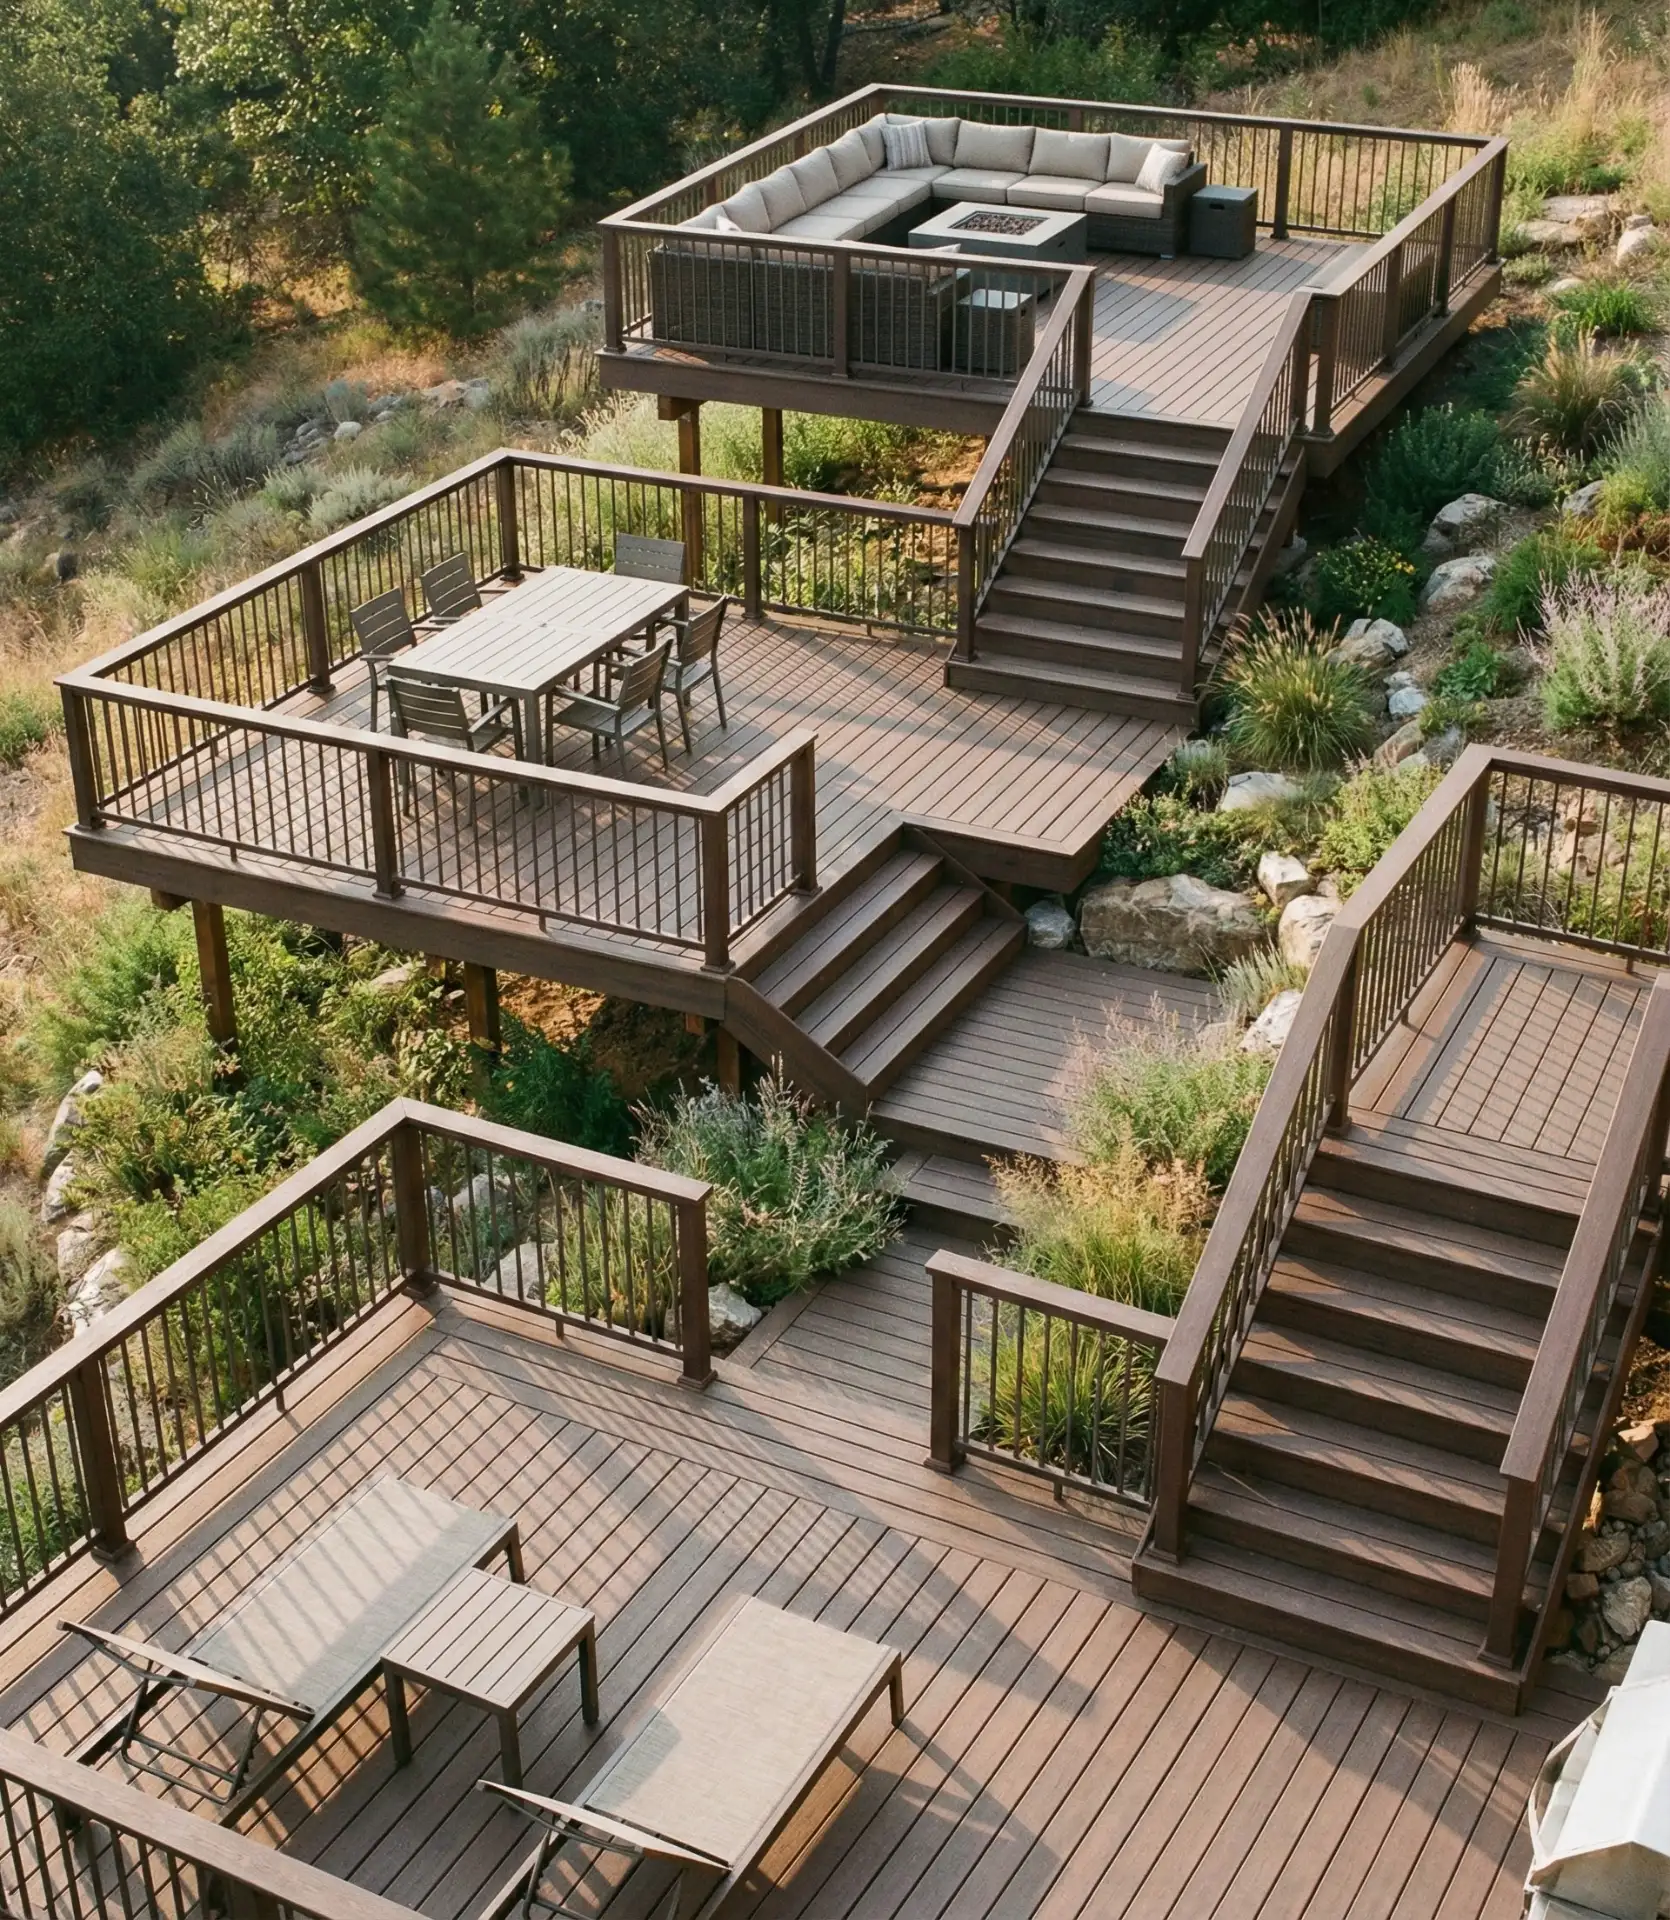
Expert commentary: tiered decks cost more per square foot than single-level construction due to additional framing and railing, but they’re often the only way to create usable outdoor space on steep properties. In hilly regions like the Pacific Northwest, Appalachia, and parts of California, this design is nearly standard. Consider the lowest level as a future spa or fire pit location—the excavation work happening now makes adding features later much simpler. Always ensure proper drainage between levels to prevent water pooling on platforms.
19. Outdoor Shower Enclosure Near Pool
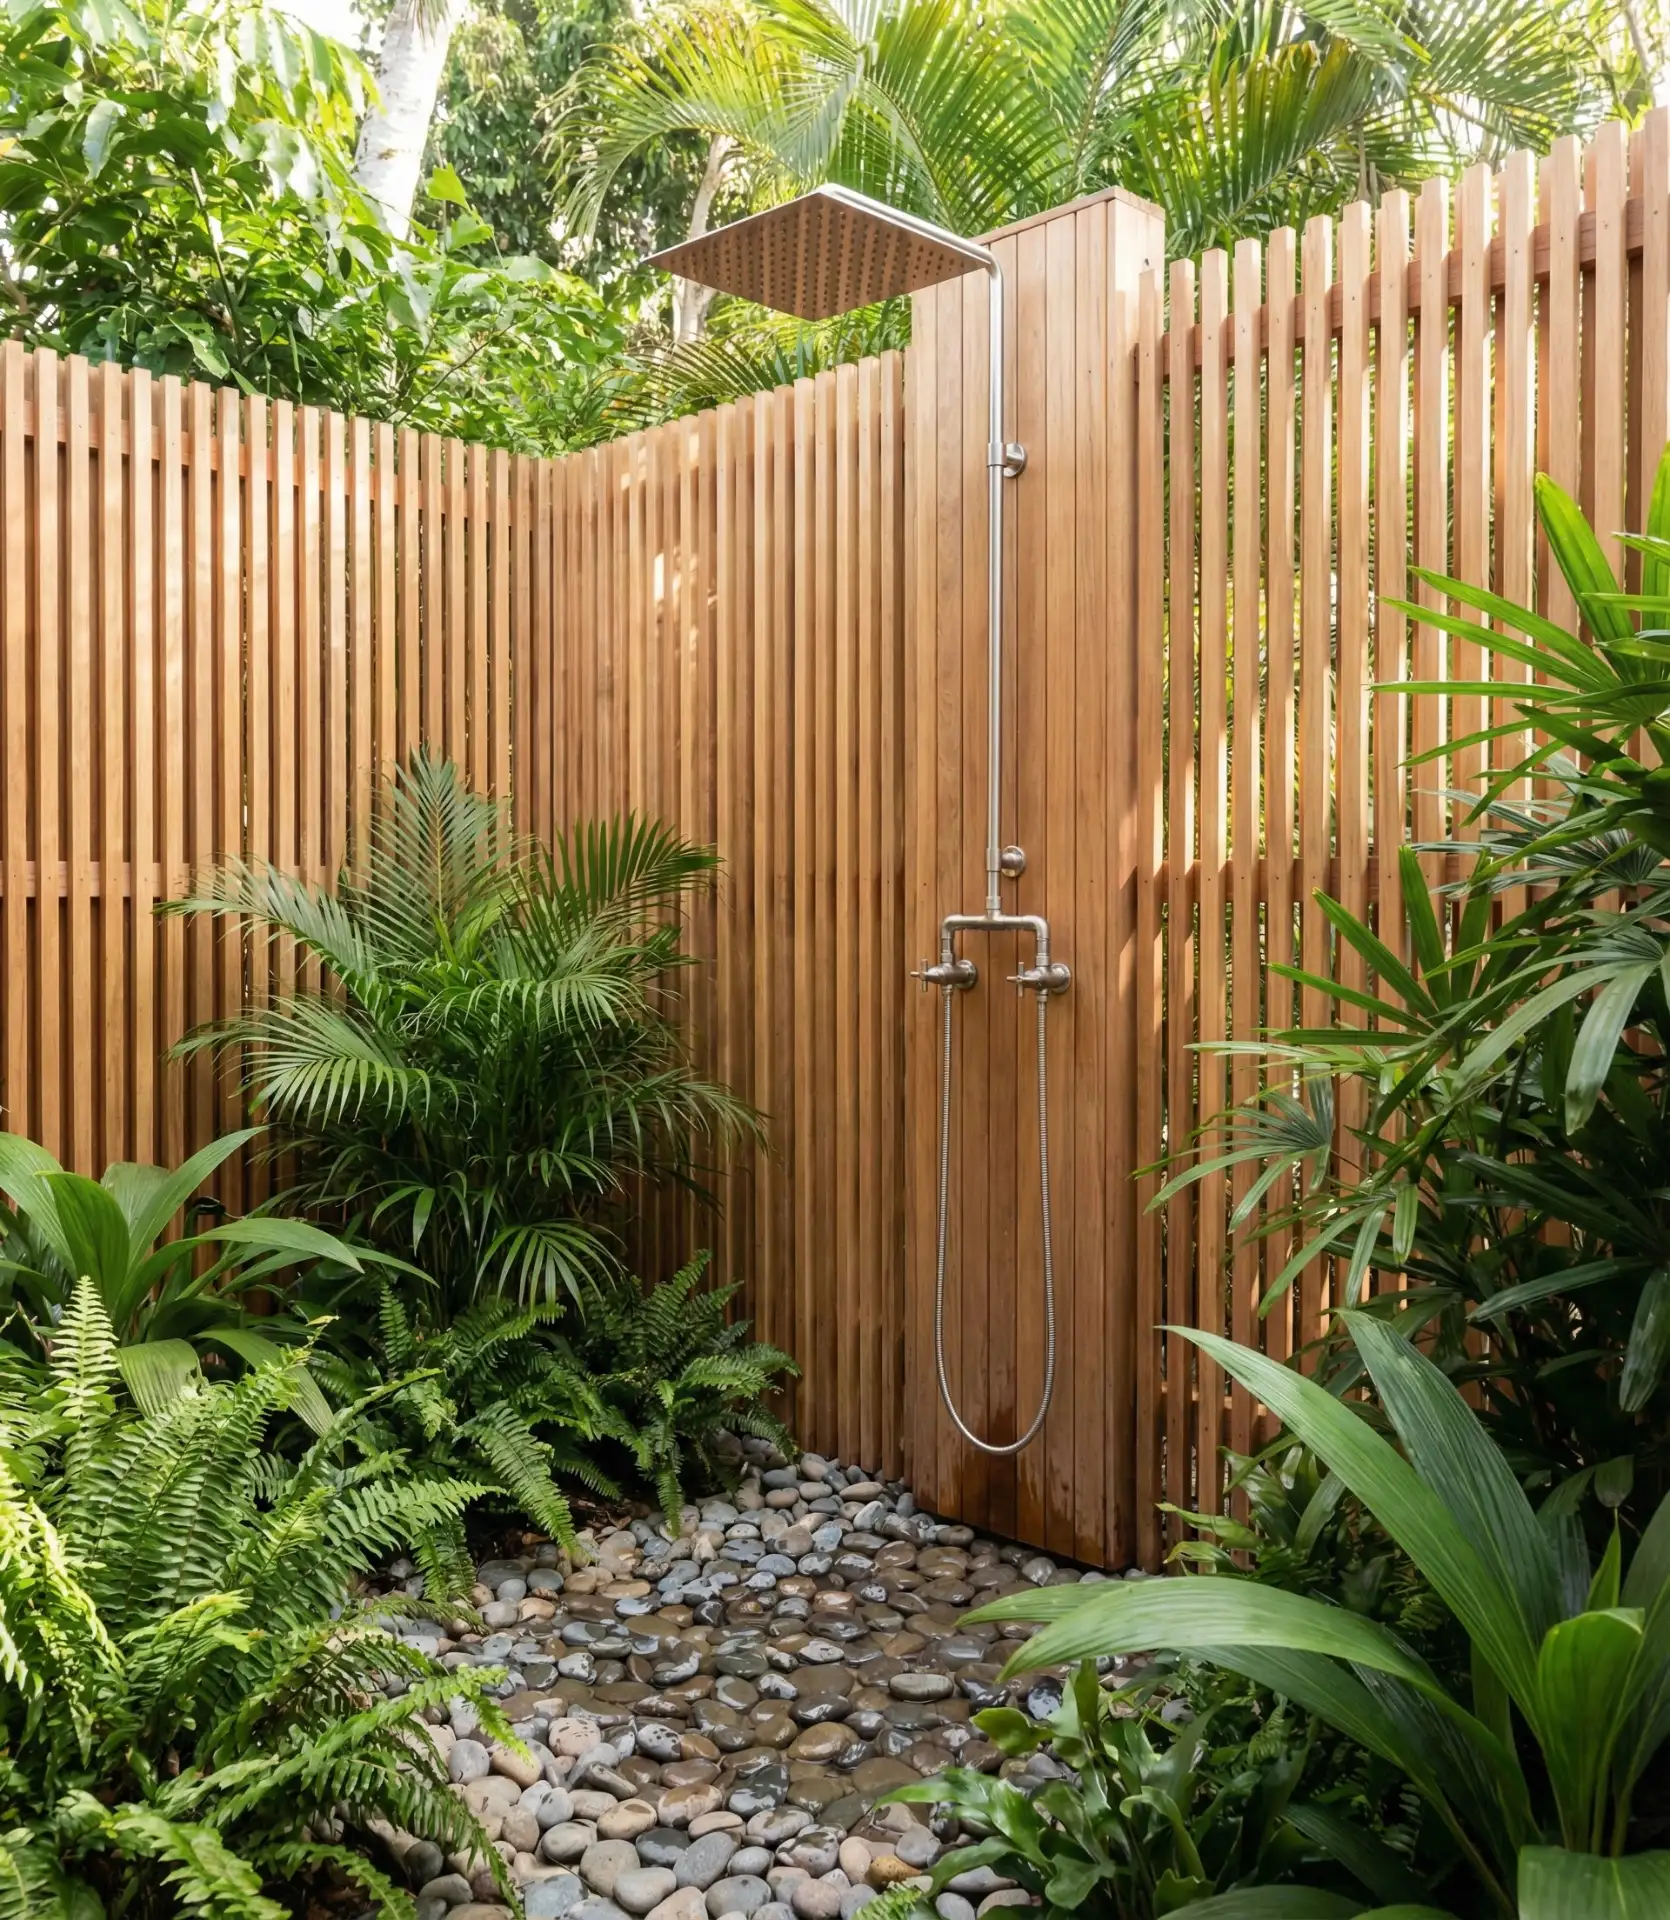
Install an outdoor shower adjacent to your pool area for rinsing before swimming and cleaning up afterward. A simple setup requires just a hot/cold water connection, showerhead, and privacy screening—achievable for $1,500-$3,000. More elaborate versions include teak flooring, stone walls, and rainfall showerheads for a luxury spa feel. Position the shower where drainage naturally flows away from the pool deck and structures. 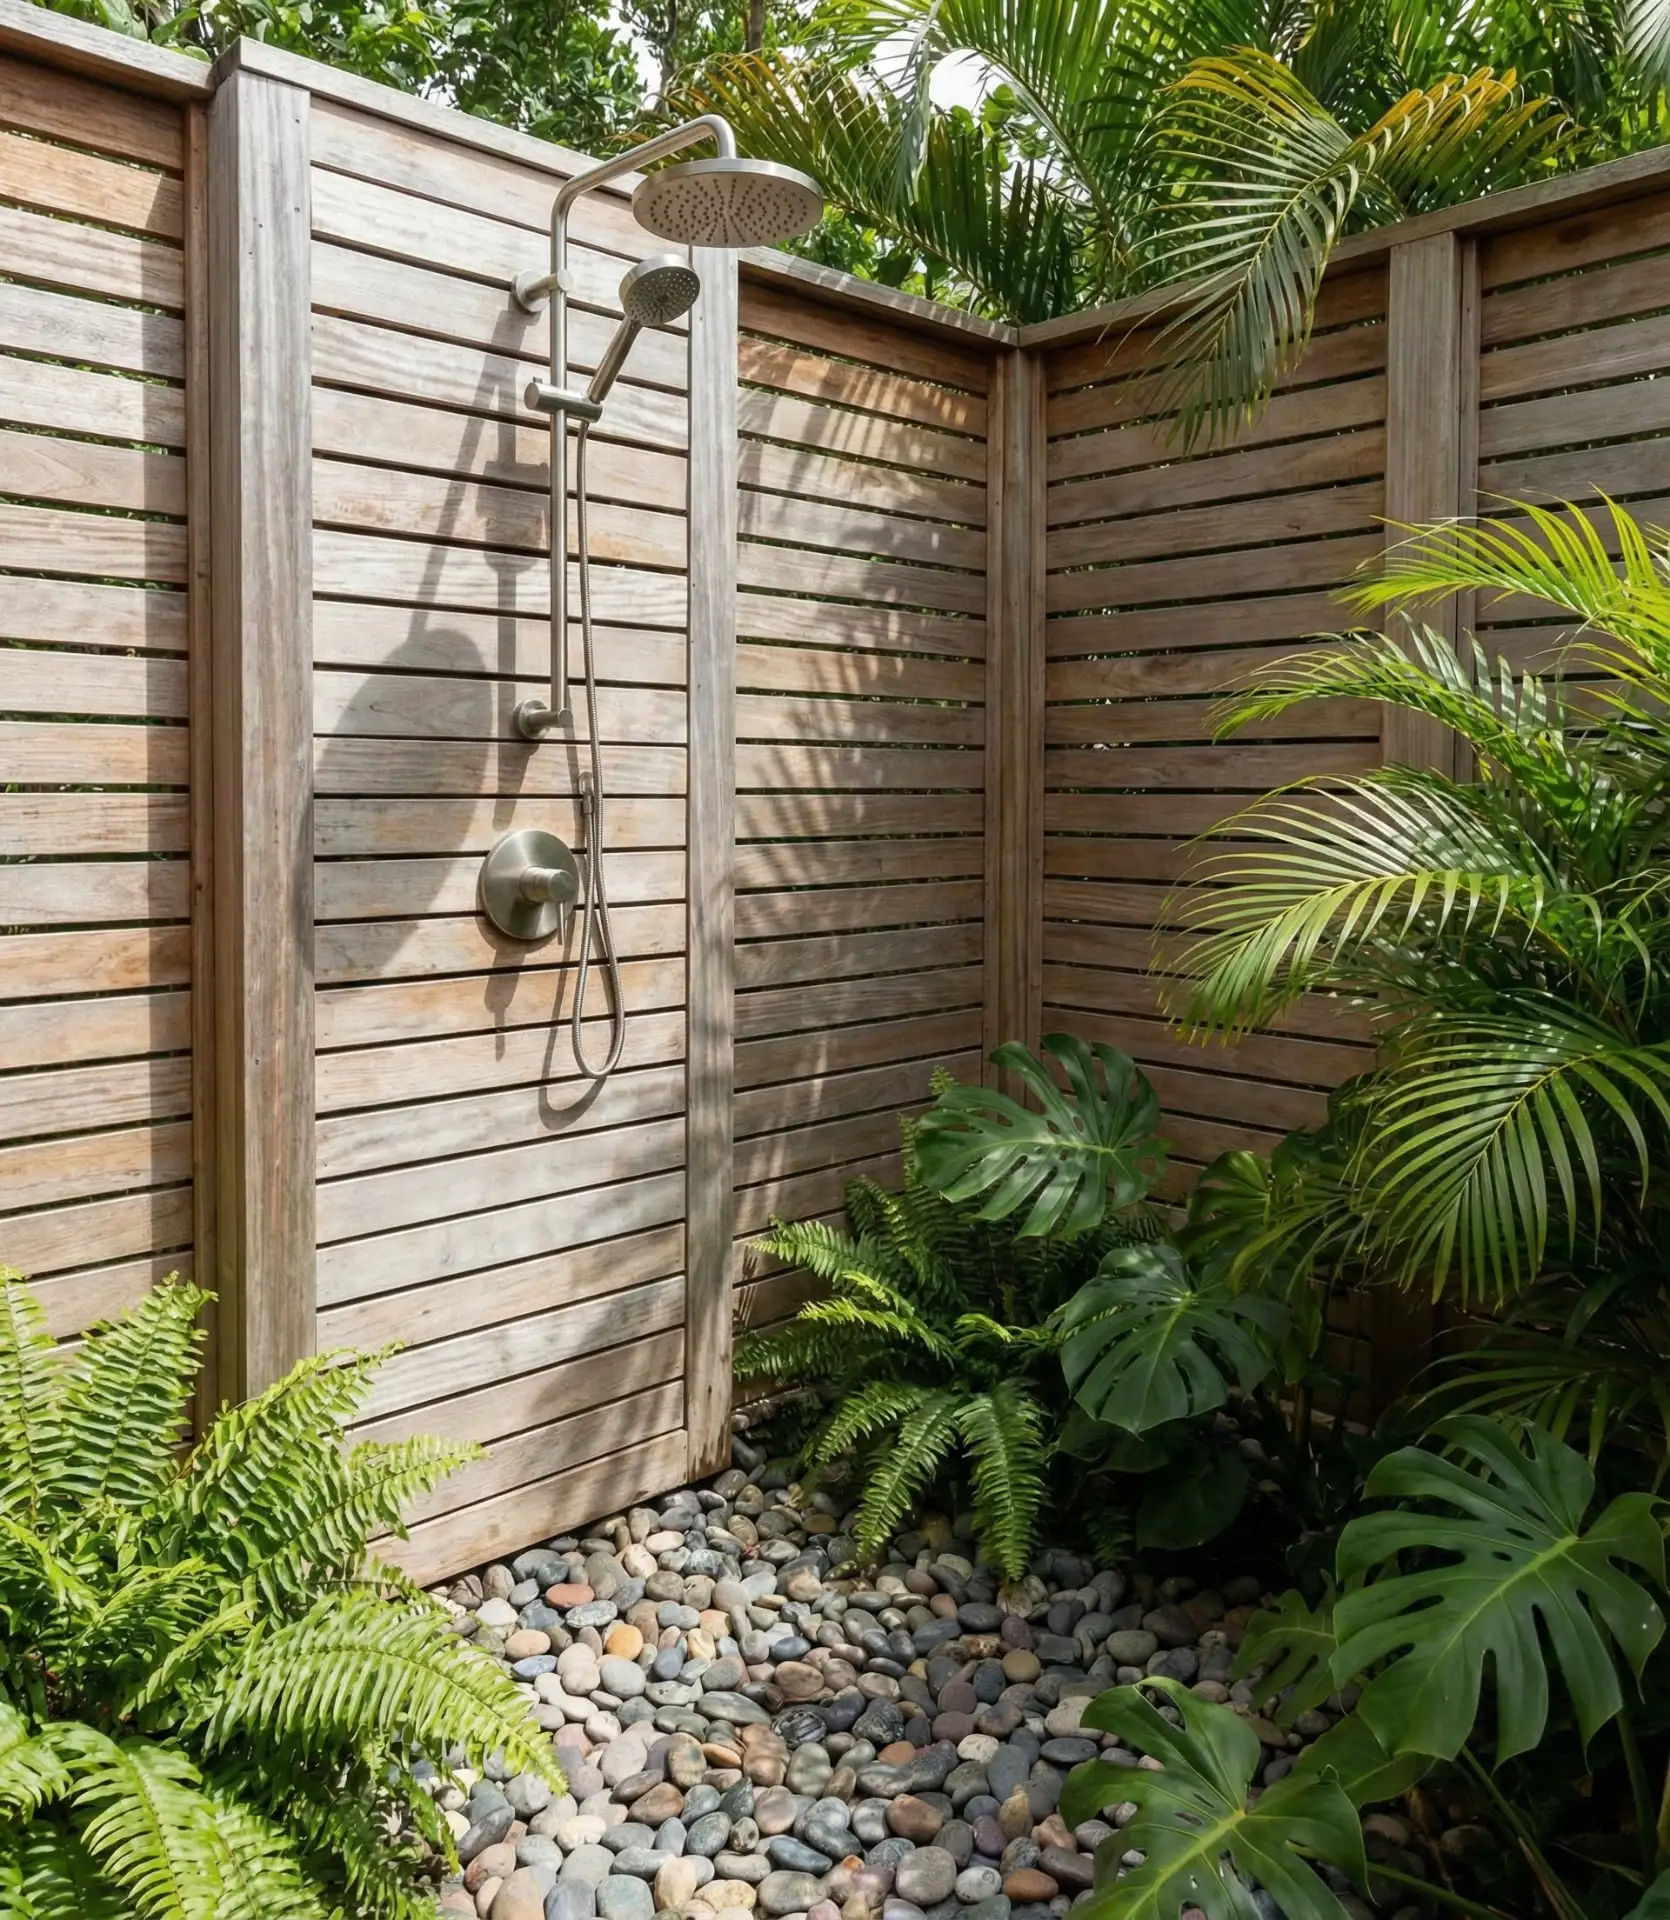
In hot climates, outdoor showers are used to rinse off after the beach, gardening, or washing the dog. They help keep the indoors clean when children are in and out of the pool, and in winter, smart people put a valve to cut off the outdoor shower to drain the pipes so they don’t freeze. It doesn’t add much value to your property, but it does a lot for your daily life.
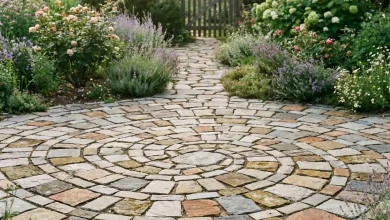
20. Meandering Gravel Path Through Garden Beds
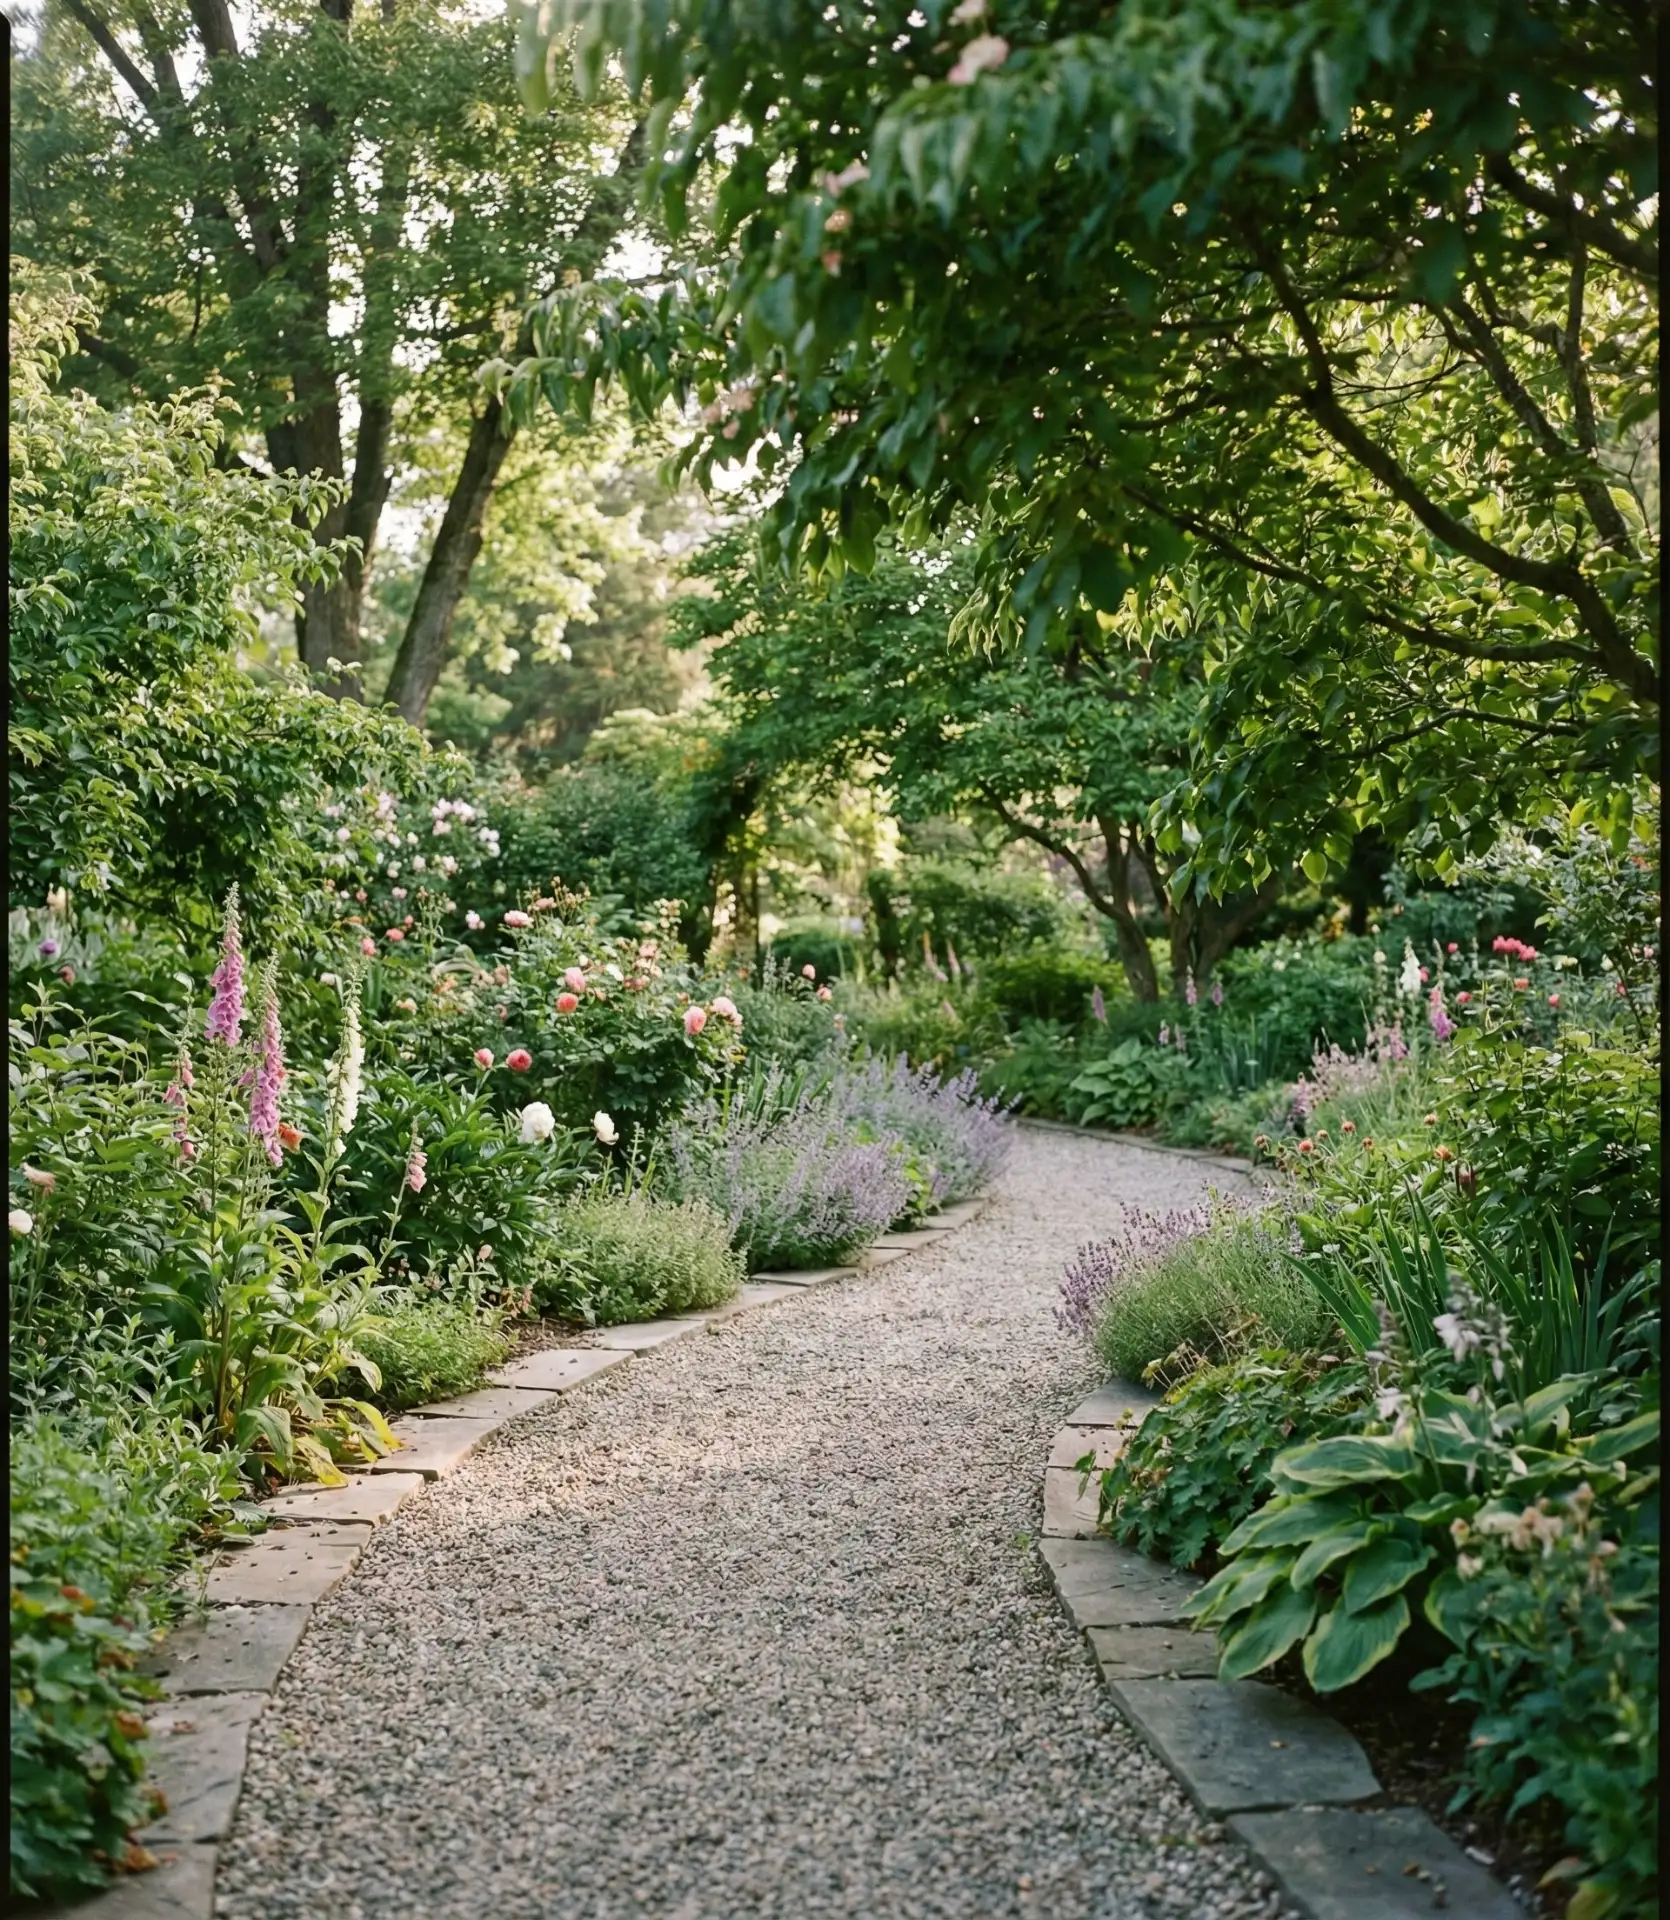
Using pea gravel or decomposed granite, create a winding path that leads through perennial garden beds, connecting different zones of the yard. This type of design invites people to explore the garden while also making even smaller yards feel bigger (gradually revealing the layout of the yard as individuals move through it). To contain the gravel, use steel strips or flat stones to edge the path. Make the path at least 3 feet wide to allow for comfortable walking, and 4 feet wide if you want to accommodate wheelbarrows and garden carts. 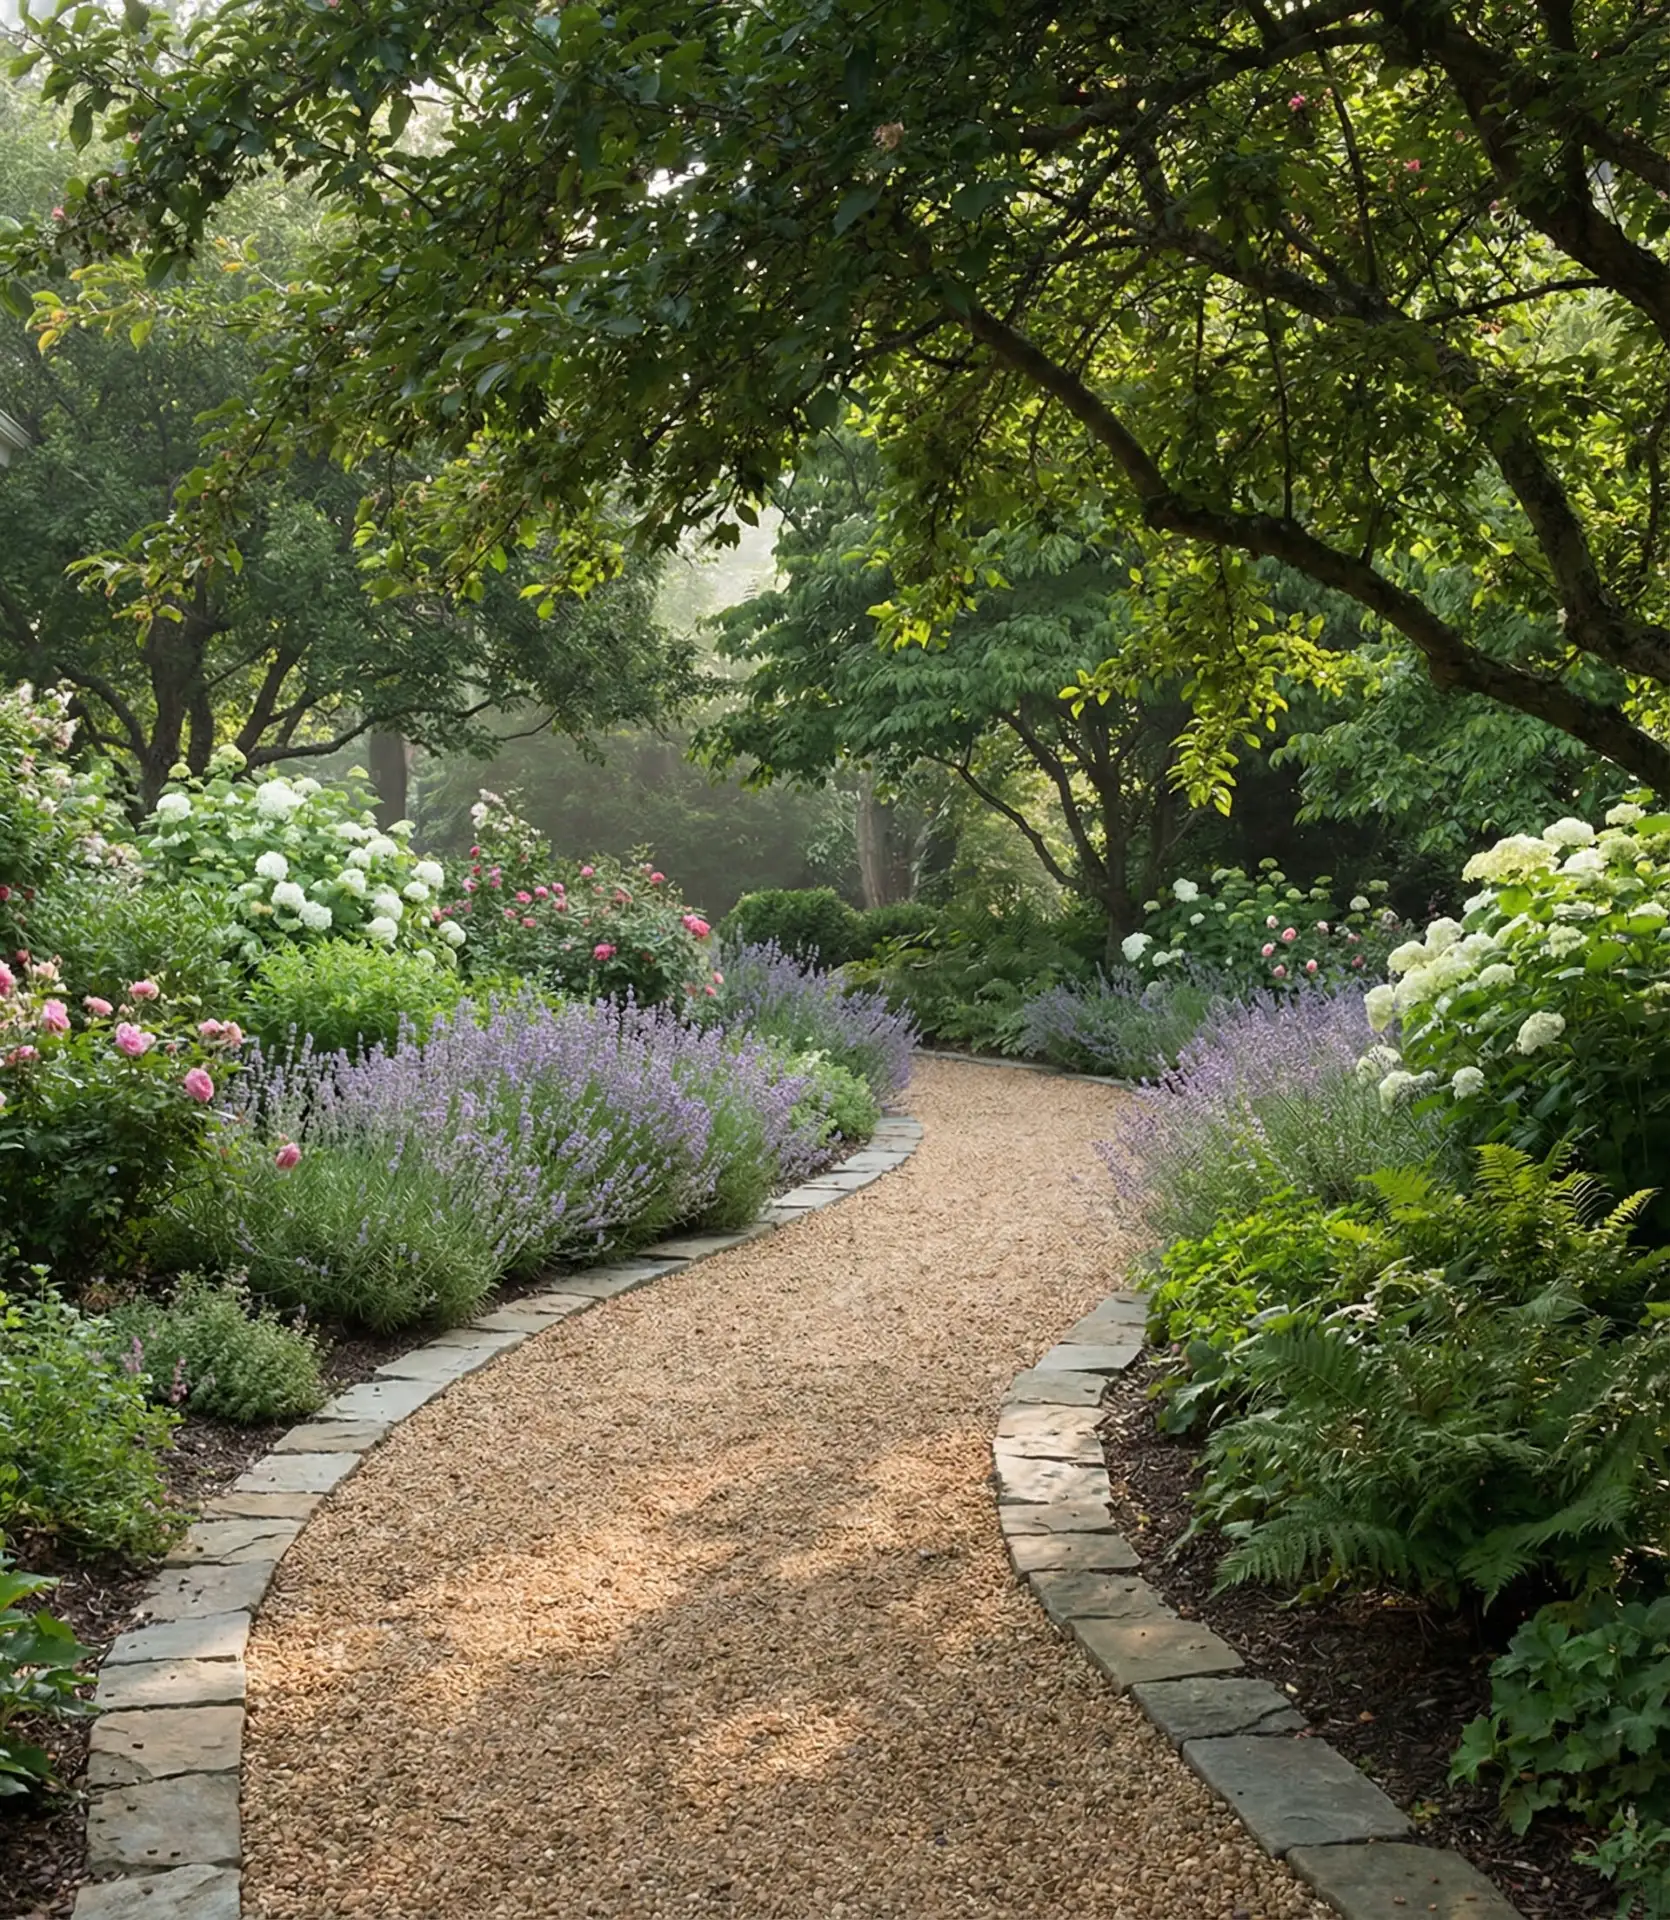
In American landscaping traditions, it is common to find straight paths, but a winding path can create the romantic look of cottage-style gardens, which have become popular on design-sharing sites like Pinterest. Winding paths can also be inviting, improving the aesthetics of the yard while also being functional and solving drainage issues (water can percolate through the gravel rather than run off as it does with a solid pavement). In 2 to 3 years, you can refresh the path by adding a new thin layer of gravel, which is also easier and more economical than picking a concrete or paved path that will crack and settle over time.
21. Built-In Seating Around Tree Canopy
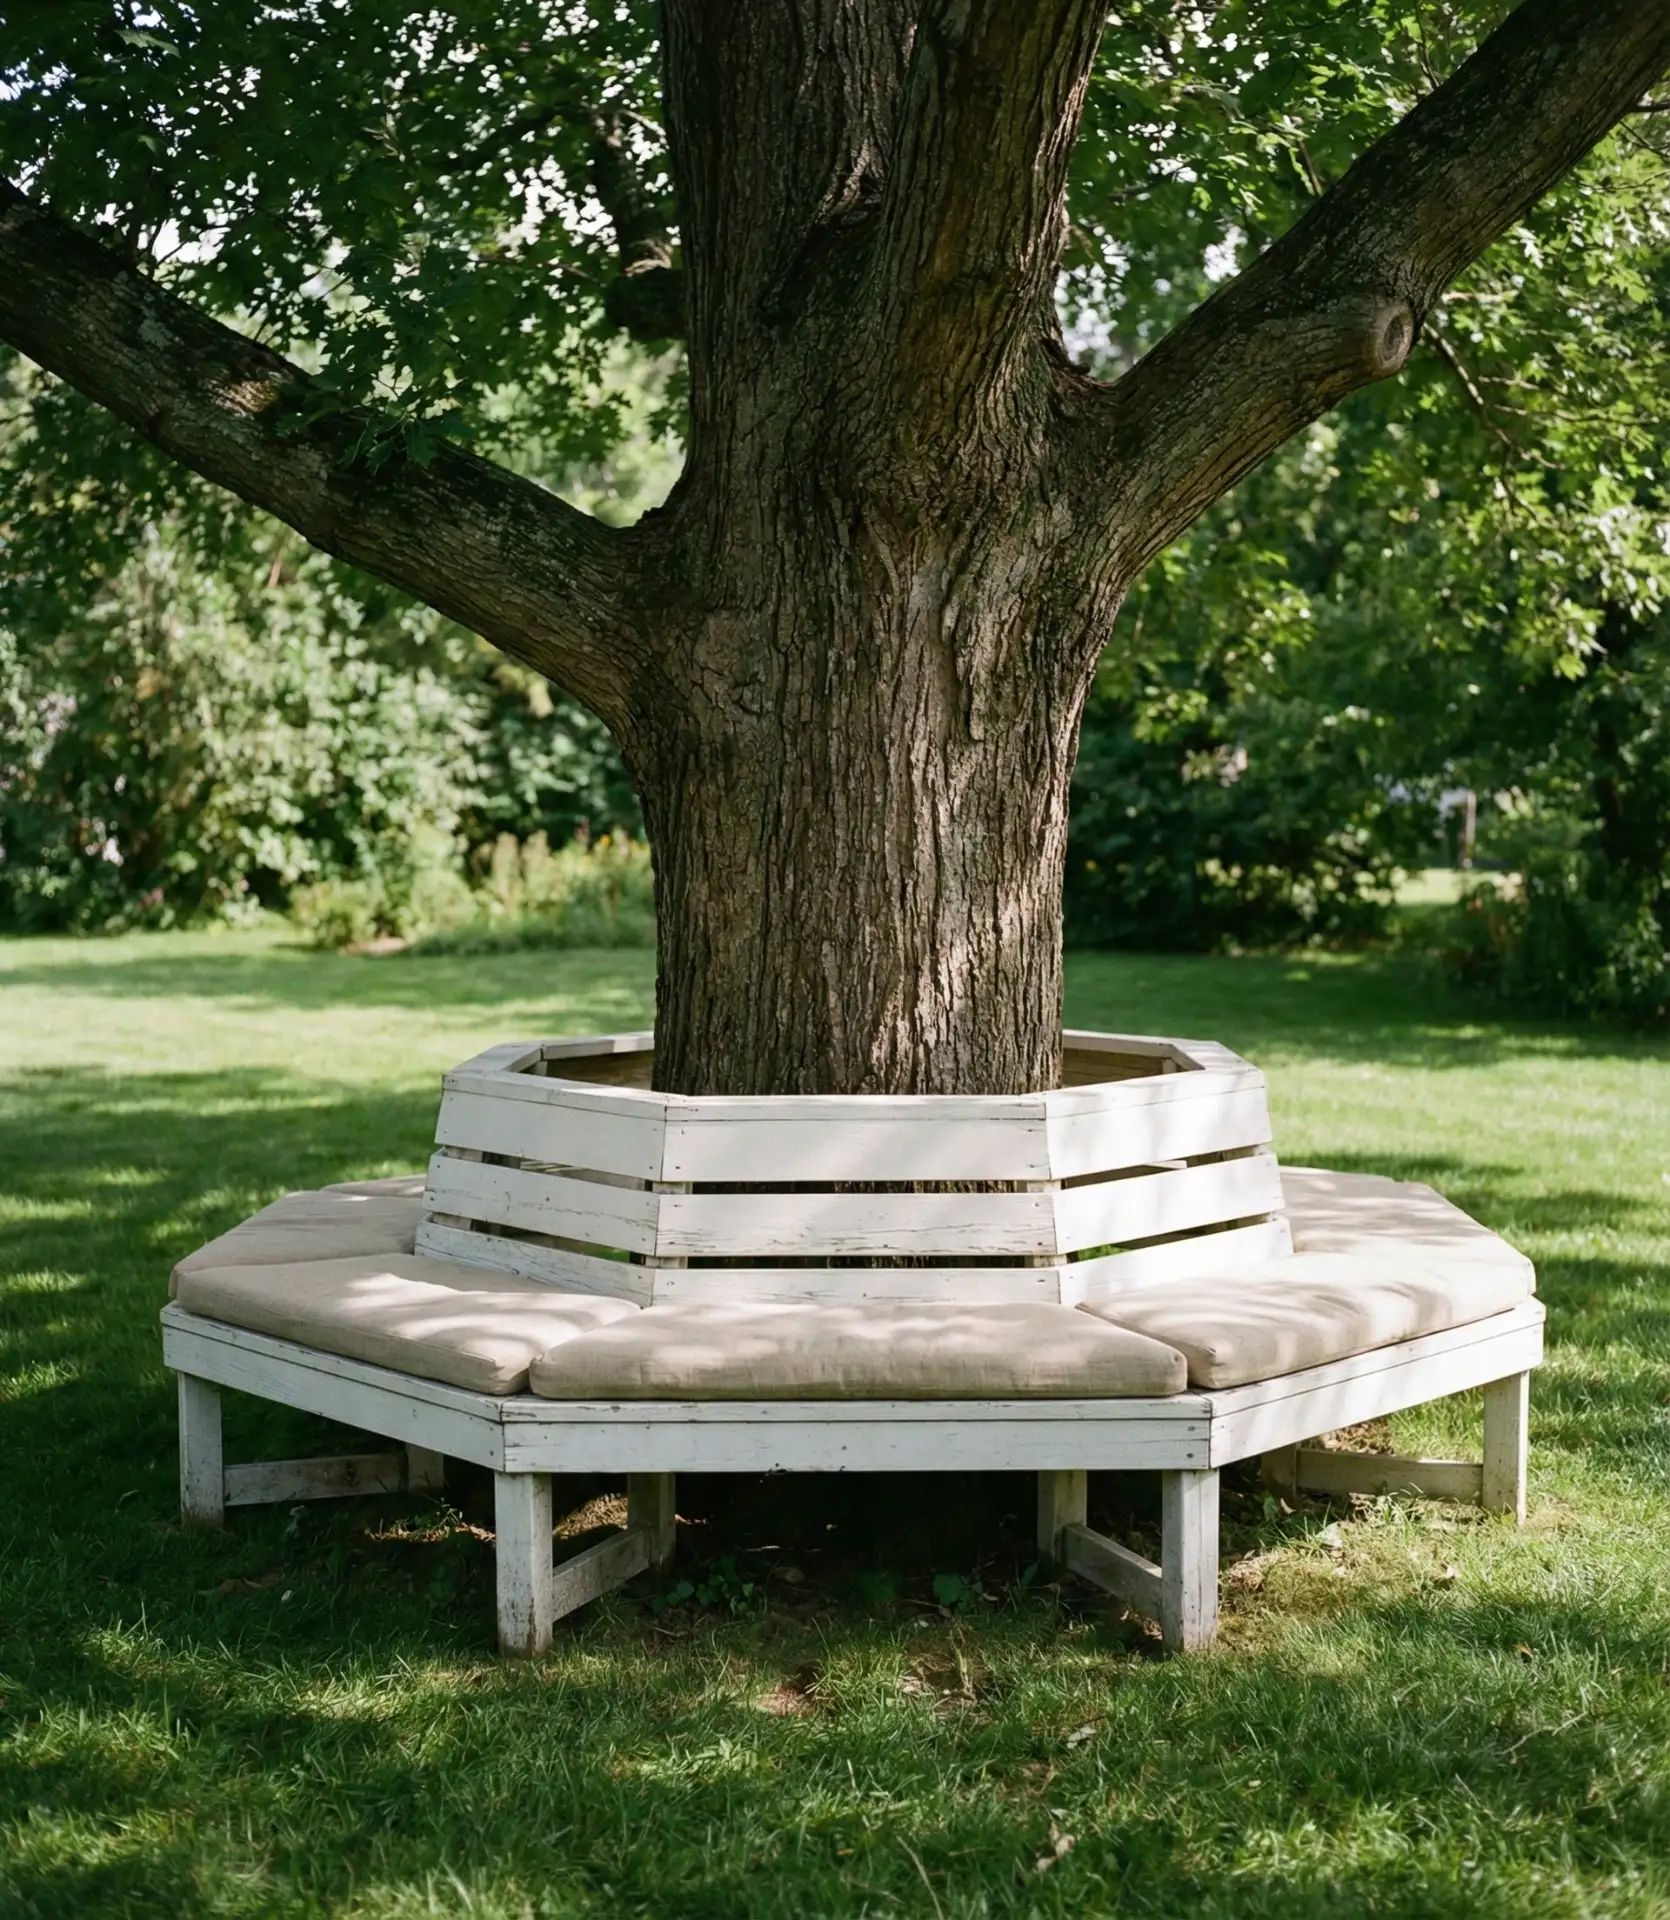
Construct a circular or hexagonal bench surrounding a mature shade tree, creating a cozy gathering spot that capitalizes on existing natural assets. This classic design requires minimal materials—typically 2×4 and 2×6 lumber plus exterior fasteners—but delivers outsized visual and functional impact. Leave adequate space around the trunk for growth, and never attach the bench directly to the tree. Position in partial shade for maximum seasonal comfort. 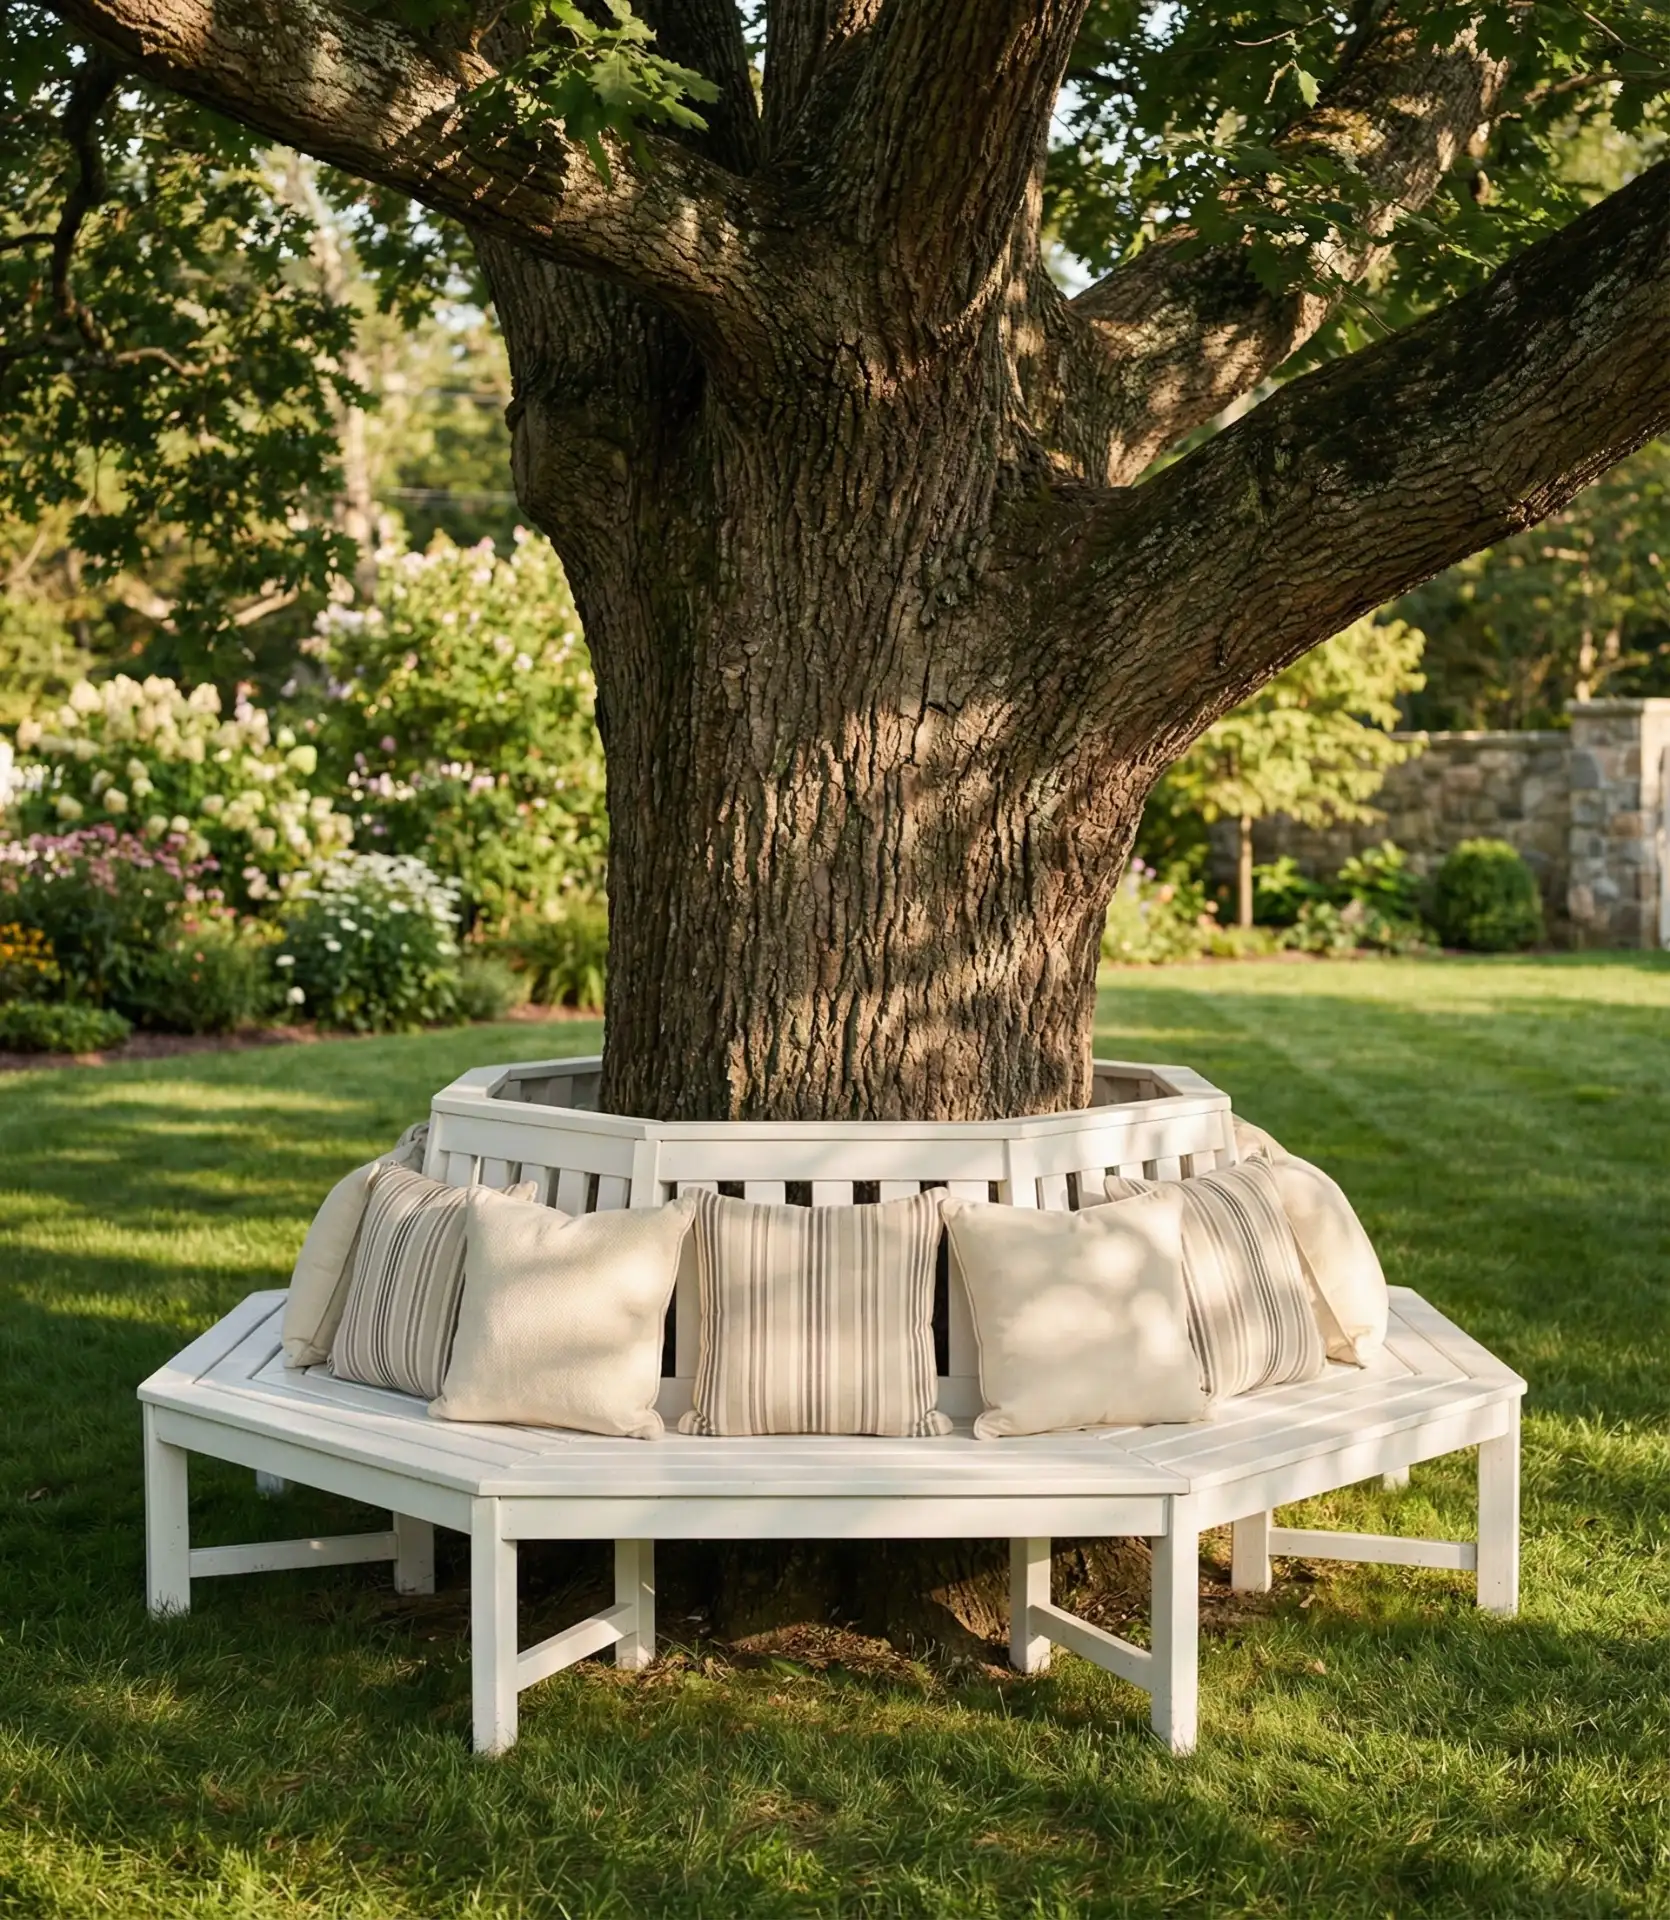
One family in North Carolina built their tree bench in sections that unbolt for easy removal—necessary because they need to mulch around the tree base annually. This modular approach also allows adjusting the bench size as the tree grows. A common mistake is to build too close to the trunk without contemplating how it will grow. Allow at least 6–12 inches of clearance, depending on tree species and age. Fast-growing trees like willows need more space than slow growers like oaks.
22. Compact Putting Green Practice Area
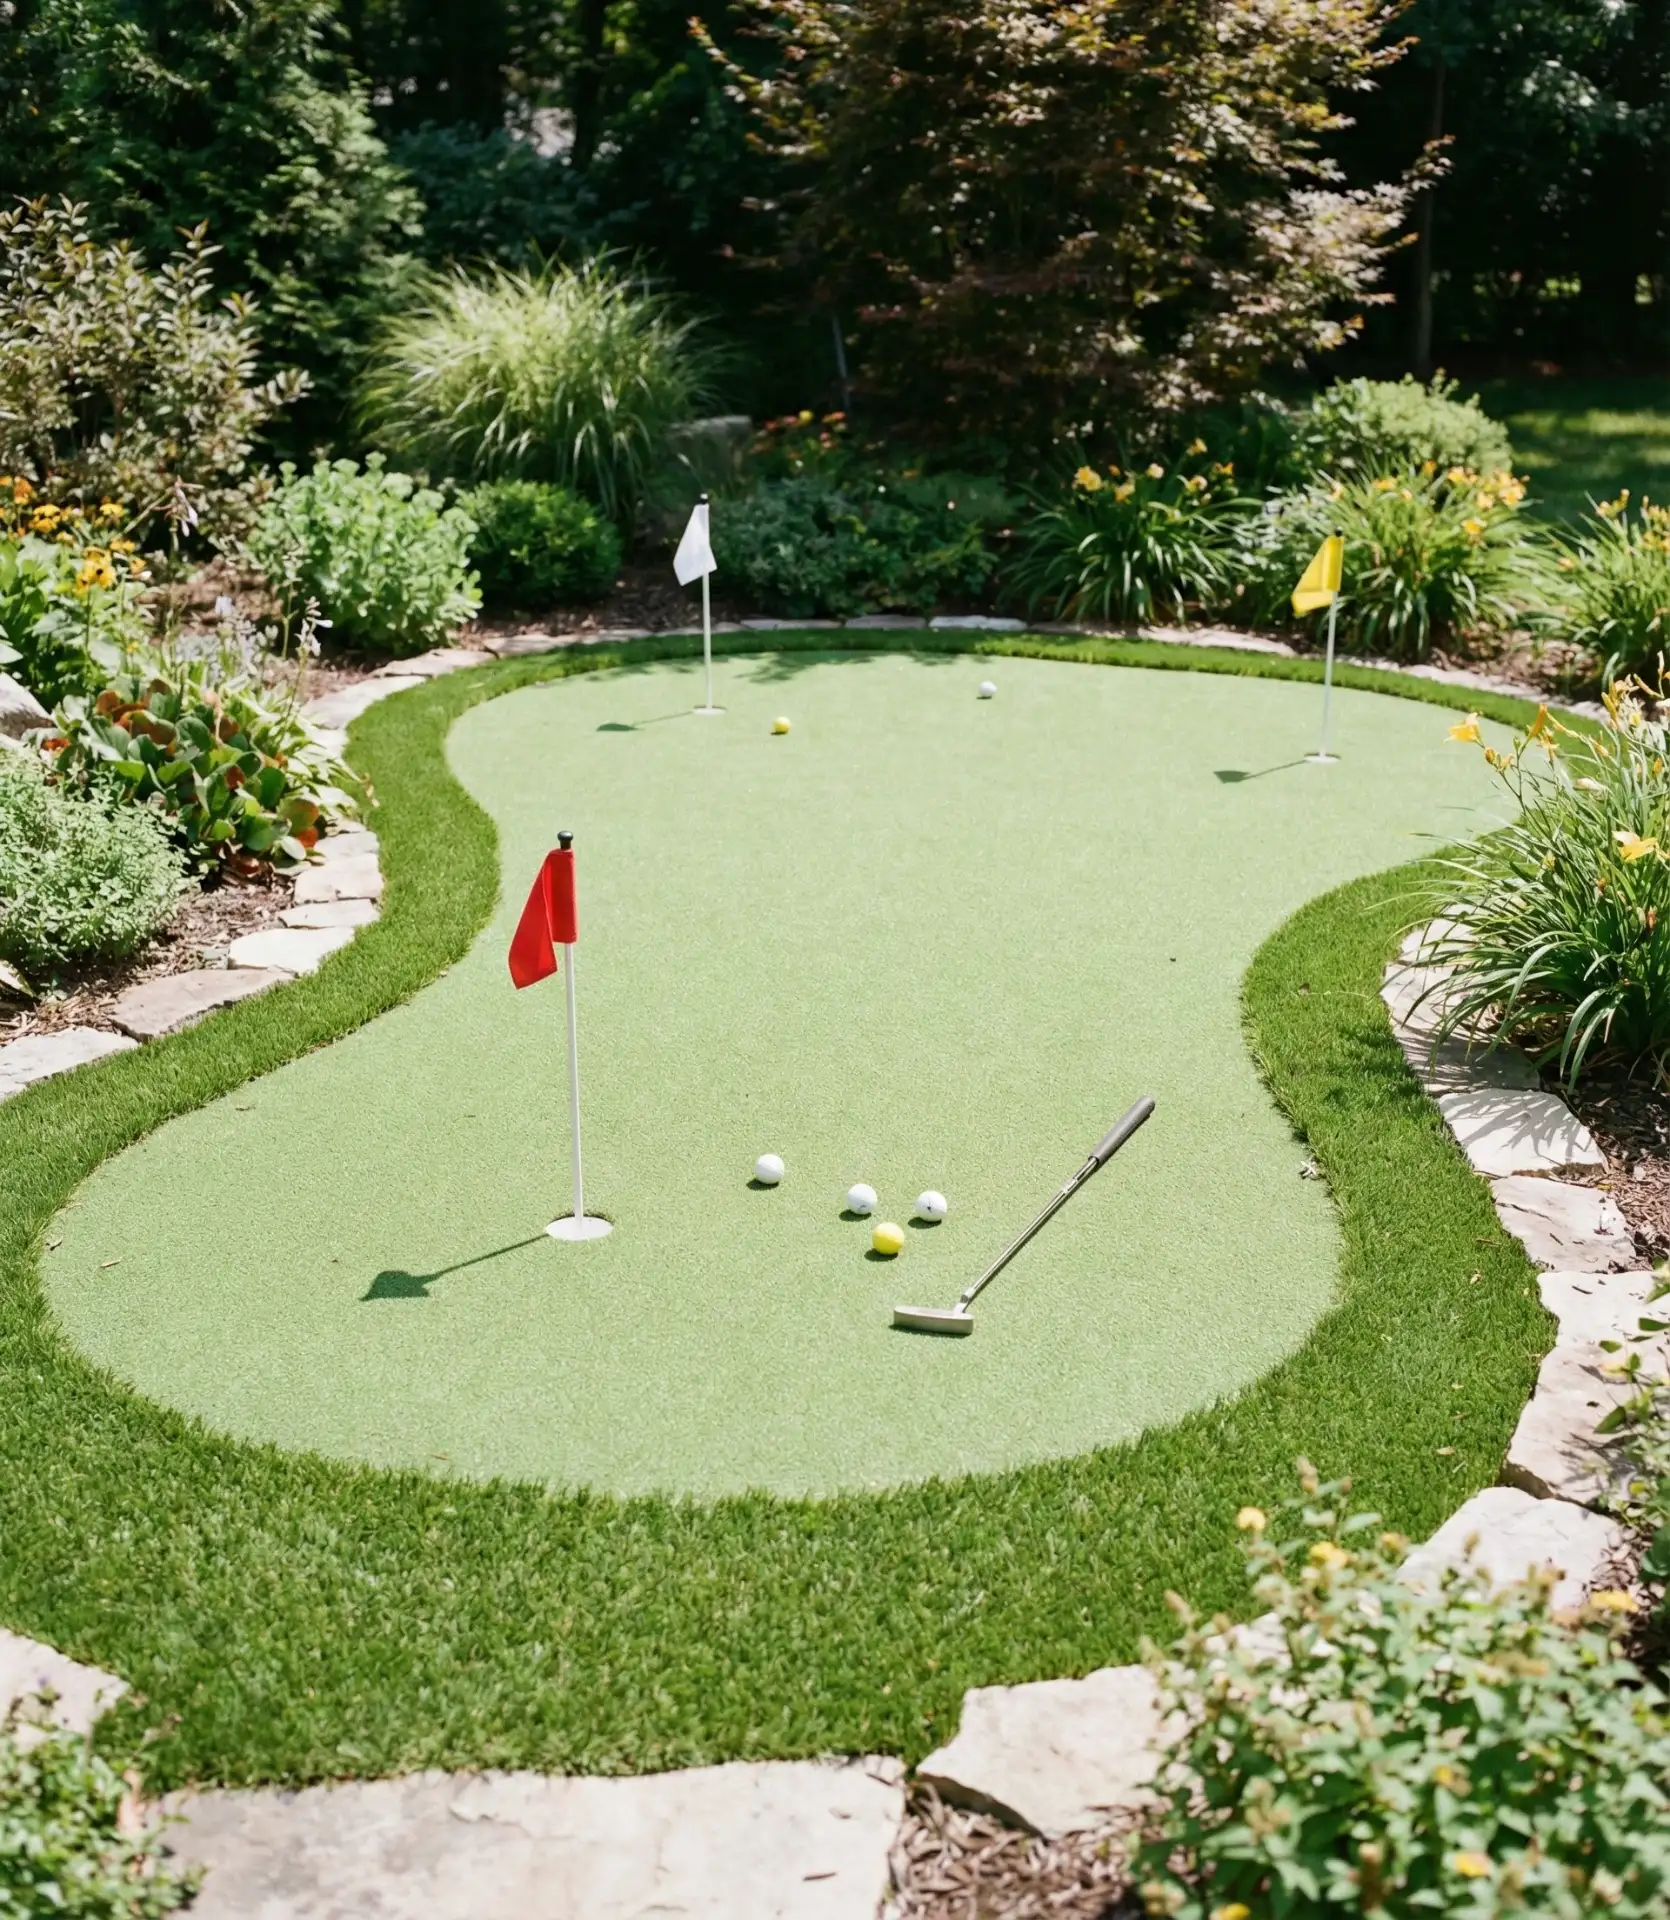
Install a small synthetic putting green—even 12×15 feet provides meaningful practice space for golf enthusiasts. Modern artificial turf designed for golf replicates true putting surfaces with accurate ball roll. This idea appeals to adults while giving children a novel play surface that stays green without maintenance. Include a small fringe area around the green using different turf heights for realistic practice of chip shots. 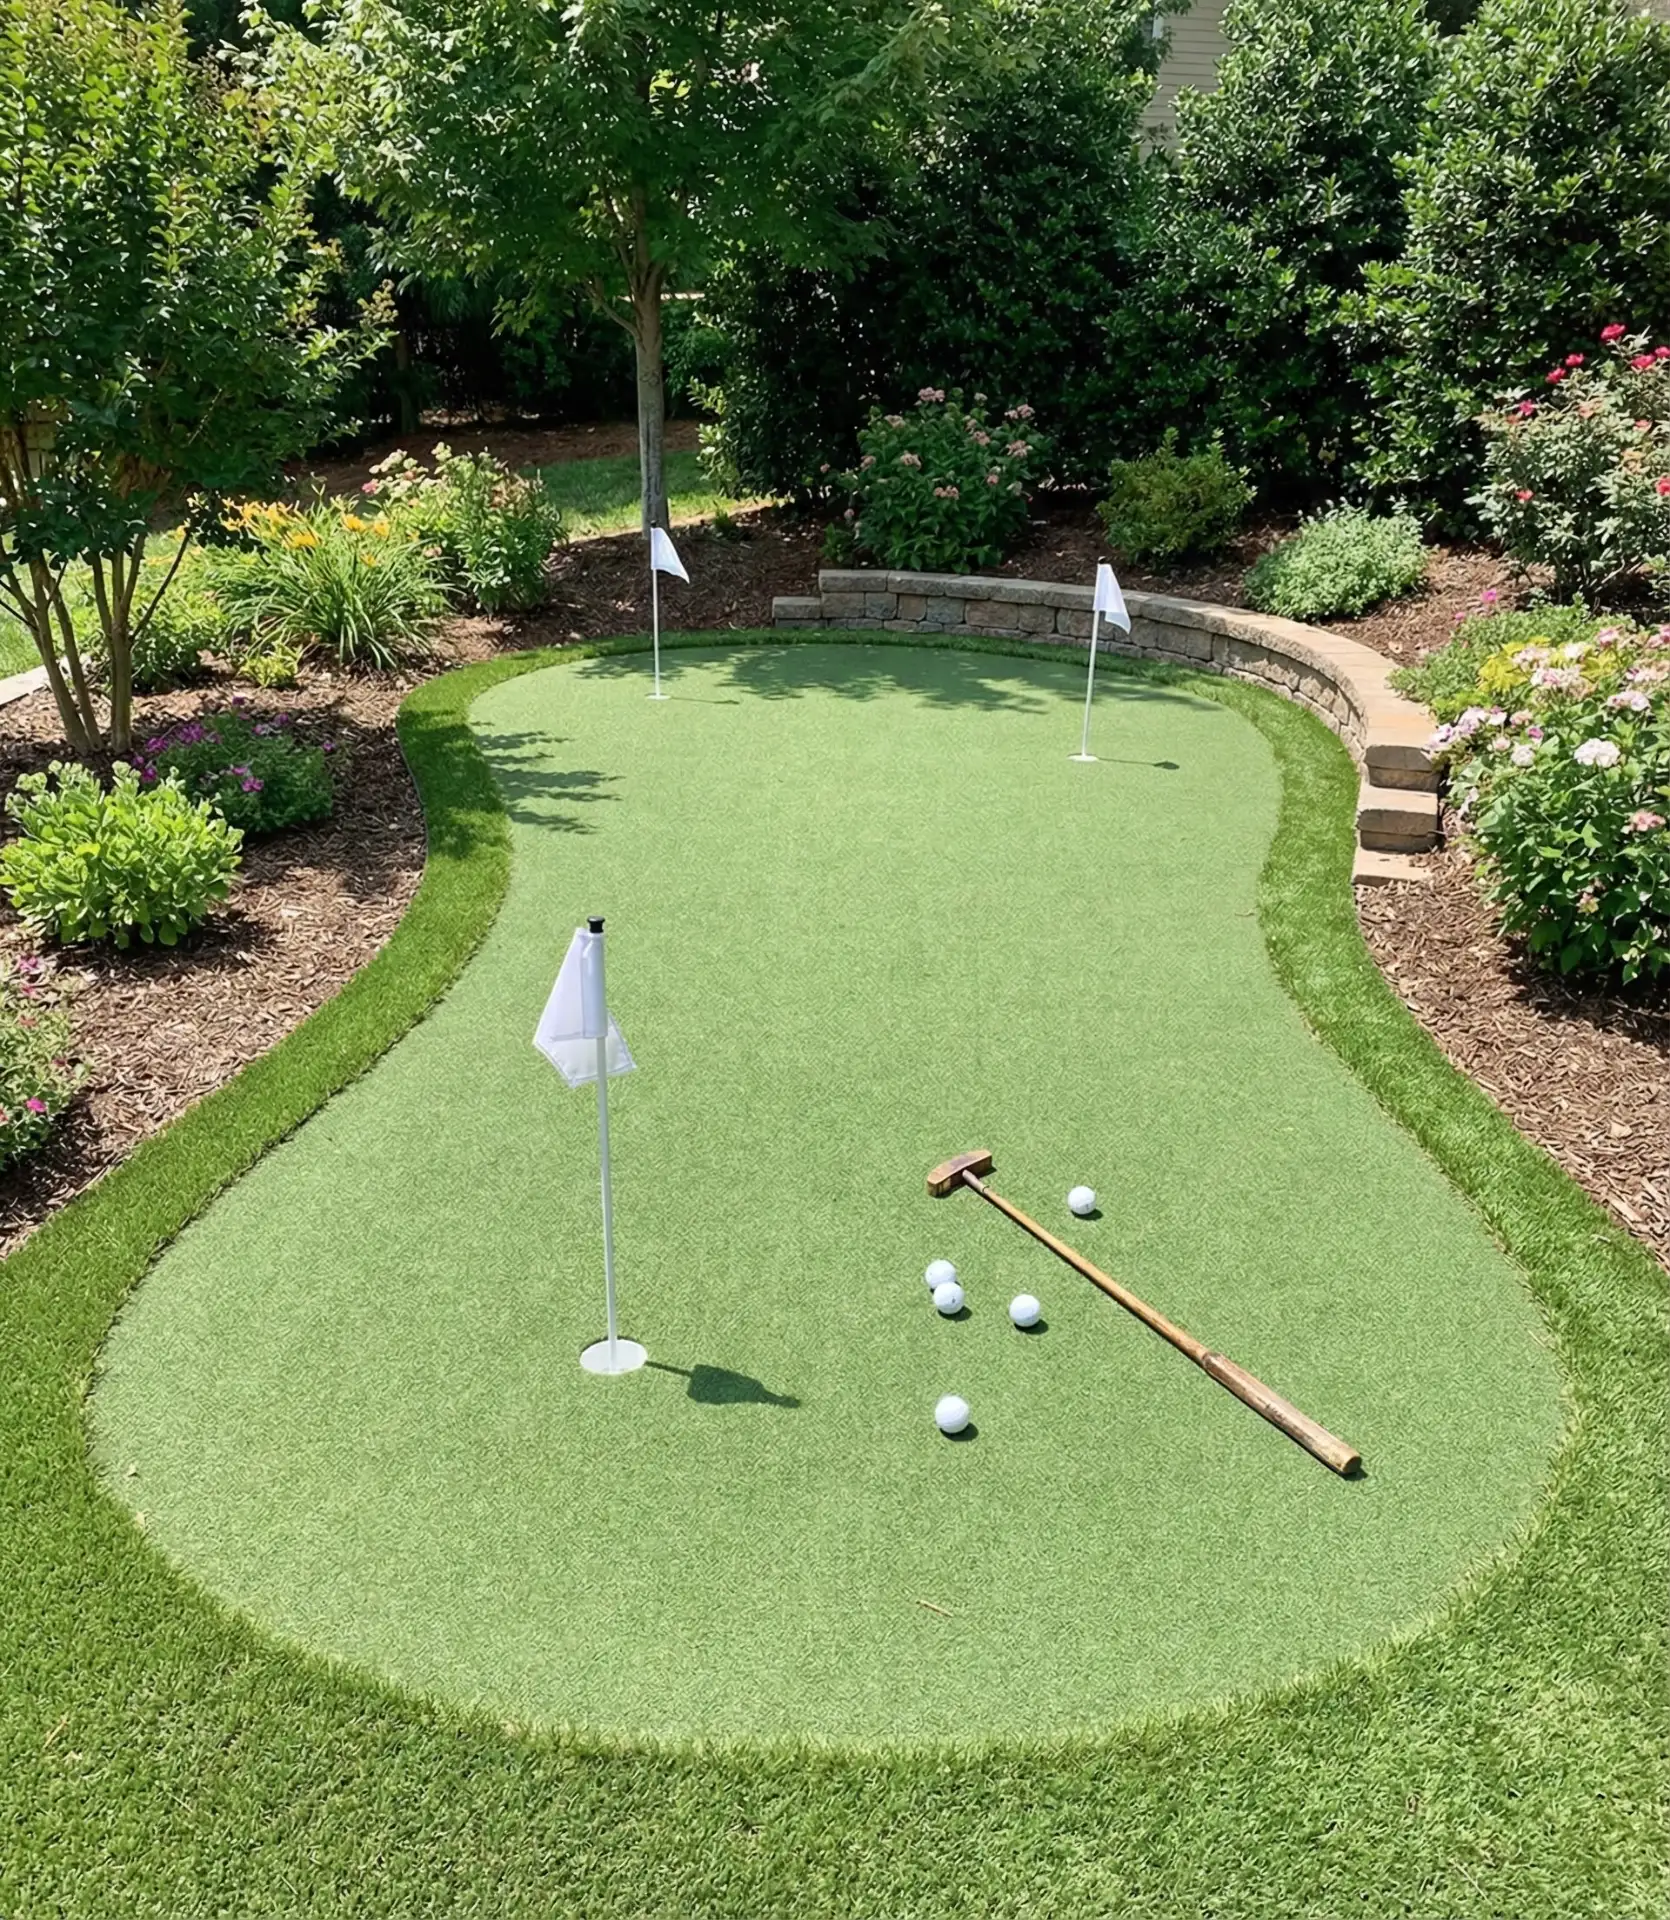
Where the system works best: corner locations in larger yards where the green becomes a destination feature. Golf-playing homeowners report using backyard greens 3-4 times weekly compared to occasional driving range visits, improving their game significantly. Installation costs range from $15 to $30 per square foot for quality systems with proper drainage and base preparation. While not cheap, families passionate about golf find the convenience justifies the investment, especially when travel to courses requires 30+ minutes each direction.
23. Perimeter Privacy Hedge with Gated Access
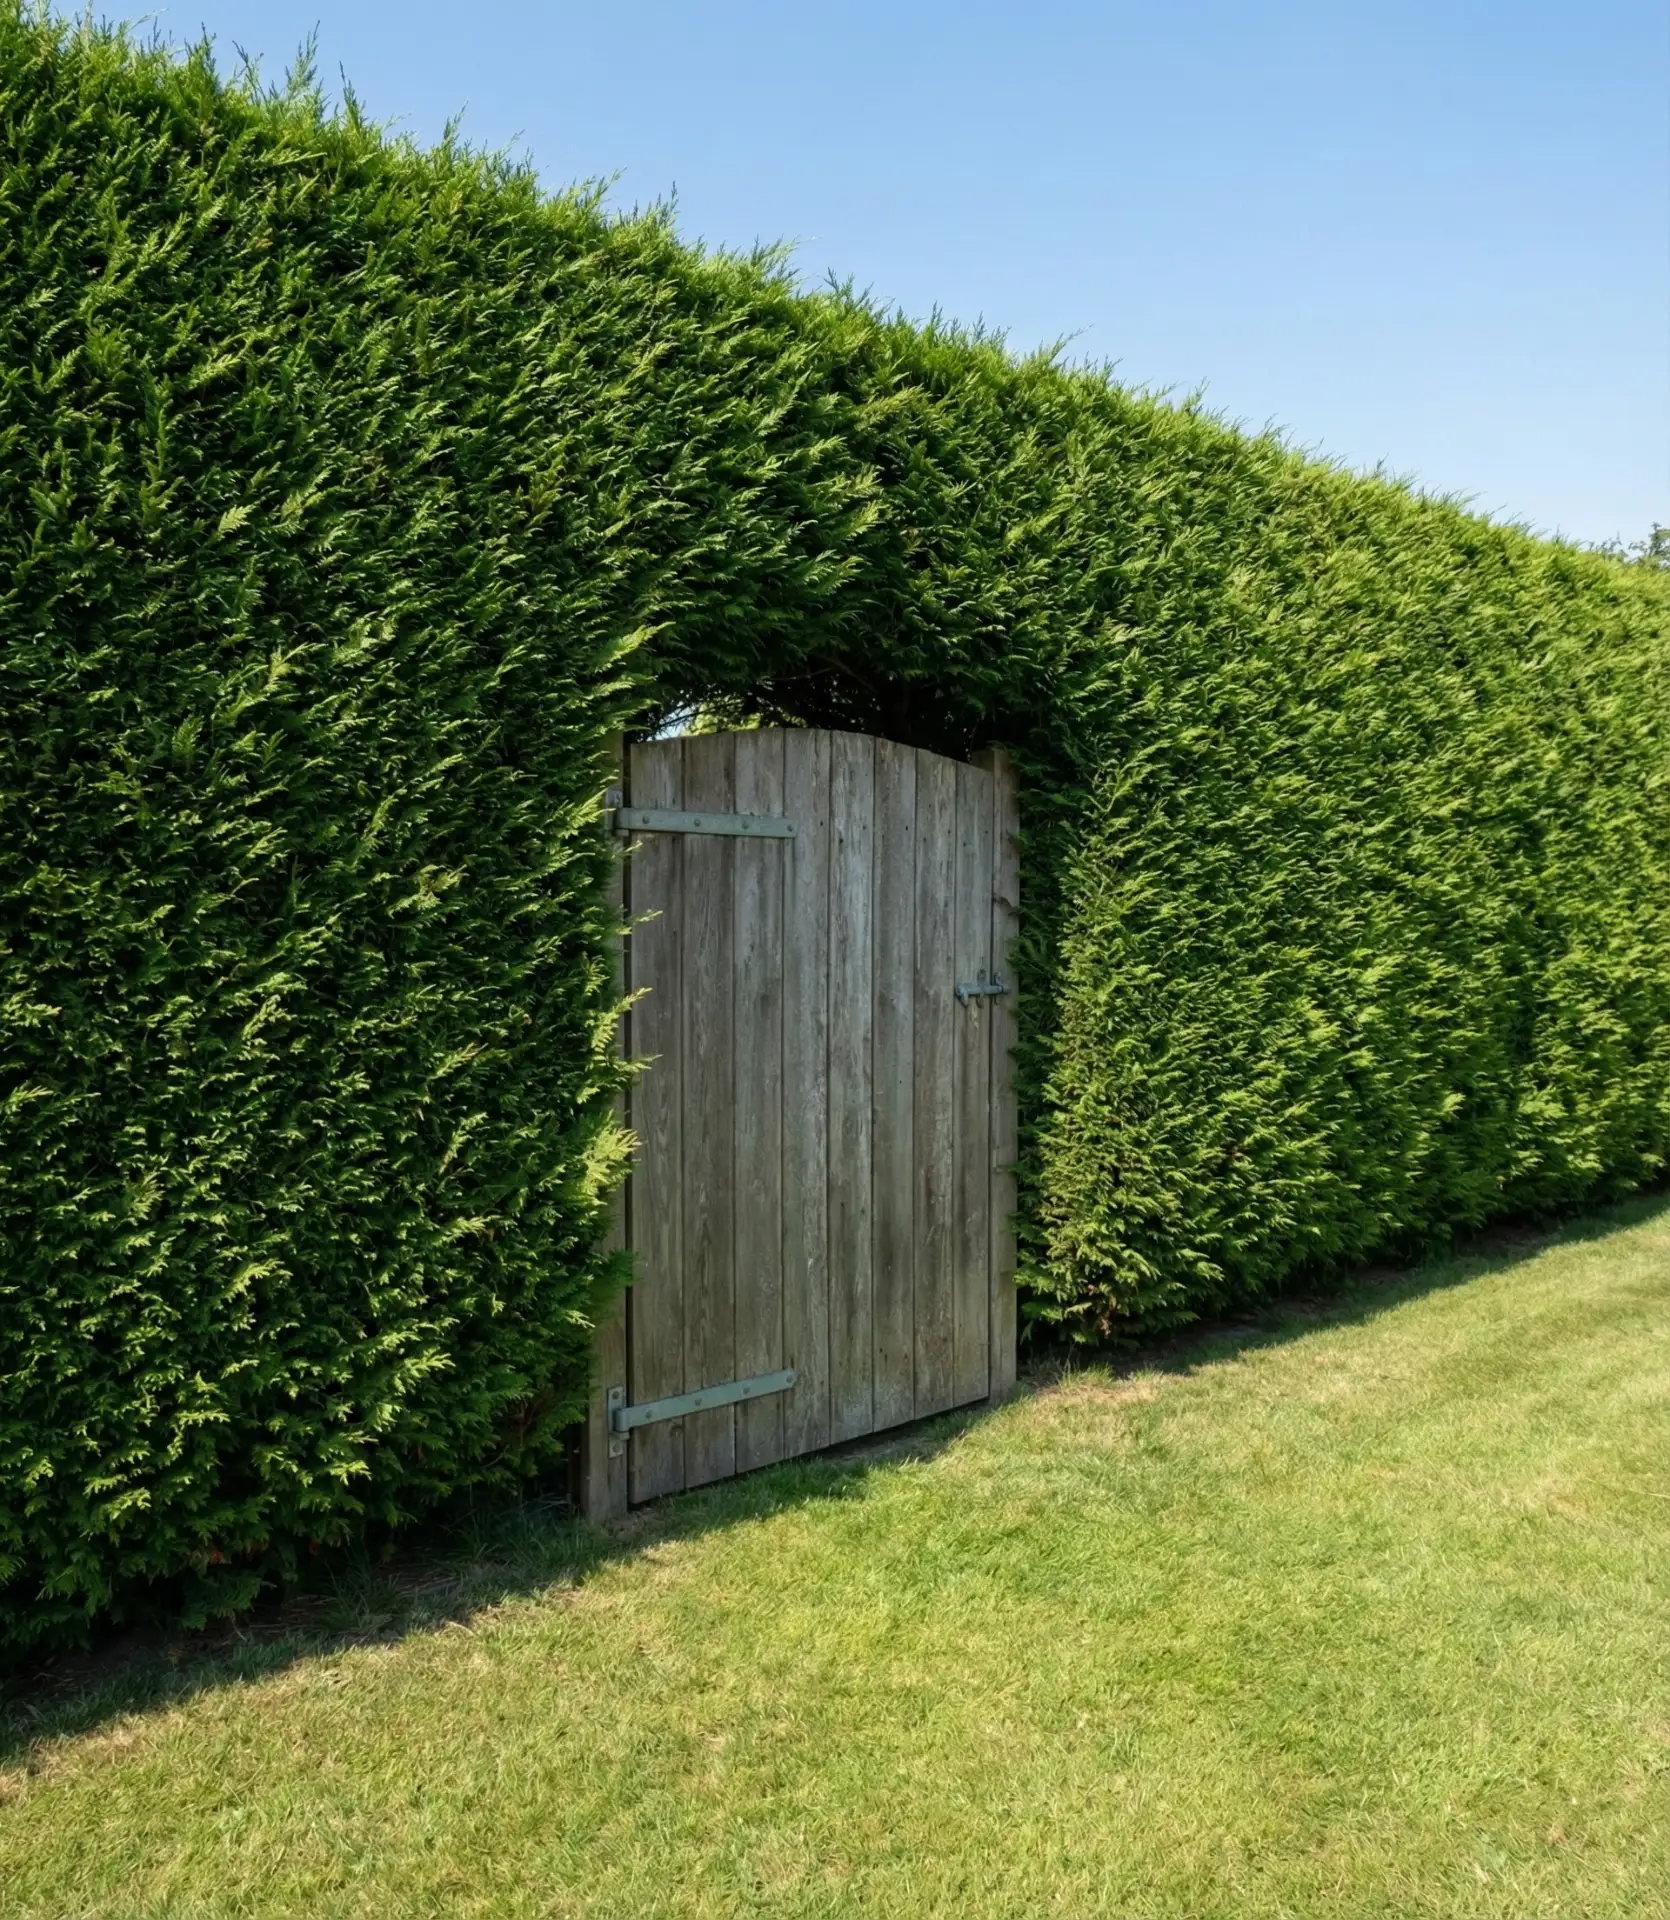
Plant a dense evergreen hedge along property lines using arborvitae, skip laurel, or hornbeam to create living walls that provide privacy without the harshness of fencing. Include one or two simple wooden or metal gates where you need pass-through access. This natural blueprint takes 3-5 years to mature but requires no repainting or repairs and improves with age. Choose species appropriate for your climate and sun conditions. 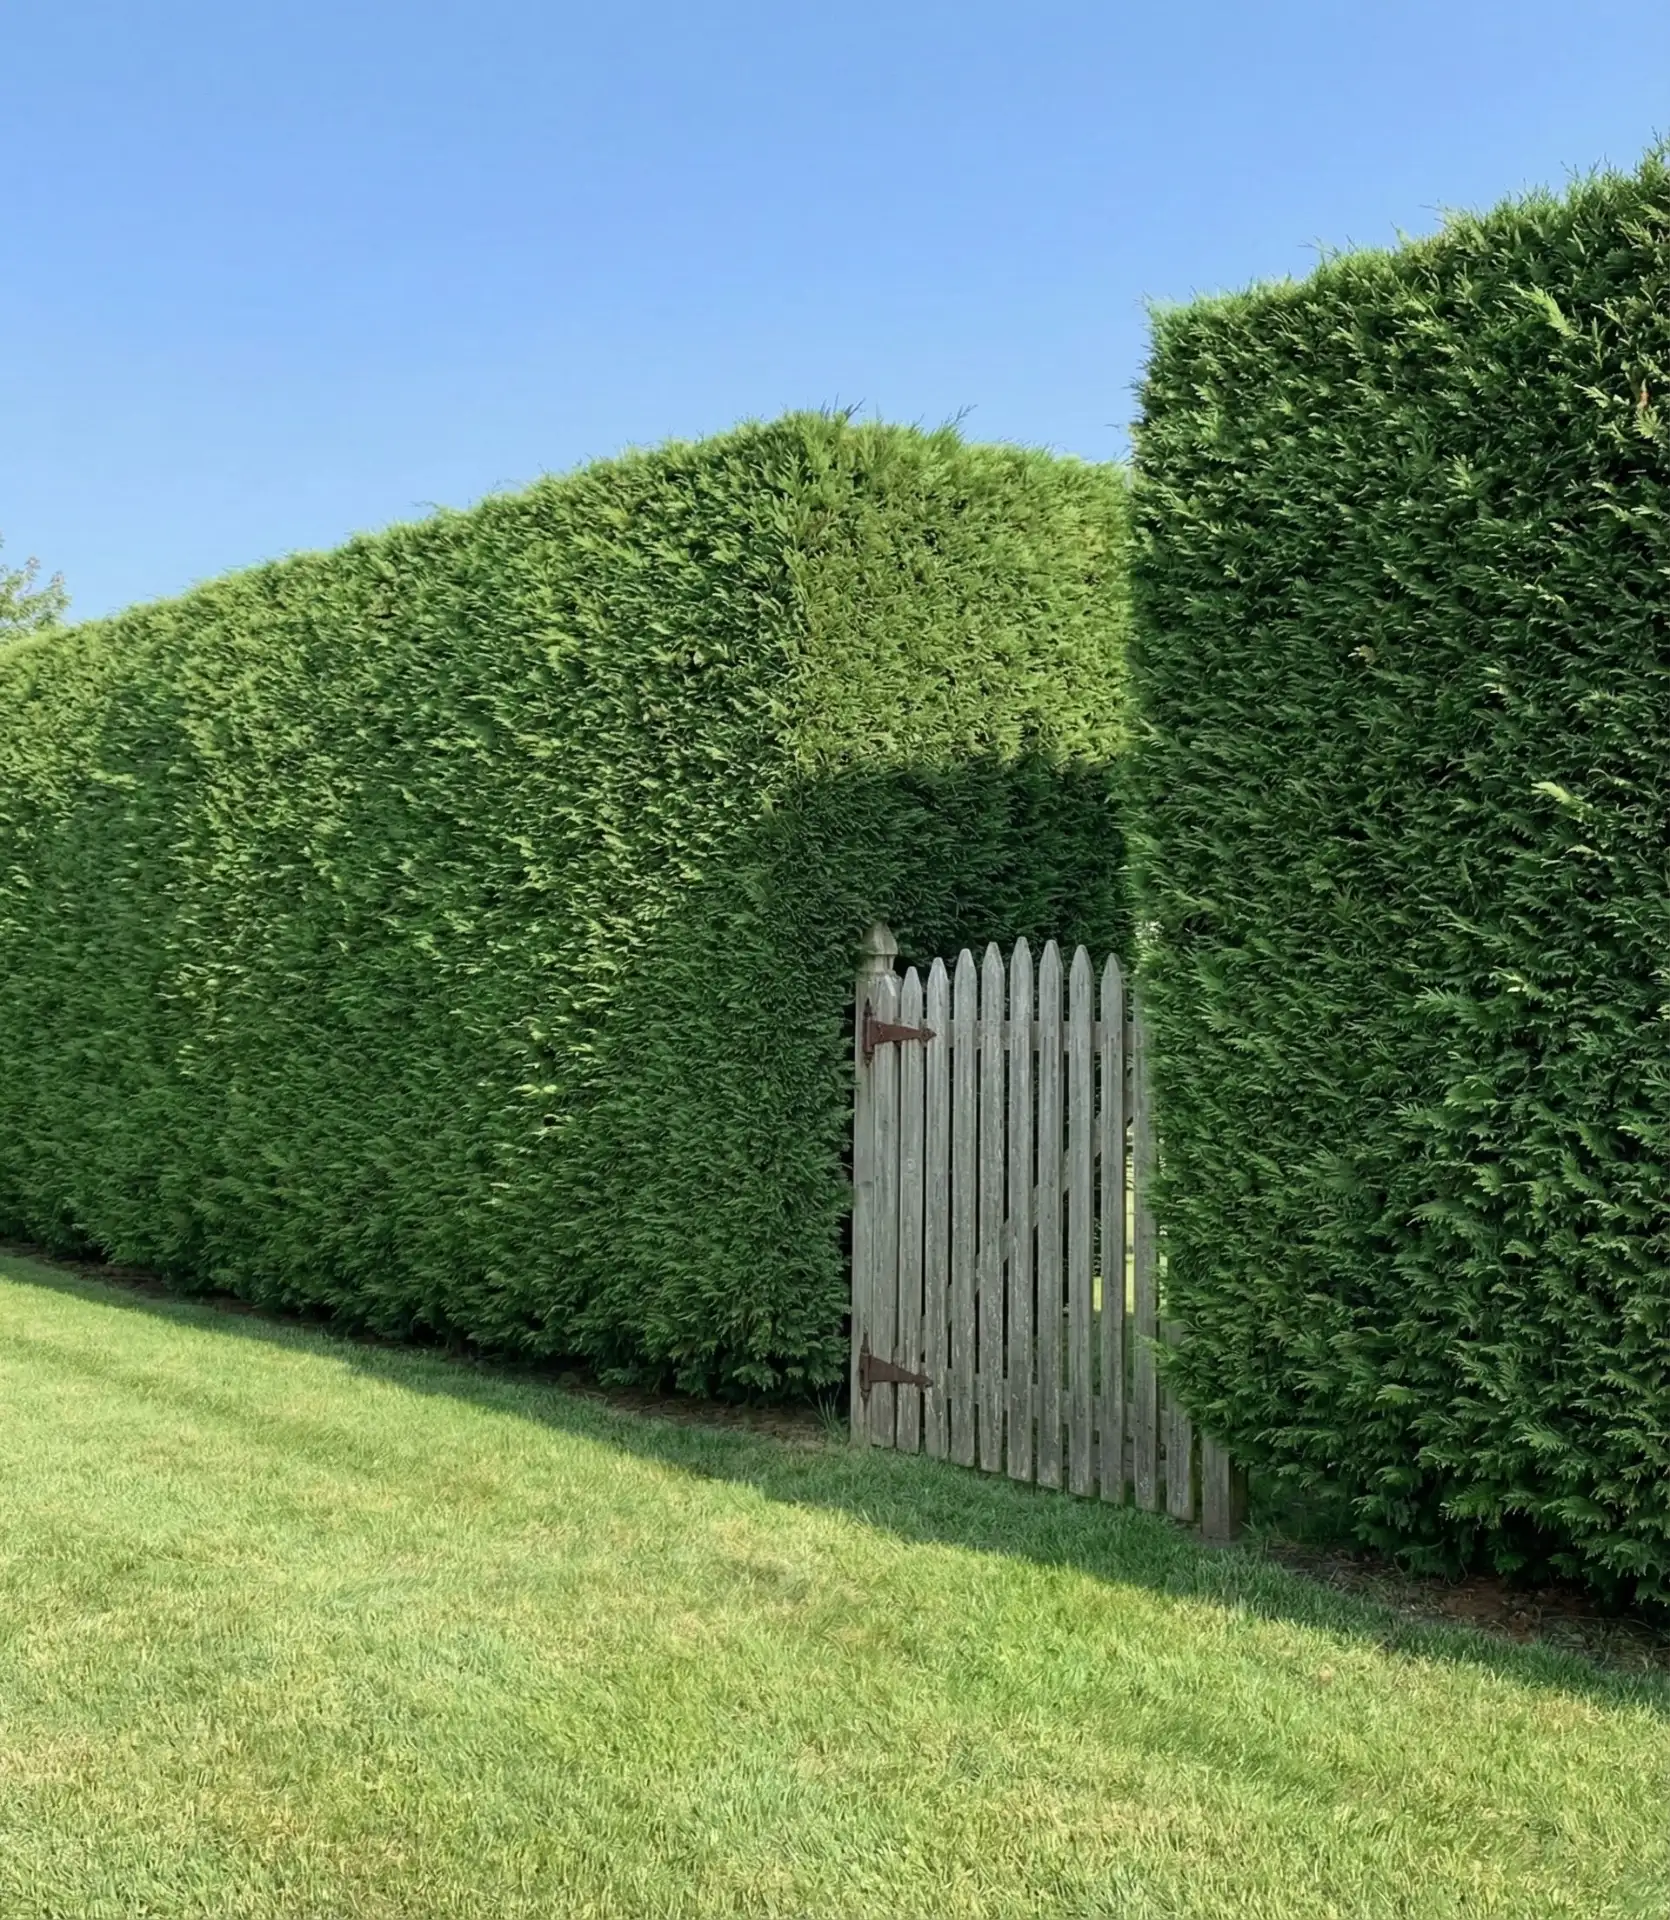
American landscape design increasingly favors hedges over solid fencing in upscale neighborhoods—they feel more organic and less defensive. The trade-off is maintenance: hedges require annual trimming, though their care becomes simple once you establish the routine. Budget approximately $25-50 per plant for 3-4 foot specimens spaced 3 feet apart, meaning a 100-foot hedge costs $800-$1,700 in materials. Compare that to $2,000-$3,000 for a privacy fence over the same distance, with a hedge providing better aesthetics and wildlife habitat.
24. Dedicated Sports Court Surface
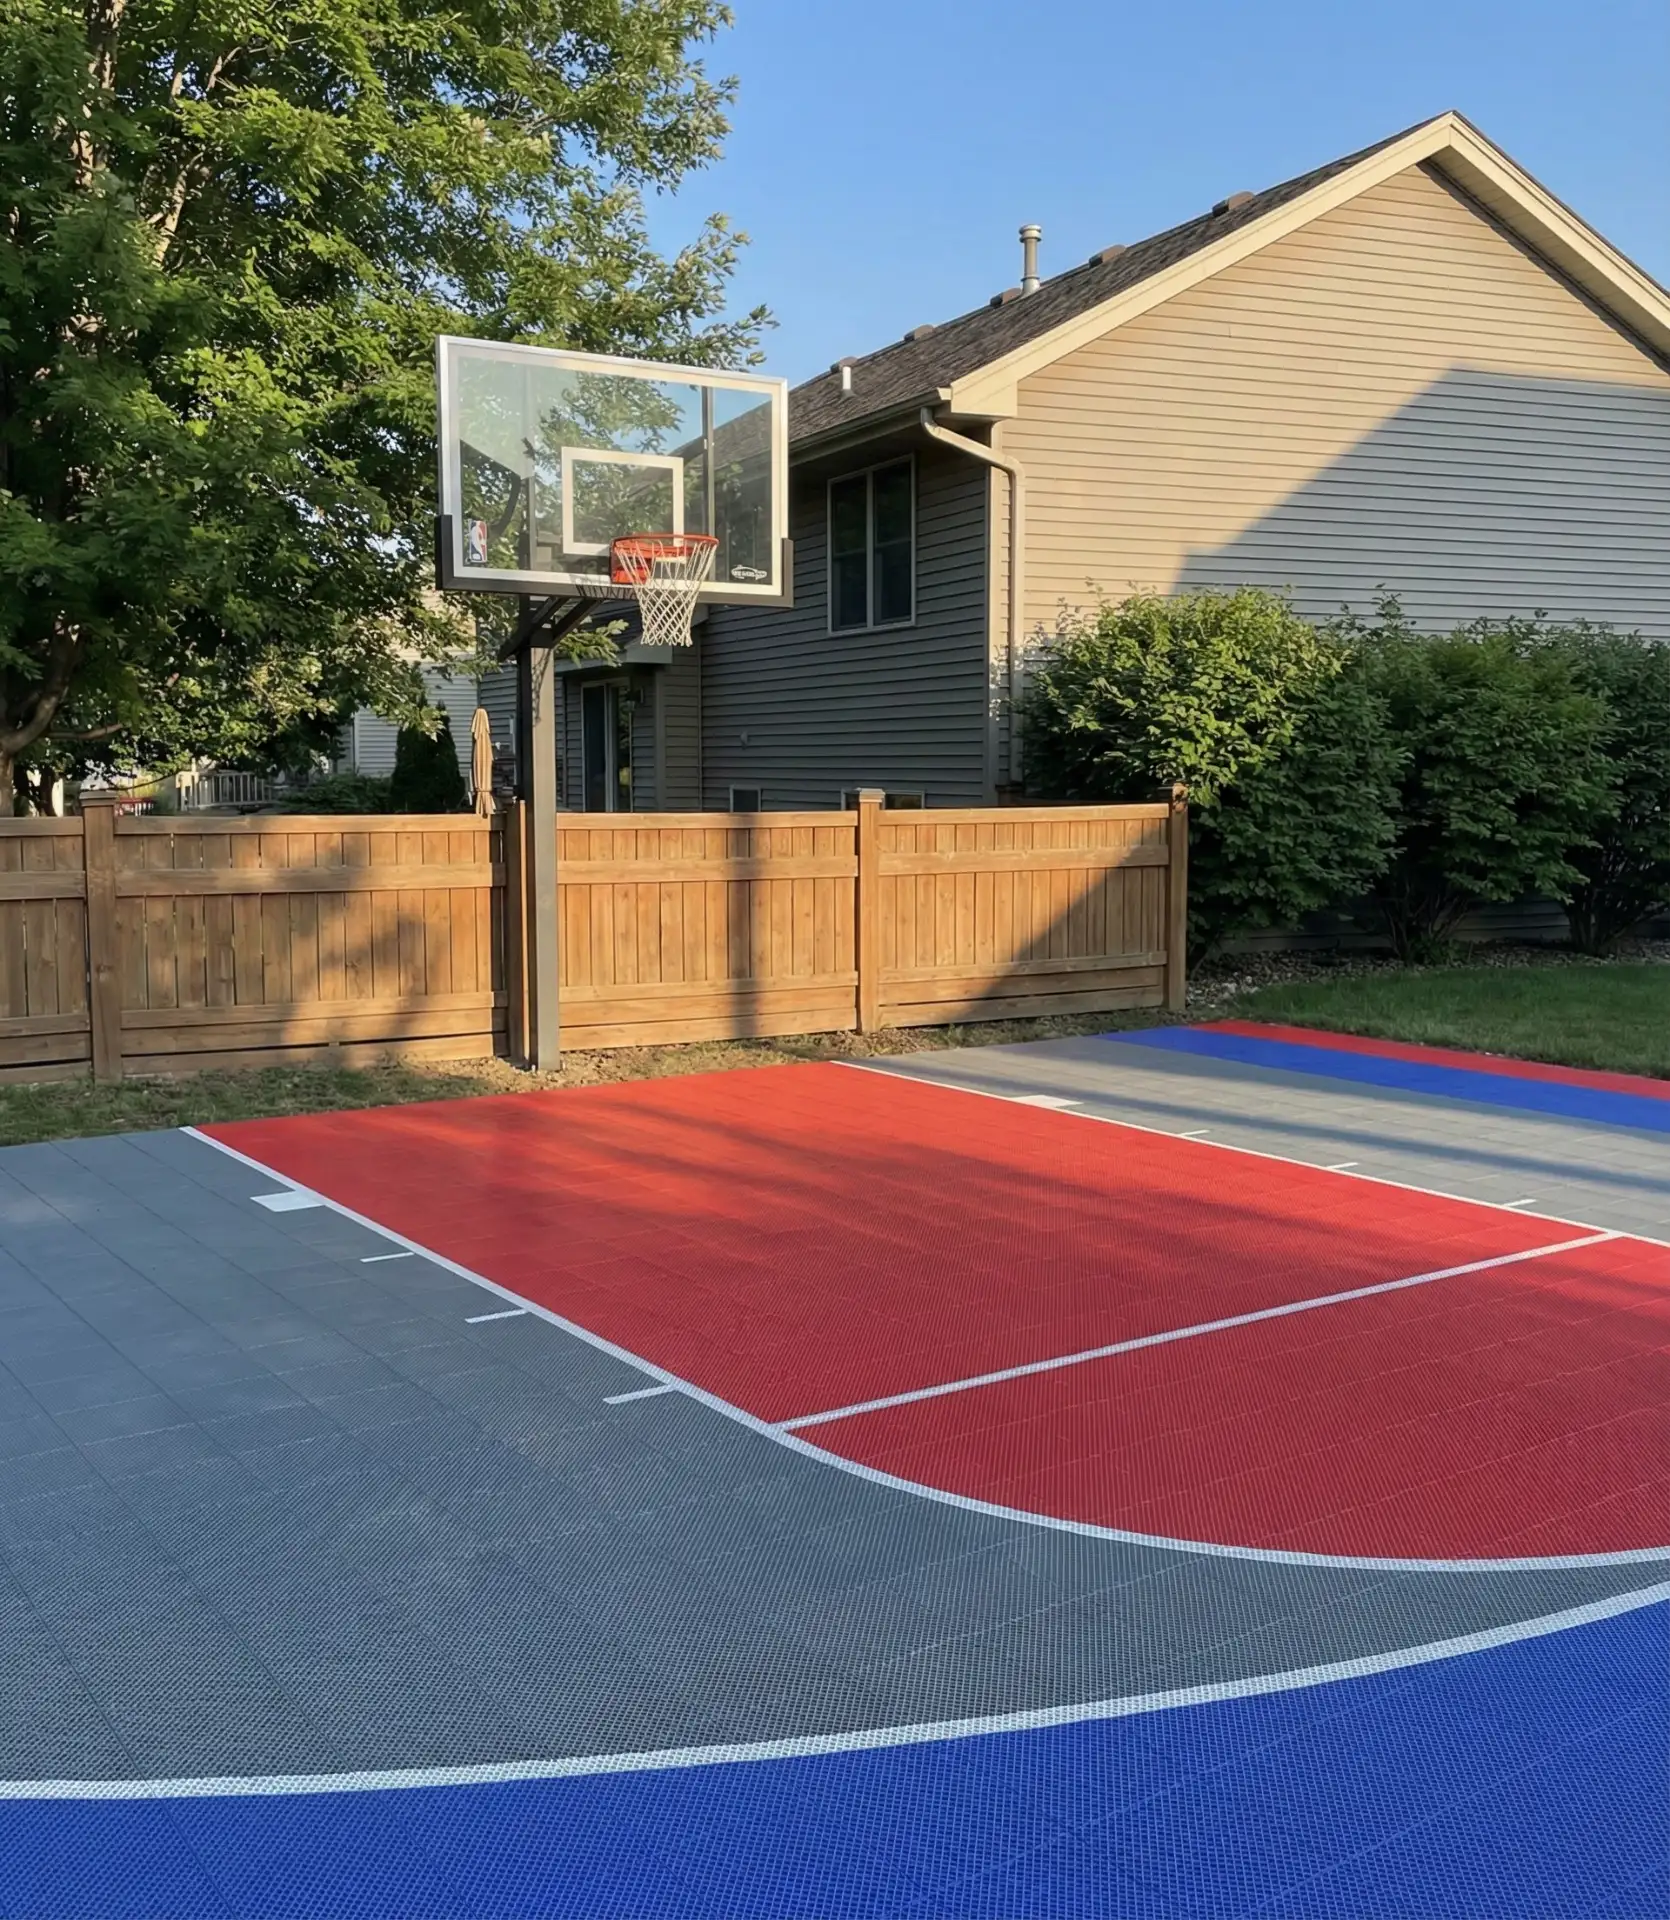
A concrete surface, or a modular tile surface, can be used for basketball, pickleball, and other multipurpose sports. A half-court basketball setup is 30×50 feet, which is a manageable size for most big suburban yards. For evening play, proper lighting and adjustable hoops for various ages and skills are recommended. This investment keeps active families home instead of driving to distant parks and adds to resale value. 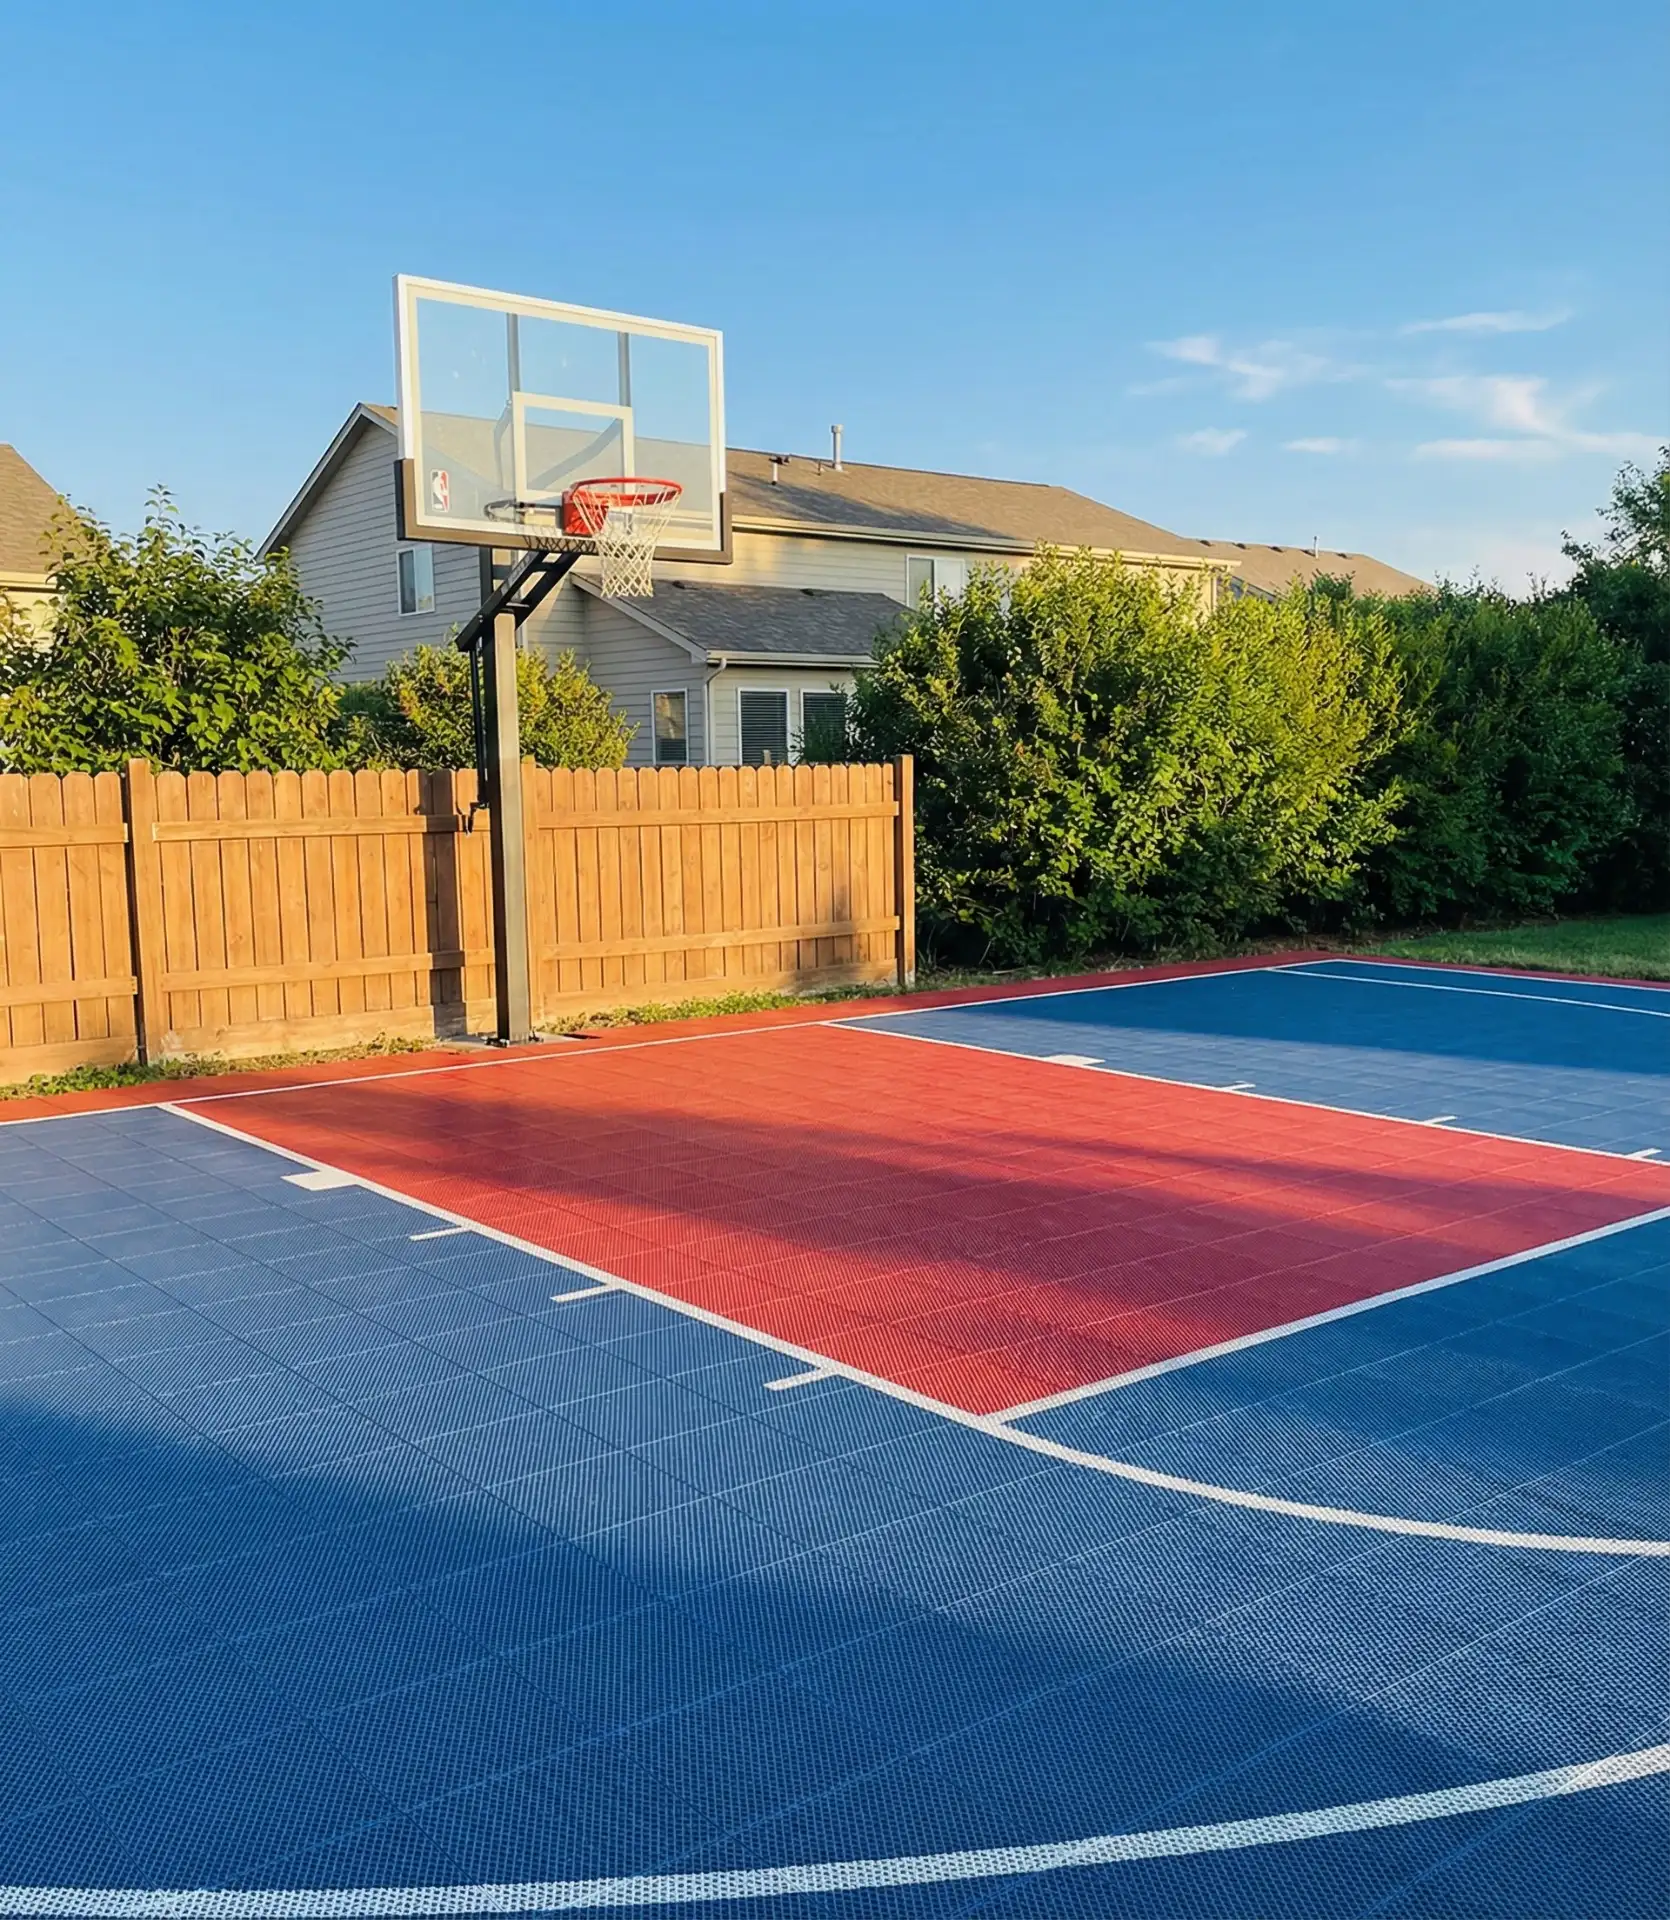
Families with teenage athletes report that home courts see heavy use—daily shooting practice and weekend games with friends. The convenience eliminates transportation time and allows parents to supervise easily. Modular court tiles cost more than concrete ($4-8 vs. $3-6 per square foot) but reduce joint impact and come in custom colors. In regions with freeze-thaw cycles, tiles also prevent the cracking common in concrete slabs. Sound can be an issue; position courts away from neighbors’ bedrooms or install during new construction when lot selection allows distance from adjacent homes.
25. Woodland Edge with Natural Plantings
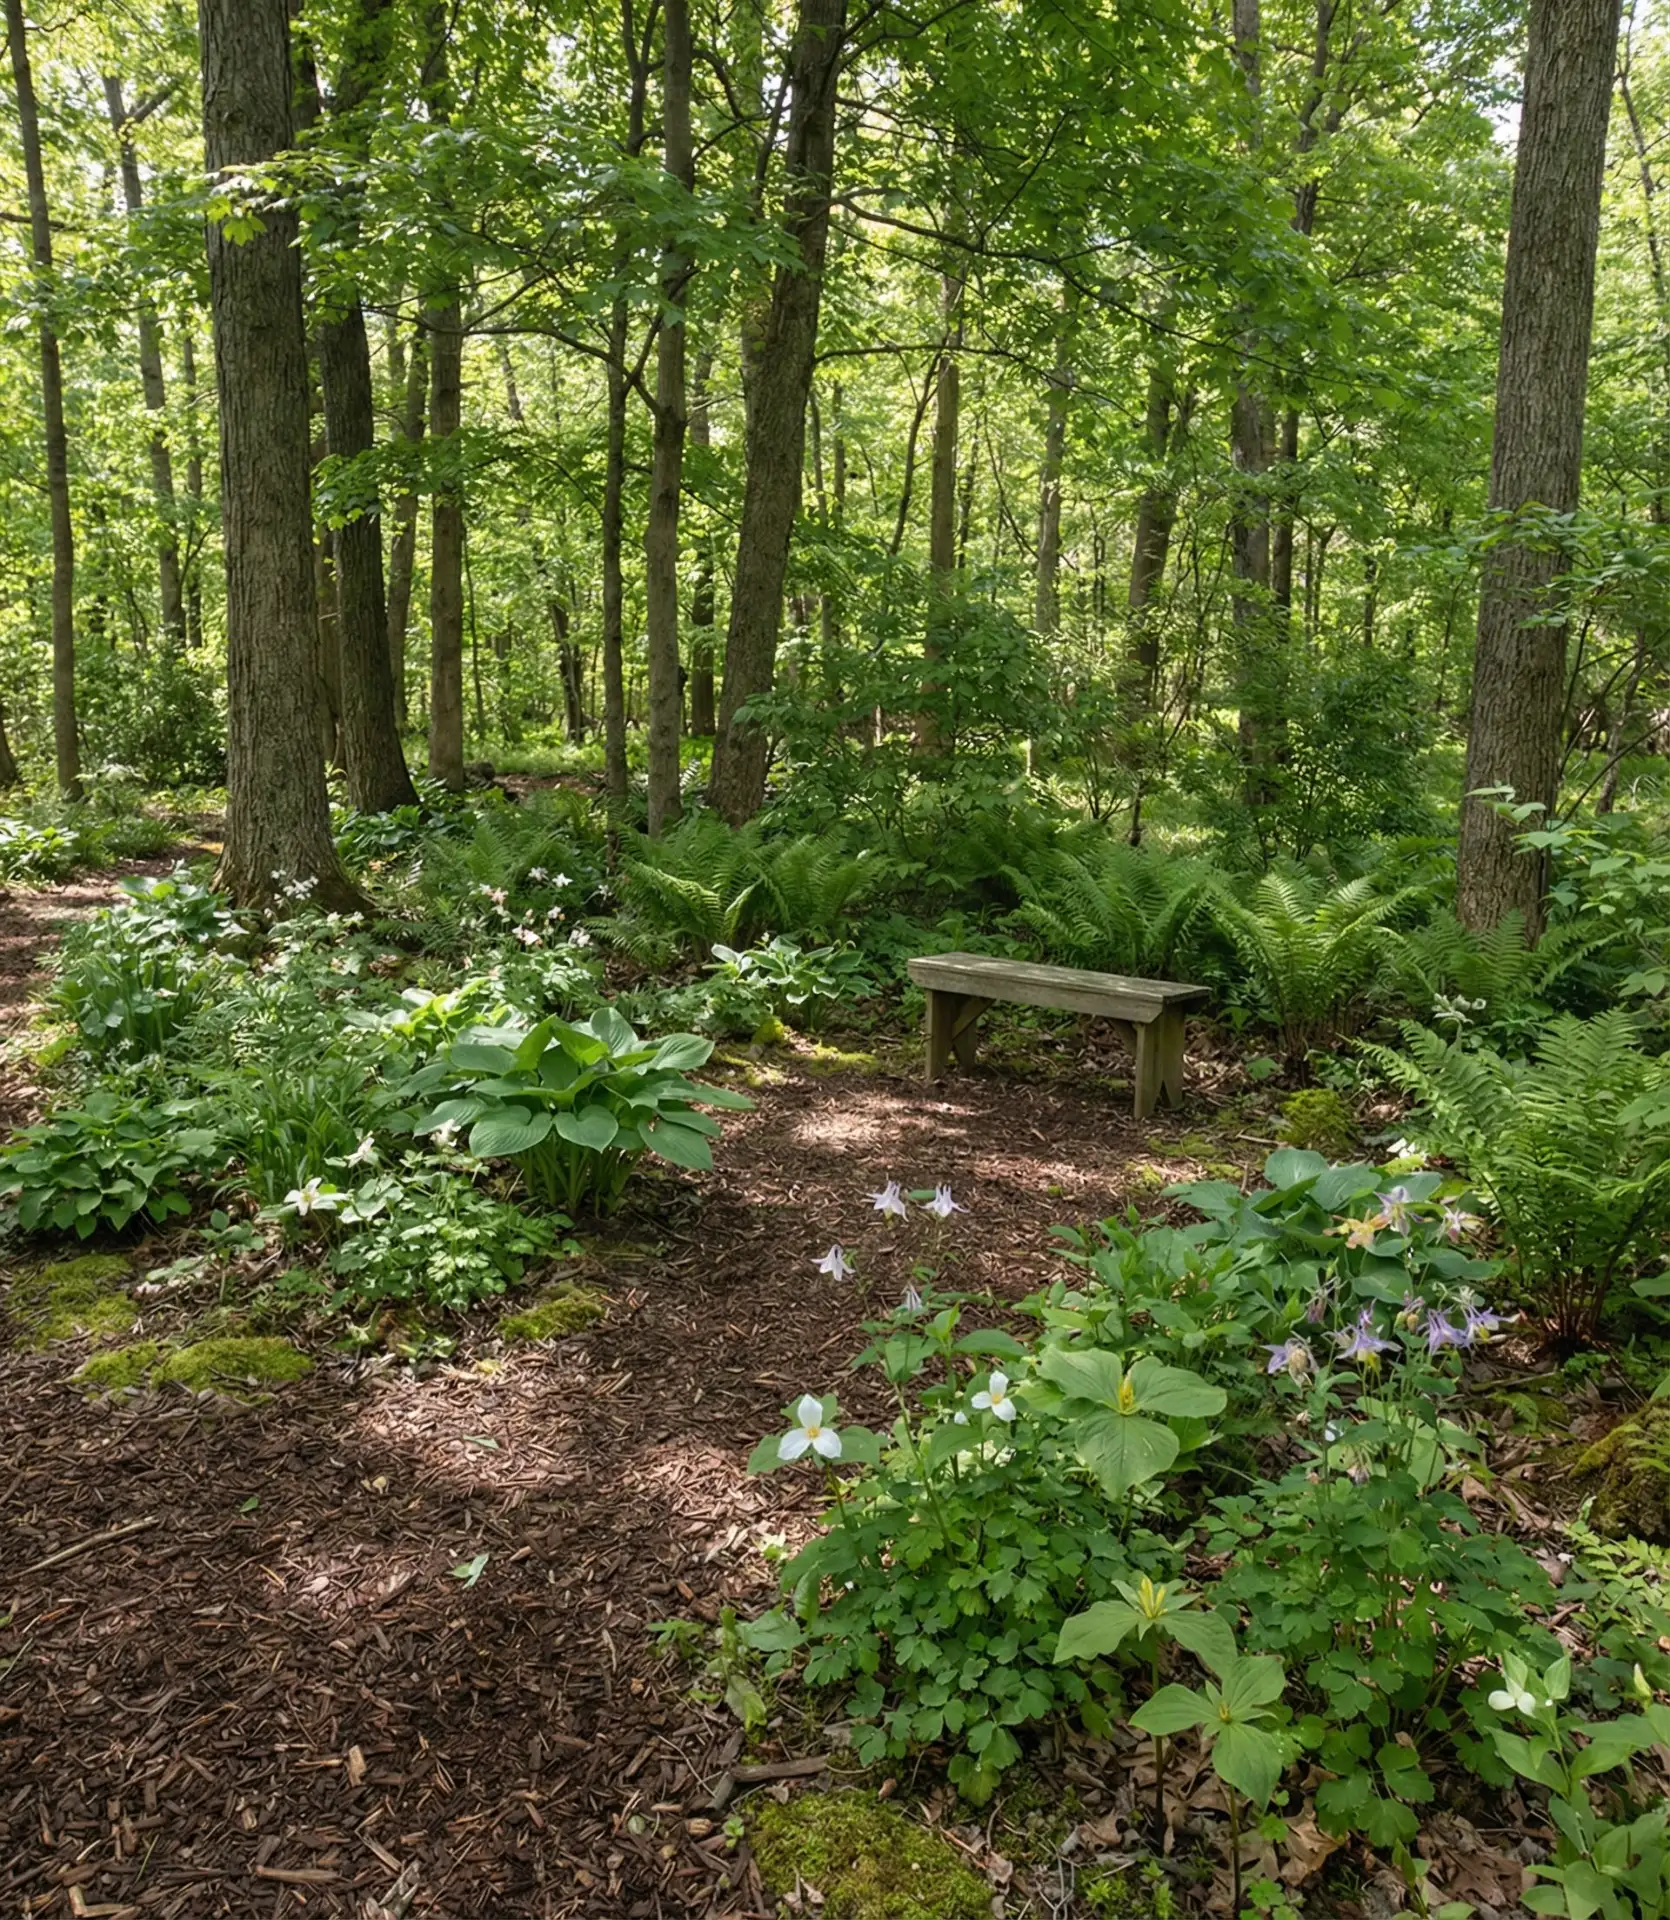
If your lot belongs to the woods or has older trees, consider planting some native ferns, shade-tolerant woodland wildflowers, and other woodland species in the transition zone. This is a better approach than trimming and clearing underbrush. The foliage gives wildlife a place to use and helps your buffer look more natural from the outside. This buffer will take some time but will be low maintenance once it is established. An observation bench can also be a lovely addition to a clearing along the path to watch birds and the changing of the seasons. 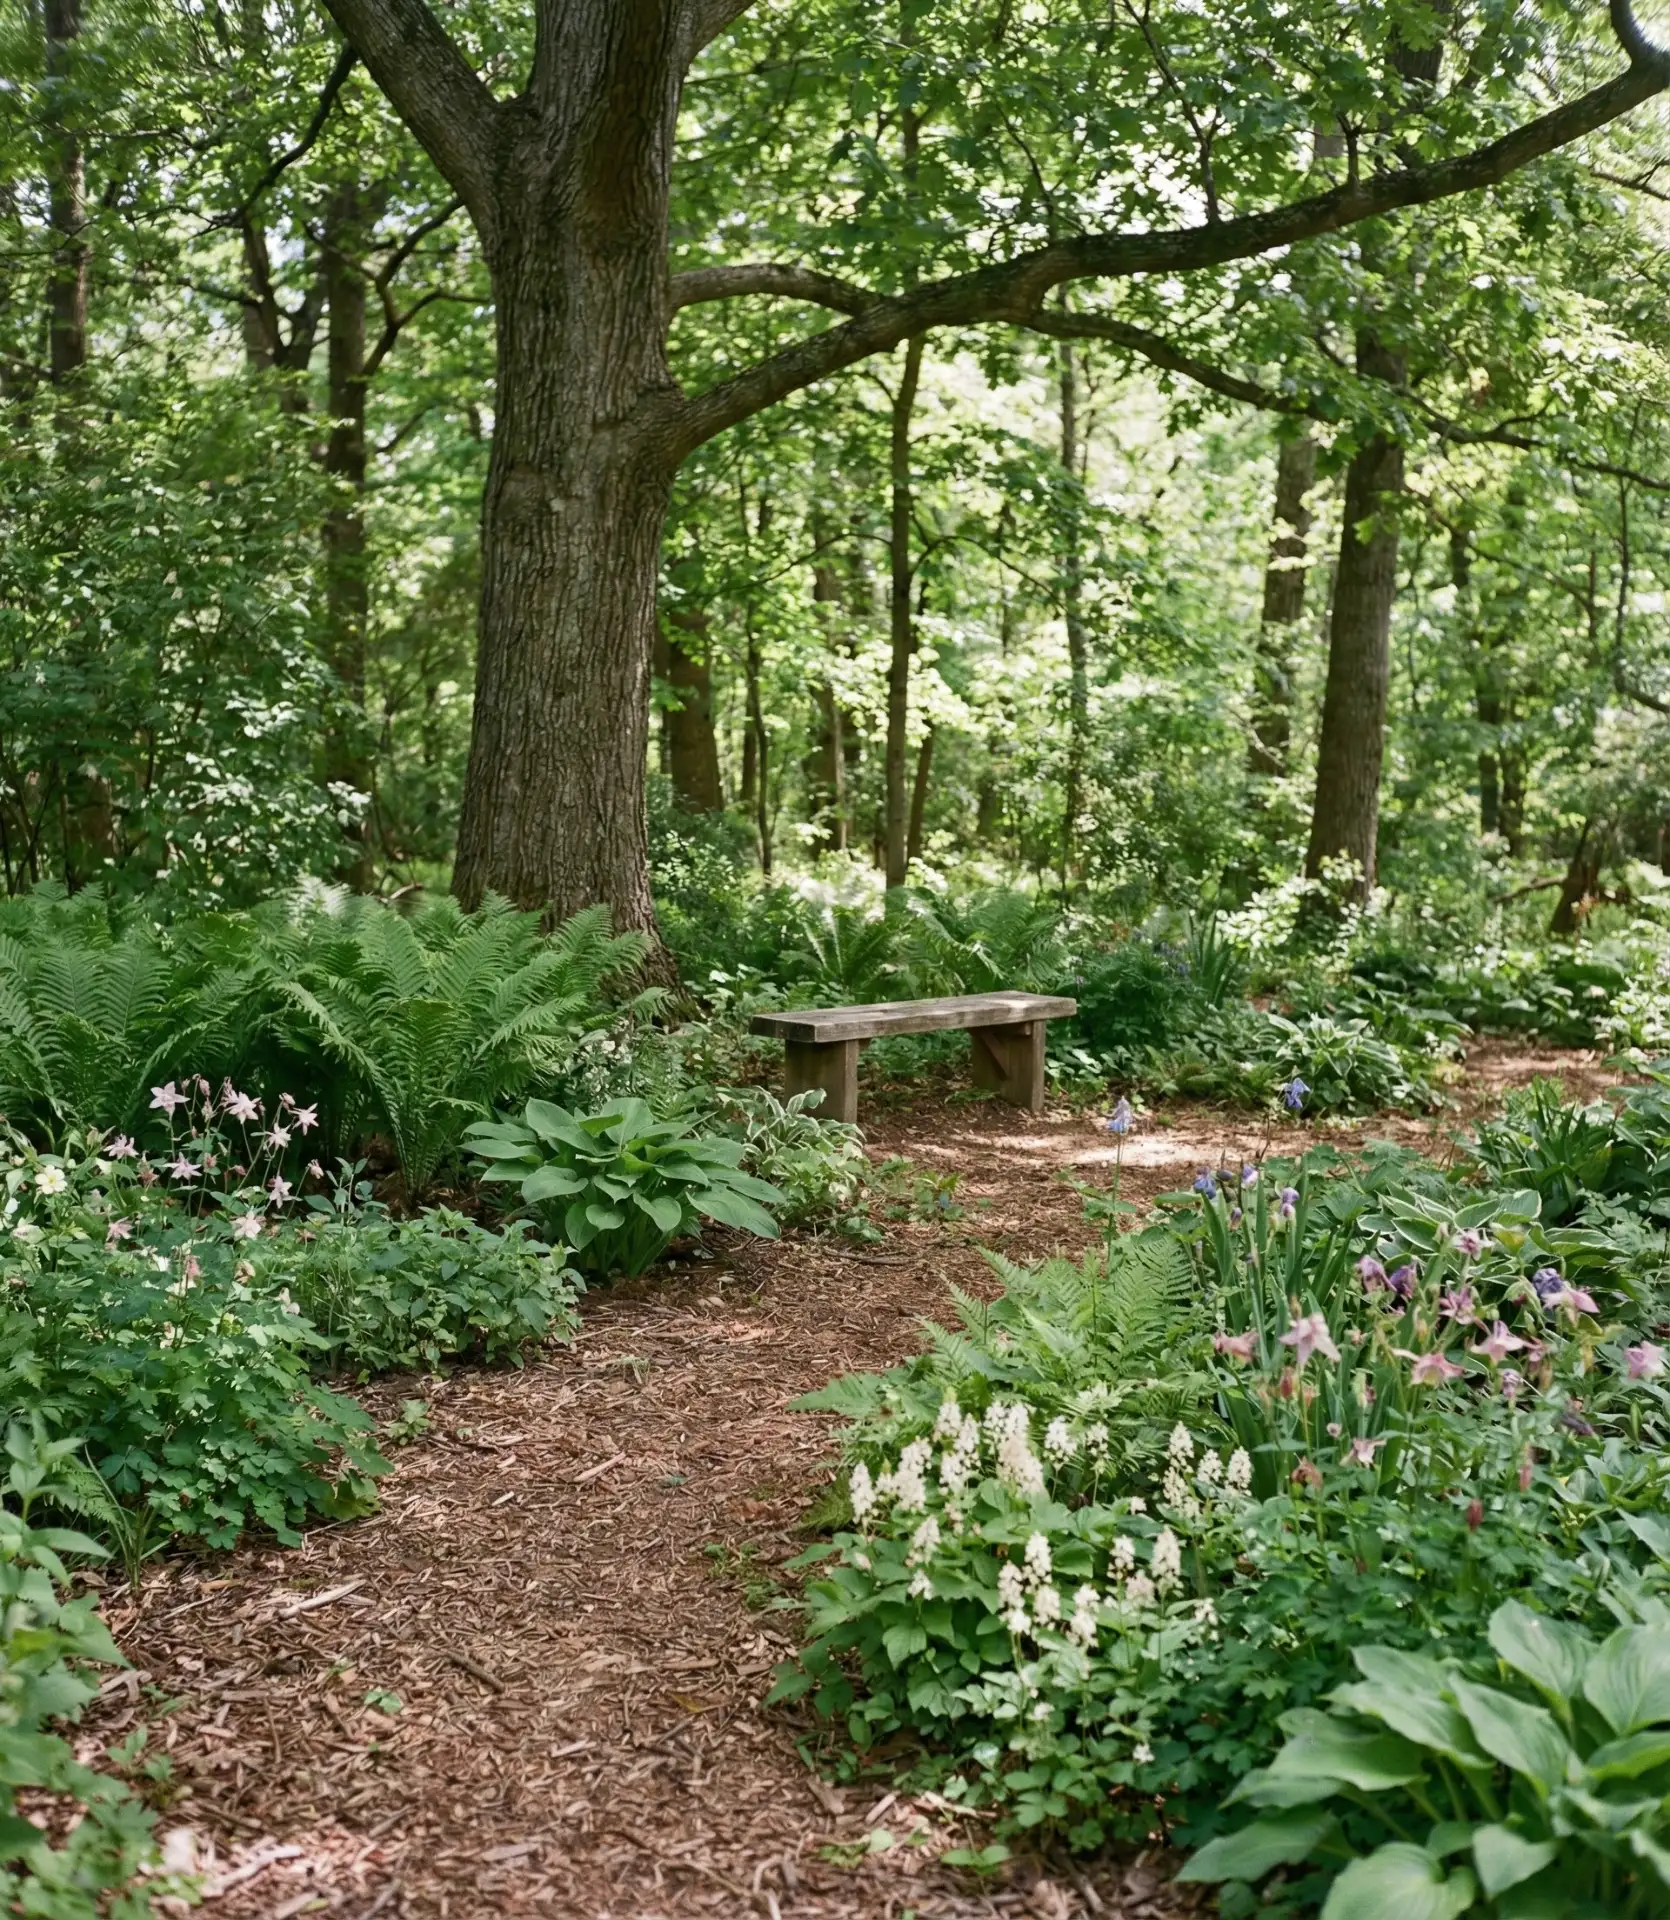
In the NE and the PNW, many homeowners have wooded lots where they leave the woods to grow as they would naturally, but there is potential to create usable space. Often, careful underplanting with native species solves erosion issues on slopes that are too dangerous to mow. The trick is finding the right dry-shade-tolerant plants for under the tree canopy; once established, flowers such as hostas, astilbes, Solomon’s seal, and bleeding heart require nearly no maintenance.
26. Four-Season Room with Retractable Walls
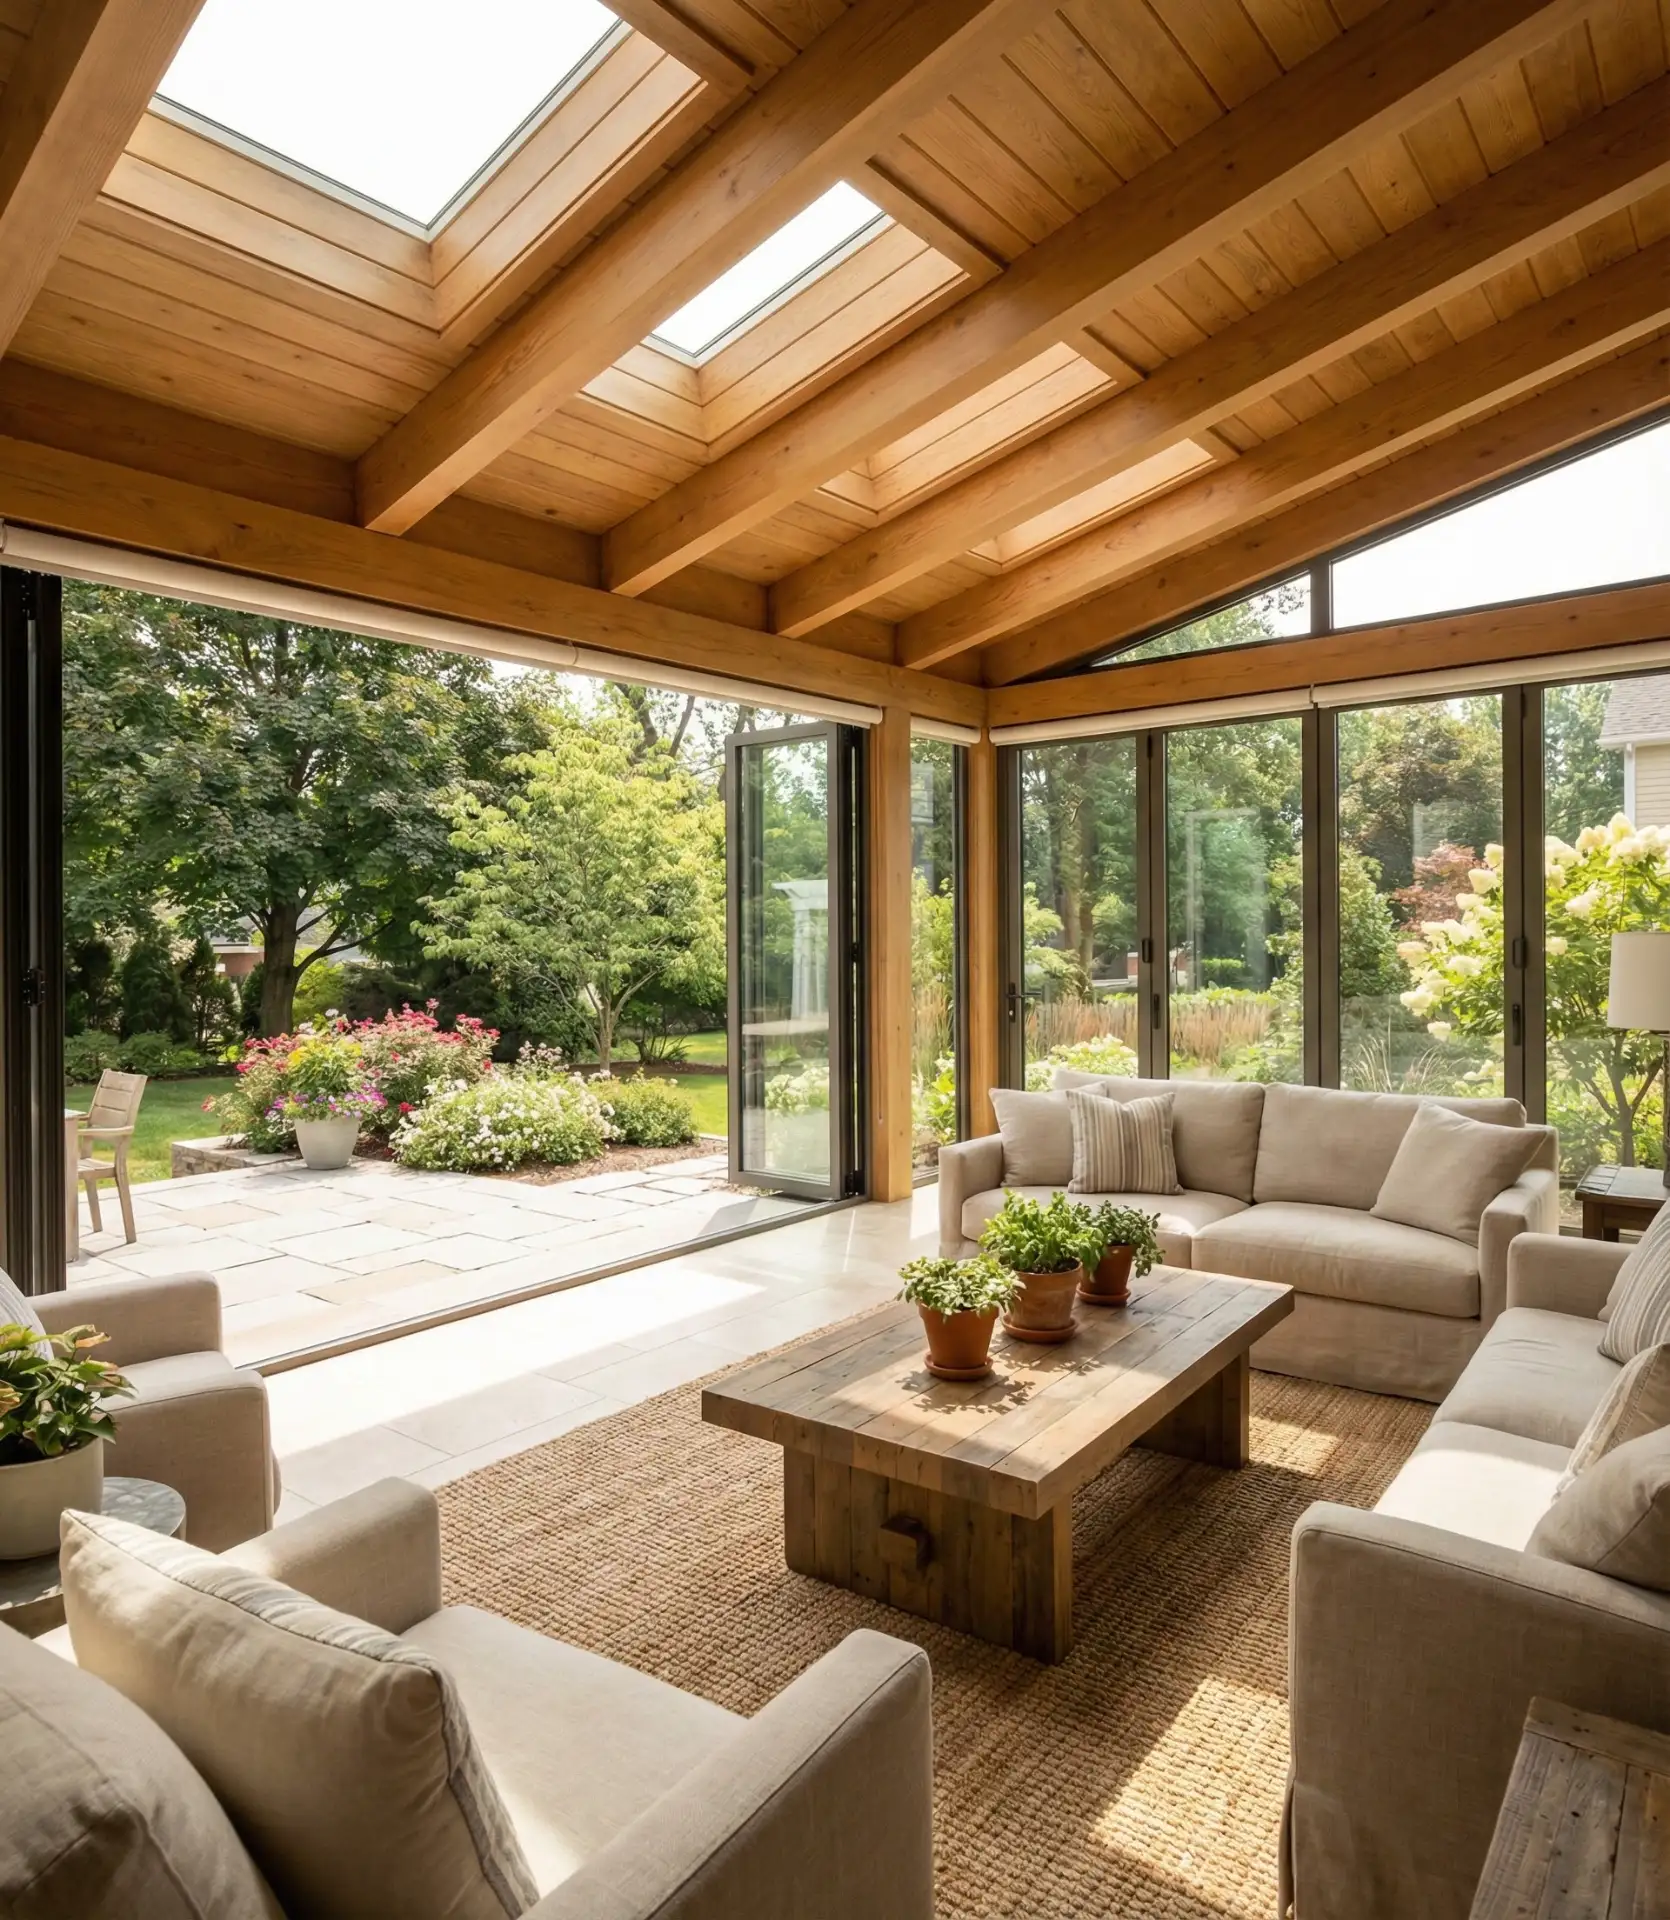
Construct or retrofit an existing space into a climate-controlled room with extensive adjustable glass panels that open entirely during pleasant weather. This premium luxury addition, which is particularly lavish, even functions as a room indoors during winter. When summer arrives and the panels retract, it seamlessly connects to the outdoor yard. The investment is considerable, ranging from $40,000 to $80,000, but it essentially adds new square footage to your home while optimizing the connection to the backyard. 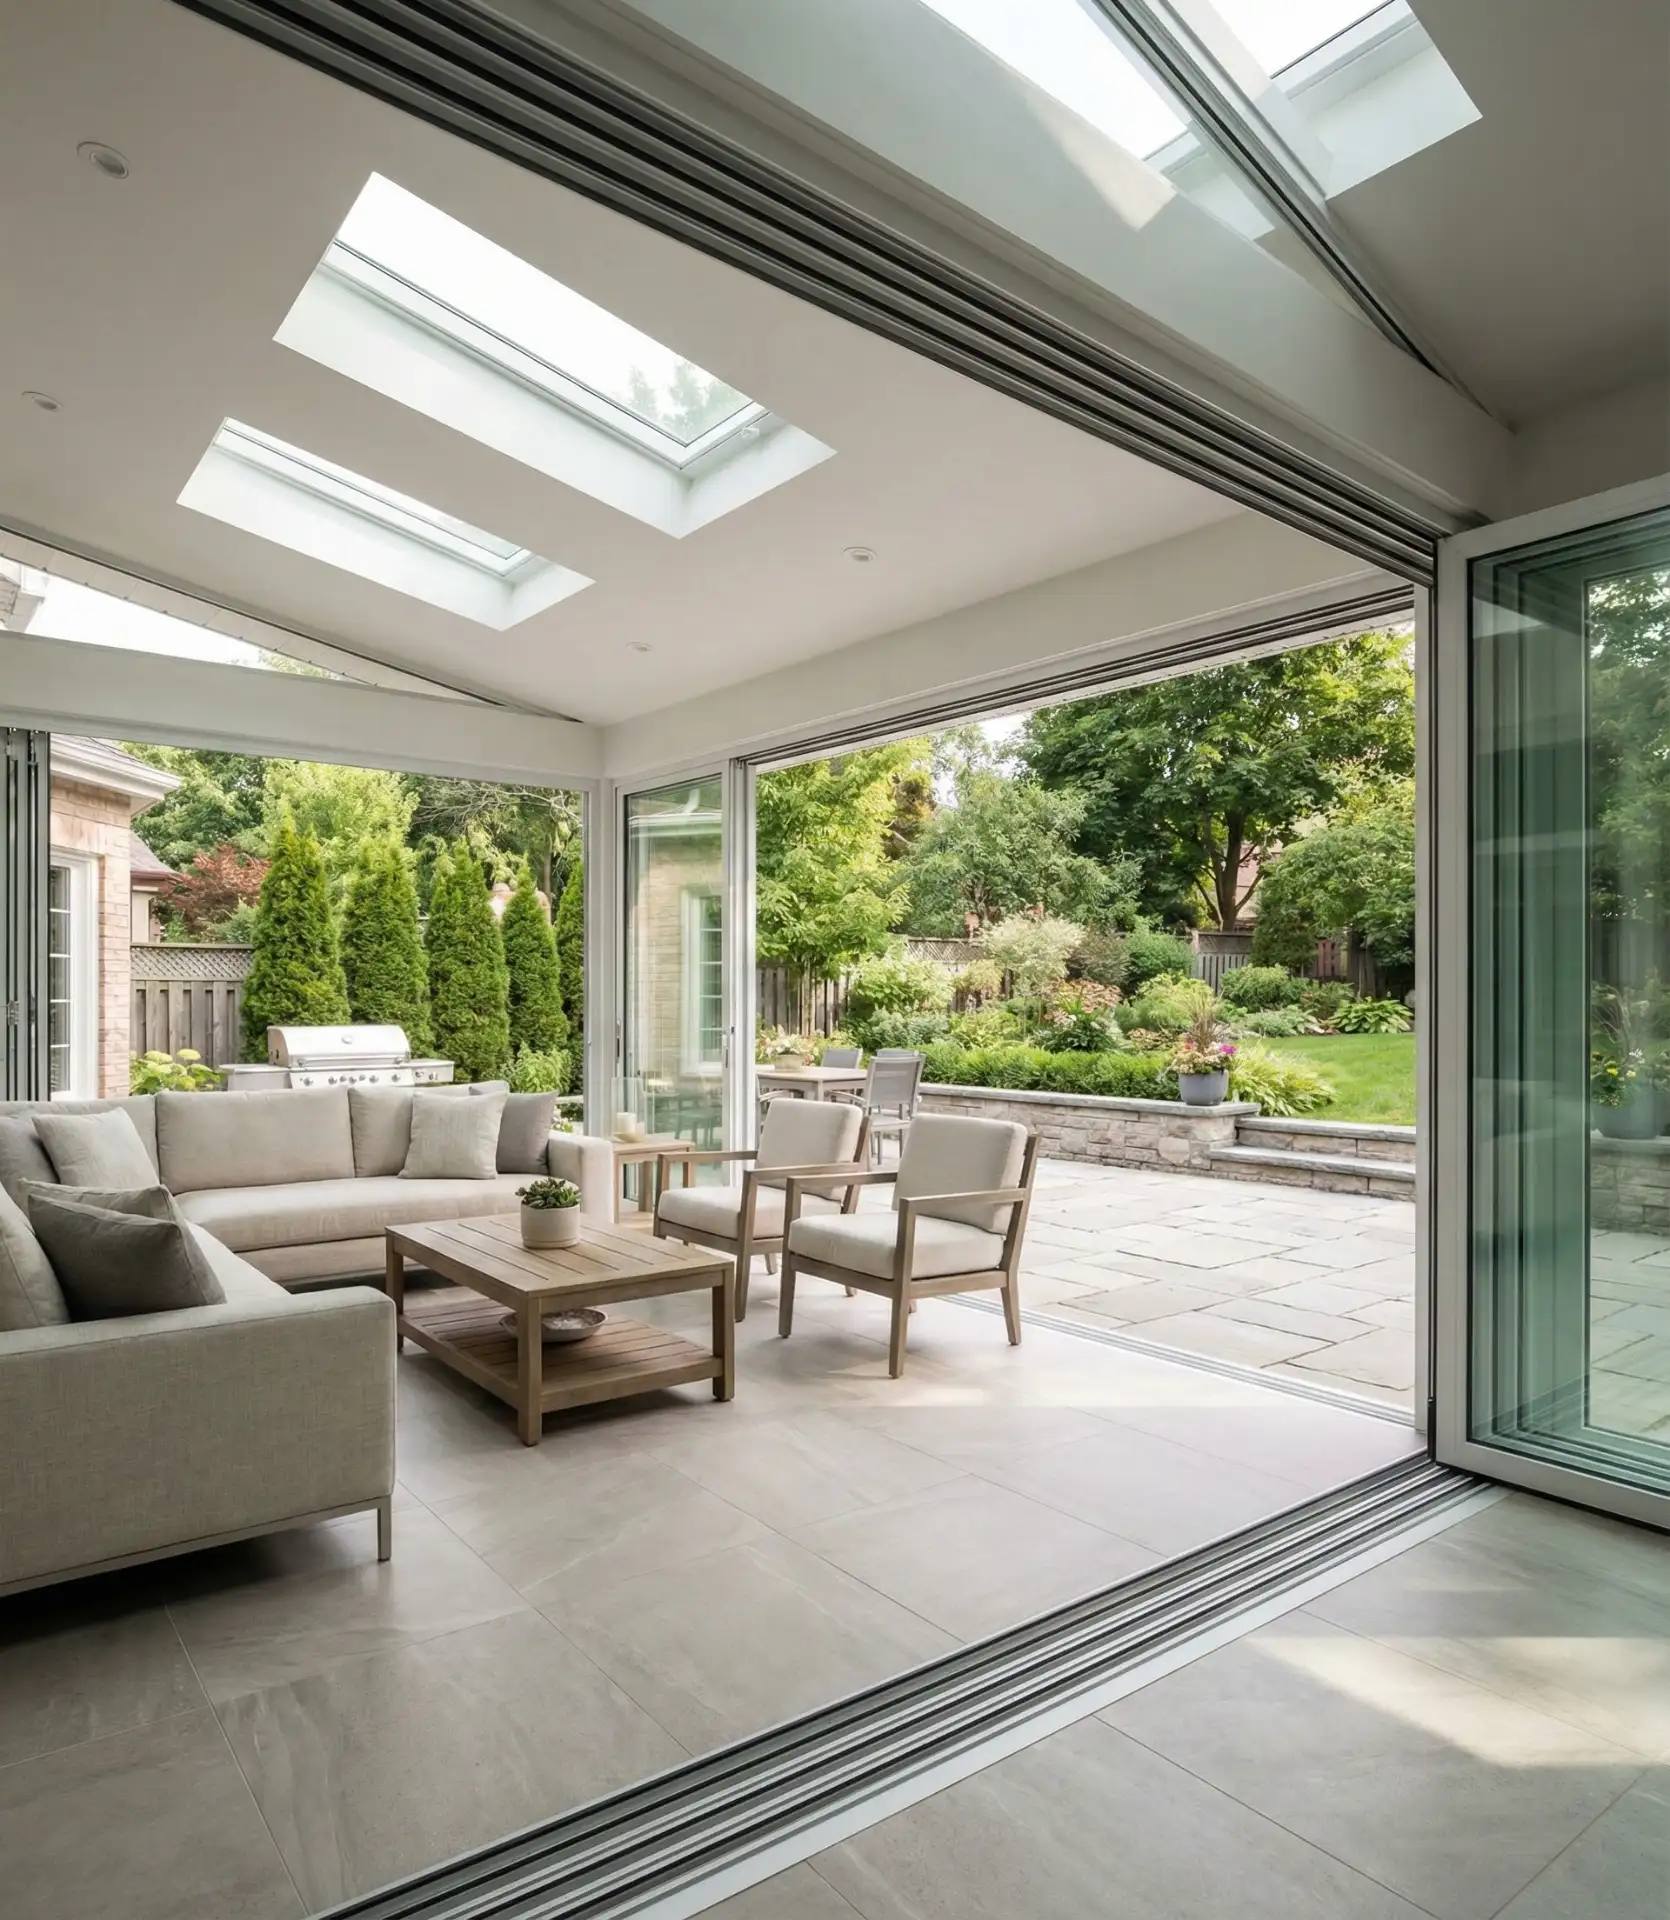
Owner behavior on record: climate control makes four-season rooms comfortable year-round, which is why families use them seasonally. Because screened porches are void of use from November to March in colder climates, these rooms become primary family spaces where retractable walls are the most important feature. Engaging with fixed sunrooms presents a disconnect, as they remain closed off even during pleasant weather. Look for European or high-quality German systems; cheaper options that leak and jam can ruin the entire investment.
This thoughtful design shows that backyard layouts can make the outdoor areas functional, beautiful extensions of your home. Whether you prefer active play zones, serene gardens, or spaces for entertaining, the most important thing is aligning design with your family’s lifestyle. We welcome you to share your backyard accomplishments or your favorite ideas in the comments. We want to know what is working well in your outdoor area.