44 Outdoor Kids Play Area Ideas 2026: Backyard Playground Design & DIY Projects
Creating an inspiring outdoor play space for children has become a top priority for American families in 2026, especially as parents seek meaningful ways to blend active play with beautiful landscape design. Pinterest searches for outdoor kids’ play areas have surged as homeowners seek fresh ideas that combine safety, creativity, and visual appeal. This collection showcases innovative concepts—from natural wood structures to modern deck installations—that will help you design a backyard playground your children will love while maintaining the aesthetic harmony of your outdoor living space.
1. Tiered Deck Adventure Zone
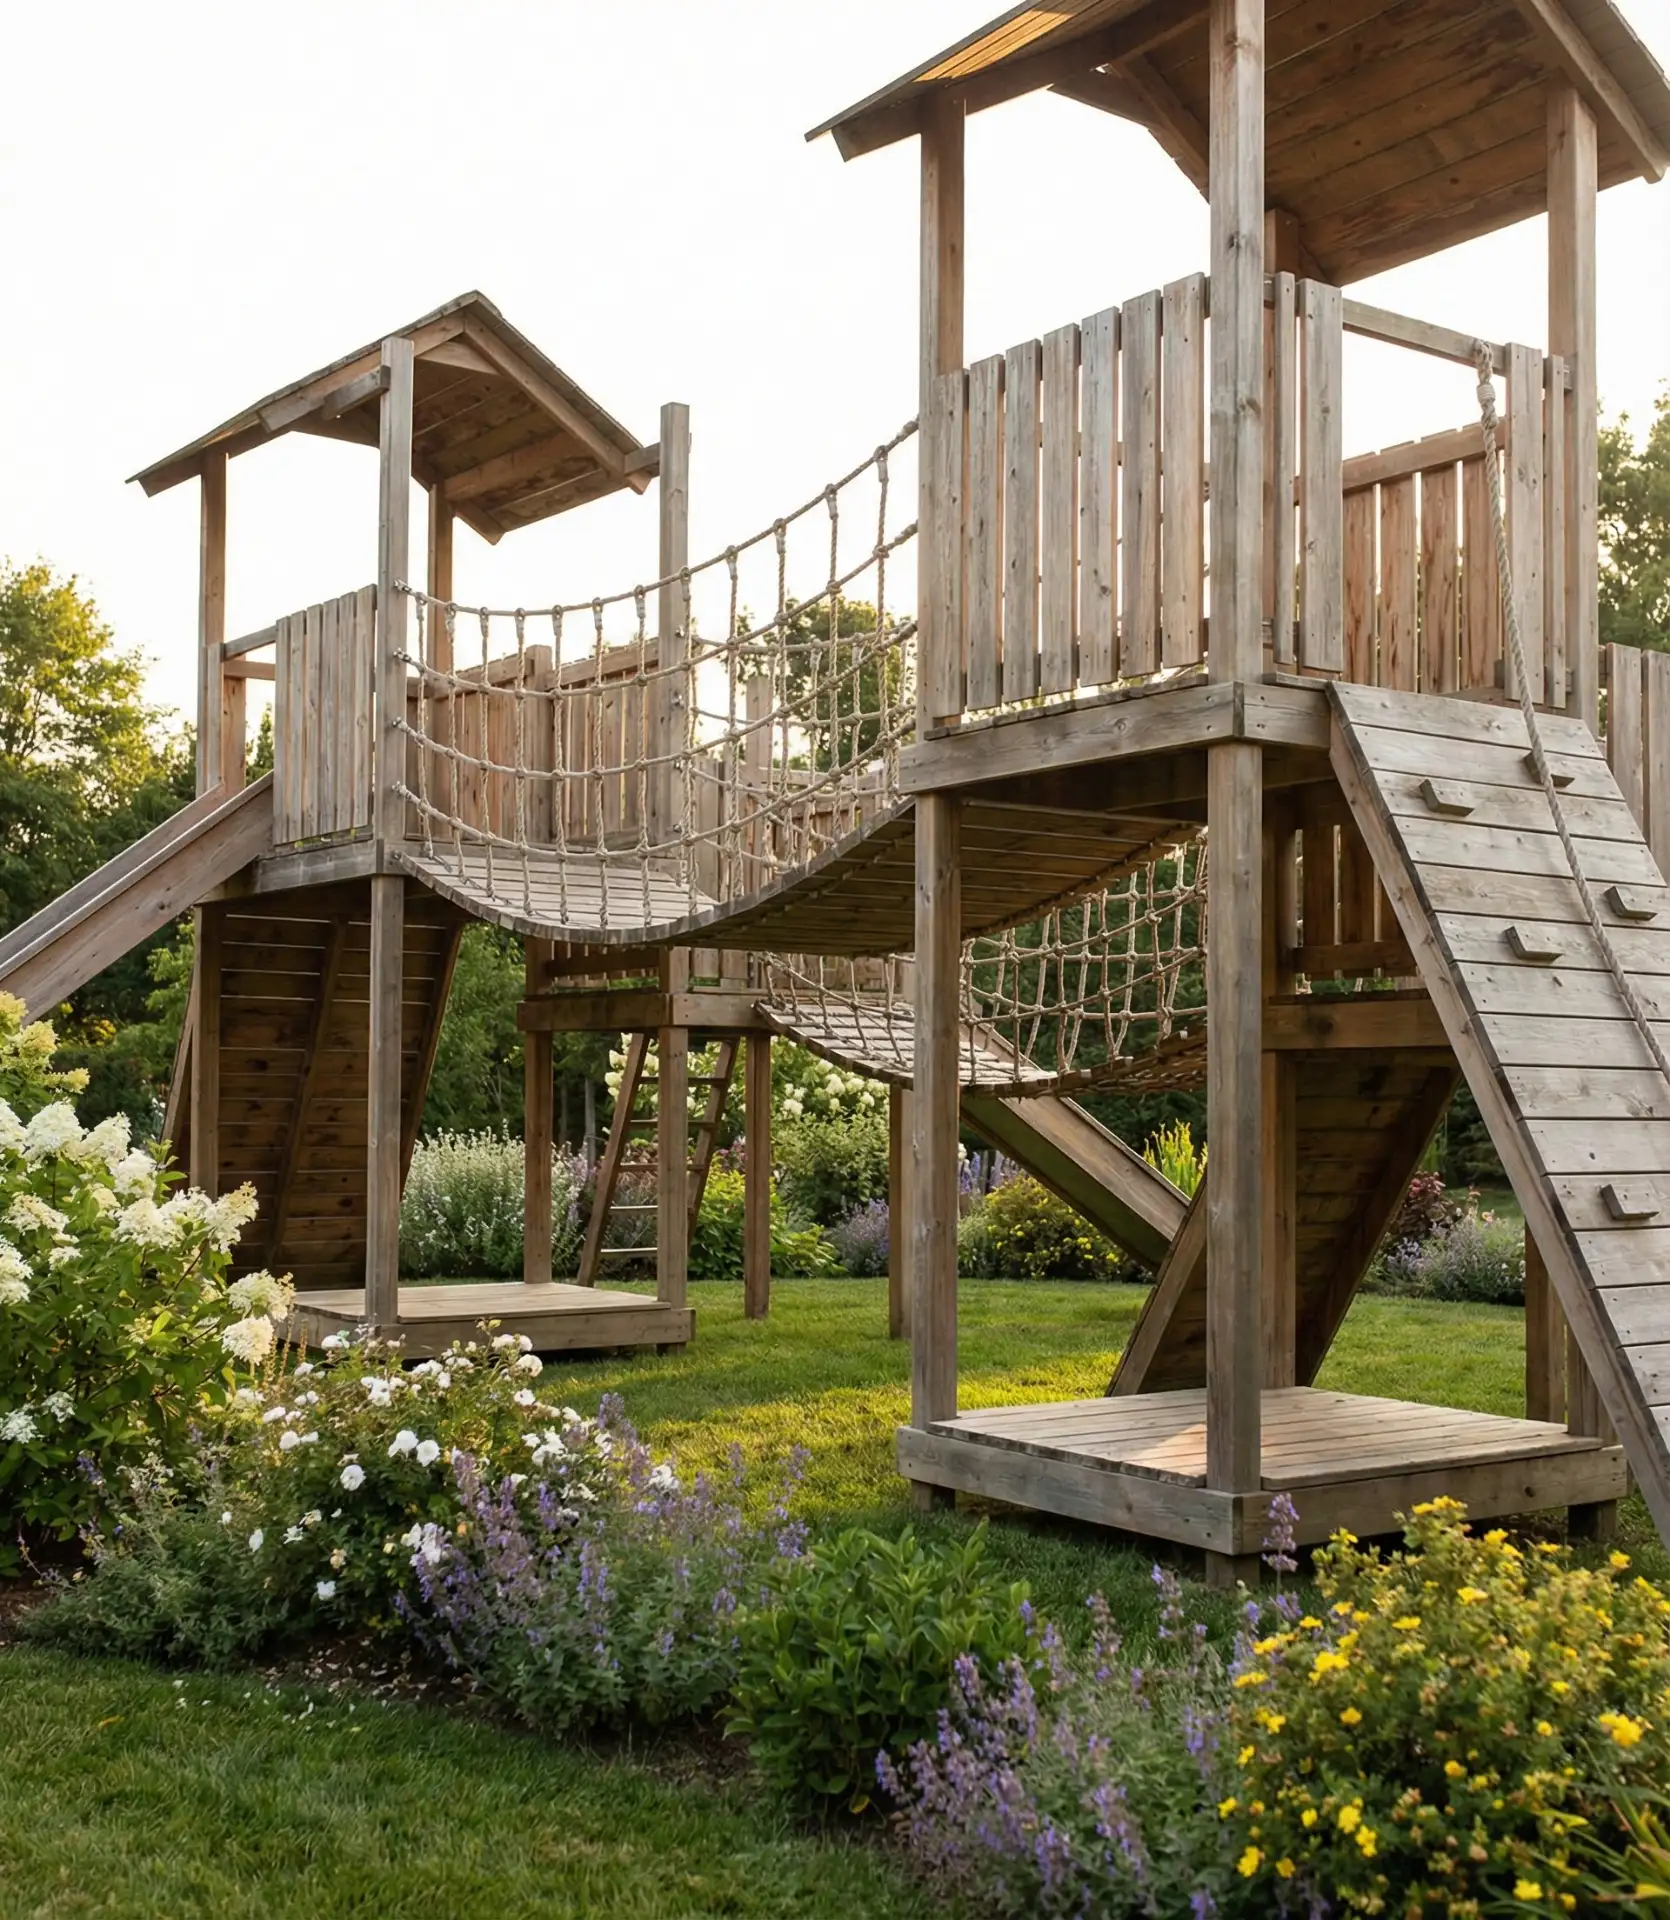
A multi-level deck playground transforms sloped backyards into exciting play terrain where kids navigate between platforms connected by bridges and climbing nets. This playground design incorporates modern backyard ideas that maximize vertical space while creating distinct activity zones: upper decks for quiet reading nooks, middle levels for active play, and lower platforms that connect to ground-level sand or gravel play areas. The staggered design naturally encourages physical development as children climb, balance, and explore different elevations throughout their outdoor adventures. 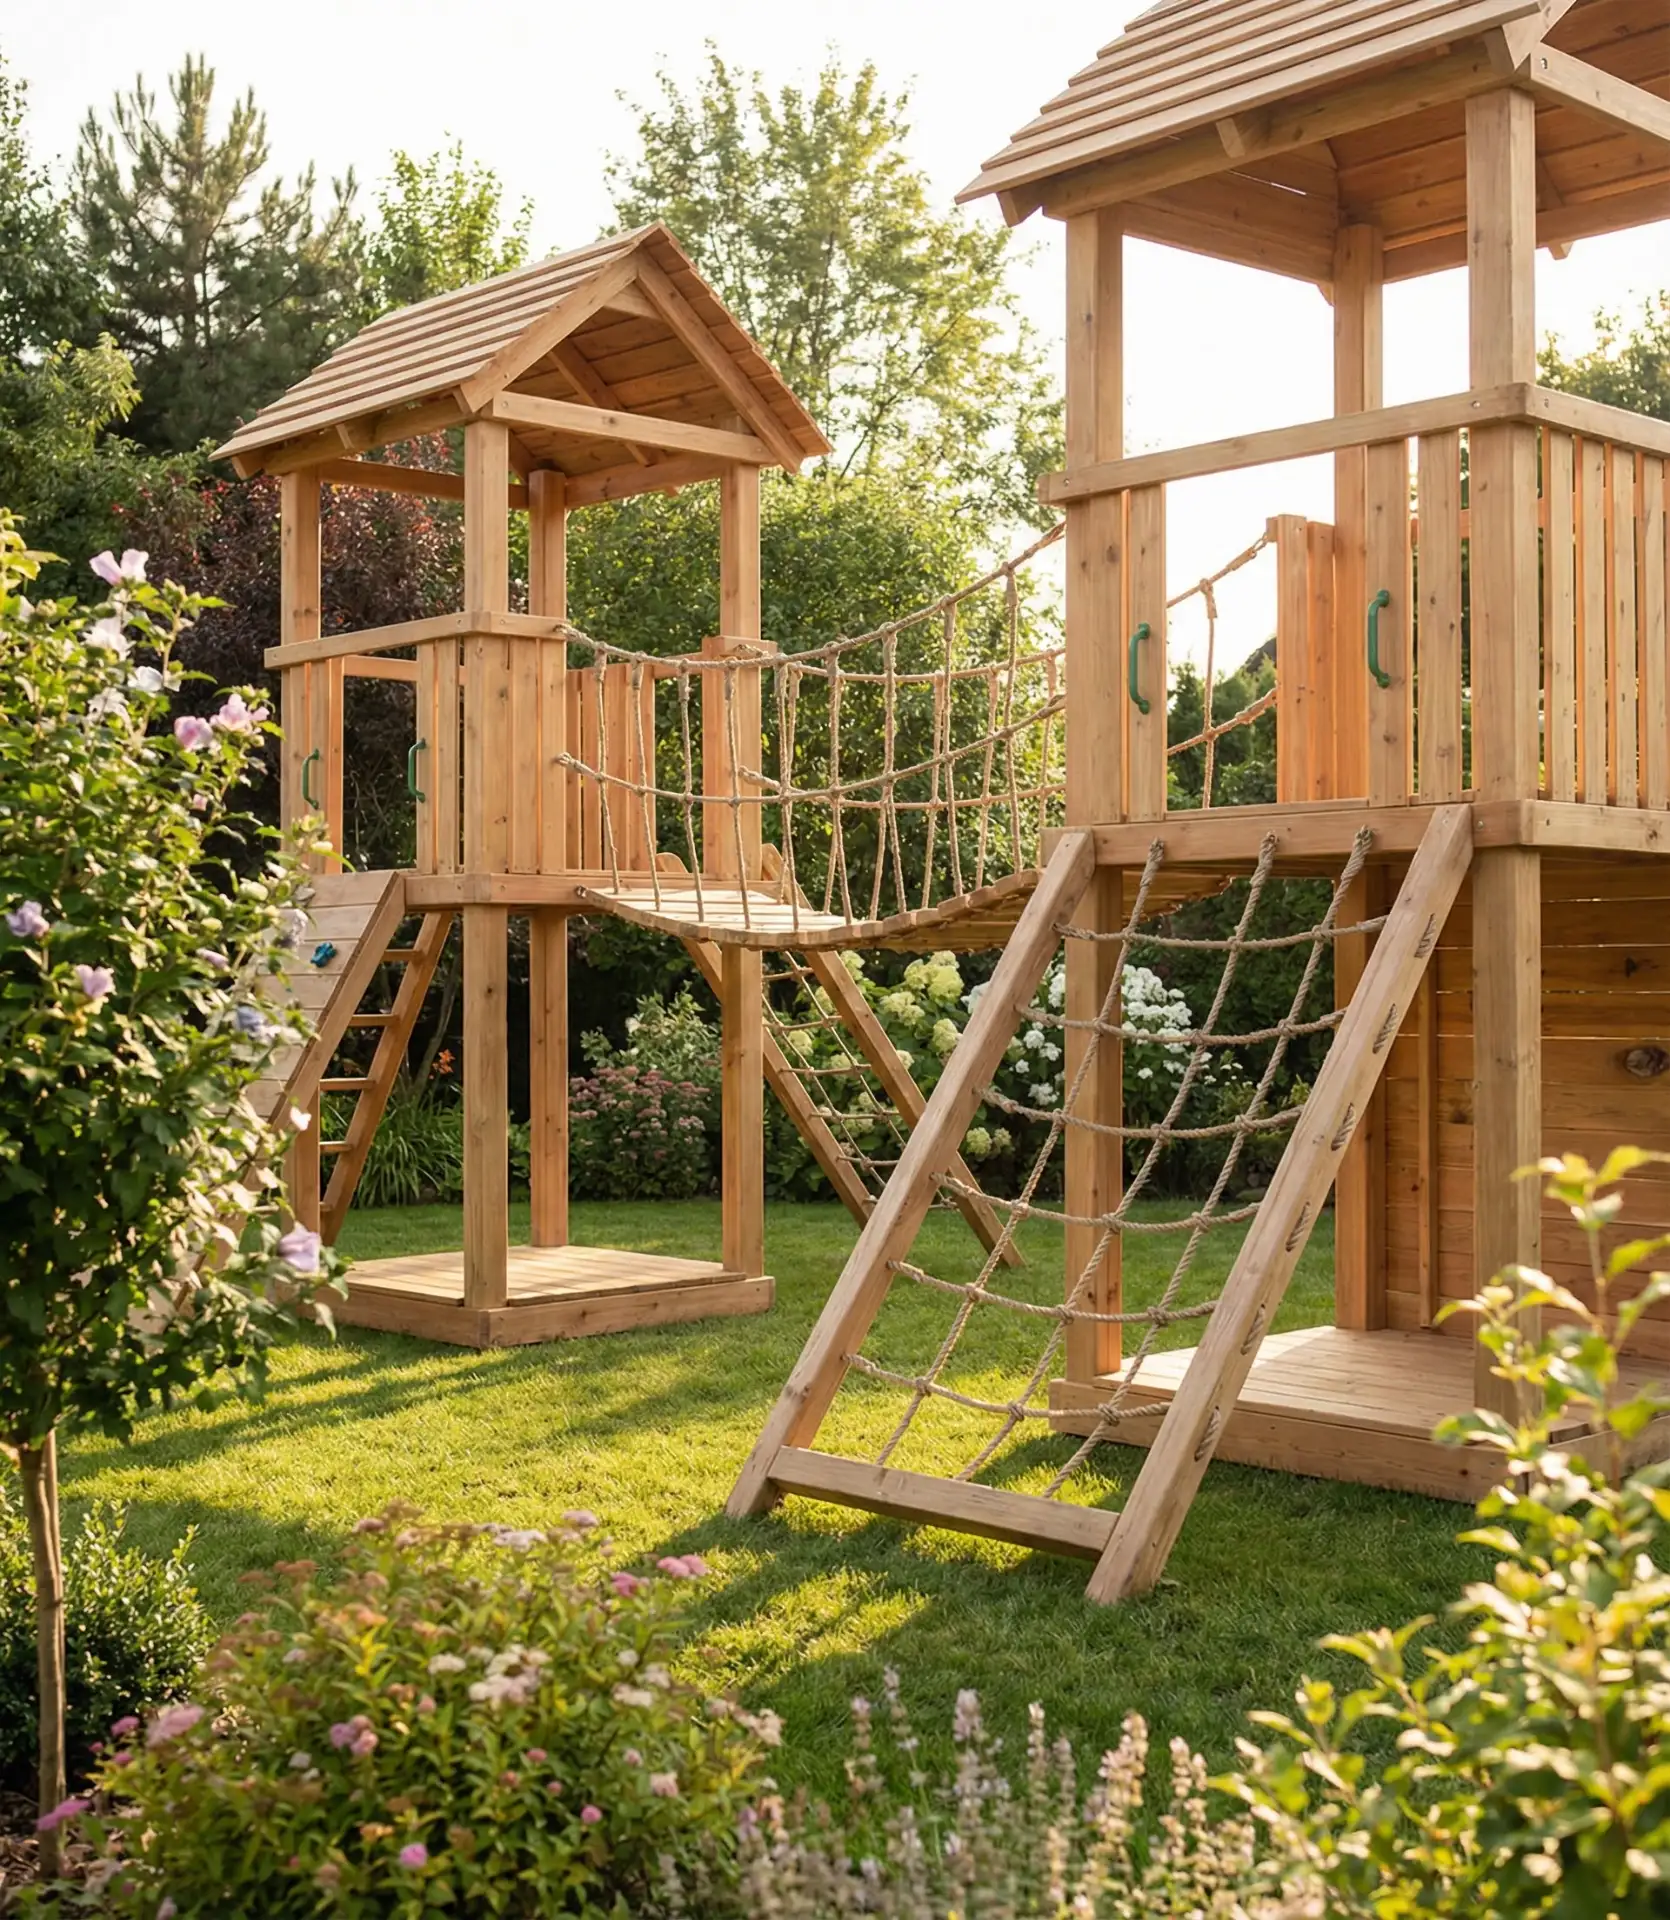
This type of layout is especially the case in Pacific Northwest and New England properties where the ground has natural slopes, which can turn landscaping challenges into landscaping opportunities. Homeowners often underestimate vertical space, which allows children to interact with the play structure in more ways than at ground level. Children perceive mountains even when there are only a couple of feet of elevation. Play decks need a lot less maintenance than ground-level play areas, and they are cleaner and provide better drainage than other ground-surfaced play areas.
2. Living Willow Playhouse

Willows are fast and highly adaptable plants with the ability to live for several seasons in a row. This playground design natural wood concept uses fast-growing willow varieties planted in circular or dome patterns and then trained and woven into walls and roof forms. As the years pass, they leaf out, providing a secret garden-like atmosphere and providing the children the opportunity to learn about plant growth and organic architecture in an experiential, hands-on manner. Initially, the transformation is gradual, but eventually, there is a significant and fun change in the atmosphere of the backyard. Eventually the willow structures provide enchanting natural play spaces and enigmatic hideouts. 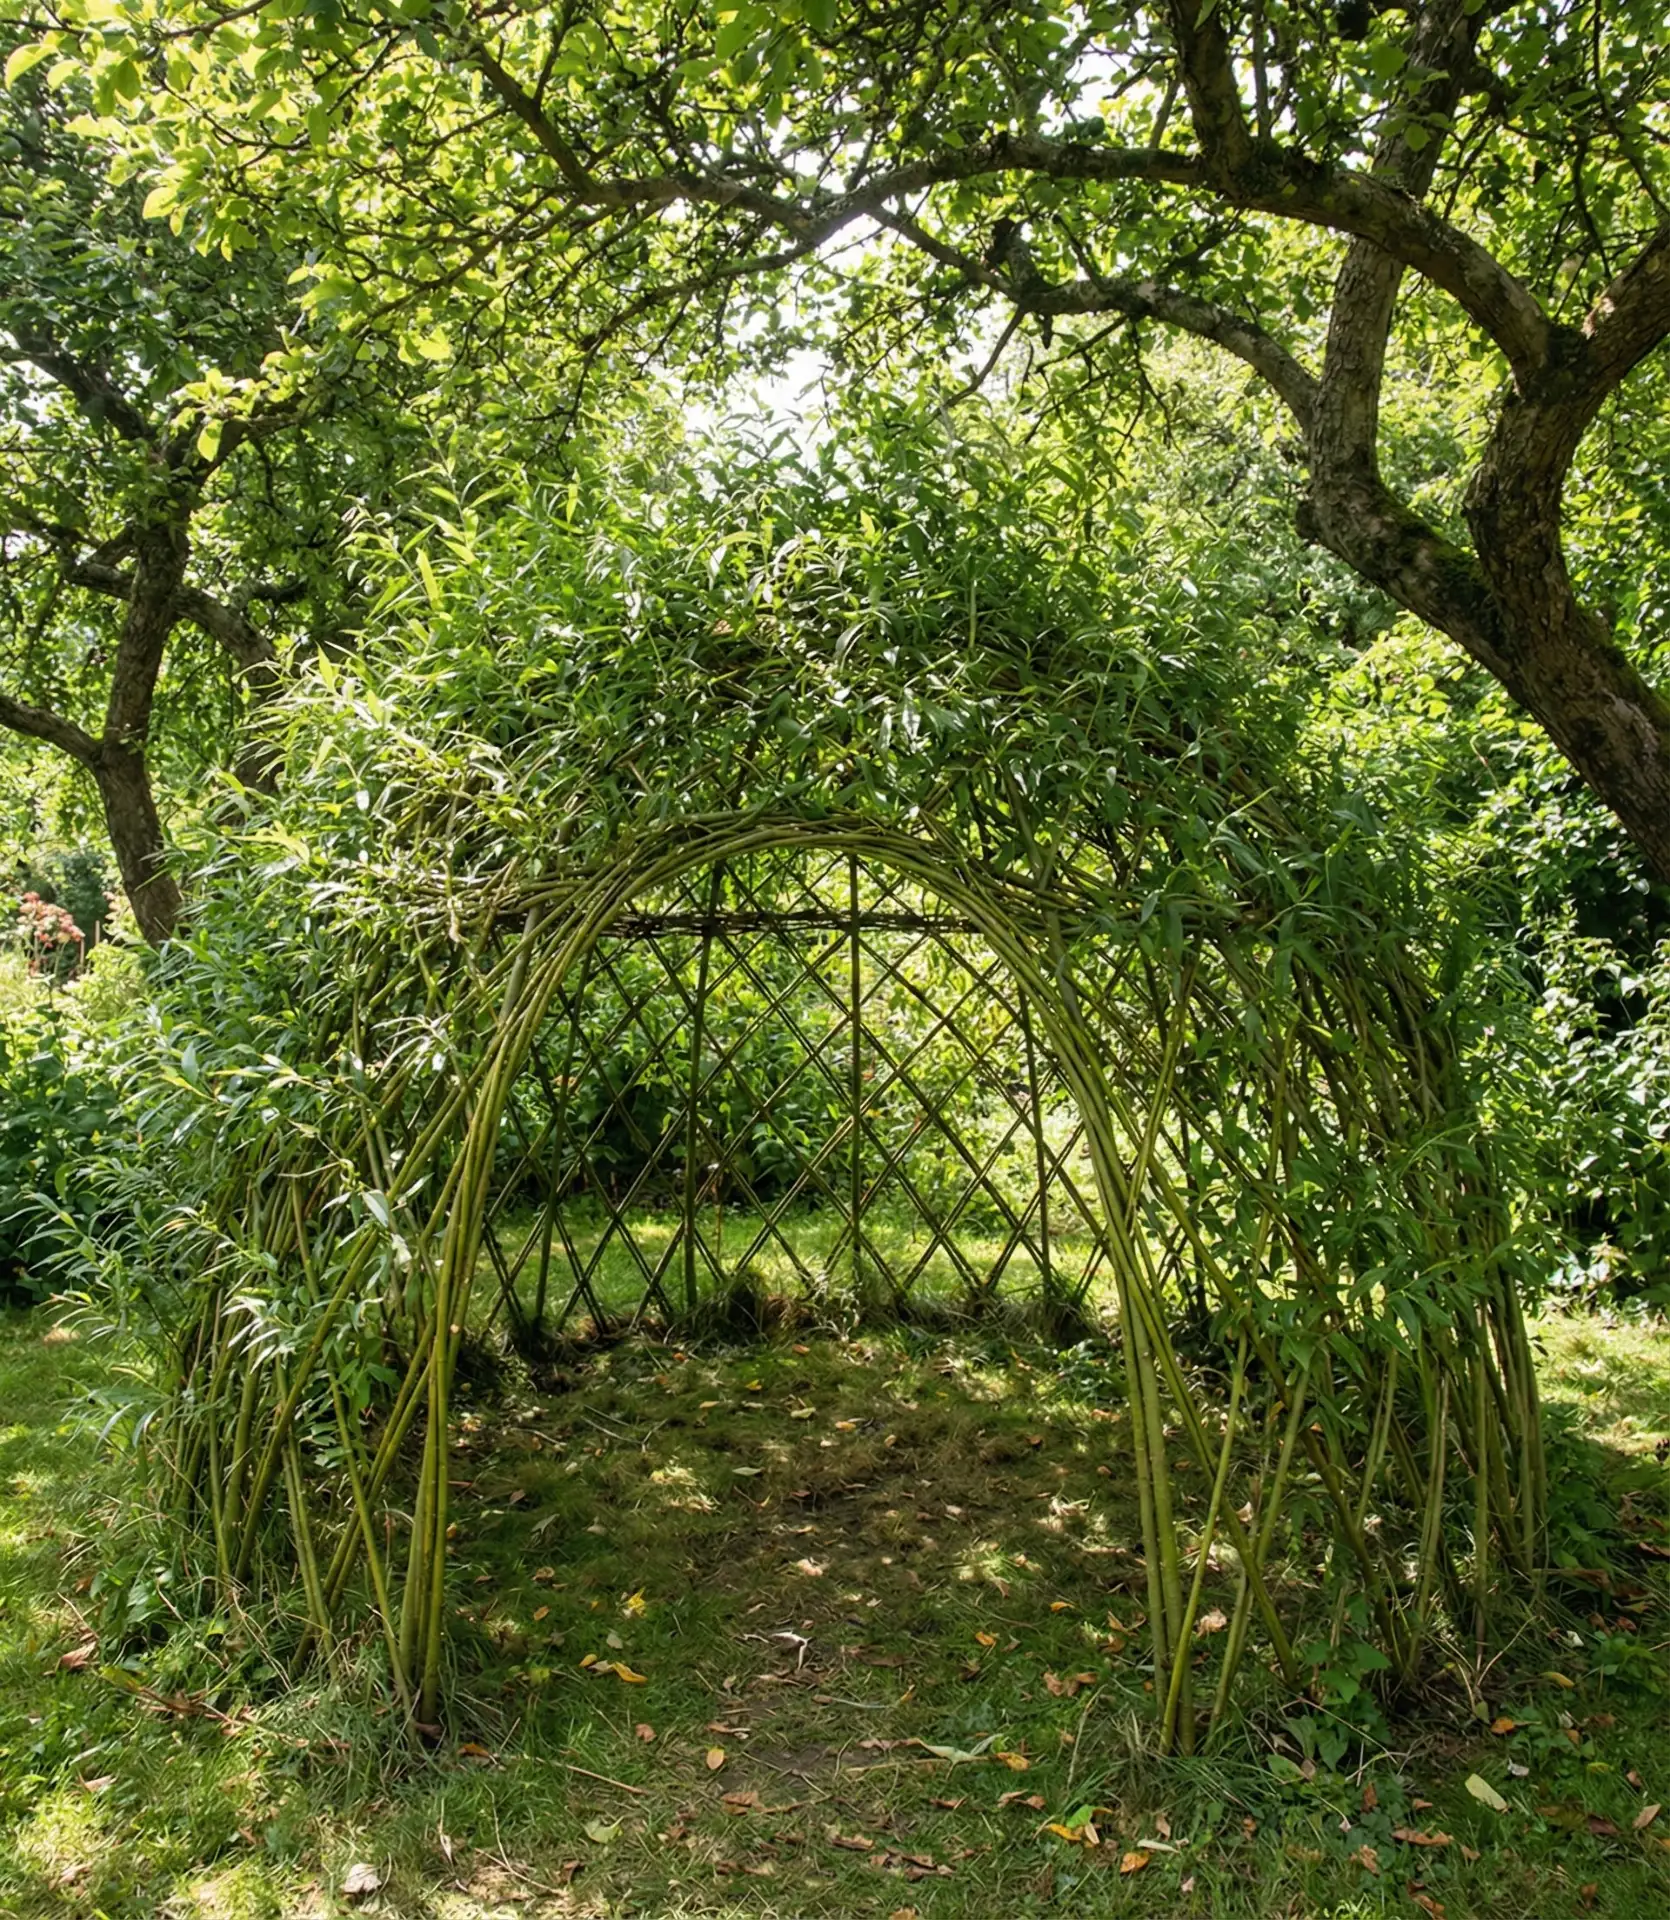
In just two seasons, one Chicago suburb mother shared that the willow playhouse became a neighborhood attraction. Children loved the medieval feel of a secret hideout that they pulled off with only natural play.
Unlike traditional builds, the initial investment costs are minimal, but patience is required as the living walls develop. Annual weaving and pruning sessions can become a family affair, as kids can help shape their ever-evolving play area.
3. Restaurant-Style Service Window Play Kitchen
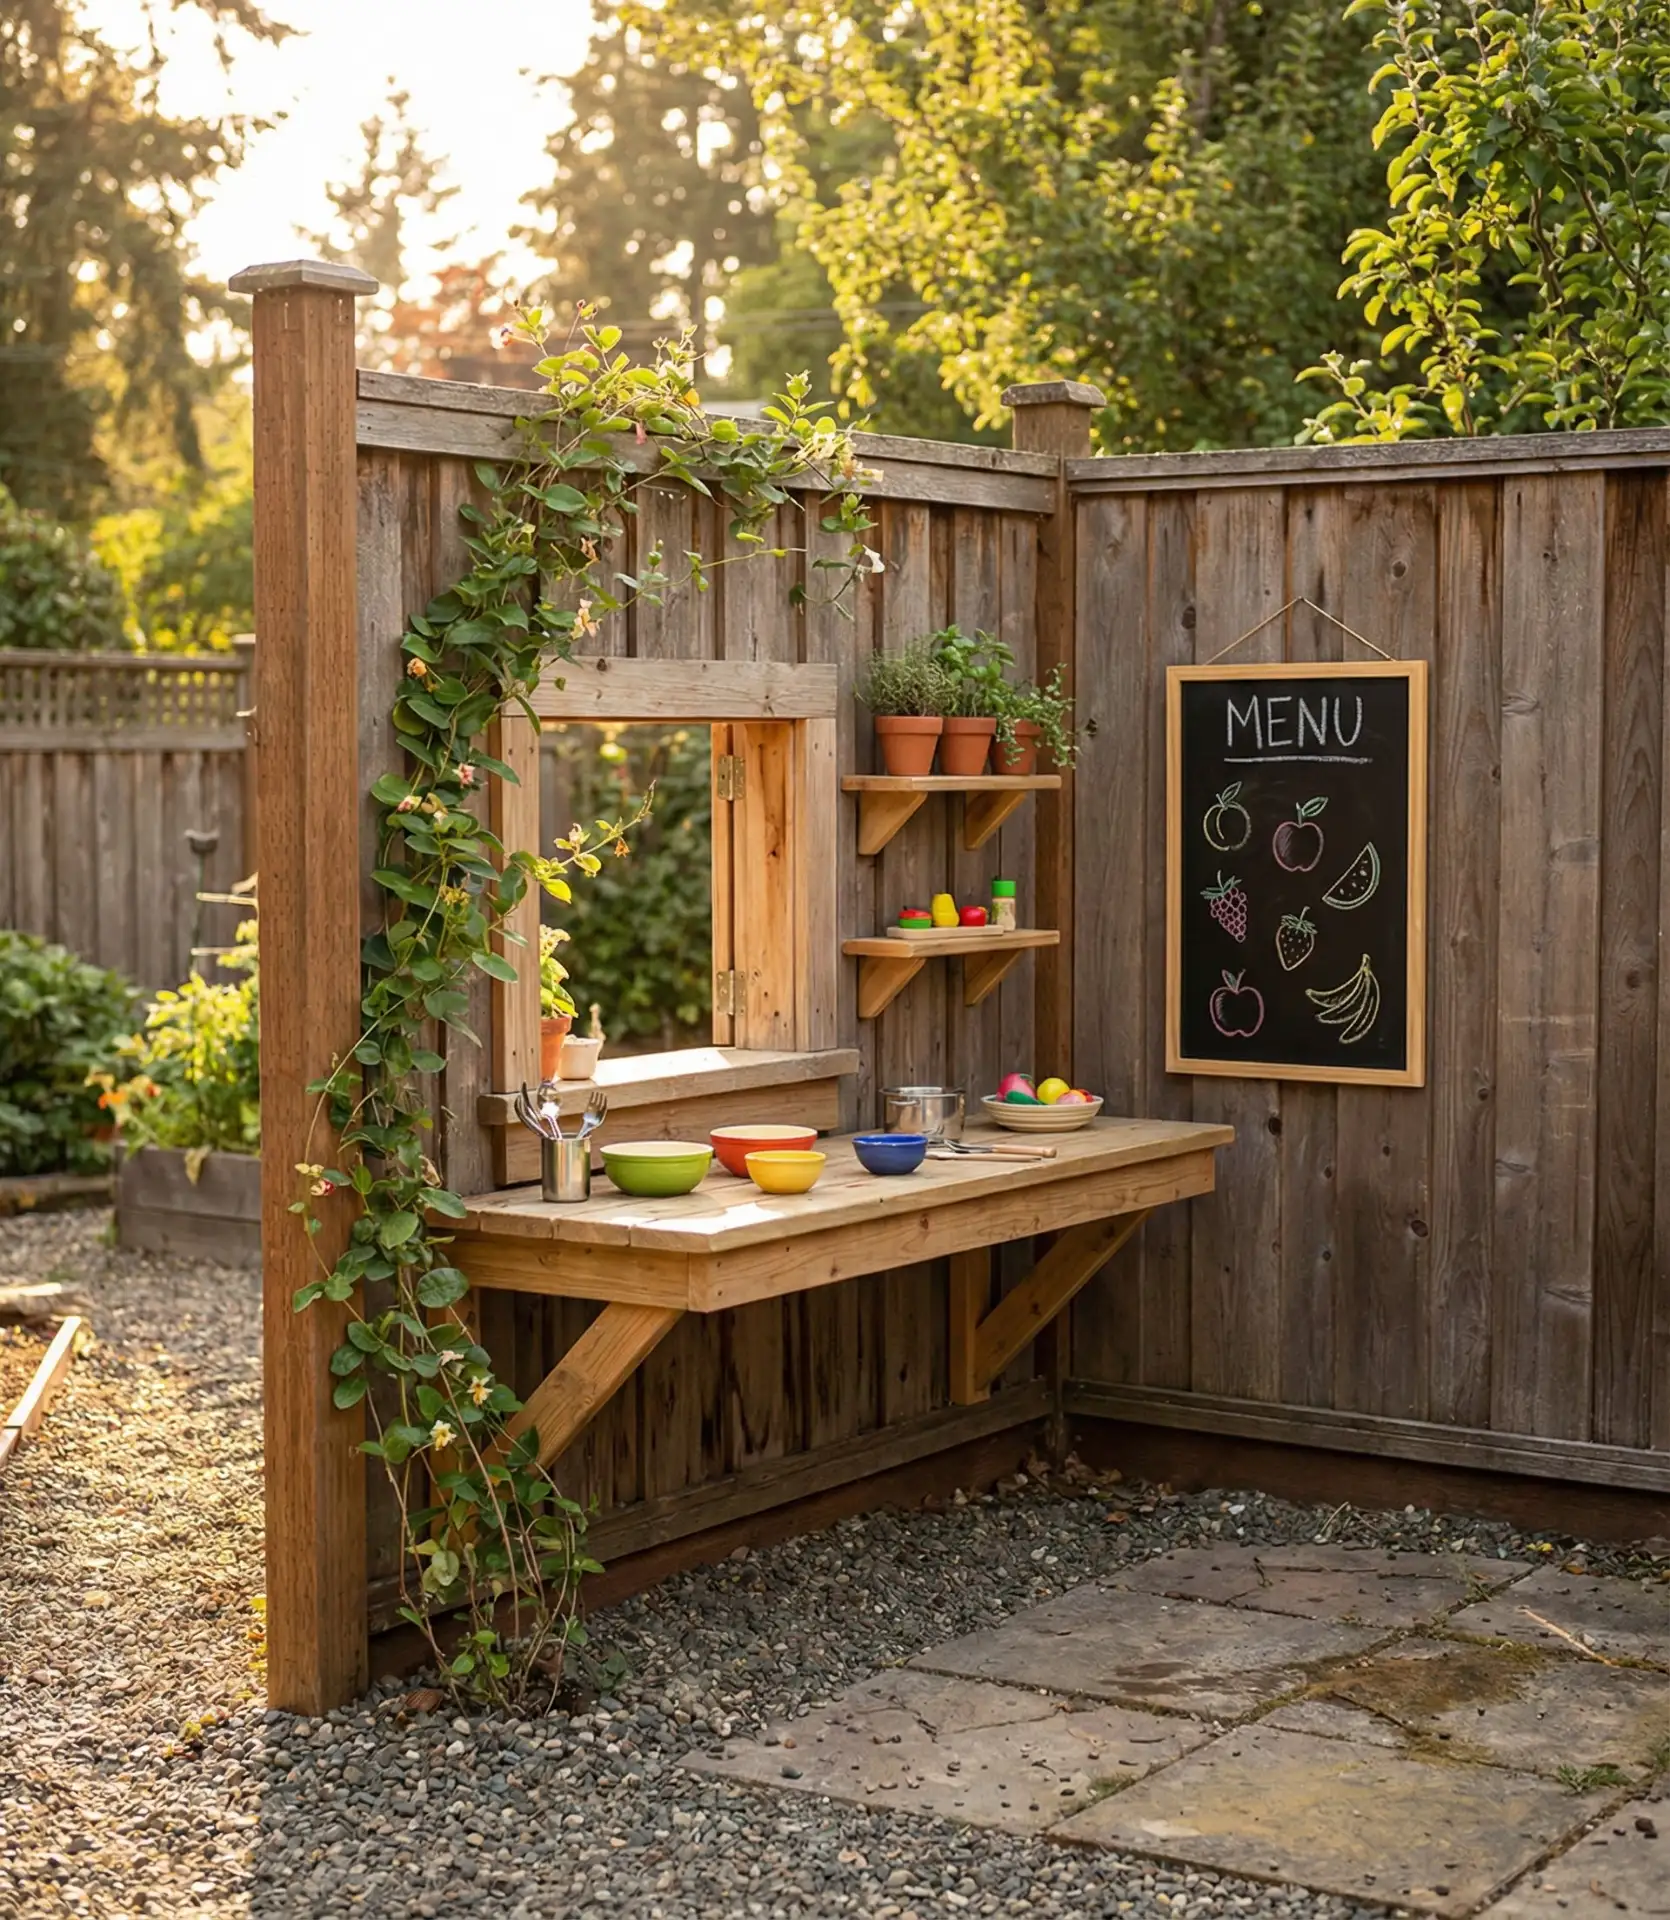
Integrating a fence or garage wall with a play kitchen, complete with a real service window, can turn the outside into a dramatic play space. The setup is a service counter where kids can “serve” meals to the family members seated at the patio and is equipped with a chalkboard menu, dish storage, and utensil hooks, as well as a shelf. This element of playground design is intended to promote social and cooperative play and to keep the messy and uncontained activities of mud and water play confined to one outdoor area. 
Parents often supervise from afar and wish to seat themselves next to the play kitchen, which is a common oversight. It is best to position the service window conversationally close to the main outdoor dining area, where kids can “serve” meals during summertime family dinners.
The small roofed overhang will protect the play area from rain and will allow the area to be usable in more weather conditions without the need for a fully enclosed structure.
4. Boulder Scramble Garden
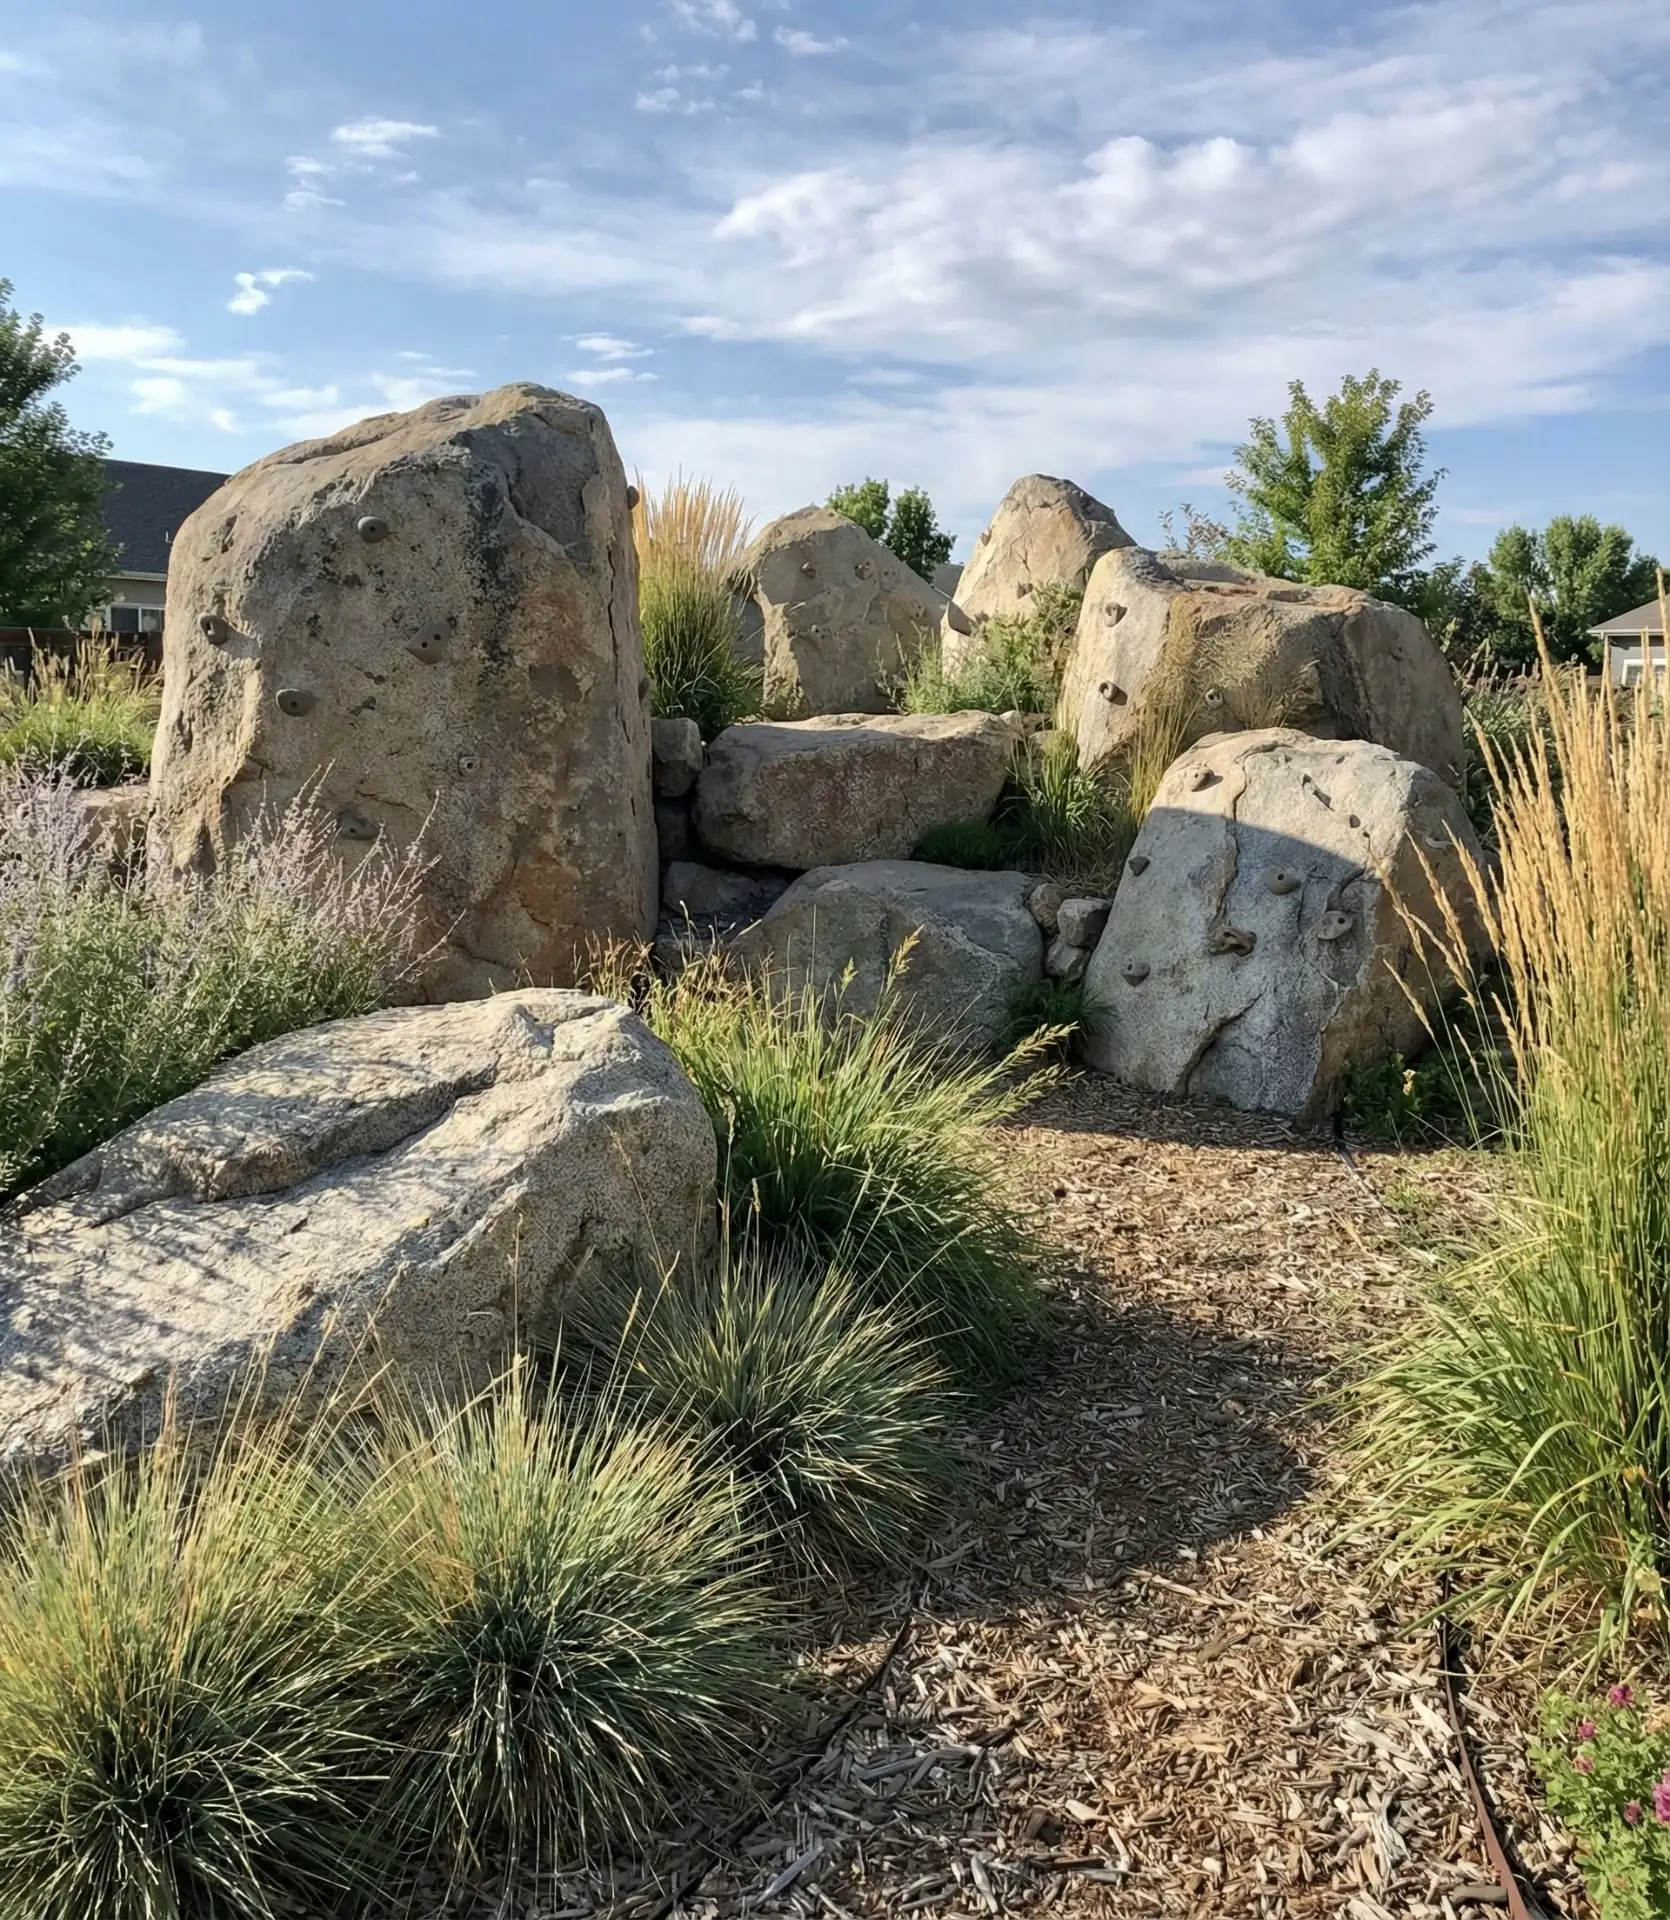
Large landscape boulders arranged in climbing clusters create natural play challenges that blend seamlessly into garden design while developing gross motor skills. This playground design backyard ideas approach uses 2-4 ton rocks positioned at varying heights and distances, allowing children to step, climb, and balance across stone pathways. The surrounding plantings—ornamental grasses, sedums, and ground covers—soften the hardscape, while the rocks absorb and radiate heat, making them naturally warm and inviting surfaces during cooler mornings in the outdoor play environment. 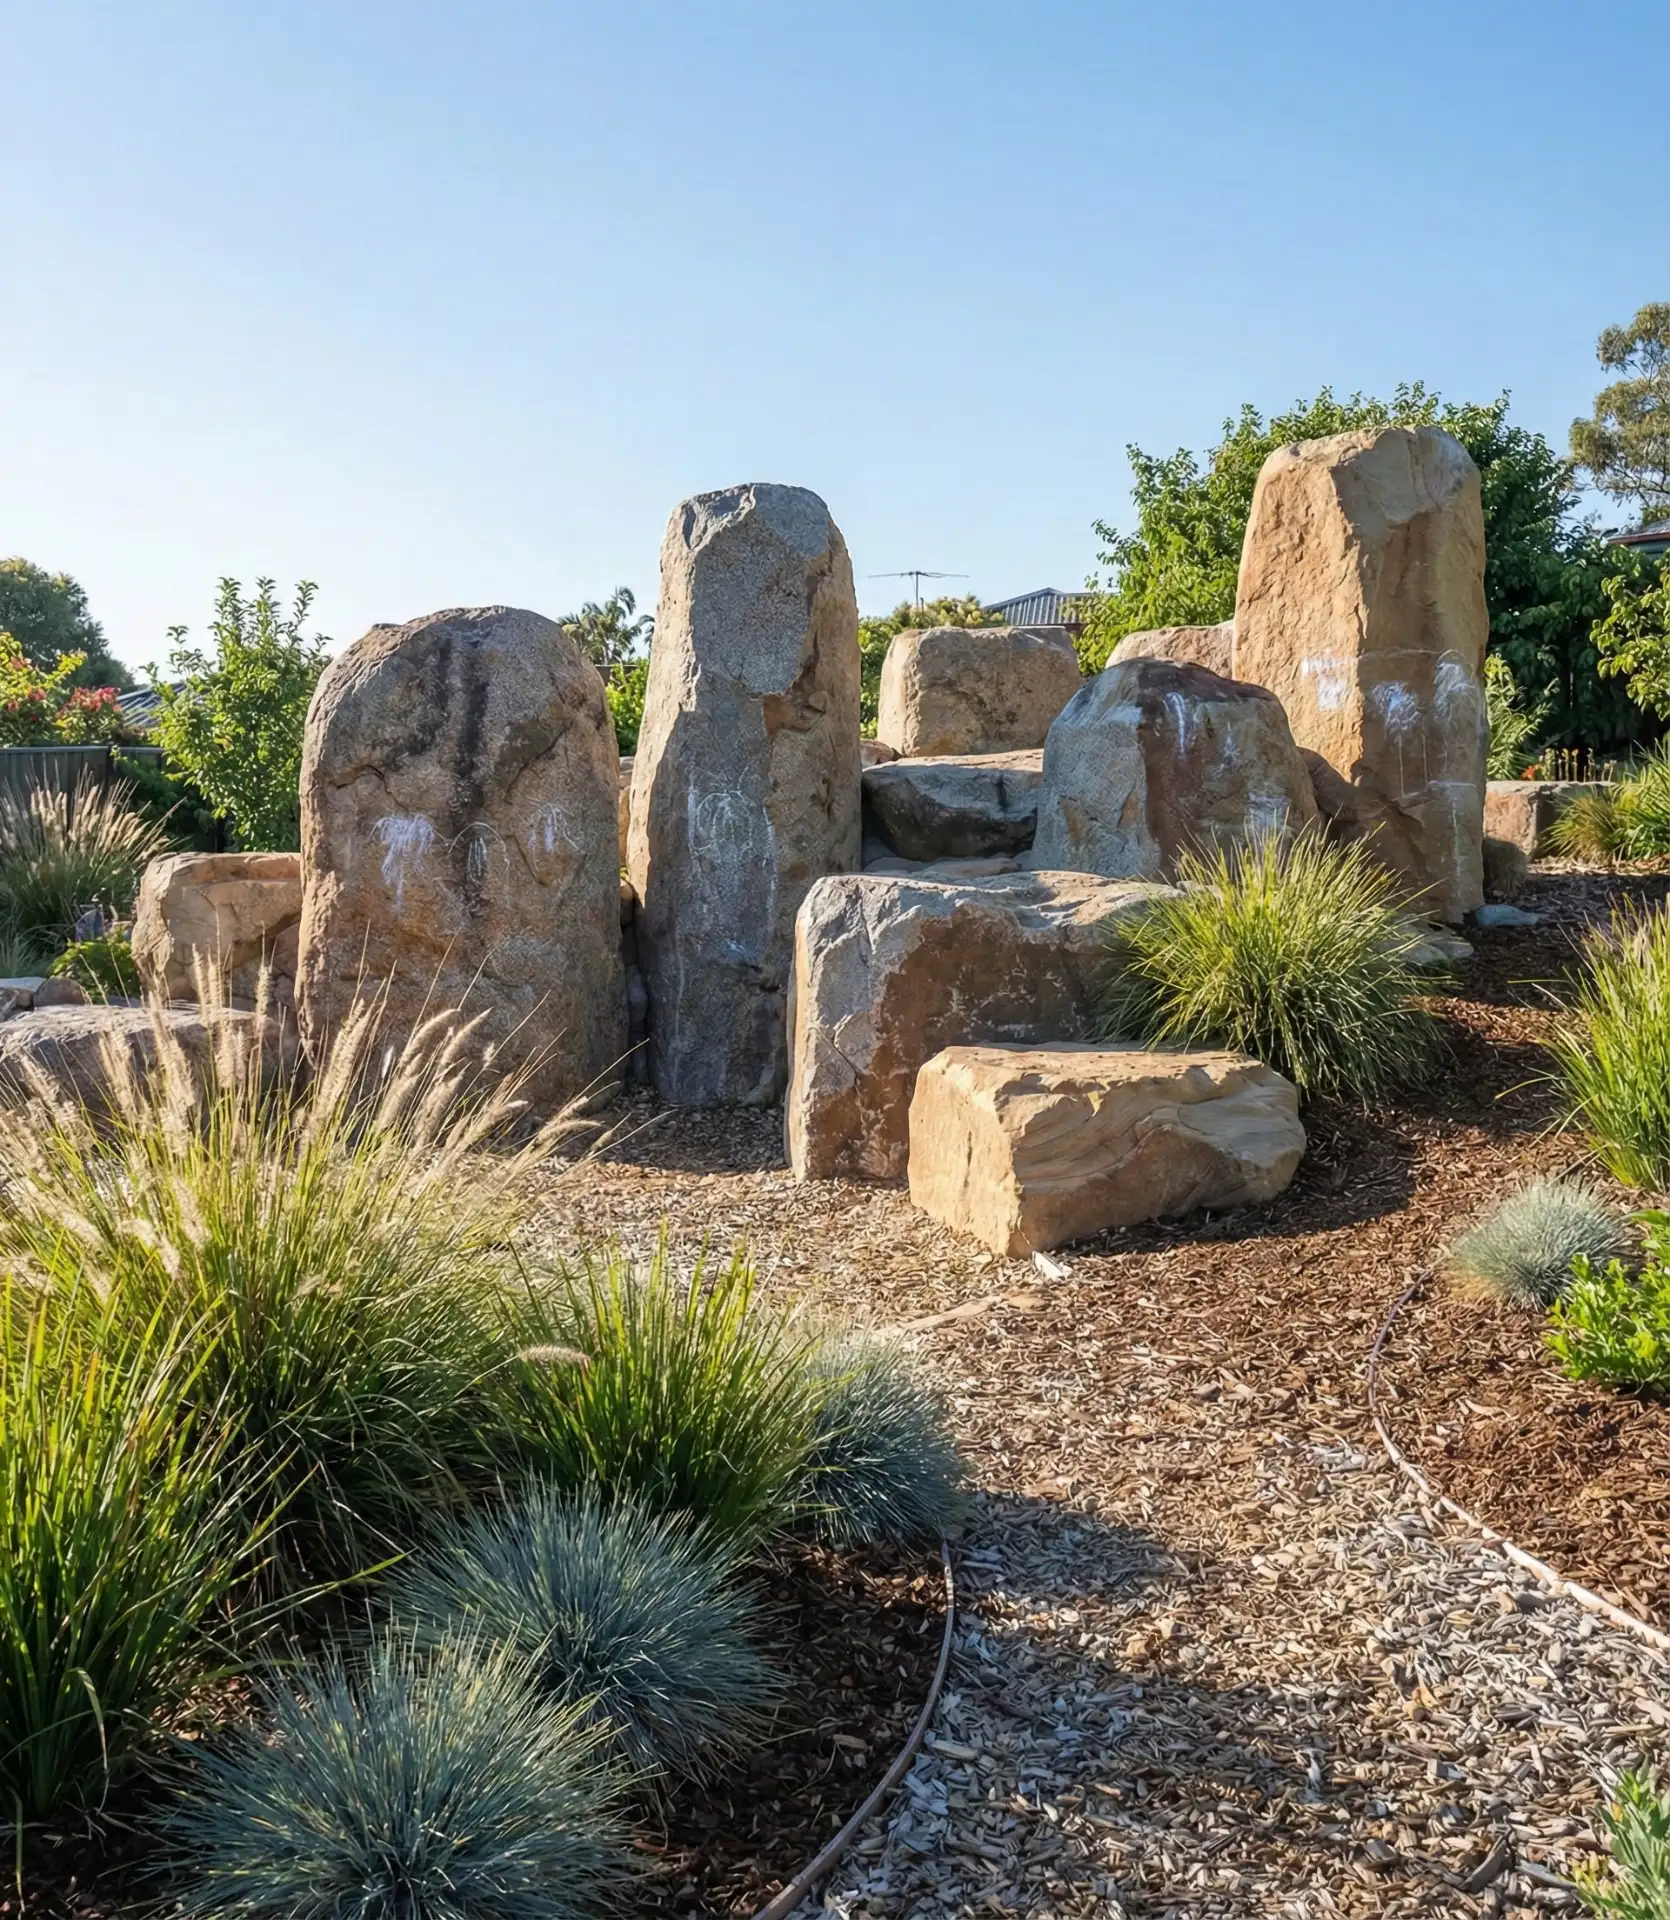
This design shines in Colorado, Utah, and other Western states where boulders complement regional landscape aesthetics. The rocks remain cool enough for barefoot play in the mornings even during the summer, unlike metal playground equipment. Budget-wise, sourcing local stone significantly reduces costs—a landscape supply yard often charges $200-400 per large boulder plus delivery, while custom playground equipment of similar play value runs $2,000-5,000. The permanence means this investment grows with your children, from toddler stepping stones to teen parkour practice.
5. Gravel Pit Construction Zone
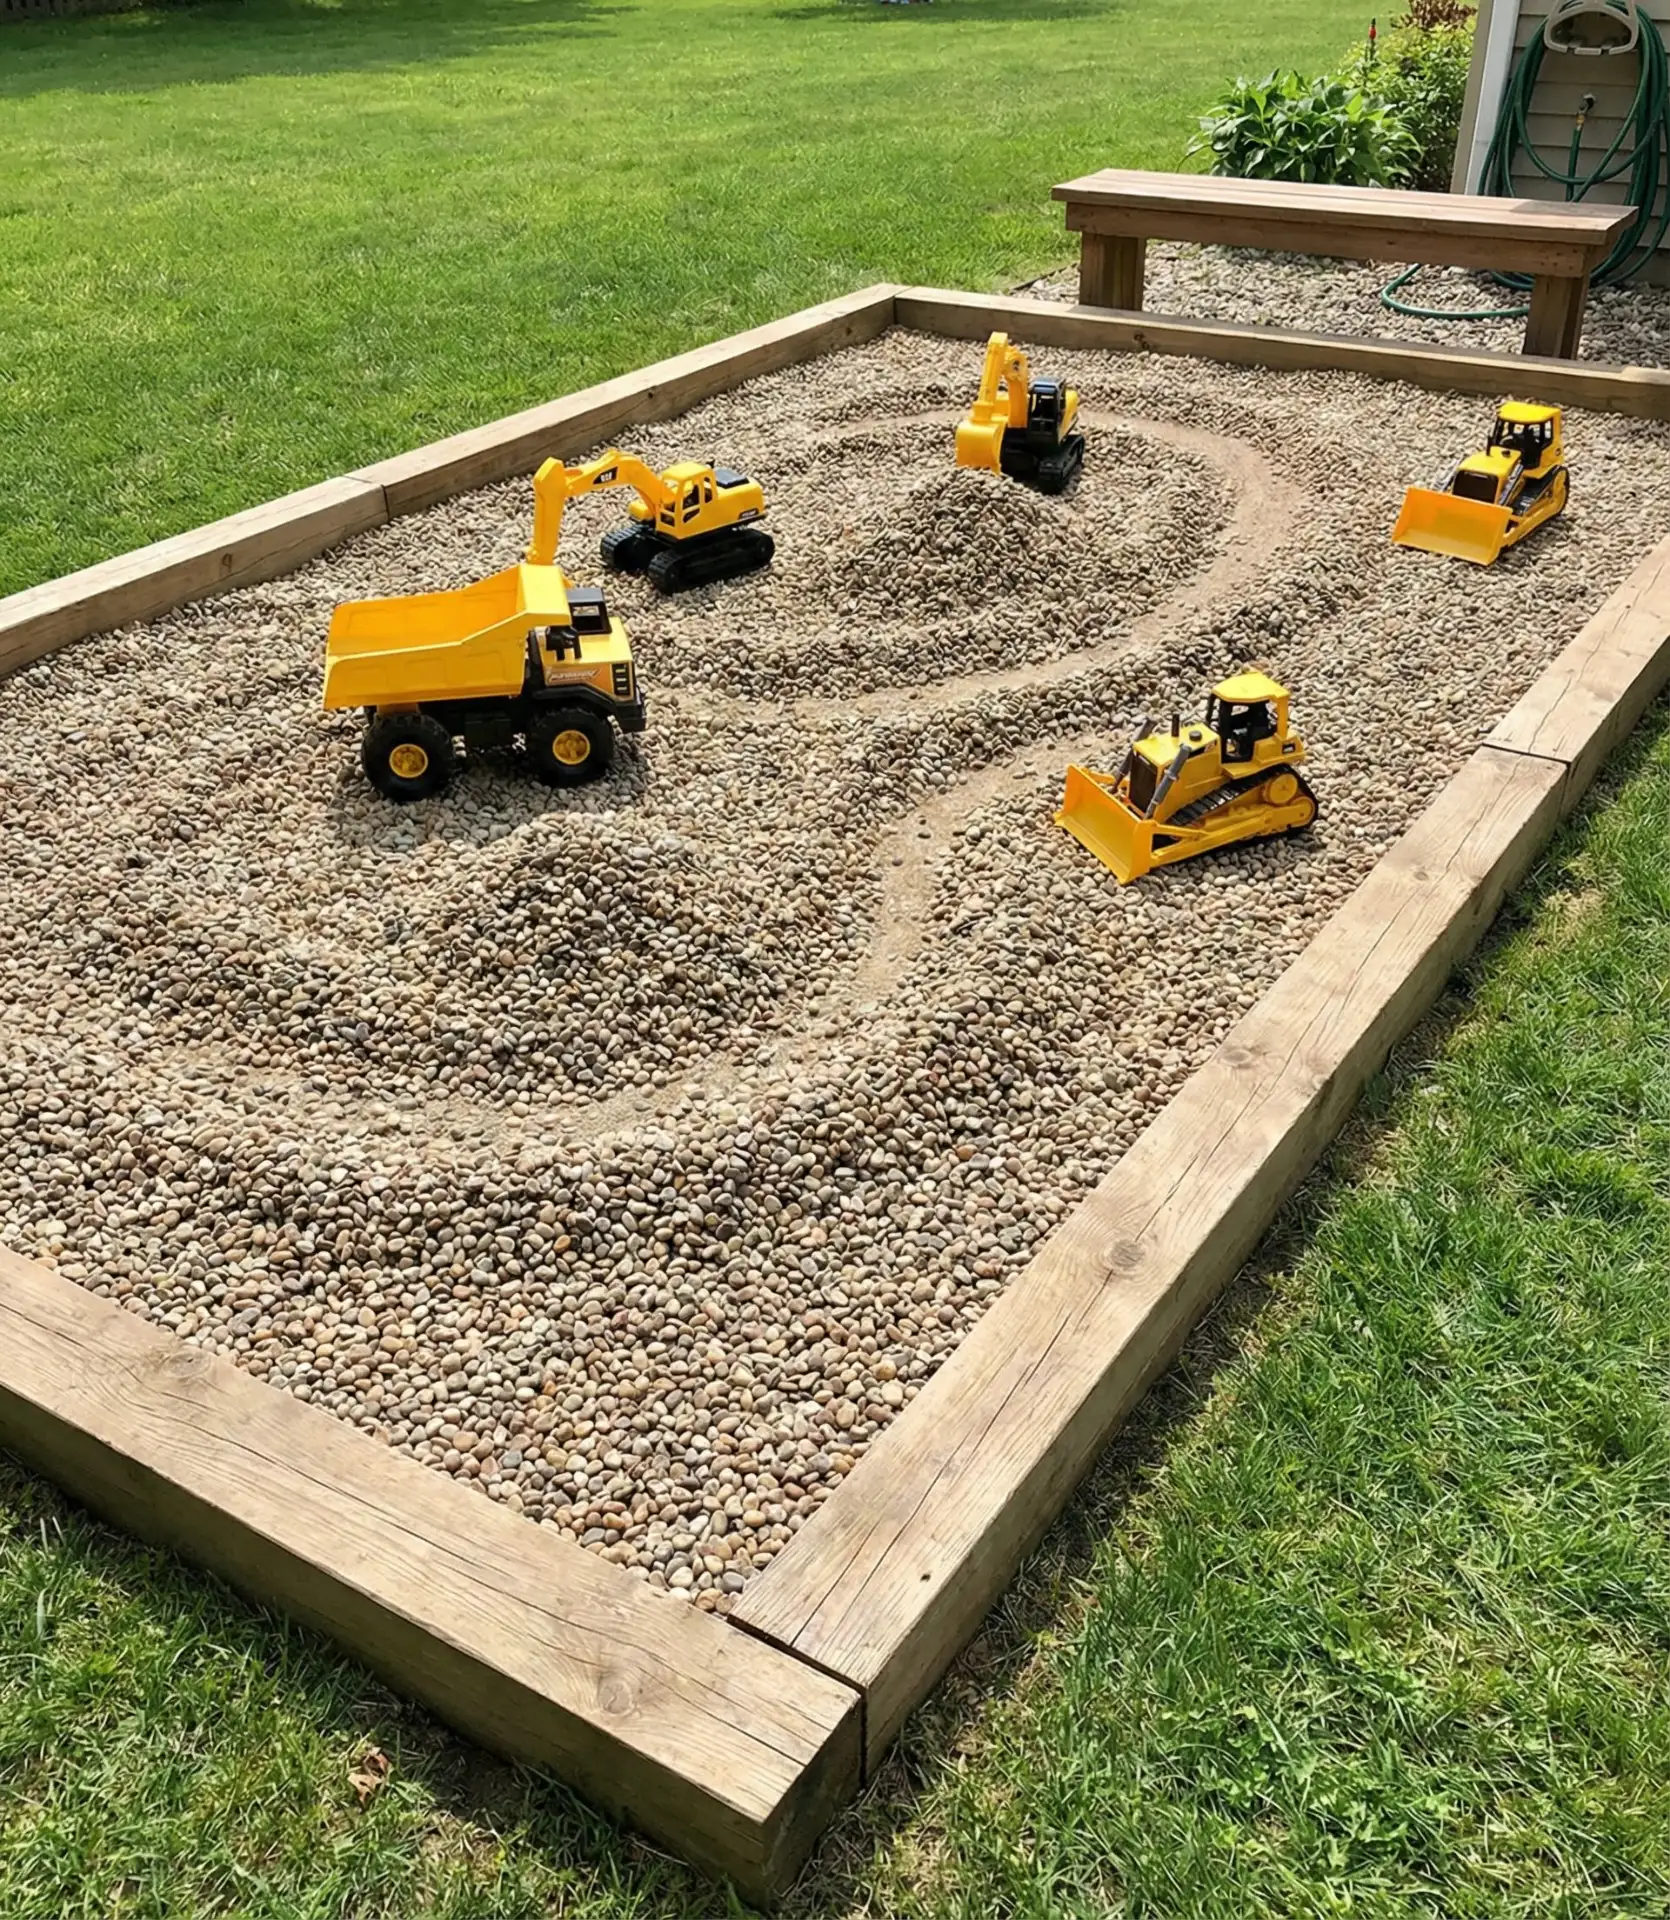
A gravel area stocked with toy construction vehicles is an engaging, cheap play area that doesn’t require supervision. Unlike play sand, 3/8-inch pea gravel drains quickly, doesn’t attract cats, and is windrow safe. The gravel surface entices construction play—building roads, digging with shovels, and driving dump truck toys—while the contained pit with landscaping timber borders gravel so it won’t get into lawns and become a mowing hazard. 
Feedback about gravel play areas is overwhelmingly positive—children always enjoy digging and construction even after other playground toys have become boring. Landscape suppliers sell about one ton of pea gravel for $50-80, which is the amount needed for a 10×10-foot pit. The depth of the pit is critical. 6-8 inches is optimal for serious construction play without excess. Place the pit so it’s visible from the kitchen windows. Children tend to play independently for a long time in these areas.
6. Cargo Net Climbing Pyramid
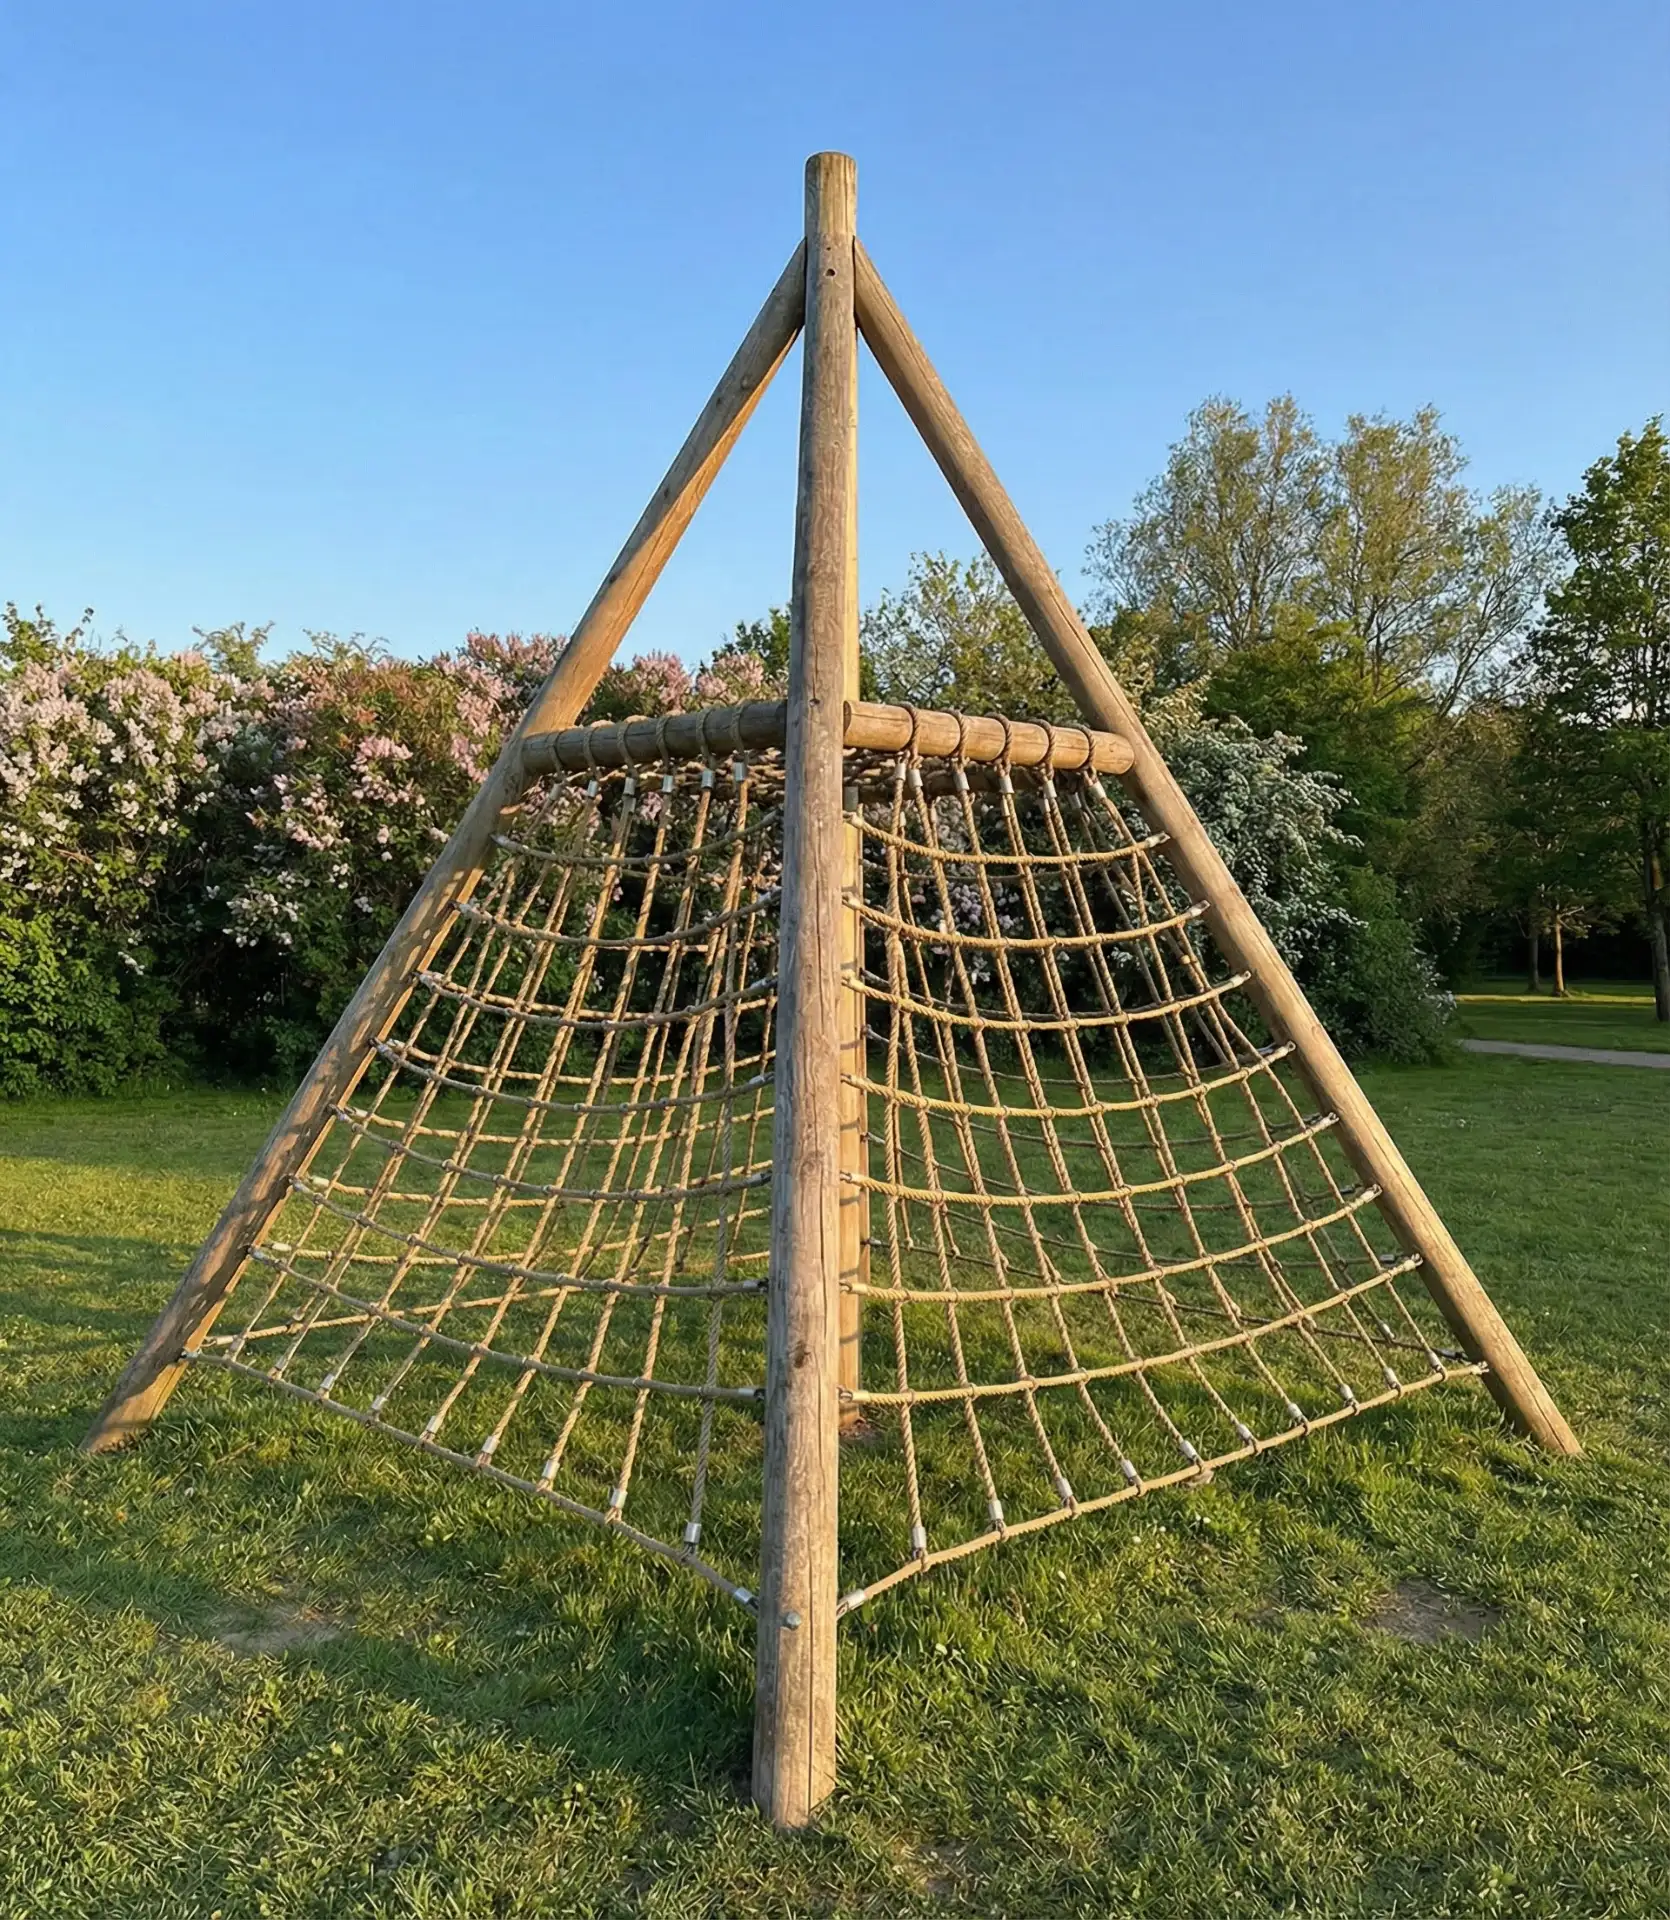
A freestanding pyramid frame covered with heavy-duty cargo netting is visually unobtrusive while providing a high-challenge climbing experience compared to other design play structures.
The open mesh design allows sight lines across the yard while incorporating a vertical play element to build strength, coordination, and confidence. The UV-resistant marine-grade netting, available in either natural manila or modern black, blends well with different yard styles, and its see-through design keeps it from taking over smaller spaces, unlike play towers that can be too big for the area.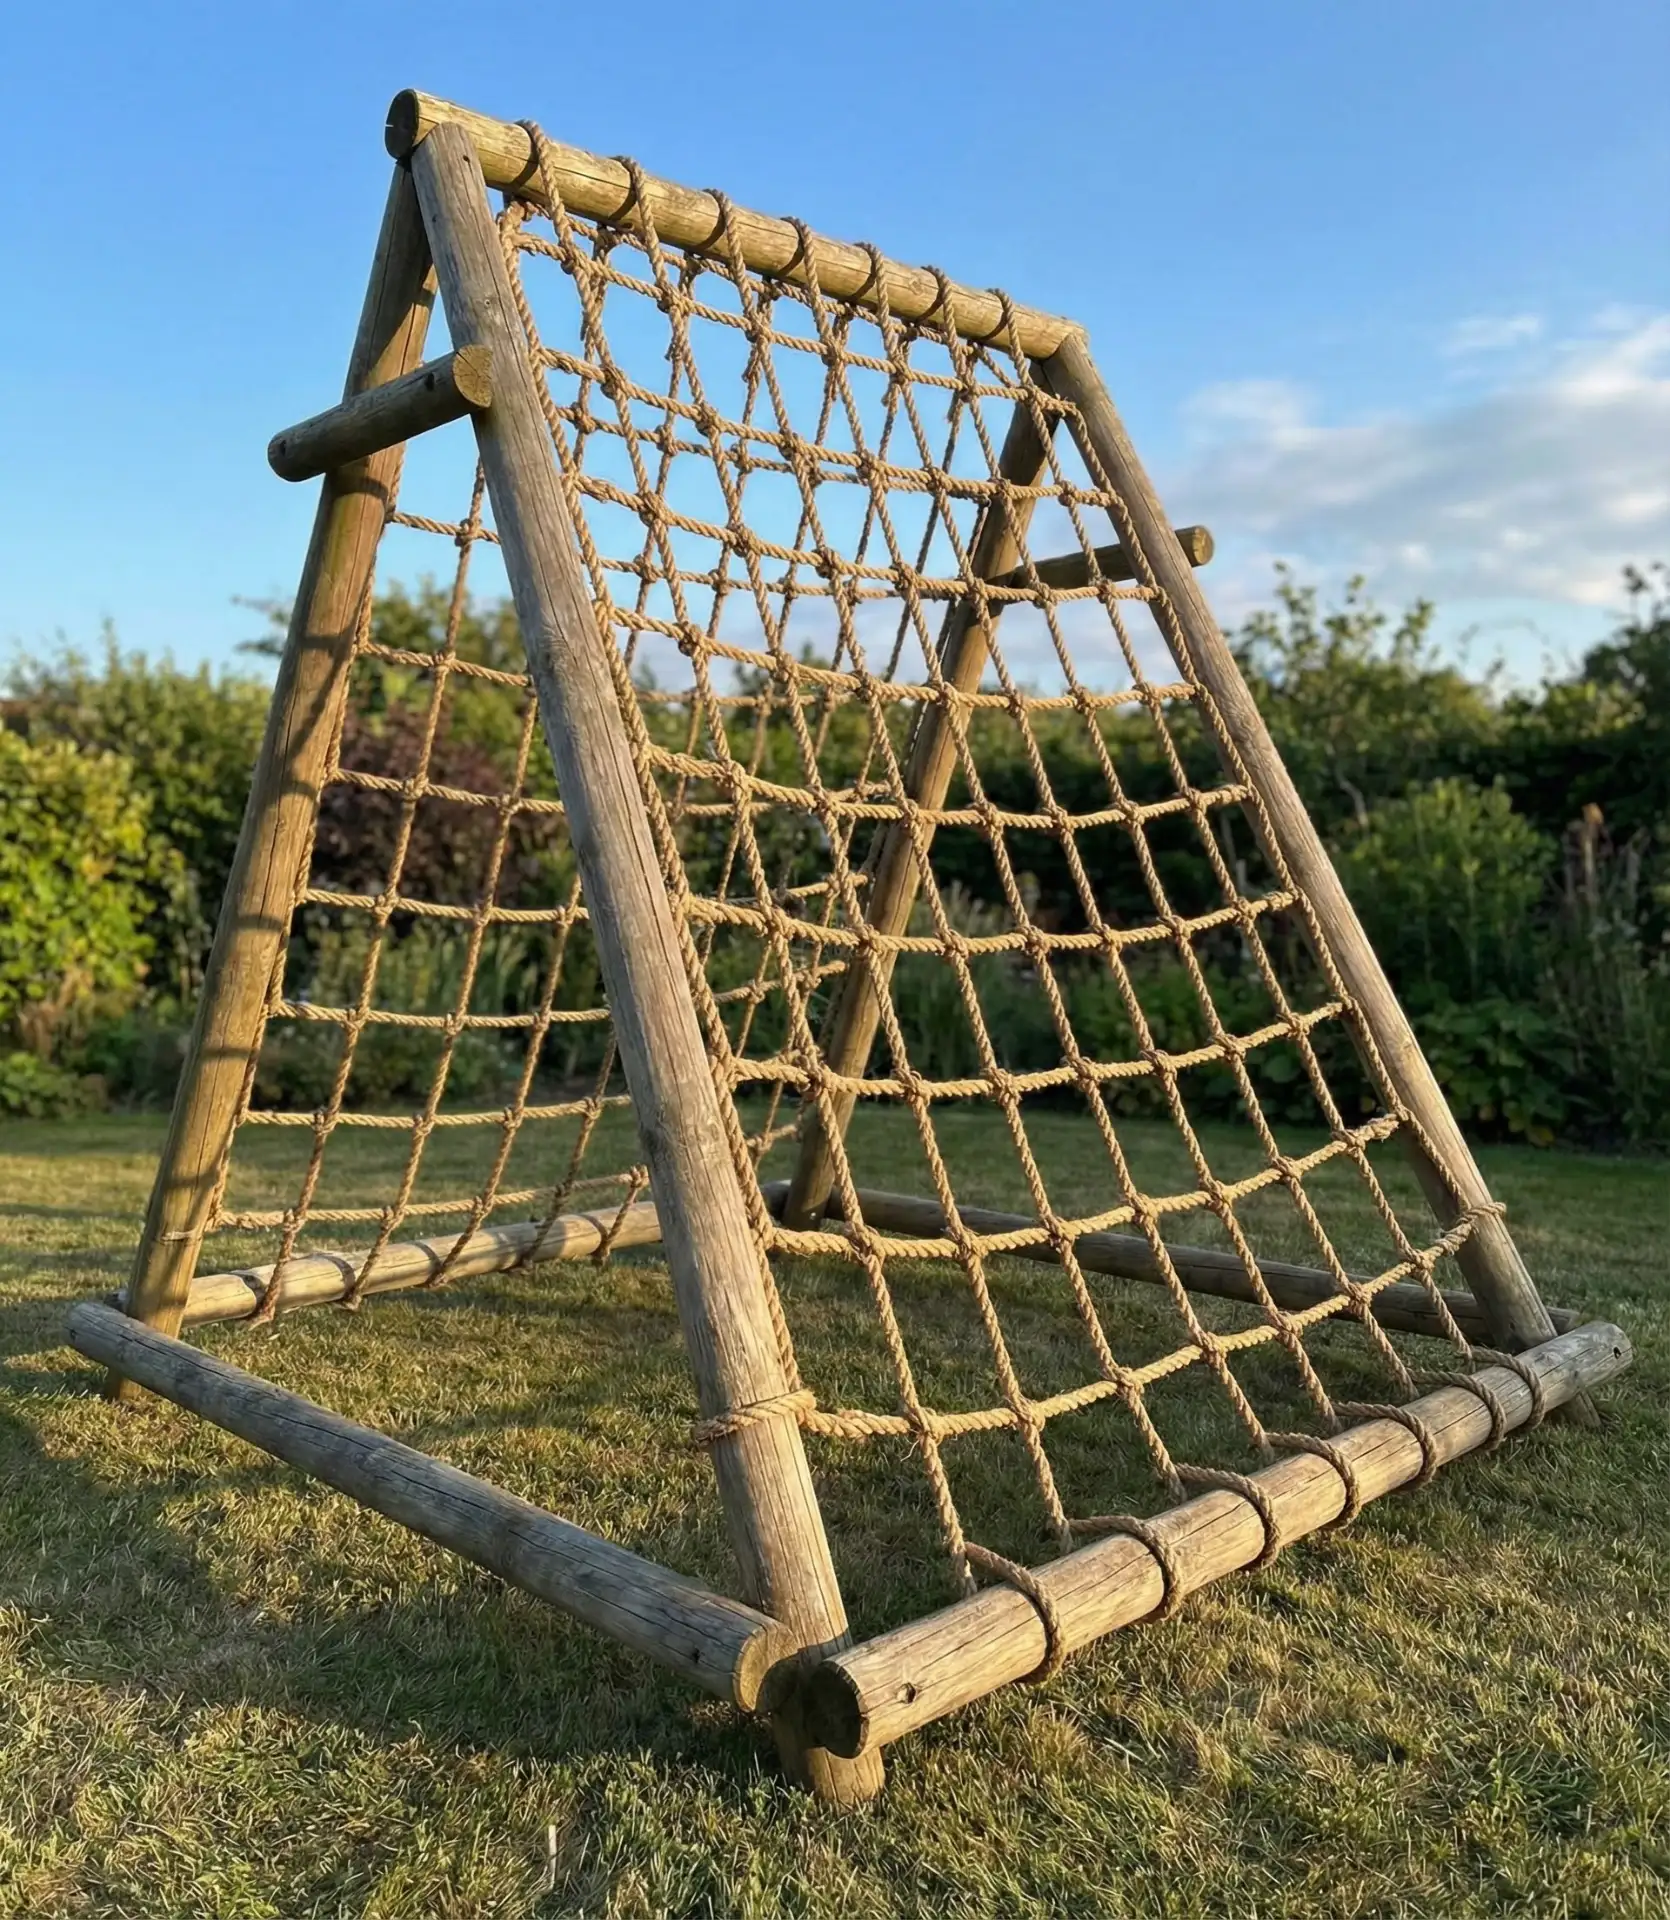
Installation is best on a 12-inch layer of wood chips or rubber mulch, rather than directly on grass, as it quickly wears away under the central climbing zone. The pyramid design encourages multiple children to climb at the same time, as there are different routes on each face. Playground design experts point out that while cargo nets do not as easily promote cooperative play as some designed structures, they do encourage problem-solving as children figure out different strategies for climbing them in contrast to fixed ladder rungs, which lead to only one “right” way to reach the top.
7. Sunken Trampoline Court
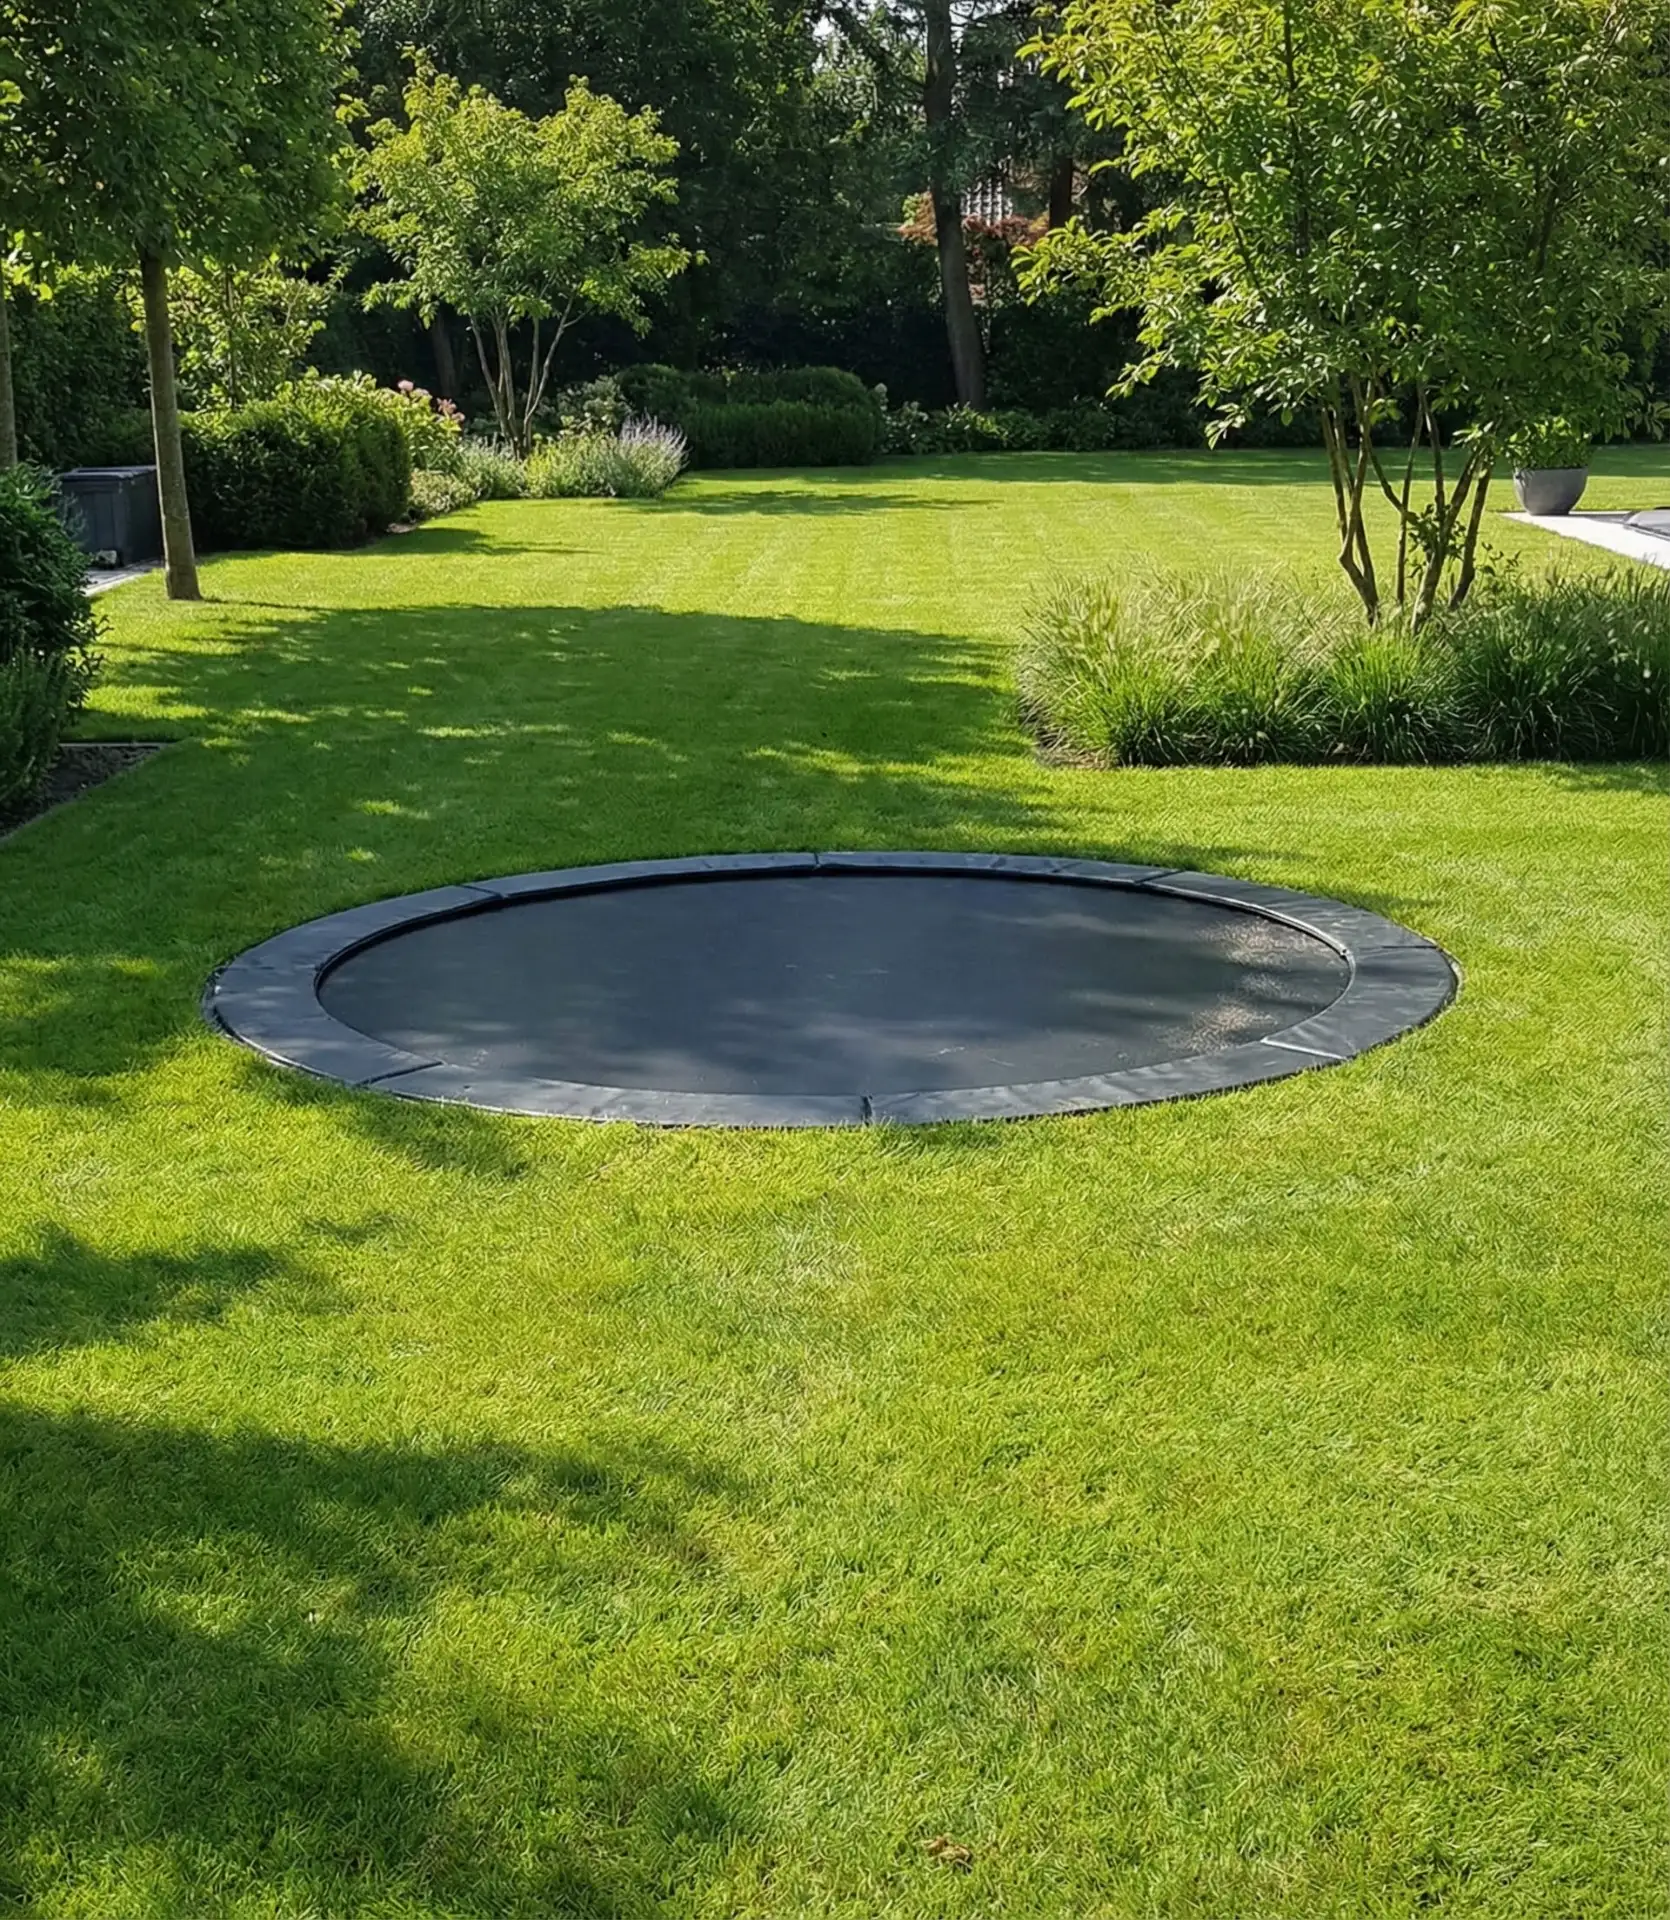
The design is modern and flows with the landscape, eliminating safety concerns while allowing for a compact design. The in-ground approach requires the excavation of a 3- to 4-foot-deep pit with drainage and retaining walls, but the result is an uninterrupted jumping surface flush with the lawn or patio.
Sunken trampolines increase backyard safety and aesthetic value by eliminating the visibility of external safety netting. Safety netting can catch wind and debris, and the adjustable netting reduces the risk of falls. 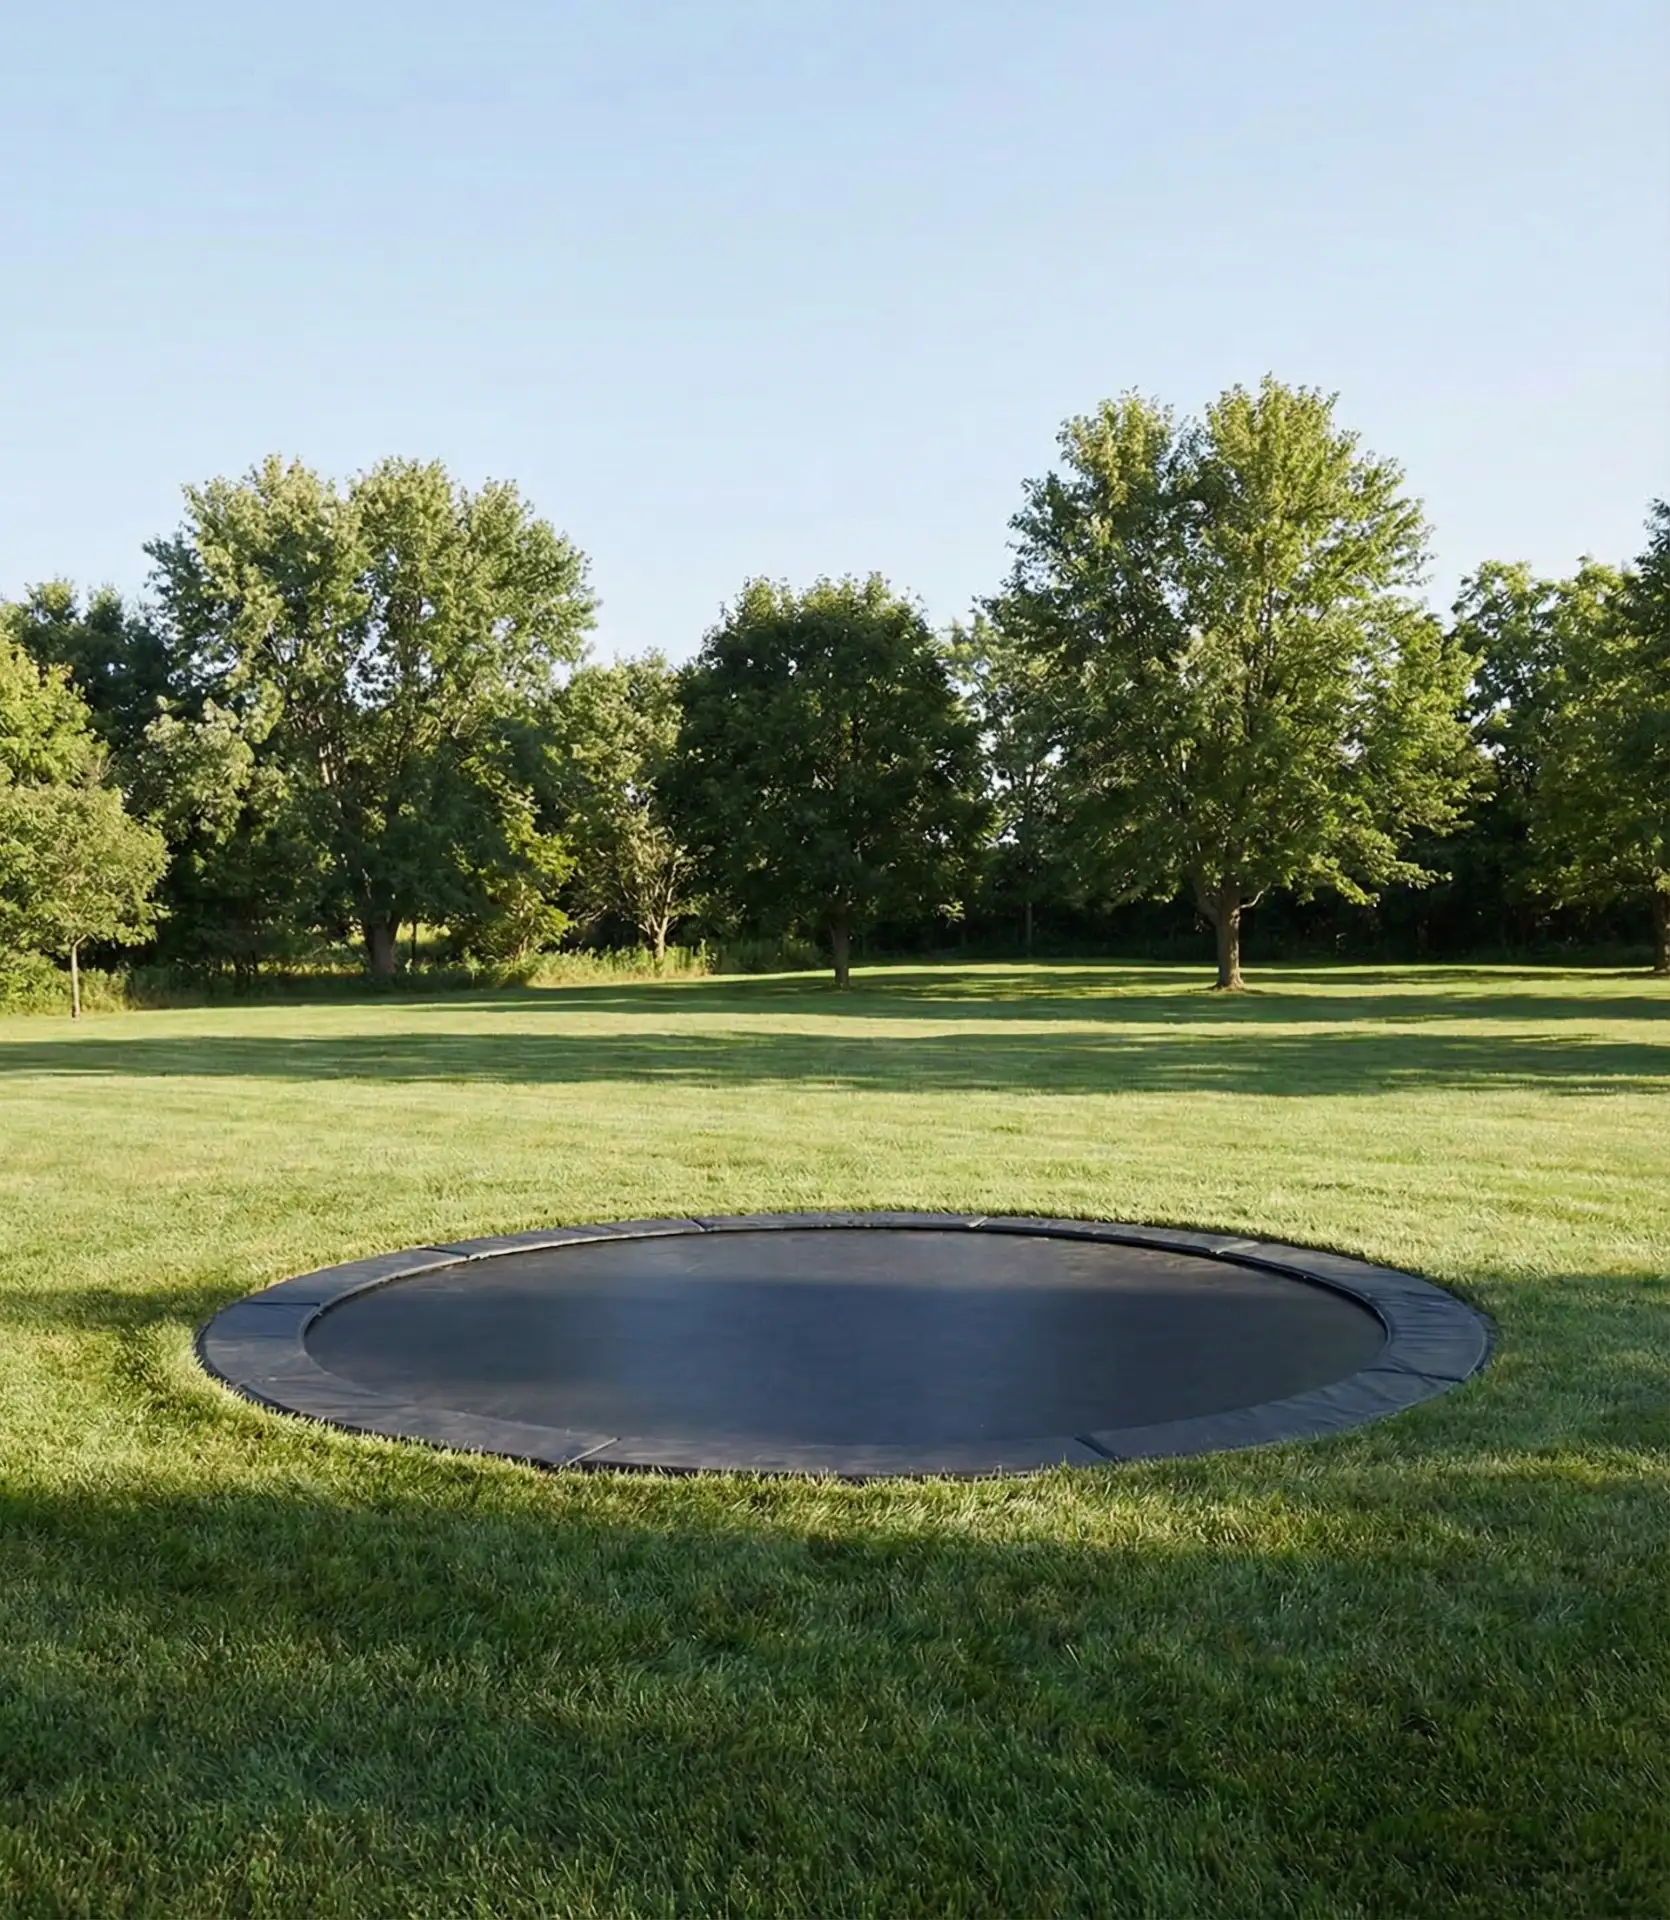
Homeowners in Southern California and Arizona value in-ground trampolines because they do not block breezes and open sight lines. Installations can cost between $2500 and $4500, which is about double the price of an above-ground trampoline, and they include excavation and drainage. However, the value of in-ground trampolines is in their longevity. Unlike above-ground trampolines that only last 5–7 years, in-ground trampolines last 15 years or more. Air pressure ventilation holes should be added to the trampoline pit to eliminate that stiff, bounce-less feeling.
8. Recycled Tire Climber Garden
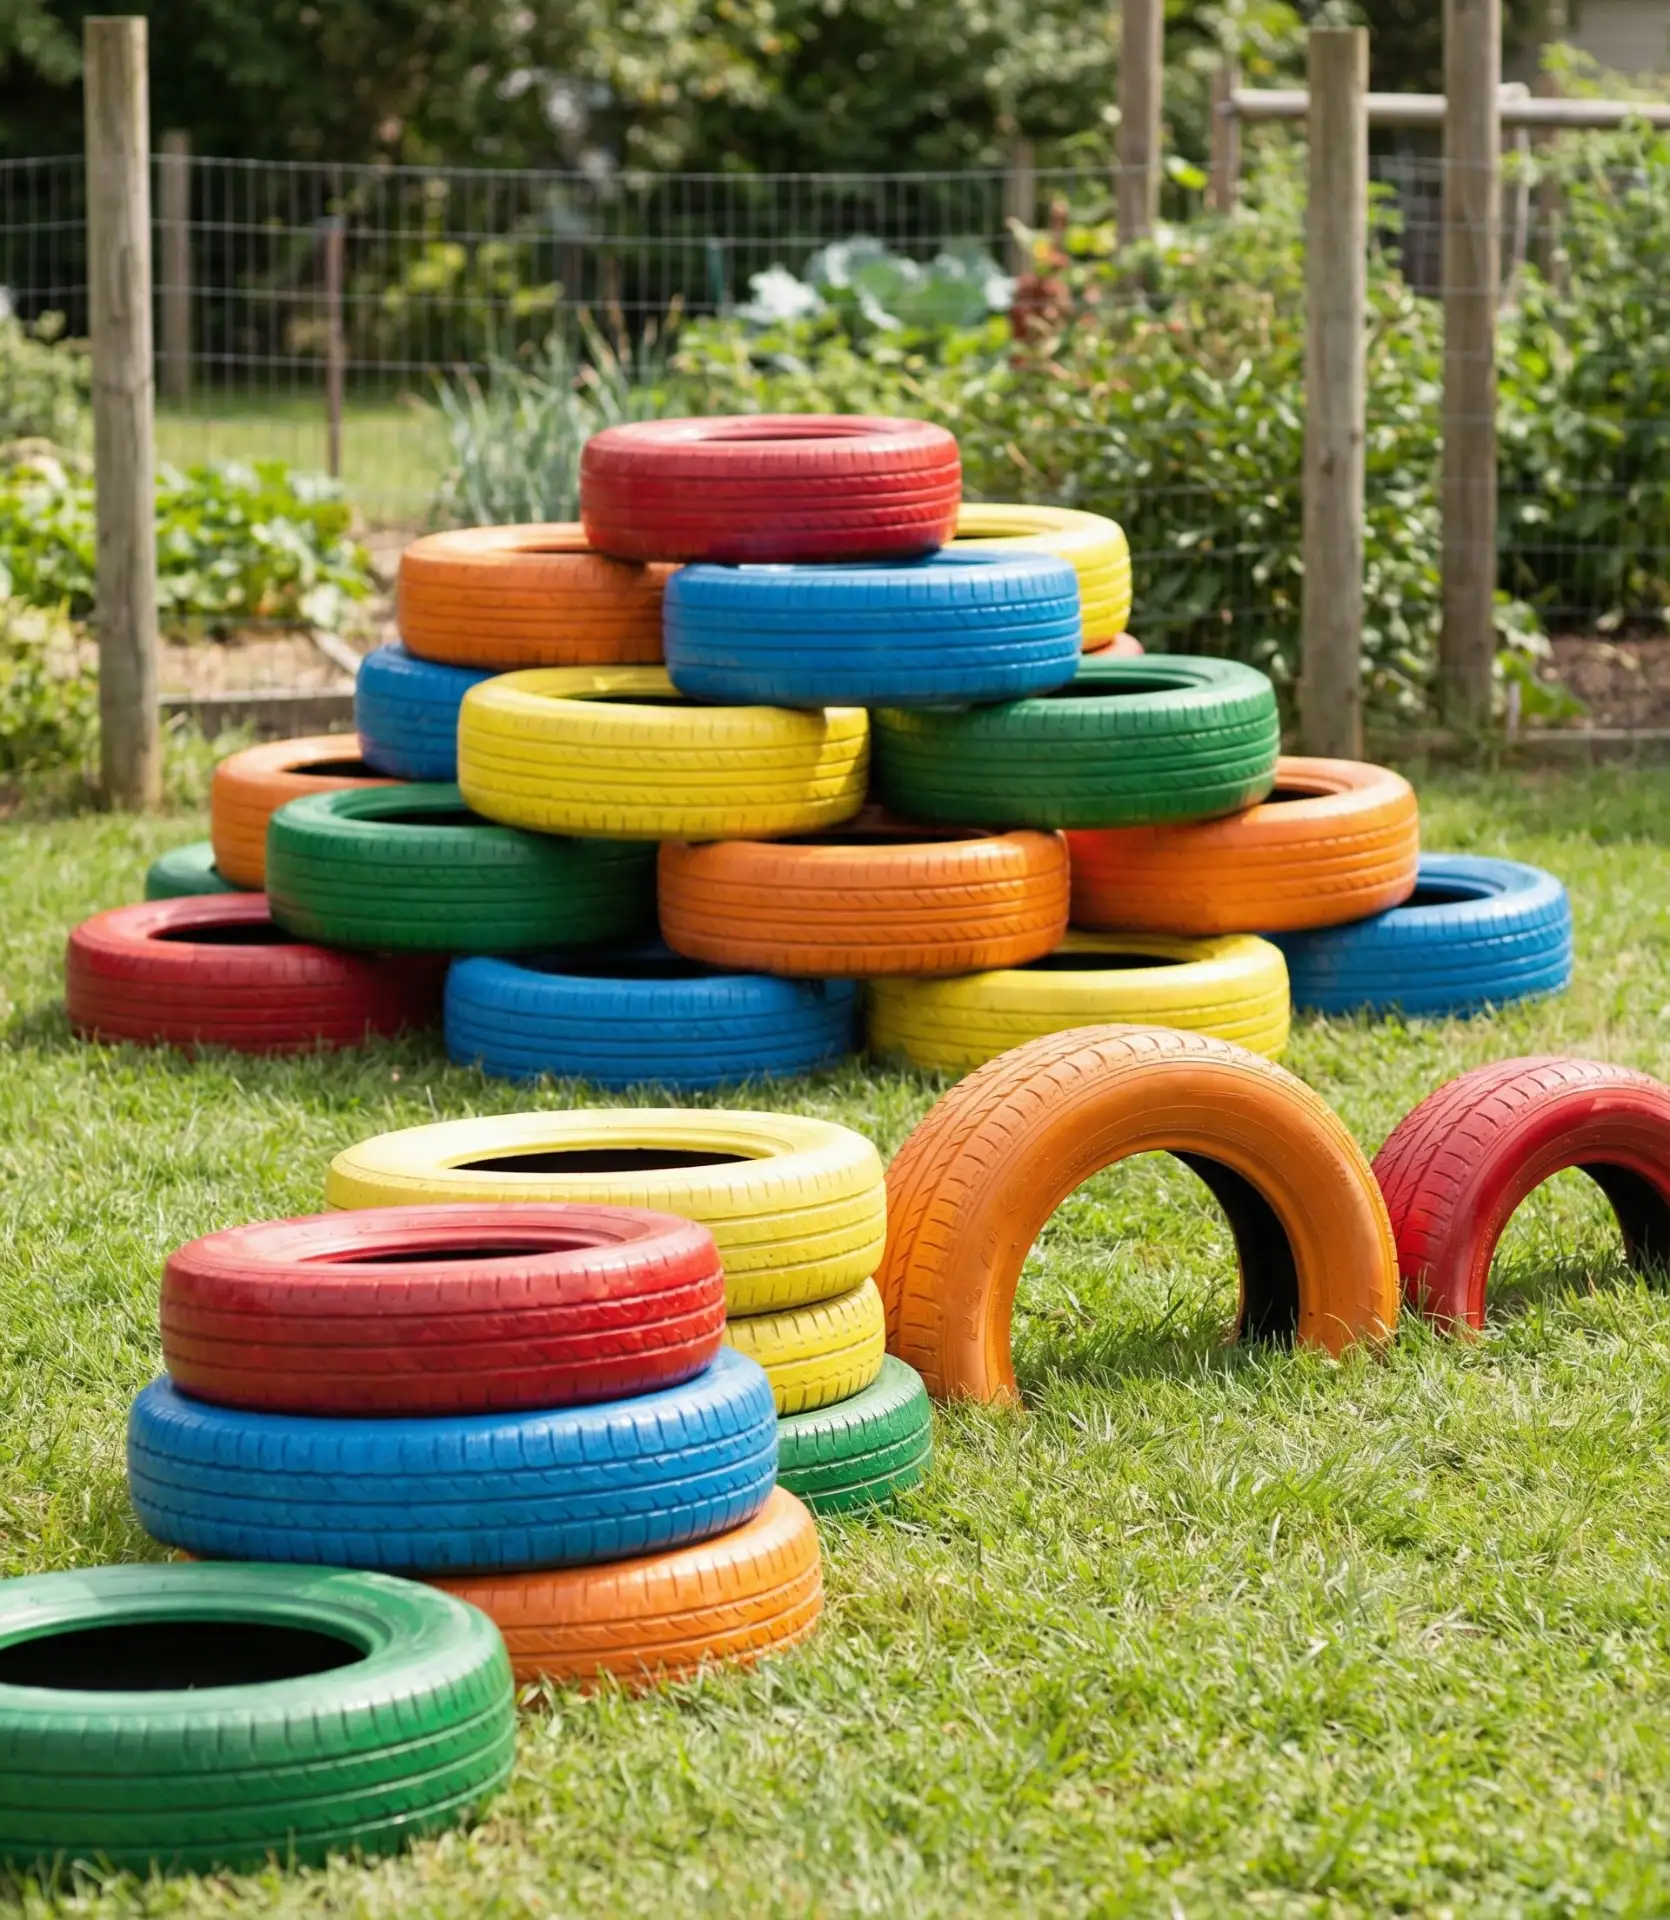
Families can obtain budget-friendly design plans using whole and part tires to create climbing sculptures, which design their own playgrounds. Tunnels made of half-buried tires, climbing structures from stacked tires, and swinging tires on obstacles are all made from freely available tires that shops are happy to dispose of.
Using a variety of colors painted on the rubber or keeping the tires in their natural black color allows for a bold contrast with the green grass, and the flexible rubber acts as a cushion for children who are likely to fall during their play adventures.
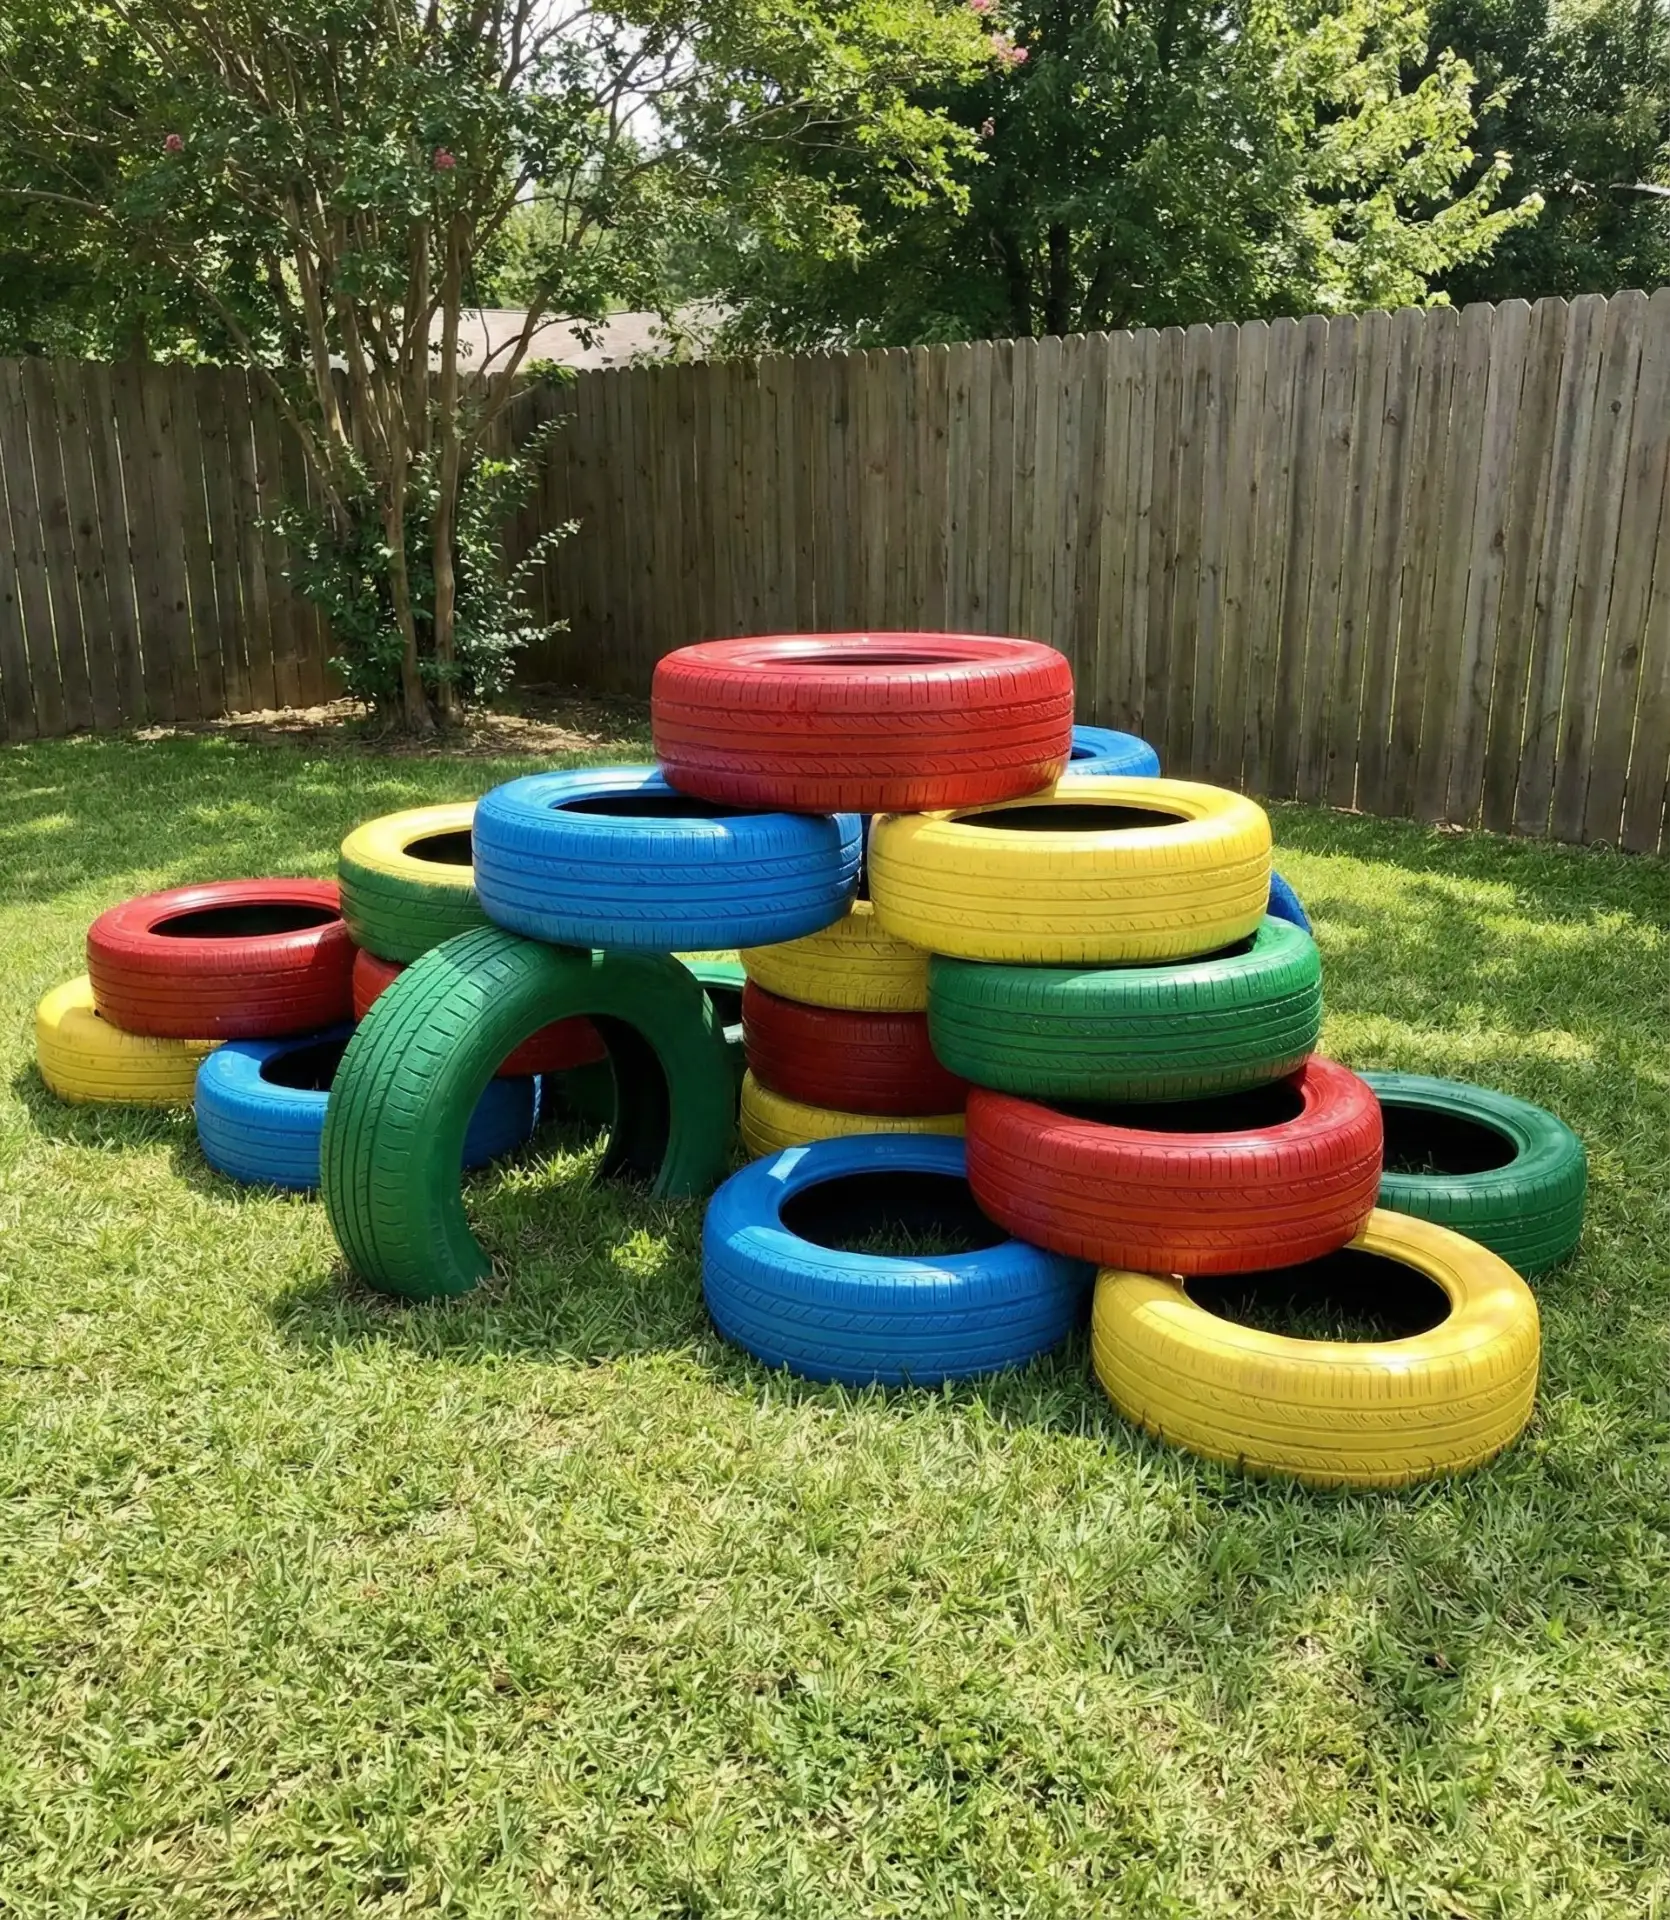
A frequent issue is installing tires that have steel belts sticking out. These are dangerous, as they can puncture and rust. Always check for exposed wires prior to installation. The surface of the tire becomes scorching when left in the sun, so it is best to choose a location that has a shade-providing tree at the peak of the afternoon. Tires can also be painted in light colors so they reflect light instead of absorbing it. After summer storms, drill drainage holes into the flat surfaces of the tires to prevent them from becoming a breeding ground for mosquitoes.
9. Ninja Warrior Training Course
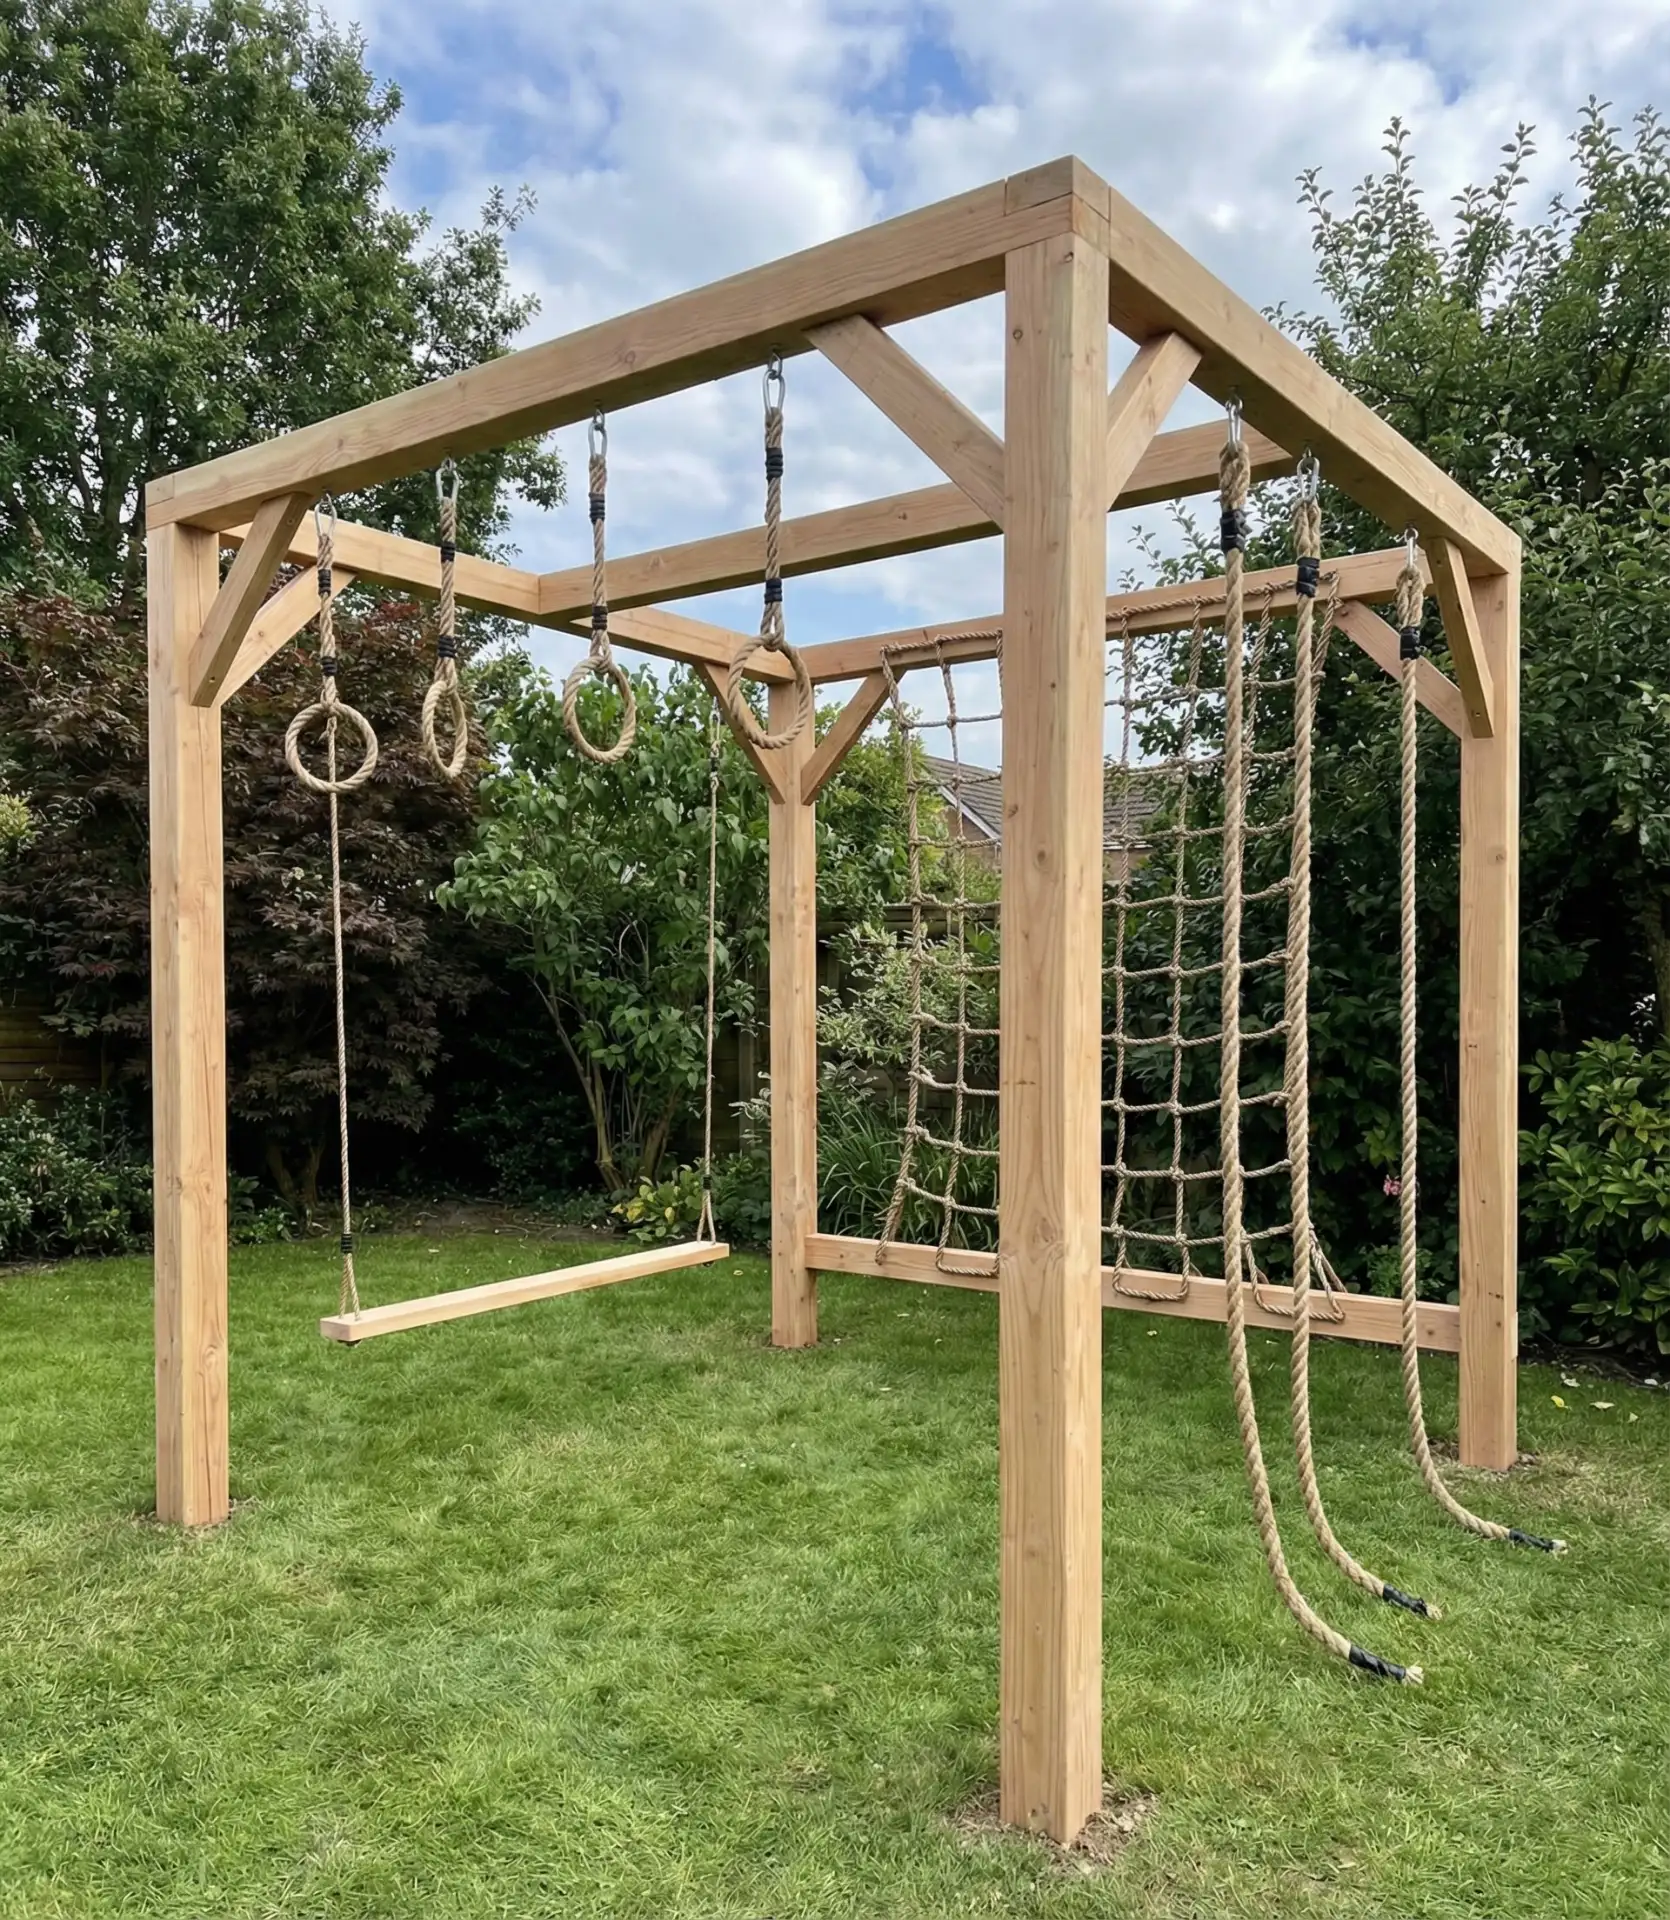
Obstacle courses are a great feature to have in a backyard. Aside from the fun play element, they are a fantastic source of exercise, with monkey bars, ring swings, rope ladders, balance beams, and cargo nets strung in a line on threads or between full trees and natural wooden posts of the playground. These obstacle courses are fantastic for children in middle school and elementary school because they have outgrown other play equipment like swing sets and offer real challenges. The layout challenges them both physically and mentally, as they have to compete against each other in a timed race to see who can cross the course the fastest. 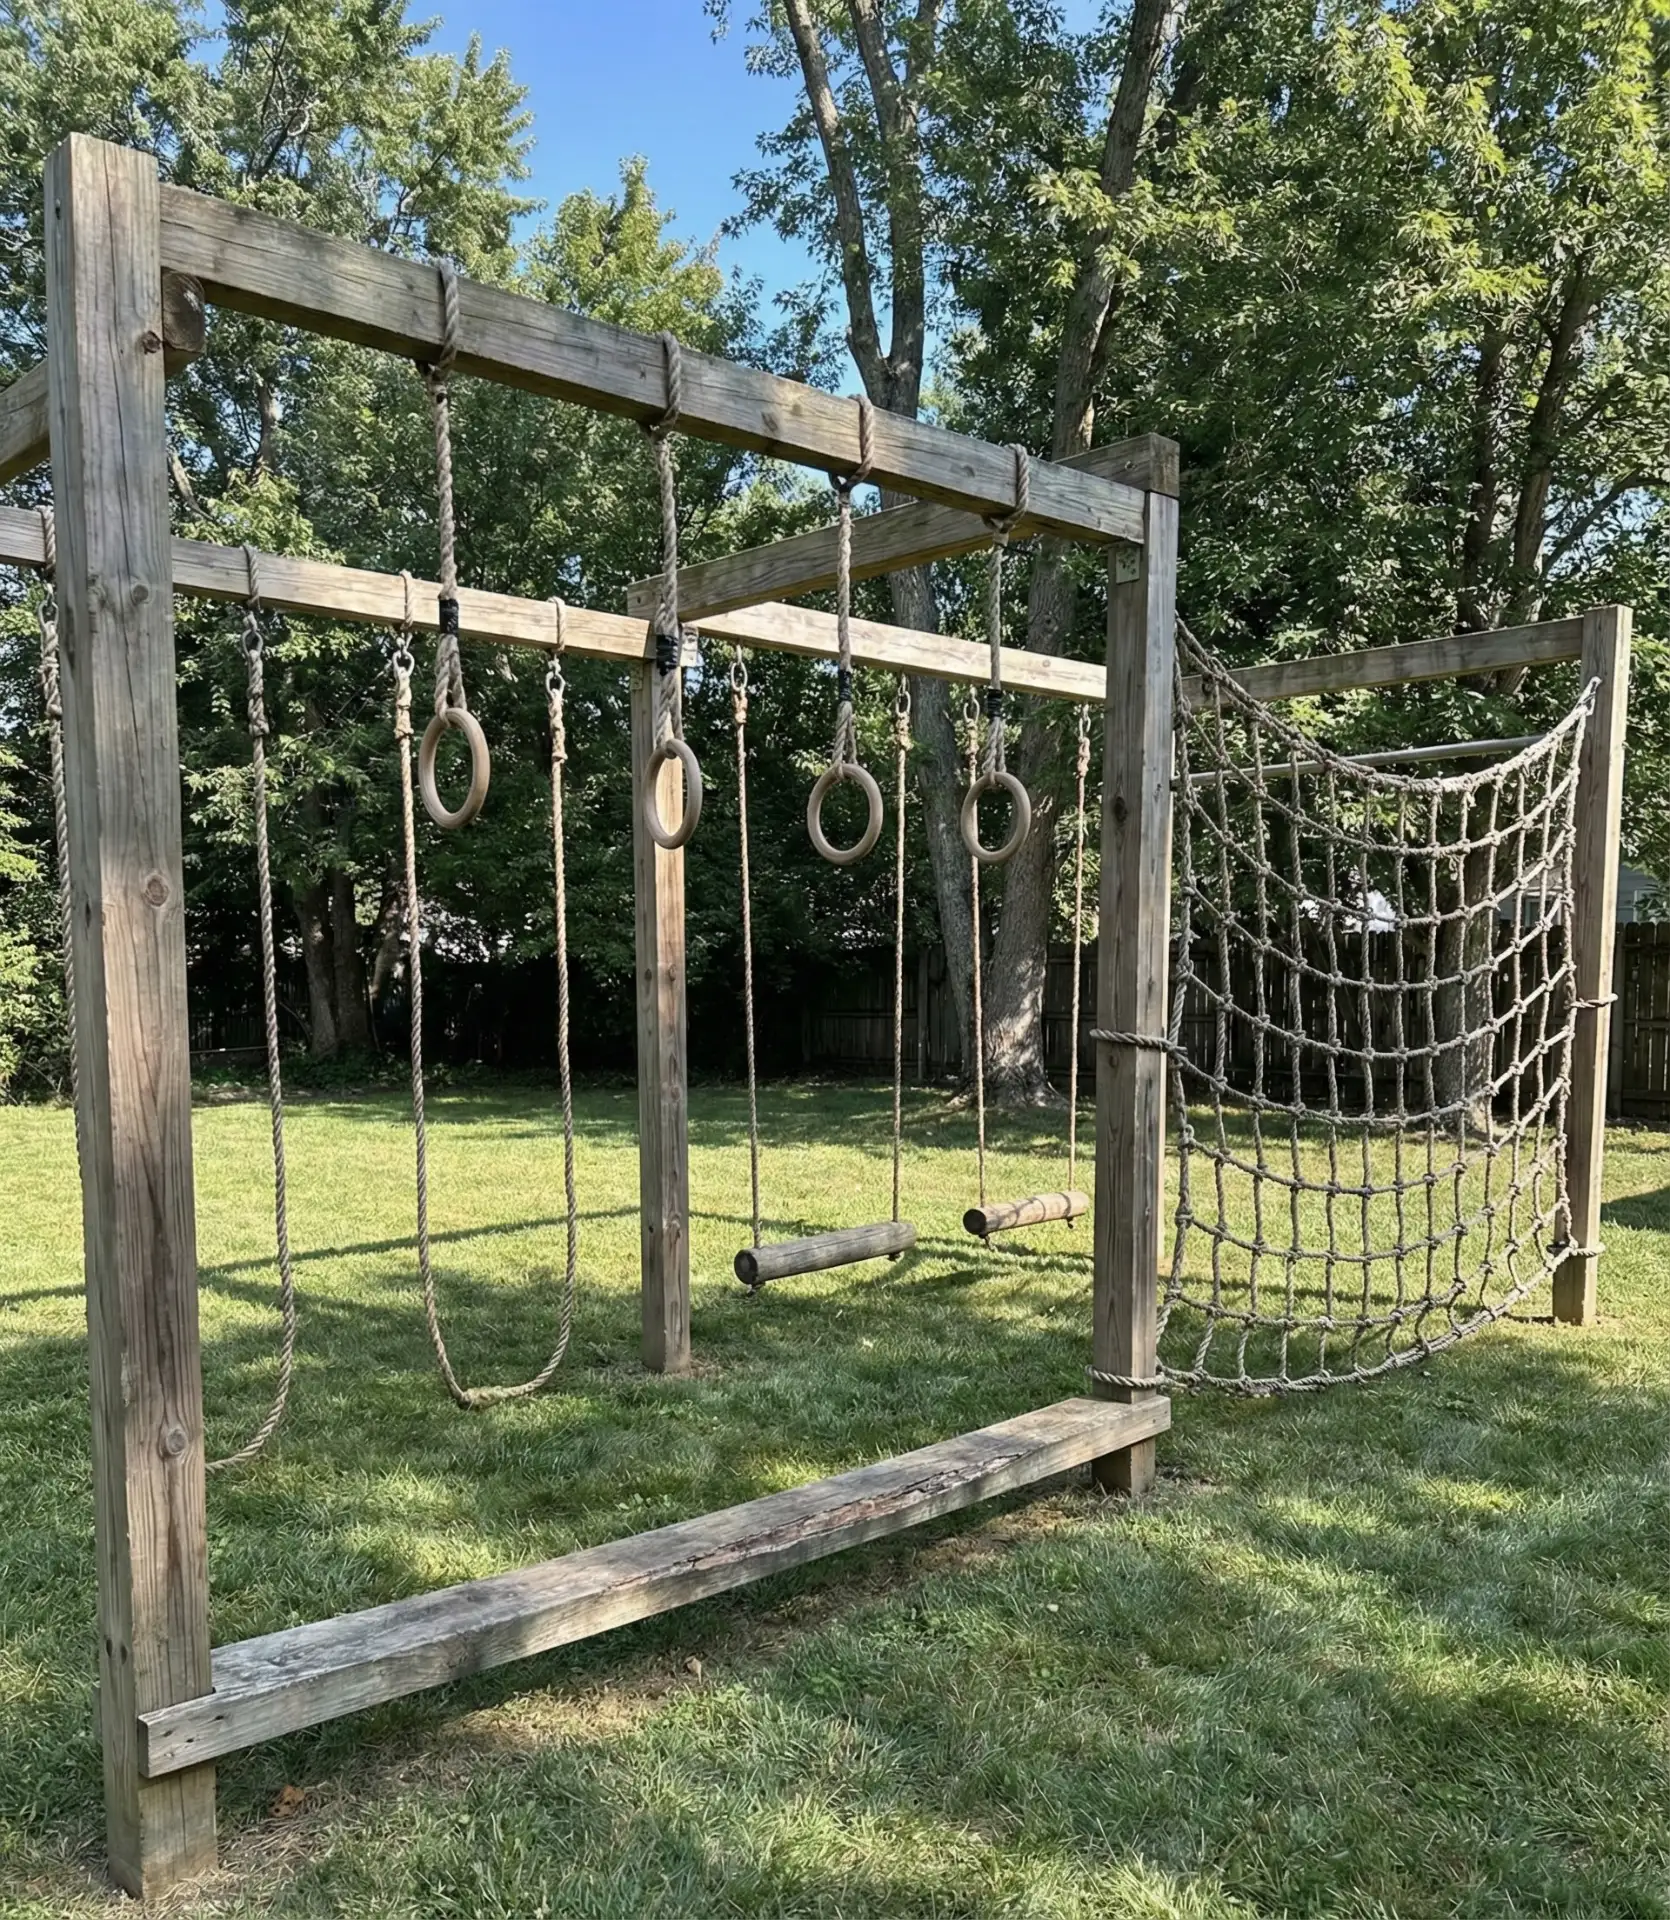
In Texas and Florida, this design works well, as there is outdoor play all year round, and larger lots can take 30–50-foot course lengths. Real homeowner behavior shows that adjustable elements maintain interest—swap ring positions, adjust to different difficulty levels, and add new challenges seasonally. Courses can range drastically in price based on how much a person is willing to do as a DIY project: basic setups using trees as anchor points range from 200 to 500 for obstacles, while frame systems that are custom-built and professionally installed can cost $3,000-6,000 for full courses.

10. Natural Log Balance Beam Trail
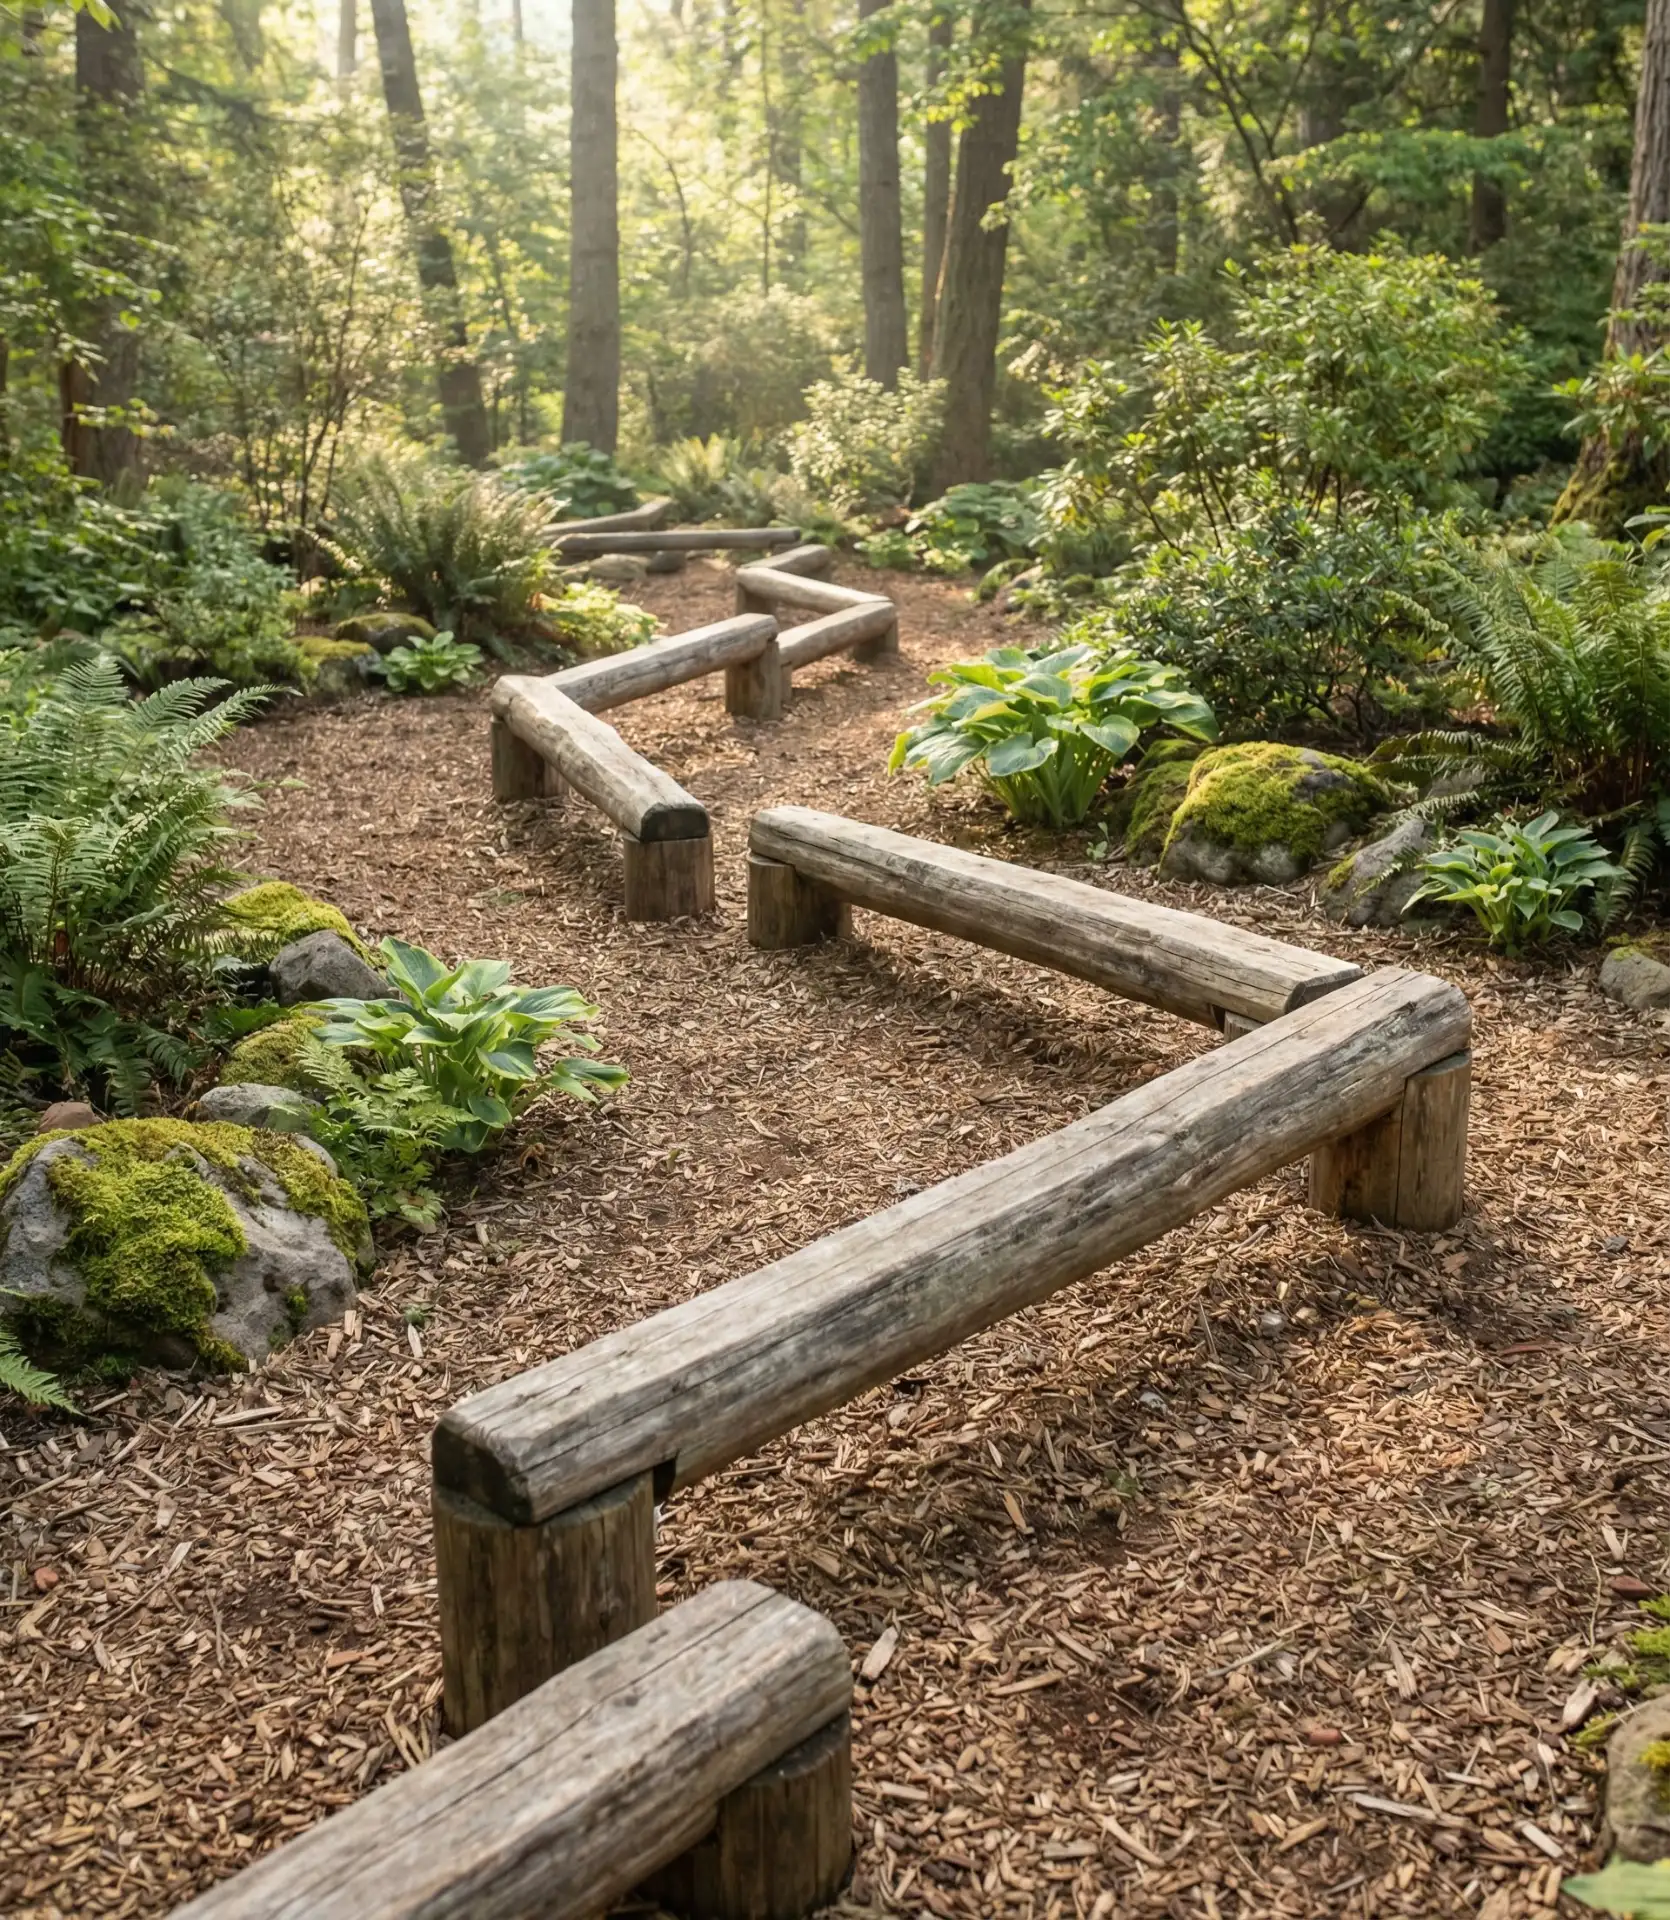
Purchase some cedar beams (or use fallen logs) and place them at different heights to make a natural balance course. This design looks a bit too rustic. For the balancing challenge, they can use logs (left a bit round) that are 8–12 inches in diameter (or, for easier balancing, round one side and leave the flat side up for beginners). The trail winds through areas of the garden and the lawn and connects with different zones of the yard. The result is a design challenge that children will navigate time and time again. This design will build children’s confidence by presenting them with challenges that seem impossible in September but will become easy by spring.
This design works best in the Pacific Northwest and Northeast with incorporated woodland aesthetics.
The logs will settle, shrink, and rot. This will take 5 to 10 years, depending on the tree species and whether they touch the ground. The change is not a flaw but part of a landscape renewal. To prolong their use, secure logs with rebar stakes driven through the pre-drilled holes. This procedure is especially important for logs with raised beams over 12 inches. The wrinkles and bent surfaces of the logs are advantages over manufactured beams, as they will enhance the balancing activities on the beams.
11. Shade Sail Reading Canopy
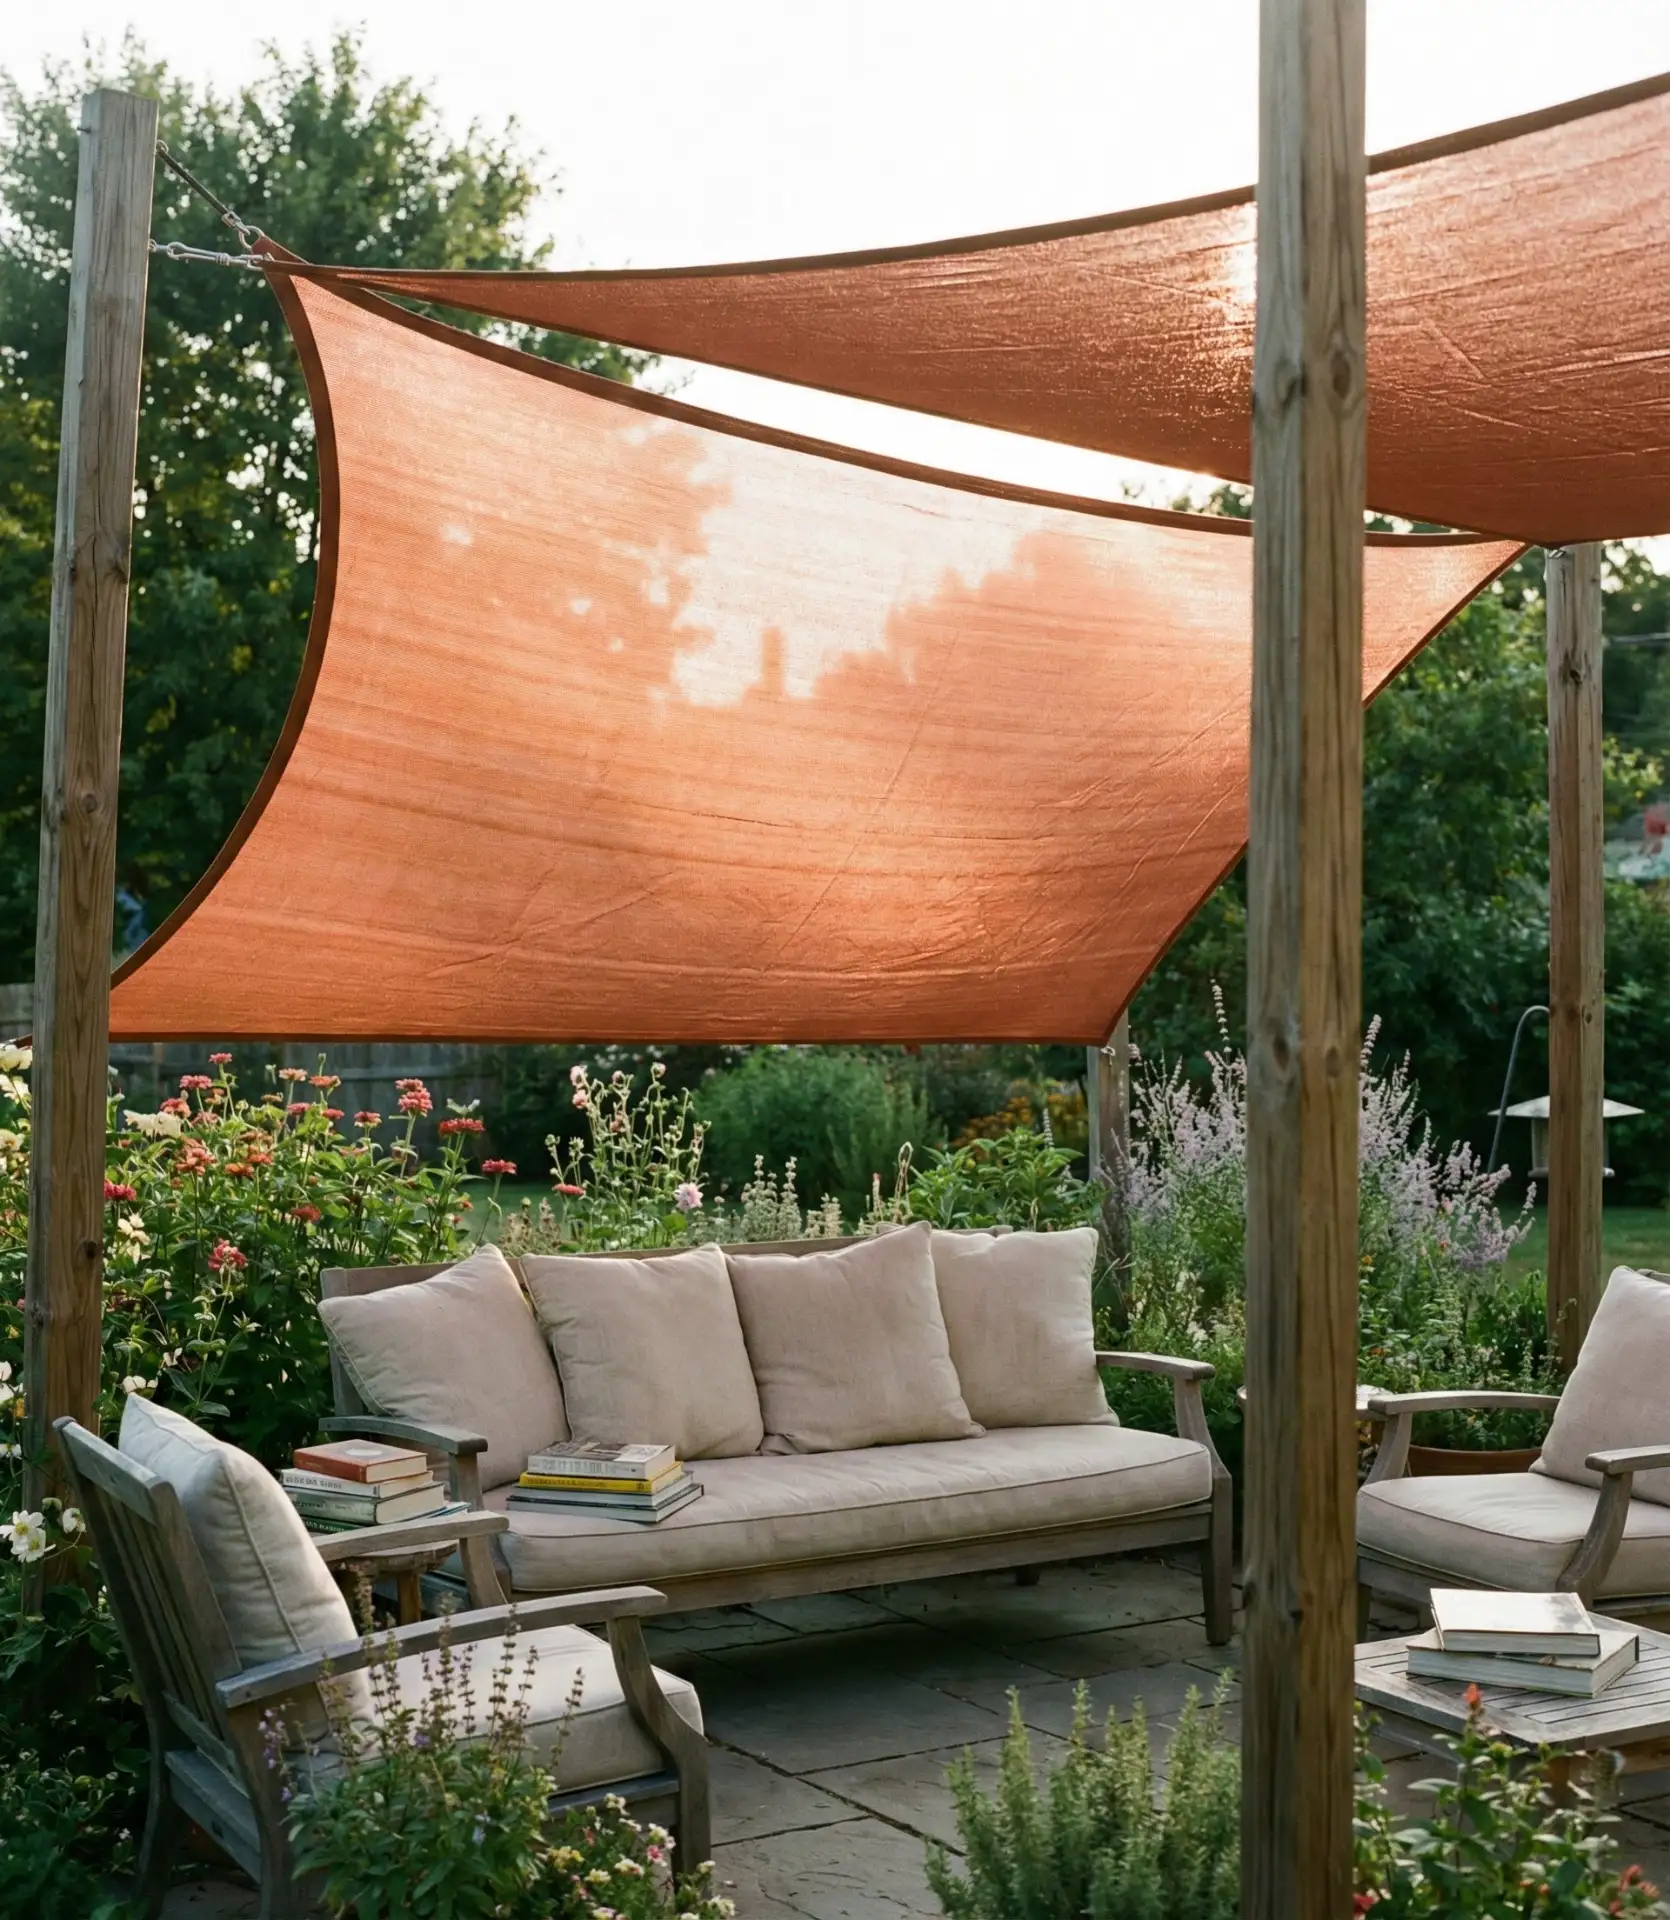
Tensioned fabric sails create UV-protected shaded quiet zones within active playground design spaces, offering respite from both sun and stimulation. Modern triangle or square sails in sand, terracotta, or navy anchor to posts or existing structures, providing 90%+ UV blockage over cushioned seating areas where kids retreat with books, art supplies, or simply to decompress. The breathable fabric allows airflow, while the dramatic angular geometry adds architectural interest to otherwise flat backyard landscapes, creating defined outdoor rooms without requiring permanent construction. 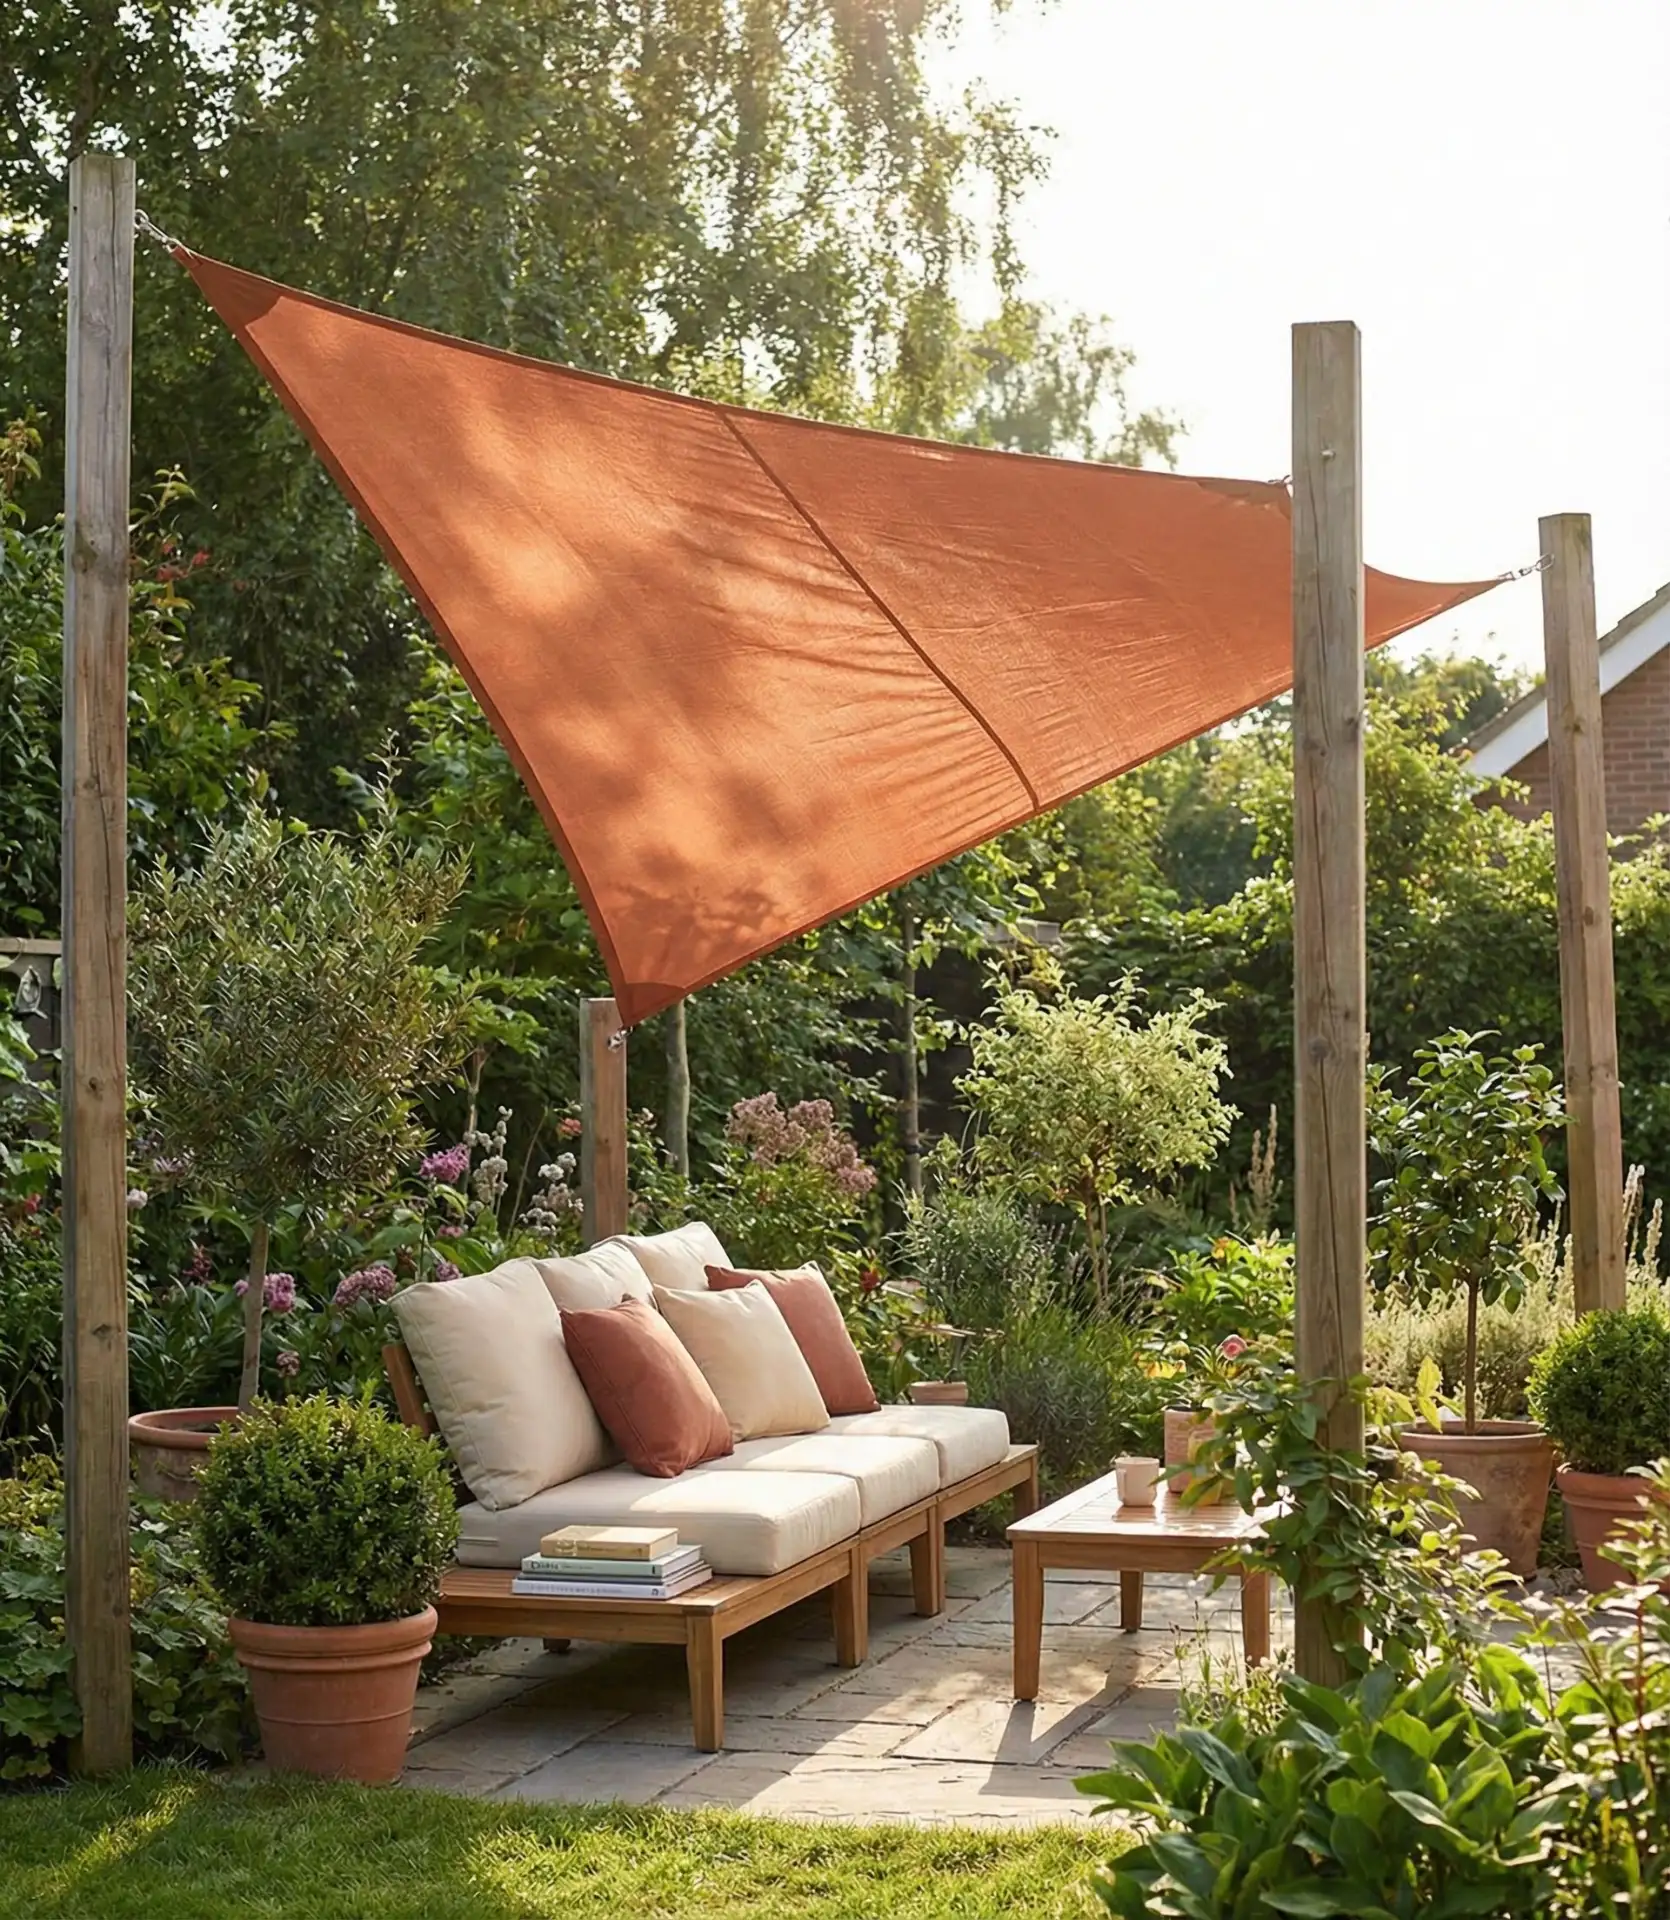
The installation cost for each shade sail, including its mounting hardware, is between $300 and $800. This makes shade sails, along with construction, some of the most affordable ways to create a comfortable outdoor space.
The trick is proper tensioning. Sails that are too loose collect rain and flap in the wind. In a storm, too-tight sails rip at their anchors. Position the sail to block afternoon sun from the west. This tip is especially important in desert Southwest climates, where unshaded play areas are unusable from 3 to 5 PM during the summer months.
12. Rubber Flooring Safety Zones
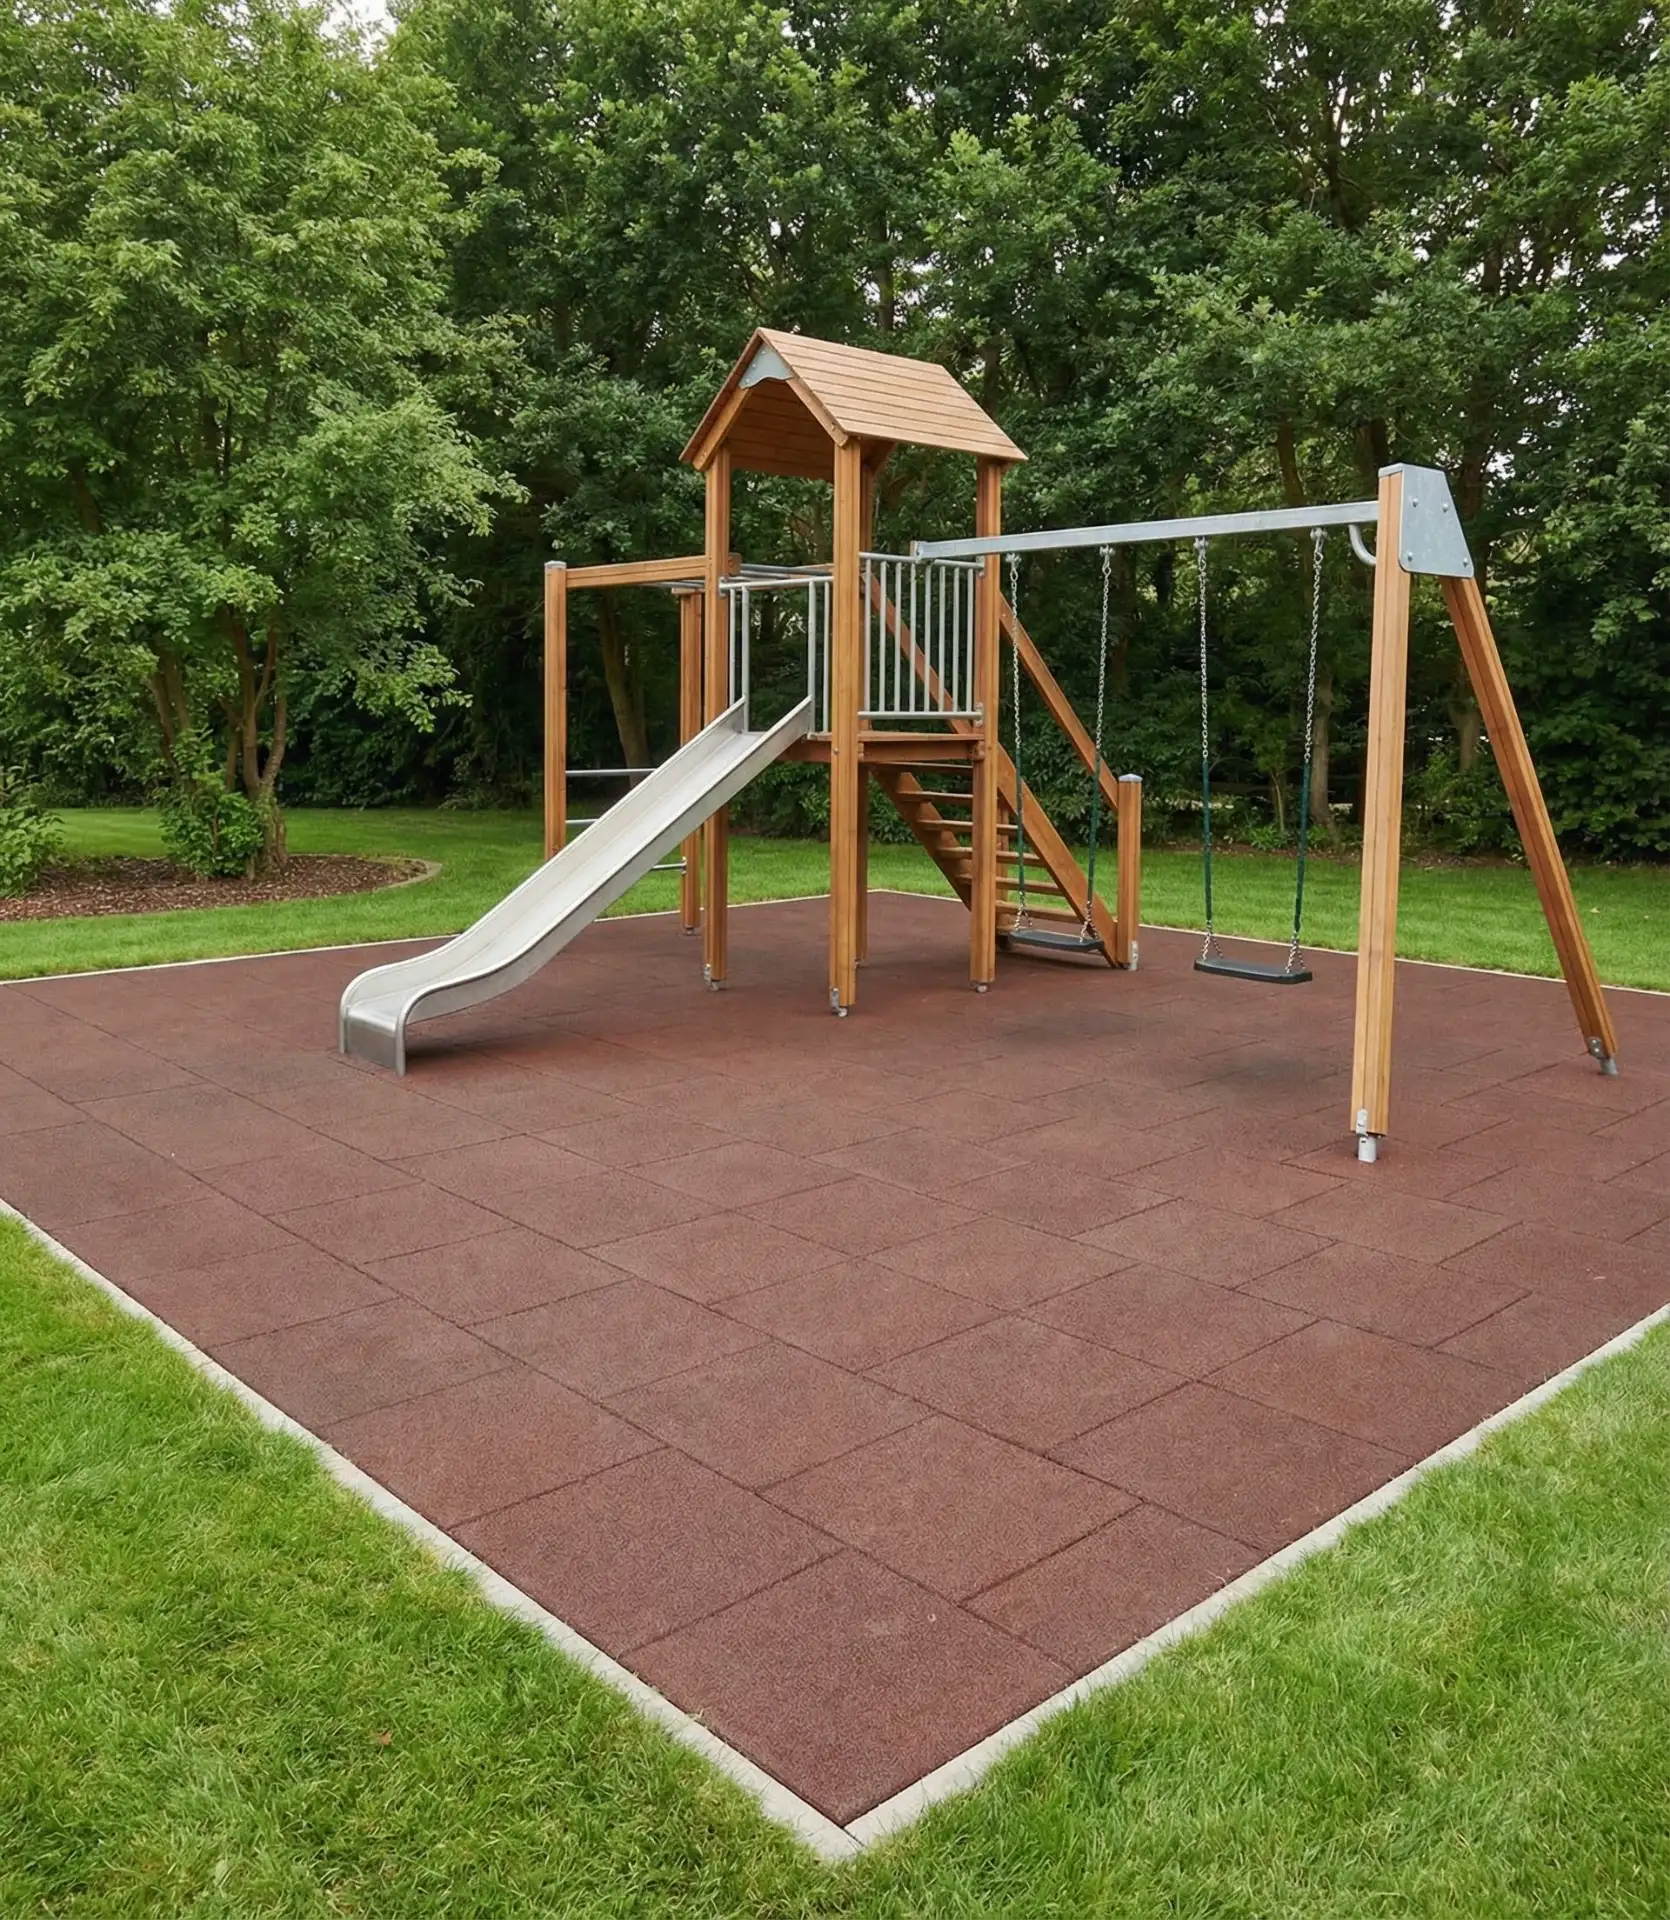
Rubber flooring tiles or poured-in-place surfaces provide professional-grade fall protection under climbing structures and swings, meeting ADA accessibility standards while offering design flexibility. Modern rubber flooring comes in earth-toned colors that blend with landscape palettes—forest green, brown, and terracotta—creating cohesive playground design backyard ideas for modern installations. The surface remains wheelchair and stroller accessible, doesn’t shift like loose-fill materials, and provides consistent cushioning that reduces injury severity from falls while maintaining traction even when wet from rain or sprinkler overspray. 
Poured rubber costs $8-12 per square foot installed, while interlocking tiles run $3-6 per square foot for DIY installation—a significant investment compared to $1 per square foot for wood chips. However, the 15-20 year lifespan without replenishment, zero maintenance, and superior safety performance justify the premium for families committed to long-term backyard play spaces. Ensure proper sub-base drainage; rubber over poorly draining soil creates swampy conditions and premature deterioration of the installation.
13. Climbing Wall Panel System
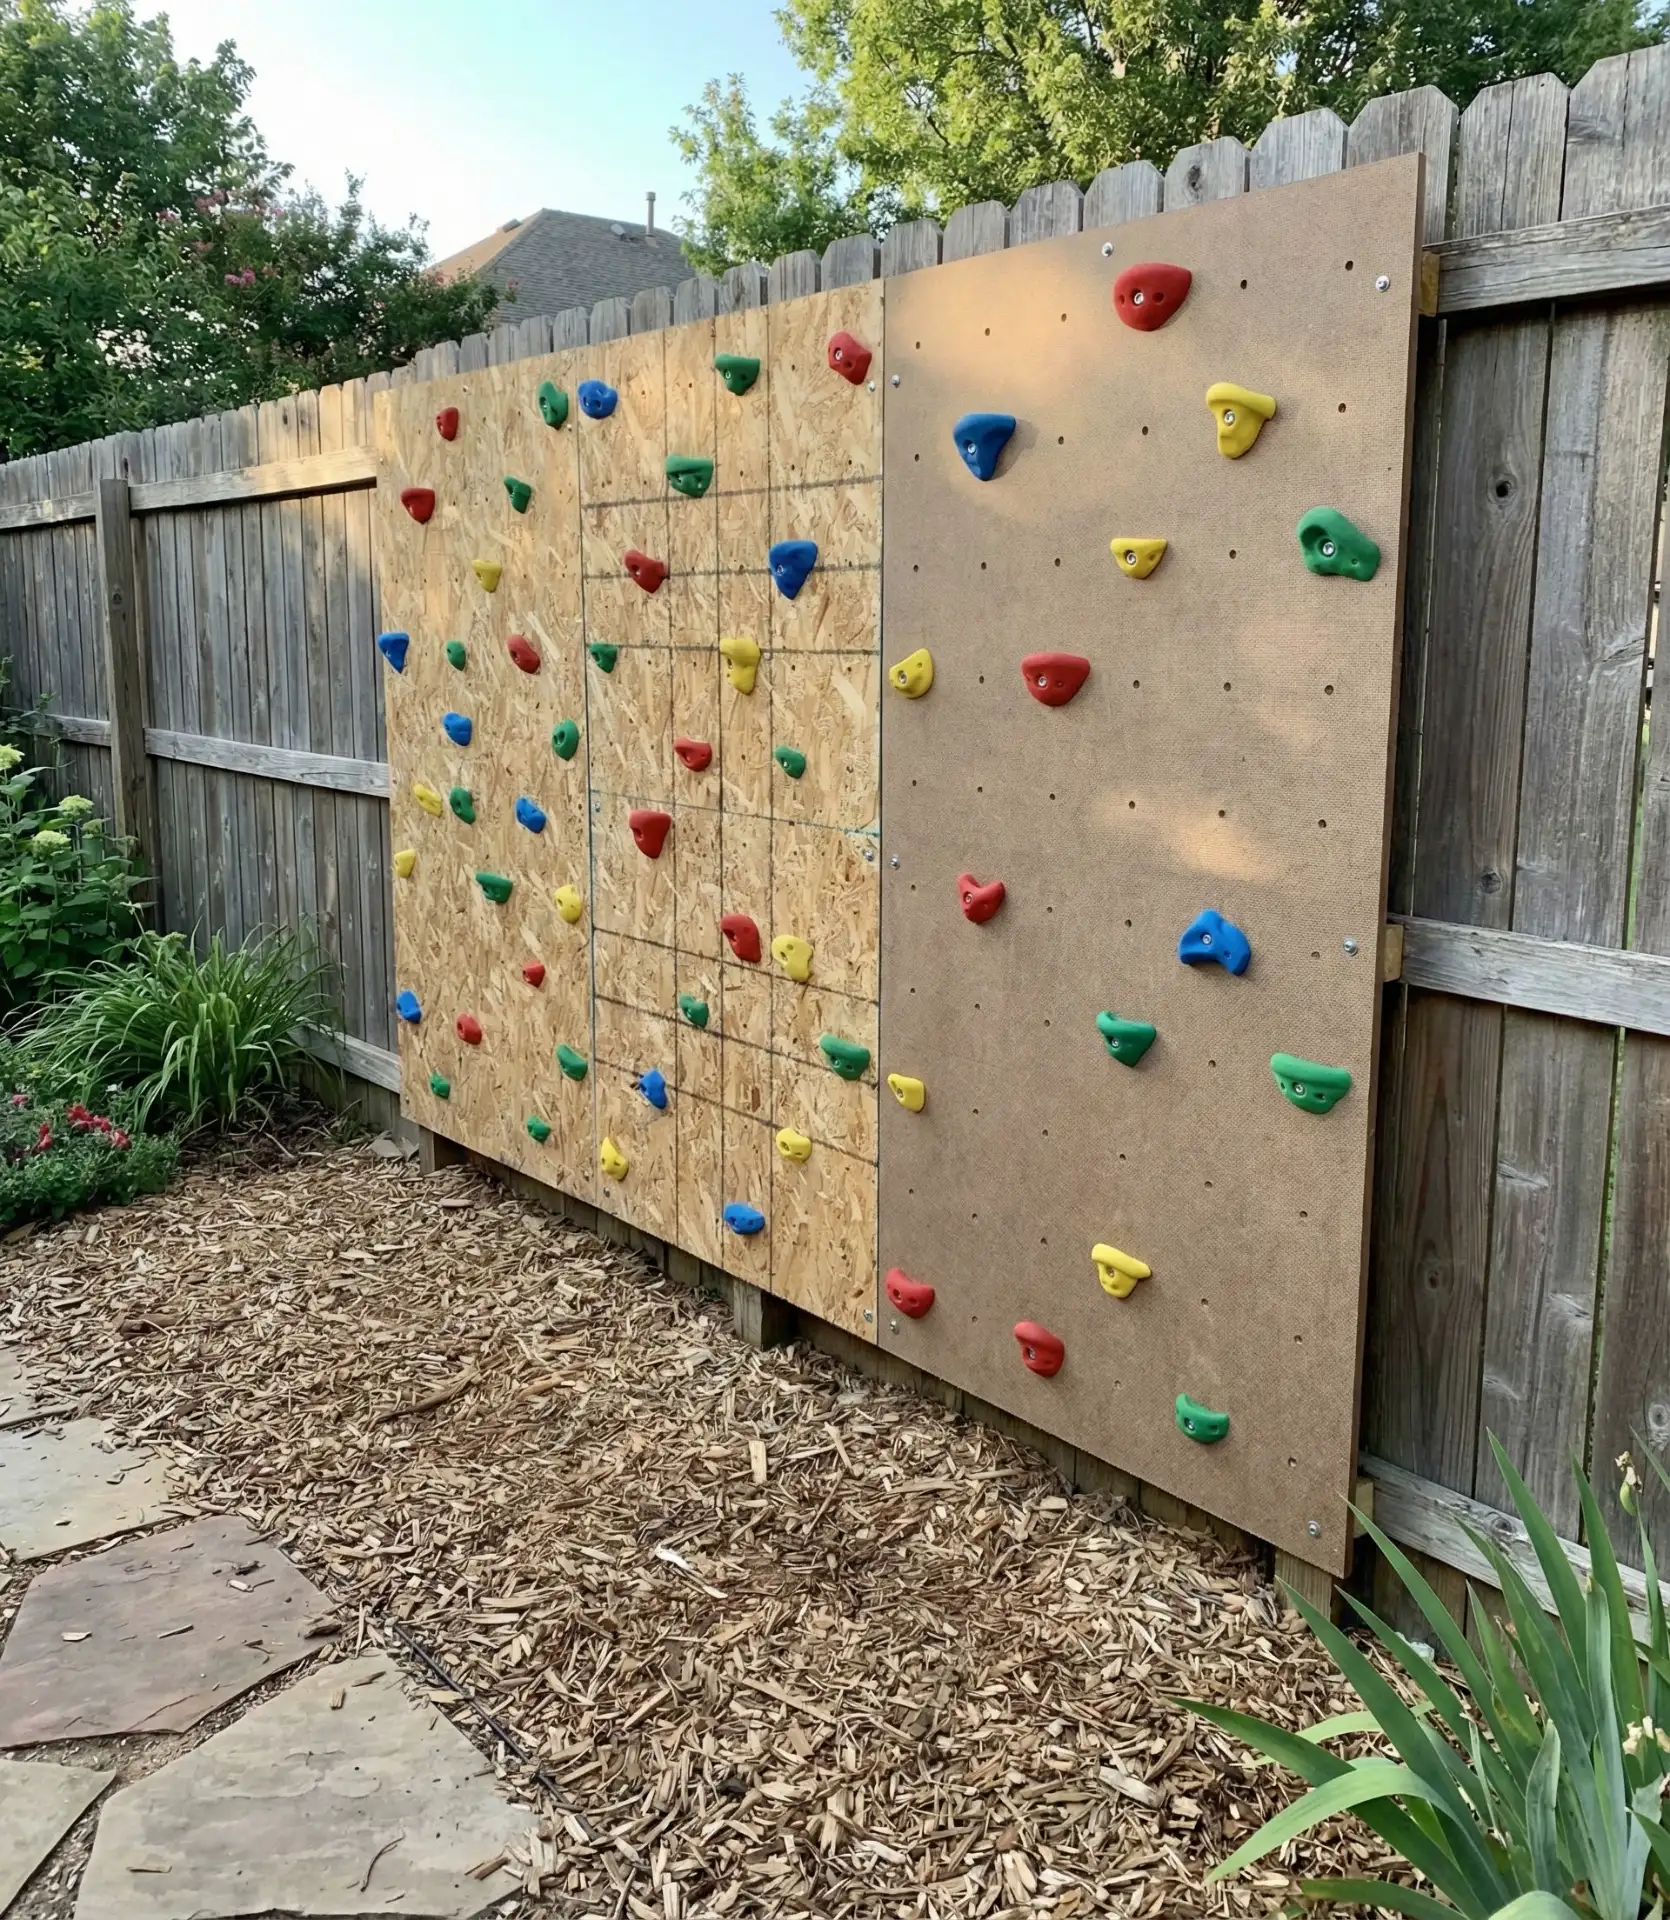
Modular rock climbing panels offer vertical challenges that can be mounted to existing fences or garage walls without requiring dedicated playground design structures or valuable yard space.
Custom-built panels with built-in handholds stick to robust walls, turning unused vertical space into interactive climbing challenges. The lower deck, or patio, serves as a landing zone, and positions of adjustable handholds let you modify challenges as kids’ climbing skills develop. Weather-resilient panels are able to last through sunny and rainy days, and this solution is perfect for tight urban yards where space is horizontal, as the panels take up very little vertical space. 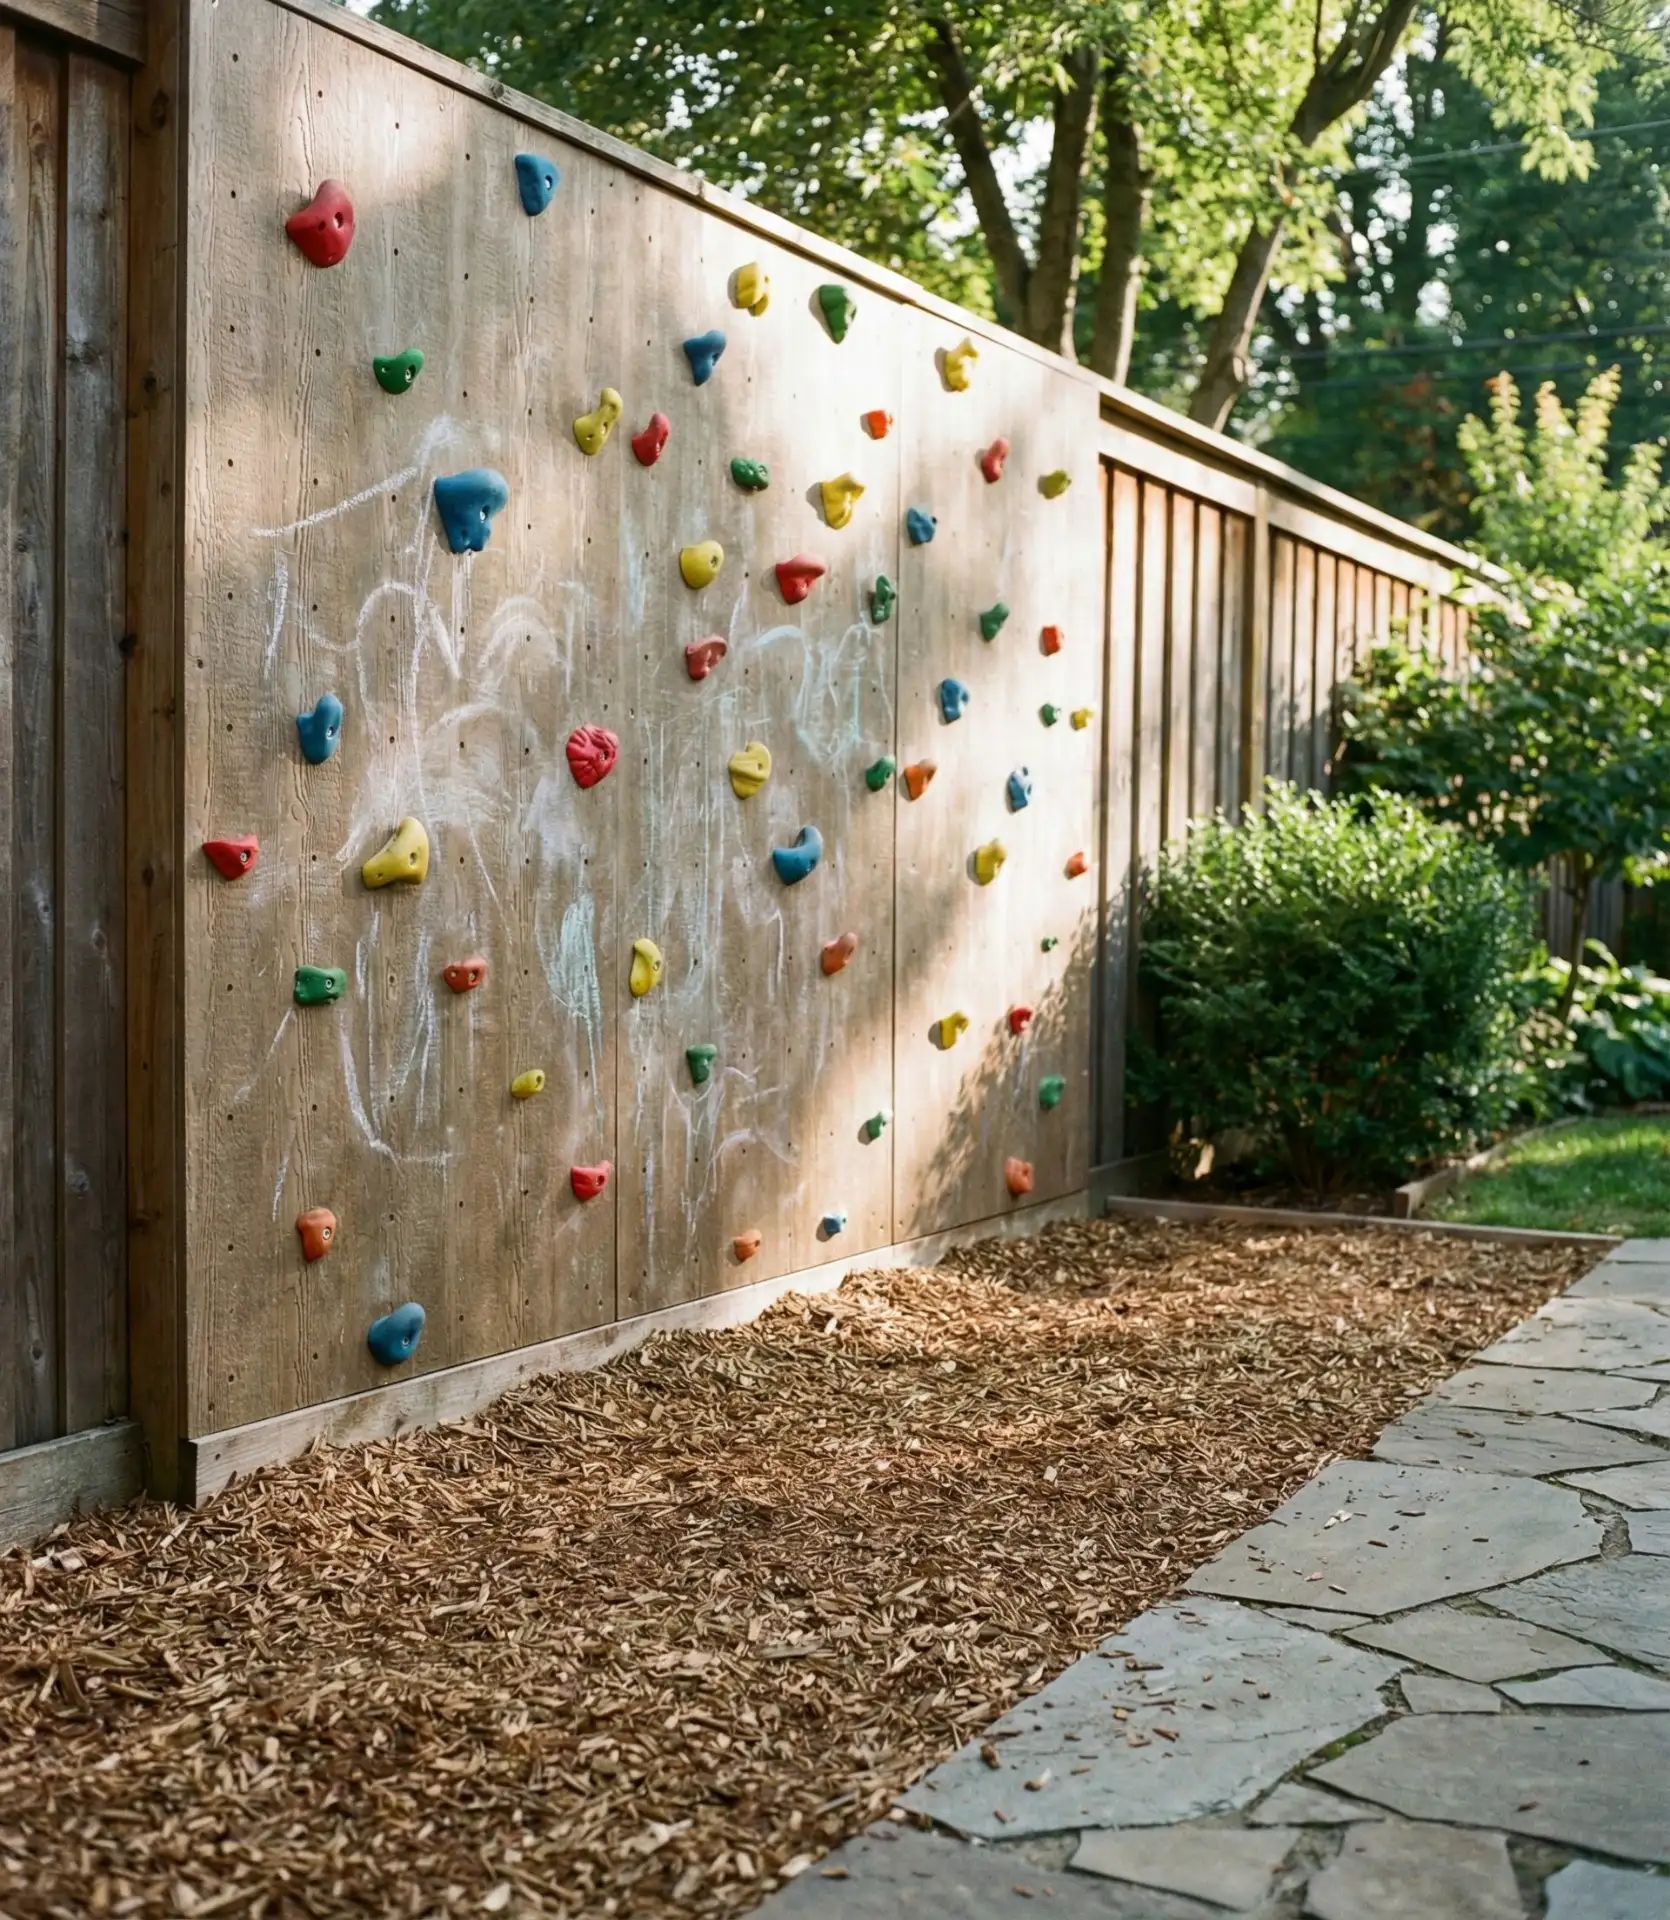
Expert installers note that the walls are very beneficial to kids in many ways, developing problem-solving skills and spatial awareness, in addition to the obvious physical activity. It costs around $400-800 for a 4×8-foot panel, including handholds and mounting hardware, and the installation time is about 2–3 hours for experienced DIYers. The mistake many make is putting up the climbing walls on a flimsy fence, which is dangerous. You need plywood over fence posts for back support or a direct attachment to structural wall studs. When mounting climbing holds, mount a little more than you think is enough. To keep kids engaged, dense placement of climbing holds provides more options for climbing different routes.
14. Sensory Garden Play Path
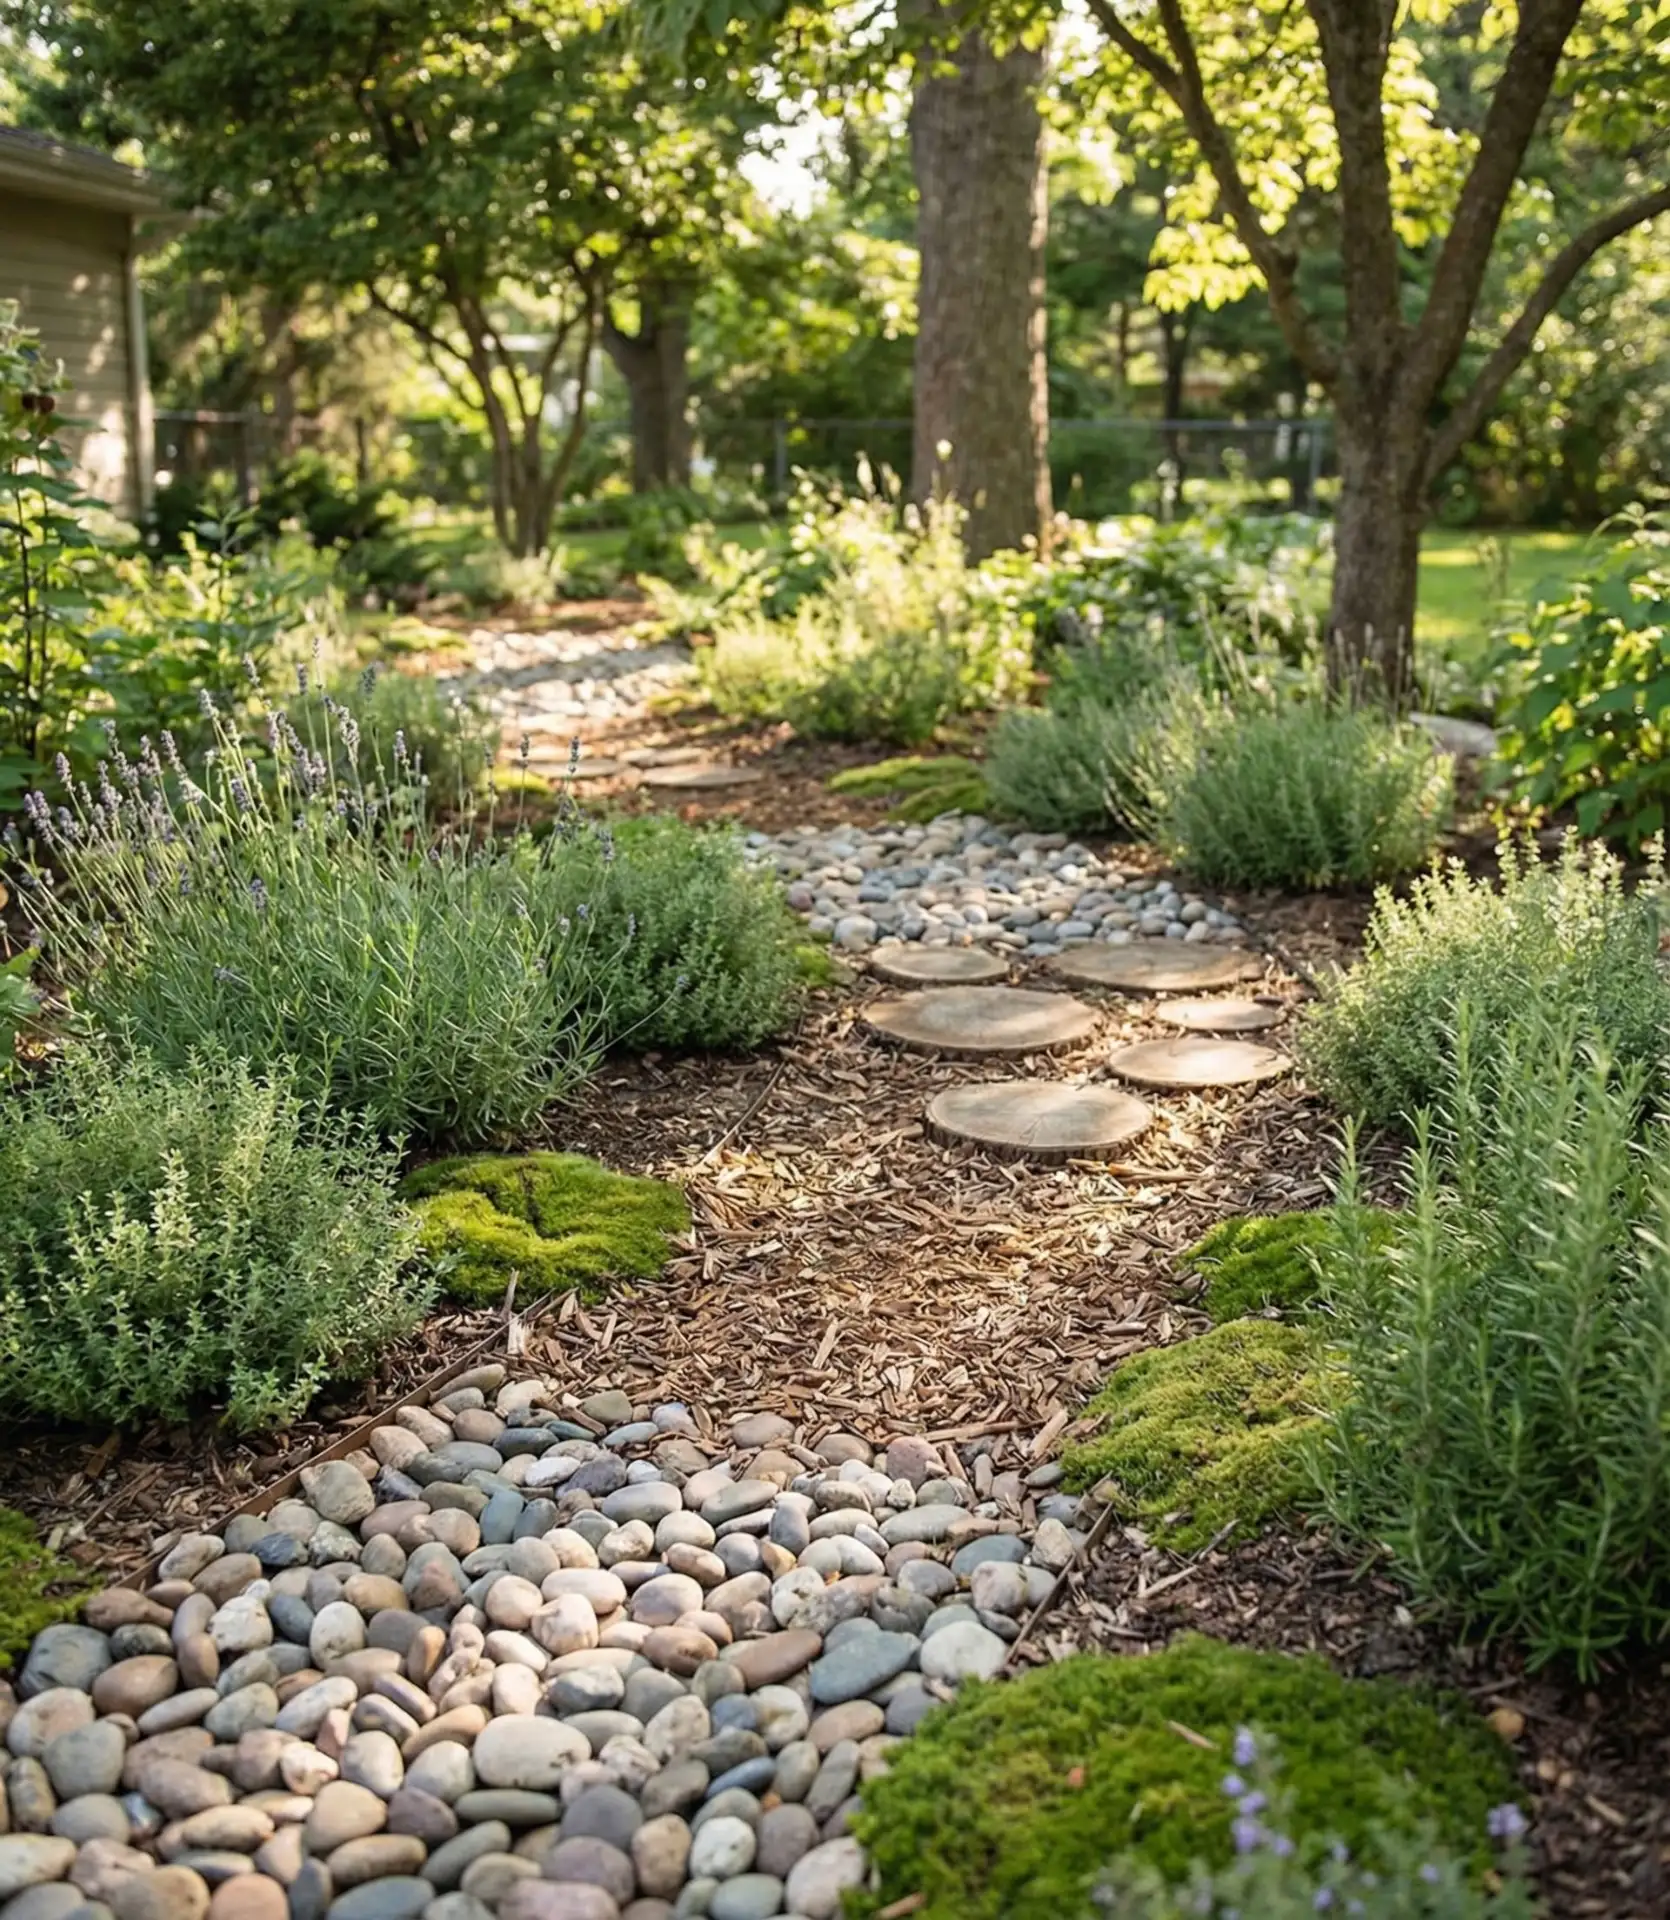
Barefoot paths featuring different textures—smooth river stones, rough bark mulch, soft moss, warm deck boards—engage tactile development while creating meditative walking routes through the backyard. This playground design weaves between fragrant herbs children can touch, wind chimes that respond to movement, and ornamental grasses that whisper when brushed. The multi-sensory experience calms overstimulated children while providing rich input for those seeking sensory engagement, and the meandering path naturally slows movement, creating a counterbalance to high-energy play zones elsewhere in the yard. 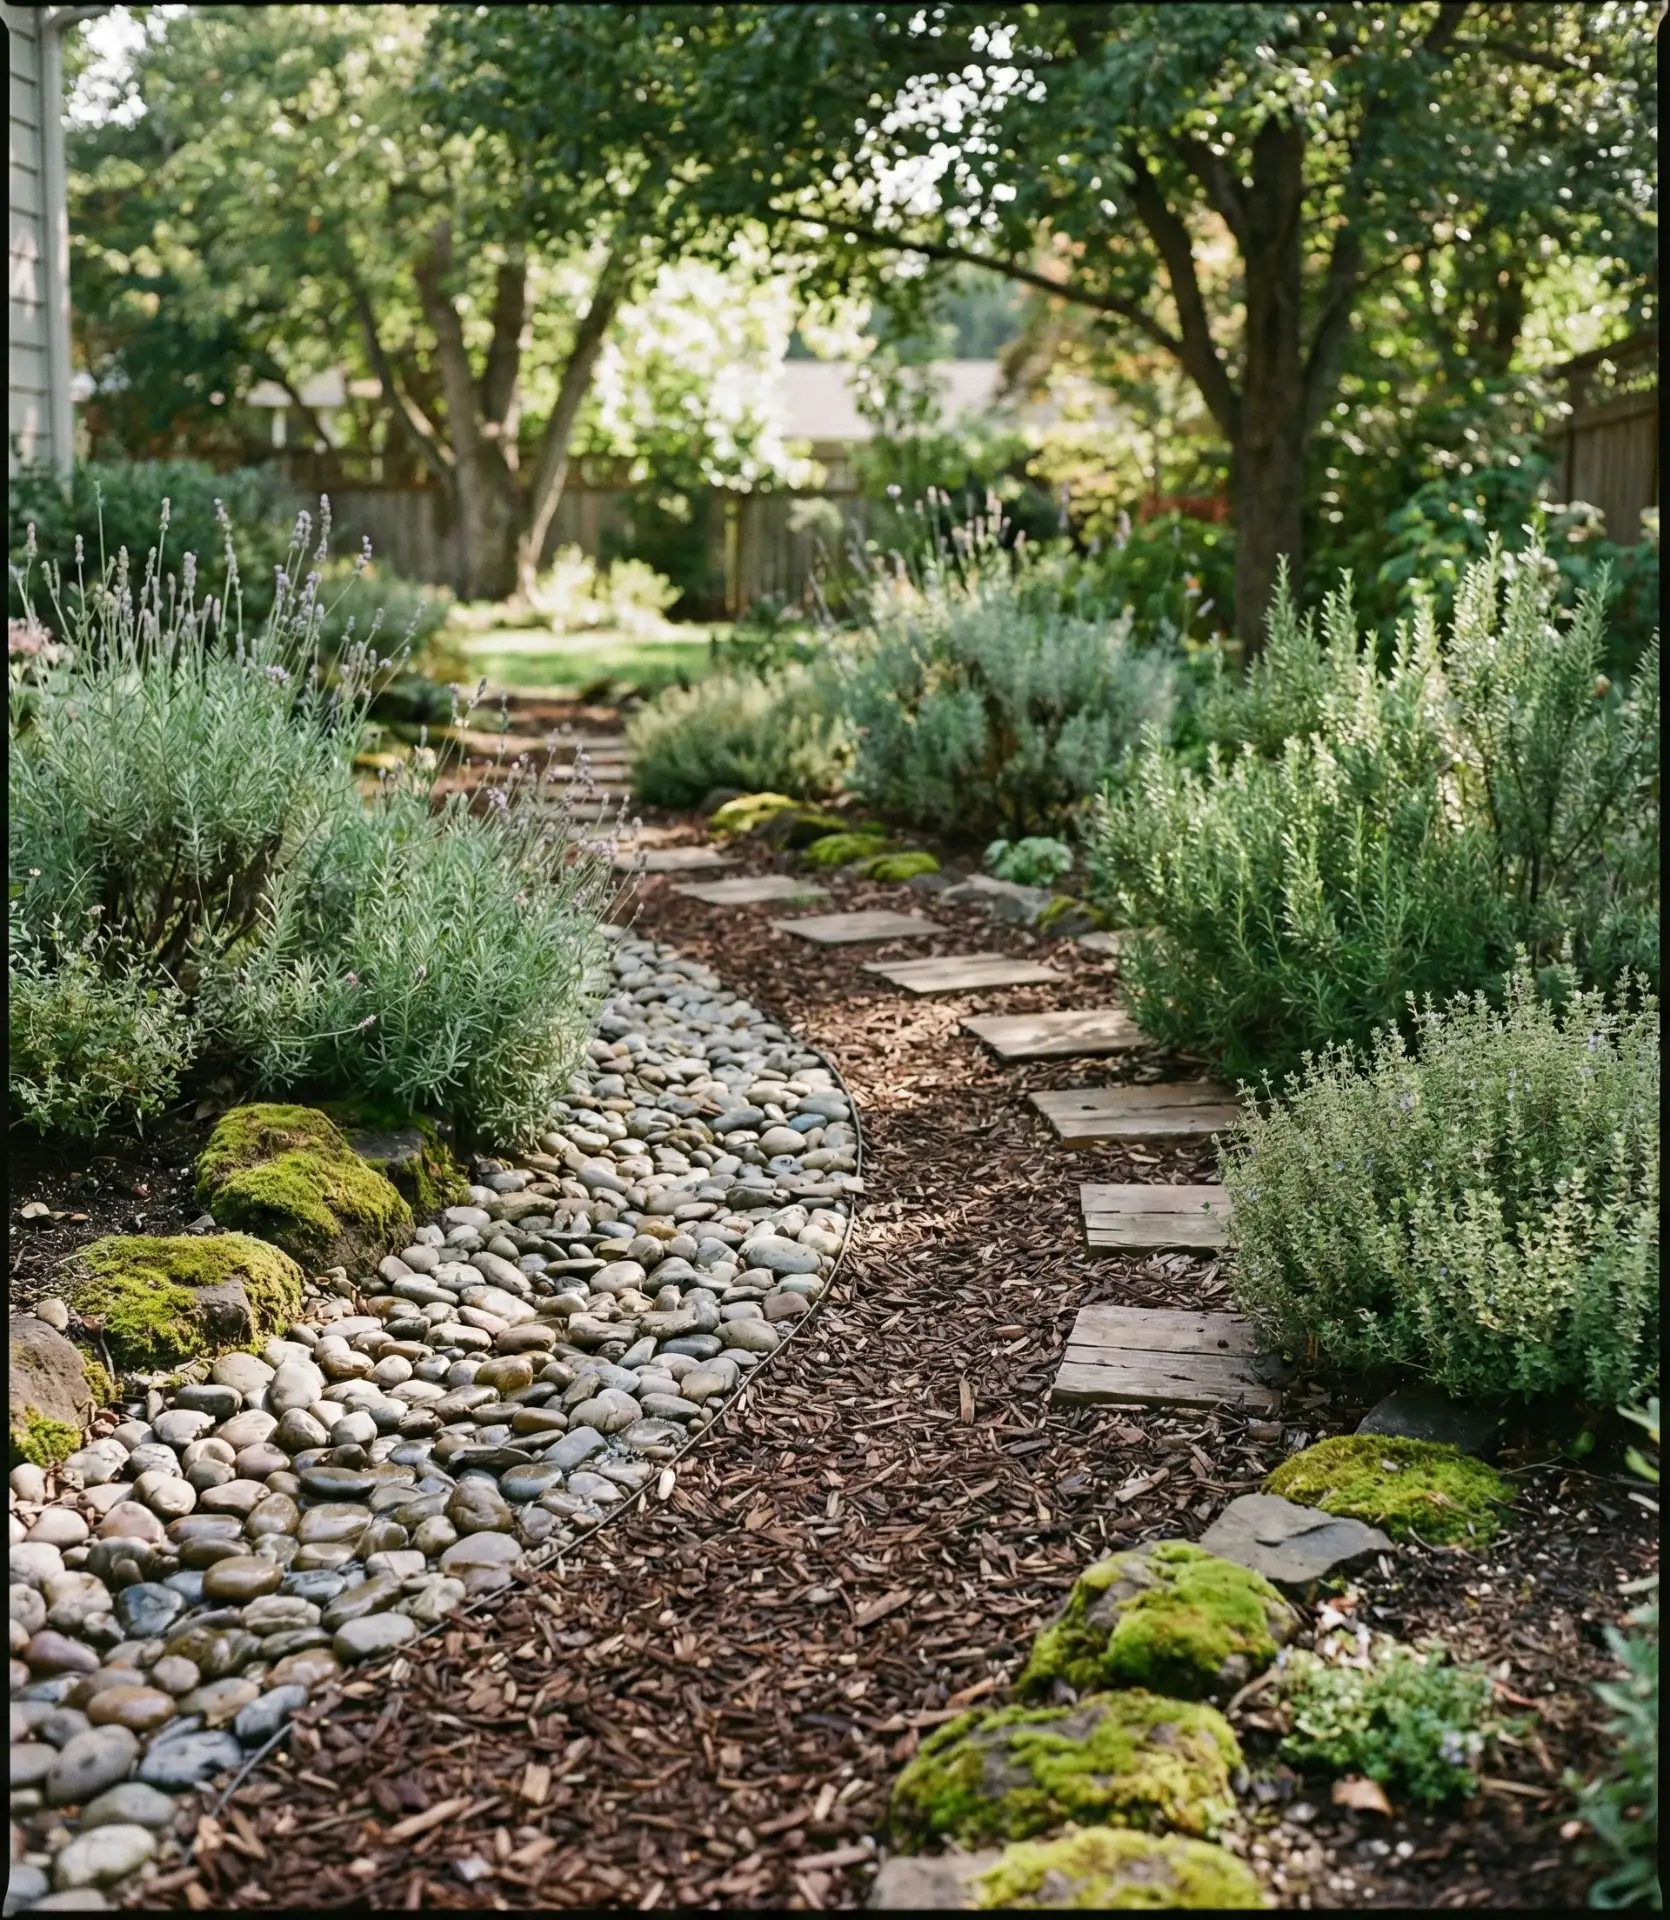
A Portland occupational therapist noted that while sensory paths benefit children with autism and sensory processing differences, all children enjoy them. For the sensory path, define the boundaries with landscape timbers or edging stones to allow children to see where the pathway begins and ends. Provide a minimum of five or six different playable textures along the path, which should be about 20 to 30 feet in length. The organic elements of the path, such as the mulch and moss, will need to be topped occasionally, but the wooden and stone features will remain for years.
15. Tree Platform Fort

Platforms raised around large, mature tree trunks offer the quintessential fort experience with playground design and natural wood construction that honors the trees while creating adventure zones 6 to 8 feet above the ground.
Modern equipment, such as tree attachment bolts (TABs), provides permanent placements without the danger of encircling tree growth. The platform can also serve as a landing zone for rope ladders or bridges from deck structures. The tree canopy provides natural shade, while the rustic leaves and songbirds provide a fantasy play environment far beyond what ground-level playsets provide. 
This concept is optimal for mature hardwoods, particularly oaks and maples, found throughout the Midwest and Eastern regions. Building costs can vary tremendously. Simple platforms can cost from $500 to $1,500, while elaborate multi-platform tree houses can range from $5,000 to $15,000. The investment provides a fantastic return if only in childhood memories. Adjustments will be necessary every 3-5 years to accommodate vertical growth of the tree and lateral shifts due to branch movement.
16. Water Play Splash Pad
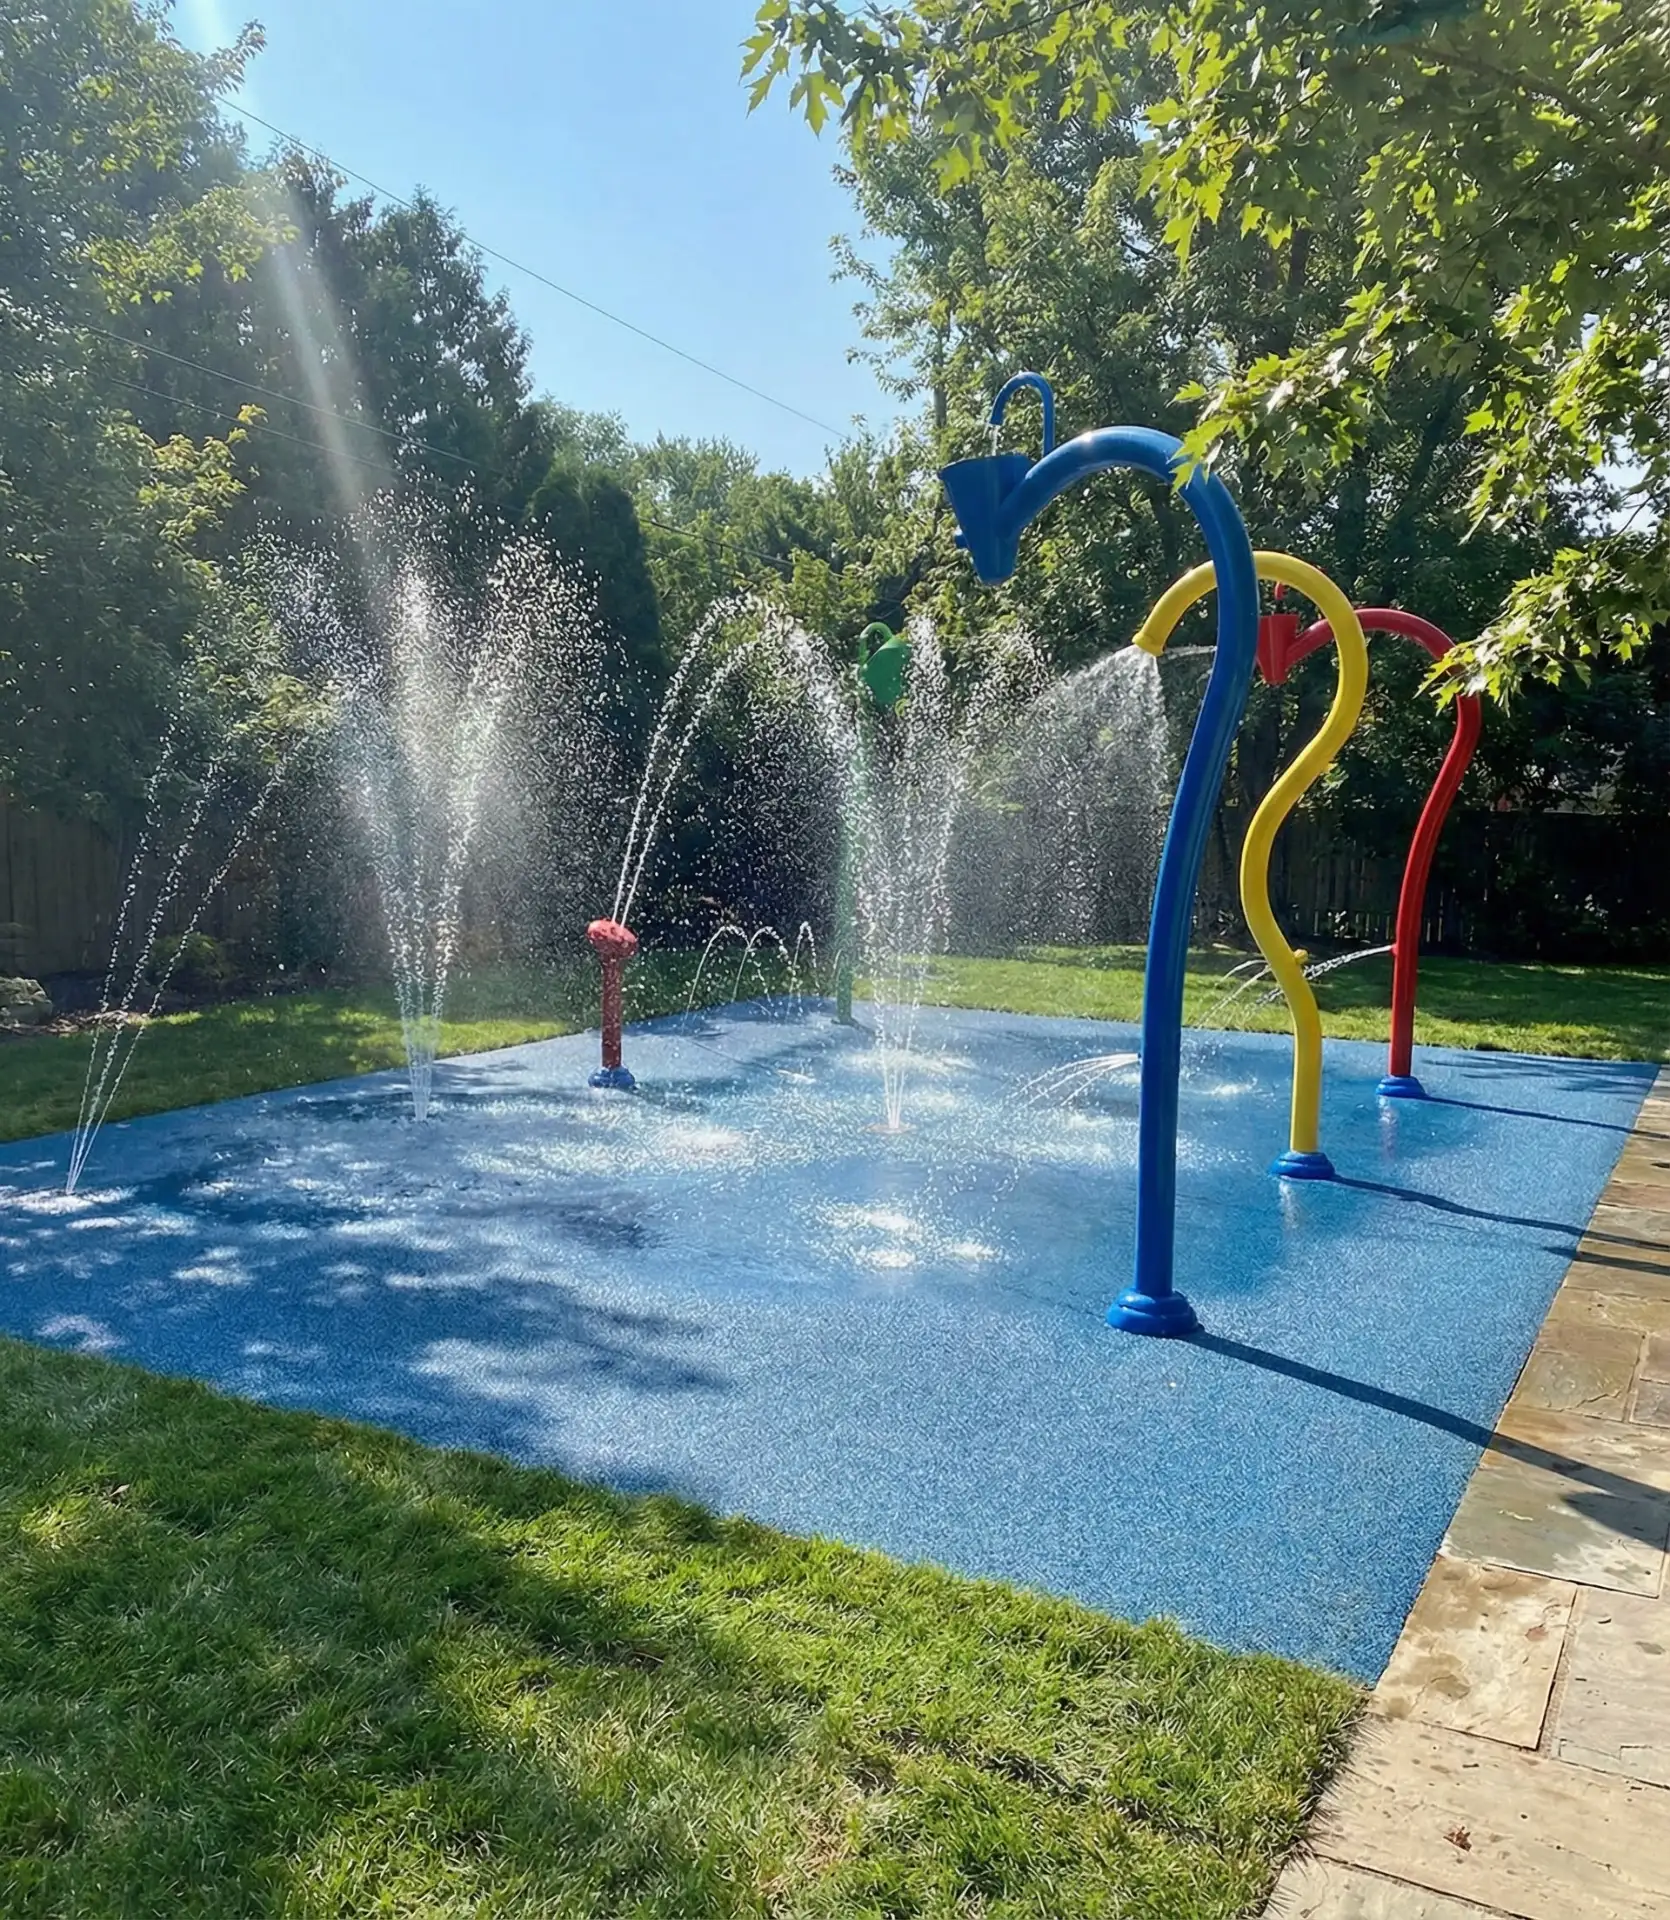
Residential splash pads with spray features, ground jets, and dump buckets bring waterpark excitement to home backyard spaces without pool maintenance requirements or drowning risks. These modern backyard playground design ideas use recycling pumps and rubber flooring or textured concrete surfaces that provide slip resistance when wet. The water elements activate on demand, operate for 15–30 minute sessions, then shut off automatically, making them water-efficient compared to traditional pools while providing the cooling relief and active play that make summer bearable in hot climates. 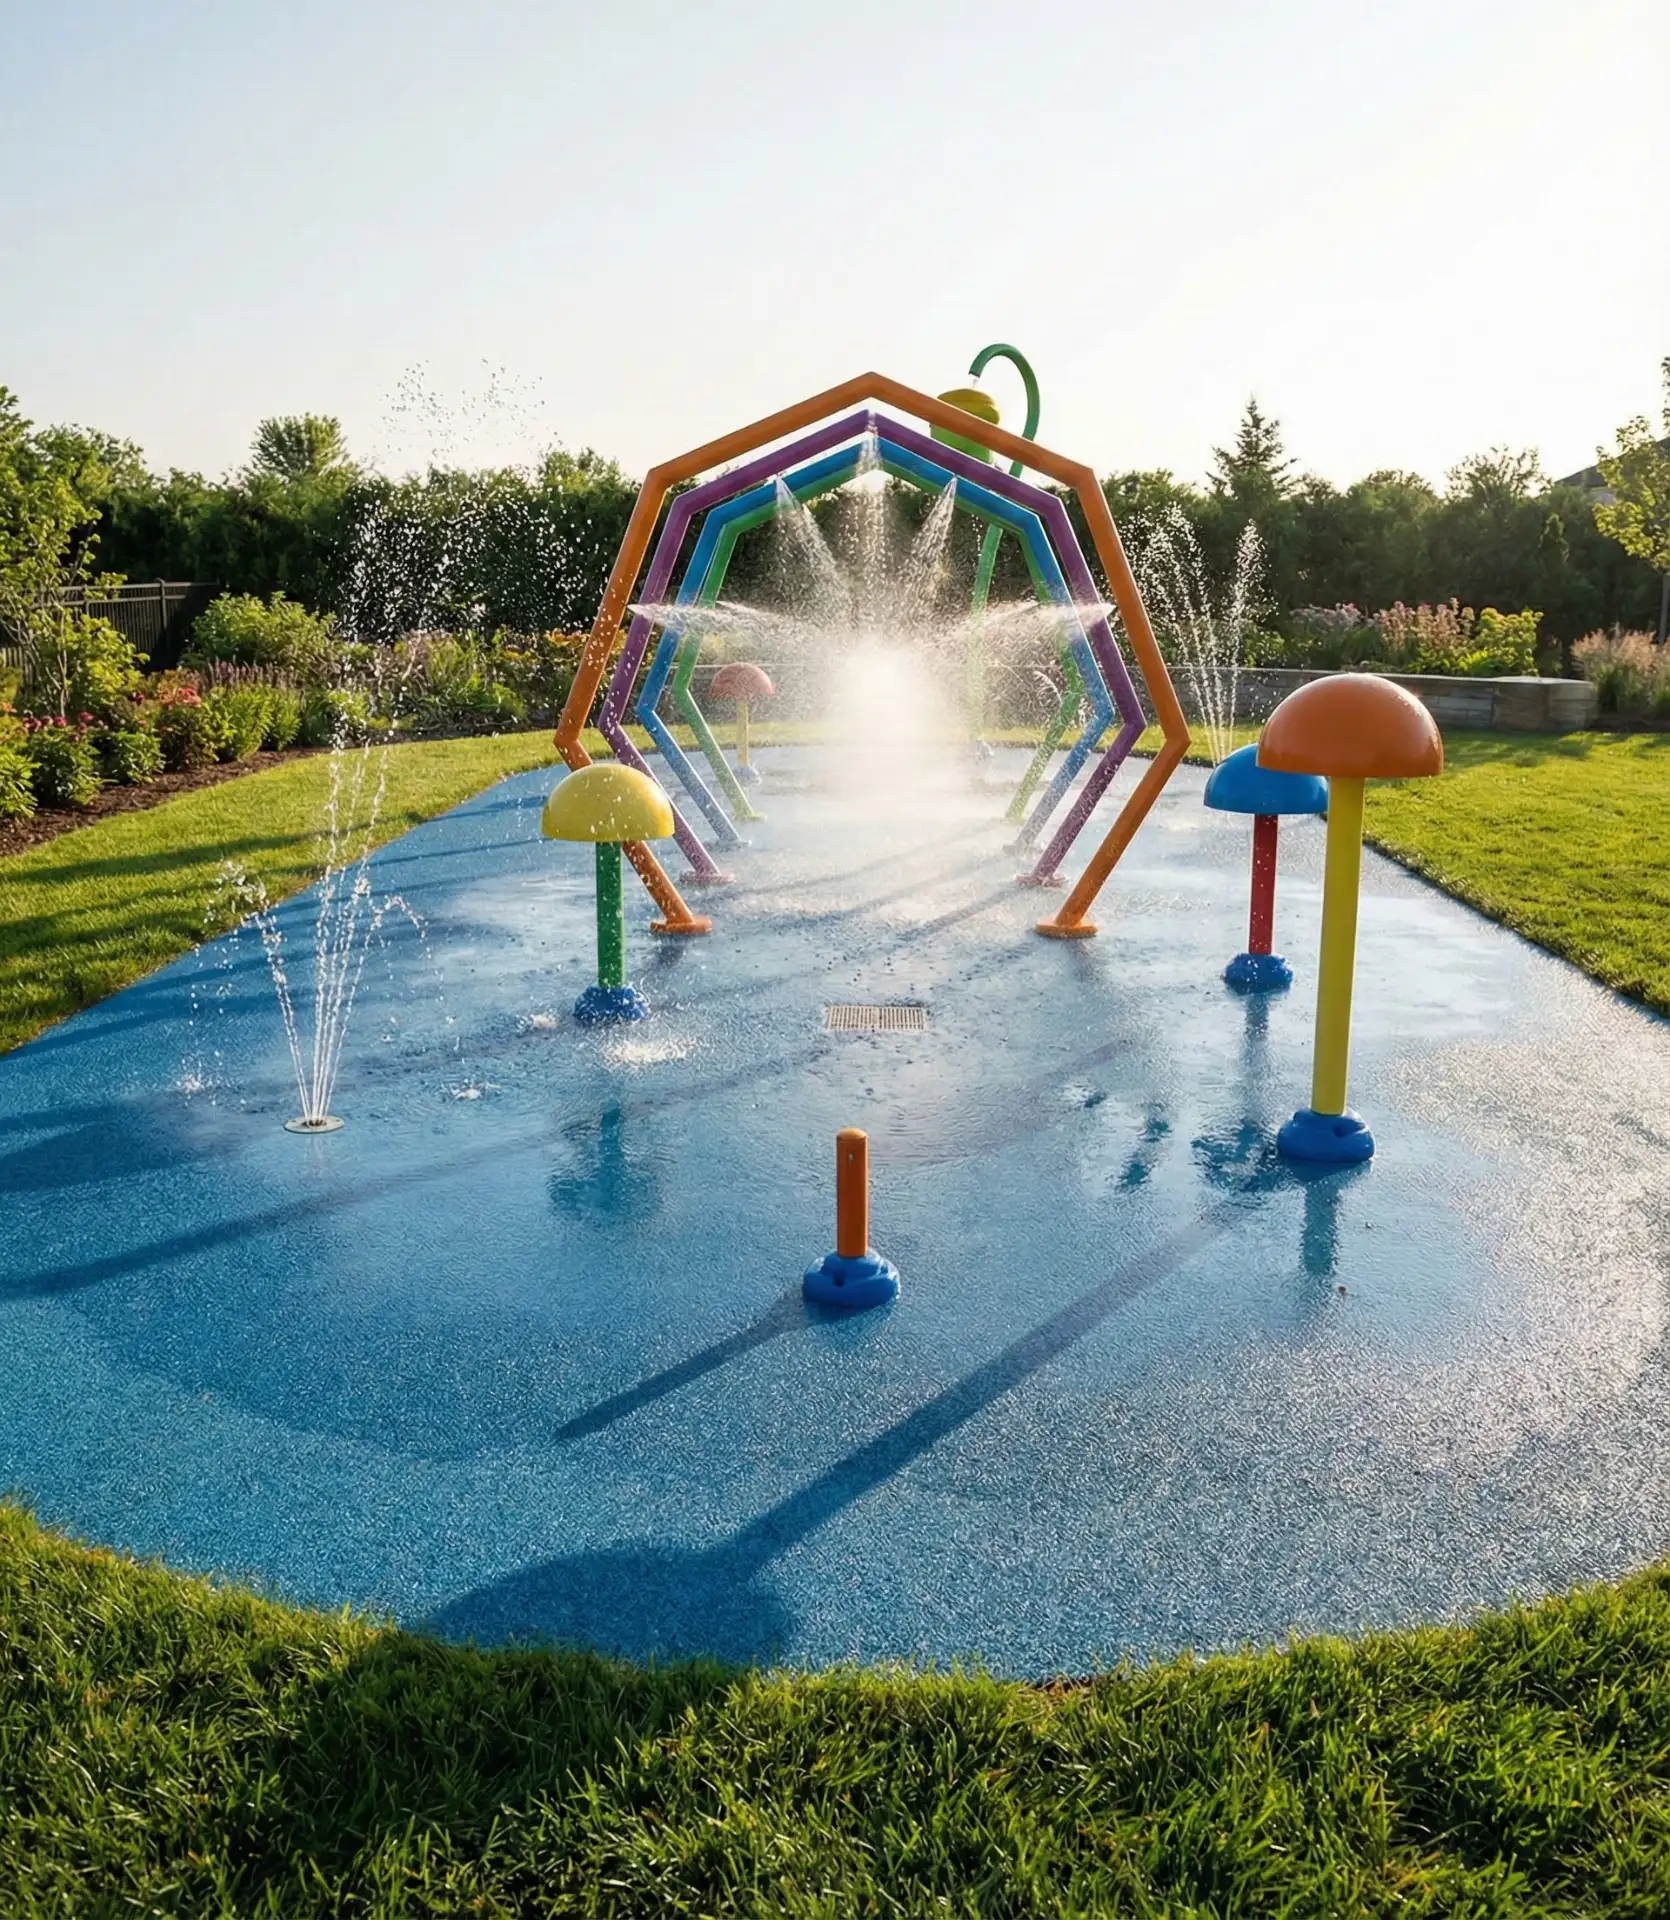
Installation costs $5,000-15,000 depending on complexity and local contractor rates—significant but less than in-ground pool construction. Southern states from California to Florida see the highest adoption rates. The key advantage over pools: splash pads suit children ages 2-10 equally well, whereas pools require years of swimming lessons and constant supervision. Many families report daily use of the splash pad during warm months, significantly surpassing pool usage rates among similar demographics. Winter storage requires draining systems in freeze-climate regions.
17. Hammock Garden Retreat
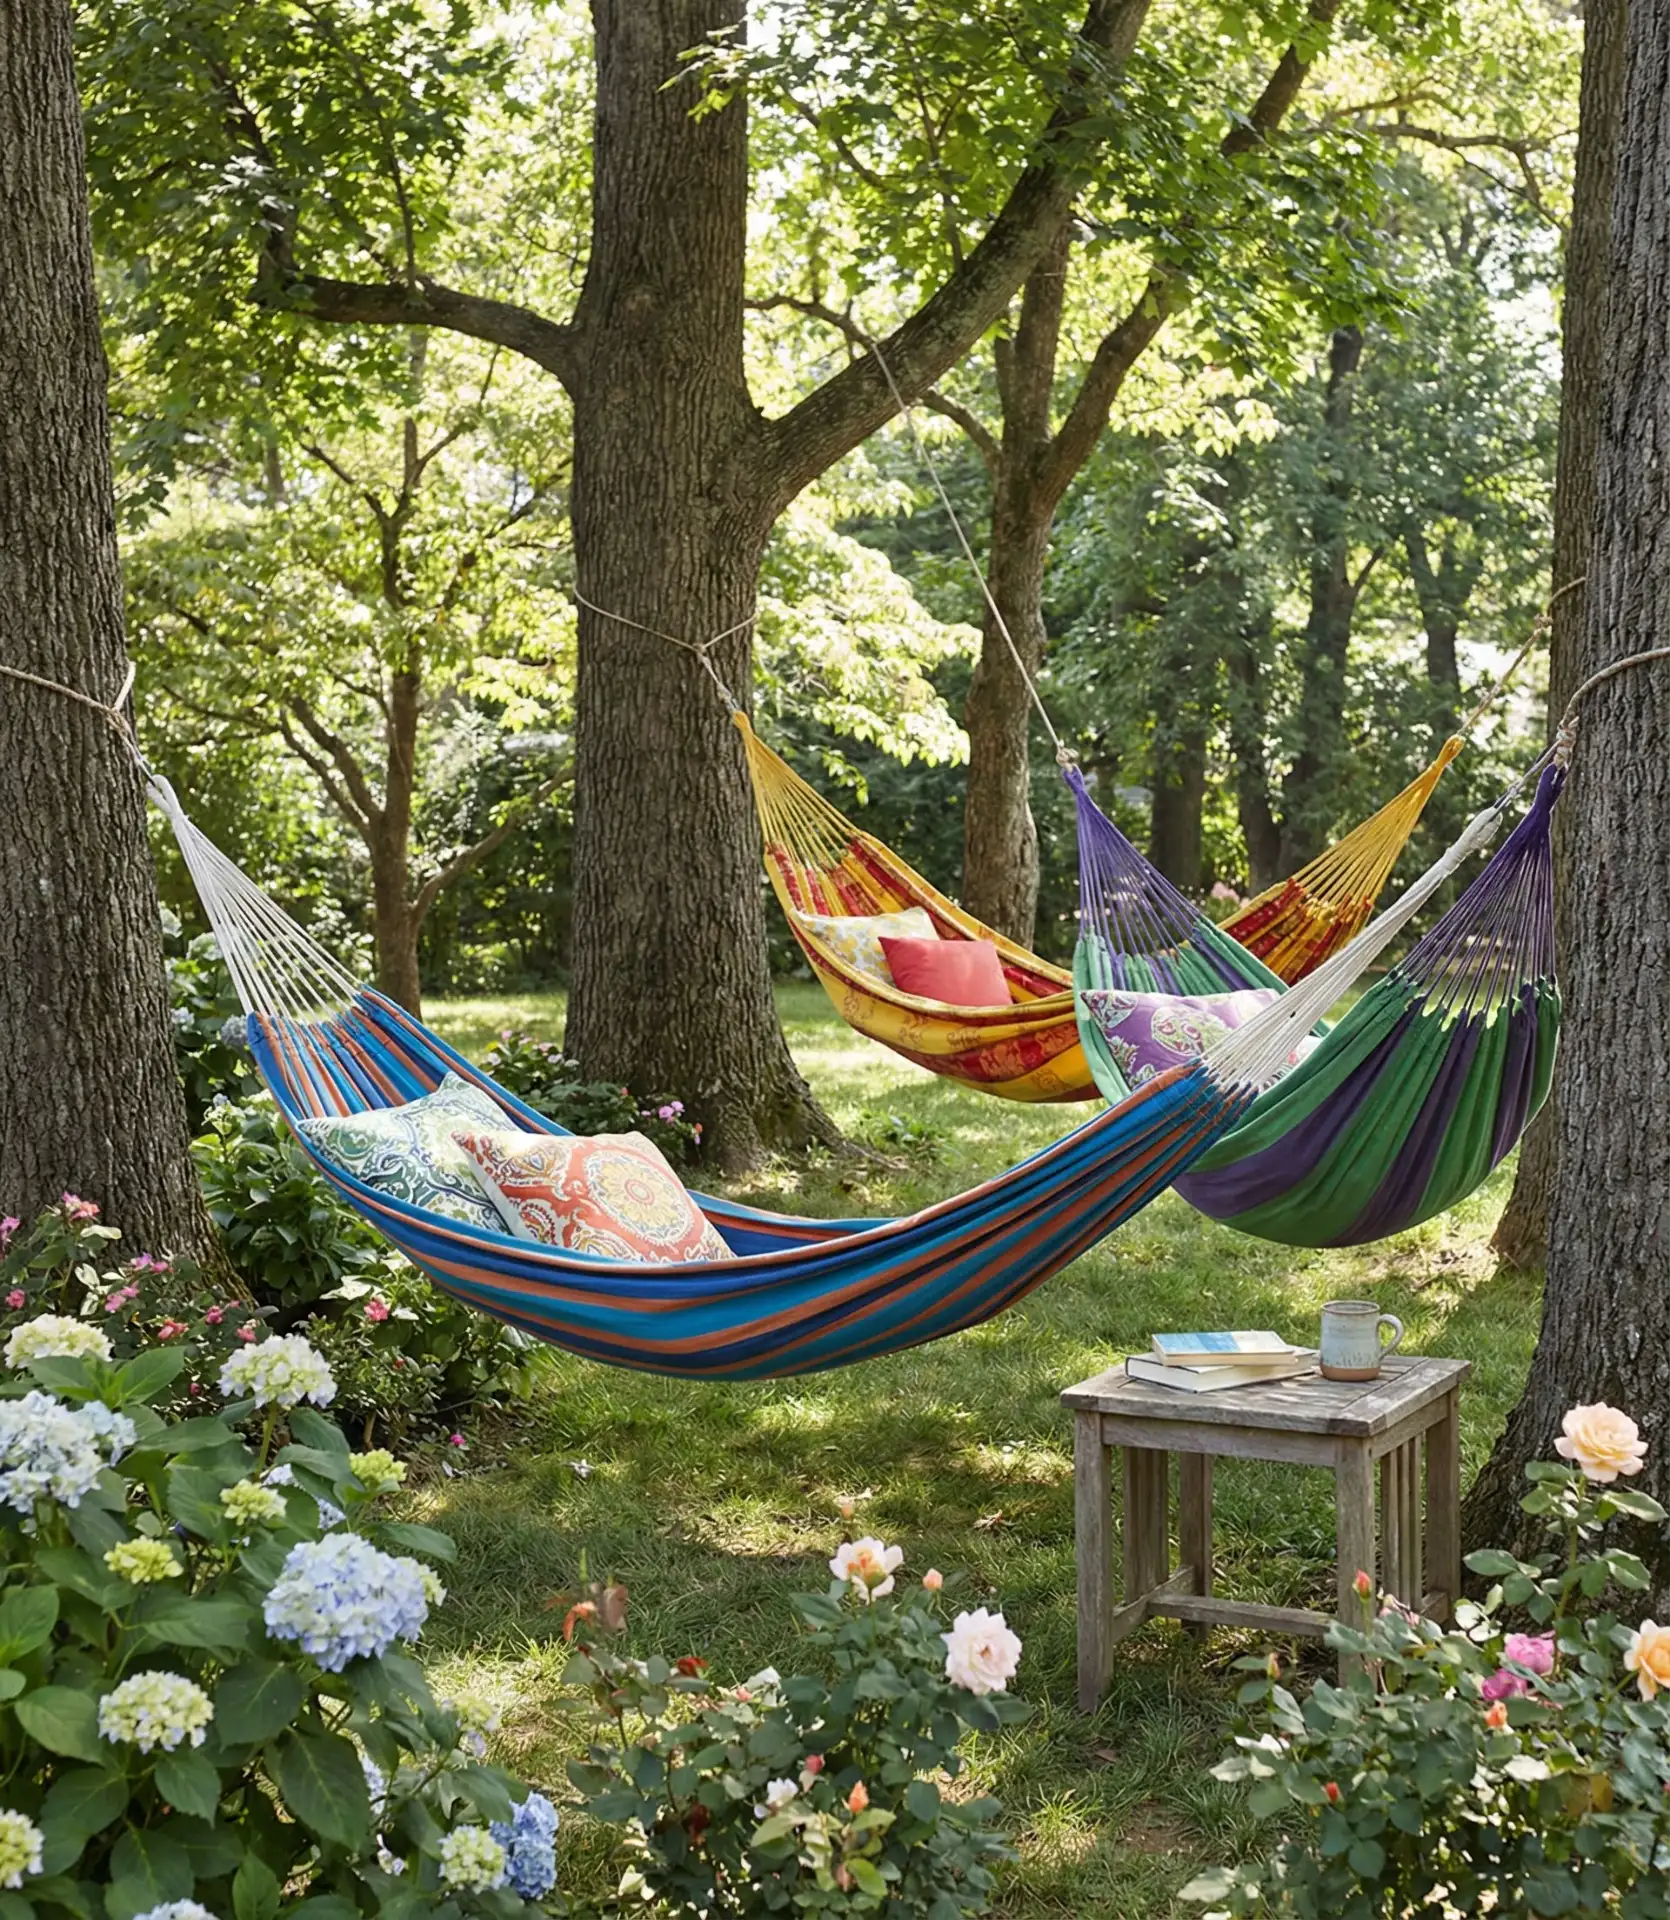
Multiple hammocks strung at different heights create a relaxing playground design element where children swing, read, or simply daydream while remaining outdoors. This low-impact addition requires only sturdy anchor points—mature trees, dedicated posts, or pergola beams—and woven cotton or nylon hammocks in weather-resistant fabrics. The gentle motion soothes, while the slightly elevated, cocooned position appeals to children seeking quiet time. Grouping 2-3 hammocks creates social spaces where siblings or friends lounge together, transforming the backyard into a destination rather than just a pass-through space. 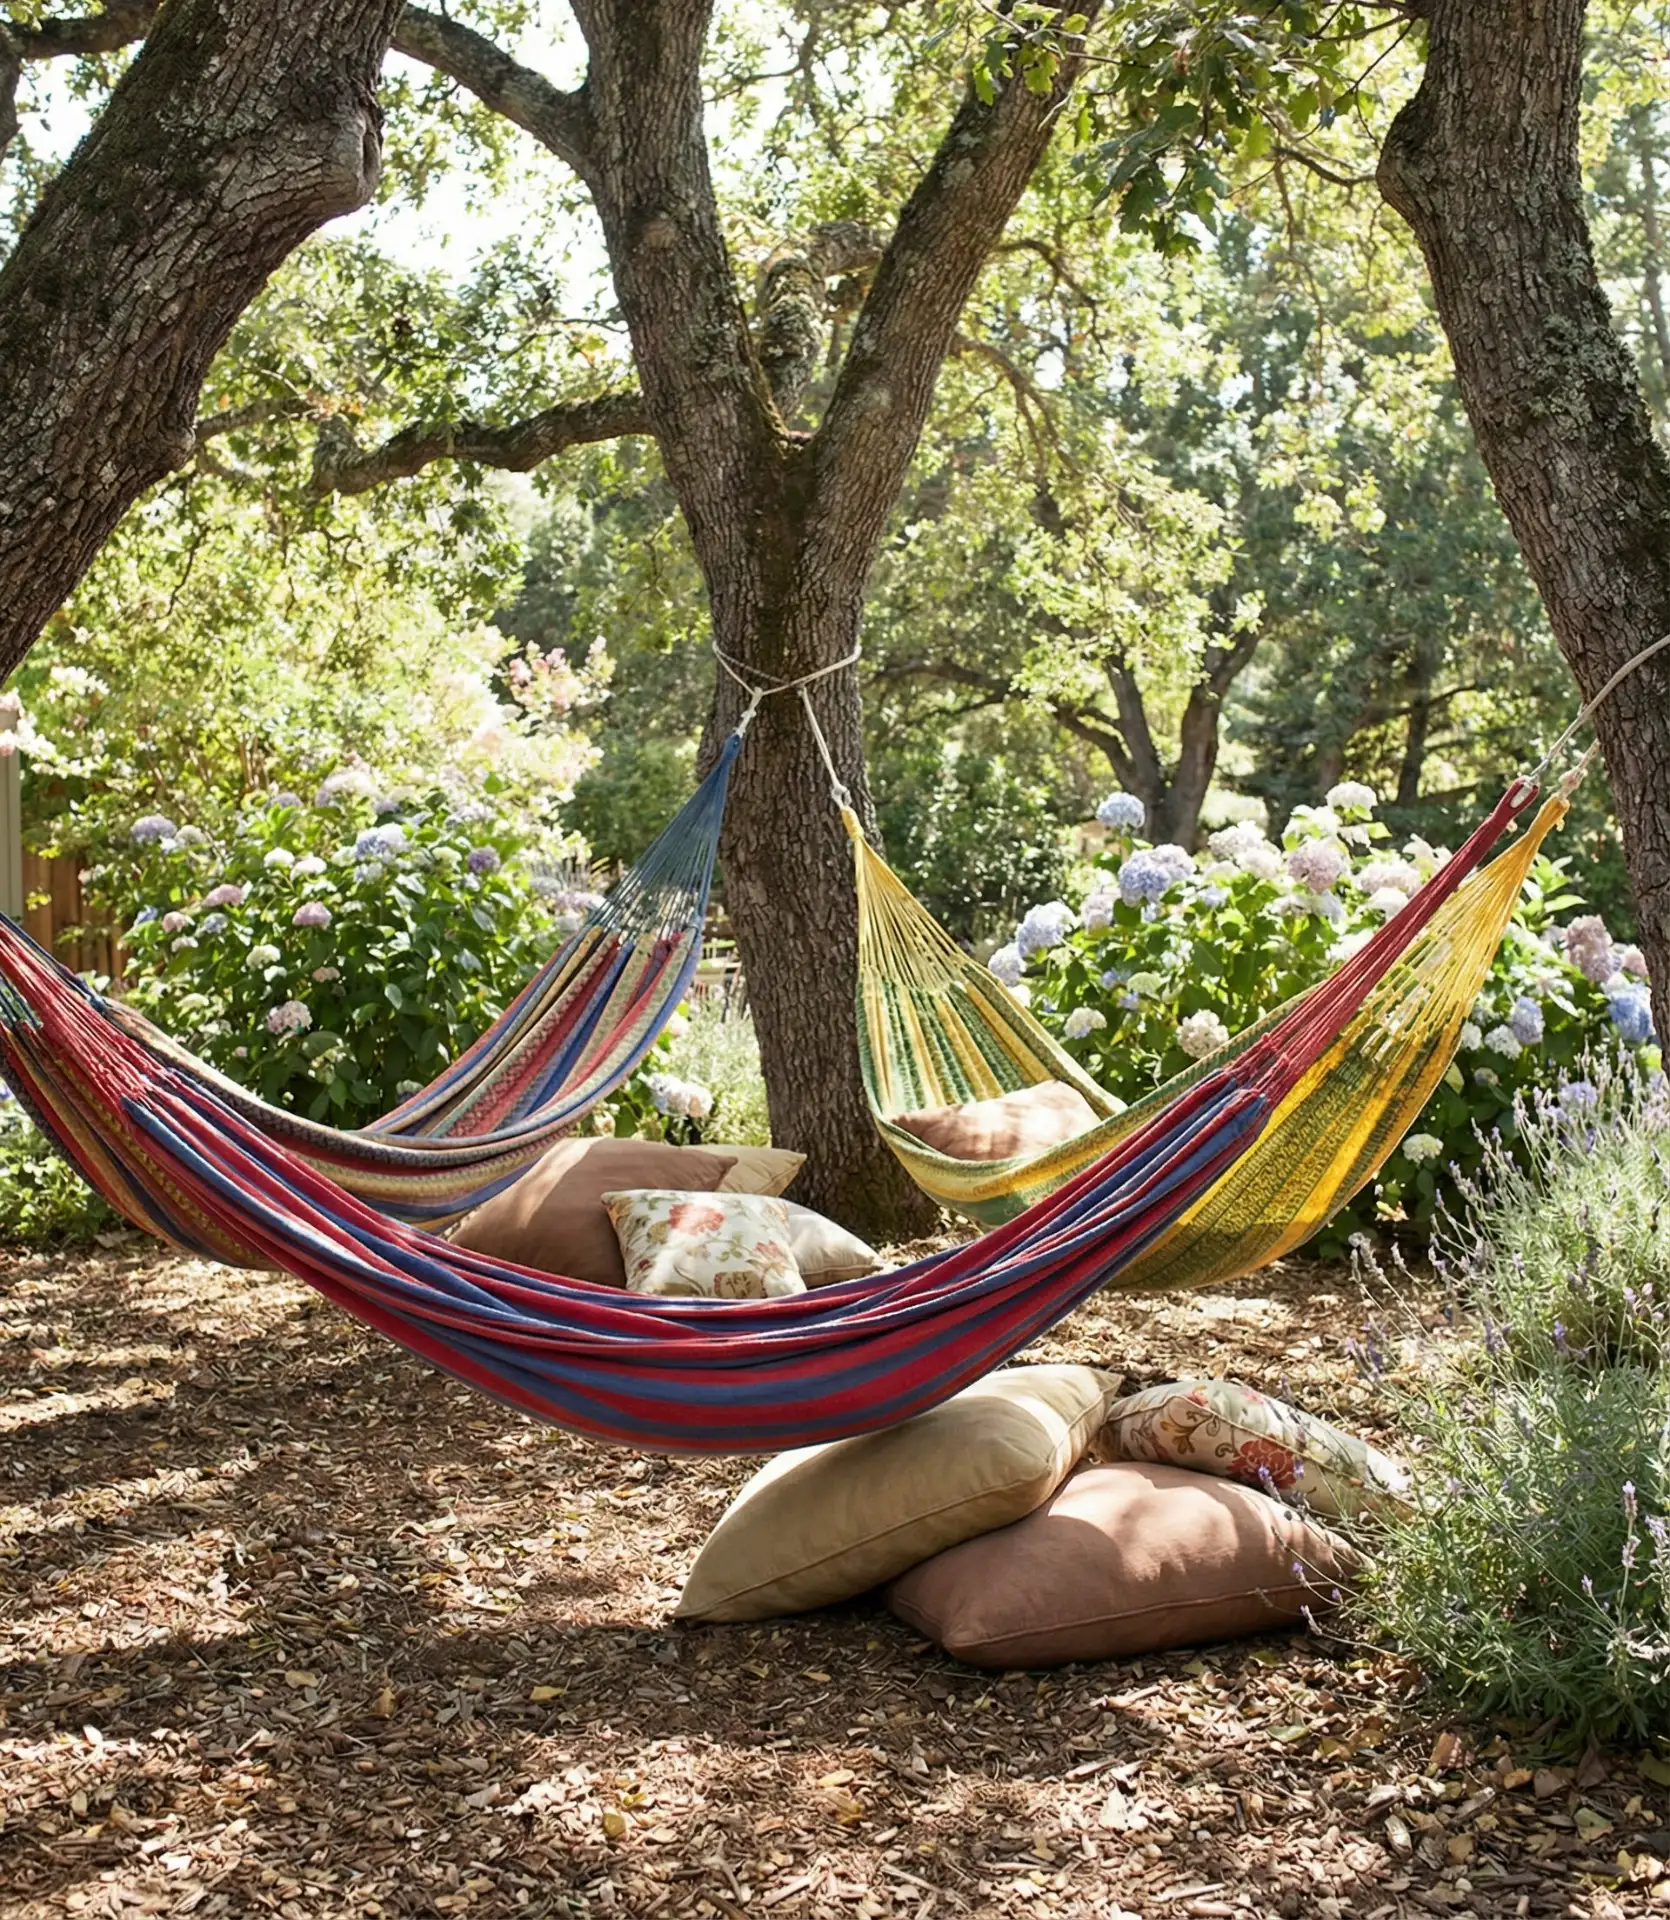
Families on a budget will be pleased to know that a quality hammock costs $30-80, and the only installation materials are tree straps or eye bolts, making the total cost of a hammock garden under $200. A common mistake when hanging hammocks is to hang them too high. The ideal height of a hammock means that the lowest point is 12-18 inches off the ground when weighted so that kids can easily get in and out by themselves. In southern states, hammocks are used year-round. In northern states, families store hammocks indoors from October to April to prevent damage from severe weather.
18. Bike Skills Circuit

Purpose-built bike paths with rollers, berms, and technical features develop cycling confidence while keeping neighborhood street riding safer. This DIY project for designing a playground creates a looping track using gravel or packed dirt with banked turns, small jumps, and obstacle sections that teach balance, braking, and steering control. The circuit typically requires 40+ linear feet, making it suitable for larger suburban or rural backyard properties. Children progress from tricycles to balance bikes to pedal bikes on the same course, with features scaled to challenge but not overwhelm riders at each developmental stage. 
A dad from Colorado said his DIY bike track cost about $300 in topsoil and compaction equipment rental but transformed how confidently his kids ride to school. The track will need maintenance each year to rebuild features that erode and to recompact bare areas, especially after freeze-thaw cycles. Position the track away from windows and seating areas to contain dust during dry periods. Starting small with one or two features lets you test interest before committing to a full circuit—many kids even love simple things like a painted street course on existing patio surfaces.
19. Musical Garden Installation
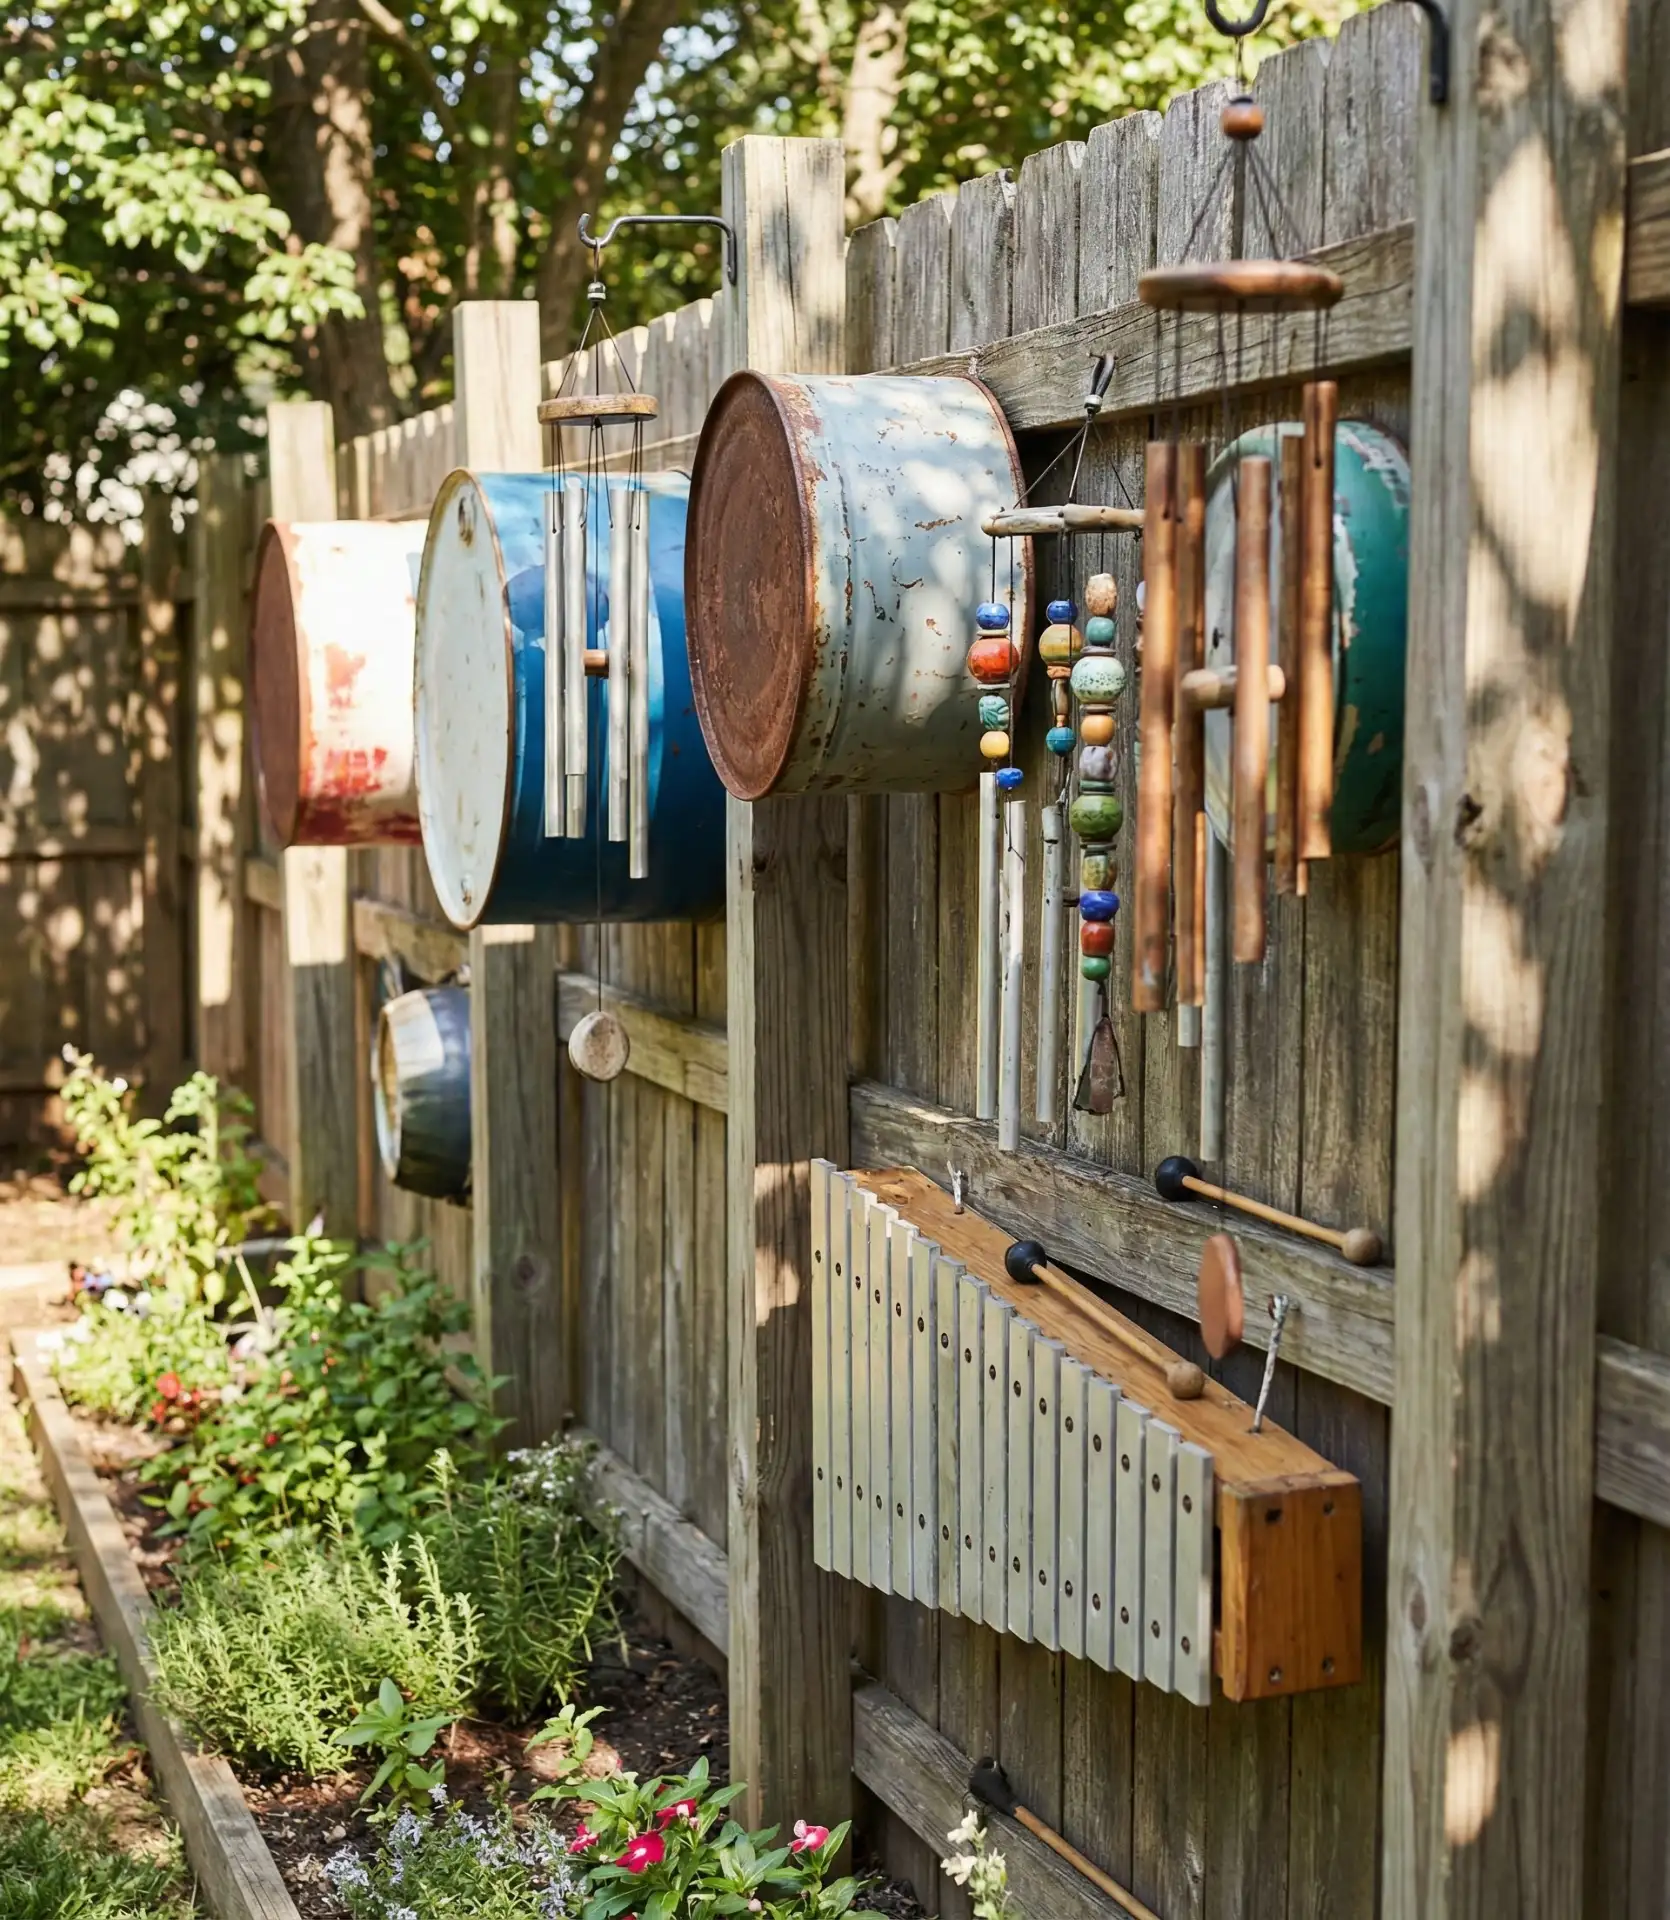
Outdoor musical instruments mounted on posts or fences turn the backyard into an interactive sound garden where children experiment with rhythm and melody. Weatherproof chimes, drums, xylophones, and pipes create a playground design element that engages children who might not gravitate toward traditional physical play. The instruments require no musical training—random strikes produce pleasant tones that encourage extended exploration. This addition particularly shines in smaller yards where space constraints limit conventional play structures, as musical elements occupy vertical rather than horizontal real estate. 
This feature is especially effective in crowded neighborhoods since outdoor musical play can improve neighbor relationships in a positive way—children’s experimental music-making is generally perceived as charming rather than as annoying as shouting or power tools. Good quality outdoor instruments range between $100 and $400. Most installations have between 3 and 5 instruments, resulting in costs between $500 and $1500. To avoid disturbing adults, adjust the height of the instruments so that children of different ages can play them, and place them where they won’t interfere with outdoor dining or relaxation.
20. Natural Clay Digging Pit

Dedicated digging pits filled with pottery clay provide tactile, creative play that satisfies children’s urge to excavate without destroying garden beds. This cheap playground design DIY project uses 50-pound bags of natural clay ($15-25 each) in a timber-framed pit, allowing kids to sculpt, build, and dig with the wonderfully malleable material. The clay stays workable with occasional water misting, unlike sand that needs constant dampening. Creations can air-dry for temporary keeping or simply be mashed back into the pit for tomorrow’s projects, creating an endlessly renewable creative medium. 
Common mistakes include using the wrong clay type—pottery clay works beautifully, but bentonite clay becomes impossibly sticky when wet. A 4×4 foot pit requires 200-300 pounds of clay, costing $60-120 initially with occasional top-up purchases. The mess factor is real but manageable: position the pit away from house entrances, provide a wash station nearby, and establish the rule that clay play ends with hand-washing before transitioning to other activities. Covered storage prevents rain from saturating the clay and making it soup.
21. Adventure Tunnel System
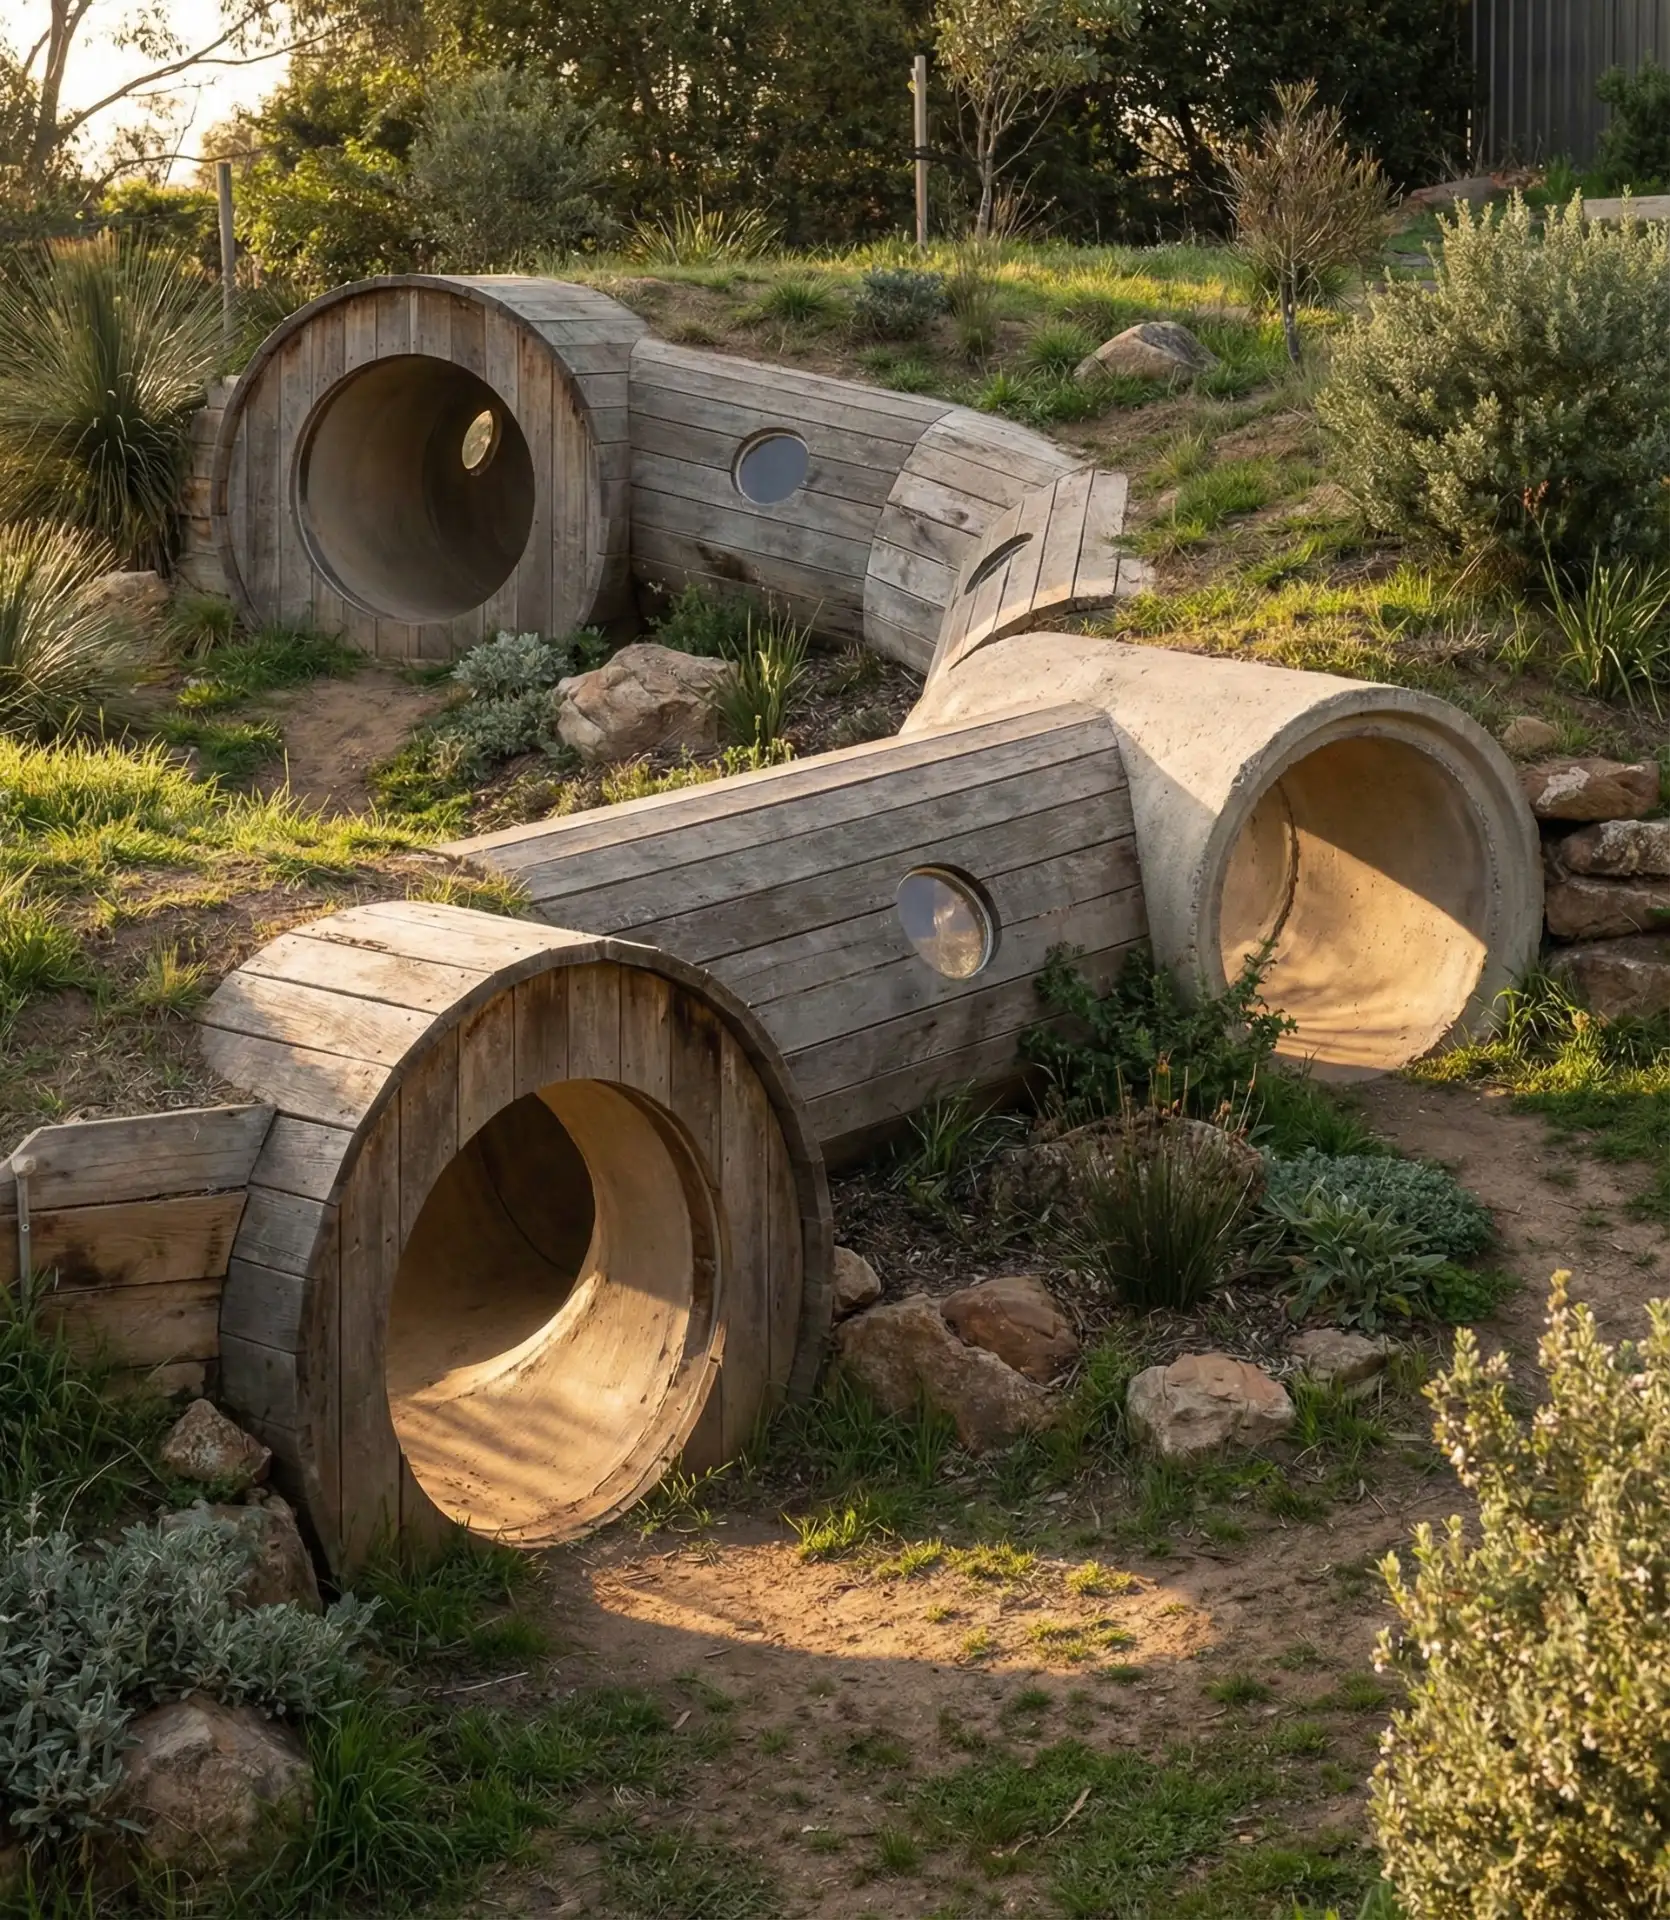
Connected crawl tunnels—whether commercial drainage pipe, custom-built wood structures, or living willow—create mysterious passageways that spark imaginative adventures. These backyard playground design ideas work particularly well on sloped lots where tunnels can incorporate elevation changes, entering hillsides like hobbit holes or connecting different terraced levels. The enclosed spaces appeal to children’s love of secret hideaways while developing spatial awareness and gross motor skills as they navigate the darkened passages. Adding windows, periscopes, or speaking tubes between tunnel sections extends play possibilities exponentially. 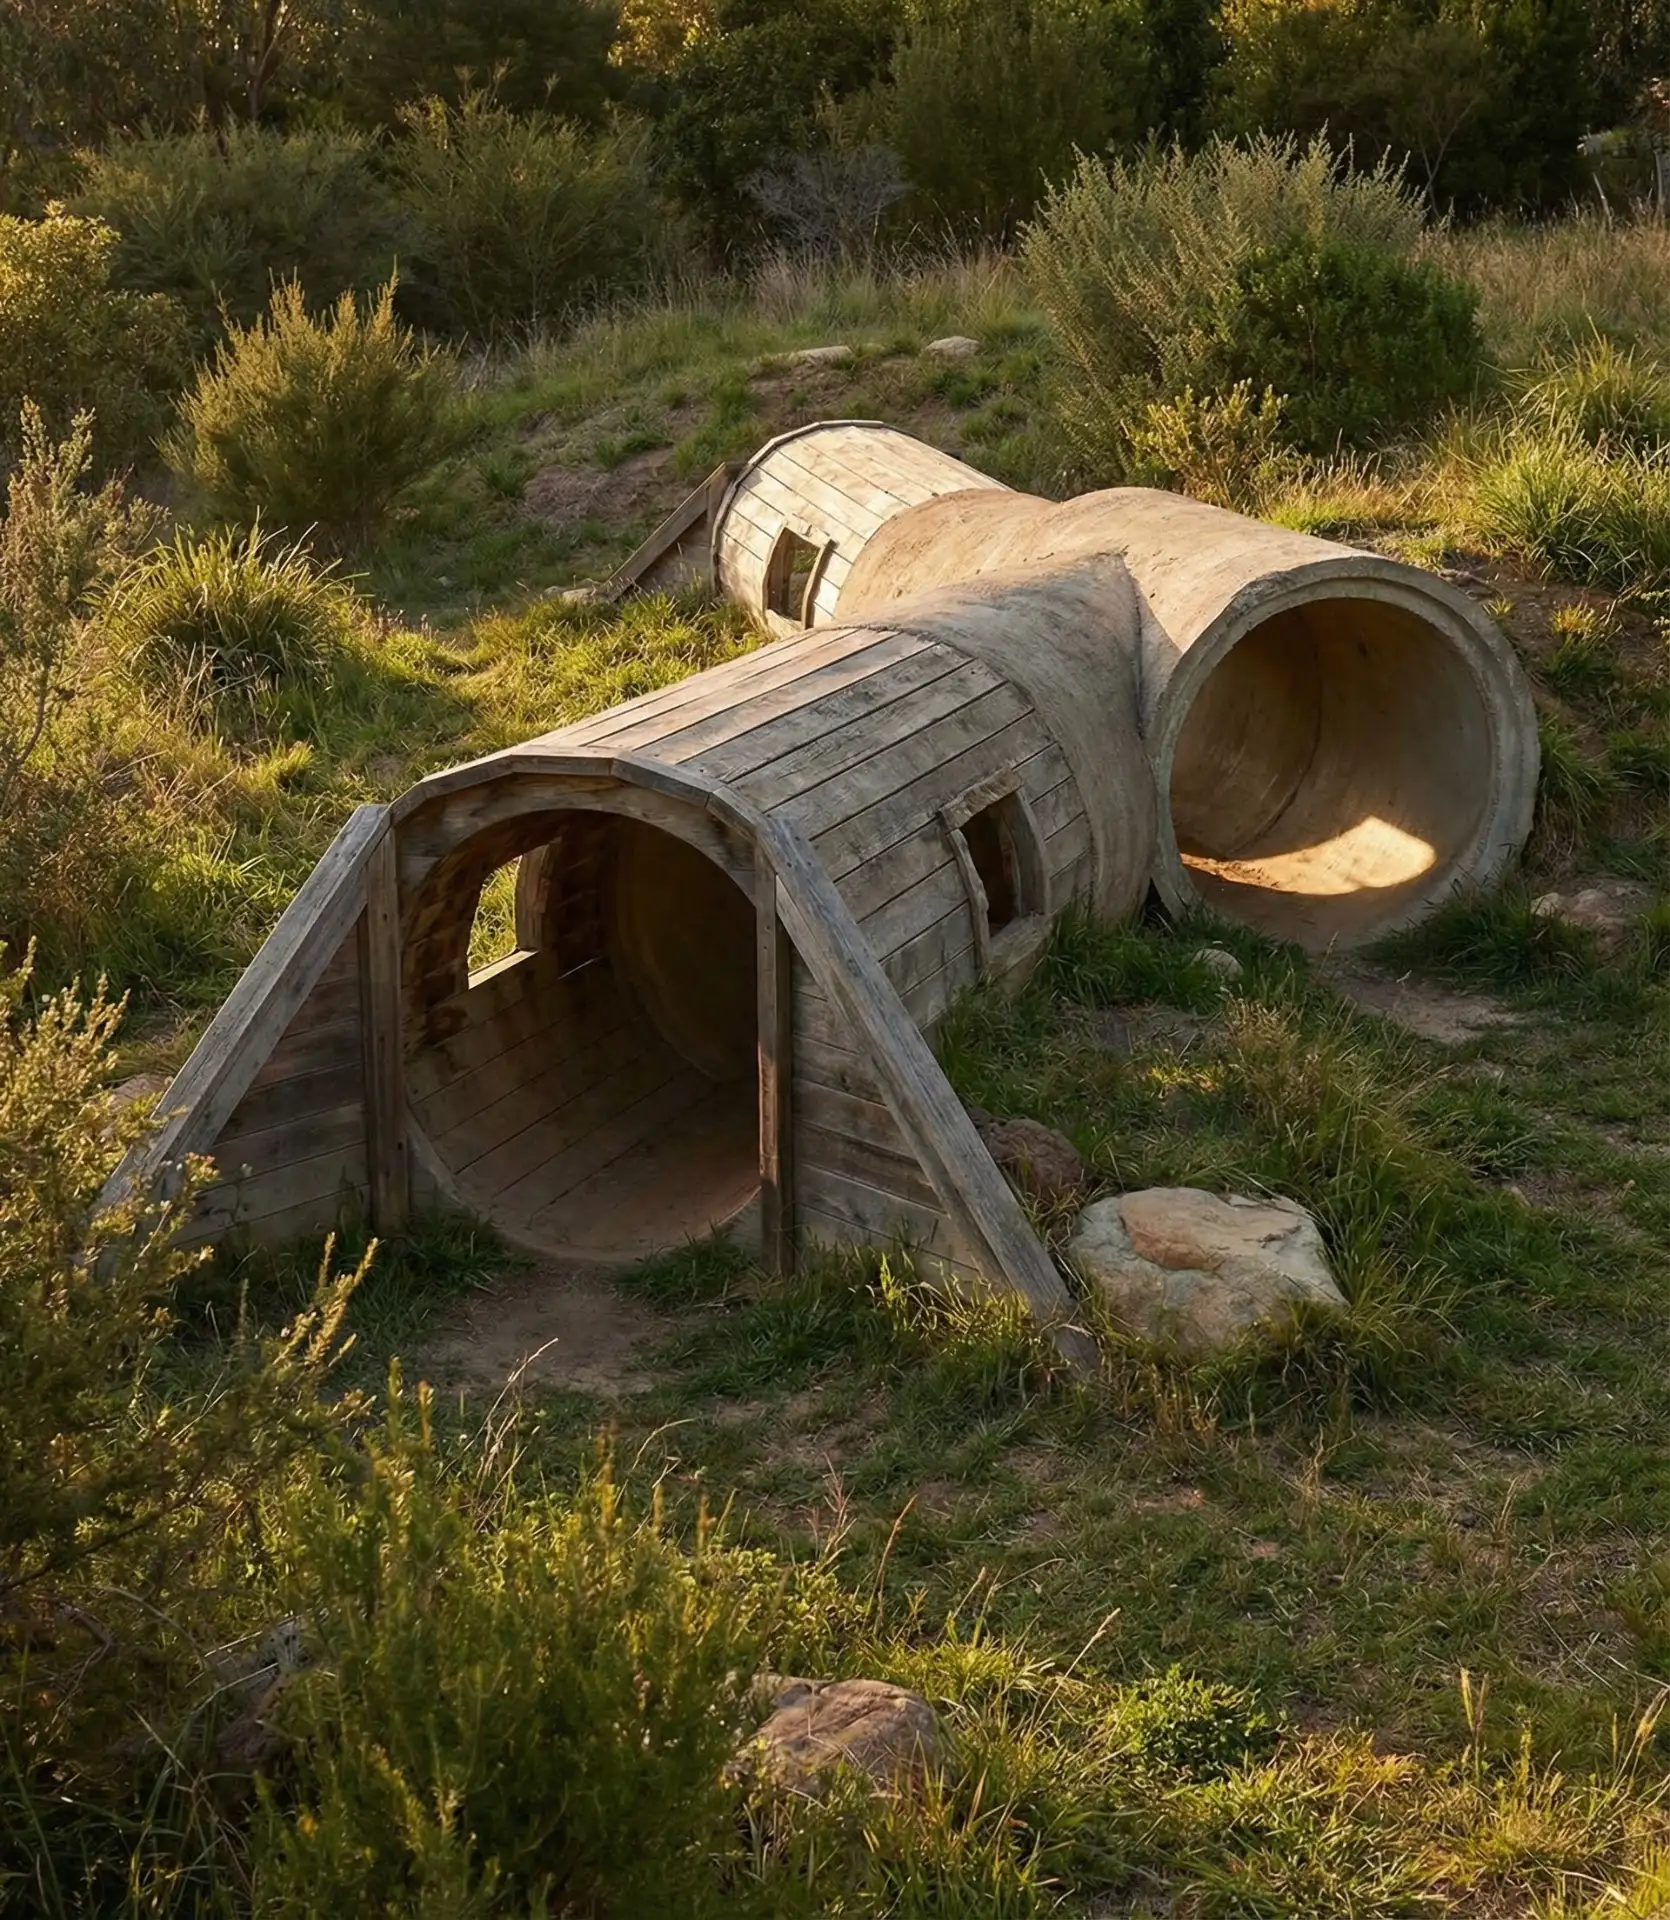
Real homeowner behavior shows that tunnels remain engaging far longer than expected—teenagers still use them for hide-and-seek and as shortcuts between yard zones. Large corrugated drainage pipes (36-48 inches in diameter) cost $30-60 per linear foot and create instant tunnels when partially buried and landscaped over. Ensure proper ventilation and lighting with periodic window openings; completely dark tunnels appeal briefly, but most children prefer dim light that allows them to see where they’re going. Drainage is critical—water pooling in tunnel low points creates muddy, unusable spaces.
22. Outdoor Art Studio Wall
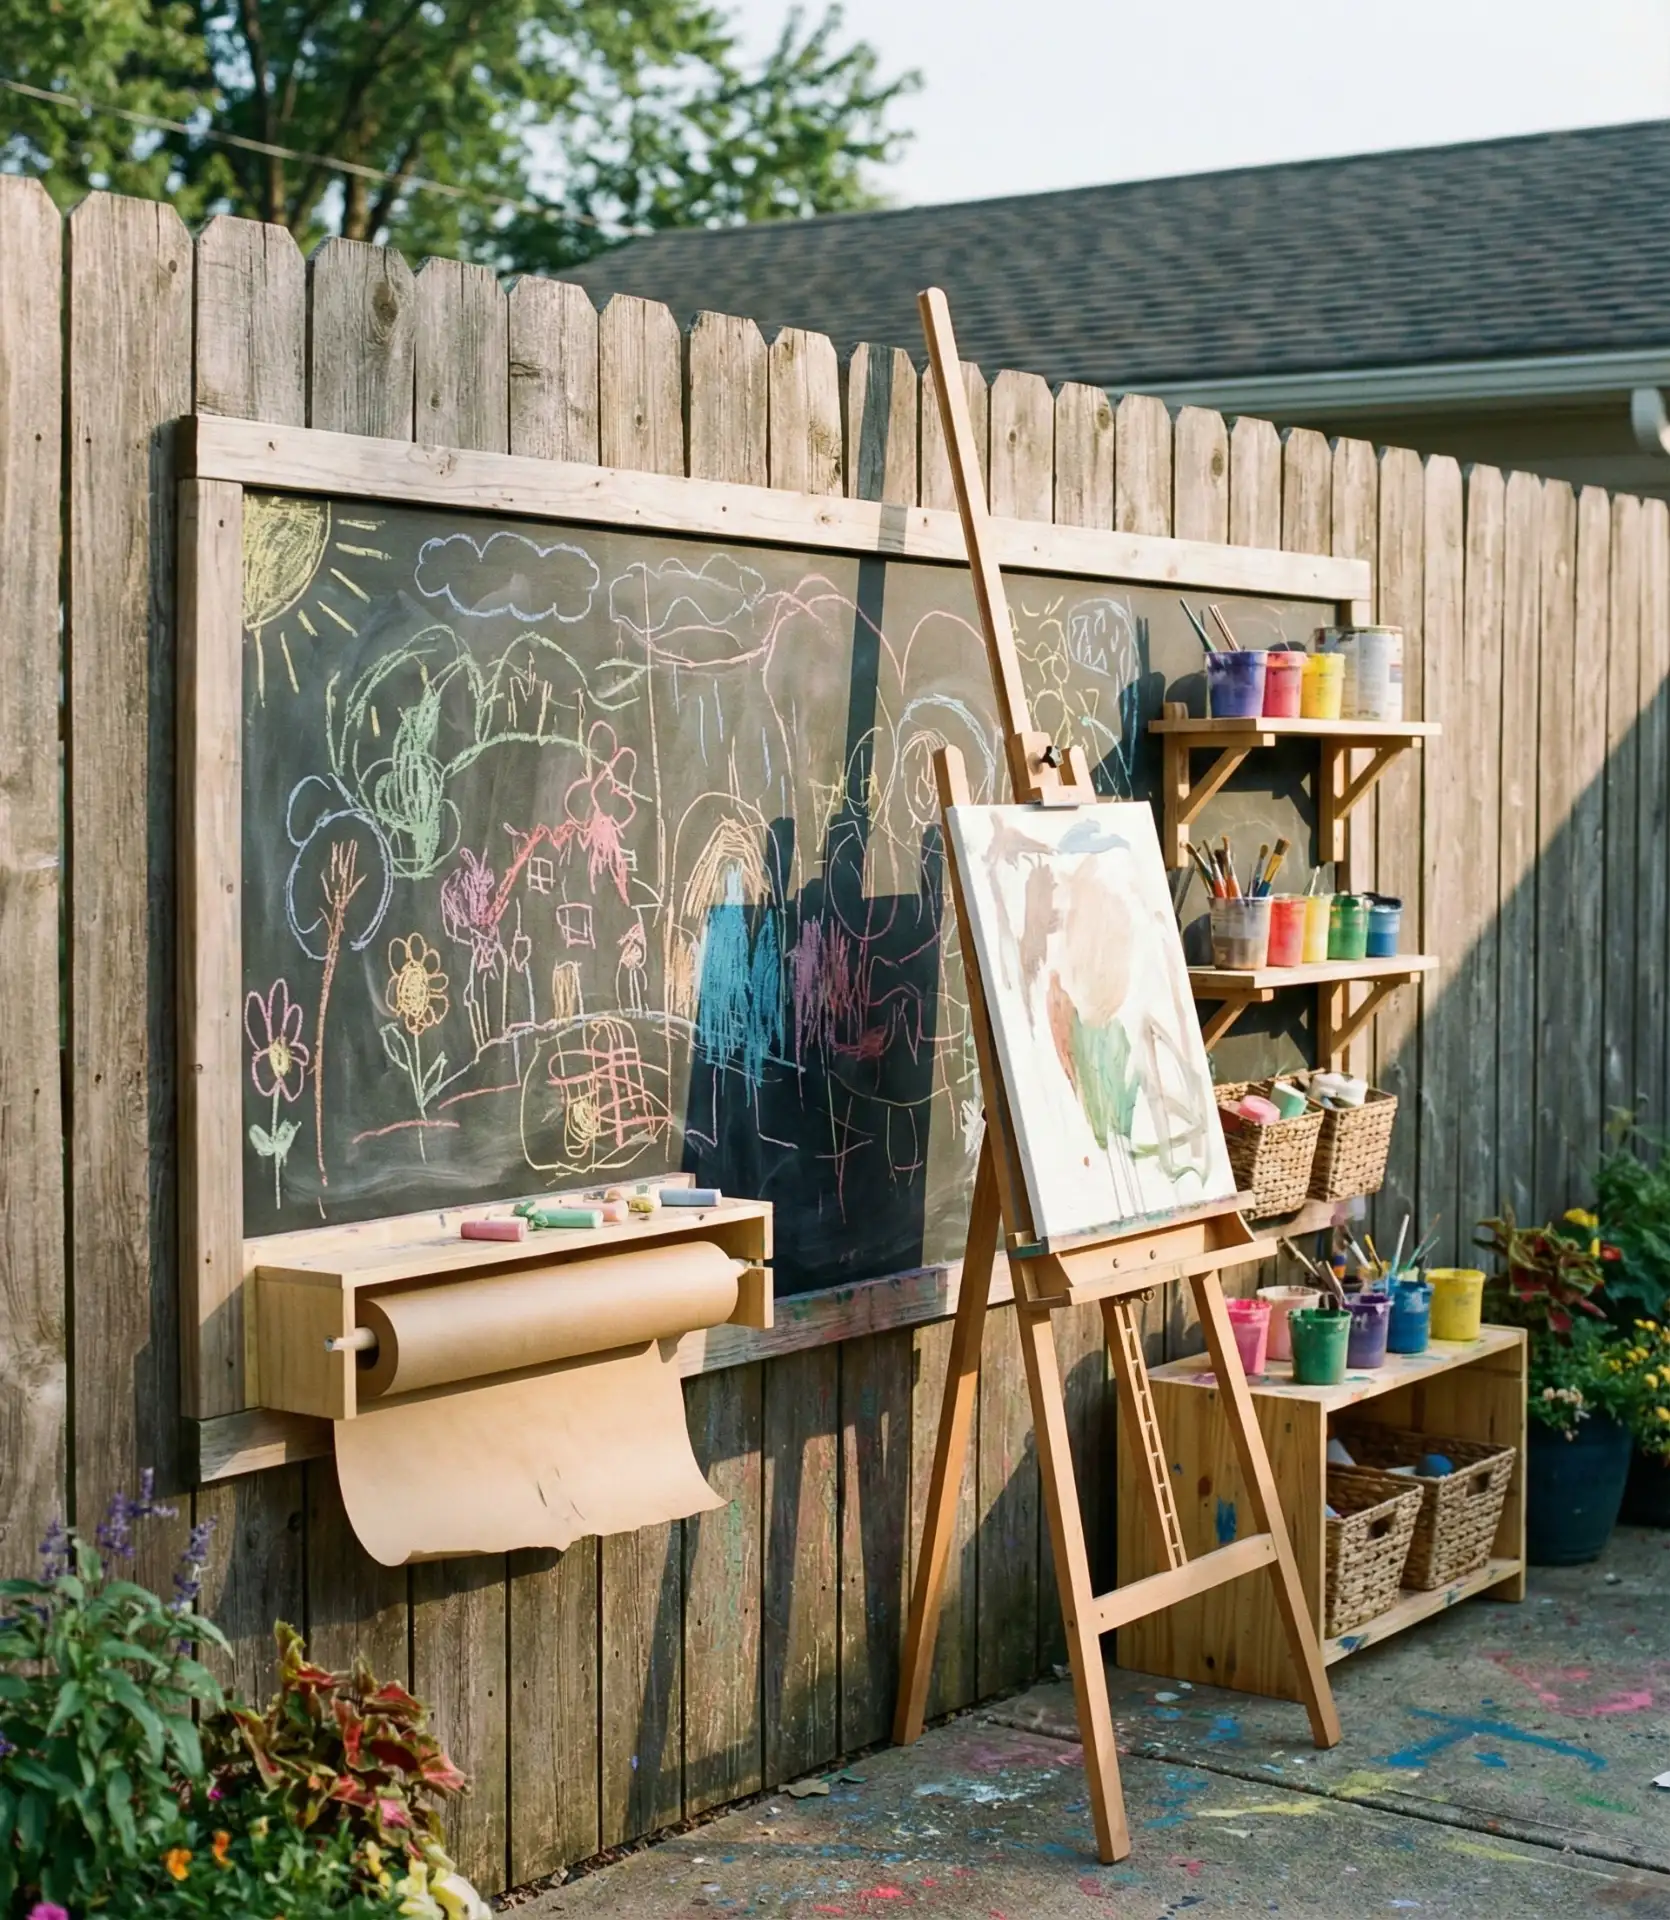
Dedicated outdoor art surfaces—chalkboard paint on fence sections, clear Plexiglas easels, or roll-paper dispensers—contain creative mess while elevating the backyard as a complete activity center beyond physical playground design elements. Large-scale vertical surfaces let children work at scales impossible indoors, creating murals, collaborative projects, or simply scribbling with abandon. The outdoor location means paint spills, chalk dust, and water cleanup happen where they’re easily hosed away rather than requiring indoor damage control, removing the anxiety that often limits children’s artistic experimentation. 
Installation costs stay under $200 for most DIY versions: chalkboard paint ($25), Plexiglas sheets ($40-80), simple lumber framing, and hardware. Position the art wall where parents can supervise from indoor work-from-home spaces or outdoor seating areas—the best creative play happens when children feel both independent and secure. Adding a small storage bench nearby for chalk, paints, and tools increases usage because everything needed is immediately accessible. This encourages spontaneous creativity rather than requiring setup that often prevents the activity from happening at all.
These outdoor play area concepts demonstrate how thoughtful design transforms backyards into dynamic learning environments that grow with your children. Whether you’re drawn to natural materials, modern installations, or budget-friendly DIY projects, the key is creating spaces that invite exploration while complementing your home’s outdoor aesthetic. We’d love to hear about your successful backyard play solutions or your favorite ideas in the comments section below.