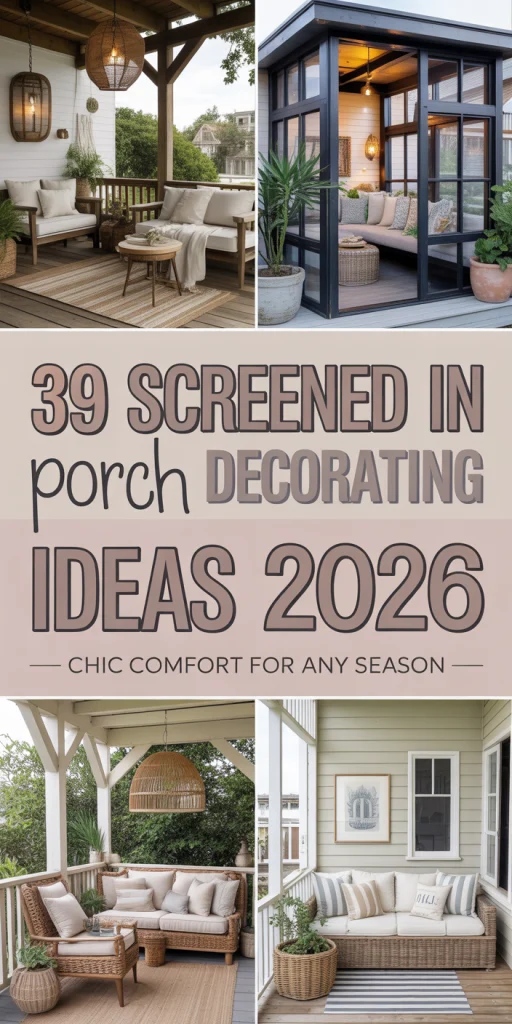
39 Screened in Porch Decorating Ideas 2026: Cozy, Budget and Boho Styles for Your Home
Screened-in porches have become one of the most sought-after home features across America, offering the perfect blend of indoor comfort and outdoor connection. As we move into 2026, homeowners are transforming these transitional spaces into year-round retreats that reflect personal style while maximizing functionality. Whether you’re working with a compact urban porch or a sprawling Southern veranda, these decorating ideas will help you create a space that’s both beautiful and livable. From budget-friendly DIY projects to sophisticated design upgrades, discover how to turn your screened porch into the most-used room in your home.
1. Layered Textiles for Cozy Farmhouse Appeal
Transform your screened porch into a cozy farmhouse sanctuary by layering multiple textile patterns and textures throughout the space. Start with weather-resistant outdoor rugs in neutral plaids or stripes, then add throw pillows in complementary patterns like ticking stripes, buffalo check, and floral prints. This approach creates depth and visual interest while maintaining that relaxed, lived-in feeling characteristic of rustic farmhouse style. The key is mixing patterns in a similar color palette—think cream, gray, and soft blue—so the space feels collected rather than chaotic. 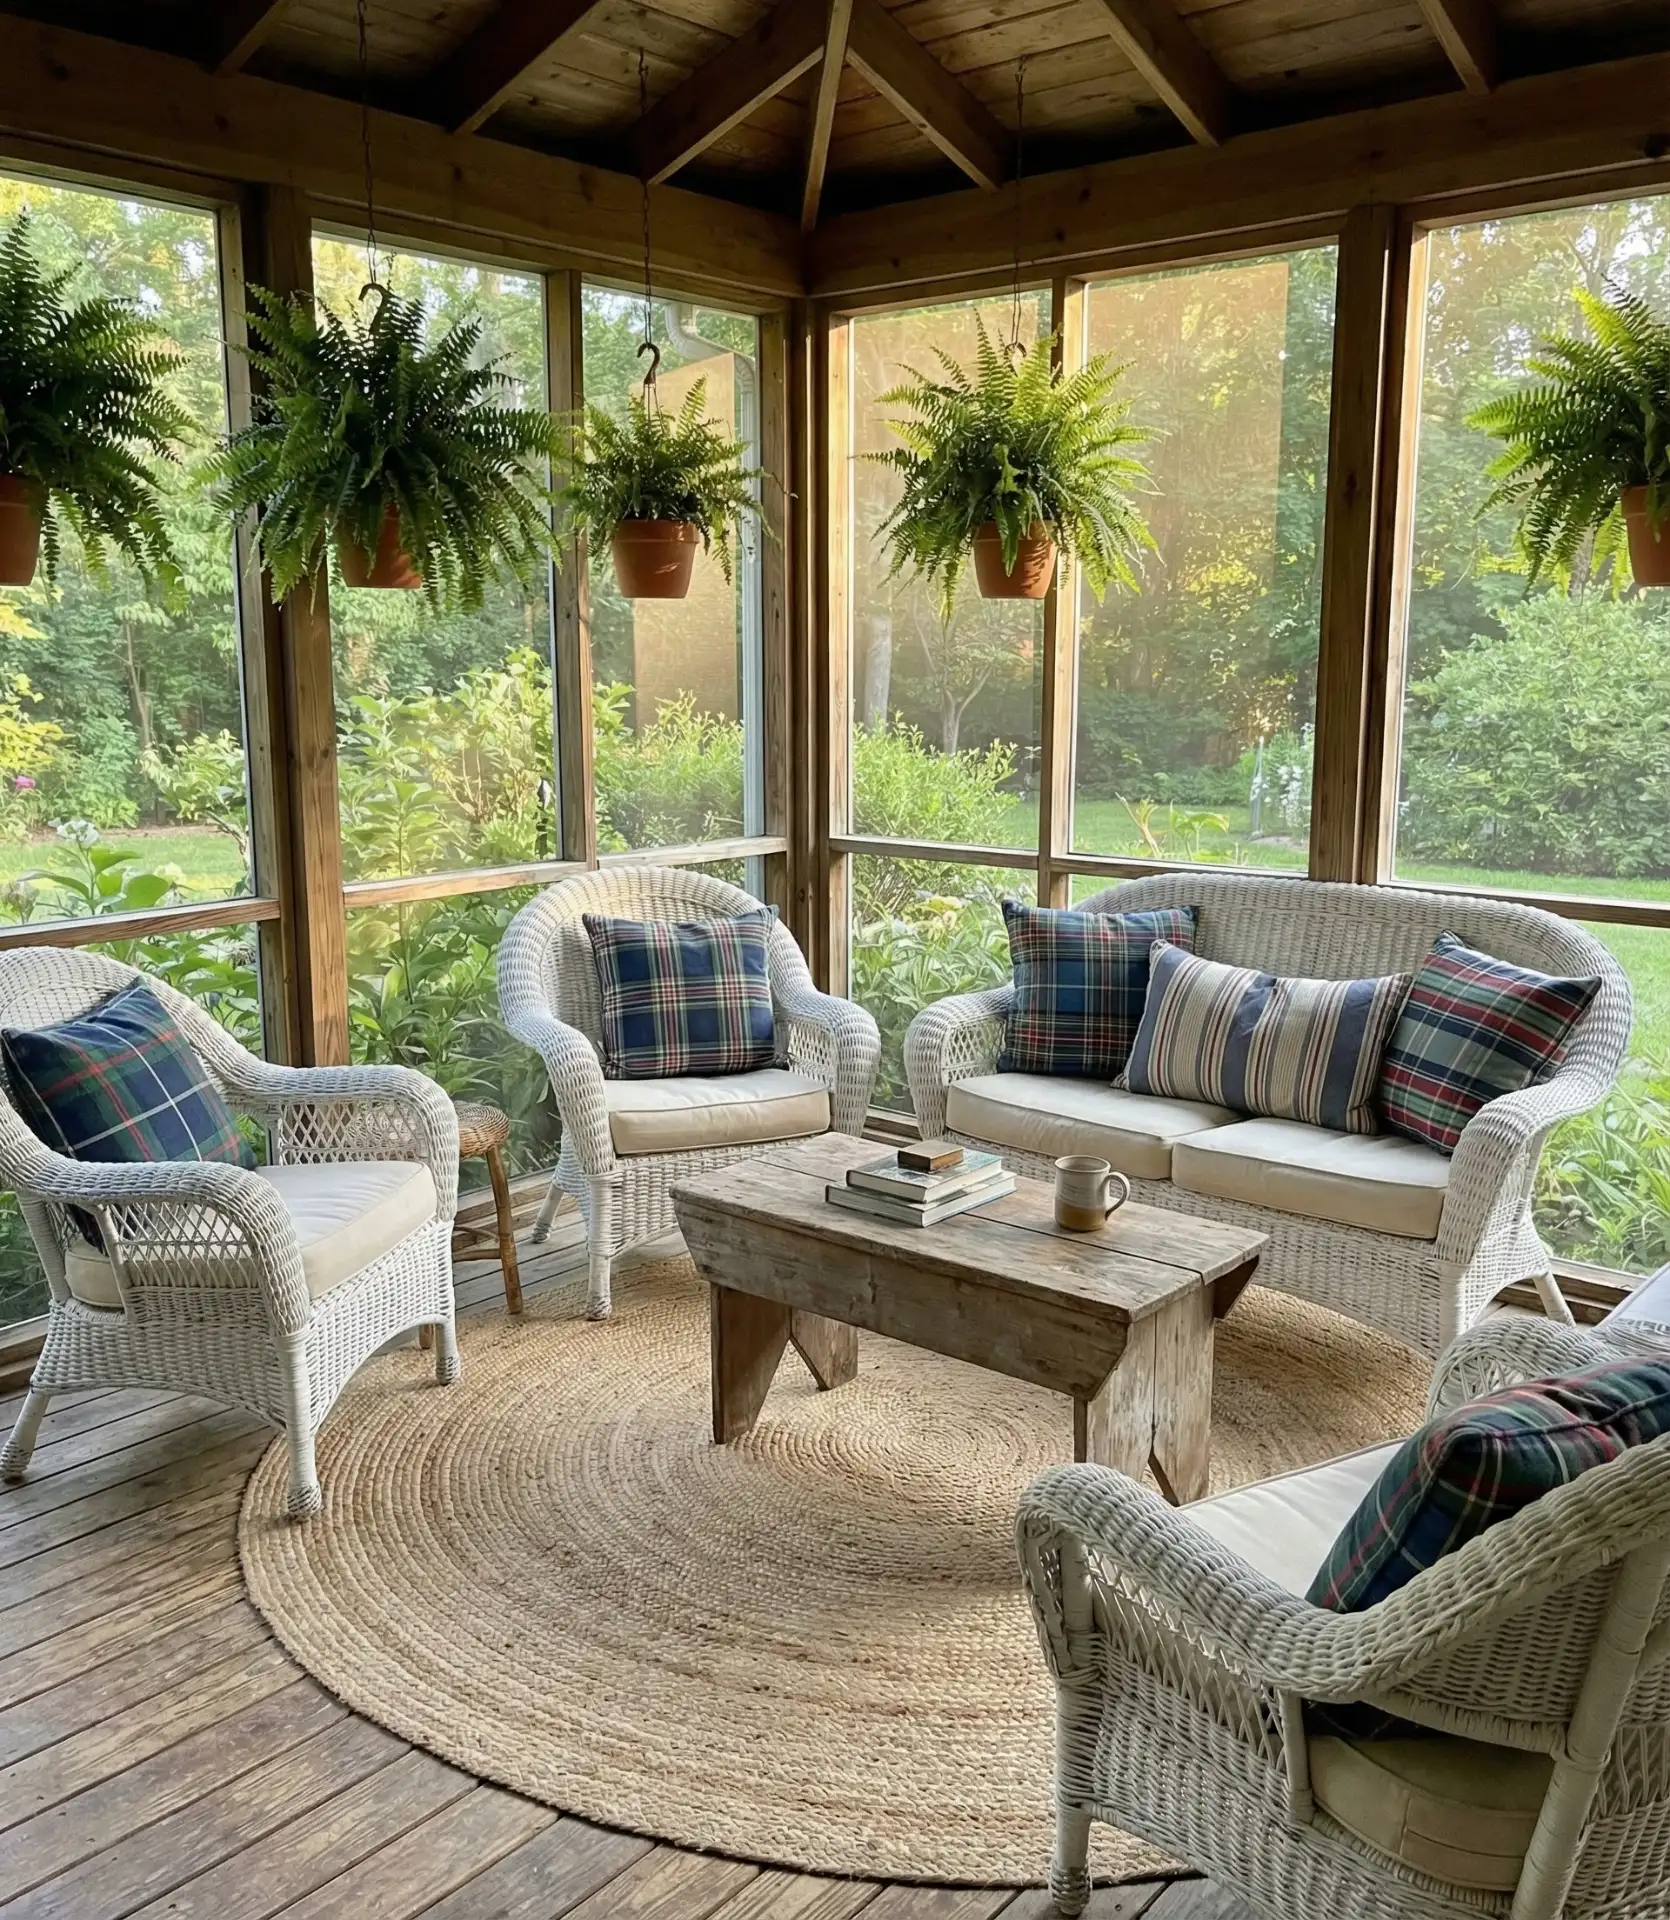
In the Midwest and Northeast, where three-season porches dominate, homeowners often swap lighter cotton textiles for heavier canvas or even indoor-grade fabrics during peak summer months, then store them away before winter. This regional adaptation allows the farmhouse aesthetic to remain practical year-round. Consider adding a vintage trunk or storage bench where you can keep extra pillows and throws—it serves double duty as both seating and a design element that reinforces the farmhouse theme.
2. Bistro Dining Setup for Intimate Meals
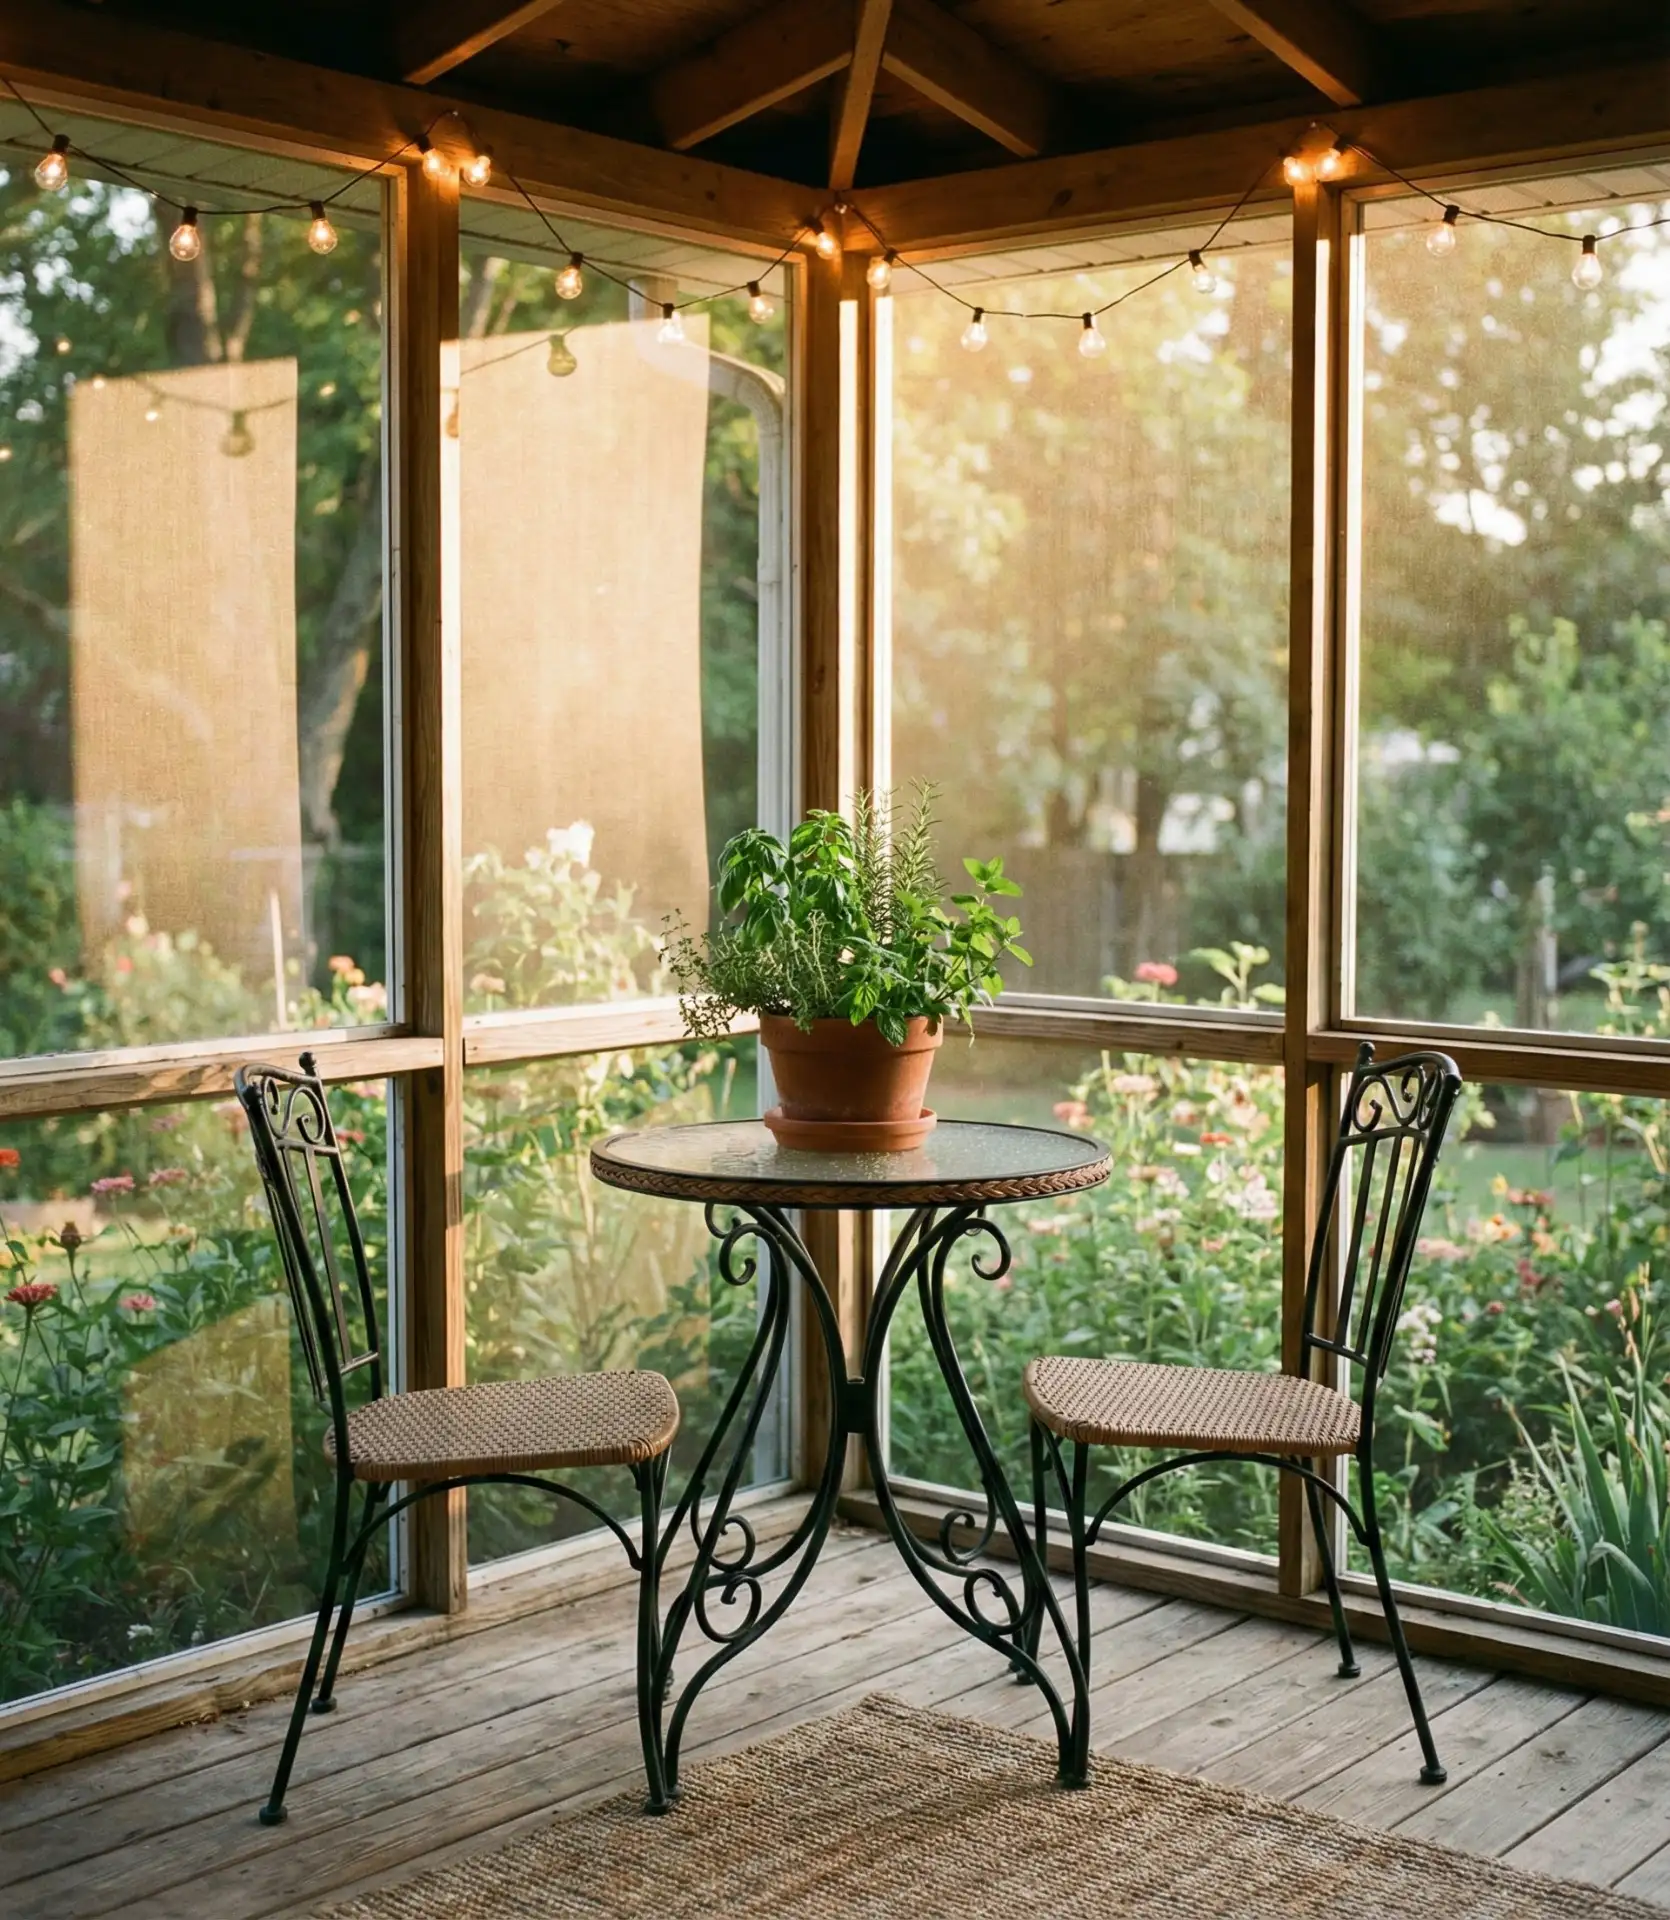
Create a charming breakfast nook or evening cocktail spot with a compact bistro table and two matching chairs positioned in the corner of your screened porch. This setup works exceptionally well for small or tiny porches where a full dining set would overwhelm the space. Choose a wrought iron or powder-coated steel table with a mosaic or marble top that can withstand temperature fluctuations and humidity. Add a small vase with fresh flowers or a potted herb like basil or rosemary to bring life to the surface without cluttering it.
Most homeowners underestimate how much they’ll actually use a dedicated dining spot on their porch. A bistro setup encourages spontaneous morning coffee dates and impromptu dinners, making it far more functional than a large table that only gets used during gatherings. Position the table near an outlet if possible—having quick access to a small speaker or string lights enhances the ambiance significantly. The compact footprint also leaves room for additional seating or a small side console.
3. Black Accent Walls for Modern Drama
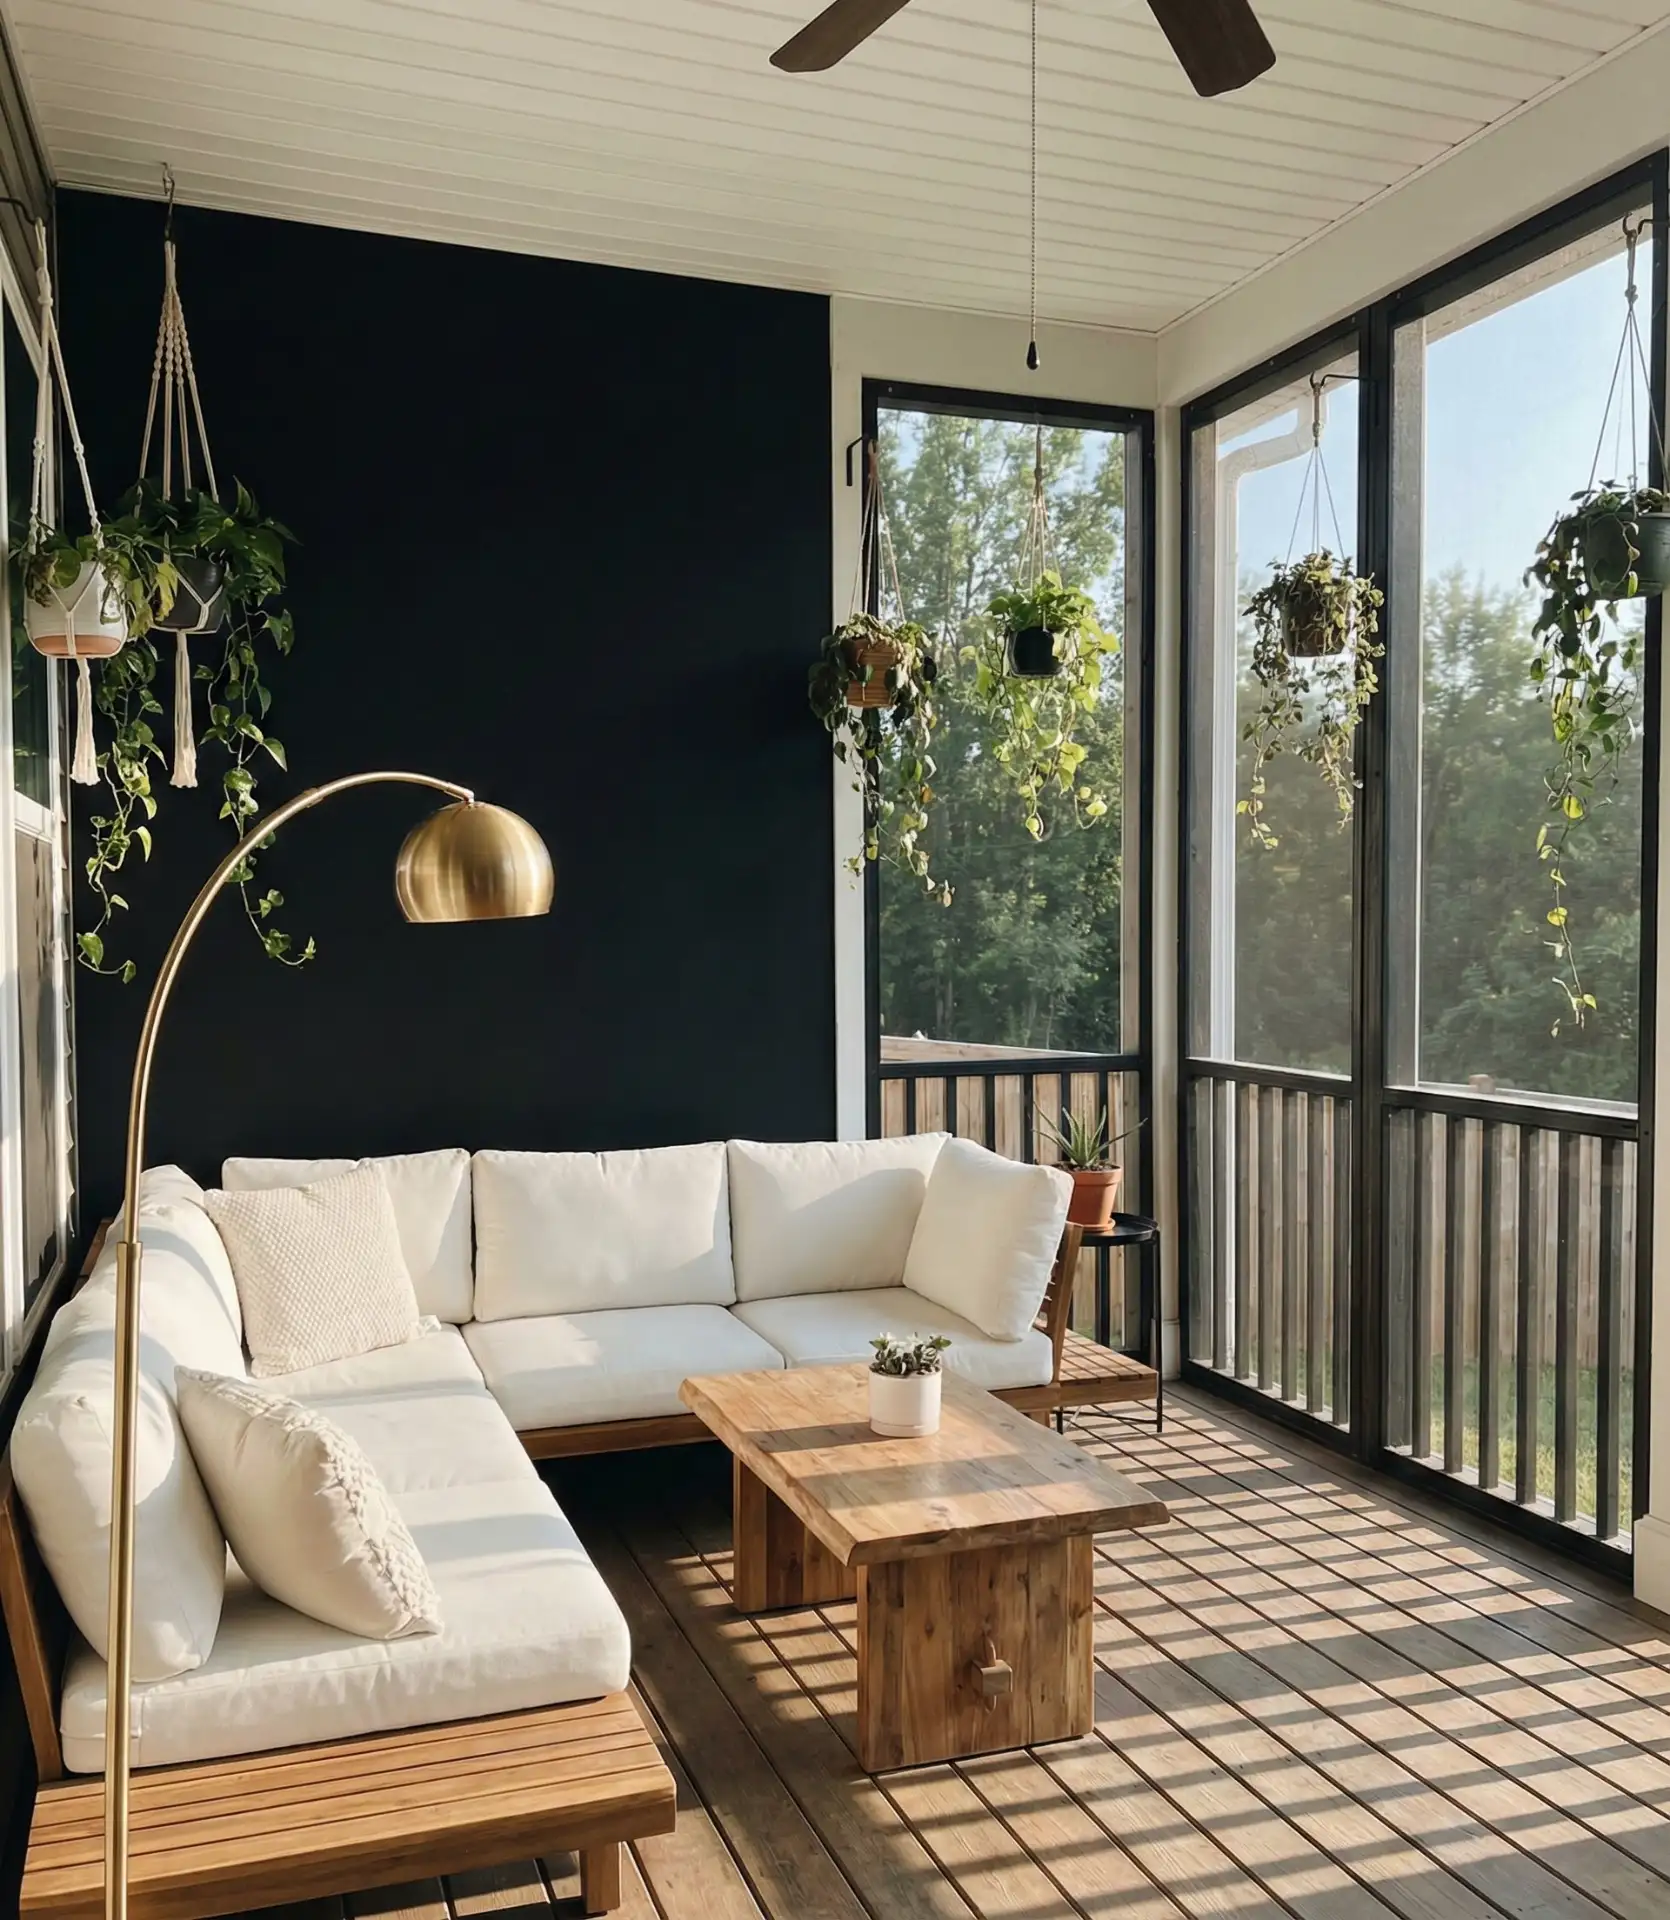
Choosing matte black for one wall of your screened porch is a dramatic choice that creates an unexpected backdrop where your furniture and plants will pop. This especially bold choice looks excellent for the wall behind a seating area or the back wall that guests see first, providing stunning contrast with natural wood tones, white wicker, or colorful cushions and making the area feel more cocooning and intimate. Pair this black wall with many plants and well-lit warm lights to keep it feeling cozy rather than heavy. 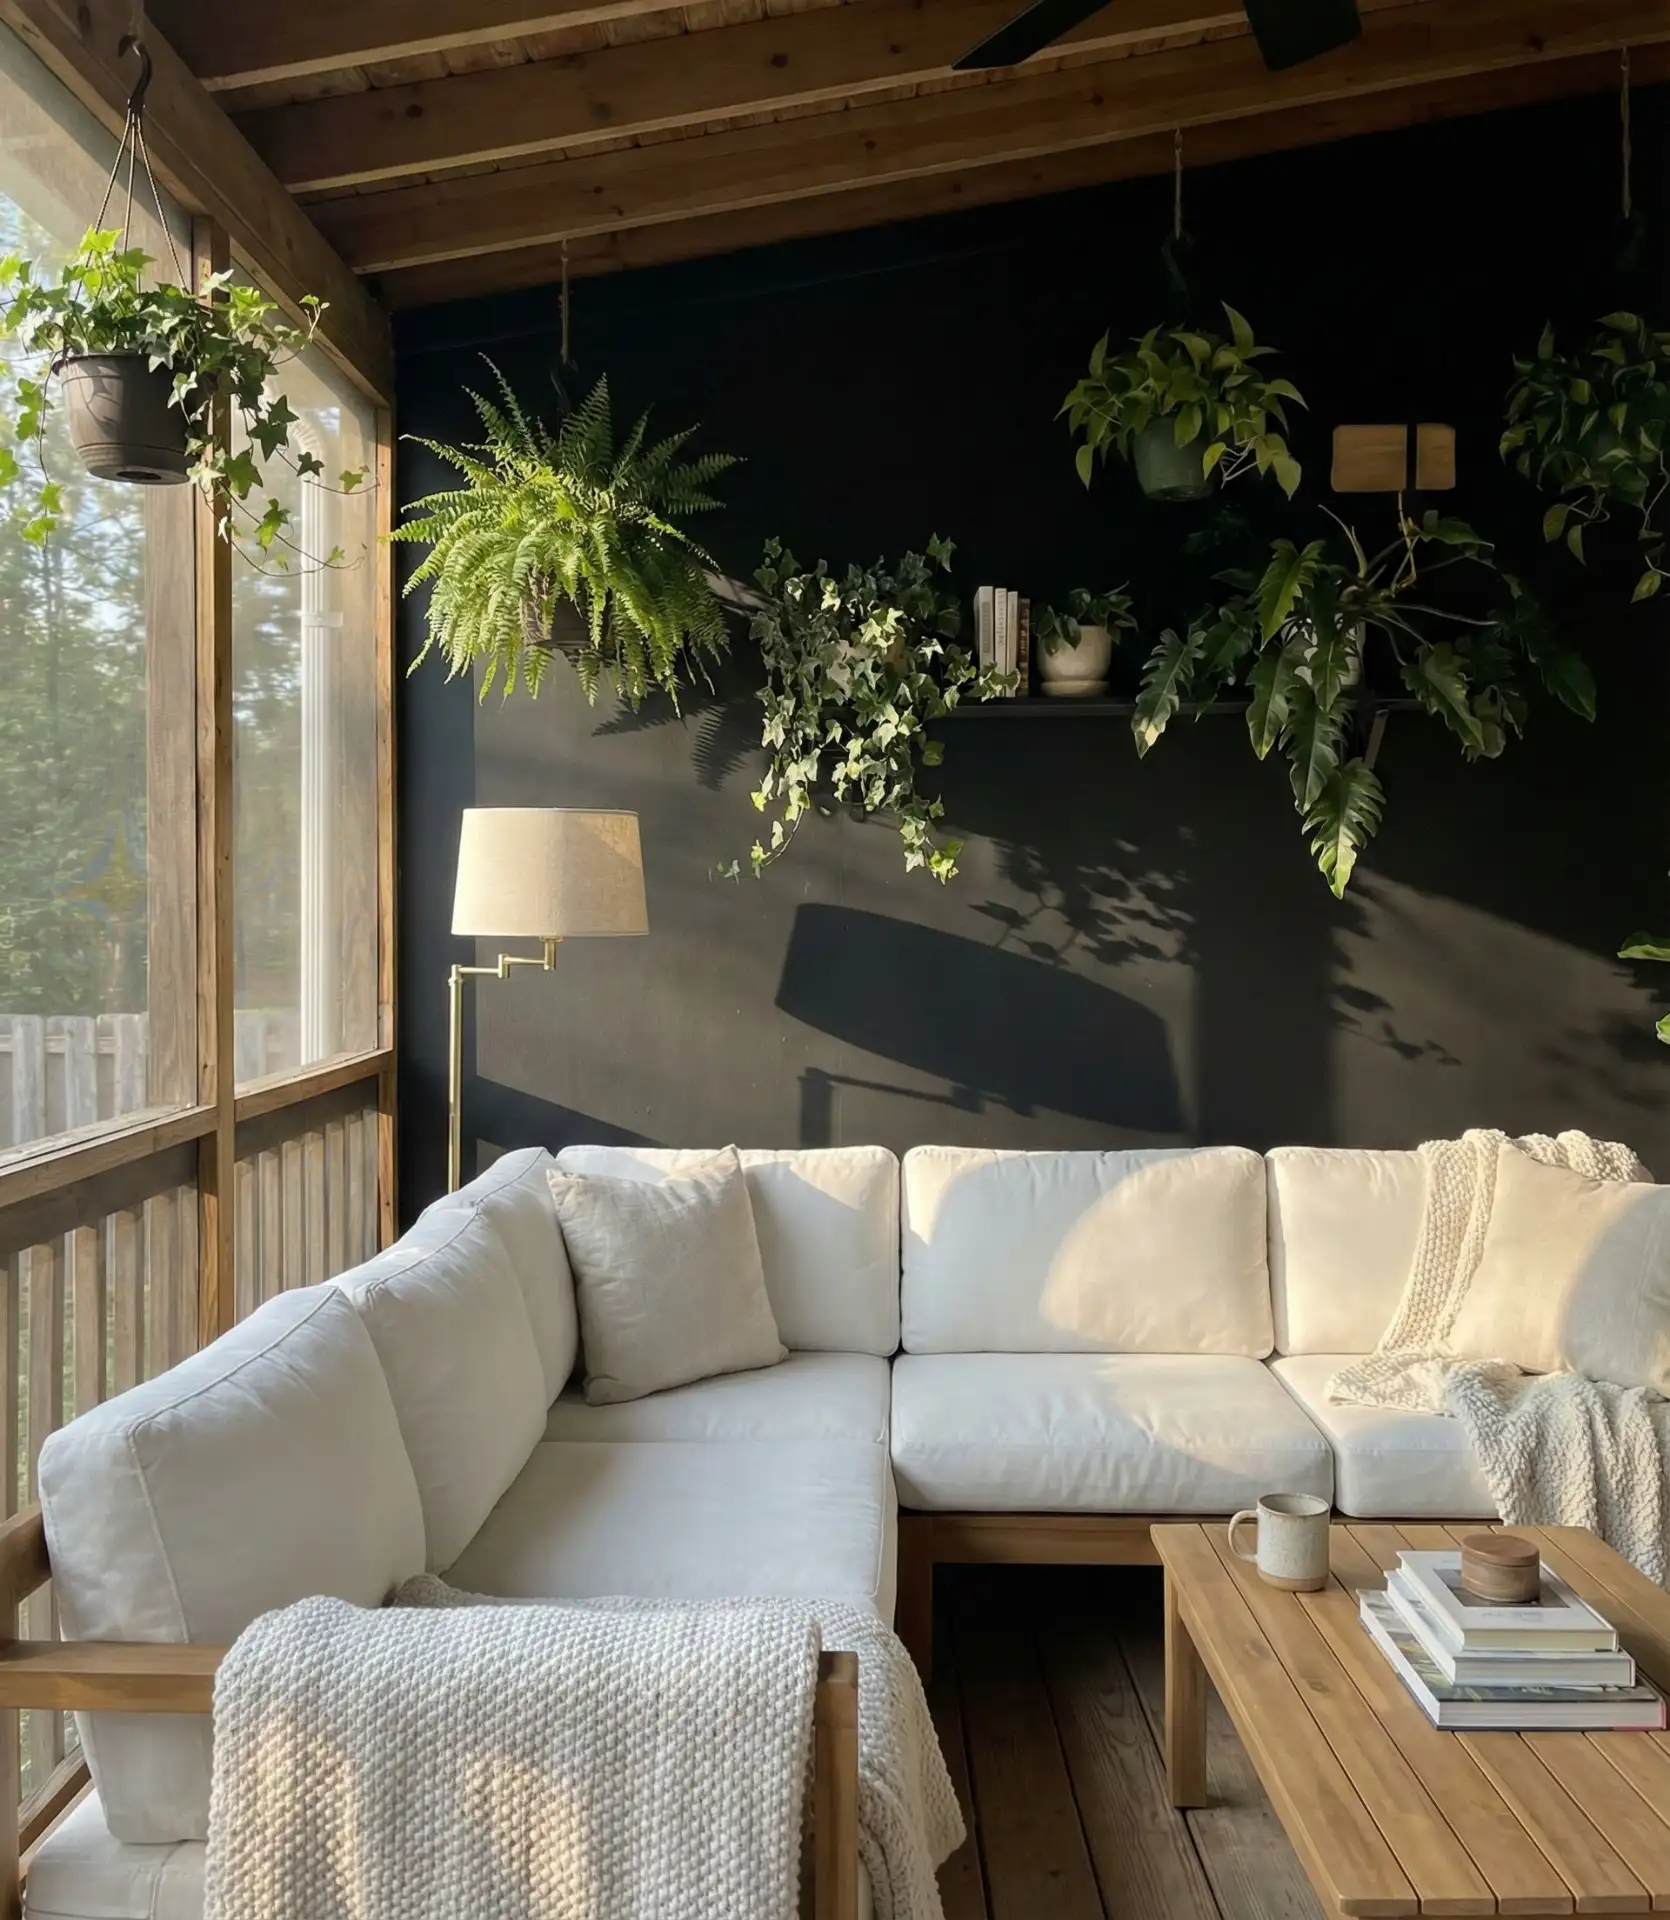
Ideally this style works best with porches facing south or east, as they tend to receive better sunlight. This technique allows the black wall to absorb the light and play with it throughout the room instead of feeling heavy.
A black accent wall for these types of porches will look more cave-like than cozy, especially if it faces north or is in many shadowed regions. Before proceeding with painting, try out the idea with black poster board silhouettes standing against the wall for a couple of days at varying times to assess the effect on the mood and light levels.
4. Hanging Daybed for Ultimate Relaxation
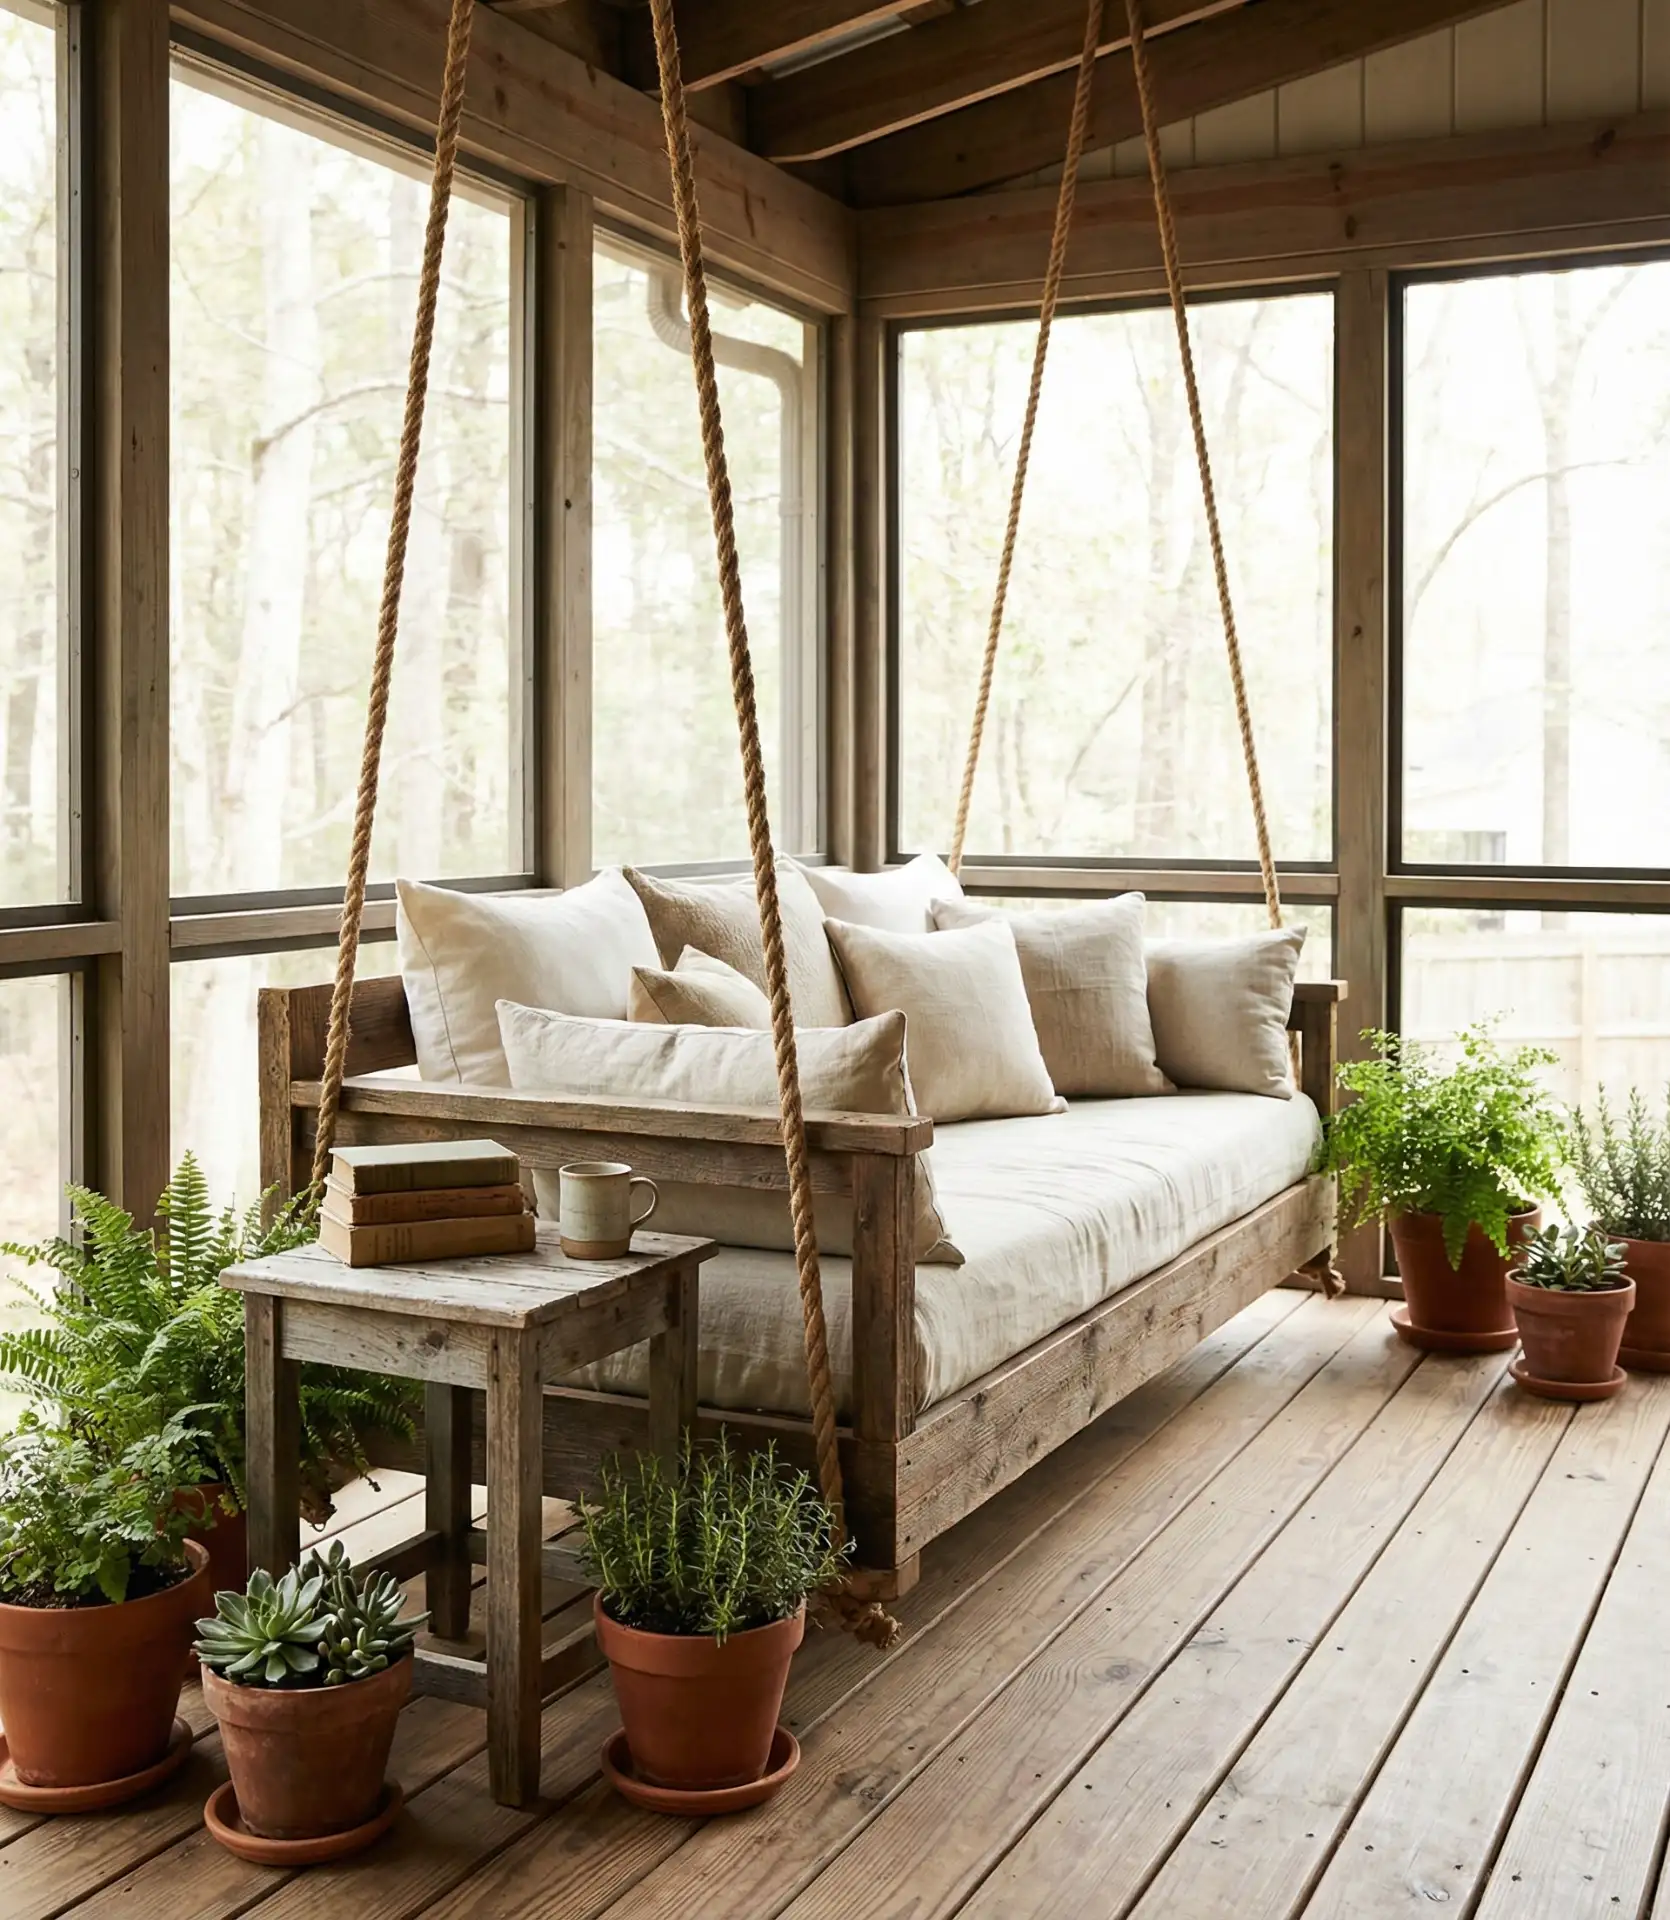
Place an oversized porch swing or a suspended daybed with enough room to lounge fully, attracting people to the space and inviting them to curl up with a favorite book. Unlike normal porch swings, these oversized beds almost always exceed 60 inches in width and contain thick seat cushions, covering any novelty usage and fully converting the swing into usable furniture. The space is made more peaceful by the gentle sway of the swing, perfect for a Sunday nap or during conversations with friends in the evening. Choose powder-coated chains or marine-grade ropes for a durable and weather-resistant product.
Confirm with an engineer or a contractor before putting the bed in place that the ceiling structure of the porch can carry the weight. Daybeds plus their occupants usually weigh in at over 400 lbs.
Many older houses were built with ceiling joists that were not designed for this type of load, and retrofitting with appropriate support beams is typical. If you do not feel confident in your carpentry abilities, budgeting around $200 to $500 for professional installation is typical. The investment is greatly appreciated because it allows for increased usage of the porch; this increase is so significant that homeowners report they spend more time on their porches once they can lounge comfortably.
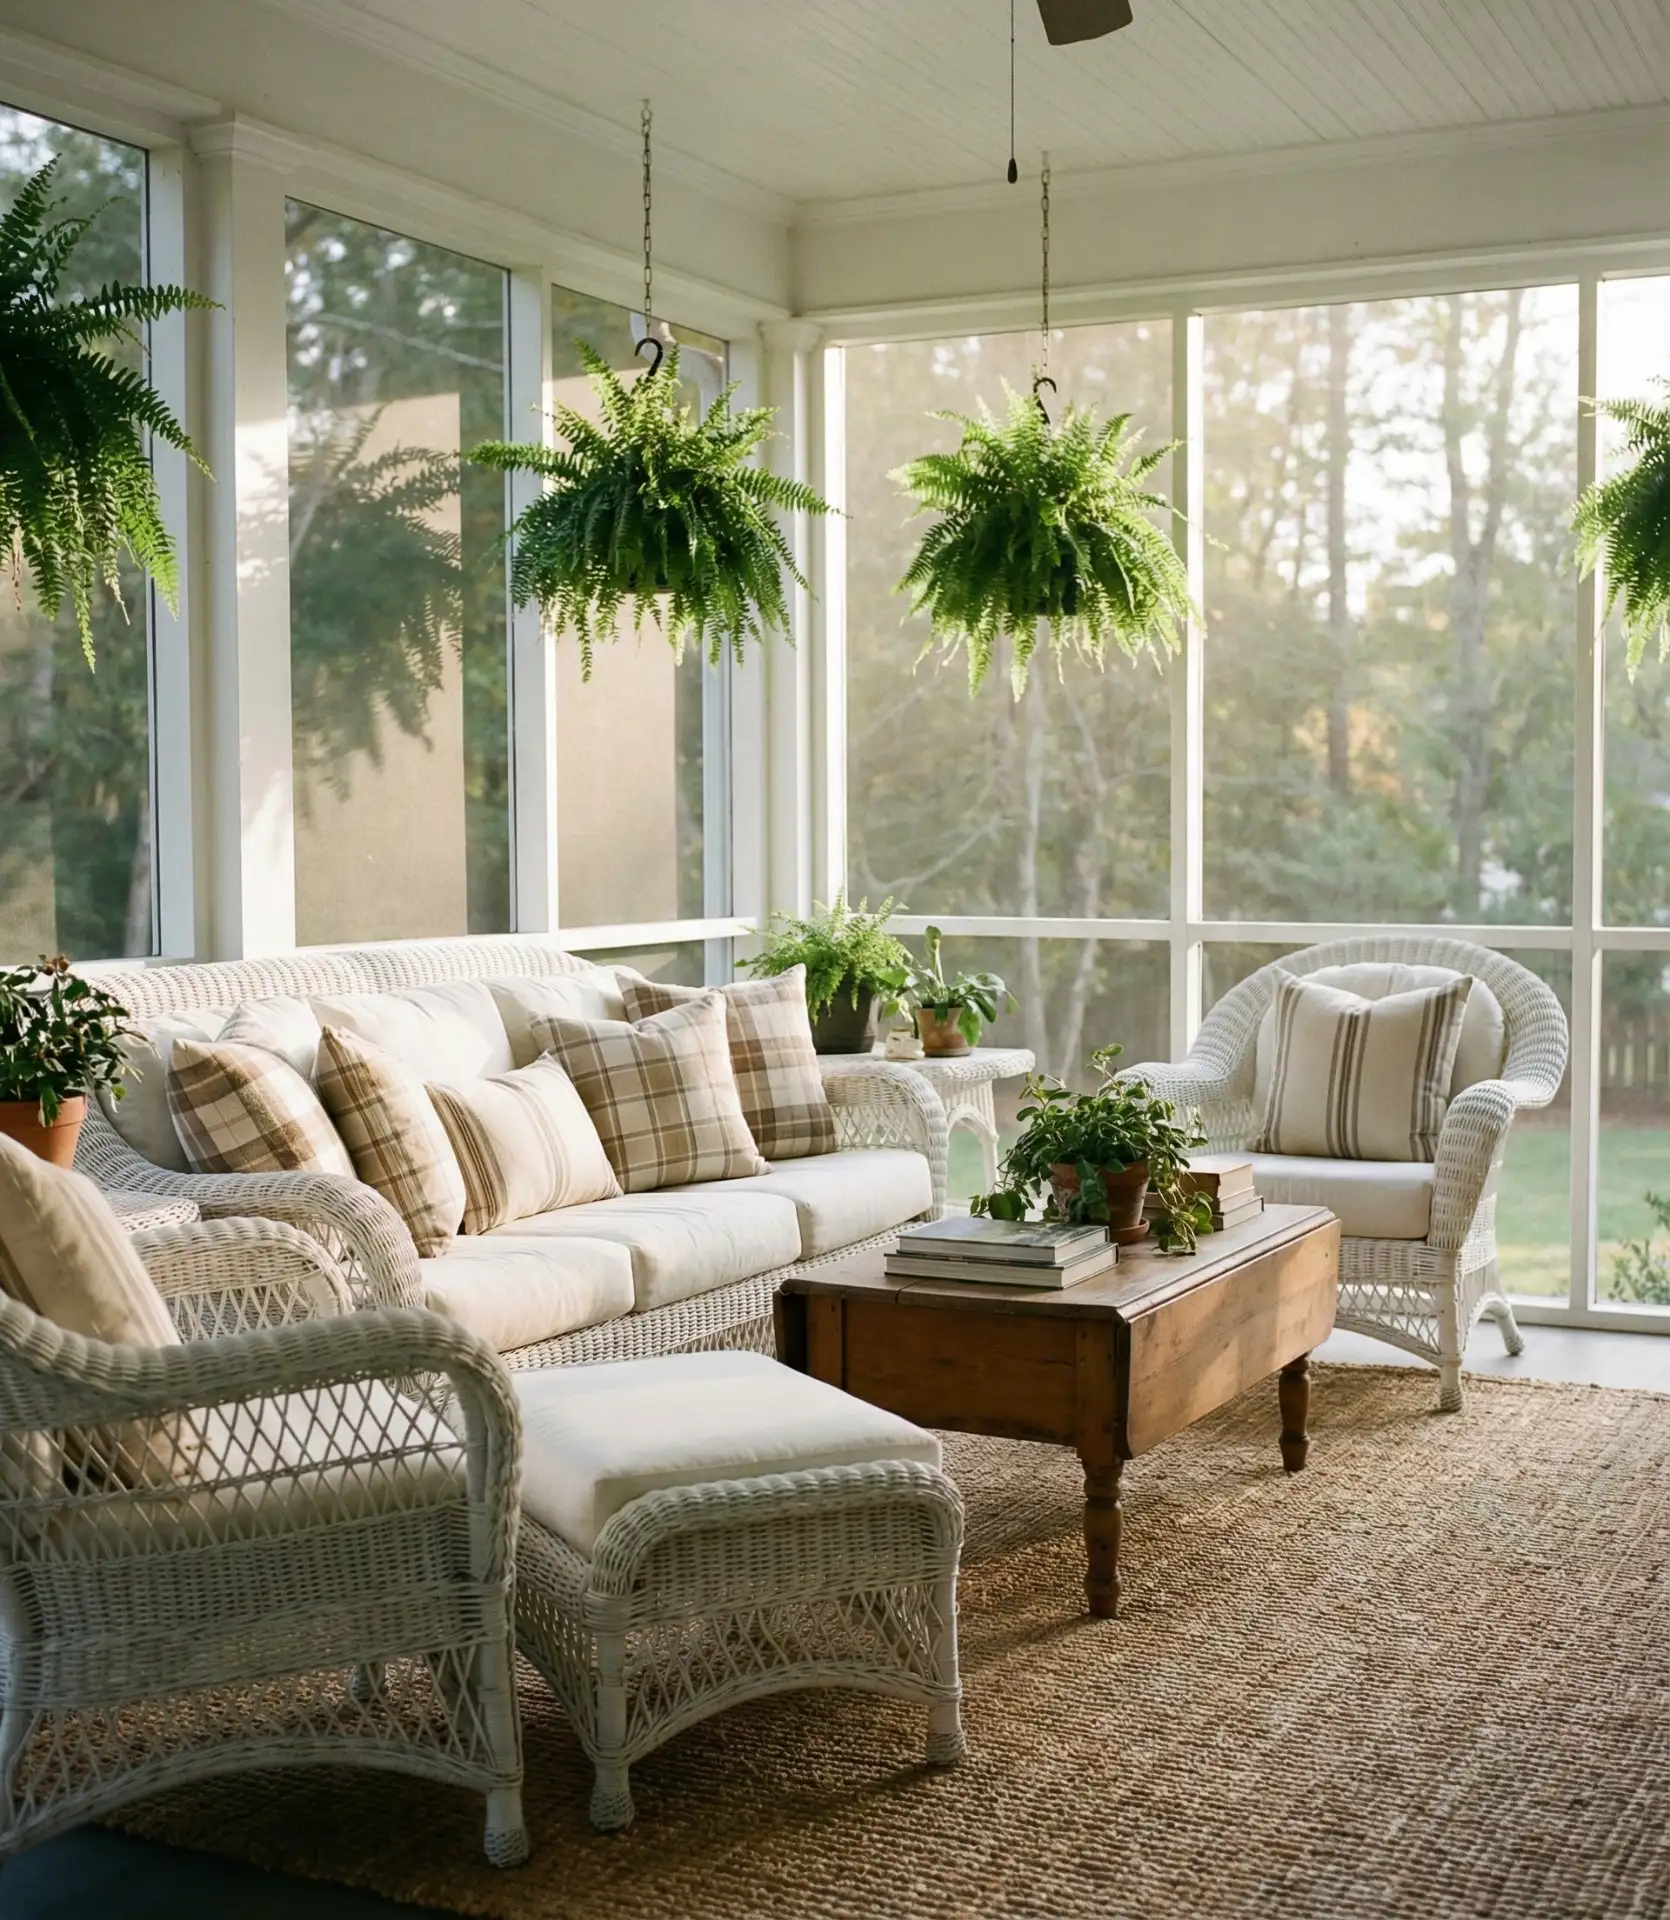
5. Botanical Gallery Wall with Green Accents
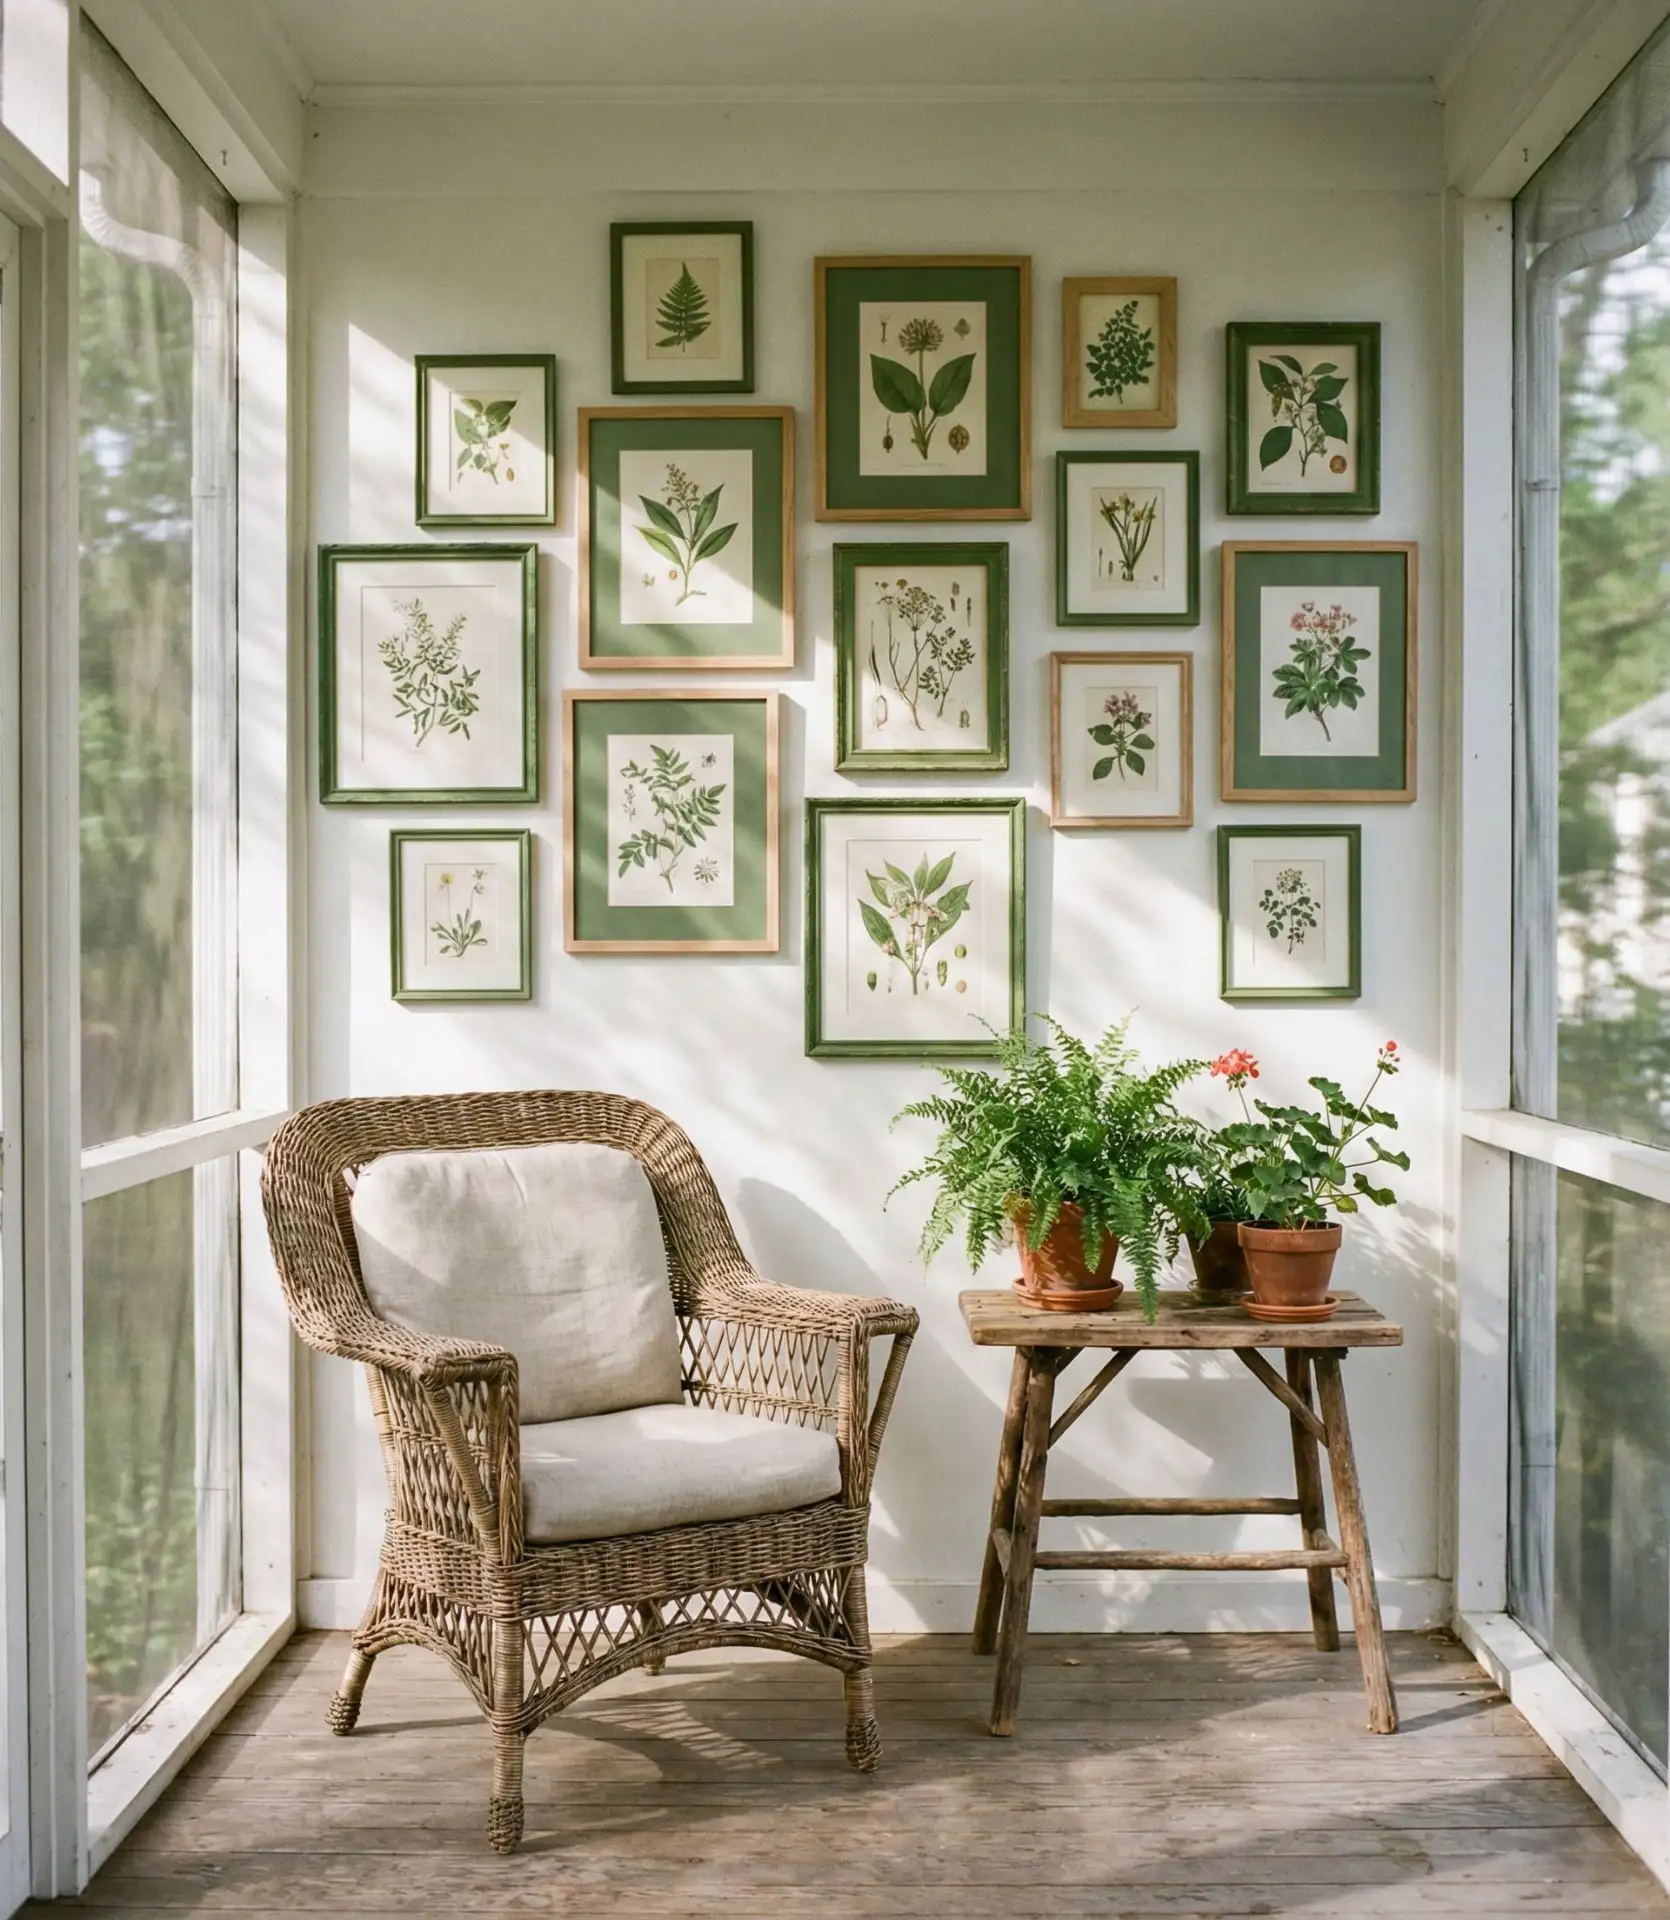
Strategically arrange vintage plant illustrations, pressed ferns, or framed botanical prints to create a gallery wall, making sure to incorporate green mats or frames so they all get tied together. This brings a touch of controlled nature and artistry to the interior of the home and works beautifully with the outside views beyond the screens. Use a mix of framed sizes and orientations—don’t be afraid to combine 8x10s with 11x14s and a couple of 16x20s—to create an intriguing composition and not the dignified appearance of matching frames. The green accents also elegantly break up the wall, complement the interior foliage visible through the screens, and provide a collected-over-time feeling that is more personal than staged.
My neighbor spent months collecting vintage botanical illustrations, and when he created a gallery wall, it became the conversation starter of every porch collection.
Over time, the collection of items acquired a storyline of its very own, further convincing the installers of the originality of the decor arrangement, contrary to the purchased piece arrangement from a home decor store at one time. Should you incur a budget, consider botanical prints from museum archives, many of which offer historical collections at no cost.
6. Kid-Friendly Activity Zone
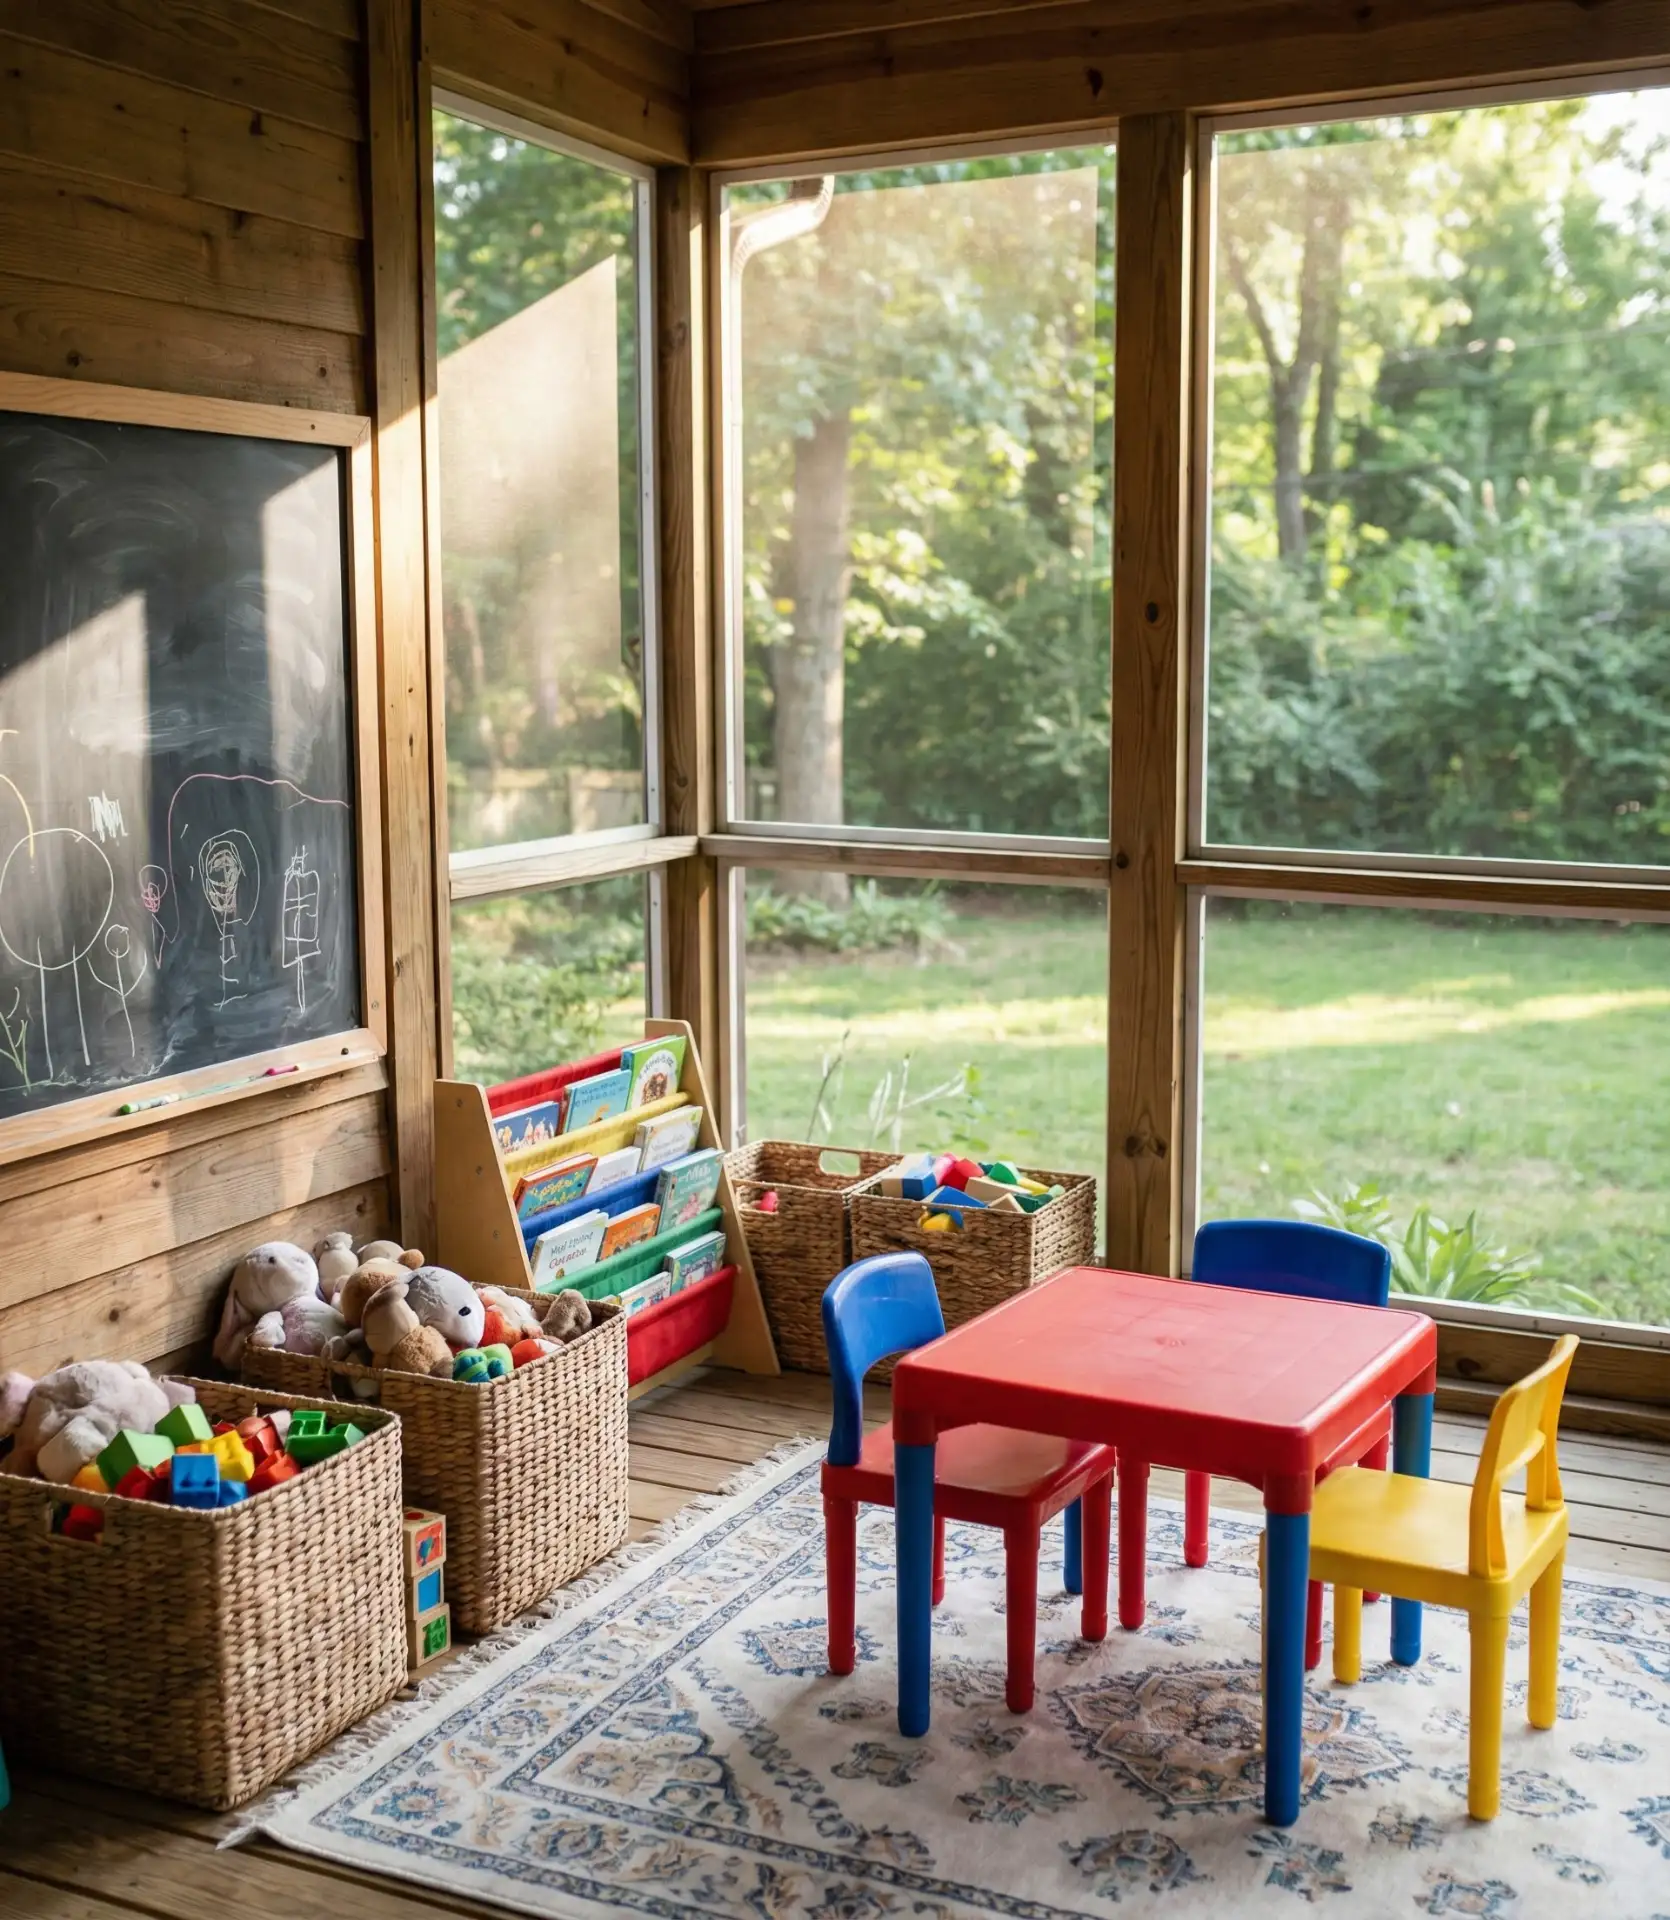
Dedicate one corner of your screened porch as a protected play area where kids can enjoy outdoor time without the bugs, sun exposure, or constant supervision required in an open yard. Install low storage cubes or baskets filled with outdoor toys, sidewalk chalk, bubbles, and art supplies that can withstand humidity. Add a small child-sized table with washable chairs where they can color, do puzzles, or enjoy snacks while you relax nearby. A washable outdoor rug defines the zone and makes cleanup easier when inevitable spills happen. This setup extends your usable living space while giving children a sense of ownership over their special area. 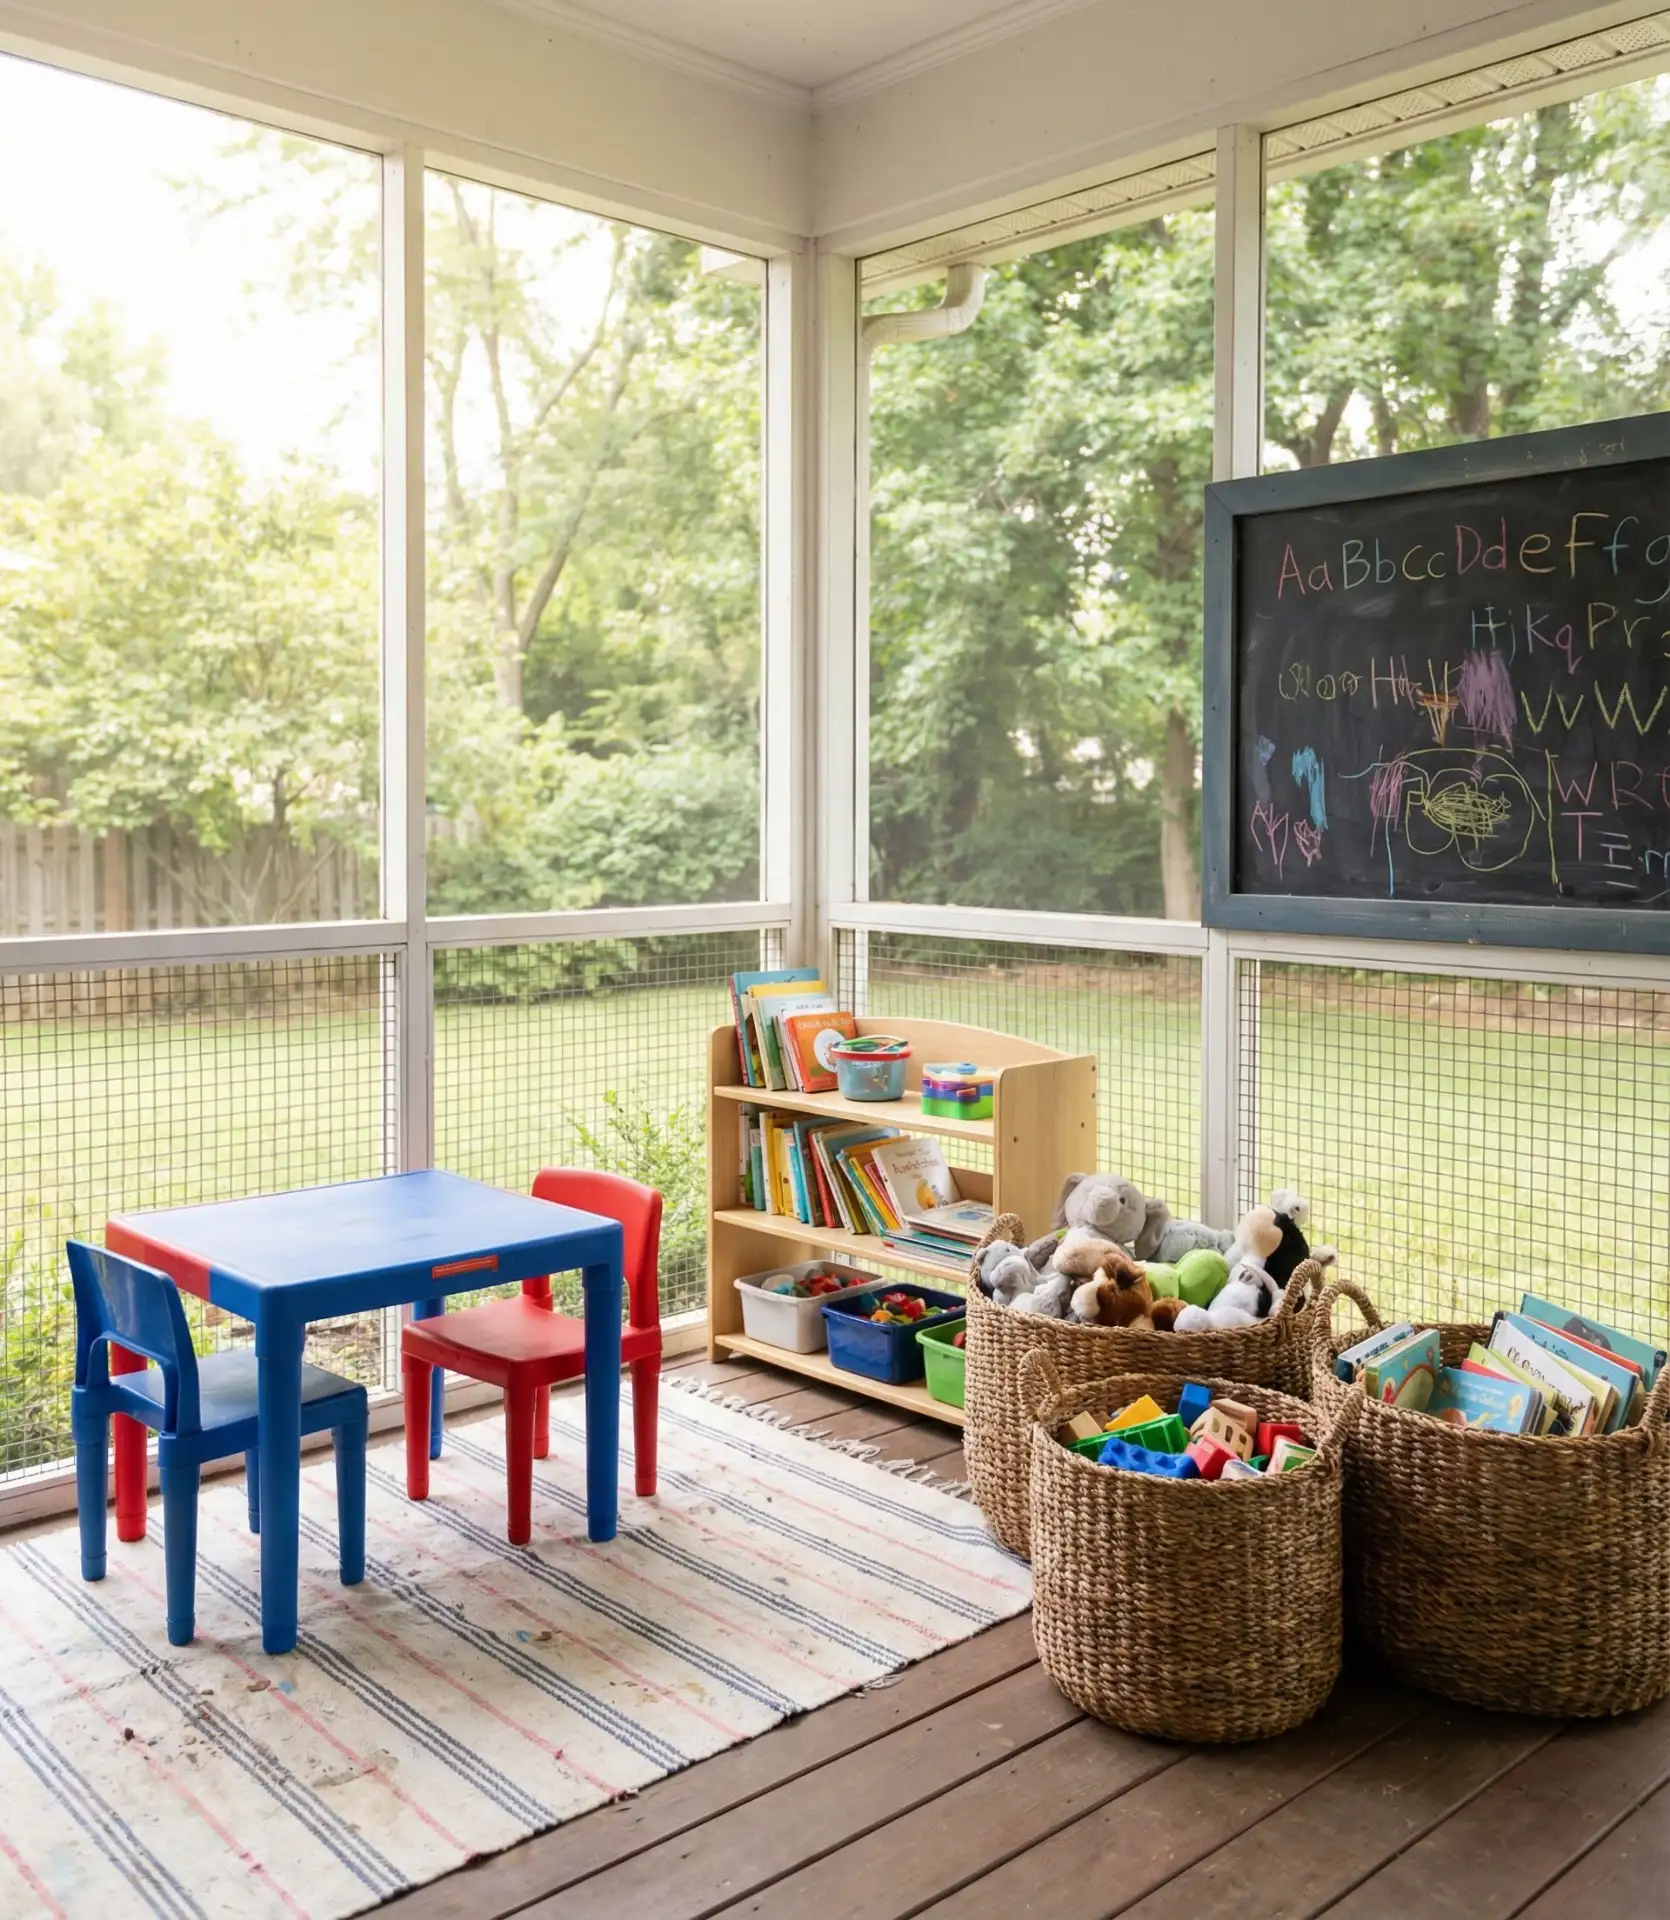
Parents consistently cite screened porches as their most valuable home feature during summer months, offering a safe middle ground between indoor and outdoor play. The contained environment means kids can play independently while you’re cooking dinner or working nearby, without the constant worry of them wandering into the street or being bothered by insects. Place the activity zone in a location where it is visible from either your kitchen window or your main seating area. As children grow, this space easily transitions into a homework station or teen hangout spot.
7. Cottage-Style Built-In Bench Seating
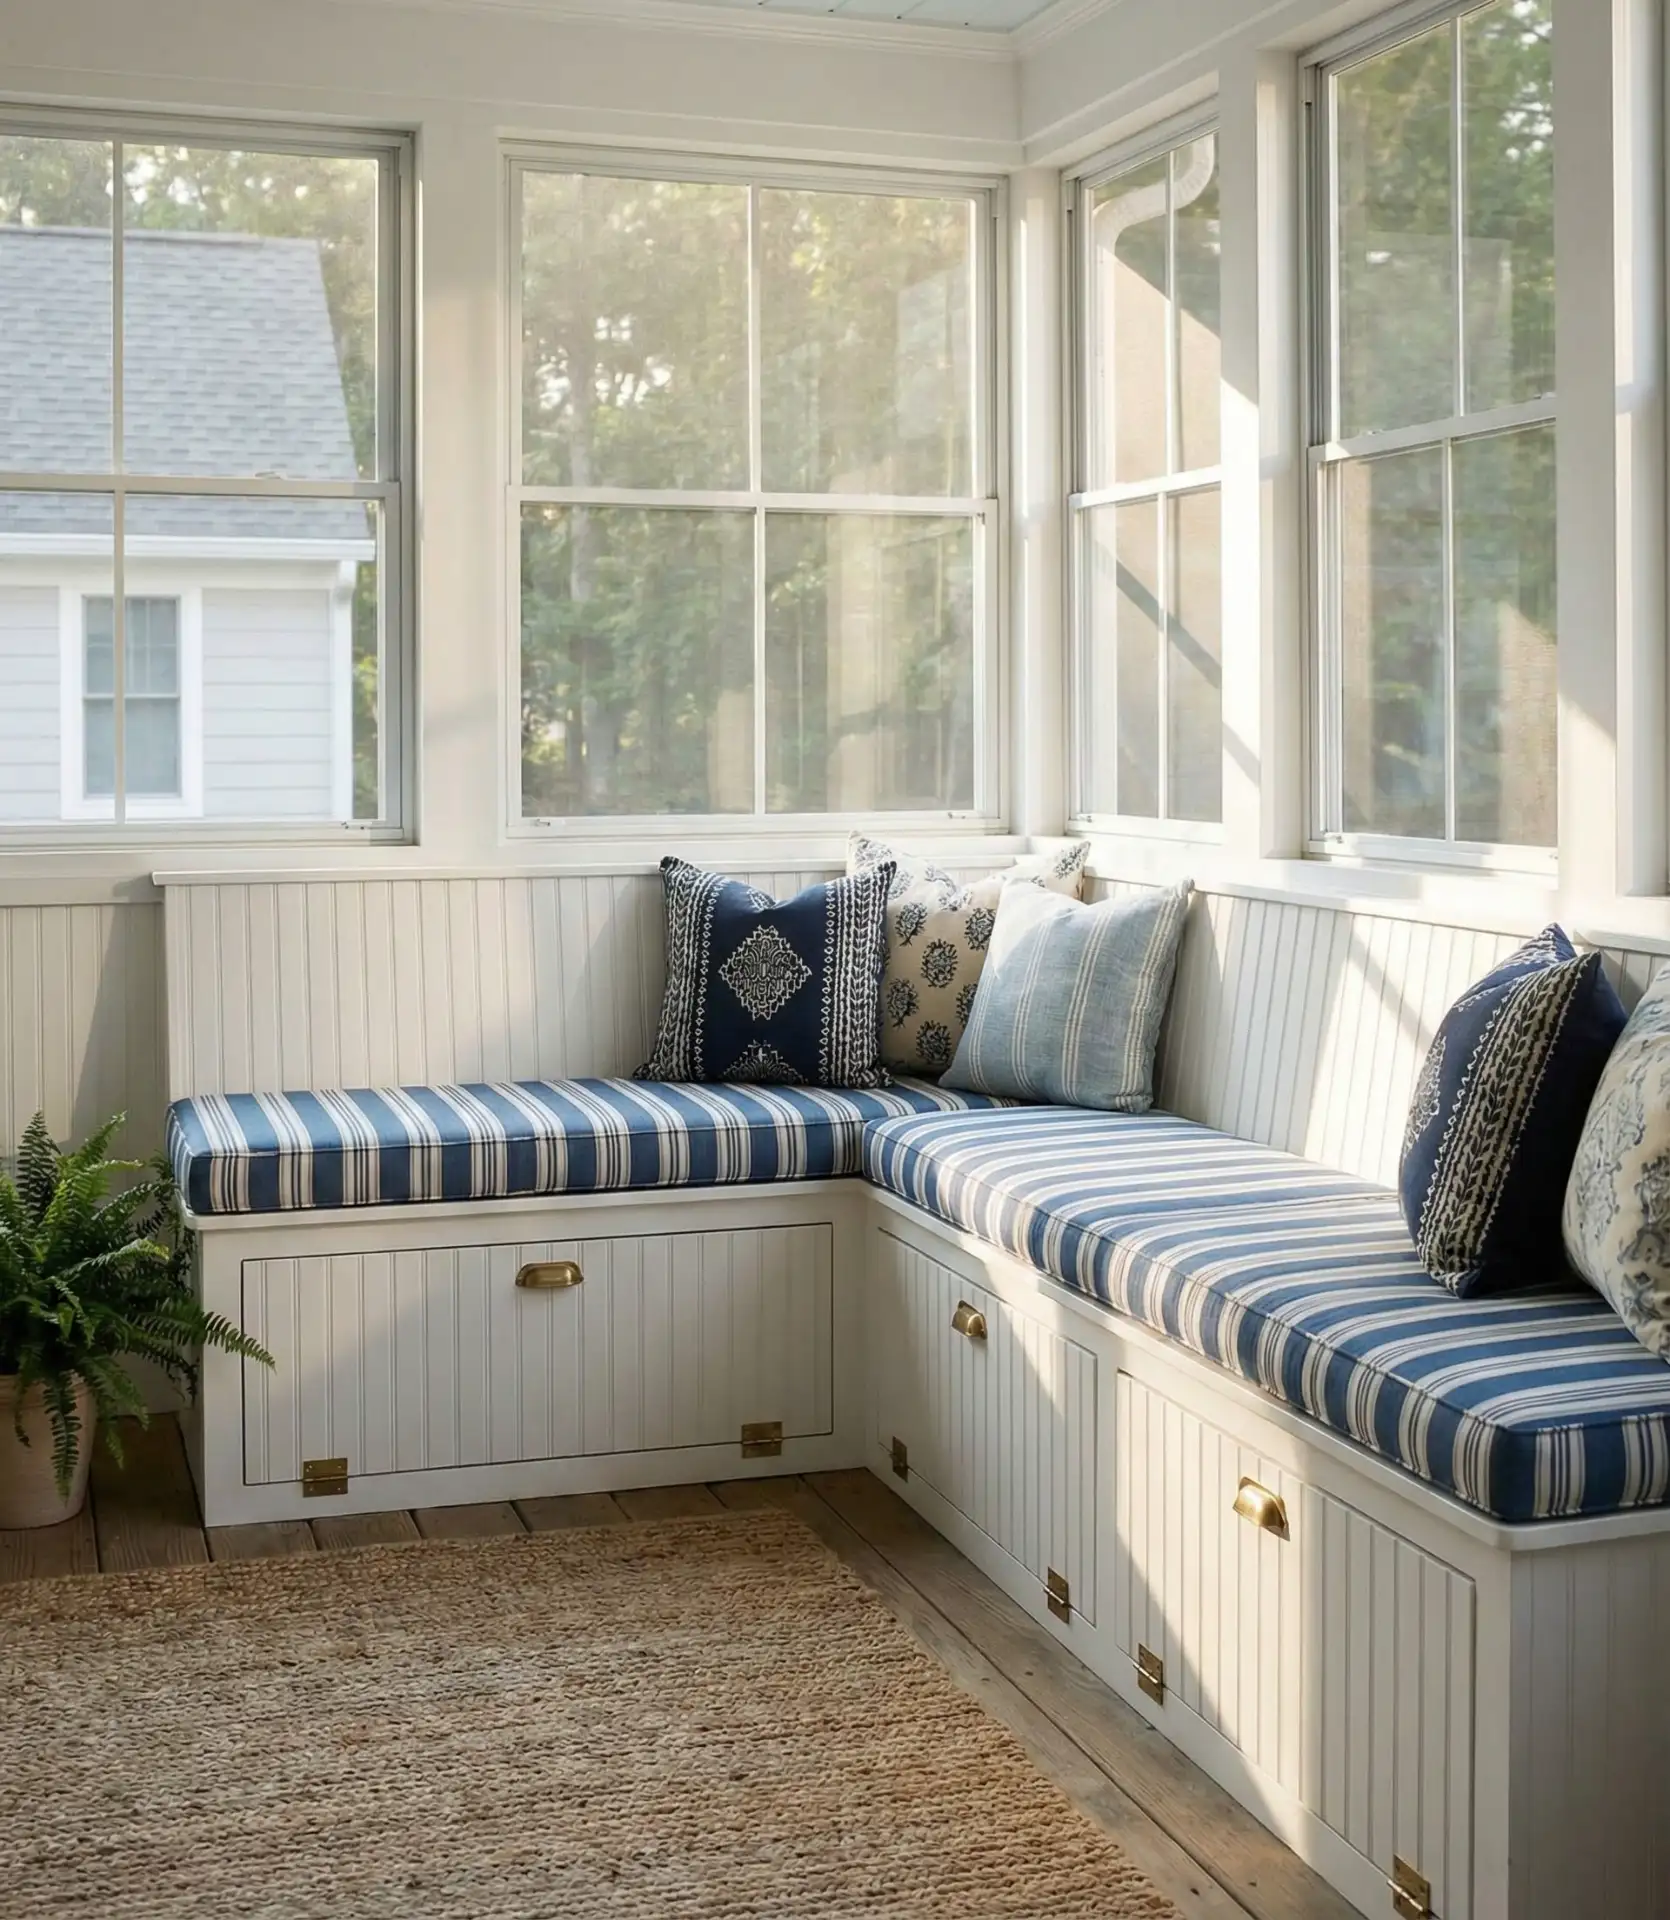
Design built-in bench seating along one or more walls of your porch to maximize seating capacity while maintaining an airy, uncluttered feel characteristic of cottage style. Paint the benches in soft white or pale blue with beadboard backing for classic coastal charm, then top them with long cushions in durable outdoor fabric. The storage space beneath the benches provides hidden spots for cushion storage during off-season, pool toys, gardening supplies, or extra entertaining pieces. This DIY-friendly project can be accomplished over a weekend with basic carpentry skills and pre-cut lumber, making it an accessible upgrade for budget-conscious homeowners. 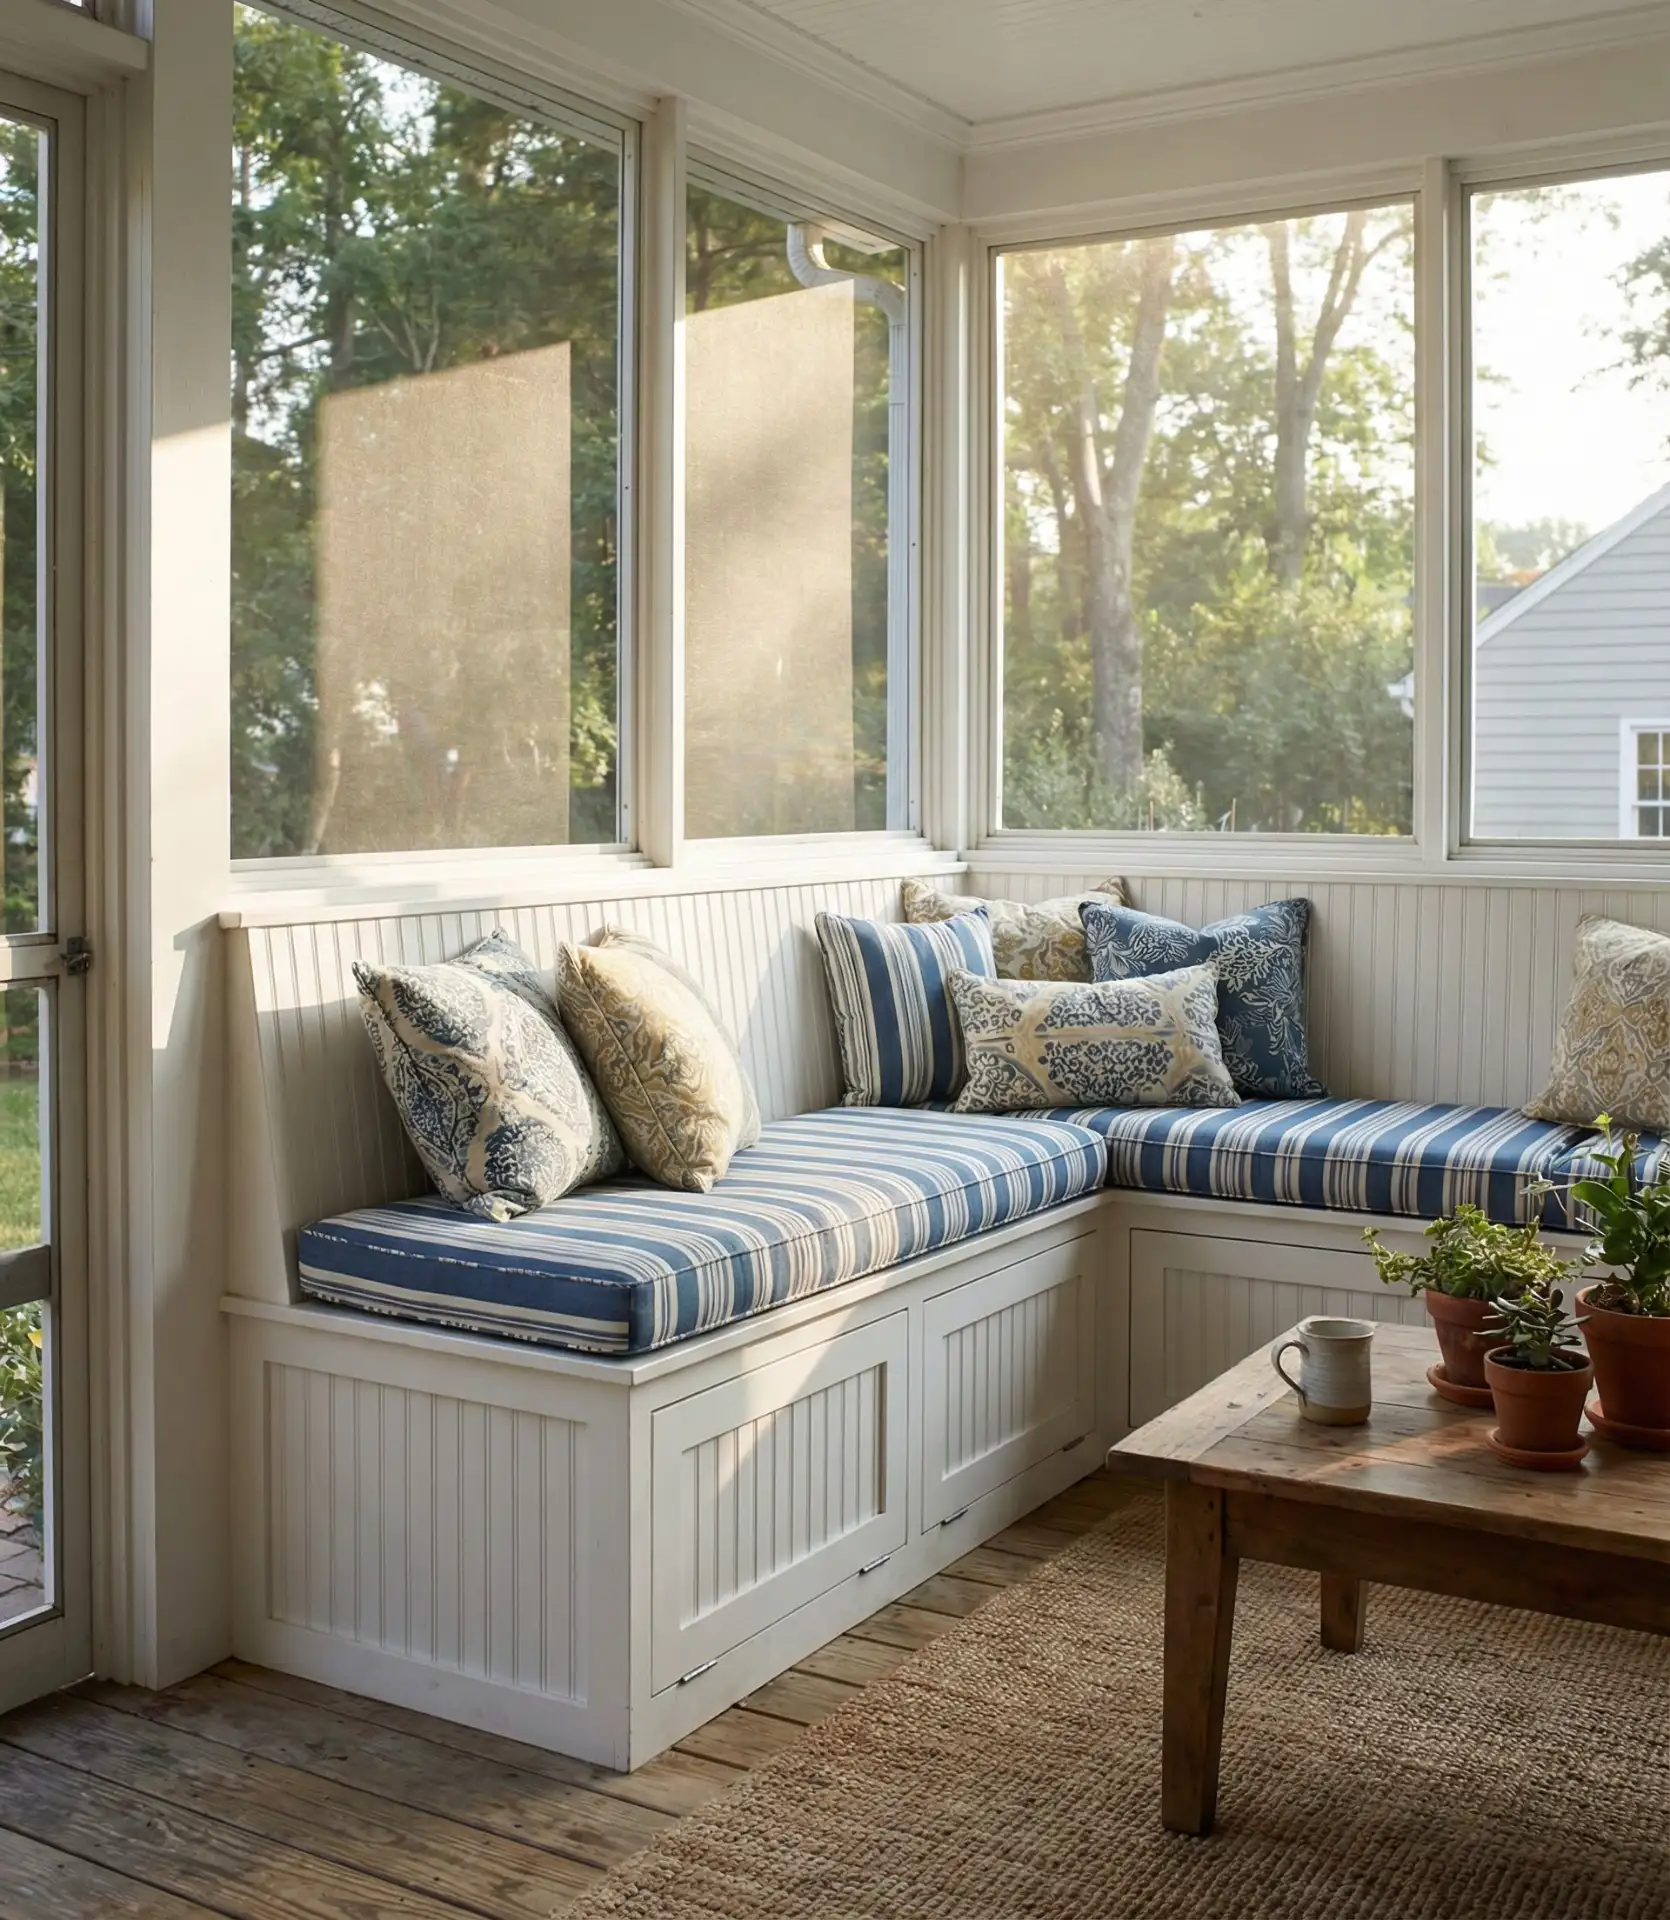
A common mistake is to add a built-in bench that is too deep. To avoid requiring an excessively thick cushion and to ensure a more comfortable experience, a bench depth of 16 to 18 inches is ideal. If the bench is deeper than 18 inches, it becomes uncomfortable to sit on, resulting in a waste of space. If hiring a carpenter, expect an investment of $1,500–3,000 for professionally built-in benches. DIY materials, on the other hand, typically cost $300-700. These built-in benches are a great investment, as they add custom detailing, feel purposeful, & go beyond typical prefab furniture.
8. Boho Layered Rug Combination
Channel boho style by layering two or three outdoor rugs of different sizes, patterns, and textures to create a collected, eclectic foundation for your porch furniture. Start with a large neutral jute or sisal rug as the base layer, then add a vintage-inspired Persian or Moroccan-style rug on top, and finish with a small accent rug or runner in a complementary pattern. This technique adds warmth and personality while defining different functional zones within an open porch layout. The layered approach also offers practical benefits—it’s easier to clean individual rugs and swap them out seasonally without replacing an entire large rug. 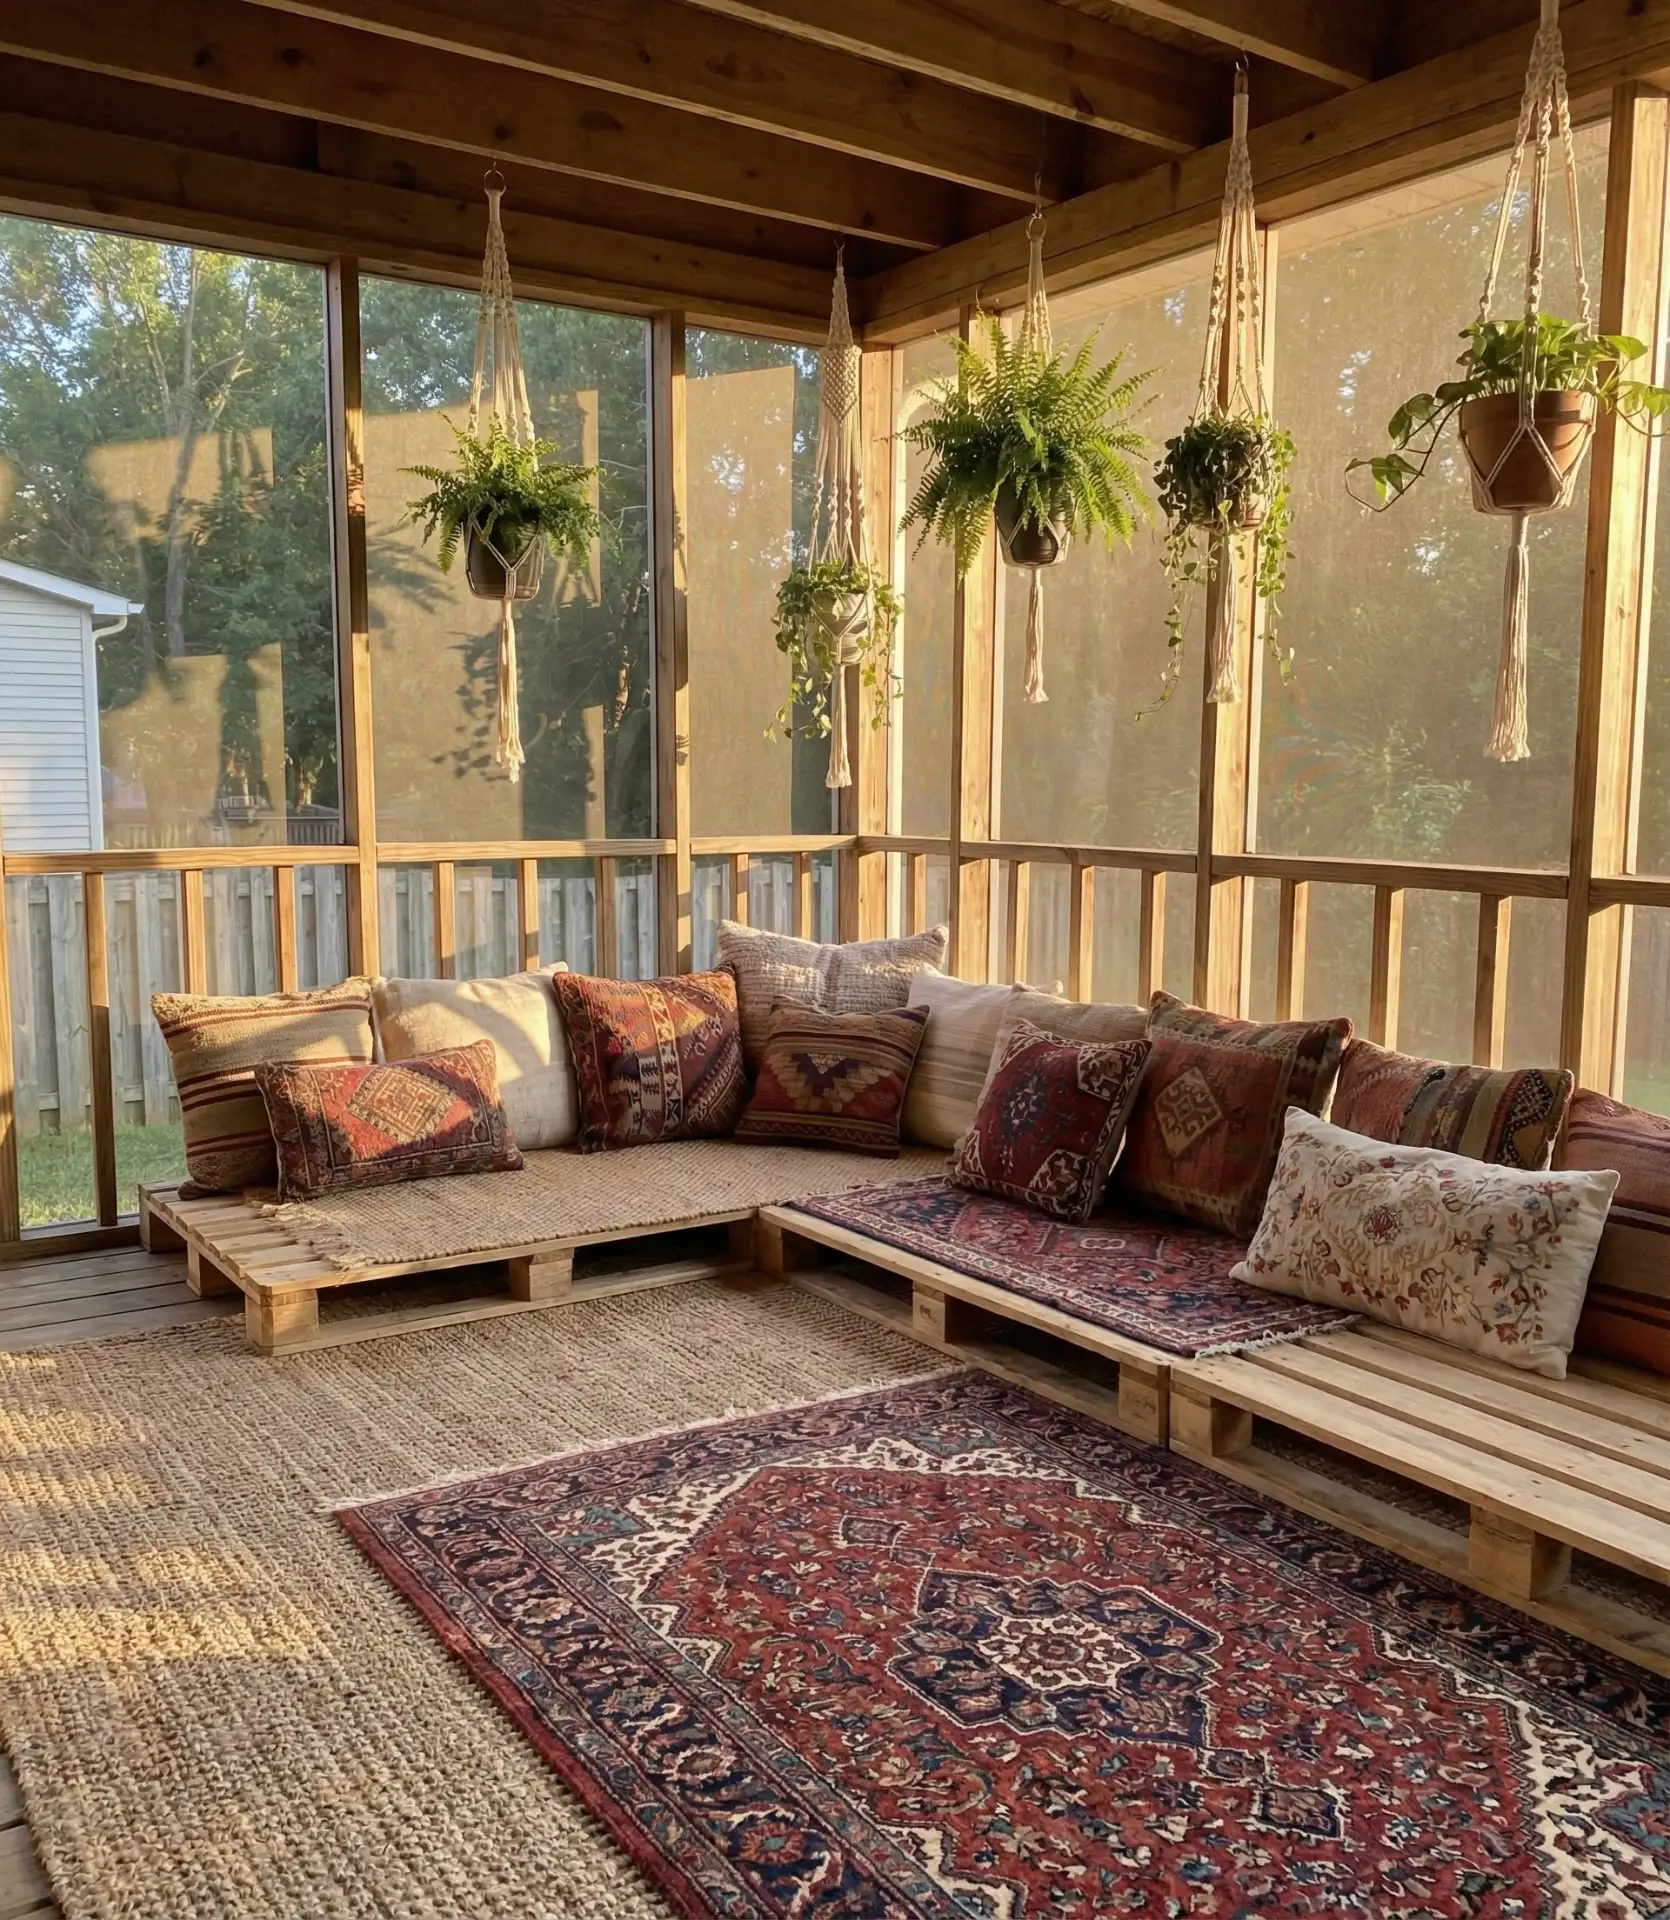
Discount home stores like HomeGoods, TJ Maxx, and Tuesday Morning often stock outdoor rugs at 40%–60% below retail prices, making the layered look surprisingly cheap to achieve. Look out for end-of-season sales in September, when retailers clear their outdoor inventory to make room for fall merchandise. You can create a stunning layered rug display for under $200 total if you’re patient and strategic about shopping. Make sure each rug has a proper outdoor rating (UV and mildew resistant) to prevent premature fading and mold growth in humid conditions.
9. Mounted TV Entertainment Hub
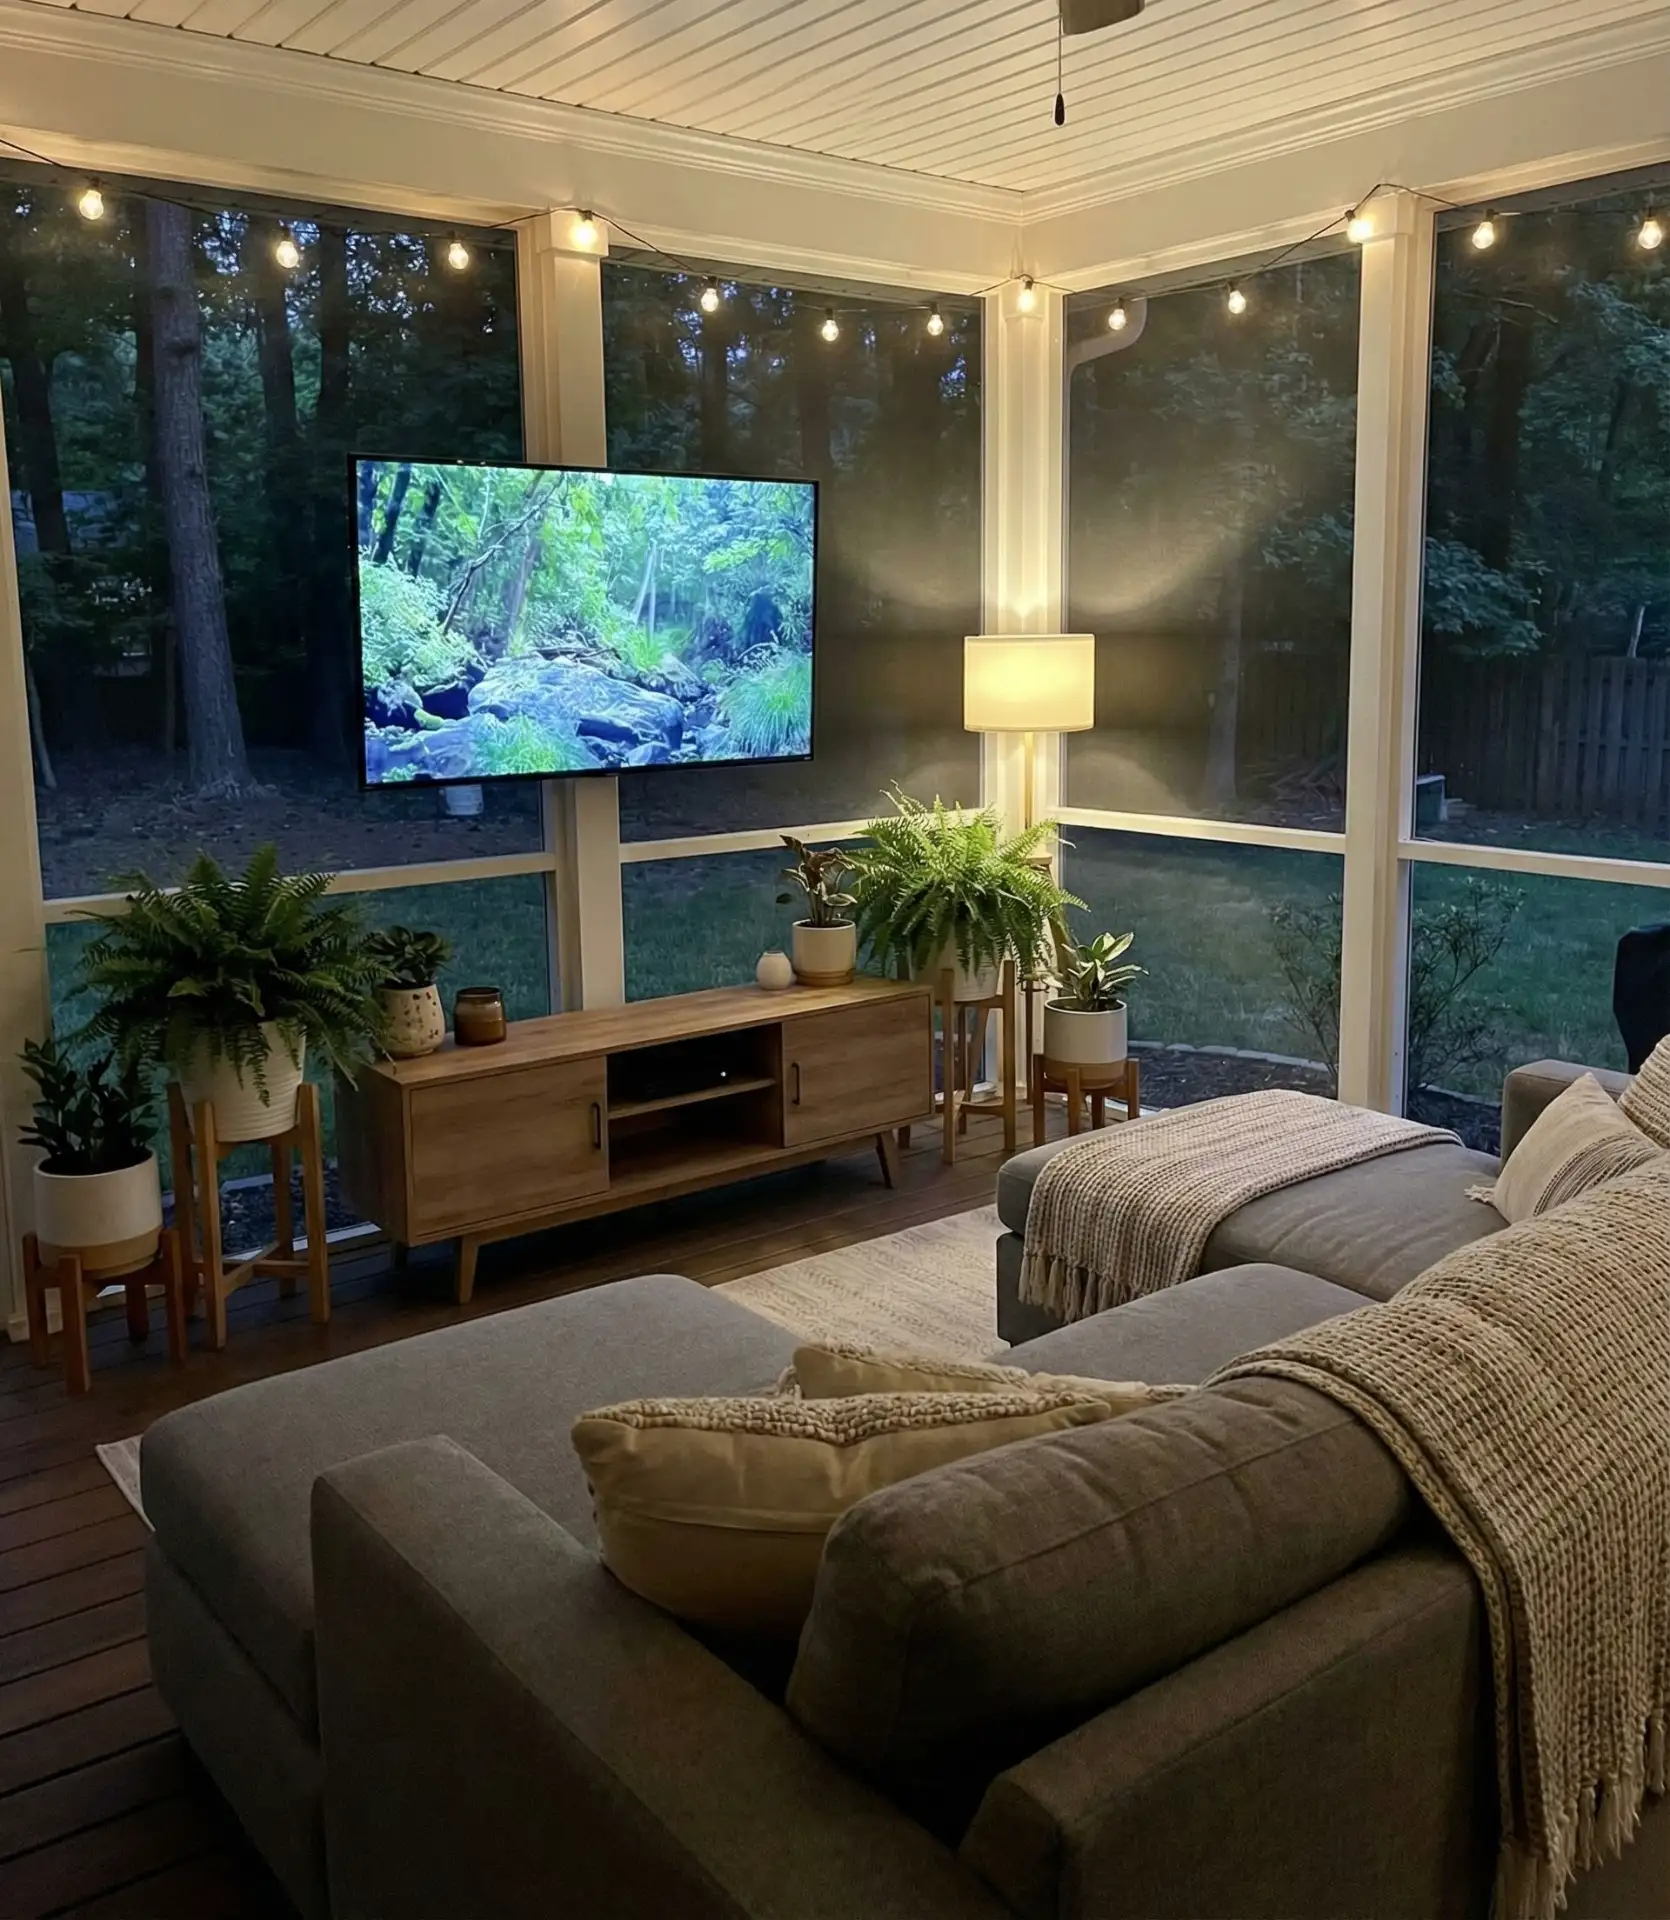
Mount a weatherproof outdoor TV on your screened porch wall to transform the space into a comfortable entertainment zone perfect for watching sports, movies, or simply having background ambiance during gatherings. Position the TV where the seating naturally faces, typically across from your main sofa or sectional, and at a height that allows the center of the screen to be at eye level when seated. Add a small media console or wall-mounted shelf below for streaming devices, speakers, or decorative objects. The key is integrating technology without letting it dominate—when the TV is off, it should blend with your décor rather than becoming a black rectangle that demands attention.
Across the Sun Belt states—particularly in Texas, Florida, and Arizona—screened porches with TVs have become virtually standard in new construction, reflecting how Americans increasingly view these spaces as true outdoor living rooms rather than seasonal add-ons. Invest in an actual outdoor-rated TV rather than trying to weatherproof an indoor model with a cover; the $300-500 premium pays for itself in longevity and eliminates the constant worry about humidity damage. Mount it on an articulating arm if possible, allowing you to adjust the angle based on time of day and glare from natural light.
10. Pink and Brass Feminine Retreat
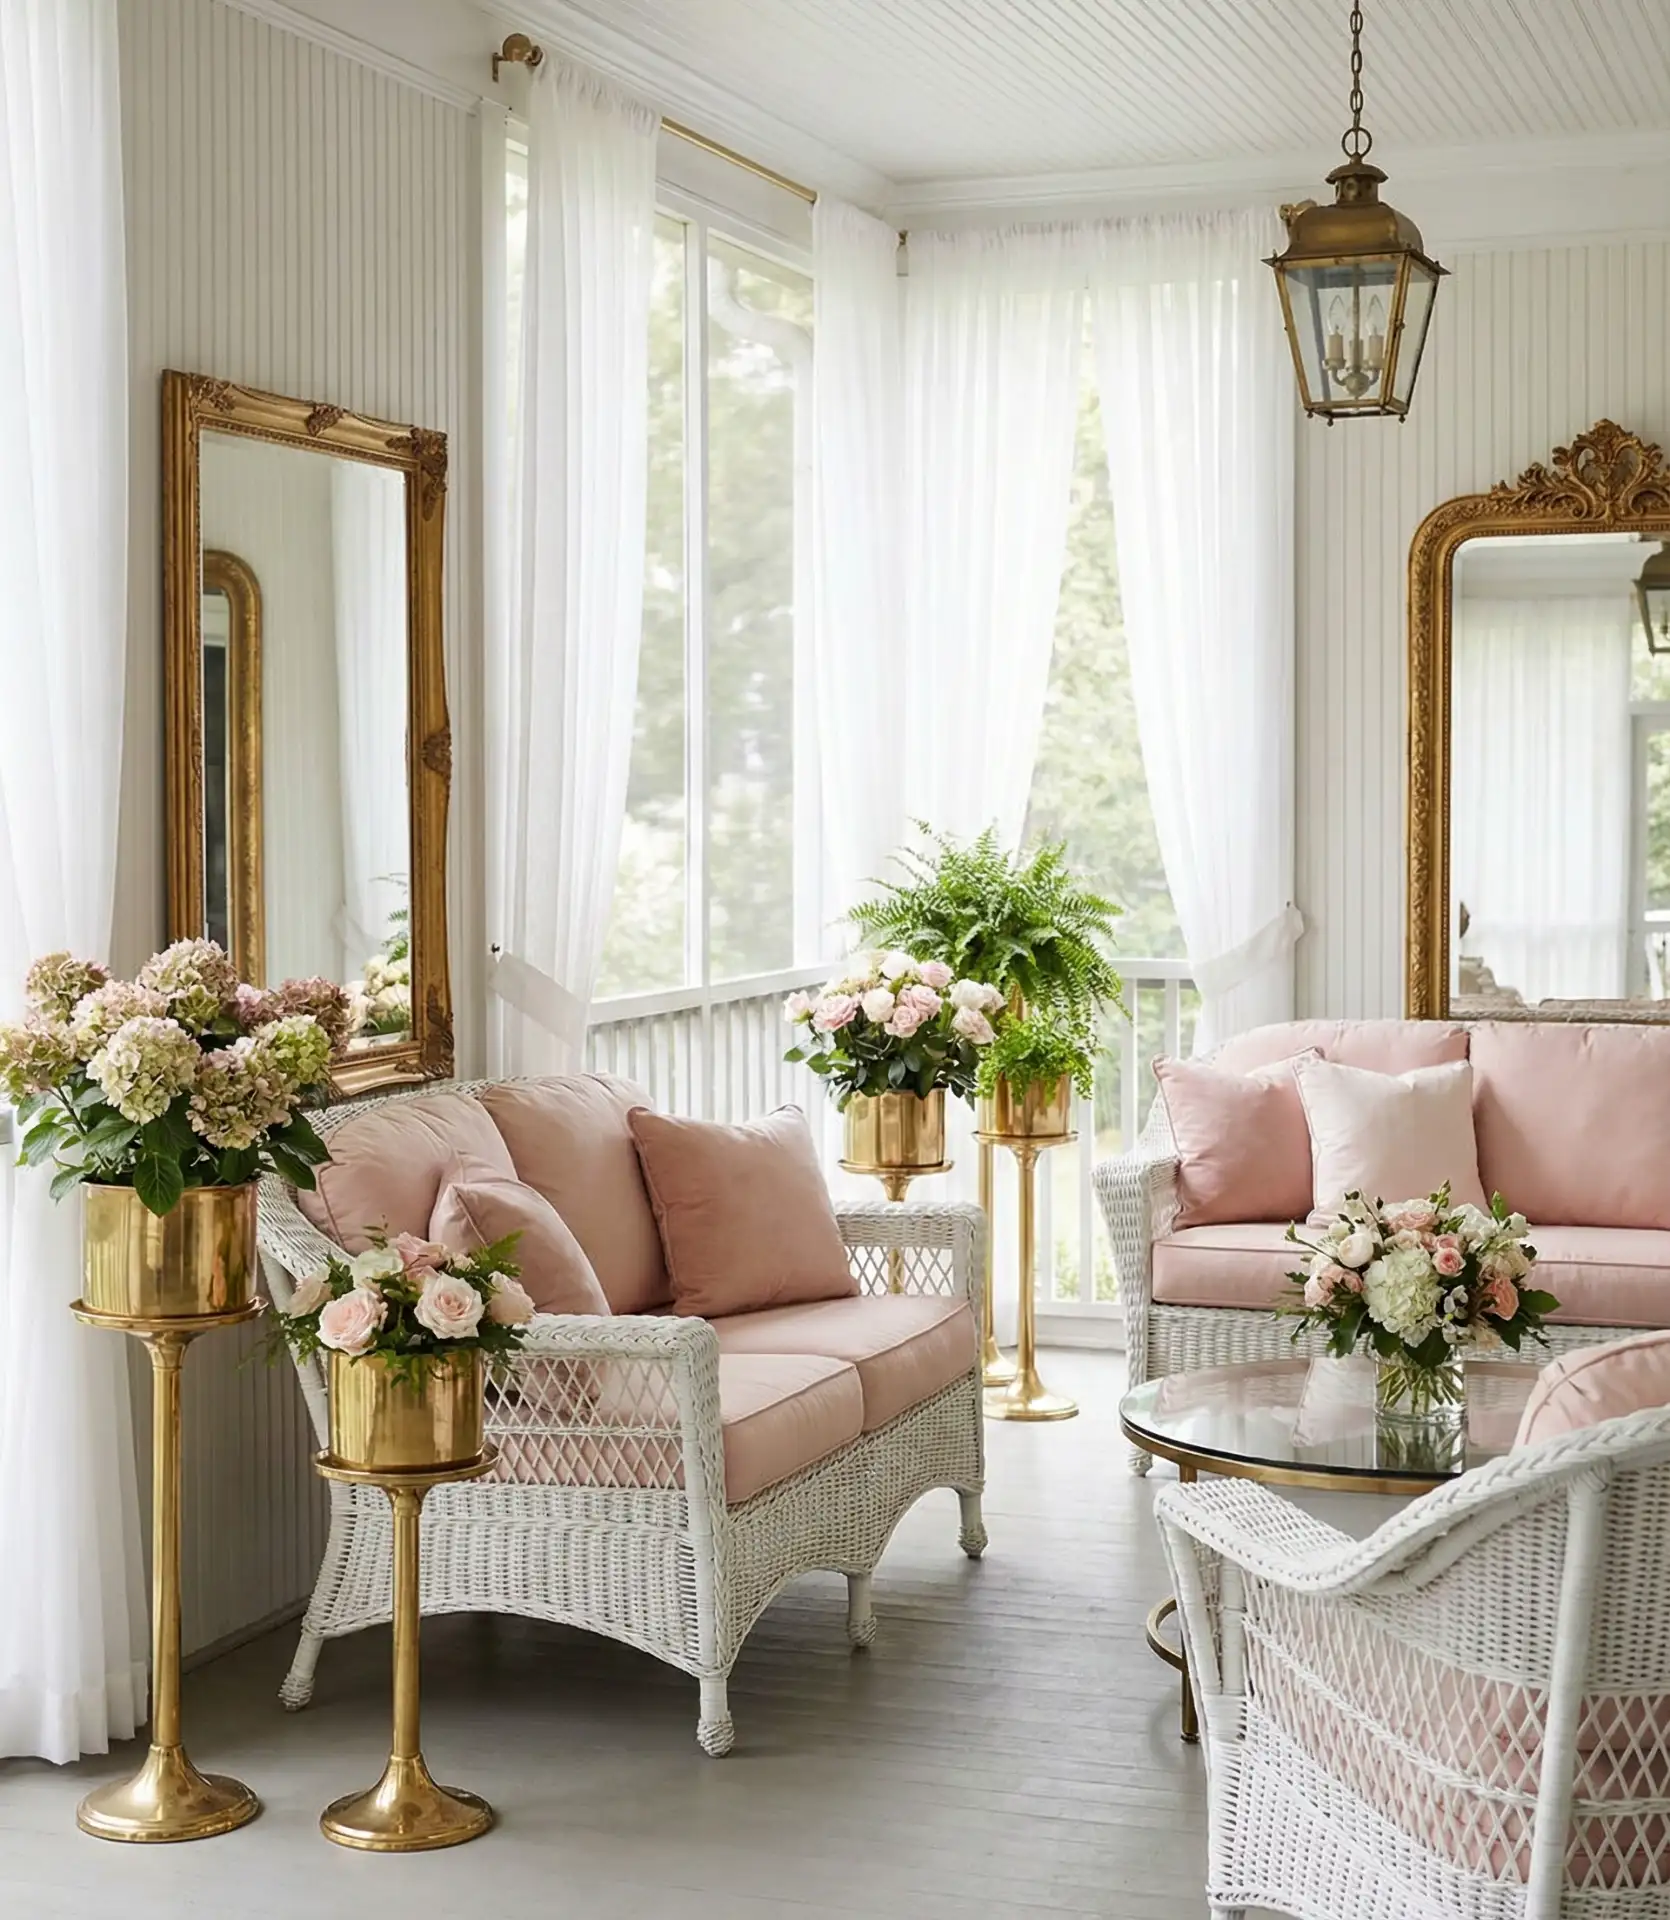
Create an elegant, feminine sanctuary using soft pink tones paired with warm brass or gold metallic accents throughout your screened porch. Start with blush or dusty rose cushions on white or natural wicker furniture, then layer in brass planters, gold-rimmed mirrors, and metallic picture frames. This color combination feels sophisticated rather than saccharine when balanced with plenty of white, cream, and natural wood tones. Add fresh or faux peonies, roses, or hydrangeas in white or coordinating pink shades to reinforce the romantic aesthetic. The brass elements catch and reflect natural light beautifully, adding warmth and glamour without overwhelming the space. 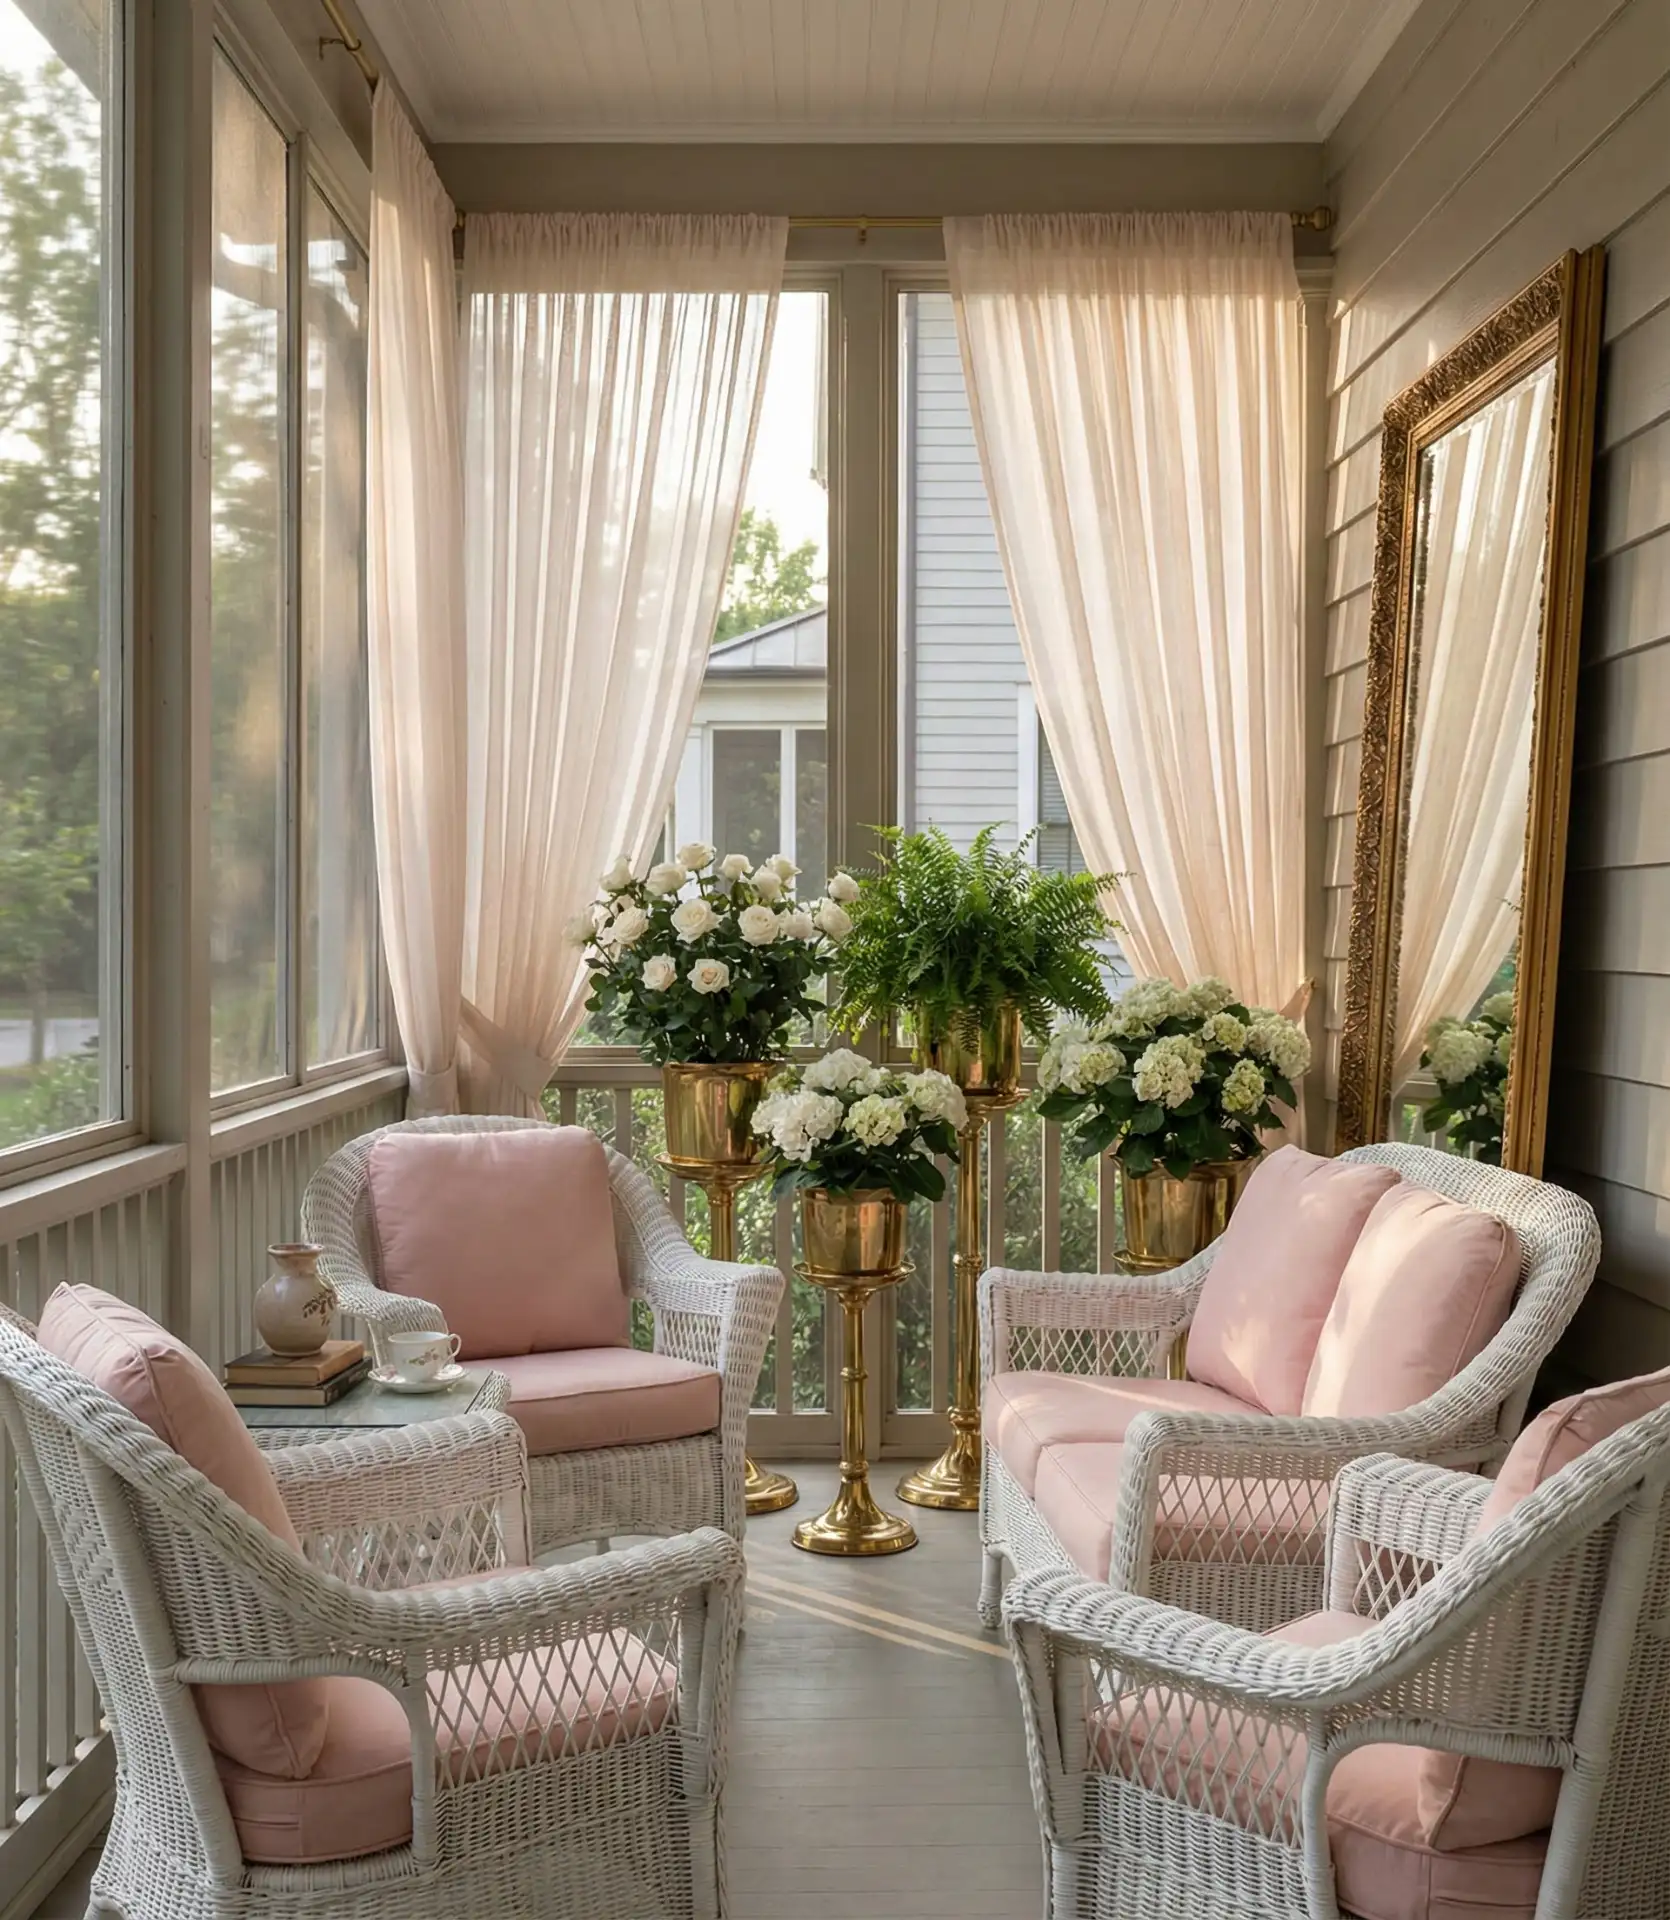
This aesthetic works exceptionally well for cabin porches or vacation homes where you want a distinct departure from rustic wood-heavy interiors. The pink and brass combination creates an instantly Instagram-worthy space that feels special and intentional. Source vintage brass pieces from thrift stores and estate sales for authentic patina and character—modern replicas often look too shiny and new. Mix in varying shades of pink from pale blush to deeper mauve to add depth and prevent the color scheme from reading as flat or one-dimensional.
11. Cabin-Inspired Wood Plank Ceiling
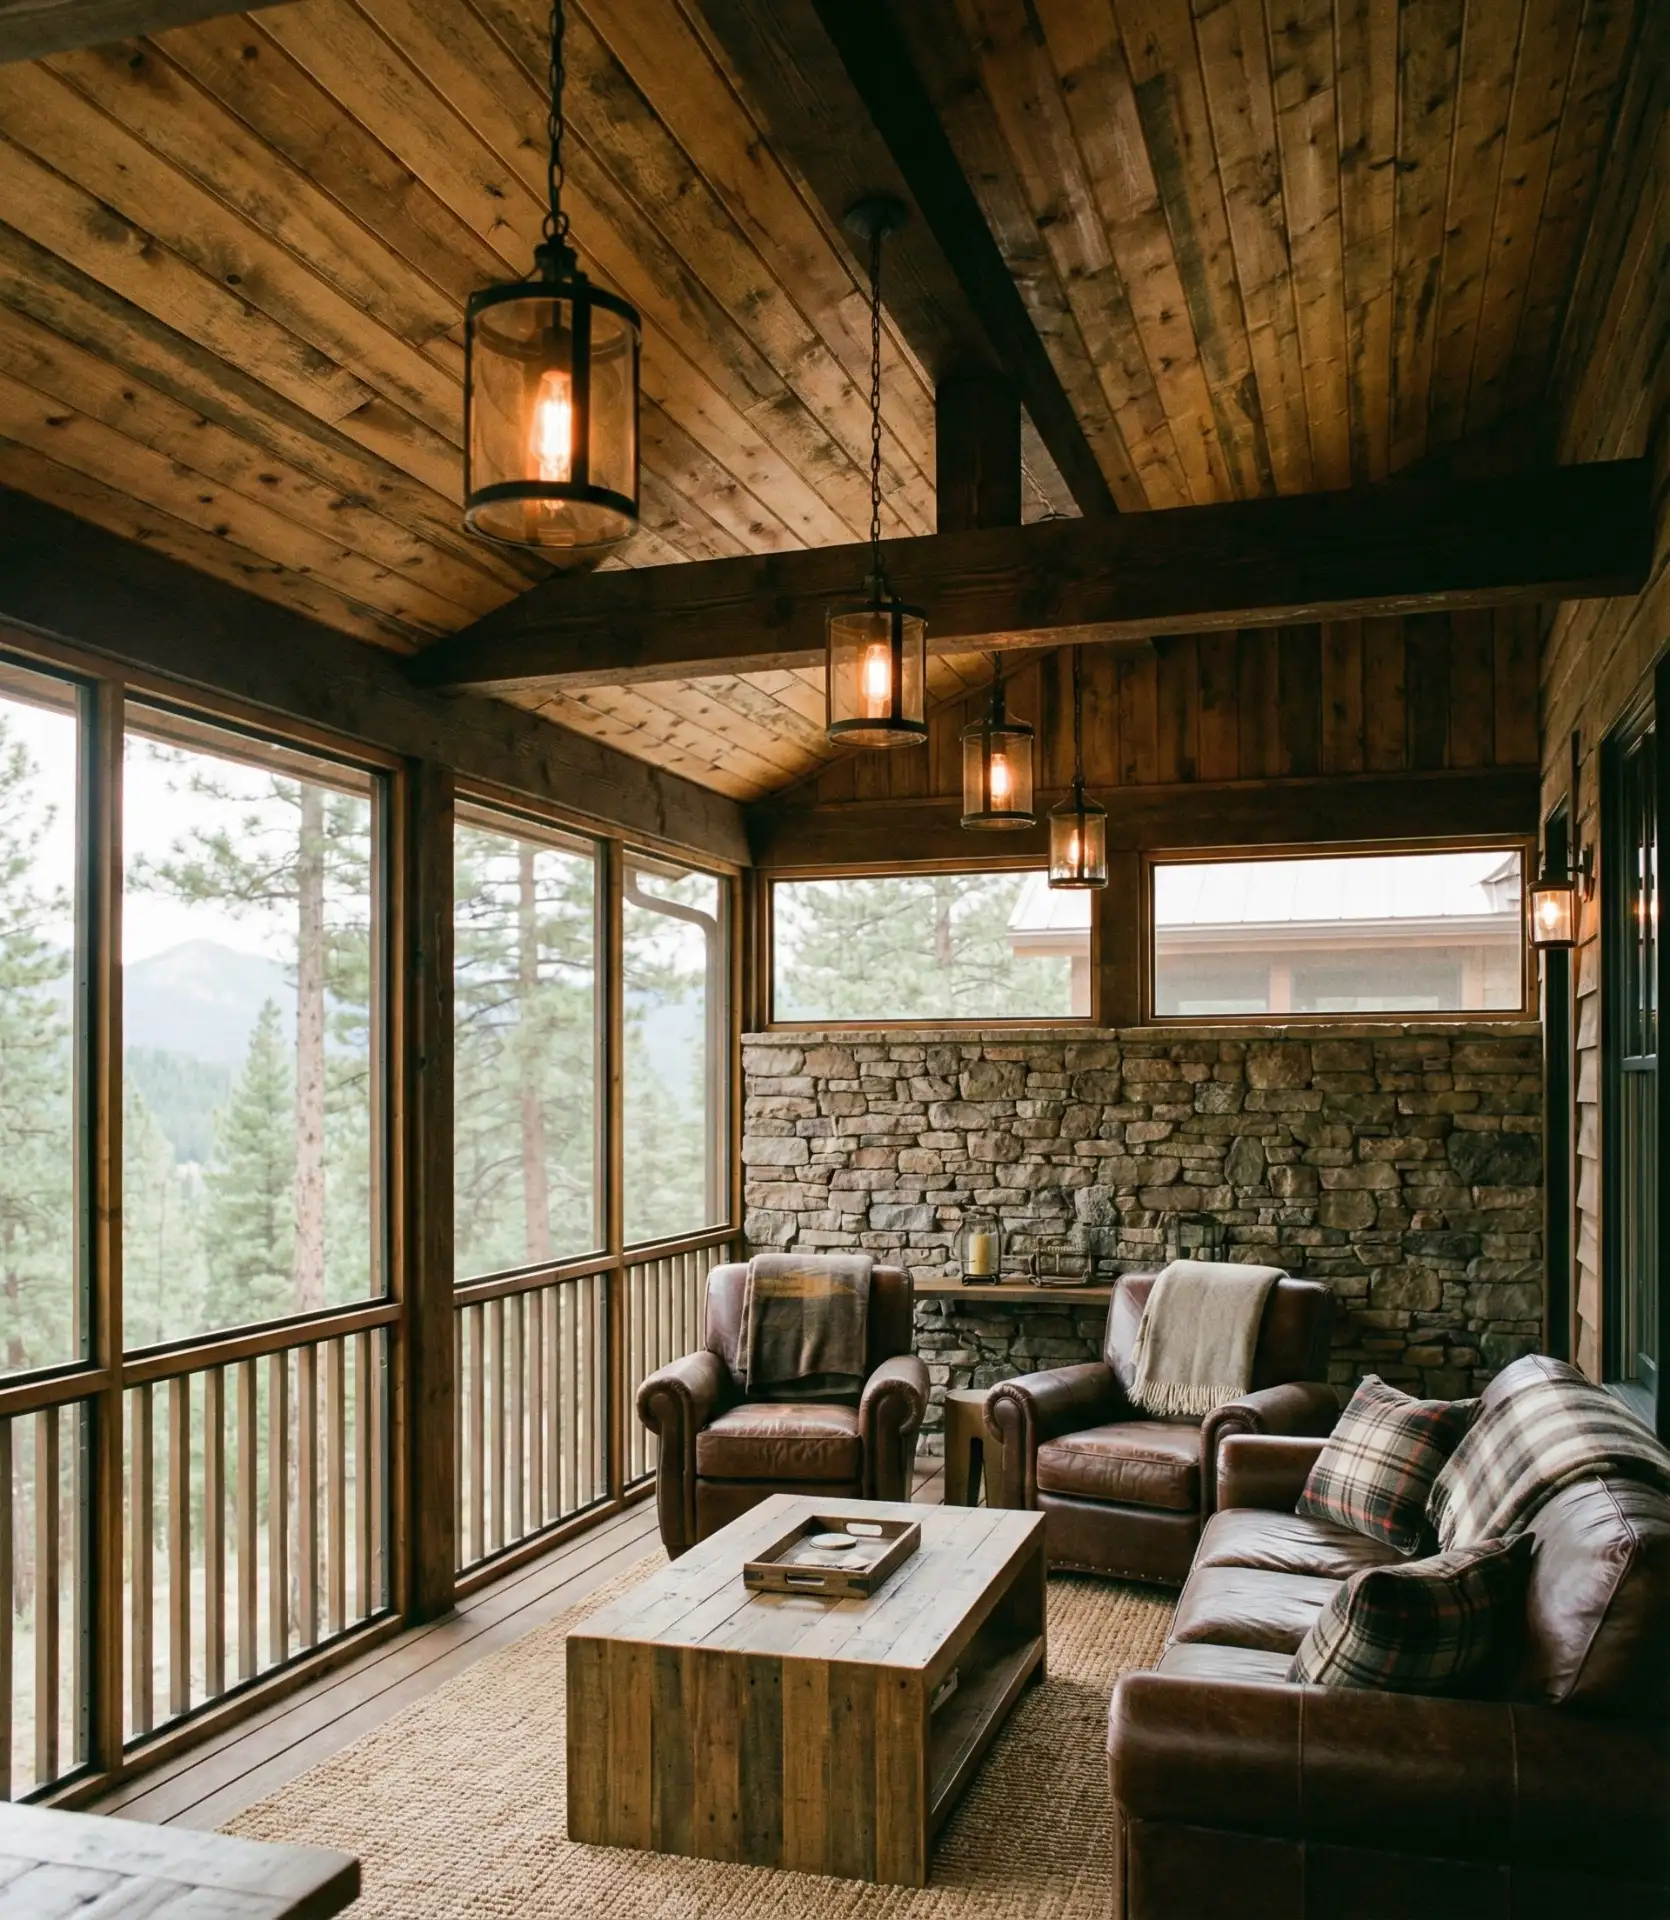
Install tongue-and-groove wood planking across your porch ceiling to introduce warmth and cabin-style character that draws the eye upward and makes the space feel more finished. Natural cedar, pine, or faux wood panels in honey or weathered gray tones work beautifully, creating a cozy canopy effect overhead. This upgrade transforms a basic painted ceiling into an architectural feature that adds thousands of dollars in perceived value. Pair the wood ceiling with exposed beams or simple wrought iron light fixtures to complete the rustic lodge aesthetic without overwhelming the space. 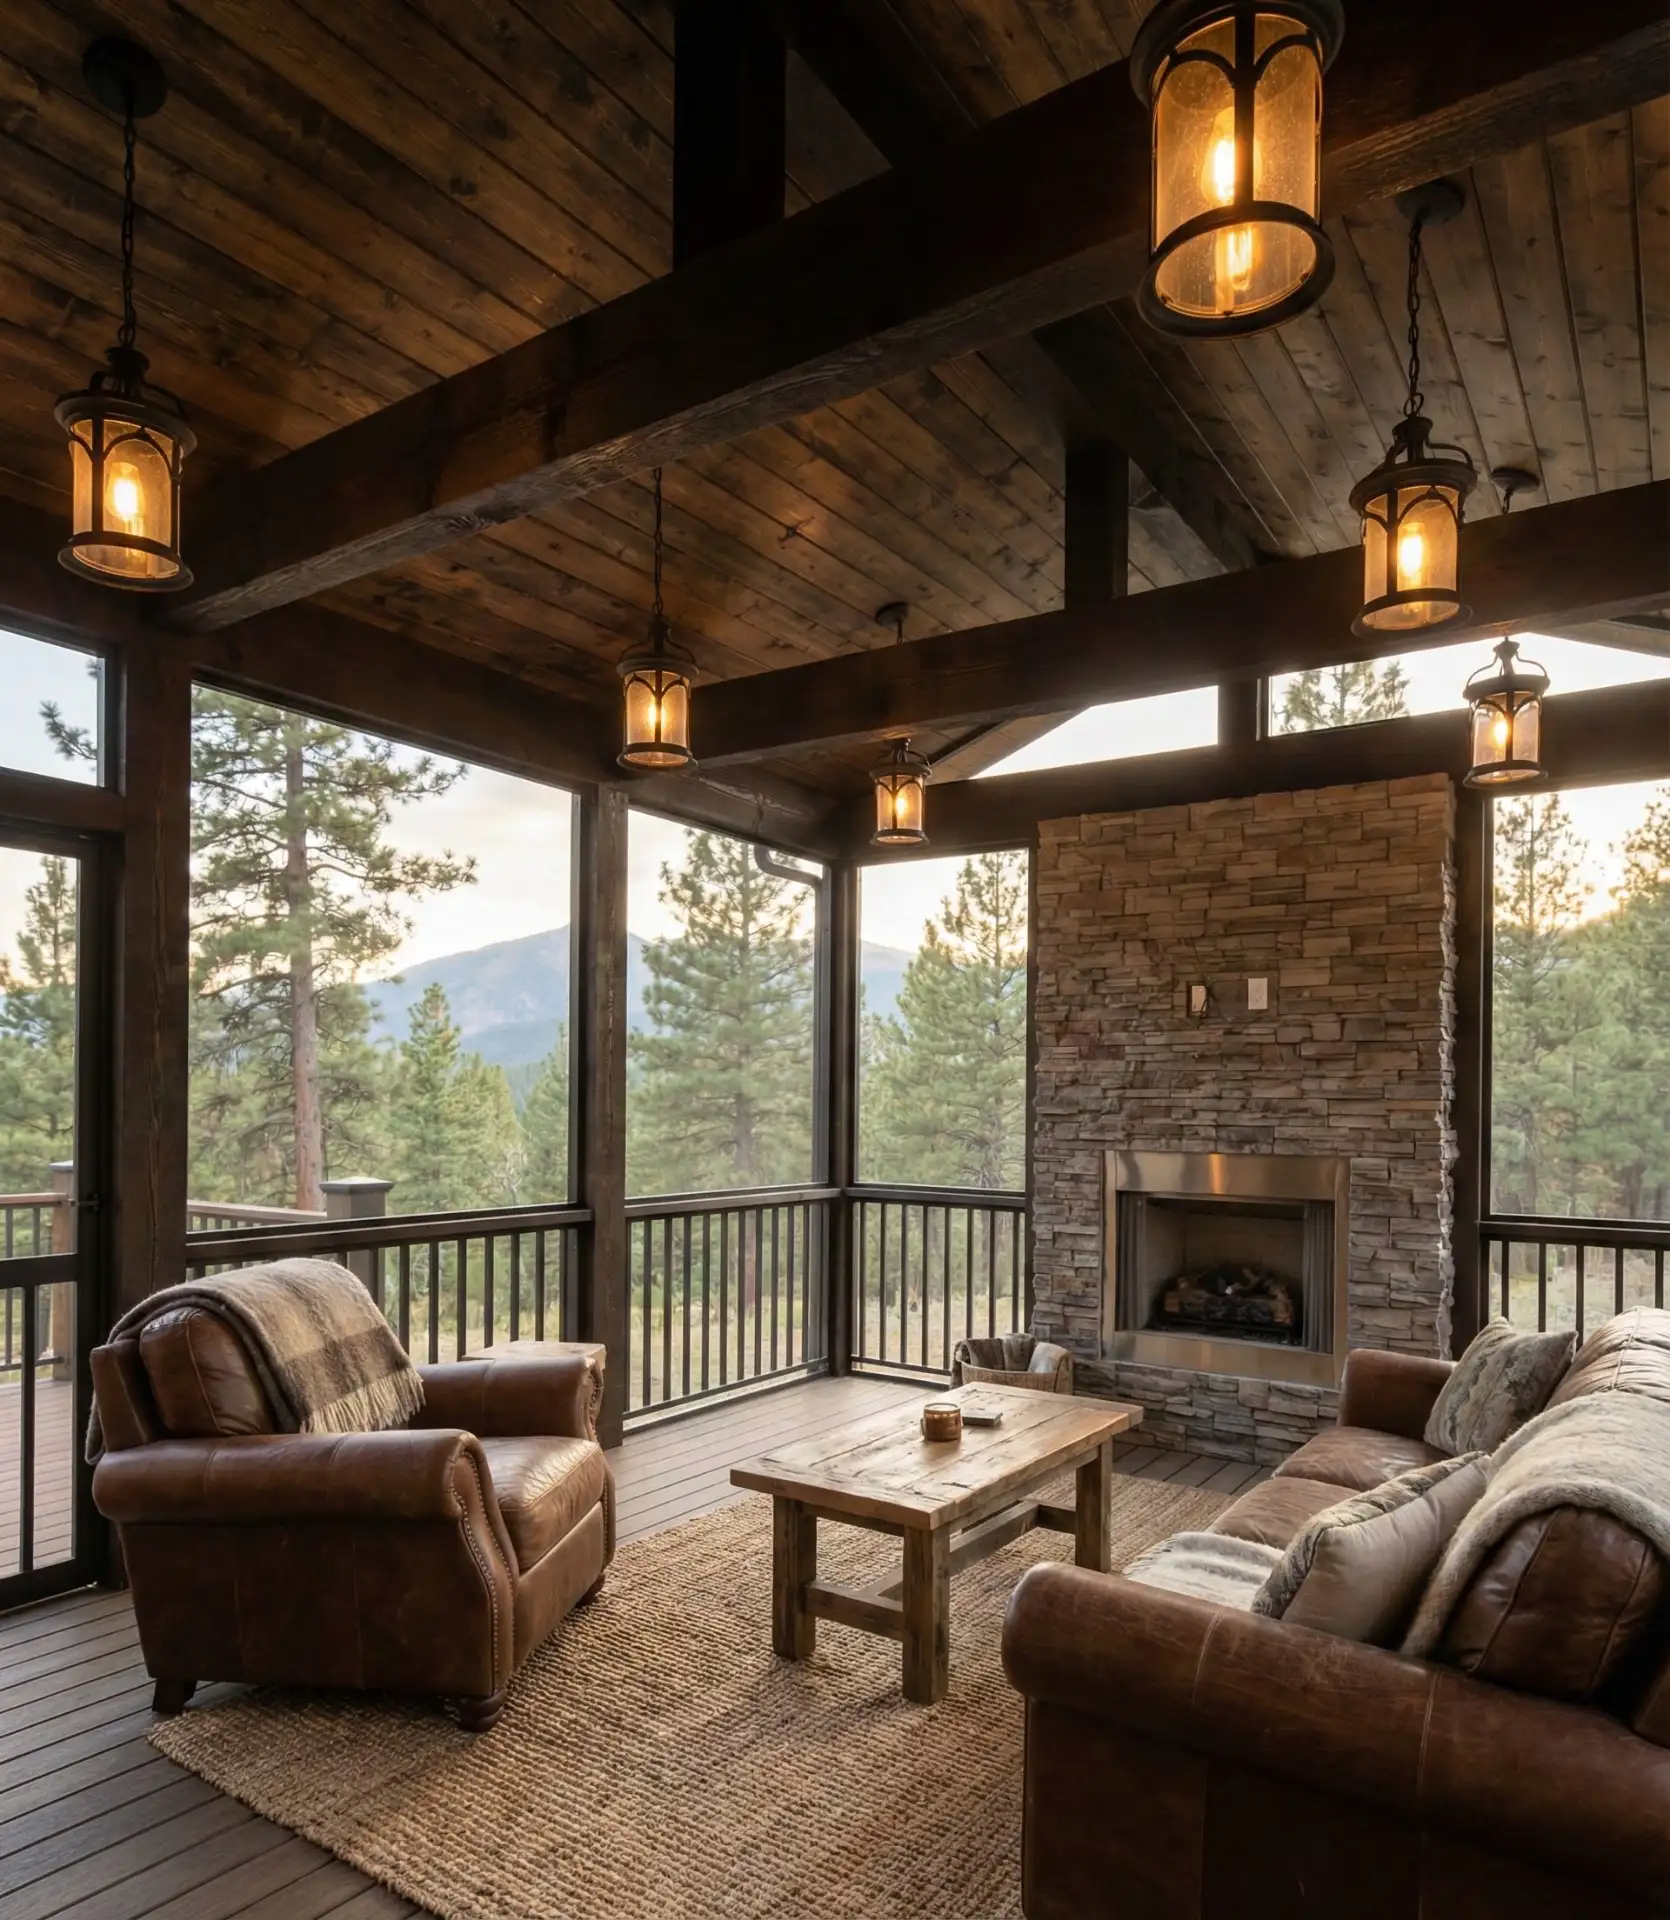
In mountain regions across Colorado, North Carolina, and Vermont, wood ceilings are practically expected in screened porches, as they tie the structure to surrounding forest environments. The installation is surprisingly manageable as a DIY project for anyone comfortable with a nail gun—most homeowners complete a 12×16 porch ceiling over a long weekend. Materials typically cost $3-6 per square foot depending on wood species, making it an affordable way to add significant visual impact. Apply a clear sealant to protect against moisture and prevent warping in humid climates.
12. Budget Gallery of Thrifted Mirrors
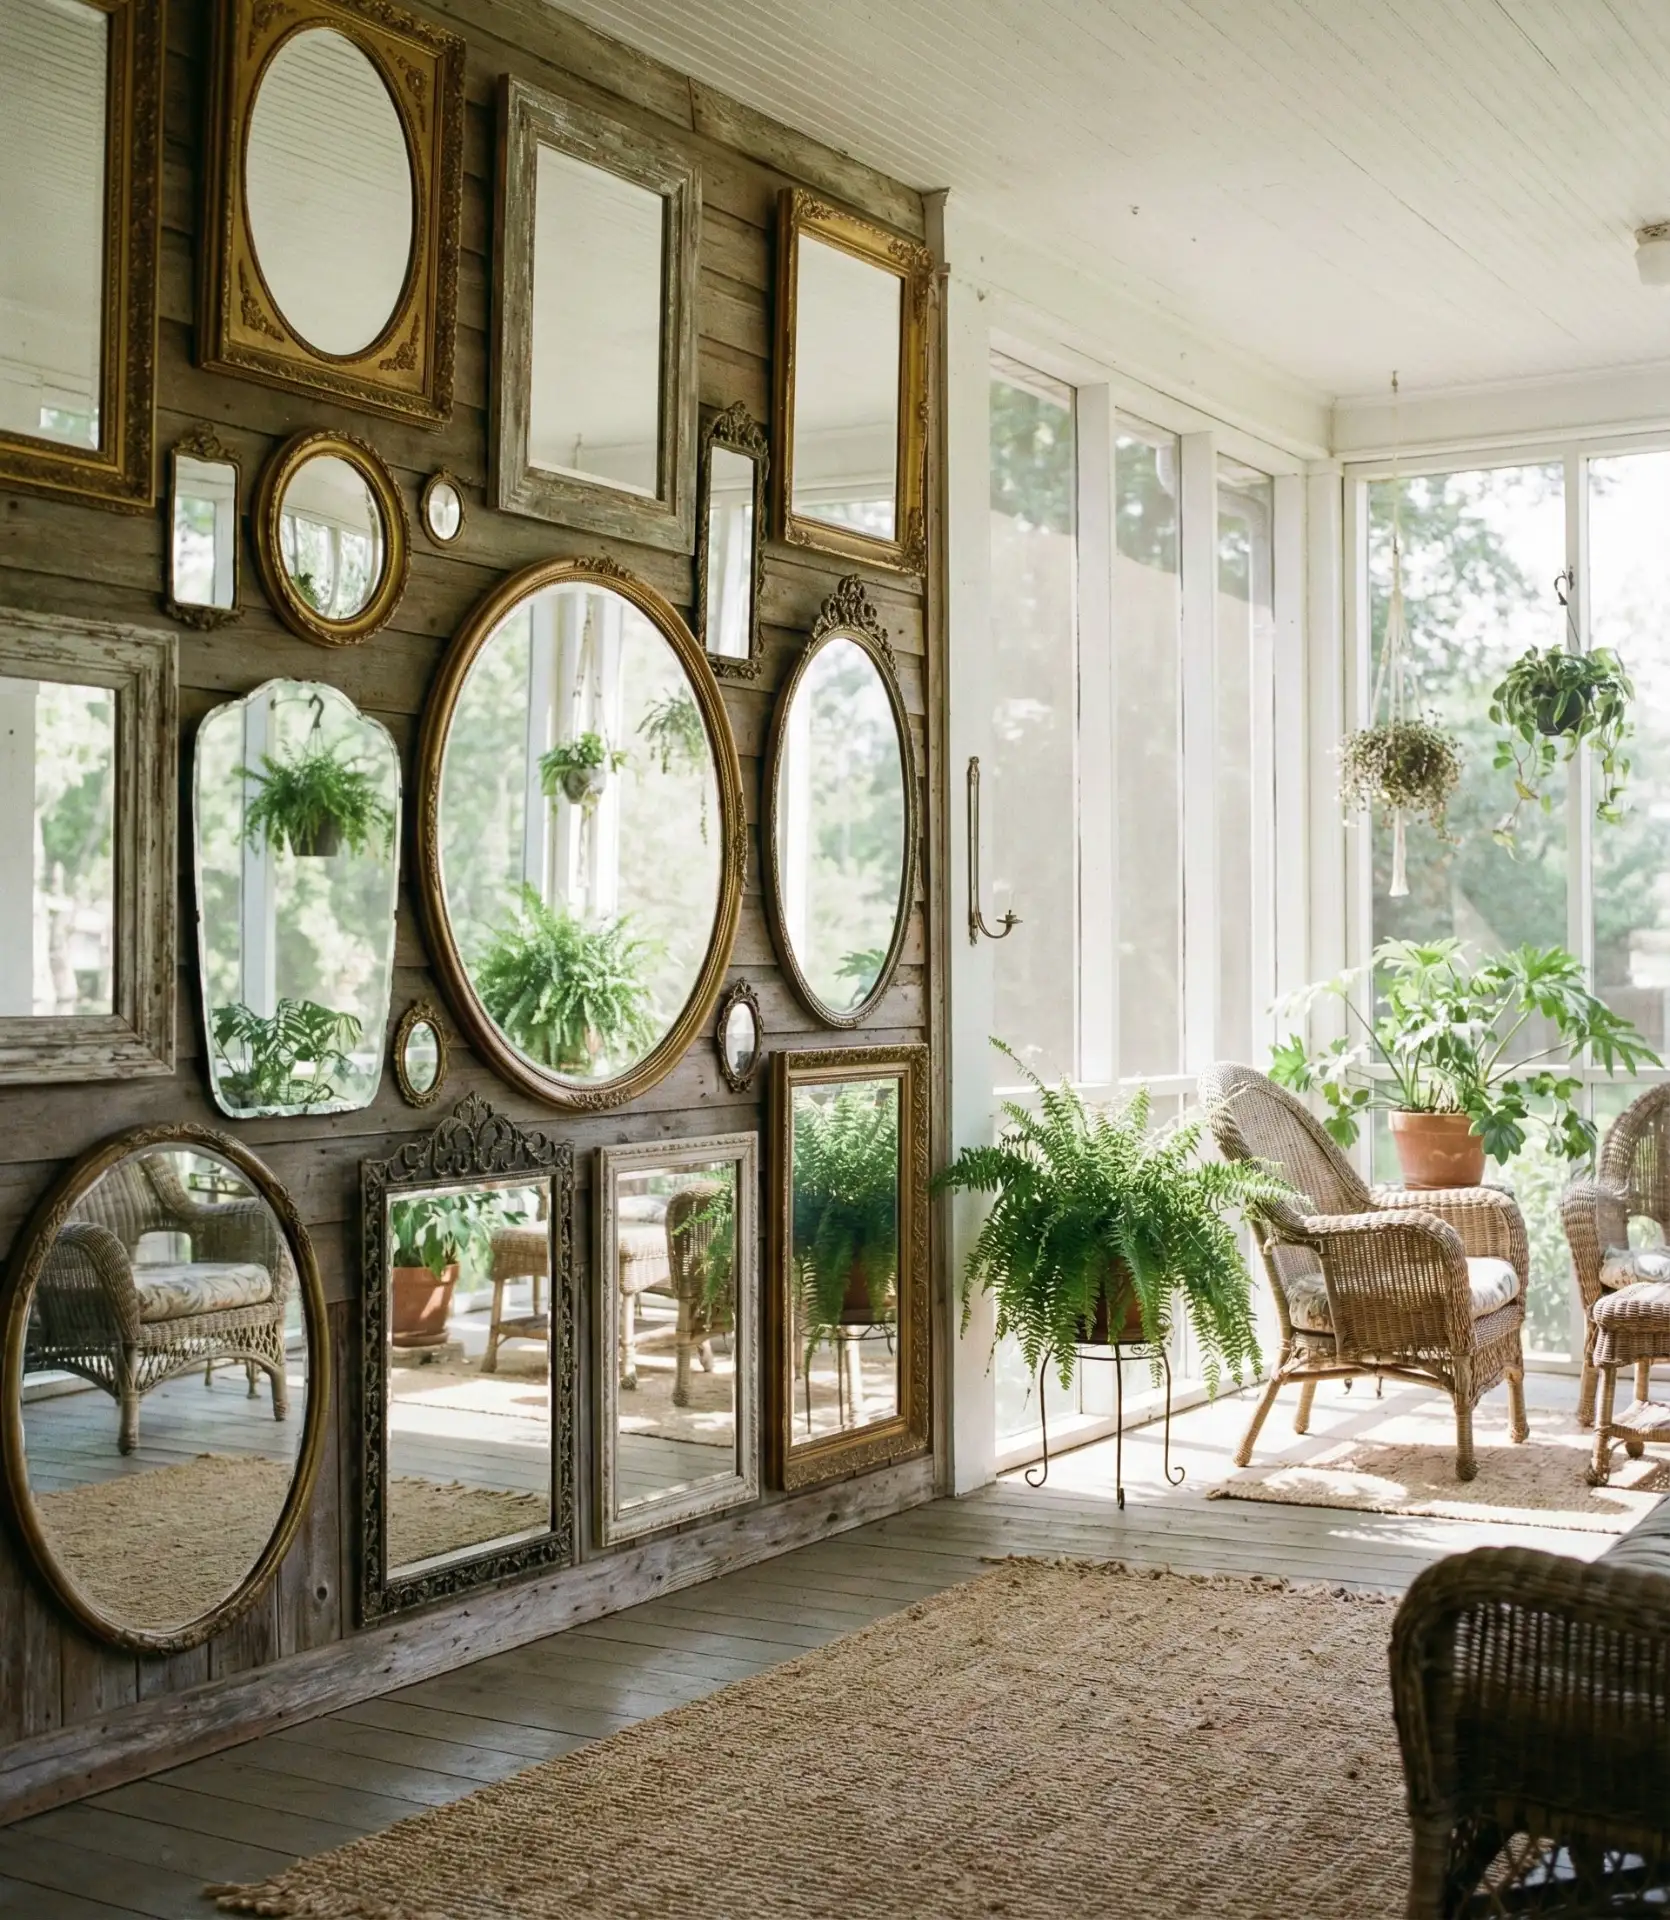
Create an eclectic mirror gallery wall using mismatched vintage and thrift store finds in various shapes, sizes, and frame finishes to maximize light reflection while staying on a budget. This approach works particularly well in porches with limited natural light or those that face north, as the mirrors bounce available light around the space and create an illusion of greater depth. Hunt for mirrors at estate sales, Goodwill, and Facebook Marketplace—aim for pieces under $15 each. Mix ornate gold frames with simple wood ones and round mirrors with rectangular ones, creating an intentionally collected look that feels personal rather than mass-produced. 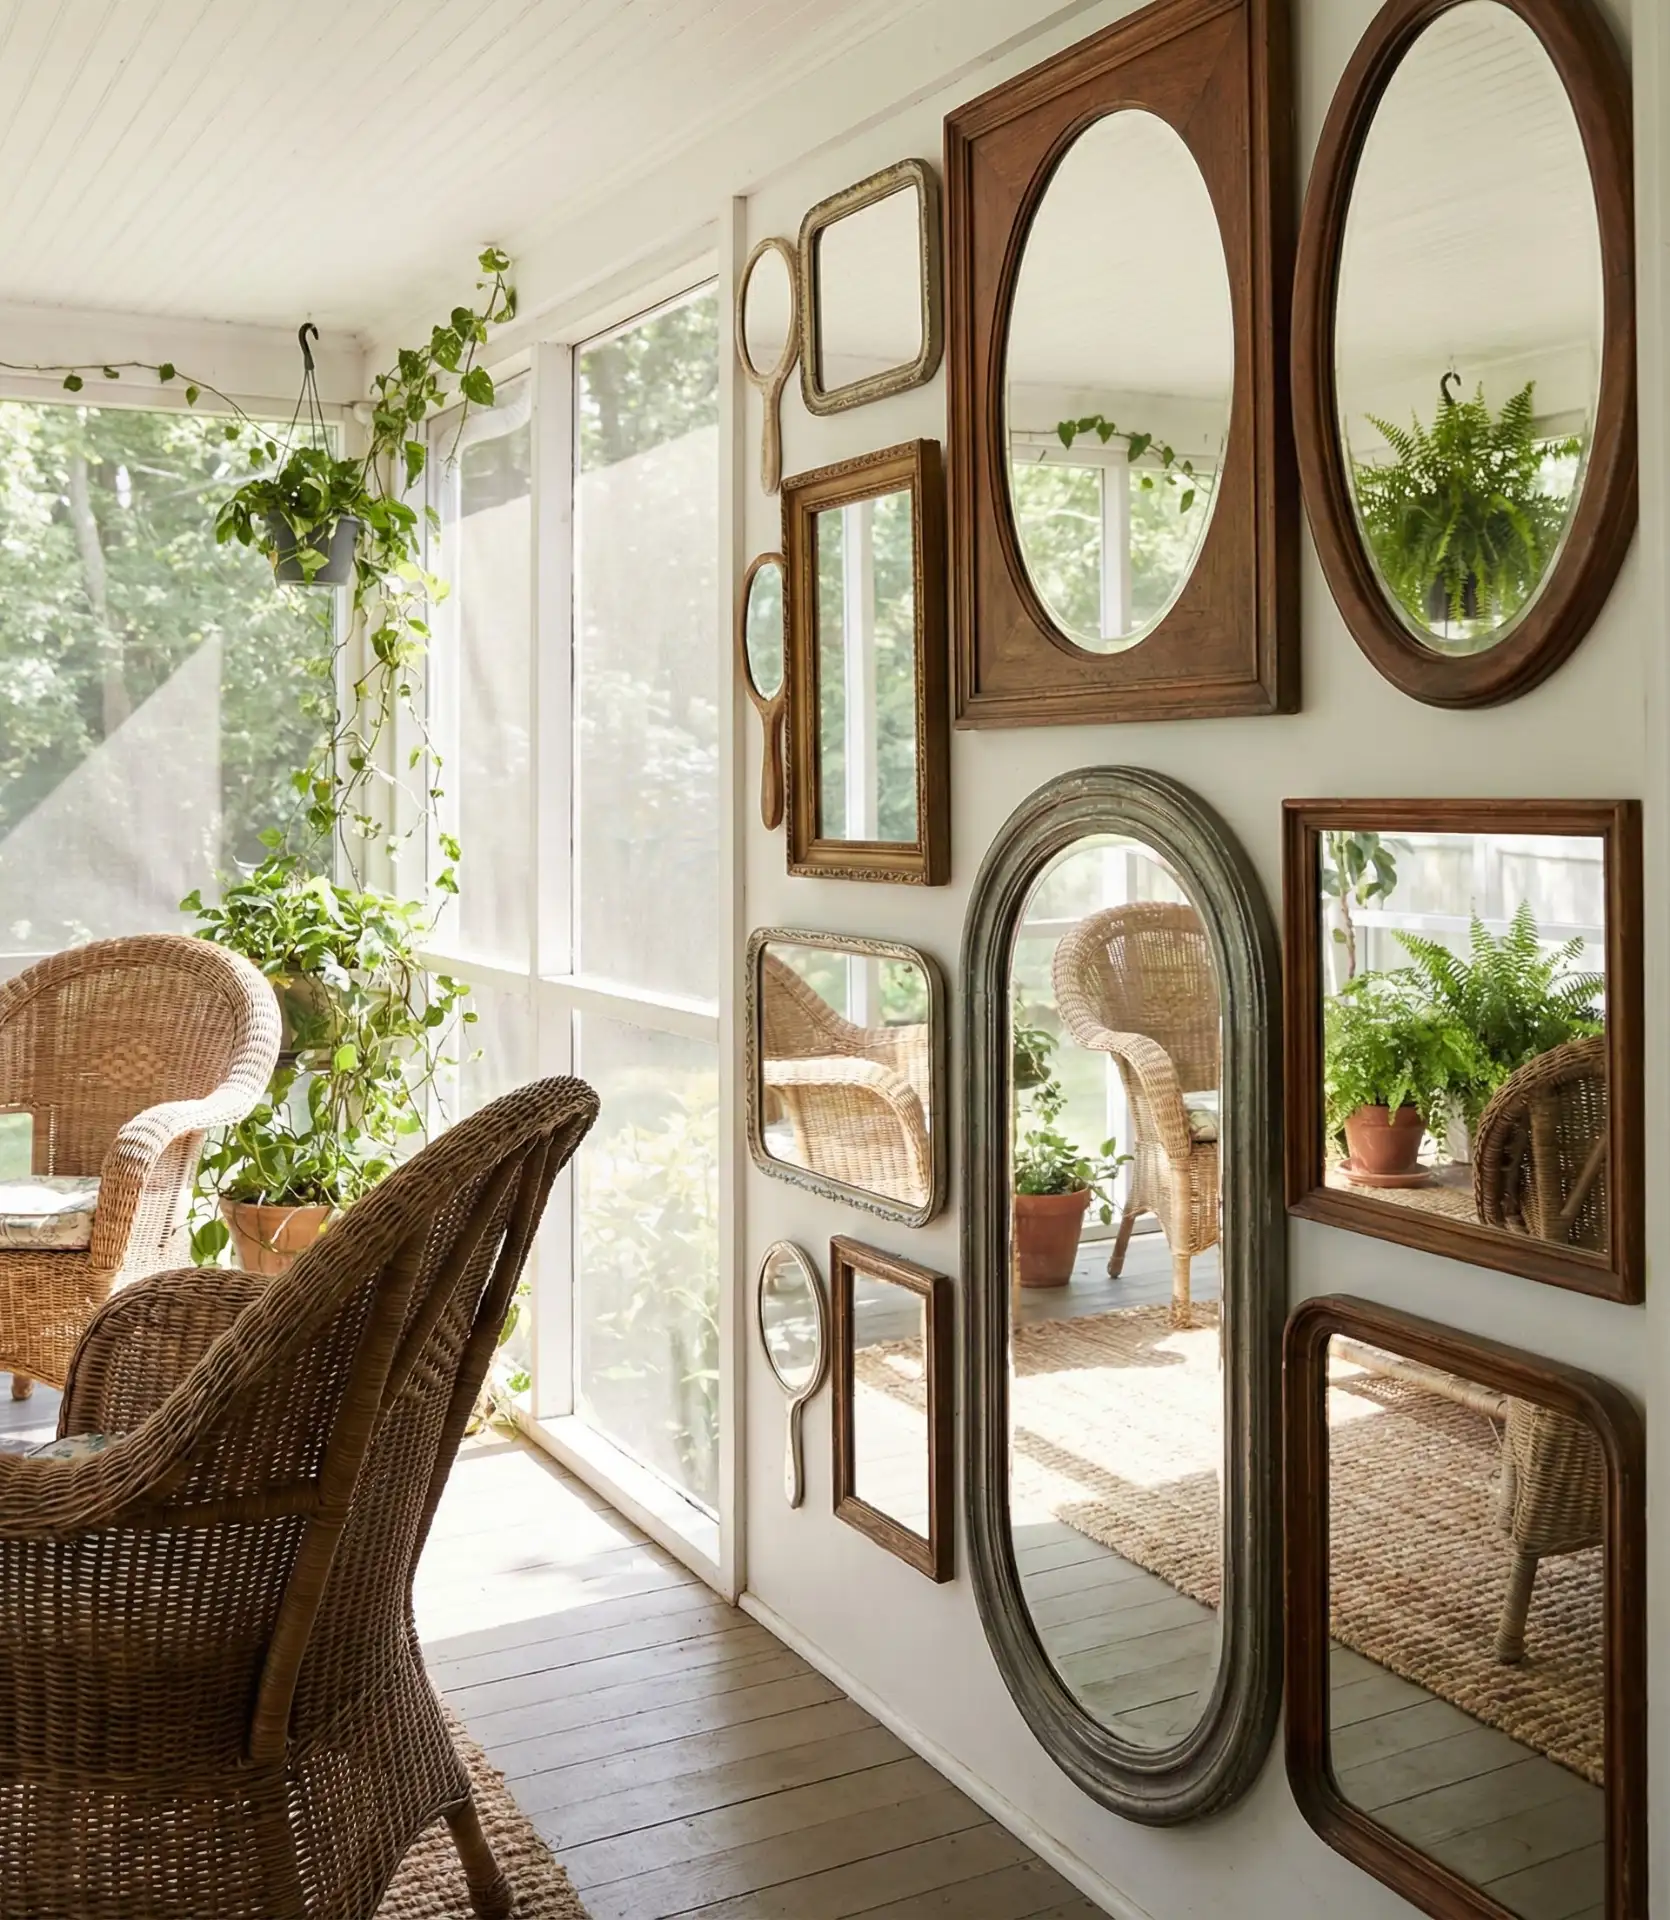
For cheap maximum impact, buy mirrors when you find them rather than all at once—this prevents the “matching set” look and gives you time to curate pieces that genuinely speak to you. Spray paint frames in a unified color like matte white or black if the collection starts feeling too chaotic, though mixed metallics often work beautifully without intervention. Position larger mirrors at eye level as anchors, then fill in around them with smaller pieces. The entire project can typically be completed for under $100 if you’re patient and strategic about hunting.
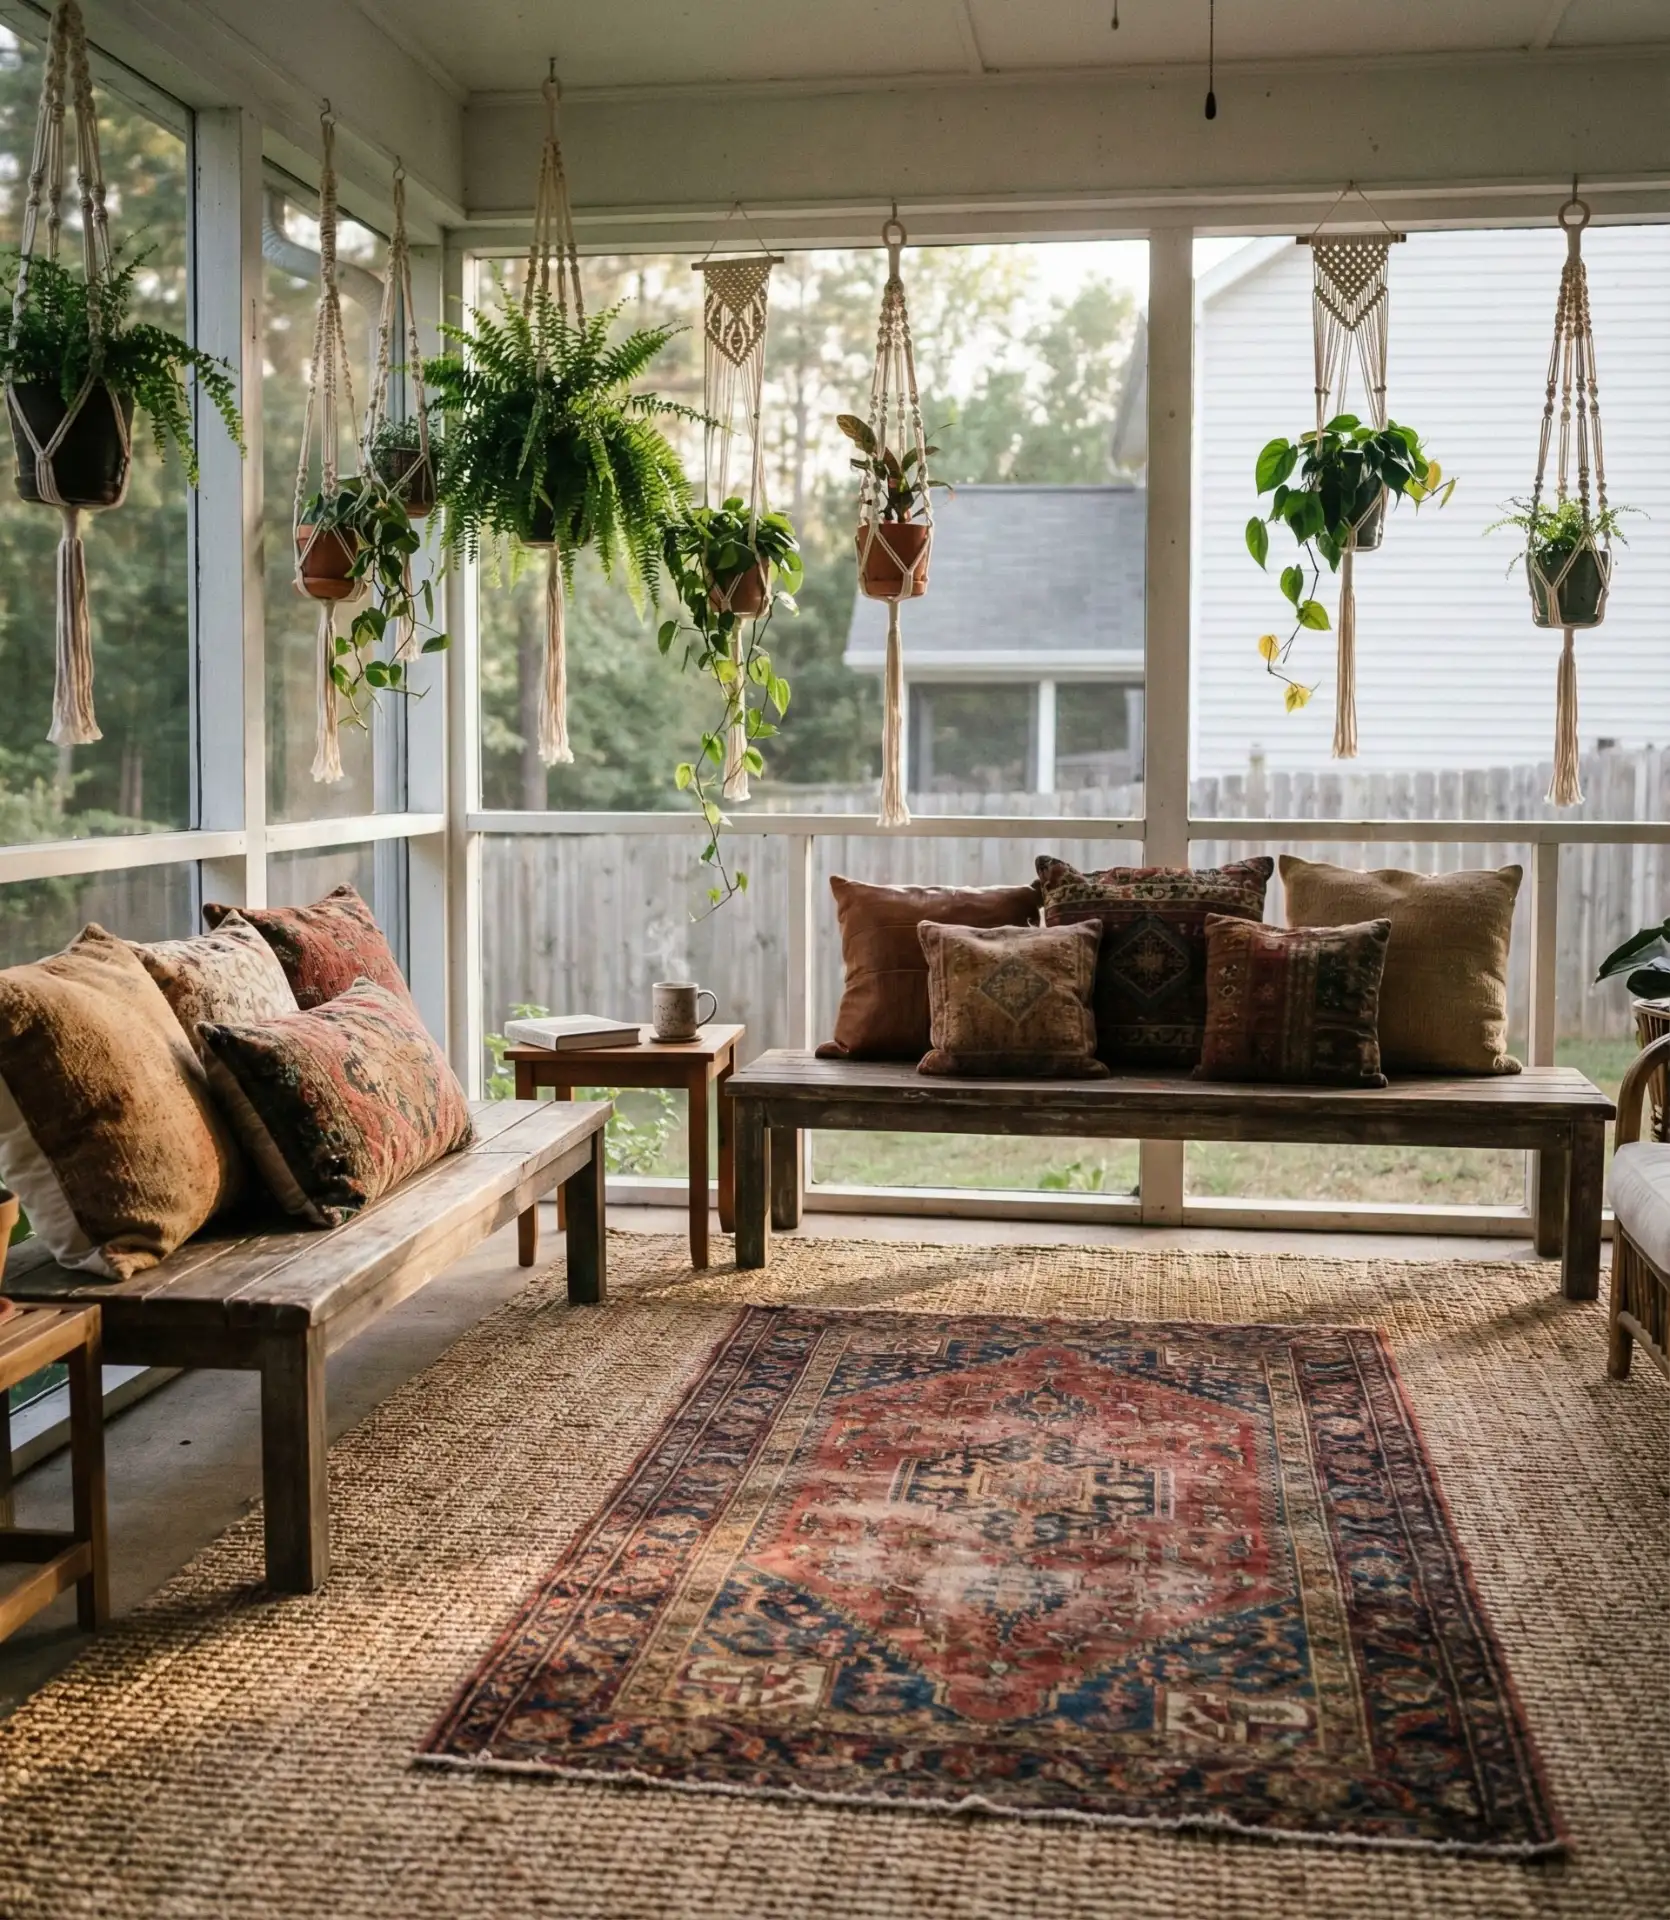
13. Boho Macramé and Woven Textures
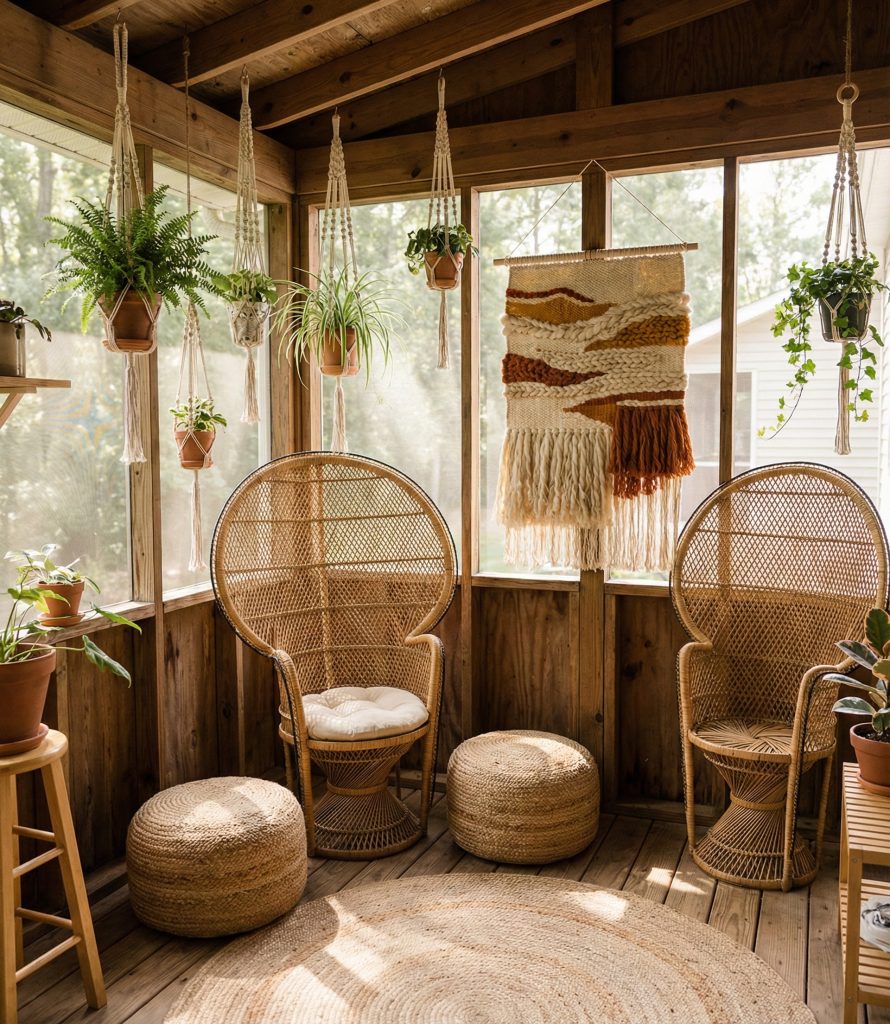
Embrace boho style by incorporating multiple macramé pieces—plant hangers, wall hangings, and curtain tiebacks—alongside woven baskets, rattan furniture, and natural fiber elements. The layered textures create visual richness and tactile interest that define bohemian design. Hang macramé plant holders at varying heights from ceiling hooks, showcasing trailing pothos, spider plants, or string of pearls. Add a large macramé wall hanging as a focal point behind your seating area, choosing one with wooden beads or driftwood accents for added dimension. This aesthetic celebrates handmade craftsmanship and natural materials, creating a relaxed, worldly atmosphere. 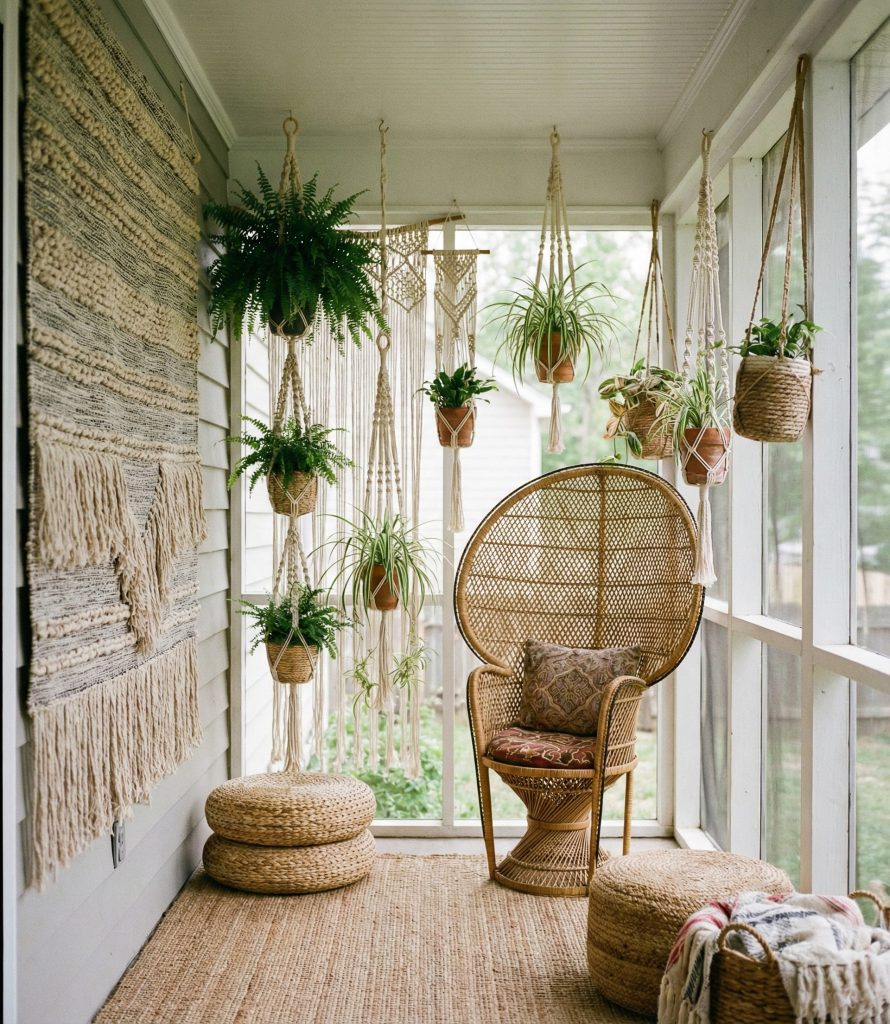
These boho outdoor spaces resonate particularly well with younger homeowners and renters who want personality without permanent modifications—all these elements can move with you. Many craft stores sell DIY macramé kits for $20-40, allowing you to customize sizes and styles while enjoying a meditative creative process. If crafting isn’t your thing, Etsy offers thousands of handmade options from artisans worldwide, typically ranging from $30 to $150 depending on size. The key is abundance—one macramé piece looks lonely, but five or more create an intentional bohemian haven.
14. Vertical Garden Privacy Screen
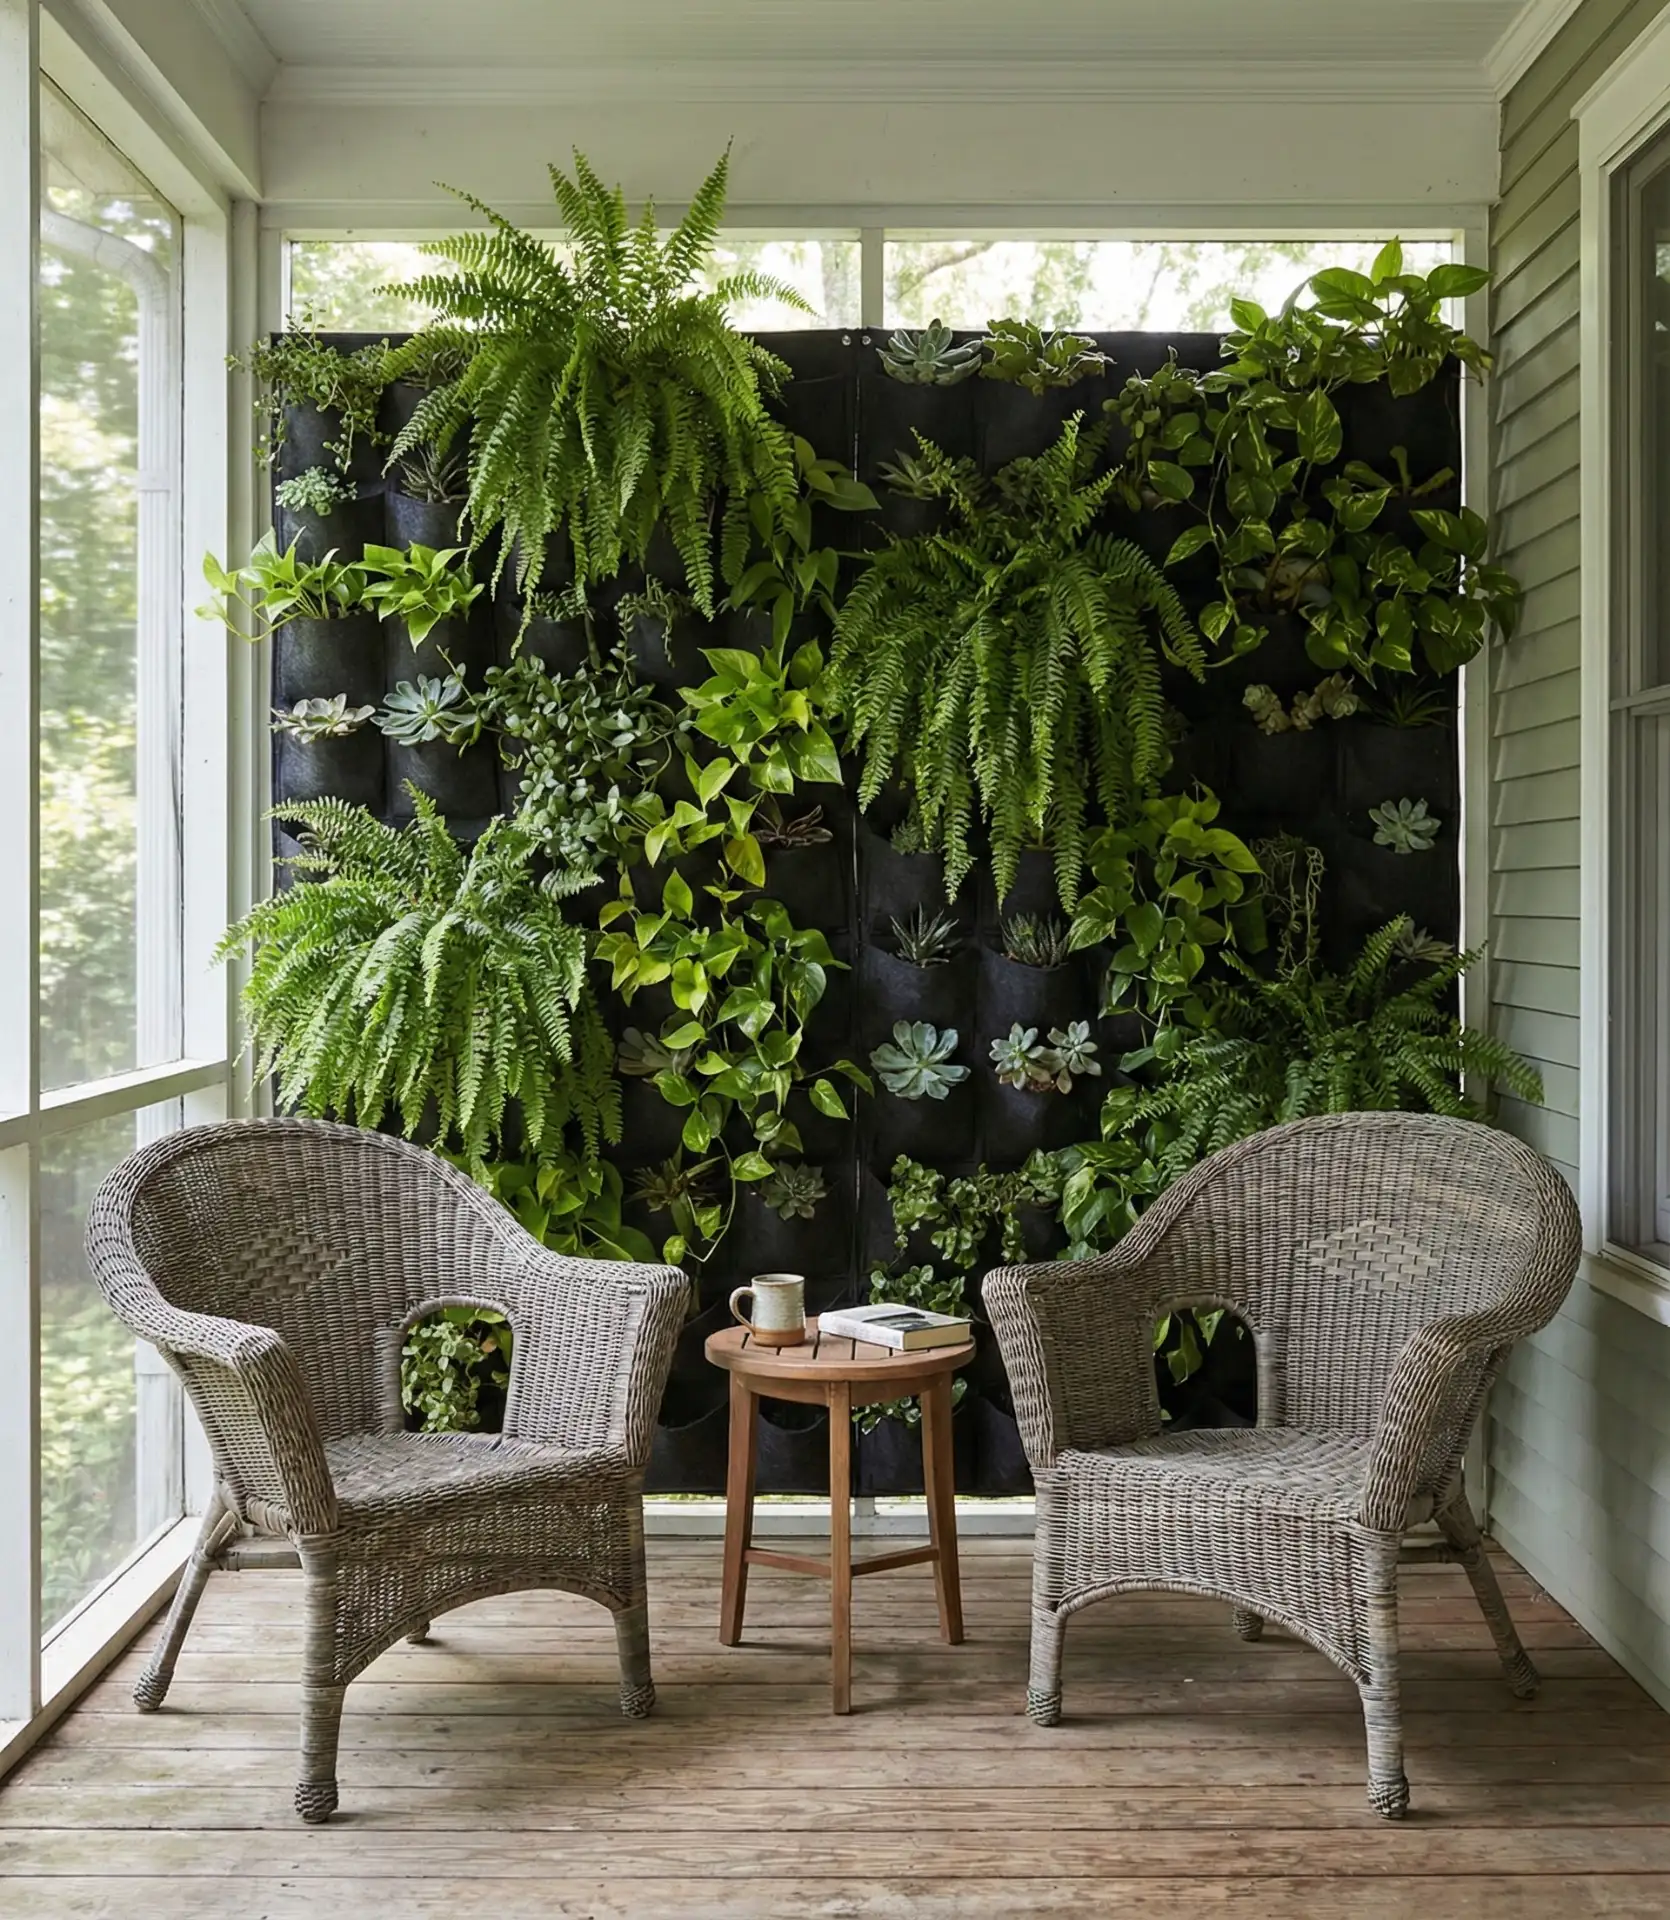
Install a vertical garden system or living wall along one side of your screened porch to add greenery while creating an affordable way to block sightlines from neighbors. Use wall-mounted planters, pocket gardens, or a trellis system with climbing vines to build a lush green screen that feels organic rather than constructed. This approach works especially well for porches that face neighboring properties or busy streets, transforming an exposed space into a private retreat. Choose low-maintenance plants like ferns, ivy, philodendron, or succulents depending on your light conditions and climate. The vertical orientation maximizes greenery without sacrificing precious floor space in small porches.
Urban and suburban homeowners increasingly seek privacy solutions that don’t feel fortress-like, and living walls deliver both function and beauty simultaneously. Pre-made vertical garden systems range from $50 to $300 depending on size, or you can DIY with wall-mounted planters from hardware stores for under $100 total. The ongoing maintenance is minimal—most systems need watering twice weekly and occasional pruning. Position your vertical garden where it blocks specific sightlines while still allowing air circulation through the screens. This creates a psychological barrier that makes the space feel secluded without actually closing it off.
15. Whitewashed Brick Accent Wall
Transform an existing brick wall or add faux brick panels, then apply a whitewash treatment for a bright, textured backdrop that reads as both cottage charming and contemporary chic. The whitewashed brick technique—where diluted white paint allows the natural brick texture and slight color variations to show through—adds architectural interest without the heaviness of bare brick. This creates an ideal neutral background for hanging artwork, mirrors, or plants while adding dimension that flat painted walls cannot achieve. The look works beautifully in both traditional and modern settings, adapting to whatever furniture style you choose. 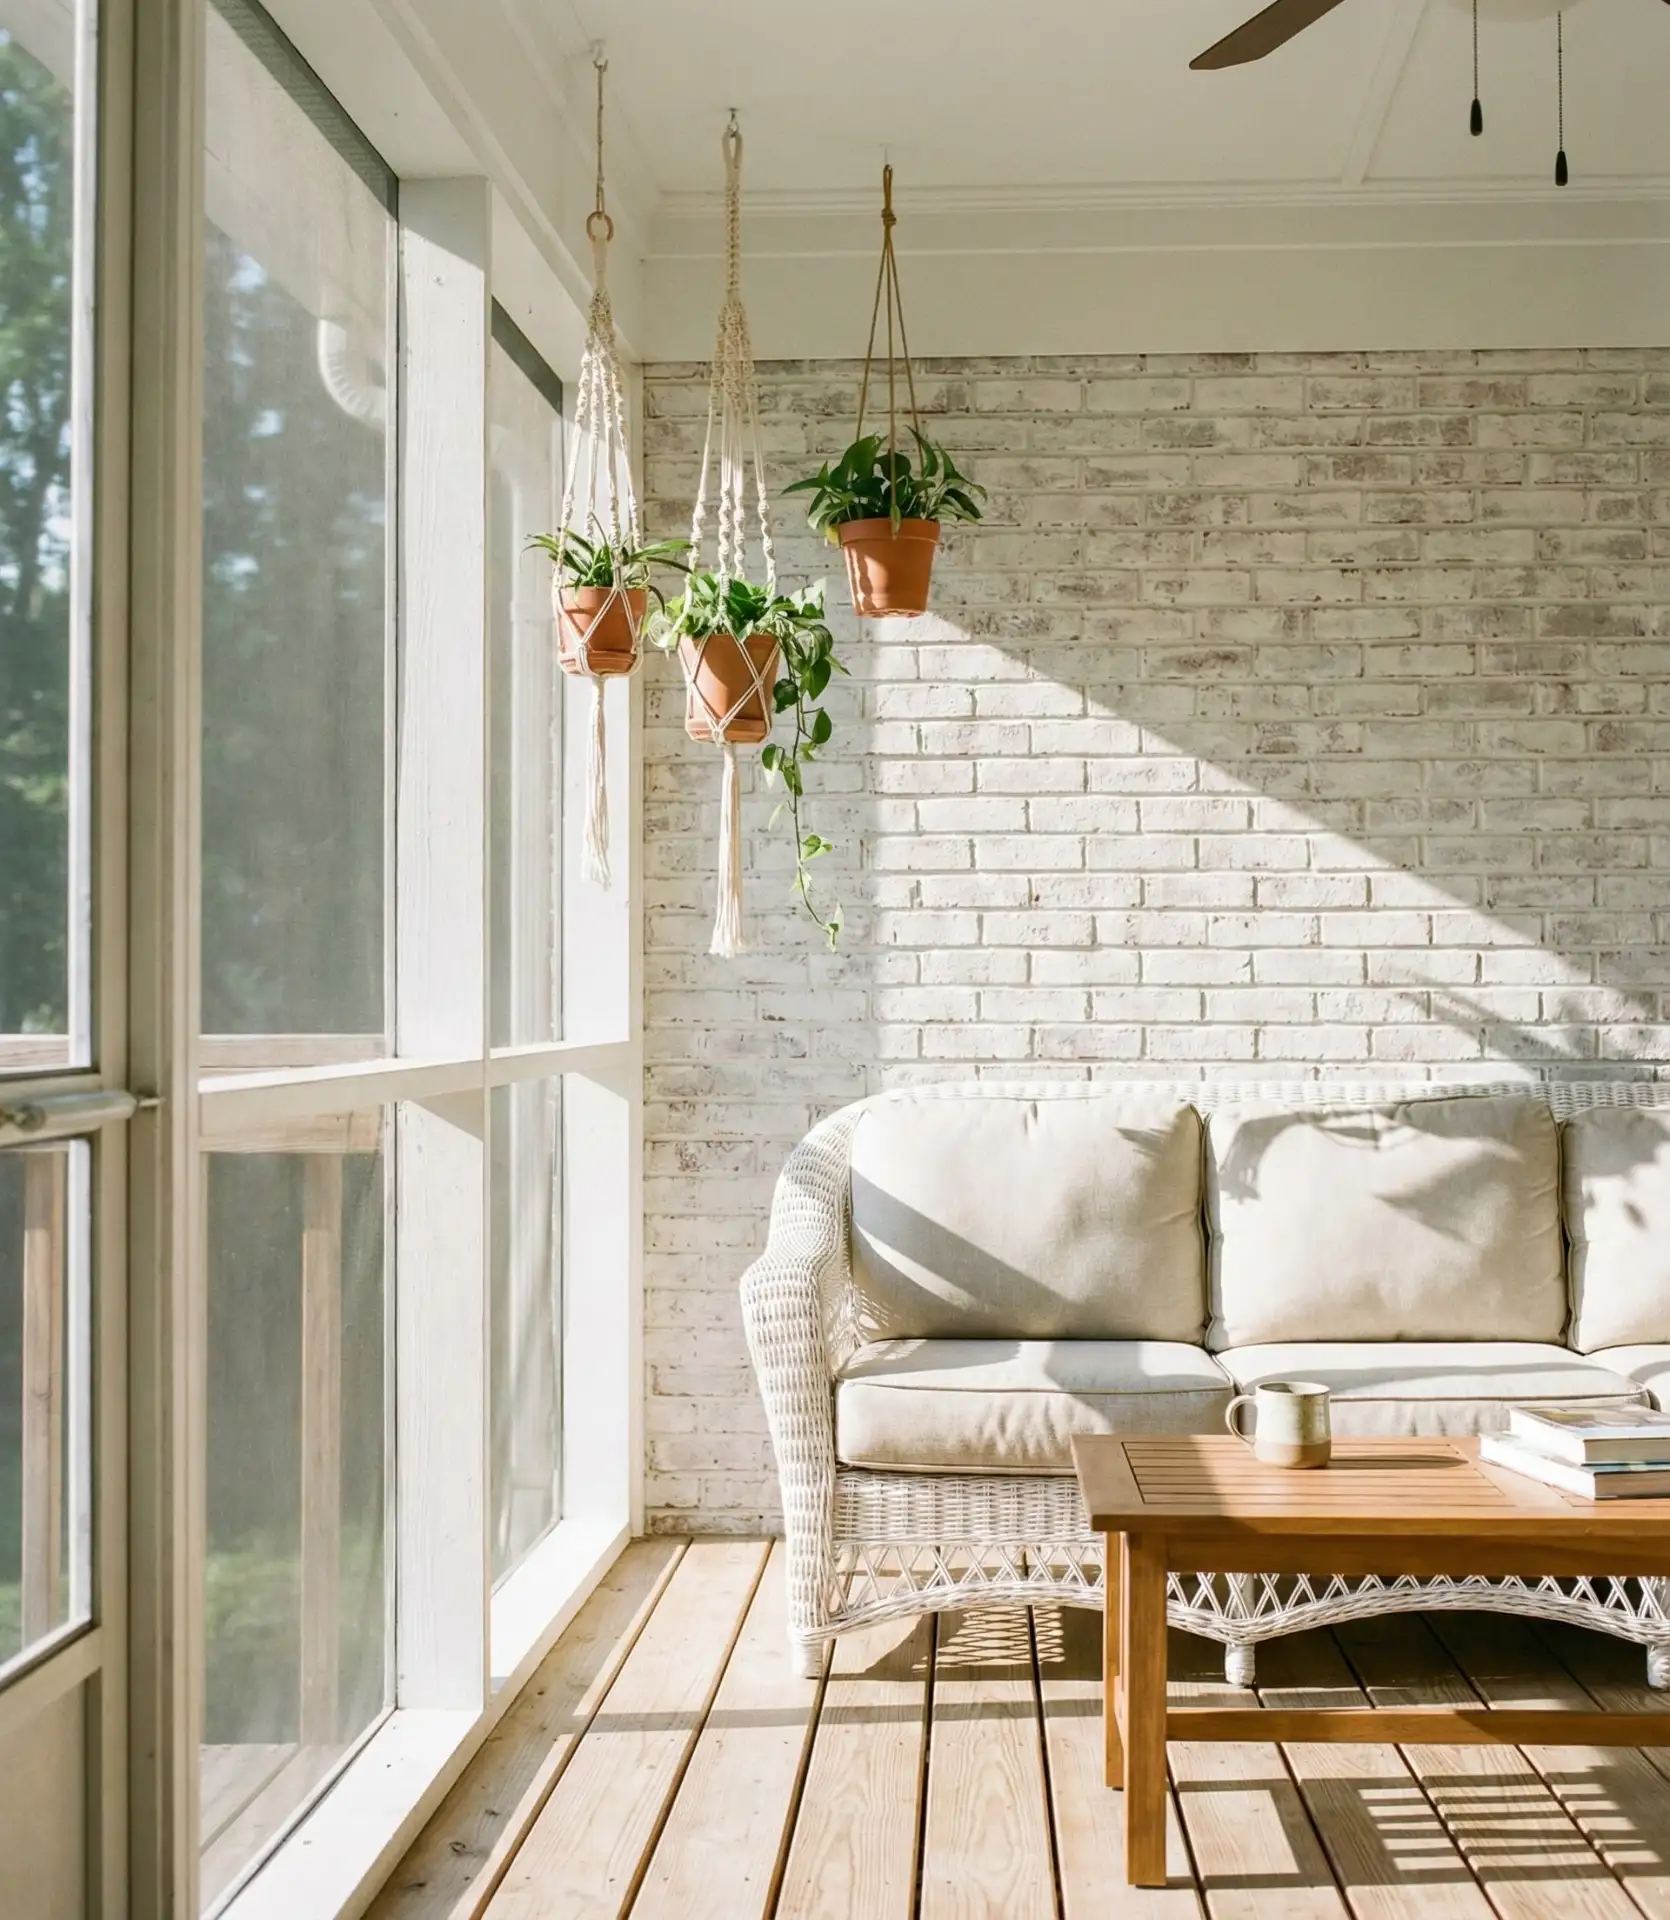
The biggest mistake people make with whitewashing is applying too much paint, which obscures the brick texture and defeats the entire purpose. The proper technique uses a 1:1 ratio of paint to water, applied with a brush and then immediately wiped with a rag to control coverage. Practice on a hidden section first to perfect your technique. This project costs $30-50 in materials and takes an afternoon to complete, making it one of the highest impact, lowest cost upgrades available. The technique also works on concrete block walls common in basement porches or older home additions.
16. Cozy Reading Nook with Oversized Chair
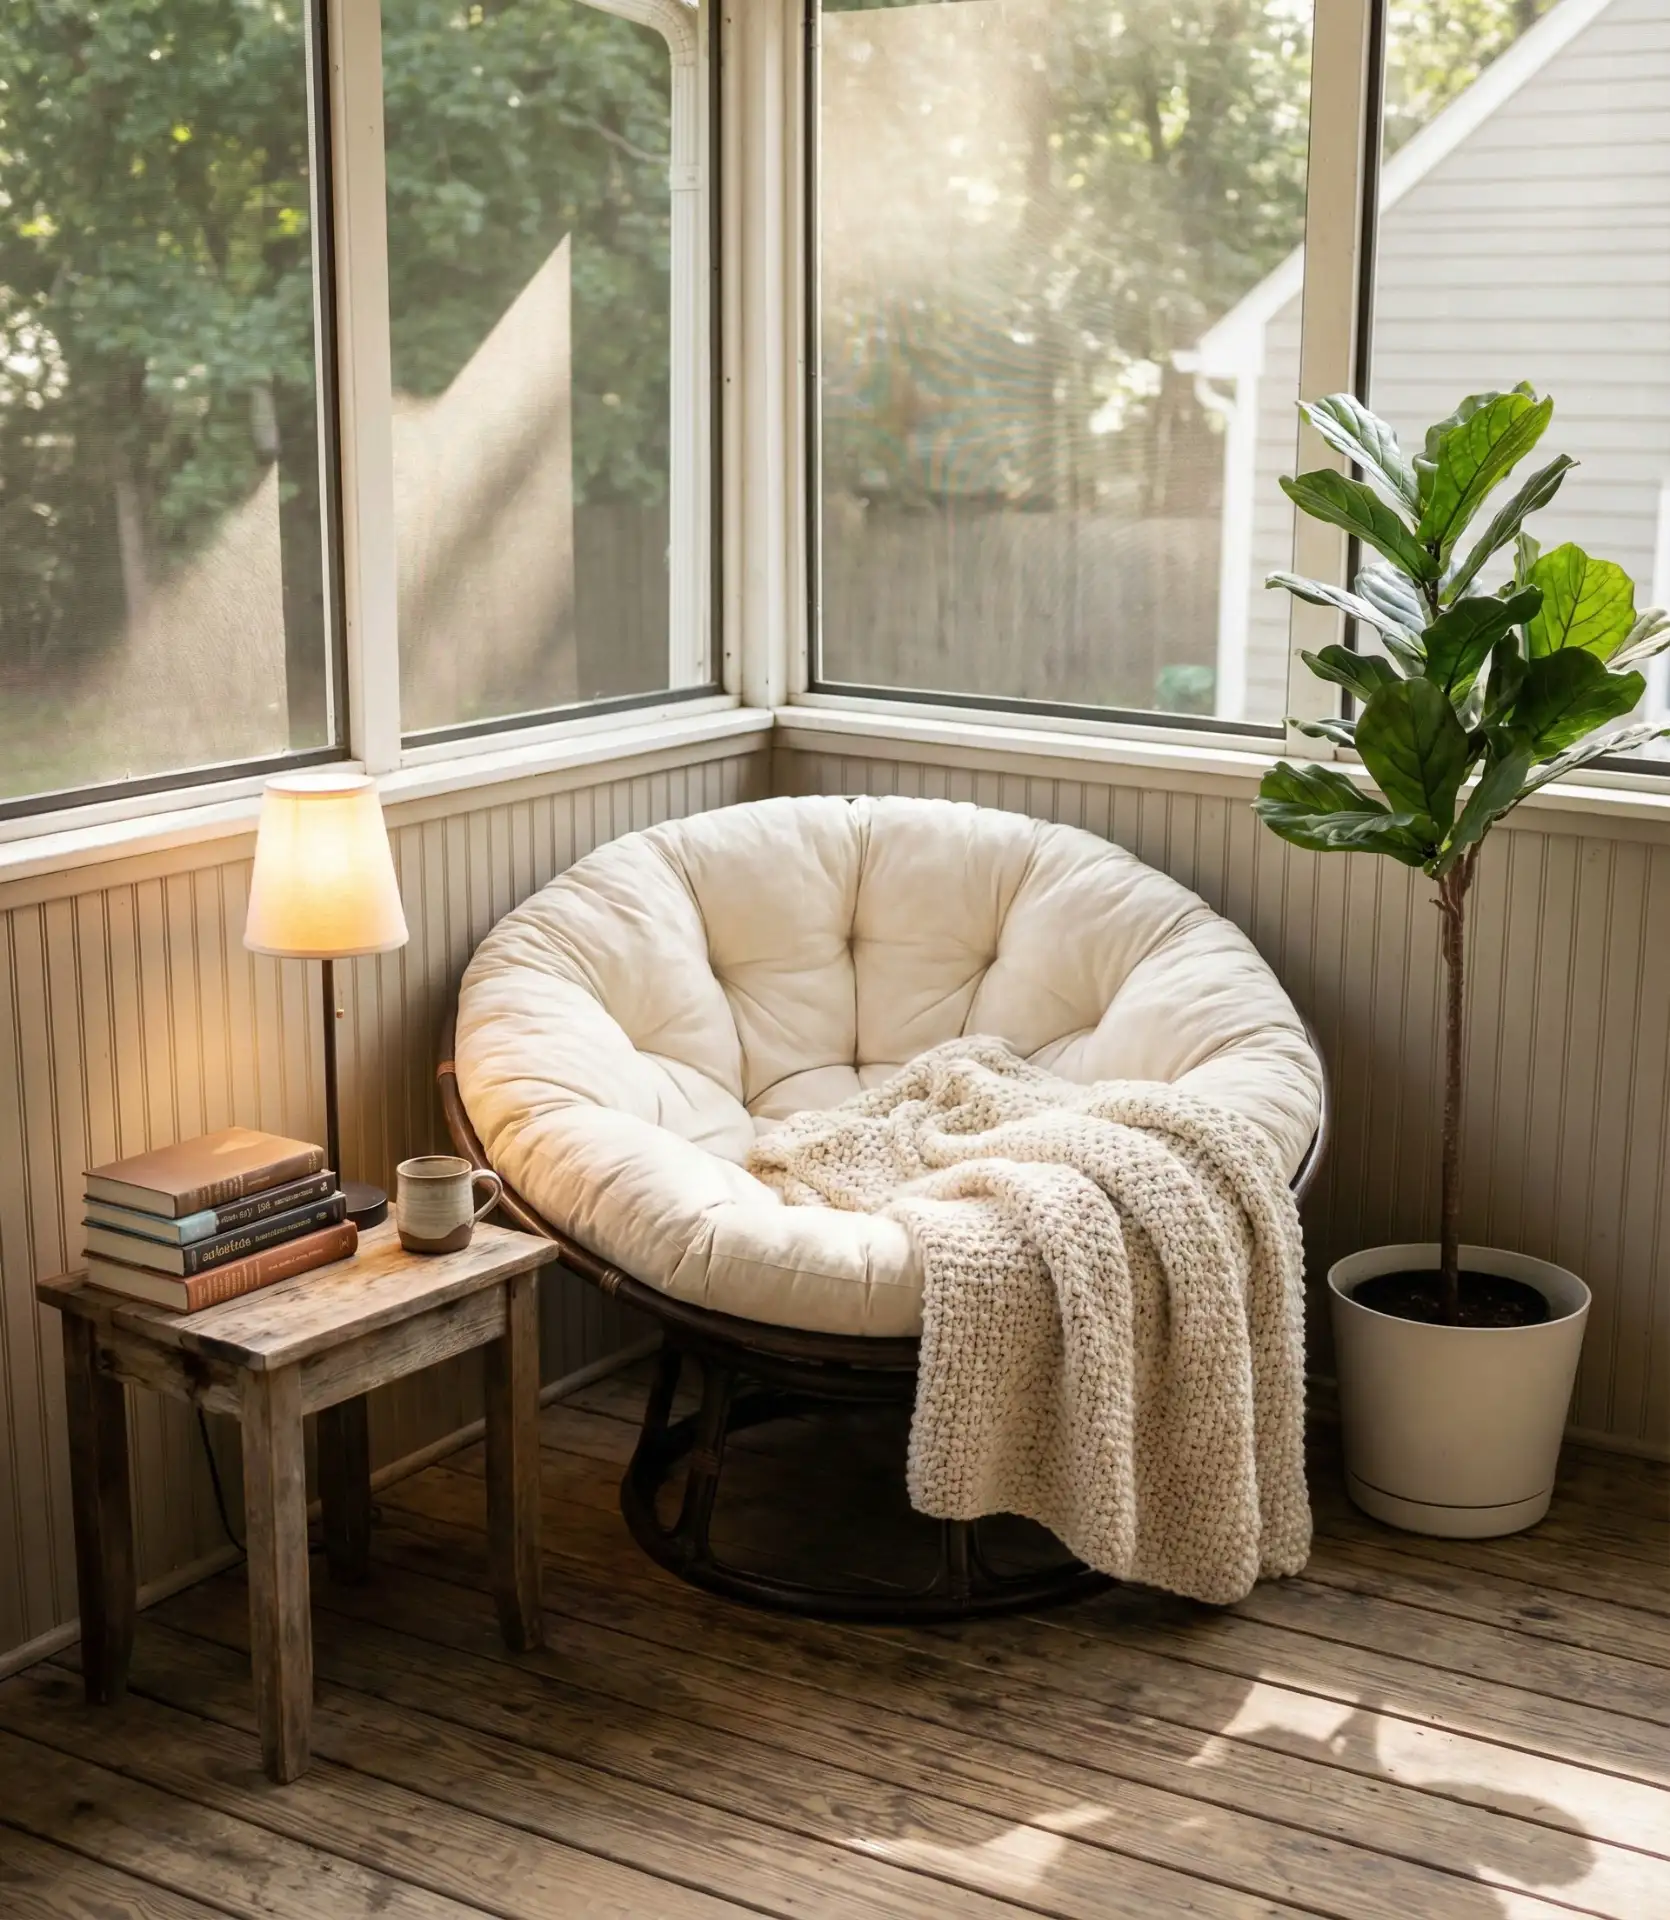
Designate a quiet corner with an oversized papasan chair, egg chair, or club chair paired with a small side table and reading lamp to create a dedicated cozy back retreat for solo relaxation. Position this nook away from main traffic flow, ideally in a corner where two screened walls meet, taking advantage of cross breezes and dual views. Add a small bookshelf or magazine rack within arm’s reach, along with a soft throw blanket draped over the chair back. This intentional space becomes your default spot for morning coffee, afternoon books, or evening unwinding—a personal sanctuary within your larger porch layout.
Homeowners who create dedicated reading nooks report using their porches far more regularly than those who only have general seating—having “your spot” makes the space feel more personal and purposeful. Look for oversized chairs during end-of-season patio sales when retailers clear inventory at 50–70% off original prices. Papasan chairs, despite their dated reputation, have made a comeback and work brilliantly on porches because their bowl shape is incredibly comfortable for extended lounging. Add a small outdoor-rated rug under the chair to define the nook and provide cushioning underfoot.
17. String Light Canopy for Magical Ambiance
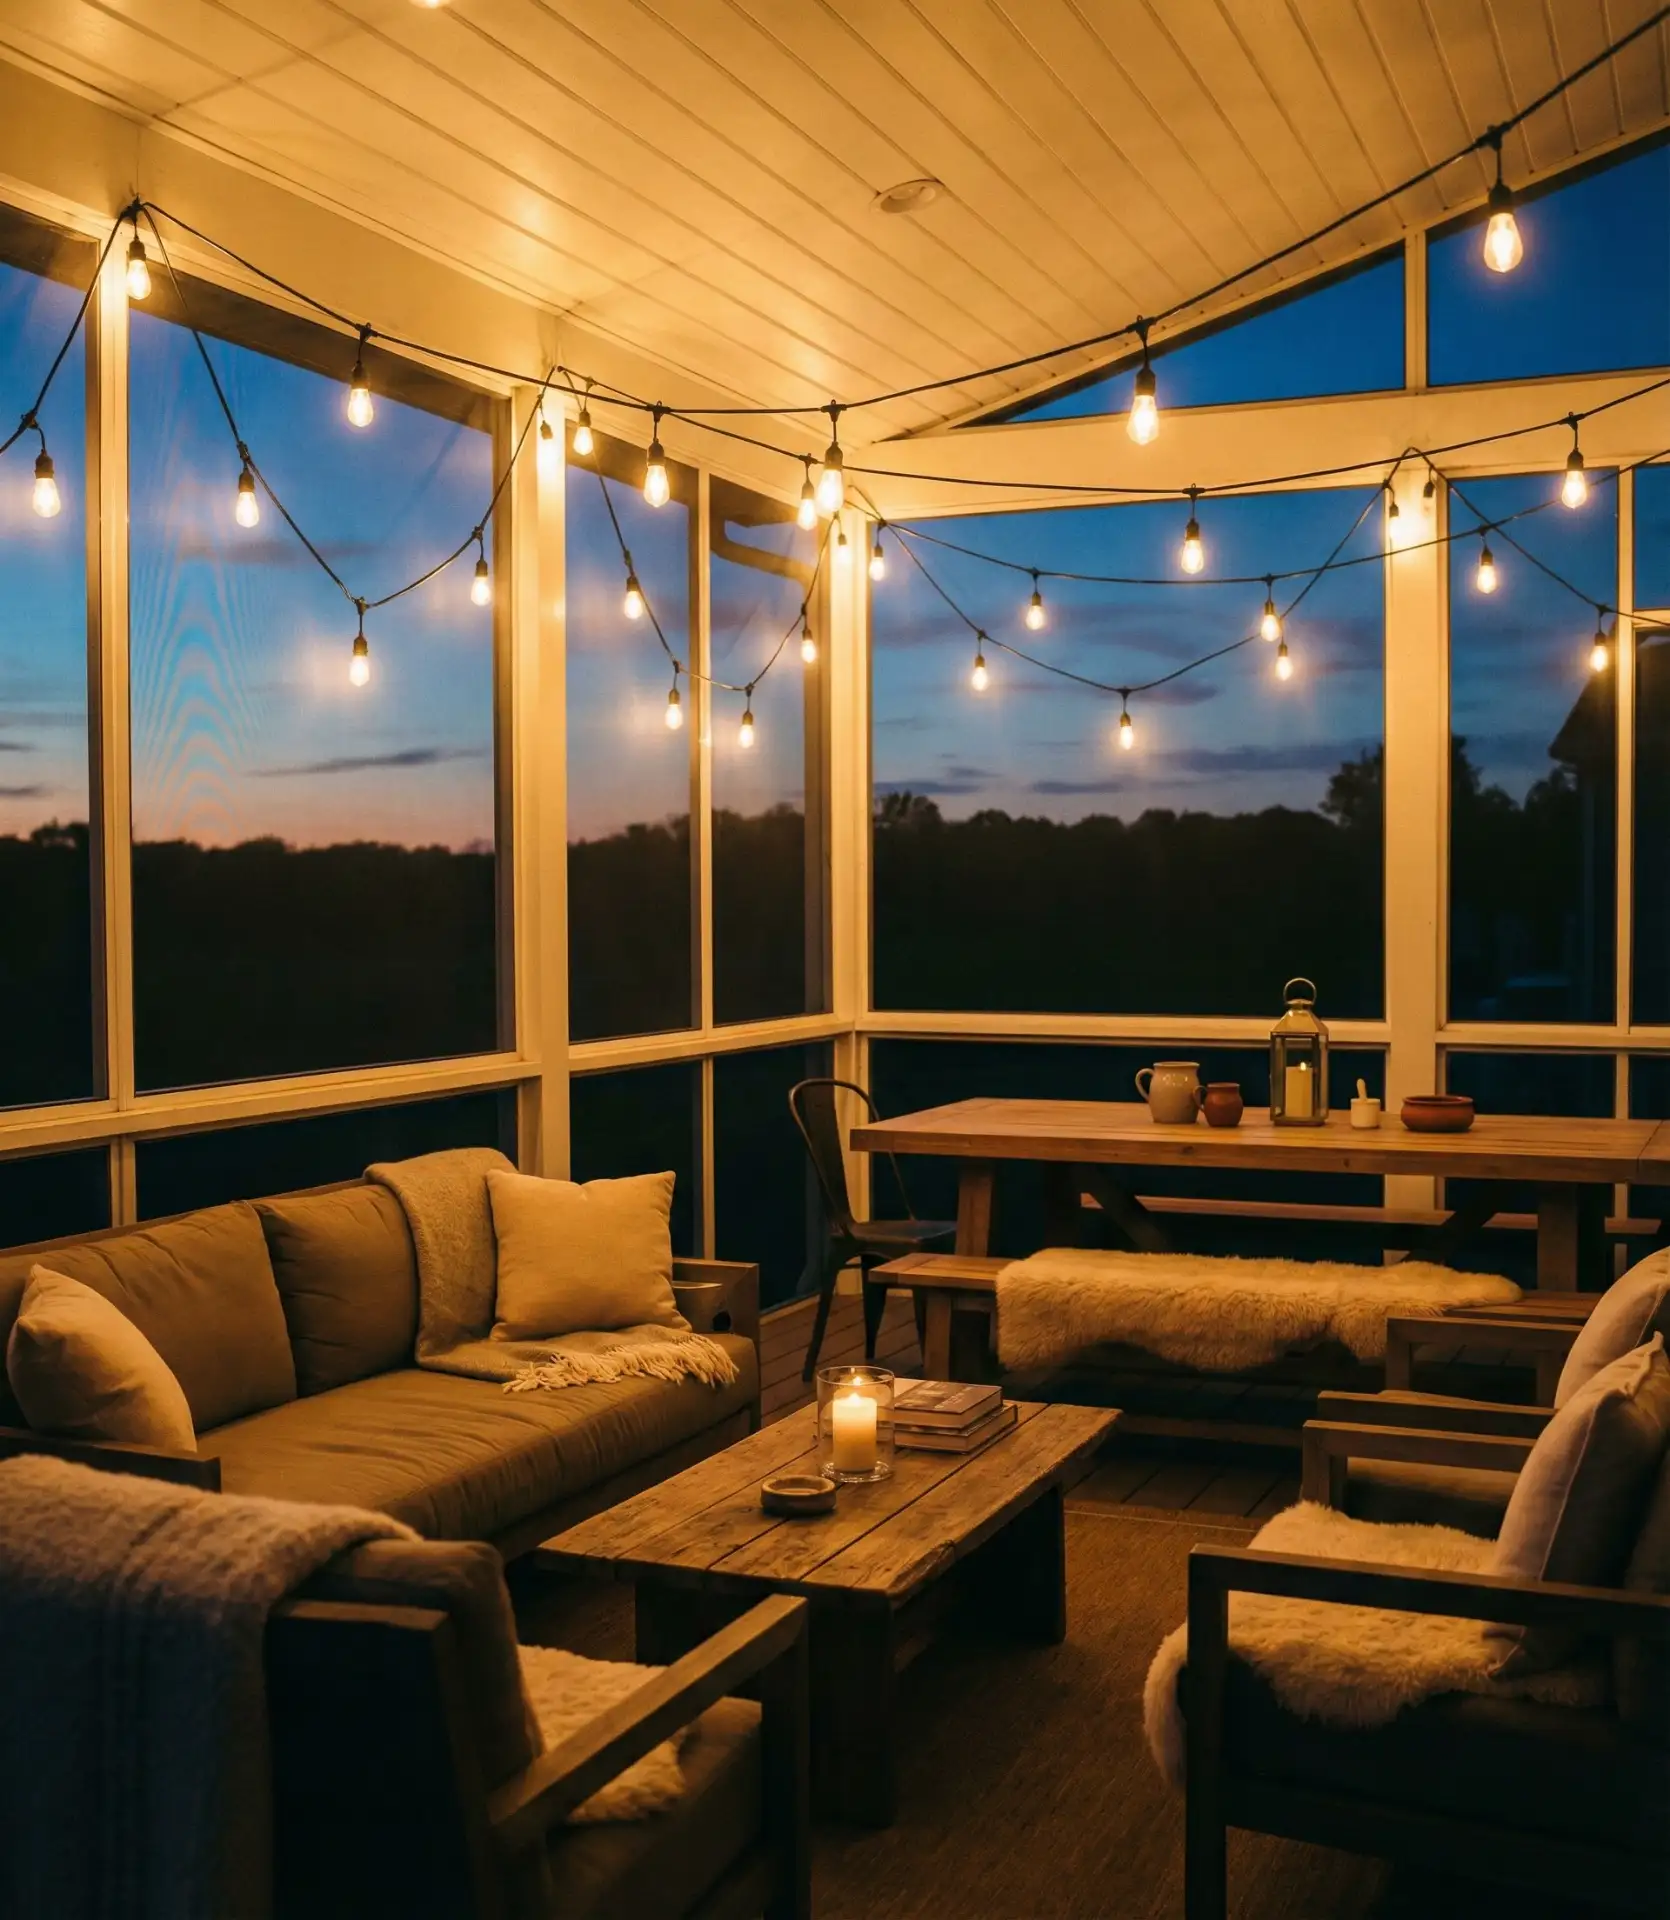
Create an enchanting overhead canopy by stringing multiple strands of Edison bulb or globe lights across your porch ceiling in a zigzag or grid pattern. This lighting transformation has maximum impact for minimal investment—creating an atmosphere that extends porch usability well into evening hours. Use eye hooks or cup hooks screwed into ceiling beams, spacing them 3-4 feet apart, then drape lights in whatever pattern suits your space. The warm glow creates an intimate, restaurant-like ambiance perfect for dinner parties, romantic evenings, or simply making everyday moments feel more special. Choose dimmable LED bulbs to control brightness levels and reduce electricity costs. 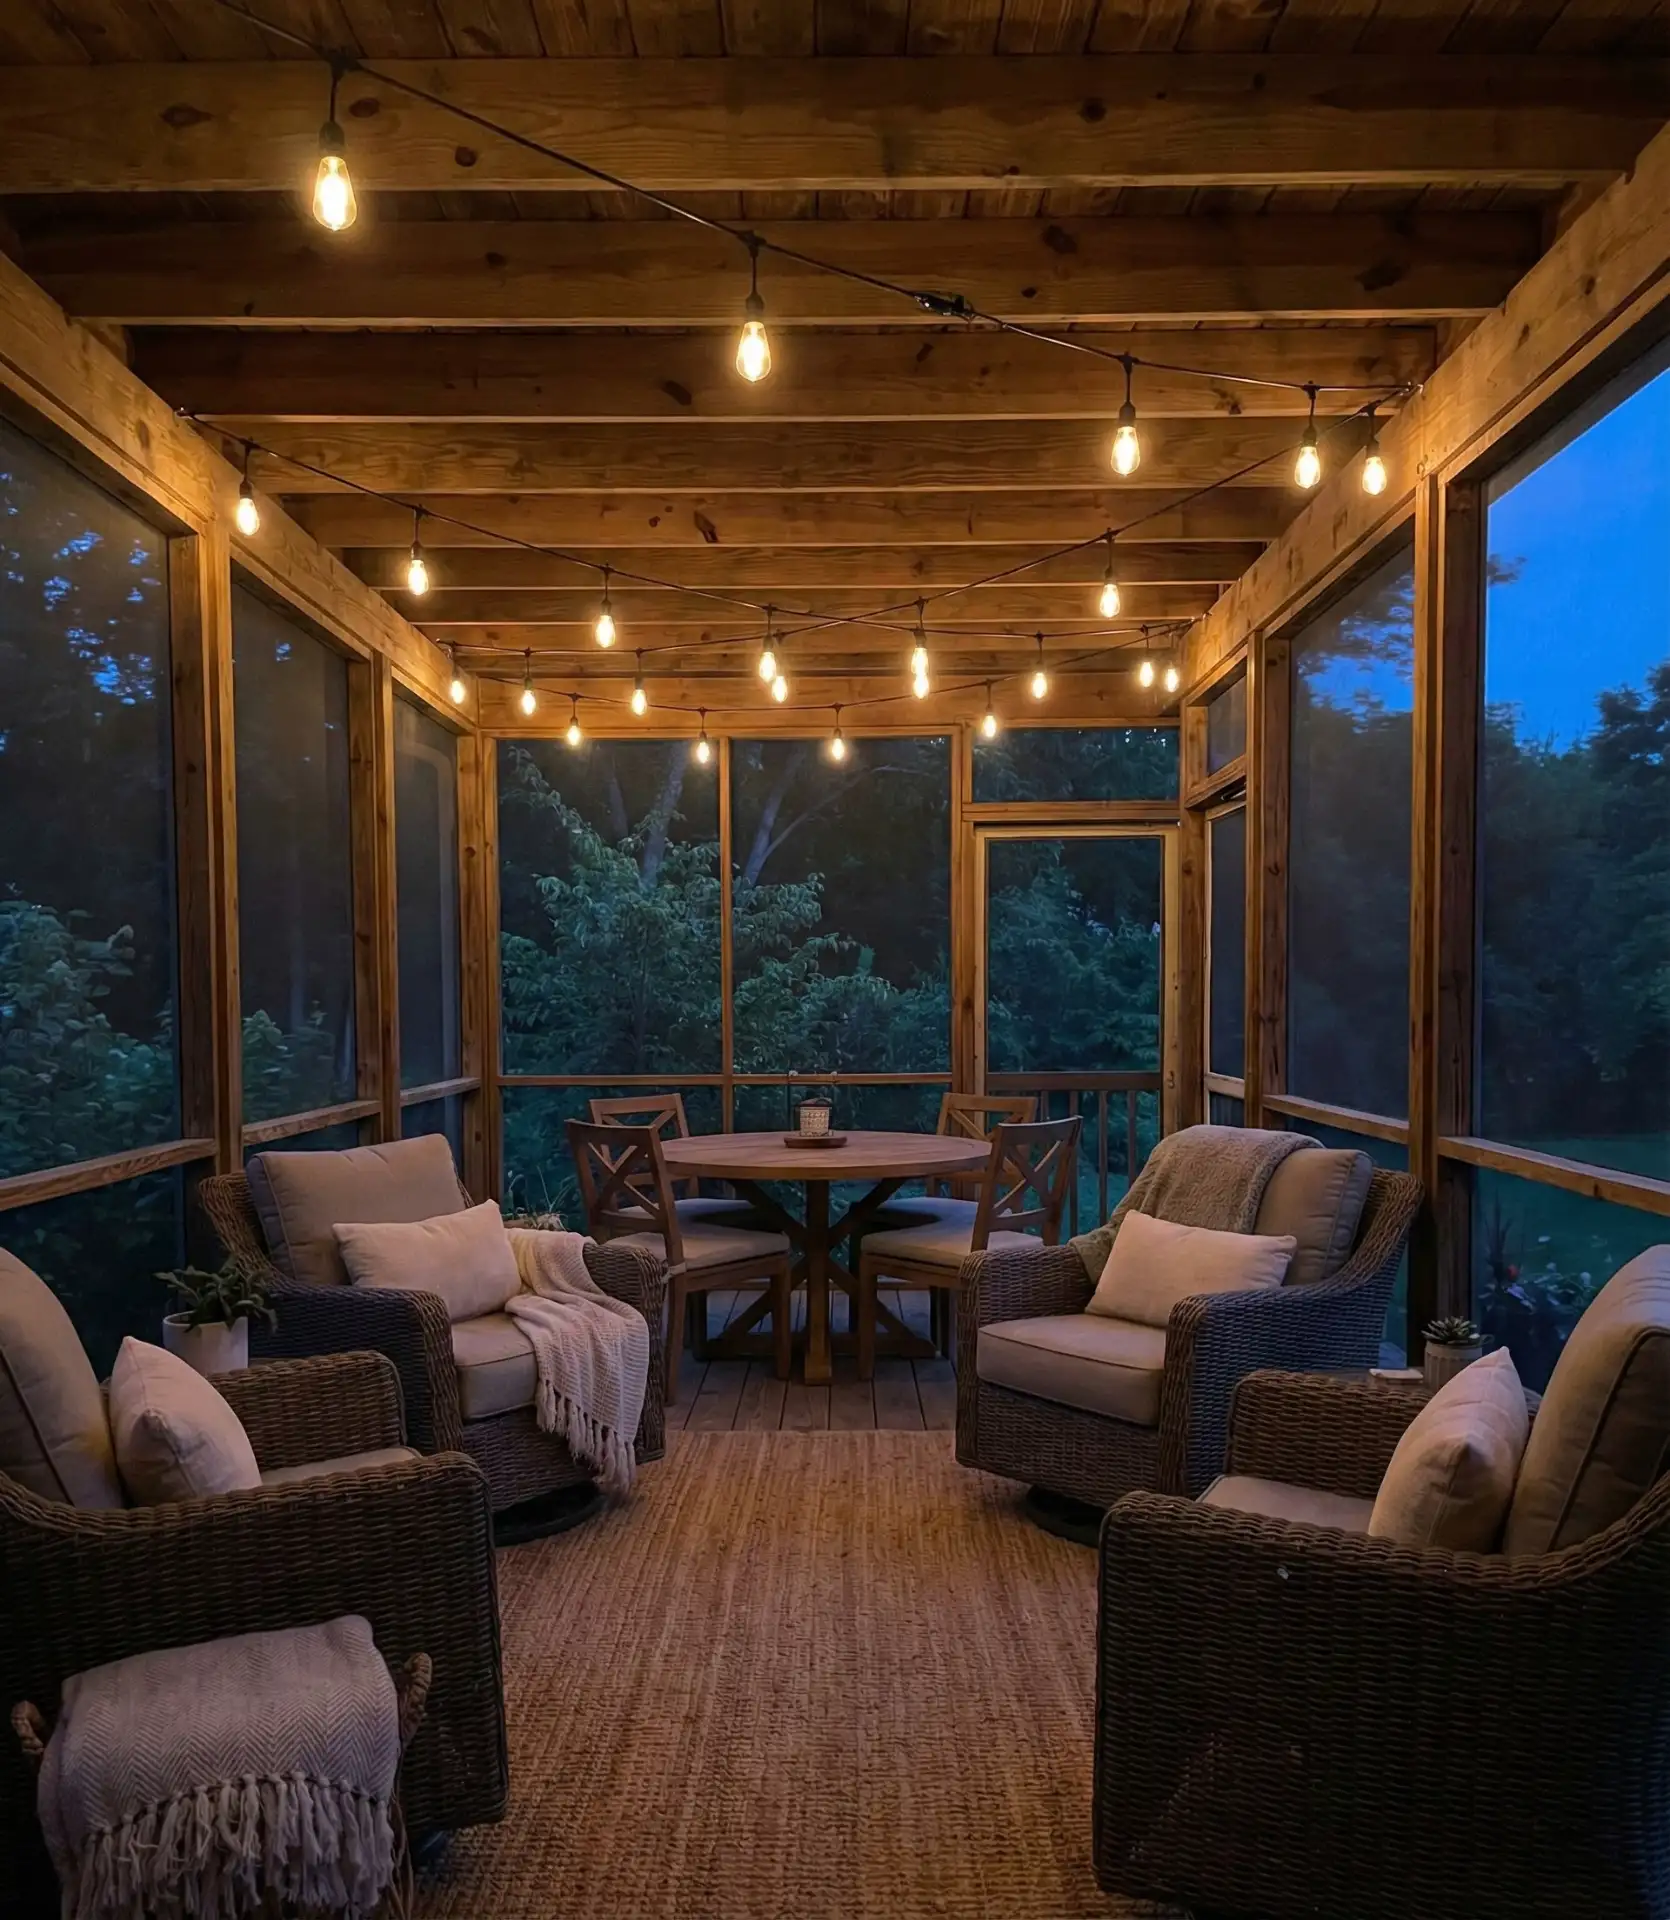
This is perhaps the single most transformative upgrade for large porches where overhead lighting typically falls flat—standard ceiling fixtures rarely provide the ambiance that string lights effortlessly create. Quality outdoor-rated string lights cost $30–$80 per strand, depending on length and bulb style, and most porches need 2-4 strands for proper coverage. Install them on a timer or smart switch so they automatically illuminate at dusk without you having to remember. The installation takes about an hour and requires only a drill, hooks, and a ladder—making it an ideal weekend project with immediate, dramatic results.
18. Farmhouse Sliding Barn Door Entry
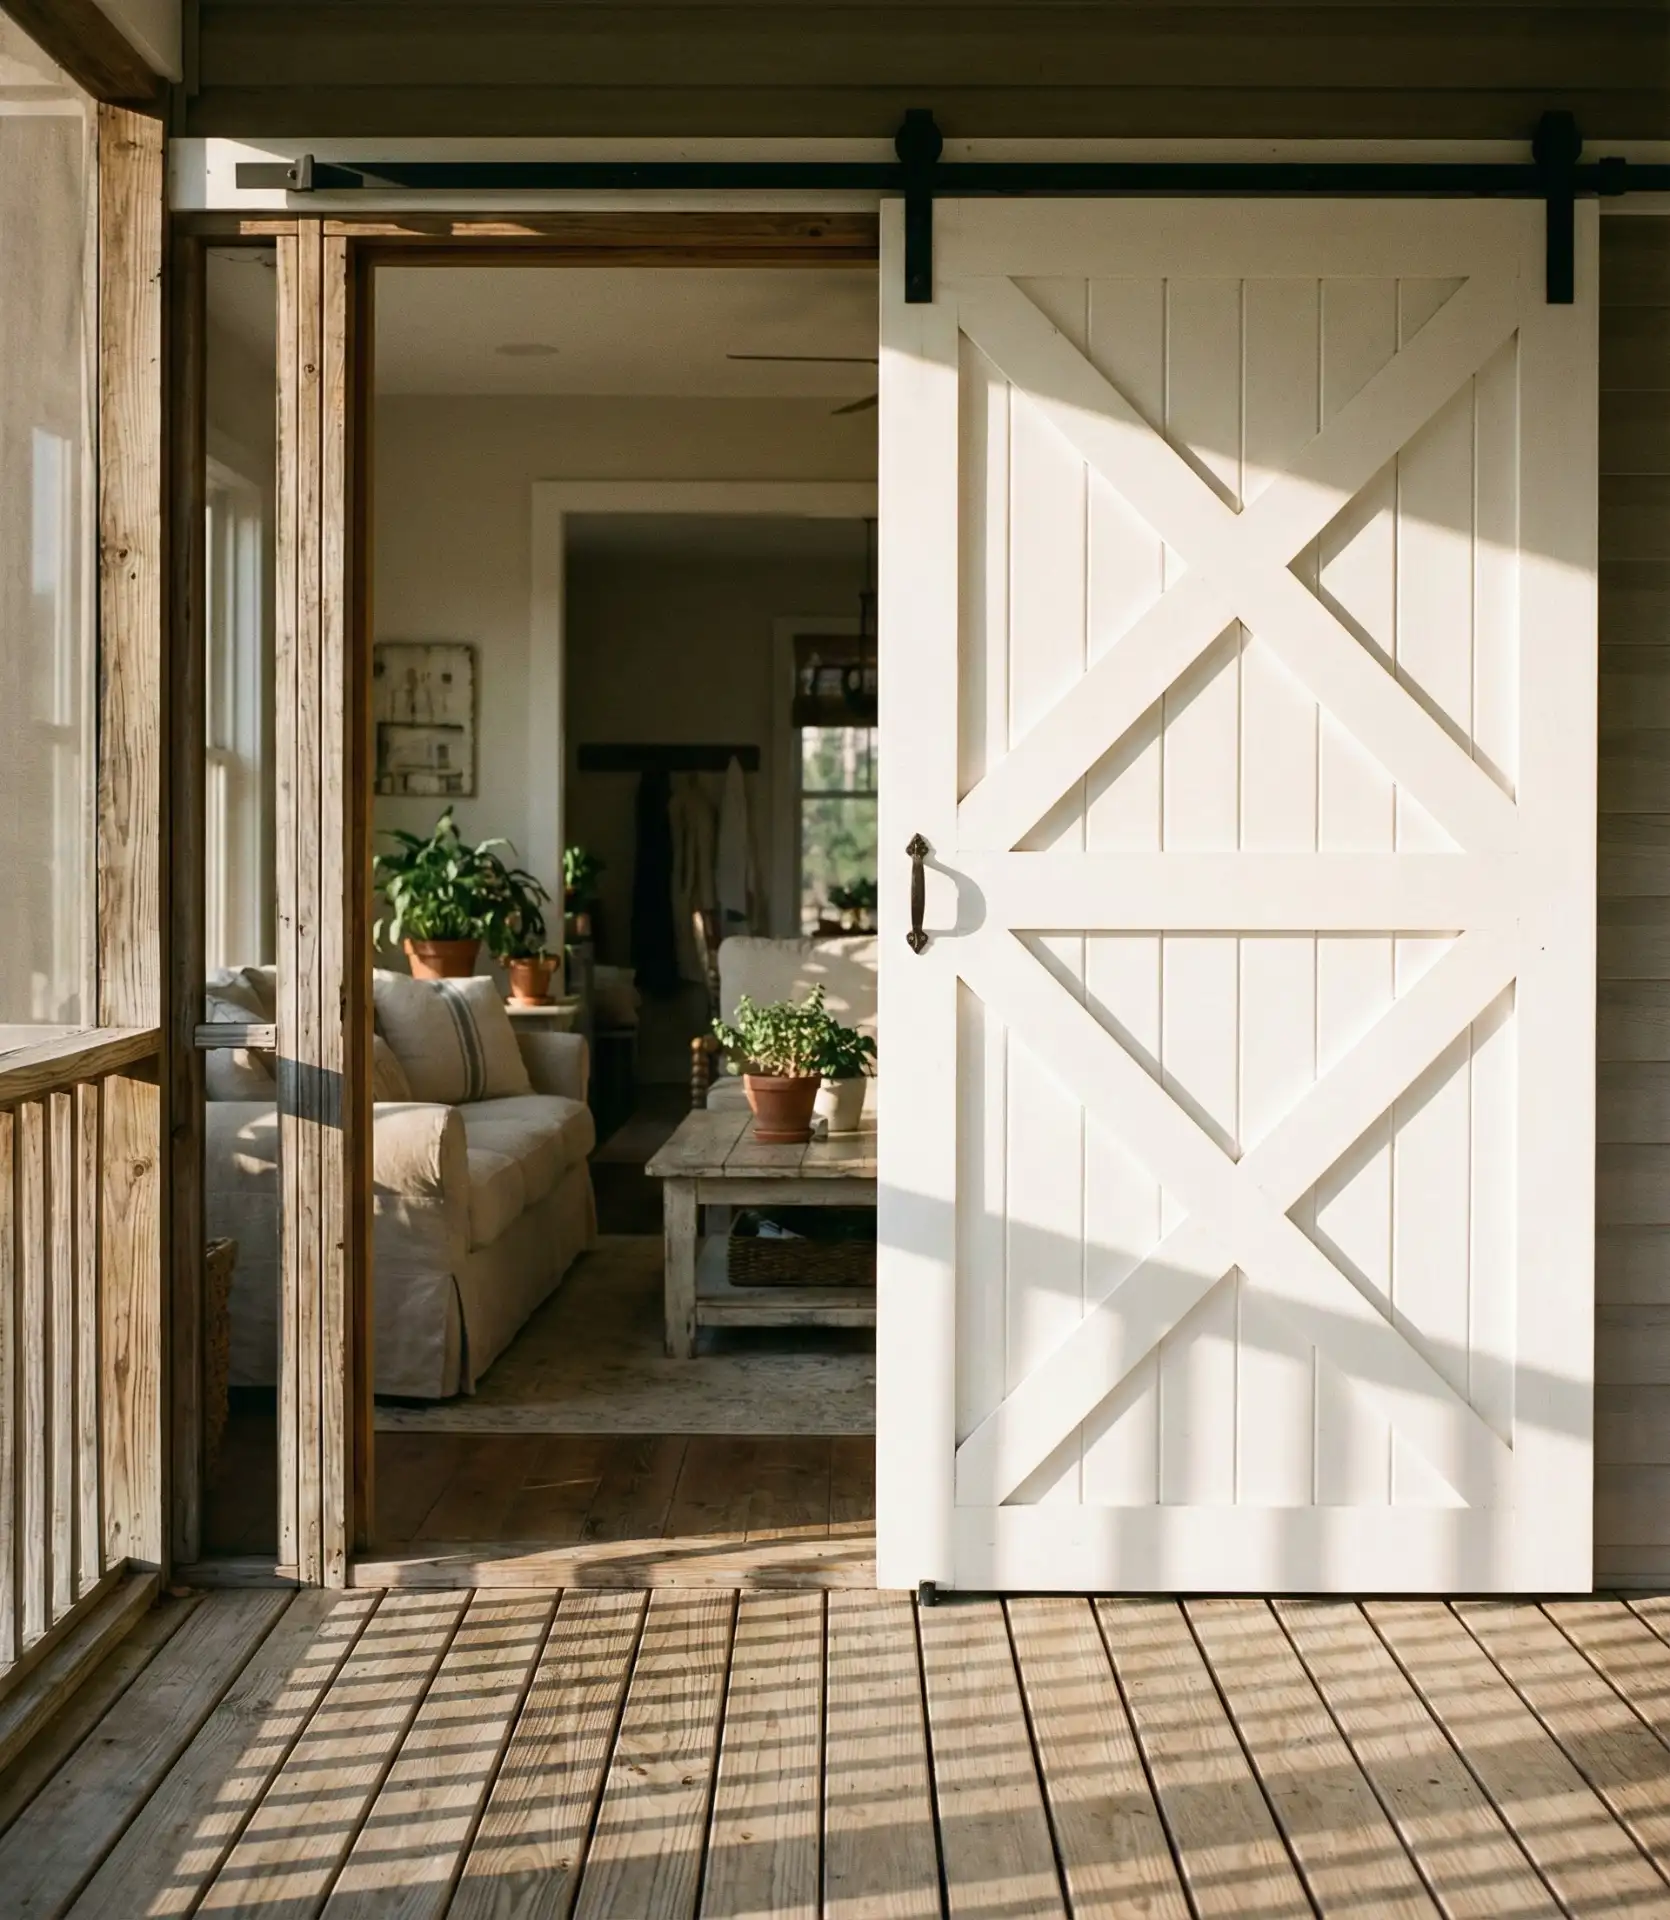
Sturdily fashioned barn sliding doors are an attractive, cozy, and rustic design addition where the porch exits to the interior of the home. They also improve aesthetic and functional traffic flow. When the porch flow is tight, a sliding barn door can save the space of a swinging door. When choosing a door style to complement the interior of the home, one has many easy options: a complete repurposing of an old door to a modern rustic style, the addition of white paint and a large X brace in the traditional farmhouse style, or the addition of a natural stripped wood door in a modern rustic style. Black hardware paired with rustic wood barns is a perfect combination and timeless look for door accents. 
Operating on a barn is one of the more affordable DIY options. Hardware sets that come with pre-drilled doors are also on the lower end of the pricing spectrum, costing between $100 and $300. That price range includes the hardware, door, and any track or handles. Most home improvement retailers sell highly affordable complete systems ranging from $80 to $200. Other than a level and drill, no specific skills are required for this intermediate DIY.
Once fully intact, the visual benefit will outweigh any effort, and the enhancement of the ease of access to the porch will be appreciated on a daily basis. When installing, be sure to use the correct floor guides to prevent any swinging of the doors so they don’t hurt any walls.

19. Screened Curtain Panels for Flexible Privacy
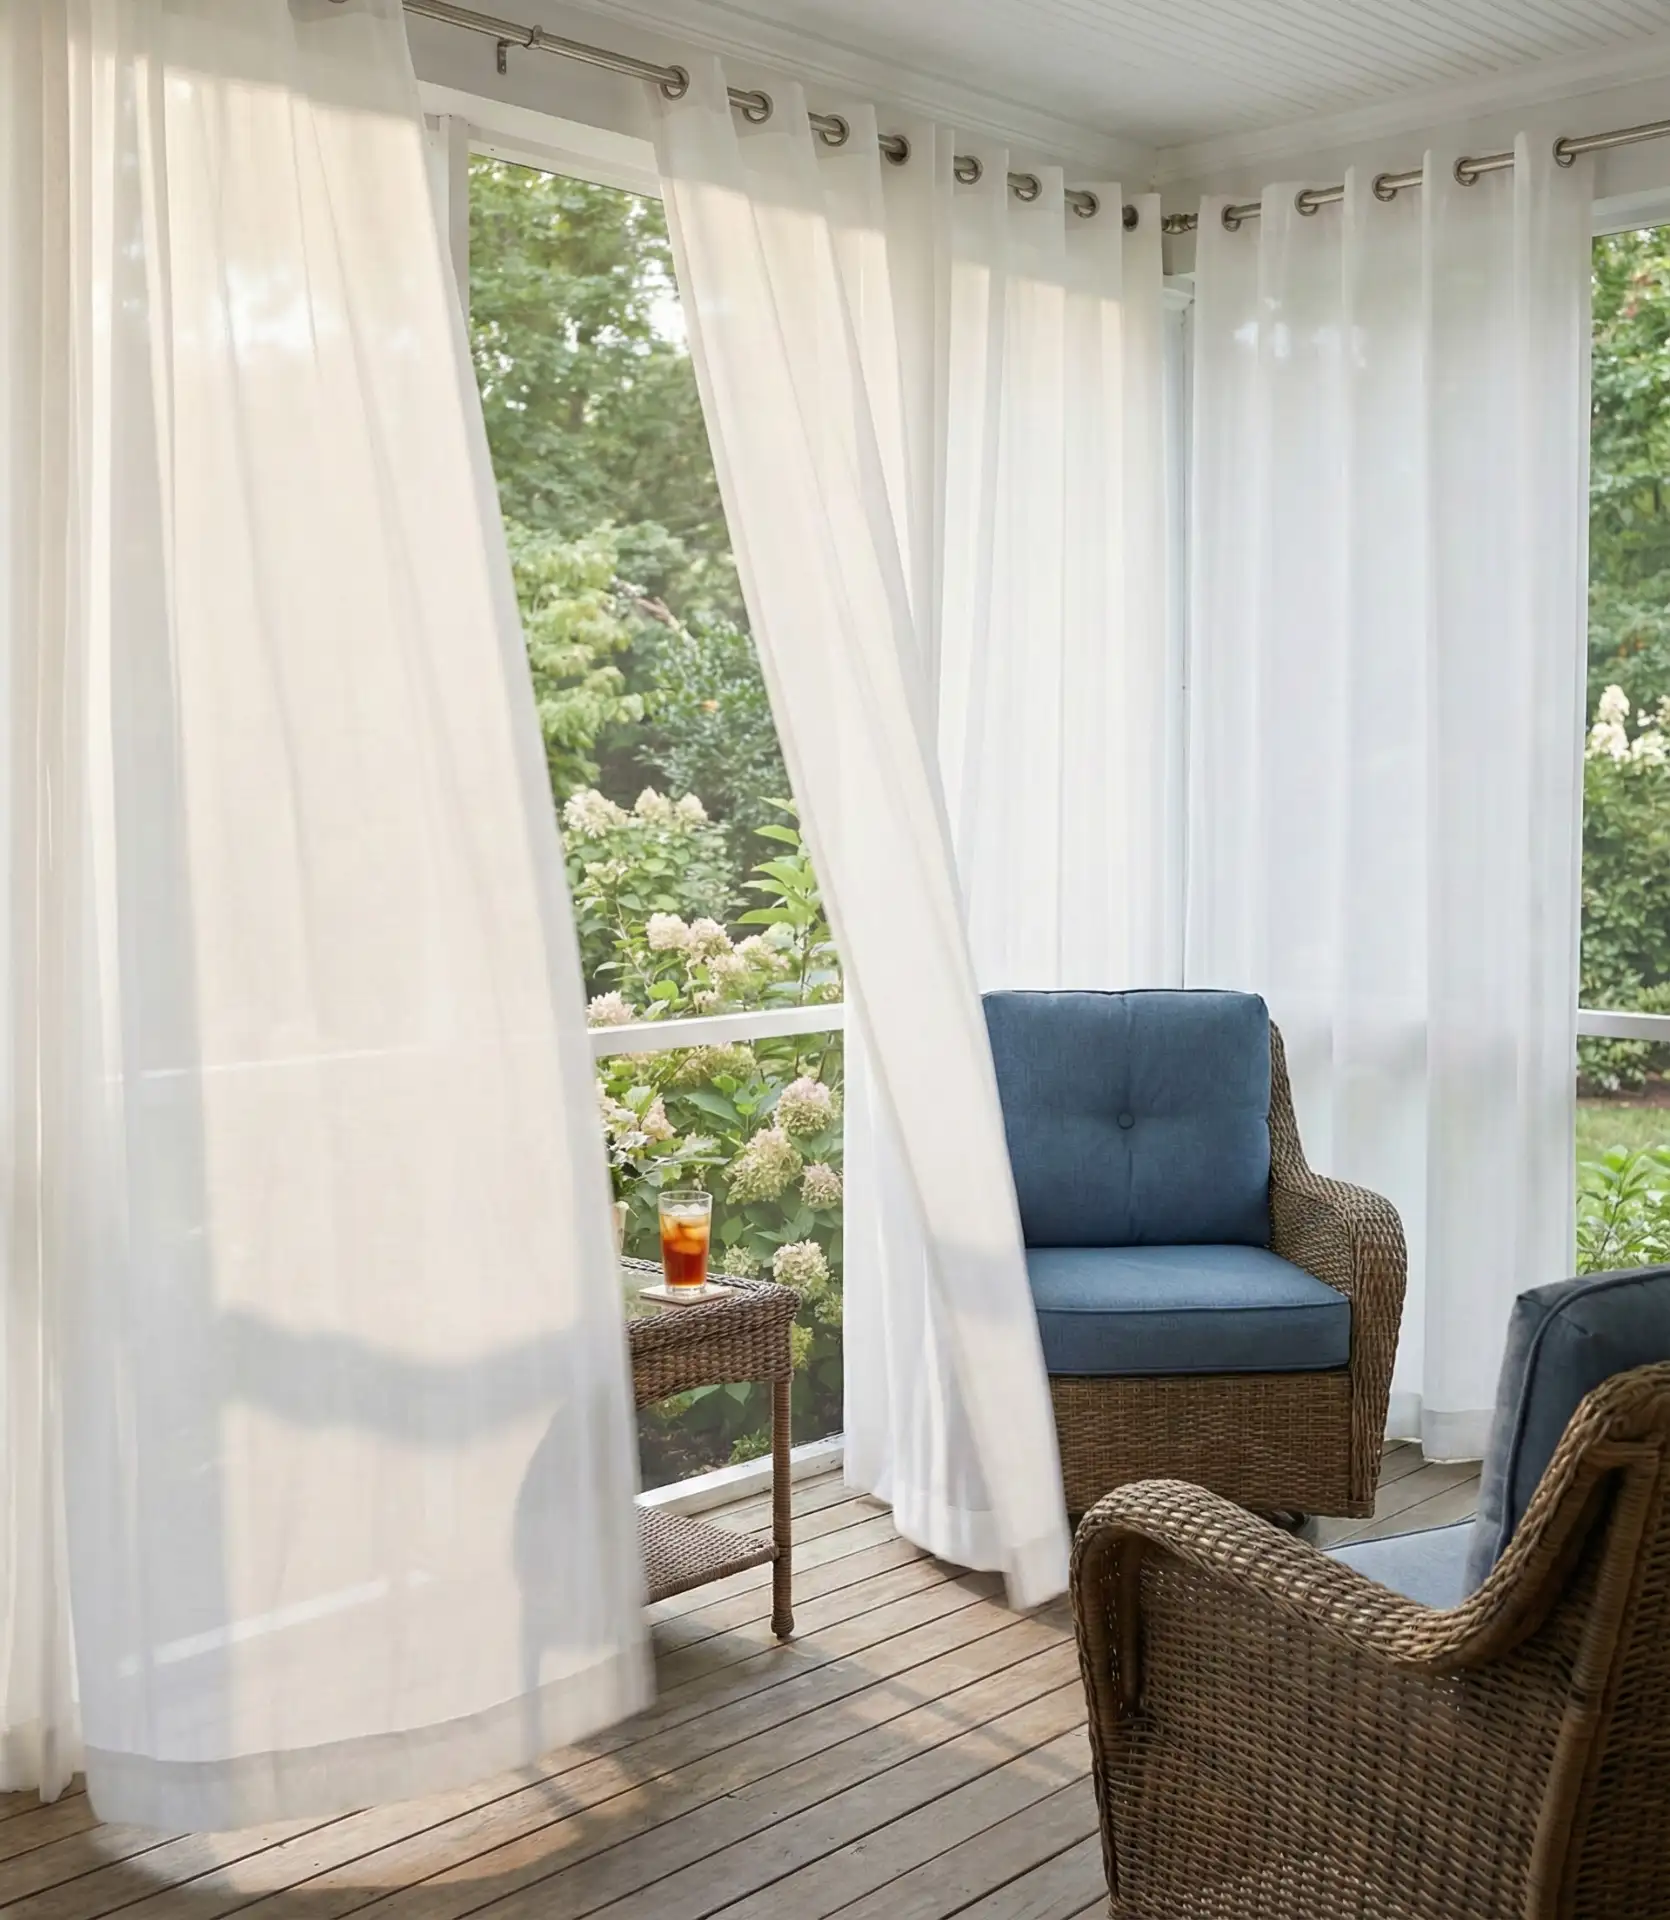
Slide outdoor panel curtains on rods mounted to the ceiling, which run parallel to your screens, to provide privacy and control of the sun while allowing air to flow through. Light, weather-resistant fabrics in colors such as white, cream, and faded blue are good to use, as they don’t block out sunlight and help create a more open space. The curtains are able to be fully drawn to block shade, closed together for a cozy ambiance during parties, or tucked to the side to open up the whole area. This solution hits a variety of points, which are privacy from onlookers, sun control to provide shade during hotter parts of the day, and a softness that visually and aesthetically helps counter the screen and building components. 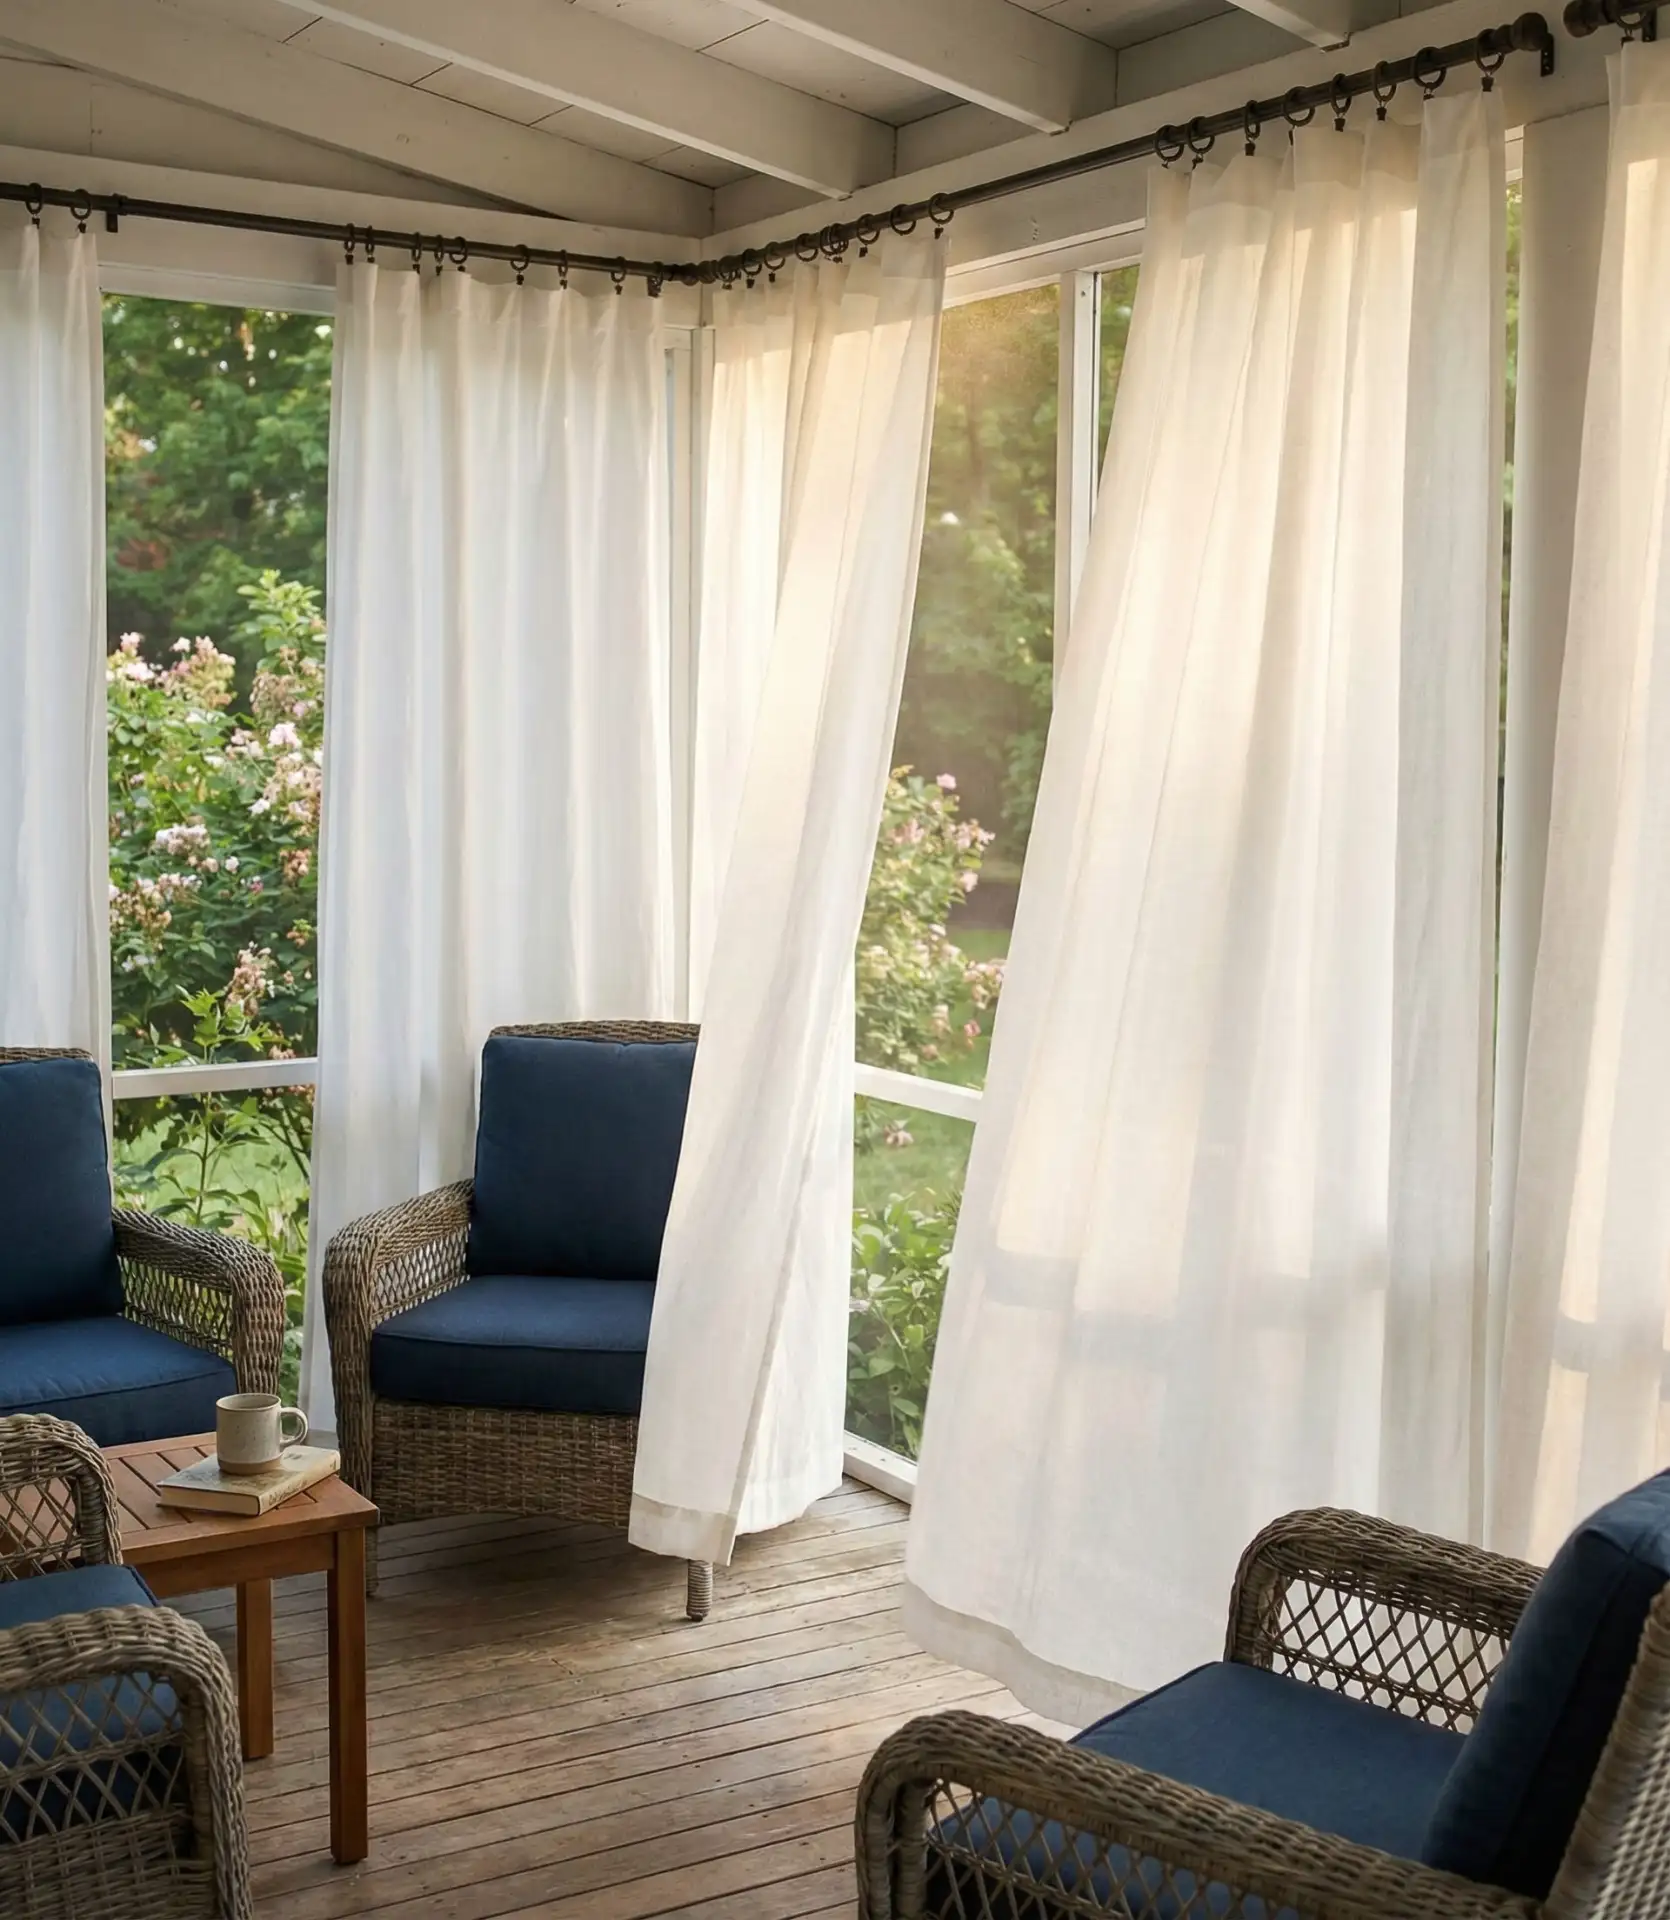
West-facing porches in particular benefit enormously from curtains, as the harsh afternoon sun can make these spaces unusable during peak heat hours. The curtain layer reduces temperature by several degrees through shading while still allowing breezes to circulate freely. Opt for grommeted panels on simple tension rods for the easiest installation—no drilling required if your porch has posts or beams to tension between. Budget $20-40 per panel, with most porches needing 4-8 panels depending on size. Wash them twice per season to maintain appearance and prevent mildew buildup in humid climates.
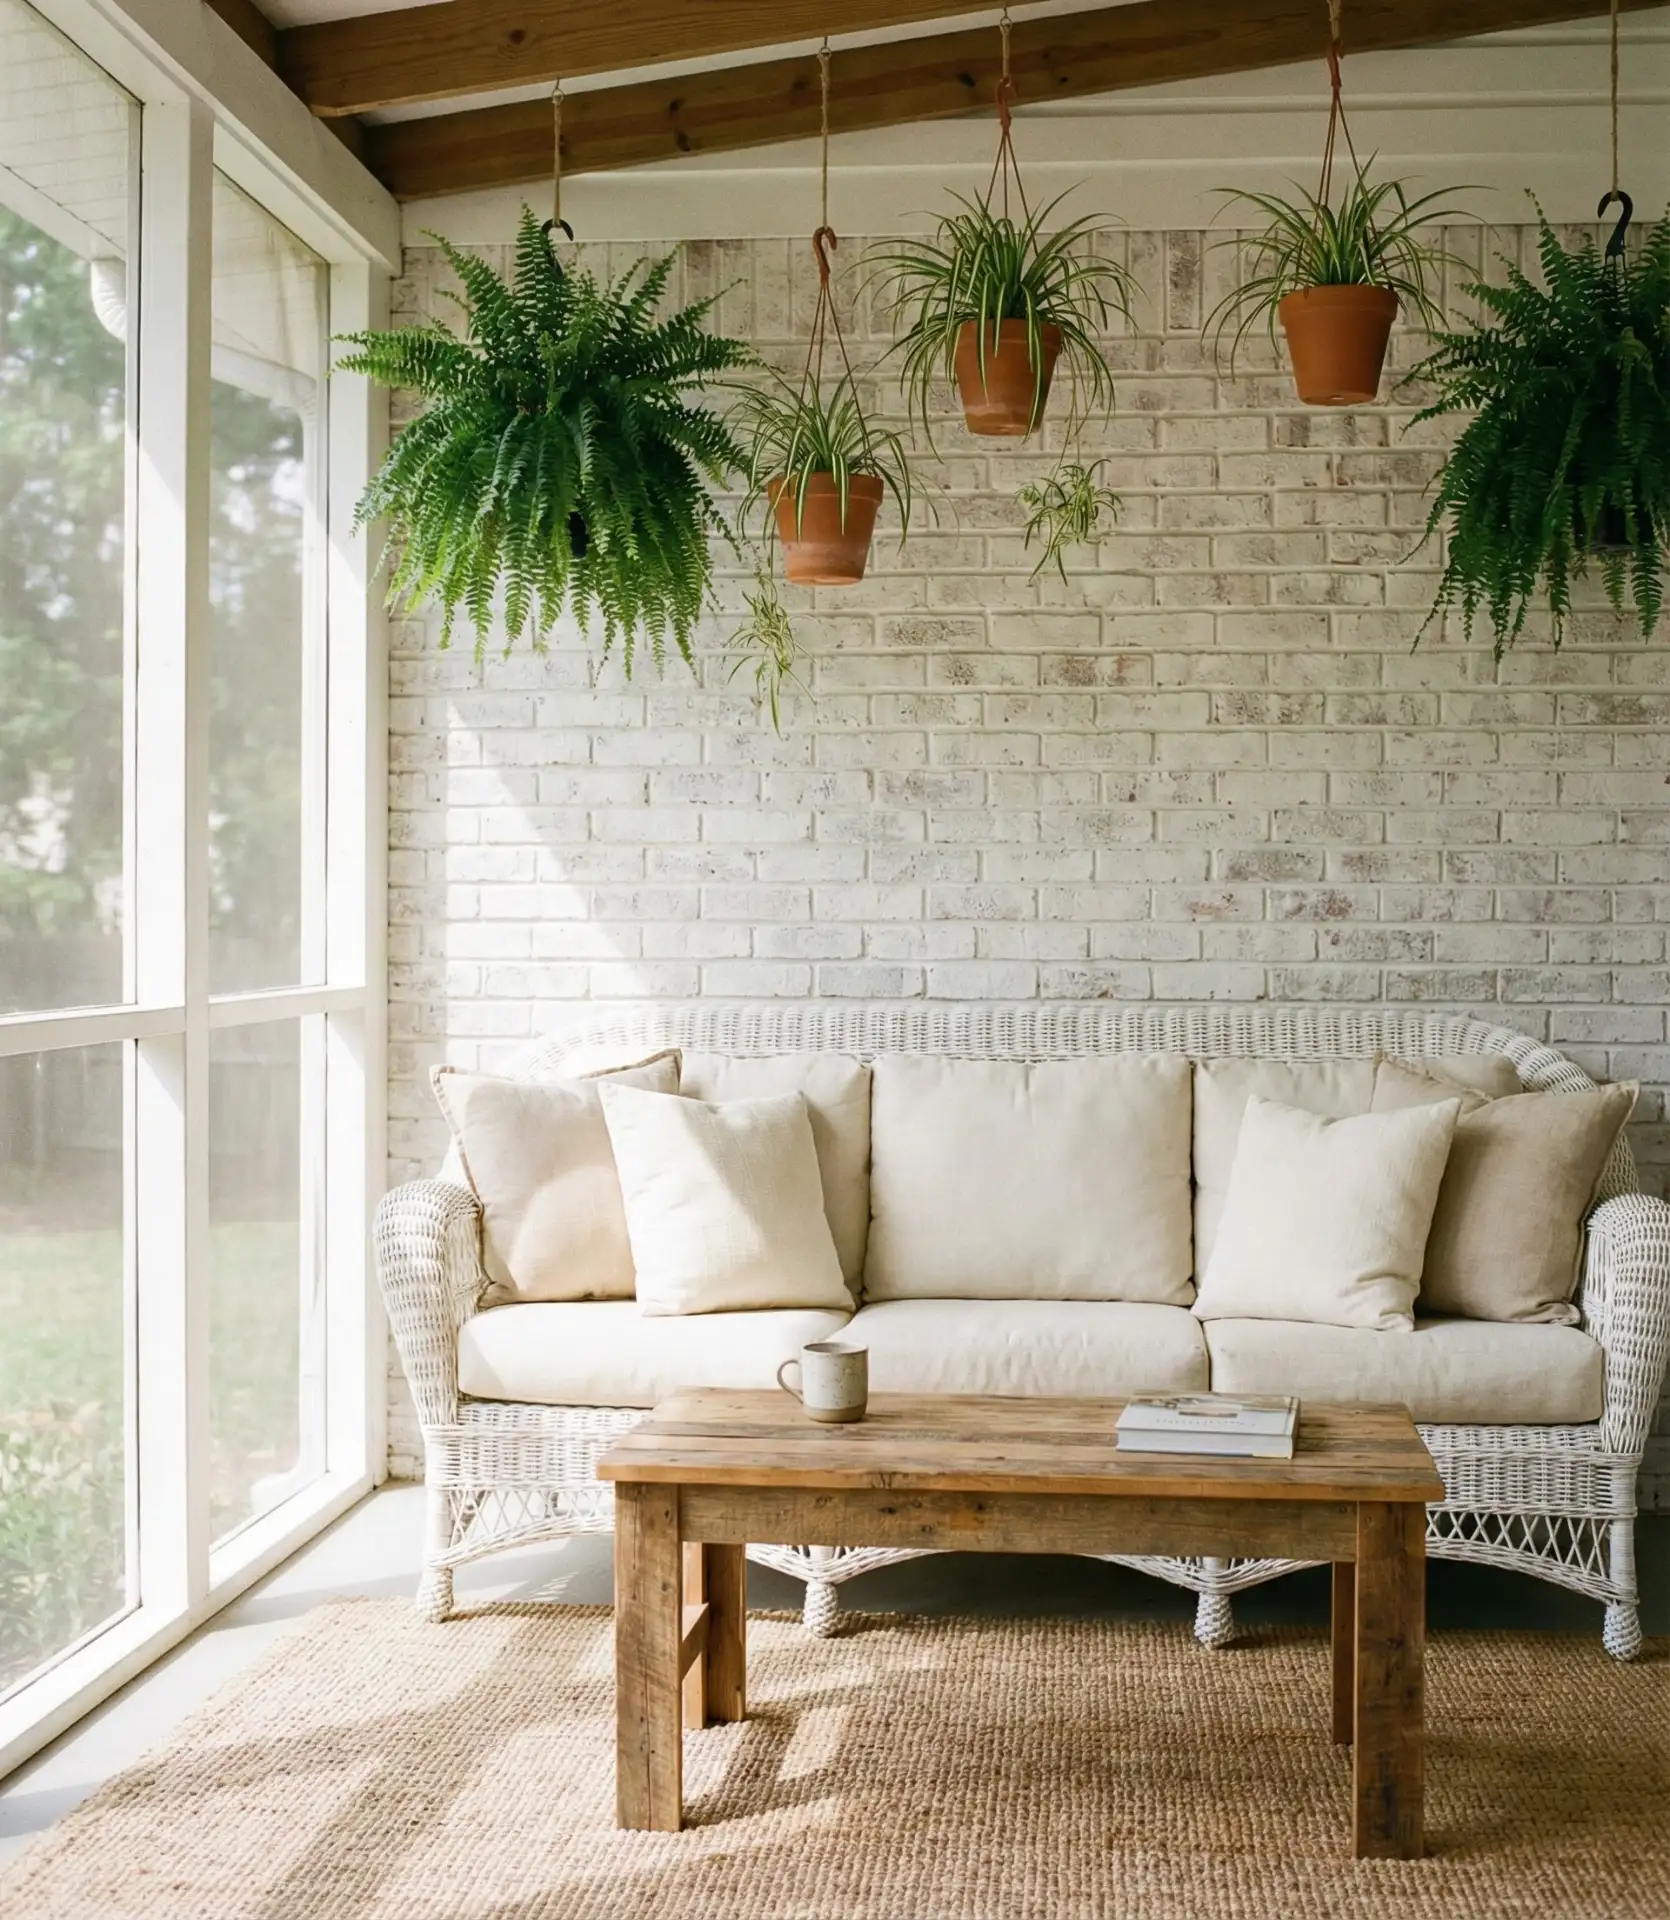
20. Multi-Level Plant Display with Stands

Create a dynamic plant showcase using tiered plant stands, wall-mounted shelves, and hanging baskets at multiple heights to transform your porch into a boho sunroom-inspired greenhouse retreat. This vertical approach displays significantly more plants without crowding floor space—essential for small porches where every square foot matters. Mix trailing plants like pothos and philodendron with upright varieties like snake plants and palms, plus flowering options like geraniums or begonias for color pops. The layered greenery creates a lush, jungle-like atmosphere that makes the porch feel like a destination rather than just a pass-through space. Vary pot styles and materials—terracotta, ceramic, woven baskets—for visual interest. 
A common mistake is purchasing too many plants initially, then realizing the maintenance burden becomes overwhelming—start with 10-15 plants and expand gradually as you develop your care routine. Group plants with similar water and light needs together on the same stand for easier care. Screened porches offer ideal growing conditions with filtered light, protection from harsh weather, and excellent air circulation, allowing you to successfully grow plants that struggle in full indoor or outdoor environments. Invest in a moisture meter ($10-15) to prevent overwatering, which kills more porch plants than any other factor.
21. Rustic Wood Slice Wall Art Display
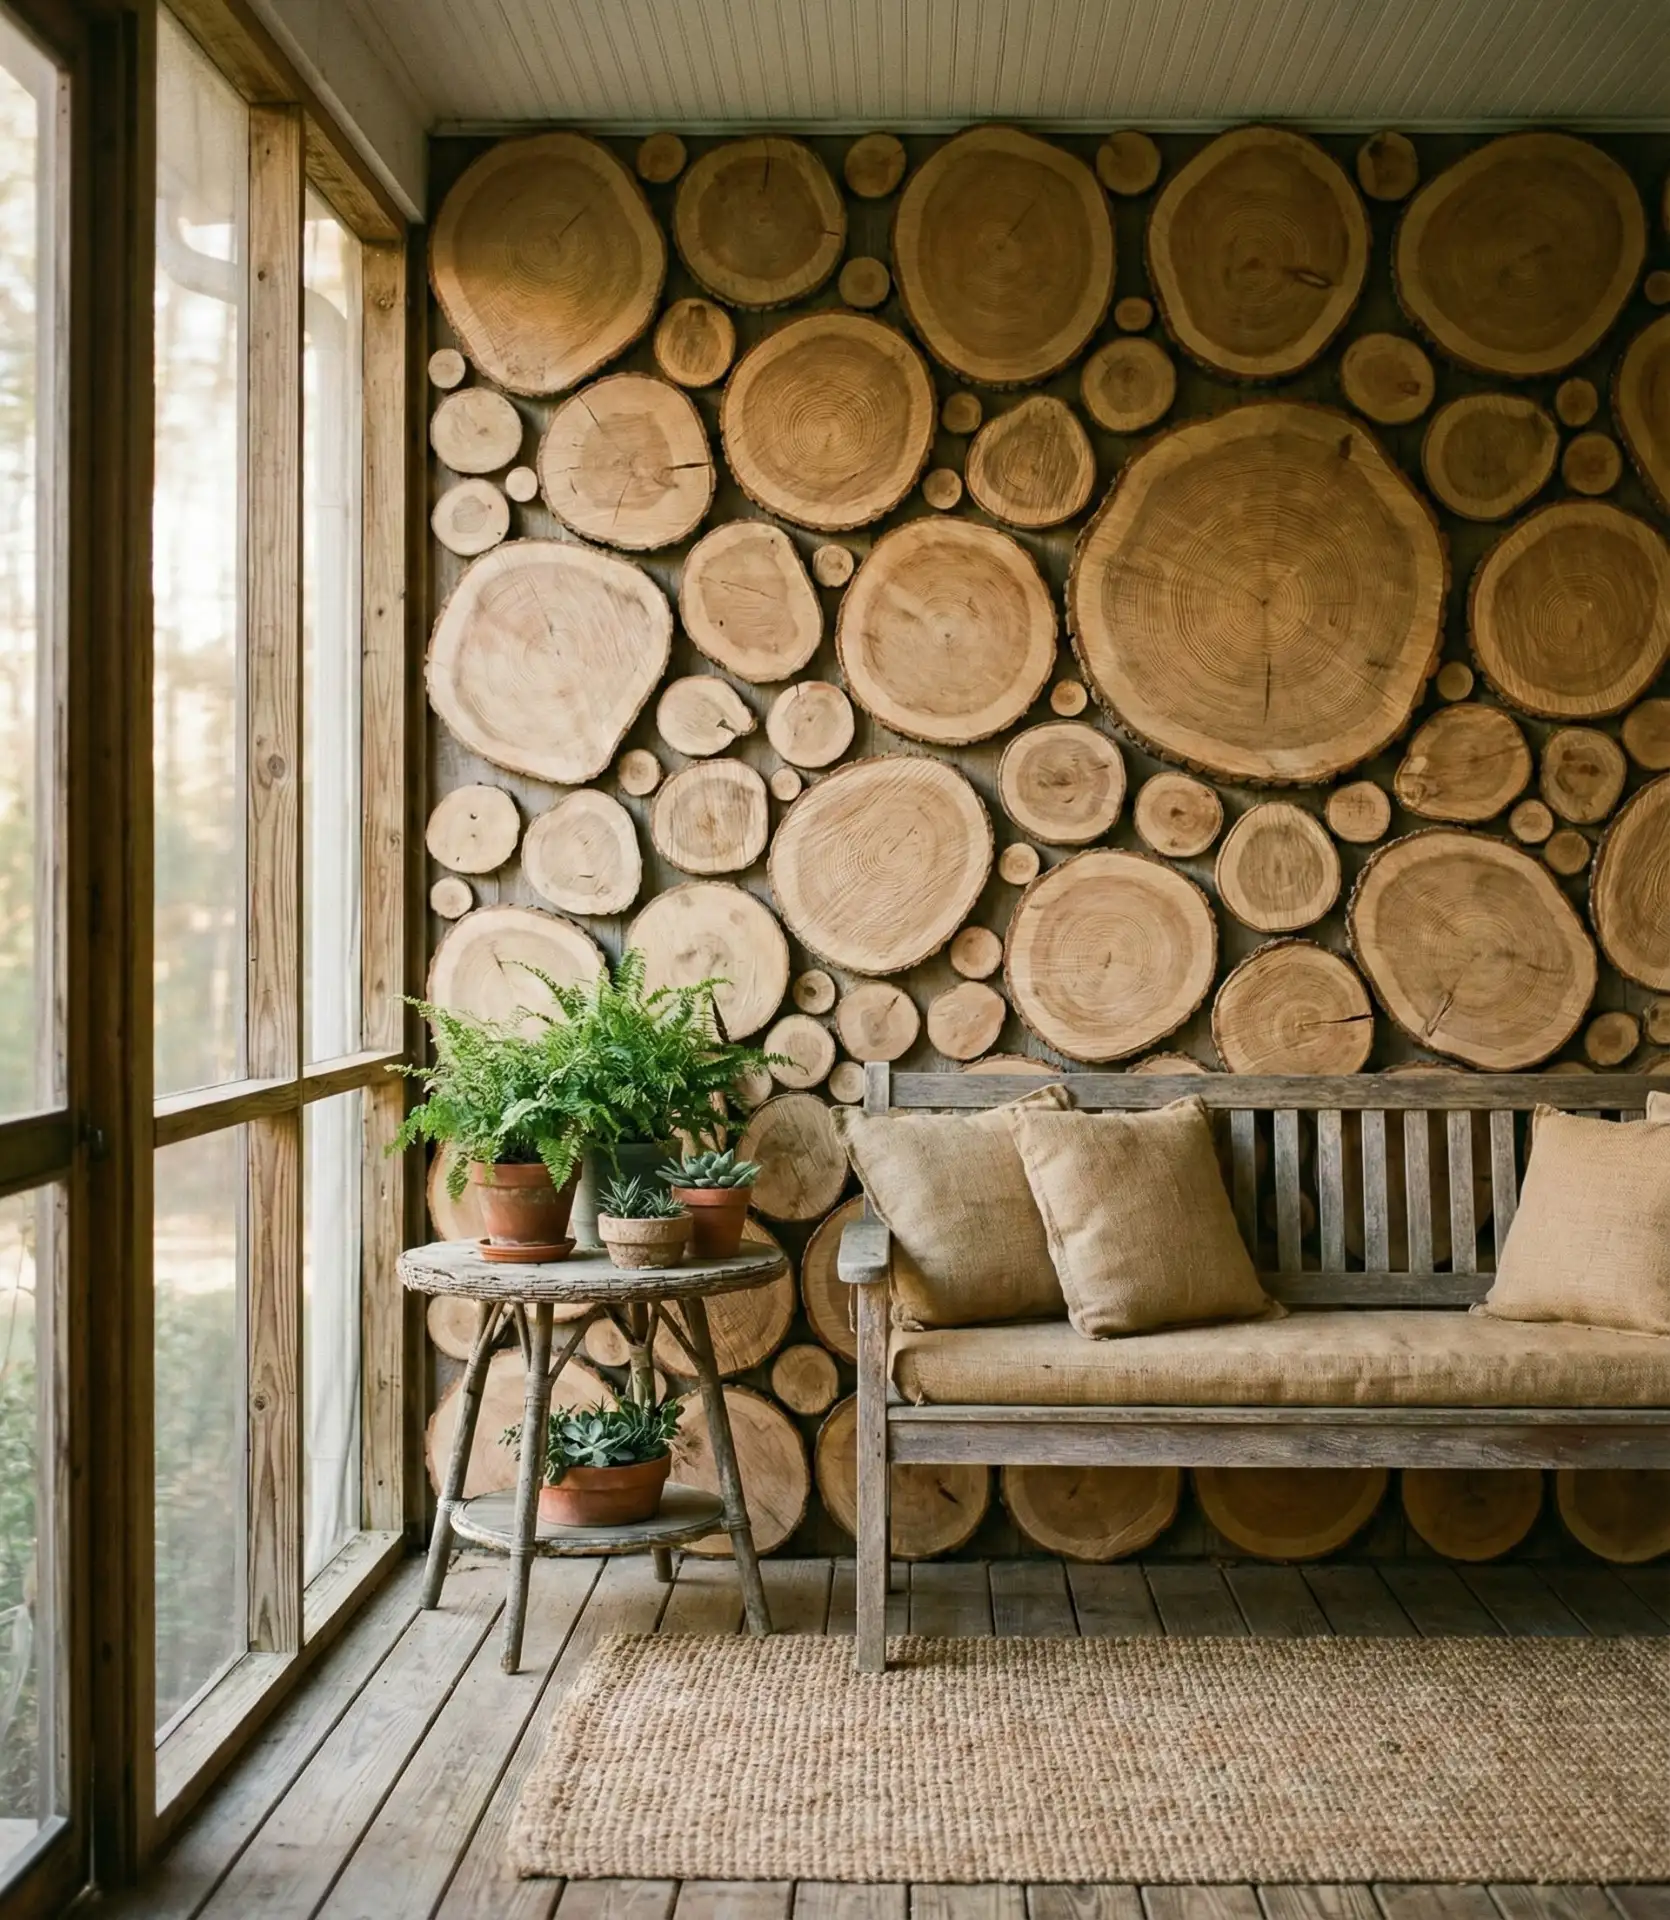
To make a beautiful focal wall, use natural wood slices of different sizes to create an organic shape. This celebrates an earthy, rustic look and brings nature into the home. Get wood slices from craft stores or lumber yards, or even make them from fallen branches if you have the woodworking tools. Use slices of different sizes, from 4 inches to 18 inches in diameter, to create a rhythm with their natural design. After sealing with polyurethane to keep out water and insects, attach them to the wall using finishing nails or strong adhesive. This installation is inspired by log cabins and adds a lot of warmth and 3D interest to the wall. This style is a pleasing contrast to the flat look of artwork. 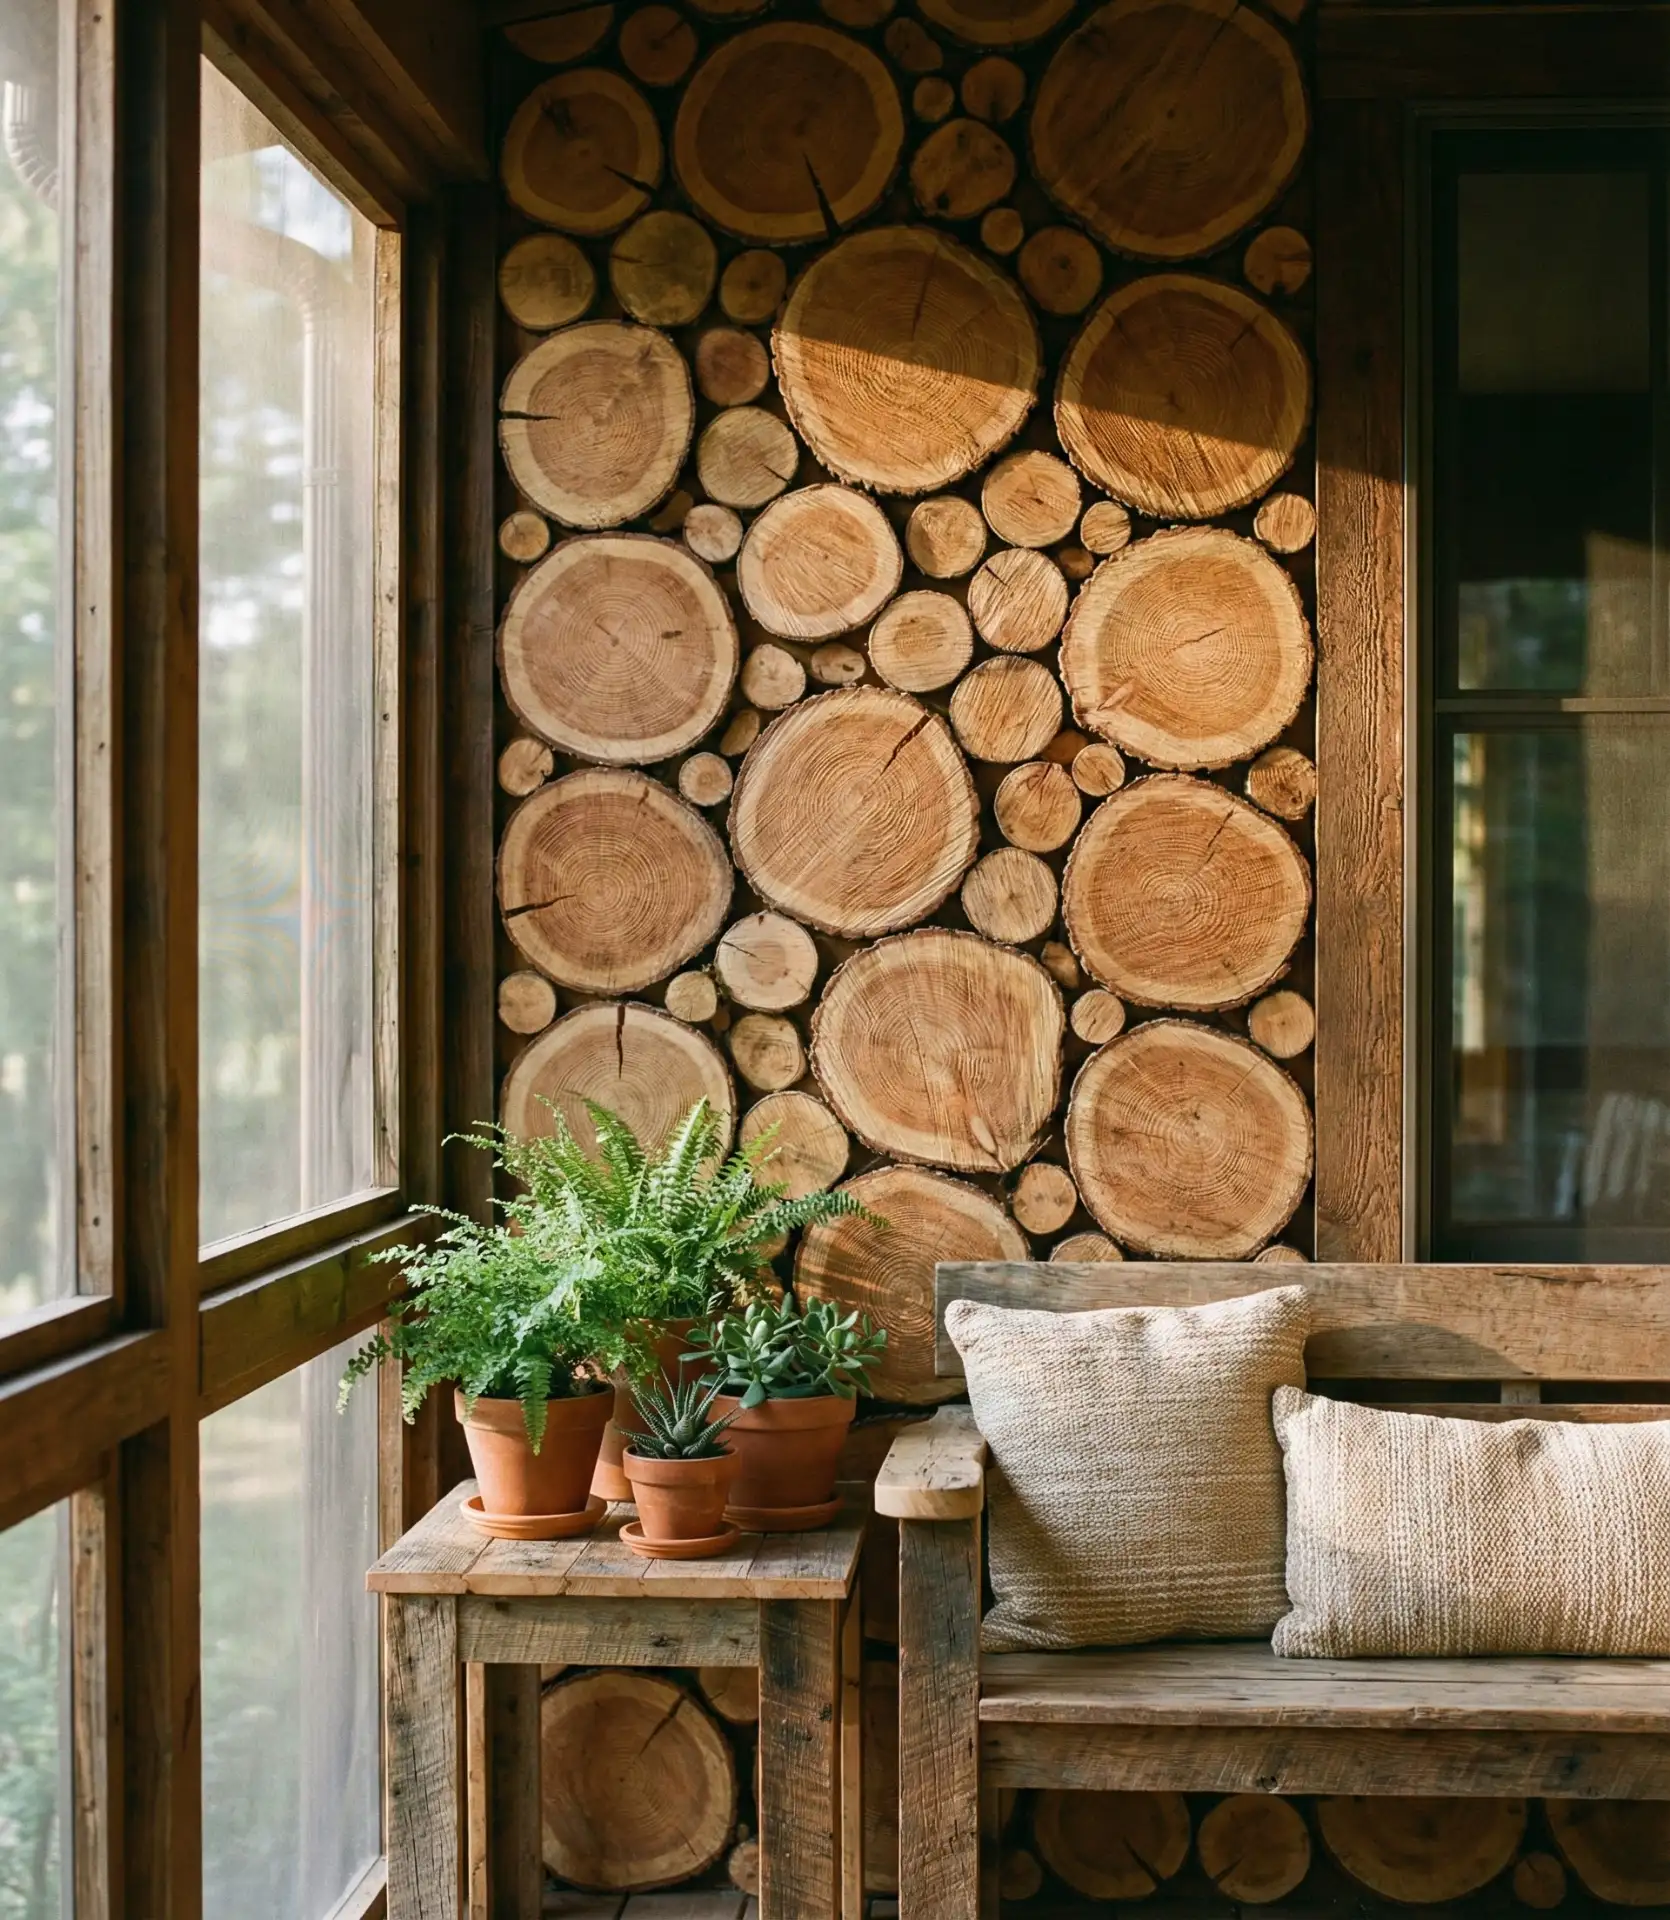
This rustic piece perfectly fits the DIY artistic endeavors since it only requires sourcing some wood and spending roughly $50. It will take an average of an afternoon to finish, and it will look handcrafted and high-end. It blends well with the New England and Pacific Northwest aesthetics since it resembles the woodsy environment you can see through the covered porches. Seal the wood after sanding the edges and smoothing it out so you won’t get any splinters. It would be nice to add some small LED downlights or uplights to create some shadowing to the wood forms.
22. Convertible Daybed to Dining Transformation
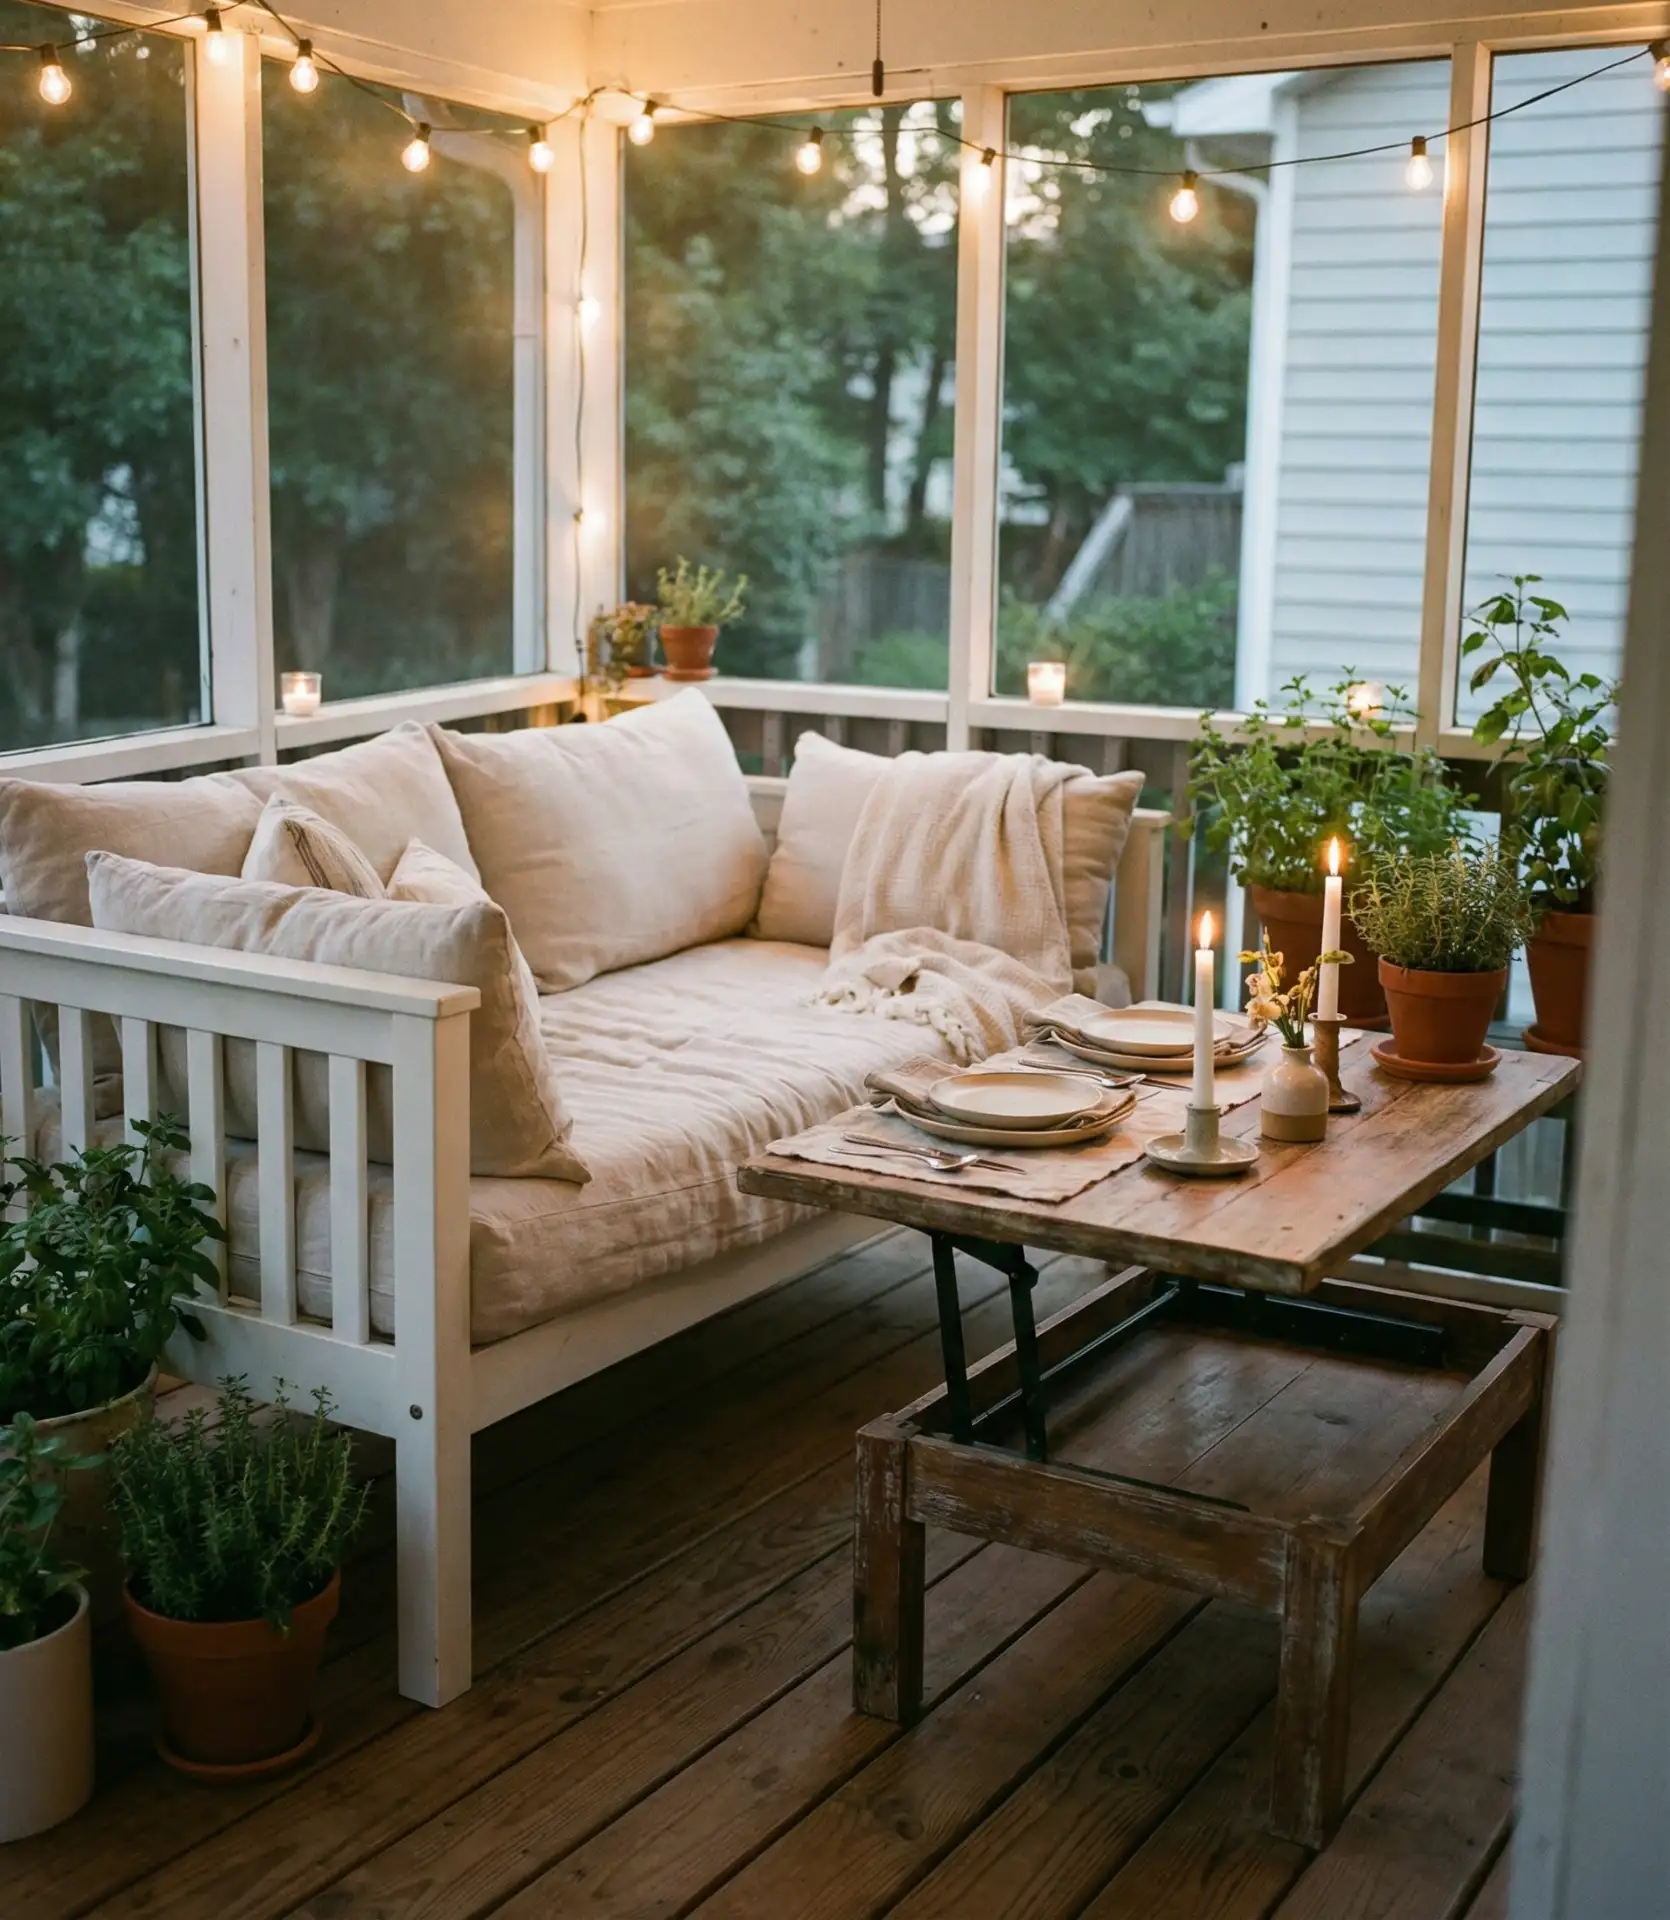
Maximize functionality in tiny porches by selecting a daybed that doubles as dining seating when paired with a lift-top coffee table or nesting tables that raise to dining height. This smart furniture choice allows the same space to serve as a cozy lounging area during the day and an intimate dining spot for evening meals. Choose a daybed with a firm mattress or cushion—overly soft pieces don’t provide adequate back support for dining. Store extra cushions underneath or in a nearby cabinet, swapping them out based on the current function. The transformation takes seconds, making it practical for daily use rather than just occasional adaptation. 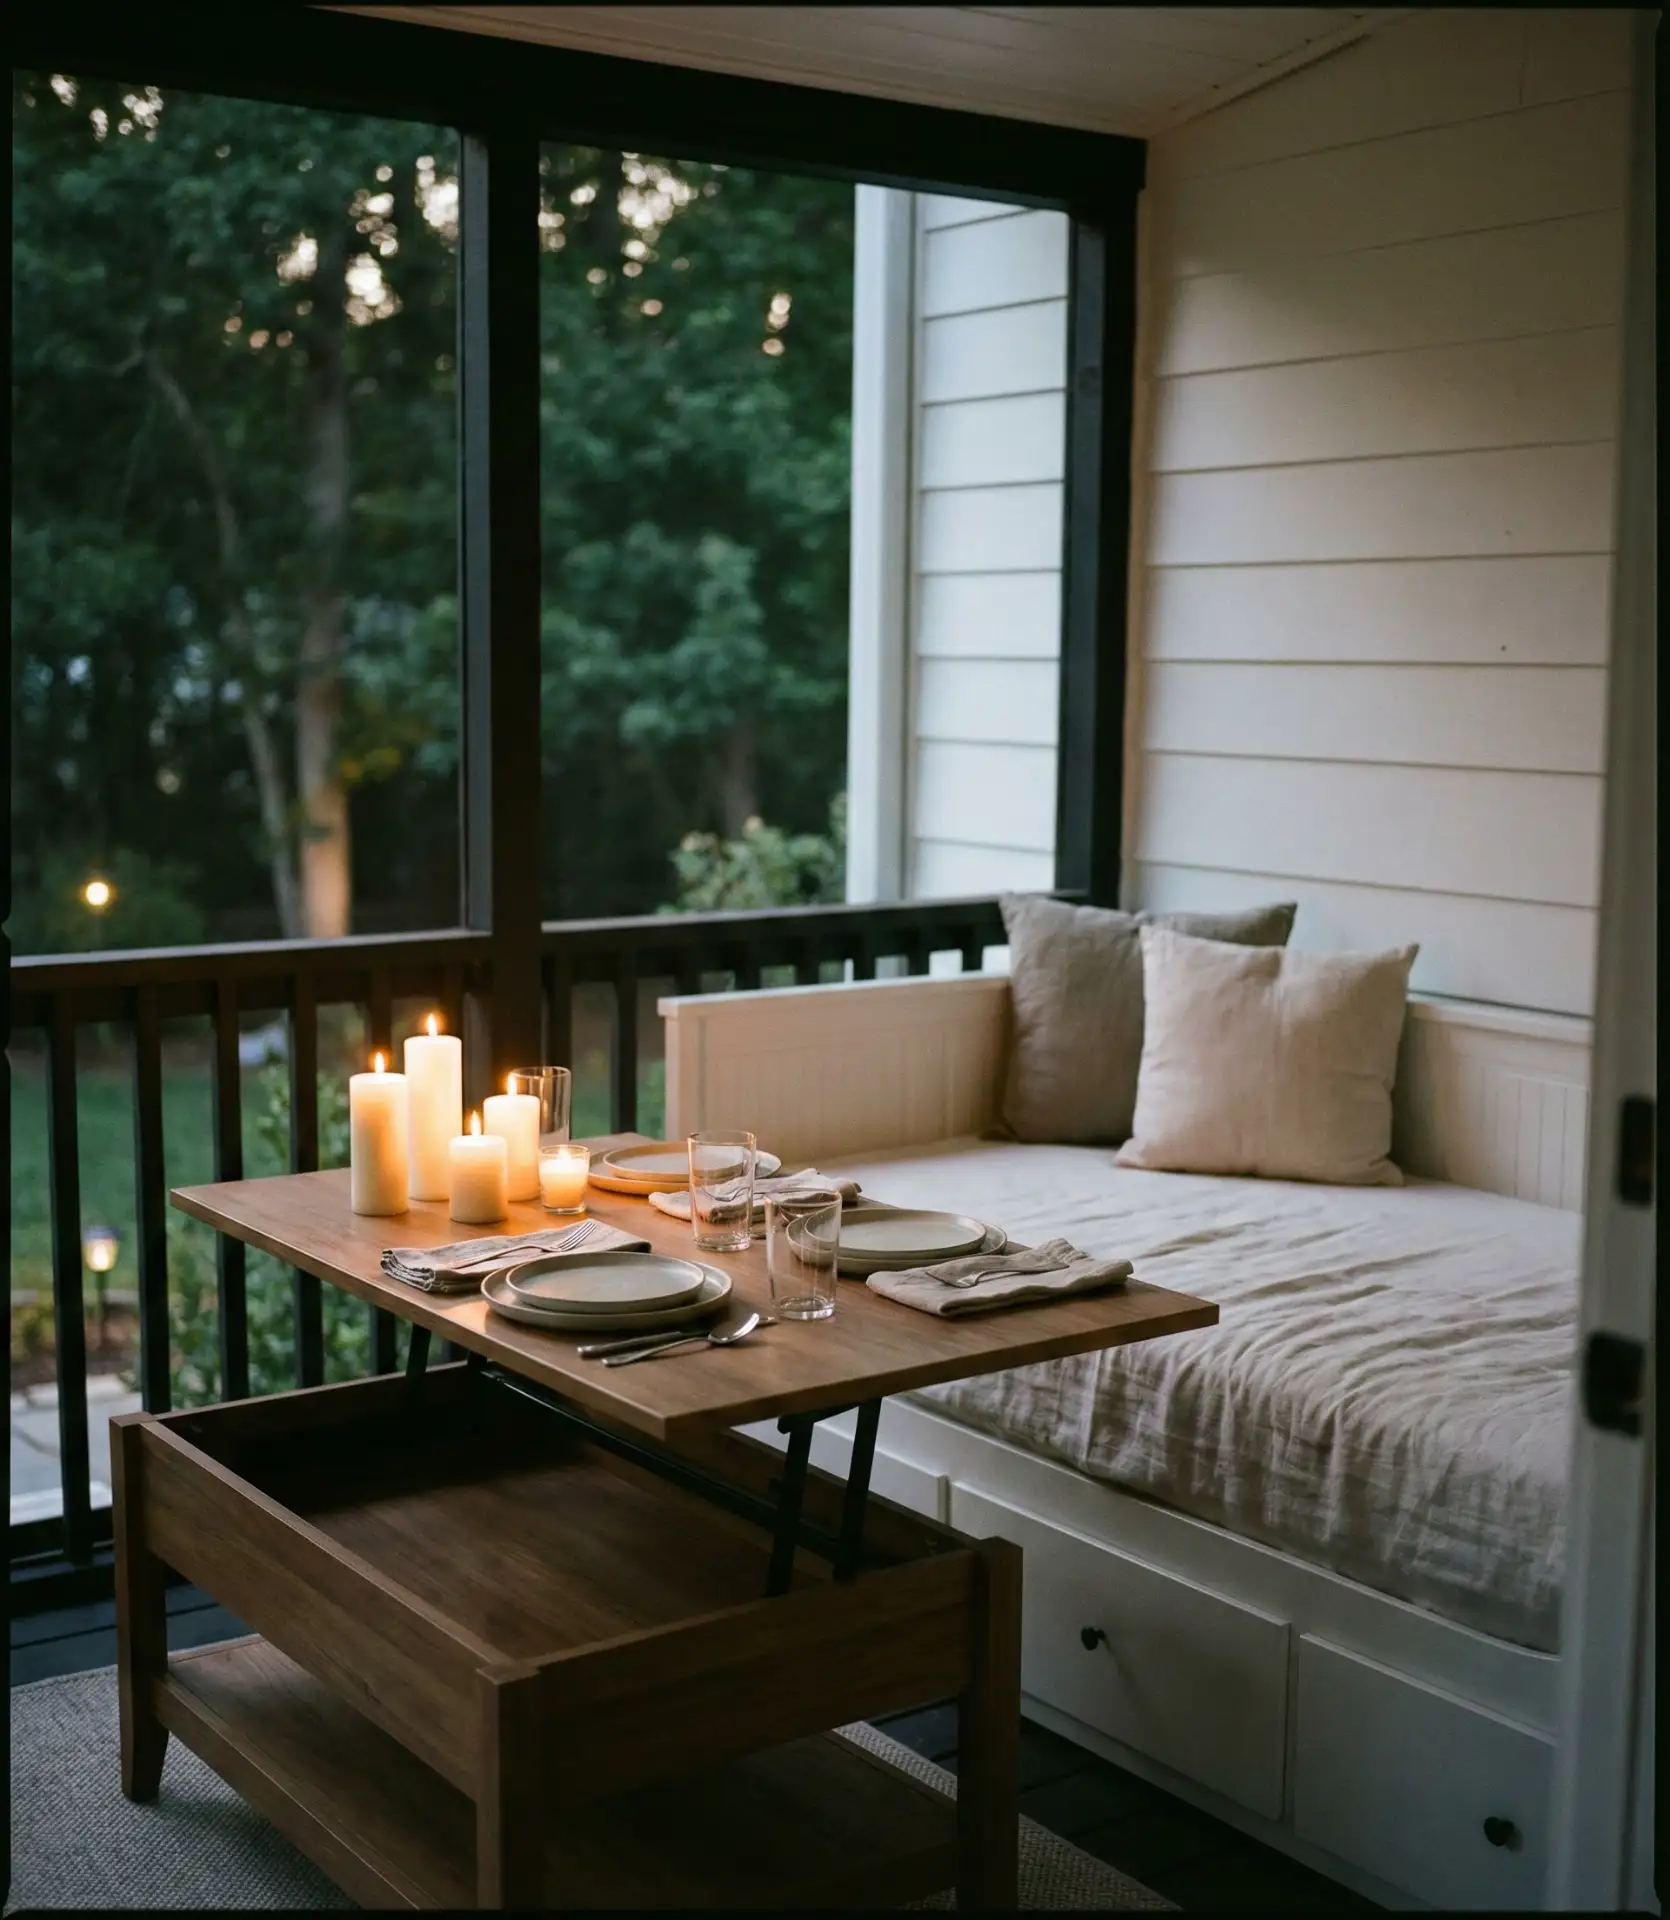
Urban apartment dwellers with small balcony porches particularly appreciate this solution, as it delivers two essential functions without requiring space for separate furniture pieces. Look for lift-top mechanisms that operate smoothly with one hand—cheaper versions often stick or require two-handed operation, defeating the convenience factor. Expect to invest $200–$400 in quality convertible tables that will withstand daily adjustments without breaking down. Position the daybed against the longest wall to maximize the remaining floor space, and choose a table size that comfortably seats 2–4 people when raised to dining height without overwhelming the room when lowered.
23. Statement Pendant Light Fixture Cluster
![]()
Install a grouping of three to five pendant lights at varying heights over your dining or seating area to create dramatic visual impact that establishes the porch as a designed destination space. Choose fixtures in complementary styles—perhaps mixing metallic finishes like brass, copper, and black iron, or clustering different sizes of the same design for cohesive variety. The multi-pendant approach provides functional task lighting while serving as sculptural art that draws the eye upward and emphasizes ceiling height. This technique works particularly well in large porches where a single overhead fixture would disappear visually, failing to anchor the space or provide adequate illumination for evening activities.
Expert designers emphasize that lighting makes or breaks a porch’s usability after sunset—adequate illumination extends functional hours dramatically, while poor lighting renders the space useless once natural light fades. Pendant clusters typically require professional electrical work unless you’re converting an existing junction box, so budget $150-300 for installation labor plus fixture costs ranging from $40 to $200 per pendant depending on style. The investment transforms your porch from a daytime-only space into an evening entertainment zone that rivals any interior room. Dimmer switches are essential, allowing you to adjust brightness from bright task lighting for dining to soft ambient glow for conversation.

Your screened porch holds untapped potential to become the most beloved space in your home—a versatile retreat where the boundaries between indoors and outdoors dissolve into pure comfort and style. From budget-friendly DIY projects to statement-making design upgrades, these twenty-three ideas demonstrate that transforming your porch doesn’t require a complete renovation or unlimited funds. Whether you’re drawn to cozy farmhouse charm, bohemian eclecticism, modern sophistication, or rustic cabin warmth, the key is choosing elements that reflect your personal style while enhancing how you actually live. Start with one or two changes that excite you most, then build from there as your vision evolves. We’d love to hear about your screened porch journey—share your favorite ideas, your completed projects, or the challenges you’re facing in the comments below. Your experience might just inspire another reader to finally tackle that porch transformation they’ve been dreaming about.