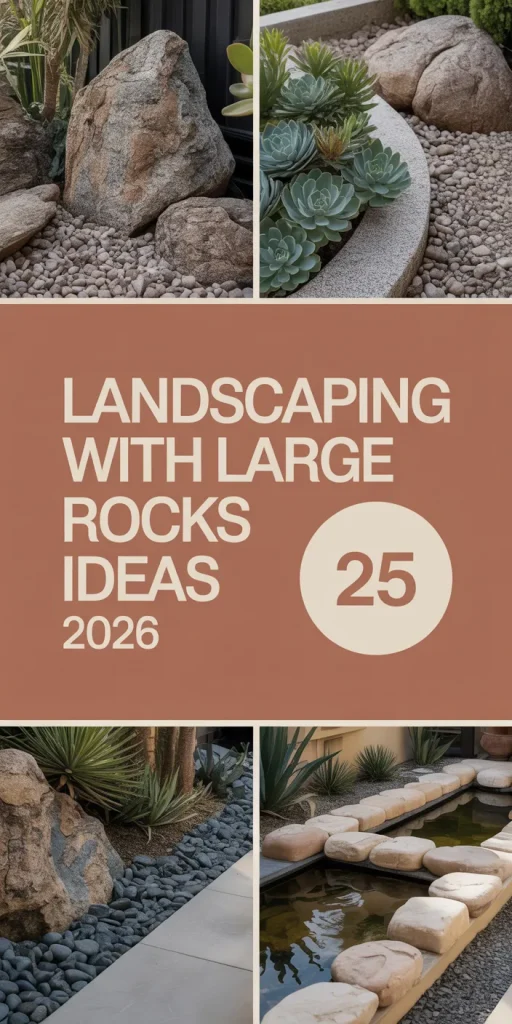
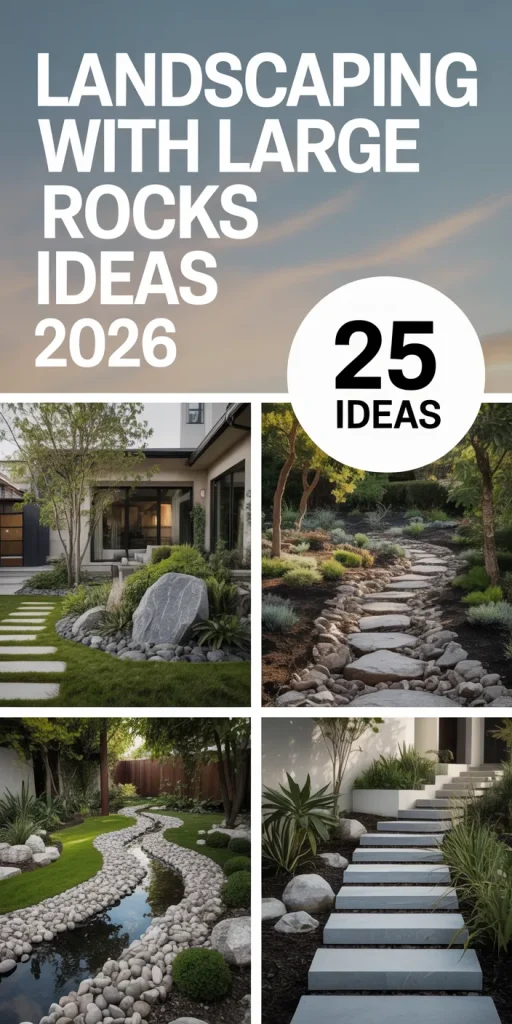
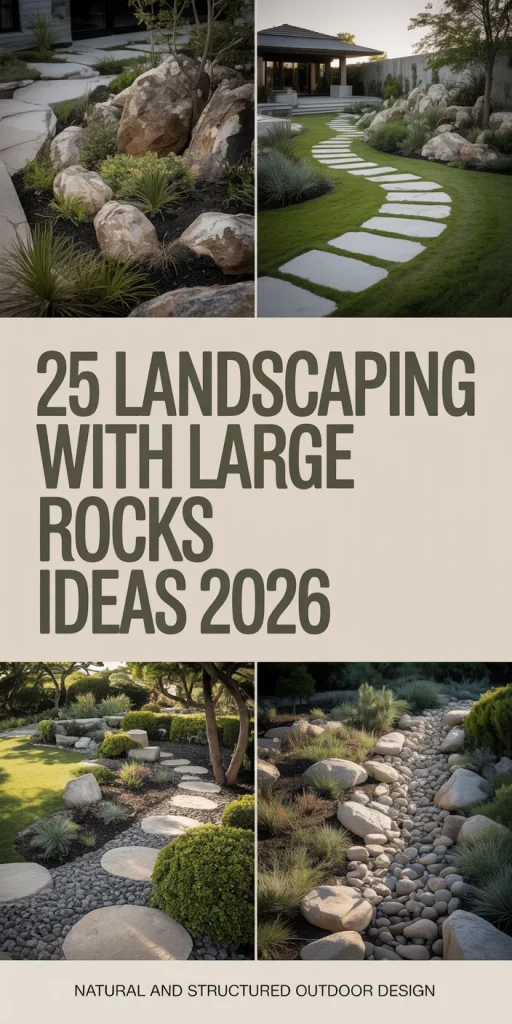
25 Jaw-Dropping Large Rock Landscaping Ideas That Will Transform Your Yard in 2026
Still scrolling through landscaping with large rocks 2026 photos without knowing where to start? You know that feeling when you finally find the landscaping that looks exactly right for your space, only to realize you have no idea how to actually achieve it?
This post may contain affiliate links. As an Amazon Associate, we earn from qualifying purchases at no extra cost to you.
After filtering through hundreds of options across Lowe’s, Home Depot, and local nurseries, we narrowed it down to 25 ideas that actually deliver. We cover everything from a relaxed, wild aesthetic to structured, modern zen gardens, with prices ranging from $50 to $15,000.
This curated guide features 25 stunning ideas, exploring naturalistic waterfalls, structured retaining walls, and serene zen gardens. We even compare budget-friendly versions side-by-side with more luxurious options, and every single idea is shippable with direct product links. The emphasis on natural, sustainable hardscaping is a huge driving force this year, with homeowners looking to blend their outdoor spaces seamlessly with the surrounding environment.
Go ahead and save this—you’re going to want to reference it.
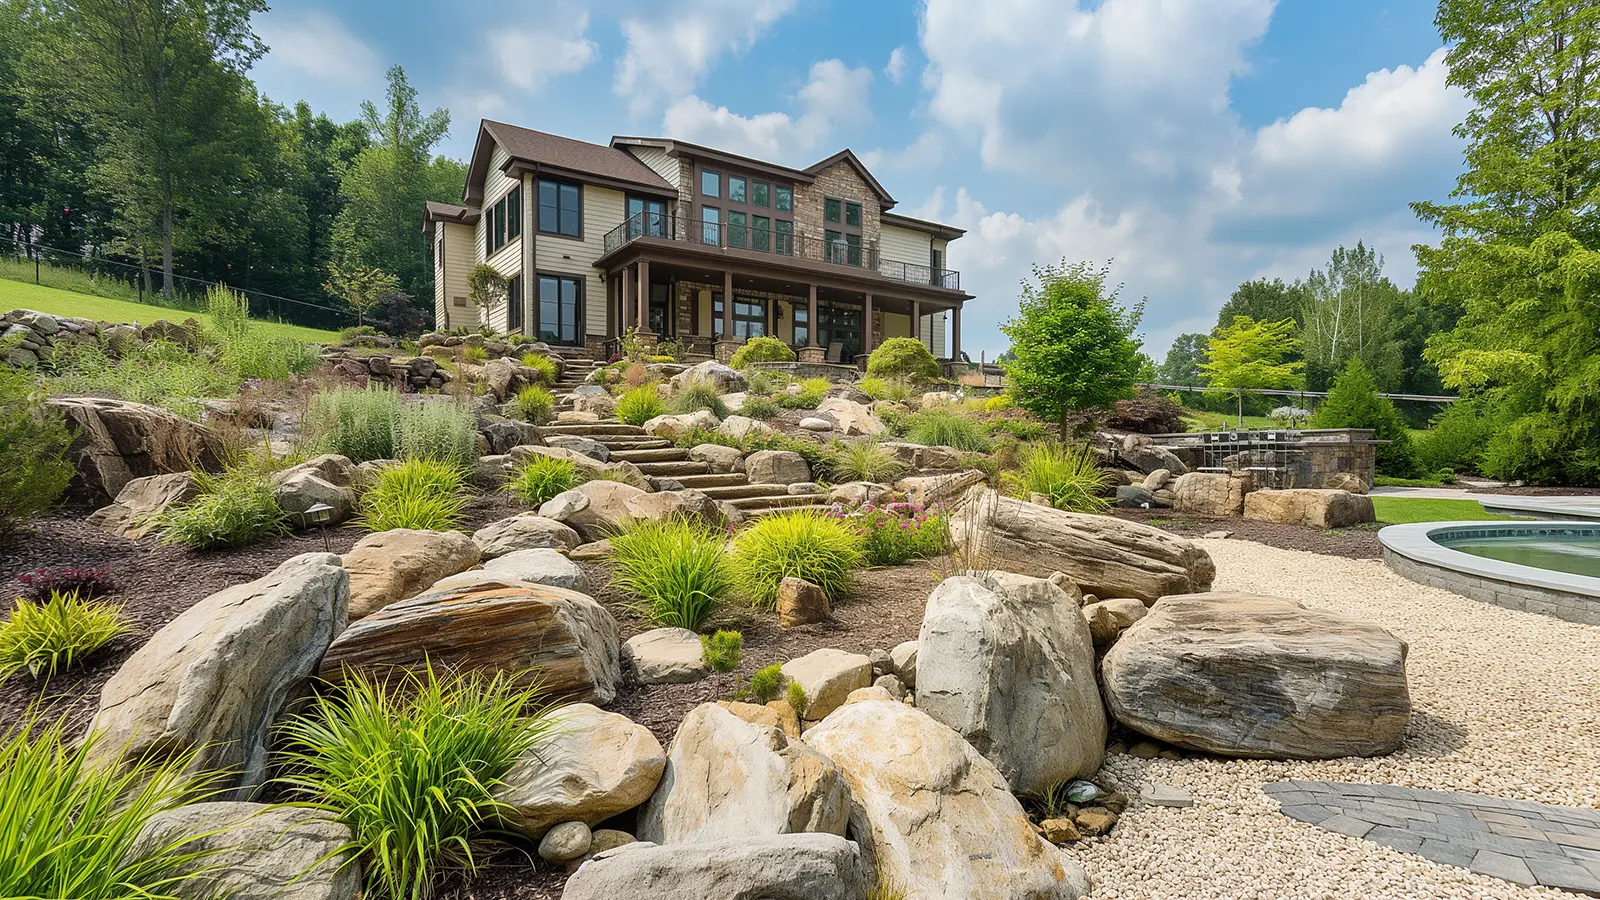
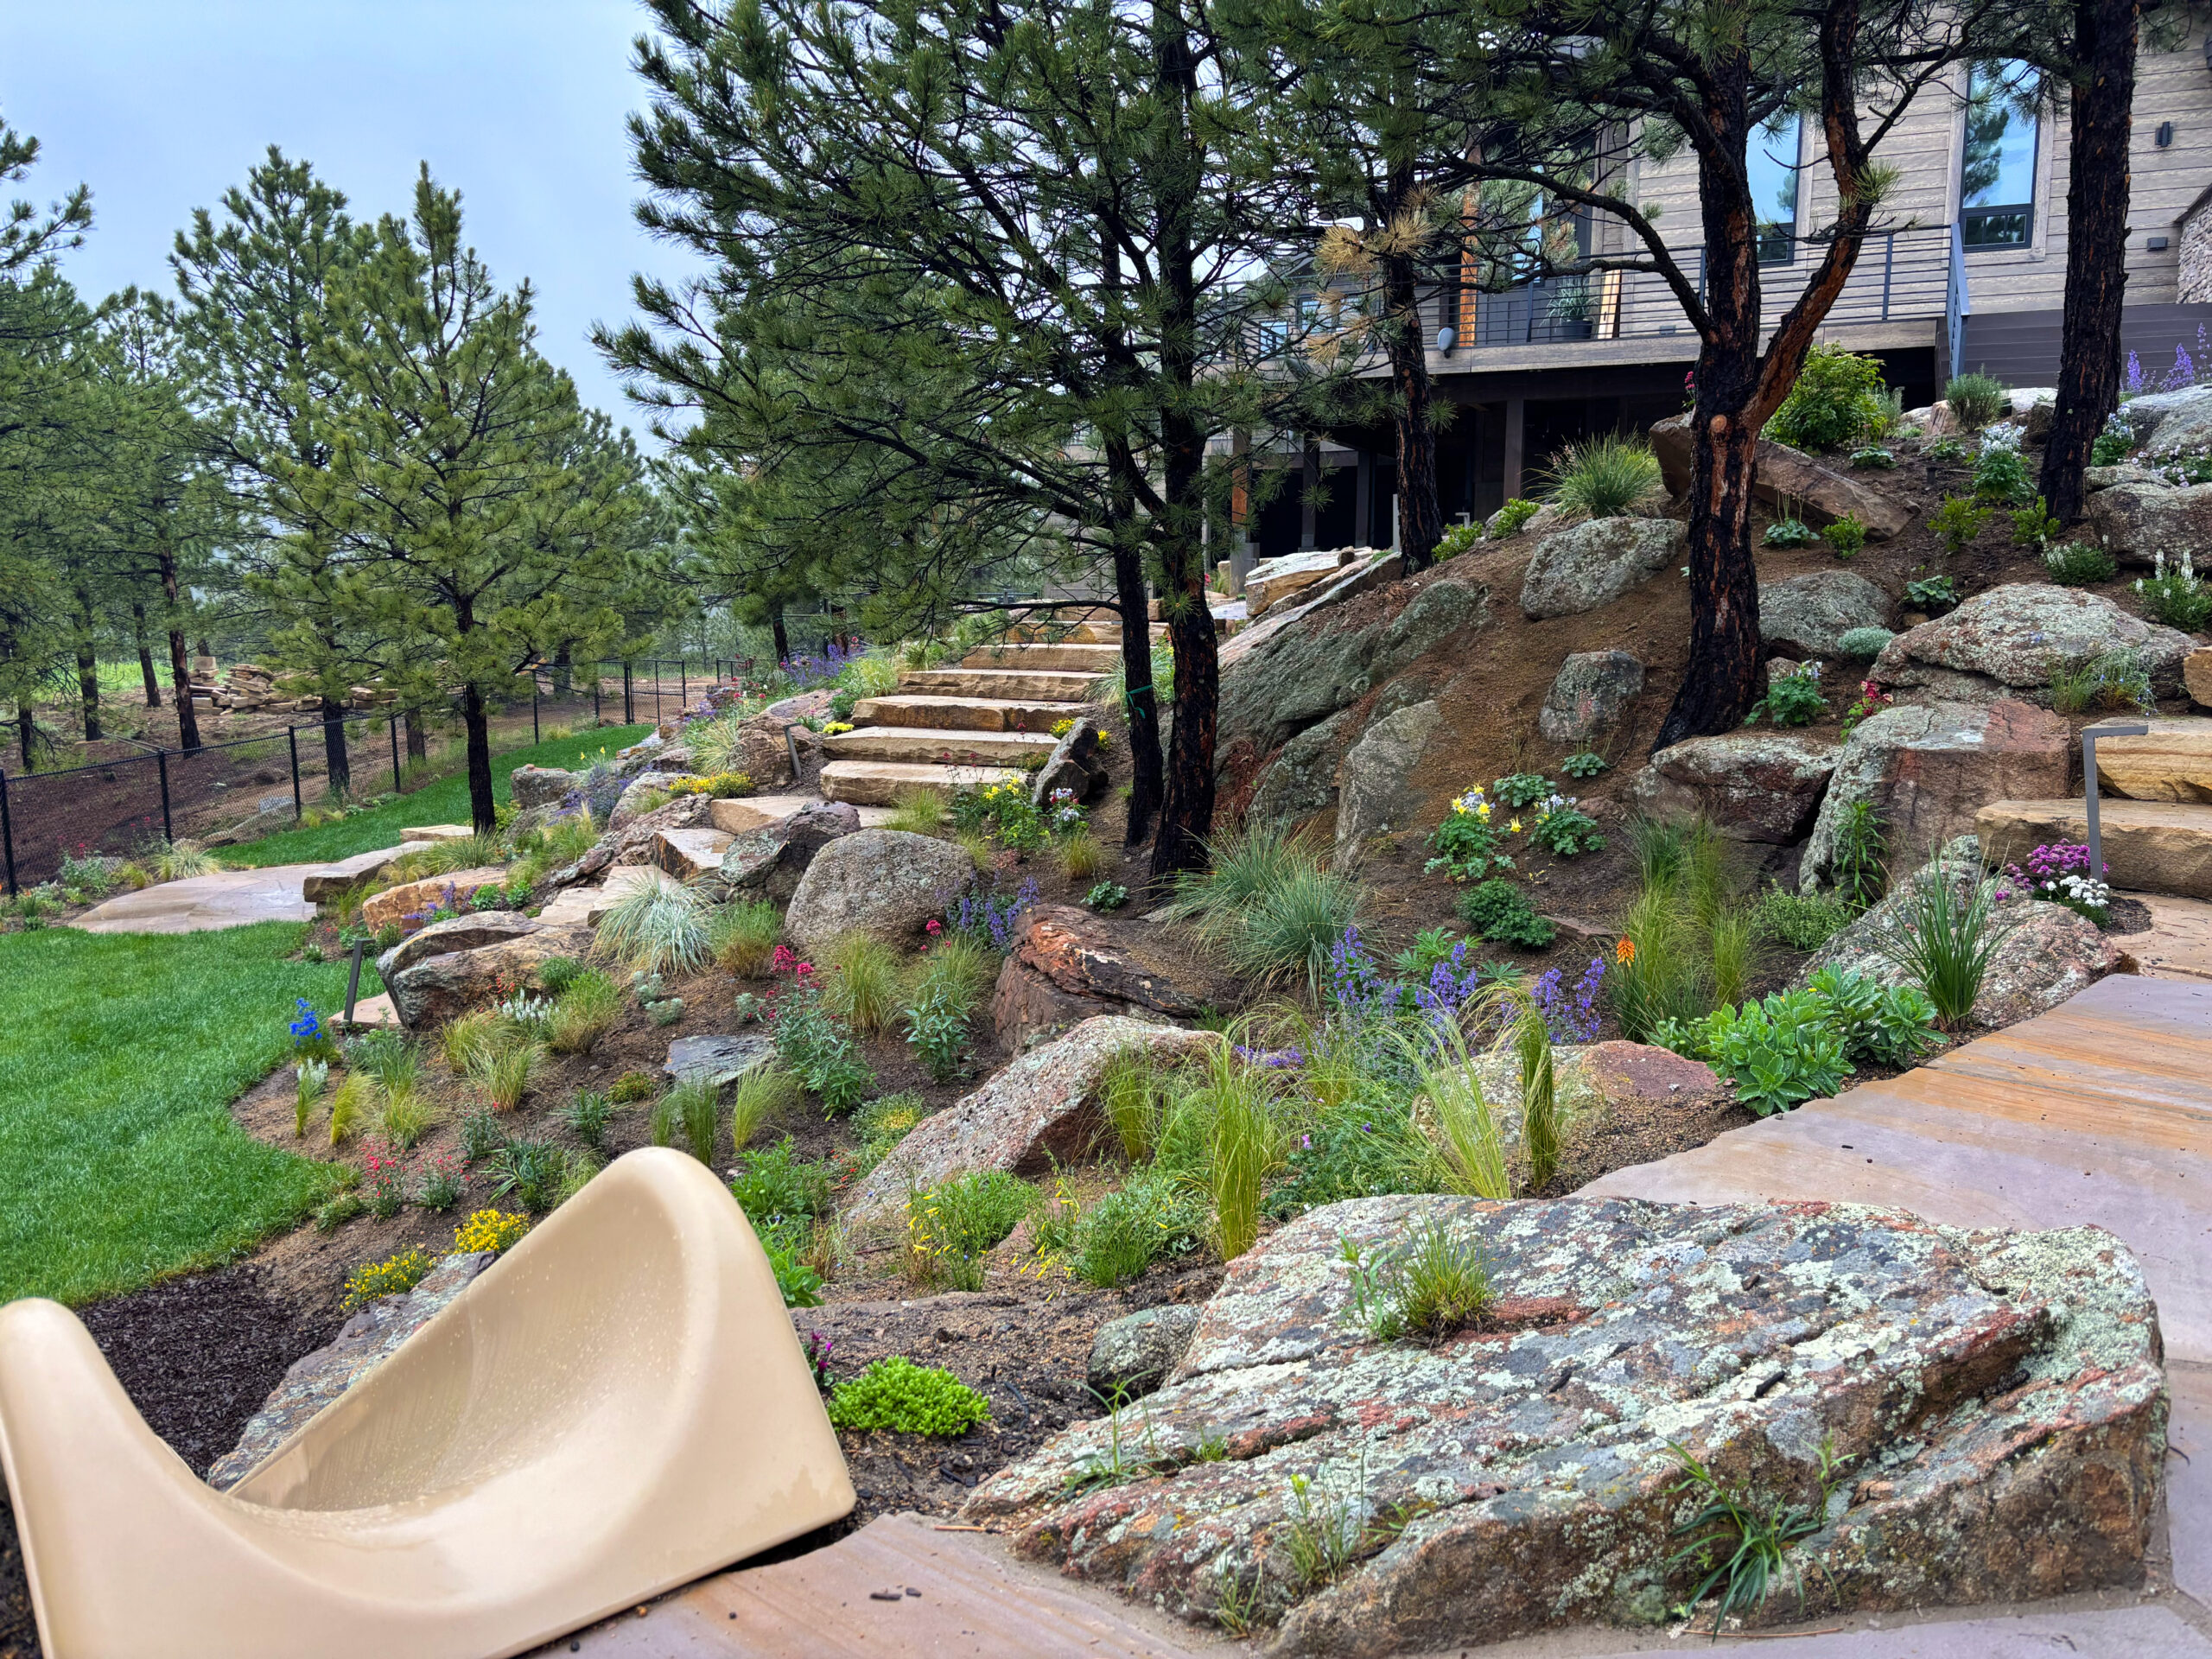
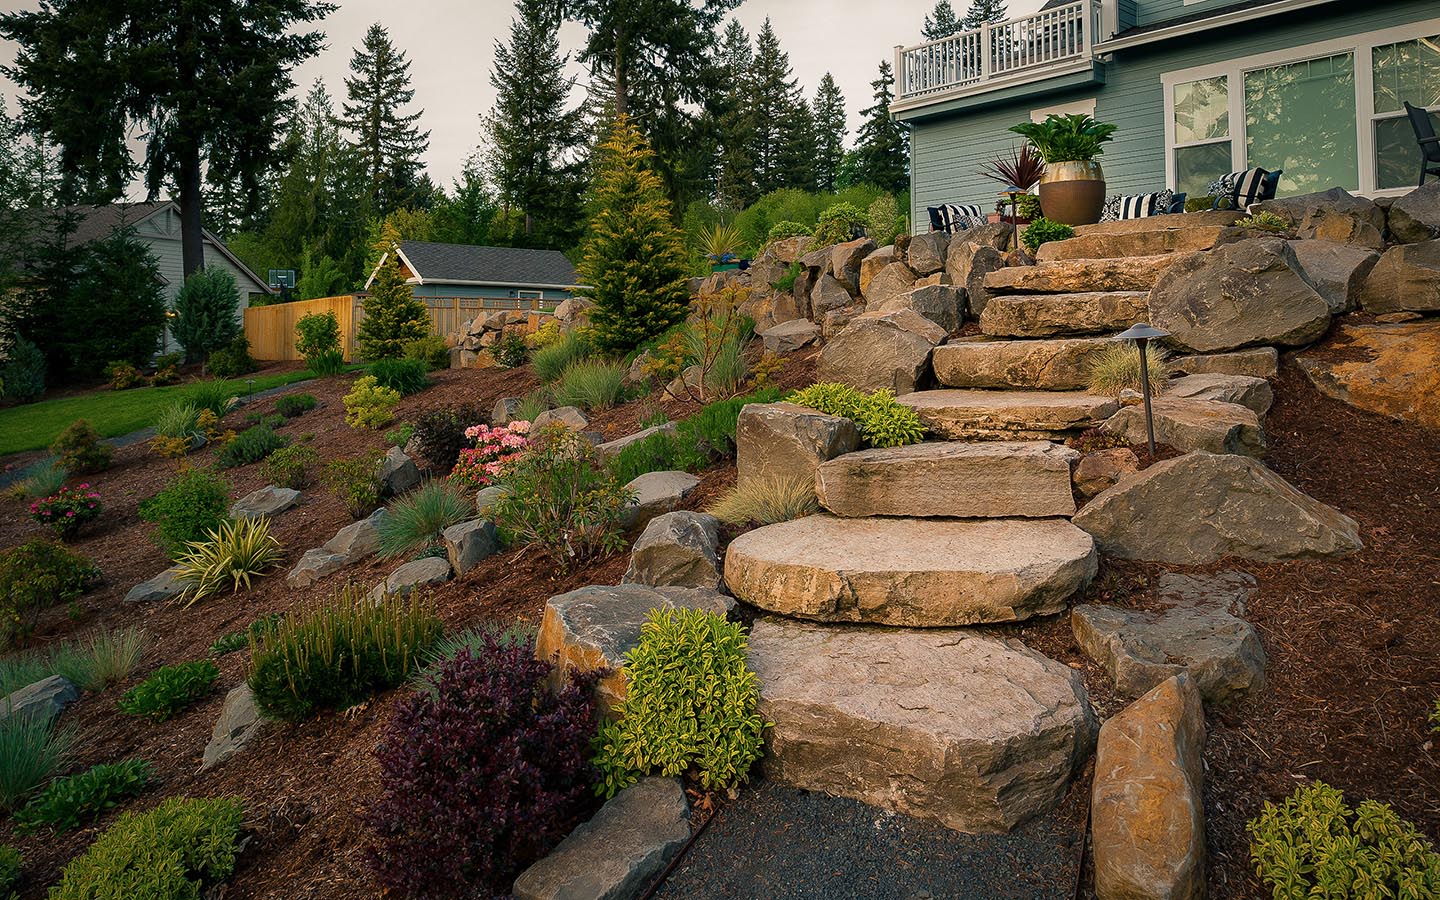
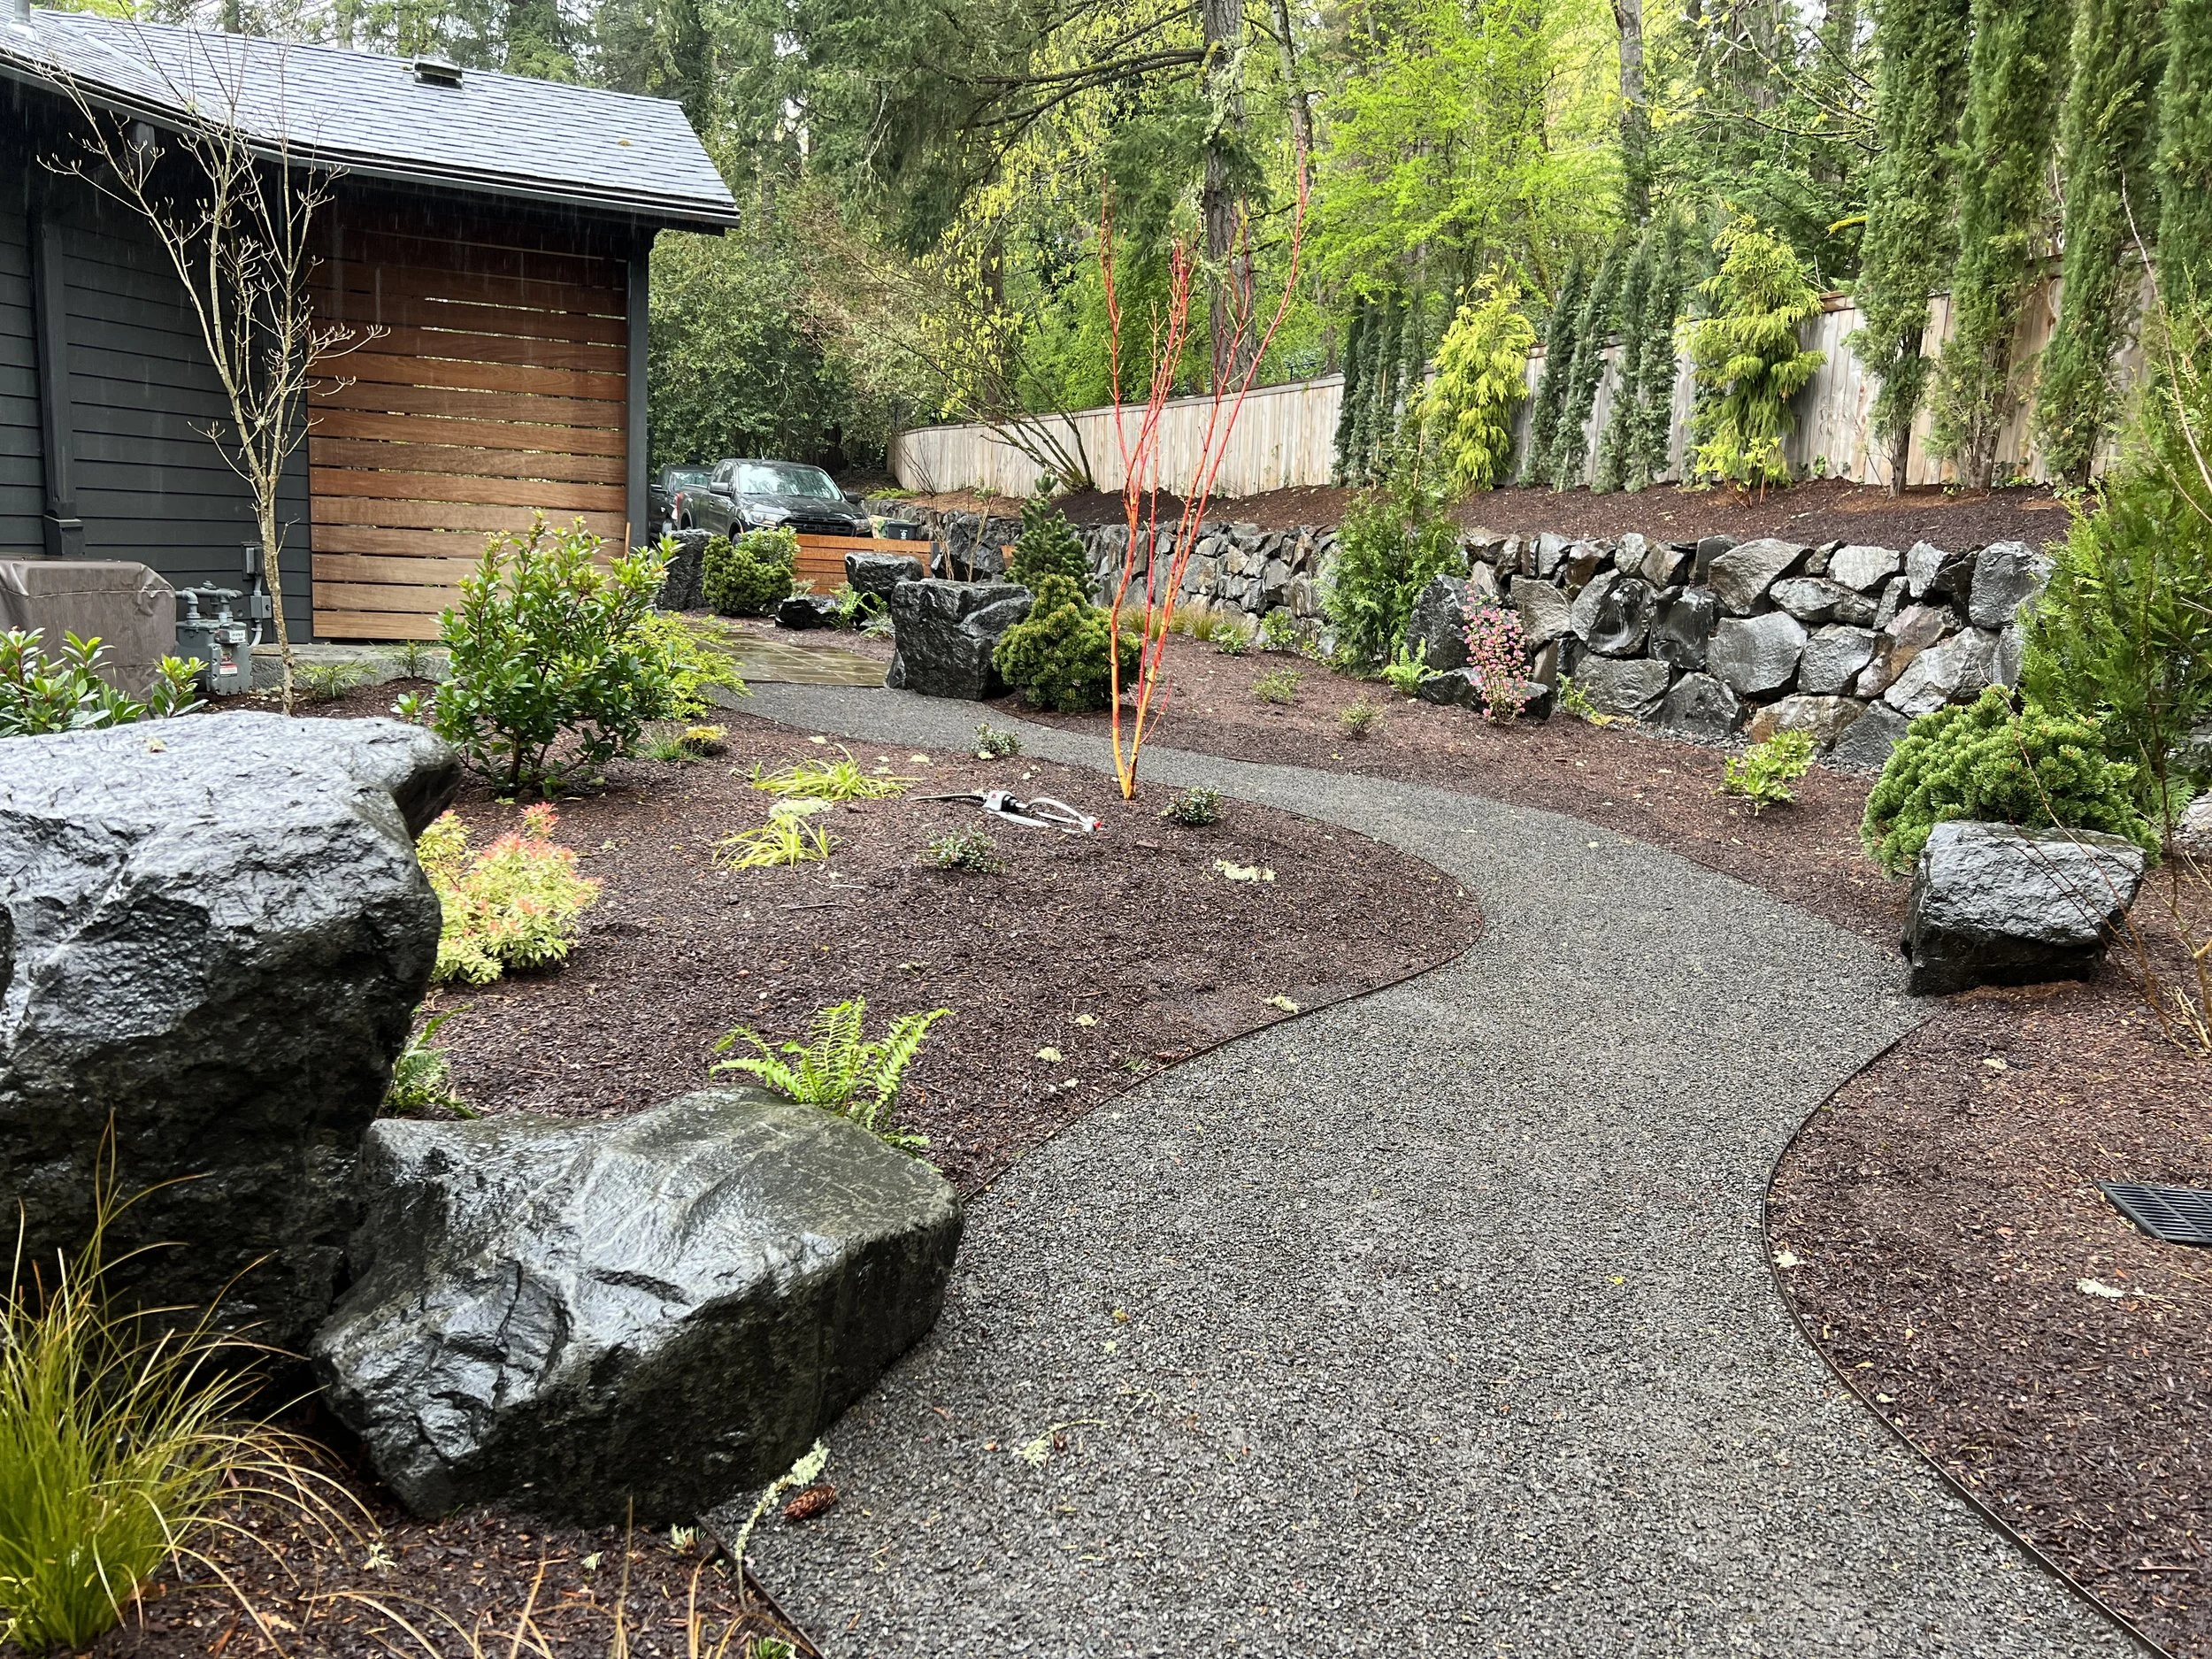
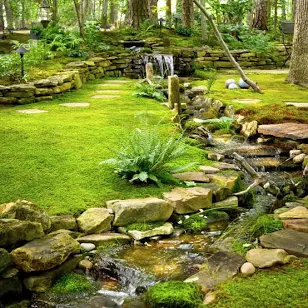
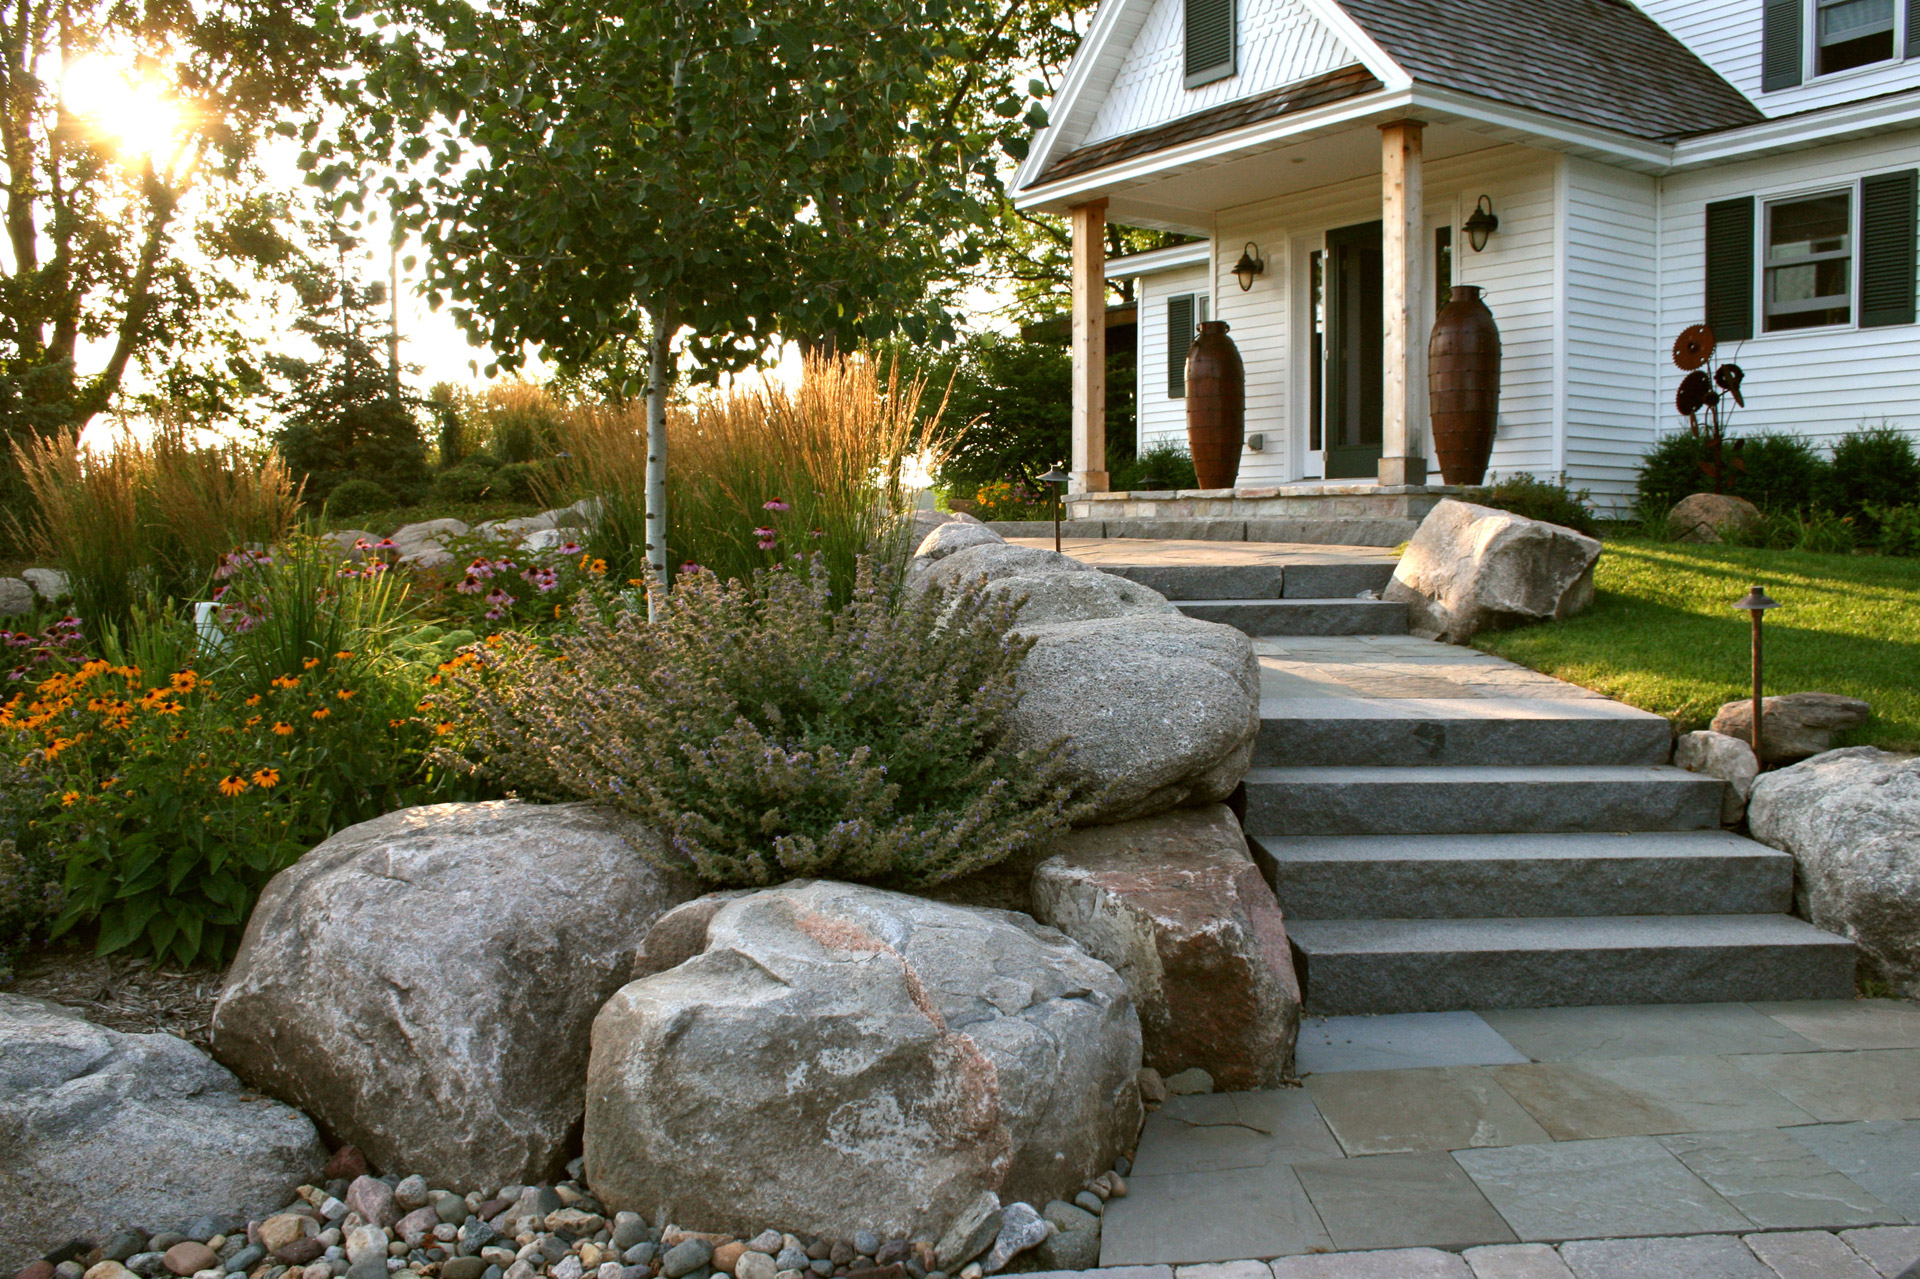
1. Boulder-Filled Hillside with Terraced Steps
This expansive hillside design isn’t just beautiful; it’s smart. The integration of numerous large, irregularly shaped boulders acts as natural erosion control on a slope, a common challenge for many homeowners. They also provide visual weight and a sense of permanence, anchoring the entire landscape.
|
📋 Copy HEX 🔗 Share |
|
$480.00
|
$190.00
|
$170.96
|
$4.99
|

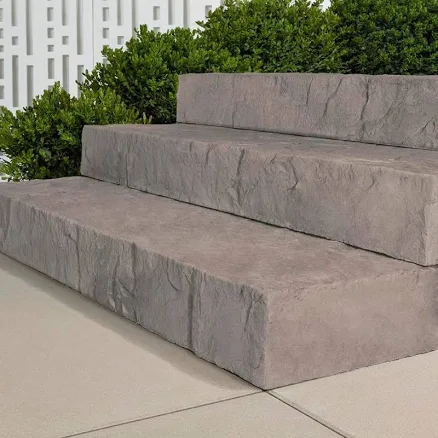
The terraced stone steps are key here, making a steep incline not just navigable but inviting. Imagine strolling down to a poolside lounge on a warm evening. This design truly marries form and function, ensuring every inch of the property is both stunning and practical.
- Main boulders (5-10 large pieces): $2,000 – $8,000
- Terraced stone steps (material & labor): $1,500 – $6,000
- Assorted greenery & ground cover: $500 – $2,000
- Gravel path material: $200 – $500
- TOTAL: $4,200 – $16,500
- Budget alternative: Use local quarry stone and DIY basic steps for 40-60% less.
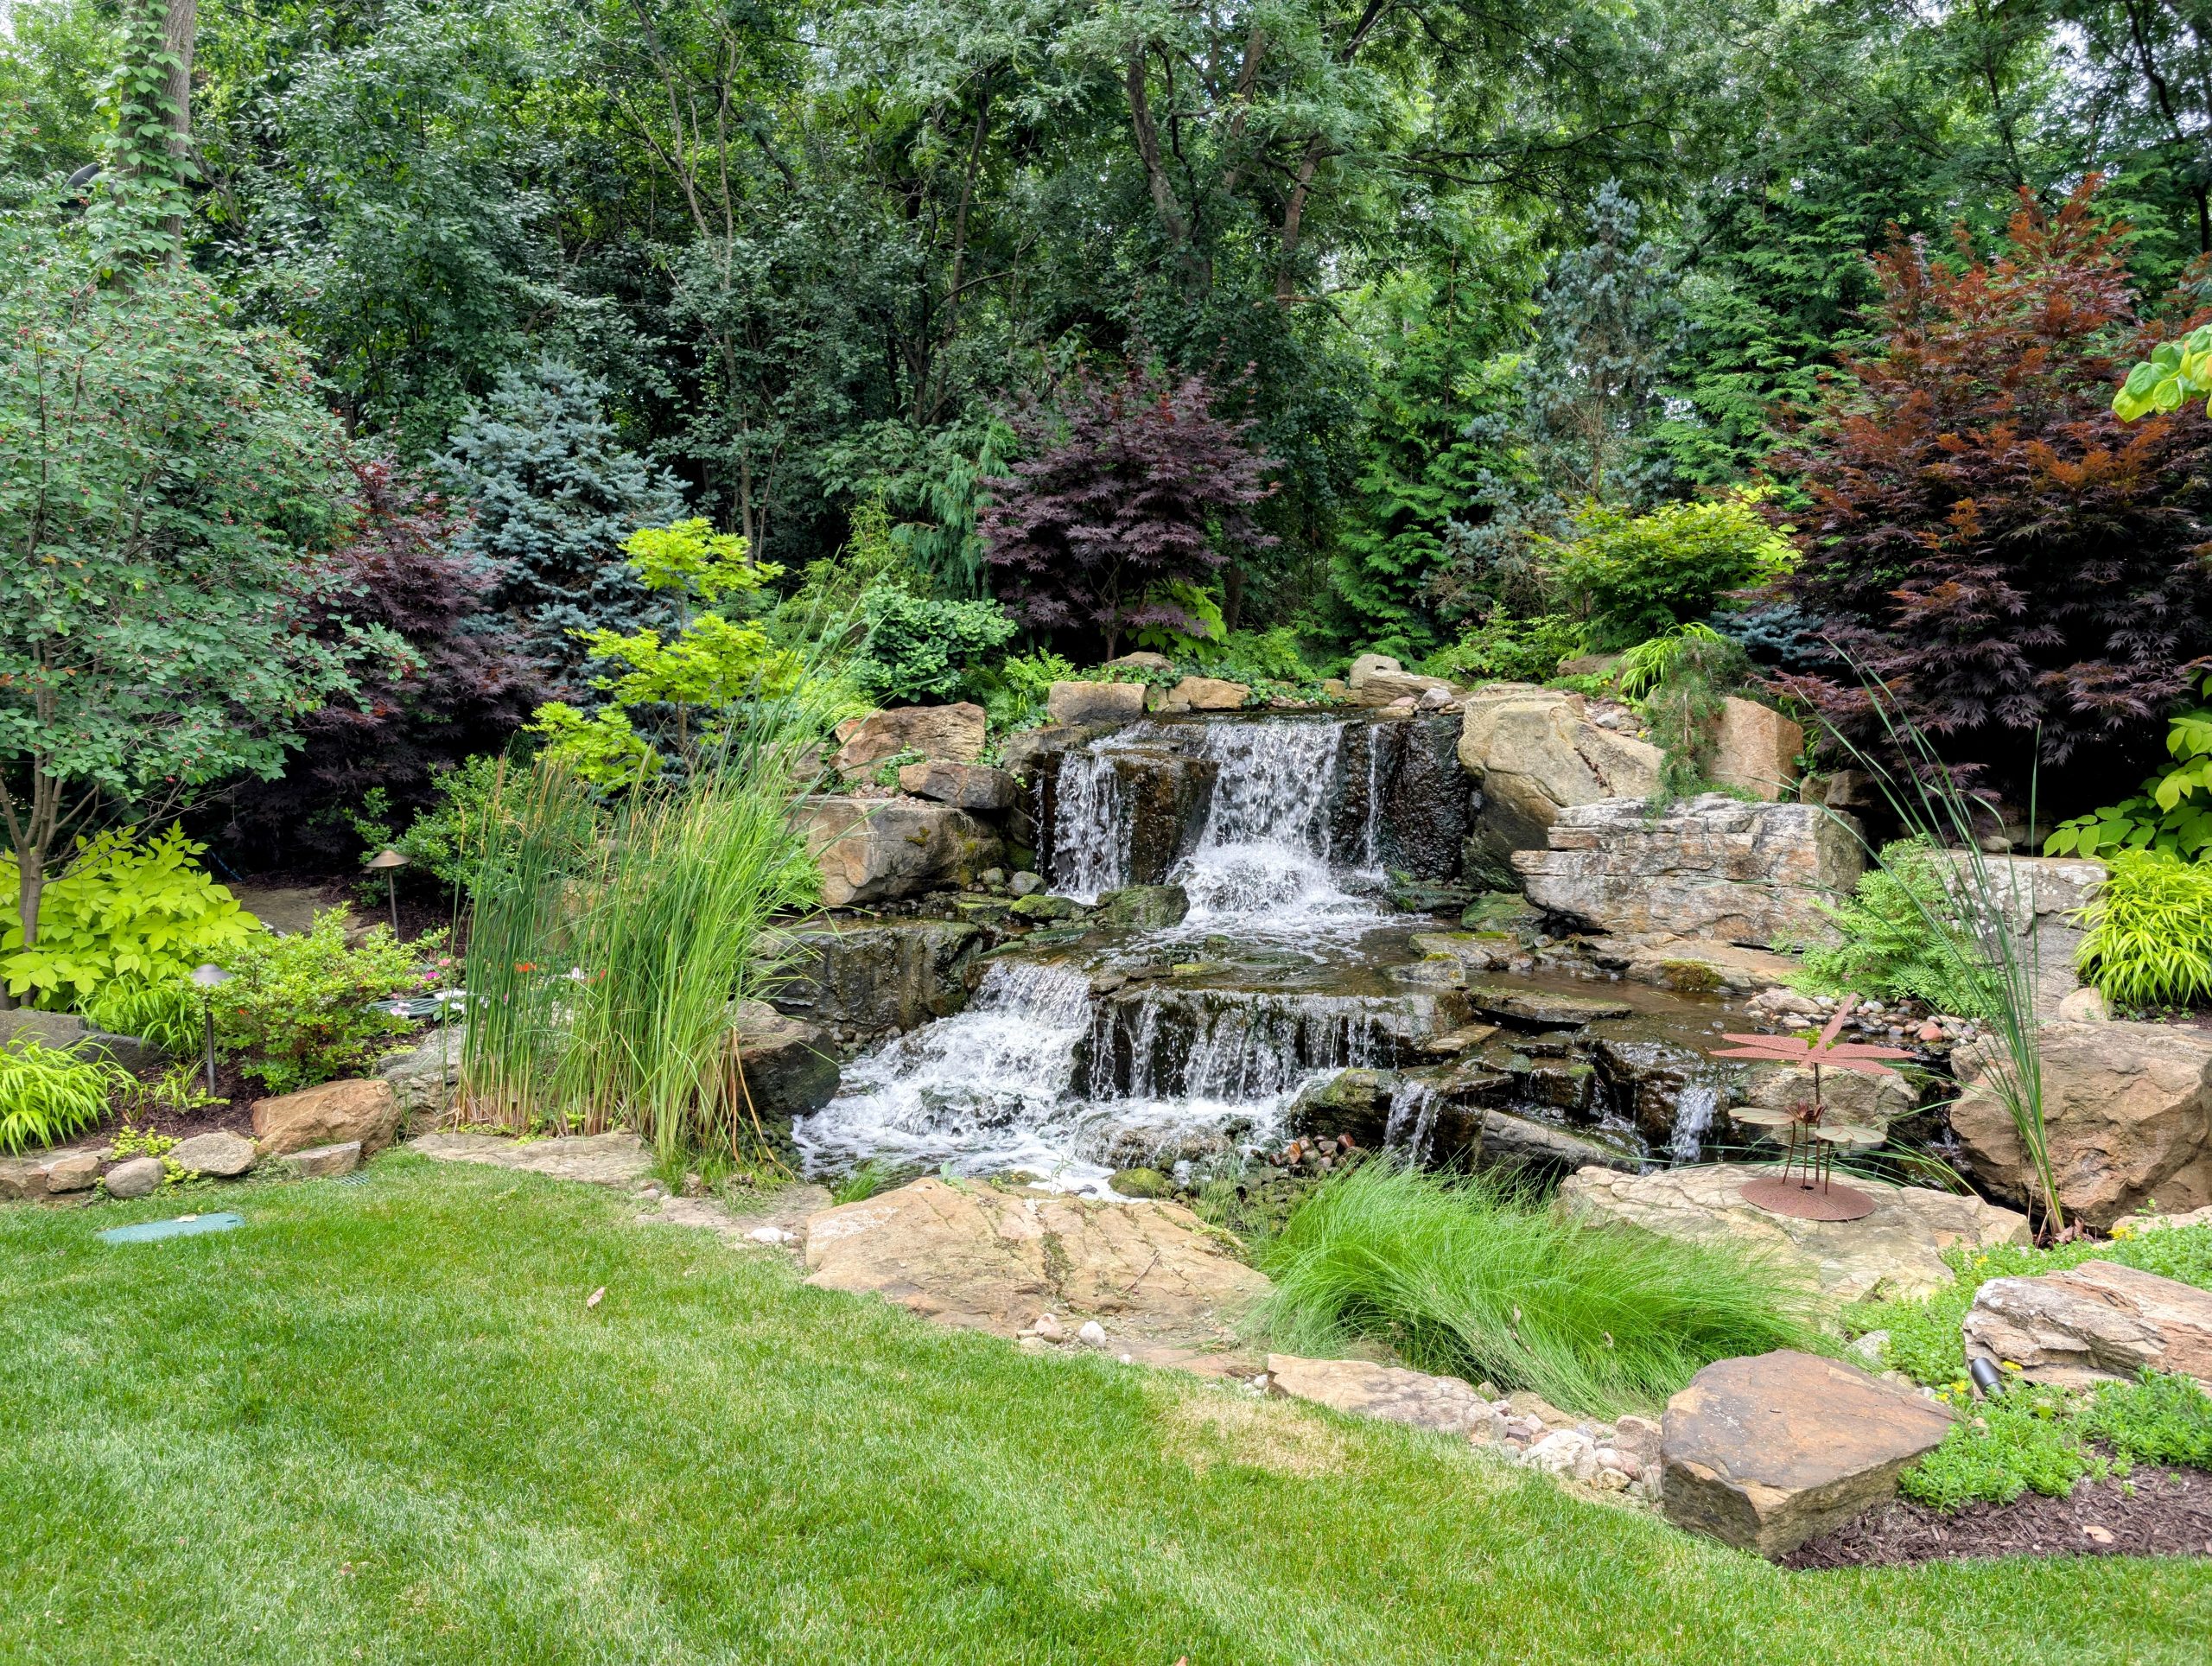
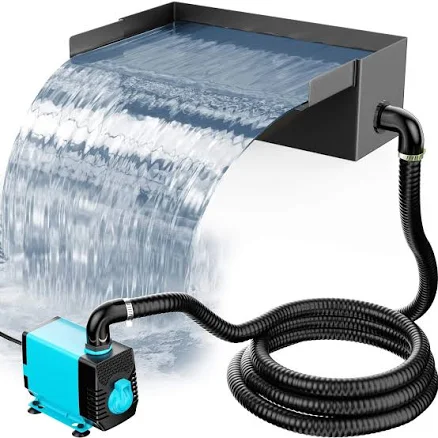
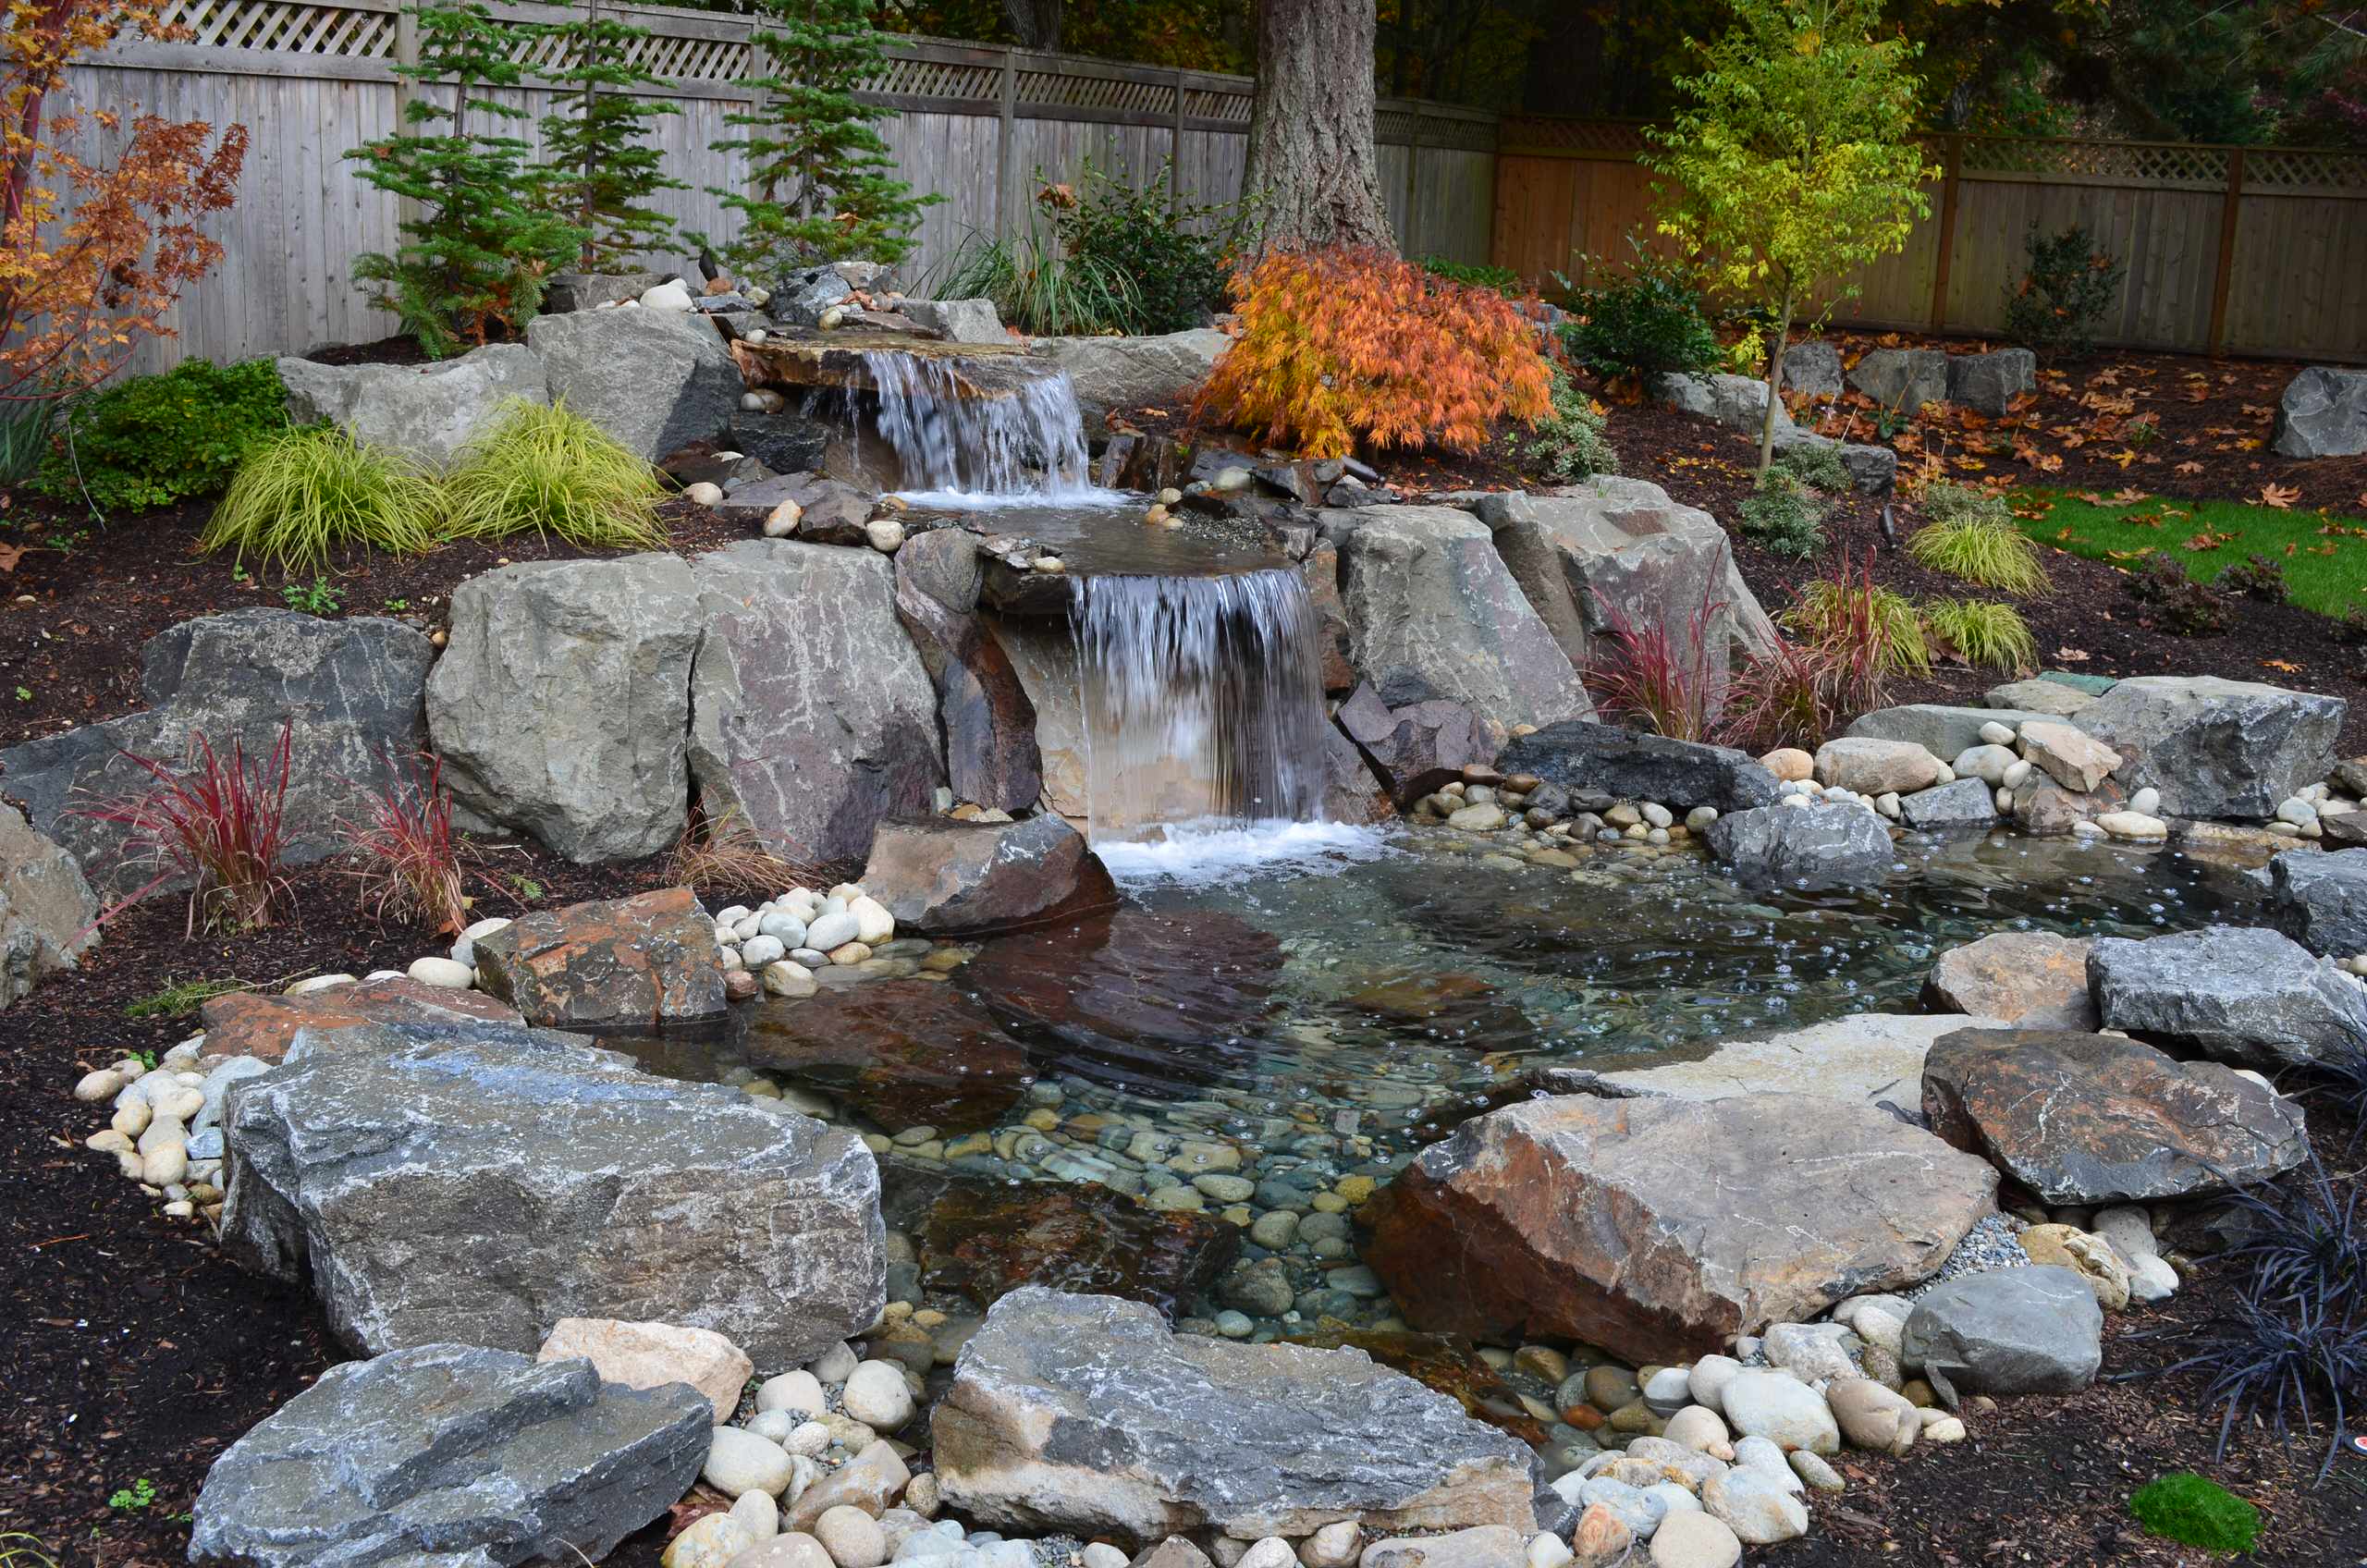
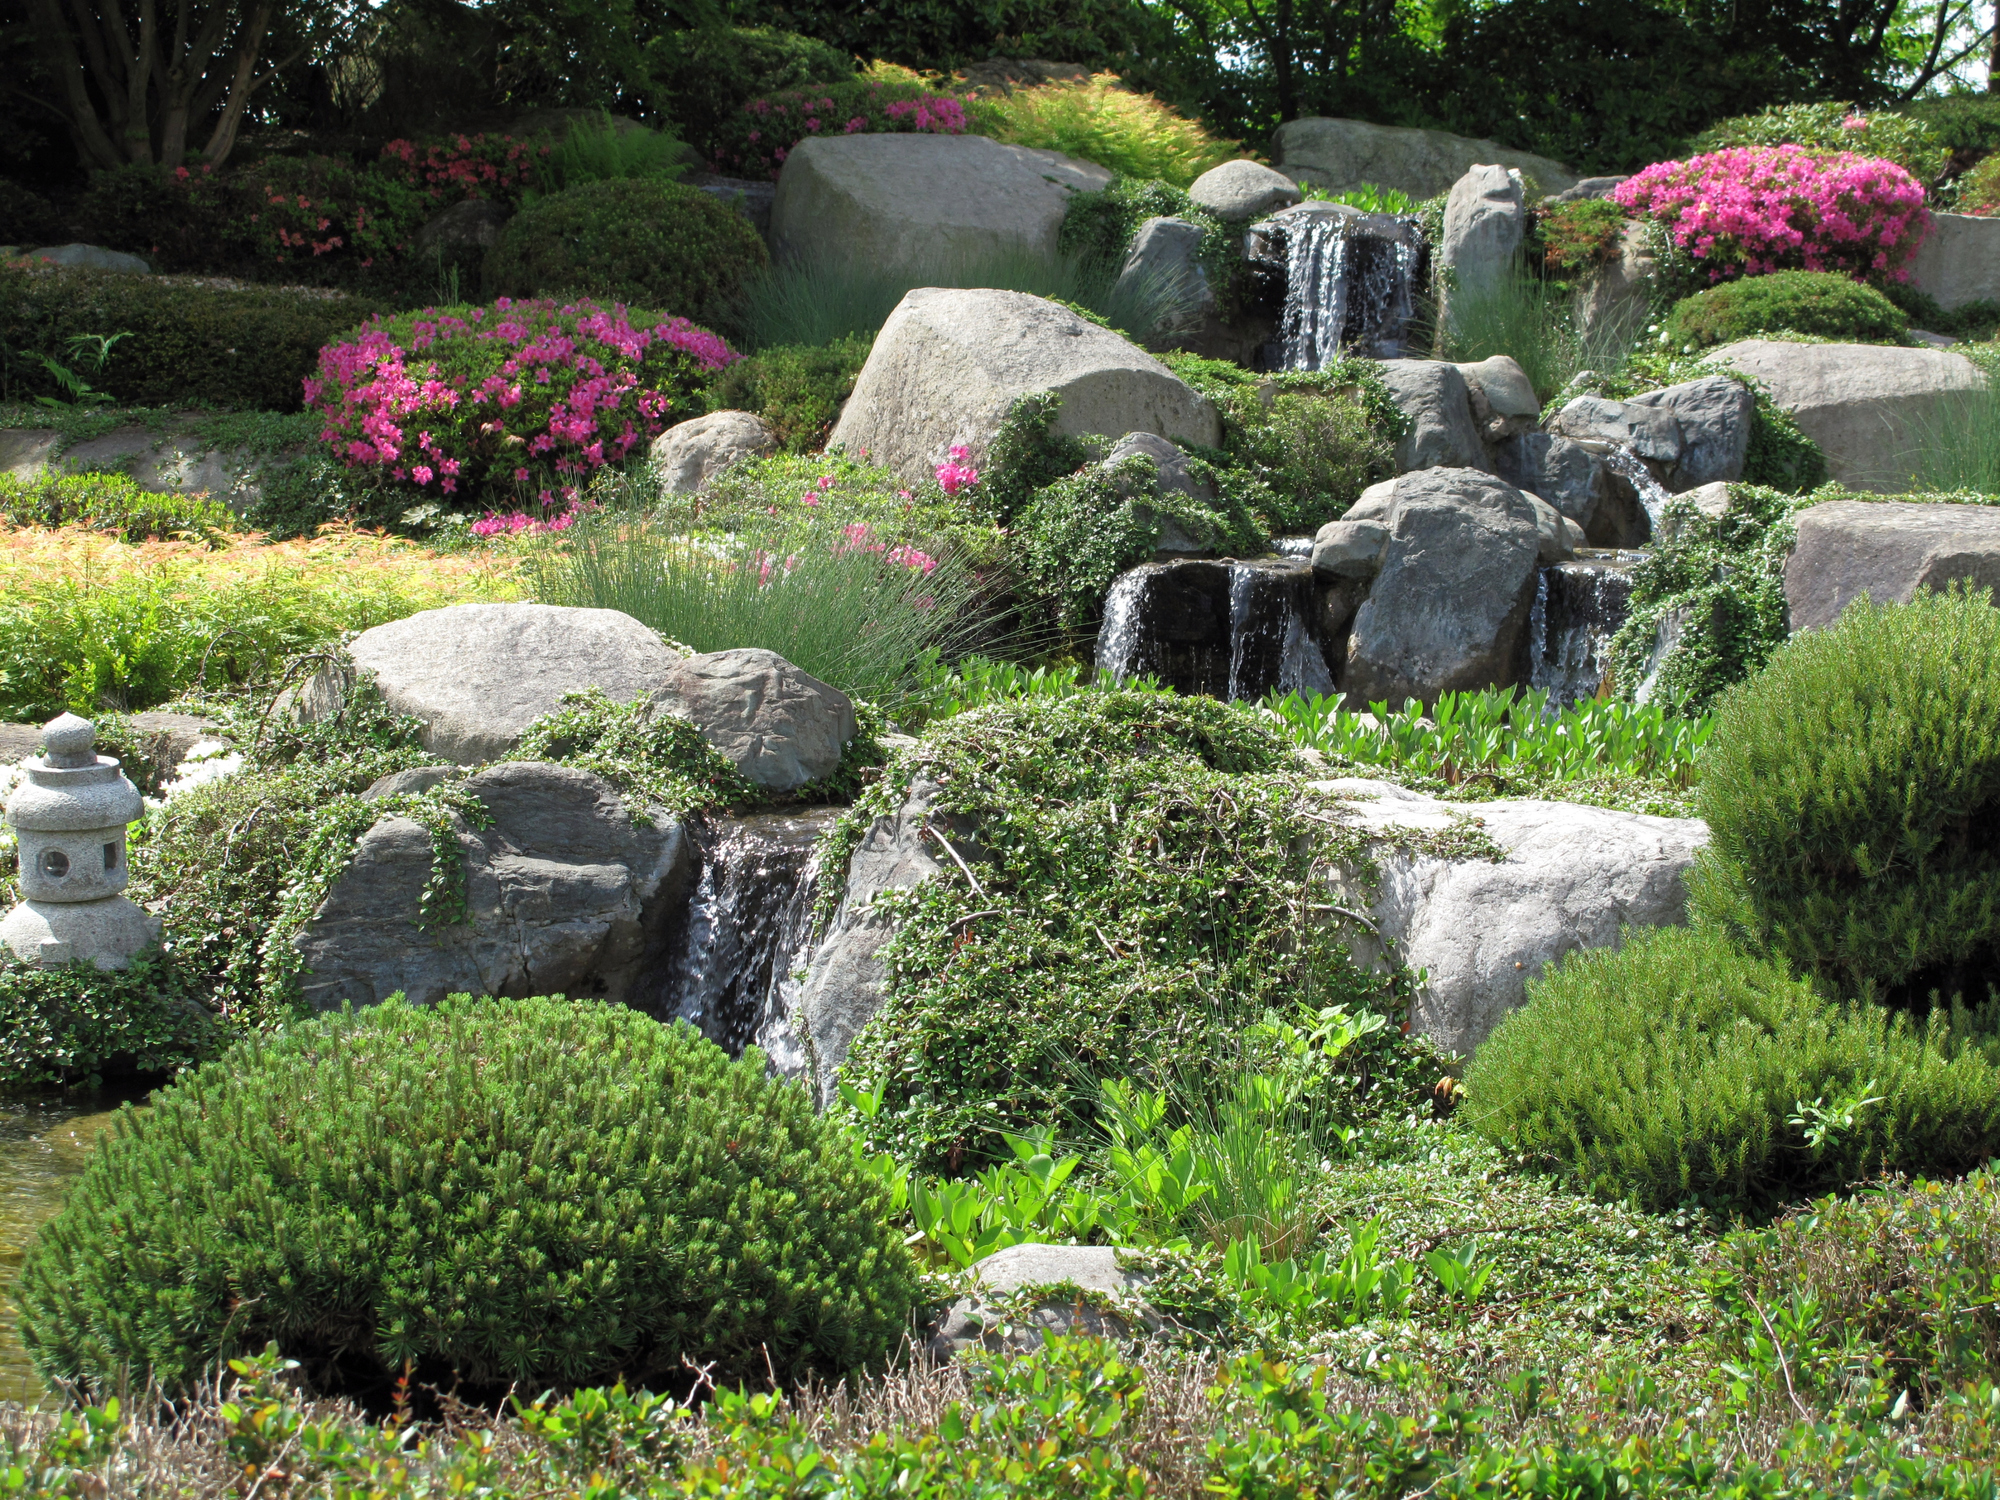
2. Layered Rock Waterfall by a Stone House
The absolute star here is the multi-tiered rock waterfall. It’s not just a water feature; it’s a living sculpture that brings movement and sound, instantly transforming a static yard into a dynamic, serene escape. Without its layered artistry and the gentle murmur of flowing water, this landscape would lose its captivating focal point and much of its luxurious, structured appeal.
|
$16.99
Organic Indian Seeds |
$8.09
|
$3,630.00
, Etc. |
$109.99
|

It grounds the substantial stone house, connecting the architecture to the surrounding nature and creating a harmonious flow. It’s that one element that truly defines the space.
While a rock waterfall is undeniably beautiful, it does require a bit of TLC. Algae can become an issue, especially in sunny spots, so plan for regular cleaning and possibly an algaecide. Also, consider the noise level. A gentle trickle is calming, but a powerful cascade might overwhelm a quiet seating area. Think about how the sound will carry and affect the overall ambiance of your outdoor space, and if you have young children or pets, ensure the basin depth is safe.
3. Relaxed Fire Pit Area with Large Retaining Rocks
This look is all about a balanced mix of raw nature and refined comfort. Calculate it as 50% substantial natural stone (those light brown retaining rocks are doing heavy lifting!), 30% soft green elements (grass and varied plants), and 20% dedicated hardscaping for leisure (that stone-clad fire pit and stepping stone path). You could swap the light brown rocks for stacked dark grey slate, introduce more flowering plants for vibrant color, and trade the concrete stepping stones for reclaimed wood planks, as long as you maintain that core percentage distribution.

|
📋 Copy HEX 🔗 Share |
|
$9.51
|
$126.72
|
$484.99
|
$305.40
|

- Source your stones: Find large, irregularly shaped rocks from a local quarry or landscape supplier. Aim for various sizes for a natural look. (Time: 1-2 days sourcing; Cost: $300-$1000+)
- Prepare the area: Clear and level the ground for your fire pit and major rock placements. Install proper drainage if needed. (Time: 1 day, Cost: $50-$100 for materials)
- Place key boulders: Use a landscape dolly or professional help to strategically place the largest retaining rocks first. (Time: 1 day, Cost: $100-$300 for rental/labor)
- Build the fire pit: Construct your stone-clad fire pit, ensuring it meets local safety codes. Remember to incorporate the blue fire glass for that unexpected pop of color. (Time: 1-2 days, Cost: $400-$1500)
- Install stepping stones: Lay your concrete stepping stone path, leaving ample space for grass to grow between, creating a soft, integrated look. (Time: 0.5-1 day, Cost: $150-$400)
- Plant and mulch: Fill in with vibrant green grass, diverse plants, and dark brown mulch beds to complete the natural aesthetic. (Time: 0.5-1 day, Cost: $200-$800)
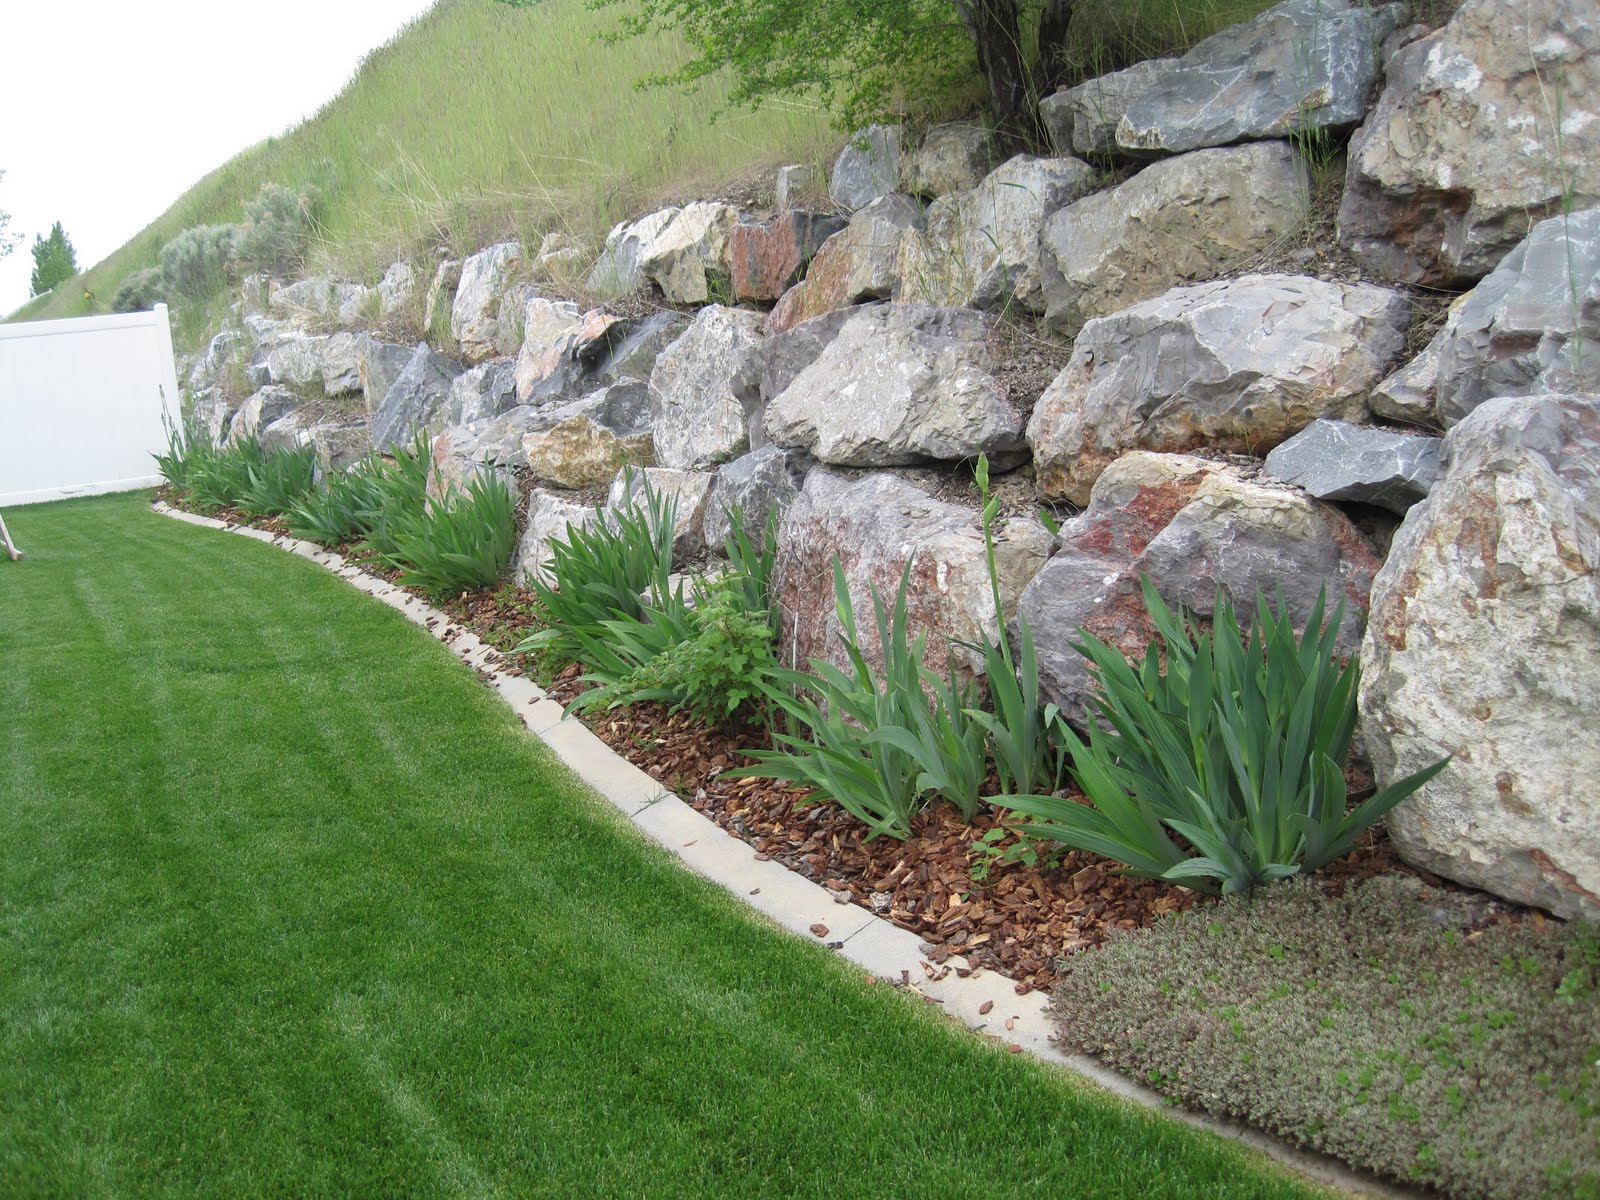
4. Layered Garden with a Natural Rock Border
When integrating large retaining rocks into a sloped garden, always excavate and set the lowest layer of rocks slightly below grade. This creates a more stable base and a natural, ’emerging from the earth’ look, rather than appearing simply placed on top. For a lasting structure, ensure a slight backward slope (around 5-10 degrees) into the hillside on each rock layer. This simple trick prevents future shifts and improves drainage, keeping your beautiful rock wall looking great for years.
|
$3,000.00
|
$1,100.00
|
$39.95
|
$85.95
|
This layered garden look is having a major moment because it speaks to a growing desire for low-maintenance, ecologically sensitive landscapes. Using substantial natural rock as a retaining feature, rather than poured concrete, feels more authentic and aligns with the broader push towards naturalistic design. People are craving connection to nature right at home, especially with the rise of ‘rewilding’ garden trends. It’s a classic for a reason, but its current popularity is fueled by sustainability and a touch of wild beauty.
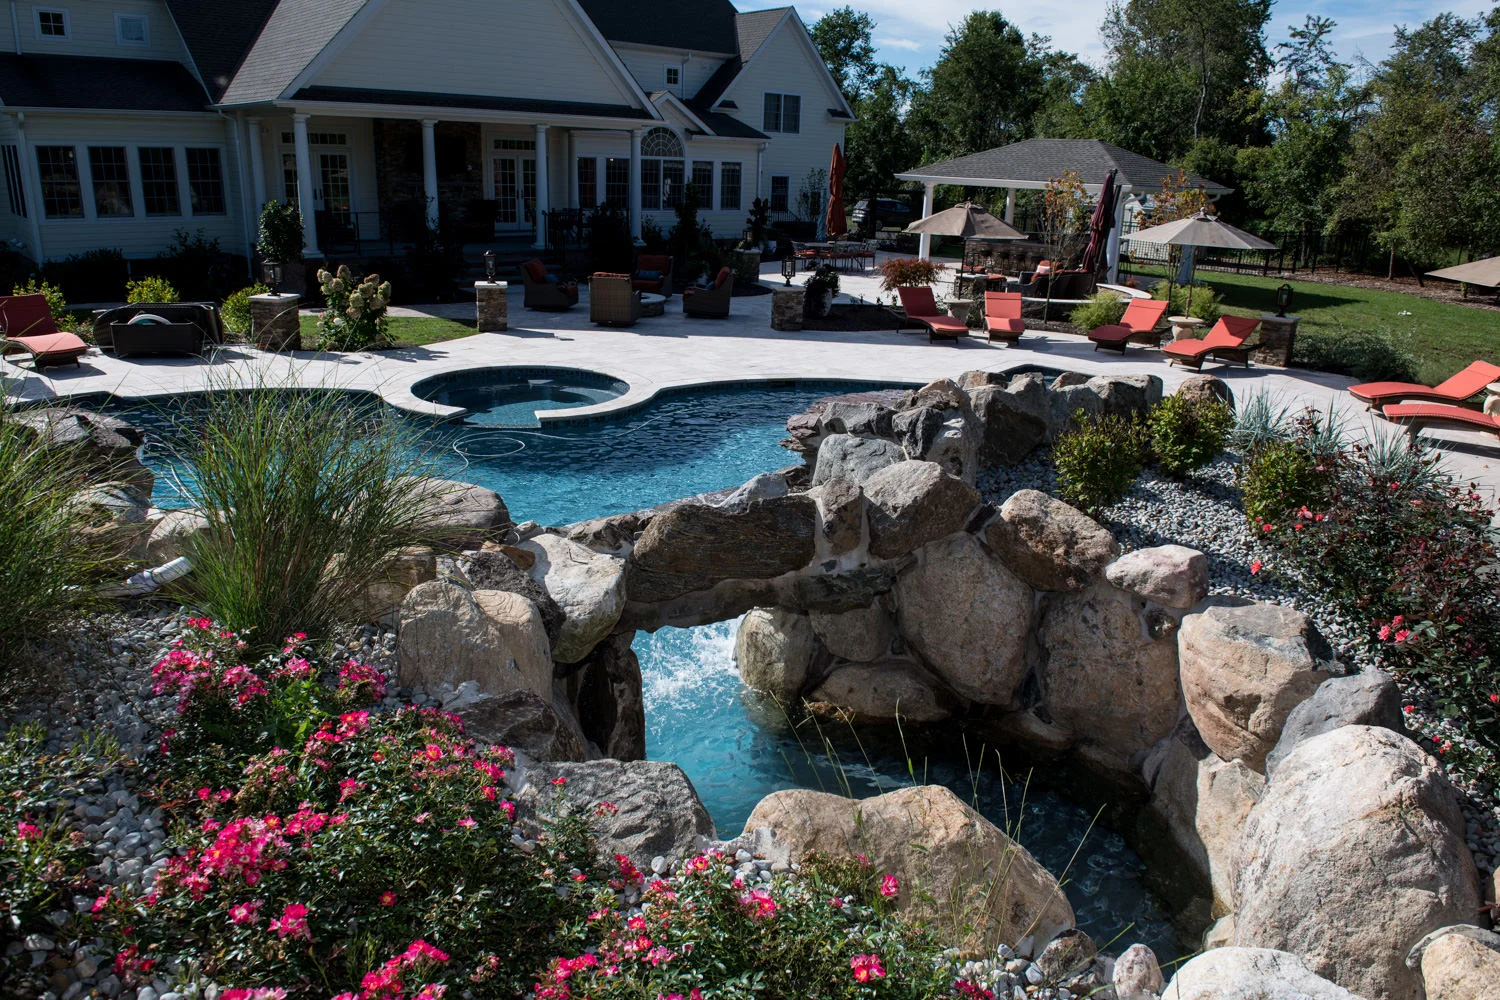
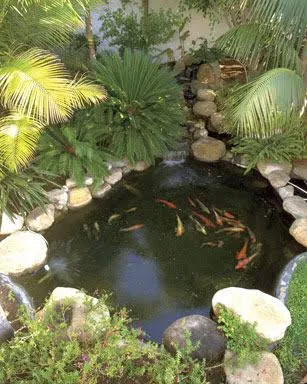
5. Poolside Rock Waterfall with Pink Groundcover
The brilliance here lies in the seamless blend of luxury with raw nature. The natural rock waterfall feature not only adds an organic element to the sleek custom swimming pool but also creates a visual break and focal point, making the pool feel like a secluded oasis rather than just a concrete structure. The contrast between the irregular, textured rocks and the smooth, light patio pavers is also key, adding depth and interest. Plus, that vibrant pink flowering groundcover along the edges adds a playful, soft touch that balances the hardscaping.
|
📋 Copy HEX 🔗 Share |
|
$1,098.00
|
$330.95
|
$7.95
|
$15.95
|

You don’t need a custom pool to get this natural lagoon vibe. For a fraction of the cost, you can install a pre-fabricated pond kit with a small pump and a waterfall spillway. Instead of massive boulders, use a collection of medium-sized river rocks from Home Depot or a local quarry (around $50-$150 for a good selection) to build up a layered effect around the spillway. Plant easy-care pink flowering groundcovers like creeping thyme or phlox (around $5-$10 per plant at your local nursery) in dark grey gravel beds (Target, $20-$30 per bag) for a similarly refreshing and natural aesthetic. This approach could cost you about $500 – $1500, a massive saving compared to Idea #0’s grander setup.
6. Lush Layered Garden with Richly Textured Waterfall
This lush, multi-tiered rock waterfall design truly shines in larger garden spaces, ideally with at least 500 square feet dedicated to the feature and surrounding landscaping. The dense foliage, large natural boulders, and multi-level arrangement require room to breathe and appear natural, not cramped. While you can scale down the concept, the ‘lush density’ is best achieved in a generous footprint. If space is tight, consider Idea #8‘s more contained cascading water feature for similar serenity in a smaller package.
|
$482.50
|
$22.49
|
$3,010.00
, Etc. |
$129.99
|
Maintaining a lush, layered garden with a rock waterfall demands consistent effort. The constant moisture and dappled light create a perfect environment for algae on rocks, which will need scrubbing every few weeks. Leaves and debris from the dense foliage will also require regular skimming from the water to prevent pump clogs. Expect to dedicate 1-2 hours weekly during growing season to keep it pristine. Consider opting for fewer deciduous plants around the waterfall if you want less leaf litter.
7. Natural Boulder and Stacked Stone Pathway
The single most impactful element here is the use of mossy, aged boulders in combination with the stacked stone pathway. These aren’t just rocks; they look like they’ve been here forever, lending an incredible sense of history and permanence to the landscape. They tell a story, grounding the entire design and making the newer pathway feel like a natural extension, not an imposition. Without that aged, organic feel, the scene would lose much of its rugged yet serene charm.
|
📋 Copy HEX 🔗 Share |
|
$18.53
Organic Indian Seeds |
$8.99
|
$18.97
|
To replicate this look for less, hit up Facebook Marketplace or local quarry discards for large, character-filled rocks that already have some moss or interesting textures (often available for free or significantly discounted). Instead of custom stacked stone, consider irregular concrete pavers from Lowe’s (around $3-$7 each) set into dirt or gravel, allowing grass to grow between for that integrated look. You can also buy bags of moss spores online (around $15-$30) to encourage growth on new stones, achieving that coveted aged appearance in time. This budget-friendly approach could come in around $300-$800, compared to a professional installation easily topping $3000+.
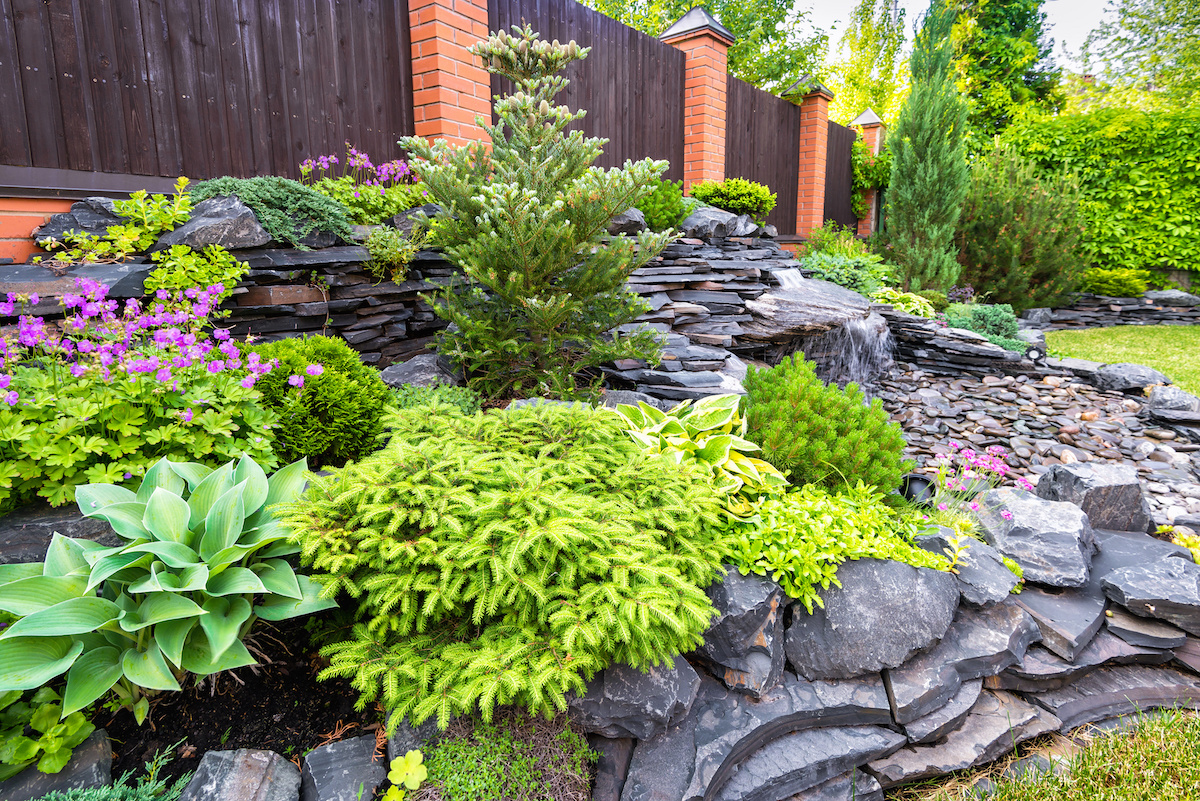
8. Layered Rock Garden with Cascading Water
When designing a cascading water feature with stacked rocks, remember this golden rule: vary the overhang. Don’t simply stack rocks directly on top of each other. Create slight overhangs with each successive layer, allowing the water to sheet and ripple over the textured edges, rather than just falling as a straight stream. This technique enhances the visual and auditory experience, making the water seem more active and natural. Aim for 1-2 inches of overhang on alternating rocks, creating micro-eddies and visual interest.
|
$260.00
|
$12.65
|
$29.98
|
$37.14
|
This design’s success hinges on blending repetition with variety. The stacked dark grey rocks provide a strong, unifying texture, repeated throughout the water feature. However, the variety comes from the different plant forms—the broad leaves of hostas, the delicate needles of conifers, and the soft carpet of pink groundcover. This thoughtful mix prevents the stacked rocks from feeling too monotonous, creating a rich tapestry that draws the eye and highlights the flowing water.
9. Cascading Waterfall with Large Stones and Foliage
The cascading waterfall here is magnificent! It’s captivating how the water flows over those large grey and brown rocks into a clear pond, framed by a mix of evergreens, grasses, and that striking orange maple. It feels so organic, yet clearly intentional.
|
📋 Copy HEX 🔗 Share |
|
$46.00
|
$319.94
|
$44.95
|
$6.78
|
- Clear the site of any debris or unwanted vegetation.
- Ensure an adequate water source and drainage.
- Assess sunlight exposure for plant selection.
- Plan for electrical access for the pump and lighting.
Water features like this are increasingly popular in 2026 as people seek to create more sensory-rich and calming outdoor environments at home. With longer working hours and increased digital screen time, the desire for tranquil, natural spaces to decompress has surged. This kind of feature taps directly into that need, offering both visual beauty and the soothing sound of flowing water, reminiscent of a forest escape, right in your backyard. It’s about bringing wellness home, and features that engage multiple senses are leading the way.
10. Landscaped Rock Retention Wall with Garden
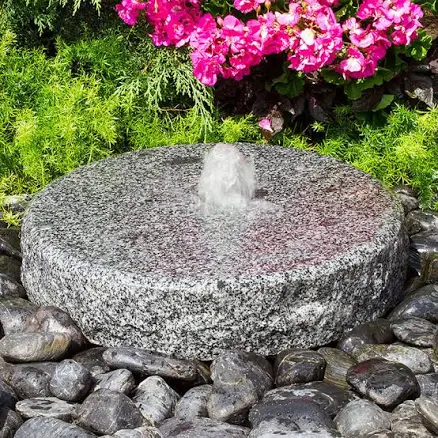
Getting this structured, tiered look doesn’t have to break the bank. Instead of custom-cut large rocks, scout for ‘fieldstone mix’ or ‘outcropping stone’ at local landscape supply yards; these are often more natural in shape and considerably cheaper per ton (around $100-$300 per ton vs. $400-$800+ for cut stone). You can also use treated lumber beams as a hidden structural core behind the largest rocks to reduce the sheer volume of stone needed. For the garden border, inexpensive plastic or metal edging (around $20-$50 for 20-foot rolls at Walmart) can substitute for concrete, and bark mulch is readily available at most garden centers (around $3-$6 per bag). You could easily achieve a similar effect for $800-$2000, saving thousands over a fully professional installation.
|
$25.00
|
$88.00
|
$2.99
Hardware Store |
$1.79
|
While a rock retention wall looks rugged and timeless, improper installation can lead to major headaches. If not built with proper drainage behind it, water can build up, causing the wall to bulge or collapse over time. Always ensure a fabric weed barrier and a layer of gravel are placed behind the rocks to facilitate drainage. You’ll also want to slightly tilt each rock backward into the slope, ensuring gravity works with, not against, your wall. If you’re building a wall over 2-3 feet tall, seriously consider consulting a structural engineer or a professional landscaper, as mistakes here can be costly and even dangerous.
11. Sloped Yard with Large Rock Steps and Diverse Plants
The visual formula for this lush, sloped yard is 60% dominant hardscaping (those massive, irregular boulders and natural stone steps), 30% vibrant green and purple foliage, and 10% dark ground cover to tie it all together. To switch up the vibe but keep the same math, you could use lighter, rounder river stones for your boulders, introduce more golden grasses for texture, and swap the dark mulch for a lighter, tan-colored bark. The key is maintaining the ratio of dominant structure to softening greenery and grounding elements.
|
📋 Copy HEX 🔗 Share |
|
$85.86
|
$15.99
|
When creating rock steps on a slope, the golden rule is to keep riser heights (the vertical distance between steps) consistent, ideally between 4 and 7 inches. This might sound counterintuitive in a ‘natural’ setting, but uneven steps are a massive trip hazard. Using large, flat-topped boulders or chiseled stone for the treads (the horizontal part you step on) ensures stability. Always set your steps firmly into a compacted gravel base, extending at least 6 inches beyond the step itself for proper support and drainage.
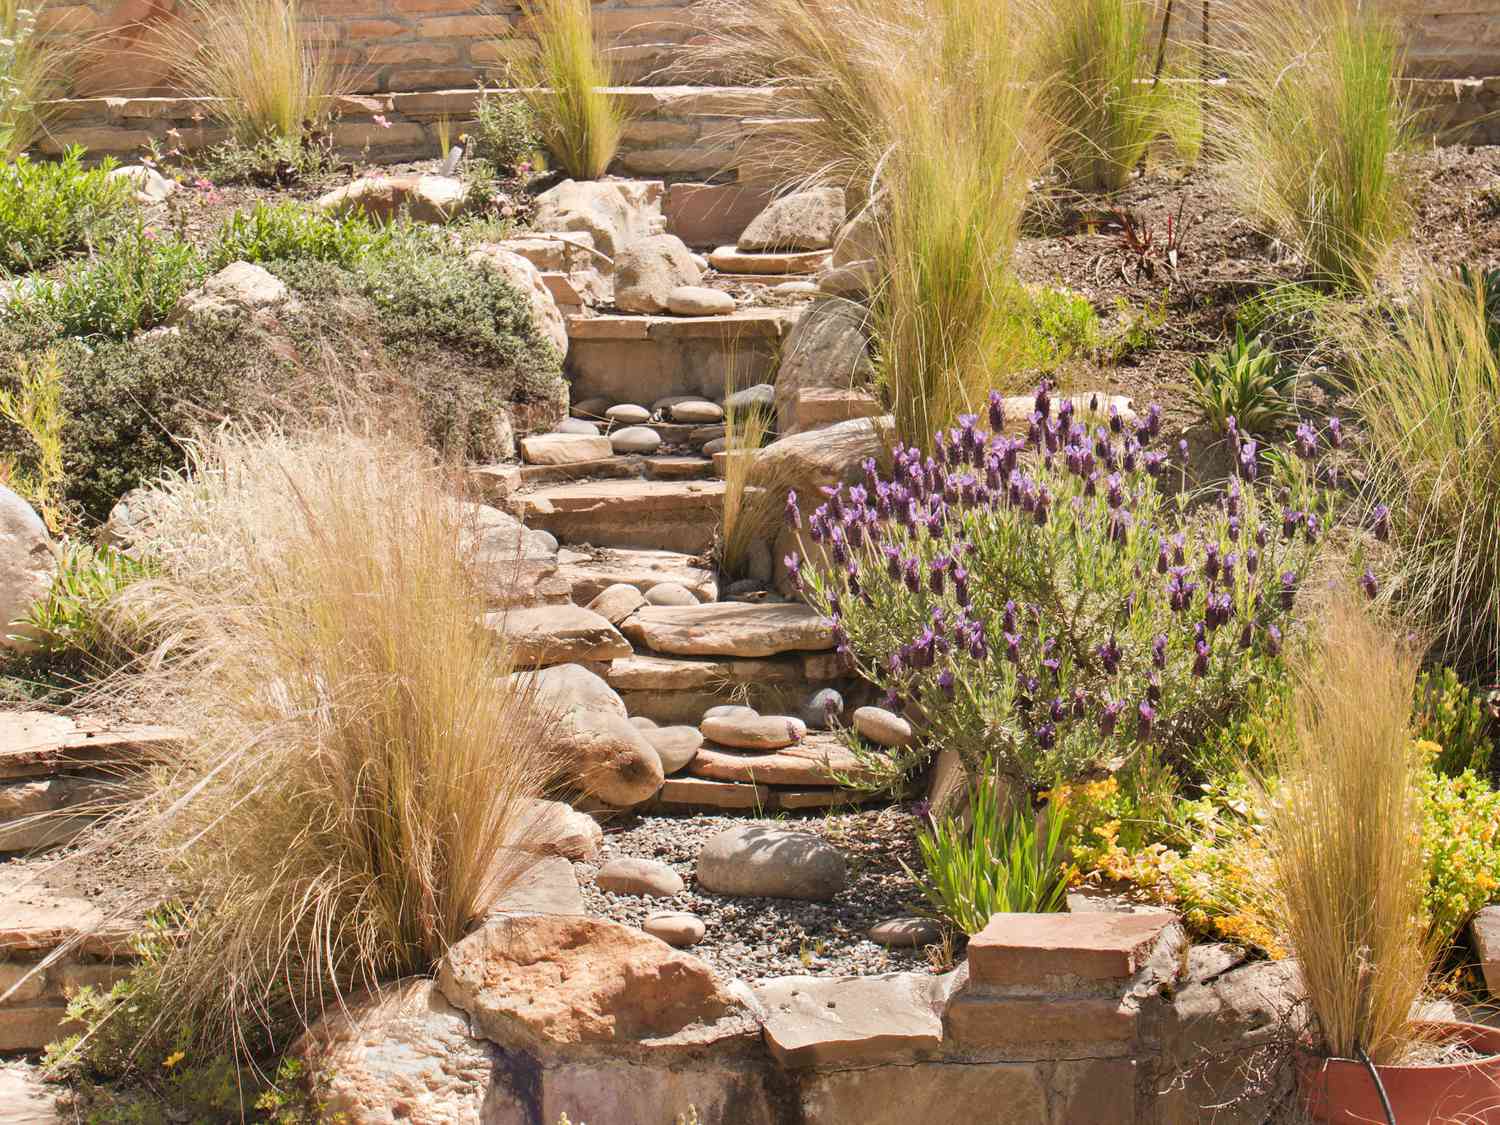
12. Layered Flagstone Steps with Ornamental Grasses
The singular genius of this design lies in its artful integration of the flagstone steps with the surrounding natural elements. It’s not just a path; it’s a journey through the landscape. The irregular flagstones, layered and interspersed with the golden ornamental grasses and the vivid purple lavender, create a seamless transition from hardscape to softscape. This organic blending prevents the steps from feeling stark or separate, instead making them an integral, almost ancient-looking part of the garden. Without this flowing integration, the steps would feel much more ordinary, losing their earthy charm.
|
$415.00
|
$34.99
|
$21.97
|
$9.36
|
- Map out your path: Use a rope or garden hose to define the meandering path for your steps. Consider the natural slope and desired flow. (Time: 30 mins)
- Excavate and level: Dig out the areas for each flagstone, ensuring a stable, level base. Aim for 4-6 inches deep for each step. (Time: 2-4 hours, Cost: minimal)
- Lay gravel base: Add a 2-3 inch layer of compacted gravel (paver base) to each step area for drainage and stability. (Time: 1-2 hours, Cost: $30-$60)
- Place flagstones: Carefully set your irregular flagstones, ensuring they are level (front to back and side to side) and stable. Use a rubber mallet to tamp them down. (Time: 2-6 hours, Cost: $100-$300 for stones
- Infill with river stones: Fill the gaps and crevices between flagstones with small, smooth river stones for a finished, natural look. (Time: 1-2 hours, Cost: $20-$50)
- Plant the edges: Integrate your ornamental grasses and purple flowering bushes around the steps, creating that soft, lush border. (Time: 1-2 hours, Cost: $50-$150 for plants)
13. Cascading Waterfall with Fuchsia Blooms
This vibrant cascading waterfall, with its large grey rocks and fuchsia flowering bushes, is a showstopper best suited for mid-sized to larger backyards (think 300+ sq ft). The multi-tiered structure needs a good horizontal and vertical presence to feel grand and natural. While you can certainly create a smaller version, the impact of these bold fuchsia blooms and large rocks really shines when given ample space. For smaller patios or courtyards, a more contained water wall or fountain, similar to what you might see in Idea #7, would be more appropriate.
|
📋 Copy HEX 🔗 Share |
|
$30.00
|
$15.97
|
$14.84
|
$114.91
|
- Large grey rocks (delivery & placement): $1,000 – $4,000
- Water pump & filtration system: $300 – $1,500
- Green shrubs, grasses & fuchsia bushes: $400 – $1,200
- Electrical & plumbing hookups: $500 – $2,000
- Stone lantern (optional decor): $150 – $500
- TOTAL: $2,350 – $9,200
- Budget alternative: DIY pump and smaller, locally sourced rocks for 40-50% less.
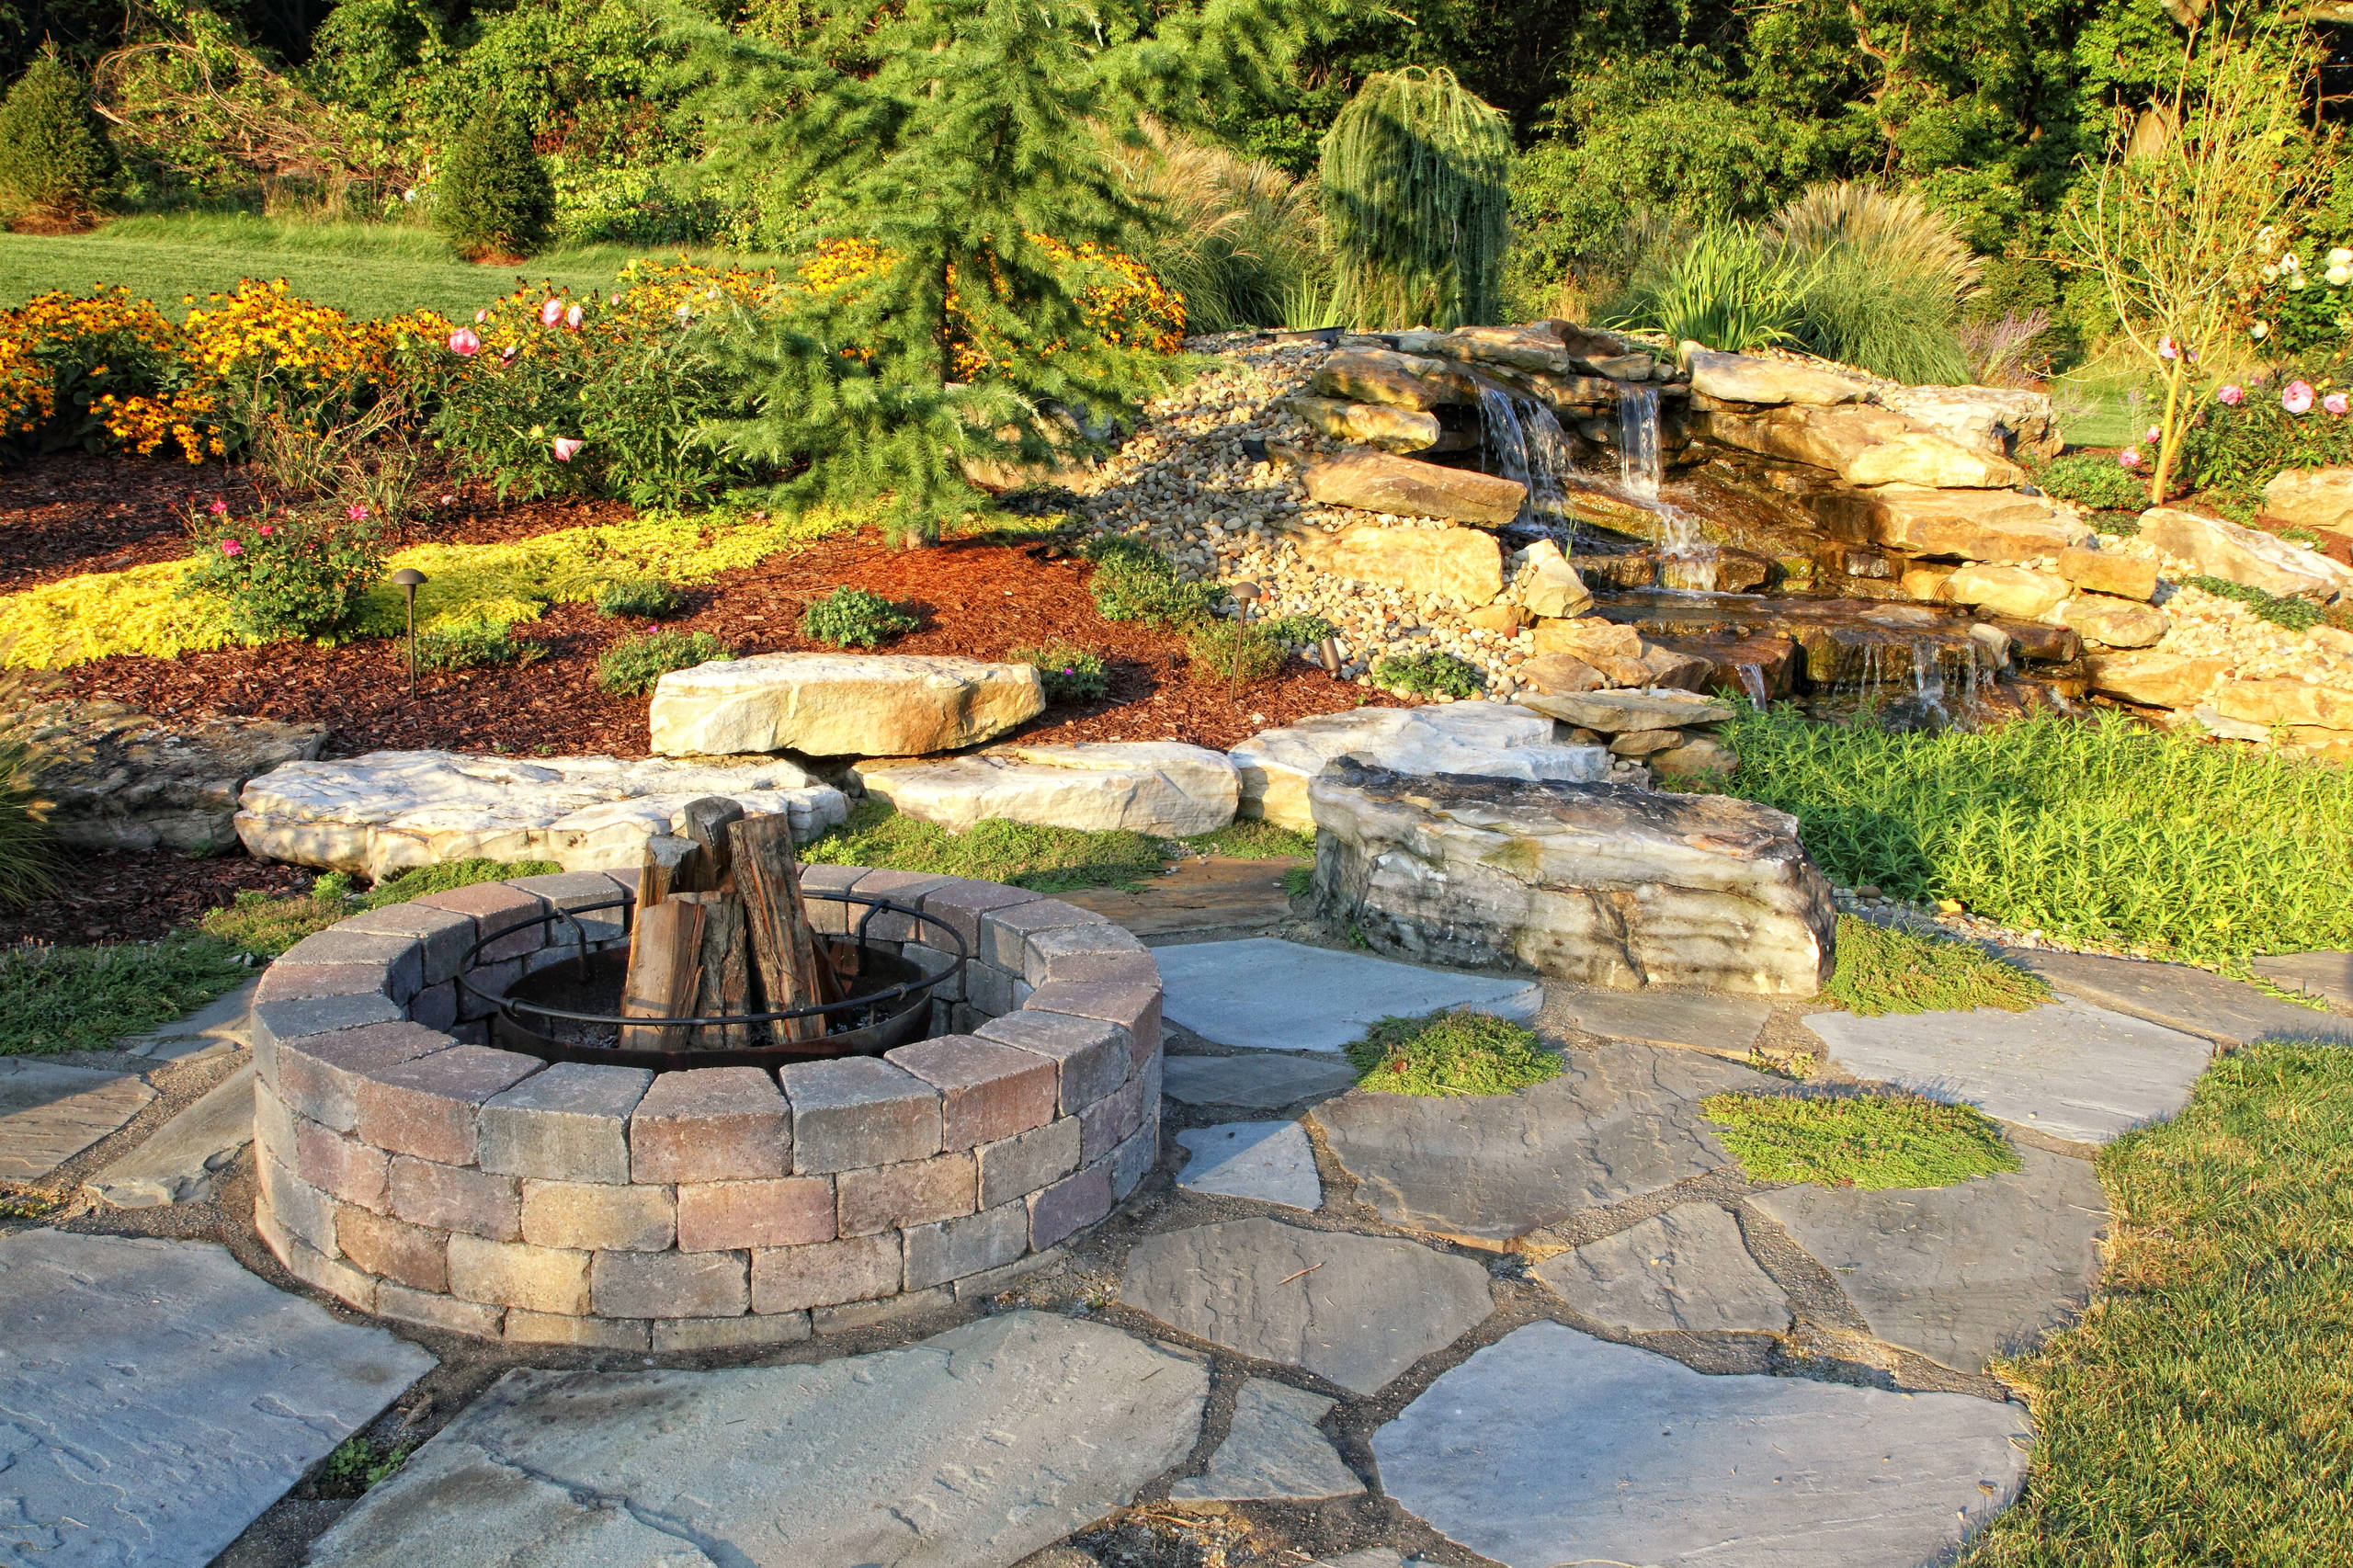
14. Flagstone Patio with Rock Waterfall and Fire Pit
What makes this outdoor space so appealing is the smart zoning. The flagstone patio clearly defines the social area for the fire pit, while the adjacent rock waterfall with its white pebbles creates a separate, serene visual and auditory experience. This distinct, yet harmonious, division of space ensures both relaxation and entertainment can coexist beautifully. The varied textures—smooth flagstone, rugged rock, and soft plants—also add a dynamic visual interest that keeps your eye moving.
|
$400.00
|
$72.97
|
$616.15
|
$494.00
|

When placing a rock waterfall near a seating area like this fire pit, consider prevailing wind direction. You want to avoid splashing guests or constantly dampening the patio. Position the waterfall so that any spray is carried away from the main gathering space. Also, for fire pits, maintain at least a 10-foot clear radius from any structures or flammable materials to ensure safety and comfort for everyone enjoying the flames.
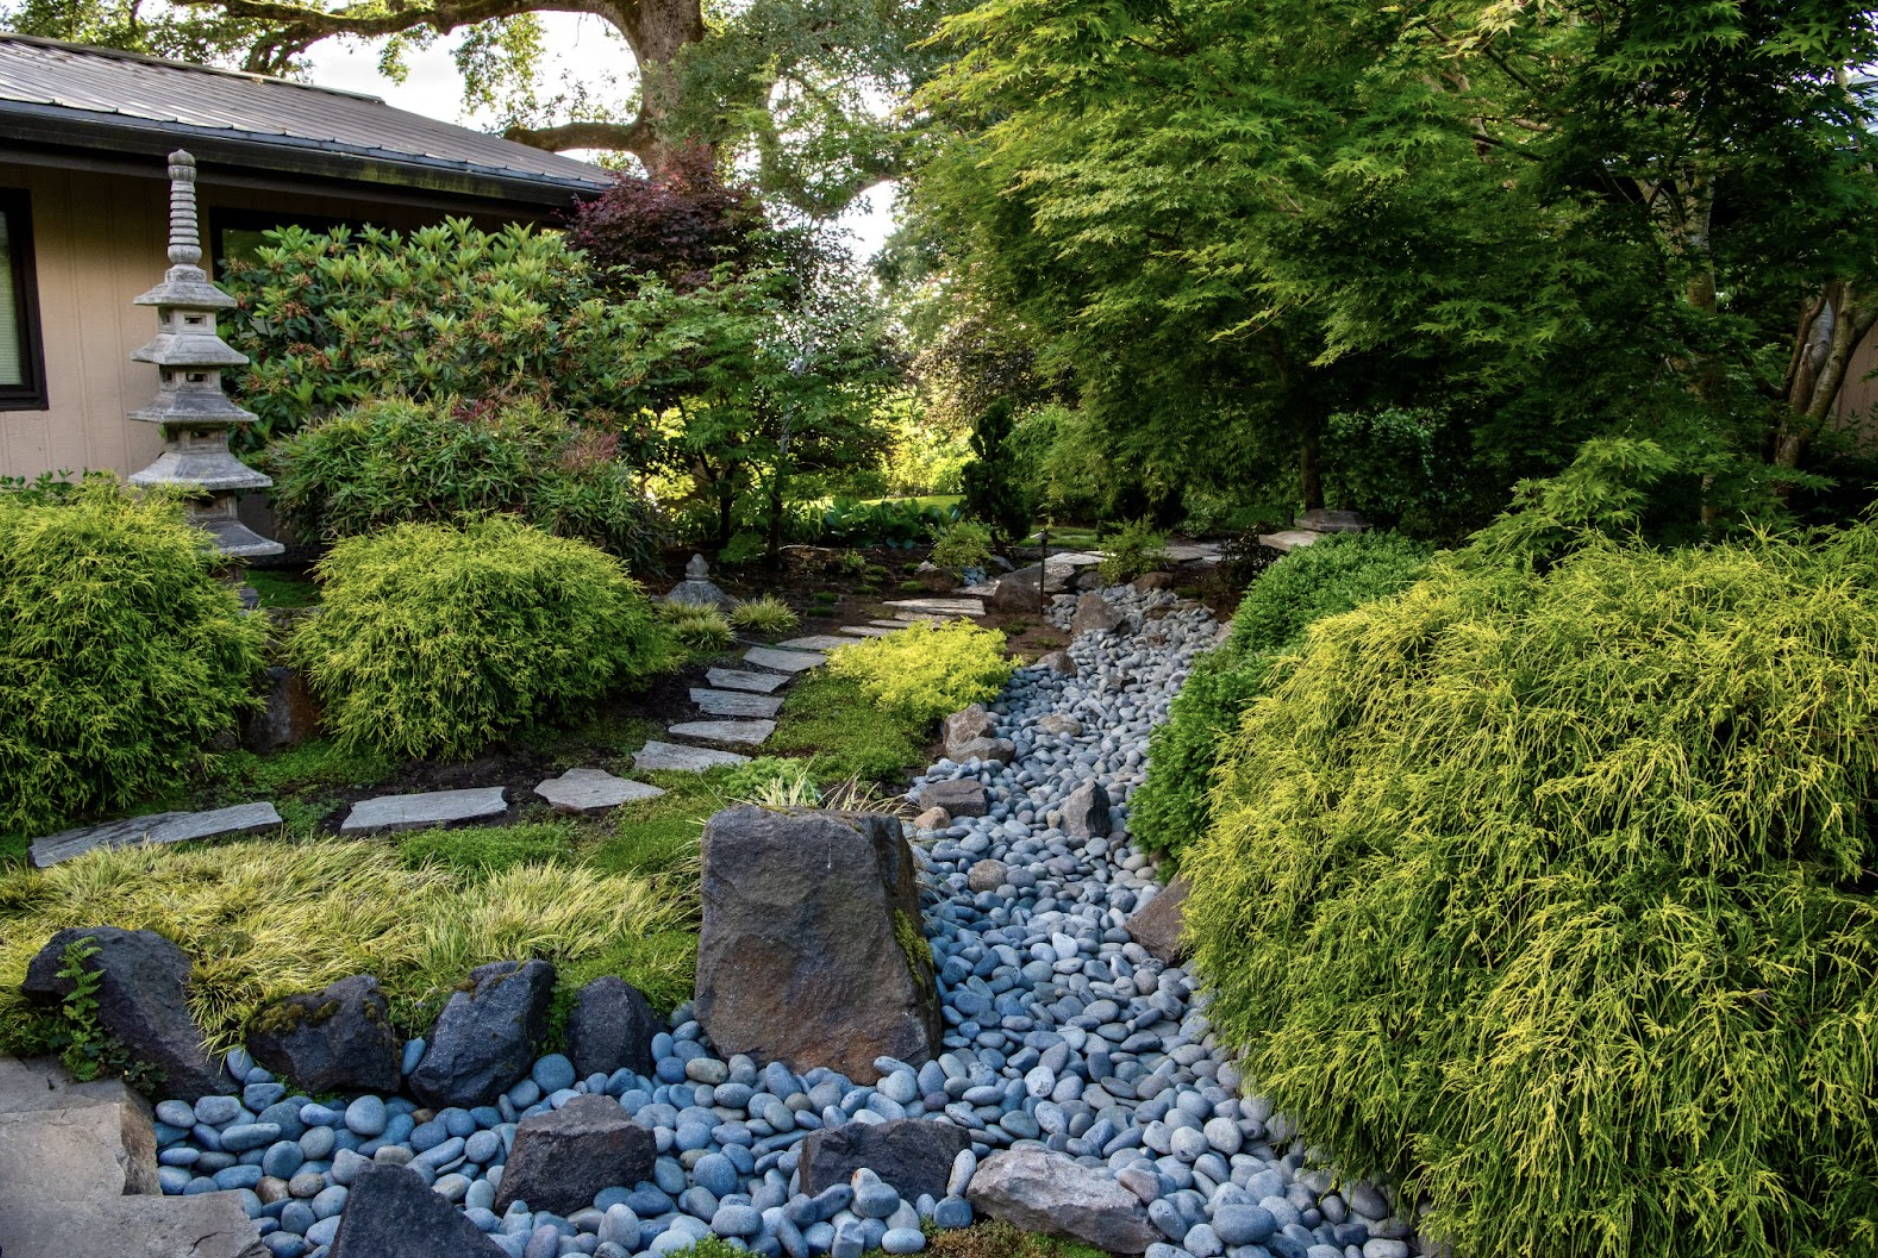
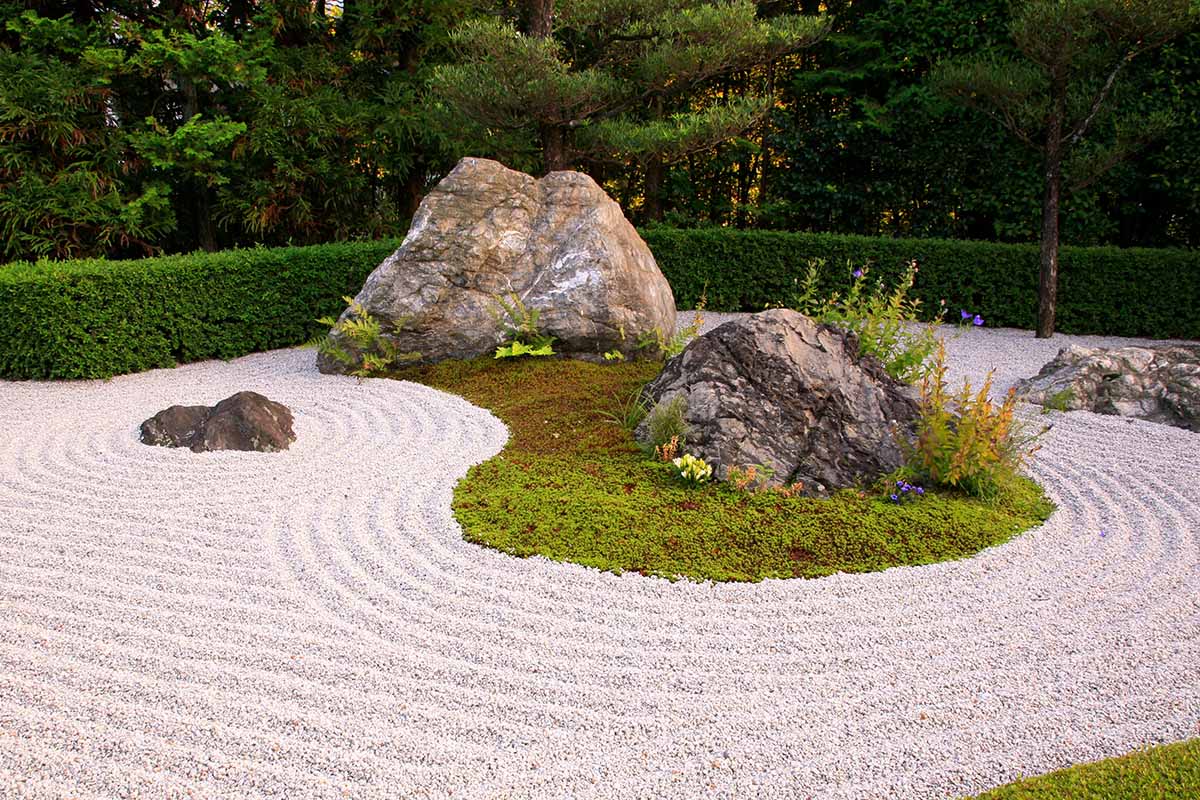
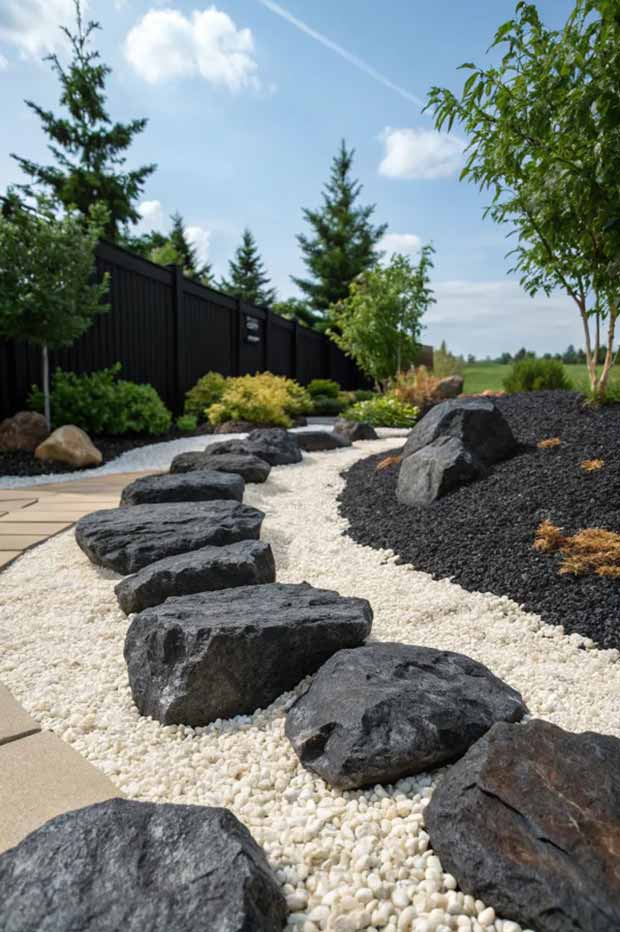
15. Japanese Dry Creek Bed with Boulders and Flagstone Steps
The undeniable star of this Japanese-inspired design is the dry creek bed itself. Constructed from smooth, light gray river stones and strategically placed dark gray boulders, it creates the illusion of flowing water without the need for constant maintenance or pumps. It’s a focal point that brings movement and tranquility through static elements, a masterful trick of design. Without its elegant curve and thoughtful stone placement, the garden would lose its grounding element and that unmistakable sense of Zen.
|
📋 Copy HEX 🔗 Share |
|
$49.99
|
$9.97
|
$18.24
|
$34.41
|
This dry creek bed, while visually stunning, does require occasional maintenance to keep it looking crisp. Leaves and debris will inevitably collect, so plan on raking or blowing out the creek bed monthly, especially if you have deciduous trees nearby. Weeds can also sprout between the river stones if a proper weed barrier isn’t installed adequately underneath, so be prepared for some vigilant weeding a few times a season. The flagstone steps might also occasionally shift, requiring minor adjustments every couple of years depending on foot traffic and ground settling.
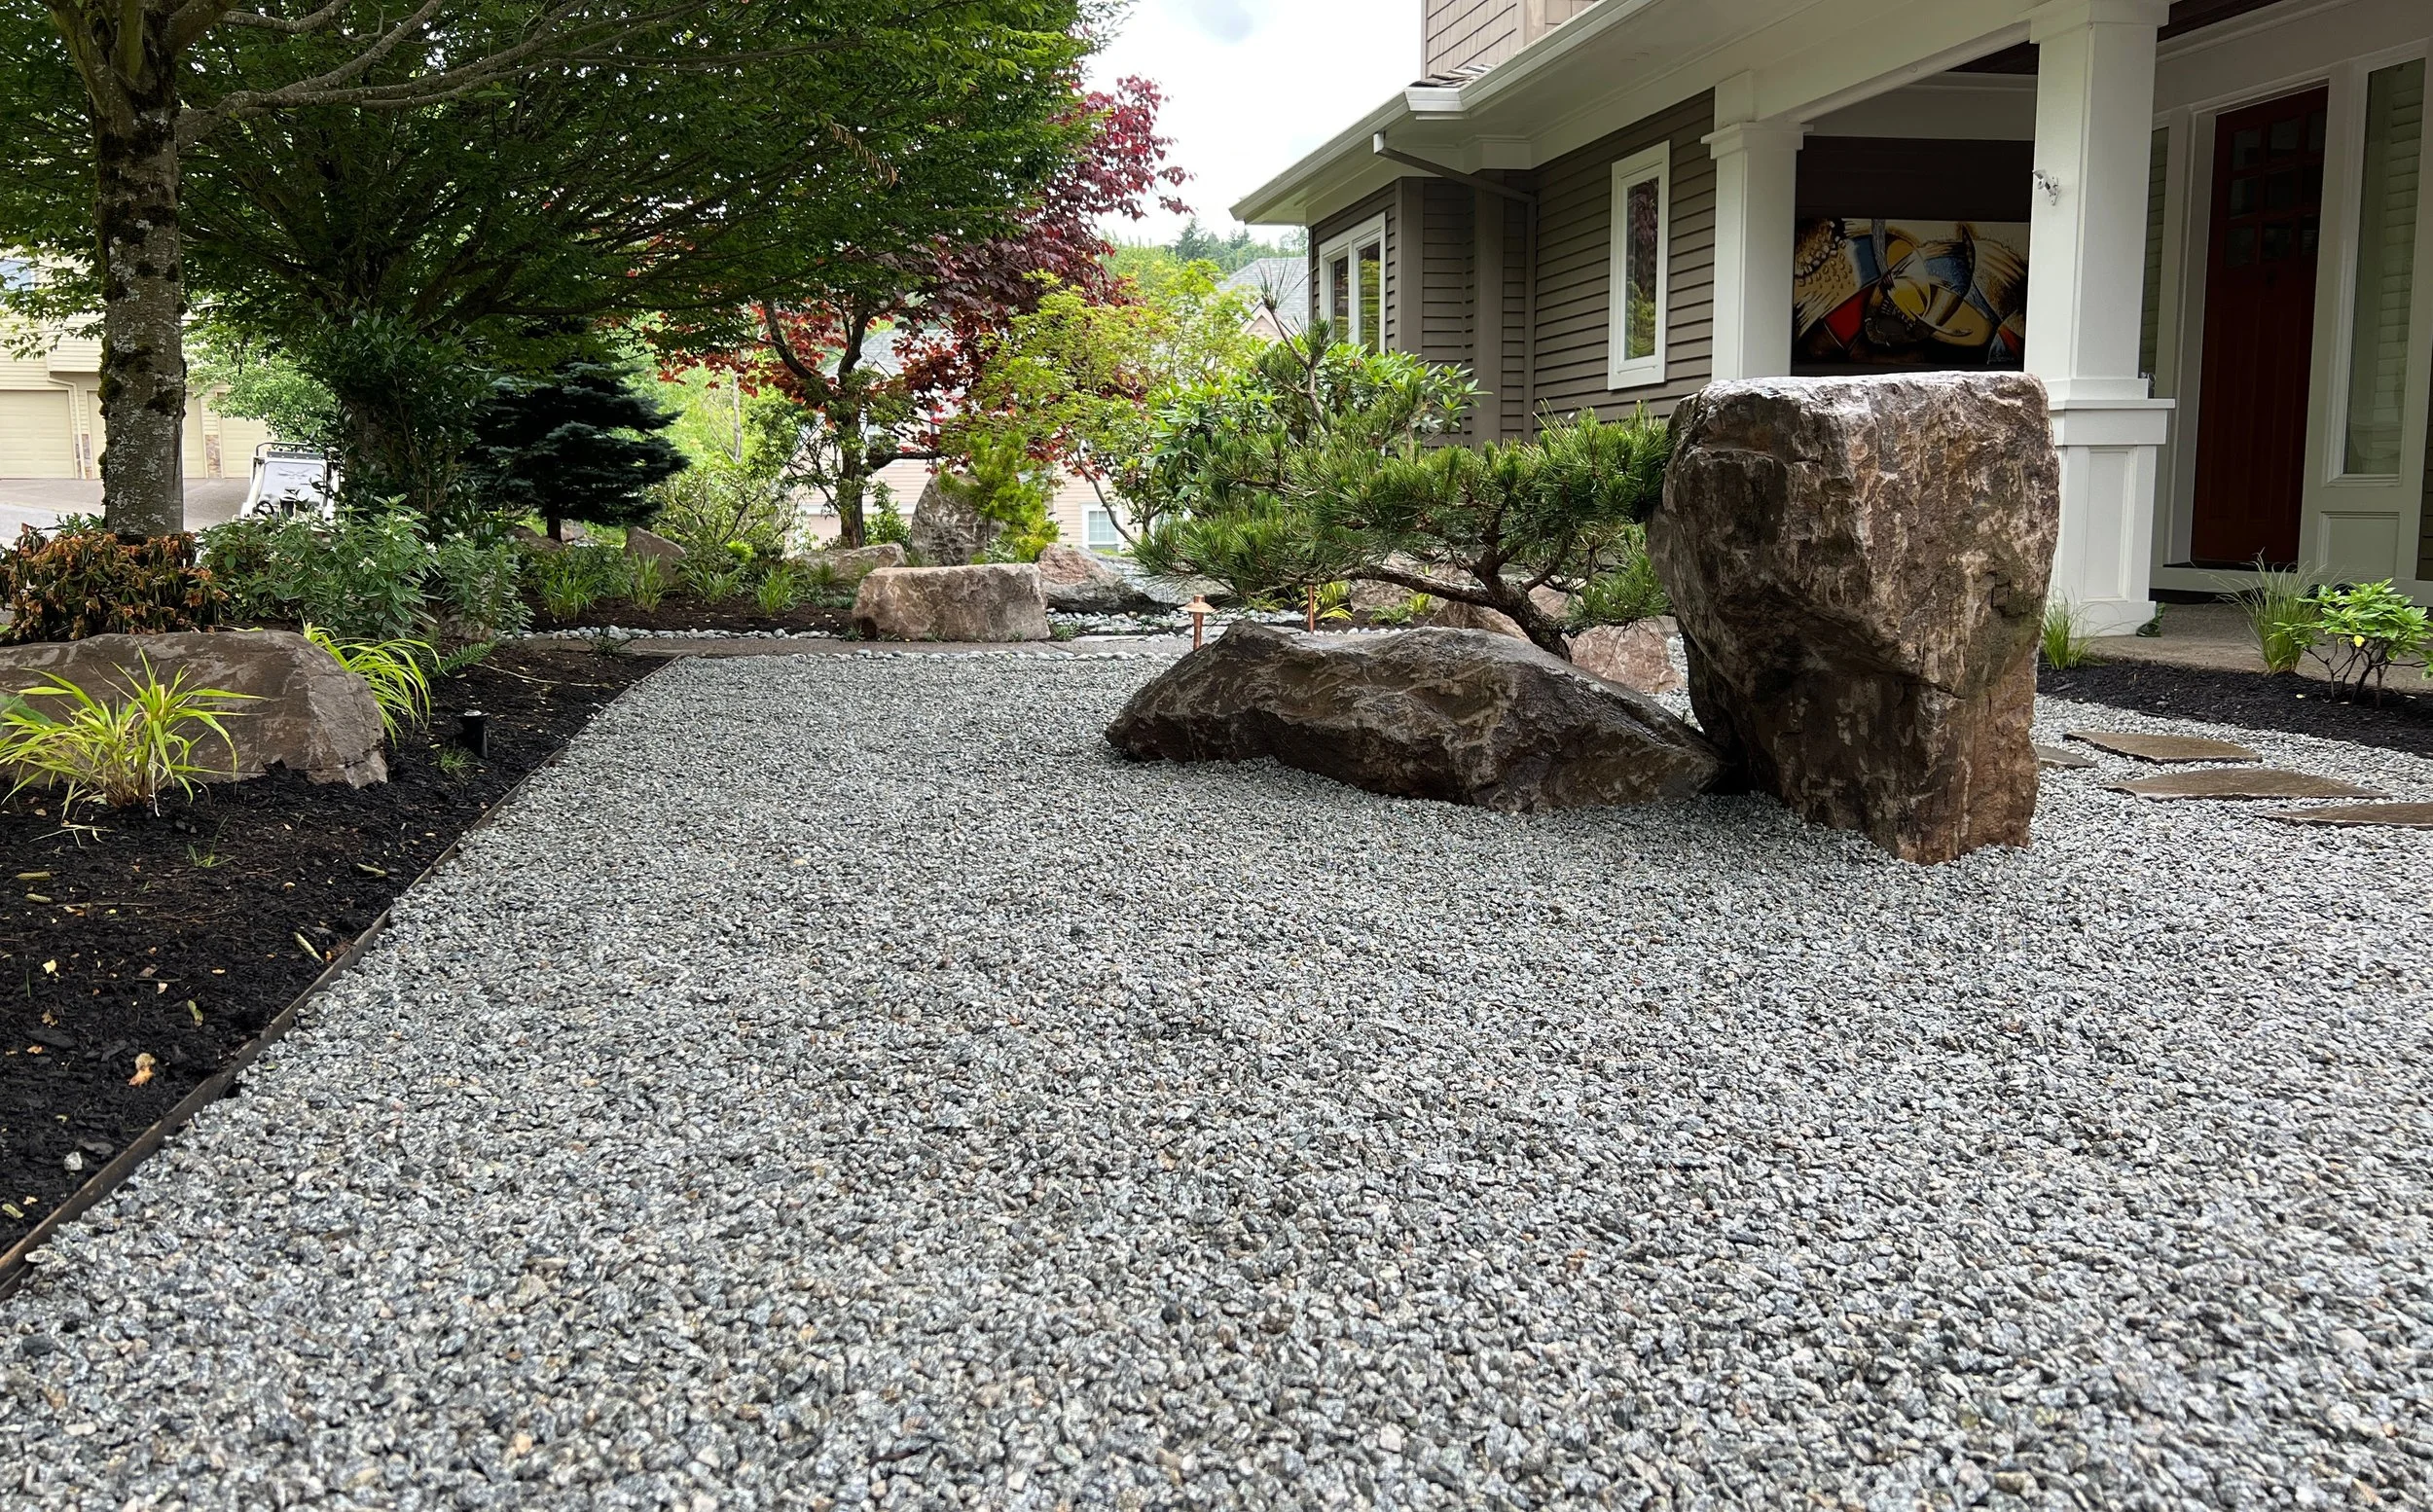
16. Modern Grey Gravel Path with Dark Boulders
- Large dark grey boulders (5-7 pieces): $800 – $2,500
- Grey gravel pathway (material & installation): $400 – $1,200
- Dark brown mulch beds: $100 – $300
- Assorted green & red-stemmed plants: $200 – $700
- Wood slat privacy screen (material & labor): $500 – $2,000
- TOTAL: $2,000 – $6,700
- Budget alternative: Smaller boulders from a local quarry, a DIY gravel path, and planting for 30-50% less.
|
$399.00
|
$12.00
Department 56 |
$20.00
|
$1.99
|
This modern, sleek look with its minimalist grey gravel and dark boulders is totally on trend for 2026. Homeowners are increasingly opting for drought-tolerant and low-maintenance landscaping, moving away from thirsty lawns. This design aesthetic minimizes water usage and embraces a more curated, architectural feel that pairs perfectly with modern home designs. It’s also incredibly popular on Pinterest as people look for clean, calm outdoor spaces that serve as an extension of their interior design, rather than a wild, untamed garden.
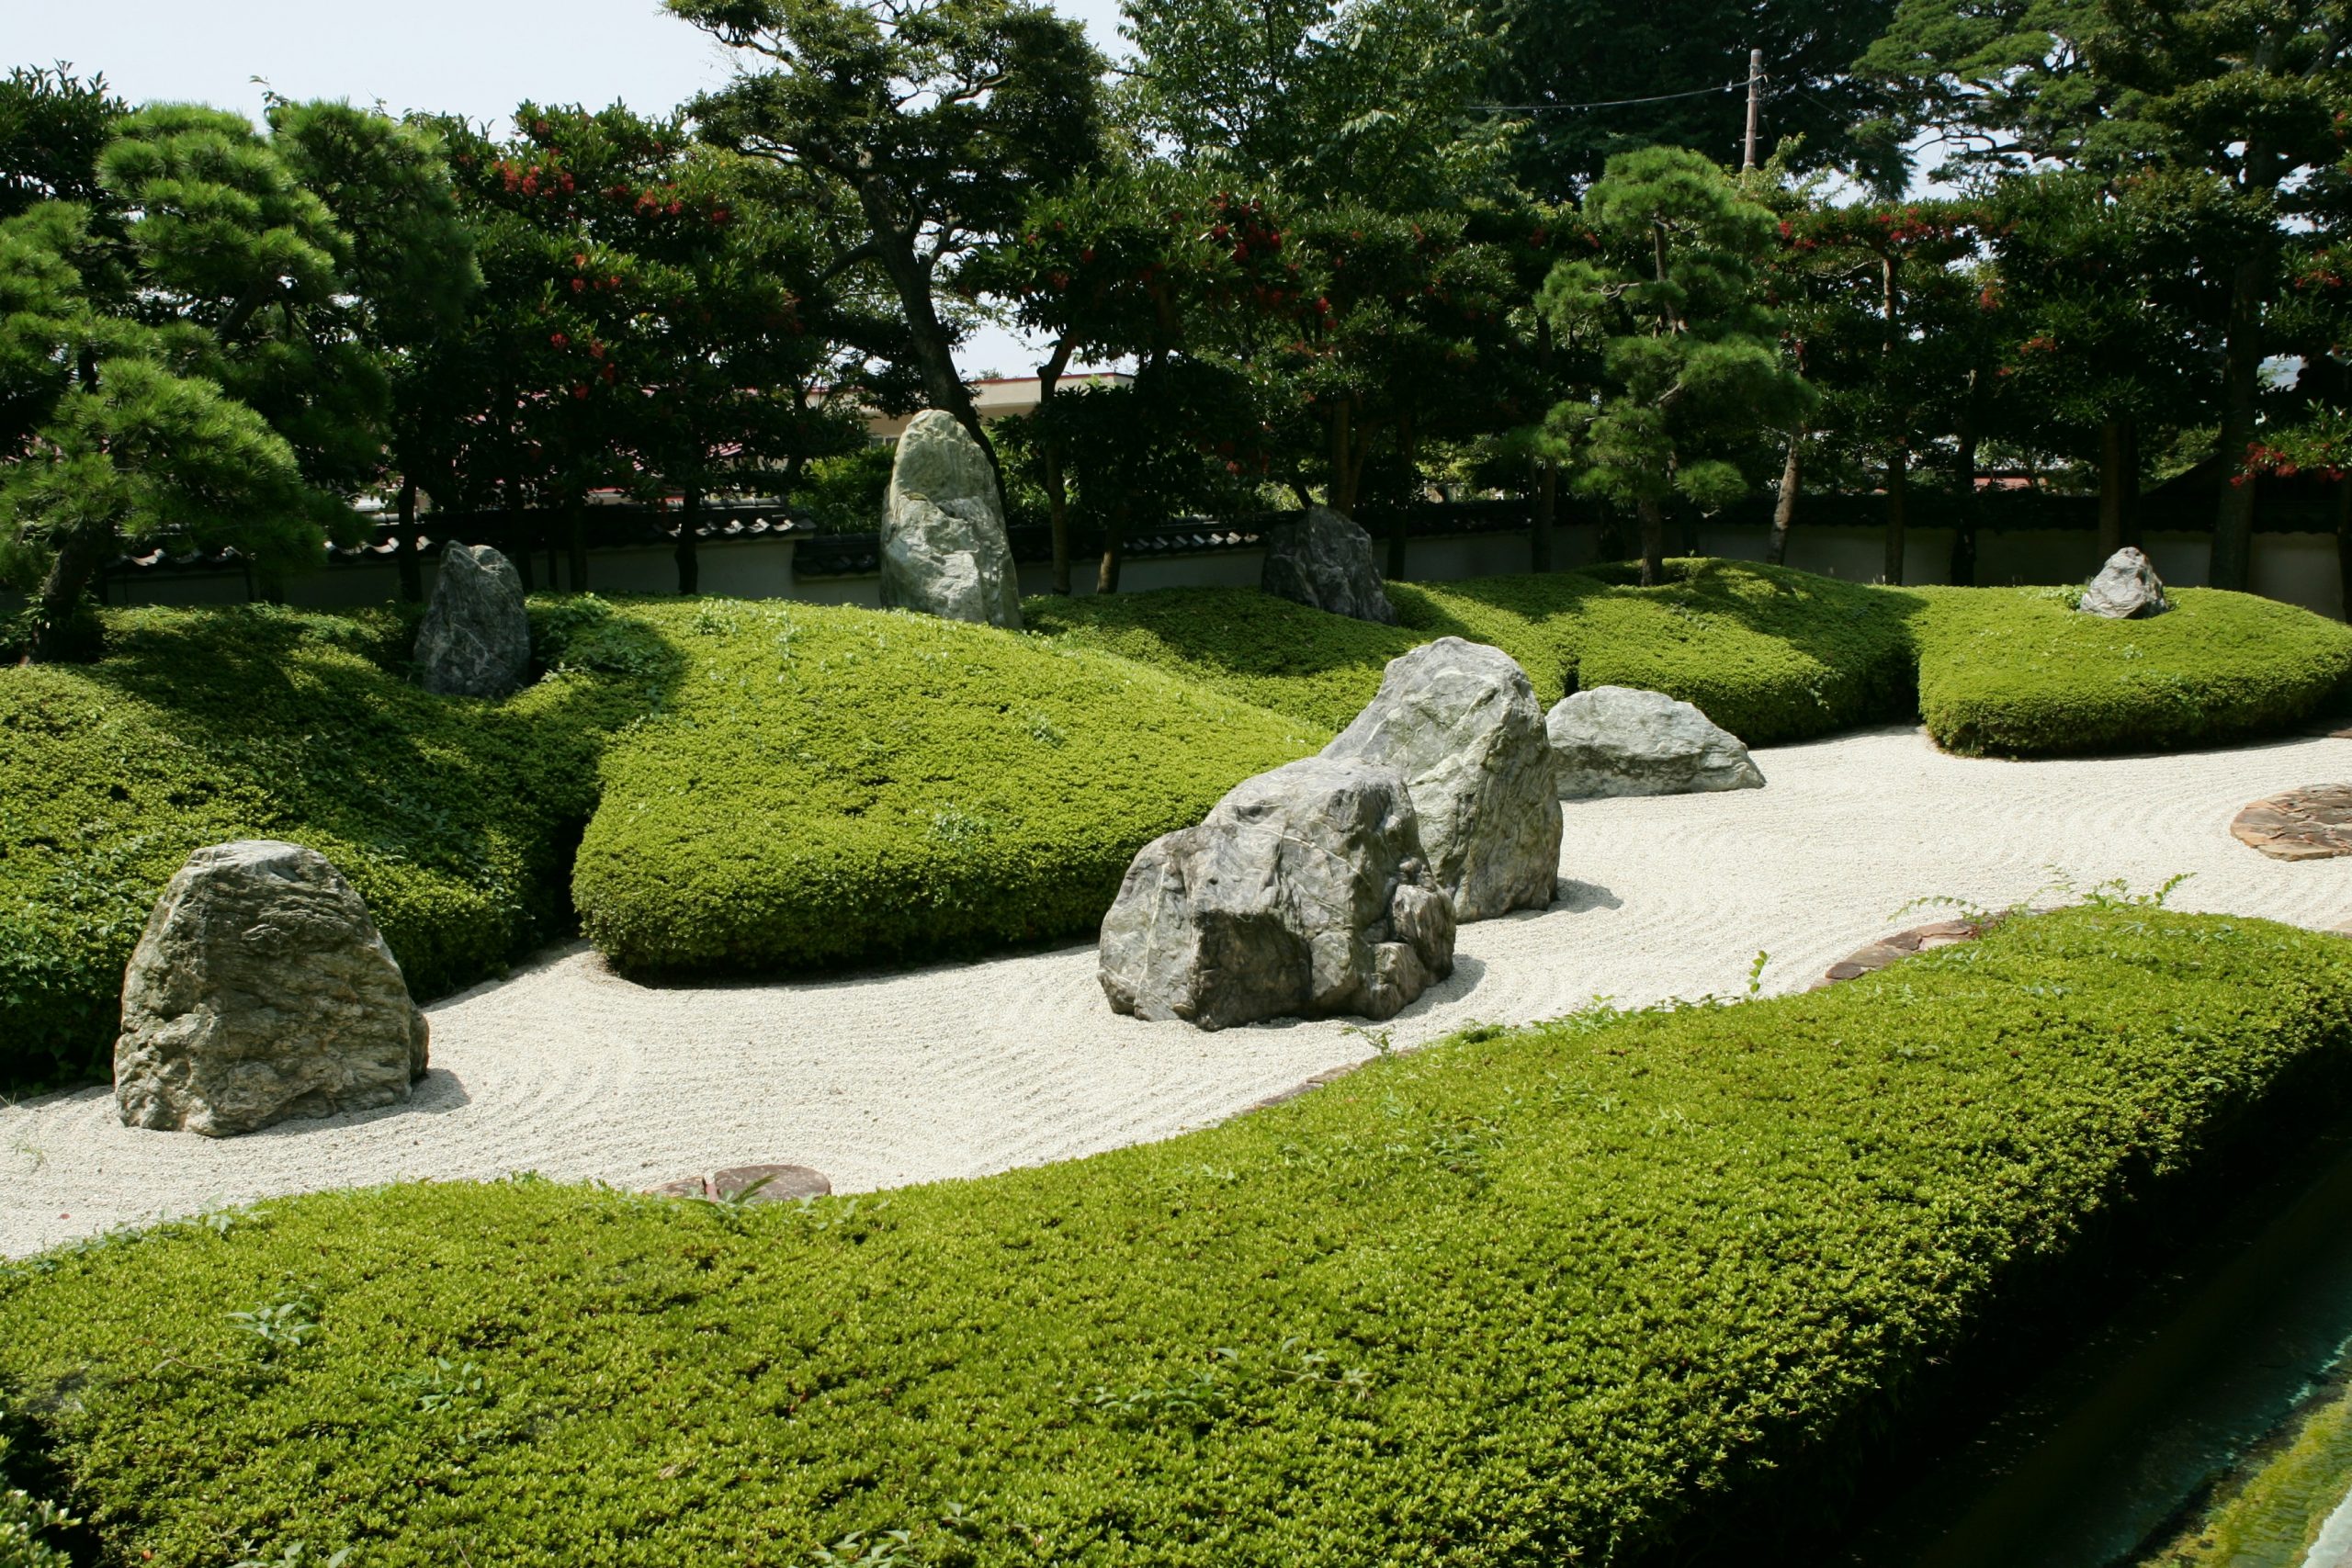
17. Zen Garden with Raked Gravel and Large Rocks
When creating a raked gravel garden, the depth of your gravel matters. Aim for a minimum of 3-4 inches of gravel over a properly installed weed barrier. This depth is crucial for holding the raked patterns, preventing the underlying soil from showing through, and discouraging weed growth. Anything less will feel shallow and won’t allow for those beautiful, contemplative patterns to hold their shape. Remember, the deeper the gravel, the less maintenance you’ll have in terms of weeds and shifting patterns.
|
📋 Copy HEX 🔗 Share |
|
$35.99
|
$65.00
|
$38.00
|
$39.59
|
This tranquil Zen garden with its raked gravel and large rocks is incredibly versatile. It works wonderfully in small, contemplative courtyards (as little as 100 sq ft), where its minimalist design can create a sense of expansive calm. However, it can also be scaled up for larger sections of a backyard, providing a peaceful contrast to more dynamic planting areas. The beauty is in its adaptability; unlike the intricate multi-level designs like Idea #1, this can fit almost anywhere you need a moment of peace.
18. Orderly Zen Garden with Raked Gravel and Trimmed Shrubs
The genius of this Zen garden design lies in its mastery of contrast and repetition. The broad, smooth paths of raked white gravel offer a pristine backdrop, creating a stark contrast to the organic forms of the undulating mounds of bright green groundcover and the rugged textures of the large grey-green rocks. The repetition of the raked patterns and the similar forms of the trimmed shrubs provide a soothing rhythm, while the subtle variations in rock color and plant height prevent monotony, creating a space that is both serene and engaging.
|
$29.99
|
$18.89
|
$4.00
|
$6.99
|
While Zen gardens exude tranquility, maintaining those pristine raked gravel paths requires dedication. Wind and rain can quickly disrupt patterns, and falling leaves or debris will stand out immediately. If you have active kids or pets, those perfectly raked lines might not last long. Also, while a weed barrier helps, weeds can still sprout, so expect regular weeding. This isn’t a ‘set it and forget it’ garden; it demands consistent, mindful upkeep to preserve its meditative quality.
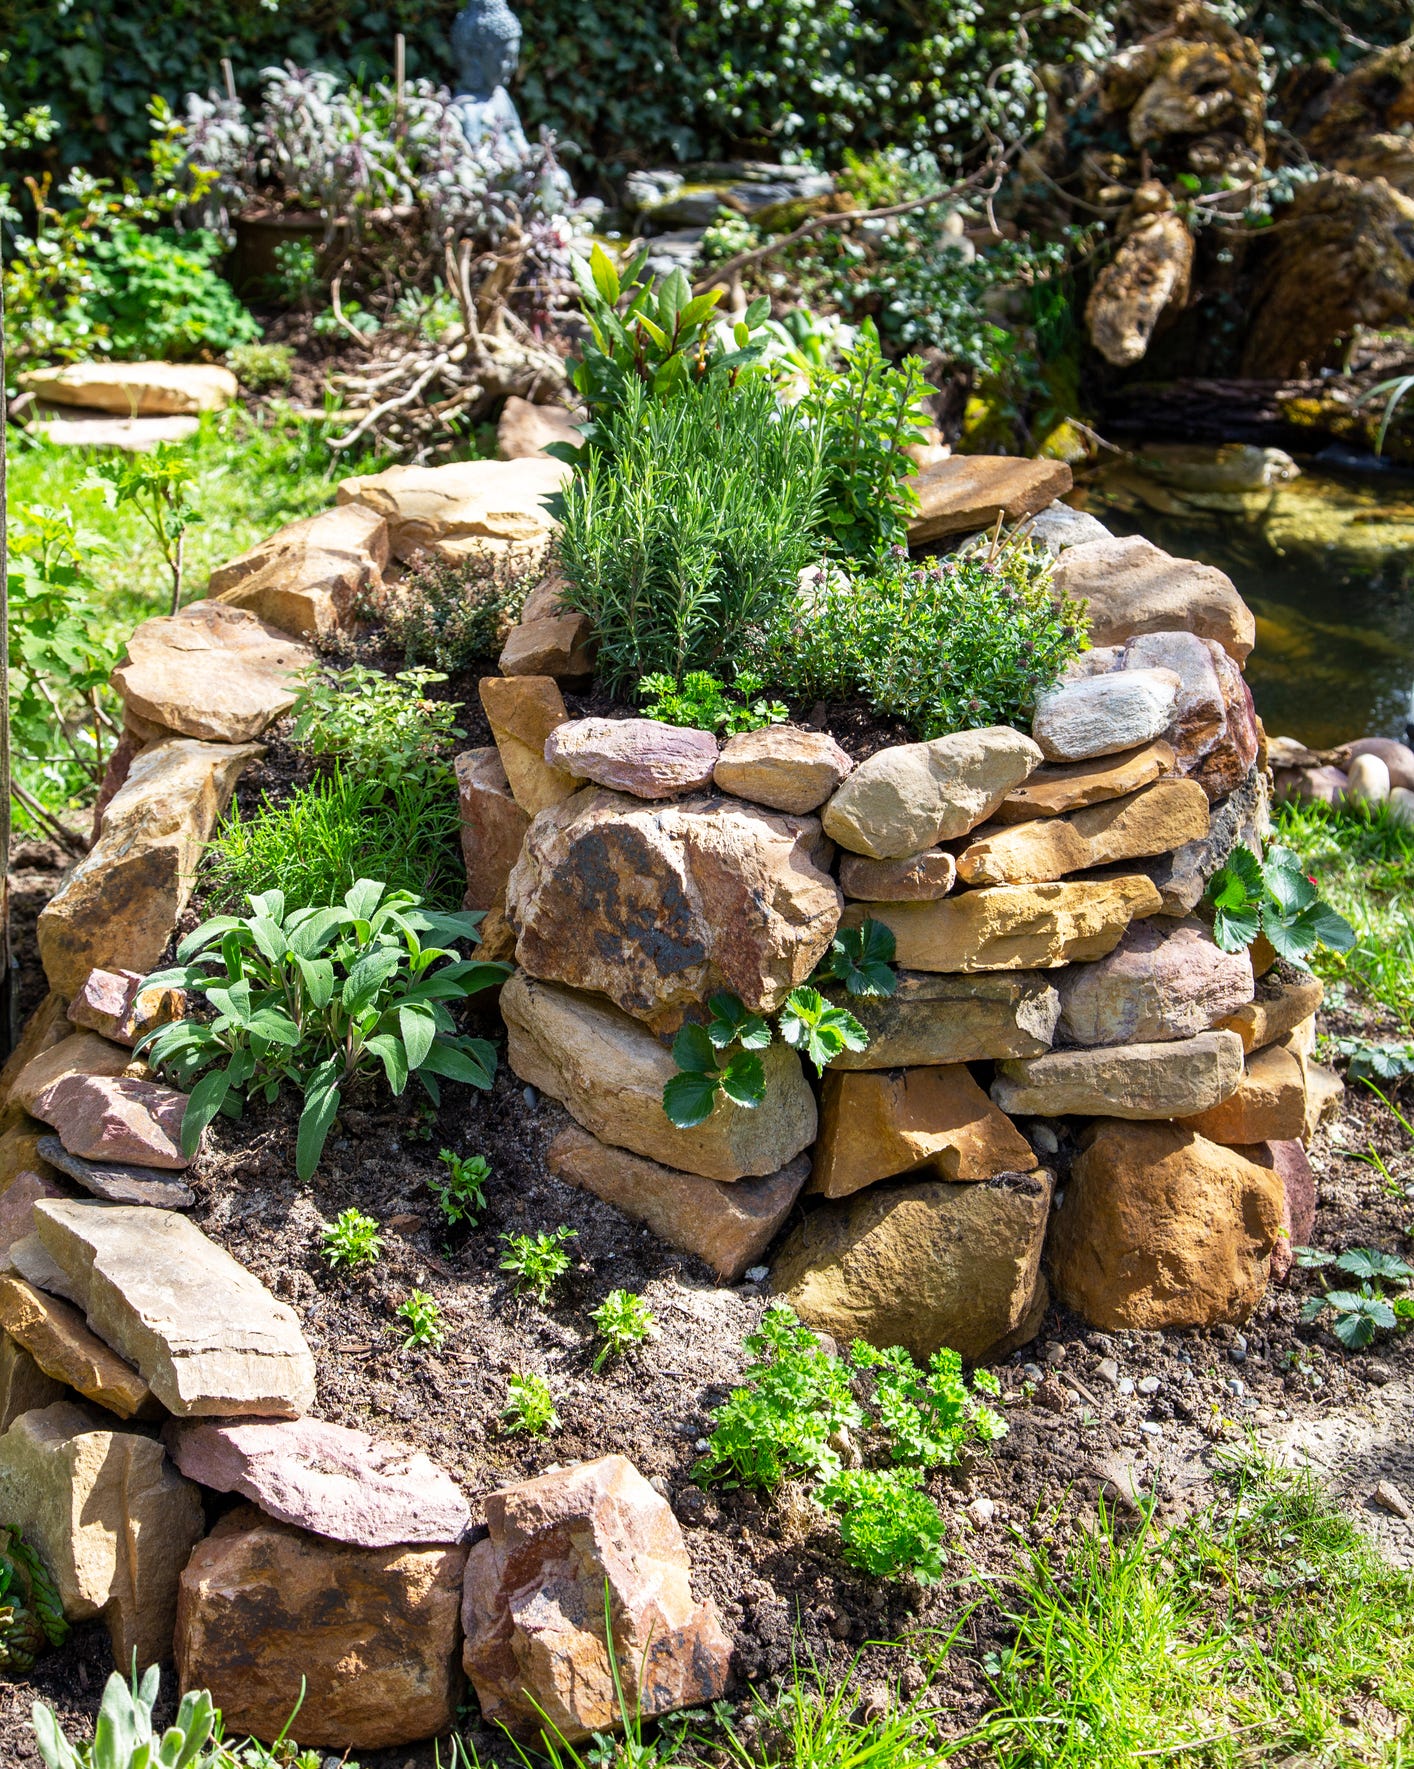
19. Spiral Rock Herb Garden
- Choose your spot: Find a sunny, well-draining spot for your spiral, ideally 4-6 feet in diameter. (Time: 15 mins)
- Mark the spiral: Use string and a stick to draw a spiral on the ground. (Time: 15 mins, Cost: negligible)
- Gather your rocks: Collect various sizes and colors of irregularly shaped rocks. Local sources are best for cost. (Time: 2-4 hours, Cost: $50-$200.
- Build the base layer: Start at the lowest point of your spiral, laying your largest rocks to define the outermost edge. (Time: 1-2 hours)
- Build upwards: Continue laying rocks in a spiral, gradually increasing the height with each layer. Angle the rocks slightly inward and backward towards the center to create stable planting pockets. (Time: 4-8 hours)
- Fill with soil: Fill each tier of the spiral with rich, well-draining soil, ideal for herbs. (Time: 1 hour, Cost: $30-$80 for soil)
- Plant your herbs: Plant your desired herbs, placing those that need drier conditions higher up and moisture-loving types lower down. (Time: 1-2 hours, Cost: $50-$150 for plants.
|
📋 Copy HEX 🔗 Share |
|
$0.18
|
$25.00
|
$75.00
|
$2.50
|
The single most captivating element here is the genius of the spiral design itself. It’s not just a functional herb garden; it’s a living sculpture that maximizes sun exposure and drainage for different plants within a compact footprint. This structure elevates the humble herb patch into a true garden feature, visually appealing from every angle and ingeniously practical. Without that distinctive spiral form, it’s just another collection of plants, but with it, it’s a conversation piece and a testament to clever landscaping.
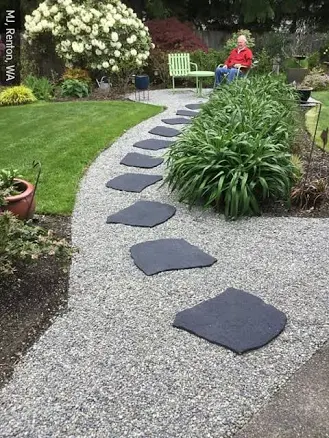
20. Stepped Stone Pathway with Garden Boulders
You can absolutely get this inviting, established look without the hefty price tag of massive granite slabs and professional installation. For the large grey boulders, search local salvage yards, Facebook Marketplace, or even construction sites where natural rock is being removed (always ask permission!). Many times, you can get beautiful, character-filled rocks for free or just the cost of transport. Instead of custom granite steps, look for irregular flagstone pavers at Home Depot or Lowe’s (around $5-$10 each) and lay them yourself over a compacted gravel base. For the plantings, focus on hardy perennials and ornamental grasses from smaller nurseries. This could bring your total down to $700-$2000, achieving elegance on a budget.
|
$56.49
|
$236.00
|
$12.95
|
$90.00
|
This design with its stepped stone pathway and large integrated boulders is a fantastic choice for properties with varying elevations or sloped yards. It’s particularly effective in spaces that need to define a path while simultaneously holding back soil and creating visual interest. It can work in a backyard as small as 200 square feet, providing a focal point, or extend beautifully through larger properties, connecting different zones. Its strength is in managing grade changes gracefully.
21. Modern Zen Garden with Dark Stepping Stones
When designing a stepping stone path in a gravel bed, aim for a consistent step spacing of around 20-24 inches center-to-center for a comfortable stride. This prevents awkward short or overly long steps, making the path feel natural and inviting. Also, ensure your stepping stones are recessed slightly below the top of the gravel, preventing the rake from catching on them. This small detail ensures smooth raking and a polished finish, essential for that crisp Zen aesthetic.
|
📋 Copy HEX 🔗 Share |
|
$36.99
|
$29.99
|
$24.99
|
$432.67
|

While visually stunning and largely drought-tolerant, this modern Zen garden isn’t entirely maintenance-free. The white pea gravel path will show dirt and debris quickly, requiring regular raking or blowing to keep it pristine. Over time, weeds can still sprout through the gravel, even with a weed barrier, so occasional weeding is a must. The dark volcanic rock area might collect fallen leaves and pine needles, which will need to be cleared to maintain its clean, minimal look. Expect to spend a couple of hours every few weeks to keep this garden looking its best.
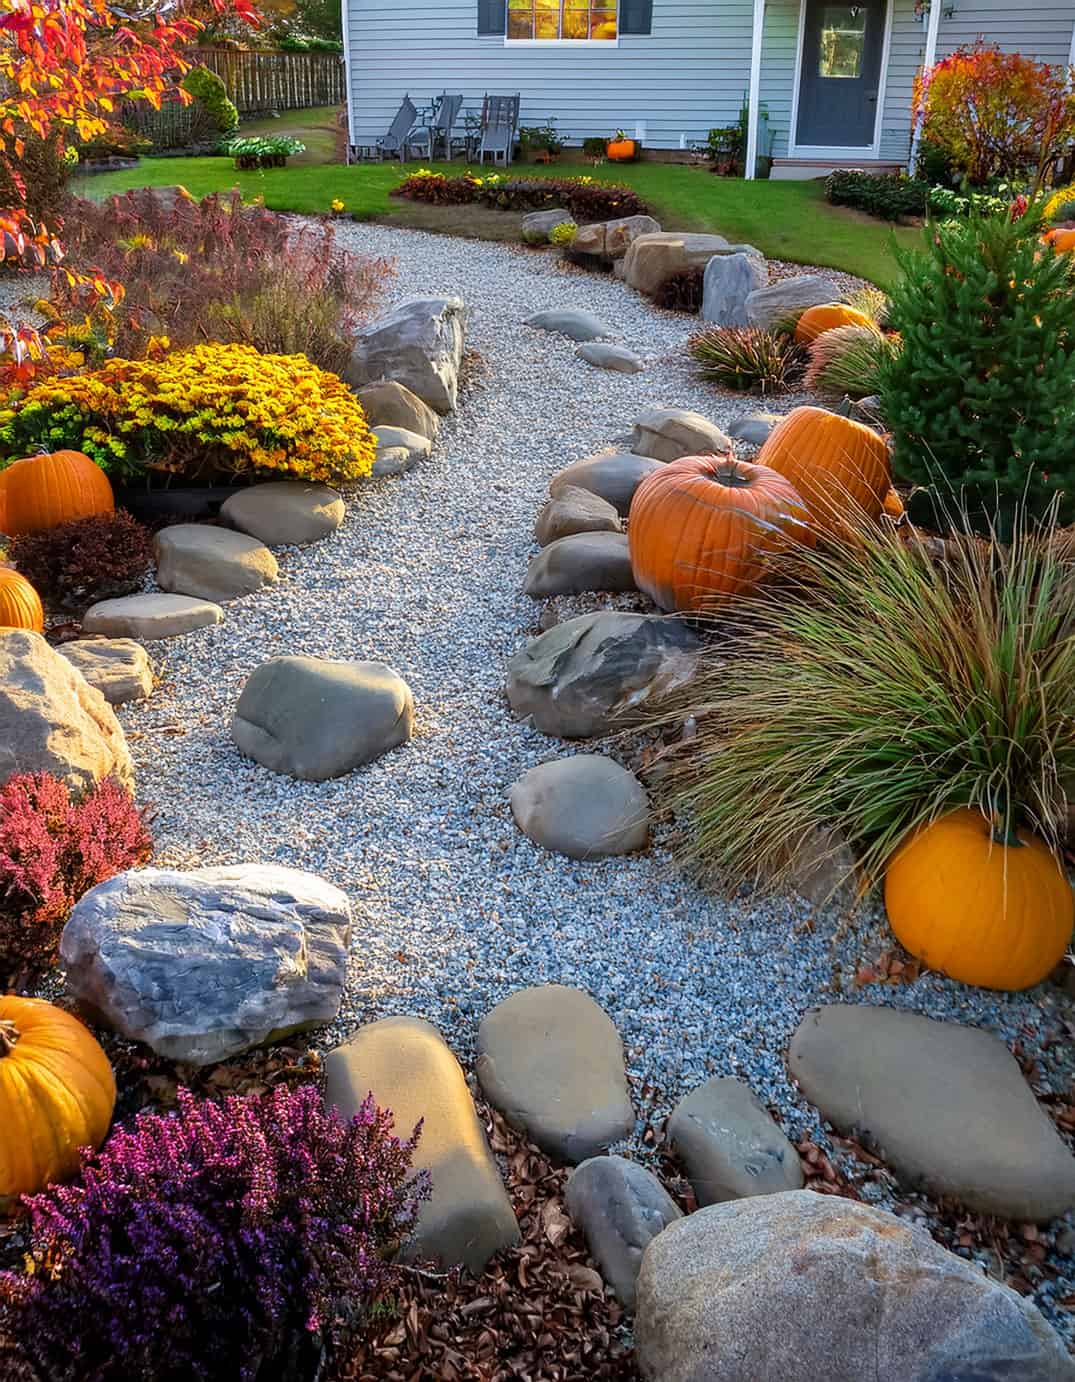
22. Autumnal Rock and Gravel Pathway with Pumpkins
This autumnal pathway’s charm can be broken down into 50% neutral base (the light grey gravel and smooth grey rocks), 30% seasonal color (the vibrant orange pumpkins, yellow mums, and red-orange foliage), and 20% textural fillers (purple heather and varied smaller plants). To adapt this for a different season, imagine swapping the orange and yellow for pastels in spring, or deep blues and silvers in winter, all while keeping the same proportion of sturdy, neutral hardscape to changeable, colorful accents. The structural rocks are your constant; the plants and pumpkins are your rotating seasonal stars.
|
$10.95
|
$29.93
|
$47.97
|
$4.99
|

This design works so well because it harmoniously blends the permanent elements of hardscaping with the fleeting beauty of seasonal decor. The large, smooth grey rocks provide a stable, neutral backdrop, allowing the vibrant orange pumpkins and rich autumnal plantings to truly pop. This contrast, coupled with the varied textures of gravel, rock, and foliage, creates a visually rich and inviting pathway that feels both grounded and celebratory of the season. It’s a masterclass in making a temporary display feel integrated and intentional.
23. Landscaping with Large Rocks and Gravel Pathway
- Measure pathway width and length.
- Check for existing drainage issues.
- Identify sun exposure for plant selection.
- Determine the budget for gravel, rocks, and plants.
|
📋 Copy HEX 🔗 Share |
|
$0.25
|
$41.90
|
$11.49
|
$6.18
|
This naturalistic landscaping style, emphasizing large, organically shaped rocks and permeable gravel pathways, is soaring in popularity in 2026. The move towards xeriscaping and sustainable design means less lawn, less watering, and more natural hardscaping. People are seeking low-maintenance solutions that still offer significant visual impact and blend seamlessly with the environment. Gravel paths are excellent for drainage and offer a soft, natural aesthetic that concrete can’t match, while large rocks provide anchors for the landscape without requiring constant care.
24. Tiered Garden with Large Natural Rocks and Shrubs
When building a tiered garden with large natural rocks, always vary the size and placement of your boulders. Avoid creating a straight, uniform line with rocks of the same size. Instead, intersperse larger, more substantial pieces with smaller, complementary ones, and stagger their placement. This creates a more organic, established look, making it seem like the rocks naturally emerged from the landscape, rather than being deliberately placed. This ‘random yet intentional’ approach adds significant visual interest and authenticity.

|
$24.94
|
$44.99
|
$12.97
|
$129.00
|

The core appeal of this tiered garden is the way those large, grey-toned natural rocks are integrated almost like living extensions of the earth. They’re not just holding back soil; they’re providing a rugged, textural backbone around which the vibrant green and reddish-brown shrubs can flourish. This seamless blend of raw, unpolished stone with soft, living plant material is the one thing that gives this garden so much depth and character. Without these substantial, earthy rocks, the tiers would lose their grounded, organic feel.
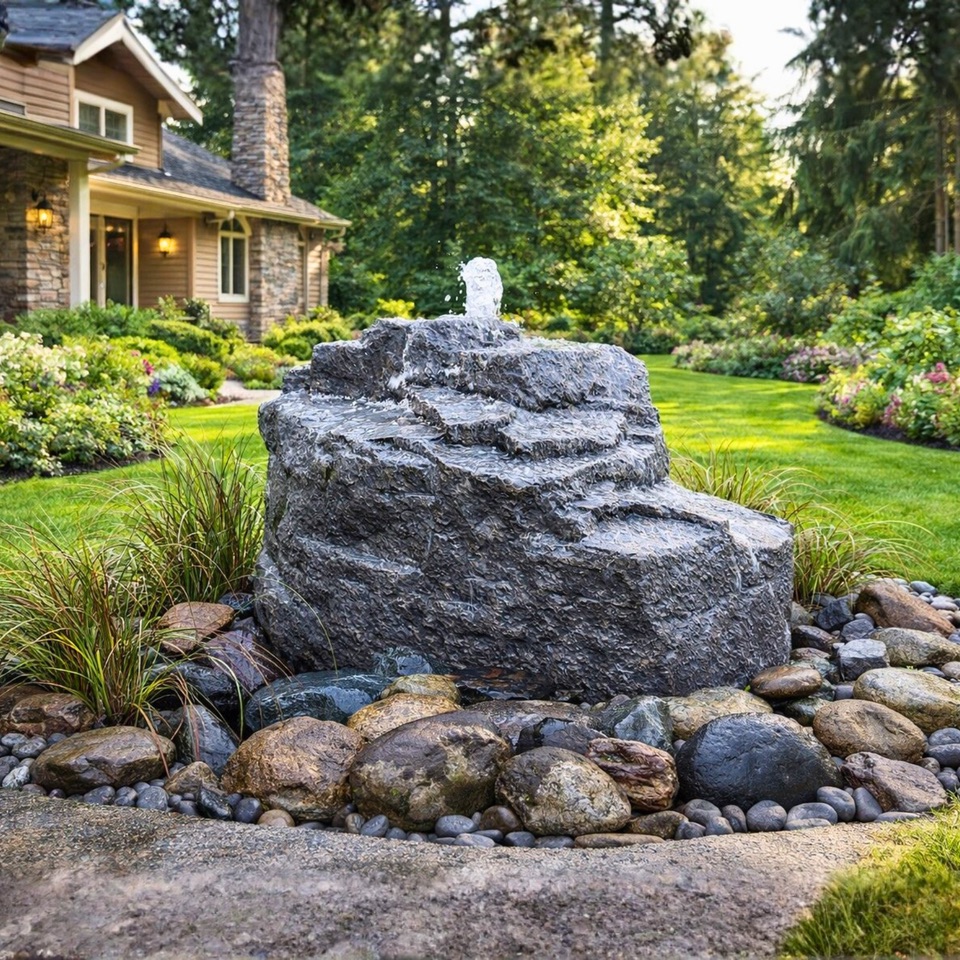
25. Layered Grey Rock Water Feature with River Stones
- Large tiered rock fountain: $1,500 – $6,000
- Water pump & tubing: $200 – $800
- Mixed river stones & pebbles: $150 – $500
- Tall green grasses (e.g., horsetail): $100 – $300
- Professional installation: $1,000 – $3,000
- TOTAL: $2,950 – $10,600
- Budget alternative: Use a pre-made fountain kit and smaller, locally sourced rocks and pebbles from a garden center for 50-70% less.
|
📋 Copy HEX 🔗 Share |
|
$949.99
|
$160.00
|
$9.99
|
$169.99
|
While a multi-tiered rock water feature is undeniably beautiful, it’s not entirely maintenance-free. Standing water, even if circulating, can attract mosquitoes if not properly maintained; adding a mosquito dunk occasionally is a must. The textured rock surface can also accumulate algae, requiring semi-regular scrubbing to keep it looking fresh. Plan for monthly debris removal from the basin and ensure your pump is protected from freezing in colder climates, or you’ll be dealing with costly repairs or replacements. It’s an investment in tranquility, but one that asks for a little consistent love back.
See? Landscaping with large rocks isn’t just about moving heavy objects; it’s about creating art, adding structure, and inviting tranquility into your outdoor living. With these 25 curated ideas, you’re well-equipped to transform your yard into a Pinterest-worthy sanctuary, regardless of your budget or property size.
Now go forth and get creative! Don’t forget to save this guide to your Pinterest board—it’s packed with inspiration you’ll thank yourself for later.
Photo credits: Big Rock Landscaping, Tampa Bay Ponds, Country Living Magazine, Bob Vila, WooHome, Greenhaven Landscapes, Hemlock Landscapes, Morning Light Landscaping LLC, Martha Stewart, Stone & Leaf Landscaping, Ross NW Watergardens, Bigger Garden, Gardener’s Path, Homedit, Houzz, Hilton Landscape Supply, Yardscapes, Premier Backyard Living, K & C Land Design & Construction, Nelson Landscaping, Reddit/Web, Jupiter Moon/Unsplash.